Thrustmaster F1 Wireless Gamepad Ferrari F60: инструкция
Раздел: Бытовая, кухонная техника, электроника и оборудование
Тип: Устройство ввода
Инструкция к Устройству ввода Thrustmaster F1 Wireless Gamepad Ferrari F60
Click on your language below
- Εγχειρίδιο χρήσης
- Kullanım Kılavuzu
- Podręcznik użytkownika
ﻡﺩﺧﺗﺳﻣﻟﺍ ﻝﻳﻟﺩ -
1/12
®
®
For: PlayStation
3 / PlayStation
3 Slim / PC
User Manual
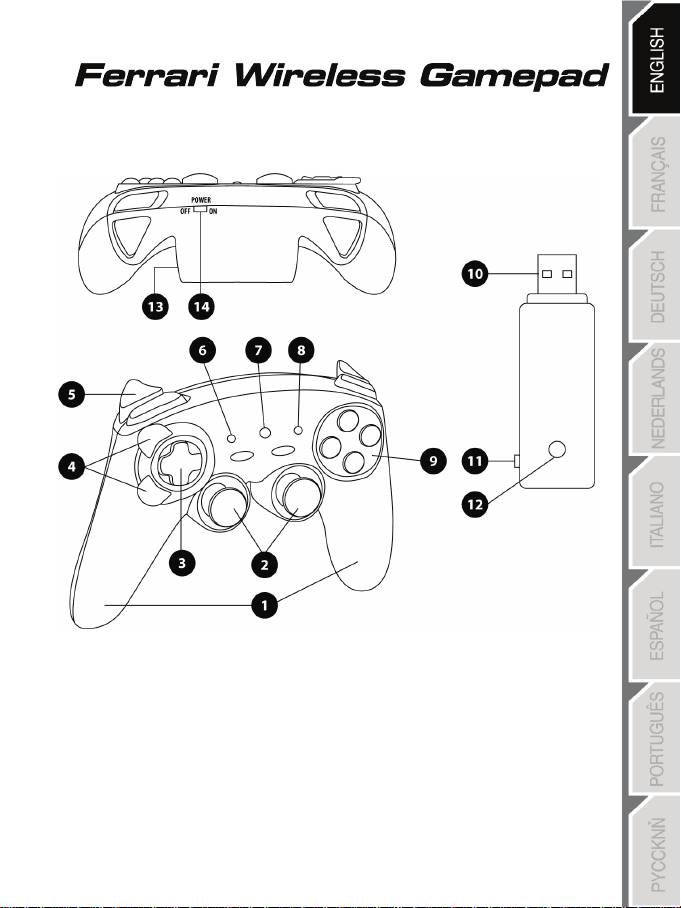
TECHNICAL FEATURES
1. Handles
2. 2 progressive analog mini-sticks
3. D-Pad
4. Progressive optical wheel
5. 2 progressive triggers
6. HOME LED button for Playstation®3
and MODE for PC
7. MAPPING LED button (for programming
and indicating connection status)
8. PRESET LED button
(to select programming)
9. Action buttons
10. PC and PlayStation®3 USB connector
11. “PC” or “PS3” USB selector
12. CONNECT LED button on receiver
13. Battery compartment
14. POWER ON/OFF switch

2/12
TABLE OF SUPPORTED MODES
Platform MODE
Color of HOME button
(6)
PLAYSTATION®3
“PS3”
RED
PC
“4 AXES”
GREEN
“7 AXES”
RED
INSTALLING BATTERIES
Insert 2 LR03 / AAA type batteries in the battery compartment situated on the back of the gamepad (13).
OVERVIEW
• POWER ON/OFF switch (14)
- OFF position = the gamepad is off (and doesn’t use up batteries).
- ON position = the gamepad is on.
• “PC / PS3” USB selector (11)
Must always be set to the correct position before connecting your receiver’s USB connector.
• MAPPING (7) and CONNECT (12) blue LEDs
- Both LEDs are on = connection established between gamepad and receiver.
- Both LEDs flash quickly = no connection between gamepad and receiver.
- The MAPPING LED is off = the gamepad is in standby mode or powered off.
- The MAPPING LED flashes slowly & continuously = please change batteries.
THE CONNECTION BETWEEN THE GAMEPAD AND RECEIVER
IS ESTABLISHED AUTOMATICALLY
To force the connection in case of error: press the CONNECT button on the receiver
and simultaneously press the L2 + R2 + MAPPING buttons on your gamepad.
• STANDBY MODE
The gamepad switches off automatically:
- After 5 minutes of inactivity
- After 5 seconds in the event of error or loss of connection.
To wake up your gamepad: press START or use the POWER ON/OFF switch (14).
3/12
PLAYSTATION®3
INSTALLATION ON PLAYSTATION®3
1. Set your receiver’s USB selector to the “PS3” position.
2. Connect the USB connector to USB port #1 on the console.
3. Switch on your console.
4. Switch on your gamepad using the POWER ON/OFF switch (14).
5. Once a connection has been established: start up your game.
You are now ready to play!
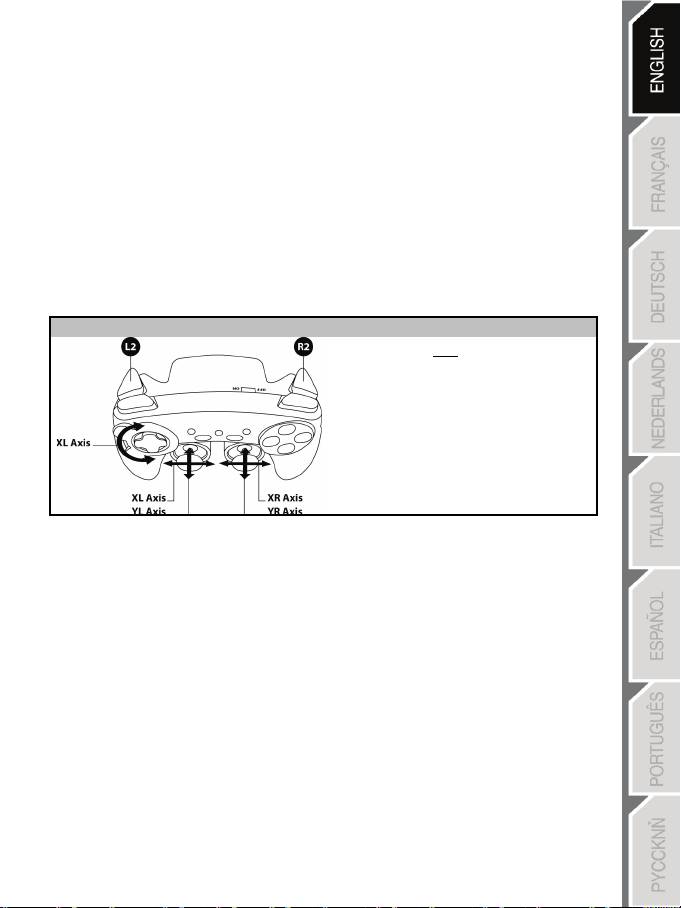
PLAYSTATION®3 MODE
“AUTOMATIC PRESET” CONFIGURATION - PLAYSTATION®3
PS3 mode
Red HOME button
Here:
• “Optical wheel” associated
with “Left/Right” direction on
left mini-stick
• “Right trigger” associated with
progressive “R2” button
• “Left trigger” associated with
progressive “L2” button
USING THE “HOME” BUTTON (6)
Your gamepad’s “HOME” button allows you to exit games, access menus and directly switch off your
PlayStation®3 system.
IMPORTANT NOTES FOR PLAYSTATION®3
- The USB selector on your receiver (11) must always be set to “PS3” before connecting the receiver.
- In “1 Player” mode: If your official gamepad is powered on, you must switch it to “gamepad port 2” in
order for your “Run’N’ Drive” gamepad to be functional.
- On PlayStation®3, the “Run’N’ Drive” gamepad is only compatible with PlayStation®3 games (and will
not work with PlayStation® 2 games) and does not feature a motion sensor.

4/12
PC
INSTALLATION ON PC
1. Set the USB selector on the receiver (11) to the “PC” position.
2. Connect the receiver’s USB connector to one of your computer’s USB ports. Windows® XP or Vista
will automatically detect the new device.
3. Switch on your gamepad using the POWER ON/OFF switch (14).
4. Click Start/Settings/Control Panel and then double-click Game Controllers.
The Game Controllers dialog box displays the gamepad’s name with OK status.
5. In the Control Panel, click Properties to test and view the buttons, D-pad, mini-sticks, triggers and
optical wheel.
You are now ready to play!
IMPORTANT NOTES FOR PC
- The USB selector on your receiver (11) must always be set to “PC” before connecting the receiver.
- The name of the gamepad displayed on PC (in the Control Panel and in games) is "Run N' Drive Wireless".
- “Advanced Programming Software” for PC is also available for download on our website at the following
address:
http://ts.thrustmaster.com/
- The "Test forces" tab (of the advanced programming software) is not compatible with this gamepad.
5/12
SELECTING “AXES” ON PC
• Selecting axes via “Software”:
After installing the “Advanced Programming Software”, go to page 1 of the Control Panel, click the
number of axes you wish to use and then click OK.
• Selecting axes via “Hardware”:
Press the HOME button (6) to select the number of active axes.
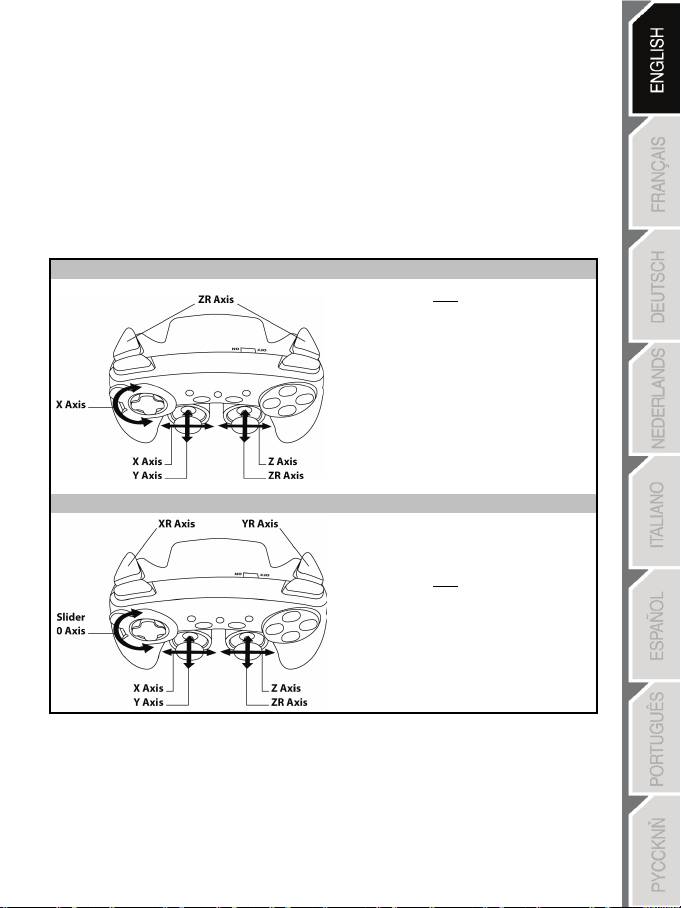
2 “AXES” MODES AVAILABLE ON PC
“AUTOMATIC PRESET” CONFIGURATION - PC
“4 AXES” mode
Green HOME button
Here:
• “Optical wheel” associated with
“Left/Right” direction on left
mini-stick
• “Right trigger” associated with
“Up” direction on right mini-
stick
• “Left trigger” associated with
“Down” direction on right mini-
stick
“7 AXES” mode
Red HOME button
Here:
• “Optical wheel” is now independent
• “Right trigger” is now independent
• “Left trigger” is now independent
To find out all of the possibilities offered on PC,
try them out in the Windows “Game Controllers” section
(once you have installed the “Advanced Programming Software”)
6/12
ADVANCED FUNCTIONS
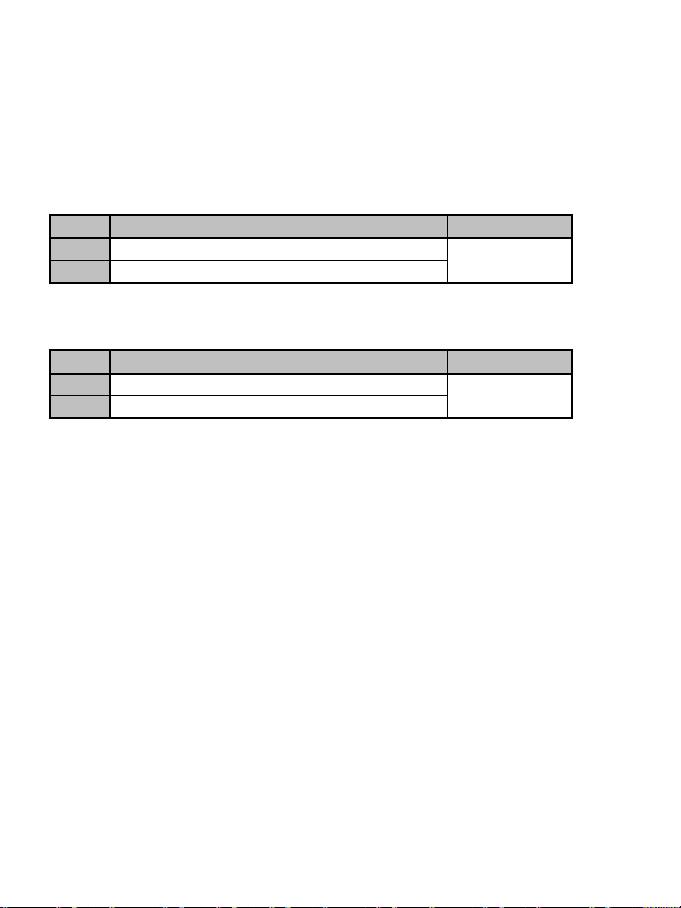
ADJUSTING THE OPTICAL WHEEL’S SENSITIVITY
The optical wheel (4) has 2 sensitivity modes:
- Normal sensitivity (the default mode)
- High sensitivity (must be set)
• Setting “High Sensitivity” mode:
Steps
Action
HOME button
1
Raise and hold the “UP” direction on the optical wheel
Flashes continuously
2
Press and release the MAPPING button (7)
Your optical wheel is now more sensitive
(Procedure must be carried out each time the gamepad restarts or is disconnected)
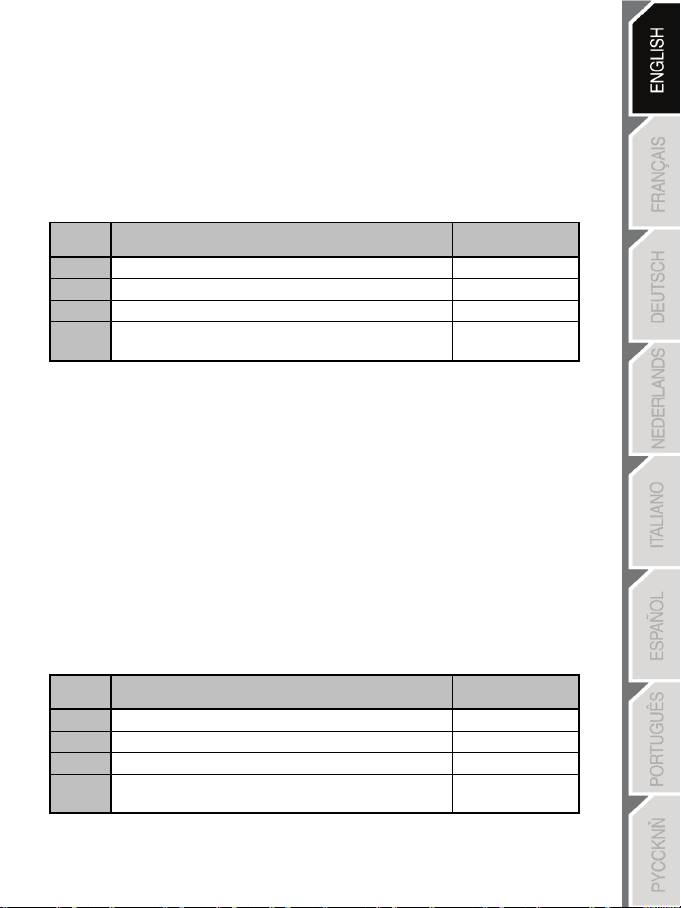
• Returning to “Normal Sensitivity” mode:
Steps
Action
HOME button
1
Lower and hold the “DOWN” direction on the optical wheel
Does not flash
2
Press and release the MAPPING button (7)
Your optical wheel has now returned to Normal Sensitivity (the default mode)
2 PROGRAMMING MODES
The PRESET button and LED (8) allows you to view the type of programming selected:
AUTOMATIC (preprogrammed) or MANUAL (programmed by yourself). A single press of this button
allows you (even during the course of a game) to switch from one programming mode to the other.
• “AUTOMATIC PRESET” (PRESET button OFF)
This represents the default programming: the functions of the optical wheel and the triggers are
preprogrammed, as are the positions of the buttons and the directions of the mini-sticks and of the D-Pad.
PLEASE REFER TO THE “AUTOMATIC PRESET” CONFIGURATION DIAGRAMS
• “MANUAL PRESET” (PRESET button GREEN)
This represents your own personal programming:
- The buttons, directions of the mini-sticks and of the D-Pad can either be
* programmed on the optical wheel and on the triggers,
* or switched between themselves.
- You can modify the programming to your liking and whenever you wish.
- The programming is automatically saved inside your gamepad (even when disconnected).
- When your “MANUAL PRESET” is clear, it is identical to the “AUTOMATIC PRESET”.
7/12
PROGRAMMING THE OPTICAL WHEEL AND TRIGGERS
The 2 directions of the optical wheel and the 2 progressive triggers can be programmed using the
MAPPING button (7).
• Examples of possible applications:
Programming a button, direction of a mini-stick or of the D-Pad:
- onto the “up” or “down” direction of the optical wheel
- onto the “right trigger” or “left trigger”
• Programming procedure on optical wheel and triggers:
Steps Action
PRESET button
color
1
Enable “MANUAL PRESET” (8) by pressing the button.
Lit up green
2
Press and release the MAPPING button (7).
Lit up red
3
Press and release the button or direction to program.
Flashes red
4
Raise or lower the direction on the optical wheel
Lit up green
or press the trigger onto which you wish to place your function.
Your “MANUAL PRESET” is now enabled and up to date
(with your programming applied to the optical wheel or triggers)
SWITCHING BUTTONS/MINI-STICKS/D-PAD
All buttons, as well as directions of the mini-sticks and of the D-Pad can be switched using the MAPPING
button (7).
• Examples of possible applications:
- Switch buttons between themselves
- Switch the 2 mini-sticks
(in this case, you will to have to map the 4 directions of the first mini-stick to the 4 directions of the
second mini-stick)
- Switch the D-Pad with a mini-stick
(in this case, you will have to map the 4 D-Pad directions to the 4 directions of the mini-stick in
question).
• Procedure for switching buttons, mini-sticks and D-Pad
- Does not work for the triggers.
- Works for the optical wheel but only on PC and in “7 axes” mode.
Steps Action
PRESET button
color
1
Enable “MANUAL PRESET” (8) by pressing the button.
Lit up green
2
Press and release the MAPPING button (7).
Lit up red
3
Press and release the button or direction to switch.
Flashes red
4
Press and release the button or direction onto which you wish to
Lit up green
place your function.
Your “MANUAL PRESET” is now enabled and up to date (with the 2 functions switched).
8/12
EEPROM MEMORY
• Your gamepad features an internal chip which saves all of your “MANUAL PRESET”
programming (even when the gamepad is switched off or disconnected for a long period of
time).
• You can save a different “MANUAL PRESET” for each platform used: PlayStation®3, PC 4
Axes and PC 7 Axes.
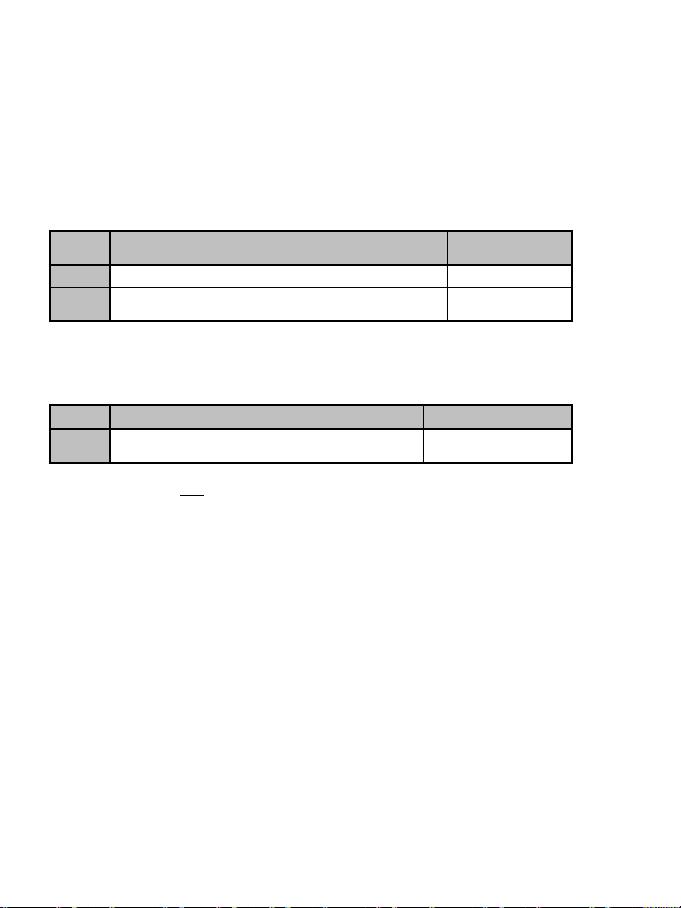
TO ERASE YOUR “MANUAL PRESET”
Steps Action
PRESET button
color
1
Enable your “MANUAL PRESET” (8).
Lit up green
2 Press and hold the MAPPING button (7) for 2 seconds.
Flashes green 2
seconds
Your “MANUAL PRESET” is now clear (and once again identical to the “AUTOMATIC PRESET”).
RETURNING TO “FACTORY SETTINGS”
You can erase all of your programming or settings:
Steps
Action
MAPPING button color
1
Press the MAPPING + SELECT + START buttons
simultaneously
Flashes blue 5 seconds
All of your “MANUAL PRESETS” (= PC + PS3) or settings are now clear.
Note: this procedure will completely restart your gamepad
(on PC, we therefore recommend that you do this outside of games).
POSSIBLE USES IN GAMES
The optical wheel (thanks to its technology and degree of rotation greater than that of any mini-stick)
offers unparalleled precision and stability in all types of games: racing (ultra-precise steering), flying
(rudder), action and FPS (progressive zoom), sports (measured shot, strength of hit), etc.
The triggers (thanks to their progressive action and range of mechanical travel greater than that of any
button) offer extremely precise control in all types of games: racing (progressive and independent
acceleration and braking, handbrake), action and FPS (rate of fire, lateral movement), sports (measured
pass or shot, strength of hit or jump, running speed), etc.
SOME EXAMPLES AND TIPS:
- There are numerous configuration possibilities, depending on the game you are playing.
- In certain games (racing type), do not hesitate to test out the 2 sensitivity modes for your optical wheel
(Normal or High) in order to optimize its precision and responsiveness.
9/12
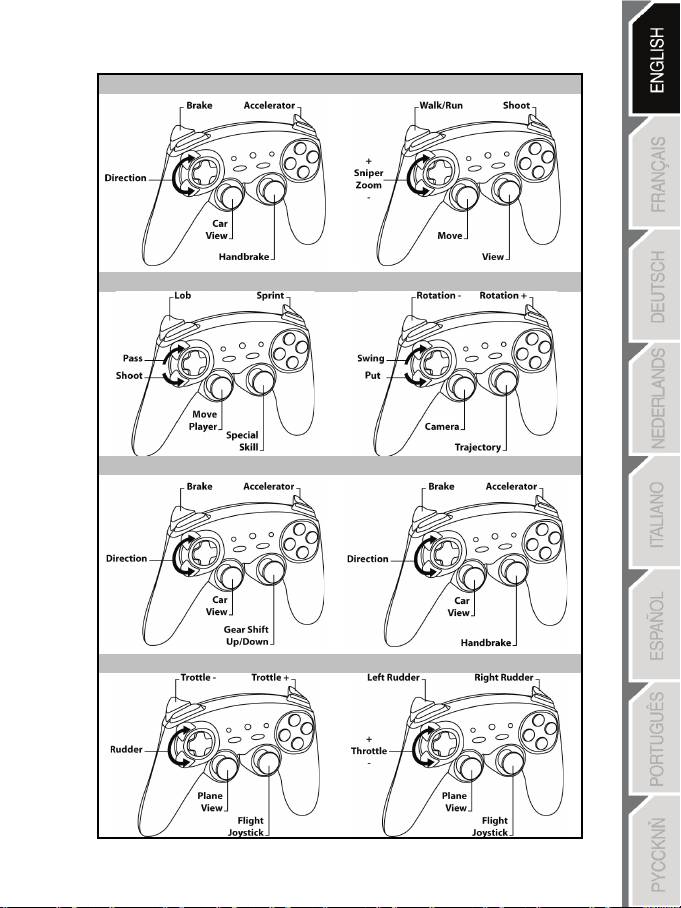
DIFFERENT EXAMPLES ACCORDING TO TYPE OF GAME
Action/Adventure (“Car” mode)
Action/Adventure (“On foot” mode)
Sports (“Ball game” type)
Sports (“Golf” type)
Car racing (“Simulation” type)
Car racing (“Arcade/Rally” type)
Flying (“Simulation” type)
Flying (“Arcade/Action” type)

10/12
USING MORE THAN ONE “Ferrari Wireless Gamepad” AT THE SAME TIME
(in Multiplayer mode)
You can use up to 4 “Ferrari Wireless Gamepads” at the same time (in multiplayer mode).
Channel detection is carried out automatically
In case of error or to force the connection: press the CONNECT button on the receiver and
simultaneously press the L2 + R2 + MAPPING buttons on your gamepad.
TROUBLESHOOTING AND WARNINGS
• My gamepad doesn’t function correctly or seems improperly calibrated:
- In the event of malfunction due to electrostatic emission, exit the game, switch off your gamepad and
disconnect the receiver from your console or your PC.
To play again, reconnect the receiver, switch your gamepad back on and start the game again.
- Never move the mini-sticks, the optical wheel or the triggers when connecting your gamepad (to avoid
any calibration problems).
- On PC, if the game does not accept “7 axes” mode (undesired effects), switch your gamepad to “4 axes”
mode (the standard gamepad mode).
• I can’t configure my gamepad in a game:
- In your game’s “Options / Controller / Gamepad” menu: select the most appropriate configuration.
- Please refer to your game’s user manual or online help for more information.
- You can also use your gamepad’s “programming” function to resolve this type of problem.
• On PC or PS3, my gamepad doesn’t function correctly:
- Exit your game, disconnect your gamepad, verify that the “PC/PS3” USB selector (11) is in the proper
position, then reconnect everything.
• The MAPPING LED flashes slowly and continuously:
- Please change batteries.
When you’re done using your gamepad, we recommend that you always set the gamepad’s
POWER ON/OFF switch (14) to the OFF position (to save your batteries).
11/12
TECHNICAL SUPPORT
If you encounter a problem with your product, please go to http://ts.thrustmaster.com and click Technical Support. From
there you will be able to access various utilities (Frequently Asked Questions (FAQ), the latest versions of drivers and
software) that may help to resolve your problem. If the problem persists, you can contact the Thrustmaster products
technical support service (“Technical Support”):
By email:
In order to take advantage of technical support by email, you must first register online. The information you provide will help
the agents to resolve your problem more quickly. Click Registration on the left-hand side of the Technical Support page
and follow the on-screen instructions. If you have already registered, fill in the Username and Password fields and then
click Login.
By telephone (if you do not have Internet access):
08450800942
United Kingdom
Monday to Saturday from 8 a.m. to 7 p.m.
Charged at local rate
1-866-889-5036
United States
Free
Monday to Friday from 9 a.m. to 8 p.m.
Saturday from 8 a.m. to 2 p.m.
(Eastern Standard Time)
Monday to Friday from 6 a.m. to 5 p.m.
Saturday from 5 a.m. to 11 a.m.
(Pacific Standard Time)
1-866-889-2181
Canada
Free
Monday to Friday from 9 a.m. to 8 p.m.
Saturday from 8 a.m. to 2 p.m.
(Eastern Standard Time)
Monday to Friday from 6 a.m. to 5 p.m.
Saturday from 5 a.m. to 11 a.m.
(Pacific Standard Time)
80887690
Monday to Saturday from 9 a.m. to 8 p.m.
Denmark
Free
(English)
0200884567
Monday to Saturday from 9 a.m. to 8 p.m.
Sweden
Free
(English)
0800 913060
Monday to Saturday from 10 a.m. to 9 p.m.
Finland
Free
(English)
Hours of operation and telephone numbers are subject to change. Please visit http://ts.thrustmaster.com for the most up-to-
date Technical Support contact information.
WARRANTY INFORMATION
Worldwide, Guillemot Corporation S.A. (“Guillemot”) warrants to the consumer that this Thrustmaster product will be free
from material defects and manufacturing flaws for a period of two (2) years from the original date of purchase. Should the
product appear to be defective during the warranty period, immediately contact Technical Support, who will indicate the
procedure to follow. If the defect is confirmed, the product must be returned to its place of purchase (or any other location
indicated by Technical Support).
Within the context of this warranty, the consumer’s defective product will, at Technical Support’s option, be either repaired
or replaced. Where authorized by applicable law, the full liability of Guillemot and its subsidiaries (including for indirect
damages) is limited to the repair or replacement of the Thrustmaster product. The consumer’s legal rights with respect to
legislation applicable to the sale of consumer goods are not affected by this warranty.
This warranty shall not apply: (1) if the product has been modified, opened, altered, or has suffered damage as a result of
inappropriate or abusive use, negligence, an accident, normal wear, or any other cause not related to a material defect or
manufacturing flaw; (2) in the event of failure to comply with the instructions provided by Technical Support; (3) to software
not published by Guillemot, said software being subject to a specific warranty provided by its publisher.
12/12
Additional warranty provisions
In the United States of America and in Canada, this warranty is limited to the product’s internal mechanism and external
housing. Any applicable implied warranties, including warranties of merchantability and fitness for a particular purpose, are
hereby limited to two (2) years from the date of purchase and are subject to the conditions set forth in this limited warranty. In
no event shall Guillemot Corporation S.A. or its affiliates be liable for consequential or incidental damage resulting from the
breach of any express or implied warranties. Some States/Provinces do not allow limitation on how long an implied warranty
lasts or exclusion or limitation of incidental/consequential damages, so the above limitation may not apply to you. This
warranty gives you specific legal rights, and you may also have other legal rights which vary from State to State or Province
to Province.
FCC STATEMENT
1. This device complies with Part 15 of the FCC Rules. Operation is subject to the following two conditions:
(1) This device may not cause harmful interference, and
(2) This device must accept any interference received, including interference that may cause undesired operation.
2. Changes or modifications not expressly approved by the party responsible for compliance could void the user's authority to
operate the equipment.
Statement of Compliance with EU Regulations
Guillemot Corporation S.A. hereby declares that the device Ferrari Wireless Gamepad complies with the main requirements
and other relevant clauses of Directive RTTE 1999/5/CE. The compliance statement can be viewed at the following site:
http://www.thrustmaster.com/certificates/Ferrari_Wireless_Gamepad/Doc-Ferrari_Wireless_Gamepad.pdf
COPYRIGHT
© 2011 Guillemot Corporation S.A. All rights reserved. Thrustmaster® is a registered trademark of Guillemot Corporation
S.A. Ferrari® is a registered trademark of Ferrari S.p.A. PlayStation® is a registered trademark of Sony Computer
Entertainment, Inc. Windows® is a registered trademark of Microsoft Corporation in the United States and/or in other
countries. All other trademarks and brand names are hereby acknowledged and are the property of their respective owners.
Illustrations not binding. Contents, designs and specifications are subject to change without notice and may vary from one
country to another. Made in China.
ENVIRONMENTAL PROTECTION RECOMMENDATION
At the end of its working life, this product should not be disposed of with standard household waste, but
rather dropped off at a collection point for the disposal of Waste Electrical and Electronic Equipment
(WEEE) for recycling.
This is confirmed by the symbol found on the product, user manual or packaging.
Depending on their characteristics, the materials may be recycled. Through recycling and other forms
of processing Waste Electrical and Electronic Equipment, you can make a significant contribution
towards helping to protect the environment.
Please contact your local authorities for information on the collection point nearest you.
Retain this information. Colours and decorations may vary.
This product conforms to all standards regarding children 14 years of age and older. This product is not suitable for use by
children less than 14 years of age.
Operates with 2 batteries LR03 / AAA (1.5V), not included. Do not recharge non-rechargeable batteries. Used batteries must
be removed from the toy. Different types of batteries or new and used batteries must not be mixed. Only batteries of the
recommended type or similar type must be used. Batteries must be inserted with the correct polarity. The terminals of a
battery must not be short-circuited. When the batteries are dead, remove them and place them in containers designated for
collecting used batteries.
Reference:
5076063
www.thrustmaster.com
Оглавление
- Click on your language below
- For: PlayStation 3 / PlayStation 3 Slim / PC User Manual
- Pour : PlayStation®3 / PlayStation®3 Slim / PC Manuel de l'utilisateur
- Für: PlayStation®3 / PlayStation®3 Slim / PC Benutzerhandbuch
- Voor: PlayStation®3 / PlayStation®3 Slim / PC Handleiding
- Per: PlayStation®3 / PlayStation®3 Slim / PC Manuale d’uso
- Para: PlayStation®3 / PlayStation®3 Slim / PC Manual del usuario
- Para: PlayStation®3 / PlayStation®3 Slim / PC Manual do Utilizador
- PlayStation®3 / PlayStation®3 Slim / PC Руководство пользователя
- Για: PlayStation®3 / PlayStation®3 Slim / PC Εγχειρίδιο χρήσης
- PlayStation®3 / PlayStation®3 Slim için / PC Kullanım Kılavuzu
- Do: PlayStation®3 / PlayStation®3 Slim / PC
- 3 Slim ﺭﺗﻭﻳﺑﻣﻛﻟﺍ / 3 /PlayStation :ﻥﻣ ﻝﻛﻟ PlayStation ﻝﻳﻟﺩ ﻡﺩﺧﺗﺳﻣﻟﺍ
