Thrustmaster TH8 RS Shifter: инструкция
Раздел: Бытовая, кухонная техника, электроника и оборудование
Тип: Устройство ввода
Инструкция к Устройству ввода Thrustmaster TH8 RS Shifter
Click on your language below
ﻡﺩﺧﺗﺳﻣﻟﺍ ﻝﻳﻟﺩ -
User Manual
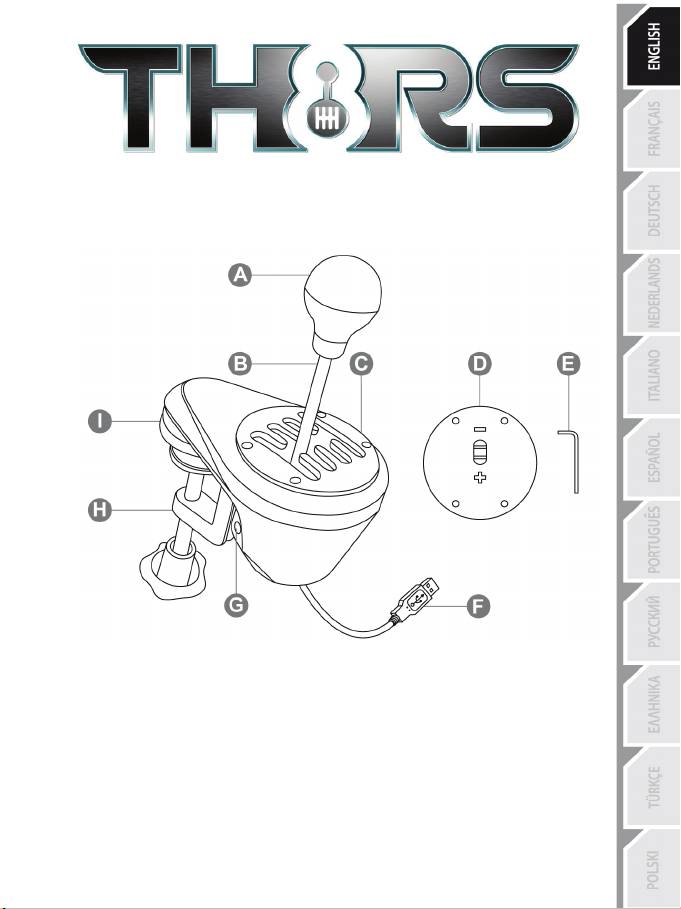
TECHNICAL FEATURES
A Removable gear shift knob
F USB cable and connector
(not installed by default)
G Internal tensioning screw
B Stick
H Adjustable clamping system
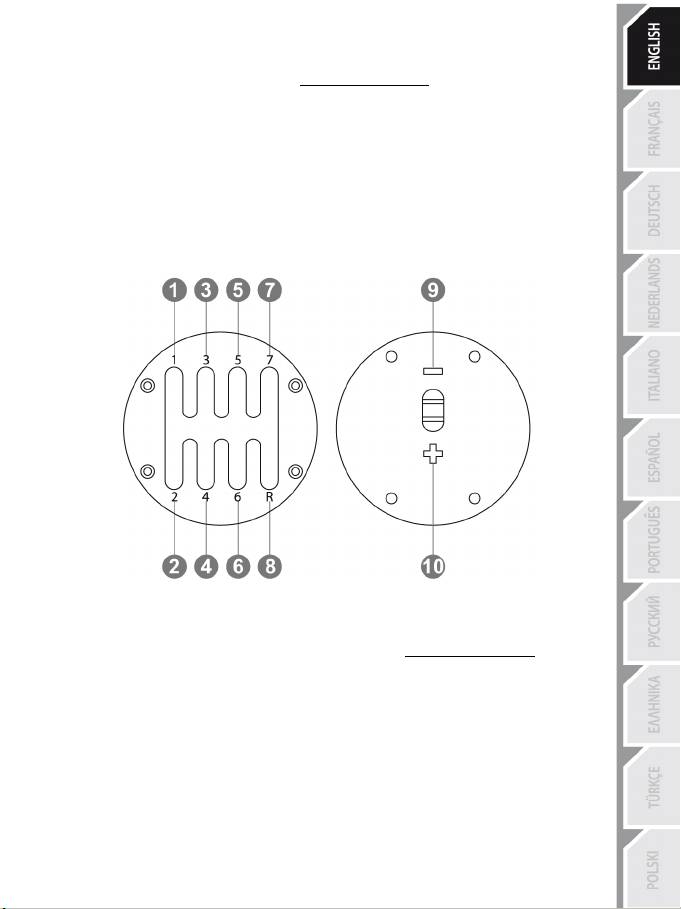
C Adjustable “H-pattern (7+1)” shift plate
I “Screw threads” for cockpit mounting
(installed by default)
D Adjustable “Sequential (+/-)” shift plate
(not installed by default)
E 2.5 mm Allen key (included)
1/14
WARNING
Before using this product, be sure to read through this manual carefully. Retain this manual for
future reference.
Warning – Electric shock
* Keep this product in a dry place, and do not expose it to dust or sunlight.
* Respect the direction of insertion for connectors.
* Do not twist or pull on the connectors and cables.
* Do not spill liquid on the product or its connector.
* Do not short-circuit the product.
* Do not dismantle this product (apart from for the possible adjustments described in this manual),
do not attempt to burn the product and do not expose the product to high temperatures.
Warning – Injuries due to repetitive movements
Playing with a shifter may result in muscle and joint pains. To avoid any problems:
* Avoid playing for extended periods of time.
* Take a 10 to 15 minute break after each hour of playing.
* Should you experience fatigue or pain in your hands, wrists or arms, stop playing and rest for a
few hours before starting to play again.
* If the symptoms or pains described above persist when you resume playing, stop playing and
consult your doctor.
* Verify that the base of the shifter is properly mounted, as described in the instructions found in this
manual.
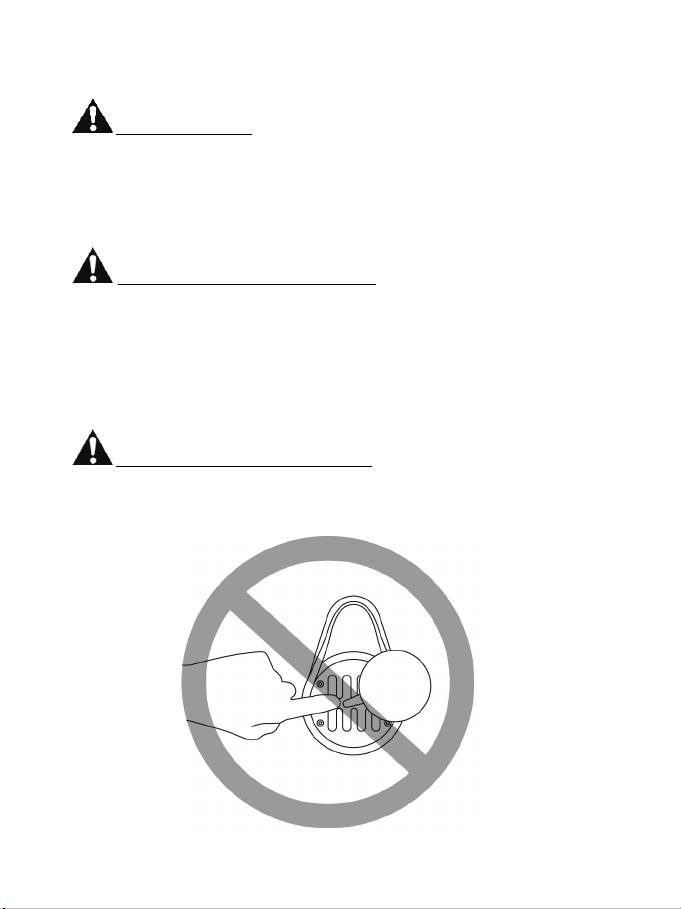
Warning – Pinching risk in shift plate openings
* Keep out of the reach of children.
* When playing a game, never place your fingers (or any other parts of your body) in the openings in
the shift plates.
NEVER
2/14
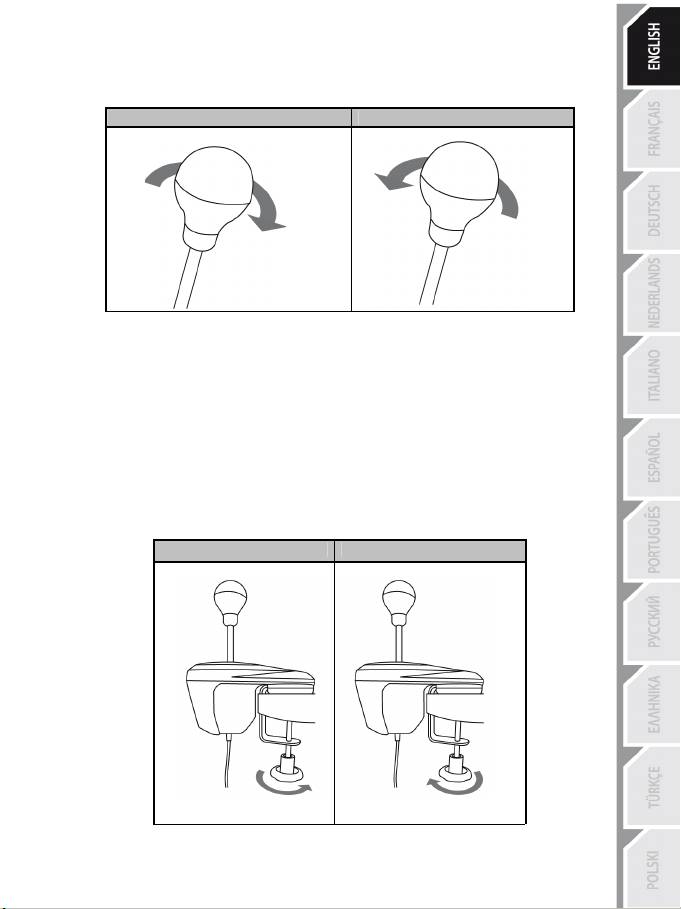
INSTALLING THE GEAR SHIFT KNOB
1. To screw the gear shift knob (A) onto its stick (B): turn the gear shift knob clockwise.
2. To unscrew the gear shift knob: turn the knob counterclockwise.
TIGHTEN UNTIGHTEN
MOUNTING THE SHIFTER
Mounting is optimized for any type of support:
- Tables, desks or shelves from 1 to 55 mm in thickness, via the clamping system (H).
- Cockpits, via the built-in “screw threads” (the clamping system is removable).
Mounting the shifter on a table or desk
1. Place the nose of the shifter on a table or other flat surface.
2. To tighten: turn the clamping wheel counterclockwise.
3. To untighten: turn the clamping wheel clockwise.
TIGHTEN UNTIGHTEN
3/14

Positioning and rotating the clamping system (can be adjusted by 360°)
1. Using the included 2.5 mm Allen key (E), very slightly unscrew the 3 screws holding the
clamping system (H) in place.
The clamping system (and therefore the entire shifter) can now be rotated manually by 360°.
2. Select your preferred position along the 360° of rotation (3 examples are shown below, among
the many other possibilities available).
Next, retighten the 3 screws holding the clamping system in place.
4/14
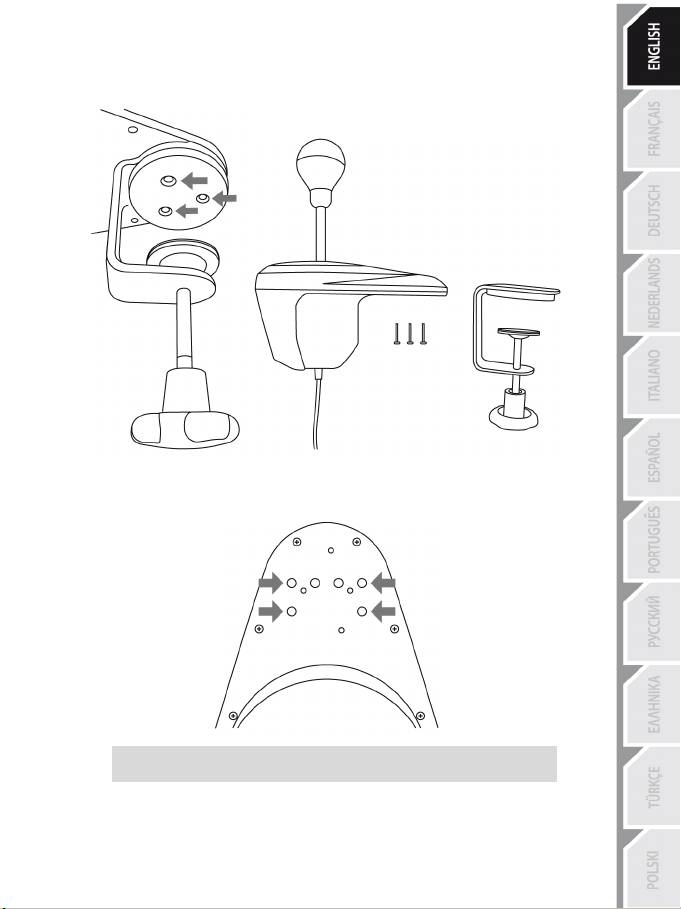
Mounting the shifter in a cockpit
1. Using the included 2.5 mm Allen key (E), completely unscrew and remove the 3 screws
holding the clamping system (H) in place. Detach the clamping system from the shifter.
2. Once the clamping system has been removed, screw 2 “M6” screws (not included) into the
cockpit shelf, and into 2 of the 4 small “screw threads” (I) located on the underside of the shifter's
nose.
Be sure not to use “M6” screws that are too long, which may pierce
and damage the upper part of the shifter’s nose.
5/14
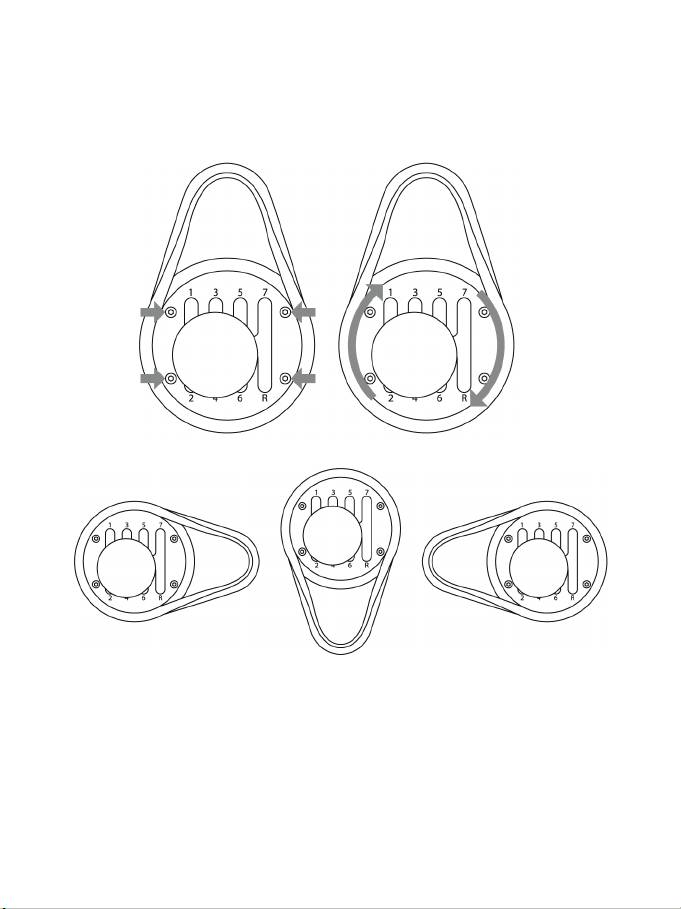
POSITIONING AND ROTATING THE SHIFT PLATES (CAN BE ADJUSTED
BY 360°)
1. Using the included 2.5 mm Allen key (E), slightly unscrew the 4 screws holding the shift plate
(C or D) in place.
The shift plate can now be rotated manually by 360°.
2. Select your preferred position along the 360° of rotation (3 examples are shown below, among
the many other possibilities available).
3. Retighten the 4 screws holding the shift plate in place.
6/14
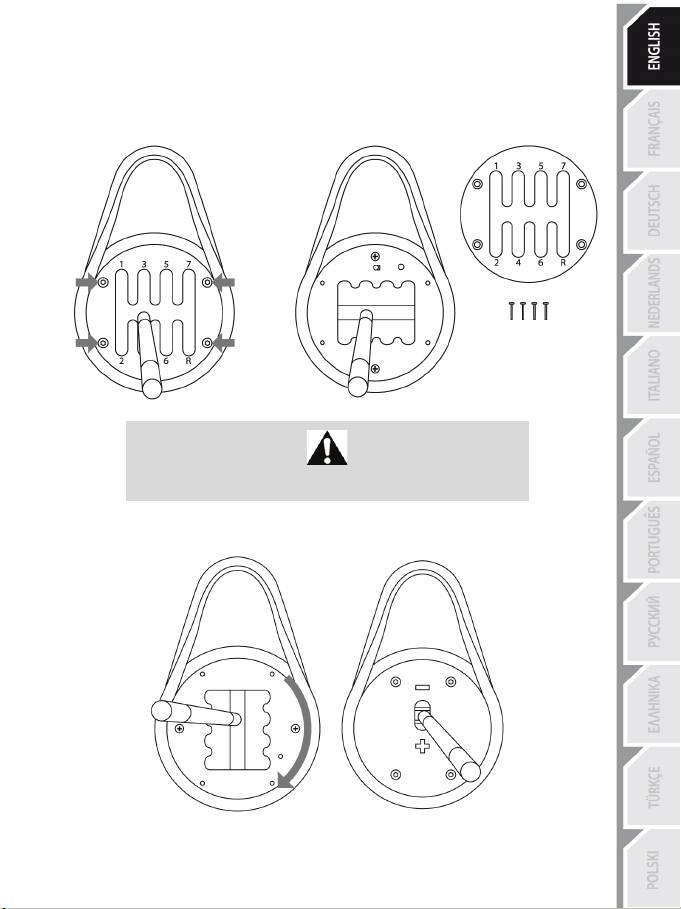
SWITCHING FROM THE “H-PATTERN (7+1)” SHIFT PLATE
TO THE “SEQUENTIAL (+/-)” SHIFT PLATE
1. Unscrew (counterclockwise) and remove the gear shift knob (A).
2. Using the included 2.5 mm Allen key (E), completely unscrew and remove the 4 screws
holding the “H-pattern (7+1)” shift plate in place. Remove the shift plate.
During this procedure, take care not to accidentally let
any of the screws fall inside the internal mechanism.
3. Manually rotate the internal structure 90° to the right (clockwise).
Next, install the “Sequential (+/-)” shift plate.
7/14
4. Using the included 2.5 mm Allen key (E), replace and completely retighten the 4 screws holding
the “Sequential (+/-)” shift plate in place. Screw the gear shift knob back on (clockwise).
Carry out this procedure in reverse to replace the “H-pattern (7+1)” shift plate.
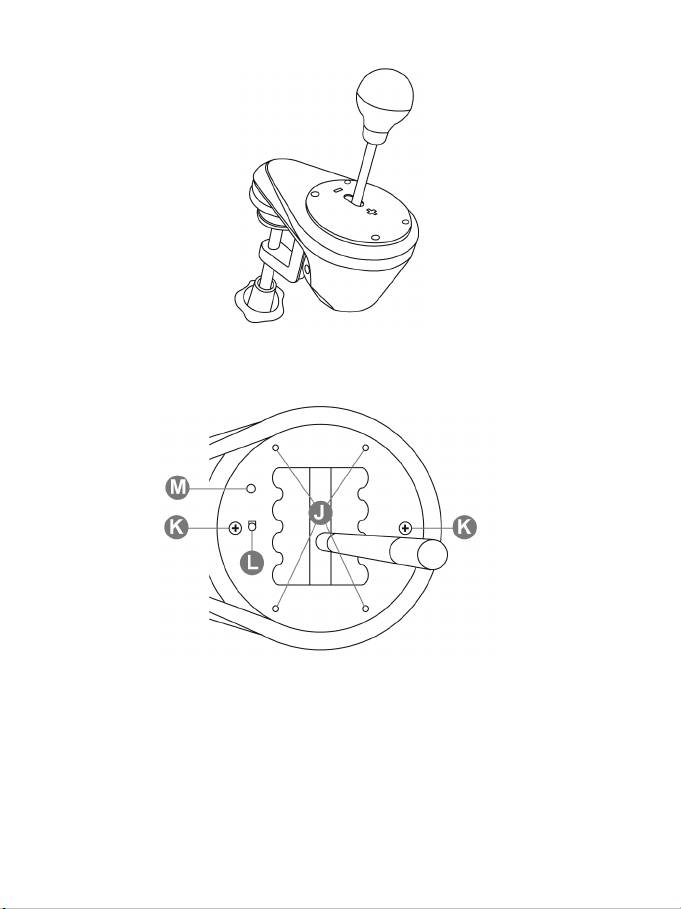
Notes regarding the internal structure's top cover:
J: 4 “screw threads” to attach the shift plates (C or D).
K: 2 screws which hold the internal structure in place (do not unscrew).
L: Button which automatically detects the type of shift plate used (C or D). Is pressed automatically
when the “Sequential (+/-)” shift plate is installed. Keep this area clean in order to avoid any
detection problems.
M: Slot for easier positioning of the shift plates.
8/14
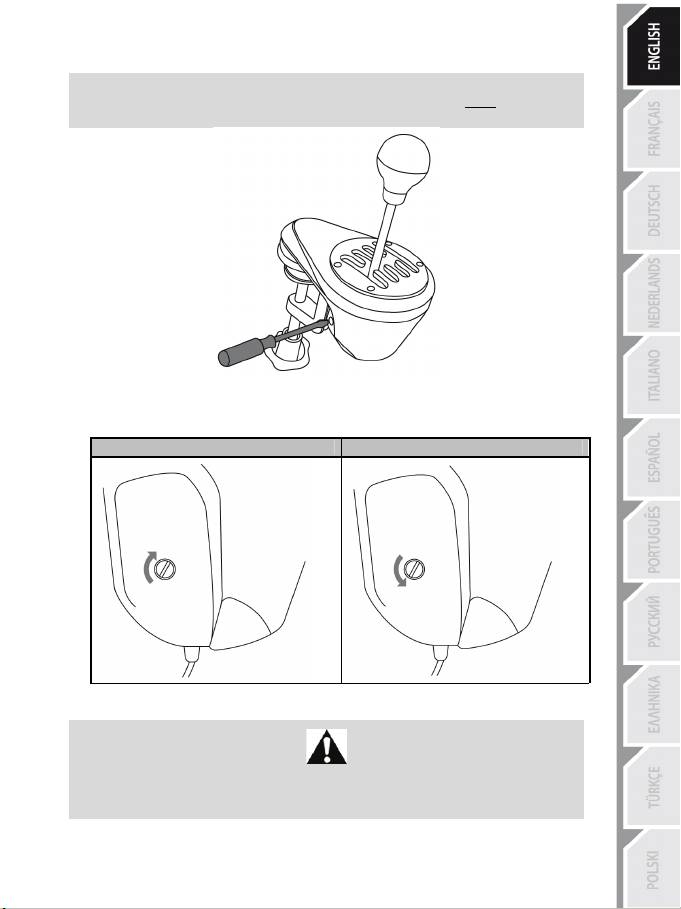
ADJUSTING THE GEAR SHIFT RESISTANCE
* Only applies to the “H-pattern (7+1)” shift plate.
* Before making any adjustments, the “H-pattern (7+1)” shift plate must be installed in
its original position (please see the diagram below).
1. Using a large flat head screwdriver, place the screwdriver in the head of the internal tensioning
screw (G) located in the lower left section of the shifter’s housing.
2. To slightly increase the resistance: turn the screw clockwise.
3. To slightly decrease the resistance: turn the screw counterclockwise.
INCREASING THE RESISTANCE DECREASING THE RESISTANCE
2 full turns are enough to go from one extreme to the other.
To avoid damaging the system:
- Stop tightening the screw when you feel strong resistance.
- Stop untightening the screw if the stick becomes loose and wobbly.
9/14

INSTALLATION ON PLAYSTATION®3
- Connect the shifter's USB connector (F) to one of the USB ports on your PlayStation®3.
- Start up your game.
You are now ready to play!
* The list of PlayStation®3 games compatible with the Thrustmaster shifter is available
here: http://ts.thrustmaster.com (in the “PlayStation/Wheels/TH8 RS Shifter” section).
This list is updated regularly.
* For some PlayStation®3 games, you must install the latest available game updates
(when you are connected to the Internet) in order for the Thrustmaster shifter to
function properly.
* On PlayStation®3, if you are using the Thrustmaster shifter with the T500 RS wheel,
we recommend that you connect the 2 devices directly to the USB ports on your
PlayStation®3. If you are using a USB hub (particularly for the T500 RS wheel), the hub
must not be powered = use a direct hub, without a power supply.
INSTALLATION ON PC
- The Thrustmaster shifter is “Plug & Play” on PC = just connect the USB connector (F) to one of
your PC's USB ports.
- Your device will then be automatically detected and installed.
- Your device will appear in the Windows® “Control Panel/Game Controllers” list, with the name
“T500 RS Gear Shift”.
- Click on “Properties” to test and view its functionalities.
You are now ready to play!
* On PC, the Thrustmaster shifter is compatible with:
- all games supporting MULTI-USB and shifters.
- all wheels on the market.
* It is preferable to connect the wheel and the shifter directly to the USB ports on your
PC (without using a USB hub).
* For some PC games, you must install the latest available game updates in order for
the Thrustmaster shifter to function properly.
* For some PC games (in order to avoid any conflicts between the wheel and the
shifter), it may be necessary:
- not to map anything onto the wheel's gear shift paddles.
- to enable the “Hold button for gear” function.
10/14
UPDATING THE FIRMWARE
- A “software package” is available here: http://ts.thrustmaster.com (in the “PC/Wheels/TH8 RS
Shifter” section, or in the “PlayStation/Wheels/TH8 RS Shifter” section).
- After installing the software package, you will be able to:
* check your shifter's firmware version.
* update the firmware (if necessary) with the latest available version.
* use the “BOOTLOADER Method”
(to restore your shifter, in the event of loss of firmware).
* access a customized Control Panel (game controller) on PC.
MAPPING
CALIBRATION SOFTWARE
The gear shift calibration is automatically carried out.
An Advanced calibration software is also available here: http://ts.thrustmaster.com (in the
"Wheels/TH8 RS Shifter" section). It allows you to adjust the gear shift travel to your convenience.
When the settings are complete, they are instantly saved into the internal gear shift memory (and
can be used on PC & PS3™).
11/14

TROUBLESHOOTING AND TIPS
* My shifter is not functioning correctly, or seems to be improperly calibrated:
- Turn off your computer or console, disconnect your shifter, reconnect it and then restart your
game.
- In your game, under “Options/Controller”, select or set up the most appropriate configuration.
- Refer to your game's user manual or online help for more information.
- Various help topics and tips (not included in this manual) are available on the
http://ts.thrustmaster.com
website, under Technical Support.
12/14

TECHNICAL SUPPORT
If you encounter a problem with your product, please go to http://ts.thrustmaster.com and click
Technical Support. From there you will be able to access various utilities (Frequently Asked
Questions (FAQ), the latest versions of drivers and software) that may help to resolve your problem.
If the problem persists, you can contact the Thrustmaster products technical support service
(“Technical Support”):
By email
:
In order to take advantage of technical support by email, you must first register online. The
information you provide will help the agents to resolve your problem more quickly. Click
Registration on the left-hand side of the Technical Support page and follow the on-screen
instructions. If you have already registered, fill in the Username and Password fields and then click
Login.
By telephone (if you do not have Internet access):
08450800942
United Kingdom
Monday to Saturday from 8 a.m. to 7 p.m.
Charged at local rate
Monday to Friday from 9 a.m. to 8 p.m.
Saturday from 8 a.m. to 2 p.m.
1-866-889-5036
(Eastern Standard Time)
United States
Free
Monday to Friday from 6 a.m. to 5 p.m.
Saturday from 5 a.m. to 11 a.m.
(Pacific Standard Time)
Monday to Friday from 9 a.m. to 8 p.m.
Saturday from 8 a.m. to 2 p.m.
1-866-889-2181
(Eastern Standard Time)
Canada
Free
Monday to Friday from 6 a.m. to 5 p.m.
Saturday from 5 a.m. to 11 a.m.
(Pacific Standard Time)
80887690
Monday to Saturday from 9 a.m. to 8 p.m.
Denmark
Free
(English)
0200884567
Monday to Saturday from 9 a.m. to 8 p.m.
Sweden
Free
(English)
0800 913060
Monday to Saturday from 10 a.m. to 9 p.m.
Finland
Free
(English)
Hours of operation and telephone numbers are subject to change. Please visit http://ts.thrustmaster.com for the most
up-to-date Technical Support contact information.
WARRANTY INFORMATION
Worldwide, Guillemot Corporation S.A. (“Guillemot”) warrants to the consumer that this
Thrustmaster product will be free from material defects and manufacturing flaws for a period of two
(2) years from the original date of purchase. Should the product appear to be defective during the
warranty period, immediately contact Technical Support, who will indicate the procedure to follow. If
the defect is confirmed, the product must be returned to its place of purchase (or any other location
indicated by Technical Support).
Within the context of this warranty, the consumer’s defective product will, at Technical Support’s
option, be either repaired or replaced. Where authorized by applicable law, the full liability of
Guillemot and its subsidiaries (including for indirect damages) is limited to the repair or replacement
of the Thrustmaster product. The consumer’s legal rights with respect to legislation applicable to the
sale of consumer goods are not affected by this warranty.
13/14
This warranty shall not apply: (1) if the product has been modified, opened, altered, or has suffered
damage as a result of inappropriate or abusive use, negligence, an accident, normal wear, or any
other cause not related to a material defect or manufacturing flaw; (2) in the event of failure to
comply with the instructions provided by Technical Support; (3) to software not published by
Guillemot, said software being subject to a specific warranty provided by its publisher.
Additional warranty provisions
In the United States of America and in Canada, this warranty is limited to the product’s internal
mechanism and external housing. Any applicable implied warranties, including warranties of
merchantability and fitness for a particular purpose, are hereby limited to two (2) years from the date
of purchase and are subject to the conditions set forth in this limited warranty. In no event shall
Guillemot Corporation S.A. or its affiliates be liable for consequential or incidental damage resulting
from the breach of any express or implied warranties. Some States/Provinces do not allow limitation
on how long an implied warranty lasts or exclusion or limitation of incidental/consequential damages,
so the above limitation may not apply to you. This warranty gives you specific legal rights, and you
may also have other legal rights which vary from State to State or Province to Province.
COPYRIGHT
®
© 2011 Guillemot Corporation S.A. All rights reserved. Thrustmaster
is a registered trademark of
Guillemot Corporation S.A. PlayStation® is a registered trademark of Sony Computer Entertainment
Inc. Microsoft® Windows® is a registered trademark of Microsoft Corporation in the United States
and/or other countries. All other trademarks and brand names are hereby acknowledged and are
property of their respective owners. Illustrations not binding. Contents, designs and specifications
are subject to change without notice and may vary from one country to another. Made in China.
ENVIRONMENTAL PROTECTION RECOMMENDATION
At the end of its working life, this product should not be disposed of with
standard household waste, but rather dropped off at a collection point for the
disposal of Waste Electrical and Electronic Equipment (WEEE) for recycling.
This is confirmed by the symbol found on the product, user manual or
packaging.
Depending on their characteristics, the materials may be recycled. Through
recycling and other forms of processing Waste Electrical and Electronic
Equipment, you can make a significant contribution towards helping to protect
the environment.
Please contact your local authorities for information on the collection point nearest you.
Reference : 5076058
www.thrustmaster.com
14/14
Manuel de l’utilisateur
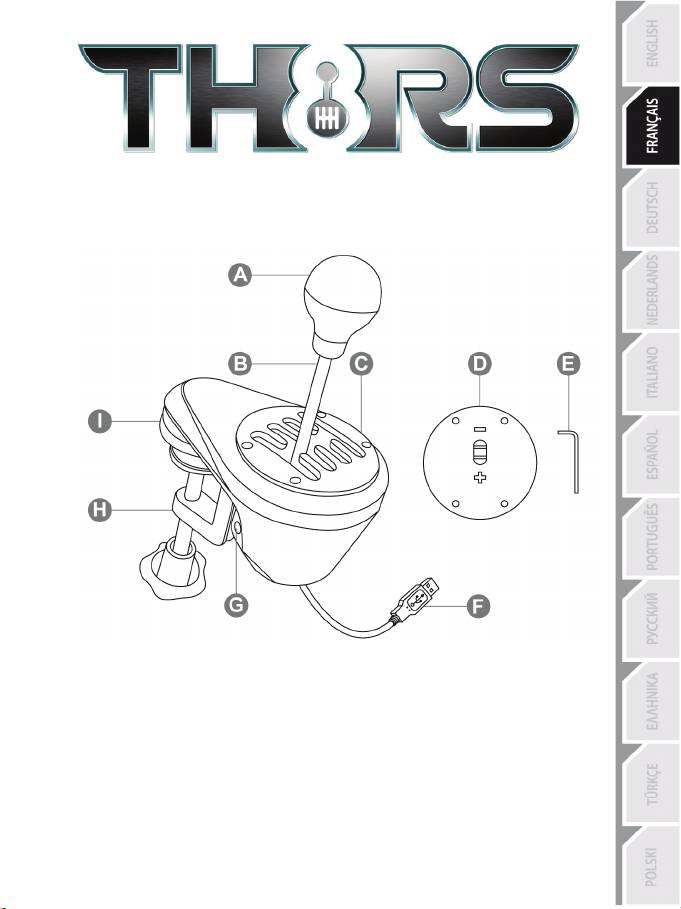
CARACTÉRISTIQUES TECHNIQUES
A Pommeau amovible
F Câble et connecteur USB
(non installé par défaut)
G Vis de tension interne
B Levier
H Système de fixation orientable
C Grille « H (7+1) » orientable
I « Pas de vis » pour fixation cockpit
(installé par défaut)
D Grille « Séquentielle (+/-) » orientable
(non installé par défaut)
E Clé Allen 2,5 mm fournie
1/14
Оглавление
- Click on your language below
- Warning – Injuries due to repetitive movements
- Avertissement – Blessures dues aux mouvements répétitifs
- Warnung – Schädigungen durch wiederholte Bewegungen
- Waarschuwing – Mogelijk letsel ten gevolge van herhaalde bewegingen
- Attenzione – Infortuni causati da movimenti ripetuti
- Advertencia – Lesiones debidas a movimientos repetitivos
- Aviso – Lesões devido a movimentos repetitivos
- PlayStation® é uma marca registada da Sony Computer
- Внимание — риск травмирования по причине многократно повторяющихся
- Προειδοποίηση – Τραυματισμοί λόγω επαναλαμβανόμενων κινήσεων
- Uyarı – Mükerrer hareketlerden kaynaklanan tıbbi sorunlar
- Ostrzeżenie — ryzyko obrażeń ciała spowodowanych powtarzającymi się ruchami
