Thrustmaster RGT FFB CLUTCH: инструкция
Раздел: Бытовая, кухонная техника, электроника и оборудование
Тип: Устройство ввода
Инструкция к Устройству ввода Thrustmaster RGT FFB CLUTCH
ﻡﺩﺧﺗﺳﻣﻟﺍ ﻝﻳﻟﺩ
1/12
User Manual
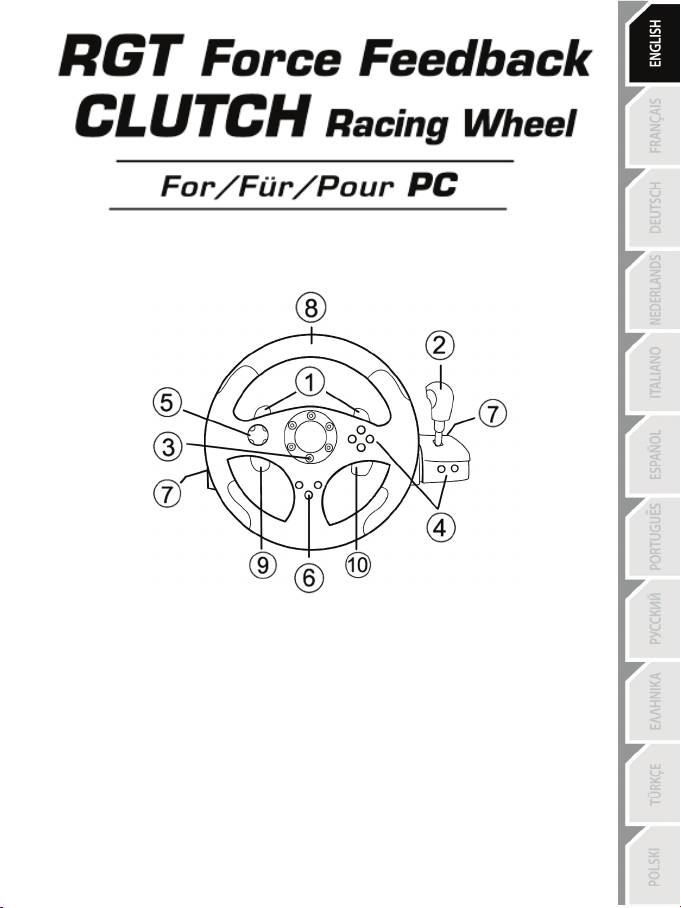
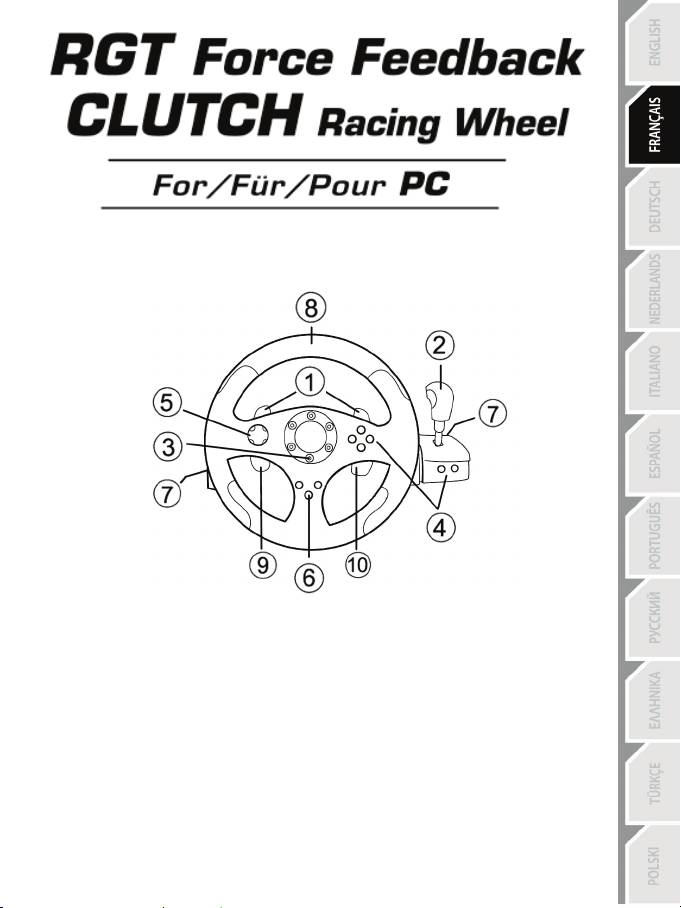
TECHNICAL FEATURES
1 2 digital gearshift levers
2 Digital gearshift knob
3 Mode LED
4 Digital action buttons
5 Digital D-pad
6 Force button
7 2 connectors for 3 pedals pedal set
8 Axis 1: Analog steering wheel
9 Axis 4: Progressive left lever
10 Axis 5: Progressive right lever

2/12
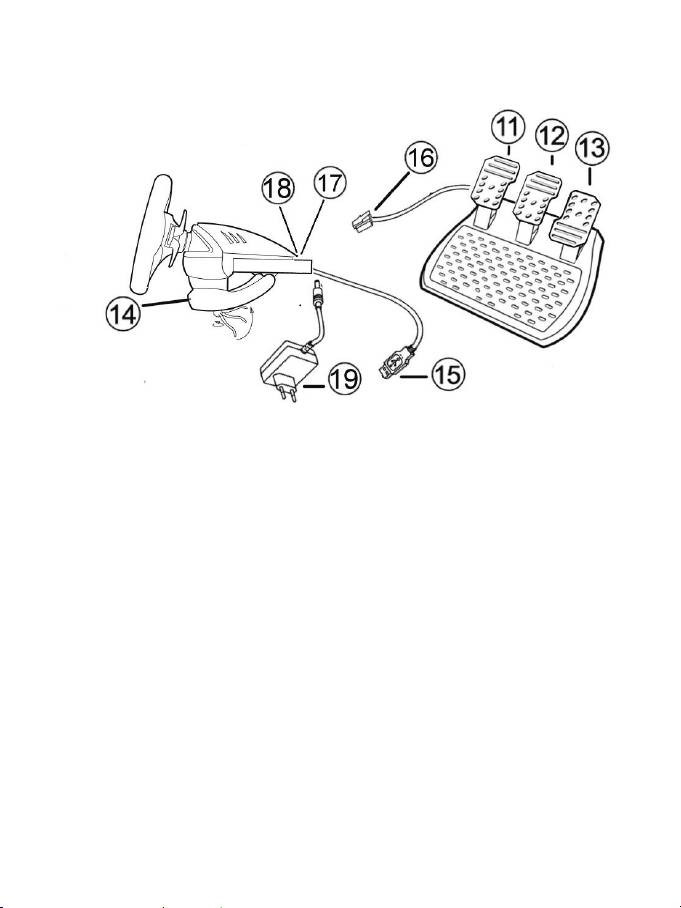
11 Axis 4: Progressive clutch pedal
12 Axis 3: Progressive brake pedal
13 Axis 2: Progressive gas pedal
14 Table clamp
15 USB PC connector
16 Pedal set cable (with switch)
17 2 RJ45 connectors for pedal set
18 Power adapter connector
19 Power adapter
INSTALLING THE WHEEL
Fixing the wheel in place
1. Place the wheel on a table or other flat surface.
2. Place the clamp screw in the table clamp (14) and then screw the clamping unit counter-clockwise into
the hole on the underside of the wheel until firmly fixed in place.
3/12
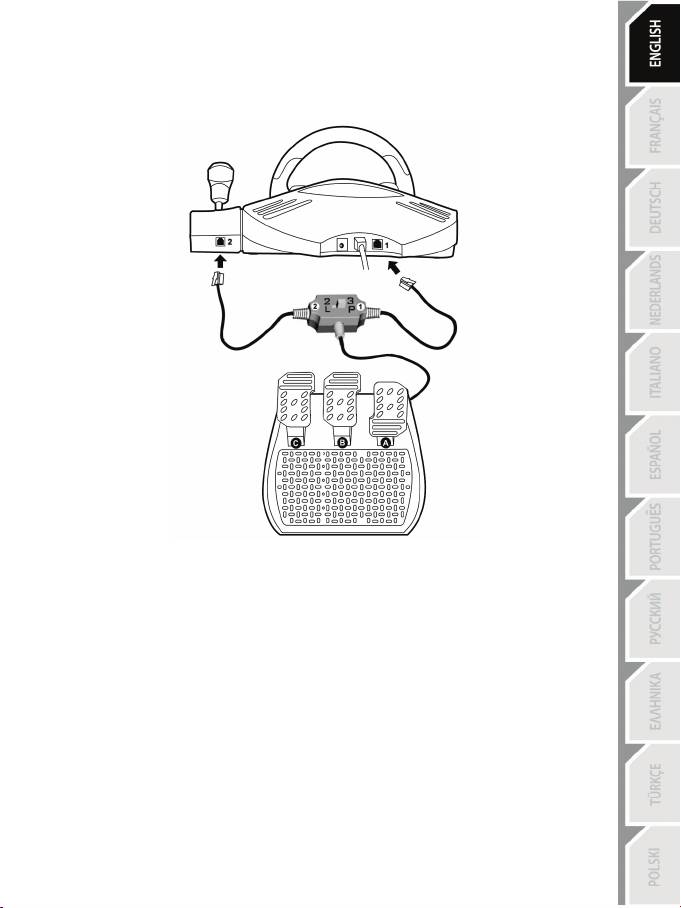
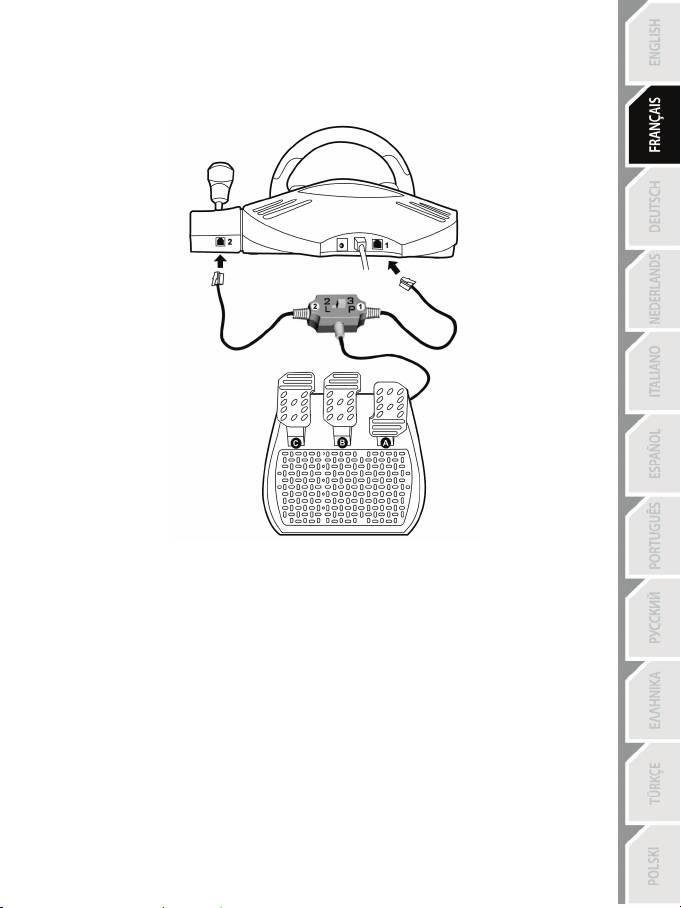
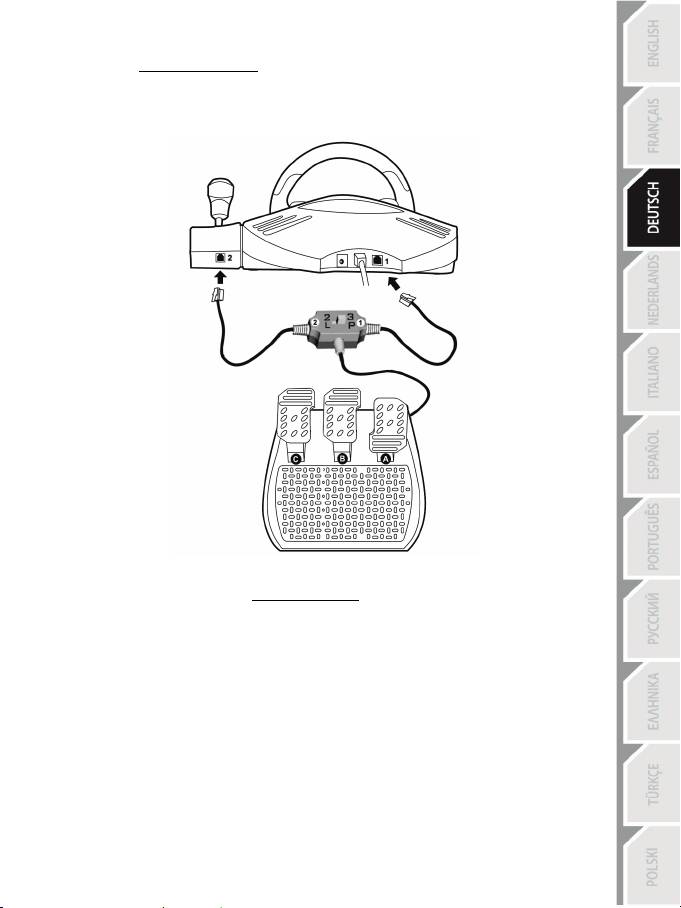
Connecting the “3 Pedals” pedal set to the wheel
1. Connect cable 1 to connector 1 located at the back of the wheel.
2. Connect cable 2 to connector 2 located behind the gearshift knob.
Using the switch
The switch, located on the cable of the “3 Pedals” pedal set, allows you at any time (even during the course of a
game) to enable (or disable):
- either the third pedal (C)
- or the 2 progressive levers located behind the wheel.
Switch set to “2 L”
The 2 progressive levers are enabled (and the third pedal disabled).
Switch set to “3 P”
The third pedal is enabled (and the 2 progressive levers disabled).
IN THE “3 P” POSITION, YOUR WHEEL AUTOMATICALLY SWITCHES TO “5 AXIS” MODE.
Connecting the wheel
Connect the power adapter (19) to the adapter connector (18) and plug the adapter into an electrical
outlet.

4/12
PLAYSTATION
3
On PlayStation®3, in the general menu, use your official gamepad (not your racing wheel) to navigate and
start your games. The wheel will work only when the game is started.
INSTALLATION FOR PC
System requirements: PC (Windows 98 SE, Me, 2000, XP, Vista or 7) equipped with USB port.
INSTALLING THE DRIVERS
The CD-ROM included with this product allows you to install the Force Feedback drivers.
1. Insert the installation CD-ROM into your CD-ROM drive. Follow the on-screen instructions to install
the Force Feedback drivers. Once the installation is complete, click Finish and restart your computer.
2. Once your computer has restarted, connect the USB connector (15) to one of your computer’s USB
ports. Windows 98/Me/2000/XP/Vista/7 will automatically detect the new device. (If you are
connecting a USB device for the first time, Windows may ask you to insert the Windows CD-ROM
during the installation procedure in order to install the required system files.)
3. Driver installation:
Windows 98: the Add New Hardware Wizard will search for the appropriate drivers. Click Next.
Follow the on-screen instructions to complete the installation.
Windows Me/2000/XP/Vista/7: the drivers are installed automatically.
4. Select Start/All Programs/Thrustmaster/Force Feedback driver/Control Panel.
The Game Controllers dialog box displays the wheel’s name with OK status.
5. In the Control Panel, click Properties to configure your wheel:
• Page 1 = Test input: allows you to test and view the buttons, D-pad and 5 axes (wheel, brake
pedal, gas pedal, clutch pedal, left and right progressive levers).
• Page 2 = Test forces: allows you to test 8 Force effects and configure the Force Feedback and
automatic re-centering settings.
AUTOMATIC CALIBRATION OF WHEEL AND PEDALS
The wheel auto-calibrates independently once the power adapter and USB connector have been
connected (this involves the wheel making movements on its own). The pedals auto-calibrate once they
have been pressed a few times.
You can also carry out manual calibration by downloading the “Thrustmaster Calibration Tool v 1.03”
software from our website:
http://ts.thrustmaster.com
5/12
AXIS SELECTION (2, 3 or 5 AXES)
• Axis selection via “Software” (page 1 of the “Control Panel”)
Click the mode you wish to use and then click OK.
• Axis selection via “Hardware”
Press the gas and brake pedals and the Force button simultaneously (13) + (12) + (6).
Axis selection via hardware must always be carried out outside of the Control Panel!
This allows you to select your mode directly in your game’s “Controls” option.
AXIS SELECTION VIA “HARDWARE” IS ONLY AVAILABLE
WHEN THE SWITCH ON YOUR PEDAL SET IS IN THE “2 L” POSITION
• 2 AXIS mode (LED is orange)
In this mode, your wheel’s gas and brake controls function in “combined” mode (and are combined with
the 2 progressive levers):
- Axis 1 = X axis (Steering wheel)
- Axis 2 = Y axis (Pedals/progressive levers)
• 3 AXIS mode (LED is red)
In this mode, your wheel’s gas and brake controls function in “separate” mode.
= the pedals are combined with the 2 progressive levers (switch set to “2 L”)
= the clutch pedal is combined with the brake pedal (switch set to “3 P”)
- Axis 1 = X axis (Steering wheel)
- Axis 2 = Y axis (Brake pedal / Progressive left lever / Clutch pedal)
- Axis 3 = RZ axis (Gas pedal / Progressive right lever)
• 5 AXIS mode (LED is green)
In this mode, your wheel’s gas and brake controls function in “separate” mode, as do the 2 progressive
levers and the clutch pedal, which are independent:
Option 1
(with pedal set switch set to “2 L”)
- Axis 1 = X axis = Steering wheel
- Axis 2 = Y axis = Brake pedal
- Axis 3 = RZ axis = Gas pedal
- Axis 4 = Slider 1 axis = Progressive right lever
- Axis 5 = Slider 0 axis = Progressive left lever

6/12
Option 2
(with pedal set switch set to “3 P”)
- Axis 1 = X axis = Steering wheel
- Axis 2 = Y axis = Brake pedal
- Axis 3 = RZ axis = Gas pedal
- Axis 4 = Slider 1 axis = Disabled
- Axis 5 = Slider 0 axis = Clutch pedal
The exclusive 5 axis mode allows you to enjoy all of the advanced options offered in most simulation-type
racing games. For the first time ever, you can now manage these new functions “progressively” (as
opposed to digitally), providing full immersion for fans of car racing simulations!
Various examples:
- Assignment of the clutch pedal or progressive left lever to the “clutch” function
(in “manual gearshift with manual clutch” mode)
- Assignment of the progressive right lever or clutch pedal to the “handbrake” function
- Assignment of the progressive left lever to the “left interior view” function
- Assignment of the progressive right lever to the “right interior view” function
Note:
- When you select 2 axis mode, the LED is Orange.
- When you select 3 axis mode, the LED is Red.
- When you select 5 axis mode, the LED is Green.
If your game does not accept all 5 axes, switch your wheel to “3 axis” mode
(or “2 axis” mode, if the problem persists).
7/12
RE-CENTERING FUNCTION SETTING
Wheel re-centering (Auto-center) is disabled by default.
Most recent games now offer their own re-centering mode.
You are strongly advised to disable wheel re-centering (in most cases), to allow the game to handle it. The
Force Feedback will then be of greater quality.
When enabled, re-centering mode is especially useful in games that do not feature Force Feedback or
which use weak re-centering.
• Setting via “Software” (page 2 of the “Control Panel”)
- to disable re-centering, click “By the game”.
- to enable re-centering, click “By the wheel”.
In this mode, you can adjust re-centering intensity from 0 to 100%.
• Setting via “Hardware”
To enable or disable re-centering directly in your game, simply press your wheel’s Force button (6). When
enabled, the intensity of re-centering corresponds to the percentage selected previously in the “By the
wheel” setting of the “Control Panel”.
Note :
- When Auto-center is enabled, the LED flashes.
- When Auto-center is disabled, the LED does not flash
(Recommended mode for Force Feedback games)
FORCE FEEDBACK EFFECTS SETTING (page 2 of the “Control Panel”)
4 settings can be set from 0 to 150 %:
- Master Forces
- Static Forces
- Dynamic Forces
- Aggressiveness
PROGRAMMING THE “GEARBOX” (page 1 of the “Control Panel”)
This function allows you to “separate” (default mode) or “combine” the digital gearshift levers (1) and the
digital gearshift knob (2).
Note :
Always remember to completely close the “Control Panel” before staring your game!
You are now ready to play!
8/12
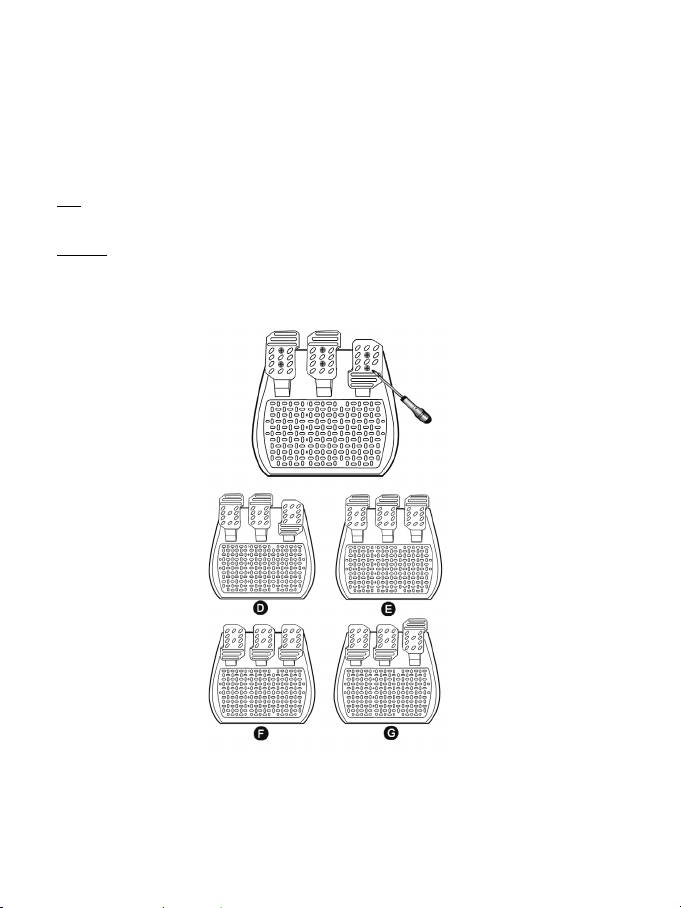
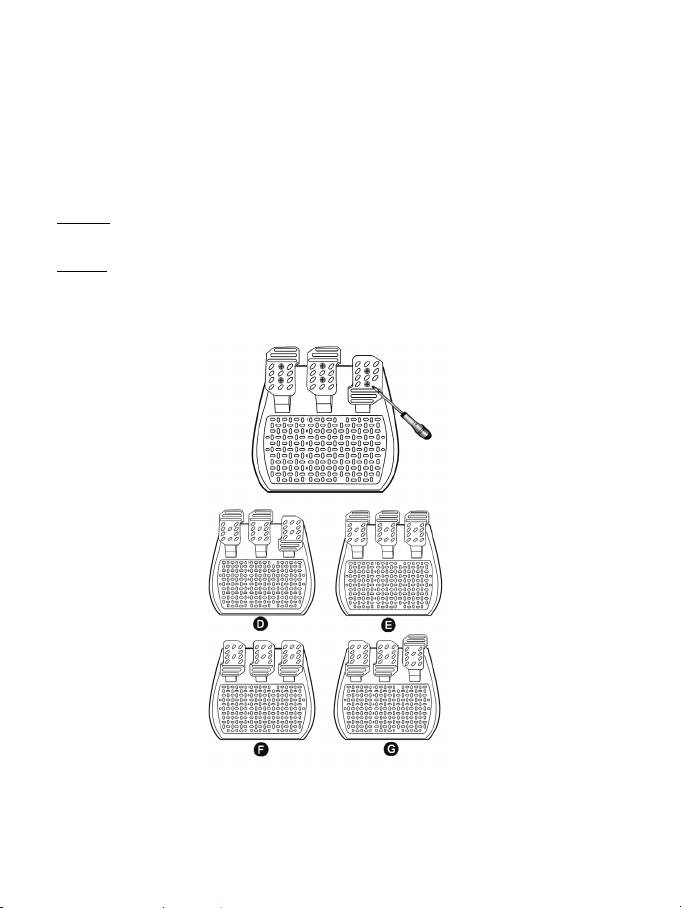
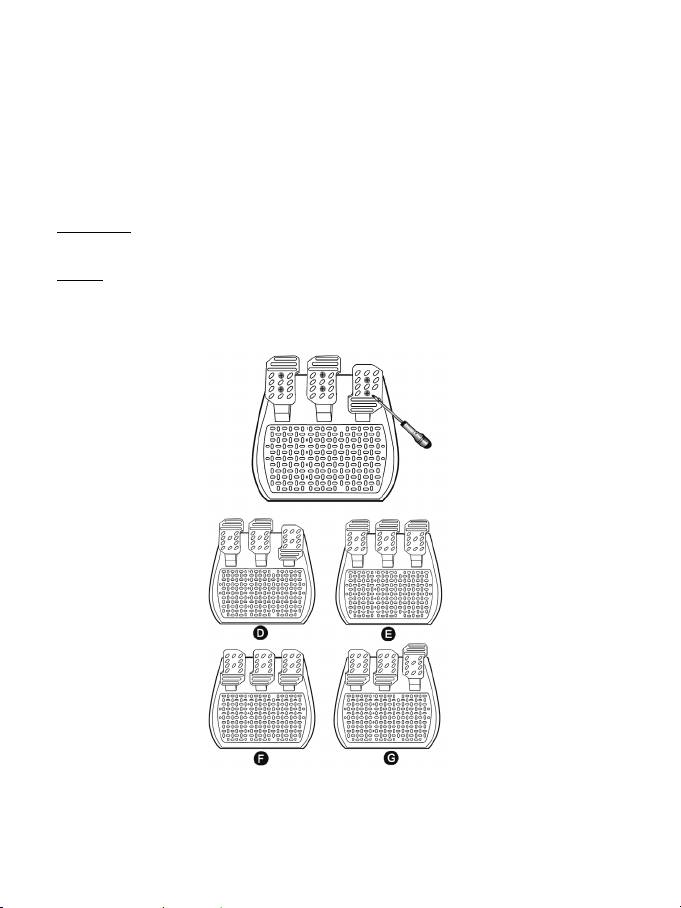
ADJUSTING THE PEDALS:
Each of the 3 aluminum pedals can be positioned to your liking in either a “Standard” or “Vertical” setting. This
adjustment allows you to adapt your pedal set not only to your style of driving (using “heel-and-toe style” or
not), but also to your seating position (“seat” or “cockpit “style).
1. Using a small screwdriver, unscrew the two screws (one short and one long) for the pedal you wish to
adjust.
2. Set the pedal into the position of your choice.
3. Replace the 2 screws.
Note: In the “Standard” position, place the large screw on the bottom; in the “Vertical” position, place the large
screw on top.
Examples: D = “Standard” gas / “Vertical” brake and clutch
E = “Vertical” gas, brake and clutch
F = “Standard” gas, brake and clutch
G = “Vertical” gas / “Standard” brake and clutch
9/12
TROUBLESHOOTING
- My wheel doesn’t work correctly or appears to be improperly calibrated. Switch off your PC,
completely disconnect your wheel, reconnect all the cables (including power adapter and pedal set),
switch your PC back on and restart the game.
If the calibration problem persists, download the “Thrustmaster Calibration Tool v 1.03 ” manual calibration
software available on our website: http://ts.thrustmaster.com
- My wheel moves by itself during the game. This is normal and is the re-centering function featured in
some games. To stop these movements, just place your hands on the wheel or reduce the Force
Feedback intensity.
- My wheel stays turned to one side (left or right) after launching a game. This is normal in some
games. The wheel will re-center itself once you have identified it as a wheel in the game’s setup options.
- My wheel is detected by my computer but doesn’t work in the game. Access your game’s options
interface to configure your wheel. Please refer to your game’s user manual or online help for more
information.
- My game doesn’t accept 5 axis mode.
Select 3 axis mode (or 2 axis mode, if the problem persists), then configure your wheel again in your
game’s options interface.
- Force Feedback doesn’t react properly.
In the Thrustmaster Control Panel, reset all forces to their default values (= to 100%) and disable
automatic re-centering (the LED should not be flashing).
In some games you will also have to reverse the forces (select “Negative Forces” in the game’s options or
set the slider to “-100%”). In other games forces should not be reversed (in this case select “Positive
Forces” or “+100%”).
- My pedals or levers are not functioning properly.
Your game does not accept the axis mode you have selected. Exit the game and select a new axis mode.
Re-launch the game and then configure your wheel again in your game’s options interface.
SAFETY RECOMMENDATIONS AND INFORMATION
- When connecting the wheel and during auto-calibration: to prevent any incorrect calibration,
never turn the wheel, press the pedals or buttons.
- When not in use for extended periods and to avoid any unwanted power consumption or
deterioration, disconnect the wheel’s power adapter. Reconnect it before going back to the
game.
- Your wheel features Force Feedback: NEVER leave the wheel within the reach of young
children, especially during the auto-calibration phases.
For safety reasons, never use the pedal set with bare feet or while wearing only socks
on your feet.
®
THRUSTMASTER
DISCLAIMS ALL RESPONSIBILITY IN THE EVENT OF INJURY RESULTING
FROM USE OF THE PEDAL SET WITHOUT SHOES.

10/12
TECHNICAL SUPPORT
If you encounter a problem with your product, please go to http://ts.thrustmaster.com and click Technical
Support. From there you will be able to access various utilities (Frequently Asked Questions (FAQ), the
latest versions of drivers and software) that may help to resolve your problem. If the problem persists,
you can contact the Thrustmaster products technical support service (“Technical Support”):
By email:
In order to take advantage of technical support by email, you must first register online. The information
you provide will help the agents to resolve your problem more quickly. Click Registration on the left-hand
side of the Technical Support page and follow the on-screen instructions. If you have already registered,
fill in the Username and Password fields and then click Login.
By telephone (if you do not have Internet access):
08450800942
United Kingdom
Monday to Saturday from 8 a.m. to 7 p.m.
Charged at local rate
1-866-889-5036
United States
Free
Monday to Friday from 9 a.m. to 8 p.m.
Saturday from 8 a.m. to 2 p.m.
(Eastern Standard Time)
Monday to Friday from 6 a.m. to 5 p.m.
Saturday from 5 a.m. to 11 a.m.
(Pacific Standard Time)
1-866-889-2181
Canada
Free
Monday to Friday from 9 a.m. to 8 p.m.
Saturday from 8 a.m. to 2 p.m.
(Eastern Standard Time)
Monday to Friday from 6 a.m. to 5 p.m.
Saturday from 5 a.m. to 11 a.m.
(Pacific Standard Time)
80887690
Monday to Saturday from 9 a.m. to 8 p.m.
Denmark
Free
(English)
0200884567
Monday to Saturday from 9 a.m. to 8 p.m.
Sweden
Free
(English)
0800 913060
Monday to Saturday from 10 a.m. to 9 p.m.
Finland
Free
(English)
Hours of operation and telephone numbers are subject to change. Please visit http://ts.thrustmaster.com
for the most up-to-date Technical Support contact information.

11/12
WARRANTY INFORMATION
Worldwide, Guillemot Corporation S.A. (“Guillemot”) warrants to the consumer that this Thrustmaster
product will be free from material defects and manufacturing flaws for a period of two (2) years from the
original date of purchase. Should the product appear to be defective during the warranty period,
immediately contact Technical Support, who will indicate the procedure to follow. If the defect is confirmed,
the product must be returned to its place of purchase (or any other location indicated by Technical
Support).
Within the context of this warranty, the consumer’s defective product will, at Technical Support’s option, be
either repaired or replaced. Where authorized by applicable law, the full liability of Guillemot and its
subsidiaries (including for indirect damages) is limited to the repair or replacement of the Thrustmaster
product. The consumer’s legal rights with respect to legislation applicable to the sale of consumer goods
are not affected by this warranty.
This warranty shall not apply: (1) if the product has been modified, opened, altered, or has suffered
damage as a result of inappropriate or abusive use, negligence, an accident, normal wear, or any other
cause not related to a material defect or manufacturing flaw; (2) in the event of failure to comply with the
instructions provided by Technical Support; (3) to software not published by Guillemot, said software being
subject to a specific warranty provided by its publisher.
Additional warranty provisions
In the United States of America and in Canada, this warranty is limited to the product’s internal mechanism
and external housing. Any applicable implied warranties, including warranties of merchantability and
fitness for a particular purpose, are hereby limited to two (2) years from the date of purchase and are
subject to the conditions set forth in this limited warranty. In no event shall Guillemot Corporation S.A. or
its affiliates be liable for consequential or incidental damage resulting from the breach of any express or
implied warranties. Some States/Provinces do not allow limitation on how long an implied warranty lasts or
exclusion or limitation of incidental/consequential damages, so the above limitation may not apply to you.
This warranty gives you specific legal rights, and you may also have other legal rights which vary from
State to State or Province to Province.
12/12
COPYRIGHT
© 2012 Guillemot Corporation S.A. All rights reserved. Thrustmaster® is a registered trademark of
Guillemot Corporation S.A. Windows® is a registered trademark of Microsoft Corporation in the United
States and/or other countries. Pentium® is a registered trademark of Intel Corporation. All other
trademarks and brand names are hereby acknowledged and are property of their respective owners.
Illustrations not binding. Contents, designs and specifications are subject to change without notice and
may vary from one country to another. Made in China.
TouchSense® Technology licensed from Immersion Corporation. Protected by one or more of the following
patents:
U.S. Patents: 5831408, 5844392, 5857986, 5907487, 5959613, 6020875, 6088017, 6104158, 6246390,
6252583, 6271833, 6275213, 6278439, 6343349, 6400352, 6411276, 6424333, 6715045, 6801008,
7131073, 7199790, 7209117, 7299321, 7327348, 7345672, and 7502011.
ENVIRONMENTAL PROTECTION RECOMMENDATION
At the end of its working life, this product should not be disposed of with standard
household waste, but rather dropped off at a collection point for the disposal of Waste
Electrical and Electronic Equipment (WEEE) for recycling.
This is confirmed by the symbol found on the product, user manual or packaging.
Depending on their characteristics, the materials may be recycled. Through recycling
and other forms of processing Waste Electrical and Electronic Equipment, you can
make a significant contribution towards helping to protect the environment.
Please contact your local authorities for information on the collection point nearest you.
Retain this information. Colours and decorations may vary.
This product conforms to all standards regarding children 14 years of age and older. This product is not
suitable for use by children less than 14 years of age.
www.thrustmaster.com
1/12
Manuel de l’utilisateur
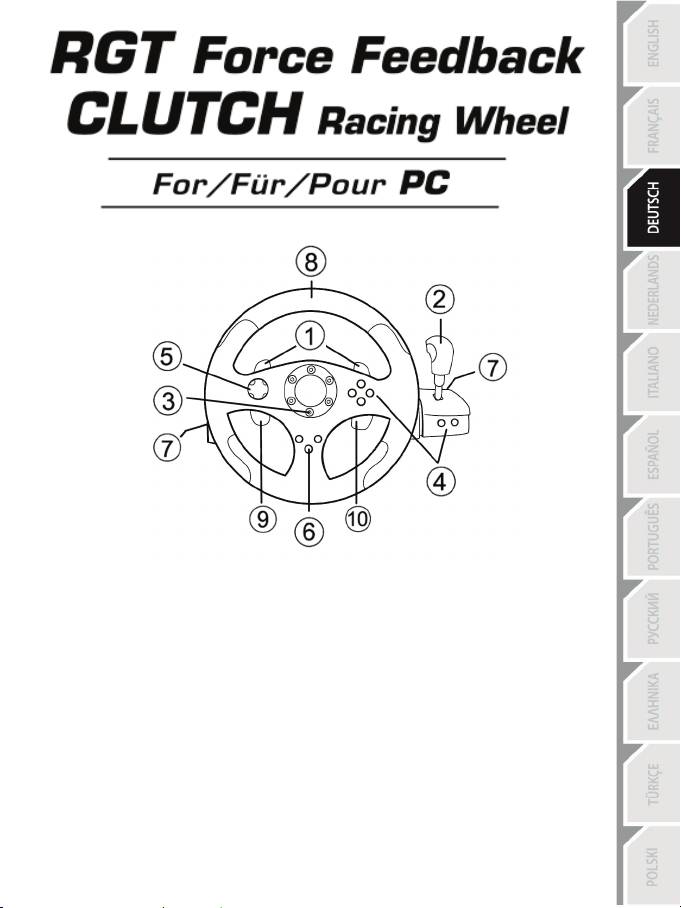
CARACTÉRISTIQUES TECHNIQUES
1 2 leviers numériques de changement de vitesse
2 Poignée numérique de changement de vitesse
3 Voyant lumineux Mode
4 Boutons d’actions numériques
5 Croix multidirectionnelle numérique
6 Bouton Force
7 2 Connecteurs pour le pédalier 3 pédales
8 Axe n° 1 : Roue du volant analogique
9 Axe n° 4 : Levier progressif gauche
10 Axe n° 5 : Levier progressif droit
2/12
11 Axe n° 4 : Pédale d’embrayage progressive
12 Axe n° 3 : Pédale de frein progressive
13 Axe n° 2 : Pédale d’accélération progressive
14 Système de fixation à la table
15 Connecteur USB PC
16 Câble du pédalier (avec bouton switch)
17 2 Connecteurs RJ45 pour le pédalier
18 Connecteur pour l’adaptateur secteur
19 Adaptateur secteur
INSTALLATION DU VOLANT
Fixer le volant
1. Placez le volant sur une table ou autre surface plane.
2. Placez la vis de serrage dans le système de fixation (14) puis vissez l’ensemble (dans le sens inverse
des aiguilles d’une montre) dans l’emplacement prévu, sous le volant, jusqu’à ce que ce dernier soit
parfaitement stable.
3/12
Relier le pédalier « 3 pédales » au volant
1. Branchez le câble n° 1 sur le connecteur n°1 situé derrière le volant
2. Branchez le câble n° 2 sur le connecteur n°2 situé derrière la poignée de vitesse
Utilisation du bouton « Switch »
Ce bouton qui est situé sur le câble du pédalier « 3 Pédales », vous permettra d’activer (ou de désactiver) à
n’importe quel moment (même en cours de jeu) :
ème
- soit la 3
pédale (C)
- soit les 2 palettes progressives situées derrière le volant.
Switch sur « 2 L » :
ème
Les 2 palettes progressives sont activées (et la 3
pédale désactivée).
Switch sur « 3 P »
La 3ème pédale est activée (et les 2 palettes progressives désactivées).
EN POSITION « 3 P », VOTRE VOLANT BASCULE AUTOMATIQUEMENT EN MODE « 5 AXES ».
Relier le volant
Reliez l’adaptateur secteur (19) au connecteur pour l’adaptateur (18) et branchez l’adaptateur sur le
secteur.

4/12
PLAYSTATION
3
Sur PlayStation®3, dans le menu général, utilisez votre manette officielle (et non votre volant) pour naviguer et
lancer vos jeux. Le volant ne sera fonctionnel qu’une fois le jeu lancé.
INSTALLATION SUR PC
Configuration requise : PC (Windows 98 SE, Me, 2000, XP, Vista et 7) équipé d'un port USB.
INSTALLATION DES PILOTES
Le CD-ROM fourni avec ce produit permet d'installer les pilotes Force Feedback.
1. Insérez le CD-ROM d'installation dans votre lecteur de CD-ROM. Suivez les instructions affichées à
l'écran pour installer les pilotes Force Feedback. Une fois l'installation terminée, cliquez sur Terminer
et redémarrez votre ordinateur.
2. Au redémarrage de l'ordinateur, reliez le connecteur USB (15) à l'un des ports USB de votre unité
centrale. Windows 98/Me/2000/XP/7 détectera automatiquement le nouveau périphérique. (Si vous
branchez un périphérique USB pour la première fois, il est possible que, pendant l'installation,
Windows vous demande d'insérer le CD-ROM Windows afin d'installer les fichiers système
nécessaires.)
3. Installation des pilotes :
Windows 98 : l'Assistant Ajout de nouveau matériel se charge de rechercher pour vous les pilotes
appropriés. Cliquez sur Suivant. Suivez les instructions affichées à l'écran pour terminer l'installation.
Windows Me/2000/XP/7 : l'installation des pilotes est automatique.
4. Sélectionnez Démarrer/Tous les programmes/Thrustmaster/Force Feedback driver/Control
Panel.
La boîte de dialogue Contrôleurs de jeu affichera le nom du volant avec l'état OK.
5. Dans le Control Panel, cliquez sur « Propriétés » pour configurer votre volant :
• Page 1 = Test du périphérique : vous permet de tester et visualiser les boutons, la croix
multidirectionnelle et les 5 axes (volant, pédale de frein, pédale d’accélération, pédale
d’embrayage, leviers progressifs gauche et droit).
• Page 2 = Tester les forces : vous permet de tester 8 effets de Force et de configurer le réglage
des effets de ForceFeedback et des effets d’Autocentrage.
CALIBRAGE AUTOMATIQUE DU VOLANT ET DES PEDALES
La roue du volant s’autocalibre de manière automatique une fois l’adaptateur secteur et le connecteur
USB connectés. (Cette opération entraîne des mouvements du volant.) Les pédales se calibrent
également automatiquement après quelques pressions.
Il vous est également possible d’effectuer une calibration manuelle en téléchargeant le logiciel
« Thrustmaster Calibration Tool v 1.03 » disponible à cette adresse : http://ts.thrustmaster.com

5/12
SELECTION DES AXES (2, 3 ou 5 AXES)
• Sélection des axes par « Software » (dans la page 1 du « Control Panel »)
Cliquez sur le mode désiré puis sur Ok.
• Sélection des axes par « Hardware »
Appuyez simultanément sur les 2 pédales accélérateur et frein et sur le bouton force (12) + (13) + (6)
Le choix par hardware doit toujours être effectué en dehors du control panel !
Il vous permettra de choisir votre mode directement dans les options « Contrôles » de votre jeu.
LA SELECTION DES AXES PAR « HARDWARE » EST UNIQUEMENT DISPONIBLE
LORSQUE LE BOUTON SWITCH DE VOTRE PEDALIER EST EN POSITION « 2 L ».
• Mode 2 AXES (voyant lumineux orange)
Dans ce mode, les commandes d’accélérateur et de frein de votre volant fonctionnent en mode
« combiné » (et sont couplées avec les 2 leviers progressifs) :
- L’axe 1 = Axe X (Roue du volant)
- L’axe 2 = Axe Y (Pédales / Leviers progressif)
• Mode 3 AXES (voyant lumineux rouge)
Dans ce mode, les commandes d’accélérateur et de frein de votre volant fonctionnent en mode
« séparé » :
- les pédales sont couplées avec les 2 leviers progressifs (si le switch est sur « 2 L »),
- la pédale d’embrayage est couplée avec la pédale de frein (si le switch est sur « 3 L »).
- L’axe 1 = Axe X (Roue du volant)
- L’axe 2 = Axe Y (Pédale de frein / Levier progressif gauche / Pédale d’embrayage
- L’axe 3 = Axe RZ (Pédale d’accélérateur /Levier progressif droit)
• Mode 5 AXES (voyant lumineux vert)
Dans ce mode, les commandes d’accélérateur et de frein de votre volant fonctionnent en mode « séparé »
ainsi que les 2 leviers progressifs et la pédale d’embrayage qui sont alors indépendants.
Possibilité 1
(lorsque le switch du pédalier est sur « 2 L »)
- L’axe 1 = Axe X = Roue du volant
- L’axe 2 = Axe Y = Pédale de frein
- L’axe 3 = Axe RZ = Pédale d’accélérateur
- L’axe 4 = Axe Slider 1 = Levier progressif droit
- L’axe 5 = Axe Slider 0 = Levier progressif gauche

6/12
Possibilité 2
(lorsque le switch du pédalier est sur « 3 P »)
- L’axe 1 = Axe X = Roue du volant
- L’axe 2 = Axe Y = Pédale de frein
- L’axe 3 = Axe RZ = Pédale d’accélérateur
- L’axe 4 = Axe Slider 1 = Non actif
- L’axe 5 = Axe Slider 0 = Pédale d’embrayage
Le mode exclusif 5 axes vous permettra de profiter de l’ensemble des options avancées proposées dans
la plupart des jeux de course de type simulation. Vous pourrez alors gérer, pour la toute première fois, ces
nouvelles fonctions de manière « progressive » (et non plus numérique). L’immersion sera alors
totale pour les fans de simulation automobile !
Exemples divers :
- Attribution de la pédale d’embrayage ou du levier progressif gauche à la fonction « embrayage »
(en mode « vitesse manuelle avec embrayage manuel »)
- Attribution du levier progressif droit ou de la pédale d’embrayage à la fonction « frein à main »
- Attribution du levier progressif gauche à la fonction « vue intérieure gauche »
- Attribuer le levier progressif droite à la fonction « vue intérieure droite »
Remarque :
- Lorsque vous sélectionnez le mode 2 axes, le voyant lumineux est Orange.
- Lorsque vous sélectionnez le mode 3 axes le voyant lumineux est Rouge
- Lorsque vous sélectionnez le mode 5 axes le voyant lumineux est Vert
Si votre jeu n’accepte pas l’ensemble des « 5 axes »,
basculez alors votre volant en mode « 3 axes » (ou « 2 axes » si le problème persiste).
7/12
REGLAGE DE LA FONCTION AUTOCENTRAGE
Par défaut, l’autocentrage du volant est désactivé.
La plupart des jeux récents proposent leur propre mode d’auto-centrage.
Il est donc fortement conseillé (dans la majorité des cas) de désactiver l’auto-centrage du volant, pour
laisser le jeu le gérer. Le Force Feedback sera alors de meilleure qualité.
Le mode auto-centrage activé sera surtout utile dans les jeux n’utilisant pas de Force Feedback ou
utilisant un faible retour au centre.
• Réglage par « Software » (dans la page 2 du « Control Panel »)
- pour désactiver l’auto-centrage, cliquez sur « Via le jeu ».
- pour activer l’auto-centrage, cliquez sur « Via le volant ».
Dans ce mode, vous pouvez régler l’intensité du retour au centre de 0 à 100 %.
• Réglage par « Hardware »
Pour activer ou désactiver l’auto-centrage directement dans votre jeu, appuyez simplement sur le bouton
Force (6) de votre volant. En mode activé, l’intensité du retour au centre correspondra au pourcentage
attribué précédemment au paramètre « Via le volant » dans le « Control Panel ».
Remarque :
- Auto-centrage activé, le voyant lumineux clignote.
- Auto-centrage désactivé, le voyant lumineux ne clignote pas.
(Mode conseillé dans les jeux ForceFeedback)
REGLAGE DES EFFETS FORCE FEEDBACK (dans la page 2 du « Control Panel »)
4 réglages possibles de 0 à 150 % :
- Forces principales
- Forces statiques
- Forces dynamiques
- Agressivité
PROGRAMMATION DE LA « BOITE DE VITESSE » (dans la page 1 du « Control Panel »)
Cette fonction vous permettra de « séparer » (mode par défaut) ou de « combiner » les leviers
numériques de changement de vitesse (1) et la poignée numérique de changement de vitesse (2).
Remarque :
Pensez à toujours fermer complètement le « Control Panel » avant de lancer votre jeu !
Vous êtes maintenant prêt à jouer !
8/12
REGLAGE DES PEDALES :
Chacune des 3 pédales aluminium peut être positionnée à votre convenance soit de manière « classique » soit
de manière « verticale ». Ce réglage vous permettra non seulement d’adapter votre pédalier à votre style de
conduite (type « talon-pointe » ou non) mais également à votre poste de conduite (type « chaise » ou
« cockpit »).
1. A l’aide d’un petit tournevis, dévissez les 2 vis (une courte et une longue) de la pédale que vous désirez
régler.
2. Retournez votre pédale dans la position désirée.
3. Revissez les 2 vis.
Remarque :: en position « classique », la grande vis se place en bas ; en position « verticale », elle se place en
haut.
Exemples :: D = Accélérateur « classique » / frein & embrayage « verticaux »
E = Accélérateur, frein & embrayage « verticaux »
F = Accélérateur, frein & embrayage « classiques »
G = Accélérateur «vertical » / frein & embrayage « classiques »
9/12
DEPANNAGE
- Mon volant ne fonctionne pas correctement ou semble mal calibré. Eteignez votre ordinateur,
déconnectez entièrement votre volant, reconnectez tous les câbles (avec l’adaptateur secteur et le
pédalier), redémarrez et relancez votre jeu.
Si le problème de calibration persiste, télécharger le logiciel de calibration manuel « Thrustmaster
Calibration Tool v 1.03 » disponible à cette adresse : http://ts.thrustmaster.com
- Mon volant bouge tout seul dans le jeu. Ceci est normal, il s'agit de la fonction d’auto-centrage
disponible dans certains jeux. Pour arrêter ces mouvements, il suffit de placer ses mains sur le volant ou
de diminuer l’intensité du ForceFeedback.
- Mon volant reste bloqué d'un coté (gauche ou droite) après le lancement du jeu. Ceci est normal
dans certains jeux. Il se recentrera de lui-même dès que vous l'aurez déclaré en tant que volant dans le
chapitre Options du jeu.
- Mon volant est détecté par mon ordinateur, mais ne fonctionne pas avec mon jeu. Ouvrez
l’interface de gestion des options de votre jeu pour configurer votre volant.). Reportez-vous au manuel de
l’utilisateur ou à l’aide en ligne de votre jeu pour plus d’informations.
- Mon jeu n’accepte pas le mode 5 axes
Choisissez alors le mode 3 axes (voire le mode 2 axes si le problème persiste) puis configurez de
nouveau votre volant dans l’interface de gestion des options de votre jeu.
- Le Force Feedback ne réagit pas correctement
Dans le control panel Thrustmaster, remettez l’ensemble des forces à leur valeur par défaut (100 %) et
désactivez l’auto-centrage. (La led ne doit pas clignoter.)
Dans certains jeux il est également nécessaire d’inverser les forces (choisissez alors dans les options du
jeu « Forces négatives » ou positionnez le curseur sur « - 100 % »). Dans d’autres jeux, les forces ne
doivent pas être inversées (dans ce cas, choisissez « Forces positive » ou « + 100 % »).
- Mon pédalier ou mes leviers ne fonctionnent pas correctement.
Votre jeu n’accepte pas le type d’axe que vous avez sélectionné. Quittez alors le jeu et sélectionnez un
nouveau mode pour les axes. Relancez le jeu puis configurez de nouveau votre volant dans l’interface de
gestion des options de votre jeu.
PRÉCONISATIONS ET INFORMATIONS RELATIVES À LA SÉCURITÉ
- Lors de la connexion de votre volant et pendant la phase d’auto-calibration : pour éviter
toute mauvaise calibration, ne tournez jamais le volant, n'appuyez pas sur les pédales ou sur les
boutons.
- Lors des périodes prolongées d’inactivité et pour éviter toute consommation inutile
d’énergie ou tout détérioration, débranchez l’adaptateur secteur du volant. Rebranchez-le
avant de reprendre la partie.
- Votre volant est à retour de force : Ne laissez jamais votre volant à la portée des jeunes
enfants surtout lors des phases d’auto-calibration.
Pour des raisons de sécurité, ne jouez pas pieds nus ou en chaussettes lorsque vous utilisez le
pédalier.
®
THRUSTMASTER
DECLINE TOUTE RESPONSABILITE EN CAS DE BLESSURE SUITE A UNE
UTILISATION DU PEDALIER SANS CHAUSSURES.

10/12
Support technique
Si vous rencontrez un problème avec votre produit, rendez-vous sur le site http://ts.thrustmaster.com et cliquez sur Support
Technique. Vous aurez alors accès à différents services (Foire Aux Questions (FAQ), dernières versions des pilotes et
logiciels) susceptibles de résoudre votre problème. Si le problème persiste, vous pouvez contacter le support technique des
produits Thrustmaster (« Support Technique ») :
Par e-mail :
Pour bénéficier du support technique par e-mail, vous devez d’abord vous enregistrer en ligne. Les informations fournies vont
permettre aux techniciens de résoudre plus rapidement votre problème. Cliquez sur Enregistrement à gauche de la page
Support technique et suivez les instructions à l’écran. Si vous êtes déjà enregistré, renseignez les champs Nom d’utilisateur et
Mot de passe puis cliquez sur Connexion.
Par téléphone (si vous n’avez pas d’accès Internet) :
Du lundi au samedi de 7h à 14h
1-866-889-2181
(Heure de l’Est)
Canada
Gratuit
Du lundi au samedi de 4h à 11h
(Heure du Pacifique)
02 99 93 21 33
France
Numéro fixe France Telecom non surtaxé.
Du lundi au samedi de 9h à 20h
Tarif selon opérateur
0842 000 022
Suisse
Du lundi au samedi de 9h à 20h
Tarif d’une communication locale
078 16 60 56
Belgique
Du lundi au samedi de 9h à 20h
Tarif d’une communication nationale
80028612
Luxembourg
Du lundi au samedi de 9h à 20h
Gratuit
Horaires et numéros de téléphone susceptibles de changer. Veuillez consulter http://ts.thrustmaster.com pour obtenir une liste à
jour.

11/12
INFORMATIONS RELATIVES À LA GARANTIE
Dans le monde entier, Guillemot Corporation S.A. (« Guillemot ») garantit au consommateur que le présent
produit Thrustmaster est exempt de défauts matériels et de vices de fabrication, et ce, pour une période de
deux (2) ans à compter de la date d’achat d’origine. Si, au cours de la période de garantie, le produit semble
défectueux, contactez immédiatement le Support Technique qui vous indiquera la procédure à suivre. Si le
défaut est confirmé, le produit devra être retourné à son lieu d’achat (ou tout autre lieu indiqué par le
Support Technique).
Dans le cadre de la garantie, le consommateur bénéficiera, au choix du Support Technique, du
remplacement ou de la réparation du produit défectueux. Lorsque la loi applicable l’autorise, toute
responsabilité de Guillemot et ses filiales (y compris pour les dommages indirects) se limite à la réparation
ou au remplacement du produit Thrustmaster. Les droits légaux du consommateur au titre de la législation
applicable à la vente de biens de consommation ne sont pas affectés par la présente garantie.
Cette garantie ne s’appliquera pas : (1) si le produit a été modifié, ouvert, altéré, ou a subi des dommages
résultant d’une utilisation inappropriée ou abusive, d’une négligence, d’un accident, de l’usure normale, ou
de toute autre cause non liée à un défaut matériel ou à un vice de fabrication ; (2) en cas de non-respect
des instructions du Support Technique ; (3) aux logiciels non-édités par Guillemot, lesdits logiciels faisant
l’objet d’une garantie spécifique accordée par leurs éditeurs.
Stipulations additionnelles à la garantie
Aux États-Unis d’Amérique et au Canada, cette garantie est limitée au mécanisme interne et au boîtier
externe du produit. Toute garantie implicite applicable, incluant les garanties de qualité marchande ou
d’adaptation à un usage particulier, est limitée à deux (2) ans à compter de la date d’achat et soumise aux
conditions de la présente garantie limitée. En aucun cas, Guillemot Corporation S.A. ou ses sociétés
affiliées ne sauraient être tenues responsables envers qui que ce soit de tous dommages indirects ou
dommages accessoires résultant du non-respect des garanties expresses ou implicites. Certains
États/Provinces n’autorisent pas la limitation sur la durée d’une garantie implicite, ou l’exclusion ou la
limitation de responsabilité pour les dommages indirects ou accessoires, de sorte que les limitations ou
exclusions ci-dessus peuvent ne pas vous être applicables. Cette garantie vous confère des droits
spécifiques ; vous pouvez également bénéficier d’autres droits qui peuvent différer d’un État/Province à l’autre.
12/12
COPYRIGHT
© 2012 Guillemot Corporation S.A. Tous droits réservés. Thrustmaster® est une marque déposée de Guillemot
Corporation S.A. Windows® est une marque déposée de Microsoft Corporation aux Etats-Unis et/ou dans
d’autres pays. Pentium® est une marque déposée d’Intel Corporation. Toutes les autres marques déposées et
noms commerciaux sont reconnus par les présentes et sont la propriété de leurs propriétaires respectifs.
Illustrations non contractuelles. Le contenu, la conception et les spécifications sont susceptibles de changer
sans préavis et de varier selon les pays. Fabriqué en Chine.
Technologie TouchSense® sous licence de Immersion Corporation. Protégée par un ou plusieurs des brevets
ci-après :
Brevets américains : 5831408, 5844392, 5857986, 5907487, 5959613, 6020875, 6088017, 6104158, 6246390,
6252583, 6271833, 6275213, 6278439, 6343349, 6400352, 6411276, 6424333, 6715045, 6801008, 7131073,
7199790, 7209117, 7299321, 7327348, 7345672 et 7502011.
RECOMMANDATION RELATIVE A LA PROTECTION DE L’ENVIRONNEMENT
En fin de vie, ce produit ne doit pas être éliminé avec les déchets ménagers normaux mais
déposé à un point de collecte des déchets d'équipements électriques et électroniques en
vue de son recyclage.
Ceci est confirmé par le symbole figurant sur le produit, le manuel utilisateur ou
l’emballage.
En fonction de leurs caractéristiques, les matériaux peuvent être recyclés. Par le recyclage
et par les autres formes de valorisation des déchets d'équipements électriques et
électroniques, vous contribuez de manière significative à la protection de l’environnement.
Veuillez consulter les autorités locales qui vous indiqueront le point de collecte concerné.
Informations à conserver. Les couleurs et décorations peuvent varier.
Ce produit est en conformité avec l’ensemble des normes relatives aux enfants de plus de 14 ans. Il ne
convient pas aux enfants de moins de 14 ans.
www.thrustmaster.com
1/12
Benutzerhandbuch
TECHNISCHE FEATURES
1 2 digitale Schalthebel
2 Digitaler Schaltknüppel
3 Mode LED
4 Digitale Actionbuttons
5 Digitales D-pad
6 Force Button
7 2 Buchsen für das 3 Pedale Pedalset
8 Achse 1: Analoges Steuer
9 Achse 4: Progressiver, linker Hebel
10 Achse 5: Progressiver, rechter Hebel

2/12
11 Achse 4: Progressives Kupplungspedal
12 Achse 3: Progressives Bremspedal
13 Achse 2: Progressives Gaspedal
14 Tischklemme
15 USB PC Stecker
16 Pedalsetkabel (mit Schalter)
17 2 RJ45 Buchsen für das Pedalset
18 Netzteilanschluß
19 Netzteil
INSTALLATION DES LENKERS
Befestigung des Lenkers am Platz
1. Plazieren Sie den Lenker auf dem Tisch oder einer flachen Unterlage.
2. Stecken Sie die Kammerschraube in die Tischklammer (14) und drehen diese in Uhrzeigerrichtung in
das Gewinde an der Unterseite des Lenkers, bis alles fest fixiert ist.
3/12
Verbinden des “3 Pedale” Pedalsets:
Ziehen Sie den USB Stecker des Lenkers aus der USB Buchse Ihres Computers.
1. Verbinden Sie Kabel 1 mit der Buchse1 an Ihrer Lenkerrückseite.
2. Verbinden Sie Kabel 2 mit der Buchse 2 zu finden hinter dem Schaltknüppelknopf.
Gebrauch des Schalters
Der Schalter, zu finden am Kabel des “3 Pedale” Pedalsets, gestattet Ihnen, das dritte Pedal (c), resp. die
beiden progressiven Schalthebel (zu finden hinter dem Lenker) jederzeit (auch während eines Spiels)
zu aktivieren/deaktivieren.
Schalter auf “2 L” = Die beiden progressiven Schalthebel sind aktiviert (das dritte Pedal deaktiviert)
Schalter auf “3 P” = Das dritte Pedal ist aktiviert (die beiden progressiven Schalthebel sind deaktiviert)
IN DER “3 P” POSITION, SCHALTET DER LENKER AUTOMATISCH IN DEN „5 ACHSEN MODE“.
Stromanschluß Lenkrad
Das Netzteil (19) mit der Strombuchse (18) verbinden und in eine Steckdose stecken.

4/12
PLAYSTATION
3
Das Hauptmenü der PlayStation®3 kann mit dem offiziellen Gamepad (und nicht Ihr Lenkrad) gesteuert
werden, um zu navigieren und Spiele zu starten. Das Lenkrad kann verwendet werden, sobald das Spiel
gestartet wurde.
INSTALLATION FÜR PC
Systemanforderungen: PC (Windows 98 SE, Me, 2000, XP, Vista oder 7) mit einem USB Port.
Installation der Treiber
Mittels der beiliegenden CD-ROM können Sie die Force Feedback Treiber für Ihr Gerät installieren.
1. Legen Sie die Installations-CD-ROM in Ihr CD-ROM Laufwerk. Folgen Sie den
Bildschirmanweisungen, um die Force Feedback Treiber zu installieren. Nach Beendigung der
Installation Fertig klicken und den Computer neu starten.
2. Nach dem Neustart, den USB Stecker (12) in einen freien USB Port stecken. Windows
98/Me/2000/XP/Vista/7 erkennt automatisch das neue Gerät. (Sollten Sie zum ersten Mal ein USB
Gerät an Ihren Computer anschließen, könnte Windows nach der Windows Installations-CD-ROM
fragen, um die erforderlichen Systemdateien zu kopieren.)
3. Treiberinstallation:
Windows 98: Der Hardwareassistent sucht nach den erforderlichen Treibern. Nächste klicken.
Folgen Sie den Bildschirmanweisungen, um die Installation zu vollenden.
Windows Me/2000/XP/Vista/7: Die Treiber werden automatisch installiert.
4. Auswählen: Start/Einstellungen/Systemsteuerung, dann Doppelklick auf Game Controller (oder
Spieloptionen, je nach Betriebssystem).
Die Game Controller Dialogbox zeigt den Namen des Gamepads mit OK Status an.
5. Im Kontrollfenster, Eigenschaften anklicken, um das Gamepad zu konfigurieren:
• Seite 1 = Test Eingänge: Testen und Beobachtung der Buttons, D-pad und der 5 Achsen (Lenker,
Bremspedal, Gaspedal, Kupplungspedal, linke und rechte, progressive Schalter).
• Seite 2 = Test Forces: Test der 8 Forceeffekte und deren Konfiguration, sowie automatische
Recentereinstellungen.
AUTOMATISCHE KALIBRIERUNG DES LENKERS UND DER PEDALE
Der Lenker kalibriert sich automatisch nach dem Anschluß an die Stromversorgung und der Verbindung
via USB (dabei führt der Lenker von allein verschiedenen Bewegungen aus). Die Pedale kalibrieren sich
automatisch nachdem diese ein paarmal betätigt wurden..
Sie können auch eine manuelle Kalibrierung vornehmen. Dazu laden Sie sich bitte die “Thrustmaster
Calibration Tool v 1.03” Software von unserer Website:
http://ts.thrustmaster.com
herunter.
5/12
ACHSENSELEKTION (2, 3 oder 5 Achsen)
• ACHSENSELEKTION via “Software” (Seite 1 des “Control Panel”)
Anklicken des gewünschten Modus und mit OK bestätigen.
• ACHSENSELEKTION via “Hardware”
Gas-, Bremspedale und den Force Button gleichzeitig (13) + (12) + (6).betätigen. Die Achsenselektion via
Hardware muß immer ohne das Control Panel durchgeführt werden! Dies gestattet die Auswahl des
entsprechenden Modus direkt in den “Control Options” des jeweiligen Spiels.
ACHSENSELEKTION VIA “HARDWARE” IIST NUR VERFÜGBAR WENN SICH DER SCHALTER DES
PEDALSETS IN DER POSITION “2 L” BEFINDET
• 2 ACHSENMODUS (LED ist orange)
In diesem Modus sind die Gas- und Bremskontrollfunktionen im „kombinierten“ Modus (und sind
kombiniert mit den beiden progressiven Schalthebeln):
- Achse 1 = X Achse (Lenkrad)
- Achse 2 = Y Achse (Pedale/progressive Schalthebel)
• 3 ACHSENMODUS (LED ist rot)
In diesem Modus sind Gas und Bremse in „separatem“ Modus.
= die Pedale sind mit den 2 progressiven Schalthebeln verbunden(Schalter auf “2 L”)
= das Kupplungs- ist mit dem Bremspedal verbunden (Schalter auf “3 P”)
- Achse 1 = X Achse (Lenker)
- Achse 2 = Y Achse (Bremspedal / Progressiver linker Schalthebel/Kupplungspedal)
- Achse 3 = RZ Achse (Gaspedal / Progressiver rechter Schalthebel)
• 5 ACHSENMODUS (LED ist grün)
In diesem Modus sind Gas und Bremse in „separatem“ Modus, genau wie die 2 progressiven Schalthebel
levers und die Kupplung, die ebenfalls unabhängig sind.
Option 1
(Pedalsetschalter auf “2 L”)
- Achse 1 = X Achse = Lenker
- Achse 2 = Y Achse = linkes Pedal
- Achse 3 = RZ Achse = rechtes Pedal
- Achse 4 = Slider 1 Achse = Progressiver, rechter Schalthebel
- Achse 5 = Slider 0 Achse = Progressiver, linker Schalthebel

6/12
Option 2
(Pedalsetschalter auf “3 P”)
- Achse 1 = X Achse = Lenker
- Achse 2 = Y Achse = Bremspedal
- Achse 3 = RZ Achse = Gaspedal
- Achse 4 = Schieberegler 1 Achse = Deaktiviert
- Achse 5 = Schieberegler 0 Achse = Kupplungspedal
Der exklusive fünfachsige Modus gestattet Ihnen den Genuß aller erweiterten Funktionen in den meisten
Rennsimulationen. Zum ersten Mal können Sie nun diese Funktionen „progressiv“ handhaben (im
Gegensatz zu digital) und tief in Ihre Rennsimulationen eintauchen!
Verschiedene Beispiele:
- Belegung des Kupplungspedals oder des progressiven, linken Schalthebels mit der „Kupplungs-“
Funktion (im “manuelles Schalten mit manueller Kupplung” Modus)
- Belegung des progressiven, rechten Schalthebels oder Kupplungspedals mit der „Handbremsen“
Funktion.
- Belegung des progressiven, linken Schalthebels mit der Funktion „linke Innenansicht“.
- Belegung des progressiven, rechten Schalthebels mit der Funktion „rechte Innenansicht“.
Anmerkung:
- Ist der 2 Achsenmodus gewählt, ist die LED Orange.
- Ist der 3 Achsenmodus gewählt, ist die LED Rot.
- Ist der 5 Achsenmodus gewählt, ist die LED Grün.
Falls Ihr Spiel den 5 Achsen Modus nicht akzeptiert, schalten Sie bitte in den 3 Achsen Modus um
(oder wenn das Problem weiterhin besteht in den 2 Achsen Modus).
7/12
REZENTRIERUNGSFUNkTION
Die Lenker-Rezentrierung (Autozentrierung) ist werksseitig deaktiviert.
Die meisten, neueren Spiele bieten ihren eigenen Rezentrierungsmodus an.
Es ist dringend angeraten (in den meisten Fällen) die REZENTRIERUNGSFUNkTION ZU
DEAKTIVIEREN und das Spiel diese Funktion durchführen zu lassen. Dadurch sind die Force Feedback
Effekte qualitativ wesentlich besser.
Eine Aktivierung ist nur dann sinnvoll, wenn ein Spiel kein Force Feedback unterstützt oder die
Rezentrierungsfunktion labil ist.
Einstellung via “Software” (Seite 2 des “Control Panel”)
- Deaktivieren Rezentrierung: “Durch Spiel” anklicken
- Aktivieren Rezentrierung: “Durch Lenker” anklicken
In diesem Modus können Sie die Rezentrierungsintensität von 0 bis 100% justieren.
• Einstellung via “Hardware”
Zum aktivieren/deaktivieren der Rezentrierung direkt im Spiel einfach den Force Button am Lenker
drücken (6). Nach der Aktivierung korrespondiert die Intensität der rezentrierung zu der Prozentzahl, die
vorher im „Control Panel“ eingestellt wurde.
Anmerkung :
- Rezentrierung ist aktiviert: Die LED blinkt.
- Rezentrierung ist deaktiviert: Die LED blinkt nicht. (Empfohlener Modus für Force Feedback Spiele)
EINSTELLUNG FORCE FEEDBACK EFFEKTE (Seite 2 “Control Panel”)
4 Einstellungen von 0 bis 150 % können gesetzt werden:
- Master Forces
- Statische Forces
- Dynamische Forces
- Aggressiv
PROGRAMMIERUNG DER “GETRIEBE” (Seite 1 “Control Panel”)
Diese Funktion erlaubt eine “Separierung” (voreingestellt) oder “Kombination” der digitalen Schalthebel (1)
und des digitalen Schaltknopfes (2).
Anmerkung :
Bitte das “Control Panel” vor einem Spielstart immer komplett beenden und schließen!
Nun können Sie mit dem Spiel loslegen!
8/12
JUSTIEREN DER PEDALE:
Jedes der 3 Aluminumpedale kann nach Ihren Vorlieben positioniert werden - “Standard” oder “Vertikal”
Einstellung. Diese Justierung erlaubt Ihnen das Pedalset nicht nur an Ihr Fahrverhalten (z. B. „Hacke –
Spitze“ Stil) anzupassen, sondern auch an Ihre Sitzposition (normaler Sitz oder „Cockpit“ Stil).
Benutzen Sie bitte einen kleinen Schraubenzieher, um die beiden Schrauben (eine kurz, eine lang) für die
Pedale zu lösen, die Sie justieren wollen.
1. Bringen Sie die Pedale in die gewünschte Position.
2. Setzen Sie die Schrauben wieder ein und ziehen diese fest.
Bitte beachten: In der “Standard” Position, schrauben Sie die lange Schraube unten ein; in der “Vertikal”
Position, schrauben Sie die lange Schraube bitte oben ein.
Beispiele: D = “Standard” Gas / “Vertikal” Bremse und Kupplung
E = “Vertikal” Gas, Bremse und Kupplung
F = “Standard” Gas, Bremse und Kupplung
G = “Vertikal” Gas / “Standard” Bremse und Kupplung
9/12
PROBLEMLÖSUNGEN
- Mein Lenker funktioniert nicht richtig oder ist falsch kalibriert. Schalten Sie den Computer aus.
Stöpseln Sie das Lenkrad vom Computer aus. Entfernen Sie alle Anschlüsse (inkl. Netzteil, und Pedalset)
am Lenker. Wieder alles einstöpseln und den Computer wieder starten. Starten des Spiels. Sollte das
Problem weiterhin bestehen, laden Sie sich bitte die “Thrustmaster Calibration Tool v 1.03” Software von
unserer Website:
http://ts.thrustmaster.com
herunter.
- Der Lenker bewegt sich von selbst während des Spiels.
Dies ist normal und ist die Rezentrierfunktion mancher Spiele. Um derartige Bewegungen zu stoppen,
legen Sie einfach die Hände auf den Lenker oder reduzieren die Force Feedback Intensität.
- Mein Lenker ist nach dem Start eines Spiels auf eine Seite (links oder rechts) gedreht. Dies ist
normal in einigen Spielen. Der Lenker rezentriert sich automatisch, wenn Sie ihn in den Setup-Optionen
des Spiels als Lenkrad identifiziert haben.
- Der Lenker wurde vom Computer erkannt aber funktioniert nicht im Spiel.
Gehen Sie in das Optionsinterface des Spiels, um den Lenker zu konfigurieren. Lesen Sie für mehr
Optionen im Handbuch des Spiels nach oder benutzen sie dessen Online-Hilfe.
- Mein Spiel akzeptier keinen 5 Achsen Modus.
Schalten Sie bitte in den 3 Achsen Modus um (oder wenn das Problem weiterhin besteht in den 2 Achsen
Modus) danach konfigurieren Sie den Lenker via Optionsmenü des Spiels erneut.
- Force Feedback reagiert nicht ordnungsgemäß.
Im Thrustmaster Control Panel, alle Forces auf die voreingestellten Werte zurücksetzen (=100%) und die
automatische Rezentrierung deaktivieren (die LED darf nicht blinken).
In einigen Spielen müssen Sie die Forces umkehren (Auswahl: Negative Forces in Spieloptionen oder den
Schieberegler auf „-100%“). In anderen Spielen wiederum, müssen die Forces nicht umgekehrt werden.
Hier setzen Sie den Schieberegler dann bitte auf „+100%“.
- Meine Pedale oder Schalthebel funktionieren nicht ordnungsgemäß.
Das Spiel akzeptiert den gewählten Achsenmodus nicht. Bitte das Spiel beenden und einen neuen
Achsenmodus auswählen. Danach das Spiel erneut starten und in dessen Optionsmenü das lenkrad
erneut konfigurieren.
SICHERHEITSHINWEISE UND INFORMATION
- Wenn der Lenker angeschlossen wird, und während der Autokalibierung: Niemals den Lenker
bewegen oder die Pedale betätigen, um jegliche inkorrekte Kalibrierung zu vermeiden. T
- Bei längerem Nichtgebrauch: Um nicht erwünschten Stromverbrauch vorzubeugen und um
eventuellen Verschleiß zu vermeiden, den Stromstecker am Lenker immer herausziehen. Bei
Gebrauch erneut anschließen.
- Ihr Lenkrad verfügt über Force Feedback: NIEMALS in der Nähe von kleinen Kindern
unbeaufsichtigt lassen – speziell während der Autokalibrierungsphasen.
Benutzen Sie das Pedalset aus Sicherheitsgründen niemals barfuß oder wenn Sie nur Socken
tragen.
®
THRUSTMASTER
LEHNT JEDWEDE HAFTUNG IM FALLE EINER VERLETZUNG DURCH DAS
PEDALSET DURCH NUTZUNG DESSELBEN OHNE SCHUHWERK AB.

10/12
TECHNISCHER SUPPORT
Sollten Sie mit Ihrem Produkt ein Problem haben, besuchen Sie bitte die Seite http://ts.thrustmaster.com und klicken Sie
auf Technischer Support. Von dort aus können Sie auf verschiedene Hilfen zugreifen (Fragen und Antworten (FAQ),
die neuesten Versionen von Treibern und Software), die Ihnen bei der Lösung Ihres Problems helfen könnten. Falls das
Problem weiterhin besteht, können Sie mit dem technischen Support für Thrustmaster Produkte in Kontakt treten
(„Technischer Support“):
Per Email:
Um den technischen Supports per Email in Anspruch nehmen zu können, müssen Sie sich zunächst online registrieren.
Mit den Informationen, die Sie uns so zukommen lassen, können die Mitarbeiter Ihr Problem schneller lösen. Klicken
Sie bitte auf Registrierung links auf der Seite des technischen Supports und folgen Sie den Anweisungen auf dem
Bildschirm. Falls Sie bereits registriert sind, füllen Sie die Textfelder Anwendername und Paßwort aus und klicken
dann auf Login.
Per Telefon (falls Sie über keinen Internetzugang verfügen):
08000 00 1445
Montag bis Freitag 9:00 bis 20:00 Uhr
Deutschland
Kostenlos
Samstag 9:00 bis 13:00 Uhr und 14:00 bis 18:00 Uhr
0810 10 1809
Montag bis Freitag 9:00 bis 20:00 Uhr
Österreich
Zum Preis eines Ortsgesprächs
Samstag 9:00 bis 13:00 Uhr und 14:00 bis 18:00 Uhr
0842 000 022
Montag bis Freitag 9:00 bis 20:00 Uhr
Schweiz
Zum Preis eines Ortsgesprächs
Samstag 9:00 bis 13:00 Uhr und 14:00 bis 18:00 Uhr
80028612
Montag bis Freitag 9:00 bis 20:00 Uhr
Luxemburg
Kostenlos
Samstag 9:00 bis 13:00 Uhr und 14:00 bis 18:00 Uhr
Geschäftszeiten und Telefonnummern können sich ändern. Bitte besuchen Sie für die aktuellen Kontaktinformationen
des Technischen Supports http://ts.thrustmaster.com.

11/12
GEWÄHRLEISTUNGSINFORMATION
Guillemot Corporation S.A. („Guillemot“) bietet dem Kunden ab dem Kaufdatum weltweit eine 2-jährige
Garantie auf Materialschäden und Herstellungsmängel. Sollte das Produkt dennoch während dieser zwei
Jahre Schäden oder Mängel aufweisen, kontaktieren Sie bitte unverzüglich den technischen Support, der
Ihnen die weitere Verfahrensweise mitteilen wird. Im Falle eines technischen Defektes können Sie da
Produkt dort, wo Sie es gekauft haben, zurückgeben (oder an die vom Technischen Support angegebene
Adresse).
Im Rahmen dieser Garantie wird das defekte Produkt nach Ermessen des technischen Supports
entweder repariert oder ersetzt. Überall wo es geltendes Recht zulässt, wird die Haftung von Guillemot
und seinen Niederlassungen für das jeweilige Produkt(einschließlich für indirekte Beschädigungen), nur
soweit übernommen, als das eine Reparatur durchgeführt wird oder Ersatz geleistet wird. Die Rechte des
Käufers gemäß dem geltenden Recht des jeweiligen Landes werden durch diese Garantie nicht
beeinflusst.
Diese Garantie tritt unter folgenden Umständen nicht in Kraft :
(1) Falls am Produkt etwas verändert wurde oder es geöffnet wurde, ein Schaden durch unangebrachte
Nutzung, Fahrlässigkeit, einen Unfall, Verschleiß oder irgendeinen anderen Grund verursacht wurde, der
nicht im Zusammenhang mit einem Materialdefekt oder Herstellungsmangel aufgetreten ist.
(2) Im Falle der Nichtbeachtung der durch den technischen Support erteilten Anweisungen.
(3) Software, die nicht von Guillemot herausgegeben wurde, unterliegt der speziellen Garantie des
jeweiligen Softwareherstellers.
12/12
COPYRIGHT
© 2012 Guillemot Corporation S.A. Alle Rechte vorbehalten. Thrustmaster® ist ein eingetragenes
Warenzeichen der Guillemot Corporation S.A. Windows® ist ein eingetragenes Warenzeichen der Microsoft
Corporation in den Vereinigten Staaten von Amerika und/oder anderen Ländern. Alle anderen Warenzeichen
und Markennamen werden hiermit anerkannt und sind Eigentum ihrer jeweiligen Eigentümer. Fotos und
Abbildungen nicht bindend. Inhalt, Design und Eigenschaften des Produkts können ohne Bekanntmachung
geändert werden und variieren von Land zu Land.
TouchSense® Technology lizenziert von Immersion Corporation. Geschützt durch ein oder mehrere folgende
Patent(e):
U.S. Patente: 5831408, 5844392, 5857986, 5907487, 5959613, 6020875, 6088017, 6104158, 6246390,
6252583, 6271833, 6275213, 6278439, 6343349, 6400352, 6411276, 6424333, 6715045, 6801008, 7131073,
7199790, 7209117, 7299321, 7327348, 7345672 und 7502011.
HINWEISE ZUM UMWELTSCHUTZ
Dieses Produkt darf am Ende seiner Lebensdauer nicht über den normalen Haushaltsabfall
entsorgt werden, sondern muss an einem Sammelpunkt für das Recycling von elektrischen
und elektronischen Geräten abgegeben werden.
Das Symbol auf dem Produkt, der Gebrauchsanleitung oder der Verpackung weist darauf
hin.
Die Werkstoffe sind gemäß ihrer Kennzeichnung wiederverwertbar. Mit der
Wiederverwendung, der stofflichen Verwertung oder anderen Formen der Verwertung von
Altgeräten leisten Sie einen wichtigen Beitrag zum Schutze unserer Umwelt.
Bitte erfragen Sie bei der Gemeindeverwaltung die zuständige Entsorgungsstelle.
Wichtige Informationen. Die Farben und Verzierungen können abweichen.
Dieses Produkt stimmt mit allen Standards, die Kinder ab 14 und älter betreffen, überein. Dieses Produkt ist
nicht geeignet für den Gebrauch von Kindern, die jünger als 14 Jahre sind.
www.thrustmaster.com
1/12
Handleiding
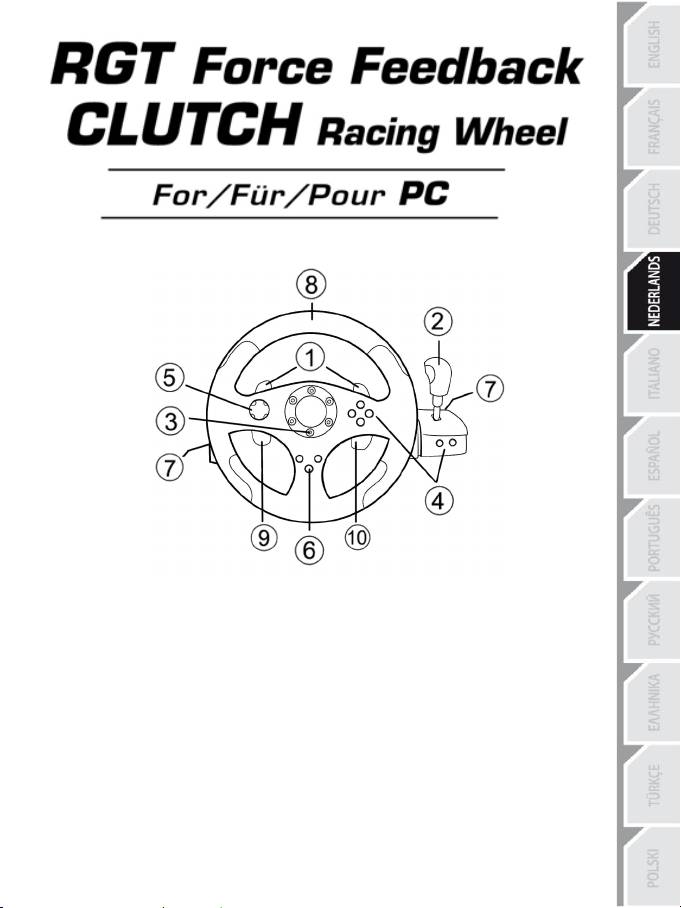
TECHNISCHE KENMERKEN
1 2 Digitale schakelflippers
2 Digitale versnellingspook
3 Mode LED
4 Digitale actieknoppen
5 Digitale D-pad
6 Force-knop
7 2 Connectors voor pedaalset met 3 pedalen
8 As 1: analoog stuur
9 As 4: progressief reagerende linkerflipper
10 As 5: progressief reagerende rechtertrigger

2/12
11 As 4: progressief reagerend koppelingspedaal
12 As 3: progressief reagerend rempedaal
13 As 2: progressief reagerend gaspedaal
14 Tafelklem
15 USB-connector voor PC
16 Pedaalsetkabel (met schakelaar)
17 2 Connectors (RJ45) voor pedaalset
18 Connector voor voedingsadapter
19 Voedingsadapter
HET STUUR INSTALLEREN
Het stuur vastzetten
1. Zet het stuur op een tafel of een ander vlak oppervlak.
2. Stop de klemschroef in de tafelklem (14) en schroef de klembeugel goed vast (linksom) in het gat aan
de onderzijde van het stuur.
3/12
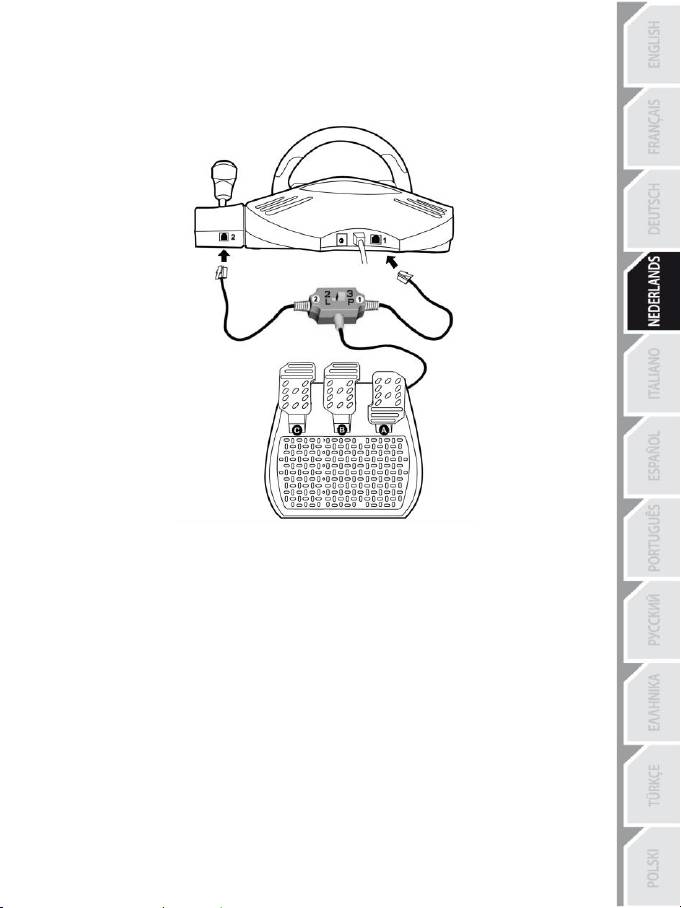
De pedaalset met 3 pedalen aansluiten op het stuur
1. Sluit kabel nummer 1 aan op connector nummer 1 op de achterkant van het stuur.
2. Sluit kabel nummer 2 aan op connector nummer 2 achter de versnellingspook.
De schakelaar gebruiken
Gebruik de schakelaar op de kabel van de pedaalset met 3 pedalen om op elk gewenst moment, zelfs
midden in een game:
- het derde pedaal ( C) in of uit te schakelen, of
- de 2 progressieve flippers achterop het stuur in of uit te schakelen.
Schakelaar in de stand “2 L”
De 2 progressieve flippers zijn ingeschakeld en het derde pedaal is uitgeschakeld.
Schakelaar in de stand “3 P”
De 2 progressieve flippers zijn uitgeschakeld en het derde pedaal is ingeschakeld.
IN DE STAND “3 P”SCHAKELT HET STUUR AUTOMATISCH OVER NAAR DE 5-AXIS-MODUS.
Het stuur aansluiten
Sluit de voedingsadapter (19) aan op de adapterconnector (18) en steek de adapter in een stopcontact.

4/12
PLAYSTATION3
Gebruik op de PlayStation®3 in het algemene menu uw officiële gamepad (niet uw racestuur) om te
navigeren en uw games te starten. Het stuur werkt alleen als de game is gestart.
HET INSTALLEREN OP DE PC
Systeemvereisten: pc (Windows 98SE, Me, 2000, XP, Vista of 7) en een USB-poort.
DE DRIVERS INSTALLEREN
Met behulp van de meegeleverde cd-rom worden de drivers geïnstalleerd die nodig zijn voor Force
Feedback.
1. Plaats de installatie-cd in de cd-rom-drive. Volg de instructies op het scherm om de Force Feedback-
drivers te installeren. Klik, als de installatieprocedure is afgerond, op Voltooien om de computer
opnieuw te starten.
2. Sluit de USB-connector (15) aan op een van de USB-poorten van de computer, zodra de computer
opnieuw is gestart. Windows 98/Me/2000/XP/Vista/7 herkent het nieuwe apparaat automatisch. (Als
een nieuw USB-apparaat voor het eerst op de computer wordt aangesloten, kan bij het installeren
gevraagd worden de Windows-cd-rom te plaatsen zodat de benodigde systeembestanden kunnen
worden geïnstalleerd).
3. Installatie van de driver:
Windows 98: de Wizard Nieuwe hardware zoekt de benodigde drivers. Klik op Volgende. Volg de
aanwijzingen op het scherm om de installatie te voltooien.
Windows Me/2000/XP/Vista/7: de drivers worden automatisch geïnstalleerd.
4. Selecteer Start/Programma's/Thrustmaster/Force Feedback driver/Configuratiescherm.
In het dialoogvenster Game Controllers dat nu wordt geopend, wordt de naam van het stuur
weergegeven met als status OK.
5. Klik op Eigenschappen in het Configuratiescherm om het stuur te configureren:
Page 1 = Test input (bediening testen): hiermee kunnen de knoppen, de D-Pad en de 5 assen
(stuur, rem-, koppelings- en gaspedaal, en de progressieve linker- en rechterflippers) worden
bekeken en getest.
Page 2 = Test forces (effecten testen): hiermee worden de 8 beschikbare Force Feedback
effecten getest en de instellingen voor Force Feedback en voor automatisch zelfcentreren
geconfigureerd.
AUTOMATISCHE KALIBRATIE VAN STUUR EN PEDALEN
Zodra de voedingsadapter en de USB-connector zijn aangesloten, kalibreert het stuur zichzelf
automatisch (het stuur zal hierbij uit zichzelf bewegen). De pedalen kalibreren zichzelf automatisch nadat
ze een paar keer zijn ingetrapt.
De kalibratie kan ook handmatig worden uitgevoerd met behulp van de “Thrustmaster Calibration Tool v
1.03”-software, te downloaden van onze website:
http://ts.thrustmaster.com/

5/12
HET SELECTEREN VAN DE ASSEN (2, 3 of 5 ASSEN)
Selecteren van as via "Software" (pagina 1 van het configuratiescherm)
Klik op de gewenste modus en vervolgens op OK.
Selecteren van as via "Hardware"
Trap het gas- en het rempedaal in en druk tegelijkertijd op de knop Force (12) + (13) + (6).
Voor het selecteren van de assen via hardware kan het configuratiescherm niet worden gebruikt.
Hiermee wordt de gewenste modus rechtstreeks bij de instellingen voor gamebesturing geselecteerd.
ASSELECTIE VIA “HARDWARE” IS ALLEN MOGELIJK WANNEER DE SCHAKELAAR OP DE
PEDAALSET IN DE STAND “2 L” STAAT
2 AXIS-modus (LED brandt oranje)
In deze modus werken de bediening voor gasgeven en remmen van het stuur in een gecombineerde
modus (de pedalen zijn dan gecombineerd met de 2 progressieve flippers):
- As 1 = X-as = stuur
- As 2 = Y-as = pedalen + progressieve flippers
3 AXIS-modus (LED brandt rood)
In deze modus werken de bediening voor gasgeven en remmen van het stuur onafhanelijk van elkaar.
= de pedalen zijn gecombineerd met de 2 progressieve flippers (schakelaar in de stand “2 L”)
= het koppelingspedaal is gecombineerd met het rempedaal (schakelaar in de stand “3 P”)
- As 1 = X-as = stuur
- As 2 = Y-as = rempedalen + progressieve linkerflipper + koppelingspedaal
- As 3 = RZ-as = gaspedaal + progressieve rechterflipper
5 AXIS-modus (LED brandt groen)
In deze modus werken de bediening voor gasgeven en remmen van het stuur onafhankelijk van elkaar.
De 2 progressieve flippers en het koppelingspedaal werken ook onafhankelijk:
Optie 1
(schakelaar in de stand “2 L”)
As 1 = X-as = stuur
As 2 = Y-as = linkerpedaal
As 3 = RZ-as = rechterpedaal
As 4 = schuifregelaar 1-as = progressieve rechterflipper
As 5 = schuifregelaar 0-as = progressieve linkerflipper

6/12
Optie 2
(schakelaar in de stand “3 P”)
As 1 = X-as = stuur
As 2 = Y-as = rempedaal
As 3 = RZ-as = gaspedaal
As 4 = schuifregelaar 1-as = uitgeschakeld
As 5 = schuifregelaar 0-as = koppelingspedaal
Met de exclusieve 5-axis-modus is het extra genieten van alle geavanceerde opties die de meeste
racesimulaties bieden. Dit is het eerste stuur waarbij deze nieuwe functies progressief reagerend in plaats
van digitaal reagerend zijn in te stellen. Voor fans van racegames is dit een lang gekoesterde wens.
Enkele voorbeelden:
- De progressieve linkerflipper of het koppelingspedaal gebruiken om te koppelen
(in de modus "handmatig schakelen met handmatig koppelen")
- De progressieve linkerflipper of het koppelingspedaal gebruiken als handrem
- De progressieve linkerflipper gebruiken als linkerbinnenspiegel
- De progressieve rechterflipper gebruiken als rechterbinnenspiegel
Opmerking:
- Als de modus 2 axis is geselecteerd, is de LED Oranje.
- Als de modus 3 axis is geselecteerd, is de LED Rood.
- Als de modus 5 axis is geselecteerd, is de LED Groen.
Zet het stuur in de 3-axis-modus als de game niet alle 5 assen accepteert
(of in de 2-axis-modus als het probleem zich blijft voordoen).
7/12
HET ZELFCENTREREN INSTELLEN
Zelfcentreren van het stuur (automatisch centreren) is standaard uitgeschakeld.
De laatste tijd zijn er steeds meer games die een eigen methode voor zelfcentreren gebruiken.
Het is meestal dan ook het beste om de functie voor automatisch centreren uit te schakelen en het aan de
game zelf over te laten. Dit levert ook meteen een betere kwaliteit ForceFeedback op.
In games die niet met ForceFeedback werken of het zelfcentreren maar matig uitvoeren, kan het
inschakelen van zelfcentreren wel een goed idee zijn.
Instellen via "Software" (pagina 2 van het configuratiescherm)
- zelfcentreren uitschakelen: klik op "By the game".
- zelfcentreren inschakelen: klik op "By the wheel".
In deze modus kan de kracht van het zelfcentreren worden ingesteld van 0 tot 100%.
Instellen via "Hardware"
Druk op de knop Force (6) op het stuur om het zelfcentreren rechtstreeks in de game in- of uit te
schakelen. Als zelfcentreren is ingeschakeld, zal het stuur gecentreerd worden met een kracht die
correspondeert met het voorheen geselecteerde percentage in de instelling "Via the wheel" van het
configuratiescherm.
Opmerking:
- Bij ingeschakeld automatisch centreren knippert de LED.
- Bij uitgeschakeld automatisch centreren knippert de LED niet.
(Aanbevolen modus voor Force Feedback-games)
HET INSTELLEN VAN DE FORCE FEEDBACK (pagina 2 van het configuratiescherm)
Er zijn 4 instellingen met elk een instelling van 0 tot 150 %:
- Master Forces (hoofdkrachten)
- Static Forces (statische krachten)
- Dynamic Forces (dynamische krachten)
- Aggressiveness (agressiviteit)
HET PROGRAMMEREN VAN DE "VERSNELLINGSBAK" (pagina 1 van het configuratiescherm)
Met deze functie kunnen de digitale schakelflippers (1) gescheiden (standaardmodus) worden van of
gecombineerd worden met de digitale versnellingspook (2).
Opmerking:
Vergeet niet het configuratiescherm te sluiten voordat de game begint!
Nu kan er gespeeld worden!
8/12
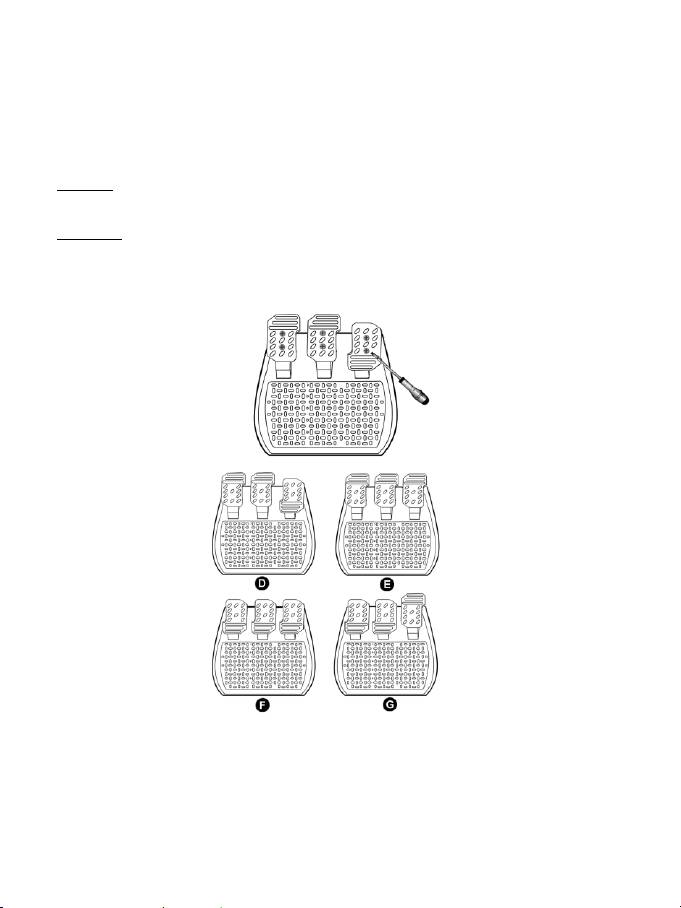
DE PEDALEN AANPASSEN:
De positie van elk van de 3 aluminum pedalen kan naar eigen wens worden ingesteld in de stand “Standaard”
of “Verticaal”. Hierdoor kan de pedaalset worden ingesteld op de gewenst rijstijl (“heel-and-toe” of juist niet) en
aangepast aan de zitpositie.
1. Draai de twee schroeven (een lange en een korte) van het in te stellen pedaal los.
2. Zet het pedaal in de gewenste stand.
3. Draai de 2 schroeven weer vast.
Opmerking: In de stand “Standaard” moet de lange schroef onderin worden gedraaid en in de stand “Verticaal”
moet deze bovenin worden gedraaid.
Voorbeelden: D: “Standaard” = gasgeven / “Verticaal” = remmen en koppelen
E: “Verticaal” = gasgeven, remmen en koppelen
F: “Standaard” = gasgeven, remmen en koppelen
G: “Verticaal” = gasgeven / “Standaard” = remmen en koppelen
9/12
VERHELPEN VAN STORINGEN
- Mijn stuur werkt niet goed of het lijkt dat het stuur niet goed gekalibreerd is. Zet de pc uit, haal alle
aansluitingen van het stuur los, sluit alle kabels opnieuw aan (inclusief die van de voedingsadapter en
pedaalset), zet de pc weer aan en start de game opnieuw.
Als het kalibreren problemen blijft geven, kan de kalibratie ook handmatig worden uitgevoerd met behulp
van de “Thrustmaster Calibration Tool v 1.03”-software, te downloaden van onze website:
http://ts.thrustmaster.com/
- Het stuur beweegt zonder dat ik iets doe. Dit heeft te maken met de functie voor zelfcentreren die in
sommige games wordt gebruikt. Het is dus een normaal verschijnsel. Als deze bewegingen gestopt
moeten worden, leg dan de handen op het stuur of kies een zwakkere ForceFeedback-instelling.
- Mijn stuur blijft helemaal naar links of rechts staan nadat de game is gestart. Dit is normaal bij
sommige games. Het stuur komt vanzelf terug in de middenpositie zodra het in de setup-opties van de
game is aangemeld als een stuur.
- Het stuur wordt door de computer herkend, maar het werkt niet in de game. Ga in de game naar de
opties en configureer het stuur. Raadpleeg de handleiding of de online help van de game voor meer
informatie.
- Mijn game kent geen 5 axis-modus.
Selecteer de 3 axis-modus (of zelfs de 2 axis-modus als het probleem zich blijft voordoen) en configureer
het stuur opnieuw met behulp van de opties in de game.
- Force Feedback reageert niet goed.
Zet in het Thrustmaster-configuratiescherm alle krachten terug op de standaardwaarden (= 100%) en
schakel automatisch zelfcentreren uit (de LED mag niet meer knipperen).
In sommige games moeten de krachten ook omgedraaid worden (selecteer “Negative Forces” in de game-
opties of zet de schuifregelaar op “-100%”). In andere games mogen de krachten juist niet omgedraaid
worden (selecteer in dat geval “Positive Forces” of “+100%”).
- Mijn pedalen of flippers werken niet goed.
De game accepteert de gekozen axis-modus niet. Sluit de game af en selecteer een nieuwe axis-modus.
Start de game opnieuw en configureer het stuur met behulp van de opties in de game.
VEILIGHEIDSINFORMATIE EN -AANBEVELINGEN
- Bij het aansluiten van het stuur en tijdens automatisch kalibreren: niet aan het stuur
draaien en knoppen, flippers of pedalen niet indrukken. Dit zou het proces van kalibreren kunnen
verstoren.
- Als het stuur langere tijd niet wordt gebruikt: haal dan altijd de voedingsadapter van het
stuur uit het stopcontact om onnodig stroomverbruik of slijtage te voorkomen. Vergeet niet de
adapter weer aan te sluiten als het stuur weer gebruikt wordt.
- Dit stuur werkt met ForceFeedback: zorg er ALTIJD voor dat het stuur buiten bereik blijft
van kleine kinderen, vooral tijdens het proces van automatisch kalibreren.
Voor uw en andermans veiligheid mag de pedaalset nooit gebruikt worden op blote voeten of met
alleen sokken aan.
®
THRUSTMASTER
WIJST ELKE VERANTWOORDELIJKHEID AF IN GEVAL VAN LETSEL ALS
GEVOLG VAN HET GEBRUIK VAN DE PEDAALSET ZONDER SCHOENEN AAN.

10/12
TECHNISCHE ONDERSTEUNING
Mocht u problemen ondervinden met dit product, ga dan naar http://ts.thrustmaster.com en klik op Technical
Support. U hebt daar toegang tot verschillende onderwerpen die u helpen bij het vinden van oplossingen,
zoals de FAQ (veelgestelde vragen) en de meest recente drivers en software. Als het probleem op die manier
niet kan worden verholpen, kunt u contact opnemen met de Thrustmaster product technical support service
(Technical Support).
Per e-mail:
Voordat u gebruik kunt maken van technische ondersteuning per e-mail dient u zich eerst online te registreren.
Met de door u verstrekte informatie kan uw probleem sneller en beter worden opgelost. Klik op Registration
aan de linkerzijde van de pagina Technical Support en volg de aanwijzingen op het scherm. Indien u reeds
geregistreerd bent, vult u de velden Username en Password in en klikt u op Login.
Per telefoon (als u geen internettoegang hebt):
Bedrijfsuren en telefoonnummers kunnen gewijzigd worden. Ga naar http://ts.thrustmaster.com voor de actuele
contactgegevens van Technical Support.
België
078 16 60 56
Kosten van interlokaal
gesprek
Van maandag t/m vrijdag van 9:00 tot 13:00 en van 14:00 tot 18:00
Nederland
0900 0400 118
Kosten van lokaal gesprek
Van maandag t/m vrijdag van 9:00 tot 13:00 en van 14:00 tot 18:00
(Nederlands)
Van maandag t/m zaterdag van 9:00 tot 20:00
(Engels)

11/12
INFORMATIE MET BETREKKING TOT DE GARANTIE
Wereldwijd garandeert Guillemot Corporation S.A. (“Guillemot”) de koper dat dit Thrustmaster-product
gedurende een periode van twee (2) jaar vanaf de oorspronkelijke aankoopdatum vrij zal zijn van
materiaal- en fabricagefouten. Indien u in de garantieperiode een defect meent te constateren aan dit
product, neem dan onmiddellijk contact op met de Technical Support, die u zal informeren over de te
volgen procedure. Als het defect wordt bevestigd, dient het product te worden geretourneerd naar de
plaats van aankoop (of een andere locatie die wordt opgegeven door Technical Support).
Binnen het gestelde van deze garantie wordt het defecte product van de consument gerepareerd of
vervangen, zulks ter beoordeling van Technical Support. Indien toegestaan door van de geldende
wetgeving, beperkt de volledige aansprakelijkheid van Guillemot en haar dochterondernemingen (inclusief
de aansprakelijkheid voor indirecte schade) zich tot het repareren of vervangen van het Thrustmaster
product. De wettelijke rechten van de klant volgens de wetgeving die van toepassing is op de verkoop van
consumentproducten, worden op generlei wijze beperkt door deze garantie.
Deze garantie is niet van kracht: (1) indien het product aangepast, geopend of gewijzigd is, of beschadigd
is ten gevolge van oneigenlijk of onvoorzichtig gebruik, verwaarlozing, een ongeluk, normale slijtage, of
enige andere oorzaak die niet gerelateerd is aan een materiaal- of fabricagefout; (2) indien u zich niet
houdt aan de instructies zoals verstrekt door Technical Support; of (3) op software die niet is geleverd
door Guillemot en daardoor onder de specifieke garantie valt zoals verstrekt door degene die deze
software levert.
12/12
COPYRIGHT
© Guillemot Corporation S.A. 2012. Alle rechten voorbehouden. Thrustmaster® is een geregistreerd
handelsmerk van Guillemot Corporation. Windows® is een geregistreerd handelsmerk van Microsoft
Corporation in de Verenigde Staten en/of andere landen. Alle overige handelsmerken en merknamen
worden hierbij erkend en zijn het eigendom van de respectieve eigenaren. Afbeeldingen zijn niet bindend.
Inhoud, ontwerp en specificaties kunnen zonder aankondiging worden gewijzigd en kunnen per land
verschillen.
TouchSense® -technologie in licentie gegeven door Immersion Corporation. Beschermd door een of meer
van de volgende patenten:
Amerikaanse patenten: 5831408, 5844392, 5857986, 5907487, 5959613, 6020875, 6088017, 6104158,
6246390, 6252583, 6271833, 6275213, 6278439, 6343349, 6400352, 6411276, 6424333, 6715045,
6801008, 7131073, 7199790, 7209117, 7299321, 7327348, 7345672 en 7502011.
AANBEVELINGEN VOOR DE BESCHERMING VAN HET MILIEU
Gooi dit product na het einde van de levensduur niet weg met het normale afval, maar breng het naar
het door uw gemeente aangewezen inzamelpunt voor elektrische en/of computerapparatuur.
Ter herinnering is hiertoe op het product, de gebruikshandleiding of de verpakking een symbool
aangebracht.
De meeste materialen kunnen worden gerecycled. Dankzij recycling en andere methodes voor het
verwerken van afgedankte elektrische en elektronische apparaten kunt u een belangrijke bijdrage
leveren aan de bescherming van het milieu.
Neem contact op met uw gemeente voor informatie over een inzamelpunt bij u in de buurt.
Bewaar deze informatie. De kleuren en decoraties kunnen variëren.
Dit product voldoet aan alle normen voor kinderen van 14 jaar en ouder. Dit product is niet geschikt voor
gebruik door kinderen jonger dan 14 jaar.
www.thrustmaster.com
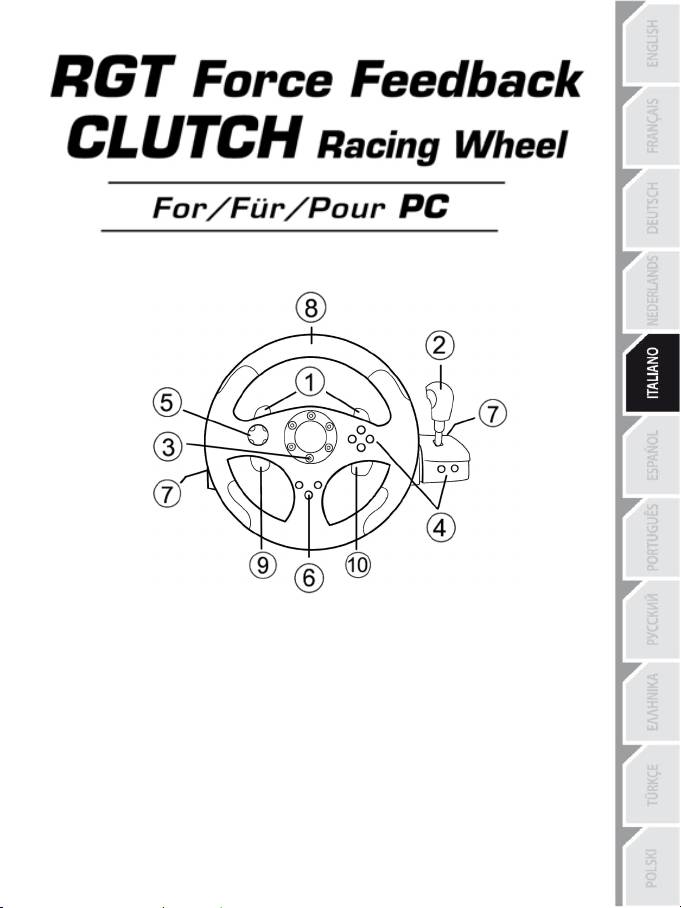
1/12
Manuale d’uso
CARATTERISTICHE TECNICHE
1 2 leve del cambio digitali
2 Manopola del cambio digitale
3 LED Mode
4 Tasti azione digitali
5 D-Pad digitale
6 Tasto Force
7 2 connettori per pedaliera 3 pedali
8 Asse 1: volante analogico
9 Asse 4: leva progressiva sinistra
10 Asse 5: leva progressiva destra
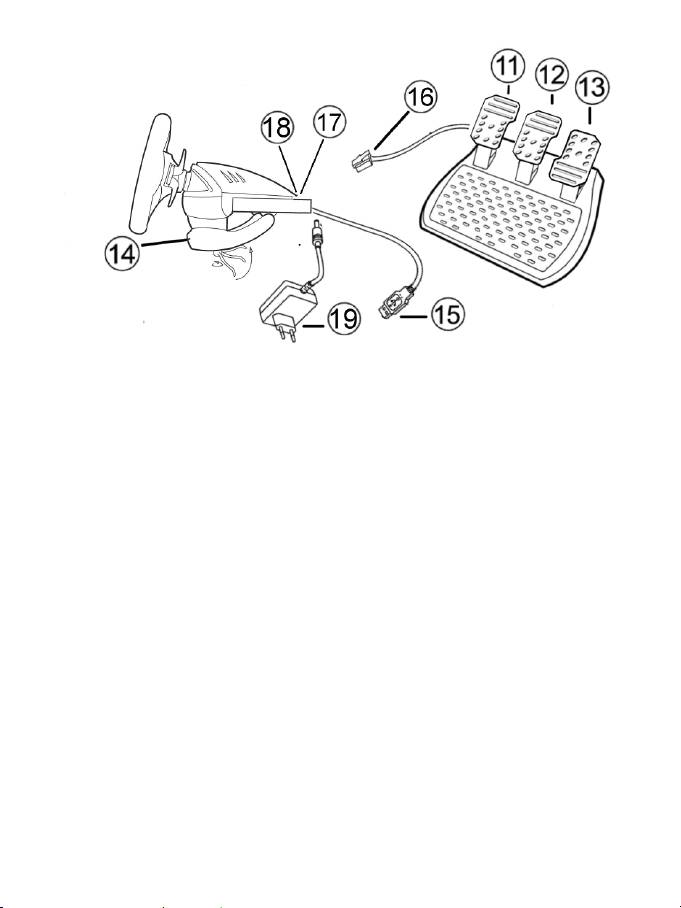
2/12
11 Asse 4: frizione progressiva
12 Asse 3: freno progressivo
13 Asse 2: acceleratore progressivo
14 Morsa per il fissaggio al tavolo
15 Connettore USB per PC
16 Cavo della pedaliera (con interruttore)
17 2 connettori RJ45 per la pedaliera
18 Connettore dell'alimentatore
19 Alimentatore
INSTALLAZIONE DEL VOLANTE
Fissare il volante in posizione
1. Appoggia il volante su un tavolo o un’altra superficie piana.
2. Inserisci la vite della morsa nella morsa stessa (14) e poi avvita l'unità di fissaggio in senso anti-orario
nell'apposito foro sulla base del volante finché non risulta saldamente bloccata.
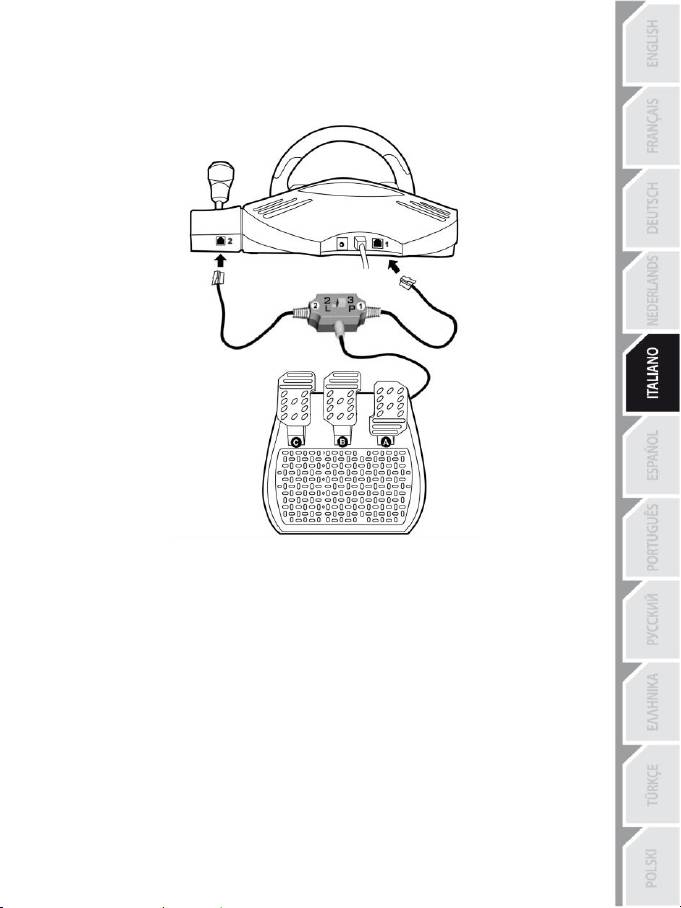
3/12
Connessione della pedaliera "3 Pedali" al volante
1. Collega il cavo numero 1 al connettore numero 1 situato nella parte posteriore del volante.
2. Collega il cavo numero 2 al connettore numero 2 situato dietro la manopola del cambio.
Uso dell'interruttore
L'interruttore situato lungo il cavo della pedaliera "3 Pedali" ti permette di attivare o disattivare in qualsiasi
momento (anche nel corso del gioco):
- il terzo pedale (C)
- oppure le 2 leve progressive collocate dietro il volante.
Interruttore su "2 L"
Le 2 leve progressive sono attive (e il terzo pedale è disattivato).
Interruttore su "3 P"
Il terzo pedale è attivo (e le 2 leve progressive sono disattivate)
IN POSIZIONE "3 P" IL VOLANTE PASSA AUTOMATICAMENTE ALLA MODALITÀ "5 ASSI".
Alimentazione del volante
Connetti l'alimentatore (19) al connettore dell'alimentatore (18) e inserisci la spina in una presa elettrica.

4/12
PLAYSTATION3
Su PlayStation®3, nel menu generale, usa il tuo gamepad ufficiale (e non il tuo volante) per navigare e
per avviare i tuoi giochi. il volante funzionerà soltanto una volta avviatosi il gioco.
INSTALLAZIONE PER PC
Requisiti di sistema: PC (Windows 98 SE, Me, 2000, XP, Vista, 7) dotato di porta USB.
INSTALLAZIONE DRIVER
Il CD-ROM accluso a questo prodotto ti permette di installare i driver Force Feedback.
1. Inserisci il CD-ROM di installazione nel lettore CD-ROM e segui le istruzioni che compaiono sullo
schermo per installare i driver Force Feedback. Una volta terminata l’installazione, scegli Fine e
riavvia il computer.
2. Dopo aver riavviato il computer, collega il connettore USB (15) a una delle porte USB del tuo
computer. Windows 98/Me/2000/XP/Vista/7 rileveranno automaticamente la presenza di una nuova
periferica. (Se stai collegando una periferica USB per la prima volta, durante il processo di
installazione potrebbe esserti richiesto di inserire il CD-ROM di Windows per installare i file di sistema
necessari).
3. Installazione driver:
Windows 98: l'Installazione guidata nuovo hardware cercherà automaticamente i driver appropriati.
Scegli Avanti. Segui le istruzioni sullo schermo per completare l'installazione.
Windows Me/2000/XP/Vista/7: i driver saranno installati automaticamente.
4. Seleziona Start/Tutti i programmi/Thrustmaster/Force Feedback driver/Pannello di controllo.
La finestra di dialogo Periferiche di gioco visualizzerà il nome del volante con stato OK.
5. Per configurare il volante, nel Pannello di controllo seleziona Proprietà:
Pagina 1 = Test input: ti permette di provare e osservare il funzionamento di tasti, D-Pad e 5 assi
(volante, freno, acceleratore, frizione, leve progressive sinistra e destra).
Pagina 2 = Test forze: ti permette di provare gli 8 effetti di vibrazione Force Feedback e di
ricentraggio automatico.
CALIBRAZIONE AUTOMATICA DI VOLANTE E PEDALIERA
Il volante si auto-calibra automaticamente non appena vengono collegati alimentatore e connettore USB
(nel corso di questa operazione il volante si muoverà da solo). La pedaliera si auto-calibra dopo che i
pedali sono stati premuti alcune volte.
Puoi anche eseguire una calibrazione manuale con il software "Strumento di calibrazione Thrustmaster v
1.03", di cui puoi effettuare il download dal nostro sito web: http://ts.thrustmaster.com
5/12
SELEZIONE DEGLI ASSI (2, 3 O 5 ASSI)
Selezione degli assi via "Software" (pagina 1 del "Pannello di controllo")
Seleziona la modalità che desideri usare e poi clicca OK.
Selezione degli assi via "Hardware"
Premi simultaneamente il pedale del freno e quello dell'acceleratore e il tasto Force (13) + (12) + (6).
La selezione via hardware deve sempre essere effettuata fuori dal Pannello di controllo!
In questo modo potrai scegliere la modalità desiderata direttamente nelle opzioni "Controlli" del tuo gioco.
LA SELEZIONE DEGLI ASSI VIA "HARDWARE" È DISPONIBILE SOLO
QUANDO L'INTERRUTTORE DELLA PEDALIERA È IN POSIZIONE "2 L"
Modalità 2 ASSI (LED arancione)
In questa modalità, i comandi dell’acceleratore e del freno del volante funzionano in modalità "combinata"
(e i pedali sono abbinati alle 2 leve progressive):
- Asse 1 = asse X (volante)
- Asse 2 = asse Y (pedali/leve progressive)
Modalità 3 ASSI (LED rosso)
In questa modalità, i comandi dell’acceleratore e del freno del volante funzionano in modalità "separata":
= i pedali sono abbinati con le 2 leve progressive (quando l'interruttore è in posizione "2 L")
= la frizione è abbinata al pedale del freno (quando l'interruttore è in posizione "3 P")
- Asse 1 = asse X (volante)
- Asse 2 = asse Y (pedale del freno/leva progressiva sinistra/pedale della frizione)
- Asse 3 = asse RZ (pedale dell'acceleratore/leva progressiva destra)
Modalità 5 ASSI (LED verde)
In questa modalità, i comandi dell’acceleratore e del freno del volante funzionano in modalità "separata",
così come le 2 leve progressive, che sono indipendenti:
Opzione 1
(con la pedaliera impostata su "2 L")
- Asse 1 = asse X = volante
- Asse 2 = asse Y = pedale sinistro
- Asse 3 = asse RZ = pedale destro
- Asse 4 = asse Slider 1 = leva progressiva destra
- Asse 5 = asse Slider 0 = leva progressiva sinistra

6/12
Opzione 2
(con la pedaliera impostata su "3 P")
- Asse 1 = asse X = volante
- Asse 2 = asse Y = pedale del freno
- Asse 3 = asse RZ = pedale dell'acceleratore
- Asse 4 = asse Slider 1 = disabilitato
- Asse 5 = asse Slider 0 = pedale della frizione
L'esclusiva modalità 5 assi ti permette di sfruttare tutte le opzioni avanzate offerte dalla maggior parte dei
giochi di corse. Per la prima volta, puoi gestire queste nuove funzioni in modo "progressivo" (e non più
digitale), godendo di un'immersione totale nella simulazione di guida!
Esempi vari:
- Attribuzione al pedale della frizione o alla leva progressiva sinistra della funzione "frizione"
(in modalità "cambio manuale con frizione manuale")
- Attribuzione al pedale della frizione o alla leva progressiva destra della funzione "freno a mano"
- Attribuzione alla leva progressiva sinistra della funzione "vista interna sinistra"
- Attribuzione alla leva progressiva destra della funzione "vista interna destra"
Nota:
- Quando selezioni la modalità 2 assi, il LED è arancione.
- Quando selezioni la modalità 3 assi, il LED è rosso.
- Quando selezioni la modalità 5 assi, il LED è verde.
Se il gioco non accetta tutti i "5 assi", imposta il volante in modalità "3 assi"
(o "2 assi" se il problema persiste).
7/12
IMPOSTAZIONI DELLA FUNZIONE DI RICENTRAGGIO
Come impostazione predefinita, il ricentraggio del volante (Auto-centraggio) è disabilitato.
La maggior parte dei giochi recenti offre una propria modalità di ricentraggio.
Nella maggior parte dei casi, è vivamente consigliato disabilitare il ricentraggio e lasciare che sia il gioco a
effettuare l'operazione. Gli effetti Force Feedback saranno così di miglior qualità.
Se abilitata, la modalità di ricentraggio è utile specialmente nei giochi che non supportano il
ForceFeedback o che utilizzano una funzione di ricentraggio troppo debole.
Impostazione via "Software" (pagina 2 del "Pannello di controllo")
- per disabilitare il ricentraggio, seleziona "Attraverso il gioco".
- per abilitare il ricentraggio, seleziona "Attraverso il volante".
In questa modalità, puoi regolare l’intensità del ricentraggio da 0 a 100 %.
Impostazione via "Hardware"
Per attivare o disattivare il ricentraggio direttamente nel gioco, premi il pulsante Force (6). Una volta
attivato, l’intensità del ricentraggio corrisponde alla percentuale selezionata precedentemente nelle
impostazioni "Attraverso il volante" del "Pannello di controllo".
Nota :
- Quando il ricentraggio automatico è attivo, il LED lampeggia.
- Quando il ricentraggio automatico non è attivo, il LED non lampeggia.
(Modalità raccomandata per tutti i giochi Force Feedback)
IMPOSTAZIONI DEGLI EFFETTI FORCE FEEDBACK (pagina 2 del "Pannello di controllo")
Possono essere regolati da 0 a 150 % questi 4 parametri:
- Forze principali
- Forze statiche
- Forze dinamiche
- Aggressività
PROGRAMMAZIONE DEL "CAMBIO" (pagina 1 del "Pannello di controllo")
Questa funzione ti permette di "separare" (modalità predefinita) o di "combinare" le leve del cambio digitali
(1) e la manopola del cambio digitale (2).
Nota :
Ricorda di chiudere completamente il "Pannello di controllo" prima di iniziare a giocare!
Adesso sei pronto a giocare!

8/12
REGOLAZIONE DEI PEDALI:
Ognuno dei 3 pedali di alluminio può essere posizionato a tuo piacimento con impostazione "Standard" o
"Verticale". Queste regolazioni ti permettono di adattare la pedaliera al tuo stile di guida (se usi uno stile "tacco
– punta" o no) e alla tua posizione ("seduto" o "allungato").
1. Usando un piccolo cacciavite, togli le due viti (una corta e una lunga) del pedale che desideri regolare.
2. Fissa il pedale nella posizione che preferisci.
3. Rimetti a posto le 2 viti.
Nota: in posizione "Standard", la vite più grande deve essere messa in basso, in posizione "Verticale" deve
invece essere messa in alto.
Esempi: D = Acceleratore "Standard" / freno e frizione "Verticali"
E = Acceleratore, freno e frizione "Verticali"
F = Acceleratore, freno e frizione "Standard"
G = Acceleratore "Verticale" / freno e frizione "Standard"
9/12
RISOLUZIONE DEI PROBLEMI
- Il volante non funziona correttamente o sembra non essere propriamente calibrato. Spegni il PC,
scollega completamente il volante, ricollega tutti i cavi (compresi alimentatore e pedaliera), riaccendi il PC
e riavvia il gioco.
Se il problema di calibrazione persiste, effettua il download del software di calibrazione manuale
"Strumento di calibrazione Thrustmaster v 1.03" disponibile sul nostro sito web: http://ts.thrustmaster.com
- Il volante si muove da solo durante il gioco. È normale: si tratta della funzione di ricentraggio attiva in
alcuni giochi. Per arrestare questi movimenti, impugna il volante oppure riduci l’intensità degli effetti di
ForceFeedback.
- Il volante rimane girato in una direzione (destra o sinistra) dopo aver avviato un gioco. In
alcuni giochi è normale. Il volante si ricentra automaticamente non appena viene identificato come volante
nelle opzioni di configurazione del gioco.
- Il volante viene riconosciuto dal computer ma non funziona nel gioco. Accedi all'interfaccia opzioni
del gioco per configurare il volante. Per ulteriori informazioni o per il servizio di supporto online, fai
riferimento al manuale del gioco.
- Il gioco non accetta la modalità 5 assi. Seleziona la modalità 3 assi (o 2 assi se il problema persiste),
poi configura nuovamente il volante nell’interfaccia opzioni del gioco.
- Gli effetti di Force Feedback non reagiscono appropriatamente. Nel Pannello di controllo
Thrustmaster, reimposta tutte le forze al loro valore predefinito (100%) e disattiva la funzione di
ricentraggio automatico (il LED non dovrebbe lampeggiare).
In alcuni giochi può essere necessario invertire le forze (seleziona "Forze negative" nelle opzioni del gioco
o imposta il valore a "-100%"). In altri giochi le forze non devono essere invertite (in questo caso,
seleziona "Forze positive" o "+100%").
- La pedaliera o le leve non funzionano correttamente. Il gioco non accetta la modalità degli assi che
hai selezionato. Esci dal gioco e seleziona una nuova modalità degli assi. Rilancia il gioco e poi configura
nuovamente il volante nell’interfaccia opzioni del gioco.
INFORMAZIONI E CONSIGLI SULLA SICUREZZA
- Durante la connessione e l'auto-calibrazione del volante: per evitare errori di calibrazione,
non girare mai il volante, né premere i pedali o i tasti.
- Quando il volante non è in uso per lunghi periodi, e per evitare sprechi energetici o
l'eventuale deterioramento, sconnetti l'alimentatore del volante. Riconnettilo solo prima di
tornare a giocare.
- Il volante genera effetti di ForceFeedback: non lasciare MAI il volante alla portata dei
bambini, specialmente durante le fasi di auto-calibrazione.
Per ragioni di sicurezza, non usare mai la pedaliera a piedi nudi o
indossando soltanto dei calzini.
®
THRUSTMASTER
DECLINA OGNI RESPONSABILITÀ PER QUALSIASI INFORTUNIO DERIVANTE
DALL’USO DELLA PEDALIERA SENZA SCARPE.

10/12
ASSISTENZA TECNICA
Qualora riscontrassi un problema con il tuo prodotto, accedi al sito http://ts.thrustmaster.com e clicca su
Assistenza tecnica. Da qui, potrai accedere a vari servizi ed informazioni (Risposte alle Domande più
Frequenti (FAQ), le più recenti versioni di driver e software) che potrebbero esserti utili per risolvere il tuo
problema. Qualora il problema persistesse, puoi contattare il servizio di assistenza tecnica Thrustmaster
(“Technical Support”):
Tramite e-mail:
Per poter usufruire del servizio di assistenza tecnica tramite e-mail, dovrai prima registrarti online. Le
informazioni che fornirai aiuteranno i nostri esperti a risolvere più rapidamente il tuo problema. Fai clic su
Registrazione nella parte sinistra della pagina di Assistenza Tecnica e segui le istruzioni che appariranno sullo
schermo. Se sei già registrato, riempi i campi Username e Password e clicca quindi su Login.
Via telefono (qualora non disponessi di un accesso a internet):
*costo massimo alla riposta de 0.1 Euro
Gli orari di reperibilità e i numeri telefonici sono soggetti a modifiche. Per conoscere le informazioni più
aggiornate su come contattare il Servizio di Assistenza Tecnica, ti preghiamo di visitare il sito
http://ts.thrustmaster.com.
Italia
848999817
costo chiamata locale*
Lun - Ven: 9:00-13:00 e 14:00-18:00

11/12
INFORMAZIONI SULLA GARANZIA
Nel mondo, Guillemot Corporation S.A. (“Guillemot”) garantisce al consumatore che questo prodotto
Thrustmaster è privo di difetti nei materiali e nell’assemblaggio per un periodo di due (2) anni dalla prima
data di acquisto. Qualora il prodotto presentasse dei difetti durante tale periodo, contatta immediatamente
il servizio di Assistenza Tecnica, che ti indicherà la procedura da seguire. Se il difetto viene confermato, il
prodotto dovrà essere riconsegnato al luogo di acquisto (o a qualsiasi altra destinazione indicata
dall’assistenza tecnica).
Contestualmente a tale garanzia, il prodotto difettoso potrà essere riparato o sostituito, secondo il parere
del servizio di Assistenza Tecnica. Dove ciò è concesso dalle leggi vigenti, gli obblighi di Guillemot e delle
sue controllate sono limitati alla riparazione o alla sostituzione del prodotto Thrustmaster (compresi
eventuali danni indiretti). I diritti legali del consumatore, stabiliti dalla legge riguardante la vendita di beni
di consumo, non vengono intaccati da tale garanzia.
Questa garanzia non è applicabile se: (1) il prodotto è stato modificato, aperto, alterato o ha subito danni
derivati da un uso improprio o non corretto, da negligenza, da un incidente, dalla normale usura o da
qualsiasi altra causa non riconducibile a difetti nei materiali o nell’assemblaggio; (2) non vengono
rispettate le istruzioni fornite dal servizio di Assistenza Tecnica; (3) si stia utilizzando un software non
pubblicato da Guillemot, ossia un software soggetto ad una specifica garanzia offerta dal suo distributore.
COPYRIGHT
© 2012 Guillemot Corporation S.A. Tutti i diritti riservati. Thrustmaster® è un marchio registrato di
proprietà di Guillemot Corporation. Windows® è un marchio registrato di proprietà di Microsoft
Corporation, negli Stati Uniti e/o altri Paesi. Tutti gli altri marchi registrati o nomi di prodotti vengono qui
citati previa autorizzazione ed appartengono ai legittimi proprietari. Illustrazioni non comprese. I contenuti,
il design e le caratteristiche possono essere oggetto di modifiche senza preavviso e possono variare da
un Paese all’altro.
Tecnologia TouchSense® su licenza di Immersion Corporation. Protetta da uno o più dei seguenti brevetti:
Brevetti U.S.: 5831408, 5844392, 5857986, 5907487, 5959613, 6020875, 6088017, 6104158, 6246390,
6252583, 6271833, 6275213, 6278439, 6343349, 6400352, 6411276, 6424333, 6715045, 6801008,
7131073, 7199790, 7209117, 7299321, 7327348, 7345672 e 7502011.
12/12
RACCOMANDAZIONI PER LA SALVAGUARDIA DELL’AMBIENTE
Al termine della sua vita operativa, questo prodotto non dovrebbe essere gettato
assieme ai comuni rifiuti, ma dovrebbe essere portato ad un apposito punto di raccolta
destinato al riciclaggio del Materiale Elettrico ed Elettronico.
Ciò è confermato dal simbolo riportato sul prodotto, nel manuale d’uso o sulla
confezione.
A seconda delle proprie caratteristiche, i materiali potrebbero essere riciclati. Tramite il
riciclaggio ed altre forme di trattamento del Materiale Elettrico ed Elettronico, è
possibile fornire un importante contributo per la salvaguardia dell’ambiente.
Per conoscere i punti di raccolta più vicini a te, contatta le autorità locali competenti.
Informazioni da conservare. I colori e le decorazioni possono variare.
Questo prodotto è conforme con le norme relative ai bambini di età superiore ai 14 anni. Non è adatto
all’uso da parte di bambini di età inferiore ai 14 anni.
www.thrustmaster.com
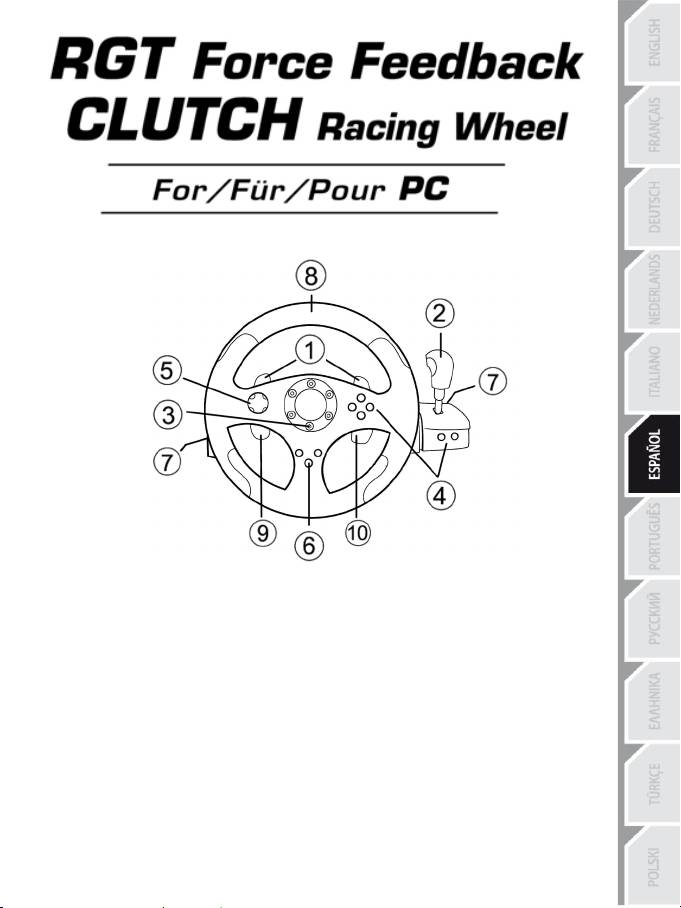
1/12
Manual del usuario
CARACTERÍSTICAS TÉCNICAS
1 2 palancas digitales de cambio de marchas
2 Pomo digital de cambio de marchas
3 LED Mode
4 Botones de acción digitales
5 D-pad digital
6 Botón Force
7 2 conectores para conjunto de 3 pedales
8 Eje 1: Volante analógico
9 Eje 4: Palanca izquierda progresiva
10 Eje 5: Palanca derecha progresiva
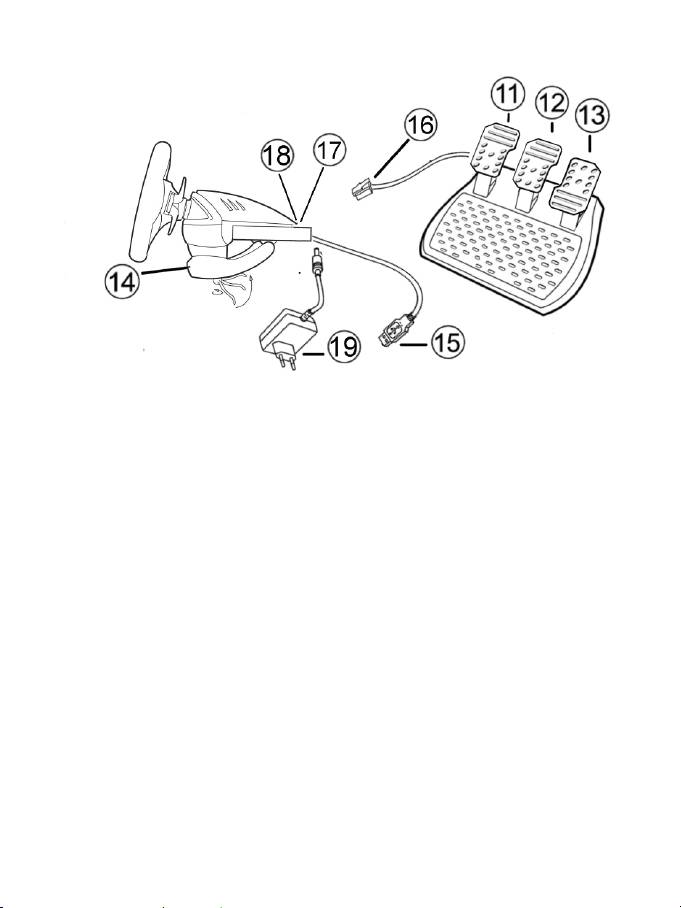
2/12
11 Eje 4: Pedal de embrague progresivo
12 Eje 3: Pedal de freno progresivo
13 Eje 2: Pedal de gas progresivo
14 Pinza para la mesa
15 Conector USB de PC
16 Cable del conjunto de pedales (con interruptor)
17 2 conectores RJ45 para el conjunto de pedales
18 Conector del adaptador de corriente
19 Adaptador de corriente
INSTALACIÓN DEL VOLANTE
Fijación del volante en su posición
1. Coloca el volante en una mesa u otra superficie plana.
2. Coloca el tornillo de sujeción en la pinza para la mesa (14) y luego atornilla la unidad de fijación en
sentido antihorario en el agujero en la cara inferior del volante hasta que quede fijado en su sitio
firmemente.
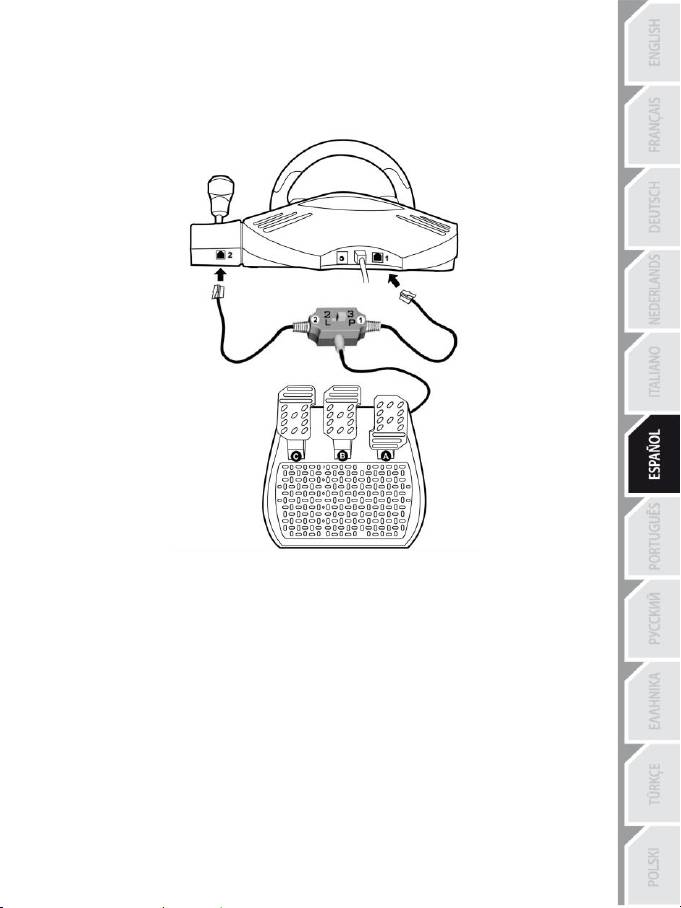
3/12
Conexión del conjunto de pedales “3 Pedals” al volante
1. Enchufa el cable 1 al conector 1 situado en la parte trasera del volante.
2. Enchufa el cable 2 al conector 2 situado detrás del pomo de cambio de marchas.
Utilización del interruptor
El interruptor, situado en el cable del conjunto de pedales “3 Pedals”, te permite en cualquier momento (incluso
en el transcurso de una partida) habilitar (o deshabilitar):
- el tercer pedal (C)
- o las 2 palancas progresivas situadas detrás del volante.
Interruptor puesto en “2 L”
Las 2 palancas progresivas están habilitadas (y el tercer pedal deshabilitado).
Interruptor puesto en “3 P”
El tercer pedal está habilitado (y las 2 palancas progresivas deshabilitadas).
EN LA POSICIÓN “3 P”, TU VOLANTE CAMBIA AUTOMÁTICAMENTE AL MODO “5 EJES”.
Conexión del volante
Enchufa el adaptador de corriente (19) al conector del adaptador (18) y enchufa el adaptador a una toma
eléctrica.

4/12
PLAYSTATION3
En PlayStation®3, en el menú general, utiliza el gamepad oficial (no el volante de carreras) para
desplazarte y ejecutar los juegos. El volante sólo funcionará cuando se ejecute el juego.
INSTALACIÓN EN PC
Requisitos del sistema: PC (Windows 98 SE, Me, 2000, XP, Vista o 7) equipado con puerto USB.
INSTALACIÓN DE CONTROLADORES
El CD-ROM suministrado con este producto te permite instalar los controladores Force Feedback.
1. Inserta el CD-ROM de instalación en el lector de CD ROM. Sigue las instrucciones en pantalla para
instalar los controladores Force Feedback. Una vez terminada la instalación, haz clic en Finalizar y
reinicia el ordenador.
2. Una vez reiniciado el ordenador, enchufa el conector USB (15) a uno de los puertos USB del
ordenador. Windows 98/Me/2000/XP/Vista/7 detectará automáticamente el nuevo dispositivo. (Si
estás conectando un dispositivo USB por primera vez, Windows puede pedirte que insertes el CD-
ROM de Windows durante el procedimiento de instalación para instalar los archivos del sistema
necesarios.)
3. Instalación de controladores:
Windows 98: el Asistente para agregar hardware buscará los controladores apropiados. Haz clic en
Siguiente y sigue las instrucciones en pantalla para completar la instalación.
Windows Me/2000/XP/Vista/7: los controladores se instalan automáticamente.
4. Selecciona Inicio/Todos los programas/Thrustmaster/Force Feedback driver/Control Panel.
El cuadro de dialogo Dispositivos de juego muestra el nombre del gamepad con el estado OK.
5. En el Panel de control, haz clic en Propiedades para configurar el volante:
Página 1 = Probar entrada: te permite probar y ver los botones, el D-pad y los 5 ejes (volante,
pedal de freno, pedal de gas, pedal de embrague, palancas progresivas izquierda y derecha).
Página 2 = Probar fuerzas: te permite probar 8 efectos Force y configurar los ajustes de Force
Feedback y recentrado automático.
CALIBRACIÓN AUTOMÁTICA DEL VOLANTE Y LOS PEDALES
El volante se autocalibra de forma independiente tras enchufar el adaptador de corriente y el conector
USB (esto produce que el volante realice movimientos por si sólo). Los pedales se autocalibran tras haber
sido pulsados algunas veces.
También puedes llevar a cabo la calibración manual descargando el software “Thrustmaster Calibration
Tool v 1.03” de nuestra página web:
http://ts.thrustmaster.com
5/12
SELECCIÓN DE EJES (2, 3 o 5 EJES)
Selección de ejes mediante “Software” (página 1 del “Panel de control”)
Haz clic en el modo que quieres utilizar y luego haz clic en Aceptar.
Selección de ejes mediante “Hardware”
Pulsa los pedales de gas y freno y el botón Force simultáneamente (13) + (12) + (6).
¡La selección de ejes mediante hardware siempre debe realizarse desde fuera del Panel de control!
Esto te permite seleccionar tu modo directamente en la opción "Controles" del juego.
LA SELECCIÓN DE EJES MEDIANTE “HARDWARE” SÓLO ESTÁ DISPONIBLE CUANDO EL
INTERRUPTOR DEL CONJUNTO DE PEDALES ESTÁ EN LA POSICIÓN “2 L”.
Modo 2 EJES (LED está en naranja)
En este modo, los controles de gas y freno del volante funcionan en modo "combinado" (y se combinan
con las 2 palancas progresivas):
- Eje 1 = eje X (Volante)
- Eje 2 = eje Y (Pedales/palancas progresivas)
Modo 3 EJES (LED está en rojo)
En este modo, los controles de gas y freno del volante funcionan en modo "separado".
= los pedales se combinan con las 2 palancas progresivas (interruptor puesto en “2 L”)
= el pedal de embrague está combinado con el pedal del freno (interruptor puesto en “3 P”)
- Eje 1 = eje X (Volante)
- Eje 2 = eje Y (Pedal de freno / Palanca progresiva izquierda / Pedal de embrague)
- Eje 3 = eje RZ (Pedal de gas / Palanca progresiva derecha)
Modo 5 EJES (LED está en verde)
En este modo, los controles de gas y freno del volante funcionan en modo "separado", como las 2
palancas progresivas y el pedal de embrague, que son independientes:
Opción 1
(con el interruptor del conjunto de pedales puesto a “2 L”)
- Eje 1 = eje X = Volante
- Eje 2 = eje Y = Pedal de freno
- Eje 3 = eje RZ = Pedal de gas
- Eje 4 = eje deslizador 1 = Palanca progresiva derecha
- Eje 5 = eje deslizador 0 = Palanca progresiva izquierda

6/12
Opción 2
(con el interruptor del conjunto de pedales puesto a “3 P”)
- Eje 1 = eje X = Volante
- Eje 2 = eje Y = Pedal de freno
- Eje 3 = eje RZ = Pedal de gas
- Eje 4 = eje deslizador 1 = Deshabilitado
- Eje 5 = eje deslizador 0 = Pedal del embrague
El modo exclusivo de 5 ejes te permite disfrutar todas las opciones avanzadas ofrecidas por la mayoría
de los juegos de carreras de tipo simulación. Por primer vez, ahora puedes gestionar esas nuevas
funciones “progresivamente” (en contraposición con digitalmente), lo que proporciona una inmersión total
a los aficionados a las simulaciones de carreras de coches.
Varios ejemplos:
- Asignación del pedal del embrague o de la palanca progresiva izquierda a la función de “embrague” (en
modo “cambio de marcha manual con embrague manual”).
- Asignación de la palanca derecha progresiva o pedal de embrague a la función de “freno de mano”.
- Asignación de la palanca progresiva izquierda a la función “vista interior izquierda”.
- Asignación de la palanca progresiva derecha a la función “vista interior derecha”.
Nota:
- Cuando seleccionas modo de 2 ejes, el LED está en Naranja.
- Cuando seleccionas modo de 3 ejes, el LED está en Rojo.
- Cuando seleccionas modo de 5 ejes, el LED está en Verde.
Si tu juego no acepta los 5 ejes, cambia tu volante al modo “3 ejes”
(o a modo “2 ejes”, si el problema persiste).
7/12
CONFIGURACIÓN DE LA FUNCIÓN DE RECENTRADO
El recentrado del volante (Autocentrado) está deshabilitado de forma predeterminada.
La mayoría de los juegos recientes ahora ofrecen su propio modo de recentrado.
Te avisamos que es necesario que deshabilites el recentrado del volante (en la mayoría de los casos),
para permitir que el juego lo gestione. El Force Feedback también será de mayor calidad.
Cuando está activado, el modo de recentrado es especialmente útil en juegos que no incorporan Force
Feedback o que utilizan un recentrado débil.
Configuración mediante “Software” (página 2 del “Panel de control”)
- para deshabilitar el recentrado, hacer clic en “By the game”.
- para habilitar el recentrado, hacer clic en “By the wheel”.
En este modo, puedes ajustar la intensidad de recentrado de 0 a 100%.
Configuración mediante “Hardware”
Para habilitar o deshabilitar el recentrado directamente en el juego, no tienes más que pulsar el botón
Force de tu volante (6). Al habilitarlo, la intensidad del recentrado corresponde con el porcentaje
seleccionado previamente en el ajuste “By the wheel” del “Panel de control”.
Nota :
- Cuando el Autocentrado está habilitado, el LED parpadea.
- Cuando el Autocentrado está deshabilitado, el LED no parpadea
(Modo recomendado para los juegos con Force Feedback)
CONFIGURACIÓN DE EFECTOS FORCE FEEDBACK (página 2 del “Panel de control”)
4 ajustes que se pueden configurar de 0 a 150 %:
- Fuerzas maestras
- Fuerzas estáticas
- Fuerzas dinámicas
- Agresividad
PROGRAMACIÓN DE LA “CAJA DE CAMBIOS” (página 1 del “Panel de control”)
Esta función te permite “separar” (modo predeterminado) o “combinar” las palancas digitales de cambio
de marchas (1) y el pomo digital de cambio de marchas (2).
Nota :
¡Recuerda siempre cerrar por completo el “Panel de control” antes de ejecutar el juego!
¡Ya estás listo para jugar!
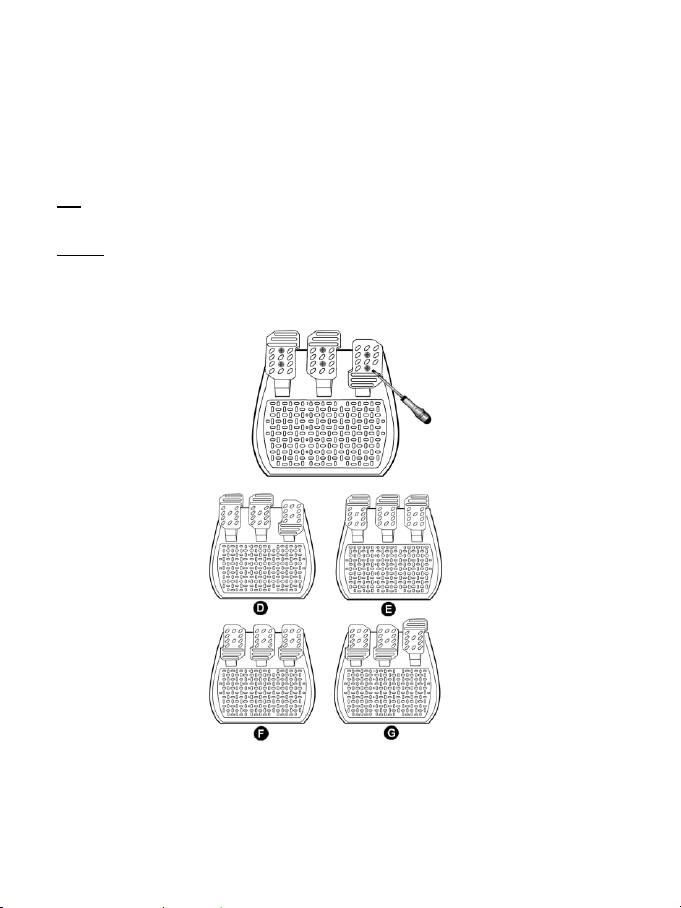
8/12
AJUSTE DE LOS PEDALES:
Cada uno de los 3 pedales de aluminio se puede colocar a tu gusto en una posición “Estándar” o “Vertical”.
Este ajuste te permite adaptar el conjunto de pedales no sólo a tu estilo de conducción (utilizando el “estilo del
talón y la punta” o no), sino también a tu posición sentado (estilo “asiento” o “cabina”).
1. Utilizando un destornillador pequeño, desatornilla los dos tornillos (uno corto y uno largo) en el pedal que
desees ajustar.
2. Pon el pedal en la posición que quieras.
3. Vuelve a colocar los 2 tornillos.
Nota: En la posición “Estándar”, coloca el tornillo largo en la parte inferior; en la posición “Vertical”, coloca el
tornillo largo en la superior.
Ejemplos: D = Gas “estándar” / Freno y embrague “verticales”
E = Gas, freno y embrague “verticales”
F = Gas, freno y embrague “estándar”
G = Gas “vertical” / Freno y embrague “estándar”
9/12
RESOLUCIÓN DE PROBLEMAS
- Mi volante no funciona correctamente o parece estar inadecuadamente calibrado. Apaga el PC,
desconecta por completo el volante, vuelve a conectar todos los cables (incluyendo el del adaptador de
corriente y del conjunto de pedales), vuelve a encender tu PC y reinicia el juego.
Si persisten los problemas de calibración, descarga el software de calibración manual “Thrustmaster
Calibration Tool v 1.03 ” disponible en nuestra página web: http://ts.thrustmaster.com
- Mi volante se mueve por sí solo durante el juego. Esto es normal y es la función de recentrado que
incorporan algunos juegos. Para detener estos movimientos, coloca las manos en el volante o reduce la
intensidad de Force Feedback.
- Mi volante permanece girado a un lado (izquierda o derecha) tras ejecutar un juego. Esto es
normal en algunos juegos. El volante se recentrará solo una vez que lo hayas identificado como un
volante en las opciones de configuración del juego.
- El ordenador detecta el volante pero no funciona en el juego. Accede a la interfaz de opciones del
juego para configurar el volante. Consulta el manual de usuario del juego o la ayuda online para más
información.
- Mi juego no acepta el modo de 5 ejes.
Selecciona el modo de 3 ejes (o el modo de 2 ejes, si persiste el problema) y luego vuelve a configurar el
volante en la interfaz de opciones del juego.
- El Force Feedback no reacciona apropiadamente.
En el Panel de control de Thrustmaster, reinicia todas las fuerzas a sus valores predeterminados (= a
100%) y desactiva el recentrado automático (el LED no debería parpadear).
En algunos juegos también tendrás que invertir las fuerzas (selecciona “Fuerzas negativas” en las
opciones del juego o pon el deslizador al “-100%”). En otros juegos, las fuerzas no se pueden invertir (en
este caso, selecciona “Fuerzas positivas” o “+100%”).
- Mis pedales o palancas no funcionan adecuadamente.
Tu juego no acepta el modo de ejes que has seleccionado. Sal del juego y selecciona un nuevo modo de
ejes. Vuelve a ejecutar el juego y luego configura de nuevo el volante en la interfaz de opciones del
juego.
INFORMACIÓN Y RECOMENDACIONES DE SEGURIDAD
- Al conectar el volante y durante la calibración automática: para evitar calibraciones
incorrectas, no gires nunca el volante, ni pulses los pedales ni los botones.
- Cuando no lo utilices durante períodos prolongados y para evitar deterioro o consumo de
energía no deseado, desconecta el adaptador de corriente del volante. Vuelve a conectarlo
antes de volver al juego.
- Tu volante incorpora Force Feedback: NUNCA dejes el volante al alcance de los niños
pequeños, especialmente durante las fases de calibración automática.
Por motivos de seguridad, no utilizar nunca los pedales con los pies desnudos o únicamente con
calcetines en los pies.
®
THRUSTMASTER
DECLINA CUALQUIER RESPONSABILIDAD EN CASO DE LESIONES
PRODUCTO DEL USO DE LOS PEDALES SIN CALZADO.
