Thrustmaster T.Flight HOTAS X: инструкция
Раздел: Бытовая, кухонная техника, электроника и оборудование
Тип: Устройство ввода
Инструкция к Устройству ввода Thrustmaster T.Flight HOTAS X

- USER MANUAL
- MANUEL DE L’UTILISATEUR
- BENUTZERHANDBUCH
- HANDLEIDING
- MANUALE D’USO
- MANUAL DEL USUARIO
- MANUAL DO UTILIZADOR
РУКОВОДСТВО ПОЛЬЗОВАТЕЛЯ
ΕΓΧΕΙΡΙΙΟ ΧΡΗΣΗΣ
KULLANIM KILAVUZU
INSTRUKCJA OBSŁUGI
Compatible / Kompatibel
®
PC & PlayStation
3
1/12
Compatible: PC / PlayStation®3
User Manual
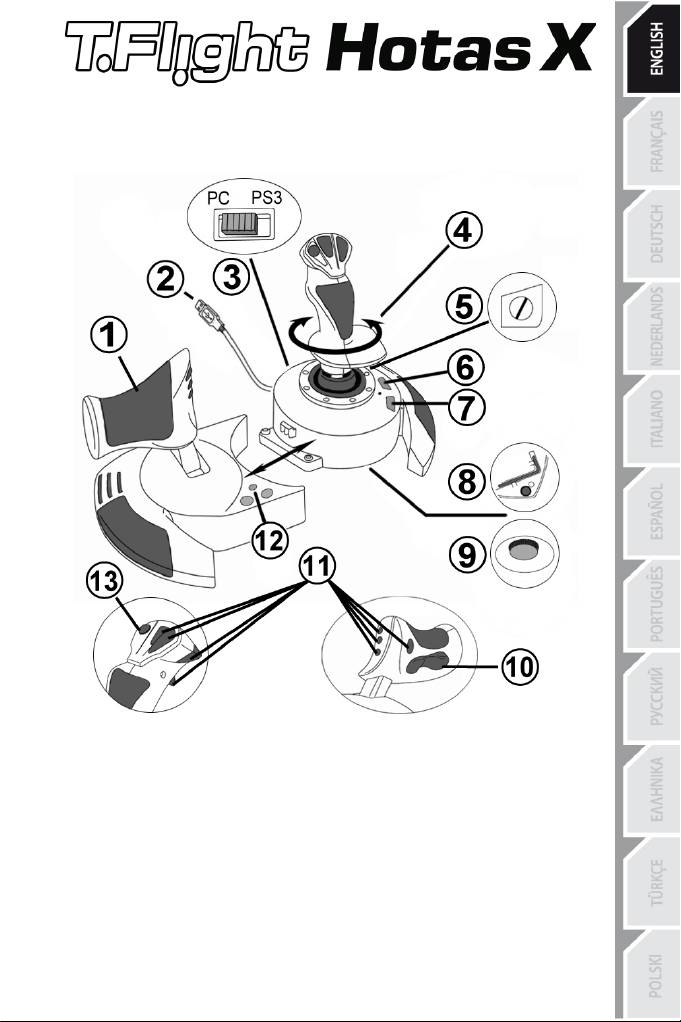
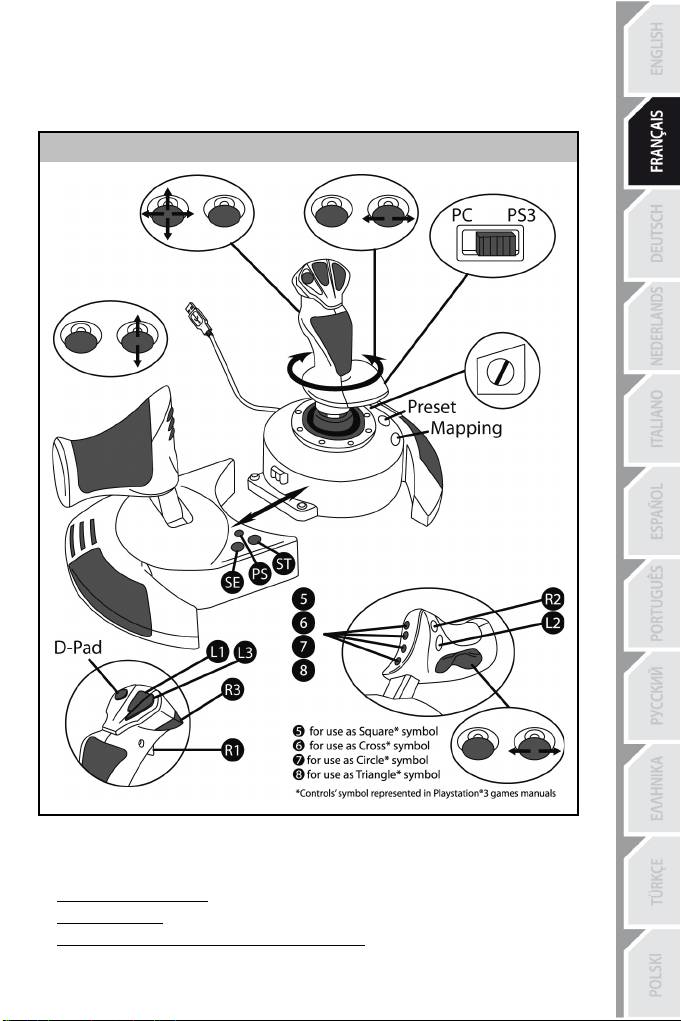
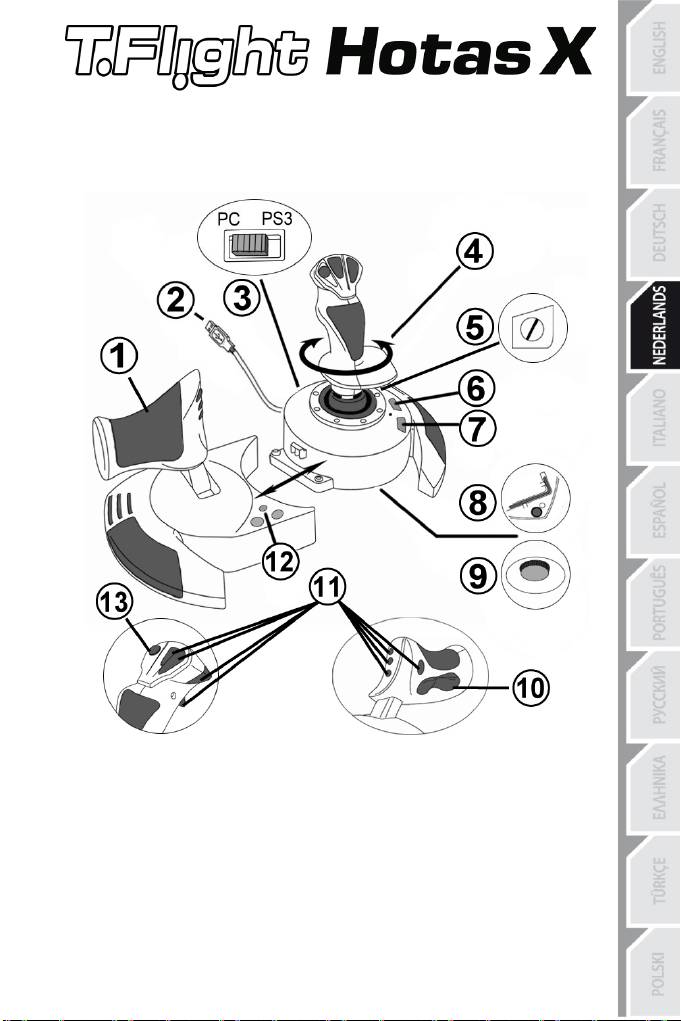
TECHNICAL FEATURES
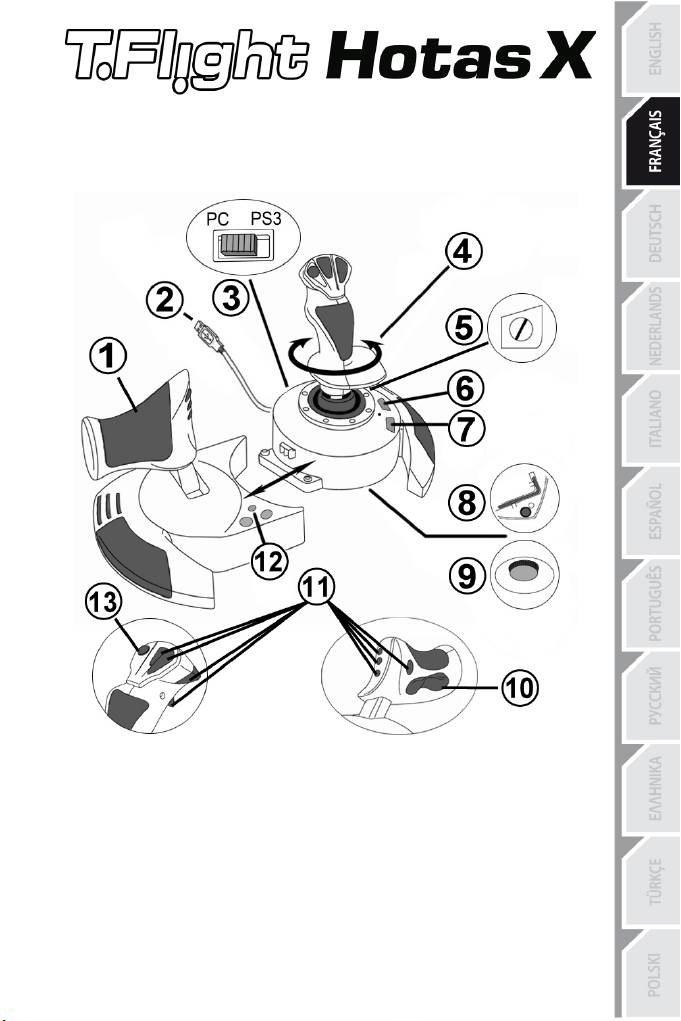
1.
Throttle
2. USB connector
3. USB selector "PC" or "PS3"
4. Rudder function via twisting handle
5. Rudder locking screw on handle
6. PRESET button (
to select
programming)
7. MAPPING button (for programming)
8.
Allen key to install or separate the
throttle
9. Handle resistance adjustment dial
th
10. Rudder via rocking button (or 5
Axis on
PC)
11. Action buttons
12. HOME / PS button with LED
13. Multidirectional "Point Of View" hat-
switch

2/12
GETTING TO KNOW YOUR HOTAS JOYSTICK
THROTTLE
Your joystick features a large throttle which you can use to easily control the acceleration of
your aircraft.
The throttle is detachable and may be positioned in 2 different ways, either:
- Detached and separated from the joystick
(to re-create authentic piloting conditions)
- Attached to the joystick
(for greater stability and to take up less space).
By default, the throttle comes detached from the joystick.
To attach the throttle to the joystick:
1. Turn both items upside down (the throttle and the joystick).
2. Take the Allen key (8) attached underneath the base of the joystick.
3. Position the throttle to the left of the joystick.
Insert the connecting tab on the left of the joystick's base into the opening on the right
hand side of the throttle.
4. Using the key, tighten the two Allen screws underneath the base
(located on the left-hand side of the joystick's base).
5. Wind up the throttle cable and thread it through the cable guide slot.
6. Put the Allen key back in its place so as not to lose it.
Carry out this procedure in reverse to detach the throttle from the joystick.
ADJUSTABLE HANDLE RESISTANCE
Depending on your style of gaming, you may wish to have an ultra-sensitive joystick, which
responds to the slightest touch, or you may prefer to have a firmer joystick, which offers
some resistance when you move it.
Your joystick's handle resistance is adjustable, in order to adapt to all players. To adjust it,
use the handle resistance adjustment dial (9) located underneath your joystick's base.
3/12
RUDDER FUNCTION
Your joystick features a rudder function, which in a plane corresponds to the pedals used by
the pilot to turn the steering, allowing the plane to pivot around its vertical axis (therefore
making the plane turn left or right). This rudder function is accessible on your joystick by
rotating the handle to the left or right.
This rudder function is accessible in two ways:
- on your joystick by rotating the handle (4) to the left or right.
- or via the rocking button (10) on the throttle.
If you are only using the rocking button (or if you are not using the rudder function), you can
disable the handle's rotation thanks to the locking screw (5) located on the base of the
joystick. Use a flat head screwdriver to change the screw’s position and thus lock/unlock the
rudder function.
Notes:
- On PlayStation®3 and on PC in "4 axes" mode, the rocking button is combined with the
handle's rotation.
- On PC in "5 axes" mode, the rocking button is independent of the handle's rotation and
therefore provides an additional progressive axis.
MULTIDIRECTIONAL "POINT OF VIEW" HAT-SWITCH
Your joystick features a “Point Of View” hat-switch (13) which, as its name indicates, allows
you (in games which permit) to instantly view everything that’s going on around your plane.
To do so, simply go to your game’s configuration menu and program the different views (rear
view, left view, right view, and also external views) onto the directions of the “Point Of View”
hat-switch.
Of course, you can also use the “Point Of View” hat-switch for other functions instead (firing,
etc.).

4/12
PC
INSTALLATION ON PC
1. Set your joystick’s USB selector (3) to the “PC” position.
2. Connect the USB connector (2) to one of your computer’s USB ports. Windows will
automatically detect the new device.
3. The drivers are installed automatically.
Follow the on-screen instructions to complete the installation.
4. Click Start/Settings/Control Panel and then double-click Game Controllers.
The Game Controllers dialog box displays the joystick’s name with OK status.
5. In the Control Panel, click Properties to configure your joystick.
Test device: Lets you test and view all of your joystick’s functions.
You are now ready to play!
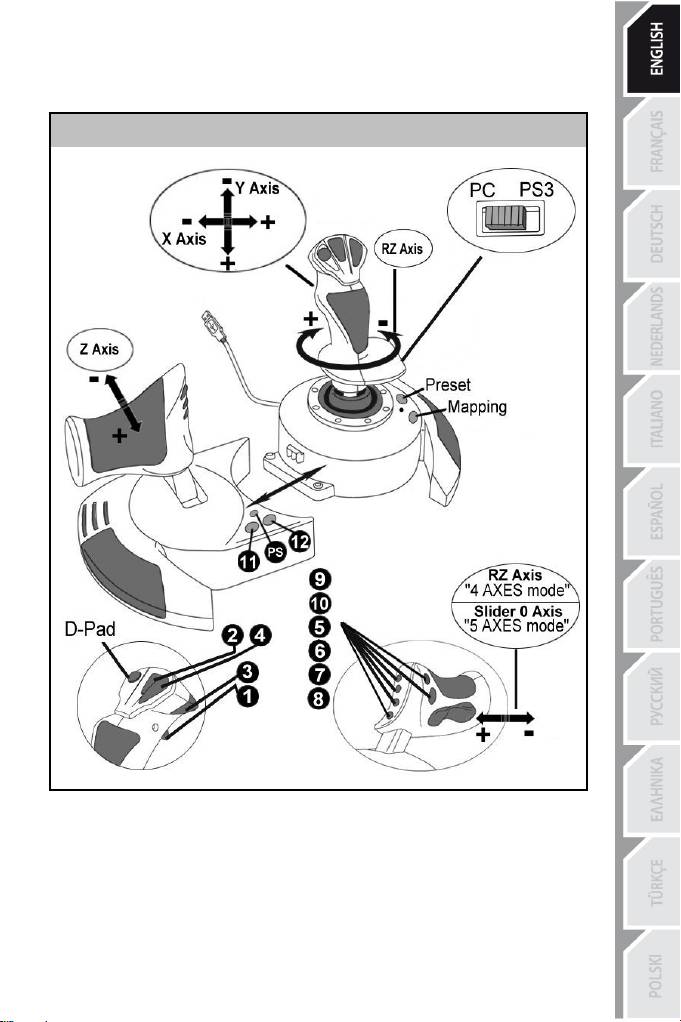
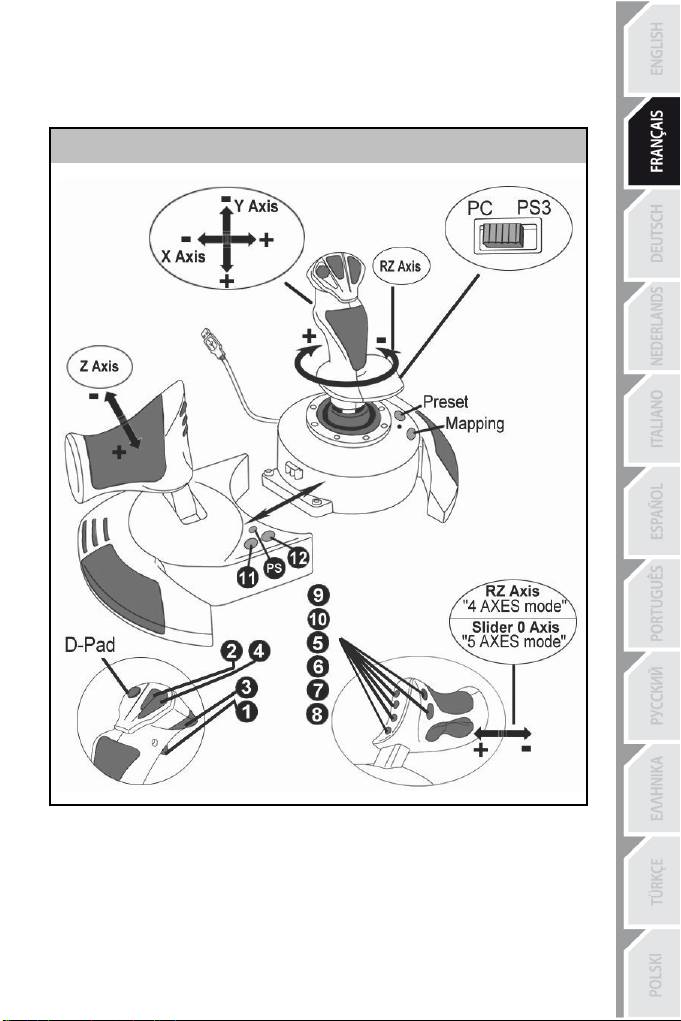
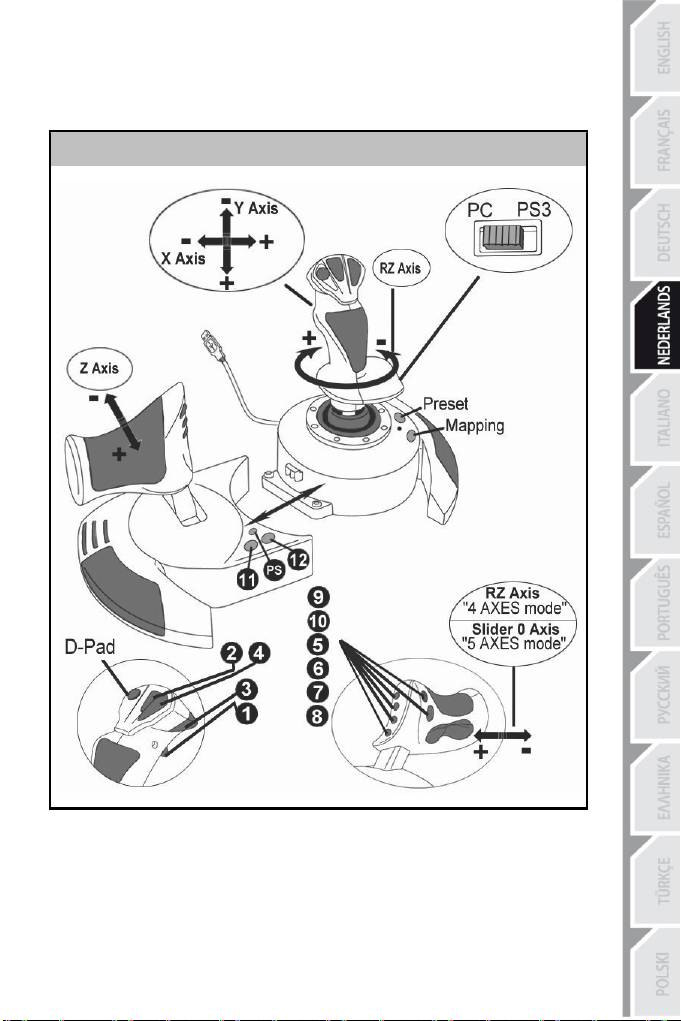
2 AXIS MODES
On PC, your joystick features 2 axis modes:
• 4 Axes mode (Red Home LED)
The rocking button is combined with the handle's rotation for the rudder function.
• 5 Axes mode (Green Home LED)
The rocking button is independent and can be manually assigned with another
function.
To switch from one mode to the other, simply press the HOME button (12).
IMPORTANT NOTES FOR PC
- Your joystick’s USB selector (3) must always be set to the “PC” position before connecting
your joystick.
- When connecting your joystick: Leave the handle, rudder and throttle centered and do not
move them (to avoid any calibration problems).
5/12
“AUTOMATIC PRESET” CONFIGURATION - PC
“AUTOMATIC PRESET” diagram on PC
RED HOME LED = 4 AXES MODE GREEN HOME LED = 5 AXES MODE
The "4 axes" mode preset corresponds to the default configurations for most aerial
simulation games on PC.
It will therefore allow you to start playing your game right away, without having to reconfigure
your joystick.
In "5 axes" mode, the function of the rocking button must be manually assigned in your
game's options.

6/12
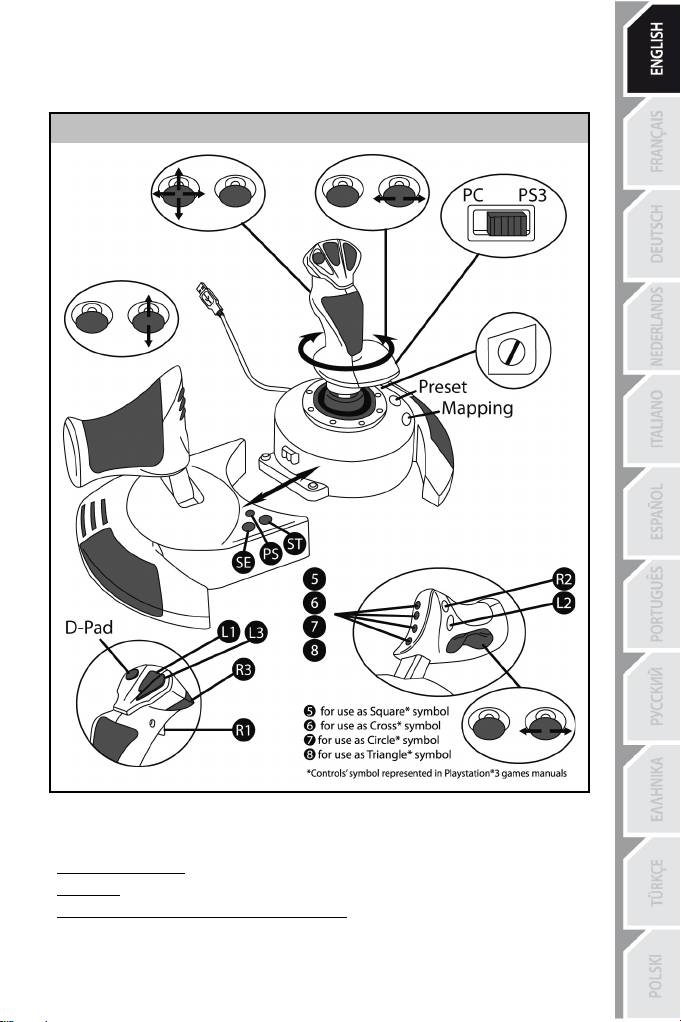
PLAYSTATION®3
INSTALLATION ON PLAYSTATION®3
1. Set your joystick’s USB selector (3) to the “PS3” position.
2. Connect the USB connector (2) to one of your console’s USB ports.
3. Switch on your console.
4. Launch your game.
You are now ready to play!
USING THE "HOME / PS" BUTTON
Your joystick’s “Home / PS” button allows you to exit your games, access menus and directly
switch off your PlayStation®3 system.
It also allows you to switch very quickly between the gamepad and the joystick in games which
alternate between "on foot sequences" and "flying sequences".
IMPORTANT NOTES FOR PLAYSTATION®3
- Your joystick’s USB selector (3) must always be set to the “PS3” position before connecting your
joystick to the console.
- In “1 Player” mode: If your official gamepad is on, you must switch it to “controller port 2” in
order for your joystick to be functional.
- On PlayStation®3, the joystick is only compatible with PlayStation®3 games (and will not
function with PlayStation® 2 games).
- When connecting your joystick: Leave the handle, rudder and throttle centered and do not move
them (to avoid any calibration problems).
7/12
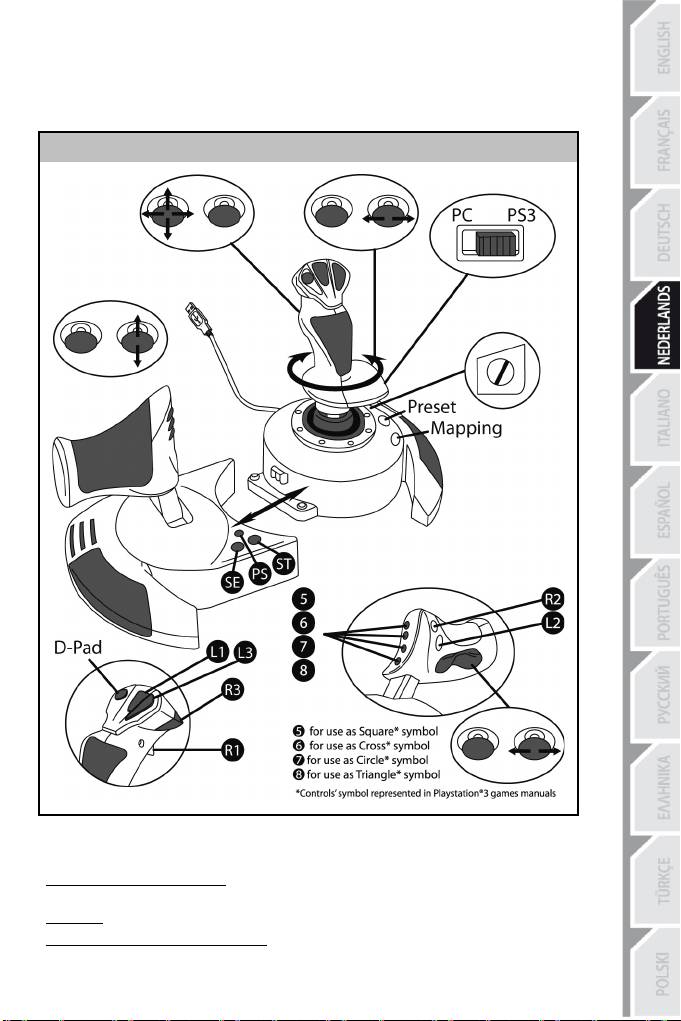
“AUTOMATIC PRESET” CONFIGURATION - PLAYSTATION®3
“AUTOMATIC PRESET” diagram on PlayStation®3
RED HOME LED
This preset corresponds to the default configurations for most aerial simulation games on PlayStation®3.
It will therefore allow you to start playing your game right away, without having to reconfigure your
joystick.
The 4 handle directions correspond to the 4 directions on the PS3 gamepad’s left mini-stick.
The throttle corresponds to the Up/Down directions on the PS3 gamepad’s right mini-stick.
The rudder (via rotating handle and rocking button) corresponds to the Left/Right directions on the
PS3 gamepad’s right mini-stick.

8/12
ADVANCED FUNCTIONS
2 PROGRAMMING MODES
The PRESET button (6) and its LED allow you to view the type of programming selected:
- AUTOMATIC (preprogrammed)
- or MANUAL (programmed by yourself).
A single press of this button will allow you to switch from one programming mode to the
other, even during the course of a game.
• AUTOMATIC PRESET: LED IS OFF
This represents the default programming: the axes, positions of the buttons and of the hat-
switch are preprogrammed.
PLEASE REFER TO THE “AUTOMATIC PRESET” CONFIGURATION DIAGRAM.
• MANUAL PRESET: LED IS GREEN
This represents your own personal programming:
- The buttons, axes and the hat-switch can be switched between themselves.
- You can modify the programming to suit your taste and whenever you like.
- Programming is automatically saved in your joystick (even when it is disconnected).
- When your “MANUAL PRESET” is blank, it is identical to the “AUTOMATIC PRESET”.
EEPROM MEMORY
• Your joystick features an internal chip which saves all of your "MANUAL
PRESET" programming (even when your joystick is switched off or
disconnected for a long period of time).
• You can save a different "MANUAL PRESET" for each platform used:
- one for PC in 4 axes mode
- one for PC in 5 axes mode
- one for PlayStation®3
PROGRAMMING/MAPPING
Your programming is carried out using the MAPPING button (7).
• Examples of possible applications:
- Switching the positions of buttons.
- Switching axes between themselves = directions of the handle, of the throttle or of the
rudder (in this case, you must map the 2 directions of the first axis to those of the
second.)
- Switching the 2 directions of the same axis.
- Switching buttons with a direction of an axis or of the hat-switch.
• Exception:
The HOME / PS, MAPPING and PRESET buttons cannot be reprogrammed and moved.
9/12
PROGRAMMING PROCEDURE
SAVING A "MANUAL PRESET"
Steps
Action
PRESET LED
1
Enable MANUAL PRESET (6)
by pressing the button.
GREEN
2
Press and release the MAPPING button (7).
FLASHES GREEN
SLOWLY
3 Press and release the button or direction to program.
FLASHES GREEN
QUICKLY
4
Press and release the button or direction onto which you
wish to place your function.
GREEN
Your “MANUAL PRESET” is now enabled and up to date
(with your programming carried out).
ERASING A "MANUAL PRESET"
Steps
Action
PRESET LED
1
Enable your MANUAL PRESET (6)
GREEN
2
Press and hold the MAPPING button (7)
for 2 seconds.
FLASHES GREEN
2 SECONDS
Your “MANUAL PRESET” is now blank
(and once again identical to the “AUTOMATIC PRESET”).
RETURNING TO “FACTORY SETTINGS”
You can erase all of your programming or settings carried out on both PC (in 4 and 5 axes
modes) and PlayStation®3 with a single step:
Step
Action
HOME / PS LED
1
Simultaneously press the
MAPPING + PRESET buttons
FLASHES GREEN/RED
3 SECONDS
All of your “MANUAL PRESETS” (PC + PS3) or settings are now blank.
Note: This operation will completely restart your joystick
(on PC, we therefore recommend that you do this outside of games).

10/12
TROUBLESHOOTING AND WARNINGS
• My joystick doesn’t function correctly or appears to be improperly calibrated:
- Switch off your computer or your console, disconnect your joystick, reconnect your joystick
and then re-launch your game.
- When connecting your joystick: Leave the handle, rudder and throttle centered and do not
move them (to avoid any calibration problems).
- Exit your game, disconnect your joystick, verify that the USB selector (PC / PS3) (3) is set
to the proper position, then reconnect your joystick.
• I can’t configure my joystick:
- In your game’s “Options / Controller / Gamepad or Joystick” menu: Select the most
appropriate configuration or completely reconfigure the controller options.
- Please refer to your game’s user manual or online help for more information.
- You can also use your joystick’s “MAPPING” function to resolve this type of problem.
• My joystick is too sensitive or not sensitive enough:
- Your joystick self-calibrates on its own after you have made a few movements on the
different axes.
- In your game’s “Options / Controller / Gamepad or Joystick” menu: Adjust the sensitivity or
dead zones for your controller (if this option is available).
- Adjust the handle resistance using the dial (9) located under your joystick’s base.
• The rudder function is too sensitive:
- Disable the handle's rotation using the locking screw (5) located on the base of the joystick
and use the rocking button for the rudder function.

11/12
Consumer warranty information
Worldwide, Guillemot Corporation S.A. (hereinafter “Guillemot”) warrants to the consumer that this
Thrustmaster product shall be free from defects in materials and workmanship, for a warranty period which
corresponds to the time limit to bring an action for conformity with respect to this product. In the countries
of the European Union, this corresponds to a period of two (2) years from delivery of the Thrustmaster
product. In other countries, the warranty period corresponds to the time limit to bring an action for
conformity with respect to the Thrustmaster product according to applicable laws of the country in which
the consumer was domiciled on the date of purchase of the Thrustmaster product (if no such action exists
in the corresponding country, then the warranty period shall be one (1) year from the original date of
purchase of the Thrustmaster product).
Notwithstanding the above, rechargeable batteries are covered by a warranty period of six (6) months from
the date of original purchase.
Should the product appear to be defective during the warranty period, immediately contact Technical
Support, who will indicate the procedure to follow. If the defect is confirmed, the product must be returned
to its place of purchase (or any other location indicated by Technical Support).
Within the context of this warranty, the consumer’s defective product shall, at Technical Support’s option,
be either repaired or replaced. If permitted under applicable law, the full liability of Guillemot and its
subsidiaries (including for consequential damages) is limited to the repair or replacement of the
Thrustmaster product. If permitted under applicable law, Guillemot disclaims all warranties of
merchantability or fitness for a particular purpose. The consumer’s legal rights with respect to laws
applicable to the sale of consumer goods are not affected by this warranty.
This warranty shall not apply: (1) if the product has been modified, opened, altered, or has suffered
damage as a result of inappropriate or abusive use, negligence, an accident, normal wear, or any other
cause unrelated to a material or manufacturing defect (including, but not limited to, combining the
Thrustmaster product with any unsuitable element, including in particular power supplies, rechargeable
batteries, chargers, or any other elements not supplied by Guillemot for this product); (2) in the event of
failure to comply with the instructions provided by Technical Support; (3) to software, said software being
subject to a specific warranty; (4) to consumables (elements to be replaced over the product’s lifespan:
disposable batteries, audio headset or headphone ear pads, for example); (5) to accessories (cables,
cases, pouches, bags, wrist-straps, for example); (6) if the product was sold at public auction.
This warranty is nontransferable.
Additional warranty provisions
In the United States of America and in Canada, this warranty is limited to the product’s internal mechanism
and external housing. In no event shall Guillemot or its affiliates be held liable to any third party for any
consequential or incidental damages resulting from the breach of any express or implied warranties. Some
States/Provinces do not allow limitation on how long an implied warranty lasts or exclusion or limitation of
liability for consequential or incidental damages, so the above limitations or exclusions may not apply to
you. This warranty gives you specific legal rights, and you may also have other rights which vary from
State to State or Province to Province.
Liability
If permitted under applicable law, Guillemot Corporation S.A. (hereinafter “Guillemot”) and its subsidiaries
disclaim all liability for any damages caused by one or more of the following: (1) the product has been
modified, opened or altered; (2) failure to comply with assembly instructions; (3) inappropriate or abusive
use, negligence, an accident (an impact, for example); (4) normal wear. If permitted under applicable law,
Guillemot and its subsidiaries disclaim all liability for any damages unrelated to a material or
manufacturing defect with respect to the product (including, but not limited to, any damages caused
directly or indirectly by any software, or by combining the Thrustmaster product with any unsuitable
element, including in particular power supplies, rechargeable batteries, chargers, or any other elements
not supplied by Guillemot for this product).
12/12
FCC STATEMENT
1. This device complies with Part 15 of the FCC Rules. Operation is subject to the following two
conditions:
(1) This device may not cause harmful interference, and
(2) This device must accept any interference received, including interference that may cause
undesired operation.
2. Changes or modifications not expressly approved by the party responsible for compliance could void the
user's authority to operate the equipment.
COPYRIGHT
© 2015 Guillemot Corporation S.A. All rights reserved. Thrustmaster® is a registered trademark of
Guillemot Corporation S.A. PlayStation® is a registered trademark of Sony Computer Entertainment, Inc.
Windows® is a registered trademark of Microsoft Corporation in the United States and/or other countries.
All other trademarks are the property of their respective owners. Illustrations not binding. Contents, designs
and specifications are subject to change without notice and may vary from one country to another. Made in
China.
ENVIRONMENTAL PROTECTION RECOMMENDATION
At the end of its working life, this product should not be disposed of with standard
household waste, but rather dropped off at a collection point for the disposal of Waste
Electrical and Electronic Equipment (WEEE) for recycling.
This is confirmed by the symbol found on the product, user manual or packaging.
Depending on their characteristics, the materials may be recycled. Through recycling
and other forms of processing Waste Electrical and Electronic Equipment, you can make
a significant contribution towards helping to protect the environment.
Please contact your local authorities for information on the collection point nearest you.
Retain this information. Colours and decorations may vary.
This product conforms to all standards regarding children 14 years of age and older. This product is not
suitable for use by children less than 14 years of age.
www.thrustmaster.com
TECHNICAL SUPPORT
http://ts.thrustmaster.com
1/12
Compatible : PC / PlayStation®3
Manuel de l'utilisateur
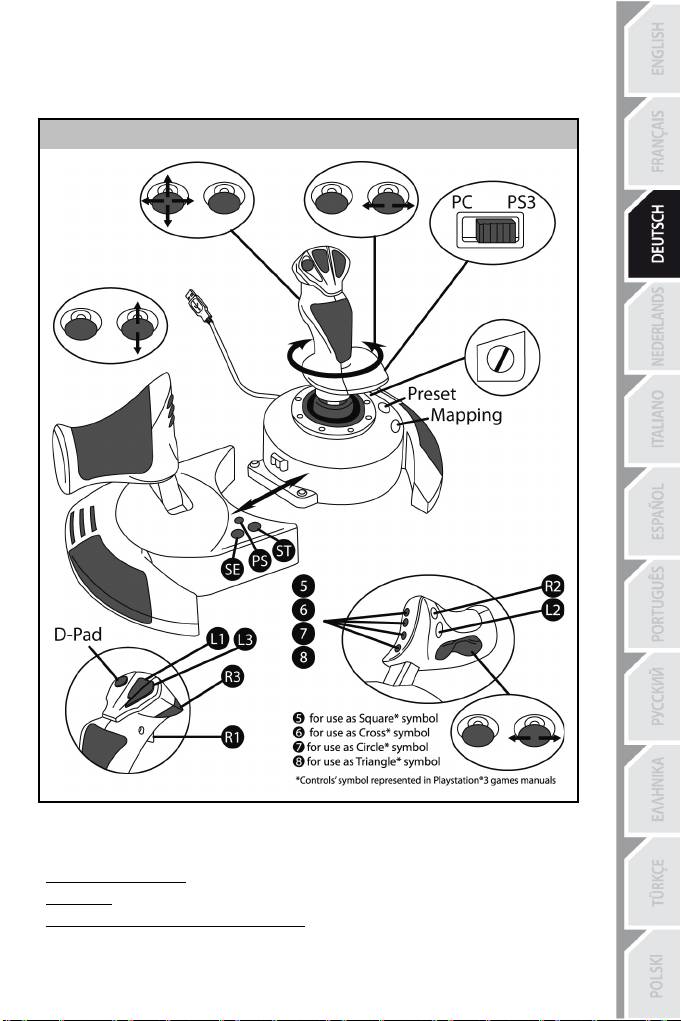
CARACTÉRISTIQUES TECHNIQUES
1. Manette des gaz
8. Clé Allen pour installer ou séparer la
2. Connecteur USB
manette des gaz
3. Sélecteur USB « PC » ou « PS3 »
9. Molette de réglage de la résistance du
4. Palonnier par rotation
du
manche
manche
ème
5. Vis de blocage du palonnier sur le
10. Palonnier par bouton bascule (ou 5
Axe
manche
sur PC)
6. Bouton PRESET
(pour
choisir
son
11. Boutons d’actions
programme)
12. Bouton HOME / PS avec Led
7. Bouton MAPPING (pour programmer)
13. Croix multidirectionnelle « Point de vue »

2/12
À LA DÉCOUVERTE DE VOTRE JOYSTICK HOTAS
MANETTE DES GAZ
Votre Joystick dispose d’une imposante manette des gaz grâce à laquelle vous
pourrez aisément contrôler l’accélération de votre appareil.
La manette des gaz est amovible et peut-être positionnée de 2 manières différentes :
- Soit détachée et séparée
du
manche
(pour récréer les véritables conditions de pilotage)
- Soit fixée au manche
(pour gain de stabilité et
de
place).
La manette des gaz est livrée par défaut détaché du Manche.
Pour fixer la manette des Gaz au Manche :
1. Retournez les 2 éléments (manette des gaz et manche)
2. Prenez la clé Allen (8) fixée sous la base du manche.
3. Positionnez la manette des gaz à gauche du manche.
Insérez le crochet qui est situé sur la gauche du manche dans la fente qui est situé à
droite de la manette des gaz
4. A l’aide de la clé, vissez alors les deux vis Allen sous la base
(situées à l’extrémité gauche de la base
du
manche).
5. Enroulez et fixez le câble de la manette des gaz dans le passe file prévue à cette effet.
6. Remettez la clé Allen dans son emplacement pour ne pas l’égarer.
Effectuez l’opération inverse pour détacher la manette des gaz du manche.
RESISTANCE DU MANCHE AJUSTABLE
Selon votre façon de jouer, vous voudrez un joystick ultra-sensible, qui réponde à la moindre
impulsion, ou au contraire un joystick plus dur, qui présente une certaine résistance lorsque
vous le manipulez.
La résistance du manche de votre Joystick est ajustable pour s’adapter à tous les joueurs.
Utilisez pour cela la molette de réglage de la résistance (9) située sous la base de
votre joystick.

3/12
FONCTION PALONNIER
Votre Joystick dispose d’une fonction palonnier, qui correspond dans un avion aux pédales
actionnées par le pilote pour faire braquer la gouverne de direction, permettant de faire
pivoter l’avion autour de son axe vertical (entraînant ainsi un virage de l’avion vers la gauche
ou la droite).
Cette fonction palonnier est accessible de deux façons :
- sur votre Joystick par rotation du manche (4) vers la gauche ou la droite
- ou via le bouton bascule (10) sur la manette des gaz.
Si vous utilisez uniquement le bouton bascule (ou que vous n’utilisez
pas
la
fonction
palonnier), vous pouvez alors désactiver la rotation du manche grâce à la vis de blocage (5)
située à la base du manche. Utilisez un tournevis à tête plate pour modifier sa position et
ainsi verrouiller/déverrouiller la rotation du manche.
Remarques :
- Sur PlayStation®3 et sur PC en mode « 4 axes » le bouton
bascule
est
couplé avec la
rotation du manche.
- Sur PC en mode « 5 axes » le bouton bascule devient indépendant de la rotation du
manche et apporte donc un axe progressif supplémentaire.
CROIX MULTIDIRECTIONNELLE « POINT DE VUE »
Votre Joystick est doté d’une Croix Point de Vue (13) qui, comme son nom l’indique, vous
permettra (dans les jeux le permettant) de surveiller instantanément tout ce qui se
passe autour de votre avion. Il vous suffit pour cela, depuis le menu de configuration de
votre jeu, de programmer les différentes vues (vue arrière, vue sur la gauche, vue sur la
droite,
mais
aussi vues externes) sur les directions de la croix Point de vue.
Vous pouvez bien entendu réserver la Croix Point de vue à d’autres utilisations (tir, etc.).

4/12
PC
INSTALLATION SUR PC
1. Mettre le sélecteur USB (3) de votre Joystick en position « PC »
2. Reliez le connecteur USB (2) à l'un des ports USB
de
vot
r
e
unité centrale. Windows XP ou
Vista détectera
automatiquement
le nouveau périphérique.
3. L'installation des pilotes est automatique.
Suivez les instructions affichées à l'écran pour terminer l'installation.
4. Sélectionnez Démarrer/Paramètres/Panneau de configuration puis double-cliquez sur
Contrôleurs de jeu
La boîte de dialogue Contrôleurs de jeu affichera le nom du Joystick avec l'état OK.
5. Dans le Control Panel, cliquez sur Propriétés pour configurer votre Joystick.
Test du périphérique : vous permet de tester et visualiser l’ensemble des fonctions.
Vous êtes maintenant prêt à jouer !
2 MODES D’AXES
Sur PC votre Joystick dispose de 2 mode d’axes :
•
Mode 4 Axes (Led
Home
Rouge)
Le bouton bascule est couplé avec la rotation du manche pour la fonction
palonnier
•
Mode 5 Axes (Led
Home
Verte)
Le bouton bascule devient indépendant pour l’attribution manuelle d’une autre
fonction
Pour basculer d’un mode à l’autre pressez simplement le bouton HOME (12)
REMARQUES IMPORTANTES SUR « PC »
- Le sélecteur USB (3) du votre Joystick doit toujours être positionné sur « PC » avant
de le connecter
- Lorsque vous branchez votre Joystick : laissez le manche, le palonnier et la manette des
gaz centrés et évitez de les déplacer (pour éviter tout problème de calibration).
5/12
CONFIGURATION DU « PRESET AUTOMATIQUE » - PC
Schéma du « PRESET AUTOMATIQUE » sur PC
LED HOME ROUGE = MODE 4 AXES LED HOME VERTE = MODE 5 AXES
Le preset en mode « 4 axes » correspond aux configurations par défaut de la plupart des
jeux de simulation aérienne sur PC.
Il vous permettra donc de lancer directement votre jeu sans avoir à reconfigurer votre
Joystick.
En mode « 5 axes » la fonction du bouton bascule devra être attribuée manuellement dans
les options de votre jeu.

6/12
PLAYSTATION®3
INSTALLATION SUR « PLAYSTATION®3 »
1. Mettez le sélecteur USB (3) de votre Joystick en position « PS3 ».
2. Branchez le connecteur USB (2) sur un port USB de la console.
3. Allumez votre console.
4. Lancez le jeu.
Vous êtes maintenant prêt à jouer !
UTILISATION DU BOUTON « HOME / PS »
Le bouton « Home / PS » de votre Joystick vous permettra de quitter vos jeux, d’accéder
aux menus et d’éteindre directement votre système PlayStation®3.
Lors de l’utilisation de cette fonction, la manette des gaz devra toujours être positionnée en
position centrale (pour éviter le dysfonctionnement de certains boutons.)
Il vous permettra également de basculer très rapidement entre la manette
et
le
joystick pour les
jeux qui alternent « phases à pied » et « phases de vol ».
REMARQUES IMPORTANTES SUR PLAYSTATION®3
- Le sélecteur USB (3) de votre Joystick doit toujours être positionné sur « PS3 » avant de
le connecter sur la console.
- En mode « 1 Joueur » si votre manette officielle est allumée, il est alors nécessaire de basculer
celle-ci en « port manette 2 » afin que votre Joystick soit fonctionnel.
- Sur PlayStation® 3, le Joystick n’est compatible qu’avec les
jeux
PlayStation®3 (et ne
fonctionnera pas avec les jeux PlayStation®2).
- Lorsque vous branchez votre Joystick : laissez le manche, le palonnier et la manette des gaz
centrés et évitez de les déplacer (pour éviter tout problème de calibration).
7/12
CONFIGURATION DU « PRESET AUTOMATIQUE » - PLAYSTATION®3
Schéma du « PRESET AUTOMATIQUE » sur PlayStation®3
LED HOME ROUGE
Ce preset correspond aux configurations par défaut de la plupart des jeux de simulation aérienne
sur PlayStation®3. Il vous permettra de lancer directement votre jeu sans avoir à reconfigurer votre
Joystick.
Les 4 directions du manche correspondent aux 4 directions du mini-stick gauche de la manette PS3.
La manette des gaz correspond à la direction Haut/Bas du mini-stick droit de la manette PS3.
Le palonnier (par rotation du manche et bouton bascule) correspond à la direction Gauche/Droite du
mini-stick droit de la manette PS3.

8/12
FONCTIONS AVANCEES
2 MODES DE PROGRAMMATION
Le bouton PRESET (6) et sa Led Lumineuse vous permettent de visualiser le type de
programmation choisi :
- AUTOMATIQUE (préprogrammé)
- ou MANUEL (programmé par vous-même).
Une simple pression sur ce bouton vous permettra (même en cours de jeu) de basculer
d’une programmation à l’autre.
•
PRESET AUTOMATIQUE : Led ETEINTE
Il s’agit ici de la programmation par défaut : les axes, la position des boutons et de la croix
sont préprogrammés
REPORTEZ-VOUS AU SCHEMA « CONFIGURATION DU PRESET AUTOMATIQUE ».
•
PRESET MANUEL : Led VERTE
Il s’agit ici de vos programmations personnelles :
- Les boutons, les axes et la croix peuvent être inversés entre eux.
- Vous pouvez modifier à votre convenance et à volonté ces programmations.
- Elles sont automatiquement sauvegardées à l’intérieur de votre Joystick (même
débranché).
- Lorsque que votre «PRESET MANUEL» est vierge, il est alors identique au «PRESET
AUTOMATIQUE».
MEMOIRE EEPROM
•
Votre Joystick dispose d'une puce interne qui garde
en
mémoire
l’ensemble de
vos programmations « PRESET MANUEL » (même Joystick éteint ou débranché
pendant une longue période).
•
Vous pouvez enregistrer un « PRESET MANUEL » différent sur chaque support
utilisé :
- un sur PC en mode
4
axes
- un sur PC en mode
5
axes
- un sur PlayStation®3
PROGRAMMATION / MAPPING
Vos programmations s’effectuent à l’aide du bouton MAPPING (7).
•
Exemples d’applications possibles :
- Inverser la position des boutons
- Inverser des axes entre eux = directions du manche, de
la
manette
des gaz ou du
palonnier (Dans ce cas, vous devez basculer les 2 directions du 1er axe vers
le second.)
- Inverser les 2 directions du même axe
- Inverser des boutons avec la direction d’un axe ou de la croix
•
Exception :
Les boutons HOME/PS, MAPPING et PRESET ne peuvent donc pas être reprogrammés
et déplacés.
9/12
PROCÉDURE DE PROGRAMMATION
ENREGISTRER UN « PRESET MANUEL »
Etapes
Action
Couleur de la
LED PRESET
1
Activez
PRESET
MANUEL
(6)
en appuyant sur
le
bouton.
VERT
2
Pressez et relâchez le bouton MAPPING (7).
CLIGNOTE
VERT
LENTEMENT
Pressez et relâchez le bouton
ou la direction à programmer.
CLIGNOTE VERT
RAPIDEMENT
4
Pressez et relâchez le bouton ou la direction sur lequel
ou laquelle vous
dési
r
ez
placer
votre fonction.
VERT
Votre « PRESET MANUEL » est désormais
actif
et
actualisé
(avec votre
programmation
effectuée).
EFFACER UN « PRESET MANUEL »
Etapes
Action
Couleur de
la
LED
PRESET
1
Activez votre PRESET MANUEL (6)
VERT
2
Pressez et maintenez appuyé le
bouton
MAPPING
(7)
pendant
2
secondes.
CLIGNOTE
VERT
2
SECONDES
Votre « PRESET MANUEL » est désormais vierge
(et redevenu identique au « Preset Automatique »).
RETOUR AU « PARAMETRAGE D’USINE »
Effacez en une seule manipulation l’ensemble de vos programmations ou réglages effectués
à la fois sur PC (en mode 4 et 5 axes) et sur PlayStation®3 :
Etapes
Action
Couleur de la
LED
HOME
/
PS
Appuyez simultanément sur
les
boutons
1
MAPPING
+
PRESET
CLIGNOTE
VERT
/
ROUGE
3 SECONDES
L’ensemble de vos « PRESET MANUEL » (PC + PS3) ou réglages sont désormais vierges.
Remarque : Cette manipulation a pour effet de redémarrer complètement votre Joystick
(sur PC, il est donc recommandé d’effectuer cette opération en dehors des jeux).

10/12
DEPANNAGE ET AVERTISSEMENT
•
Mon Joystick ne fonctionne pas correctement ou semble mal calibré :
- Eteignez votre ordinateur ou votre console, déconnectez votre Joystick,
rebranchez et relancez votre jeu.
- Lorsque vous branchez votre Joystick : laissez le manche, le palonnier et la manette
des gaz centrés et évitez de les déplacer (pour éviter tout problème de calibration).
- Quittez votre jeu, débranchez votre Joystick, vérifiez la bonne position du sélecteur USB
« PC/PS3 » (3), puis rebranchez le tout.
- Sur PS3, lors de l’accès au menu PS, la manette des gaz devra toujours être positionnée
en position centrale (pour éviter le dysfonctionnement de certains boutons.)
•
Je n’arrive pas à configurer mon Joystick :
- Dans le menu « Options / Contrôleur / Manettes ou Joystick » de votre jeu :
choisissez la configuration appropriée ou reconfigurez complètement les options du
contrôleur.
- Reportez-vous au manuel de l’utilisateur ou à l’aide en ligne de votre jeu pour
plus d’informations.
- Vous pouvez également utiliser la fonction « MAPPING » de votre Joystick pour
résoudre ce type de problème.
•
Mon Joystick est trop ou pas assez sensible :
- Votre Joystick s’auto-calibre de manière autonome après quelques mouvements
effectués sur les différents axes.
- Dans le menu « Options / Contrôleur / Manettes ou Joystick » de votre jeu :
ajustez la sensibilité et les zones mortes de votre Contrôleur (si l’option est disponible).
- Ajustez la résistance du manche à l’aide de la molette (9) située sous la base de
votre joystick.
•
La fonction Palonnier est trop sensible
- Désactivez la rotation du manche grâce à la vis de blocage (5) située
à
la
base du
manche et utilisez le bouton bascule pour la fonction palonnier.

INFORMATIONS RELATIVES A LA GARANTIE AUX CONSOMMATEURS
Dans le monde entier, Guillemot Corporation S.A. (ci-après « Guillemot ») garantit au consommateur que le
présent produit Thrustmaster est exempt de défaut matériel et de vice de fabrication, et ce, pour une période
de garantie qui correspond au délai pour intenter une action en conformité de ce produit. Dans les pays de
l’Union Européenne, ce délai est de deux (2) ans à compter de la délivrance du produit Thrustmaster. Dans
les autres pays, la durée de la période de garantie correspond au délai pour intenter une action en
conformité du produit Thrustmaster selon la législation en vigueur dans le pays où le consommateur avait
son domicile lors de l’achat du produit Thrustmaster (si une telle action en conformité n’existe pas dans ce
pays alors la période de garantie est de un (1) an à compter de la date d’achat d’origine du produit
Thrustmaster).
Nonobstant ce qui précède, les batteries sont garanties six (6) mois à compter de la date d’achat d’origine.
Si, au cours de la période de garantie, le produit semble défectueux, contactez immédiatement le
Support Technique qui vous indiquera la procédure à suivre. Si le défaut est confirmé, le produit devra
être retourné à son lieu d’achat (ou tout autre lieu indiqué par le Support Technique).
Dans le cadre de la garantie, le consommateur bénéficiera, au choix du Support Technique, du
remplacement ou de la réparation du produit défectueux. Lorsque la loi applicable l’autorise, toute
responsabilité de Guillemot et ses filiales (y compris pour les dommages indirects) se limite à la
réparation ou au remplacement du produit Thrustmaster. Lorsque la loi applicable l’autorise, Guillemot
exclut toutes garanties de qualité marchande ou d’adaptation à un usage particulier. Les droits légaux du
consommateur au titre de la législation applicable à la vente de biens de consommation ne sont pas
affectés par la présente garantie.
Cette garantie ne s’appliquera pas : (1) si le produit a été modifié, ouvert, altéré, ou a subi des
dommages résultant d’une utilisation inappropriée ou abusive, d’une négligence, d’un accident, de
l’usure normale, ou de toute autre cause non liée à un défaut matériel ou à un vice de fabrication (y
compris, mais non limitativement, une combinaison du produit Thrustmaster avec tout élément inadapté,
notamment alimentations électriques, batteries, chargeurs, ou tous autres éléments non-fournis par
Guillemot pour ce produit) ; (2) en cas de non respect des instructions du Support Technique ; (3) aux
logiciels, lesdits logiciels faisant l’objet d’une garantie spécifique ; (4) aux consommables (éléments à
remplacer pendant la durée de vie du produit : piles, coussinets de casque audio, par exemple) ; (5) aux
accessoires (câbles, étuis, housses, sacs, dragonnes, par exemple) ; (6) si le produit a été vendu aux
enchères publiques.
Cette garantie n’est pas transférable.
Stipulations additionnelles à la garantie
Aux États-Unis d’Amérique et au Canada, cette garantie est limitée au mécanisme interne et au boîtier
externe du produit. En aucun cas, Guillemot ou ses sociétés affiliées ne sauraient être tenues
responsables envers qui que ce soit de tous dommages indirects ou dommages accessoires résultant
du non respect des garanties expresses ou implicites. Certains États/Provinces n’autorisent pas la
limitation sur la durée d’une garantie implicite, ou l’exclusion ou la limitation de responsabilité pour les
dommages indirects ou accessoires, de sorte que les limitations ou exclusions ci-dessus peuvent ne pas
vous être applicables. Cette garantie vous confère des droits spécifiques ; vous pouvez également
bénéficier d’autres droits qui peuvent différer d’un État/Province à l’autre.
Responsabilité
Lorsque la loi applicable l’autorise, Guillemot Corporation S.A. (ci-après « Guillemot ») et ses filiales
excluent toute responsabilité pour tous dommages causés par un ou plusieurs des faits suivants: (1) le
produit a été modifié, ouvert, altéré, (2) l’irrespect des instructions de montage, (3) l’utilisation
inappropriée ou abusive, la négligence, l’accident (un choc, par exemple), (4) l’usure normale du produit.
Lorsque la loi applicable l’autorise, Guillemot et ses filiales excluent toute responsabilité pour tout
dommage dont la cause n’est pas liée à un défaut matériel ou à un vice de fabrication du produit (y
compris, mais non limitativement, tout dommage causé directement ou indirectement par tout logiciel, ou
par une combinaison du produit Thrustmaster avec tout élément inadapté, notamment alimentations
électriques, batteries, chargeurs, ou tous autres éléments non-fournis par Guillemot pour ce produit).
11/12
12/12
COPYRIGHT
®
© 2015 Guillemot Corporation S.A. Tous droits réservés. Thrustmaster
est une marque déposée de
Guillemot Corporation S.A. PlayStation® est une marque déposée de Sony Computer Entertainment
Inc. Windows® est une marque déposée de Microsoft Corporation aux Etats-Unis et/ou dans d’autres
pays. Toutes les autres marques sont la propriété de leurs propriétaires respectifs. Illustrations non
contractuelles. Le contenu, la conception et les spécifications sont susceptibles de changer sans préavis
et de varier selon les pays. Fabriqué en Chine.
RECOMMANDATION RELATIVE A LA PROTECTION DE L’ENVIRONNEMENT
En fin de vie, ce produit ne doit pas être éliminé avec les déchets ménagers normaux
mais déposé à un point de collecte des déchets d'équipements électriques et
électroniques en vue de son recyclage.
Ceci est confirmé par le symbole figurant sur le produit, le manuel utilisateur ou
l’emballage.
En fonction de leurs caractéristiques, les matériaux peuvent être recyclés. Par le
recyclage et par les autres formes de valorisation des déchets d'équipements
électriques et électroniques, vous contribuez de manière significative à la protection de l’environnement.
Veuillez consulter les autorités locales qui vous indiqueront le point de collecte concerné.
Informations à conserver. Les couleurs et décorations peuvent varier.
Ce produit est en conformité avec l’ensemble des normes relatives aux enfants de plus de 14 ans. Il ne
convient pas aux enfants de moins de 14 ans.
www.thrustmaster.com
SUPPORT TECHNIQUE
http://ts.thrustmaster.com
1/12
Kompatibel: PC / PlayStation®3
Benutzerhandbuch
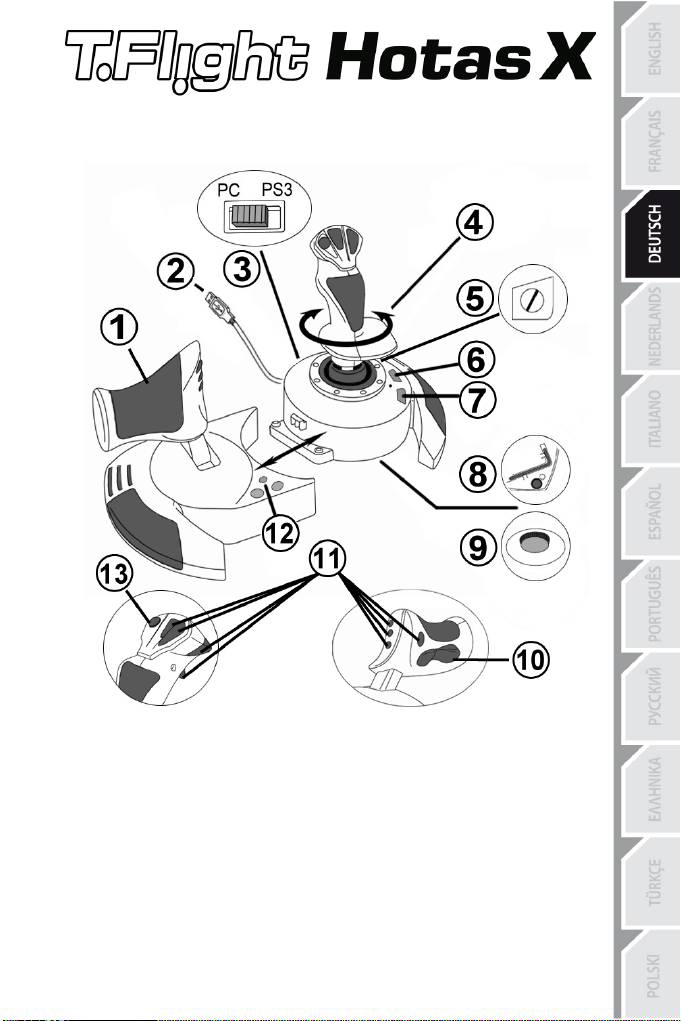
TECHNISCHE FEATURES
1. Gashebel
8. Inbusschlüssel zur Installation oder
2. USB Stecker
Abnahme des Gashebels
3. USB Wahlschalter "PC" oder "PS3"
9. Justierungsschraube
fü
r
Griffwiderstand
4. Ruderfunktion via drehbarem Griff
10. Ruder via Kippschalter (oder 5. Achse auf
5. Ruder-Feststellschraube am Griff
PC)
6. PRESET-Button (Programmierungs-
11. Action Buttons
auswahl)
12. HOME / PS Button mit LED
7. MAPPING
Button (zum
13. Multidirektionaler "Point
Of View"
Programmieren)
Kopfschalter

2/12
LERNEN SIE IHREN HOTAS JOYSTICK KENNEN
GASHEBEL
Ihr Joystick verfügt über einen großen Gashebel, mit dem Sie die Beschleunigung Ihres
Flugzeugs leicht kontrollieren können.
Der Gashebel ist abnehmbar und kann und kann in zwei unterschiedlichen Positionen
benutzt werden:
- Alleinstehend, separiert vom Joystick
- (um authentische Pilotenbedingungen zu schaffen)
- Am Joystick befestigt
(platzsparend und größere Stabilität).
Normalerweise wird der Gashebel unmontiert mit dem Joystick ausgeliefert.
Um den Gashebel am Joystick zu befestigen:
1. Drehen Sie beide Elemente auf den Kopf (Gashebel und Joystick).
2. Nehmen Sie den Inbusschlüssel (8), der unterhalb an der Basis des Joysticks befestigt
ist.
3. Positionieren Sie den Gashebel linkerhand vom Joystick.
Stecken Sie die Verbindungslasche links an der Joystickbasis in die Öffnung rechts am
Gashebel.
4. Mit dem Inbusschlüssel drehen Sie die beiden Sechskantschrauben unterhalb der Basis
fest (zu finden auf der linken Seite der Joystickbasis).
5. Rollen Sie das Gashebelkabel auf und fädeln dies durch die Kabelführungsöffnung.
6. Stecken Sie den Inbusschlüssel wieder an seinen Platz, um diesen nicht zu verlieren.
Führen Sie diese Prozedur in umgekehrter Reihenfolge aus, um den Gashebel wieder vom
Joystick zu trennen.
JUSTIERBARER GRIFFWIDERSTAND
Je nach der Art des Spiels, möchten Sie vielleicht einen hochsensiblen Joystick haben, der
auf die kleinsten Bewegungen reagiert - oder einen festeren Joystick, der einen deutlich
spürbaren Wiederstand beim benutzen bietet.
Der Griffwiderstand Ihres Joysticks ist justierbar, um diesen allen Spielern anzupassen. Zur
Justierung nutzen Sie bitte die Justierungsschraube (9), die Sie unten an der Basis
des Joysticks finden.
3/12
RUDERFUNKTION
Ihr Joystick verfügt über eine Ruderfunktion, die in einem Flugzeug den Pedalen
entspricht, die ein Pilot zur Steuerung benutzt, um das Flugzeug um seine vertikale
Achse zu drehen (danach fliegt das
Flugzeug
entweder
nach rechts oder links). Diese
Ruderfunktion können Sie mit dem Joystick mittels drehen des Griffes nach rechts oder
links ausführen.
Diese Ruderfunktion kann auf zwei Wegen ausgeführt werden:
- Auf Ihrem Joystick durch drehen des Griffes (4) nach rechts oder links.
- Oder via des Kippschalters (10) am Gashebel.
Falls Sie nur den Kippschalter nutzen (oder die Ruderfunktion
nicht
nutzen),
können
Sie die Drehbarkeit des Griffes mit der Feststellschraube (5) an der Basis des
Joysticks blockieren. Benutzen Sie einen flachen Schraubenzieher, um die Position der
Schraube zu ändern, um so die Ruderfunktion zu sperren oder entsperren.
Bitte beachten:
- Im 4-Achsenmodus auf der PlayStation®3 und auf dem PC ist der Kippschalter mit der
Drehung des Griffes kombiniert.
- Im 5-Achsenmodus auf dem PC ist der Kippschalter unabhängig von der Griffdrehung
und bietet somit eine zusätzliche, progressive Achse.
MULTIDIREKTIONALER "POINT OF VIEW" KOPFSCHALTER
Ihr Joystick enthält einen “Point Of View” Kopfschalter (3), mit dem Sie – wie der
Name schon sagt - alles beobachten können (in Spielen, die dies gestatten), was um das
Flugzeug herum geschieht. Um dies ausführen zu können, gehen Sie einfach in das
Konfigurationsmenü Ihres Spiels und programmieren die verschiedenen Blickwinkel
(Rücksicht, Sicht nach links/rechts und ebenfalls externe Blickwinkel) auf die Richtungen
des “Point Of View” Kopfschalters.
Natürlich können Sie dem “Point Of View” Kopfschalter auch andere Funktionen (Feuern,
etc.) zuweisen.

4/12
PC
INSTALLATION AUF DEM PC
1. Setzen Sie den USB Wahlschalter (3) Ihres Joysticks auf die Position “PC”..
2. Stecken Sie den USB Stecker (2) in einen freien USB Port Ihres Computers. Windows XP
oder Vista wird nun das neue Gerät automatisch erkennen.
3. Die Treiber werden automatisch installiert.
Befolgen Sie die Bildschirmanweisungen, um mit der Installation fortzufahren.
4. Klicken Sie auf Start/Einstellungen/Systemsteuerung und dann (doppel-)klicken Sie
auf Gamecontroller.
In der Dialogbox von Gamecontroller wird der Name des Joysticks mit dem OK Status
angezeigt.
5. Klicken Sie auf Eigenschaften im Kontrollfenster, um Ihren Joystick zu konfigurieren.
Test Gerät: Hier können Sie alle Funktionen Ihres Joysticks testen und sich ansehen.
Sie können jetzt mit Spielen loslegen!
2 UNTERSCHIEDLICHE ACHSENMODI
Ihr Joystick verfügt auf dem PC über zwei Achsenmodi:
•
4-Achsenmodus
(Rote
Home
LED)
Der Kippschalter ist für die Ruderfunktion mit der Griffdrehung kombiniert.
•
5- Achsenmodus
(Grüne
Home
LED)
Der Kippschalter ist unabhängig und kann manuell mit einer anderen Funktion
belegt werden.
Um von einem Modus in den anderen zu schalten, einfach den
HOME
Button
(12) drücken.
WICHTIGE ANMERKUNGEN FÜR PC
- Der USB Wahlschalter (3) Ihres Joysticks muß immer vor dem Anschluß an Ihren
Computer auf die Position “PC” gestellt werden.
- Beim Anschluß Ihres Joysticks: Lassen Sie den Griff und das Ruder in der Mitte stehen
und bewegen diese nicht (um Kalibrierungsprobleme zu vermeiden).
5/12
“AUTOMATISCHE PRESET”-KONFIGURATION - PC
“AUTOMATISCHES PRESET” Diagramm auf dem PC
ROTE HOME LED = 4-Achsenmodus GRÜNE HOME LED = 5- Achsenmodus
Die "4-Achsenmodus"-Voreinstellung entspricht den vorgegebenen Konfigurationen für die
meisten Flugsimulationsspiele auf dem PC.
Somit können Sie sofort mit Ihrem Spiel loslegen, ohne vorher Ihren Joystick konfigurieren zu
müssen.
Im "5-Achsenmodus" muß die Funktion des Kippschalters in den Optionen des Spiels
manuell zugewiesen werden.

6/12
PLAYSTATION®3
INSTALLATION AUF DER PLAYSTATION®3
1. Setzen Sie den USB Wahlschalter (3) Ihres Joysticks auf die Position “PS3”.
2. Stecken Sie den USB Stecker (2) in einen freien USB Port Ihrer Konsole.
3. Schalten Sie Ihre Konsole ein.
4. Rufen Sie Ihr Spiel auf.
Sie können nun gleich mit Spielen loslegen!
BENUTZEN DES “HOME / PS” BUTTON
Der “Home / PS” Button Ihres Joysticks ermöglicht Ihnen das Beenden Ihrer Spiele, Zugang
zu den Spielemenüs und das direkte Ausschalten Ihres PlayStation®3 Systems.
Wenn Sie diese Funktion nutzen, muß der Gashebel immer auf eine zentrale Position gesetzt
werden (um Fehlfunktionen einiger Buttons zu vermeiden).
Ebenso wird ein schnelles Umschalten zwischen Gamepad und Joystick ermöglicht, je nach
Wechsel zwischen „Zufuß-Sequenzen“ und „Flugsequenzen“ im Spiel.
WICHTIGE ANMERKUNGEN FÜR PLAYSTATION®3
- Der USB Wahlschalter (3) Ihres Joysticks muß immer vor dem Anschluß an Ihre
Konsole auf die Position“PS3” gestellt werden.
- Im “1 Player (Spieler)” Modus: Ist Ihr offizielles Gamepad an, müssen Sie dieses auf den
“Kontrollerport 2” umschalten, damit Ihr Joystick funktionieren kann.
- Auf der PlayStation®3 ist der Joystick ausschließlich kompatibel mit PlayStation®3
Spielen (und funktioniert auf keinen Fall mit PlayStation® 2 Spielen).
- Beim Anschluß Ihres Joysticks: Lassen Sie den Griff und das Ruder in der Mitte stehen und
bewegen diese nicht (um Kalibrierungsprobleme zu vermeiden).
7/12
“AUTOMATISCHE PRESET” KONFIGURATION - PLAYSTATION®3
“AUTOMATISCHES PRESET” Diagramm auf PlayStation®3
ROTE HOME LED
Diese Voreinstellung korrespondiert mit den vorgegebenen Konfigurationswerten für die meisten
Flugsimulationsspielen auf der PlayStation® 3. Daher sind Sie in der Lage sofort „Abzuheben“, ohne Ihren Joystick
rekonfigurieren zu müssen
Die 4 Richtungen des Griffs: Korrespondieren mit den 4 Richtungen des linken Mini-Sticks Ihres Gamepads.
Der Gashebel: Korrespondiert mit den Hoch/Runter Richtungen des rechten Mini-Sticks Ihres Gamepads.
Das Ruder (via Drehgriff und Kippschalter): Korrespondiert mit den Links/Rechts Richtungen
des rechten Mini-Sticks Ihres PS3 Gamepads.

8/12
ERWEITERTE FUNKTIONEN
2 PROGRAMMIERMODI
Der PRESET Button (6) und die LED gestatten Ihnen den Typ der gewählten
Programmierung zu sehen:
- AUTOMATISCH (vorprogrammiert)
- oder MANUELL (von Ihnen programmiert).
Einmaliges drücken dieses Buttons erlaubt Ihnen das Umschalten von einem zum anderen
Programmodus – auch während des Spiels.
•
AUTOMATISCHE VOREINSTELLUNG: LED IST AUS
Dies repräsentiert die werksseitige Programmierung: Die Achsen, Positionen der Buttons und
des Kopfschalters sind vorprogrammiert.
BITTE SCHAUEN SIE SICH DAS DIAGRAMM “AUTOMATISCHE PRESET” KONFIGURATION AN.
•
MANUELLE VOREINSTELLUNG: GRÜNE LED
Dies repräsentiert Ihre eigene Programmierung:
- Die Buttons, Achsen und der Kopfschalter können untereinander geschaltet werden.
- Sie können die Programmierung jederzeit nach Ihrem Gusto modifizieren.
- Die Programmierung wird automatisch in Ihrem Joystick gespeichert (auch wenn dieser
nicht mit einem Gerät verbunden ist).
- Ist Ihr “MANUELLES PRESET” leer, so ist dieses identisch mit dem
“AUTOMATISCHEN PRESET”.
EEPROM SPEICHER
•
Ihr Joystick verfügt über einen internen Speicherchip, der
alle
Ihre
“MANUELLEN
PRESETS” Programmierungen abspeichert (auch wenn der Joystick für längere Zeit
ausgeschaltet oder ausgestöpselt wurde).
•
Sie können für jede Plattform verschiedene “MANUELLE PRESETS” speichern:
- Eine für PC im 4-Achsenmodus
- Eine für PC im 5-Achsenmodus
- Eine für PlayStation®3
PROGRAMMIEREN/MAPPING (Zuordnung)
Sie können Ihren Joystick mittels des MAPPING Buttons (7) programmieren.
•
Beispiele
mögliche
r
Applikationen:
- Umschalten der Buttonpositionen.
- Umschalten der Achsen untereinander = Richtungen des Griffs, auf en Gashebel oder
auf das Ruder (in diesem Fall müssen Sie
die
zwei
Richtungen der ersten Achse auf
die der zweiten Achse zuordnen).
- Umschalten der beiden Richtungen der gleichen Achse.
- Umschalten der Buttons auf eine Achsenrichtung oder auf den Kopfschalter.
9/12
•
Ausnahme:
Die HOME / PS, MAPPING und PRESET Buttons können nicht neu programmiert
und umgelegt werden.
PROGRAMMIERPROZEDUR
SPEICHERN EINER "MANUELLEN VOREINSTELLUNG (PRESET)"
Schritt
Aktion
PRESET LED
1
MANUELLES PRESET (6) durch drücken
des
Buttons
aktivieren.
GRÜN
2
Drücken und loslassen des MAPPING Buttons (7).
BLINKT
LANGSAM
GRÜM
3
Drücken und loslassen
des
Buttons/Richtung,
der/die
programmiert
werden
soll.
BLINKT
SCHNELL
GRÜN
4
Drücken und loslassen des Buttons/Richtung, auf
der/die Funktion plaziert werden soll.
GRÜN
Ihr “MANUELLES PRESET” ist nun
aktiviert
und
aktuell
(mit
Ihrer
Programmierung).
LÖSCHEN EINER "MANUELLEN VOREINSTELLUNG (PRESET)"
Schritt
Aktion
PRESET LED
1
Aktivieren Sie Ihr MANUELLES PRESET (6)
GRÜN
2
Drücken und halten des MAPPING Buttons
für
2
Sekunden.
BLINKT FÜR 2
SEK. GRÜN
Ihr “MANUELLES PRESET”
ist
nun
leer
(und erneut identisch mit dem
“AUTOMATISCHEN
PRESET”).
Rückkehr zur “WERKSEINSTELLUNG”
Sie können all Ihre Programmierungen für beide Plattformen - PC (im 4- und 5-
Achsenmodus) und PlayStation®3 – mit einem einzigen Schritt löschen:
Schritt
Aktion
HOME / PS LED
1
Drücken Sie gleichzeitig
die
Buttons
MAPPING
+
PRESET
BLINKT
GRÜN/ROT
FÜR
3
SEKUNDEN
All Ihre “MANUELLEN PRESETS” (PC + PS3) oder Einstellungen sind nun gelöscht.
Bitte beachten: Diese Prozedur startet Ihren Joystick komplett neu (insofern sollten Sie diese
Aktion auf dem PC nur außerhalb eines laufenden Spiels ausführen).

10/12
FEHLERBESEITIGUNG UND WARNUNG
•
Mein Joystick scheint nicht richtig zu funktionieren oder scheint nicht richtig
kalibriert zu sein:
- Schalten Sie Ihre Konsole oder Ihren Computer aus und stöpseln den Joystick komplett
von dem jeweiligen System ab. Danach schließen Sie selbigen wieder an, starten Ihr
jeweiliges System und starten das Spiel erneut.
- Beim Anschluß des Joysticks: Griff, Ruder und Drosselklappe mittig stehen lassen und
nicht bewegen (um Kalibrierungsprobleme zu vermeiden).
- Beenden Sie Ihr laufendes Spiel und stöpseln Sie Ihren Joystick komplett vom jeweiligen
System ab. Überzeugen Sie sich, ob der USB Wahlschalter (PC / PS3) (3) in der richtigen
Position ist. Schließen Sie danach Ihren Joystick wieder an und rufen Ihr Spiel auf.
- Wenn Sie auf das PS Menü auf der PS3 zugreifen, muß der Gashebel immer auf die
zentrale Position gestellt werden (um Fehlfunktionen einiger Buttons zu vermeiden).
•
Ich kann meinen Joystick nicht konfigurieren:
- In Ihrem Spiel- oder Joystick-Menü rufen Sie bitte auf: “Optionen / Kontroller / Gamepad
oder Joystick”. Wählen Sie nun die am besten geeignete Konfiguration oder rekonfigurieren
Sie komplett die Kontrolleroptionen.
- Bitte lesen Sie in der Bedienungsanleitung Ihres Spiels für mehr Informationen nach oder
bemühen Sie die Online-Hilfefunktion.
- Sie können auch die “MAPPING” Funktion Ihres Joysticks nutzen, um dieses Problem zu
beheben.
•
Mein Joystick ist zu empfindlich oder nicht empfindlich genug:
- Ihr Joystick kalibriert sich selbständig, nachdem Sie einige Bewegungen auf verschiedenen
Achsen ausgeführt haben.
- Im Menü des Spiels “Optionen / Kontroller / Gamepad oder Joystick” aufrufen: Justieren
Sie die Empfindlichkeit oder toten Winkel (falls diese Optionen zur
Verfügung
stehen).
- Justieren Sie den Griffwiederstand mittels der Justierungsschraube (9) an der Unterseite
der Basis Ihres Joysticks.
•
Die Ruderfunktion ist zu empfindlich:
- Deaktivieren Sie die Griffdrehung mittels der Feststellschraube (5) an der Basis des
Joysticks und benutzen den Kippschalter für die Ruderfunktion.

11/12
Kunden-Garantie-Information
Guillemot Corporation S.A. (fortfolgend “Guillemot”) garantiert Kunden weltweit, daß dieses Thrustmaster
Produkt frei von Mängeln in Material und Verarbeitung für eine Gewährleistungsfrist ist, die mit der Frist
für eine Mängelrüge bezüglich des Produktes übereinstimmt. In den Ländern der Europäischen Union
entspricht diese einem Zeitraum von zwei (2) Jahren ab Kaufdatum des Thrustmaster Produktes. In
anderen Ländern entspricht die Gewährleistungsfrist der zeitlichen Begrenzung für eine Mängelrüge
bezüglich des Thrustmaster Produktes in Übereinstimmung mit anwendbarem Recht des Landes, in dem
der Kunde zum Zeitpunkt des Erwerbs eines Thrustmaster Produktes wohnhaft ist. Sollte eine
entsprechende Regelung in dem entsprechenden Land nicht existieren, umfasst die
Gewährleistungspflicht einen Zeitraum von einem (1) Jahr ab dem originären Kaufdatum des
Thrustmaster Produktes.
Ungeachtet dessen werden wiederaufladbare Batterien (fortfolgend „Akkus“) durch eine
Gewährleistungsfrist von sechs (6) Monaten ab dem Kaufdatum abgedeckt.
Sollten bei dem Produkt innerhalb der Gewährleistungsfrist Defekte auftreten, kontaktieren Sie
unverzüglich den Technischen Kundendienst, der die weitere Vorgehensweise anzeigt. Wurde der
Defekt bestätigt, muß das Produkt an die Verkaufsstelle (oder an eine andere Stelle, je nach Maßgabe
des Technischen Kundendienstes) retourniert werden.
Im Rahmen dieser Garantie sollte das defekte Produkt des Kunden, je nach Entscheidung des
Technischen Kundendienstes, repariert oder ausgetauscht werden. Wenn nach geltendem Recht
zulässig, beschränkt sich die volle Haftung von Guillemot und ihrer Tochtergesellschaften auf die
Reparatur oder den Austausch des Thrustmaster Produktes (inklusive Folgeschäden). Wenn nach
geltendem Recht zulässig, lehnt Guillemot alle Gewährleistungen der Marktgängigkeit oder Eignung für
einen bestimmten Zweck ab. Die Rechte des Kunden in Übereinstimmung mit anwendbarem Recht
bezüglich des Verkaufs auf Konsumgüter wird durch diese Garantie nicht beeinträchtigt.
Der Gewährleistungsanspruch verfällt: (1) Falls das Produkt modifiziert, geöffnet, verändert oder ein Schaden
durch unsachgemäßen oder missbräuchlichen Gebrauch hervorgerufen wurde, sowie durch Fahrlässigkeit,
einen Unfall, Verschleiß oder irgendeinem anderen Grund – aber nicht durch Material- oder
Herstellungsfehler (einschließlich, aber nicht beschränkt auf, die Kombination der Thrustmaster Produkte mit
ungeeigneten Elementen, insbesondere Netzteile, Akkus, Ladegeräte, oder andere Elemente, die von
Guillemot für dieses Produkt nicht mitgeliefert wurden); (2) Im Falle der Nichteinhaltung der durch den
Technischen Support erteilten Anweisungen; (3) Durch Software. Die besagte Software ist Gegenstand einer
speziellen Garantie; (4) Bei Verbrauchsmaterialien (Elemente, die während der Produktlebensdauer
ausgetauscht werden, wie z. B. Einwegbatterien, Ohrpolster für ein Audioheadset oder für Kopfhörer); (5) Bei
Accessoires (z. B. Kabel, Etuis, Taschen, Beutel, Handgelenk-Riemen); (6) Falls das Produkt in einer
öffentlichen Versteigerung verkauft wurde.
Diese Garantie ist nicht übertragbar.
Haftung
Wenn nach dem anwendbaren Recht zulässig, lehnen Guillemot Corporation S.A. (fortfolgend
"Guillemot") und ihre Tochtergesellschaften jegliche Haftung für Schäden, die auf eine oder mehrere der
folgenden Ursachen zurückzuführen sind, ab: (1) das Produkt wurde modifiziert, geöffnet oder geändert;
(2) Nichtbefolgung der Montageanleitung; (3) unangebrachte Nutzung, Fahrlässigkeit, Unfall (z. B. ein
Aufprall); (4) normalem Verschleiß. Wenn nach dem anwendbaren Recht zulässig, lehnen Guillemot und
seine Niederlassungen jegliche Haftung für Schäden, die nicht auf einen Material- oder
Herstellungsfehler in Bezug auf das Produkt beruhen (einschließlich, aber nicht beschränkt auf, etwaige
Schäden, die direkt oder indirekt durch Software oder durch die Kombination der Thrustmaster Produkte
mit ungeeigneten Elementen, insbesondere Netzteile, Akkus, Ladegeräte, oder andere Elemente, die von
Guillemot für dieses Produkt nicht geliefert wurden), ab.
12/12
COPYRIGHT
®
© Guillemot Corporation S.A. 2015. Alle Rechte vorbehalten. Thrustmaster
ist ein eingetragenes
Warenzeichen der Guillemot Corporation S.A. PlayStation® ist ein eingetragenes Warenzeichen von
Sony Computer Entertainment Inc. Windows® ist eine eingetragene Warenzeichen der Microsoft
Corporation in den Vereinigten Staaten von Amerika und/oder anderen Ländern. Alle anderen
Handelsmarken sind im Besitz Ihrer jeweiligen Eigentümer. Illustrationen nicht verbindlich. Inhalte,
Design und Spezifikationen können ohne vorherige Ankündigung geändert werden und können von Land
zu Land unterschiedlich sein. Hergestellt in China.
HINWEISE ZUM UMWELTSCHUTZ
Dieses Produkt darf nach Ende seiner Lebensdauer nicht über den Hausmüll
entsorgt werden, sondern muss an einem Sammelpunkt für das Recycling von
elektrischen und elektronischen Geräten abgegeben werden.
Das Symbol auf dem Produkt, der Gebrauchsanleitung oder der Verpackung weist
darauf hin.
Die Werkstoffe sind gemäß ihrer Kennzeichnung wiederverwertbar. Mit der
Wiederverwertung, der stofflichen Verwertung oder anderen Formen von Altgeräten
leisten Sie einen wichtigen Beitrag zum Schutz unserer Umwelt. Bitte erfragen Sie
bei der Gemeindeverwaltung die zuständige Entsorgungsstelle.
Wichtige Informationen. Die Farben und Verzierungen können abweichen.
Dieses Produkt stimmt mit allen Standards, die Kinder ab 14 und älter betreffen, überein. Dieses Produkt
ist nicht geeignet für den Gebrauch von Kindern, die jünger als 14 Jahre sind.
www.thrustmaster.com
TECHNISCHER SUPPORT
http://ts.thrustmaster.com
1/12
Compatibel met PC / PlayStation®3
Handleiding
TECHNISCHE KENMERKEN
1. Throttle
8. Inbussleutel voor losmaken of vastzetten
2. USB-aansluiting
van throttle
3. USB-schakelaar (PC of PS3)
9. Wieltje voor
aanpassen
stickweerstand
4. Roerfunctie via schommelstick
10. Roer via rocking-knop (of 5e as op pc)
5. Roerfixatieschroef op stick
11. Actieknoppen
6. PRESET-knop (om programmering
12. HOME/PS-knop met LED
te selecteren)
13. Multidirectionele Point-Of-View-hat-switch
7. MAPPING-knop (om te
programmeren)

2/12
DE DIVERSE FUNCTIES VAN DE HOTAS-JOYSTICK
THROTTLE
De joystick beschikt over een grote throttle die uitermate geschikt is voor het bedienen van
de stuwkracht van een vliegtuig.
De throttle is afneembaar en kan op twee verschillende manieren worden gebruikt:
- Losgemaakt en apart van
de
joystick
(voor een
authentieke
pilootbeleving)
- Bevestigd aan de joystick
(voor meer stabiliteit en minder ruimtebeslag).
Standaard wordt de throttle los van de joystick geleverd.
De throttle aan de joystick bevestigen:
1. Zet beide items op hun kop (de throttle en de joystick).
2. Maak de inbussleutel (8) los die onderop de voet van de joystick is vastgeklemd.
3. Plaats de throttle links van de joystick.
Steek de aansluittab aan de linkerkant van de joystickvoet in de opening op de
rechterkant van de throttle.
4. Draai de twee inbusbouten onderop de voet vast
met
de
inbussleutel
(de bouten bevinden zich aan de linkerkant van
de
joystickvoet
)
.
5. Rol de throttle-kabel op en leid deze door de kabeldoorgang.
6. Klem de inbussleutel terug op zijn plaats om hem niet kwijt te raken.
Voer deze procedure in omgekeerde volgorde uit om de throttle
los
te
maken van de
joystick.
STICK MET INSTELBARE WEERSTAND
Bij de ene game wilt u graag een supergevoelige joystick die reageert op de minste of
geringste aanraking en bij een andere game wilt u een stick met meer weerstand die pas in
actie komt als u er flink tegen duwt.
De weerstand van de stick is instelbaar zodat u er elk type game mee kunt spelen. U kunt de
weerstand instellen met behulp van het wieltje voor het aanpassen van de stickweerstand
(9) onderop de voet van de joystick.

3/12
ROERFUNCTIE
De joystick beschikt over een roerfunctie die correspondeert met de pedalen in een vliegtuig
waarmee de piloot het stuur bedient om het vliegtuig om de verticale as te kantelen (om een
bocht naar links of rechts te maken). Deze roerfunctie is beschikbaar op de joystick door de
stick naar links of rechts te draaien.
Deze roerbediening is op twee manieren beschikbaar:
- op de joystick door de stick (4) naar links
of
rechts
te draaien.
- of via de rocking-knop (10) op de throttle.
Als u alleen de rocking-knop gebruikt (of als u de roerfunctie niet nodig hebt), kunt u
de draaiing van de stick vergrendelen met de fixatieschroef (5) in de voet van de stick.
Gebruik een gewone schroevendraaier om de roerfunctie vast of los te zetten.
Opmerkingen:
- Op de PlayStation®3 en op de pc in "4-assen"-modus is de rocking-knop gekoppeld aan
de draaiing van de stick.
- Op de pc in "5-assen"-modus werkt de rocking-knop onafhankelijk van de draaiing van de
stick en biedt daarmee een extra progressieve as.
MULTIDIRECTIONELE POINT-OF-VIEW-HAT-SWITCH
De joystick beschikt over een Point Of View-hat-switch (13) waarmee u in één keer
een overzicht krijgt van alles dat zich rondom
uw
vliegtuig
afspeelt (indien de game deze
mogelijkheid biedt). Als u deze functie wilt gebruiken, hoeft u alleen maar in het
instellingenmenu van uw game de verschillende weergaven (links, rechts, naar voren, naar
achteren) op de richtingen van de Point of View-hat-switch te programmeren.
De Point Of View-hat-switch kan natuurlijk ook voor andere functies worden gebruikt zoals
schieten.

4/12
PC
INSTALLATIE OP DE PC
1. Zet de USB-schakelaar (3) van de joystick in de stand PC.
2. Sluit de USB-connector (2) aan op een van de USB-poorten van de computer. Windows
XP of Vista herkent het nieuwe apparaat automatisch.
3. De drivers worden automatisch geïnstalleerd.
Volg de aanwijzingen op het scherm om de installatie te voltooien.
4. Klik op Start/Configuratiescherm en dubbelklik vervolgens op Spelbesturingen.
In het dialoogvenster Spelbesturingen dat nu wordt geopend, ziet u de naam van de
joystick met als status OK.
5. Klik op Eigenschappen in het dialoogvenster om de joystick te configureren.
Apparaat testen: Hiermee kunt u alle functies van de joystick testen en bekijken.
Nu kan er gespeeld worden!
TWEE ASSEN-MODI
Op de pc beschikt de joystick over twee verschillende assen-modi:
•
4 Assen-modus (
Home
-LED
brandt
rood
)
De rocking-knop is gekoppeld aan de draaiing van de stick voor de bediening
van het roer.
•
5 Assen-modus (
Home
-LED
brandt
groen)
De rocking-knop werkt onafhankelijk en er kan handmatig een andere functie
aan worden toegekend.
Met de Force-knop (12) wordt van de ene modus naar de andere overgeschakeld.
BELANGRIJKE OPMERKINGEN VOOR PC-GEBRUIKERS
Zet de USB-schakelaar (3) van de joystick altijd in de stand PC voordat u de joystick
aansluit.
- Bij het aansluiten van de joystick: laat de stick, het roer en de throttle tijdens het aansluiten
van de joystick in het midden staan en raak deze niet aan (dit ter voorkoming van problemen
met de kalibratie).
5/12
AUTOMATIC PRESET-CONFIGURATIE - PC
AUTOMATIC PRESET-diagram voor pc
RODE HOME-LED = 4 ASSEN-MODUS GROENE HOME-LED = 5 ASSEN-MODUS
Deze voorinstelling voor 4-assen-modus is de standaardinstelling voor de meeste
vlieggames voor pc's.
Met deze speelklare instellingen kunt u de joystick dus direct gebruiken.
In de 5-assen-modus moet de functie van de rocking-knop handmatig worden toegewezen
in het optiemenu van de game.

6/12
PLAYSTATION®3
INSTALLATIE OP DE PLAYSTATION®3
1. Zet de USB-schakelaar (3) van de joystick in de stand PS3.
2. Sluit de USB-connector (2) aan op een van de USB-poorten van de console.
3. Zet de console aan.
4. Start de game.
Nu kan er gespeeld worden!
DE HOME/PS-KNOP GEBRUIKEN
Met de Home/PS-knop van de joystick kunt u op de PlayStation®3 een game afsluiten, de
menu's bedienen en de console direct uitzetten.
Wanneer deze functie wordt gebruikt, moet de throttle altijd in de middenstand worden gezet om
het slecht functioneren van bepaalde knoppen
te
voorkomen.
Deze functie maakt het ook mogelijk heel snel te wisselen tussen de gamepad en de joystick in
games waarin lopen en vliegen elkaar afwisselen.
BELANGRIJKE OPMERKINGEN VOOR PLAYSTATION®3-GEBRUIKERS
Zet de USB-schakelaar (3) van de joystick altijd in de stand PS3 voordat
u
de
joystick aansluit.
- In 1 Player-modus: als uw officiële gamepad aan staat, moet u deze op controller port 2 zetten
anders werkt uw joystick niet.
- Op een PlayStation®3 is de joystick alleen compatibel met PlayStation®3-games. De joystick
werkt niet met PlayStation® 2-games.
- Bij het aansluiten van de joystick: laat de stick, het roer en de throttle tijdens het aansluiten van
de joystick in het midden staan en raak deze niet aan (dit ter voorkoming van problemen met de
kalibratie).
7/12
"AUTOMATIC PRESET"-CONFIGURATIE - PLAYSTATION®3
AUTOMATIC PRESET-diagram voor PlayStation®3
RODE HOME-LED
Deze voorinstellingen zijn geschikt als standaardinstellingen voor de meeste vlieggames voor de
PlayStation®3. Met deze speelklare instellingen kunt u de joystick dus direct gebruiken.
De vier richtingen van de stick komen overeen met de vier richtingen op de linkermini-stick van de
PS3-gamepad.
De throttle komt overeen met de omhoog/omlaag-richting op de rechtermini-stick van de PS3-gamepad.
Het roer (via draaistick en rocking-knop) komt overeen met de links/rechts-richting op de rechtermini-
stick van de PS3-gamepad.

8/12
GEAVANCEERDE FUNCTIES
TWEE PROGRAMMEERMODI
Met de PRESET-knop en LED (6) kunt u zien welk type programmering is geselecteerd:
- AUTOMATIC (voorgeprogrammeerd)
- of MANUAL (door uzelf geprogrammeerd).
Met één druk op deze knop kunt u, zelfs tijdens de game, van de ene programmeermodus
naar de andere overschakelen.
•
AUTOMATIC PRESET: LED brandt niet
Dit is de standaardprogrammering: de assen, posities van de knoppen en de hat-switch zijn
voorgeprogrammeerd.
RAADPLEEG DE AUTOMATIC PRESET-CONFIGURATIEDIAGRAMMEN.
•
MANUAL PRESET: LED
brandt
groen
Hiermee wordt de programmering aangegeven die u zelf hebt ingevoerd:
- De knoppen, assen en de hat-switch kunnen onderling worden verwisseld.
- U kunt de programmering naar eigen voorkeur wijzigen wanneer
u
maar
wilt.
- Uw programmering wordt automatisch op de joystick
opgeslagen,
zelfs
als deze niet is
aangesloten.
- Als voor uw MANUAL PRESET geen programmering is opgegeven, is MANUAL
PRESET identiek aan AUTOMATIC PRESET.
EEPROM-GEHEUGEN
•
Uw joystick beschikt over een ingebouwde chip die uw MANUAL PRESET-
programmering in het
geheugen
bewaart,
zelfs als de joystick uit staat of
langere tijd niet is aangesloten.
•
U kunt voor elk platform dat u gebruikt verschillende MANUAL PRESET-
instellingen opslaan:
- een voor de pc
in
4
-
assen-modus
- een voor de pc
in
5
-
assen-modus
- een voor de PlayStation 3
PROGRAMMERING/MAPPING
U programmeert de joystick met de MAPPING-knop (7).
•
Voorbeelden van mogelijke toepassingen:
- De posities van knoppen verwisselen.
- De assen onderling verwisselen, ofwel de richtingen van de stick, de throttle of het roer
(in dit geval moet u de twee richtingen van de eerste as koppelen aan die van
de tweede as).
- De twee richtingen van dezelfde as verwisselen.
- De knoppen verwisselen met een richting van een as of de hat-switch.
•
Uitzondering:
De knoppen HOME/PS, MAPPING en PRESET kunnen niet geherprogrammeerd of
verplaatst worden.
9/12
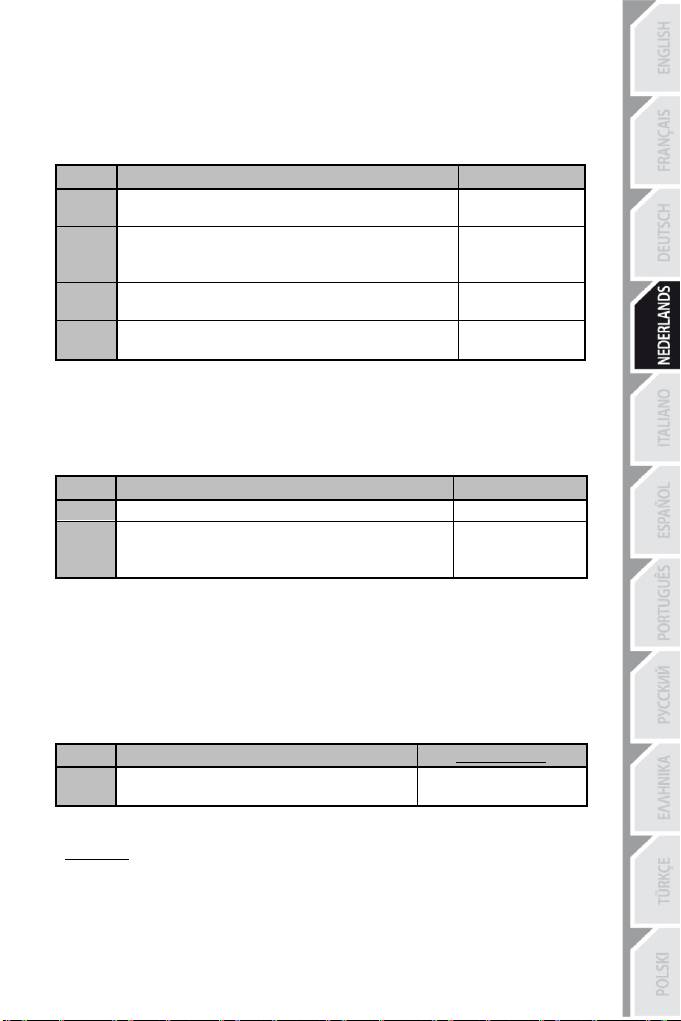
PROGRAMMEERPROCEDURE
EEN MANUAL PRESET OPSLAAN
Stap
Actie
PRESET-LED
1
Schakel MANUAL PRESET (6) in door op
de
knop
te
drukken.
GROEN
2
Druk op de MAPPING-knop (7) en laat deze weer los.
KNIPPERT
LANGZAAM
GROEN
3
Druk op de te programmeren knop
of
richting en
laat
deze
weer
los.
KNIPPERT
SNEL
GROEN
4
Druk op de knop of richting waaraan u de functie wilt
toewijzen en laat deze weer los.
GROEN
Uw MANUAL PRESET is nu ingeschakeld en bijgewerkt
(uw
programmering
is uitgevoerd).
EEN MANUAL PRESET WISSEN
Stap
Actie
PRESET-LED
1
Schakel uw MANUAL PRESET (6) in
GROEN
2
Houd de MAPPING-knop (7) twee seconden ingedrukt
KNIPPERT
2
SECONDEN
GROEN
Uw MANUAL PRESET is
nu
gewist
(en is weer identiek aan de
AUTOMATIC
PRESET
-programmering).
TERUGZETTEN OP FABRIEKSINSTELLINGEN
U kunt al uw programmeringen en instellingen voor een pc (in 4- en 5-assen-modi) of
PlayStation®3 in één stap wissen:
Stap
Actie
HOME/PS-LED
1
Druk tegelijkertijd op
de
knoppen
MAPPING
+
PRESET
KNIPPERT
3
SECONDEN
GROEN/ROOD
Al uw MANUAL PRESETS (= pc + PS3) of instellingen zijn nu gewist.
Opmerking: met deze procedure wordt uw joystick helemaal opnieuw opgestart
(voor pc's adviseren we daarom ook dat u dit niet tijdens het spelen van een game doet).

10/12
PROBLEMEN OPLOSSEN EN WAARSCHUWINGEN
•
Mijn joystick werkt niet goed of lijkt niet goed gekalibreerd te zijn
- Zet uw computer of console uit, koppel uw joystick los, sluit de joystick opnieuw aan en
start de game opnieuw op.
- Bij het aansluiten van de joystick: laat de stick, het roer en de throttle tijdens het aansluiten
van de joystick in het midden staan en raak deze niet aan (dit ter voorkoming van problemen
met de kalibratie).
- Sluit de game af, koppel de joystick los, controleer of de PC/PS3-USB-schakelaar (3) in de
goede stand staat en sluit alles weer aan.
- Wanneer deze functie wordt gebruikt, moet de throttle altijd in de middenstand worden
gezet om het slecht functioneren van bepaalde knoppen te voorkomen.
•
Ik kan mijn joystick niet configureren:
- Ga in de game naar het menu met opties voor de controller, gamepad en joystick.
Selecteer de meest geschikte configuratie of stel alle controller-opties volledig opnieuw in.
- Raadpleeg de handleiding of de online help van de game voor meer informatie.
- U kunt ook de MAPPING-functie van uw joystick gebruiken om dit soort problemen op te
lossen.
•
Mijn joystick reageert te gevoelig of reageert niet gevoelig genoeg:
- De joystick wordt automatisch gekalibreerd wanneer u deze een paar maal in de richting
van de verschillende assen hebt bewogen.
- Ga in de game naar het menu met opties voor de controller,
gamepad
en
joystick. Pas de
gevoeligheid of dode zones van de controller aan (indien deze optie beschikbaar is).
- Pas de weerstand van de stick aan met het wiel (9) onderop de voet van de joystick.
•
De roerbediening is te gevoelig:
- Schakel de draaiing van de stick uit met behulp van de fixatieschroef (5) op de voet van de
joystick en gebruik de rocking-knop voor de bediening van het roer.

Informatie met betrekking tot kopersgarantie
Wereldwijd garandeert Guillemot Corporation S.A. (“Guillemot”) de koper dat dit Thrustmaster-product
vrij zal zijn van materiaal- en fabricagefouten gedurende een garantieperiode gelijk aan de tijd maximaal
vereist om een restitutie/vervanging voor dit product te claimen. In landen van de Europese Unie komt
dit overeen met een periode van twee (2) jaar vanaf het moment van levering van het Thrustmaster-
product. In andere landen komt de garantieperiode overeen met de tijd maximaal vereist om een
restitutie/vervanging voor dit Thrustmaster-product te claimen zoals wettelijk is vastgelegd in het land
waarin de koper woonachtig was op de datum van aankoop van het Thrustmaster-product. Indien een
dergelijk claimrecht niet wettelijk is vastgelegd in het betreffende land, geldt een garantieperiode van één
(1) jaar vanaf datum aankoop van het Thrustmaster-product.
Ongacht het hierboven gestelde, geldt voor oplaadbare batterijen een garantieperiode van zes (6)
maanden vanaf datum aankoop.
Indien u in de garantieperiode een defect meent te constateren aan dit product, neem dan onmiddellijk
contact op met Technical Support die u zal informeren over de te volgen procedure. Als het defect wordt
bevestigd, dient het product te worden geretourneerd naar de plaats van aankoop (of een andere locatie
die wordt opgegeven door Technical Support).
Binnen het gestelde van deze garantie wordt het defecte product van de koper gerepareerd of
vervangen, zulks ter beoordeling van Technical Support. Indien toegestaan door van toepassing zijnde
wetgeving, beperkt de volledige aansprakelijkheid van Guillemot en haar dochterondernemingen
(inclusief de aansprakelijkheid voor vervolgschade) zich tot het repareren of vervangen van het
Thrustmaster-product. Indien toegestaan door van toepassing zijnde wetgeving, wijst Guillemot elke
garantie af met betrekking tot verhandelbaarheid of geschiktheid voor enig doel. De wettelijke rechten
van de koper die van toepassing zijn op de verkoop van consumentproducten worden op generlei wijze
door deze garantie beperkt.
Deze garantie is niet van kracht: (1) indien het product aangepast, geopend of gewijzigd is, of
beschadigd is ten gevolge van oneigenlijk of onvoorzichtig gebruik, verwaarlozing, een ongeluk, normale
slijtage, of enige andere oorzaak die niet gerelateerd is aan een materiaal- of fabricagefout (inclusief
maar niet beperkt tot het combineren van het Thrustmaster-product met enig ongeschikt element
waaronder in het bijzonder voedingsadapters, oplaadbare batterijen, opladers of enig ander element niet
geleverd door Guillemot voor dit product); (2) indien u zich niet houdt aan de instructies zoals verstrekt
door Technical Support; (3) op software die onder een specifieke garantie valt; (4) op verbruiksartikelen
(elementen die tijdens de levensduur van het product worden vervangen zoals bijvoorbeeld batterijen of
pads van een headset of koptelefoon); (5) op accessoires (zoals bijvoorbeeld kabels, behuizingen,
hoesjes, etui's, draagtassen of polsbandjes); (6) indien het product werd verkocht op een openbare
veiling.
Deze garantie is niet overdraagbaar.
Aansprakelijkheid
Indien toegestaan door van toepassing zijnde wetgeving, wijzen Guillemot Corporation S.A. (hierna te
noemen “Guillemot”) en haar dochterondernemingen alle aansprakelijkheid af voor enige schade
veroorzaakt door één van de volgende oorzaken: (1) indien het product aangepast, geopend of gewijzigd
is; (2) de montage-instructies niet zijn opgevolgd; (3) oneigenlijk of onvoorzichtig gebruik, verwaarlozing,
een ongeluk (bijvoorbeeld stoten); (4) normale slijtage. Indien toegestaan onder van toepassing zijnde
wetgeving, wijzen Guillemot en haar dochterondernemingen alle aansprakelijkheid af voor enige schade
aan dit product niet gerelateerd aan een materiaal- of fabricagefout (inclusief maar niet beperkt tot enige
schade direct of indirect veroorzaakt door enige software, of door het combineren van het Thrustmaster-
product met enig ongeschikt element waaronder in het bijzonder voedingsadapters, oplaadbare
batterijen, opladers of enig ander element niet geleverd door Guillemot voor dit product).
11/12
