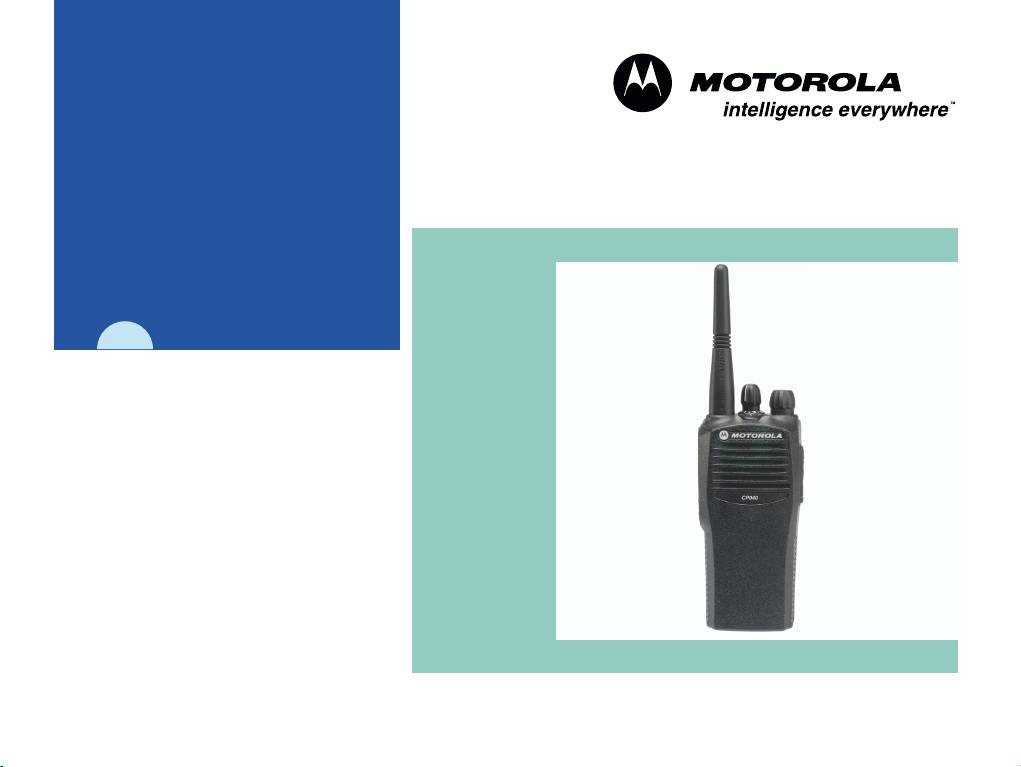
Motorola CP040: инструкция
Раздел: Домашние и офисные телефоны/Радиостанции
Тип:
Инструкция к Motorola CP040
SF
EN
MOTOROLA
GK
DE
COMMERCIAL SERIES
FR
RU
ES
CZ
IT
HU
PR
PL
DA
RO
SV TU
NL
AR
BA
S
I
C
U
S
E
R
G
U
I
D
E
C
P
040
MOTOROLA and the Stylized M Logo are registered in the U.S. Patent & Trademark Office.
All other product or service names are the property of their respective owners.
© Motorola, Inc. 2003.
6866549D01-O
CP040_InsdeCov.fm Page 1 Thursday, October 2, 2003 1:53 PM
2
3
1
4
5
7
8
6
English

CP040_EN.fm Page 1 Thursday, October 2, 2003 10:53 AM
Turning the Radio On or Off . . . . . . . . . . .11
CONTENTS
Adjusting the Volume. . . . . . . . . . . . . . . . .11
Computer Software Copyrights . . . . . . . . . 2
Selecting a Radio Channel . . . . . . . . . . . .11
Sending a Call . . . . . . . . . . . . . . . . . . . . . .12
RadioOverview .................... 3
Receiving a Call. . . . . . . . . . . . . . . . . . . . .12
Operation and Control Functions . . . . . . . . 3
Monitoring . . . . . . . . . . . . . . . . . . . . . . . . .12
Radio Controls . . . . . . . . . . . . . . . . . . . 3
VOX Operation . . . . . . . . . . . . . . . . . . . . .13
CONTENTS
LED Indicator . . . . . . . . . . . . . . . . . . . . 4
Connecting a VOX Headset . . . . . . . . .13
Programmable Buttons . . . . . . . . . . . . . 4
Enable/Disable Headset Sidetone. . . . . . .13
Improved Audio Feature . . . . . . . . . . . . 6
VOX Headset . . . . . . . . . . . . . . . . . . . .13
Companding . . . . . . . . . . . . . . . . . . . . . 6
Non-VOX Headset With In-Line PTT . .13
Battery Charge Status. . . . . . . . . . . . . . 6
RadioCalls........................14
Audio Indicators for Programmable
Buttons . . . . . . . . . . . . . . . . . . . . . . . . . 6
Repeater Or Talkaround Mode . . . . . . . . .14
Setting Tight or Normal Squelch . . . . . . . .14
GettingStarted..................... 7
Setting the Power Level. . . . . . . . . . . . . . .14
Battery Information. . . . . . . . . . . . . . . . . . . 7
Receiving a Selective Call . . . . . . . . . . . . .14
Charging Your Battery. . . . . . . . . . . . . . 7
Receiving a Call Alert Page. . . . . . . . . . . .14
Desktop Charger . . . . . . . . . . . . . . . . . . 7
Scan .............................15
Accessory Information . . . . . . . . . . . . . . . . 8
Attaching the Battery. . . . . . . . . . . . . . . 8
Starting or Stopping Scan . . . . . . . . . . . . .15
Removing The Battery . . . . . . . . . . . . . 8
Talkback . . . . . . . . . . . . . . . . . . . . . . . . . .15
Attaching The Antenna . . . . . . . . . . . . . 9
Deleting a Nuisance Channel . . . . . . . . . .15
Removing The Antenna . . . . . . . . . . . . 9
Restoring a Channel to the Scan List . .16
Attaching The Belt Clip . . . . . . . . . . . . 10
Prioritizing a Scan List Member. . . . . . . . .16
Removing The Belt Clip . . . . . . . . . . . 10
1
English

CONTENTS
English
2
C
omputer
S
o
f
tware
C
opyr
i
g
h
CP040_EN.fm Page 2 Thursday, October 2, 2003 10:53 AM
t
The products described in this manual may include copyrighted computer
programmes stored in semiconductor memories or other media. Laws in the
United States of America and other countries preserve for Motorola Europe
and Motorola Inc. certain exclusive rights for copyrighted computer
programmes, including the right to copy or reproduce in any form the
copyrighted computer programme. Accordingly, any copyrighted computer
programmes contained in the products described in this manual may not be
copied or reproduced in any manner without the express written permission of
the holders of the rights. Furthermore, the purchase of these products shall not
be deemed to grant either directly or by implication, estoppel, or otherwise, any
licence under the copyrights, patents, or patent applications of the holders of
the rights, except for the normal non-exclusive royalty free licence to use that
arises by operation of the law in the sale of the product.
CP040_EN.fm Page 3 Thursday, October 2, 2003 10:53 AM
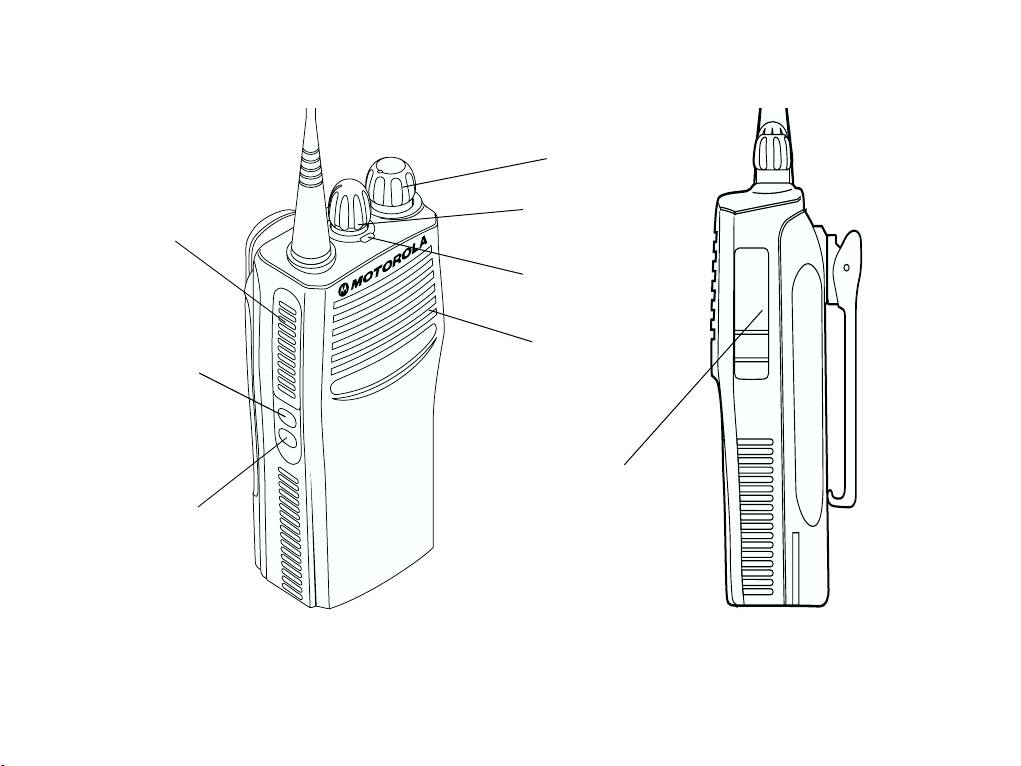
2. On-Off / Volume Knob
RADIO OVERVIEW
Used to turn the radio on or off, and to adjust
the radio’s volume.
This user guide covers the operation of the CP040
Portable Radios.
3. Channel Selector Knob
Switches the radio to different channels.
Before using this product, read the
4. LED Indicator
operating instructions for safe usage
Indicates power up, transmit, receive, scan
contained in the Product Safety and
status, Call Alert, Selective Call and battery
!
RF Exposure booklet 6864117B25_
status.
RADIO OVERVIEW
enclosed with your radio.
Caution
5. Microphone
Hold the microphone 2.5 to 5 cm from your
ATTENTION!
mouth, and speak clearly into it.
This radio is restricted to occupational use only to
satisfy ICNIRP RF energy exposure requirements.
6. Side Button 2 (Programmable)
Before using this product, read the RF energy
7. Side Button 1 (Programmable)
awareness information and operating instructions in
Recommended for Monitor/Cancel button.
the Product Safety and RF Exposure booklet
(Motorola Publication part number 6864117B25_) to
8. Accessory Connector
ensure compliance with RF energy exposure limits.
Connects remote microphones, remote
earphones and other accessories. Replace
OPERATION AND CONTROL
dust cap when not in use.
FUNCTIONS
Radio Controls
The numbers below refer to the illustrations on the
inside front cover.
1. Push-to-talk (PTT)
Press and hold down this button to talk; release
it to listen.
3
English
CP040_EN.fm Page 4 Thursday, October 2, 2003 10:53 AM
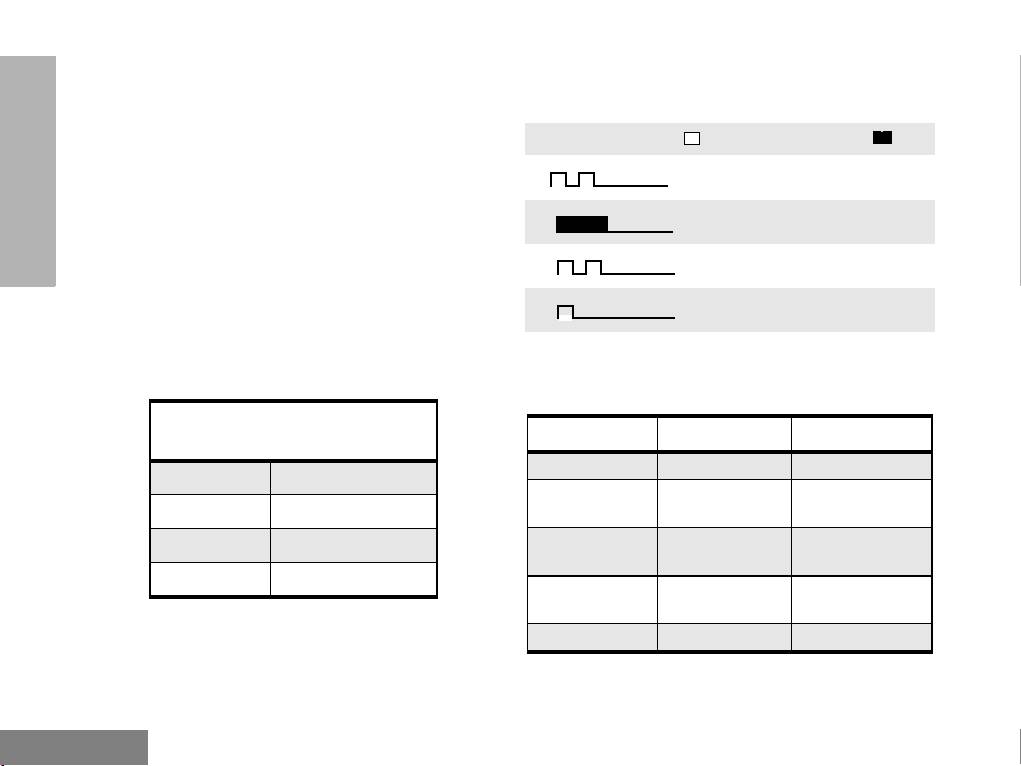
LED Indicator
Programmable Buttons
RADIO OVERVIEW
The LED shows radio status as follows:
Your radio has two programmable buttons. Your
dealer can program these buttons as shortcuts to
LED State Indication
various radio features.
Check with your dealer for a complete list of
Radio Call
functions your radio supports.
Red Solid Radio transmitting.
The buttons can access up to two features,
depending on the type of button press:
Red Flashing Channel busy - when
• short press—quickly pressing and releasing the
receiving.
programmable buttons
Scan
• long press—pressing and holding the
Green Flashing Radio is scanning.
programmable buttons for a period of time (at
Call Alert
least 1 1/2 seconds)
Yellow Flashing Receiving a Call Alert
• hold down—pressing and holding down the
programmable buttons while checking status or
Selective Call
making adjustments
Yellow Flashing Receiving a Selective Call
The following table is a summary of programmable
Sticky Monitor/Open Squelch
radio features and corresponding page references.
Yellow Solid Radio in monitor mode.
In the “Button” column, have your dealer record the
name of the programmable button next to the
Low Battery Level
feature that has been programmed to it.
Red Flashing Flashing when
Also, where appropriate, have your dealer indicate
transmitting.
whether the button press requires a short press, a
long press, or needs to be held down.
English
4

CP040_EN.fm Page 5 Thursday, October 2, 2003 10:53 AM
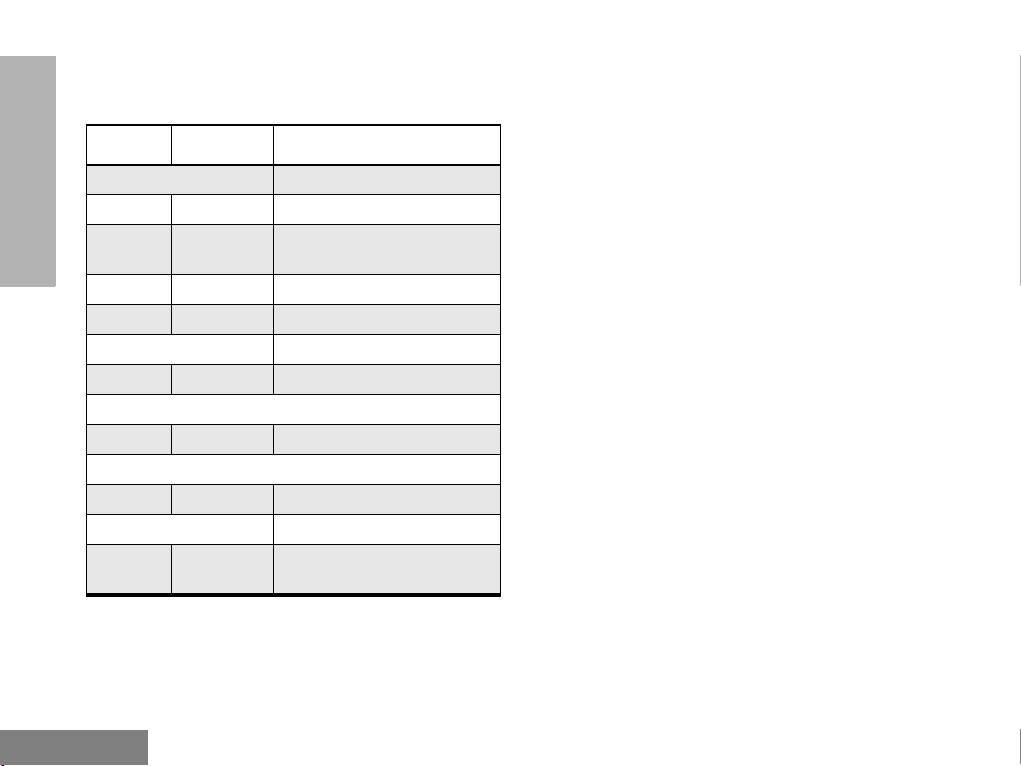
Function Short Press Long Press Hold Down Page Button
Battery Indicator Checks battery
6
charge status.
Volume Set — — Sound a tone
11
for adjusting
your radio’s
volume level.
RADIO OVERVIEW
Sticky
A long press of the Monitor
Monitors activity
— 12
Permanent
button initiates. A short press of
on a selected
Monitor
the Monitor button cancels.
channel.
Voice Operated
Toggle VOX On and Off. 13
Transmission (VOX)
Repeater/
Toggle between using a repeater or transmitting
— 14
Talkaround
directly to another radio.
Power Level Toggle transmit power level between High and
—14
Low.
Squelch Toggles your radio’s squelch level between tight
14
and normal squelch.
Scan/Nuisance
Toggle scan on and off . Delete a
—15
Channel Delete
nuisance
channel while
scanning.
5
English
CP040_EN.fm Page 6 Thursday, October 2, 2003 10:53 AM
Improved Audio Feature
Audio Indicators for Programmable Buttons
RADIO OVERVIEW
Companding
Companding is a feature that allows further
High pitched tone Low pitched tone
improvement of voice quality. It compresses your
voice at transmission and expands it when receiving
while simultaneously reducing extraneous noise.
Self Test Pass Tone.
However, to enjoy this benefit, all transmitting and
receiving radios must have this feature activated.
Self Test Fail Tone.
Battery Charge Status
Positive Indicator Tone.
You can check battery charge status if your dealer
has preprogrammed one of the programmable
Negative Indicator Tone.
buttons. Hold down the preprogrammed Battery
Indicator button. The charge status is shown by the
Some programmable buttons use tones to indicate
color of the radio’s LED indicator.
one of two modes:
Battery
LED
Button Positive Tone Negative Tone
Level
Indicator
Scan Start scan Stop scan
Good Green
Power Level High power
Low power
Sufficient Yellow
selected
selected
Squelch Tight Squelch Normal
Low Flashing Red
Squelch
Very Low None
Repeater/
Does not use
Uses repeater
Talkaround
repeater
VOX VOX Enabled VOX Disabled
English
6
CP040_EN.fm Page 7 Thursday, October 2, 2003 10:53 AM
GETTING STARTED
LED color Status
BATTERY INFORMATION
No LED Indication Battery inserted incorrectly
or battery not detected.
Charging Your Battery
Single Green Flash Successful charger
If a battery is new, or its charge level is very low, you
power-up.
will need to charge it before you can use it. When
a
Flashing Red
Battery unchargeable or not
the battery level is low and the radio is in transmit
making proper contact.
mode you will see the LED indicator flash red. Upon
GETTING STARTED
release of the PTT button, you will hear an alert
Red Battery is charging.
tone.
Flashing Yellow Battery in charger but
Note: Batteries are shipped uncharged from the
waiting to be charged. The
factory. Always charge a new battery 14 to 16
battery temperature may be
hours before initial use, regardless of the
too hot or too cold. The
status indicated by the charger.
voltage may be lower than
the predetermined threshold
Desktop Charger
level for charging.
b
To Charge the Battery
Flashing Green
Battery 90% (or more)
charged.
1 Turn the radio off.
Green Battery fully charged.
2 Place the battery, with or without the radio, in
a Remove and replace the battery in the charger.
If the LED indicator continues to flash red,
the charger pocket.
consult your dealer.
• The charger LED indicates the charging
b A standard battery may require 90 minutes to
progress.
charge to 90% capacity.
7
English
CP040_EN.fm Page 8 Thursday, October 2, 2003 10:53 AM
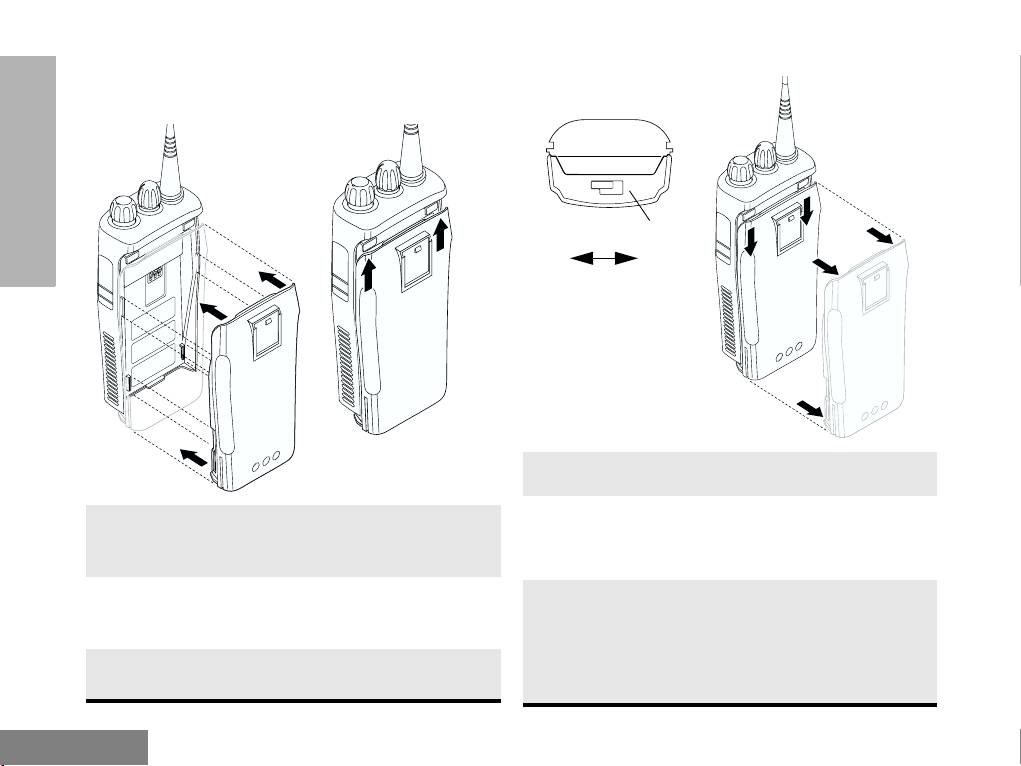
ACCESSORY INFORMATION
Removing the Battery
GETTING STARTED
Attaching the Battery
Battery Latch
Locked Un-locked
1 Turn off the radio if it is turned on.
1 Align the battery to the battery rails on the
2 Slide the battery latch into the unlock position.
back of the radio (approximately 1 cm from the
Disengage by pushing downward and holding
top of the radio.)
the latch towards the front of the radio.
2 Press the battery firmly to the radio and slide
3 With the battery latch disengaged, slide the
the battery upward until the latch snaps into
battery down from the top of the radio
place.
approximately 1 cm. Once the battery is free
3 Slide the battery latch, located on radio
from the battery rails, lift it directly away from
bottom, into the lock position.
the radio.
English
8
CP040_EN.fm Page 9 Thursday, October 2, 2003 10:53 AM
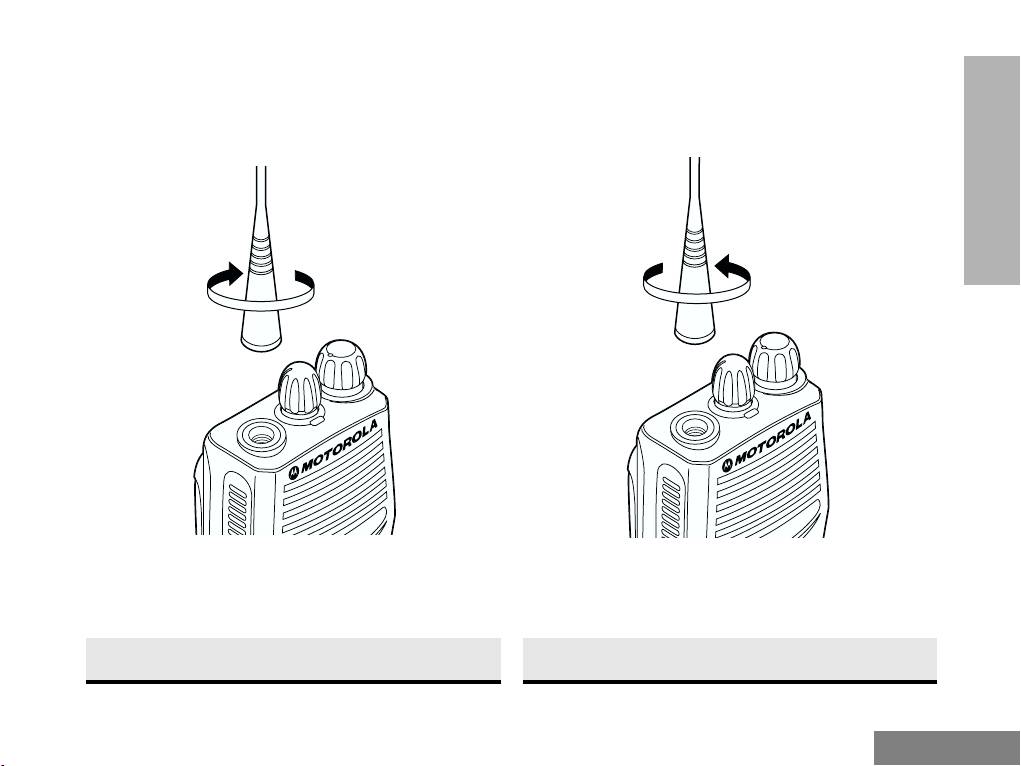
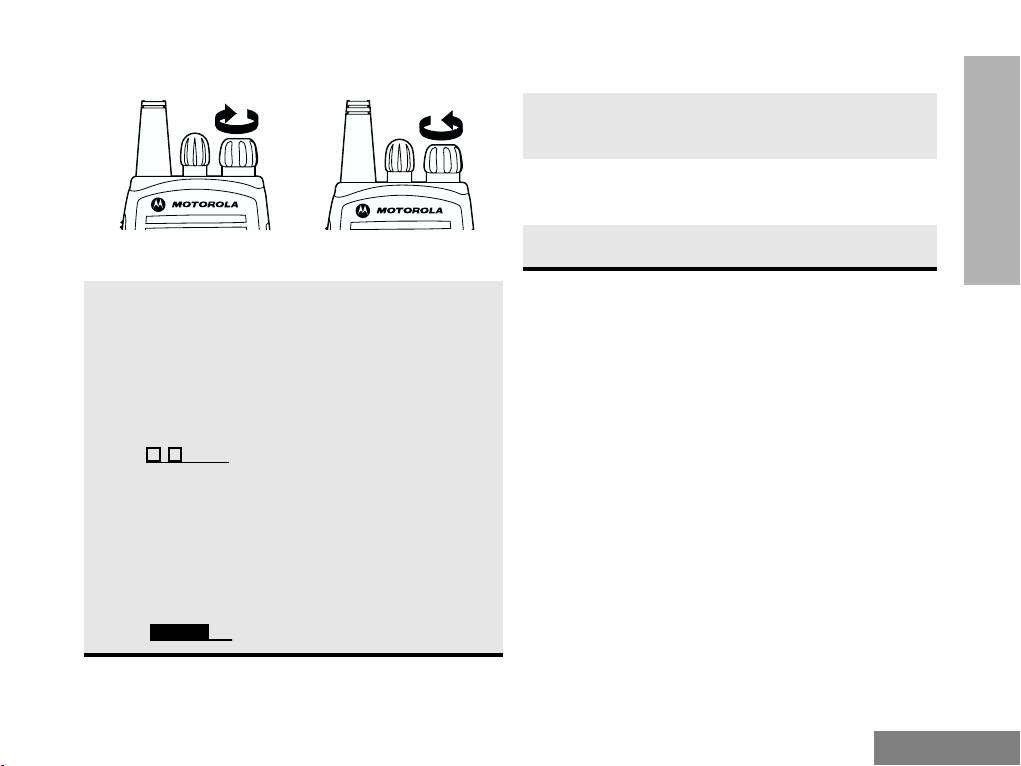
Attaching the Antenna Removing the Antenna
GETTING STARTED
Turn the antenna clockwise to attach it. Turn the antenna counter-clockwise to remove it.
9
English
CP040_EN.fm Page 10 Thursday, October 2, 2003 10:53 AM
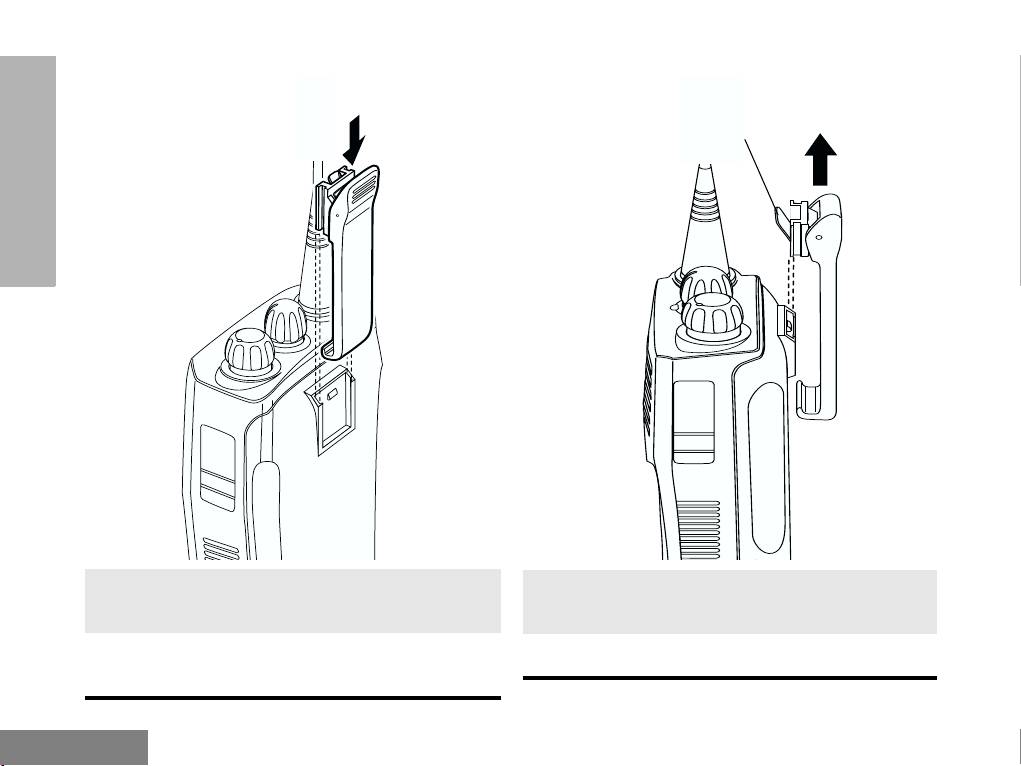
Attaching the Belt Clip Removing the Belt Clip
GETTING STARTED
Belt Clip Tab
1 Align the grooves of the belt clip with those of
1 Use a key to press the belt clip tab away from
the battery.
the battery to unlock the belt clip.
2 Press the belt clip downward until you hear a
2 Slide the belt clip upward to remove it.
click.
English
10
CP040_EN.fm Page 11 Thursday, October 2, 2003 10:53 AM
TURNING THE RADIO ON OR OFF ADJUSTING THE VOLUME
1 Hold down the Volume Set button; you will
hear a continuous tone.
2 Turn the On/Off/Volume Control knob to the
desired volume level.
3 Release the Volume Set button.
ON OFF
GETTING STARTED
Turn the On/Off/
Turn the On/Off/
SELECTING A RADIO CHANNEL
Volume Control
Volume Control knob
knob clockwise. If
counter-clockwise until
Your radio offers 4 or 16 channels.
power-up is
you hear a click.
Note: Due to government regulations, some
successful, you will
channels may not be programmed. Ask your
hear the Self-Test
dealer for more information.
Pass Tone
To select a channel, turn the Channel Selector
( ) and
knob clockwise or counterclockwise until you reach
see the LED flash
the desired channel.
green.
If the radio fails to
power up, you will
hear the Self Test
Fail Tone
().
11
English

CP040_EN.fm Page 12 Monday, November 10, 2003 9:16 AM
SENDING A CALL
MONITORING
GETTING STARTED
It is important to monitor traffic before transmitting to
1 Turn your radio on.
ensure that you do not “talk over” someone who is
already transmitting.
2 Use the Channel Selector knob to select the
desired channel.
1 Press and hold the preprogrammed
Monitor button to access channel traffic.
3 Hold the radio in a vertical position, press the
PTT, and talk at a distance of about
2 Once channel traffic has cleared, proceed
2.5 to 5 cm from the microphone.
with your call by pressing the PTT button.
4 Release the PTT to listen.
3 A long press of the preprogrammed Monitor
button places the radio in Sticky Permanent
Monitor mode.
RECEIVING A CALL
• You hear a high-pitched tone.
1 Turn your radio on.
A short press of the Monitor button cancels
Sticky Permanent Monitor mode and returns
2 Adjust the radio’s volume.
the radio to normal operation.
3 Switch to the desired channel. To respond,
hold the radio in a vertical position, press the
PTT, and talk at a distance of about
2.5 to 5 cm from the microphone.
English
12

CP040_EN.fm Page 13 Thursday, October 2, 2003 10:53 AM
VOX OPERATION
ENABLE/DISABLE HEADSET
SIDETONE
When hands-free operation is desired, your radio
Your dealer can program your radio to hear your
can be activated by voice alone using the VOX
voice through the headset during transmit.
feature when you speak through an accessory that
is connected to your radio.
VOX Headset
Connecting a VOX Headset
1 Turn off your radio.
1 Turn off your radio.
2 Connect the VOX accessory to your radio.
GETTING STARTED
2 Connect the VOX accessory to your radio and
turn the radio on.
3 Turn the radio on. During transmit, the
sidetone will be enabled, if programmed in
3 To enable or disable VOX operation, press
the radio.
the preprogrammed VOX button.
Note: Pressing PTT disables VOX.
Non-VOX Headset with In-Line PTT
–or–
Select a channel that has been programmed
1 Turn off your radio.
for VOX by your dealer to enable VOX.
2 Connect the non-VOX accessory to your
Note: You do not need to press a
radio.
preprogrammed VOX button.
3 Press and hold the In-line PTT on your
Note: Pressing the PTT button disables
headset.
VOX.
4 Turn the radio on and release the PTT once
4 Select a channel that has not been
the radio has completed start-up.
preprogrammed for VOX by your dealer to
disable VOX.
5 To disable the headset sidetone, turn off your
radio and turn the radio on again.
13
English

CP040_EN.fm Page 14 Thursday, October 2, 2003 10:53 AM
RADIO CALLS
SETTING THE POWER LEVEL
RADIO CALLS
Each channel in your radio has a predefined
REPEATER OR TALKAROUND
transmit power level that can be changed.
MODE
•
High power
allows you to reach a radio that is
farther away.
Talkaround Mode enables you to communicate with
•
Low power
conserves the battery’s charge.
another radio when either:
• the repeater is not operating
Press the preprogrammed Power Level button to
toggle between low and high power.
—or—
RECEIVING A SELECTIVE CALL
• your radio is out of the repeater’s range but
within communicating distance of another radio.
When you receive a selective call:
Press the preprogrammed Repeater/Talkaround
• The LED indicator flashes yellow, if programmed
button to toggle between Repeater mode and
by your dealer.
Talkaround Mode.
• You hear two high pitched tones.
SETTING TIGHT OR NORMAL
To answer the call, press the PTT button.
SQUELCH
RECEIVING A CALL ALERT PAGE
Use this feature to filter out nuisance (unwanted)
When you receive a Call Alert Page:
calls and/or background noise. However, tightening
• The LED indicator flashes yellow, if programmed
squelch could cause calls from remote locations to
by your dealer.
be filtered out as well. In this case, normal squelch
• You hear four high pitched tones.
may be more desirable.
Press the preprogrammed Squelch button to toggle
To answer the Page, press the PTT button; to
between tight and normal squelch.
cancel the Page, press any other key.
English
14

CP040_EN.fm Page 15 Thursday, October 2, 2003 10:53 AM
SCAN
TALKBACK
If the Talkback option is preprogrammed, you can
You can monitor multiple channels and receive any
respond to any calls received during the scan
calls that are transmitted on them. Channels can be
operation. To respond, press the PTT button before
programmed into a scan list by your dealer. Your
the programmed hangtime elapses. Otherwise, the
radio automatically switches to a scan list channel
radio will continue scanning. Check with your dealer
when it detects activity on it.
SCAN
for details.
STARTING OR STOPPING SCAN
DELETING A NUISANCE CHANNEL
The LED indicator blinks green during a scan
Note: Your dealer must have preprogrammed a
operation and stops blinking when the radio
button to Nuisance Delete to access this
switches to a channel.
feature.
You can start or stop a scan operation by:
If a channel continually generates unwanted calls or
1 To start or stop a scan operation, press the
noise (a “nuisance” channel), you can temporarily
preprogrammed Scan button.
remove it from the scan list:
-or-
1 While the radio is on the Nuisance Channel,
press the preprogrammed Nuisance
2 Select a channel that has been
Channel Delete button until you hear a tone.
preprogrammed by your dealer to start Auto
Scan.
2 Release the Nuisance Channel Delete
button. The nuisance channel is deleted.
Note: You do not need to press a prepro-
grammed Scan button.
Note: You cannot delete a priority channel or the
3 Select a channel that has not been
last remaining channel in the scan list.
preprogrammed by your dealer to stop Auto
Scan.
15
English
CP040_EN.fm Page 16 Thursday, October 2, 2003 10:53 AM
Restoring a Channel to the Scan List
PRIORITIZING A SCAN LIST
MEMBER
1 Press the Scan button to stop the scan.
You may want your radio to scan a specific channel
SCAN
2 Press the Scan button again to start scanning
more frequently for calls. Your dealer can prioritize
scan list members for you. Check with your dealer
again. The Deleted Nuisance Channel is
for details.
restored to the scan list.
Priority Channel Scanning Sequence
None specified Ch1➠Ch2➠Ch3➠
Ch4➠...Ch1
Channel 2 Ch2➠Ch1➠Ch2➠Ch3➠
Ch2➠Ch4➠Ch2➠...Ch1
Even though your radio has switched to a
non-priority channel, it will still check for activity on
the priority channel. If activity is detected, the radio
will switch to the priority channel.
English
16

CP040a_DE.fm Page 1 Tuesday, September 30, 2003 3:48 PM
Ein-/Ausschalten des Funkgeräts. . . . . . . . . 11
INHALT
Einstellen der Lautstärke . . . . . . . . . . . . . . . 11
Auswählen eines Kanals . . . . . . . . . . . . . . . 11
Absenden eines Rufs . . . . . . . . . . . . . . . . . . 12
Copyright für Computer-Software . . . . . . . . . .2
Empfangen eines Rufs . . . . . . . . . . . . . . . . . 12
AllgemeineInformationen ..............3
Überwachen eines Funk-Kanals. . . . . . . . . . 12
VOX-Betrieb . . . . . . . . . . . . . . . . . . . . . . . . . 13
Betriebs- und Steuerfunktionen. . . . . . . . . . . .3
Anschließen eines VOX-Kopfhörers . . . . 13
Bedienelemente des Funkgeräts . . . . . . . .3
Aktivieren/Deaktivieren des
INHALT
LED-Anzeigen . . . . . . . . . . . . . . . . . . . . . .4
Kopfhörer-Mithörtons . . . . . . . . . . . . . . . . . . 13
Programmierbare Tasten . . . . . . . . . . . . . .4
VOX-Kopfhörer . . . . . . . . . . . . . . . . . . . . 13
Steigerung der Klangqualität . . . . . . . . . . .6
Nicht-VOX-Kopfhörer mit Lippenmikrofon
Klangverbesserung . . . . . . . . . . . . . . . . . .6
und Sendetaste . . . . . . . . . . . . . . . . . . . . 13
Akku-Kapazitätsanzeige. . . . . . . . . . . . . . .6
Akustische Signalanzeigen
Rufmöglichkeiten....................14
programmierbarer Tasten. . . . . . . . . . . . . .6
Ruf über Relaisstelle oder Relaisstelle
InbetriebnahmedesGeräts .............7
umgehen. . . . . . . . . . . . . . . . . . . . . . . . . . . . 14
Rauschsperre normal/hoch einstellen . . . . . 14
Informationen zum Akku . . . . . . . . . . . . . . . . .7
Einstellen der Sendeleistung . . . . . . . . . . . . 14
Aufladen des Akku. . . . . . . . . . . . . . . . . . .7
Empfangen eines Selektivrufs . . . . . . . . . . . 14
Tisch-Ladegerät . . . . . . . . . . . . . . . . . . . . .7
Empfangen eines Page-Anruftons . . . . . . . . 14
Informationen zum Zubehör . . . . . . . . . . . . . .8
Anbringen des Akku. . . . . . . . . . . . . . . . . .8
Scannen............................15
Entfernen des Akku . . . . . . . . . . . . . . . . . .8
Starten/Stoppen des Scan-Vorgangs . . . . . . 15
Montieren der Antenne . . . . . . . . . . . . . . .9
Rücksprechen. . . . . . . . . . . . . . . . . . . . . . . . 15
Abmontieren der Antenne . . . . . . . . . . . . .9
Unterdrücken eines Störkanals. . . . . . . . . . . 16
Anbringen des Gürtelclips . . . . . . . . . . . .10
Wiederaufnahme eines entfernten
Entfernen des Gürtelclips. . . . . . . . . . . . .10
Störkanals in die Scan-Liste . . . . . . . . . . 16
Kanalprioritäten der Scan-Liste einstellen . . 16
1
Deutsch

CP040a_DE.fm Page 2 Tuesday, September 30, 2003 3:48 PM
INHALT
Copyright für Computer-Software
Die in diesem Handbuch beschriebenen Produkte werden zum Teil mit
urheberrechtlich geschützten Computerprogrammen ausgeliefert, die in
Halbleiterspeichern oder auf anderen Medien gespeichert sind. Nach den
Gesetzen der USA und anderer Staaten sind bestimmte exklusive Rechte an
der urheberrechtlich geschützten Software, insbesondere Rechte der
Vervielfältigung, der Firma Motorola vorbehalten. Demzufolge dürfen
urheberrechtlich geschützte Computerprogramme, die zusammen mit den in
diesem Handbuch beschriebenen Produkten ausgeliefert werden, ohne die
vorherige schriftliche Genehmigung von den Inhabern der Urheberrechte nicht
kopiert oder in irgendeiner Weise reproduziert werden. Auch der Erwerb dieser
Produkte bedeutet in keiner Weise den Erwerb einer Lizenz für die
mitgelieferten Produkte, die durch Copyright, Patente oder
Patentanmeldungen der Inhaber dieser Rechte geschützt sind. Der Käufer
erhält mit dem Erwerb lediglich die normale Berechtigung, das Produkt in der
dafür vorgesehenen Form und in rechtmäßiger Weise zu benutzen.
Deutsch
2
