Siemens TE809201RW – page 2
Manual for Siemens TE809201RW
Table of contents

en
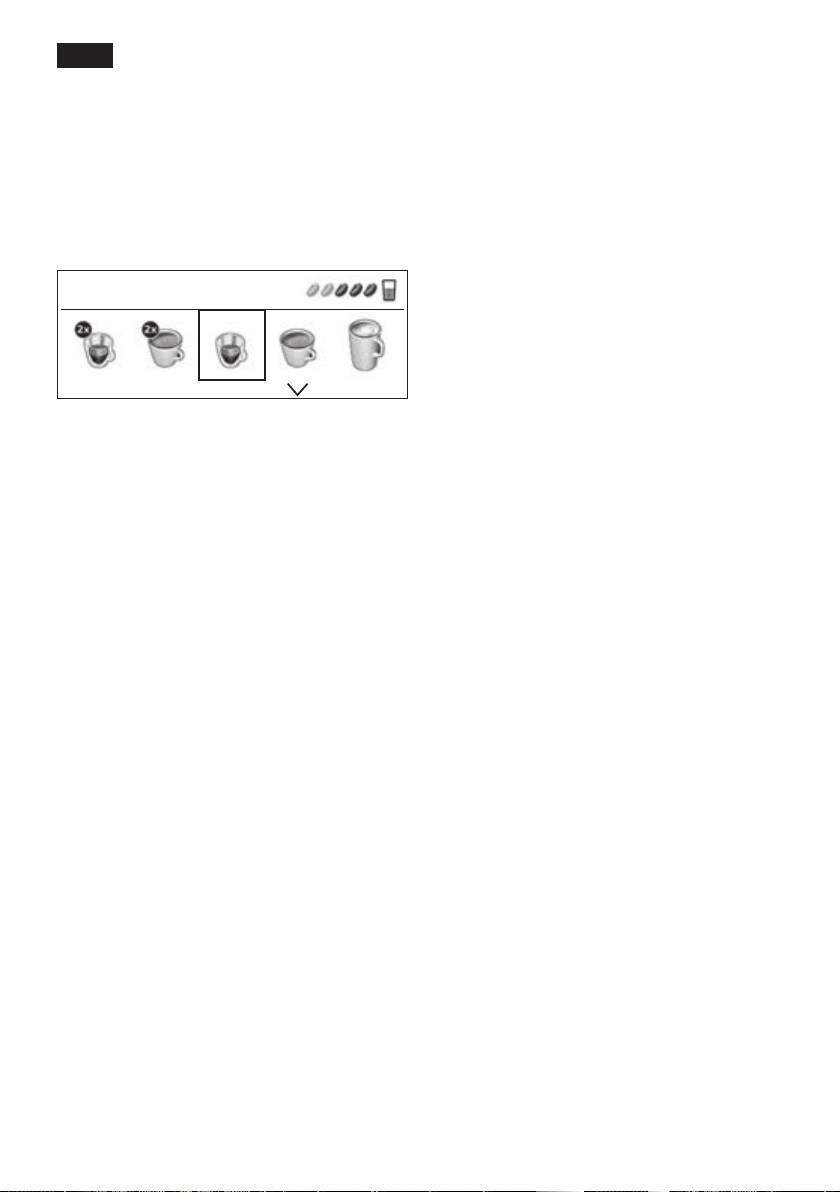
Drink preparation with milk
Preparing milk froth and
The appliance must be ready for use.
warm milk
● Place the suction pipe 10d of the milk
frother 10 deep in the milk container 26.
● Swivel the coffee outlet 9 to the right until
¡ Risk of burns!
it clicks into place.
The milk frother 10 gets very hot. After use,
● Place the pre-warmed cup or glass under
allow to cool down rst before touching.
the coffee outlet 9 and milk frother 10.
● Select the required Caffe Latte,
The appliance must be ready for use.
Macchiato, Cappuccino or Mycoffee by
● Place the suction pipe 10d of the milk
turning the rotary knob 6.
frother 10 deep in the milk container 26.
● Open the powder compartment 18.
● Place the pre-warmed cup or glass under
● Pour in no more than 2 level measuring
the outlet of the milk frother 10.
spoons 14 of ground coffee.
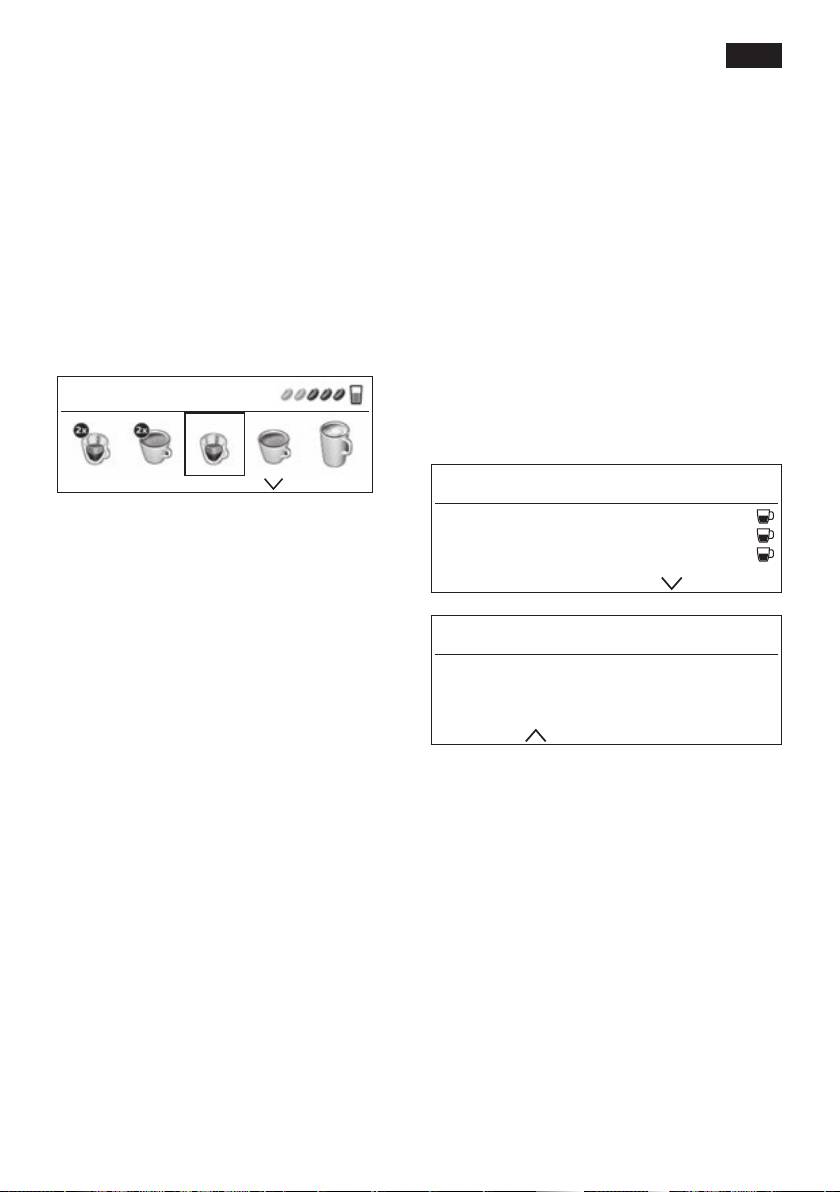
● Select the required setting Milk froth or
Warm milk by turning the rotary knob 6.
¡ Warning!
● Press the start button 8.
Do not use whole beans or instant coffee.
Milk froth or warm milk ows from the outlet
of the milk frother 10.
● Close the powder compartment 18.
● Press the start button 8.
Press the start button 8 again to cut the
First milk is delivered into the cup or glass.
process short.
Then the coffee is brewed and dispensed
into the cup or glass.
Info: When preparing warm milk, you may
hear a whistling sound. This is caused by
Important: Dried milk residue is difcult
the milk frother for technical reasons.
to remove, so the milk frother 10 must be
cleaned with lukewarm water immediately
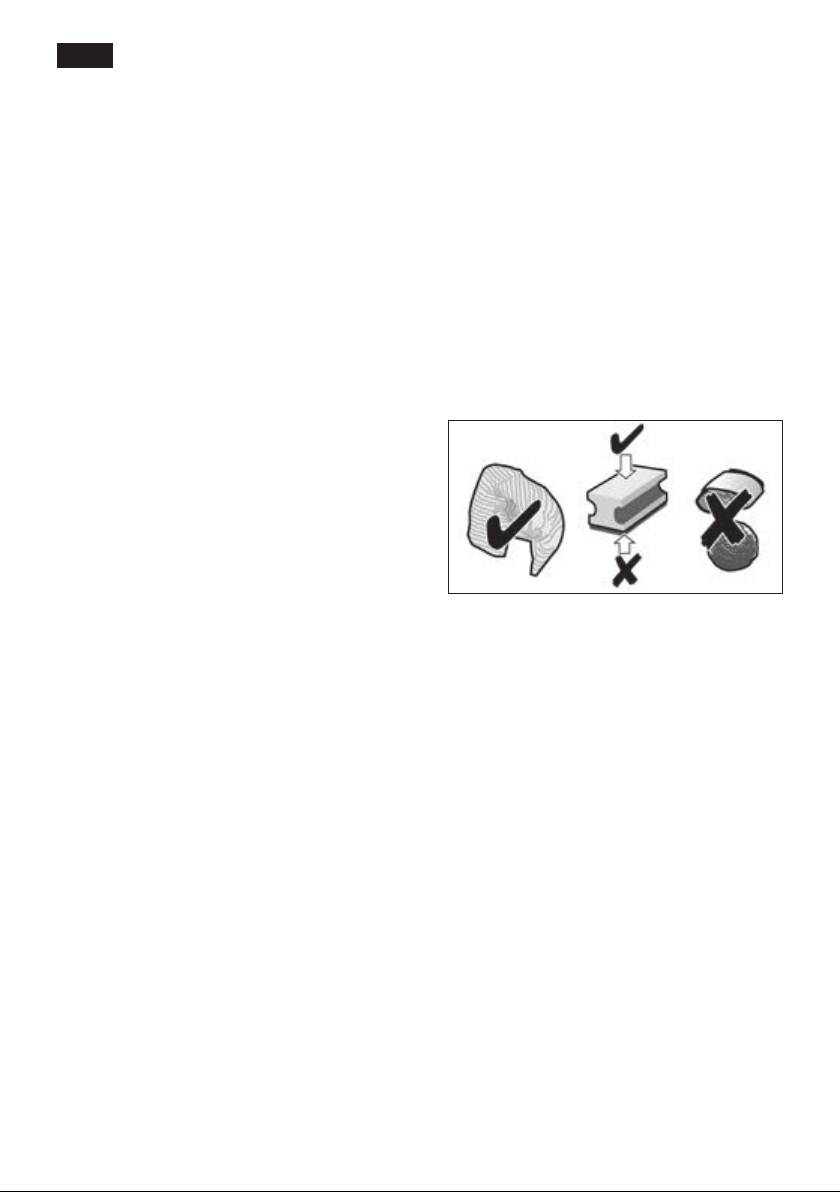
Tip: For optimal milk froth quality, use cold
after use (see “Cleaning the milk system”).
milk with a fat content of at least 1.5 % if
possible.
Note: Repeat the procedure for another
cup of coffee / milk drink. If coffee is not
Important: Dried milk residue is difcult
dispensed within 90 seconds, the brewing
to remove, so the milk frother must be
chamber empties automatically to avoid an
cleaned with lukewarm water immediately
overow. The appliance rinses.
after use (see “Cleaning the milk system”).
17
en
Dispensing hot water
Maintenance and
daily cleaning
¡ Risk of burns!
The milk frother 10 gets very hot. After use,
allow to cool down rst before touching.
¡ Danger of electric shock!
Unplug the appliance before cleaning it.
The milk frother must be cleaned before
Never submerse the appliance in water.
drawing hot water.
Do not use a steam cleaner.
The appliance must be ready for use.
● Wipe the outside of the appliance with a
● Place the pre-warmed cup or glass under
soft, damp cloth.
the outlet of the milk frother 10.
● Do not use any cleaning agents that
● Select the required setting for Hot water
contain alcohol or spirits.
by turning the rotary knob 6.
● Do not use abrasive cloths or cleaning
● Press the start button 8.
agents.
Pleaseremovesuctionhose▶start
● Remove the milk suction hose 10c and
press the start button 8.
Hot water runs out of the milk frother
outlet 10.
Press the start button 8 again to cut the
process short.
● Always remove any limescale, coffee,
Note: It is possible to set the temperature of
milk, cleaning or descaling uid residue
the hot water (see “Menu settings”).
immediately. Such residue can cause
corrosion.
● New sponge cloths may contain salts.
Salts can cause rust lm on stainless
steel and must therefore be washed out
thoroughly before use.
● Pull the drip tray 23 with the coffee
grounds container 23c forwards and out.
Remove the panel 23a and grate 23b.
Empty and clean the drip tray and coffee
grounds container.
18
en
Do not put the following items in the
Cleaning the milk system
K
dishwasher: Panel of drip tray 23a,
Important: The milk system 10 must be
powder compartment 18, brewing unit
cleaned immediately after use!
20, water tank 11, aroma cover 16 and
stainless steel milk container.
The milk system 10 can be pre-cleaned
The following parts may be cleaned
automatically (see “Service programmes”
J
in the dishwasher: Drip tray 23, grate
or cleaned manually.
23b, coffee grounds container 23c,
measuring spoon 14 and the individual
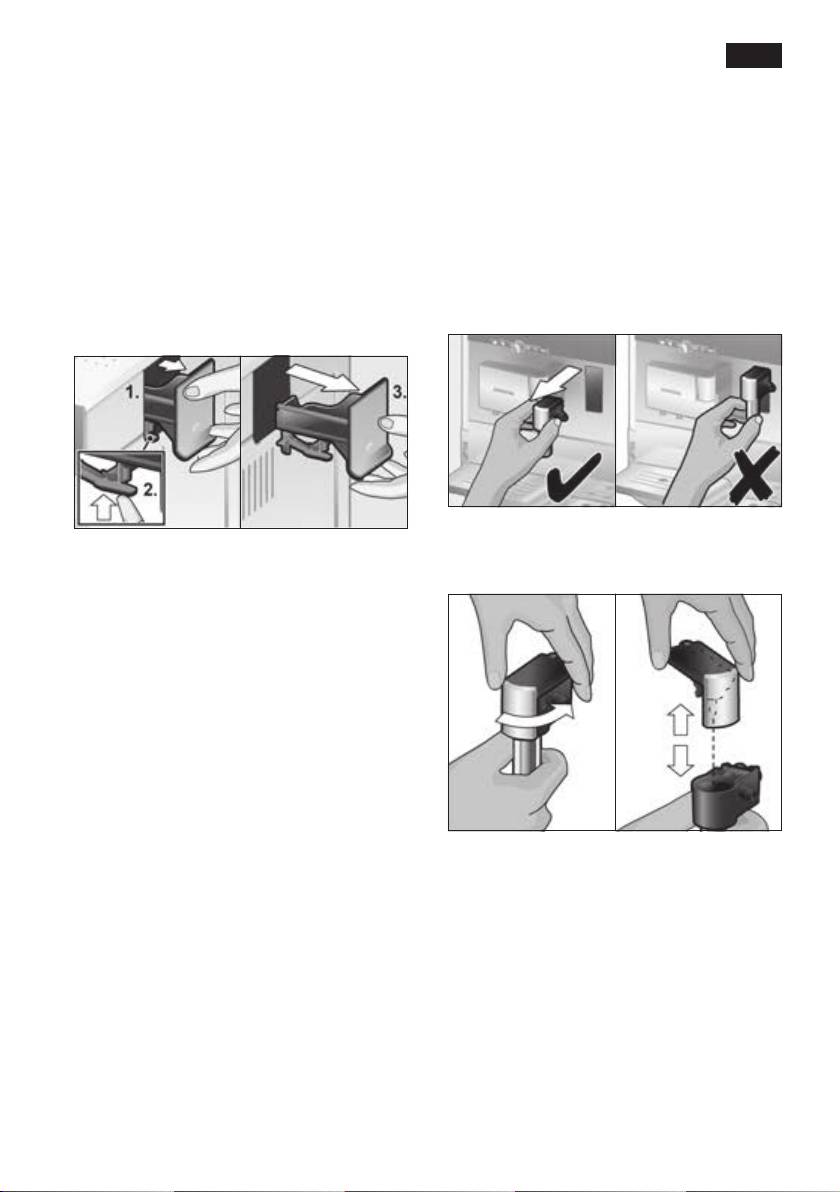
Dismantling the milk system 10 for cleaning:
parts of the milk container cover.
● Pull the milk system 10 forward out of the
● Remove powder compartment 18 and
appliance.
rinse under running water.
● Turn the upper part 10a in an anti-
● Wipe out the inside of the tray holders.
clockwise direction and remove from the
lower part 10b.
Important: Drip tray 23 and coffee
grounds container 23c should be emptied
and cleaned daily to prevent mould from
developing.
Note: If the appliance is cold when
switched on, or if it is switched off after
dispensing coffee, it rinses automatically.
In other words, the system cleans itself.
Important: If the appliance has not been
used for a prolonged period of time (e. g.
after a vacation), clean the entire appliance
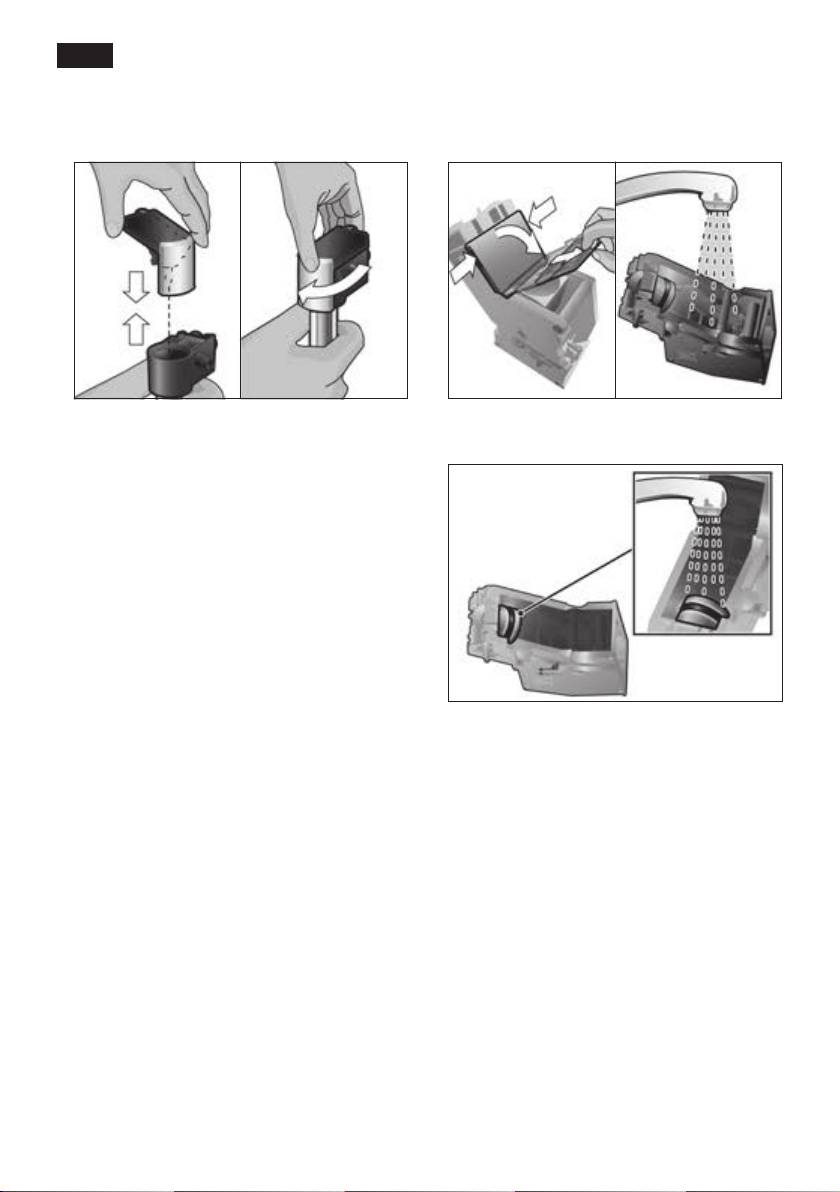
● Clean the individual parts with detergent
thoroughly, including the milk system 10
solution and a soft cloth.
and brewing unit 20.
● Rinse all parts with clean water and dry.
19
en
● Put all the parts back together. The milk
● Remove the cover 20b of the brewing unit
frother can then be clicked back into
and rinse the brewing unit 20 thoroughly
place in the appliance.
under running water.
Info: All parts of the milk frother 10 can also
● Thoroughly clean the brewing unit sieve
be put in the dishwasher.
under the running water.
Cleaning the brewing unit (Fig. F)
(refer also to the quick reference guide)
In addition to the automatic cleaning
programme, the brewing unit 20 should be
removed regularly for cleaning.
● Switch the appliance off completely at
the power on/off switch 1 O / I; no buttons
are lit.
● Take hold of the door to the brewing unit
19 at the bottom and open it.
● Slide the red lock 20a on the brewing unit
20 completely to the left.
Important: Clean the brewing unit with-
● Press the eject lever 21 down fully. The
out detergent and do not put it in the
brewing unit is released.
dishwasher.
● Grasp the brewing unit 20 by the
recessed grips and remove carefully.
● Wipe out the inside of the appliance
thoroughly with a damp cloth and remove
any coffee residues.
● Allow the brewing unit 20 and the inside
of the appliance to dry.
● Replace the cover 20b on the brewing
unit and reinsert the brewing unit 20 fully
into the appliance.
● Press the eject lever 21 up fully.
● Slide the red lock 20a fully to the right
and close the door 19.
20

en
Cleaning the milk system
Service Programmes
Duration: approx. 1 minute
Tip: Refer also to the quick reference guide
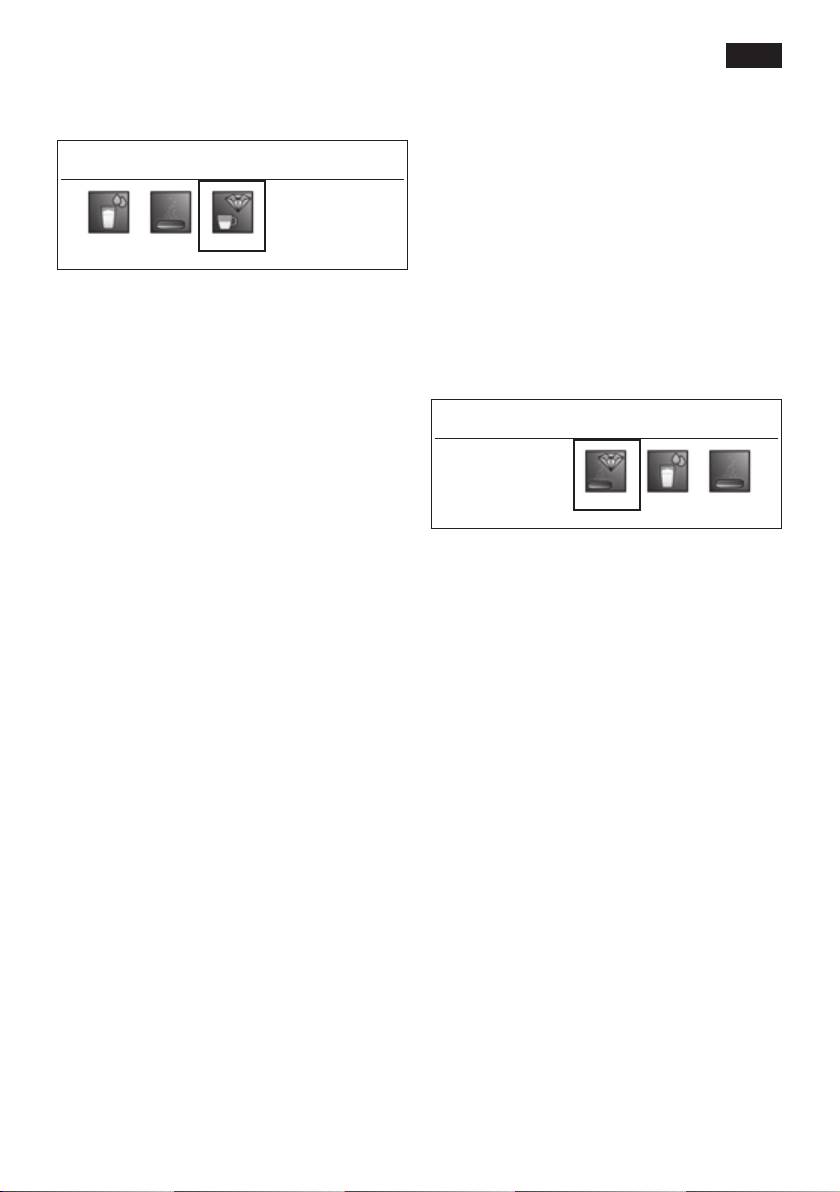
Short rinse milk system ▶ start
in the storage compartment 22.
At regular intervals, the display 5 shows the
following texts:
Shortrinsemilksystemor
Service - descale or
Service - clean or
The milk system 10 can be pre-cleaned
Service - calc‘nClean.
automatically.
The appliance should be cleaned or descaled
● Press the à button 3.
immediately using the corresponding pro-
gramme. You have the option of combining
Shortrinsemilksystem▶start
the processes Descale and Clean with the
● Press the start button 8.
calc‘nClean function (see “ calc‘nClean”).
If the service programme is not run as
Placeemptyglassundermilkfrotherand
instructed, the appliance may be damaged.
placesuctionpipeinglass▶start
● Place an empty glass under the milk
¡ Warning!
system 10 and put the end of the pipe
Follow the instructions for using the descal-
10d in the glass.
ing and cleaning agents for each service
● Press the start button 8. The milk system
programme. Never interrupt the service
is cleaned automatically.
programme!
● Now empty the glass and clean the
Do not drink the liquids.
suction pipe 10d.
Never use vinegar, vinegar-based products,
citric acid or citric acid-based products.
In addition to this, clean the milk system
Never put descaling tablets or other descal-
thoroughly at regular intervals (by hand or
ing agents in the powder compartment 18.
in the dishwasher).
Before starting the respective service
programme (descaling, cleaning or
calc‘nClean), remove the brewing unit,
clean as instructed and replace.
Specially developed and suitable descal-
ing and cleaning tablets are available
from retailers or customer service (see
“Accessories”).
21

en
Descaling
Add0.5lwateranddescaler▶start
Duration: approx. 30 minutes.
● Pour lukewarm water into the empty
water tank 11 up to the “0.5 l” mark and
Descale ▶ start
then dissolve 1 Siemens descaling tablet
TZ80002 in it. When using TZ60002,
2 tablets must be dissolved.
● Press the start button 8. The descaling
programme will now run for about
20 minutes.
The start button 8 ashes while the
Descaling
different descaling processes are running.
The gures on the top right indicate the
Not enough descaling fluid.
progress of the programme.
Refillfluid▶start
Info: If there is not enough descaling solu-
Important: If there is a water lter 29 in
tion in the water tank 11, the corresponding
the water tank 11, it needs to be removed
prompt is displayed. Pour in descaling solu-
before the service programme is run.
tion and press the start button 8 again.
● Press the à button 3.
Cleanandrefillwatertank▶start
● Rinse the water tank 11 and rell it with
Descale▶start
fresh water up to the “max” mark.
● Press the start button 8; the display 5 will
● Press the start button 8. The descaling
guide you through the programme.
programme now runs for about 1 minute
and rinses the appliance.
Emptydriptray
Descaling
Replacedriptray
● Empty the drip tray 23 and reinsert it.
Emptydriptray
Replacedriptray
Place 1 l container under milk frother
● Empty the drip tray 23 and reinsert it.
Placesuctionpipeincontainer▶start
● Place a container with 1 litre capacity
Replace the lter if one is being used. The
under the milk frother 10.
appliance is ready for use again.
● Place the end of the suction pipe 10d in
the container.
Important: Wipe down the appliance
● Press the start button 8.
using a soft, damp cloth to immediately
remove any descaler residue. Such residue
Removewaterfilter▶start
can cause corrosion. New sponge cloths
Info: If the water lter 29 is activated, the
may contain salts. Salts can cause rust
display will prompt you to remove the lter
lm on stainless steel and must therefore
29, then press the start button 8 again.
be washed out thoroughly before use.
Thoroughly clean the suction pipe 10d of
the milk frother.
22
en
Cleaning
Emptydriptray
Duration: approx. 8 minutes.
Replacedriptray
● Empty the drip tray 23 and reinsert it.
Clean ▶ start
The appliance is ready for use again.
calc‘nClean
Duration: approx. 36 minutes.
The start button 8 ashes while the
calc‘nClean combines the separate
different cleaning processes are running.
functions of descaling and cleaning.
The gures on the top right indicate the
If both programmes are due to be run
progress of the programme.
soon, the espresso machine automatically
● Fill the water tank 11 up to the “max”
suggests this service programme.
mark.
calc‘nClean ▶ start
● Press the à button 3.
Clean▶start
● Press the start button 8; the display 5 will
guide you through the programme.
Emptydriptray
The start button 8 ashes while the
Replacedriptray
different calc‘nClean processes are running.
● Empty the drip tray 23 and reinsert it.
The gures on the top right indicate the
progress of the programme.
Position swivel arm
● Swivel the coffee outlet 9 to the left until it
Important: If there is a water lter 29 in
clicks into place.
the water tank 11, it needs to be removed
Cleaning
before the service programme is run.
Open powder compartment
● Press the à button 3.
● Open the powder compartment 18.
calc‘nClean▶start
Insert Siemens cleaning tablet and
● Press the start button 8; the display 5 will
close powder compartment
guide you through the programme.
● Drop a Siemens cleaning tablet into the
drawer 18 and close it.
Emptydriptray
Replacedriptray
Press start
● Empty the drip tray 23 and reinsert it.
● Press the start button 8. The clean-
● Swivel the coffee outlet 9 to the right until
ing programme will now run for about
it clicks into place.
7 minutes.
Cleaning
Place 1 l container under milk frother
Placesuctionpipeincontainer▶start
● Place a container with a capacity of at
least 1 l under the milk frother 10.
● Place the end of the suction pipe 10d in
the container.
23

en
● Press the start button 8.
Emptydriptray
Cleaning
Replacedriptray
● Empty the drip tray 23 and reinsert it.
Open powder compartment
● Open the powder compartment 18.
Replace the lter if one is being used. The
appliance has completed descaling and
Insert Siemens cleaning tablet and
cleaning and is ready for use again.
close powder compartment
● Drop a Siemens cleaning tablet in the
Important: Wipe down the appliance
drawer 18 and close.
using a soft, damp cloth to immediately
remove any descaler residue. Such residue
Removewaterfilter▶start
can cause corrosion. New sponge cloths
Info: If the water lter 29 is activated, the
may contain salts. Salts can cause rust
display will prompt you to remove the lter
lm on stainless steel and must therefore
29, then press the start button 8 again.
be washed out thoroughly before use.
Thoroughly clean the suction pipe 10d of
Add0.5lwateranddescaler▶start
the milk frother.
● Pour lukewarm water into the empty
water tank 11 up to the “0.5 l” mark and
Note: If one of the service programmes
then dissolve 1 Siemens descaling tablet
is interrupted, e. g. by a power outage,
TZ80002 in it. When using TZ60002,
proceed as follows:
2 tablets must be dissolved.
● Rinse the water tank 11 and rell it with
● Press the start button 8. The descaling
fresh water up to the “max” mark.
programme now runs for about
● Press the start button 8. The cleaning
20 minutes.
programme now runs for about 3 minutes,
Descaling
and rinses the appliance.
Cleaning
Not enough descaling fluid.
Refillfluid▶start
Emptydriptray
Info: If there is not enough descaling solu-
Replacedriptray
tion in the water tank 11, the corresponding
● Empty the drip tray 23 and reinsert it.
prompt is displayed. Pour in descaling
The appliance is ready for use again.
solution and press the start button 8 again.
Cleanandrefillwatertank▶start
● Rinse the water tank 11 and rell it with
fresh water up to the “max” mark.
● Press the start button 8. The descaling
programme now runs for about 1 minute
more, followed by the cleaning pro-
gramme for about 7 minutes, and rinses
the appliance.
Descaling
Cleaning
24

en
Tips on energy saving
Storing accessories
● The display has a dimming function that
The espresso machine has special com-
switches on automatically when the
partments for storing the accessories and
appliance is not in use. The display is
quick reference guide inside the appliance.
illuminated dimly. Press any button or
● To store the measuring spoon 14, remove
the rotary knob to brighten the display
the water tank 11 and insert the spoon in
illumination again.
the shaped recess 13.
● If the appliance is not being used, switch
● To store the quick reference guide, open
it off at the power on/off switch 1 O / I on
the door to the brewing unit 19 and stow
the front.
away the quick reference guide in the
● If possible, do not interrupt coffee or milk
storage compartment 22 provided for this
froth dispensing. Stopping a process
purpose.
prematurely results in higher energy
consumption and the drip tray lls up
more quickly.
Accessories
● Descale the appliance regularly to avoid
a build-up of limescale. Limescale residue
The following accessories are available
results in higher energy consumption.
from retailers or from customer service:
Accessories Ordering number
Frost protection
Retail /
Customer service
¡ To avoid damage caused by frost
Cleaning tablets TZ60001
during transport and storage, the
00310575
appliance must be completely
Descaling tablets TZ80002
emptied rst.
00576693
Water lter TZ70003
See “Menu settings – Transportation lock”
00575491
Care set TZ80004
00576330
Milk container with
TZ80009N
“Fresh Lock” lid
00576166
25

en
Disposal
A
Guarantee
Dispose of packaging in an environmen-
The guarantee conditions for this appliance
tally-friendly manner. This appliance is
are as dened by our representative in the
labelled in accordance with European Direc-
country in which it is sold. Details regarding
tive 2012/19/EG concerning used electrical
these conditions can be obtained from the
and electronic appliances (waste electrical
dealer from whom the appliance was pur-
and electronic equipment – WEEE). The
chased. The bill of sale or receipt must be
guideline determines the framework for the
produced when making any claim under the
return and recycling of used appliances as
terms of this guarantee.
applicable throughout the EU. Please ask
your specialist retailer about current dis-
Changes reserved.
posal facilities.
Technical specications
Power connection (voltage – frequency) 220-240 V – 50/60 Hz
Heater wattage 1600 W
Maximum static pump pressure 19 bar
Maximum water tank capacity (without lter) 2.4 l
Maximum capacity of the coffee bean container ~300 g
Length of power cable 100 cm
Dimensions (H x W x D) 385 x 301 x 458 mm
Weight, empty 10–12 kg
Type of grinding unit Ceramic
26
en
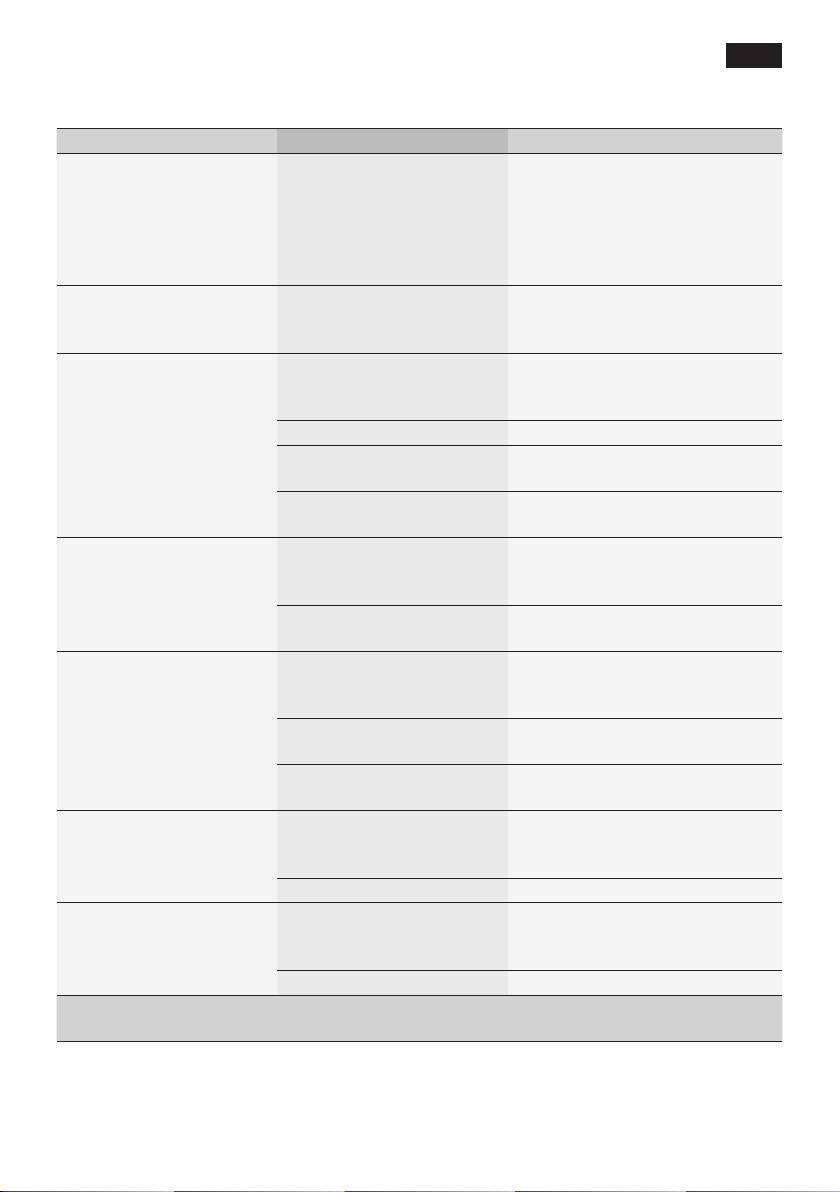
Simple troubleshooting
Problem Cause Solution
Display shows
Beans are not falling into
Gently tap the bean container
15.
Refill bean container
the grinding unit (beans
Change the type of coffee if
although the bean
too oily).
necessary. When the bean
container 15 is full, or the
container
15 is empty, wipe it
grinding unit does not
with a dry cloth.
grind the beans.
No tea water dispensed. The milk frother 10 or its
Clean the milk frother 10 or its
holder is soiled.
holder (see “Cleaning the milk
system”).
Too little or no milk froth,
The milk frother 10 or its
Clean the milk frother 10 or its
or the milk frother 10 does
holder is soiled.
holder (see “Cleaning the milk
not draw the milk in.
system”).
Milk unsuitable for frothing. Use low-fat milk (1.5 % fat).
The milk frother 10 is not
Moisten and assemble the milk
correctly assembled.
frother parts.
Build-up of limescale in the
Descale the appliance as
appliance.
described in the instructions.
The selected per-cup
Coffee is ground too
Adjust the grinding unit to a
quantity is not reached.
nely. Pre-ground coffee
coarser setting. Use coarser
Coffee dispensing slows
is too ne.
pre-ground coffee.
to a trickle or stops
Build-up of limescale in the
Descale the appliance as
completely.
appliance.
described in the instructions.
Coffee has no “crema”. Unsuitable type of coffee. Use a type of coffee with a
higher proportion of robusta
beans.
The beans are no longer
Use fresh beans.
fresh.
The grinding setting is not
Adjust the grinding setting to
suitable for the beans.
ne.
Coffee is too “acidic”. The grinding setting is too
Adjust the grinding unit to a ner
coarse or the pre-ground
setting or use ner pre-ground
coffee is too coarse.
coffee.
Unsuitable type of coffee. Use a darker roast.
Coffee is too “bitter”. The grind setting is too ne
Adjust the grinding unit to a
or the pre-ground coffee is
coarser setting or use coarser
too ne.
pre-ground coffee.
Unsuitable type of coffee. Change the type of coffee.
If you are unable to solve the problem, always call the hotline!
You will nd the telephone numbers at the back of these instructions.
27

en
Problem Cause Solution
The coffee tastes “burnt”. Brewing temperature too
Reduce the temperature,
high.
see “Menu settings – Coffee
temperature”.
The grinding setting is
Adjust the grinding unit to a
too ne or the pre-ground
coarser setting or use coarser
coffee is too ne.
pre-ground coffee.
Unsuitable type of coffee. Change the type of coffee.
Display shows
The appliance has a fault. Please contact the hotline.
Error
Please contact hotline
The water lter does not
The water lter is not
Firmly press the water lter
stay in position in the
mounted correctly.
straight down into the tank
water tank.
connection.
Display shows
Water tank has been
Insert the water tank correctly or
Check water tank
incorrectly inserted or the
rinse the water lter according to
new water lter has not
instructions and then switch on.
been rinsed according to
instructions.
Carbonated water in the
Fill the water tank with fresh tap
water tank.
water.
The coffee grounds are
The grinding setting is too
Adjust the grinding unit to a
not compact and are too
ne or too coarse, or not
coarser or ner setting, or use
wet.
enough ground coffee has
2 level measuring spoons of
been used.
ground coffee.
Display shows
Brewing unit is soiled. Clean brewing unit.
Clean brewing unit
Too much pre-ground
Clean brewing unit (pour in no
coffee in the brewing unit.
more than 2 level measuring
spoons of ground coffee).
The brewing unit’s
Clean brewing unit (see “Mainte-
mechanism is stiff.
nance and daily cleaning”).
Coffee or milk froth quality
Build-up of limescale in the
Descale the appliance as
varies considerably.
appliance.
described in the instructions.
Water dripped onto the
Drip tray removed too
Wait a few seconds after the
inner oor of the appli-
early.
last drink was dispensed before
ance when the drip tray
removing the drip tray.
was removed.
If you are unable to solve the problem, always call the hotline!
You will nd the telephone numbers at the back of these instructions.
28

fr
Chère amatrice de café,
Table des matières
cher amateur de café,
Consignes de sécurité ..............................30
Nous vous félicitons pour l’achat de cette
Contenu de l’emballage ............................32
machine à expresso automatique Siemens.
Présentation .............................................32
Avant la première utilisation .....................33
Éléments de commande ...........................34
Ce mode d’emploi décrit les différents
Afchages à l’écran ..................................36
modèles d’appareils qui se distinguent par
Réglages de l’écran ..................................37
des détails.
Personnalisation .......................................38
Sécurité enfants........................................40
Veuillez également tenir compte du
Réglages menu ........................................40
Mémento joint. Un logement 22 a été prévu
Préparation avec du café en grains ..........43
spécialement pour le conserver à portée de
Préparation avec du café moulu ...............44
main dans la machine.
Préparer de la mousse
de lait et du lait chaud...............................45
Préparer de l’eau chaude .........................45
Entretien et nettoyage quotidiens .............46
Programmes de maintenance ..................48
Conseils pour économiser l’énergie .........52
Protection contre le gel .............................52
Rangement des accessoires ....................52
Accessoires ..............................................53
Mise au rebut ............................................53
Garantie ....................................................53
Caractéristiques techniques .....................53
Éliminer soi-même
les problèmes simples ..............................54
29

fr
Consignes de sécurité
Lire attentivement ce mode d’emploi, s’y conformer lors de
l’utilisation et le conserver ! Veuillez joindre ce mode d’emploi
si vous passez l’appareil à quelqu’un d’autre. Cet appareil est
conçu pour la préparation de quantités usuelles, dans le cadre
d’un foyer ou d’un usage non commercial de type domestique.
Citons p. ex. les cuisines du personnel dans les commerces,
bureaux, exploitations agricoles et établissements artisanaux
ainsi que les clients de pensions, petits hôtels et toute autre
résidence de type similaire.
¡ Risque de chocs électriques !
Ne brancher et n’utiliser l’appareil que conformément aux données
indiquées sur la plaque signalétique. Les réparations sur l’appareil
telles que le remplacement d’un cordon endommagé ne doivent être
effectuées que par notre SAV a n d’éliminer tout danger.
Cet appareil peut être utilisé par des enfants à partir de 8 ans et
par des personnes ayant des facultés physiques, sensorielles
ou mentales réduites ou manquant d’expérience et/ou de
connaissances à condition d’être surveillés ou d’avoir été informés
quant à la bonne utilisation de l’appareil et d’avoir compris les
dangers qui en découlent. Les enfants de moins de 8 ans doivent
être tenus éloignés de l’appareil et du cordon d’alimentation et ne
doivent pas utiliser l’appareil. Ne pas laisser les enfants jouer avec
l’appareil. Le nettoyage et l’entretien incombant à l’utilisateur ne
doivent pas être effectués par des enfants sauf s’ils ont 8 ans ou
plus et sont surveillés.
30

fr
Ne jamais plonger l’appareil ou le cordon électrique dans l’eau.
N’utiliser la machine que lorsque le cordon électrique et l’appareil
ne présentent aucun dommage. En cas de défaut, débrancher
immédiatement la che secteur ou couper la tension du réseau.
¡ Risque d’étouffement !
Ne pas laisser les enfants jouer avec les emballages.
¡ Risque de brûlure !
Le mousseur de lait 10 pour le lait / l’eau chaude devient brûlant.
Après utilisation, bien laisser refroidir avant de le toucher.
¡ Risque de blessure!
Ne pas glisser les doigts à l’intérieur du broyeur.
¡ Attention !
Le chauffe-tasses 27 devient brûlant !
31

fr
Contenu de l’emballage
(Figure A sur les pages dépliantes)
1 Machine à expresso automatique
6 Cuillère-dose
2 Mode d’emploi
7 Réservoir de lait, isolé
3 Mémento
8 Filtre à eau
4 Mousseur de lait
5 Bandelette pour déterminer la
dureté de l’eau
Présentation
(Figures B, C, D, E et F sur les pages dépliantes)
1 Interrupteur électrique O / I
14 Cuillère-dose (sert de poignée pour
2 Touche á (personnalisation)
placer le ltre d’eau)
3 Touche à (programmes de
15 Bac à café
maintenance)
16 Couvercle préservateur d’arôme
4 Touches de sélection < >
17 Sélecteur de réglage de
5 Écran
nesse de mouture
a) Ligne d’état
18 Tiroir à café
b) Ligne de sélection
(café en poudre / pastille de nettoyage)
c) Ligne de navigation
19 Volet de l’unité de percolation
6 Bouton rotatif pour les réglages à l’écran
20 Unité de percolation
7 Touche j (menu Info)
a) Verrouillage
8 Touche start (boissons / programmes)
b) Couvercle de protection
9 Bec verseur du café,
21 Levier d’éjection pour l’unité de
réglable en hauteur et pivotant
percolation
10 Système lait,
22 Logement du Mémento
réglable en hauteur et amovible
23 Bac collecteur
(production de mousse de lait /
a) Panneau
eau chaude)
b) Égouttoir
a) Partie supérieure
c) Récipient pour marc de café
b) Partie inférieure
24 Logement du cordon électrique
c) Tube d’aspiration de lait
25 Plaque signalétique (n° E. ; FD)
d) Tube d’aspiration
26 Réservoir de lait (isolé)
11 Réservoir d’eau amovible
27 Chauffe-tasses
12 Couvercle du réservoir d’eau
28 Touche pour le chauffe-tasses, éclairée
13 Logement de la cuillère-dose
29 Filtre à eau
32

fr
● Retirer le réservoir d’eau 11, le rincer et le
Avant la
remplir d’eau froide. Ne pas dépasser le
première utilisation
repère « max » .
● Placer le réservoir d’eau 11 bien vertical
Généralité
et appuyer pour le faire descendre.
Utiliser exclusivement de l’eau pure, froide,
● Refermer le couvercle du
sans gaz carbonique et exclusivement
réservoir d’eau 12.
du café en grains torréé (de préférence
● Remplir de café en grains le
pour expresso ou percolateur) et remplir
bac à café 15.
les conteneurs correspondants. Ne pas
● Appuyer sur l’interrupteur électrique
employer des grains de café avec glaçage,
1 O / I, la touche 8 start s’allume et à
des grains caramélisés ou enrobés d’une
l’écran 5 s’afchent différentes langues.
substance sucrée quelconque ; ils obturent
Vous avez le choix entre les langues
l’unité de percolation.
suivantes :
Il est possible, sur cette machine, de régler
la dureté de l’eau. En usine, la dureté de
TE809 DE
l’eau est préréglée sur 4. Tester la dureté
Deutsch English
de l’eau utilisée à l’aide de la bandelette
Français Italiano
jointe. Si la dureté est différente de la valeur
4, programmer la machine en conséquence
TE809 RW
après la mise en marche (voir au chapitre
English Русский
« Réglages menu – Dureté eau »).
Nederlands Français
Italiano Svenska
Mise en service de la machine
Español Polski
● Placer la machine à expresso automa-
Українська Magyar
tique sur un plan horizontal, sufsamment
Türkçe Dansk
solide pour supporter son poids et
Norsk Suomi
résistant à l’eau.
Português Čeština
Ελληνικa
Important : Utiliser l’appareil uniquement
dans des locaux hors gel. Dans le cas où
● À l’aide des touches de sélection 4
< et
l’appareil a été transporté ou entreposé
>, choisir la langue souhaitée ; tous les
à des températures en dessous de 0 °C,
textes écrans s’afcheront ensuite dans
attendre au moins 3 heures avant la mise
cette langue.
en service de l’appareil.
Sprache
Deutsch ▶ start
Extraire du logement 24 la longueur de
English
cordon électrique nécessaire et brancher
Français
dans une prise. Pour ajuster la longueur du
cordon, il suft de tirer le cordon ou de le
repousser à l’intérieur. Pour cela, placer la
machine sur un bord de table, p. ex. et tirer
le câble vers le bas ou le pousser vers
le haut.
La langue sélectionnée est marquée.
● Rabattre vers le haut le couvercle du
● Appuyer sur la touche 8 start, la langue
réservoir d’eau 12.
sélectionnée est enregistrée.
33
fr
● Le logo de la marque s’allume à l’écran
Éléments de commande
5. La machine chauffe et effectue un
rinçage, un peu d’eau s’écoule du bec
Interrupteur électrique O / I
verseur du café 9.
L’interrupteur électrique 1 O / I permet de
● La machine est prête à fonctionner
mettre la machine en marche ou de l’arrê-
lorsque les symboles de sélection de
ter. La machine effectue automatiquement
boisson et la touche 8 start sont allumés
un rinçage lorsqu’elle est mise en marche
à l’écran 5.
et arrêtée.
Espresso
La machine n’effectue pas de rinçage
lorsque :
● elle est encore chaude au moment de la
mise en marche.
● il n’a pas été préparé de café avant la
mise à l’arrêt.
Info : La machine à expresso automatique
est programmée en usine de façon à fonc-
La machine est prête à fonctionner lorsque
tionner de manière optimale. La machine
les symboles de sélection de boisson et la
s’arrête automatiquement après une
touche 8 start sont allumés à l’écran 5.
durée dénie (voir au chapitre « Réglages
menu – AR auto dans »).
Touche
á Personnalisation
La machine permet d’enregistrer et d’acti-
Remarque : Lors de la première utilisation
ver des réglages personnalisés pour les
de la machine ou après un programme de
boissons au café. Pour l’enregistrement et
service ou encore après une longue période
l’activation, procéder de la façon décrite au
d’inutilisation, la première tasse préparée
chapitre « Personnalisation ».
n’a pas encore son plein arôme. Il ne faut
donc pas la boire.
Touche
à Programmes de maintenance
Une pression brève sur la touche 3 à
Une fois la mise en service de la machine
afche la sélection des programmes de
effectuée, la présence d’une mousse dense
maintenance. Exécuter le programme de la
et ne sur le café n’est obtenue qu’après
manière décrite au chapitre « Programmes
avoir préparé plusieurs tasses.
de maintenance ».
La sécurité enfants est activée ou désac-
tivée par une pression longue, voir au
chapitre « Sécurité enfants ».
Bouton rotatif
Le bouton rotatif 6 sert à naviguer dans
l’écran 5 en tournant vers la gauche et la
droite ; il permet aussi de modier certains
paramètres dans le menu.
34
fr
Touches de sélection < et >
Touche j Réglages
L’activation des touches de sélection 4 < et
La touche 7 j sert à appeler des infor-
> permet de naviguer à l’écran (Ligne de
mations (appui bref) et à effectuer des
navigation 5c) vers le bas et vers le haut.
réglages (maintenir appuyée pendant 3 s
au moins).
Écran
À l’aide des symboles Boissons au café,
Appeler des informations
Arôme et Quantité ainsi que des textes de
Dans le menu Info, il est possible d’appeler
réglage, l’écran 5 afche en permanence
les informations suivantes :
les opérations en cours et les messages. Le
● date de la prochaine maintenance.
bouton rotatif 6 et les touches de sélection 4
● nombre de boissons préparées depuis
servent à effectuer les réglages. Le réglage
la mise en service de la machine à
sélectionné est identié par un cadre.
expresso automatique.
Espre sso
5a
● Appuyer brièvement sur la touche 7 j et
naviguer à l’aide des touches de sélection
5b
4 < et >.
5c
Menu Info
Exemple :
Détartrage dans env. 150
La ligne d’état 5a indique le nom de la bois-
Nettoyer dans env. 200
son, ainsi que, pour les boissons au café,
Chang.filtre dans 200
*
l’arôme 55 et la quantité
réglé.
Î
Sur la ligne de sélection 5b gurent les
symboles pour le choix des boissons.
Menu Info
Les èches de la ligne de navigation 5c
indiquent la direction où se trouvent encore
Nombre de cafés 11
des niveaux de menu.
Nombre de boissons lactées 15
Quantité d’eau chaude 2 l
Se référer au chapitre « Afchages à
l’écran ».
* apparaît uniquement lorsque le ltre est
Touche start
activé.
Appuyer sur la touche 8 start pour lancer la
préparation d’une boisson ou pour effectuer
Appuyer de nouveau brièvement sur la
un programme de maintenance.
touche 7 j pour revenir à la sélection de
Pour réduire la quantité de boisson,
boissons. Après env. 10 secondes sans
appuyer de nouveau sur la touche 8 start
conrmation, la machine se replace auto-
en cours de préparation.
matiquement en mode de sélection des
boissons.
Effectuer les réglages
Voir au chapitre « Réglages menu ».
35
fr
Régler la nesse de la mouture
Chauffe-tasses
Le sélecteur 17 de réglage de la mouture
du café permet de régler la nesse de
¡ Attention !
mouture souhaitée du café.
Le chauffe-tasses 27 devient brûlant !
¡ Attention !
La machine à expresso automatique est
Modier le réglage de la mouture unique-
équipée d’un chauffe-tasses 27 qui peut
ment lorsque le broyeur fonctionne. Sinon,
être activé ou désactivé manuellement à
la machine peut être endommagée. Ne pas
l’aide de la touche 28. Lorsque le chauffe-
glisser les doigts à l’intérieur du broyeur.
tasses 27 est activé, la touche 28 est
éclairée.
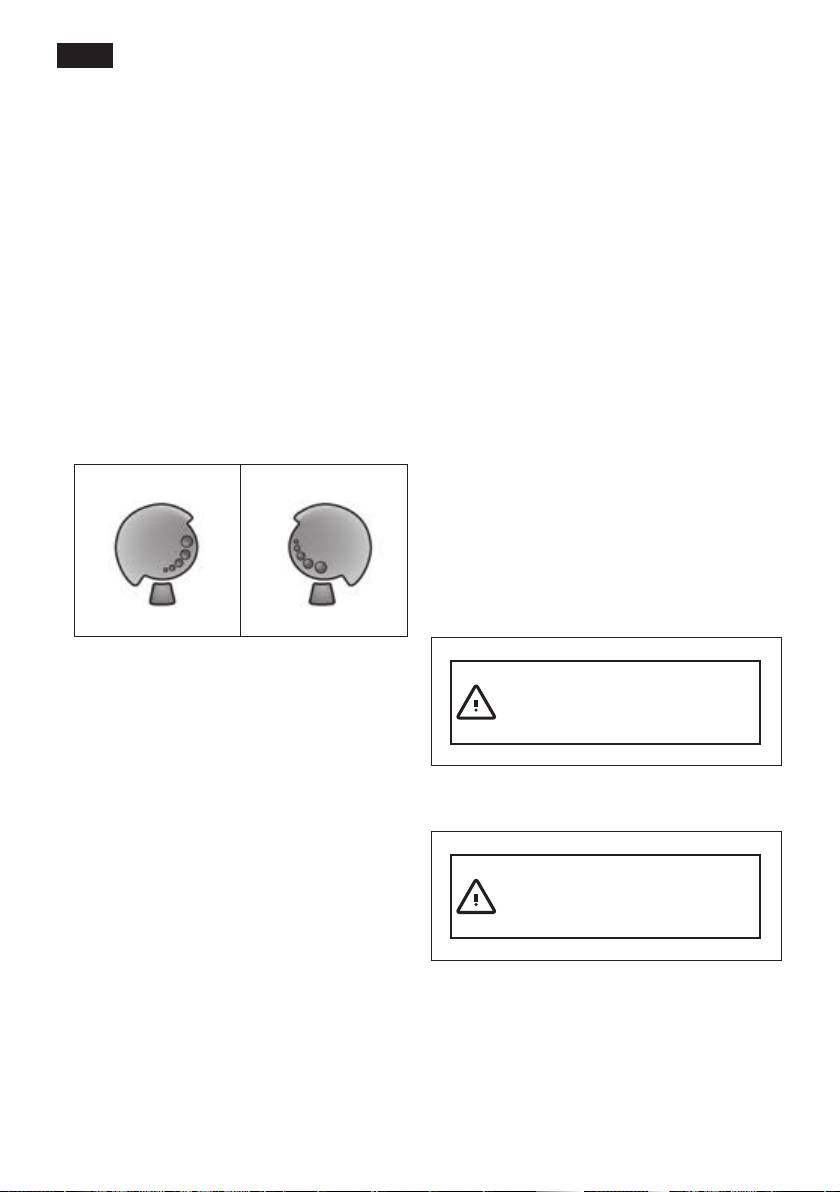
● Lorsque le broyeur fonctionne, régler
le sélecteur 17 entre une mouture ne
Conseil pratique : Pour réchauffer les
(a : Tourner dans le sens opposé aux
tasses de manière optimale, les poser sur
aiguilles d’une montre) et une mouture
le chauffe-tasses 27 ouverture dirigée vers
plus grossière (b : Tourner dans le sens
le haut.
des aiguilles d’une montre).
a
b
Afchages à l’écran
Messages à l’écran
L’écran 5 afche différents messages.
Informations
Par exemple :
Info : Le nouveau réglage n’est perceptible
qu’à partir de la seconde tasse de café.
Rés. eau presque vide
Remarque : Si le message Moudre moins
fin SVP apparait à l’écran, les grains de café
sont moulus trop nement. Régler une mou-
ture moins ne.
Invitations à agir
Par exemple :
Conseil pratique : Régler une mouture
plus ne pour les grains torréés foncés et
un mouture plus grossière pour les grains
Remplir le
torréés clairs.
réservoir d’eau
36
