Sigma ELECTRONIC FLASH EF-610 DG SUPER EO-ETTL II (キヤノン用): SLAVE FLASH
SLAVE FLASH: Sigma ELECTRONIC FLASH EF-610 DG SUPER EO-ETTL II (キヤノン用)
8. Press the SEL button make the flash output display and
blink.
9. Press the
+
or
-
button to set the flash output amount for ID 3.
10. Press the SEL button to make the indicator stop blinking.
◆ If there are only two slave units, please select the indicator at step 3 ( step 9 and step 10 should be
omitted).
WIRELESS MULTI FLASH
Set the master flash unit as follows.
1. Follow the procedure for Changing the Wireless Mode, and set to the MULTI/
mark.
2. Press the SEL button to make the firing frequency display blink.
3. Press the
+
or
-
button to set the firing frequency.
4. Press the SEL button to make the flash output amount display blink.
5. Press the
+
or
-
button to set the flash output amount.
6. Press the SEL button to make the flash count display blink.
7. Press the
+
or
-
button to set the flash count.
8. Press the SEL button to make the display stop blinking.
◆ The firing frequency and flash count will be the same for all slave units.
SLAVE FLASH
◆ When selecting this mode with the MODE button, make sure that the flash indicator mode (ETTL, M,
MULTI) is not displayed.
NORMAL SLAVE FLASH
Even if the EF-610 DG SUPER is not attached to the camera body, you can fire the flash by using another
flash unit.
◆ Built-in flash (E-TTL, E-TTL II) cannot be used.
◆ Please set your Master Flash unit to TTL autoflash (E-TTL, E-TTL II autoflash cannot be used) or Manual
flash mode.
1. Attach the flash unit to the camera’s hot shoe.
2.
Set
the
camera’s
exposure
mode
to
the
desired
mode
.
If
you
use
A
or
M
mode,
also
set
the
desired
aperture
value
.
3. Turn on the flash unit and press the shutter button half way.
◆ Now, the aperture value and film speed are automatically
transmitted to the flash unit.
4. Remove the flash unit from the camera.
5.
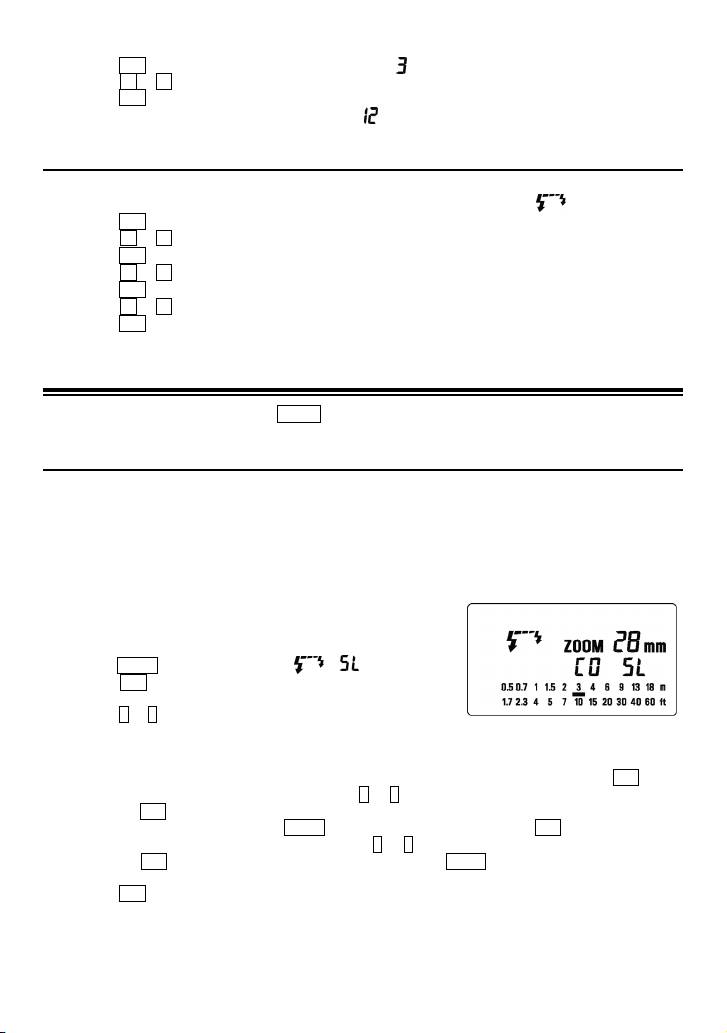
Press the MODE button and select the /
(Slave) mode.
6. Press the SEL button several times to make the flash output value
indicator blink.
7. Press the + or – button to set the flash output amount.
◆ Determine the appropriate flash output by setting the distance indicator on the LCD panel to coincide as
closely as possible with the actual distance from the slave flash to the subject. If the actual distance is
out of range, you will need to change the aperture value or film speed.
a. To change the aperture value: When the flash unit is set to the Slave mode, press the SEL button
until the aperture value blinks, then press the + or – button to set the desired aperture value. Then
press the SEL button to stop the display blinking.
b. To change the film speed: Press
MODE
to select the ISO, then press the SEL button to make the
indicator for the aperture value blink. Press the + or – button and set the desired film speed, then
press the SEL button once again. You will need to press the
MODE
button several times to return to
the slave mode.
8. Press the SEL button several times to make the display stop blinking.
9. Place the slave unit in the desired location. Do not place the slave unit within the picture area.
10. After confirming that all flash units are fully charged, press the shutter button to take the picture.
◆ When the EF-610 DG SUPER is fully charged, the AF Auxiliary Light will blink.
◆ The flash will not fire if the EF-610 DG SUPER is attached to the camera body while it is in the Slave
Mode setting.
26
Оглавление
- 安全上のご注意
- 各部の名称(1 ページ)
- 発光部のセット
- ワイドパネルについて
- 連続撮影時のご注意
- 後幕シンクロ撮影
- モデリング発光
- マルチ発光撮影
- ワイヤレス撮影
- スレーブ発光
- 主要諸元
- PRECAUTIONS
- DESCRIPTION OF THE PARTS
- ADJUSTING THE FLASH HEAD
- WIDE PANEL
- LIMITS OF CONTINUOUS SHOOTING
- HIGH SPEED SYNC (FP) FLASH, A TYPE CAMERAS ONLY
- MODELING FLASH
- BOUNCE FLASH
- SLAVE FLASH
- SPECIFICATIONS
- VORSICHTSMAßNAHMEN
- BESCHREIBUNG DER TEILE
- EINSTELLEN DES BLITZKOPFES
- WEITWINKELSTREUSCHEIBE
- GRENZEN DER SERIENAUSLÖSUNG
- SYNCHRONISATION AUF DEN ZWEITEN VERSCHLUSSVORHANG
- BLITZBELICHTUNGSSPEICHERUNG (FE-LOCK)
- STROBOSKOPBETRIEB
- KABELLOSES BLITZEN
- „SLAVE“ GERÄT
- TECHNISCHE DATEN
- PRECAUTIONS
- DESCRIPTION DES ELEMENTS
- AJUSTEMENT DE LA TETE FLASH
- ELARGISSEUR D'ANGLE
- LIMITES DES PRISES DE VUE CONSECUTIVES AU FLASH
- SYNCHRONISATION GRANDE VITESSE (FP)
- FLASH PREDICTIF
- FLASH INDIRECT
- FLASH ESCLAVE
- CARACTERISTIQUES TECHNIQUES
- PRECAUCIONES
- DESCRIPCIÓN DE LAS PARTES
- AJUSTE DEL CABEZAL DEL FLASH
- PANTALLA ANGULAR
- LIMITACIONES DEL DISPARO CONTINUO
- BLOQUEO FE (sólo para cámaras de tipo B)
- LUZ DE MODELADO
- FLASH REFLEJADO
- CONTROL REMOTO DEL FLASH
- FLASH ESCLAVO
- ESPECIFICACIONES
- ATTENZIONE
- DESCRIZIONE DELLE PARTI
- REGOLAZIONE DELLA TESTA DEL FLASH
- ILLUMINAZIONE DEL DISPLAY LCD
- LIMITAZIONI QUANDO SI SCATTA IN SEQUENZA
- BLOCCO FE
- FB (Esposizione Bracketing del flash)
- FLASH TELECOMANDATO SENZA FILI (WIRELESS)
- FLASH SECONDARIO
- SPECIFICHE
- BEMÆRK
- BESKRIVELSE AF FLASHENS DELE
- JUSTERING AF FLASHHOVEDET
- ETTL (TTL) AUTO FLASH
- SYNKRONISERING MED ANDET LUKKERGARDIN
- FE LÅS
- MULTI-FLASH FUNKTION
- TRÅDLØS FLASH
- SLAVE-FLASH
- SPECIFIKATIONER
- VOORZORGSMAATREGELEN
- OMSCHRIJVING VAN DE ONDERDELEN
- HET AFSTELLEN VAN DE FLITSKOP
- GROOTHOEK ADAPTER
- MAXIMALE PRESTATIES BIJ CONTINU FOTOGRAFEREN.
- FP FLITS (High Speed Sync)
- FB MODE (Flash Exposure Bracketing)
- DRAADLOOS FLITSEN
- SLAVE FUNCTIE
- TECHNISCHE GEGEVENS:
- 注 意
- 相容相機型號
- 安裝閃光燈到相機及其解除
- 閃燈連發限制
- 第二簾幕閃燈同步
- 造型閃光燈
- 反射閃光
- 離機無線從屬(Slave)閃光模式
- 規 格
- 사용상 주의점
- 각부의 명칭
- 플래시 헤드 조정
- ETTL (TTL) 오토 플래시
- 후막 싱크로 촬영
- FE LOCK 촬영
- 멀티 플래시 모드
- 무선 플래시 촬영
- 슬레이브 플래시
- 제품 사양
- ПРЕДОСТОРОЖНОСТИ
- ОПИСАНИЕ СОСТАВНЫХ ЧАСТЕЙ
- НАСТРОЙКА ГОЛОВКИ ВСПЫШКИ
- ОСВЕЩЕНИЕ ЖК ПАНЕЛИ
- ОГРАНИЧЕНИЯ ДЛЯ НЕПРЕРЫВНОЙ СЪМКИ
- ВЫСОКОСКОРОСТНАЯ СИНХРОНИЗАЦИЯ ВСПЫШКИ,
- КОМПЕНСАЦИЯ ЭКСПОЗИЦИИ
- НАПРАВЛЕННОСТЬ ВСПЫШКИ
- ДОПОЛНИТЕЛЬНАЯ ВСПЫШКА
- ХАРАКТЕРИСТИКИ
- PRECAUÇÕES
- DESCRIÇÃO DOS COMPONENTES
- COMO AJUSTAR A CABEÇA DO FLASH
- ILUMINAÇÃO DO PAINEL LCD
- LIMITES DE DISPAROS CONTÍNUOS
- SINCRONIZAÇÃO DO FLASH A ALTA VELOCIDADE (FP),
- FB (Exposição Múltipla com Flash)
- FLASH INDIRECTO
- FLASH ESCRAVO
- ESPECIFICAÇÕES
