Sigma ELECTRONIC FLASH EF-610 DG SUPER EO-ETTL II (キヤノン用): DESCRIPTION OF THE PARTS
DESCRIPTION OF THE PARTS : Sigma ELECTRONIC FLASH EF-610 DG SUPER EO-ETTL II (キヤノン用)
DESCRIPTION OF THE PARTS
1.Flash Head 2.AF Auxiliary Light 3.Bounce Angle; Up and Down
EXTERNAL
4.Bounce Angle; Right and Left 5.Bounce Lock and Release Button; Up and Down
PARTS
6.Swivel Lock and Release Button; Right and Left 7.LCD Panel 8.Battery Cover
9.Shoe Ring 10.Shoe 11.Catch Light Panel 12.Wide Panel
13.MODE Button 14.SEL SELECT Button 15.
+ Increment Button
CONTROLS
16.
-
Decrement Button 17.ZOOM Button 18.TEST Button
19.LIGHT Button 20.Ready Light 21.Power Switch
CAMERA MODELS AND FUNCTIONS
Although this Flash unit has been equipped with numerous functions, depending on the camera model
being used some functions may have some limitations. Please confirm the type camera you have from
the list below. Please refer to explanations of each function through the instruction manual; If no
model information is specified, it means that this function of flash can be used with all type of EOS
cameras.
A type camera E-TTL(E-TTL II) Compatible EOS SLR cameras
B type camera All other EOS cameras except those listed above
ABOUT THE BATTERY
This flash unit uses four “AA” type Alkaline dry cell batteries, Ni-Cad or Ni-MH rechargeable batteries.
Manganese batteries can also be used but as they have a shorter life than Alkaline batteries, we do
not recommend using them. Please replace batteries if it takes more than 30seconds to light the
Ready Lamp.
◆ To assure proper electrical contact, clean the battery terminals before installing the batteries.
◆ Ni-Cad or Ni-MH batteries do not have standardized contacts. If you use Ni-Cad or Ni-MH batteries,
please confirm that the battery contacts touch the battery compartment properly.
◆ To prevent battery explosion, leakage or overheating, use four new AA batteries of the same type
and brand. Do not mix the type or new and used batteries.
◆ Do not disassemble or short-circuit the batteries, or expose them fire or water; they may explode.
Do not recharge the batteries other than Ni-Cad or Ni-MH rechargeable batteries.
◆ When the flash will not be used for an extended period of time, remove the batteries from the flash
to avoid the possibility of damage from leakage.
◆ Battery performance decreases at low temperatures. Keep batteries insulated when using the flash
in cold weather.
◆ As with any flash, it is recommended you carry spare batteries when on a long trip or when
photographing outdoors in cold weather.
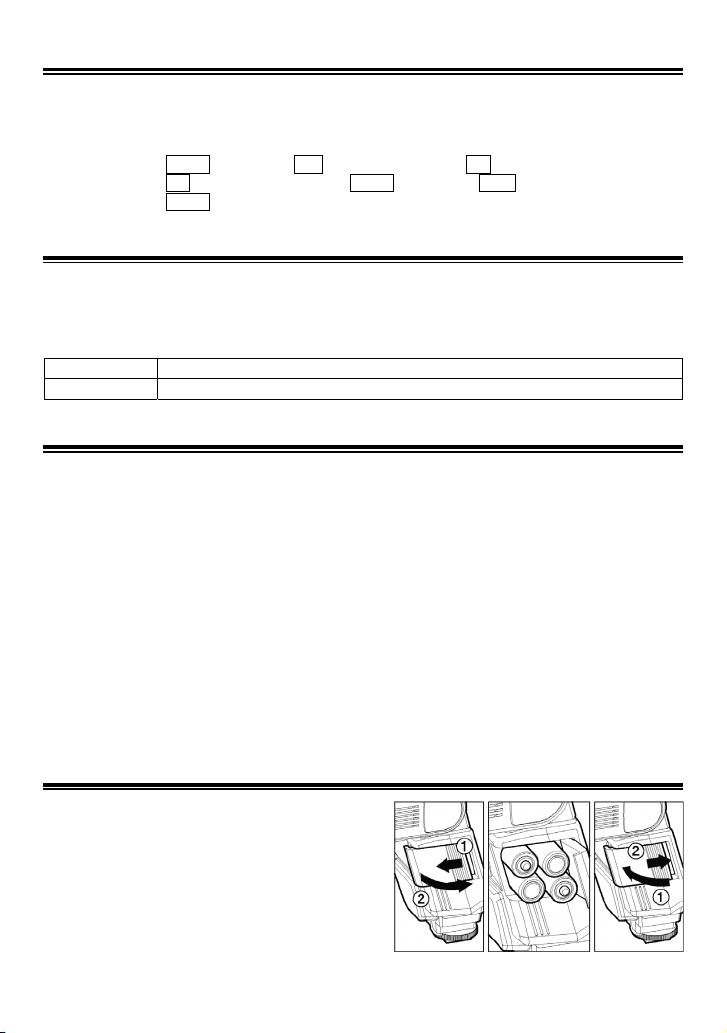
BATTERY LOADING
1. Be sure to set the Power Switch to the off position
then slide the battery cover in the direction of the
arrow to open.
2. Insert four AA size batteries into the battery
chamber. Be sure the + and – ends of the batteries
are aligned according to the diagram in the chamber.
3. Close the cover.
4. Slide the Power Switch to the ON position. After few
seconds the Ready Lamp will light, indicating that
the flash unit can be fired.
5. Please press the “Test Button” to be sure that the flash is working properly.
16
Оглавление
- 安全上のご注意
- 各部の名称(1 ページ)
- 発光部のセット
- ワイドパネルについて
- 連続撮影時のご注意
- 後幕シンクロ撮影
- モデリング発光
- マルチ発光撮影
- ワイヤレス撮影
- スレーブ発光
- 主要諸元
- PRECAUTIONS
- DESCRIPTION OF THE PARTS
- ADJUSTING THE FLASH HEAD
- WIDE PANEL
- LIMITS OF CONTINUOUS SHOOTING
- HIGH SPEED SYNC (FP) FLASH, A TYPE CAMERAS ONLY
- MODELING FLASH
- BOUNCE FLASH
- SLAVE FLASH
- SPECIFICATIONS
- VORSICHTSMAßNAHMEN
- BESCHREIBUNG DER TEILE
- EINSTELLEN DES BLITZKOPFES
- WEITWINKELSTREUSCHEIBE
- GRENZEN DER SERIENAUSLÖSUNG
- SYNCHRONISATION AUF DEN ZWEITEN VERSCHLUSSVORHANG
- BLITZBELICHTUNGSSPEICHERUNG (FE-LOCK)
- STROBOSKOPBETRIEB
- KABELLOSES BLITZEN
- „SLAVE“ GERÄT
- TECHNISCHE DATEN
- PRECAUTIONS
- DESCRIPTION DES ELEMENTS
- AJUSTEMENT DE LA TETE FLASH
- ELARGISSEUR D'ANGLE
- LIMITES DES PRISES DE VUE CONSECUTIVES AU FLASH
- SYNCHRONISATION GRANDE VITESSE (FP)
- FLASH PREDICTIF
- FLASH INDIRECT
- FLASH ESCLAVE
- CARACTERISTIQUES TECHNIQUES
- PRECAUCIONES
- DESCRIPCIÓN DE LAS PARTES
- AJUSTE DEL CABEZAL DEL FLASH
- PANTALLA ANGULAR
- LIMITACIONES DEL DISPARO CONTINUO
- BLOQUEO FE (sólo para cámaras de tipo B)
- LUZ DE MODELADO
- FLASH REFLEJADO
- CONTROL REMOTO DEL FLASH
- FLASH ESCLAVO
- ESPECIFICACIONES
- ATTENZIONE
- DESCRIZIONE DELLE PARTI
- REGOLAZIONE DELLA TESTA DEL FLASH
- ILLUMINAZIONE DEL DISPLAY LCD
- LIMITAZIONI QUANDO SI SCATTA IN SEQUENZA
- BLOCCO FE
- FB (Esposizione Bracketing del flash)
- FLASH TELECOMANDATO SENZA FILI (WIRELESS)
- FLASH SECONDARIO
- SPECIFICHE
- BEMÆRK
- BESKRIVELSE AF FLASHENS DELE
- JUSTERING AF FLASHHOVEDET
- ETTL (TTL) AUTO FLASH
- SYNKRONISERING MED ANDET LUKKERGARDIN
- FE LÅS
- MULTI-FLASH FUNKTION
- TRÅDLØS FLASH
- SLAVE-FLASH
- SPECIFIKATIONER
- VOORZORGSMAATREGELEN
- OMSCHRIJVING VAN DE ONDERDELEN
- HET AFSTELLEN VAN DE FLITSKOP
- GROOTHOEK ADAPTER
- MAXIMALE PRESTATIES BIJ CONTINU FOTOGRAFEREN.
- FP FLITS (High Speed Sync)
- FB MODE (Flash Exposure Bracketing)
- DRAADLOOS FLITSEN
- SLAVE FUNCTIE
- TECHNISCHE GEGEVENS:
- 注 意
- 相容相機型號
- 安裝閃光燈到相機及其解除
- 閃燈連發限制
- 第二簾幕閃燈同步
- 造型閃光燈
- 反射閃光
- 離機無線從屬(Slave)閃光模式
- 規 格
- 사용상 주의점
- 각부의 명칭
- 플래시 헤드 조정
- ETTL (TTL) 오토 플래시
- 후막 싱크로 촬영
- FE LOCK 촬영
- 멀티 플래시 모드
- 무선 플래시 촬영
- 슬레이브 플래시
- 제품 사양
- ПРЕДОСТОРОЖНОСТИ
- ОПИСАНИЕ СОСТАВНЫХ ЧАСТЕЙ
- НАСТРОЙКА ГОЛОВКИ ВСПЫШКИ
- ОСВЕЩЕНИЕ ЖК ПАНЕЛИ
- ОГРАНИЧЕНИЯ ДЛЯ НЕПРЕРЫВНОЙ СЪМКИ
- ВЫСОКОСКОРОСТНАЯ СИНХРОНИЗАЦИЯ ВСПЫШКИ,
- КОМПЕНСАЦИЯ ЭКСПОЗИЦИИ
- НАПРАВЛЕННОСТЬ ВСПЫШКИ
- ДОПОЛНИТЕЛЬНАЯ ВСПЫШКА
- ХАРАКТЕРИСТИКИ
- PRECAUÇÕES
- DESCRIÇÃO DOS COMPONENTES
- COMO AJUSTAR A CABEÇA DO FLASH
- ILUMINAÇÃO DO PAINEL LCD
- LIMITES DE DISPAROS CONTÍNUOS
- SINCRONIZAÇÃO DO FLASH A ALTA VELOCIDADE (FP),
- FB (Exposição Múltipla com Flash)
- FLASH INDIRECTO
- FLASH ESCRAVO
- ESPECIFICAÇÕES
