Mr Handsfree Blue Compact Microphone: INSTALLATION INSTALLATION
INSTALLATION INSTALLATION: Mr Handsfree Blue Compact Microphone
GB - 5
INSTALLATION INSTALLATION
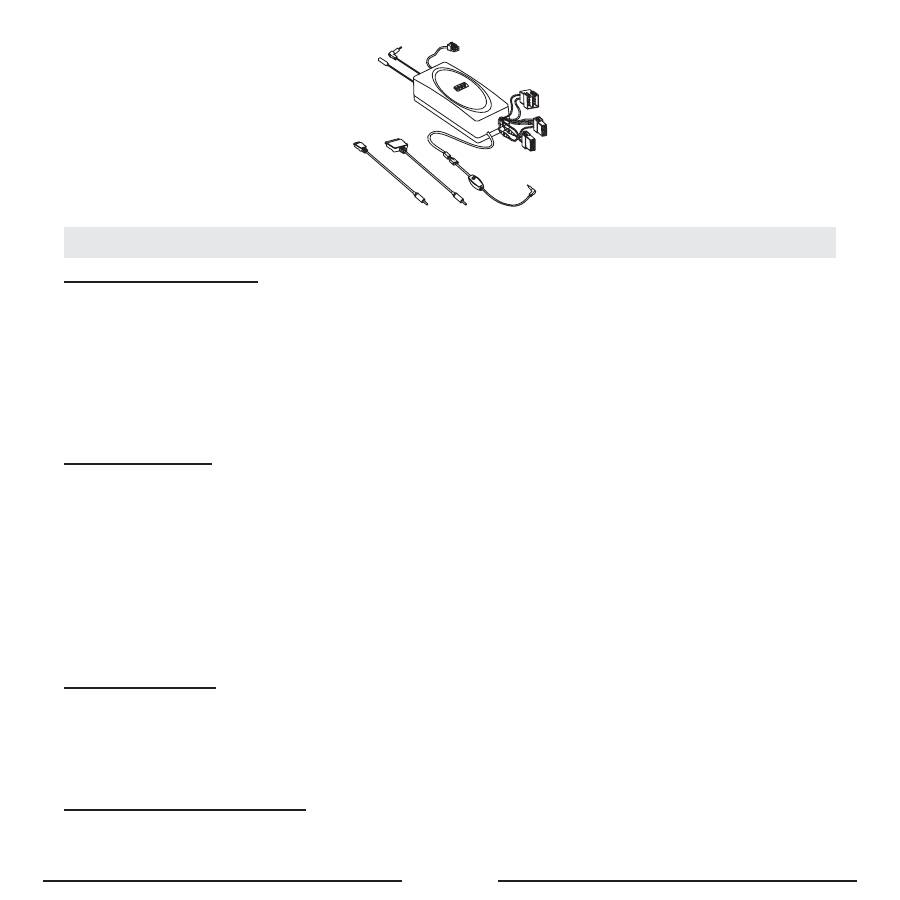
HANDSFREE UNIT (SM2)
Search for a location in your car where the handsfree unit fits and where it is comfortable for use. Make sure that the loca-
tion in your car where you would like to install your handsfree unit is free from dust and dirt.
We recommend mounting the handsfree unit at a less visible position in the car. However, make sure that the unit can
provide good acoustic, by directing the speaker in the opposite direction of the microphone and by placing the unit at a
distance of more than 1 meter from the microphone.
The handsfree unit can be fixed in 2 ways:
1. Under the dashboard or at any other place in the car using the installation screws.
2. Under the dashboard or at any other place in the car using the double-sided tape plate.
SCREEN UNIT (D2)
Search for a location in your car where the screen unit fits and where it is comfortable for use. Make sure that the location
in your car where you would like to install your screen unit is free from dust and dirt.
The screen unit can be fixed in 2 ways:
1. Mount the bracket to the screen unit, using the supplied screws. Then please mount the bracket with the screen unit,
using the double-sided tape, on the dashboard or at any other place where it is clearly visible but make sure not to
impair control or operation of the vehicle.
2.
The most advanced and nice looking option is to place the screen directly on the dashboard, without the bracket, using
the double-sided tape.
The cable that comes out of the screen unit is used for connecting the screen unit to the handsfree unit. Make sure that the
cable is placed so that it will not be damaged (e.g. not laid under car seats or over sharp edges).
MICROPHONE (M1)
Mount the microphone close to the user’s head (30 cm is optimal) and place it so that it is directed towards the mouth.
Experience has shown that the best location is near the rearview mirror or to the left of the sun visor. To avoid echo, it is
recommended to have a minimum distance of 1 meter between the microphone and the handsfree unit.
Make sure to mount the microphone so that it is not exposed to air streams from the vents. Do not lay the microphone cable
in the heating, ventilation or AC systems. Fix the microphone using Velcro.
CONNECTING TO THE POWER
There are 4 ways of connecting the Blue Compact to the car’s electronic system:
1. Plug & drive connection: Via the adapter for the cigarette lighter (SC3) (
Optional
).

GB - 6
2. Built-in connection: Immediately to the car’s electronic system via system cable SC2 (
Optional
).
The wires of cable SC2 are color-coded. They are listed in Table 1 in column A and each wire should be connected to
the corresponding item listed in column B.
Table 1
A
B
Red wire
The + voltage of the car’s power supply
Black wire
The negative GND connection
Blue wire
Ignition
Brown wire
Used for Car Radio Muting (CRM) and has to be connected to the car radio (Mute)
• To avoid distortions, make sure that the cables are laid far away from the electronic systems of the car.
• Connect the wires with the contact clips. Put the car wire in the through groove of the clips and the cable wire in the
groove with the confining rib.
Attention!
If there is no “Ignition” wire or if it is unavailable, you should connect the blue cable wire to the red wire of the handsfree
unit and the red cable wire to the “Continuous” wire of the car which keeps the voltage when ignition is turned off. In
this case, the phone call will not be disconnected if the ignition is turned off.
CAR RADIO MUTING (CRM)
The Blue Compact allows muting your car radio when there is an incoming call.
• Check the user’s manual of your car radio and ensure that it has a Mute function. If additional settings have to be
set from the car radio menu, make sure that they are done correctly.
• Remove the control panel of the car radio.
• Remove the decorative panel and take the car radio out of the sleeve using the handles. Disconnect the car radio plug.
• Connect the wires of the mr Handsfree Blue Compact to the corresponding wires of the car radio according to Table
1. Use the contact clips for the connection.
• Restore the connection and installation of the car radio.
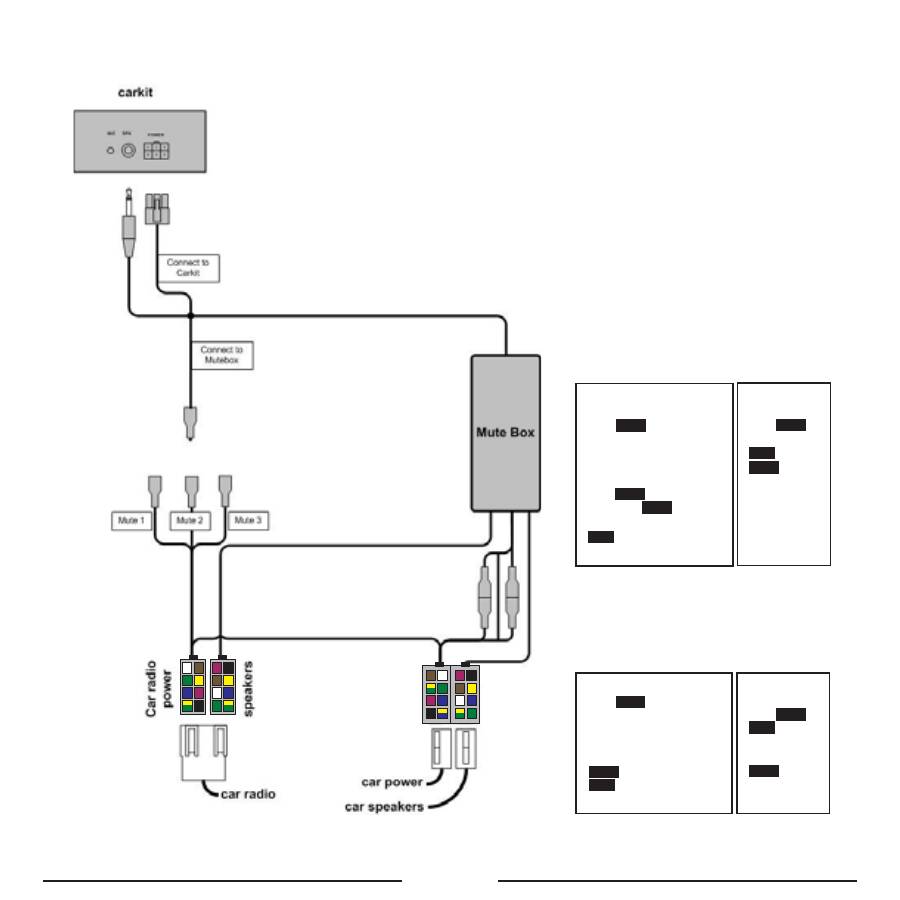
3. Professional built-in connection: Immediately to the car’s electronic system via system cable MB1 (
Optional
).
• Disconnect the car radio and power leads.
• Join the cable according to the connection diagram shown below. If the car radio has a mute jack, connect the yel-
low wire of the cable to one of the “mute in” jacks (1, 2 or 3). Refer to your car radio manual to determine the position
of the mute jack.
GB - 7
7
8
5
6
3
4
1
2
7
8
5
6
3
4
1
2
X1
X2
7
8
5
6
3 4
1
2
7 8
5
6
3
4
1
2
Y1
Y2
POWER/MUTE Y1
1.
green
yellow
ignition (+12V)
2. black (Ground)
3.
blue
(Aerial*)
4.
violet
(Illumination*)
5.
green
(Mute N1)
6.
yellow
(+12V) permanent
7.
white
(Mute N2)
8.
brown
(Mute N3)
SPEAKERS X2
1.
green
(LB+)
2.
green
yellow
(LB-)
3.
blue
(LF+)
4.
white
(LF-)
5.
yellow
(RF+)
6.
brown
(RF-)
7. black (RB+)
8.
violet
(RB-)
SPEAKERS Y2
1.
green
(LB+)
2.
green
yellow
(LB-)
3.
white
(LF+)
4.
blue
(LF-)
5.
brown
(RF+)
6.
yellow
(RF-)
7.
violet
(RB+)
8. black (RB-)
POWER/MUTE X1
1.
3.
4.
5.
6.
7.
white
(Mute N2)
blue
(to mute box) +
green
yellow
(toY1) ignition (+12V)
8.
brown
(Mute N3)
green
(Mute N1)
green
yellow
(to
mute box) +
yellow
(to Y1) (+12V) permanent
blue
(Aerial*)
violet
(Illumination*)
2. black + black (Ground)
GB - 8
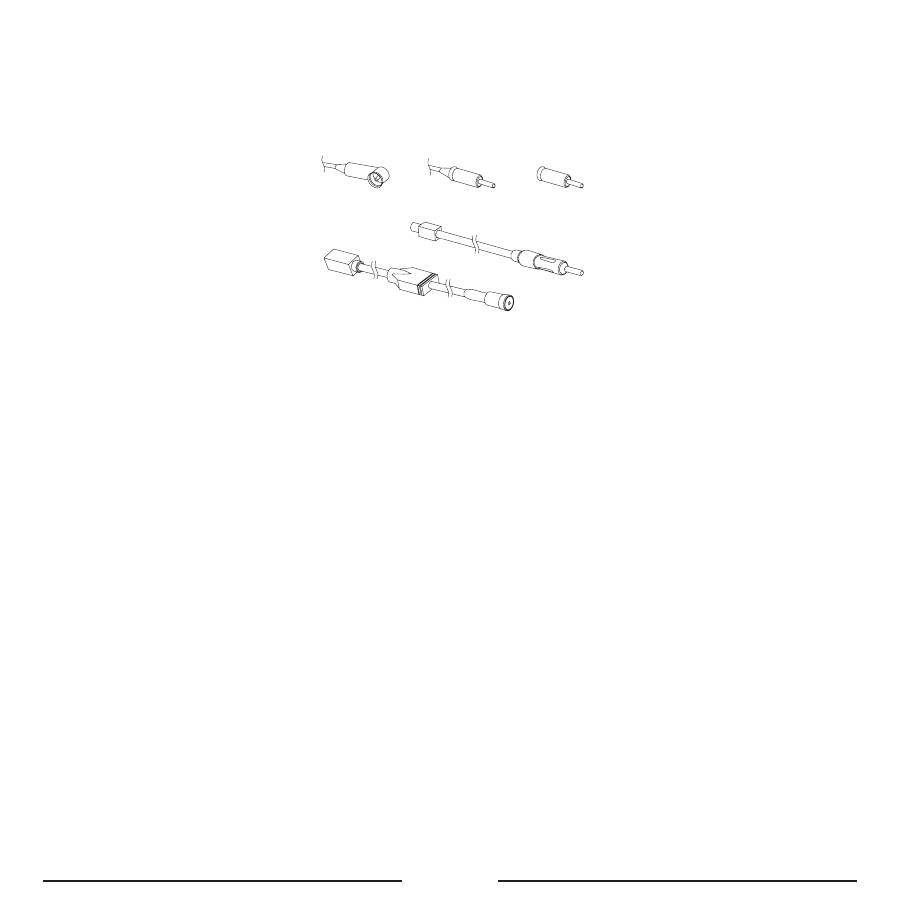
4. Professional built-in connection: Immediately to the car’s electronic system via system cable Po Music 100 (
Optional
)
• Take out your car radio according to the specifications of your car and your radio.
• Unplug the antenna plug from your radio and connect it to the female antenna socket of your Pro Music 100.
– If the car has DIN type (1), make the connection via the conversion plug (3).
– If the car has ISO type (2), make the connection directly.
– If the car has FAKRA type, make the connection via the conversion plug (4.2).
1
2
3
4.2
4.1
• Plug the male antenna plug from the Pro Music 100 into the car radio.
– If the car has DIN type (1), make the connection directly.
– If the car has ISO type (2), make the connection via the conversion plug (3).
– If the car has FAKRA type, make the connection via the conversion plug (4.1).
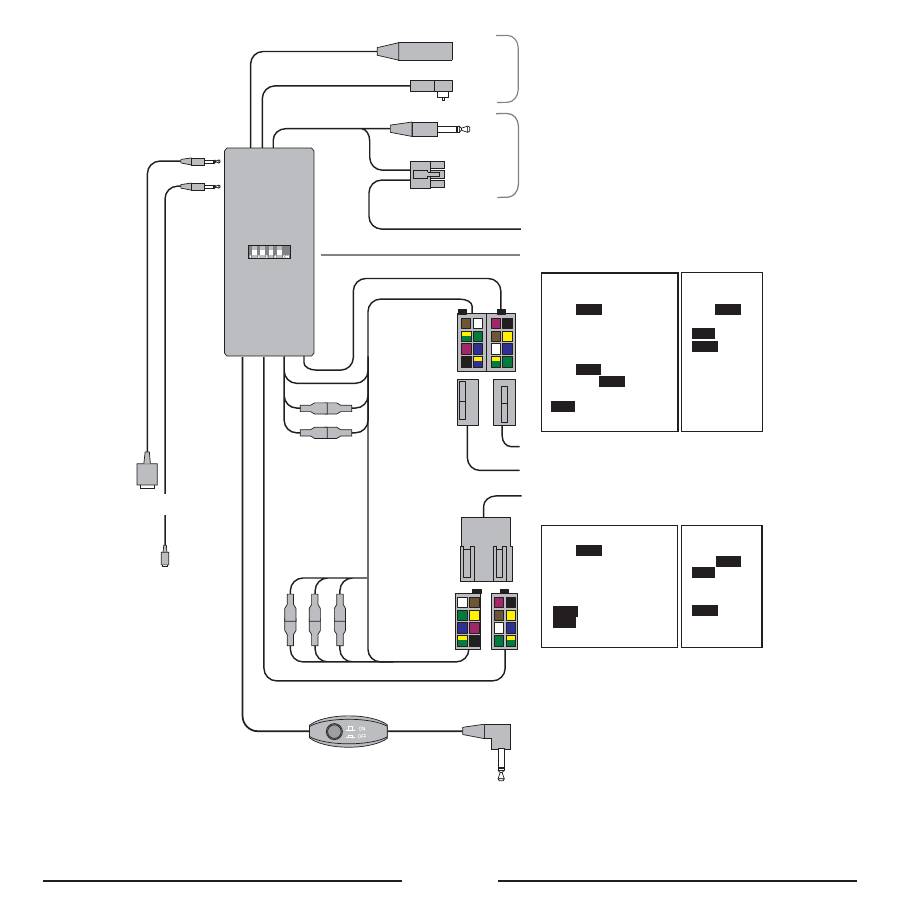
• Select a frequency with the 4 dip switches on the Pro Music 100. The frequency table is printed on the backside of
your Pro Music 100. Please take a close look at this frequency table!
• Connect the ISO-plug to the radio and speakers. If your car is provided with plugs other than ISO-plugs, you will
need adapters. These are not included.
• Guide the wire with the button and the 2.5 mm / 3.5 mm jack plug to the place where your audio device is located.
• Select your charging wire, for mini USB or iPod, and connect this to the Pro Music 100. Guide this wire also to the
place where your audio device is located.
• Place your Pro Music 100 in the hole behind your car radio and place your car radio back into its place.
Use with audio device
• Connect the jack plug of your Pro Music 100 to your audio device.
• Connect your charging cable to your music device when you need to charge the battery.
• Select the frequency of the Pro Music 100 on your car radio (please store this frequency as a preset).
• Press the control button on the cable of your Pro Music 100 to switch it on or off.
GB - 9
7
8
5
6
3
4
1
2
7
8
5
6
3
4
1
2
7
8
5
6
3 4
1
2
7 8
5
6
3
4
1
2
DIN/ISO/FAKRA TO ANTENNA
JACK + MOLEX PLUG TO CARKIT
YELLOW WIRE TO MUTE FROM RADIO
*
FREQUENCY SELECTOR FOR FM
CAR SPEAKERS
CAR POWER
CAR RADIO
TO MP3 ETC. JACK 3.5/2.5 MM
FUSE 2 A
MUTE 1
MUTE 2
MUTE 3
X1
X2
Y1
Y2
POWER/MUTE Y1
1.
green
yellow
ignition (+12V)
2. black (Ground)
3.
blue
(Aerial*)
4.
violet
(Illumination*)
5.
green
(Mute N1)
6.
yellow
(+12V) permanent
7.
white
(Mute N2)
8.
brown
(Mute N3)
SPEAKERS X2
1.
green
(LB+)
2.
green
yellow
(LB-)
3.
blue
(LF+)
4.
white
(LF-)
5.
yellow
(RF+)
6.
brown
(RF-)
7. black
(RB+)
8.
violet
(RB-)
SPEAKERS Y2
1.
green
(LB+)
2.
green
yellow
(LB-)
3.
white
(LF+)
4.
blue
(LF-)
5.
brown
(RF+)
6.
yellow
(RF-)
7.
violet
(RB+)
8. black
(RB-)
POWER/MUTE X1
1.
3.
4.
5.
6.
7.
white
(Mute N2)
blue
(to mute box) +
green
yellow
(toY1) ignition (+12V)
8.
brown
(Mute N3)
green
(Mute N1)
green
yellow
(to
mute box) +
yellow
(to Y1) (+12V) permanent
blue
(Aerial*)
violet
(Illumination*)
2. black + black (Ground)
TO iPod
TO MP3-Player
(mini USB)
Оглавление
- DECLARATION OF CONFORMITYDECLARATION OF CONFORMITY
- TABLE OF CONTENTSTABLE OF CONTENTS
- SAFETY INSTRUCTIONSSAFETY INSTRUCTIONS
- DESCRIPTIONDESCRIPTION
- INSTALLATION INSTALLATION
- OPERATIONOPERATION
- TROUBLE-SHOOTINGTROUBLE-SHOOTING
- TECHNICAL PARAMETERSTECHNICAL PARAMETERS
- CARE AND TECHNICAL MAINTENANCECARE AND TECHNICAL MAINTENANCE
- INHOUDSTAFELINHOUDSTAFEL
- VEILIGHEIDSINSTRUCTIESVEILIGHEIDSINSTRUCTIES
- BESCHRIJVINGBESCHRIJVING
- INSTALLATIE INSTALLATIE
- WERKINGWERKING
- VERHELPEN VAN PROBLEMENVERHELPEN VAN PROBLEMEN
- BLUETOOTHBLUETOOTH
- TABLE DES MATITABLE DES MATI ÈÈ RESRES
- INSTRUCTIONS DE SÉCURITÉINSTRUCTIONS DE SÉCURITÉ
- DESCRIPTIONDESCRIPTION
- INSTALLATION INSTALLATION
- FONCTIONNEMENTFONCTIONNEMENT
- RÉSOLUTION DE PROBLRÉSOLUTION DE PROBL ÈÈ MESMES
- BLUETOOTHBLUETOOTH
- INHALTSVERZEICHNISINHALTSVERZEICHNIS
- SICHERHEITSHINWEISESICHERHEITSHINWEISE
- BESCHREIBUNGBESCHREIBUNG
- MONTAGEMONTAGE
- BETRIEBBETRIEB
- AbmeldungPairing
- PROBLEMLÖSUNGPROBLEMLÖSUNG
- BLUETOOTHBLUETOOTH
- SOMMARIOSOMMARIO
- NORME DI SICUREZZANORME DI SICUREZZA
- DESCRIZIONEDESCRIZIONE
- INSTALLAZIONEINSTALLAZIONE
- FUNZIONAMENTOFUNZIONAMENTO
- RICERCA DEI PROBLEMIRICERCA DEI PROBLEMI
- BLUETOOTHBLUETOOTH
- ÍNDICEÍNDICE
- INSTRUCCIONES DE SEGURIDADINSTRUCCIONES DE SEGURIDAD
- DESCRIPCIÓNDESCRIPCIÓN
- INSTALACIÓN INSTALACIÓN
- FUNCIONAMIENTOFUNCIONAMIENTO
- LOCALIZACIÓN DE AVERÍASLOCALIZACIÓN DE AVERÍAS
- BLUETOOTHBLUETOOTH
- ÍNDICEÍNDICE
- INSTRUÇINSTRUÇ ÕÕ ES DE SEGURANÇAES DE SEGURANÇA
- DESCRIÇDESCRIÇ ÃÃ OO
- INSTALAÇINSTALAÇ ÃÃ OO
- UTILIZAÇUTILIZAÇ ÃÃ OO
- RESOLUÇRESOLUÇ ÃÃ O DE PROBLEMASO DE PROBLEMAS
- PARÂMETROS TÉCNICOSPARÂMETROS TÉCNICOS
- BLUETOOTHBLUETOOTH
- TARTALOMJEGYZÉKTARTALOMJEGYZÉK
- BIZTONSÁGI RENDSZABÁLYOKBIZTONSÁGI RENDSZABÁLYOK
- ÁTTEKINTÉSÁTTEKINTÉS
- ÜZEMBE HELYEZÉS ÜZEMBE HELYEZÉS
- MŰKÖDTETÉSMŰKÖDTETÉS
- HIBAELHÁRÍTÁSHIBAELHÁRÍTÁS
- MŰSZAKI ADATOKMŰSZAKI ADATOK
- SADRŽAJSADRŽAJ
- UPOZORENJA O SIGURNOSTI UPOZORENJA O SIGURNOSTI
- OPIS UREĐAJAOPIS UREĐAJA
- UGRADNJAUGRADNJA
- RUKOVANJERUKOVANJE
- PROBLEMI U RADUPROBLEMI U RADU
- BLUETOOTHBLUETOOTH
- OBSAHOBSAH
- BEZPEČNOSTNÍ POKYNYBEZPEČNOSTNÍ POKYNY
- POPISPOPIS
- INSTALACEINSTALACE
- OVLÁDÁNÍ SADYOVLÁDÁNÍ SADY
- KDYŽ SE DOSTAVÍ PROBLÉMYKDYŽ SE DOSTAVÍ PROBLÉMY
- PÉČE A ÚDRŽBA PÉČE A ÚDRŽBA
- СОДЕРЖАНИЕСОДЕРЖАНИЕ
- ПРАВИЛА ТЕХНИКИ БЕЗОПАСНОСТИПРАВИЛА ТЕХНИКИ БЕЗОПАСНОСТИ
- ОПИСАНИЕОПИСАНИЕ
- УСТАНОВКА УСТАНОВКА
- РАБОТА С УСТРОЙСТВОМРАБОТА С УСТРОЙСТВОМ
- ВОЗМОЖНЫЕ НЕИСПРАВНОСТИ И ИХ УСТРАНЕНИЕВОЗМОЖНЫЕ НЕИСПРАВНОСТИ И ИХ УСТРАНЕНИЕ
- ТЕХНИЧЕСКИЕ ХАРАКТЕРИСТИКИТЕХНИЧЕСКИЕ ХАРАКТЕРИСТИКИ
- BLUETOOTHBLUETOOTH
