Ardo A1000X – страница 4
Инструкция к Стиральной Машине Ardo A1000X
Оглавление
- Содержание
- ЗАМЕЧАНИЯ И СОВЕТЫ ДЛЯ ПОЛЬЗОВАТЕЛЯ
- УСТАНОВКА МАШИНЫ Как распаковать и освободить прибор от транспортировочных деталей Как вновь упаковать машину
- Установка и выставление уровня стиральной машины Подключение к водопроводу
- Электрическое подключение ВЫВЕДЕНИЕ НЕКОТОРЫХ ТИПОВ ПЯТЕН
- МЕЖДУНАРОДНЫЕ СИМВОЛЫ ПО УХОДУ ЗА ОДЕЖДОЙ
- ОПИСАНИЕ СТИРАЛЬНОЙ МАШИНЫ ; ПАНЕЛЬ УПРАВЛЕНИЯ
- ЭКСПЛУАТАЦИЯ СТИРАЛЬНОЙ МАШИНЫ
- ДОПОЛНИТЕЛЬНЫЕ ФУНКЦИИ (В НАЛИЧИИ ИСХОДЯ ИЗ МОДЕЛИ)
- ТАБЛИЦЫ ПРОГРАММ ПРОГРАММЫ ИНТЕНСИВНОЙ СТИРКИ ПРОГРАММЫ ДЕЛИКАТНОЙ СТИРКИ
- ПРОГРАММЫ СТИРКИ ШЕРСТИ СТИРАЛЬНЫЕ СРЕДСТВА
- ОБСЛУЖИВАНИЕ
- РЕШЕНИЕ ВОЗНИКАЮЩИХ ПРОБЛЕМ
- ТЕХНИЧЕСКИЕ ДАННЫЕ
✽ Under no circumstances should any
✽ Repairs to the washing machine must
repairs to the machine be attempted
only be carried out persons authorised
by unqualified persons as this could
to do so by the service centres. Only
result in serious damage and will
original spare parts may be used for
invalidate the guarantee.
repairs.
PREPARING THE MACHINE FOR USE
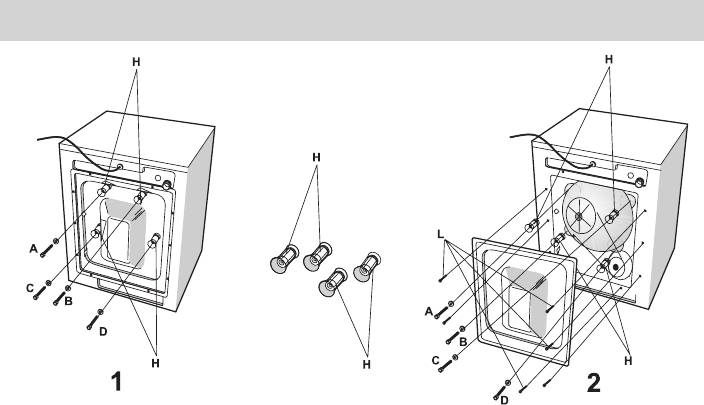
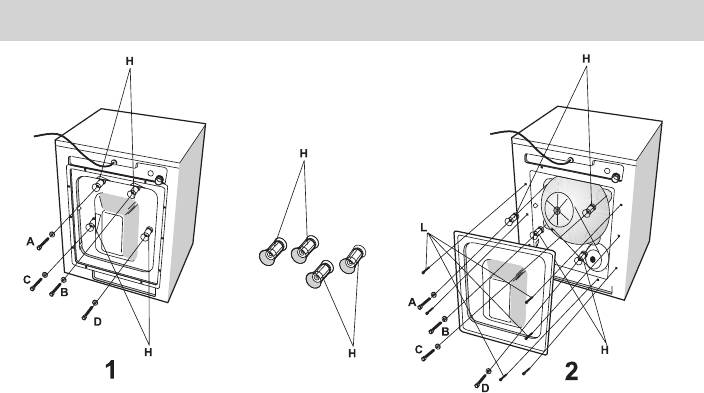
How to unpack and remove the protection devices
➘ Put the washing machine in its place of installation and remove the external packag-
ing.
➘ Unscrew the 4 protection screws anchoring the mobile parts marked with the letters A-B-
C-D in figures 1 and 2, and then remove them together with the plastic spacers H [fig. 2].
Insert the plugs supplied in the holes left by the screws.
➘ If the spacers remain in the machine, they can be removed by unscrewing the screws
indicated with the letter L in figure 2, and then finish by screwing the panel back in
place. The screws and spacers must be kept in a safe place for re-use when the
machine is moved in the future.
The spacers must be removed, in that if they are left in position they may cause
damage to the equipment.
➘ Lift the washing machine and remove the polystyrene base.
How to repack the machine
a) unscrew the 8 screws marked L from the rear panel and remove the panel.
b) insert the locking screws A-B-C-D in their respective holes.
c) insert the 4 spacers onto screws A-B-C-D of the panel.
d) locate the rear panel on the machine, ensure it is positioned correctly and then
tighten screws A-B-C-D.
e) replace and tighten the 8 rear panel screws marked L.
SM1
3

Installing and levelling the machine
After having chosen the most suitable position, level the
washing machine using the adjustable feet [Fig. 3]. Care must
be taken when selecting the installation position and when
levelling the machine. Make sure that the lock-nuts on the
adjustable feet are properly tightened.
If the machine is not levelled properly, it will become unstable
and noisy during operation and may cause damage.
If the machine is installed on a carpeted floor, make sure that
air is free to circulate between the machine and the floor.
It is advisable not to install the machine in a room where the
o
temperature may fall to below 0
C.
Connecting to the water supply
➘ The mains water pressure must be between 0.05 - 1.00
MPa (0.5 - 10 bar.)
➘ Before making the connection, open the tap or valve to allow a
certain amount of water to flow. This will clean the pipes of any dirt
such as sand or rust (this operation is above all necessary when
connecting the washing machine to a new connection or one that
has been inactive for a long period of time).
➘ The water feed pipe must be connected to the cold water
system through a 3/4” screwed connection.
➘ Insert the washer with the filter (supplied with the washing
machine) between the valve and the feed hose, then tighten
the connection by hand [fig. 4].
➘ Insert the washer in the other end of the feed hose and screw it
onto the washing machine [fig. 5].
➘ During washing, the water feed valve must be fully open.
➘ The water drain pipe outlet must be located at a height between
60 cm and 90 cm [fig. 6].
MIN. 60 CM
MAX.90 CM
➘ If the washing machine drains directly into the waste water
system, the free end of the machine drain hose must be
inserted into a pipe of diameter not less than 40 mm.
➘ In order to prevent the siphon from filling with air and
causing water leaks, the connection of the drain hose to
the waste water system should not be sealed.
➘ If the water is drained into a washbasin or other free
discharge point, the free end of the drain hose must be
reinforced at the bend using the bracket supplied for the
purpose. Hook the hose over the rim of the recipient and
fix the bracket in a manner that prevents the hose from
falling [fig. 7]. The drain pipe from the washbasin must be
clear to allow the water to flow freely.
4
SM1
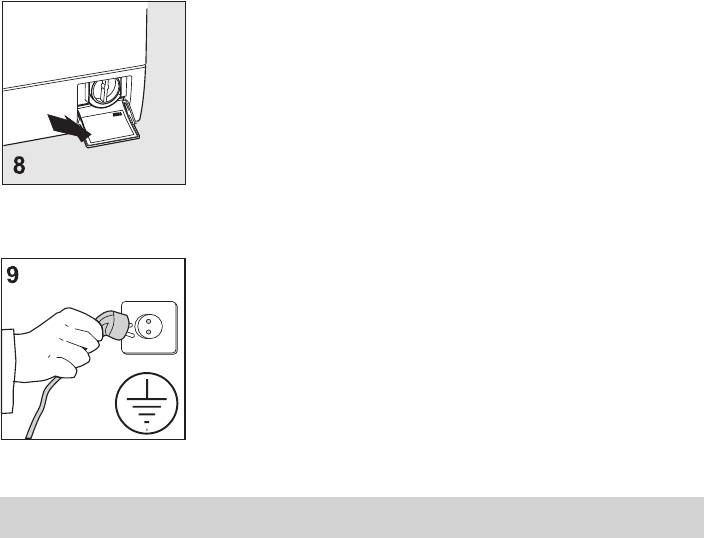
Connecting to the mains electricity supply
➘ Make sure that the voltage specified in the technical data,
written on the rating plate mounted on the inside of the
filter door, corresponds to the mains voltage [fig. 8].
➘ Trip-switches, electric wiring and mains sockets must pos-
sess characteristics that enable them to support the maxi-
mum load indicated on the rating plate.
➘ The mains socket to which the washing machine is con-
nected must be earthed. If not, the manufacturer will not be
held responsible for any incidents which may occur [fig. 9].
➘ If the mains socket to which the washing machine is con-
nected does not work or is unsuitable, it must be replaced
by a qualified electrician.
➘ The washing machine must not be connected to the mains
supply through intermediate devices such as extension
leads or multiple socket adapters.
➘ During maintenance work, the washing machine plug must
be disconnected from the mains supply.
➘ Never insert or remove the electric plug with wet hands.
➘ If the power cable is damaged in any way, please contact
the technical service department.
➘ Position the apparatus so that the plug can be accessed
and disconnected easily in case of need.
HOW TO REMOVE STAINS
Some stains cannot be removed by just washing in a washing machine. Before trying to
remove any type of stain by hand, first try the removal procedure on a small area of hidden
fabric starting from the edge of the stain and working inwards, this will prevent a dark ring
from forming around the site of the stain. A few methods for removing stains are reported
below.
••
••
•
WAX:
scrape the wax using a blunt point in order not to damage the fabric. Then, with
the fabric placed between two pieces of absorbent paper, run a hot iron over the
stain.
•
••
••
BALL-POINT PENS AND FELT-TIP PENS:
clean using a soft cloth soaked in ethyl alcohol.
Take care not to spread the mark.
•
••
••
DAMP AND MOULD:
if the fabric supports the use of bleach, perform a wash cycle
adding bleach to the appropriate compartment in the dispenser [see table of
programmes]. Otherwise, soak the soiled part in hydrogen peroxide (strength 10)
and leave for 10 to 15 minutes.
•
••
••
SCORCH MARKS CAUSED BY IRONING:
follow the instructions for mould and damp.
•
••
••
RUST:
use products specially designed for rust stains, following the manufacturer’s
instructions written on the packet.
•
••
••
CHEWING GUM:
rub ice over the mark, scrape away as much as possible and then rub
with a cotton cloth soaked in acetone (alternatively, use nail varnish remover).
•
••
••
PAINT:
do not allow the paint to dry. Rub the area with the solvent recommended by
SM1
5
the paint manufacturer (e.g. water, turps, trichloroethylene), apply soap and then
rinse.
••
•
••
LIPSTICK:
stains on cotton or wool can be eliminated using a cloth soaked in ether.
Stains on silk require the use of trichloroethylene.
•
••
••
NAIL VARNISH:
place a sheet of absorbent paper on the stained material, then dampen
the back of the fabric with acetone, frequently changing the paper placed over the
stain. Continue like this until the stain has disappeared.
••
••
•
TAR OR DIRT:
spread some fresh butter over the stain, allow to stand and then wash
with oil of turpentine.
••
••
•
GRASS:
delicately soap the stain, use diluted bleach. Good results can be obtained
on woollen fabrics using 90% alcohol.
••
•
••
BLOOD:
put into soak in cold water with added salt, then wash with washing soap.
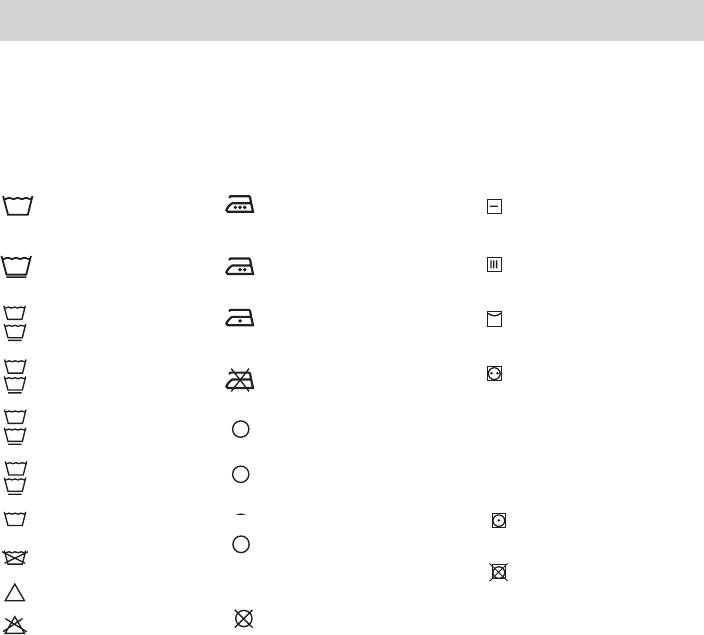
INTERNATIONAL CLOTHING CARE SYMBOLS
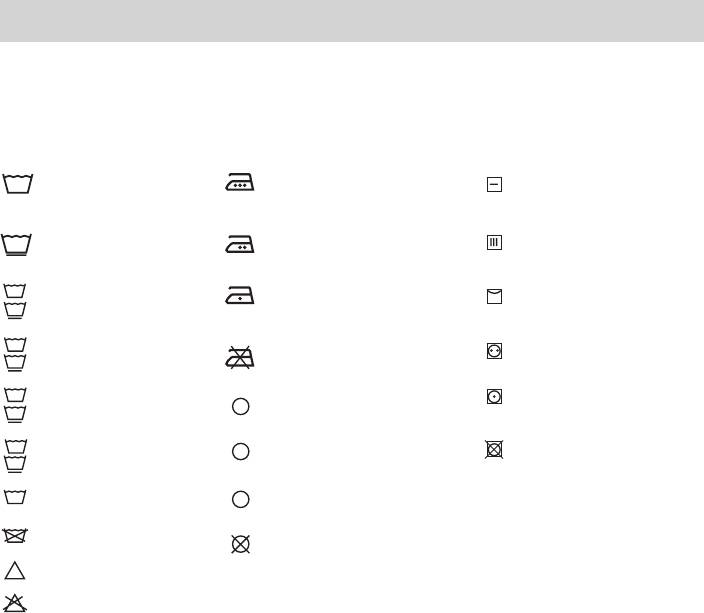
Before placing the clothes in the washing machine and selecting the wash programme,
examine the symbols on the manufacturer’s label. The table reported below will provide a
useful guide to reading the symbols.
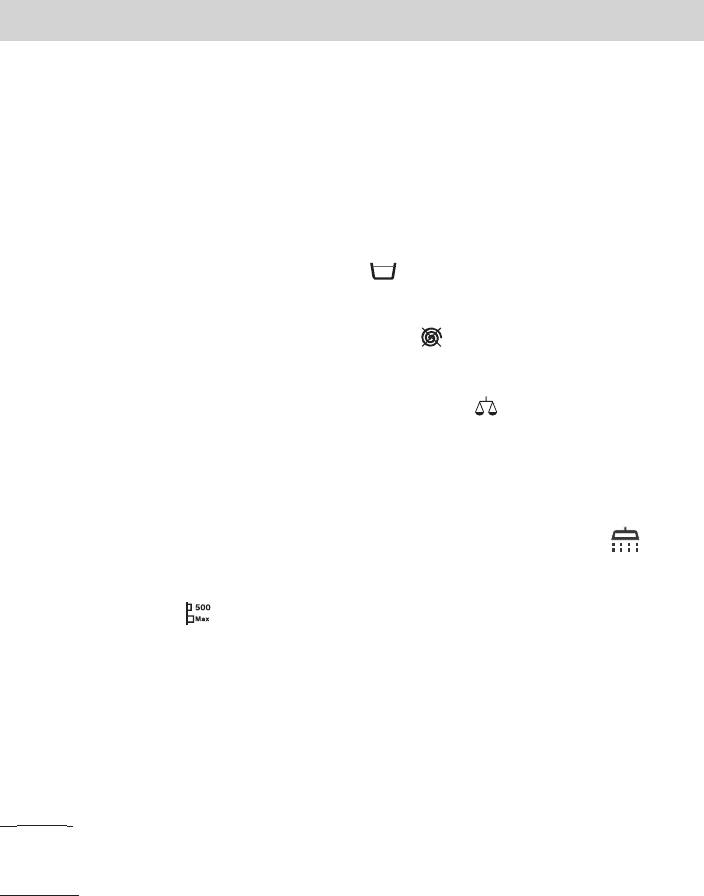
Normal was
Iron at 200° max.
Dry flat
Delicate wash
Iron at 150° max.
Dry hung
95
Wash at t° up to 95°C
Iron at 100° max.
Dry on clothes hanger
95
60
Wash at t° up to 60°C
60
Do not iron
Dry in a clothes drier at
normal temperature
40
A
Dry clean using solvents
40
Wash at t° up to 40°C
30
Wash at t° up to 30°C
P
Dry clean only with cleaning
30
fluid, pure alcohol and R113
Hand wash
Dry in a clothes drier at
F
Dry clean only using
reduced temperature
Do not wash in water
perchloride, cleaning fluid,
Do not dry in a tumble
pure alcohol, R111 and R113.
cl
Bleach in cold water
drier
Do not dry clean
Do not bleach
6
SM1
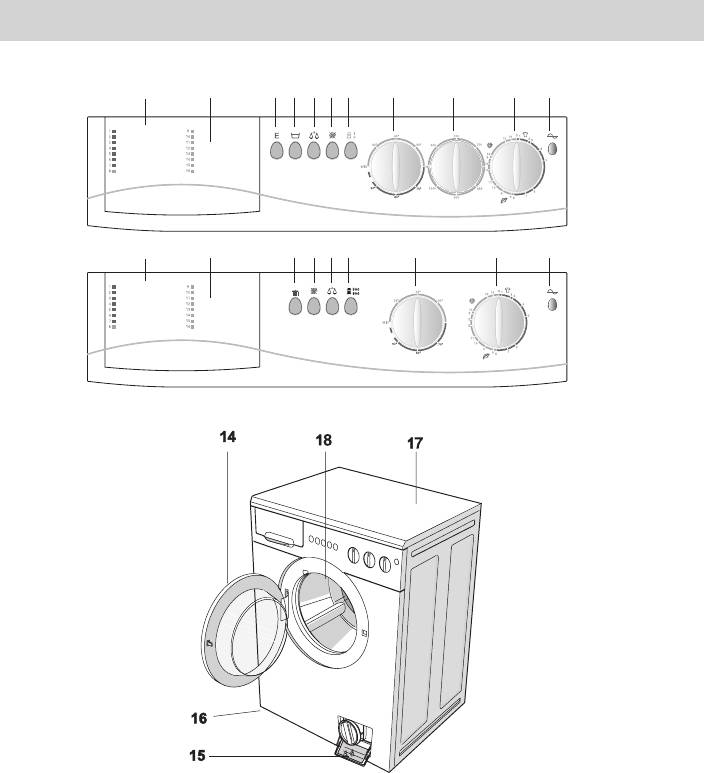
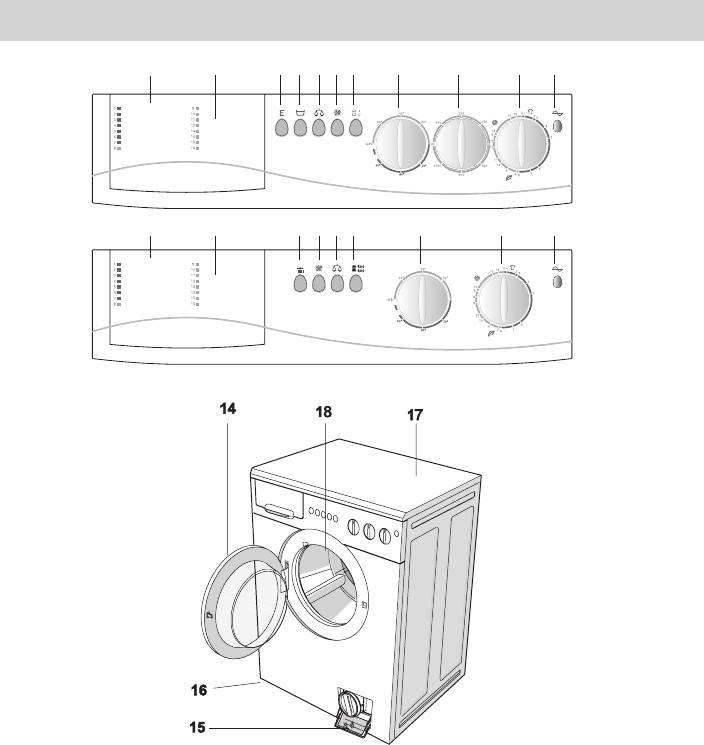
DESCRIPTION OF THE WASHING MACHINE - CONTROL PANEL
1 2 3 4 5 6 7 8 9 10 11
1 2 3 12 6 5 13 8 9 10 11
1. – table of programmes
10. – programmer dial
2. – detergent compartment
11. – machine “on” indicator light
3. – temperature limit button
12. – additional rinse button
4. – no-drain button
13. – 500/800 spin speed button
5. – economy was button
14. – door
6. – no-spin button
15. – filter
7. – main on/off button
16. – adjustable feed
8. – thermostat dial
17. – top cover
9. – spin rpm control dial
18. – drum
SM1
7

USING THE WASHING MACHINE
Warning: Before proceeding with the first wash, carry out a brief wash cycle with the
spin drum empty. This will allow the operation of the machine to be checked
and will clean the spinner.
Before each wash, always follow the procedure listed below:
1. Check that the water connections are correctly fitted and tight: the water feed valve
must be open and the water drain pipe must be correctly positioned [see chapter on
installation and figures 4 - 7]
2. Check that the programme dial is in the
STOP position
3. With dry hands, insert the plug in the mains socket.
4. Sort the washing, dividing it into fabric types (check with the manufacturer’s symbol
on the garment)
5. Before loading the clothes in the washing machine, check that:
− the pockets are empty,
− loose or unthreaded seams have been repaired,
− zips, belts, buckles and hooks are closed
− any stains have been previously treated.
6. Open the washing machine door.
7. Load the washing in the drum and close the door.
Warning: Do not overload the washing machine. It is inadvisable to wash items, such as
mats for example, which absorb a large quantity of water.
8. Place a low-suds detergents in the special dispenser compartment. Add a liquid
softener, again in the correct compartment. Use a softener designed for use in auto-
matic washing machines (see chapter “Use of detergents”)
9. Insert the container in the dispenser
WARNING !! Do not remove the container from the dispenser during the wash cycle as this
will cause water to spill out.
10. Select the required programme, spin rpm and temperature.
11. Set the required programme and temperature on dials 10 and 9. Set the spin rpm on
dial or button 3
WARNING !! Do not rotate the programme dial anticlockwise. If you turn the dial
past the required programme setting by mistake, do not go back but continue
turning the dial clockwise until the required position is reached.
12. Start the machine by pulling the programmer knob, or if the machine has push-but-
ton, press the start push-button . The indicator light will be illuminated.
13. At the end of the wash programme, the washing machine will stop on one of the
STOP positions of the programmer.
If need be, the machine can be stopped at any time during the wash cycle by press-
ing the on/off button or by pressing dial (10).
14. The washing machine door can be opened one minute after the end of the
wash cycle or after pressing the main on/off button
15. Remove the clean washing.
16. With dry hands, unplug the washing machine plug from the mains socket.
17. Close the water feed valve.
8
SM1
ADDITIONAL FUNCTIONS (AVAILABLE ACCORDING TO MODEL)
-
ON/OFF:
To start the machine, pull the Timer knob outwards, or press the button if the
machine is fitted with one. The indicator light will light up.
−−
−−
−
Temperature limit button:
Pushing this button will limit the temperature to 60°
when the temperature dial is set at a higher temperature. Symbol E.
−
−−
−−
No-drain button:
When this button is pushed, the washing machine will stop auto-
matically at the end of the last rinse cycle and before draining the water. In this case,
the washing is held in the water-filled drum to prevent creasing. This function only
works for the delicate wash cycle. Symbol
−−
−−
−
No-spin button:
The washing machine carries out a normal wash cycle but does not
spin. To do this, press the button with the symbol
−
−−
−−
Economy wash button:
When the load to be washed is small (less than 3 kg),
push the low water consumption button with the symbol
−−
−−
−
Additional rinse button:
The washer has been designed so that a minimum amount of water is used, usually
three rinse cycles are enough.
For areas with particularly soft water and for those who are allergic to detergent resi-
due, the washers are supplied with a button for an additional rinse cycle.
−−
−−
−
500/Max or spin speed button:
Push in for Max rpm. push in egain to release
switch for 500 rpm.
−
−−
−−
Temperature control:
The temperature control allows you to set the required
temperature. The temperature is programmed by turning the dial clockwise,
until the required temperature is reached. To set the correct temperature for the wash,
refer to the table of programmes on page 10 of the instructions for use.
−−
−−
−
Spin rpm control dial:
This allows the spin speed to be selected
WARNING: This is only available during intensive wash programmes. For delicates and wool,
the spin speed is 550 rpm regardless of the speed setting.
IMPORTANT:Any changes to the above programme and function settings must only be
made with the machine switched off, i.e. with the main switch in position 0.
SM1
9
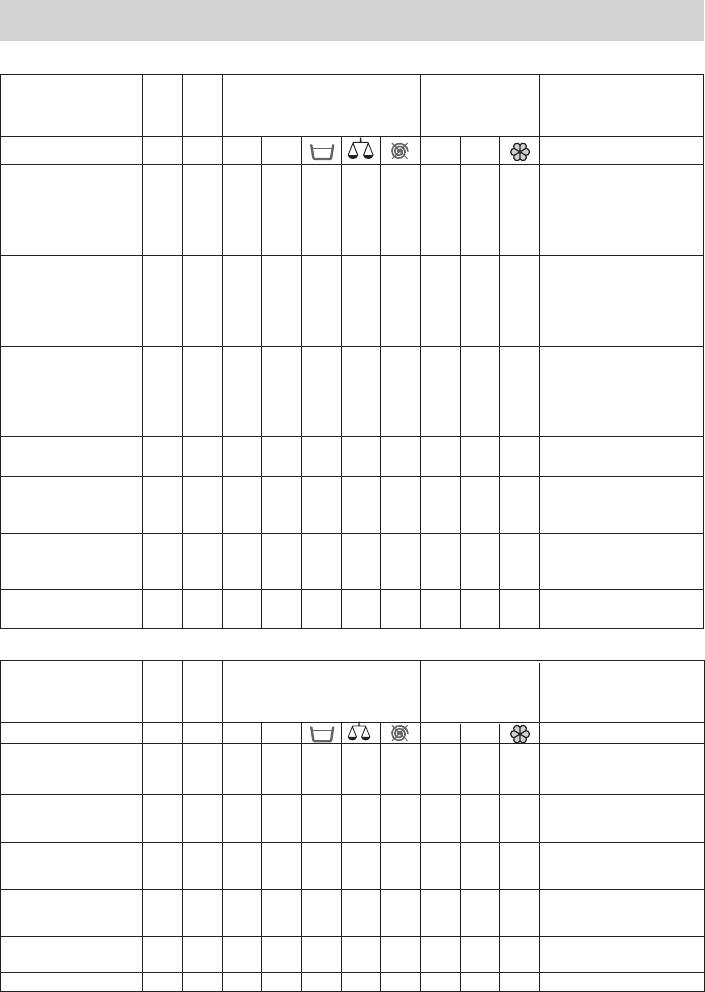
WASHING PROGRAMMES
INTENSIVE WASH PROGRAMMES
Position of program-
Max
Positions
Dispenser
Description of wash
mer Type of
load
cycle
programme
Kg
pos.
C°
E
III
_
Prewash max. 40°C
~
BIO Prewash
1 5,0 90 W–WW+ + +
and normal wash,
Heavy soiled resistant
rinses, of which one is
fabrics (white and
special with bleach or
colourfast sheets)
conditioner, intermediate
and final spin
Normal wash
2 5,0 90 W–WW– + +
Normal wash, rinses and
Normal soiled white and
spin as above
colourfast fabrics
60
Normal wash
Normal wash, rinses and
3 5,0 60 ––WW–++
Normal soiled colourfast
spin as above
fabrics
40
Normal short wash, rinses
Normal wash Short
4 5,0 40 ––WW–++
and spin as above
Rinses
Rinses, of which one is
5 5,0 –––WW––+
special with bleach or
conditioner, spin as above
Special rinse
Rinse with conditioner or
perfumed substance, starch,
6 5,0 –––WW––+
etc. spin as above
Spin
7 5,0 –––WW–––
Final spin
DELICATE WASH PROGRAMMES
Position of program-
Max
Positions
Dispenser
Description of wash
mer Type of
load
cycle
programme
Kg
pos.
C°
E
III
_
Prewash Heavy soiled
Prewash max. 40°C and normal
~
8 2,5 60 –WWW+++
Synthetic fabrics
wash, rinses, one of which is
40
special with conditioner, final spin
Normal wash Normal
Normal wash, rinse and spin
9 2,5 60 – WWW – + +
soiled Synthetic fabrics
as above
40
Normal wash Lightly
Normal wash, rinse and spin
soiled delicate fabrics
10 2,5 40 –W–W– + +
as above
Rinses
Rinses, one of which is
11 2,5 – –W–W– – +
special with conditioner,
spin as above
Special rinse
Rinses with conditioner or perfumed
12 2,5 – –W–W– – +
substance, etc., spin as above
Spin
Final spin
13 2,5 ––––––––
10
SM1
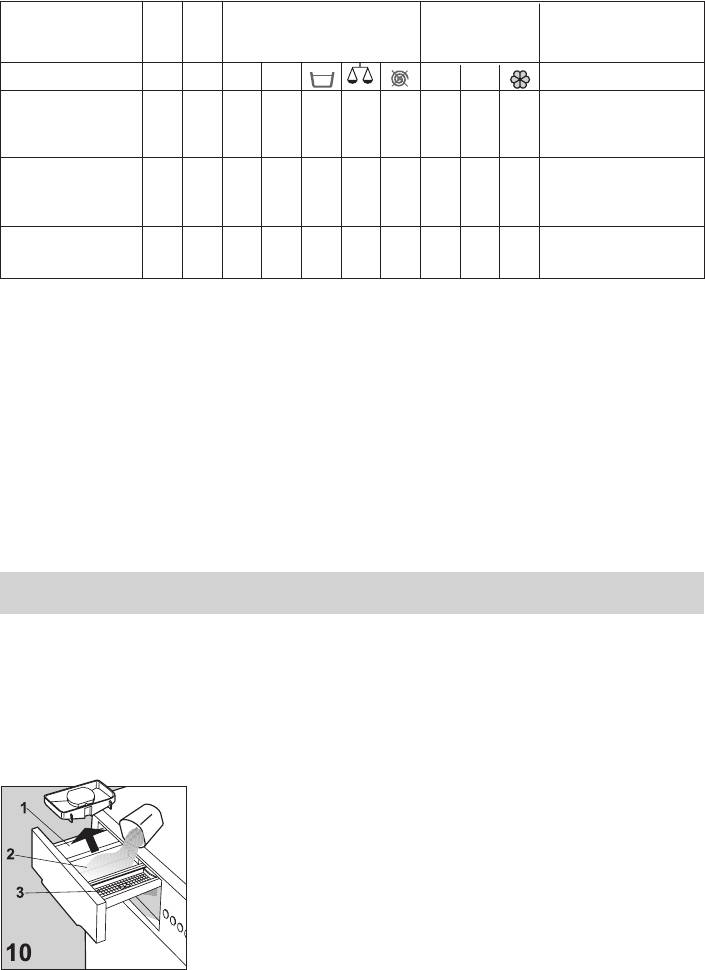
WOOL WASH PROGRAMMES
Position of program-
Max
Positions
Dispenser
Description of wash
mer Type of
load
cycle
programme
Kg
pos.
E
C°
III
Normal wash, rinses, one of
Normal wash
14 1,0 35 –W–W– + +
which is special with
conditioner for the spin
Rinse with conditioner or
Special rinse
15 1,0 ––W–W––+
perfumed substance,
etc. spin
Water drain / Spin
16 1,0 ––––––––
Water drain, final spin
W- option (on or off)
– - not possible (no response)
+ - water feed to respective dispenser
USE OF DETERGENTS
The washing machine is fitted with a three-compartment dispenser for detergents [fig. 10].
A description of the programmes can be found on the dispenser panel.
I compartment for washing powders for pre-wash or soak (1)
II compartment for washing powder for the main wash (2)
❃ compartment for liquid softeners, perfumed additives, starch or bleach (3)
When washing using liquid detergents (programmes without
pre-wash) in the main wash compartment (2), insert the liquid
doser supplied, then slowly pour in the liquid up to the maxi-
mum level mark. Remember to remove the liquid doser when
using washing powder for the main wash.
WARNING: Before using liquid detergent, remove any traces of
powder from the dispenser.
SM1
11
In hard water areas, use a water softener together with the detergents. This will increase
the effectiveness and improve the quality of the wash. At the same time, the addition of a
water softener will protect the parts of the machine from calcium deposits. The water
softener is added to the detergent in the main wash compartment of the dispenser (2).
IMPORTANT: Only use washing powders and liquid detergents designed for use in
automatic machines as these will produce less foam.
The detergents must be used in the quantities recommended by the manufacturer written
on the packet or container.
An excessive quantity of detergent will produce too much foam and will have a negative
effect on the results of the wash.
Too little detergent will reduce the effect of the wash.
MAINTENANCE
The washing machine has been designed in a manner that reduces maintenance to a
minimum. It is nevertheless important to carry out regular cleaning.
Before carrying out any cleaning, ensure that the washing machine is unplugged from the
mains and that the water supply is closed-off.
WARNING !! Never clean the machine using chemical cleaners, use only a lightly soaped
damp cloth.
Cleaning the washing machine
Wipe the outside and rubber components of the washing machine with a damp cloth. Do
not use abrasive products, cleaning fluid or any other solvents.
At the end of a wash cycle, leave the washing machine door open slightly to enable the
rubber parts to dry out.
Wash the detergent dispenser regularly. To do this, remove the dispenser and rinse it
under running water, then replace it.
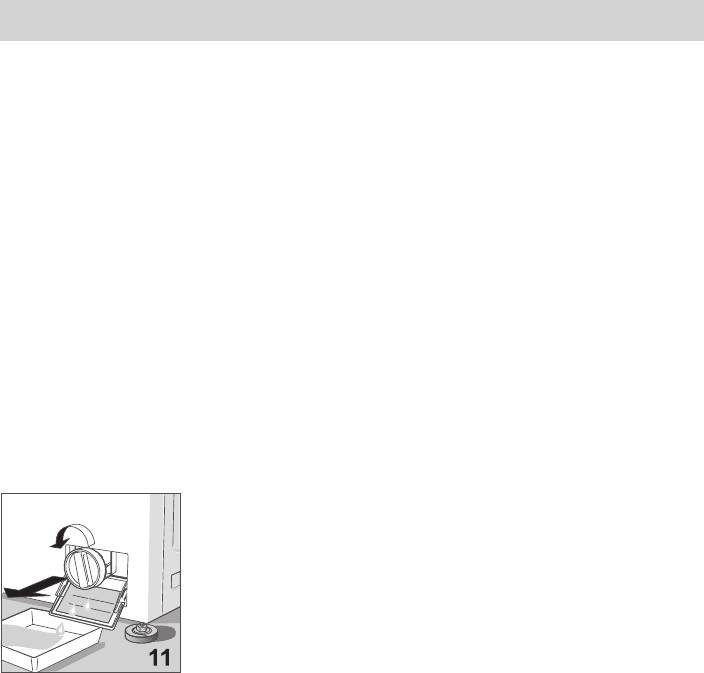
Cleaning the filter
WARNING!! Before carrying out the procedure below, make
sure that the washing machine is empty. Do not remove the
filter when the machine is running or when filled with water.
Place a cloth or tray under the filter to collect any water left inside.
Open the filter door, unscrew and remove the filter by turning it anti-
clockwise [fig. 11].
The filter must be cleaned regularly.
Rinse the filter under running water and eliminate any residues.
Replace the filter by screwing it clockwise, ensuring that it forms a
seal.
12
SM1

TROUBLESHOOTING
If the machine should stop working, before calling for technical assistance, check
whether the machine has stopped for one of the following reasons. The services of
a specialist called-out for no justifiable reason must be paid for, even if the washing
machine is still under guarantee.
pressed
The washing machine does not work
5) the no-drain button has not been
(the on/off indicator does not light-up)
pressed
• check that:
The washing machine vibrates exces-
1) the mains power supply is working
sively and is noisy
2) the plug is correctly inserted
• check that:
3) the programmer dial is in the “on”
1) all the transport protection devices
position, or that the “off” button
have been removed .
hasn’t been pressed
2) the washing machine is perfectly
4) the upper cover of the washing
level
machine is closed properly
3) bulky items such as sheets, table-
The washing machine does not work
cloths, etc. have not become tangled
(the on/off indicator is lit)
The door will not open
• check that:
1) wait about one minute after the
1) the programmer dial is in the cor-
wash cycle has finished
rect position for the selected pro-
The washing is still wet after spinning
gramme;
• check that:
2) if need be, check the instructions
1) the washing has been put in the
listed under “The washing machine
drum evenly distributed
does not fill with water”
2) the correct spin speed has been
The washing machine does not fill with
selected
water
The washing machine stops inadvert-
• check that:
ently during a wash cycle
1) there is water in the pipes
• check that:
2) the water feed valve is open
1) the power has not been cut
3) the drain pipe is not kinked
Excessive detergent is left in the dis-
4) the filter is not blocked. If it is
penser
blocked, follow the cleaning pro-
• check that:
cedure by first unplugging the ma-
1) the water feed valve is fully open
chine from the mains
2) the filter between the valve and feed
5) there are no lumps of hardened
pipe is not blocked
soap powder in the dispenser
After a wash cycle, the washing is still
The washing machine fills and drains
dirty
water continuously
• check that:
• check that:
1) the drum has not been overloaded
1) the drain hose is at the correct
2) the right amount of detergent has
height (60-90 cm)
been used
2) the end of the drain hose in not
3) the correct wash programme was
under water
selected
The washing machine does not drain
The washing has shrunk or is discol-
and spin
oured
• check that:
• check that:
1) the drain hose is connected prop-
1) the correct wash programme was
erly
selected
2) the drain hose is not kinked
2) the correct wash temperature was
3) the filter is not blocked
4) the no-spin button has not been
selected
SM1
13

If, after carrying the checks listed on the previous page, the washing machine
still does not work properly, call the nearest authorised service centre.
When contacting the service centre, please communicate the model of washing
machine, the serial number and the type of malfunction. The washing machine
data can be found on the rating plate on the inside of the filter door.
This information will allow the service centre engineer to locate the necessary
spare parts, guaranteeing a speedy and efficient repair. It is always advisable to
have the following information to hand:
MODEL: ........................................................................... .
SERIAL NUMBER: ..........................................................
DATE OF PURCHASE: ...................................................
TECHNICAL DATA
DIMENSIONS - width - 59.0 cm
- height - 84.5 cm
- depth - 53.0 cm
Power supply see plate with technical feature
Total power consumption see plate with technical feature
Mains cut-out switch see plate with technical feature
Water pressure min. 0,05 MPa – max. 1 MPa
Maximum recommended washing load 5 kg – cotton, linen
2,5 kg – synthetic and delicate fabrics
1 kg – wool
THE MANUFACTURER WILL NOT BE HELD RESPONSIBLE FOR ANY INCIDENTS CAUSED BY NON-
OBSERVANCE OF SAFETY STANDARDS OR THE INSTRUCTIONS FOR USE
14
SM1

Gentile Signora,
I
La ringraziamo per aver scelto la nostra lavatrice.
La preghiamo di leggere attentamente le istruzioni per l’uso prima dell’al-
lacciamento e dell’utilizzo della macchina. La conoscenza dei principi di
funzionamento garantirà un corretto e sicuro sfruttamento dell’apparec-
chio. Le istruzioni per l’uso contengono molte indicazioni utili circa il fun-
zionamento, oltre ai particolari tecnici della lavatrice che La aiuteranno ad
ottimizzare l’utilizzo di questa macchina.
In caso di vendita, oppure di cessione della lavatrice, bisogna ricordarsi di
consegnare al nuovo utilizzatore anche il libretto delle istruzioni per l’uso.
[
\
Indice
••
••
• NOTE E CONSIGLI PER L’UTILIZZATORE 2
• INSTALLAZIONE DELLA MACCHINA 3
••
••
− Come disimballare e sbloccare l’apparecchio dalle protezioni 3
−−
−−
− Come imballare di nuovo la macchina 3
−−
−−
− Installazione e messa in piano della lavatrice 4
−−
−−
− Allacciamento idrico 4
−−
−−
− Collegamento elettrico 5
−−
−−
••
••
• COME ELIMINARE ALCUNE MACCHIE 5
••
••
• SIMBOLI INTERNAZIONALI PER IL TRATTAMENTO DEI VESTITI 6
••
••
• DESCRIZIONE DELLA LAVATRICE - PANNELLO COMANDI 7
• UTILIZZO DELLA LAVATRICE 8
••
••
••
••
• FUNZIONI AGGIUNTIVE 9
••
••
• TABELLE DEI PROGRAMMI 10
• USO DEI DETERSIVI 11
••
••
••
••
• MANUTENZIONE 12
− Pulizia della lavatrice 12
−−
−−
−
−−
−−
Pulizia del filtro 12
••
••
• SOLUZIONE DEI PROBLEMI 13
••
••
• DATI TECNICI 14
SM1
1

NOTE E CONSIGLI PER L’UTILIZZATORE
✽ La macchina è destinata esclusiva-
✽ La lavatrice non deve essere sovrac-
mente all’uso domestico.
caricata.
✽ Qualsiasi modifica o tentativo di ma-
✽ Lavare esclusivamente tessuti desti-
nomissione dell’apparecchio possono
nati al lavaggio in lavatrice. Per qual-
essere pericolosi per l’utilizzatore e
siasi dubbio è possibile controllare le
provocare danni alla lavatrice.
indicazioni del produttore riportate sul-
le etichette dei vestiti (vedi „Simboli per
✽ Considerato il notevole peso della la-
il trattamento dei vestiti” pag. 6)
vatrice, bisogna osservare particolari
norme di sicurezza durante il suo spo-
✽ Prima di inserire i vestiti nella lavatrice
stamento.
è necessario controllare che tutte le ta-
✽ E’ vietato l’uso della macchina ai bam-
sche siano state vuotate. Oggetti duri
bini, se non sorvegliati.
e appuntiti come, ad esempio, monete,
spille, chiodi, viti oppure sassi potrebbe-
✽ Qualsiasi cambiamento dell’impianto
ro provocare seri danni.
idrico o elettrico deve essere effettua-
to da tecnici autorizzati.
✽ Non è possibile lavare in lavatrice ve-
stiti sporchi di sostanze contenenti
✽ Dopo l’installazione della macchina
benzina. Nel caso in cui le macchie
verificare di non averla posizionata sul
siano state eliminate con prodotti va-
cavo di alimentazione elettrica.
porizzanti, prima del carico in lavatri-
✽ Prima dell’attivazione della lavatrice,
ce, bisogna attendere la totale
togliere l’intero imballaggio e il
vaporizzazione di queste sostanze
bloccaggio usato per il trasporto (viti
dalla superficie dei tessuti.
di protezione). In caso contrario, si
✽ La lavatrice può essere aperta non pri-
potrebbe danneggiare seriamente sia
ma di un minuto dopo il termine del
la macchina sia l’ambiente della Vo-
ciclo di lavaggio oppure dopo lo spe-
stra abitazione.
gnimento della macchina.
✽ Se l’apparecchio deve essere instal-
✽ Alla fine del lavaggio di passatoie, co-
lato su una superficie in moquette, bi-
perte oppure di altri tessuti a fibre lun-
sogna assicurasi che, tra la lavatrice
ghe bisogna ricordarsi di controllare il
e il pavimento, l’aria circoli liberamen-
filtro e, se necessario, di pulirlo.
te.
✽ La lavatrice deve essere allacciata alla
✽ Prima di una lunga e programmata as-
rete elettrica con messa a terra con-
senza da casa oppure in caso di lun-
forme alle norme di sicurezza.
ga inattività della lavatrice, è neces-
sario togliere la spina dalla presa e
✽ Alla fine di ogni lavaggio la spina elet-
chiudere il rubinetto di alimentazione
trica della lavatrice deve essere stac-
dell’acqua. E’ bene anche lasciare
cata e deve essere chiusa la valvola
l’oblò semiaperto per ventilare l’inter-
di alimentazione dell’acqua.
no dell’apparecchio.
✽ Non inserire né togliere la spina elet-
✽ Non sottoporre la macchina all’azione
trica con le mani bagnate.
2
SM1
di fattori atmosferici.
ranzia.
✽ Le riparazioni dell’apparecchio posso-
✽ Non si può tentare di riparare da soli i
no essere effettuate esclusivamente
guasti dell’apparecchio perché le ri-
da personale autorizzato dei centri di
parazioni effettuate da non professio-
assistenza. Per le riparazioni devono
nisti possono provocare seri danni e
essere usate solo parti di ricambio ori-
tolgono il diritto alle riparazioni di ga-
ginali.
INSTALLAZIONE DELLA MACCHINA
Come disimballare e sbloccare l’apparecchio dalle protezioni
➘ Mettere la lavatrice nel posto stabilito e togliere l’imballaggio esterno.
➘ Svitare le 4 viti di protezione del gruppo oscillante identificate con le lettere A-B-C-D nelle
figure 1 e 2 e successivamente toglierle insieme ai distanzieri in plastica H [fig. 2]. Nei fori
liberati mettere i relativi tappi in plastica in dotazione.
➘ Nel caso in cui i distanzieri restino nella lavatrice, toglierli svitando le viti indicate nella
figura 2, lettera L, quindi finire di avvitare il pannello. Le viti e i distanzieri devono
essere comunque conservati per un eventuale trasporto successivo.
E’ indispensabile togliere i distanzieri perché la loro presenza potrebbe provocare
danneggiamenti all’apparecchio.
➘ Sollevare la lavatrice ed estrarre la base in polistirolo.
Come imballare di nuovo la macchina
a) svitare le 8 viti L dal pannello posteriore e togliere il pannello.
b) inserire le viti di bloccaggio A-B-C-D negli appositi fori.
c) infilare i 4 distanzieri sulle viti A-B-C-D del pannello.
d) posizionare il pannello posteriore sulla lavatrice, farlo combaciare perfettamente,
quindi, avvitare le viti A-B-C-D.
e) avvitare le 8 viti L del pannello posteriore.
SM1
3

Installazione e messa in piano della lavatrice
Dopo aver scelto il posto adatto, regolare bene in piano la
macchina utilizzando i piedini regolabili [Fig. 3]. Porre partico-
lare attenzione alla scelta della posizione, al livellamento della la-
vatrice stessa ed alla sicurezza dei controdadi.
Nel caso in cui la messa in piano non sia stata eseguita cor-
rettamente, la lavatrice sarà instabile ed il funzionamento ru-
moroso con conseguenti danni.
Nel caso in cui la macchina sia posta su pavimento in moquet,
bisogna assicurarsi che fra la lavatrice e il pavimento l’aria
circoli liberamente.
Non è consigliabile il montaggio della macchina in vani in cui
la temperatura potrebbe scendere sotto 0°C.
Allacciamento idrico
➘
La pressione nella rete idrica deve essere compresa fra 0,05
e 1,00 MPa (0,5 - 10 bar.)
➘
Prima dell’allacciamento, aprire il rubinetto e far defluire una certa
quantità d’acqua per pulire i tubi da impurità come sabbia, ruggine
(questa operazione è particolarmente importante nel caso in cui la
lavatrice sia rimasta a lungo inattiva o venga collegata ad una tuba-
zione nuova dell’acqua).
➘
Il tubo di alimentazione dell’acqua deve essere collegato
alla presa d’acqua fredda con bocca filettata da 3/4”.
➘
Tra il rubinetto e il tubo mettere il filtrino guarnizione in dotazione
alla lavatrice, quindi avvitare a mano strettamente [fig. 4].
➘
Mettere la guarnizione sull’altra estremità del tubo di alimentazio-
ne ed avvitarlo alla lavatrice [fig. 5].
➘
Durante il lavaggio la presa di alimentazione dell’acqua deve
essere completamente aperta.
➘
Il tubo di scarico dell’acqua deve essere ad un’altezza com-
presa fra 60 c
m e 90 cm [fig. 6].
➘
Se è previsto lo scarico dell’acqua direttamente nella
MIN. 60 CM
MAX.90 CM
conduttura di scarico, l’estremità libera del tubo della mac-
china dovrà essere inserita nella conduttura con diametro
interno non inferiore a 40 mm.
➘
E’ importante non allacciare ermeticamente il tubo della
macchina alla conduttura di scarico per evitare di riempire
d’aria il sifone e, di conseguenza, di provocare la fuoriusci-
ta dell’acqua.
➘
Nel caso in cui l’acqua debba essere scaricata nel lavabo o
in un’altra zona di scarico, l’estremità libera del tubo deve
essere preventivamente rinforzata nel punto della piegatu-
ra con un gancio apposito in dotazione alla lavatrice. Quin-
di, porre il tubo sull’orlo del lavabo e fissare il gancio in
modo tale da non far cadere il tubo [fig. 7]. Il lavabo deve
avere lo scarico pulito per permettere all’acqua di scorrere
liberamente.
4
SM1

Collegamento elettrico
➘ Accertarsi che la tensione elettrica indicata nei dati tecni-
ci della targhetta posta sul lato interno dello sportellino
filtro, corrisponda a quella della rete elettrica [fig. 8].
➘ Salvavita, cavi elettrici e presa della rete devono avere
parametri tali da permettere di sopportare il carico massi-
mo indicato sulla targhetta stessa.
➘ La presa di corrente alla quale viene allacciata la mac-
china deve essere munita di messa a terra. In caso con-
trario, il produttore declina qualsiasi responsabilità per
eventuali incidenti [fig. 9].
➘ Se la presa nella quale viene inserita la spina non funzio-
na oppure non è adatta, deve essere sostituita da un elet-
tricista qualificato.
➘ E’ vietato allacciare la lavatrice alla rete attraverso ele-
menti indiretti come prolunghe e prese multiple.
➘ Durante la manutenzione la spina della lavatrice deve es-
sere staccata dalla fonte di corrente.
➘ Non inserire e non togliere la spina dalla presa con le
mani bagnate.
➘ Se il cavo d’alimentazione è danneggiato in qualche
modo,contattare il centro di assistenza tecnica specializ-
zato.
➘ Posizionare l’apparecchio in modo che il cavo alimentazione sia facilmente accessibile
in modo da poterlo disconnettere in caso di necessità.
COME ELIMINARE ALCUNE MACCHIE
Esistono alcune macchie che non possono essere asportate dai vestiti soltanto con lavag-
gio in lavatrice. Prima di pulire a mano macchie di ogni genere bisogna eseguire una
prova su una parte poco visibile del capo, iniziando dall’orlo della macchia e procedendo
verso il suo centro per evitare, in questo modo, la formazione di aloni. Qui sotto riportiamo
vari modi per eliminare le macchie.
••
•
••
CERA:
Raschiare la cera con una punta arrotondata per non provocare danni al tessu-
to, quindi, mettendo il tessuto fra due fogli di carta assorbente, passare la macchia
sotto il ferro caldo.
••
•
••
PENNE A SFERA E PENNARELLI:
pulire con un panno morbido imbevuto di alcol etilico. Fare
attenzione a non allargare la macchia.
••
••
•
UMIDITÀ E MUFFA:
se il tessuto tollera bene l’uso della candeggina, eseguire il ciclo di
lavaggio aggiungendo candeggina nell’apposita vaschetta [vedi tabella programmi]. In
caso contrario, bagnare la parte sporca con acqua ossigenata a 10 volumi e lasciare
agire per 10 o 15 minuti.
•
••
••
BRUCIATURE LEGGERE DA FERRO DA STIRO:
seguire le indicazioni per la muffa e l’umidità.
••
••
•
RUGGINE:
usare prodotti per macchie di ruggine seguendo le indicazioni del produttore
poste sulla confezione.
••
••
•
GOMMA DA MASTICARE:
passare sul tessuto con il ghiaccio, sfregare il più possibile e poi
passare con un panno di cotone imbevuto di acetone.
•
••
••
VERNICE:
non lasciare asciugare la vernice. Passare sulla zona sporca il solvente indi
SM1
5
cato sulla confezione della vernice (ad es. acqua, trementina, tricloroetilene), insaponare
e poi sciacquare.
••
••
•
ROSSETTO PER LABBRA:
le macchie sul cotone oppure sulla lana si eliminano con un
panno imbevuto di etere. Per la seta, invece, usare il tricloroetilene.
••
••
•
SMALTO PER UNGHIE:
mettere sul tessuto macchiato la carta assorbente, quindi, inumidire
il rovescio del tessuto con acetone cambiando spesso la carta assorbente posta sulla
macchia. Procedere in questo modo fino alla totale eliminazione della macchia.
••
•
••
MORCHIA O CATRAME:
spalmare sulla macchia un po’ di burro fresco, lasciare riposare e
poi lavare con essenza di trementina.
••
••
•
ERBA:
insaponare
delicatamente, utilizzare candeggiante diluito. Per tessuti in lana si
può ottenere un buon risultato anche con alcol al 90%.
••
••
•
SANGUE:
mettere a mollo nell’acqua fredda con l’aggiunta di sale, quindi, lavare con il
sapone da bucato.
SIMBOLI INTERNAZIONALI PER IL TRATTAMENTO DEI VESTITI
Prima di mettere i vestiti in lavatrice e di selezionare il relativo programma è consigliabile
esaminare i simboli posti sulle etichette del produttore. La tabella qui di seguito può essere
utile per la lettura dei simboli.
Lavaggio normale Stirare fino a max. 200° Asciugare disteso
Lavaggio delicato Stirare fino a max. 150° Asciugare appeso
95
Lavare fino a 95°C Stirare fino a max. 100° Asciugare su appendiabiti
95
60
Lavare fino a 60°C Non stirare Asciugare con macchina
60
asciugabiancheria a temperatura
normale
40
Asciugare con macchina
Lavare fino a 40°C Lavare a secco con solvente
A
40
asciugabiancheria a temperatura ridotta
30
Lavare fino a 30°C Lavare a mano Lavare a secco esclusivamente con benzina,
P
Non asciugare nel cestello
30
alcool puro e R113
Lavaggio a mano
F
Lavare a secco esclusivamente con percloro,
benzina, alcol puro, R111 e R113.
Non
lavare con acqua
Non lavare a secco
cl
Candeggiare in acqua fredda
Non candeggiare
6
SM1
DESCRIZIONE DELLA LAVATRICE - PANNELLO COMANDI
1 2 3 4 5 6 7 8 9 10 11
1 2 3 12 6 5 13 8 9 10 11
10. – manopola programmatore
1. – tabella dei programmi
11. – spia di controllo - lavatrice accesa
2. – scomparto detersivi
12. – pulsante risciacquo supplementare
3. – pulsante di limitazione temperatura
13. – pulsante giri centrifuga 500/800
4. – pulsante di stop con acqua
14. – oblò
5. – pulsante di lavaggio economico
15. – filtro
6. – pulsante di esclusione centrifuga
16. – piedini regolabili
7. – pulsante di accensione generale
17. – coperchio superiore
8. – manopola termostato
18. – cestello
9. – manopola regolazione giri della
centrifuga
SM1
7

UTILIZZO DELLA LAVATRICE
Attenzione: Prima di procedere al primo lavaggio della biancheria si prega di esegui-
re un breve ciclo di lavaggio senza centrifuga. Questo permette di verifi-
care il funzionamento della lavatrice e di pulire la centrifuga stessa.
Prima di cominciare ogni lavaggio, effettuare sempre le seguenti operazioni:
1. Controllare che gli allacciamenti idrici siano a posto: il rubinetto dell’acqua deve essere
aperto e il tubo di scarico dell’acqua deve essere posizionato correttamente [vedi capi-
tolo del montaggio e le figure 4 - 7]
2. Controllare che la manopola programmatore si trovi nella posizione
STOP
3. Inserire, con le mani asciutte, la spina nella presa della corrente.
4. Selezionare la biancheria dividendola a seconda del tessuto (controllare i simboli sui
capi)
5. Prima di caricare i vestiti nel cestello controllare che:
− le tasche dei vestiti siano vuote,
− le parti scucite siano state sistemate,
− le chiusure lampo, le cinture, le fibbie e i ganci siano chiusi
− le macchie siano state preventivamente pulite.
6. Aprire l’oblò.
7. Caricare la biancheria nel cestello e chiudere lo sportello.
Attenzione: E’ vietato sovraccaricare la lavatrice. E’ sconsigliato il lavaggio di capi
che assorbono una grande quantità di acqua, per es. tappeti.
8. Versare nelle rispettive vaschette il detersivo in polvere poco schiumogeno e l’ammor-
bidente per lavatrici automatiche (por. capitolo „Uso dei detersivi”)
9. Chiudere lo scomparto detersivi.
ATTENZIONE !! Non togliere lo scomparto detersivi durante il funzionamento della lavatrice
perché l’acqua potrebbe fuoriuscire.
10. Scegliere il programma, il numero di giri e la temperatura desiderati.
11. Impostare il programma prescelto e la temperatura attraverso la manopola 9 e 10 ed
impostare la velocità di giri con la manopola o il pulsante 3.
ATTENZIONE !! Non girare la manopola programmatore verso sinistra. Se, per caso,
con la manopola programmatore è stato superato il programma prescelto, non è
possibile tornare indietro. Continuare a girare verso destra fino a raggiungere la
posizione desiderata.
12
Accendere la macchina tirando la manopola Timer verso l’esterno, o se la
macchina è dotata di pulsante premerlo. La lampada indicatrice si accenderà.
13. Al termine del programma di lavaggio la lavatrice si ferma su uno dei punti STOP del
programmatore.
In caso di necessità si può interrompere il funzionamento dell’apparecchio in ogni mo-
mento del ciclo di lavaggio, spingendo il pulsante di accensione generale o spingendo
la manopola programmatore 10.
14. La lavatrice può essere aperta un minuto dopo il termine del lavaggio oppure
dopo il suo spegnimento tramite il pulsante di alimentazione
15. Togliere la biancheria.
16. Con le mani asciutte staccare la presa della lavatrice dalla rete.
17. Chiudere il rubinetto di alimentazione dell’acqua.
8
SM1


