Sony ILCA-77M2 – page 2
Manual for Sony ILCA-77M2
Table of contents

Using the In-Camera Guide
You can use [Custom Key Settings] to assign In-Camera Guide to the
desired button.
The In-Camera Guide displays explanations for the currently selected menu
function or setting.
1 Select MENU button t (Custom Settings) 6 t [Custom
Key Settings] t desired functions assigned to the button t
[In-Camera Guide].
Press the MENU button and use the multi-selector to select a MENU item
whose explanation you want to read, and then press the button to which [In-
Camera Guide] is assigned.
GB
GB
21
Preparing the camera
Charging the battery pack
When using the camera for the first time, be sure to charge the NP-FM500H
InfoLITHIUM™ battery pack (supplied).
The InfoLITHIUM battery pack can be charged even when it has not been
fully depleted.
It can also be used when it has not been fully charged.
The charged battery pack is discharged little by little, even when you do not
use it. To avoid missing an opportunity to shoot, charge the battery pack
again before shooting.
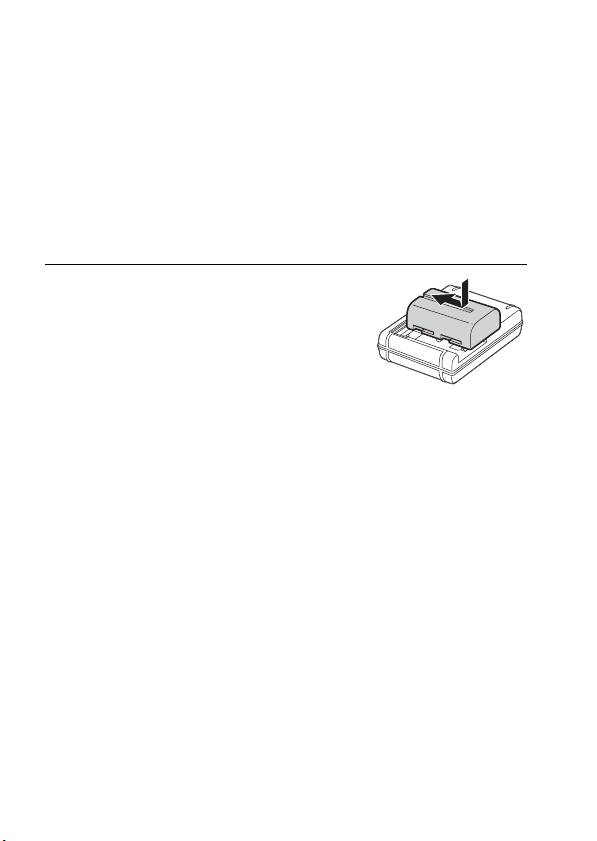
1 Insert the battery pack into the
battery charger.
Push the battery pack until it clicks.
GB
22
Charging the battery pack
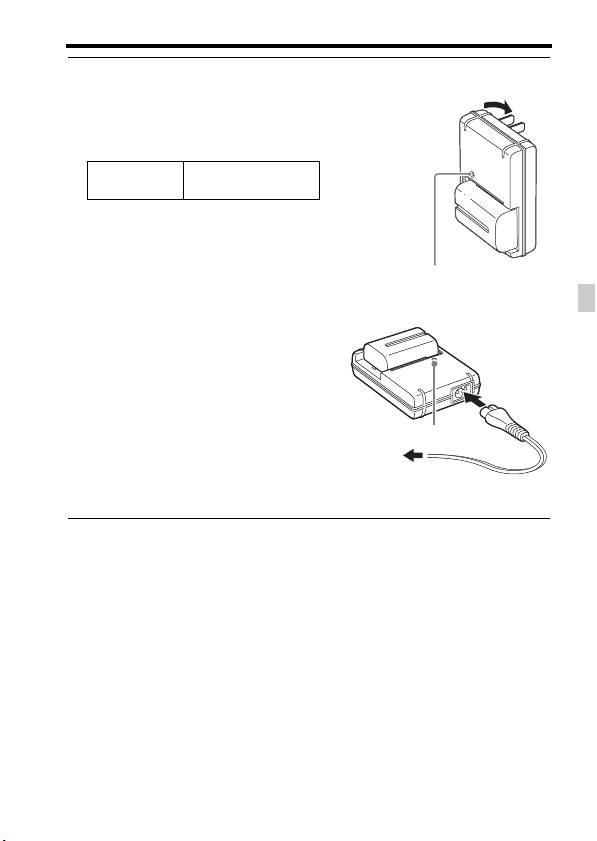
2 Connect the battery charger to the
For the U.S.A and Canada
wall outlet (wall socket).
Light on: Charging
Light off: Charge completed
Charging time
Approx. 175 minutes
(Full charge)
• When charging a fully depleted battery
pack at a temperature of 25°C (77°F).
• The CHARGE lamp turns off when
charging is completed.
CHARGE lamp
For countries/regions other than
GB
the U.S.A. and Canada
CHARGE lamp
To a wall outlet
(wall socket)
Notes
• The charging time differs depending on the remaining capacity of the battery pack or
charging conditions.
• Be sure to use only genuine Sony brand battery packs.
• We recommend charging the battery pack in an ambient temperature of between
10°C to 30°C (50°F to 86°F). You may not be able to efficiently charge the battery
pack outside this temperature range.
• Connect the battery charger to the nearest wall outlet (wall socket).
GB
23
Inserting the battery pack/memory
card (sold separately)
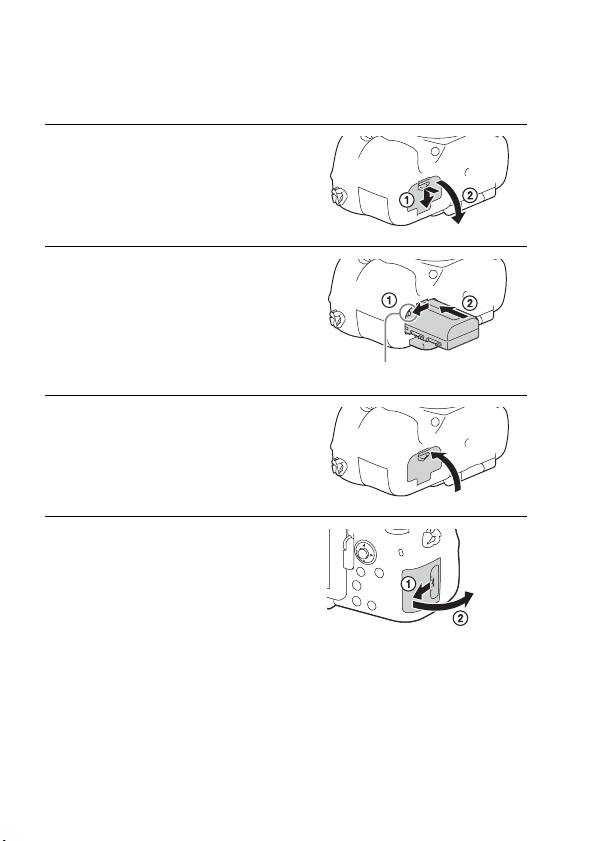
1 While sliding the battery cover
open lever, open the cover.
2 Firmly insert the battery pack all
the way while pressing the lock
lever with the tip of the battery.
Lock lever
3 Close the cover.
4 While sliding the memory card
cover, open the cover.
GB
24
Inserting the battery pack/memory card (sold separately)
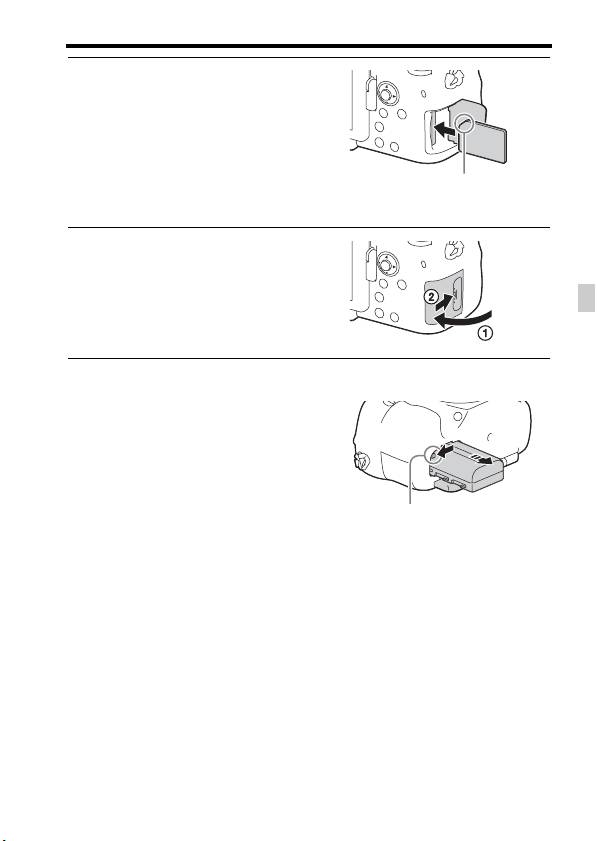
5 Insert a memory card.
• With the notched corner facing as
illustrated, insert the memory card until
it clicks into place.
Ensure the notched corner faces
correctly
6 Close the cover.
GB
To remove the battery pack
Turn off the camera and slide the lock
lever in the direction of the arrow. Be
careful not to drop the battery pack.
Lock lever
To remove the memory card
Check that the access lamp (page 16) is not lit, then open the cover, and
push the memory card once.
To check the remaining battery level
The supplied battery pack is a lithium-ion battery pack that has functions
for exchanging information related to operating conditions with your
camera. The percentage of the remaining battery life is displayed according
to the operating conditions of your camera.
GB
25
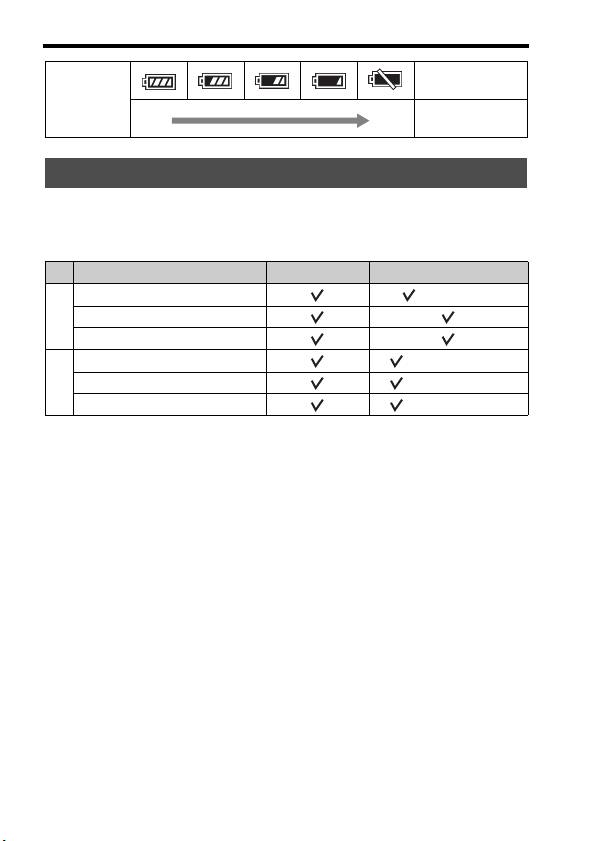
Inserting the battery pack/memory card (sold separately)
“Battery
exhausted.”
Battery level
You cannot shoot
High Low
any more pictures.
Memory cards that can be used
You can use the following types of memory cards with this camera.
However, proper operation cannot be guaranteed for all types of memory
cards.
Memory card For still images For movies
Memory Stick PRO Duo™ (Mark2 only)
A
Memory Stick PRO-HG Duo™
Memory Stick XC-HG Duo™
SD memory card (Class 4 or faster)
B
SDHC memory card (Class 4 or faster)
SDXC memory card (Class 4 or faster)
• In this manual, the products in the table are collectively referred to as follows:
A: Memory Stick PRO Duo media
B: SD card
• This camera supports UHS-I-compatible SD cards.
Notes
• Images recorded on a Memory Stick XC-HG Duo media or an SDXC memory card
cannot be imported to or played on computers or AV devices that are not compatible
with exFAT*. Make sure that the device is compatible with exFAT before
connecting it to the camera. If you connect your camera to an incompatible device,
you may be prompted to format the card.
Never format the card in response to this prompt, as doing so will erase all data on
the card.
* exFAT is the file system used on Memory Stick XC-HG Duo media and SDXC
memory cards.
GB
26
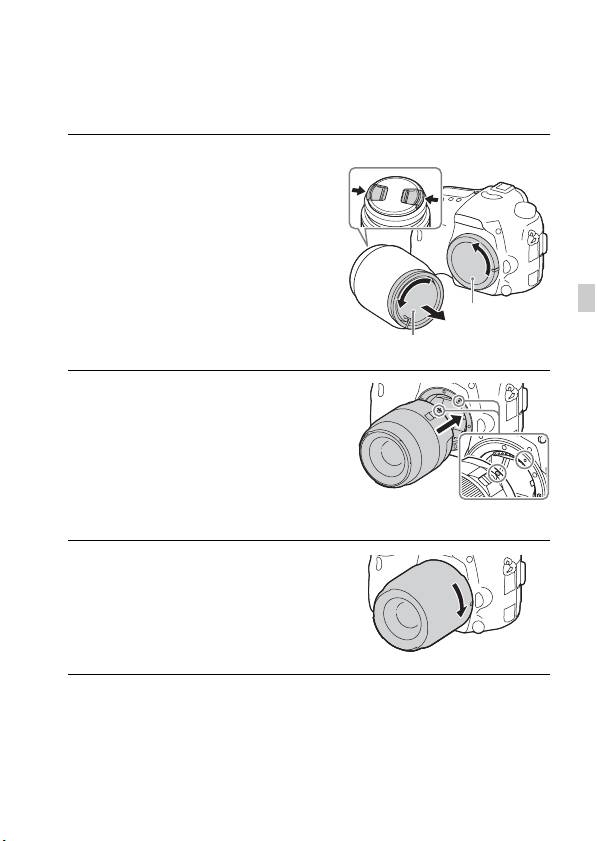
Attaching a lens
Set the power switch of the camera to OFF before you attach or remove the
lens.
1 Remove the body cap from the
Front lens cap
camera and the rear lens cap
from the rear of the lens.
• When changing the lens, quickly
change the lens away from dusty
locations to keep dust or debris from
getting inside the camera.
• When shooting, remove the front lens
GB
Body cap
cap from the front of the lens.
Rear lens cap
2 Mount the lens by aligning the
orange index marks (mounting
indexes) on the lens and camera.
• Hold the camera with the lens facing
down to prevent dust from entering into
the camera.
Orange index marks
3 While pushing the lens lightly
toward the camera, turn the lens
clockwise until it clicks into the
locked position.
• Be sure to put the lens on straight.
GB
27

Attaching a lens
Notes
• When attaching a lens, do not press the lens release button.
• Do not use force when attaching a lens.
• E-mount lenses are not compatible with this camera.
• When you use a lens for which a tripod socket is provided, attach the lens onto the
tripod using the tripod socket provided to help balance the weight of the lens.
• When carrying the camera with a lens attached, hold both the camera and the lens
firmly.
• Do not hold the part of the lens that is extended for the zoom or focus adjustment.
To remove the lens
1 Press the lens release button all
the way in and turn the lens
counterclockwise until it stops.
Lens release button
2 Attach the caps to the front and
rear of the lens and the body cap
to the camera.
• Before you attach them, remove any
dust from them.
Notes on changing the lens
When changing the lens, if dust or debris gets inside the camera and
adheres to the surface of the image sensor (the part that converts the light to
an electric signal), it may appear as dark spots on the image, depending on
the shooting environment.
The camera is equipped with an anti-dust function to prevent dust from
landing on the image sensor. However, always make sure to quickly change
the lens away from dusty locations when attaching/removing a lens.
GB
28
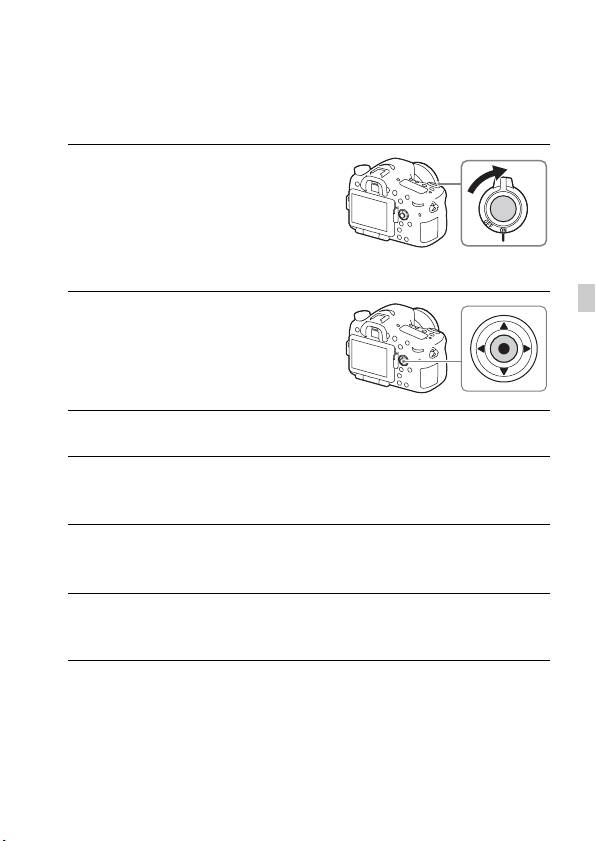
Setting the date and time
When you turn on the camera for the first time or after you initialize the
functions, the screen to set the date and time appears.
1 Set the power switch to ON to turn
on the camera.
The screen to set the date and time
appears.
• To turn the camera off, set the power
switch to OFF.
GB
2 Check that [Enter] is selected on
the screen, then press z on the
multi-selector.
3 Select a desired geographic location, and then press z.
4 Select a setting item by using v/V on the multi-selector, then
press z.
5 Select a desired setting by using v /V/b/B on the multi-
selector, then press z.
6 Repeat steps 4 and 5 to set other items, then select [Enter] and
press z.
To cancel the date and time setting operation
Press the MENU button.
GB
29
Setting the date and time
Setting the date/time and area again
The date and time setup screen appears automatically when the power is
turned on for the first time or when the internal rechargeable backup battery
has been discharged. To reset the date and time, use the menu.
MENU button t (Setup) 4 t
[Date/Time Setup] or [Area Setting]
MENU button
Maintaining the date and time setting
This camera has an internal rechargeable battery for maintaining the date
and time and other settings regardless of whether the power is on or off, or
the battery is installed or not.
GB
30
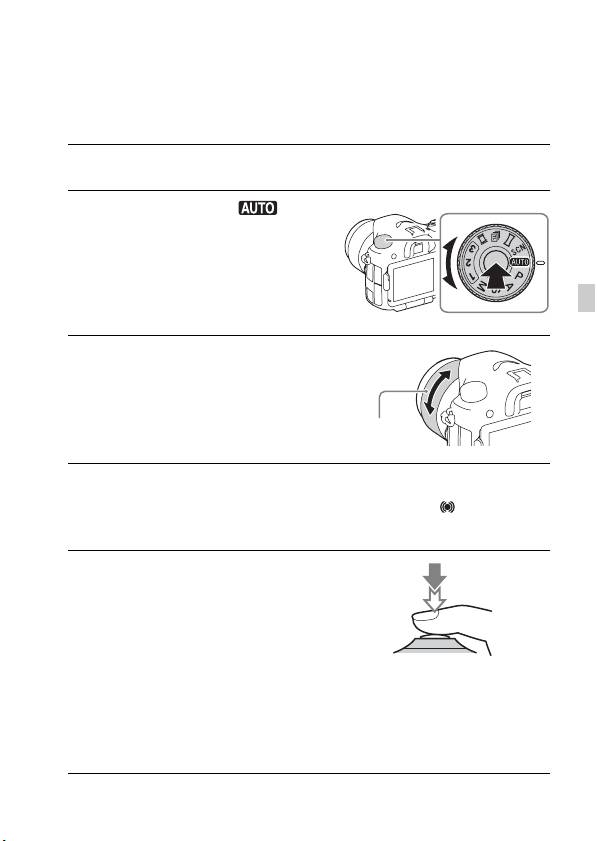
Shooting and viewing images
Shooting still images
In auto mode, the camera analyzes the subject and allows you to shoot with
the appropriate settings.
1 Set the power switch to ON to turn on the camera.
2 Set the mode dial to (Auto
Mode).
• Turn the mode dial while pressing the
mode dial lock release button on the
center of the mode dial.
GB
3 Look into the viewfinder and hold
the camera.
When using a zoom lens, adjust the zoom
ring to the proper size of the subject.
Zoom ring
4 Press the shutter button halfway down to focus.
• When the image is in focus, a beep sounds and the z or indicator
lights.
5 Press the shutter button fully
down to shoot an image.
• If [Auto Obj. Framing] is set to [Auto],
when shooting faces, close-up (macro)
subjects, or subjects tracked by [Lock-
on AF], the camera analyzes the scene
and automatically trims the captured
image into a suitable composition. Both
the original and the trimmed images
will be saved.
GB
31
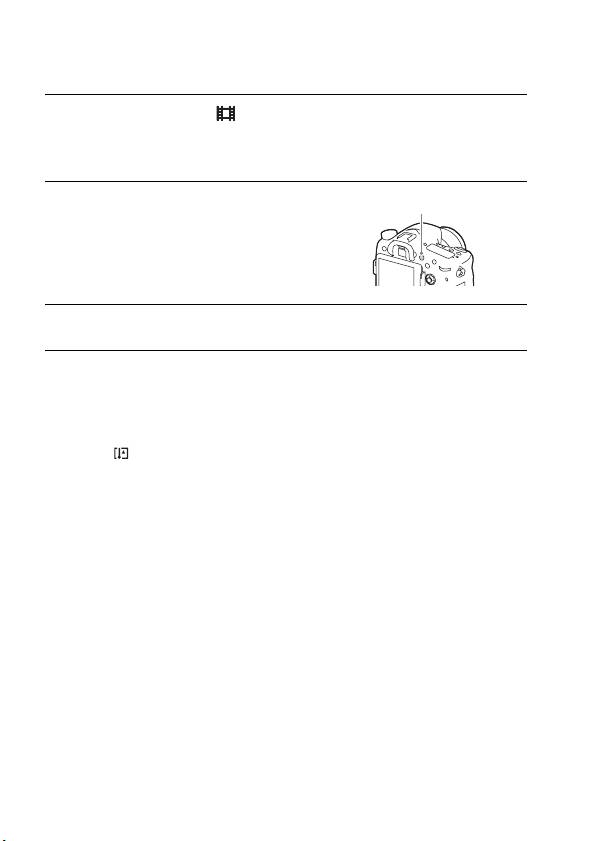
Recording movies
1 Set the mode dial to (Movie).
• When the [MOVIE Button] is set to [Always], the movie recording can be
started from any shooting mode.
2 Press the MOVIE button to start
MOVIE button
recording.
3 Press the MOVIE button again to stop recording.
Notes
• The sound of the camera in operation may be recorded while recording a movie. You
can disable the sound recording by setting [Audio Recording] to [Off].
• The continuous recording time of a movie depends on the ambient temperature or
the condition of the camera. See “Notes on continuous movie recording” (page 46).
• When the icon appears, the temperature of the camera is too high. Turn the
camera off and wait until the temperature of the camera decreases.
• When you are recording continuously for a long time, you may feel that the camera
is warm. This is normal. Also, “Internal temp. high. Allow it to cool.” may appear.
In such cases, turn the camera off and wait until the camera is ready to shoot again.
GB
32
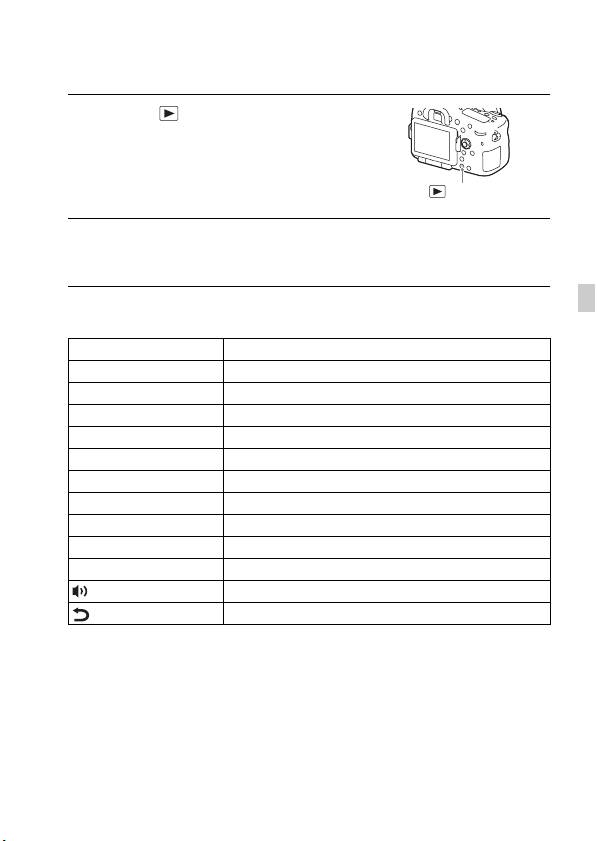
Playing back images
1 Press the button.
button
2 Select an image by pressing the b/B on the multi-selector.
• To play back movies, press z on the multi-selector.
GB
• If you press V on the multi-selector while playing back a movie, the
control panel will be displayed.
Control panel Action during movie playback
N Playback
X Pause
M Fast forward
m Fast rewind
T Forward slow playback
t Rewind slow playback
> Next movie
. Previous movie
C Frame advance
c Frame rewind
Volume settings
Closes the control panel
Notes
• Movies recorded using other devices may not play back on this camera.
GB
33
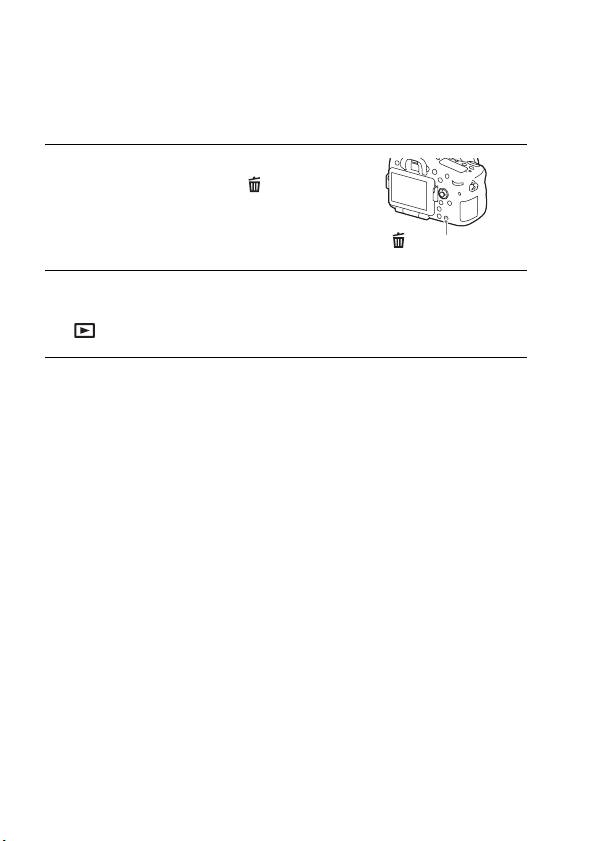
Deleting images
Once you have deleted an image, you cannot restore it. Be sure that you
want to delete the image before proceeding.
1 While displaying the image you
want to delete, press the
(Delete) button.
(Delete) button
2 Select [Delete] with v/V on the multi-selector, then press z.
• To delete several images at a time, select MENU button t
(Playback) 1 t [Delete].
Notes
• Protected images cannot be deleted.
GB
34

Selecting a shooting mode
Selecting a shooting mode
Turn the mode dial while pressing
the mode dial lock release button on
the center of the mode dial.
The following shooting modes are available.
(Auto Mode) Allows you to shoot still images with the settings adjusted
automatically.
GB
(Program Auto) Allows you to shoot with the exposure (the shutter speed and
the aperture value) adjusted automatically. The other settings
can be adjusted manually.
(Aperture
Shoots by adjusting the aperture and changing the focus
Priority)
range, or by defocus the background.
(Shutter Priority) Adjusts the shutter speed to show the movement of the
subject.
(Manual
Allows you to shoot after manually adjusting the exposure
Exposure)
(the shutter speed and the aperture value) using the front or
rear dial.
1/2/3 (Memory
Calls up settings pre-registered in [Memory] in the
recall)
(Camera Settings).
(Movie) Allows you to change shooting settings and shoot a movie.
(Cont. Priority
Allows continuous shooting while the shutter button is fully
AE)
depressed. The camera records the images continuously at a
maximum of about 12 images per second.
(Sweep
Allows you to shoot panoramic images by combining
Panorama)
multiple images.
(Scene
Allows you to shoot with preset settings according to the
Selection)
scene.
GB
35
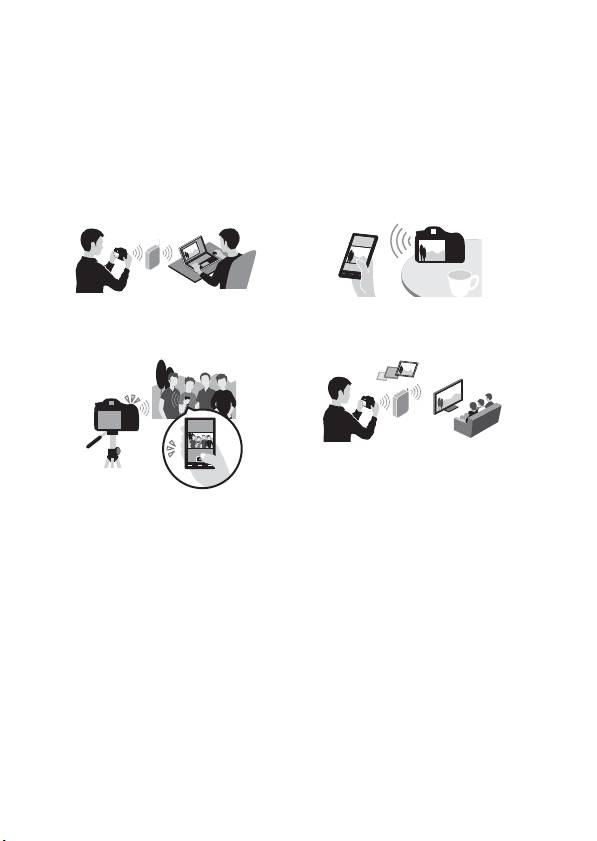
Using Wi-Fi functions
Using the Wi-Fi and NFC one-touch
functions
You can perform the following operations using the camera’s Wi-Fi and
NFC One-touch functions.
Saving images to a computer. Transferring images from the
camera to a smartphone.
Using the smartphone as a remote
Viewing still images on a TV.
control for the camera.
For details on the Wi-Fi and NFC One-touch functions, refer to the attached
document “Wi-Fi Connection/One-touch (NFC) Guide” or to the “Help
Guide” (page 2).
GB
36
Using the Wi-Fi and NFC one-touch functions
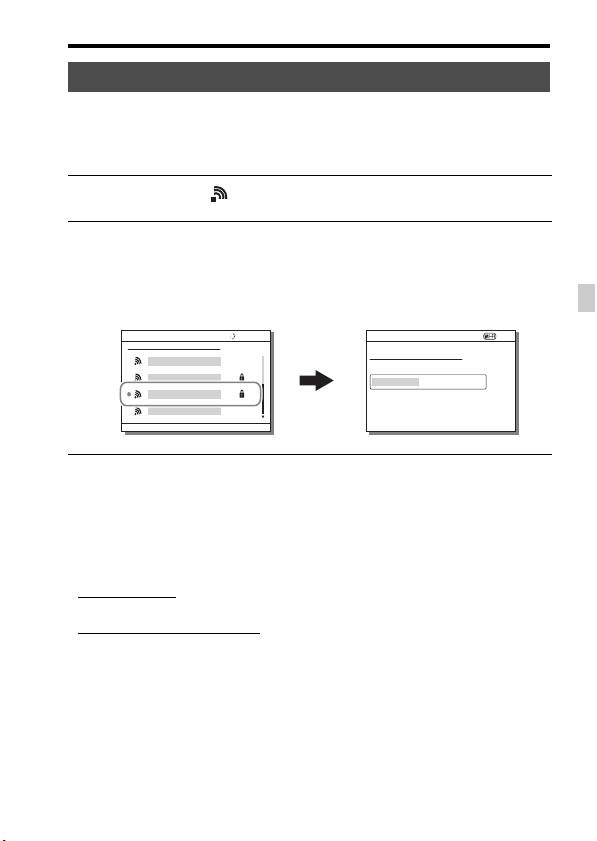
Connecting the camera to a wireless access point
Connect the camera to your wireless access point. Before starting the
procedure, make sure you have the SSID (name of the access point) and
password of your wireless access point with you.
1 MENU button t (Wireless) 2 t [Access Point Set.].
2 Use v/V on the multi-selector to select the access point you
want to connect to. Press z in the center of the multi-selector
and enter the password if a key icon is displayed with a
GB
wireless access point, then select [OK].
Notes
• If a connection is not established, see the wireless access point operating instructions
or contact the administrator of the access point.
• To save images to a computer, install the following dedicated software on your
computer.
When using Windows: PlayMemories Home
www.sony.net/pm/
When using Mac: Wireless Auto Import
http://www.sony.co.jp/imsoft/Mac/
GB
37

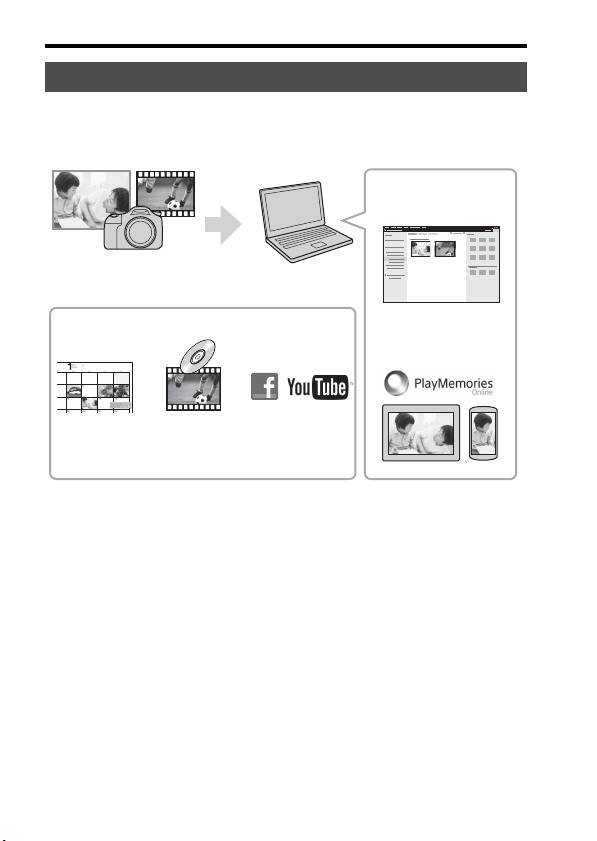
Viewing images on a computer
Using the software
Use the following applications to optimize use of the images shot with your
camera.
• Image Data Converter
• PlayMemories Home
• Remote Camera Control
For details on installation, see pages 39 to 42.
System requirements
You can find the system requirements for the software at the following
URL:
www.sony.net/pcenv/
GB
38

Using the software
Using Image Data Converter
With Image Data Converter, you can do the following:
• You can play back and edit images recorded in RAW format with various
corrections, such as tone curve and sharpness.
• You can adjust images with white balance, exposure, and [Creative
Style], etc.
• You can save the images displayed and edited on a computer.
You can either save the image as RAW format or save it in a general file
format.
• You can display and compare the RAW images and JPEG images
recorded by this camera.
GB
• You can rank images in 5 grades.
• You can apply color labels.
To use Image Data Converter, refer to Help.
Click [Start] t [All Programs] t [Image Data Converter] t [Help] t
[Image Data Converter Ver.4].
Image Data Converter support page (English only)
http://www.sony.co.jp/ids-se/
Installing Image Data Converter
1 Download the software from the following URL and install it on
your computer.
Windows:
http://www.sony.co.jp/imsoft/Win/
Mac:
http://www.sony.co.jp/imsoft/Mac/
Notes
• Log on as Administrator.
GB
39
Using the software
Using PlayMemories Home
The software PlayMemories Home allows you to import still images and
movies to your computer and use them. PlayMemories Home is required
for importing AVCHD movies to your computer.
Playing back imported
images
Importing images from your camera
For Windows, the following functions are also
Sharing images on
available:
PlayMemories
Online™
Viewing images
Creating
Uploading
on a calendar
movie
images to
discs
network services
• You can download Image Data Converter or Remote Camera Control,
etc. by performing the following procedure:
Connect the camera to your computer t launch PlayMemories Home t
click [Notifications].
Notes
• An Internet connection is required to install PlayMemories Home.
• An Internet connection is required to use PlayMemories Online or other network
services. PlayMemories Online or other network services may not be available in
some countries or regions.
• Refer to the following URL for Mac software:
http://www.sony.co.jp/imsoft/Mac/
• If the software PMB (Picture Motion Browser), supplied with models released
before 2011, has already been installed on your computer, it will be overwritten by
PlayMemories Home during the installation. Use PlayMemories Home, the
successor software of PMB.
GB
40
