Panasonic RPBTD10E: instruction
Class: Audio and DJ Equipment
Type:
Manual for Panasonic RPBTD10E
Operating Instructions
ENGLISH
Bedienungsanleitung
Mode d’emploi
DEUTSCH
Istruzioni per l’uso
Instrucciones de funcionamiento
Gebruiksaanwijzing
FRANÇAIS
Bruksanvisning
Betjeningsvejledning
ITALIANO
Návod k obsluze
Instrukcja obsługi
ESPAÑOL
Kezelési útmutató
Návod na obsluhu
NEDERLANDS
Инструкция по эксплуатации
使⽤说明书
SVENSKA
使用說明書
Digital Wireless Stereo Headphones
DANSK
Digitale drahtlose Stereo-Kopfhörer
ČESKY
Casque d’écoute stéréo sans fil numérique
Cuffie stereo senza fili digitali
POLSKI
Cascos auriculares estéreo inalámbricos digitales
Digitale draadloze stereo-hoofdtelefoon
MAGYAR
Digitala trådlösa stereohörlurar
SLOVENSKY
Digital trådløse stereo hovedtelefoner
Digitální bezdrátová stereofonní sluchátka
РУССКИЙ ЯЗЫК
Bezprzewodowe cyfrowe słuchawki nagłowne stereo
Digitális vezeték nélküli sztereó fejhallgató
中⽂(简体)
Digitálne bezdrôtové stereo slúchadlá
E
中文(繁體)
Цифровые беспроводные стереонаушники
Manufactured by:
数码⽆线⽴体声头戴式⽿机
Panasonic Corporation
EU
數碼無線立體聲頭戴式耳機
Kadoma, Osaka, Japan
Importer for Europe:
Panasonic Marketing Europe GmbH
Model No. RP-BTD10
Panasonic Testing Centre
Winsbergring 15, 22525 Hamburg, Germany
VQT5J79-1
Dear customer
Thank you for purchasing this product.
Accessories
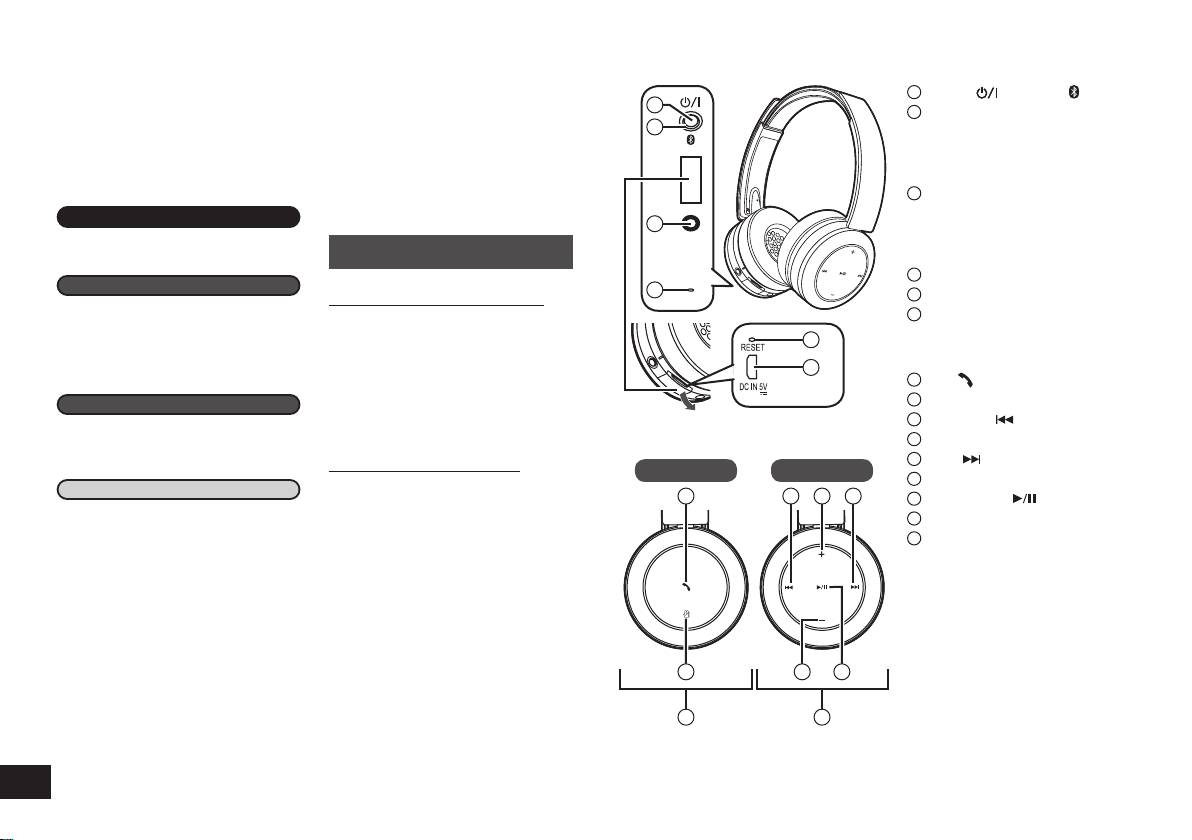
Part names
Please read these instructions carefully
before using this product, and save this
Please check and identify the supplied
1
Power / Pairing button
manual for future use.
accessories.
1
2
LED indicator light*
Use numbers indicated in parentheses
2
• The number of blinks or colour
when asking for replacement parts.
notifies the status of the unit.
Table of
(As of February 2014)
(* hereafter referred to as
“LED”)
contents
1 Detachable cord [RFX0H75]
3
Audio input terminal
1 USB charging cord [RFX0H76]
• Connect the detachable cord
Before use
3
(supplied) to this terminal
Accessories ........................................ 2
For the United Kingdom and Ireland
when using the unit as wired
Part names ......................................... 2
customers
headphones.
4
Microphone
Preparation
Sales and Support Information
4
Customer Communications Centre
5
RESET hole
Charging ............................................. 3
• For customers within the U.K.:
6
Charging terminal (DC IN)
Turning the power on/off ..................... 3
0844 844 3899
• Connect the USB charging
Connecting a Bluetooth
®
device ......... 3
5
• For customers within Ireland:
cord (supplied) to this terminal
One-Touch Connection
01289 8333
when charging. (→ P. 3)
6
(Connecting by NFC) ..................... 4
• Monday - Friday 9:00am - 5:00pm
7
Call
(Excluding public holidays).
Operation
8
NFC touch area
• For further support on your product,
Open the cover
9
Previous
Listening to music ............................... 4
please visit our website:
www.panasonic.co.uk
10
Volume +
Making a phone call............................ 5
Useful functions .................................. 5
11
Next
Direct Sales at Panasonic U.K.
Left Right
• Order accessory and consumable
12
Volume –
Other
items for your product with ease and
7
9
10 11
13
Play/Pause
Restoring to the factory settings ......... 5
confidence by phoning our Customer
14
Left speaker
Safety precautions .............................. 6
Communications Centre -
15
Right speaker
Maintenance ....................................... 6
Monday - Friday 9:00am - 5:00pm
About Bluetooth
®
................................ 7
(Excluding public holidays).
Specifications ..................................... 7
• Or go on line through our Internet
■
Note
Accessory ordering application at
Troubleshooting guide ........................ 8
• Do not use any other USB
www.pas-europe.com
Copyright, etc. .................................... 9
charging cords except the
• Most major credit and debit cards
To remove the battery when
supplied one.
accepted.
disposing of this unit ....................... 9
• Do not use any other detachable
• All enquiries transactions and
Limited Warranty
cords except the supplied one.
distribution facilities are provided
8
12 13
• When using the unit, do not cover
(ONLY FOR AUSTRALIA)
... Back cover
directly by Panasonic U.K.
the left speaker with the palm
• It couldn’t be simpler!
of your hand. The Bluetooth
®
• Also available through our Internet is
14 15
connection may be blocked.
direct shopping for a wide range of
VQT5J79
finished products. Take a browse on
our website for further details.
2
The product illustrations may differ from
2
the actual product.
®
Charging
Connecting a Bluetooth
device
The rechargeable battery (installed in the unit) is not charged initially. Charge
To establish a wireless connection, register the unit with Bluetooth
®
compatible
the battery before using the unit.
devices.
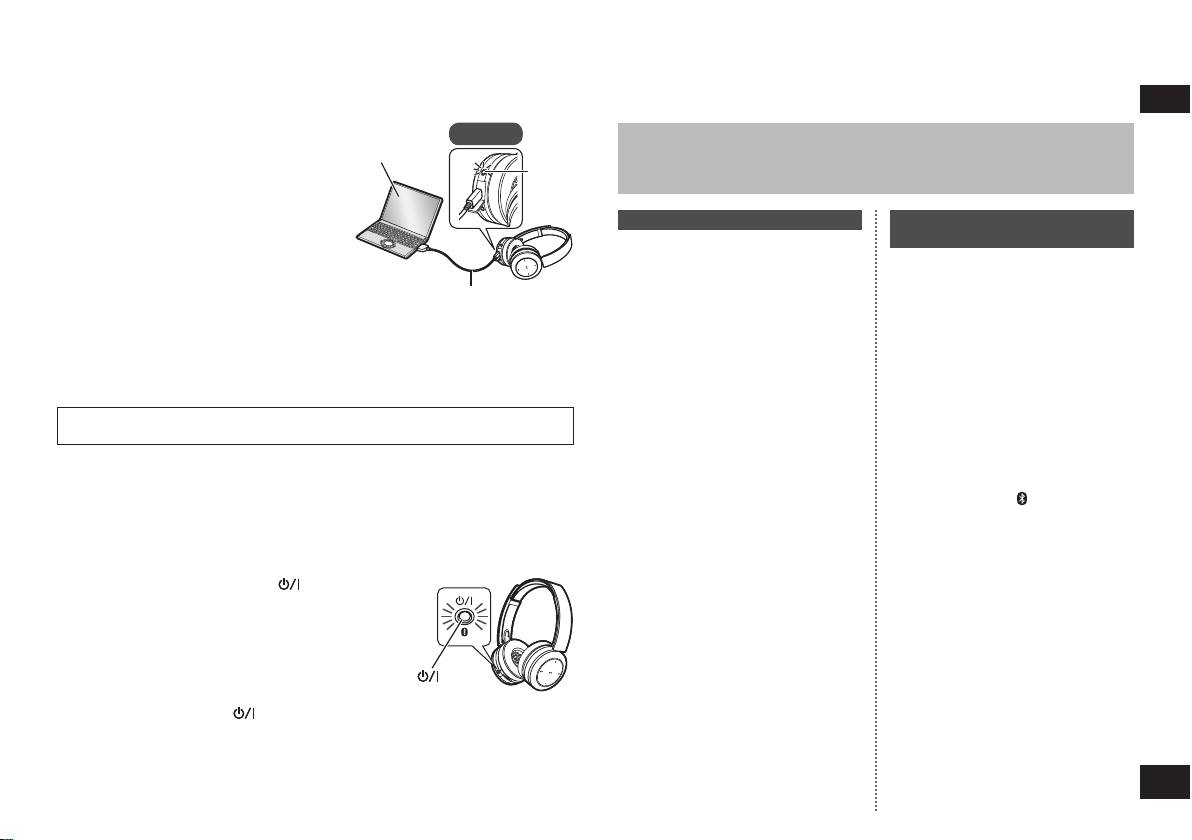
Connect this unit to a computer
1
Left
®
Preparation on the Bluetooth
device
using the USB charging cord
®
Computer
• Turn on the power, and enable the Bluetooth
feature.
• During charging, the LED on the left
LED
• Place the device within 1 m from the unit.
speaker will light in red. When charging
ENGLISH
• Check the device operation in its operation instructions, as required.
is completed, the LED will go out.
• Charging will take approximately
Power on for the first time
Connection after the second
4.5 hours from empty state to fully
time
charged.
Turn on the unit
1
<Connect the same Bluetooth
®
• The unit will start searching for
device>
the Bluetooth
®
device to connect
When the unit is turned on, it will
USB charging cord (supplied)
to, and the LED on the left
search for the previously setup
Bluetooth
®
device and automatically
■
Note
speaker will blink in blue and red
start connecting to it. First the LED
• The Bluetooth
®
feature cannot be used when this unit is connected to a computer
alternately. (Only one operation
after purchase)
on the left speaker lights in blue
using the USB charging cord.
and repeats on and off. When the
• Recharge in a room temperature between 10 °C and 35 °C.
When the unit (“RP-BTD10”)
2
connection is established, blinking
• The power cannot be turned on while charging.
®
is detected by the Bluetooth
pattern will change.
• Do not use any other USB charging cords except the supplied one.
device, select it
Caution: Use only the supplied USB charging cord when connecting to a
• If prompted for a passkey, input
<Connect a different Bluetooth
®
computer.
“0000 (four zeros)”.
device>
• If the Bluetooth
®
profile selection
Disable the Bluetooth
®
feature on
screen appears, select the
the previously connected device.
“A2DP” profile. If “A2DP” is not
Check that the unit is turned off. Press
supported or if you want to just
and hold the pairing
button for
use phone calls, select the “HSP”
approximately 5 seconds. The unit will
or “HFP” profile. (For details on
start searching for other Bluetooth
®
profiles, see “Listening to music”
device. The LED on the left speaker
Turning the power on/off
(→ P. 4) and “Making a phone
will blink in blue and red alternately. A
call” (→ P. 5))
beep will sound.
Press and hold the power button for
1
Continue steps 2 and 3.
approximately 2 seconds
Check the connection with
3
• A beep will sound and the LED on the left speaker
®
the Bluetooth
device on the
■
will blink.
Note
unit
• If connection to a device is not
• First the LED on the left speaker
established within approximately
lights in blue and repeats on
Power button
5 minutes, the unit will be turned off.
and off. When the connection is
To turn the power off
Start from step 1 again.
established, blinking pattern will
• 2 or more Bluetooth
®
• Press and hold the power
button for 2 seconds or more. A beep will sound
devices cannot
change.
and the power will be turned off.
be connected to the unit at the same
time.
• You can pair up to 8 devices with
VQT5J79
■
Note
this unit. If a 9th device is paired, the
• When the unit is not operated for approximately 5 minutes, the power will
3
device with the oldest connection will
automatically turn off. (See “Auto power off” (→ P. 5))
be replaced. To use it, pair it again.
3
