Panasonic ER220: instruction
Class: Home Accessories
Type:
Manual for Panasonic ER220
P00-05(ER220欧)04.9.1411:00ページ1
AC/Rechargeable
Beard/Hair Trimmer
Operating Instructions
Model No. ER220
Matsushita Electric Works Wanbao (Guangzhou) Ltd.
Wanbao Base, Zhong Cun Pan Yu, GuangDong 511495, China
No.1 EN, GR, FR, IT, NE, SP, DN, PO, NR, SW, FN, Po, Cz, Hu, Ru, Russi, TU, Uk (
欧州
)
Printed in China
Before operating this unit, please read these instructions completely.
1
8 9 10
˛
˛
G
M
˛
C
˛
H
˛
J
˛
I
˛
K
˛
E
˛
D
˛
L
˛
N
˛
A
˛
F
11 12 13
˛
B
˛
O
2 3 4
14 15 16
5 6 7
32
charge
P00-05(ER220欧)04.9.1411:00ページ2
54
(c)
(a)
(d)
(f)
(e)
(b)
(n)
(o)
(l)
(m)
19
21 22
(h)
(g)
(k)
(i)
(j)
(q)
(p)
P00-05(ER220欧)04.9.1411:00ページ4
17 18
Index
ENGLISH Page 6
SVENSKA Sid 54
DEUTSCH Seite 11
SUOMI Sivu 59
FRANÇAIS Page 17
TÜRKÇE Sayfa 64
ITALIANO Pagina 22
POLSKI Strona 69
NEDERLANDS Pagina 27
ČESKY Strona 75
ESPAÑOL Pagina 33
MAGYAR Oldal 80
DANSK Side 39
ROMANA Pagina 86
PORTUGÊS Pagina 44
êìëëäàâ
ëÚ‡Ìˈ‡
91
NORSK Side 49
ì͇ªÌÒ¸ÍËÈ
ëÚÓ¥Ì͇
97
20
K Finishing blade of Mini Trimmer
hours if it seems to be losing speed.
Use this when finishing the edges
A full charge will supply enough
(see fig. 9) and trimming the
power for approx. 10 trims (5 minutes
moustache.
per trim for a normal beard).
L Trimmer guide of Mini Trimmer
Slide it up when finishing blade is
AC operation
used.
Connect the AC adaptor to the body
M Adaptor
in the same way as for charging, and
Use this to connect the trimmer
set the switch to “1” to use the trim-
to an AC power source for re-
mer.
charging or for AC operation.
If the trimmer does not operate after
N Oil
connection as mentioned above, re-
Lubricate the space between the
turn switch to “0•charge” position for
stationary and moving blade with
1 minute and then set switch back to
2 or 3 drops of oil after use. (see
“1” position.
fig. 16)
O Cleaning Brush
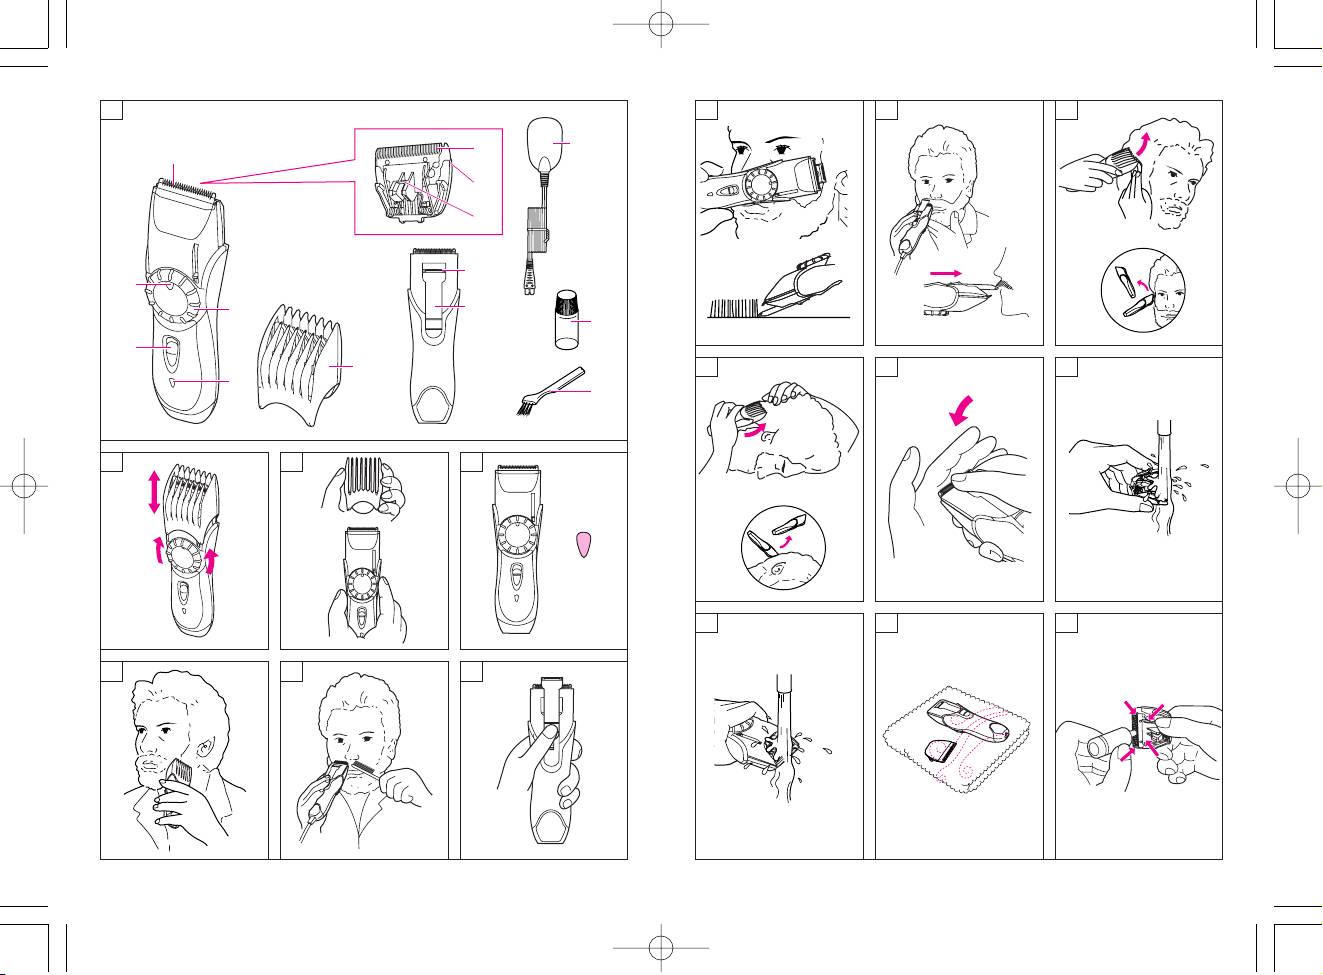
Trimming of beard
Place the angled face of the comb
READ ALL INSTRUCTIONS BE-
against the skin and cut the beard
FORE USE.
by moving the trimmer in all direc-
tions to obtain a uniform cut. (see fig.
Operation
5)
With curly facial hair, the comb at-
Charging and cordless trimming
tachment may not cut all of the hair.
When charging the beard/hair trim-
In this case, remove the comb attach-
mer for the first time or when it has
ment and use a conventional comb
not been in use for more than 6
to draw out the remaining uncut, hair.
months, charge it for the activation
(see fig. 6)
for at least 16 hours before use.
When shaping the beard, remove the
Connect the power cord to the beard/
comb attachment. Place the angled
hair trimmer, and plug the adaptor to
edge against the skin and make the
an AC outlet.
border of the beard even.
In some areas, a special plug adap-
tor may be required.
When finishing the edges (see fig.
8) and trimming the moustache
The charge indicator lamp will glow
(see fig. 9)
red and it will stay on until the adap-
Use the finishing blade of mini trim-
tor is disconnected from the AC out-
mer.
let. (see fig. 4)
Slide the trimmer guide up and then
You can fully charge the trimmer in 8
6
This Beard/Hair Trimmer is for the
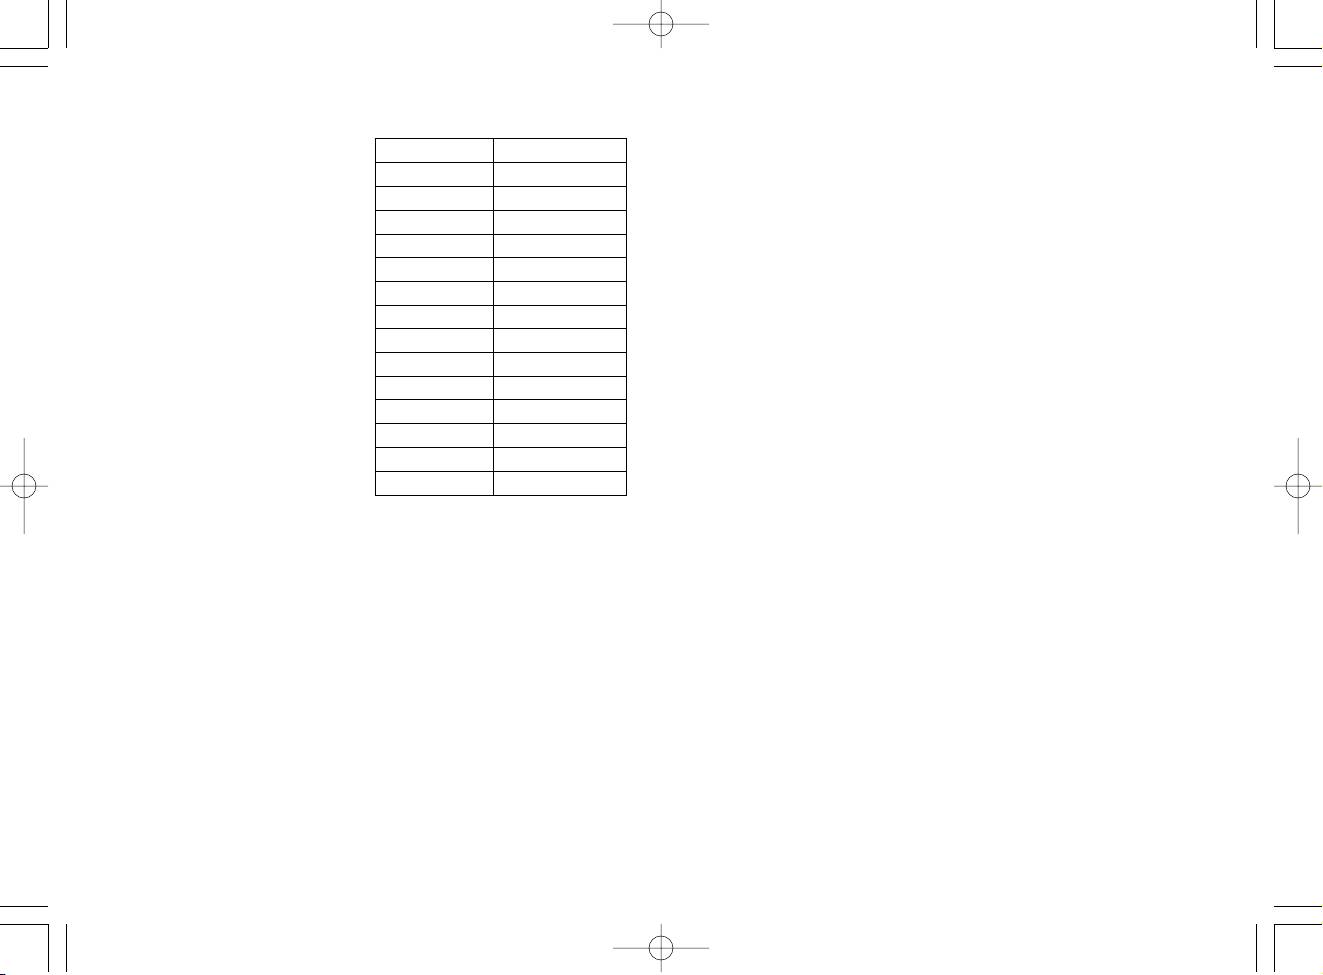
E Trimming Length Indicator
trimming and care of mustaches,
Indicator Trimming Length
beards and hair. Trimming length can
be adjusted between 1 to 20 mm. The
1 1.0 mm
trimmer can be operated either from
2 2.0 mm
an AC power source or on its own
• 3.5 mm
rechargeable battery.
5 5.0 mm
• 6.5 mm
Parts identification
8 8.0 mm
(see fig. 1)
• 9.5 mm
A Switch
Slide up to turn on, slide down to
11 11.0 mm
turn off.
• 12.5 mm
B Charge Indicator Lamp
14 14.0 mm
Lights when the unit is connected
• 15.5 mm
with the adaptor M to an AC
power source for charging.
17 17.0 mm
• 18.5 mm
C Main Blade
A precision 39 mm-wide blade
20 20.0 mm
which can be used with the comb
attachment F.
• The actual hair length may be
D Quick Adjust Dial
longer than the set trimming hight.
Turn the dial to a higher setting to
F Comb Attachment
raise or lower the comb attach-
Use this to control the trimming
ment F to the desired length (be-
length. (see fig. 3)
tween 1 and 20 mm) (see fig. 2).
G Moving Blade
The comb attachment is locked
in position when the switch is set
H Stationary Blade
to “1”.
I Cleaning Lever
Push this lever to remove bits of
hair caught between the station-
ary blade and the moving blade.
J Blade Block
Release to remove the blade
block from the housing to clean
or replace the blade. (see fig. 12)
5
P06-29(ER220欧)04.8.3119:55ページ6
76

ciency is reduced substantially de-
low is intended only for removal of
spite proper maintenance, the blades
the rechargeable battery for the pur-
have exceeded their service life and
pose of proper disposal.
should be changed.
Always make sure that the battery
The replacement part no. is
have been removed from the trimmer
WER9602.
before disposing of it.
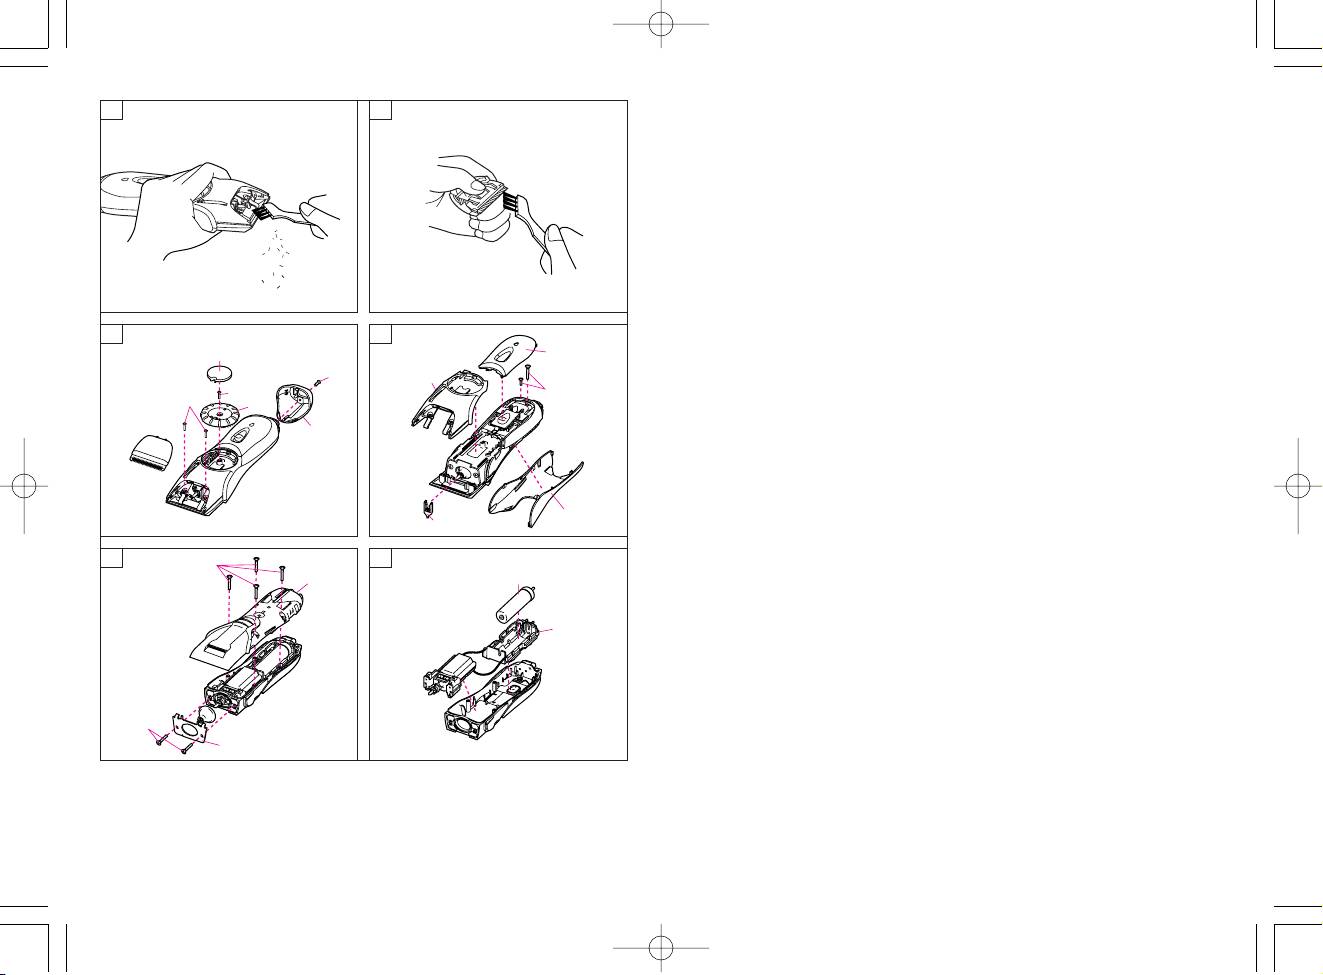
1. Disconnect the adaptor from the
AC outlet, and remove the power
Battery life
cord from the trimmer.
Battery life will vary according to the
2. Remove the blade from the trim-
frequency and length of use. If the
mer.
battery is charged 3 times a month,
Remove the screw (a) and detach
the service life will be approximately
the bottom cover (b). (see fig. 19)
6 years. If the unit is left without be-
3. Detach the dial cover (c), remove
ing charged for more than 6 months,
the screw (d) and disconnect the
the charge will drain from the battery
dial (e).
and their service life may be short-
4. Remove the two screws (f).
ened. Therefore, even when not us-
5. Detach the housing (g), front
ing regularly, it is recommended that
panel (h) and side panel (i), then
the unit be recharged at least once
remove the trimmer drive rod (j)
every 6 months.
(see fig. 20).
6. Remove the two screws (k).
7. Remove the two screws (l) and
For environmental protec-
disconnect the rubber push plate
tion and recycling of
(m). (see fig. 21)
8. Remove the screws (n) and dis-
materials
connect housing (o).
This trimmer contains Nickel-Metal
9. Disconnect the battery chamber
Hydride battery.
(p) and remove the battery (q).
Please make sure that the battery is
(see fig. 22)
disposed of at an officially assigned
location, if there is one in your coun-
try.
Attention
• Do not charge the trimmer at tem-
How to remove the built-in re-
peratures below 0° C (32° F) or
chargeable battery before dis-
above 40°C (104°F), or where it will
posal of the trimmer
be exposed to direct sunlight, or
The battery in this trimmer is not in-
other heat sources.
tended to be replaced by consum-
• Do not continue charging for more
ers. However, the battery may be re-
than 48 hours. Doing so may dam-
placed at an authorized service
age the battery.
center. The procedure described be-
• Clean the housing only with a soft
8
turn the trimmer on (see fig. 7).
the trimmer and blade, and then
To smooth off a beard surface, run
place it onto a towel with the
this blade lightly over the surface.
“Washable” indicator facing
downward to let it fully dry. (see
fig. 15)
Cutting of hair
4. Apply a few drops of the oil to the
Cut hair to the correct height by mov-
points indicated by the arrows.
ing the trimmer back against the flow
(see fig. 16)
of the hair.
5. Remount the blade on the trim-
mer body.
Cutting around the ears
Cut a little, and then gently separate
WARNING: Detach the trimmer from
the trimmer from the hair (see fig. 10).
the AC adaptor before cleaning it in
Cutting the nape of the neck
water.
Bring the trimmer gently away from
the hair to finish (see fig. 11).
• If cleaning with brush
(Do not use the trimmer in an in-
1. Remove the blade and brush off
verted position. This can cut hair too
the cut hairs from the blade edge.
deeply.)
2. Use the cleaning brush to brush
off the cut hairs from the trimmer
body and from around the blade.
Turn off the trimmer (“0•charge”) be-
(see fig. 17)
fore changing the trim height or re-
3. Brush the cut hairs out from be-
moving the attachment.
tween the stationary blade and
the moving blade. Press down on
the lever for cleaning in order to
Maintenance
raise the moving blade, and brush
Hold body of the trimmer with
the cut hairs out from between the
Panasonic mark upwards, place the
blades. (see fig. 18)
thumb against the blades, and push
4. Apply a few drops of the oil to the
them away from the main body. (see
points indicated by the arrows.
fig. 12)
(see fig. 16)
5. Remount the blade on the trim-
• If washing in water
mer body.
1. Rinse off any hairs that are stick-
ing to the blade in running water.
(see fig. 13)
Blade life
2. Rinse out any hairs that are in-
Blade life will vary according to the
side the trimmer with running wa-
frequency and length of use. For ex-
ter. (see fig. 14)
ample, using the unit for 10 minutes
3. Shake the trimmer 4-5 times gen-
every 3 days, the life expectancy is
tly, wipe off any water drops from
approximately 3 years. If cutting effi-
7
P06-29(ER220欧)04.8.3119:55ページ8
98
