Panasonic EY6803: instruction
Class: Tools, power tools and power equipment
Type:
Manual for Panasonic EY6803
Operating Instructions
Bedienungsanleitung
Instructions d’utilisation
Istruzioni per l’uso
Gebruiksaanwijzing
Cordless Rotary Hammer Drill & Driver
Manual de instrucciones
Akku-Schlagbohrschrauber
Perceuse/Visseuse rotative à percussion sans l
Brugsvejledning
Trapano avvitatore a percussione rotante senza lo
Driftsföreskrifter
Draadloze klopboormachine & schroevendraaier
Bruksanvisning
Destornillador y martillo de taladro rotatorio sin cables
Akku roterende hammerbor & skruertrækker
Käyttöohjeet
Sladdlös borrhammare & skruvdragare med variabel hastighet
Инструкция по эксплуатации
Ledningløs roterende slagdrill og skrutrekker
Langaton pyörövasarapora & ruuvinväännin
Iнструкцiя з експлуатації
Комбинированный аккумуляторный перфоратор-шуруповерт
Комбінований акумуляторний перфоратор-шуруповерт
Model No: EY6803
Before operating this unit, please read these instructions completely and save this manual for future use.
Vor Inbetriebnahme des Gerätes die Betriebsanleitung bitte gründlich durchlesen und diese Broschüre zum späteren Nachschlagen sorgfältig aufbewahren.
Lire entièrement les instructions suivantes avant de faire fonctionner l’appareil et conserver ce mode d’emploi à des fins de consultation ultérieure.
Prima di usare questo apparecchio, leggere completamente queste istruzioni e conservare il manuale per usi futuri.
Lees deze gebruiksaanwijzing aandachtig door voor u het apparaat in gebruik neemt en bewaar de gebruiksaanwijzing voor eventuele naslag.
Antes de usar este aparato por primera vez, lea todas las instrucciones de este manual y guarde el manual para poderlo consultar en el futuro.
Gennemlæs denne betjeningsvejledning før brugen og gem den til fremtidig brug.
Läs igenom hela bruksanvisningen innan produkten tas i bruk. Spara bruksanvisningen för senare användning.
Før enheten tas i bruk, vennligst les disse alle anvisningene og oppbevar bruksanvisningen for senere bruk.
Lue ohjeet huolella ennen laitteen käyttöönottoa ja säilytä tämä käyttöohje tallessa tulevaa tarvetta varten.
Перед эксплуатацией данного устройства, пожалуйста, полностью прочтите данную инструкцию и сохраните данное руководство для использования в будущем.
Перед екплуатацiєю даного пристрою, будь ласка, повнiстю прочитайте дану iнструкцiю i збережiть даний посiбник для використання у майбутньому.
EY6803(EU).indb 1 2006/04/10 9:41:22
-
2
-
Index/Index/Index/Indice/Index/Indice/Indeks/Index/Indeks/Hakemisto/Индекс/Індекс
English: Page 4
Deutsch: Seite 12
Français: Page 20
Italiano: Pagina 28
Nederlands: Bladzijde 36
Español: Página 44
Dansk: Side 52
Svenska: Sid 60
Norsk: Side 68
Suomi: Sivu 76
Русский Страница 84
Українська Сторiнка 92
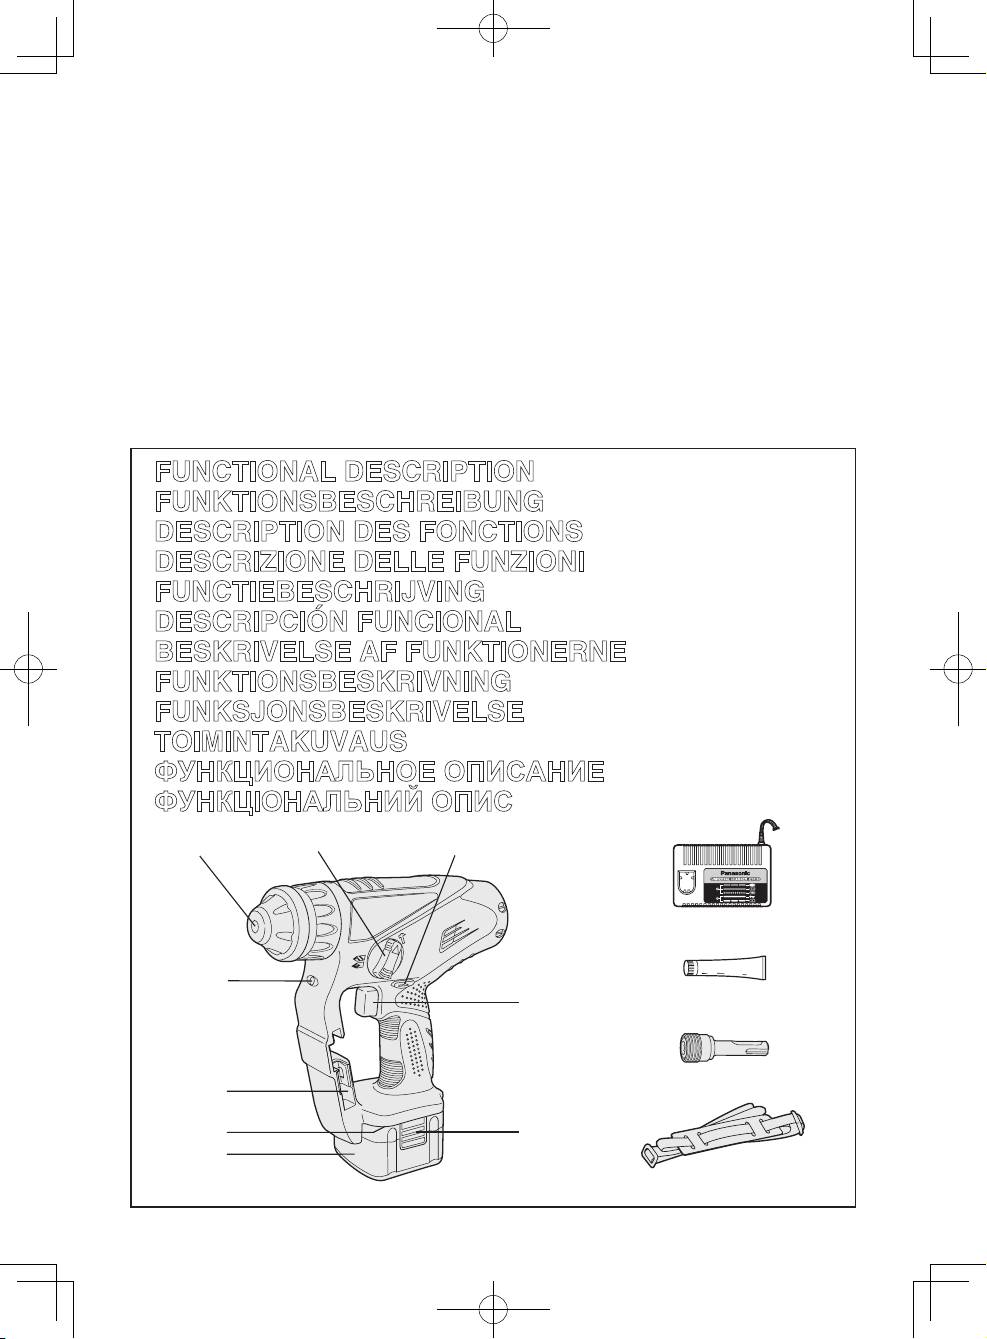
FUNCTIONAL DESCRIPTION
FUNKTIONSBESCHREIBUNG
DESCRIPTION DES FONCTIONS
DESCRIZIONE DELLE FUNZIONI
FUNCTIEBESCHRIJVING
DESCRIPCIÓN FUNCIONAL
BESKRIVELSE AF FUNKTIONERNE
FUNKTIONSBESKRIVNING
FUNKSJONSBESKRIVELSE
TOIMINTAKUVAUS
ФУНКЦИОНАЛЬНОЕ ОПИСАНИЕ
ФУНКЦIОНАЛЬНИЙ ОПИС
(A) (B) (C)
(J)
(I)
(K)
(D)
(L)
(H)
(G)
(E)
(F)
(M)
EY6803(EU).indb 2 2006/04/10 9:41:25
-
3
-
Chuck
Hammering/drilling switching lever
Futter
Zum Umschalten zwischen normalem Bohren und Schlagbohren
Mandrin
Commutateur martelage/perforation
Mandrino
Leva di commutazione martellatura/perforazione
Boorkop
Keuzehendel normaal boren/klopboren
Portabroca
Palanca de conmutación de martillo/taladro
(A)
(B)
Borepatron
Hamrings/borings omskiftningsgreb
Chuck
Omkopplare mellan slagborr/vanlig borr
Chuck
Slag/bor omskifter
Kiinnityslaite
Vasaran/poran kytkentävipu
Зажимнойпатрон
Рычагпереключениядолбления/сверления
Затискнийпатрон
Важільперемиканнядовбання/свердління
Forward/reverse lever
Variable speed control trigger
Vorwärts/Rückwärtshebel
Elektronikschalter
Levier d’inversion marche avant/marche arrière
Gâchette de commande de vitesse
Leva di avanzamento/inversione
Grilletto di controllo velocità variabile
Links/rechtsschakelaar
Startschakelaar met variabele toerentalregeling
Palanca de avance/marcha atrás
Disparador del control de velocidad variable
(C)
(D)
Greb til forlæns/baglæns retning
Kontroludløser for variabel hastighed
Riktningsomkopplare
Avtryckare med variabel varvtalsreglering
Forover-/bakoverbryter
Hovedbryter, trinnløs
Eteenpäin/taaksepäin vipu
Nopeudensäätökytkin
Рычагпереключениявперед/назад
Переключательрегулировкипеременнойскорости
Важільперемиканнявперед/назад
Перемикачрегулюваннязмінноїшвидкості
Battery pack release button
Batterypack(EY9201)
Akku-Entriegelungsknopf
Akku(EY9201)
Bouton de libération de batterie autonome
Batterieautonome(EY9201)
Tasto di rilascio pacco batteria
Paccobatteria(EY9201)
Accu-ontgrendeltoets
Accu(EY9201)
Botón de liberación de batería
Batería (EY9201)
(E)
(F)
Udløserknap til batteripakning
Batteripakning(EY9201)
Frigöringsknapp för batteri
Batteri(EY9201)
Utløserknapp for batteripakke
Batteripakke(EY9201)
Akkupaketin irrotuspainike
Akku(EY9201)
Кнопкаосвобождениябатарейногоблока
Батарейныйблок(EY9201)
Кнопкавивільненнябатарейногоблоку
Батарейнийблок(EY9201)
Bit holder (inside of the body)
Bit adapter holder
Einsatzhalter (im Maschinenkörper)
Einsatzadapterhalter
Porte-mèche (intérieur du corps)
Porte-adaptateur de mèche
Portabit (all'interno della struttura)
Adattatore di portabit
Bithouder (geïntegreerd in de behuizing)
Bitadapterhouder
Soporte de broca (en el interior del cuerpo)
Soporte de adaptador de broca
(G)
(H)
Bitholder (indvendig i værktøjet)
Boradapterholder
Bitshållare (inuti höljet)
Hållare för verktygsspetsadapter
Bitholder (inne i maskinhuset)
Holderstykke for bit-tilpasningsstykke
Terän pidin (rungon sisällä)
Terän sovittimen pidin
Отсекдляхранениянасадок(внутрикорпуса)
Отсекхраненияадаптерадлянасадок
Відсікдлязберіганнянасадок(всерединікорпусу)
Відсікзберіганняадаптерадлянасадок
LED light
Battery charger (EY0110)
Grease
LED-Leuchte
Ladegerät (EY0110)
Schmierung
Lumière DEL
Chargeur de batterie (EY0110)
Graisse
Luce LED
Caricabatteria (EY0110)
Lubricante
LED-lampje
Acculader (EY0110)
Vet
Luz indicadora
Cargador de baterías (EY0110)
Grasa
(I)
(J)
(K)
LED-lys
Batterioplader (EY0110)
Smørefedt
LED-ljus
Batteriladdare (EY0110)
Fett
LED lys
Batterilader (EY0110)
Smørefett
LED-valo
Akkulaturi (EY0110)
Rasva
Светодиоднаяподсветка
Зарядноеустройство(EY0110)
Смазка
Світлодіоднепідсвічування
Заряднийпристрій(EY0110)
Мастило
Bitadapter(EY9HX403)
Shoulder strap
Einsatzadapter(EY9HX403)
Schulterriemen
Adaptateur de mèche(EY9HX403)
Dragonne
Portabit(EY9HX403)
Cinghia da spalla
Bitadapter(EY9HX403)
Schouderriem
Adaptadordebroca(EY9HX403)
Correa al hombro
(L)
(M)
Boradapter(EY9HX403)
Skulderrem
Verktygsspetsadapter(EY9HX403)
Axelrem
Bit-tilpasningsstykke(EY9HX403)
Skulderbelte
Teränsovitin(EY9HX403)
Olkahihna
Адаптердлянасадок(EY9HX403)
Плечевойремень
Адаптердлянасадок(EY9HX403)
Плечовийремінь
EY6803(EU).indb 3 2006/04/10 9:41:26
-
4
-
Read “Safety Instructions” booklet and
10)
Do not use the tool continuously for a
the following before using.
long period of time. Stop using the tool
from time to time to avoid temperature
rise and heat overload of the motor.
.
ADDITIONAL SAFETY
11) Do not drop the tool.
RULES
1) Wear ear protection. Exposure to
Symbol meaning
noise can cause hearing loss.
V Volts
2) Be aware that this tool is always
in an operating condition, since it
does not have to be plugged into an
Direct current
electrical outlet.
3) When drilling into walls, floors,
n
0
No load speed
etc., “live” electrical wires may be
encountered. DO NOT TOUCH THE
CHUCK OR ANY FRONT METAL
Revolutions or
…/min
PARTS OF THE TOOL! Hold the
reciprocations per minutes
tool only by the plastic handle to
prevent electric shock in case you
Rotation with hammering
drill into a “live” wire.
4)
If the bit becomes jammed, immediately
Rotation only
turn the trigger switch off to prevent an
overload which can damage the battery
pack or motor. Use reverse motion to
loosen jammed bits.
5)
Do NOT operate the Forward/Reverse
lever when the trigger switch is on.
The battery will discharge rapidly and
damage to the unit may occur.
6) When storing or carrying the tool,
set the Forward/Reverse lever to
the center position (switch lock).
7)
Do not strain the tool by holding
the speed control trigger halfway
(speed control mode) so that the
motor stops. The protection circuit
will activate and may prevent speed
control operation. If this happens,
release the speed control trigger and
squeeze again for normal operation.
8) Be careful not to get dust inside the
chuck.
9)Do not touch the rotating parts to
avoid injury.
EY6803(EU).indb 4 2006/04/10 9:41:27

-
5
-
Forward/Reverse Lever
. OPERATION
Chuck
NOTE: Grease for bit
Grease the oval indentation
ReverseForward
on the bit with the supplied
grease at least once a month.
Lock
1. To insert the bit
Be sure to set the switch in the center
1-1. Insert a bit into the mounting hole,
to lock it after use.
and turn it slightly to locate an
engaged position.
Operate the Forward/Reverse lever
after the motor rotation is completely
1-2. At the engaged position, push the
stopped.
bit as far as it goes. Make sure that
the bit is fixed by pulling it.
Hammering/Drilling Switching Lever
SDS PLUS type
shank
NOTE: Operate the mode change af-
ter the motor rotation is com-
pletely stopped.
Position of
Action mode Operation
switching lever
Concrete
Rotation with
Drilling,
2. To remove the bit
hammering
Block Drilling
2-1. Depress the chuck cover and pull
Screw
the bit.
Rotation only
Fastening,
Metal Drilling
Clutch Torque Setting
Adjust the torque to one of the 5
clutch settings or “ ” position.
CAUTION:
Fastening Screws
Test the setting before actual
Use a bit adapter (standard) and bit.
operation.
Set the scale at this mark ( ).
1. Remove the bit adapter from the
bit adapter holder on the main unit.
2. Pull the bit holder. (
2)
3. Insert the bit.
(3)
4. Make sure the bit is
inserted firmly by pulling
it lightly.
5. Insert the
bit adapter into
the mounting hole and
turn to locate an engaged
Variable Speed Control Trigger
position.
Bit
holder
6. At the engaged position,
To set the center of a hole, pull the trigger
push in as far as it goes.
slightly to start the drill rotation slowly.
• Make sure it does not move by
The more the speed control trigger is
pulling it lightly.
pulled, the higher the speed becomes.
EY6803(EU).indb 5 2006/04/10 9:41:30
-
6
-
LED Light
CAUTION:
• The built-in LED light is designed
to illuminate the small work area
temporarily.
• Do not use it as a substitute for
a regular flashlight, since it does
not have enough brightness.
Shoulder pad
Depress the trigger
switch, then LED
• The shoulder strap can be adjusted
l i g h t t u r n s o n .
according to the individual.
When the trigger
• Adjust the shoulder pad to the
switch is released,
shoulder.
the light turns off automatically. The
• Pull the shoulder strap to make
light illuminates with very low current,
sure it is firmly attached to the main
and it does not adversely affect the
unit of the tool.
performance of the tool during use or
For Appropriate Use of Battery
its battery capacity.
Pack
This product has the built-in LED light.
This product is classified into
“
Class 1
Ni-MH Battery Pack (EY9201)
LED Product
”
to EN 60825-1
• Charge the Ni-MH battery fully
before storage in order to ensure a
Class 1 LED Product
longer service life.
Caution : DO NOT STARE INTO BEAM.
•
The ambient temperature range is
between 0°C (32°F) and 40°C (104°F).
If the battery pack is used when the
Installing the Shoulder Strap
battery temperature is below 0°C
(32°F), the tool may fail to function
CAUTION:
properly. In that case, charge the
• Install the shoulder strap firmly to
battery until charging is completed for
the main unit of the tool and check
appropriate functioning of the battery.
the length of the strap before use.
• When battery pack is not in use,
• Check the condition of the strap
keep it away from other metal
and do not use if it is cut or torn
objects like: paper clips, coins, keys,
etc.
nails, screws, or other small metal
There is a risk of injury or damage
objects that can make a connection
if used while improperly installed.
from one terminal to another.
Shorting the battery terminals together
• Please wear the shoulder strap se
-
may cause sparks, burns or a fire.
curely on the shoulder.
There is a risk of injury or damage
• When operating the battery pack,
if it is accidentally dropped.
make sure the work place is well
ventilated.
1. Pass the strap through the strap
holders. (1)
Battery Pack Life
2. Pass the strap through the buckles
The rechargeable batteries have a
and adjust the length. (2)
limited life. If operation time becomes
extremely short after recharging, replace
the battery pack with a new one.
EY6803(EU).indb 6 2006/04/10 9:41:31
-
7
-
NOTE:
Use under extremely hot or
5.
When in any of the conditions that
cold conditions will reduce
battery pack is too cool, or the
operating capacity per charge.
battery pack has not been used for
a long time, the charging lamp is lit.
In this case charging takes longer
Battery Recycling
to fully charge the battery pack,
For environmental protection and
than the standard charging time.
recycling of materials, be sure that it
•
If a fully charged battery pack is
is disposed of at an officially assigned
inserted into the charger again,
location, if there is one in your country.
the charging lamp lights up. After
several minutes, the charging
Battery Charger
lamp may flash quickly to indicate
NOTE: Charge a new battery pack,
the charging is completed.
or a battery pack that has not
been used for a prolonged time,
6. If the charging lamp does not light
for about 24 hours to bring the
immediately after the charger is
battery up to full charge.
plugged in, or if after the standard
charging time the lamp does not go
Battery charger (EY0110)
off, consult an authorized dealer.
1. Plug the charger into the AC outlet.
NOTE: •
When charging a cool battery
NOTE:
Sparks may be produced when
pack (below 5°C (41°F)) in a
the plug is inserted into the AC
warm place, leave the battery
power supply, but this is not a
pack at the place and wait for
problem in terms of safety.
more than one hour to warm
2. Insert the battery pack firmly into
up the battery to the level of
the charger.
the ambient temperature.
Otherwise battery pack may
Battery pack
not be fully charged.
To AC
• Cool down the charger when
outlet
charging more than two
battery packs consecutively.
• Do not insert your fingers
Battery charger
into contact hole, when
holding charger or any other
3. During charging, the charging lamp
occasions.
will be lit.
When charging is completed, an
CAUTION:
internal electronic switch will
To prevent the risk of fire or damage
automatically be triggered to prevent
to the battery charger.
overcharging.
• Do not use power source from
•
Charging will not start if the
an engine generator.
battery pack is warm (for example,
• Do not cover vent holes on the
immediately after heavy-duty
charger and the battery pack.
operation).
• Unplug the charger when not in
The orange standby lamp will
use.
be lit until the battery cools
down. Charging will then begin
automatically.
4. When charging is completed, the
charging lamp will start flashing
quickly in green color.
EY6803(EU).indb 7 2006/04/10 9:41:32
