Panasonic EY6409GQKW: instruction
Class: Home Accessories
Type:
Manual for Panasonic EY6409GQKW
Cordless Drill & Driver
Akku-Bohrschrauber
Perceuse et tournevis sur batterile
Trapano e cacciavite senza fi lo
Draadloze boor en schroevedraaier
Taladro y destornillador sin cable eléctrico
Ledningsfri bor og skrutrækker
Laddningsbar borr/skruvdragare
Oppladbar drill og skrutrekker
Ladattava porakone/ruuvinväännin
Аккумуляторная дрель-шуруповерт
Аккумуляторний дриль-шуруповерт
— 1 —
M
odel No: EY
6
4
05/
EY
6
4
09/
EY
6
4
32
Be
f
ore operatin
g
this unit, please read these instructions completel
y
and save this manual
f
or
f
uture use.
V
or Inbetriebnahme des Gerätes, die Betriebsanleitung bitte grüdlich durchlesen und diese Broschüre zum späteren Nachschlagen sorgfältig aufbewahren.
Lire entièrement les instructions suivantes avant de
f
aire
f
onctionner l’appareil et conserver ce mode d’emploi à des
f
ins de consultation ultérieure.
P
rima di usare questa unità, le
gg
ere completamente queste istruzioni e conservare il manuale per usi
f
uturi.
L
ees
d
eze ge
b
ru
ik
saanw
ij
z
i
ng aan
d
ac
h
t
i
g
d
oor voor u
h
et apparaat
i
n ge
b
ru
ik
neemt en
b
ewaar
d
e ge
b
ru
ik
saanw
ij
z
i
ng voor eventue
l
e nas
l
ag.
A
ntes de usar este aparato por primera vez, lea todas las instrucciones de este manual
y
g
uarde el manual para poderlo consultar en el
f
uturo.
G
ennemlæs denne betjeningsvejledning
f
ør brugen og gem den til
f
remtidig brug.
Läs igenom hela bruksanvisningen innan strålkastaren tas i bruk. Spara bruksanvisningen för senere användning.
Før enheten tas i bruk, vennli
g
st les disse alle anvisnin
g
ene o
g
oppbevar deretter bruksanvisnin
g
en
f
or senere bruk.
Lue ohjeet huolella ennen laitteen käyttöönottoa ja säilytä tämä käyttöohje tallessa tulevaa tarvetta varten.
П
еред экспл
у
атацией данного
у
стройства, пожал
у
йста, полностью прочтите данн
у
ю инстр
у
кцию и сохраните данное р
у
ководство для использования в
бу
д
у
щем.
П
еред екпл
у
атацiєю даного пристрою,
бу
дь ласка, повнiстю прочитайте дан
у
iнстр
у
кцiю i з
б
ережiть даний посi
б
ник для використання
у
май
бу
тньом
у
O
perating Instruction
s
B
e
di
enun
g
san
l
e
i
tun
g
In
st
r
uct
i
o
n
s
d
'
ut
ili
sat
i
on
I
struz
i
on
i
p
er
l’
us
o
G
ebruiksaanwijzin
g
M
anua
l
d
e
i
nstrucc
i
one
s
B
rugsvejlednin
g
D
ri
f
ts
f
öreskri
f
ter
B
ruksanvisnin
g
K
äyttöohjee
t
И
нстр
у
кция по экспл
у
атаци
и
Iнстр
у
кцiя з експл
у
атаці
ї
EY6405(EU).book Page 1 Wednesday, June 15, 2005 7:14 PM
EY6405(EU).book Page 2 Wednesday, June 15, 2005 7:14 PM
Index/Hinweise/Index/Indice/Index/Indice/Indeks/Index/Indeks/Hakemisto/
Индекс/Індекс
English: Page 6 Dansk: Side 32
Deutsch: Seite 12 Svenska: Sid 36
Français: Page 16 Norsk: Side 40
Italiano: Pagina 20 Suomi: Sivu 44
Nederlands: Badzijde 24 Русский: Страница 48
Español: Página 28 Українська Сторiнка 53
1
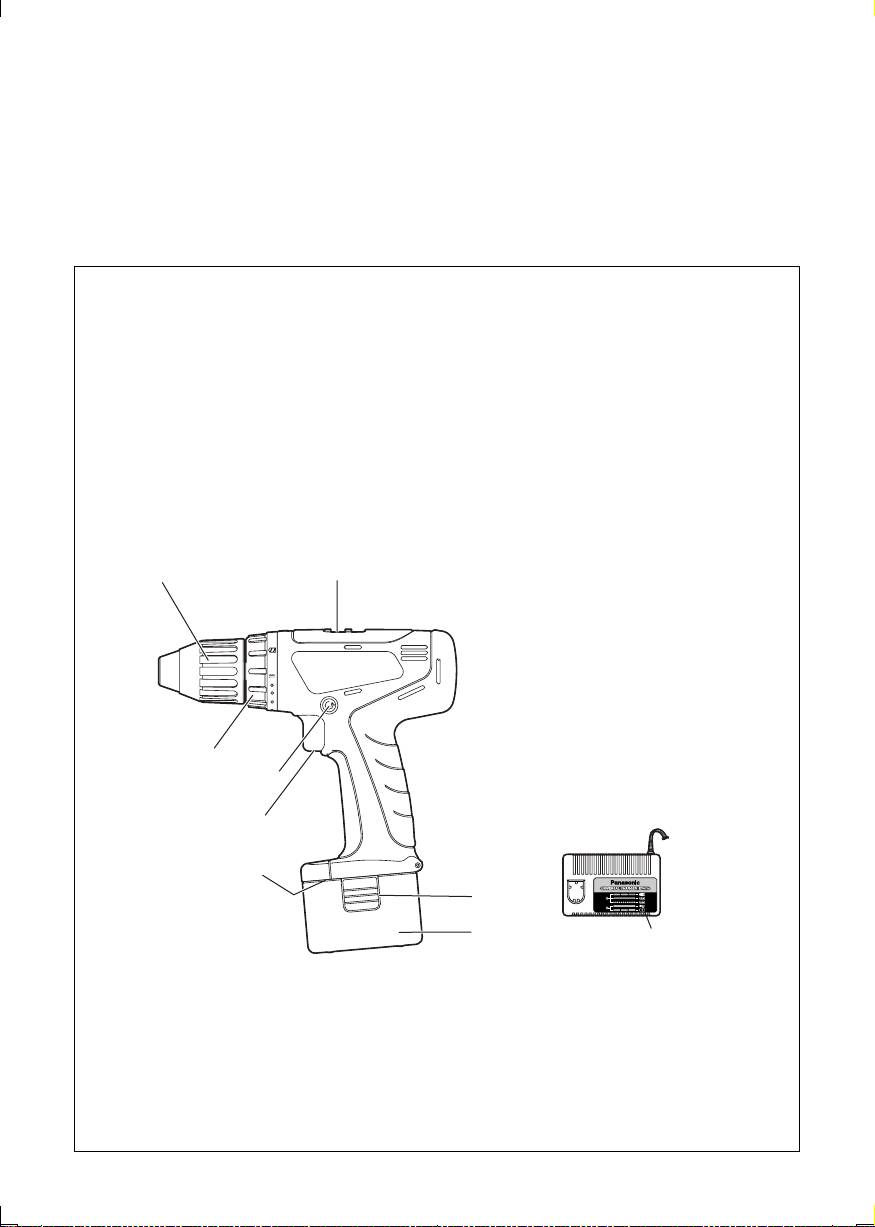
FUNCTIONAL DESCRIPTION
FUNKTIONSBESCHREIBUNG
DESCRIPTION DES FONCTIONS
DESCRIZIONE DELLE FUNZIONI
FUNCTIEBESCHRIJVING
DESCRIPCIÓN FUNCIONAL
BESKRIVELSE AF FUNKTIONERNE
FUNKTIONSBESKRIVNING
FUNKSJONSBESKRIVELSE
TOIMINTAKUVAUS
ФУНКЦИОНАЛЬНОЕ ОПИСАНИЕ
ФУНКЦIОНАЛЬНИЙ ОПИС
(A)
(B)
(H)
(G)
(F)
(E)
(C)
(D)
(I)
※ EY6405 is referred for illustration.
※ Zur Illustration wird auf EY6405 Bezug genommen.
※ Le modèle EY6405 est montré à titre d’exemple.
※ Ci si riferisce a EY6405 per I’illustrazione.
※ De EY6405 dient ter illustratie.
※ Se remite al EY6405 como ilustración.
※ Der henvises til EY6405 som illustration.
※ Modell EY6405 visas på bilderna.
※ Illustrasjonen viser EY6405.
※ EY6405 viittaa kuvaan.
※ Для иллюстративных целей использована модель EY6405.
※ Для ілюстративних цілей використана модель EY6405.
— 2 —

EY6405(EU).book Page 3 Wednesday, June 15, 2005 7:14 PM
Keyless drill chuck
Speed selector switch
Schlüsselfreies Bohrfutter
Bereichsschalter
Mandrin de perçage sans clé
Sélecteur de vitesse de rotation
Mandrino senza chiave
Selettore di velocità
Sleuteloze boorkop
Snelheidskeuzeschakelaar
Portabrocas de apriete sin llave
Conmutador selector de velocidad
(A)
(B)
Nøgleløs borepatron
Hastighedsvælgeromskifter
Snabbchuck
Varvtals omkopplare
Nøkkelfri chuck
Gearvelger høy/lav
Pikaistukka
Nopeusalueen valitsin
Беcключевой сверлильный патрон
Селекторный переключатель скорости
Безключовий свердлильний патрон
Селекторний перемикач швидкості
Battery pack release button
Battery pack (EY9106/EY9200/EY9201/EY9136/EY9230/EY9231)
Akkupack-Entriegelungsknopf
Akkupack (EY9106/EY9200/EY9201/EY9136/EY9230/EY9231)
Bouton de libération de batterie
Batterie (EY9106/EY9200/EY9201/EY9136/EY9230/EY9231)
Tasto di rilascio blocco batteria
Pacco batteria (EY9106/EY9200/EY9201/EY9136/EY9230/EY9231)
Accu-ontgrendeltoets
Accu (EY9106/EY9200/EY9201/EY9136/EY9230/EY9231)
Botón de liberación de la batería recargable
Bloque de pilas (EY9106/EY9200/EY9201/EY9136/EY9230/EY9231)
(C)
(D)
Udløserknap til batteripakning
Batteri (EY9106/EY9200/EY9201/EY9136/EY9230/EY9231)
Batteriets låsknappar
Batteri (EY9106/EY9200/EY9201/EY9136/EY9230/EY9231)
Batteriets utløserknapper
Batteri-pakke (EY9106/EY9200/EY9201/EY9136/EY9230/EY9231)
Akkupaketin irrotuspainikeet
Akku (EY9106/EY9200/EY9201/EY9136/EY9230/EY9231)
Кнопка освобождения батарейного блока
Батарейный блок (EY9106/EY9200/EY9201/EY9136/EY9230/EY9231)
Кнопка вивільнення батарейного блоку
Батарейний блок (EY9106/EY9200/EY9201/EY9136/EY9230/EY9231)
Bit holder
Variable speed control trigger
Elnsatzhalter
Betriebsschalter
Porte-mèche
Gâchette de commande de vitesse
Portapunta
Grilletto di controllo velocità variabile
Bithouder
Startschakelaar variabele snelheid
Portabrocas
Disparador del control de velocidad variable
(E)
(F)
Bitholder
Kontroludløser for variabel hastighed
Borrspetshållare
Steglös varvtalsreglerare
Bitsholder
Hovedbryter, trinnløs
Terän pidin
Nopeudensäätökytkin
Держатель насадки
Переключатель регулировки скорости вращения
Тримач насадки
Перемикач регулювання швидкості
Forward/Reverse lever
Clutch handle
Vorwärts/Rückwärts-Hebel
Kupplungskranz
Levier d'inversion marche avant – marche arrière
Embrayage
Leva di avanzamento/inversione
Manico della frizione
Voorwaarts/achterwaarts-hendel
Koppelhendel
Palanca de avance/inversión
Empuñadura del embrague
(G)
(H)
Greb til forlæns/baglæns retning
Koblingshåndtag
Riktningsomkopplare
Momentinställning
Forover/Revers bryter
Momentvelger
Eteenpäin/taaksepäin vipu
Momentinsäädin
Рычаг переключения вперед/назад
Рукоятка сцепления
Важіль перемикання вперед/назад
Рукоятка зчеплення
Battery charger (EY0110)
Ladegerät (EY0110)
Chargeur de batterie (EY0110)
Caricabatteria (EY0110)
Acculader (EY0110)
Cargador de batería (EY0110)
(I)
Batterioplader (EY0110)
Laddare (EY0110)
Batteri-lader (EY0110)
Latauslaite (EY0110)
Зарядное устройство (EY0110)
Зарядний пристрiй (EY0110)
— 3 —
EY6405(EU).book Page 4 Wednesday, June 15, 2005 7:14 PM
2
3
2
1
2
1
Lock collar
Lock collar
Knebelring
Knebelring
Bague de serrage
Bague de serrage
Collarino di bloccaggio
Collarino di bloccaggio
Vergrendelkraag
Vergrendelkraag
Collar de enclavamiento
Collar de enclavamiento
Låsekrave
Låsekrave
Låsring
Låsring
Låsering
Låsering
Lukkorengas
Lukkorengas
Зажимная обойма
Зажимная обойма
Затискна обойма
Затискна обойма
4
5
1 2
Bit
Bohrer/Schraubeinsatz
Mèche
Punta
Blad
Broca
Bor
Bits
Bits
Lock collar
Bit
Knebelring
Насадка
Bague de serrage
Насадка
Collarino di bloccaggio
Vergrendelkraag
Collar de enclavamiento
6
Låsekrave
Låsring
Låsering
Lukkorengas
Зажимная обойма
Затискна обойма
— 4 —
EY6405(EU).book Page 5 Wednesday, June 15, 2005 7:14 PM
7
Set the scale at this mark
Die Skala an dieser Markierung einstellen.
Réglez l'échelle sur ce repère
Regolare la scala su questo segno
Stel de schaal op dit merkteken in.
Ajuste la escala en esta marca
Indstil skalaen på dette mærke.
Momentkraften ställs in mot märket.
Innstill skalaen mot dette punktet
Aseta haluttu momentti tämän merkin kohdalle.
Установите шкалу с помощью этой метки.
Встановіть шкалу за допомогою цієї мітки.
8
Battery pack
Akkupack
Batterie
Pacco batteria
Accu
Bloque de pilas
Batteri
To AC outlet
Batteri
An Wandsteckdose
Batteri
Vers une prise secteur
Akku
Alla presa di rete
Батарейный блок
Naar stopkontakt
Батарейний блок
A la toma de la pared
Til en stikkontakt i lysnettet.
2
Till vägguttag
Til nettstrøm
Vaihtovirta
К штепсельной розетке переменного тока
До штепсельної розетки змінного струму
1
Battery charger
Ladegerät
Chargeur de batterie
Caricabatteria
Acculader
Cargador de batería
Batterioplader
Batteriladdare
Batterilader
Latauslaite
Зарядное устройство
Зарядний пристрій
— 5 —

EY6405(EU).book Page 6 Wednesday, June 15, 2005 7:14 PM
Read the Safety Instructions booklet
II. ASSEMBLY
and the following before using.
Attaching or removing bit
I. ADDITIONAL
Note: When attaching or removing a bit, be sure
SAFETY RULES
to set the Forward/Reverse lever to its cen-
ter position (switch lock).
1) Be aware that this tool is always in an operat-
ing condition, since it does not have to be
This tool is equipped with a keyless drill chuck.
plugged into an electrical outlet.
1) Attachment
Insert the bit and turn the lock collar clock-
2) When drilling or driving into walls, floors, etc.,
wise (looking from the front) to tighten. (Fig.
“live” electrical wires may be encountered.
2)
DO NOT TOUCH THE CHUCK OR ANY
FRONT METAL PARTS OF THE TOOL! Hold
2) Removal
the tool only by the plastic handle to prevent
Turn the lock collar counterclockwise (looking
electric shock in case you drill or drive into a
from the front), then remove the bit. (Fig. 3)
“live” wire.
3) Storage
3) If the bit becomes jammed, immediately turn
Keep the bit in bit holder when not in use.
the main switch off to prevent an overload,
Remove the battery pack to expose the bit
which can damage the battery pack or motor.
storage compartment inside the handle hous-
Use reverse motion to loosen jammed bits.
ing.
Bits up to 50 mm (1-31/32 inch) long can be
4) Do NOT operate the Forward/Reverse lever
stored here. (Fig. 4)
when the main switch is on. The battery will
discharge rapidly and damage to the unit
Note: If excessive play occurs in the chuck,
may occur.
secure the drill in place and open the
1
chuck claws by turning the lock collar and
5) During charging, the charger may become
2
tighten the screw (left-handed screw)
slightly warm. This is normal. Do NOT charge
with a screwdriver by turning it counter-
the battery for a long period.
clockwise (viewed from the front). (Fig. 5)
6) Use only a dry, soft cloth to wipe the unit. Do
NOT use a damp cloth, thinner, benzine, or
Attaching or removing battery pack
other volatile solvents for cleaning.
1. To connect the battery pack:
Insert the battery pack. It snaps into place to
7) When storing or carrying the tool, set the Forward/
indicate proper connection.
Reverse lever to the center position (switch lock).
2. To remove the battery pack:
Press the two buttons on the sides of the bat-
8) Do not strain the tool by holding the speed
tery pack. Slide the battery pack out of the tool
control trigger halfway (speed control mode)
body.
so that the motor stops.
9) Do not operate the speed selector switch
(LOW-HIGH) while pulling on the speed con-
trol trigger. This can cause the rechargeable
battery to wear quickly or damage the inter-
nal mechanism of the motor.
10) Young children should be supervised to
ensure that they do not play with the appli-
ance.
11) Wear ear protectors when using the tool for
extended periods.
— 6 —
Table of contents
- II. ASSEMBLY
- III. OPERATION
- IV. LAMP INDICATIONS
- V. ACCESSORIES
- ONLY FOR U. K.
- II. BAUGRUPPE
- IV. ANZEIGELAMPEN
- V. ZUBEHÖR
- II. MONTAGE
- IV. INDICATIONS DU TEMOIN
- V. ACCESSOIRES
- II. MONTAGGIO
- III. FUNZIONAMENTO
- IV. INDICAZIONI DELLE SPIE
- V. ACCESSORI
- II. MONTAGE
- III. BEDIENING
- IV. INDICATORS
- V. ACCESSOIRES
- II. MONTAJE
- III. OPERACIÓN
- IV. LUCES INDICADORAS
- V. ACCESORIOS
- II. MONTERING
- III. BETJENING
- IV. BETYDNINGEN AF LAMPERNE
- V. EKSTRATILBEHØR
- II. MONTERING
- III. DRIFT
- IV. INDIKERINGSLAMPOR V. TILLBEHÖR
- VI. TILLÄGG
- II. MONTASJE
- III. Betjening
- IV. INDIKATORLAMPER
- VI. TILLEGG
- II. KOKOAMINEN
- III. TOIMINTA
- IV. MERKKIVALOT V. VARUSTEET
- VI. LIITE
- I. ДОПОЛНИТЕЛЬНЫЕ
- III. ФУНКЦИОНИРОВАНИЕ
- IV. СВЕТОВЫЕ ИНДИКАТОРЫ
- VI. ПРИЛОЖЕНИЕ
- I. ДОДАТКОВІ ПРАВИЛА
- III. ФУНКЦІОНУВАННЯ
- IV. СВIТЛОВI IНДИКАТОРИ
- VII. ТЕХНІЧНІ ХАРАКТЕРИСТИКИ
