Severin BM 3990 – страница 2
Инструкция к Хлебопечке Severin BM 3990
a2
a3
a1
a4
A
B
C
D
E
F
G
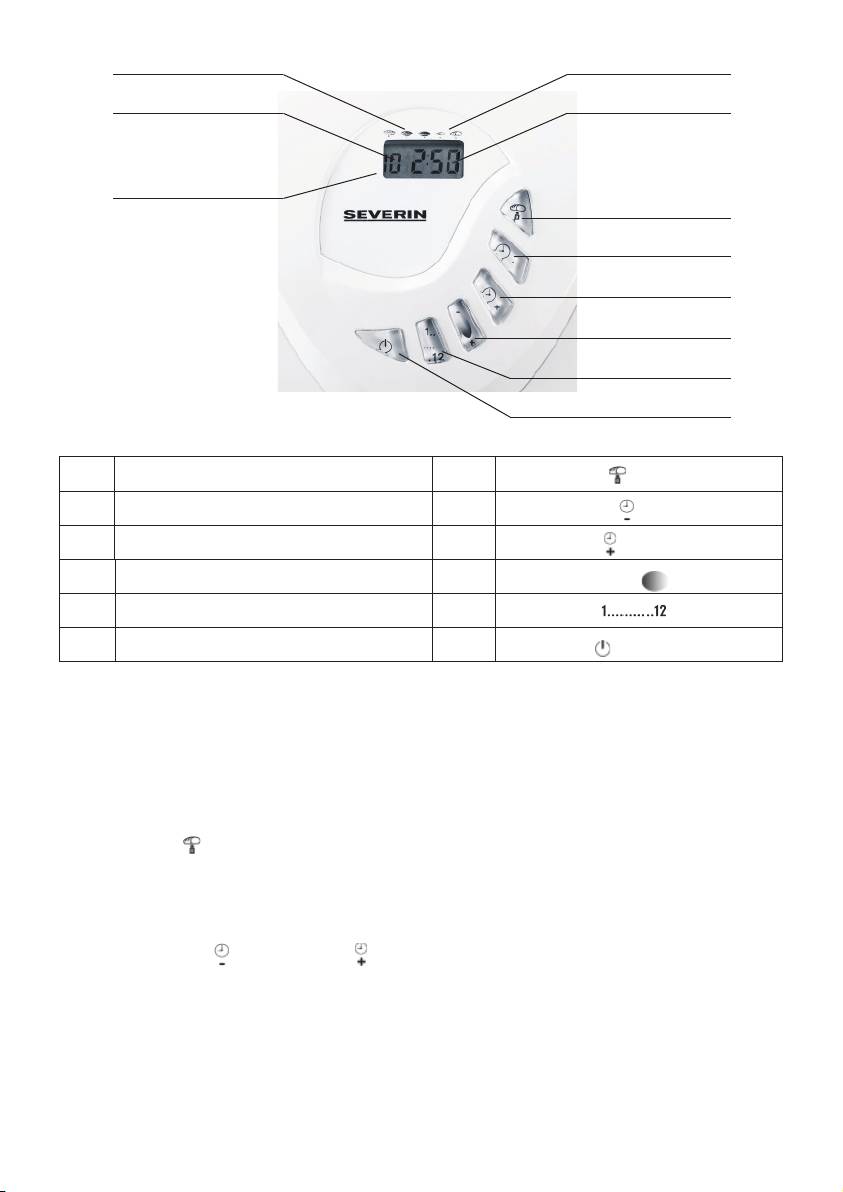
A Display B
Bread weight
a1 Display - programme C
Timer - minus
a2 Display - browning level D
Timer - plus
a3 Display - weight E
Browning control
a4 Display - running time F Programme
G
Start / Stop
CONTROL PANEL
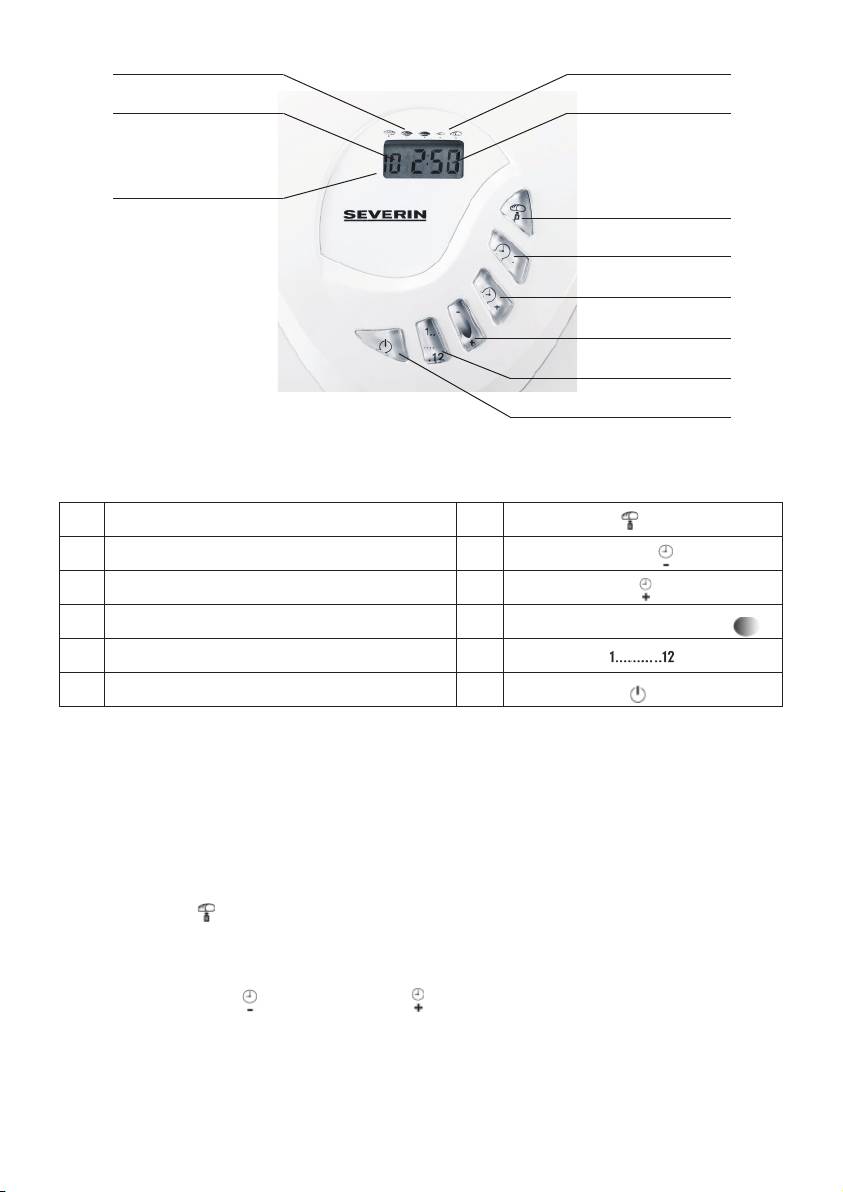
A Display
The display shows the programme selected, level of browning, weight and remaining running
time. An active programme is indicated by the continuously flashing colon in the time display.
B Loaf weight
Baking programmes 1, 2, 3, 5 and 11 allow for pre-selection of the loaf size. The selected weight
is indicated in the form of an arrowhead symbol beneath the corresponding bread symbol on the
display.
C/D Timer - minus
/ Timer - plus
Programmes 1, 2, 3, 4, 5, 8, 9, 10, 11 and 12 may be started with a delayed timer setting,
enabling the selected programme to finish up to 13:00 hours later.
Example:
You want to start the programme at 20:00, and you would like your bread to be finished at 7:30
the next morning. Accordingly, the total programme running time will be 11 hours and 30
minutes.
21

Use the - button to select the desired programme.
Press the appropriate timer button -
or until the display shows a total running time of
11:30.
Add the ingredients following the instructions given in the section Operation. Avoid any -
contact between the yeast and fluids or salt.
Do not use the timer function where a recipe requires the use of perishable ingredients such as •
eggs, fresh milk or fruit. The timer function is also unsuitable for recipes which require the
addition of any ingredients (e.g. nuts, grains or dried fruits) during the kneading or rising
phase.
E Browning
Baking programmes 1-7 allow for a pre-selection of the desired level of browning: three settings
are available. The level of browning selected is indicated by an arrowhead in the lower part of the
display.
LIGHT
MEDIUM
DARK
F Programme
Press the - button to select the desired programme.
The programme code appears in the display.
G Button
This button starts the selected programme.
A beep signal is heard, and the colon in the time display starts flashing.
To end the programme, keep the button pressed for 3 seconds. This is acknowledged by a beep
signal.
Protection against wrong input:
Once a programme has been started, all other control buttons will remain blocked until the
baking process has finished, or until the
button has been pressed for a minimum of 3 seconds.
PROGRAMME FUNCTIONS
The menu allows for the selection of 12 different programmes:
1 = STANDARD
This programme is used most frequently and suitable for breads with a high content of wheat
flour.
2 = WHITE BREAD/FRENCH BREAD
Suitable for typical light dough White bread/French bread.
3 = WHOLEMEAL
As opposed t to the STANDARD setting, this programme has extended rising and baking phases,
since the dough for bread with a high rye or wholemeal flour content tends to rise less strongly
than dough containing wheat flour.
4 = BISCUITS, PASTRY
Suitable for preparing biscuits, when using baking powder instead of yeast.
22

5 = CAKES WITH YEAST
Because of its relatively high sugar content, sweet yeast dough tends to brown more quickly; in
this programme, the baking phase is therefore shorter.
6 = SHORT PROGRAMME, 700g
Suitable for recipes up to 700g; the loaves will also turn out smaller and firmer than usual.
7 = SHORT PROGRAMME, 1000g
Suitable for recipes up to 1000g; the loaves will also turn out smaller and firmer than usual.
8 = DOUGH
This programme does not include a baking phase. After the programme has finished, the dough
(e.g. pizza dough) can be removed and then baked in a conventional oven.
9 = JAM, MARMALADE
Suitable for preparing jam, marmalade. During preparation, make sure the baking-tin is only two
thirds full of all the ingredients (approx. 1000g), since the mixture may tend to foam up.
10 = NORMAL CAKES
Suitable for cakes where baking powder is used instead of yeast.
11 = SANDWICH
Suitable for baking sandwich bread. The bread has a light structure and a thin crust.
12 = BAKING
Suitable for baking dough (e.g. dough previously kneaded using the DOUGH programme). In
this way, the rising phase can be modified according to the type of dough before the BAKING
programme is started.
Short Programme 700g and 1000g: –
These programmes are suitable for baking bread in a shorter period of time. With a shortened
rising phase, the loaves will turn out slightly smaller and firmer than usual. Please keep in mind
that warm water must be used. Best results are generally achieved with a water temperature of
around 48-50°C. We recommend using a suitable food thermometer. With the temperature too
low, the bread may not rise sufficiently strongly; too high a temperature will cause the yeast
contained in the dough to rise too early, again leading to an unsatisfactory baking result.
In the – programmes STANDARD, WHITE BREAD, WHOLEMEAL, CAKES WITH YEAST, CAKE
and SANDWICH, you may add such ingredients as wheat germ, sunflower seeds, herbs, caraway
seeds, ground pepper, ground nuts, muesli, hominy grits, finely cut bacon cubes etc. according to
taste.
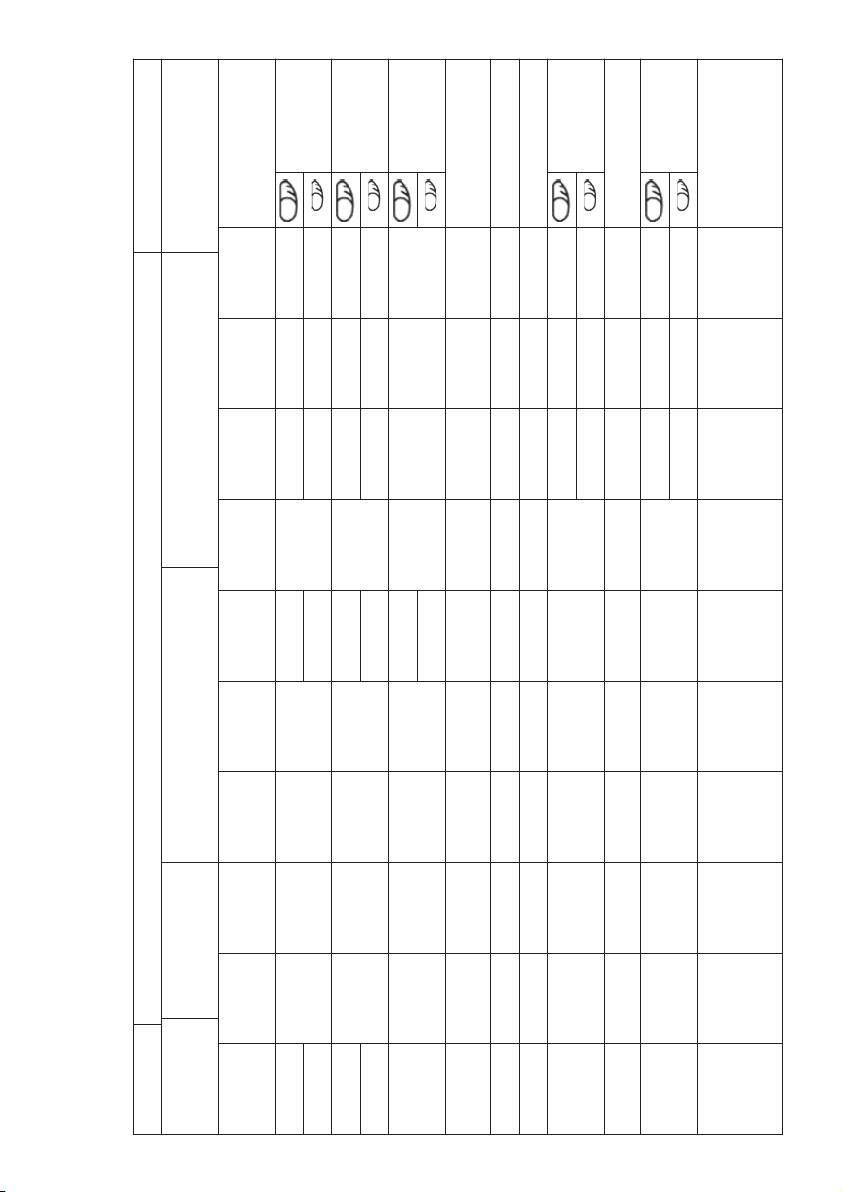
An acoustic signal indicates when the most suitable time for adding these ingredients has been –
reached. The table below shows the most suitable times as ‘•’.
23
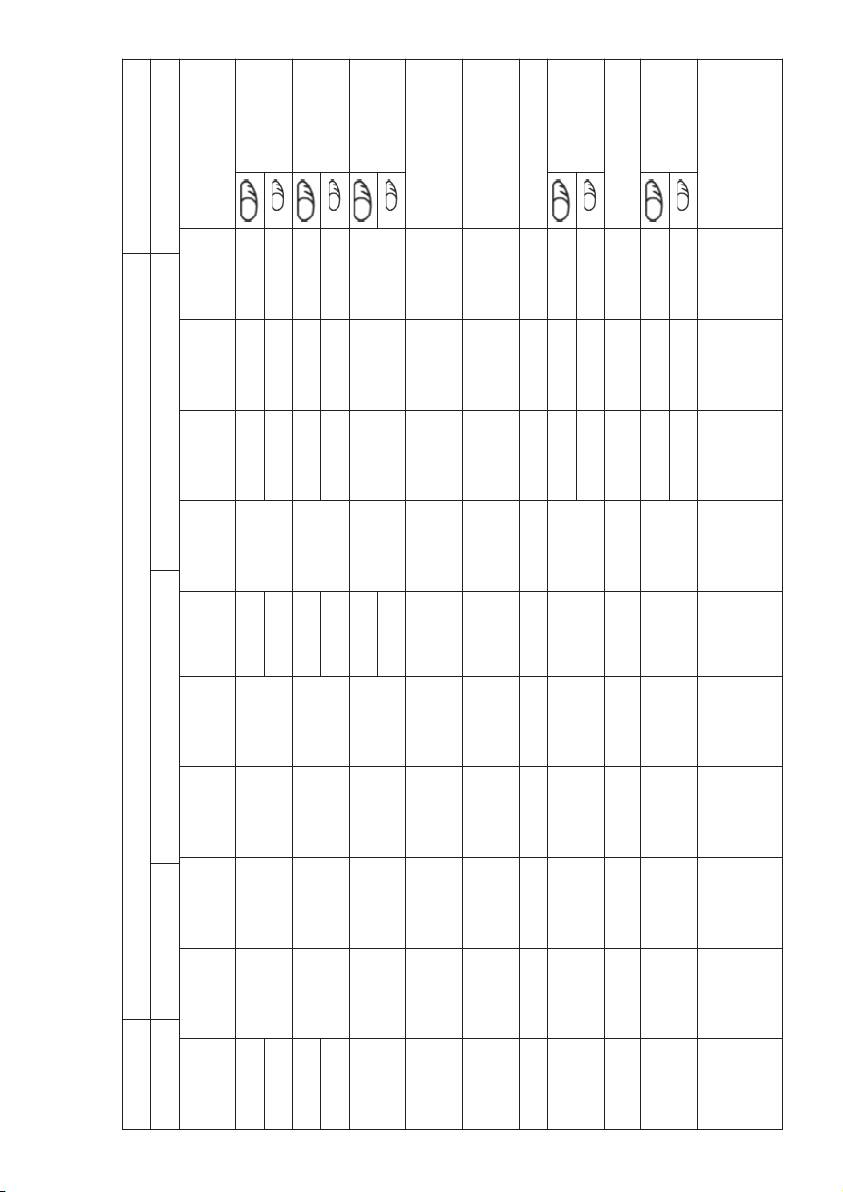
Menu 12 BAKING Baking 60 min. Total 1:00
Menu 9 JAM, MARMALADE Pre-heating 15 min. Heating and kneading phase45 min. Standing phase 20 min. Total 1:20
programme
Acoustic signal during
running time
Programme
Baking
Last rising phase
3
back)
Short stirring phase (Knock
2
phase
2
1
phase
1
Programme
rd
nd
nd
st
st
Rising phase
Rising phase 20 min. • 40 min. • 25 min. 5 min. 5 min. - - - 5 min. 40 min.
Rising phase 20 min. 20 min. 20 min. - 20 min. - - 20 min. 29 min. 24 min.
Kneading
Kneading
Standard
65 min. 70 min. 60 min. 60 min. 55 min.
60 min. 65 min. 55 min.
45 min. 50 Min 70 min. -
30 sec.
4 min.
30 sec. 30 sec. 30 sec. - 30 sec. - - 30 sec. 30 sec. 30 sec.
15 min. 22 min. 20 min. •
14 min. 19 min. 18 min. •
10 min. 18 min. 10 min.
9 min. 16 min. 9 min.
3:00 3:50 3:40 2:55 3:00
2:53 3:40 3.32
xxx-x-- -xx
1
French bread
White bread/
30 sec.
9 min.
2
Wholemeal
30 sec.
14 min.
3
80 min.
Biscuits,
8 min. 20 min. • - - - 20 min. • 5 min. •
7 min. 10 min. 12 min. 8 min. 20 min. 10 min. 15 min.
pastry
1:40
-
4
Cakes with
50 min.
50 min.
55 min.
30 sec.
9 min.
2:50
yeast
5
Short, 750 g
35 min. 40 min. - 70 min.
11 min. 9 min. 40 min. 35 min. 40 min.
0:58 0:58 1:30 2:50
--
6
Short, 900g
7
Dough (900g)
30 sec.
9 min.
8
Normal cakes
30 sec. 30 sec.
10
50 min.
Sandwich
2:55
11
24

Important information
If you observe flour residue on the walls of the baking-tin, open the lid during the kneading –
phase, and use a rubber scraper to move the flour back into the dough so that it can be properly
processed.
Close the lid afterwards.
When using yeast, the kneading hook may be removed after the final kneading phase. –
USING THE BREAD-MAKER
Your new bread-maker allows you to:
bake breads to various recipes, some of which can be found in the appendix to this manual. –
However, this bread-maker also allows you to use commercially available ready-to-bake mixtures
with up to 500g of solid ingredients (for a loaf of up to 1000g).
knead dough for bread rolls, pizza etc., and let the dough rise. –
Only recipes with a flour content of 200 – 550g should be used with this bread-maker. Use 1 ½ –
teaspoons of yeast for wheat flour, and 2 teaspoons for rye flour.
Should the flour content fall short of this minimum, thorough kneading of the dough cannot be
ensured. Excessive flour content may result in the dough rising over the edge of the baking-tin.
BEFORE FIRST USE
Remove the baking-tin by turning it anti-clockwise. –
Before the bread-maker is used for the first time, it should be thoroughly cleaned, as described in –
the section Cleaning and Care.
Fit the kneading hook into its socket inside the baking-tin and fill the tin with around125ml of –
water.
Replace the baking-tin in the unit and turn it clockwise to lock it. Make sure that it locks firmly –
into place.
Insert the plug into a suitable wall socket. –
Use the –
button to select programme 12 (BAKING).
Press the –
-button and let the unit heat up for approximately 10 minutes with the lid open. This
will remove the smell typically encountered when first activating the heating elements. Ensure
sufficient ventilation.
Afterwards, press and hold the –
-button for approx. 3 seconds to switch the bread-maker off
(this is confirmed by an acoustic signal); now remove the plug from the wall socket and allow
the appliance to cool down.
Clean the unit again as described in the section – Cleaning and Care.
OPERATION
Open the lid, turn the baking-tin anti-clockwise and remove it. –
Fit the kneading hook into its socket inside the baking-tin. –
For best results, always put liquids in first, followed by solid ingredients such as flour. –
Finally, add the yeast. Be sure to avoid any contact between the yeast and salt or liquids when –
using the timer.
Replace the baking-tin in the unit and turn it clockwise to lock it. Make sure that it locks firmly –
into place. Before starting the programme, close the lid, insert the plug into a suitable wall socket
and switch the appliance on.
25
Use the – button to select the desired baking programme.
Each time the button is pressed, the display changes to the next programme in the sequence. –
Select the desired level of browning –
. (Only for programmes 1-7)
Select the weight –
.
(Only for programmes 1, 2, 3, 5 and 11)
Press the –
button to start the kneading and/or baking process. (If you wish to start the
programme with a timer delay, the total running time desired can now be set, using the
appropriate timer button
or .)
During the kneading or rising phase in programmes – 1, 2, 3, 5, 10 and 11, an acoustic signal
indicates that additional ingredients such as fruits and nuts can be added to the dough, after
which do not open the lid, but wait until the programme has finished.
If you need to interrupt the programme during operation, press the –
button for approx. 3
seconds. The key input is confirmed by an acoustic signal.
Once the bread or dough is ready, a multiple acoustic signal is heard and the time display shows –
0:00. Press the
button for at least 3 seconds and open the lid.
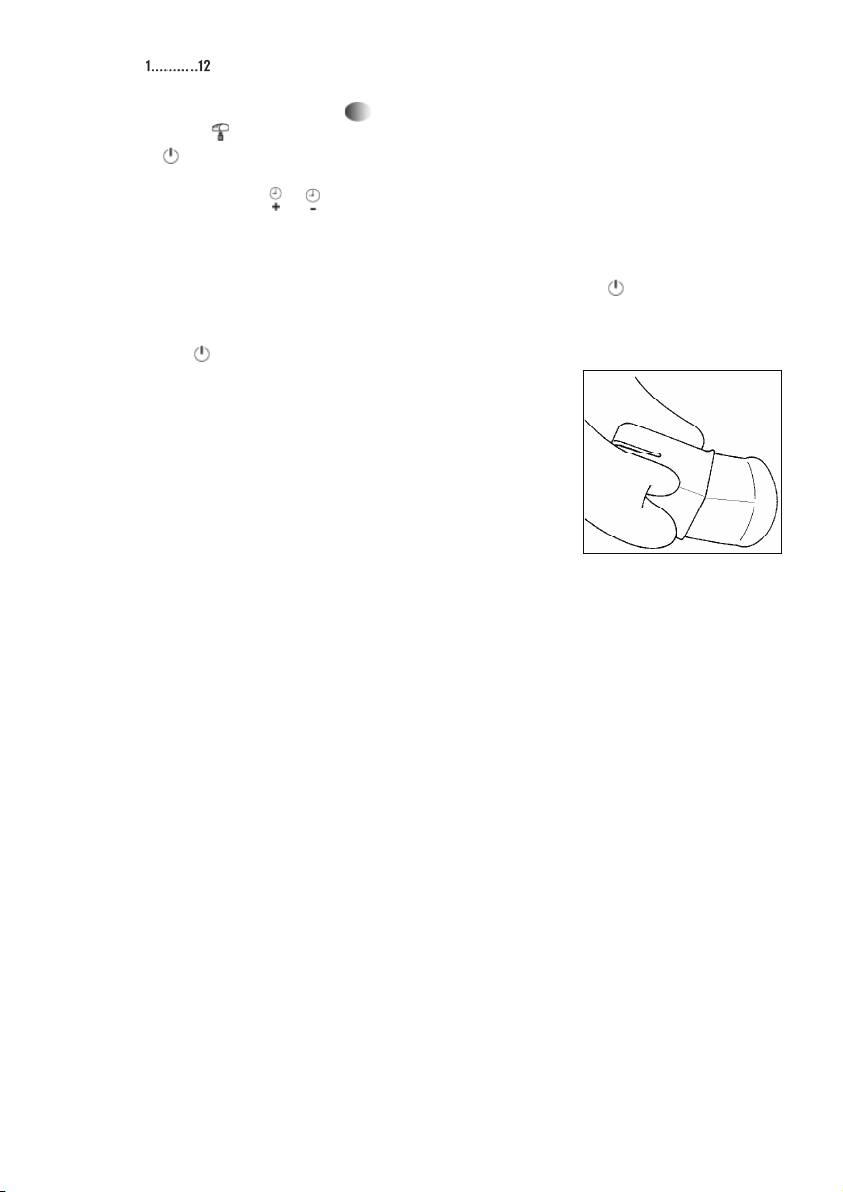
Carefully remove the baking-tin – using oven cloths. Do not place
the hot baking-tin on any heat-sensitive surfaces.
Remove the bread from the baking-tin. To loosen the bread, it may –
be lightly shaken. Should the kneading hook be stuck in the bread,
it should be carefully removed using the extractor tool supplied. To
allow the underside of the loaf to cool down as well, it should be
placed on a suitable wire rack. Do not attempt to cut the bread
until it has cooled down.
If the bread-maker is not switched off immediately after the –
programme running time has elapsed, the bread will be kept warm automatically for a period of
60 minutes.
The unit will then switch off automatically. –
CLEANING AND CARE
Caution: before cleaning the appliance, ensure that the plug has been removed from the wall ●
socket, and that the appliance has cooled down. Never immerse the bread-maker in water.
Turn the baking-tin anti-clockwise, lift it out and remove the kneading hook. –
The baking-tin and the kneading hook may be cleaned using hot water and a mild detergent. Do
not use any rough material for cleaning. If you are unable to separate the kneading hook from
the baking tin using normal force, let it soak in lukewarm water for approximately 30 minutes.
Do not use excessive force to remove the hook.
To prevent damage to the drive-shaft seal, the baking-tin should not be left soaking for any ●
extended period of time. Do not clean the baking-tin in a dish-washer.
The inside of the lid may be cleaned with a slightly damp, soft cloth. The interior of the appliance –
must only be cleaned with a soft, dry cloth.
Do ● not use cleaning agents specifically designed for ovens, and do not use any abrasives or harsh
cleaning solutions, vinegar or bleaching agents for cleaning.
Before storing the appliance, always ensure that it has cooled down and that it is completely dry. ●
26

TYPICAL PROBLEMS AND QUESTIONS
1. The bread has a strong smell.
Check whether the correct amount of yeast was used. Too much yeast causes an unpleasant smell
and makes the loaf rise too much. Always use fresh ingredients.
2. The baked bread is wet and has a sticky surface.
Remove the bread from the appliance immediately after baking, and place it onto a wire rack,
allowing it to cool down.
3. Pressing the Start button fails to activate the selected programme.
Make sure that the unit is properly connected to the mains supply.
Should the appliance still be too hot after a previous work cycle, an automatic safety switch
prevents the appliance from resuming operation. In that case, the LCD-display shows the letters
H:HH, and a continuous acoustic signal is heard. Press the
button for 3 seconds, and remove
the baking-tin with the ingredients from the unit. Allow the bread-maker to cool down for about
20 minutes with the lid open before you attempt to start the programme again.
4. After pressing the Start button, the message E:EE appears on the display.
This message indicates a temperature sensor malfunction. In such a case, the appliance must be
checked by a qualified technician.
5. The loaf has risen too high.
Reduce the amount of yeast, water or flour used.
6. The loaf has not risen high enough.
Increase the amount of yeast, water or sweeteners. Ensure that the correct order is used when
putting the ingredients into the baking-tin: first the liquid ingredients, followed by the solid
ingredients, finally the yeast.
Note: bread made of rye or wholemeal flour tends to rise less strongly than bread made of wheat
flour.
7. After the baking phase has started, the dough collapses inwards.
The dough is too light. Slightly reduce the quantity of liquids or the amount of yeast, or use a
programme with a shorter rising phase. You may also try increasing the amount of salt.
8. The dough is too soft or too sticky.
The dough texture may become smoother if a spoonful of flour is added during kneading.
9. The dough is very difficult to knead.
Add a spoonful of water during the kneading process.
27
RECIPES
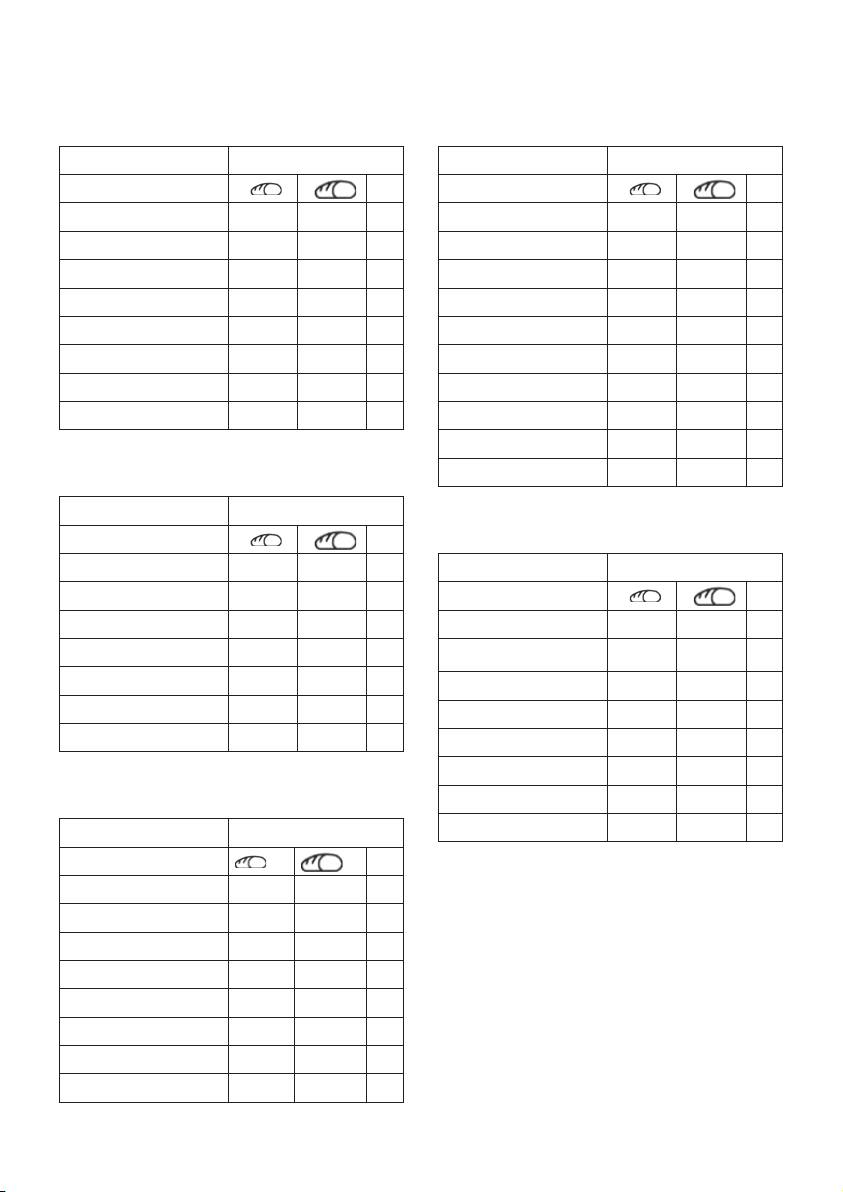
White bread/French bread
Wholemeal bread
Ingredients:
Ingredients:
Programme 2 / White bread
Programme 3 / Wholemeal bread
Setting
Setting
water 120 180 ml
water 310 415 ml
milk 140 220 ml
oil 1 1 ½ tbs.
butter 10 15 g
lemon juice 1 1 ½ tbs.
salt 1 ½ 2 tsp
rye wholemeal flour 150 200 g
sugar 2 3 tbs.
wheat flour, type 1050 300 400 g
wheat flour, type 405 400 600 g
sugar 3 4 tsp.
dry yeast 1 1 ½ tsp.
salt 1 3 tsp.
approx. yield 650g 1000g
dry yeast 2 3 tsp.
oat meal 4 6 tsp.
Onion bread
approx. yield 750 1000
Ingredients:
Programme 1 / Standard
Wheat and rye bread
Setting
Ingredients:
water 350 500 ml
Programme 1 / Basis
salt 1 1 ½ tsp.
Setting
sugar 1 1 tsp.
water 220 350 ml
natural plain yoghurt 3.5%
wheat flour, type 1050 540 760 g
110 175 ml
fat content
fried onions 75 100 g
salt 1 ½ 2 ½ tsp.
dry yeast 1 ½ 2 tsp.
sugar ¼ ¾ tsp.
approx. yield 900g 1300g
wheat flour, type 550 230 350 g
wheat flour, type 1150 230 350 g
Raisin bread
dry yeast 1 ¼ 2 tsp.
Ingredients:
approx. yield 700g 1150g
Programme 1 / Standard
Setting
water 200 310 ml
butter 1 ½ 2 ½ tbs.
salt ¾ 1 tsp.
honey 2 3 tbs.
wheat flour, type 405 420 650 g
dry yeast 1 ½ 2 tsp.
raisins 75 100 g
approx. yield 700g 1100g
28

Pizza dough
Ingredients:
Tip:
Programme 8 / Dough
Once the programme has finished, remove the
Setting
dough from the baking-tin. Let the dough rise
water 230 ml
at room temperature for approximately 30
olive oil 3 tbs.
minutes.
salt 2 tsp.
Abbreviations:
sugar 1 tsp.
tsp. = teaspoon (measuring spoon: 1 tsp.) = 5 ml
wheat flour, type 550 400 g
tbs. = tablespoon (measuring spoon: 1 tbs.) =
15 ml
dry yeast 2 tsp.
g = gram
approx. yield 600g
ml = millilitre
Commercially available ready-to-bake mixes
Various ready-to-bake mixes are to be found.
Put up to 500g of the ready-to-bake mixture and the required amount of dry yeast into the baking- –
tin. Depending on the size of the mix, it may be that only half of the mix can be used at a time.
Add the corresponding quantity of liquid. –
Programme: STANDARD, WHITE BREAD or WHOLEMEAL, depending on the type of flour used.
Jam, marmalade
The basic recipe consists of finely cut or puréed fruit and gelatine sugar (e.g ‘2:1’). Information about the
correct proportions of fruit and gelatine sugar may be found on the sugar packaging.
Wash the fruit and, if necessary, peel it. –
Weigh out about 900g of fruit, but always observe the overall quantity limits to prevent the –
mixture from foaming and spilling out. The fruit should be cut into small pieces (max. 1 cm) or
puréed.
Place the fruit and 500 g gelatine sugar into the baking-tin. When making marmalade from –
berries. add 1 tbs. of lemon juice and blend in well.
Start the JAM, MARMALADE programme. –
Carefully monitor the process. Use a rubber scraper to remove any sugar residue from the walls –
of the tin.
After the programme has finished, remove the plug from the wall socket, and carefully take out –
the baking-tin using an oven cloth.
Carefully transfer the jam or marmalade into prepared jars. Close the jars tightly afterwards, and –
allow them to cool down.
The baking-tin should be thoroughly rinsed immediately after use. –
Additional recipe information
The bread-maker is designed to process recipes with a flour content of up to 550g. In order to
prevent the dough rising over the edge of the baking-tin and to ensure that the dough is properly and
thoroughly kneaded, do not exceed these limits.
All ingredients should be at normal room temperature.
Sugar assists the yeast as a rising agent, and tends to make the crust darker and thicker.
Salt gives a firmer texture to the dough and slows the rising process down.
When adding additional ingredients of a liquid nature to a recipe, make sure that the quantity of
29

liquid given in the recipe is reduced accordingly. This applies, for instance, when eggs, fresh cheese
or yoghurt are used.
The baking results depend on several factors such as air pressure, humidity, water hardness,
room temperature or the temperature of the ingredients. If a recipe does not turn out to your
taste right away, we recommend modifying the suggested recipes accordingly, as described in the
section ‘Typical problems’.
Special information for those with allergies
With this bread-maker you may also use flour mixtures specifically formulated for people allergic to
grain. The loaves will turn out relatively firm even when higher quantities of yeast or baking powder
are used.
However, in this case only the STANDARD programme should be used, choosing the darker
browning setting. With this programme, the loaf turns out to have a stronger crust.
With gluten-free flour types, pre-programming is not recommended. Always start the programme
immediately after the ingredients have been put in.
For gluten-free bread, commercially available ready-to-bake mixes are most suitable.
TECHNICAL SPECIFICATIONS
Art.-Nr.: BM 3990
Operating voltage: 230 V~, 50 Hz
Power consumption: 600 W
Baking capacity: max. 550g flour for a 900g loaf
Approximate dimensions: 420 mm (L) x 280 mm (D) x 305 mm (H)
Weight: 5.7 kg
Timer: Pre-programmable up to 13 hours
Programme functions: 12
Accessories: Measuring cup, measuring spoon, kneading hook extractor
This product complies with all binding CE labelling directives.
Disposal
Do not dispose of old or defective appliances in domestic garbage; this should only be done
through public collection points.
GUARANTEE
This product is guaranteed against defects in materials and workmanship for a period of two years
from the date of purchase. Under this guarantee the manufacturer undertakes to repair or replace
any parts found to be defective, providing the product is returned to one of our authorised service
centres. This guarantee is only valid if the appliance has been used in accordance with the
instructions, and provided that it has not been modified, repaired or interfered with by any
unauthorised person, or damaged through misuse.
This guarantee naturally does not cover wear and tear, nor breakables such as glass and ceramic
items, bulbs etc. This guarantee does not affect your statutory rights, nor any legal rights you may
have as a consumer under applicable national legislation governing the purchase of goods. If the
product fails to operate and needs to be returned, pack it carefully, enclosing your name and address
30

and the reason for return. If within the guarantee period, please also provide the guarantee card and
proof of purchase.
31

Machine à pain
TABLE DES MATIÈRES
IMPORTANTES CONSIGNES DE SÉCURITÉ 33
VOTRE MACHINE À PAIN 35
LE TABLEAU DE COMMANDE 36
LES PROGRAMMES 37
UTILISATION DE LA MACHINE À PAIN 40
AVANT LA PREMIERE MISE EN SERVICE 40
FONCTIONNEMENT 40
NETTOYAGE ET ENTRETIEN 41
PROBLÈMES COURANTS ET QUESTIONS 42
RECETTES 43
FICHE TECHNIQUE 46
GARANTIE 46
32

IMPORTANTES CONSIGNES DE SÉCURITÉ
Avant d’utiliser la machine à pain, lisez attentivement les instructions ci-après :
La surface du boîtier et les sorties de vapeur deviennent très chaudes pendant le fonctionnement. ●
Ne touchez aucune des parties chaudes de l’appareil. Utilisez un torchon pour le four ou des
gants appropriés pour retirer le pain. En ouvrant l’appareil, prenez soin de ne toucher que la
poignée du couvercle.
Cette machine à pain doit être branchée exclusivement sur une prise de courant avec terre, ●
installée selon les normes. Assurez-vous que la tension d’alimentation correspond à la tension
indiquée sur la plaque signalétique.
Débranchez toujours la fiche de la prise de courant après utilisation et également ● :
en cas de fonctionnement défectueux, -
avant de retirer le moule à pain, -
avant de nettoyer l’appareil. -
Ne jamais tirer sur le cordon pour débrancher l’appareil de la prise murale; tirez toujours sur la ●
fiche. Ne pas laisser pendre le cordon d’alimentation; maintenez-le toujours à l’écart des surfaces
chaudes de l’appareil.
Avant toute utilisation, vérifiez soigneusement que l’appareil, son cordon d’alimentation et ses ●
accessoires ne présentent aucun signe de détérioration qui pourrait avoir un effet néfaste sur la
sécurité de fonctionnement de l’appareil. Ne faites jamais fonctionner l’appareil si celui-ci est
tombé par terre, car il pourrait être endommagé sans que ces dommages soient visibles
extérieurement.
Retirez tous les emballages externes et internes. Les matériaux d’emballage peuvent être recyclés. ●
Attention ● : Tenez les enfants à l’écart des emballages, qui représentent un risque potentiel, par
exemple, de suffocation.
Cet appareil ne doit pas être utilisé par une personne (y compris un enfant) souffrant d’une ●
déficience physique, sensorielle ou mentale, ou manquant d’expérience ou de connaissances, sauf
si cette personne a été formée à l’utilisation de l’appareil par une personne responsable de sa
sécurité, ou est surveillée par celle-ci.
Les enfants doivent être surveillés afin qu’ils ne jouent pas avec l’appareil. ●
Respectez une distance minimale de 5 cm entre l’appareil et les murs ou autres objets. Ne pas ●
utiliser l’appareil sous, ou à proximité, d’un élément de cuisine ou d’objets suspendus tels que
rideaux ou autres matières inflammables, et ne pas poser d’objets sur l’appareil pendant son
fonctionnement.
Installez toujours l’appareil sur une surface de travail plane et résistante à la chaleur. Ne pas ●
laisser l’appareil ou son cordon d’alimentation entrer en contact avec une surface chaude ou une
source de chaleur quelconque (ex. plaque de cuisson ou flamme nue).
Ne pas utiliser l’appareil sans le moule à pain contenant les ingrédients. ●
Ne pas exposer l’appareil à la pluie ou à l’humidité et ne pas l’utiliser à l’extérieur ou sur une ●
surface mouillée. Maintenez-le toujours à l’abri des éclaboussures. Ne pas immerger l’appareil, le
cordon d’alimentation ou la fiche dans l’eau.
Attention: ● pendant la cuisson, ne pas couvrir le pain de papier aluminium ou autres matières
similaires; l’accumulation de chaleur ainsi créée pourrait sérieusement endommager l’appareil.
Cette machine à pain est destinée exclusivement à un usage domestique et non pas à un usage ●
professionnel.
Ne pas utiliser cet appareil à des fins autres que celles décrites dans le présent manuel. ●
L’utilisation de tout accessoire autre que ceux fournis par le fabricant risque d’endommager ●
l’appareil ; il existe également un risque de blessures.
Pendant le fonctionnement de l’appareil, ne toucher aucun élément en mouvement. Ne jamais ●
introduire les doigts ou la main dans l’appareil, à moins que si celui-ci ne soit débranché de la
33

prise secteur et complètement refroidi.
Afin de se conformer aux normes de sécurité en vigueur et d’éviter tout risque, la réparation ●
d’appareils électriques, y compris le remplacement d’un cordon d’alimentation, doit être effectuée
par un agent qualifié. En cas de panne, envoyez votre appareil à un de nos centres de service
après-vente agréés dont vous trouverez la liste en annexe de ce manuel.
Conservez le présent manuel d’instructions pour toute consultation ultérieure. ●
Autres instructions importantes
Utilisez toujours un torchon isolant ou des gants de cuisine lorsque vous touchez l’appareil chaud –
ou maniez le pain fraîchement cuit.
En cas de panne de courant d’une durée inférieure à 5 minutes en cours de programme, la –
cuisson reprendra automatiquement à partir du point d’interruption.
Pendant le pétrissage, de la vapeur d’eau peut se condenser sur le hublot. Cette condensation –
disparaît toutefois pendant la phase de cuisson.
Pour assurer la cuisson uniforme du pain, ne pas ouvrir le couvercle pendant la cuisson. –
Après utilisation, laissez la machine et le moule à pain refroidir avant de les nettoyer –
soigneusement.
Le moule à pain et le crochet pétrisseur sont recouverts d’un revêtement anti-adhésif. Pour éviter –
d’endommager celui-ci, ne pas le toucher avec des objets métalliques, durs, acérés ou pointus.
Attention : toute utilisation à vide de la machine à pain risque de l’endommager – en provoquant la
surchauffe du moule.
Attention
En cas de fumée s’échappant de la cuve, maintenez le couvercle bien fermé et débranchez –
immédiatement la fiche de la prise de courant. N’essayez sous aucun prétexte d’étouffer ou
d’éteindre avec de l’eau la pâte en combustion. La pâte peut s’enflammer si elle déborde du moule
à pain et entre en contact avec la résistance. Il est donc très important de respecter les doses
limites indiquées dans chaque recette.
Assurez-vous toujours que l’appareil est installé hors de la portée des enfants, en particulier –
lorsqu’il est en marche.
Ne pas poser l’appareil sur une surface molle ou inflammable (ex. un tapis). Placez-le toujours –
sur un plan de travail stable et horizontal. Positionnez toujours l’appareil de manière à ce qu’il ne
puisse pas tomber.
Ne toucher ni le boîtier métallique, ni les sorties de vapeur à l’arrière de l’appareil ni le hublot du –
couvercle, car ces éléments deviennent chauds pendant le fonctionnement.
Avant de nettoyer l’appareil, assurez-vous qu’il est éteint, débranché de la prise murale et –
complètement froid au toucher.
34
VOTRE MACHINE À PAIN
8
1
7
2
3
6
4
5
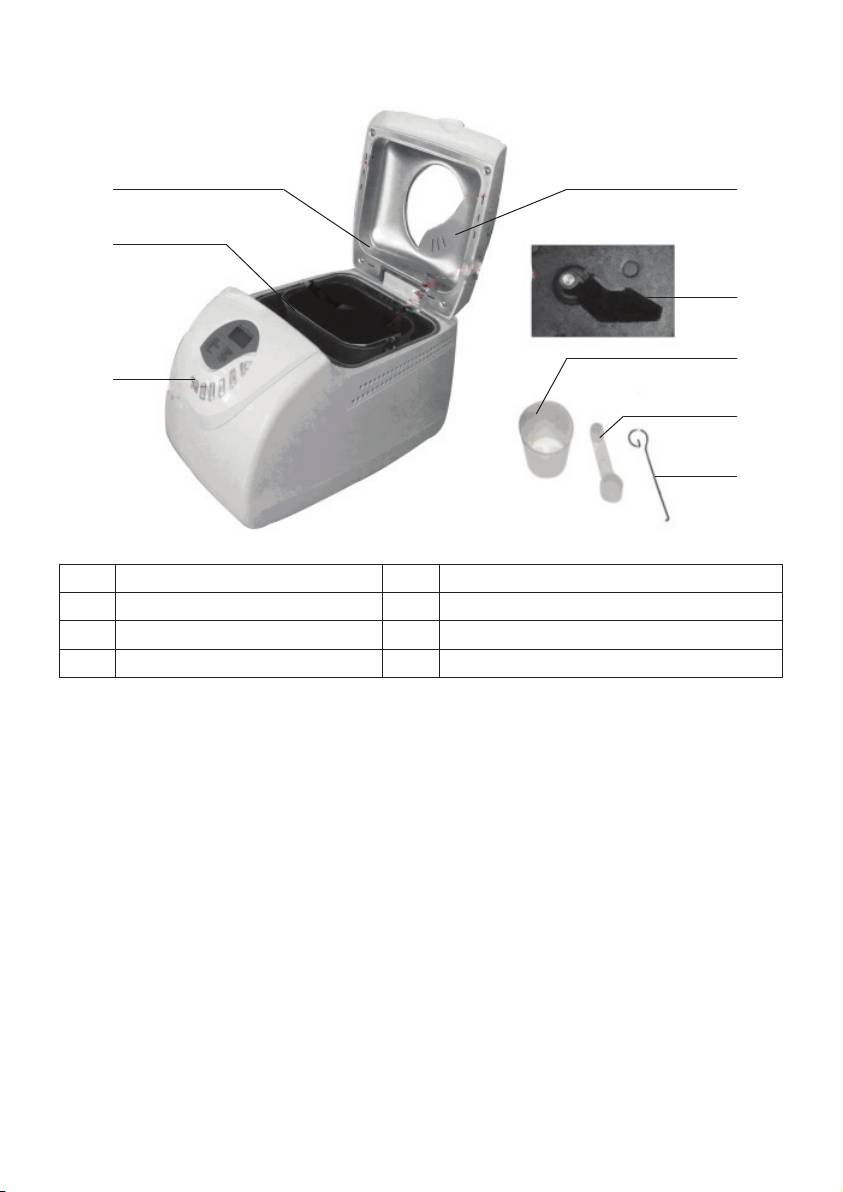
1. Hublot d’observation 5. Outil destiné au retrait du crochet pétrisseur
2. Crochet pétrisseur 6. Tableau de commande avec affichage
3. Gobelet gradué 7. Moule à pain
4. Cuiller à doser 8. Couvercle
35
a2
a3
a1
a4
A
B
C
D
E
F
G
A Affichage B
Poids du pain
a1 Affichage - programme C
Minuterie - moins
a2 Affichage – intensité de brunissage D
Minuterie - plus
a3 Affichage - poids E
Contrôle du degré de cuisson
a4 Affichage – écoulement du temps de cuisson F Programme
G
Marche / Arrêt
LE TABLEAU DE COMMANDE
A Écran
L’affichage indique le programme sélectionné, l’intensité de brunissage, le poids et l’écoulement
du temps de cuisson. Un programme actif est signalé par le clignotement constant des deux
points sur l’affichage du temps.
B Poids du pain
Les programmes de cuisson 1, 2, 3, 5 et 11 permettent la présélection du poids du pain. Le poids
sélectionné est indiqué par une flèche affichée à l’écran, sous le symbole de pain correspondant.
C/D Minuterie - moins
/ Minuterie - plus
Le démarrage des programmes 1, 2, 3, 4, 5, 8, 9, 10, 11 et 12 peut être différé à l’aide de la
minuterie, le report maximum de la fin de cuisson étant de 13 heures.
Exemple:
Vous souhaitez faire démarrer le programme à 20 H 00, et que votre pain soit prêt le lendemain
36

matin à 7 H 30. Le temps de fonctionnement total du programme sera donc de 11 heures 30
minutes.
Sélectionnez le programme souhaité à l’aide de la touche -
.
Appuyez sur -
ou jusqu’à ce que l’écran affiche une durée totale de 11:30.
Ajoutez les ingrédients en suivant les instructions figurant à la section Fonctionnement. Évitez -
tout contact entre la levure et les liquides ou le sel.
Ne pas utiliser la minuterie avec les recettes utilisant des denrées périssables tels qu’œufs, lait •
frais ou fruits. La fonction minuterie est également inadaptée aux recettes nécessitant l’addition
d’ingrédients (tels que noix, graines ou fruits secs) pendant la phase de pétrissage ou de levage.
E Degré de cuisson
Les programmes 1 à 7 autorisent une présélection du degré de cuisson; trois réglages sont
possibles. Le degré de cuisson sélectionné est indiqué par une flèche affichée en haut de l’écran.
PÂLE
MOYEN
FONCÉ
F Programme
Appuyez sur la touche pour sélectionner le programme désiré.
Le code du programme est alors affiché.
G Touche
Cette touche a pour fonction de démarrer le programme sélectionné.
Un signal sonore retentit, et les deux points de l’affichage « temps» se mettent à clignoter.
Pour arrêter le programme, appuyez sur la touche pendant 3 secondes. L’arrêt du programme est
alors confirmé par un signal sonore.
Blocage des touches :
Une fois le programme lancé, toutes les autres touches restent bloquées jusqu’à la fin de la
cuisson, ou jusqu’à ce que vous appuyiez sur la touche
pendant 3 secondes minimum.
LES PROGRAMMES
Le menu vous permet de sélectionner 12 programmes différents :
1 = NORMAL (BASIS)
Ce programme, adapté aux pains à haute teneur en farine de froment, est utilisé le plus
fréquemment.
2 = PAIN BLANC/CROUSTILLANT
Adapté à la pâte à PAIN BLANC/CROUSTILLANT typique, de couleur pâle.
3 = PAIN COMPLET
Par rapport au réglage NORMAL, ce programme présente des phases de levage plus longues, les
pâtes à haute teneur en farine de seigle ou farine intégrale ayant tendance à lever moins que les
pâtes à base de farine de froment.
4 = BISCUITS, PÂTISSERIES
Convient à la préparation de biscuits ou gâteaux à base de levure chimique plutôt que de levure
de boulanger.
37

5 = GÂTEAUX AVEC LEVURE
De par leur teneur relativement élevée en sucre, les pâtes à base de levure sucrées ont tendance à
dorer plus rapidement ; dans ce programme, la phase de cuisson est donc plus courte.
6 = PROGRAMME COURT, 700 g
Adapté aux recettes de pains d’un poids jusqu’à 700 g; le pain sera également plus petit et plus
ferme que la normale.
7 = PROGRAMME COURT, 1000 g
Adapté aux recettes de pains d’un poids jusqu’à 1000 g; le pain sera également plus petit et plus
ferme que la normale.
8 = PÂTE
Ce programme exclut la phase de cuisson. À la fin du programme, la pâte (ex. pâte à pizza) peut
être retirée de l’appareil pour être cuite dans un four conventionnel.
9 = CONFITURES, MARMELADES
Convient à la préparation de confitures et de marmelades. Pendant la préparation, assurez-vous
que le moule à pain n’est rempli d’ingrédients qu’aux deux tiers car le mélange peut avoir
tendance à mousser.
10 = GÂTEAUX STANDARDS
Convient pour les gâteaux dont la recette utilise de la levure chimique à la place de la levure de
boulanger.
11 = SANDWICH
Convient à la préparation de pain pour sandwich. Ce pain à une mie légère et une croûte fine.
12 = CUISSON
Adapté à la pâte prête à cuire (ex. une pâte préalablement pétrie avec le programme “PÂTE”). La
phase de levage peut être ainsi modifiée en fonction du type de pâte, avant le démarrage du
programme de CUISSON
Programmes courts 700 g et 1000 g : –
Ces programmes permettent la cuisson du pain dans un temps plus court. La phase de levage
plus brève produit un pain légèrement plus petit et ferme que le pain normal. Veillez à utiliser de
l’eau tiède; les meilleurs résultants sont obtenus avec une eau à environ 48 à 50°C. Nous
recommandons l’utilisation d’un thermomètre de cuisine. Une température trop basse pourrait
entraver le levage de la pâte; également, une température trop élevée provoquera un levage
précoce de la pâte et donnera un résultat peu satisfaisant.
Pour les – programmes NORMAL, PAIN BLANC, PAIN COMPLET, GÂTEAUX AVEC LEVURE,
GÂTEAUX et SANDWICH, vous pouvez ajouter des ingrédients tels que germes de blé, graines
de tournesol, herbes aromatiques, graines de carvi, poivre moulu, noix concassées, mueslï,
semoule de maïs, lardons finement tranchés en dés etc. en fonction de votre goût.
Un signal sonore indique à quel moment il convient d’ajouter ces ingrédients. Ces moments sont –
indiqués dans le tableau ci-dessous au moyen d’un ‘•’.
38
Menu 12 CUISSON Cuisson 60 min. Total 1:00
MARMELADES
Menu 9 CONFITURES
programme
Signal sonore pendant le
programme
Durée du
Cuisson
de levage
Dernière phase
3ème phase de levage
Phase de pétrissage - brève 30 s. 30 s. 30 s. - 30 s. - - 30 s. 30 s. 30 s.
2ème phase de levage 20 min. 20 min. 20 min. - 20 min. - - 20 min. 29 min. 24 min.
pétrissage
2ème phase de
1ère phase de levage 20 min. • 40 min. • 25 min. 5 min. 5 min. - - - 5 min. 40 min.
pétrissage
1ère phase de
Menu
65 min. 70 min. 60 min. 60 min. 55 min.
60 min. 65 min. 55 min.
45 min. 50 Min 70 min. -
Normal
4 min.
15 min. 22 min. 20 min. •
14 min. 19 min. 18 min. •
10 min. 18 min. 10 min.
9 min. 16 min. 9 min.
3:00 3:50 3:40 2:55 3:00
2:53 3:40 3.32
30 s.
xxx-x- --xx
1
Croustillant
Pain blanc /
9 min.
Préchauffage 15 min. Phase de chauffage et de pétrissage 45 min. Phase de repos 20 min. Total 1:20
30 s.
2
Pain complet
14 min.
30 s.
3
pâtisseries
80 min.
Biscuits,
8 min. 20 min. • - - - 20 min. • 5 min. •
7 min. 10 min. 12 min. 8 min. 20 min. 10 min. 15 min.
1:40
-
4
Gâteaux avec
50 min.
50 min.
55 min.
9 min.
levure
2:50
30 s.
5
court 750 g
Programme
35 min. 40 min. - 70 min.
11 min. 9 min. 40 min. 35 min. 40 min.
0:58 0:58 1:30 2:50
--
6
court 900 g
Programme
7
Pâte (900 g)
9 min.
30 s.
8
standards
Gâteaux
30 s. 30 s.
10
Sandwich
50 min.
2:55
11
39

Information Importante
Si vous observez des résidus de farine sur les parois du moule à pain, ouvrez le couvercle pendant –
la phase de pétrissage et réincorporez ces résidus à la pâte à l’aide d’une spatule en caoutchouc.
Refermez ensuite le couvercle.
Lorsque vous utilisez de la levure, le crochet pétrisseur peut être retiré après la phase finale de –
pétrissage.
UTILISATION DE LA MACHINE À PAIN
Votre nouvelle machine à pain vous permet :
de faire du pain d’après des recettes variées, dont certaines figurent en annexe de ce manuel. –
Cette machine à pain vous permet également d’utiliser les mélanges prêts à l’emploi, disponibles
dans le commerce, contenant jusqu’à 500 g d’ingrédients solides (pour un pain d’environ 1000
g).
de mélanger et pétrir la pâte à petits pains, à pizza etc., et laisser lever la pâte. –
Cette machine à pain ne doit être utilisée que pour les recettes dont la quantité de farine est de –
200 g à 550 g. Utilisez 1 ½ c.à.c. de levure pour la farine de froment, et 2 c.à.c. pour la farine de
seigle.
Si la quantité de farine est inférieure au minimum, le pétrissage en profondeur de la pâte ne
pourra être assuré. Également, toute quantité de farine au-delà du maximum risque de faire
déborder la pâte du moule à pain.
AVANT LA PREMIÈRE MISE EN SERVICE
Retirez le moule à pain en le tournant dans le sens contraire des aiguilles d’une montre. –
Veuillez nettoyer soigneusement la machine à pain avant de l’utiliser pour la première fois, en –
suivant les instructions figurant au chapitre Nettoyage et Entretien.
Fixez le crochet pétrisseur sur son arbre d’entraînement à l’intérieur du moule à pain et –
remplissez le moule d’environ 125ml d’eau.
Remettez le moule à pain dans l’appareil, puis tournez-le dans le sens des aiguilles d’une montre –
pour le verrouiller. Vérifiez que le moule est solidement verrouillé en position.
Branchez la fiche à une prise murale adaptée. –
Sélectionnez le programme – 12 (CUISSON) à l’aide de la touche
.
Appuyez sur la touche –
et laissez l’appareil chauffer pendant 10 minutes environ, couvercle
ouvert. Vous éliminerez ainsi l’odeur caractéristique qui se dégage lors de la mise sous tension
initiale des résistances chauffantes. Prévoyez une aération suffisante.
A la suite de cela, appuyez sur la touche –
-pendant environ 3 secondes pour éteindre la machine
à pain (l’action est confirmée par un signal sonore); retirez à présent la fiche de la prise murale et
laissez le temps à l’appareil de refroidir.
Nettoyez à nouveau l’appareil tel expliqué au chapitre – Nettoyage et Entretien.
FONCTIONNEMENT
Ouvrez le couvercle, puis tournez le moule à pain dans le sens contraire des aiguilles d’une –
montre pour le retirer.
Insérez le crochet pétrisseur sur son arbre d’entraînement, à l’intérieur du moule à pain. –
Pour un résultat optimal, versez en premier les liquides, suivis des ingrédients secs tels que la –
farine.
40
