Gigabyte GA-8IGX: Chapter 5 Appendix
Chapter 5 Appendix: Gigabyte GA-8IGX
Appendix
Revision History
Chapter 5 Appendix
Picture below are shown in Windows XP (IUCD driver version 2.0)
Insert the driver CD-title that came with your motherboard into your CD-ROM driver, the driver
CD-title will auto start and show the installation guide. If not, please double click the CD-ROM device
icon in "My computer", and execute the setup.exe.
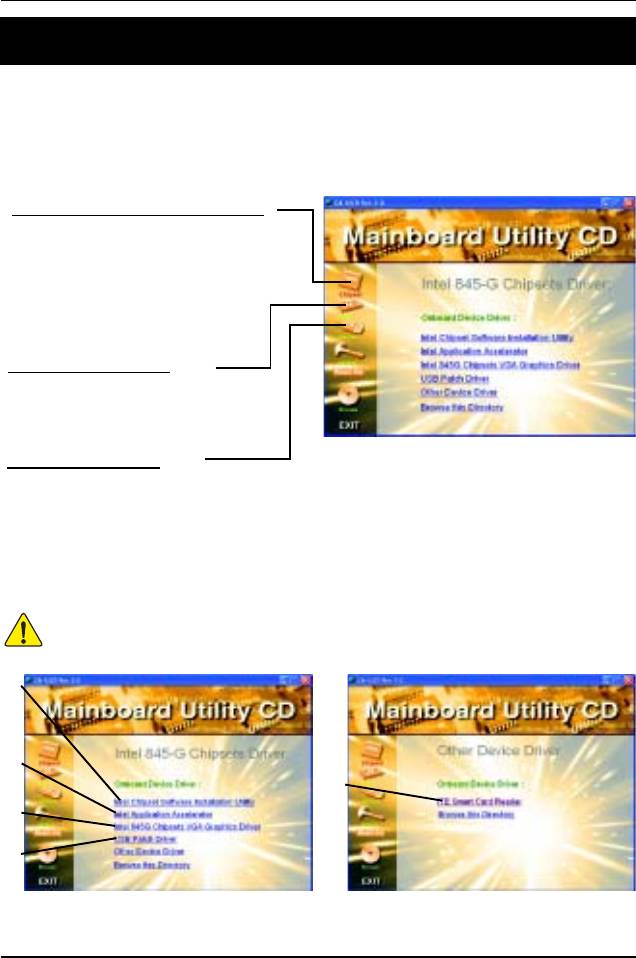
A. Installing Intel 845-G Chipset Driver
Please install this driver as the first
priority. this item installs the chipset
driver utility that enableds Plug-n-
Plag INF support for Intel chipset
component.
B. Installing Sound Driver
Click this item to install sound
driver.
C. Installing LAN Driver
Click this item to install LAN
driver.
Appendix A: Intel 845-G Chipset Driver Installation
Follow the setup that showing on the scween to install the Utility.
Inorder to install the driver successfully, please refer to the following installation procedures.
1
2
5
3
4
63
GA-8IGX Motherboard
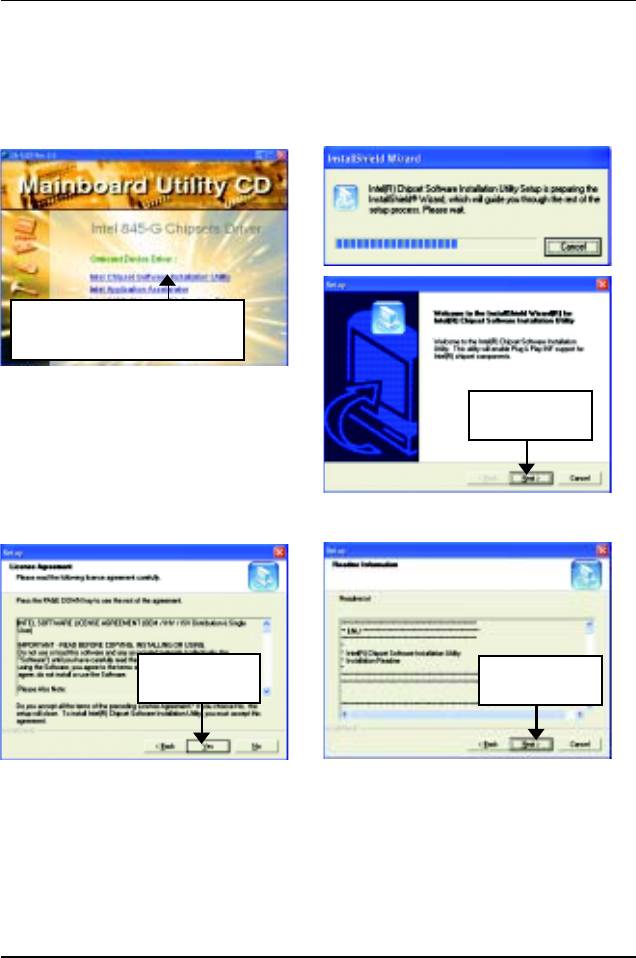
A-1. Intel Chipset Software Installation Utility
Insert the driver CD-title that came with your motherboard into your CD-ROM driver, the driver
CD-title will auto start and show the installation guide. If not, please double click the CD-ROM device
icon in "My computer", and execute the setup.exe.
1.Click "Intel Chipset Software
Installation Utility" item.
(1)
2.Click "Next".
(2)
3.Click "Yes".
4.Click "Next".
(3)
(4)
64
Appendix
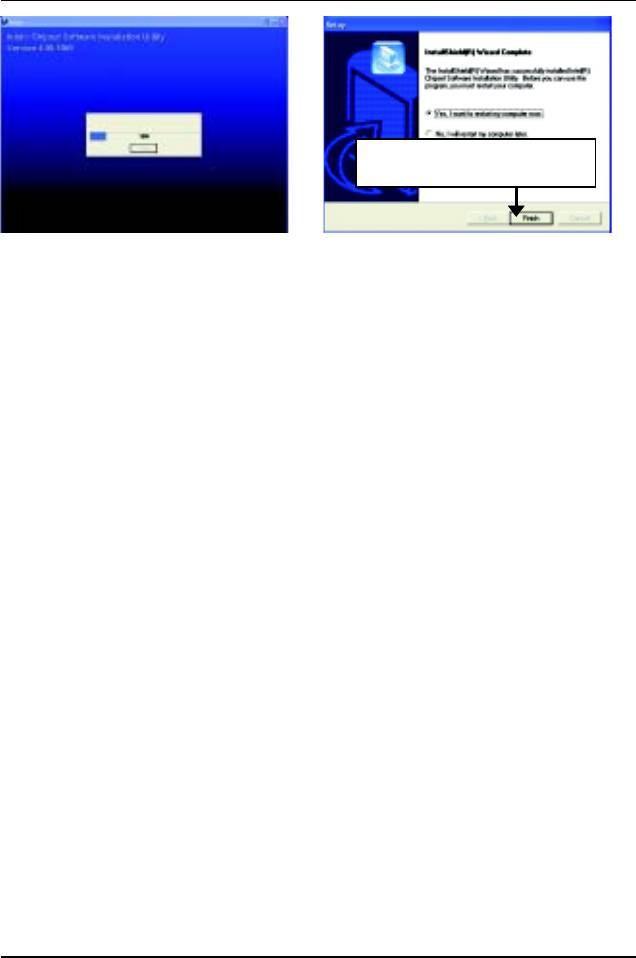
5.Click "Finish" to restart computer.
(5)
(6)
65
GA-8IGX Motherboard
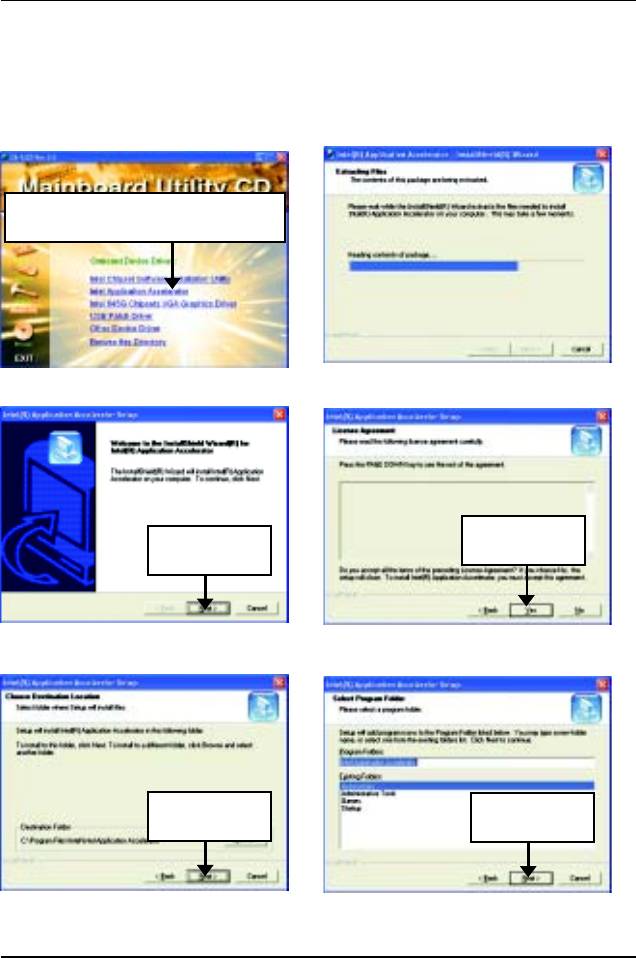
A-2. Intel Application Accelerator
Insert the driver CD-title that came with your motherboard into your CD-ROM driver, the driver
CD-title will auto start and show the installation guide. If not, please double click the CD-ROM device
icon in "My computer", and execute the setup.exe.
1.Click "Intel Application Accelerator" item.
(1)
(2)
3.Click "Yes".
2.Click "Next".
(3)
(4)
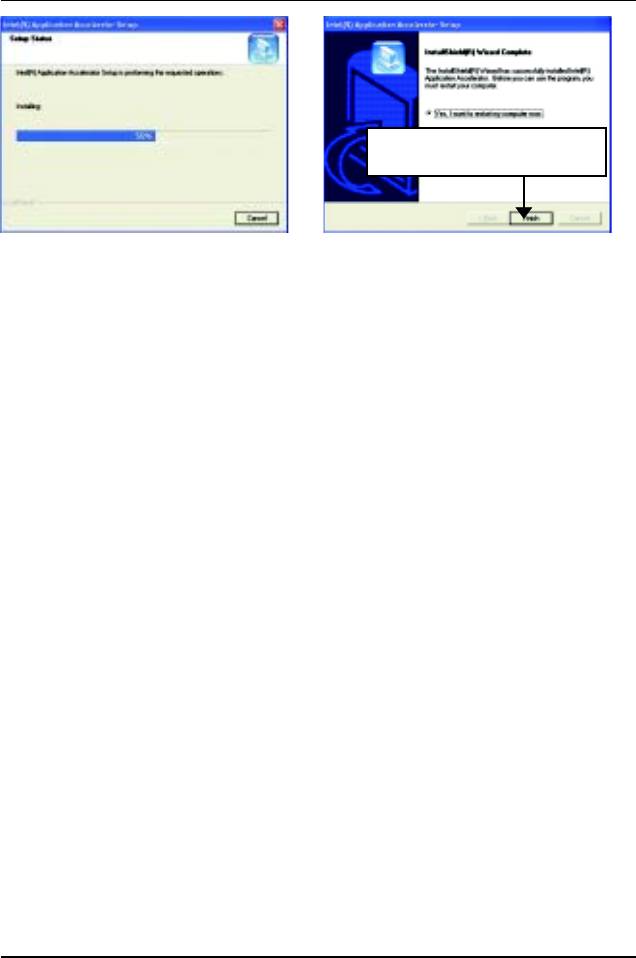
4.Click "Next".
5.Click "Next".
(5)
(6)
66
Appendix
6.Click "Finish" to restart computer.
(7)
(8)
67
GA-8IGX Motherboard
A-3. Intel 845G Chipset VGA Graphics Driver
Insert the driver CD-title that came with your motherboard into your CD-ROM driver, the driver
CD-title will auto start and show the installation guide. If not, please double click the CD-ROM device
icon in "My computer", and execute the setup.exe.
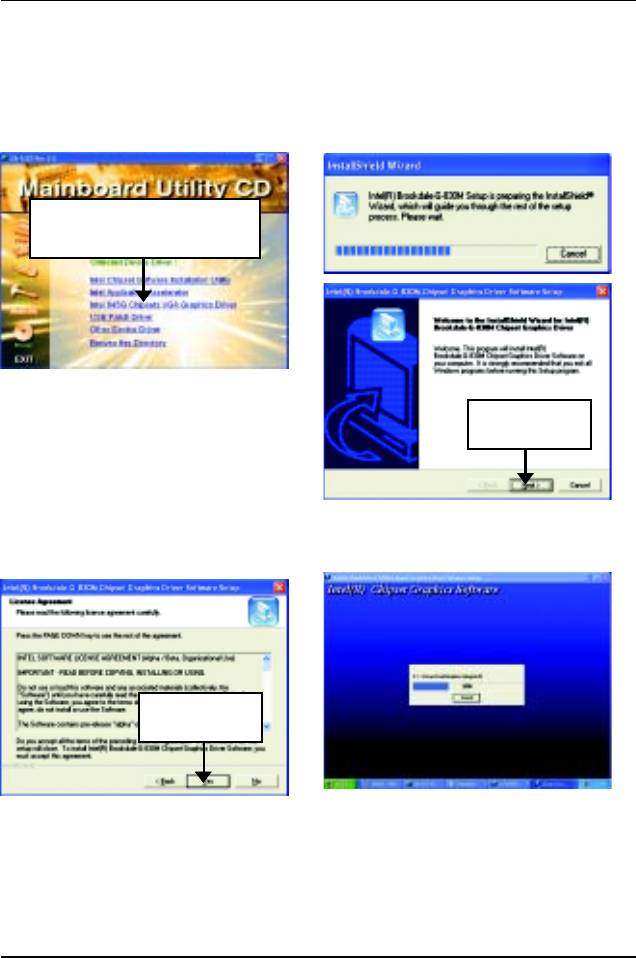
1.Click "Intel 845G Chipset VGA
Graphics Driver" item.
(1)
2.Click "Next".
(2)
3.Click "Yes".
(3)
(4)
68
Appendix
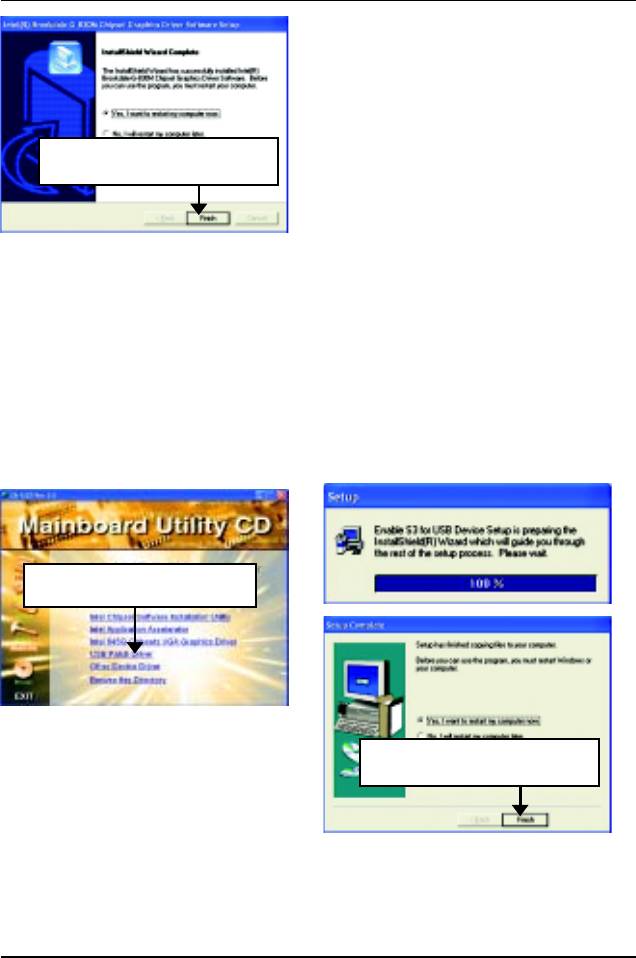
4.Click "Finish" to restart computer.
(5)
A-4. USB Patch Driver
Insert the driver CD-title that came with your motherboard into your CD-ROM driver, the driver
CD-title will auto start and show the installation guide. If not, please double click the CD-ROM device
icon in "My computer", and execute the setup.exe.
1.Click "USB Patch Driver" item.
(1)
2.Click "Finish" to restart computer.
(2)
69
GA-8IGX Motherboard
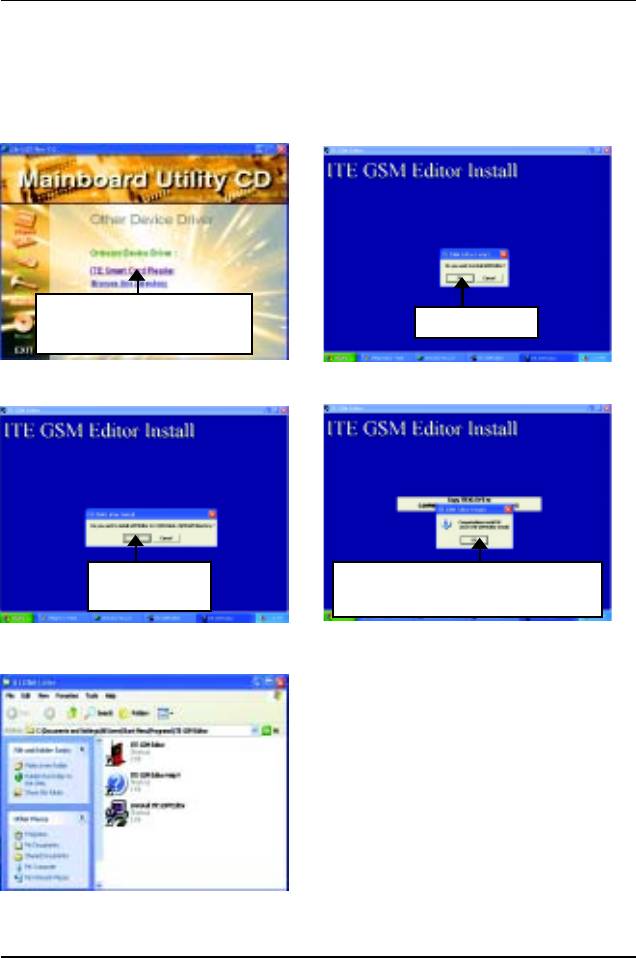
A-5. ITE Smart Card Reader
Insert the driver CD-title that came with your motherboard into your CD-ROM driver, the driver
CD-title will auto start and show the installation guide. If not, please double click the CD-ROM device
icon in "My computer", and execute the setup.exe.
1.Click "ITE Smart Card
2.Click "OK".
Reader" item.
(1)
(2)
3.Click "OK".
4.Click "OK" to Leave ITE GSM Editor
Install.
(3)
(4)
(5)
70
Appendix
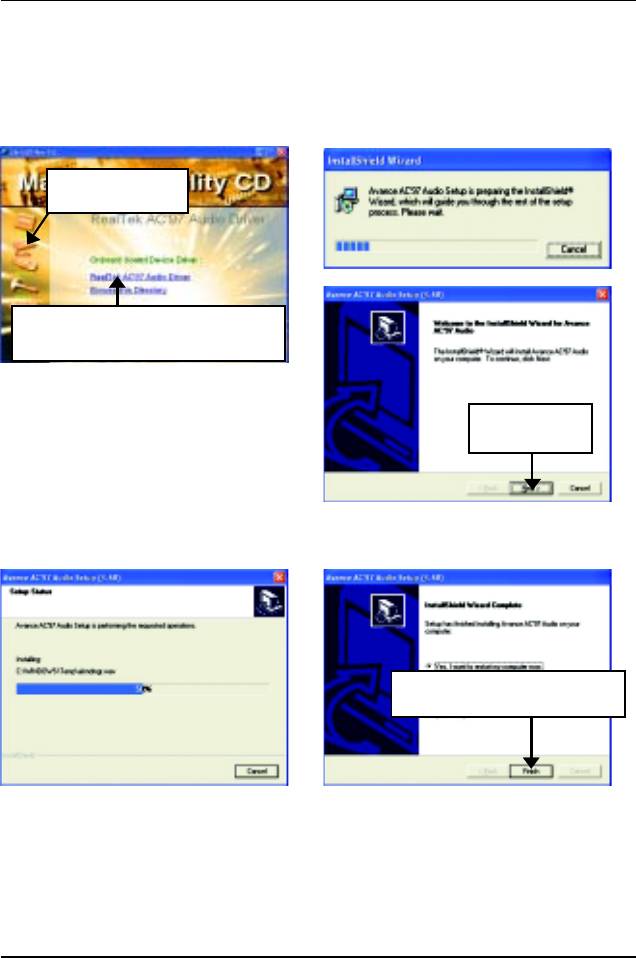
Appendix B: RealTek AC’97 Audio Driver
Revision History
Insert the driver CD-title that came with your motherboard into your CD-ROM driver, the driver
CD-title will auto start and show the installation guide. If not, please double click the CD-ROM device
icon in "My computer", and execute the setup.exe.
Press "Audio" icon.
1.Click "RealTek AC’97 Audio Driver"
item.
(1)
2.Click "Next".
(2)
3.Click "Finish" to restart computer.
(3)
(4)
71
GA-8IGX Motherboard
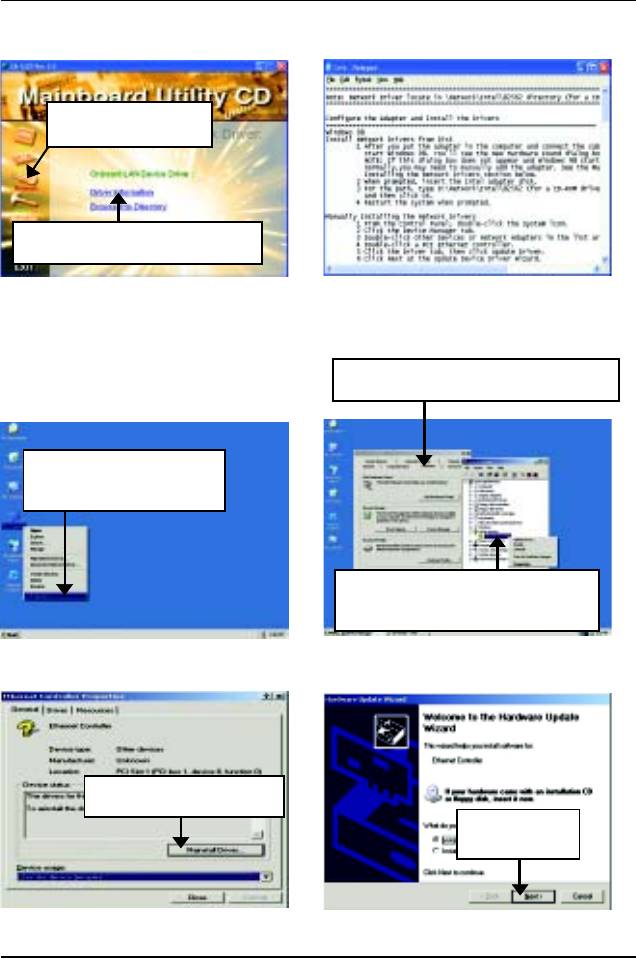
Appendix C: Intel 82562 Network Driver
Press "Network" icon.
1.Click "Driver Information" item.
(1)
(2)
¾ For your reference, you can use the
followingsteps to complete the Network Driver
2.Click "Hardware"”Device Manager”.
Installation.
1.Click "My Computer"
“Properties”.
3.Click "Other devices""Ethernet
Controller".
(4)
(3)
4.Click "Reinstall Driver”.
5.Click "Next".
(5)
(6)
72
Appendix
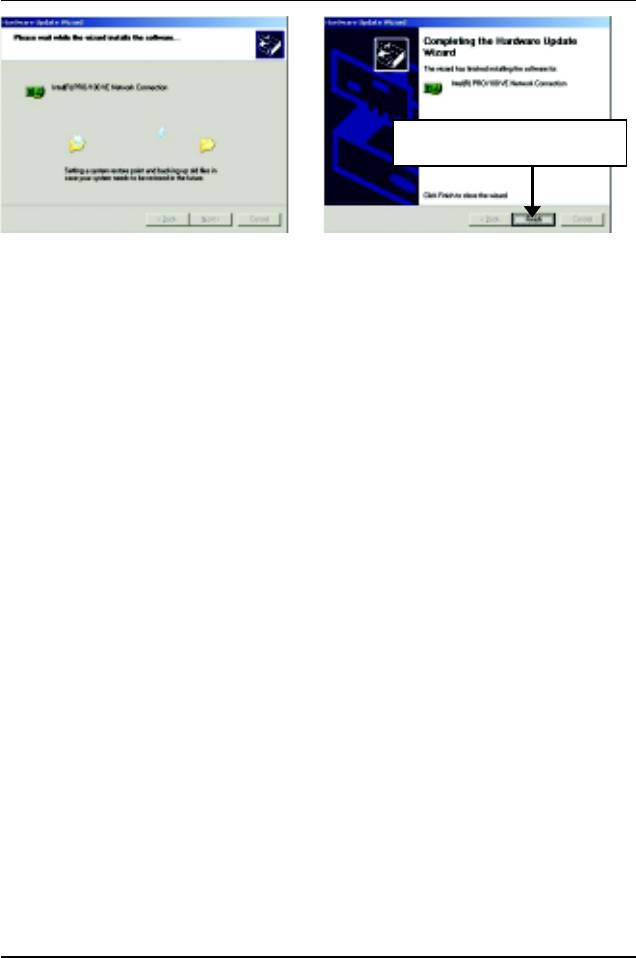
6.Click "Finish" to restart computer.
(7)
(8)
73
GA-8IGX Motherboard
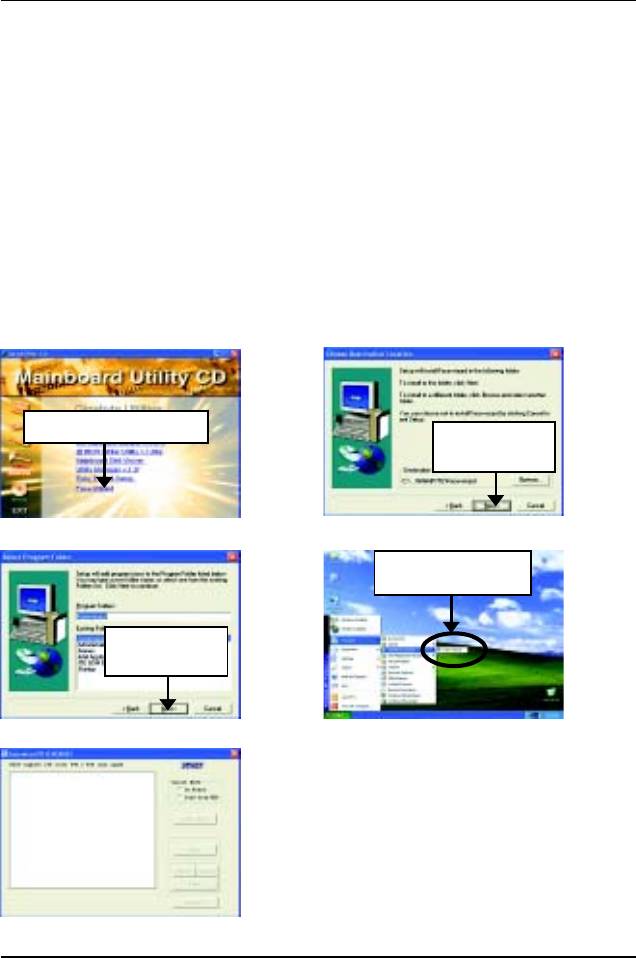
Appendix D: Face-Wizard Utilities Installation
TM
What is Face-Wizard
?
TM
Face-Wizard
is a windows based utility with user-friendly interface that allows users to change
the boot-up logo with picture from Gigabyte Logo Gallery on web site or other compatible picture
you have.
How does it work?
TM
Face-Wizard
allows user to select BIOS on board or file in hard drive, floppy disk , zip, MO or
other storage devices and combine the compatible picture you prefer into BIOS. And not only this,
TM
Face-Wizard
also helps user to update BIOS in windows mode.
TM
What’s benefit for using Face-Wizard
?
It can personalize boot-up logo to show your unique style from others, and never again looking at
the black and white boot up screen.
1.Click "Face-Wizard" item.
2.Click "Next".
(1)
(2)
4.Click "Face-Wizard".
3.Click "Next".
(3)
(4)
(5)
74
Appendix
Appendix E: EasyTune 4 Utilities Installation
Revision History
Insert the driver CD-title that came with your motherboard into your CD-ROM driver, the driver
CD-title will auto start and show the installation guide. If not, please double click the CD-ROM device
icon in "My computer", and execute the setup.exe.
Press "Tools" icon.
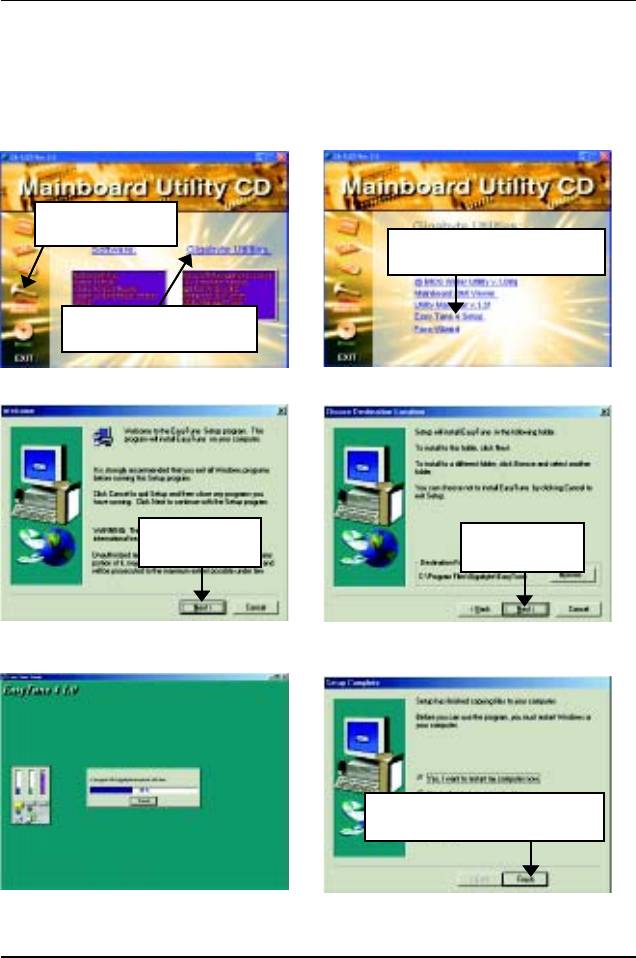
2.Click "Easy Tune 4 Setup".
1.Click "Gigabyte Utilities".
(1)
(2)
3.Click "Next".
4.Click "Next".
(3)
(4)
5.Click "Finish" to restart computer.
(5)
(6)
75
GA-8IGX Motherboard
Appendix F: BIOS Flash Procedure
BIOS update procedure:
Method 1:
TM
If your OS is Win9X, we recommend that you used Gigabyte @BIOS
Program to flash BIOS.
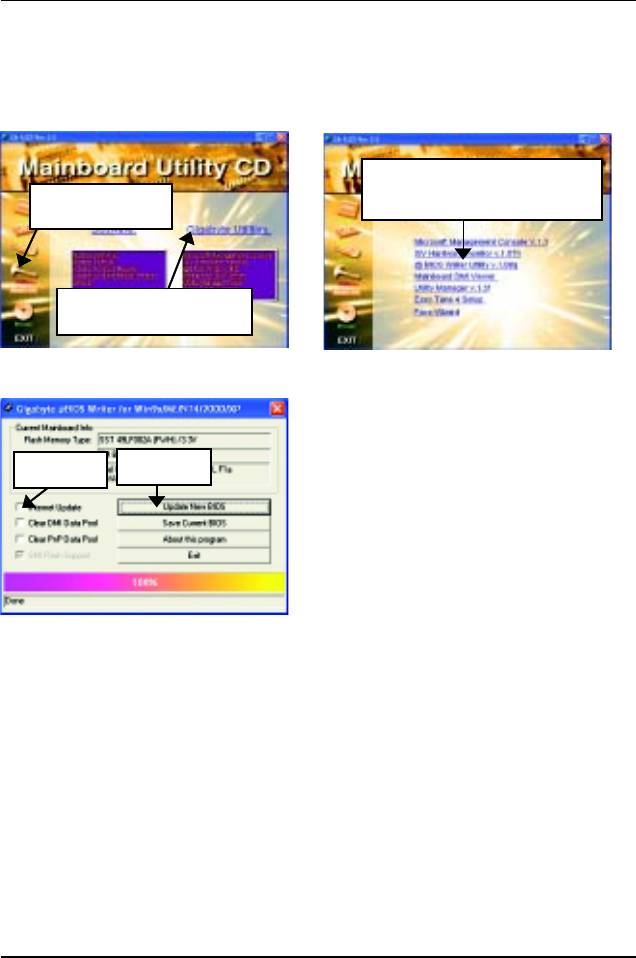
2.Click "@BIOS Writer Utility
Press "Tools" icon.
v.1.08q".
1.Click "Gigabyte Utilities".
(1)
(2)
Click "".
Click here.
(3)
Methods and steps:
I. Update BIOS through Internet
a. Click "Internet Update" icon
b. Click "Update New BIOS" icon
TM
c. Select @BIOS
sever ("Gigabyte @BIOSTM sever 1 in Taiwan" and "Gigabyte
TM
@BIOS
sever 2 in Taiwan" are available for now, the others will be completedsoon)
d. Select the exact model name on your motherboard
e. System will automatically download and update the BIOS.
76

Appendix
II. Update BIOS NOT through Internet:
a. Do not click "Internet Update" icon
b. Click "Update New BIOS"
c. Please select "All Files" in dialog box while opening the old file.
d. Please search for BIOS unzip file, downloading from internet or any other methods (such as:
8IGX.F1).
e. Complete update process following the instruction.
III. Save BIOS
In the very beginning, there is "Save Current BIOS" icon shown in dialog box. It means to save
the current BIOS version.
IV. Check out supported motherboard and Flash ROM:
In the very beginning, there is "About this program" icon shown in dialog box. It can help you
check out which kind of motherboard and which brand of Flash ROM are supported.
Note:
a. In method I, if it shows two or more motherboard's model names to be selected, please make
sure your motherboard's model name again. Selecting wrong model name will cause the
system unbooted.
b. In method II, be sure that motherboard's model name in BIOS unzip file are the same as your
motherboard's. Otherwise, your system won't boot.
TM
c. In method I, if the BIOS file you need cannot be found in @BIOS
server, please go onto
Gigabyte's web site for downloading and updating it according to method II.
d. Please note that any interruption during updating will cause system unbooted
77
GA-8IGX Motherboard
Method 2:
We use GA-7VTX motherboard and Flash841 BIOS flash utility as example.
Please flash the BIOS according to the following procedures if you are now under the DOS mode.
Flash BIOS Procedure:
STEP 1:
(1) Please make sure your system has installed the extraction utility such as winzip or pkunzip.
Firstly you have to install the extraction utility such as winzip or pkunzip for unzip the files. Both of
these utilities are available on many shareware download pages like
http://www.shareware.cnet.
com
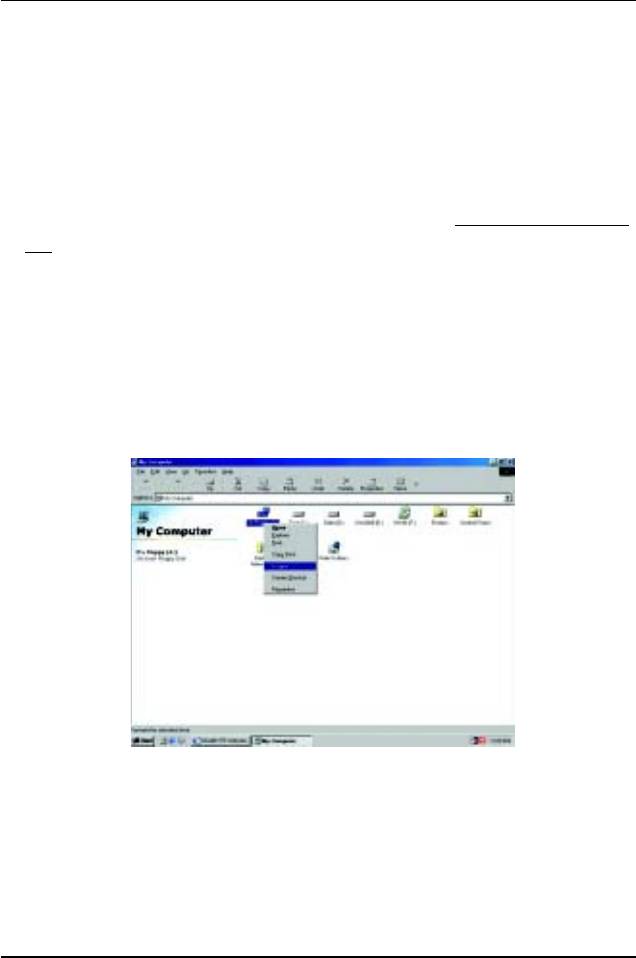
STEP 2: Make a DOS boot diskette. (See example: Windows 98 O.S.)
Beware: Windows ME/2000 are not allowed to make a DOS boot diskette.
(1) With an available floppy disk in the floppy drive. Please leave the diskette "UN-write protected"
type. Double click the "My Computer" icon from Desktop, then click "3.5 diskette (A)" and right
click to select "Format (M)"
78
Appendix
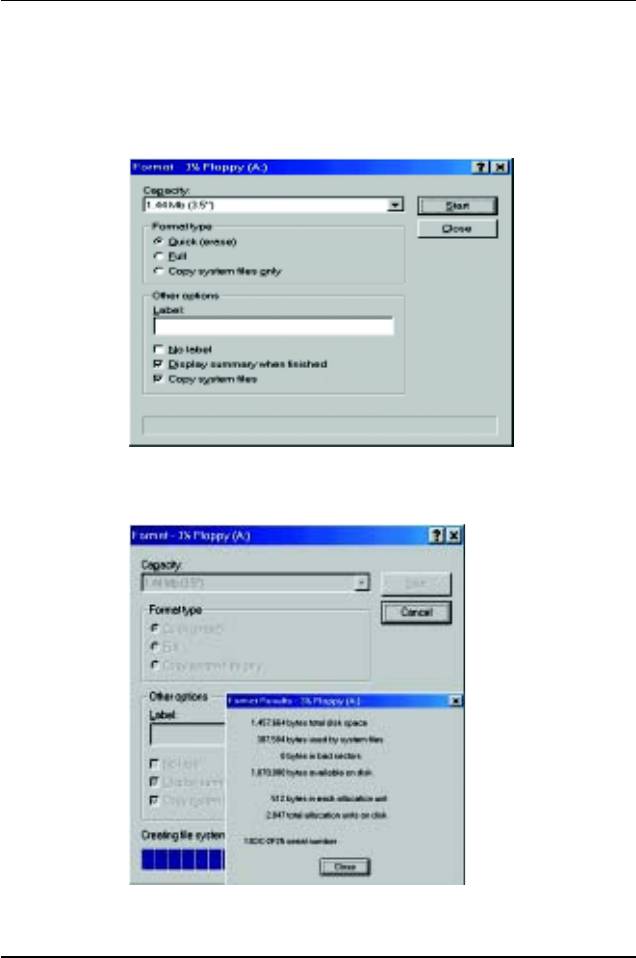
(2) Select the "Quick (erase)" for Format Type, and pick both "Display summary when finished" and
"Copy system files", after that press "Start". That will format the floppy and transfer the needed
system files to it.
Beware: This procedure will erase all the prior data on that floppy, so please proceed accordingly.
(3) After the floppy has been formatted completely, please press "Close".
79
GA-8IGX Motherboard
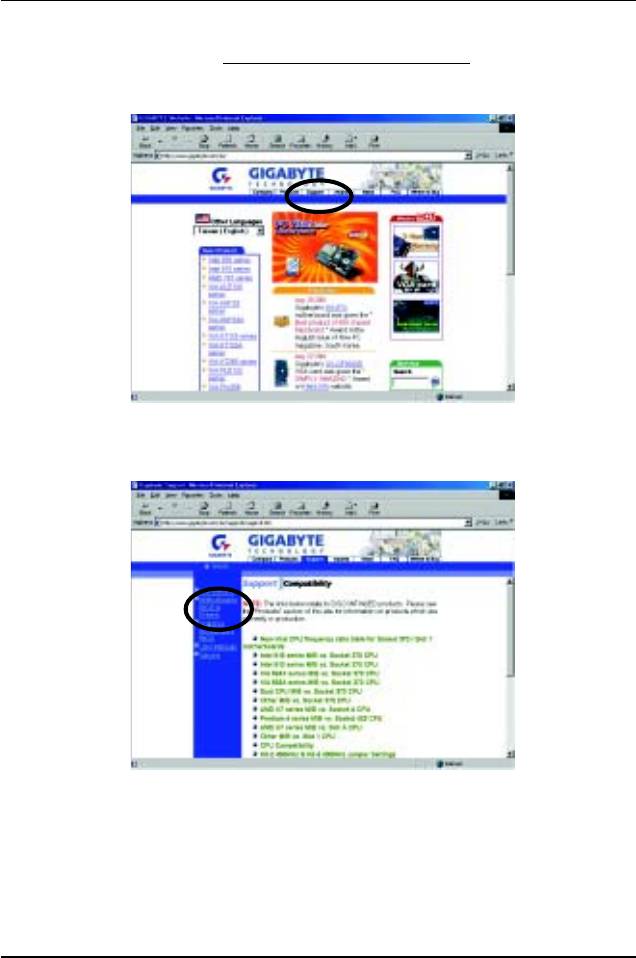
STEP 3: Download BIOS and BIOS utility program.
(1) Please go to Gigabyte website
http://www.gigabyte.com.tw/index.html, and click "Support".
(2) From Support zone, click the "Motherboards BIOS & Drivers".
80
Appendix
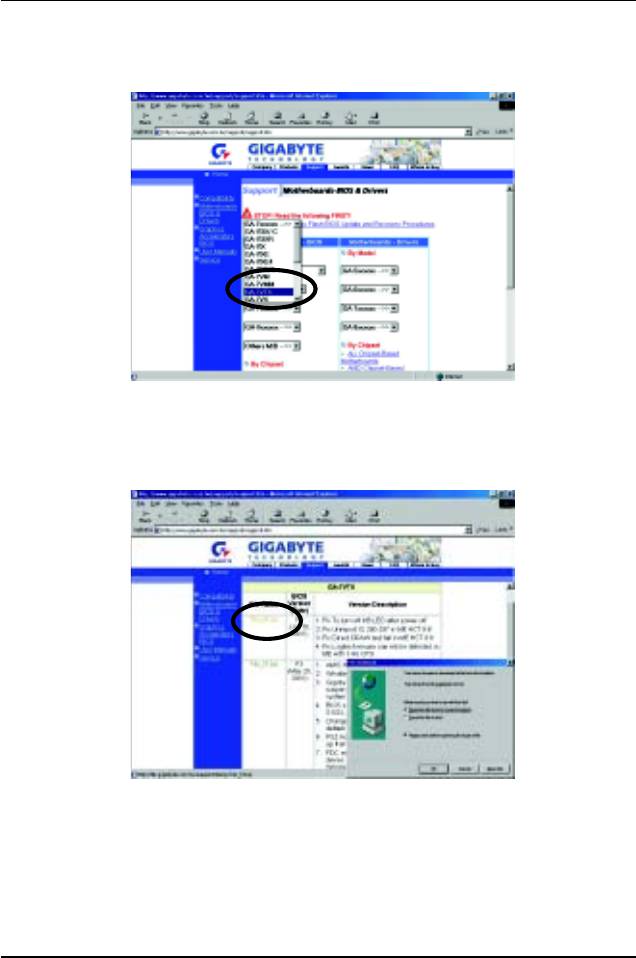
(3) We use GA-7VTX motherboard as example. Please select GA-7VTX by Model or Chipset
optional menu to obtain BIOS flash files.
(4) Select an appropriate BIOS version (For example: F4), and click to download the file. It will pop
up a file download screen, then select the "Open this file from its current location" and press "OK".
81
GA-8IGX Motherboard
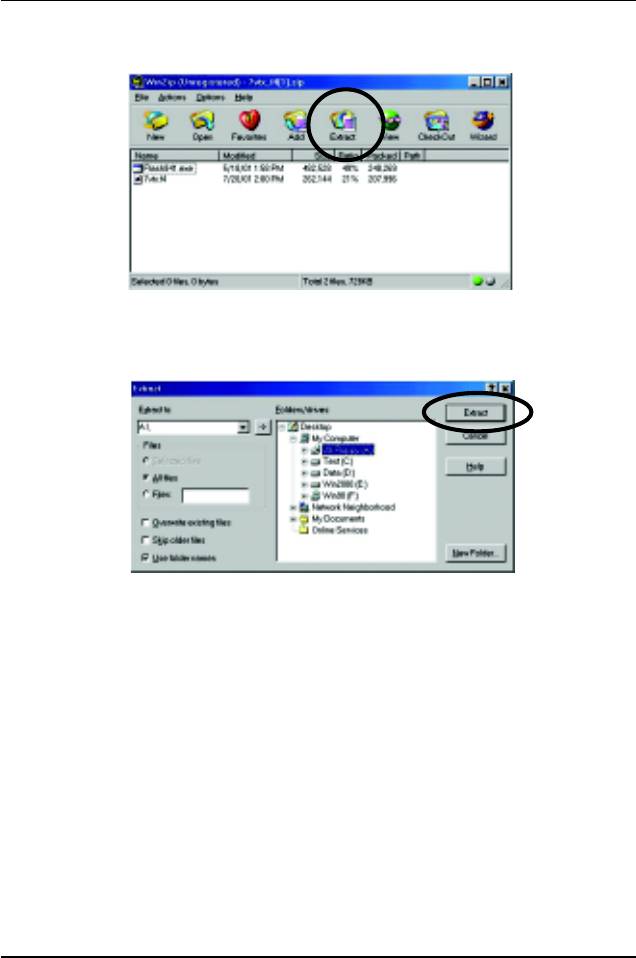
(5) At this time the screen shows the following picture, please click "Extract" button to unzip the files.
(6) Please extract the download files into the clean bootable floppy disk A mentioned in STEP 2, and
press "Extract".
82
Appendix
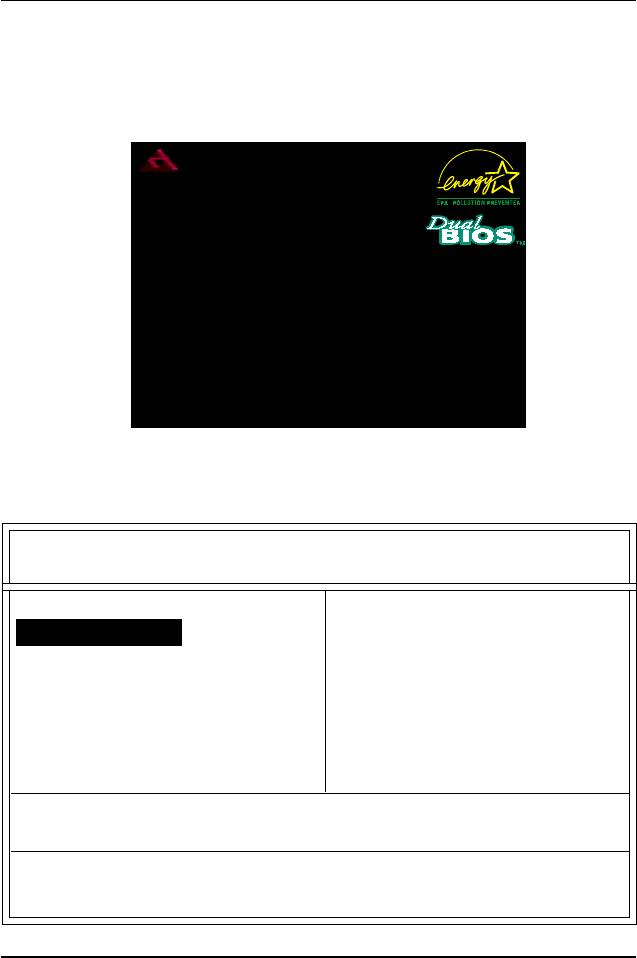
STEP 4: Make sure the system will boot from the floppy disk.
(1) Insert the floppy disk (contains bootable program and unzip file) into the floppy drive A. Then,
restart the system. The system will boot from the floppy disk. Please press <DEL> key to enter
BIOS setup main menu when system is boot up.
American Release:09/16/99
Megatrends AMIBIOS (C) 1999 American Megatrend
7VTX F1
Check System Health OK
AMD-Athlon(tm)Processor-900MHz
Checking NVRAM...
262144KB
Wait...
Press F1 to enter Dual BIOS Utility. Press ESC to quit
Press any key to contiune
( C ) American Megatrends Inc.,
63-0001-001199-00101111-071595-VIA_K7-GA7VTX1-F
(2) Once you enter the BIOS setup utility, the main menu will appear on the screen. Use the arrows
to highlight the item "BIOS FEATURES SETUP".
AMIBIOS SIMPLE SETUP UTILITY - VERSION 1.24b
(C) 1999 American Megatrends, Inc. All Rights Reserved
STANDARD CMOS SETUP INTEGRATED PERIPHERALS
BIOS FEATURES SETUP HARDWARE MONITOR & MISC SETUP
CHIPSET FEATURES SETUP SUPERVISOR PASSWORD
POWER MANAGEMENT SETUP USER PASSWORD
PNP / PCI CONFIGURATION IDE HDD AUTO DETECTION
LOAD BIOS DEFAULTS SAVE & EXIT SETUP
LOAD SETUP DEFAULTS EXIT WITHOUT SAVING
ESC: Quit : Select Item (Shift)F2 : Change Color F5: Old Values
F6: Load BIOS Defaults F7: Load Setup Defaults F10:Save & Exit
Time, Date , Hard Disk Type…
83

GA-8IGX Motherboard
(3) Press "Enter" to enter "BIOS FEATURES SETUP" menu. Use the arrows to highlight the item
"1st Boot Device", and then use the "Page Up" or "Page Down" keys to select "Floppy".
AMIBIOS SETUP - BIOS FEATURES SETUP
( C ) 2001 American Megatrends, Inc. All Rights Reserved
1st Boot Device : Floppy
2nd Boot Device : IDE-0
3rd Boot Device : CDROM
S.M.A.R.T. for Hard Disks : Disabled
BootUp Num-Lock : On ESC: Quit : Select Item
Floppy Drive Seek : Disabled F1 : Help PU/PD/+/- : Modify
Password Check : Setup F5 : Old Values (Shift)F2: Color
F6 : Load BIOS Defaults
F7 : Load Setup Defaults
(4) Press "ESC" to go back to previous screen. Use the arrows to highlight the item "SAVE & EXIT
SETUP" then press "Enter". System will ask "SAVE to CMOS and EXIT (Y/N)?" Press "Y"
and "Enter" keys to confirm. Now the system will reboot automatically, the new BIOS setting
will be taken effect next boot-up.
AMIBIOS SIMPLE SETUP UTILITY - VERSION 1.24b
(C) 2001 American Megatrends, Inc. All Rights Reserved
STANDARD CMOS SETUP INTEGRATED PERIPHERALS
BIOS FEATURES SETUP HARDWARE MONITOR & MISC SETUP
CHIPSET FEATURES SETUP SUPERVISOR PASSWORD
POWER MANAGEMENT SETUP USER PASSWORD
PNP / PCI CONFIGURATION IDE HDD AUTO DETECTION
Save to CMOS and EXIT (Y/N)? Y
LOAD BIOS DEFAULTS SAVE & EXIT SETUP
LOAD SETUP DEFAULTS EXIT WITHOUT SAVING
ESC: Quit : Select Item (Shift)F2 : Change Color F5: Old Values
F6: Load BIOS Defaults F7: Load Setup Defaults F10:Save & Exit
Save Data to CMOS & Exit SETUP
84
Appendix
STEP 5: BIOS flashing.
(1) After the system boot from floppy disk, type "A:\> dir/w" and press "Enter" to check the entire
files in floppy A. Then type the "BIOS flash utility" and "BIOS file" after A:\>. In this case you
have to type "A:\> Flash841 7VTX.F4" and then press "Enter".
Starting Windows 98…
Microsoft(R) Windows98
© Copyright Microsoft Corp 1981-1999
A:\> dir/w
Volume in drive A has no label
Volume Serial Number is 16EB-353D
Directory of A:\
COMMAND.COM 7VTX.F4 FLASH841.EXE
3 file(s) 838,954 bytes
0 dir(s) 324,608 bytes free
A:\> Flash841 7VTX.F4
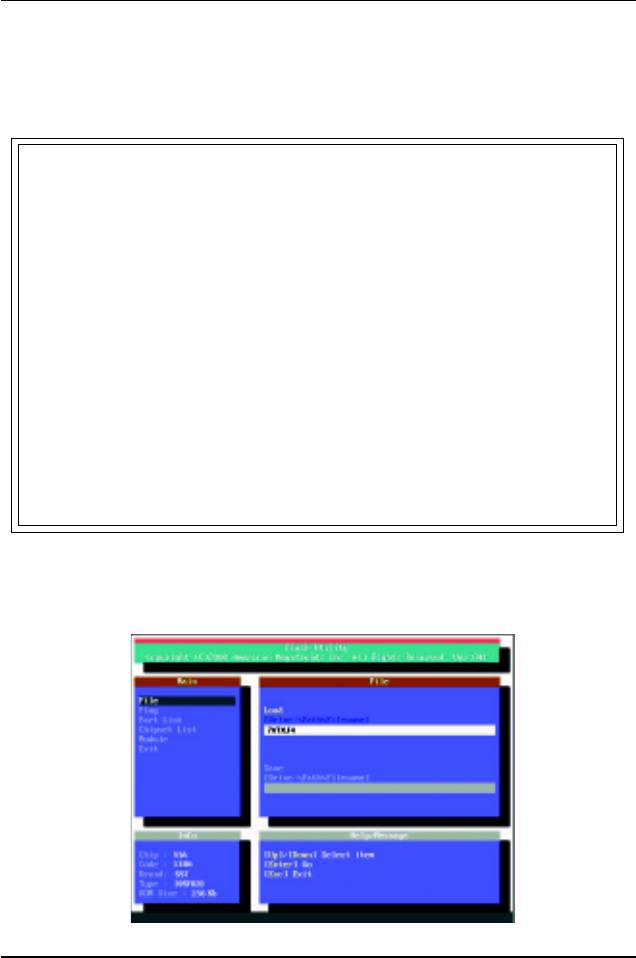
(2) Now screen appears the following Flash Utility main menu. Press "Enter", the highlighted item
will locate on the model name of the right-upper screen. Right after that, press "Enter" to start
BIOS Flash Utility.
85
GA-8IGX Motherboard
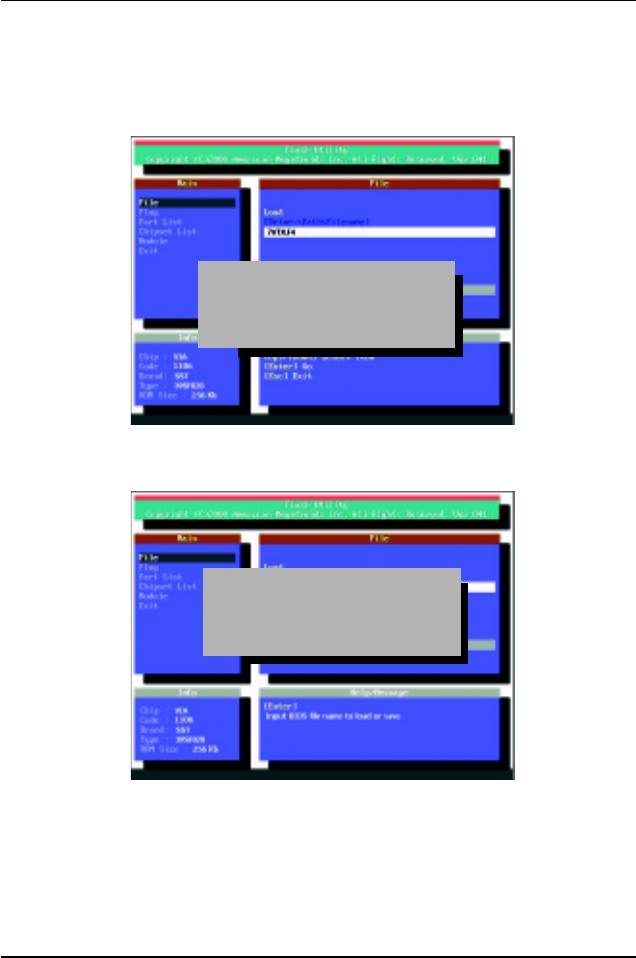
(3) It will pop up a screen and asks "Are you sure to flash the BIOS?" Press [Enter] to continue the
procedure, or press [ESC] to quit.
Beware: Please do not turn off the system while you are upgrading BIOS. It will render your
BIOS corrupted and system totally inoperative.
Are you sure to flash the BIOS?
[Enter] to continue Or [Esc] to cancel?
(4) The BIOS flash completed. Please press [ESC] to exit Flash Utility.
EXIT?
[Enter] to continue Or [Esc] to cancel?
86
Appendix
STEP 6: Load BIOS defaults.
Normally the system redetects all devices after BIOS has been upgraded. Therefore, we highly
recommend reloading the BIOS defaults after BIOS has been upgraded. This important step
resets everything after the flash.
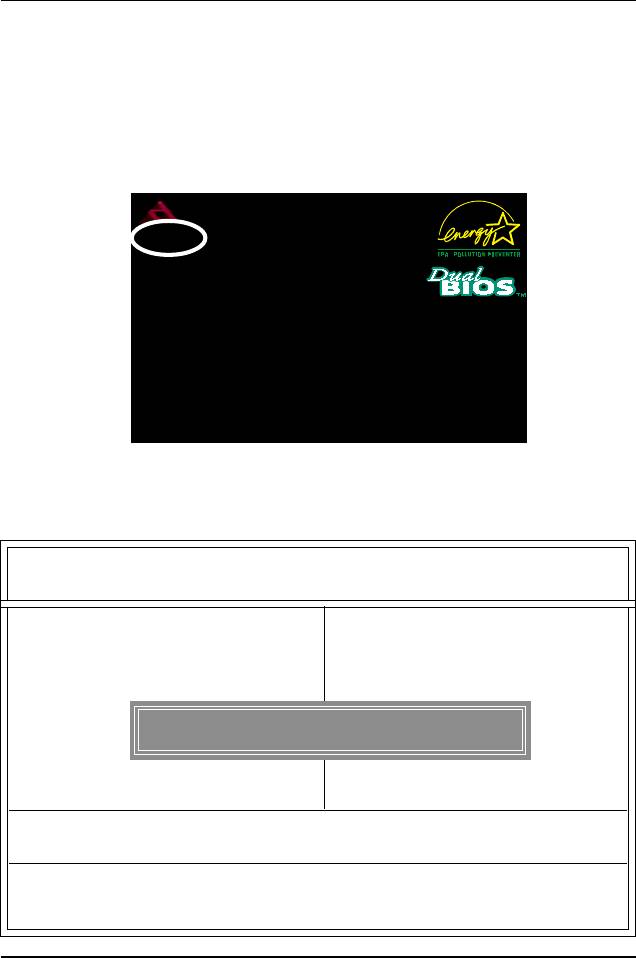
(1) Take out the floppy diskette from floppy drive, and then restart the system. The boot up screen will
indicate your motherboard model and current BIOS version.
American Release:09/16/99
Megatrends AMIBIOS (C) 1999 American Megatrend
7VTX F4
Check System Health OK
AMD-Athlon(tm)Processor-900MHz
Checking NVRAM...
262144KB
Wait...
Press F1 to enter Dual BIOS Utility. Press ESC to quit
Press any key to contiune
( C ) American Megatrends Inc.,
63-0001-001199-00101111-071595-VIA_K7-GA7VTX1-F
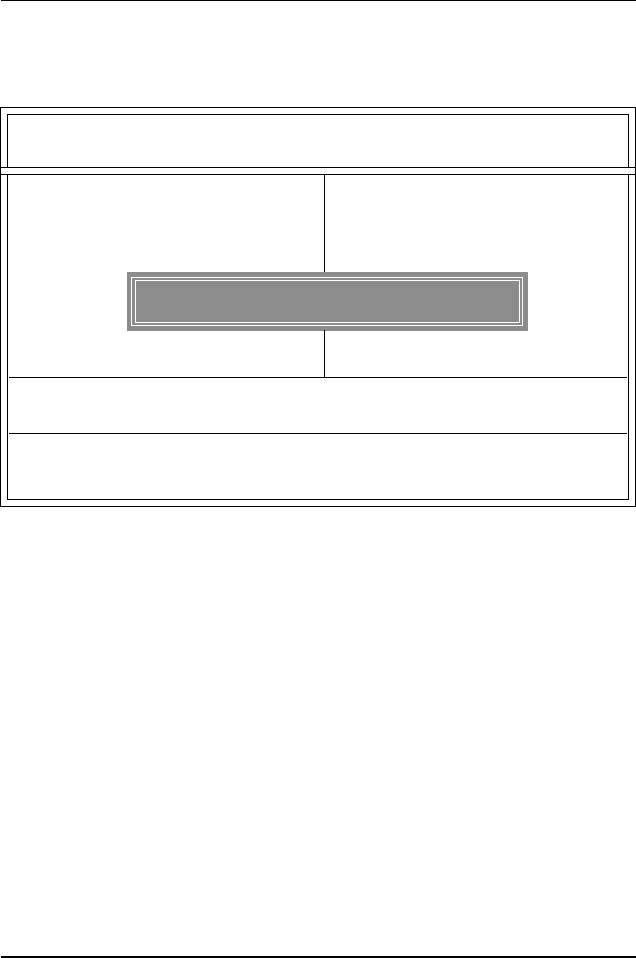
(2) Don't forget to press <DEL> key to enter BIOS setup again when system is boot up. Use the
arrows to highlight the item "LOAD SETUP DEFAULTS" then press "Enter". System will ask
"Load Setup Defaults (Y/N)?" Press "Y" and "Enter" keys to confirm.
AMIBIOS SIMPLE SETUP UTILITY - VERSION 1.24b
(C) 2001 American Megatrends, Inc. All Rights Reserved
STANDARD CMOS SETUP INTEGRATED PERIPHERALS
BIOS FEATURES SETUP HARDWARE MONITOR & MISC SETUP
CHIPSET FEATURES SETUP SUPERVISOR PASSWORD
POWER MANAGEMENT SETUP USER PASSWORD
PNP / PCI CONFIGURATION IDE HDD AUTO DETECTION
Load Setup Defaults? (Y/N)?N
LOAD BIOS DEFAULTS SAVE & EXIT SETUP
LOAD SETUP DEFAULTS EXIT WITHOUT SAVING
ESC: Quit : Select Item (Shift)F2 : Change Color F5: Old Values
F6: Load BIOS Defaults F7: Load Setup Defaults F10:Save & Exit
Load Setup Defaults
87
GA-8IGX Motherboard
(3) Use the arrows to highlight the item "SAVE & EXIT SETUP" and press "Enter". System will
ask "SAVE to CMOS and EXIT (Y/N)?" Press "Y" and "Enter" keys to confirm. Now the
system will reboot automatically, the new BIOS setting will be taken effect next boot-up.
AMIBIOS SIMPLE SETUP UTILITY - VERSION 1.24b
(C) 2001 American Megatrends, Inc. All Rights Reserved
STANDARD CMOS SETUP INTEGRATED PERIPHERALS
BIOS FEATURES SETUP HARDWARE MONITOR & MISC SETUP
CHIPSET FEATURES SETUP SUPERVISOR PASSWORD
POWER MANAGEMENT SETUP USER PASSWORD
PNP / PCI CONFIGURATION IDE HDD AUTO DETECTION
Save to CMOS and EXIT (Y/N)? Y
LOAD BIOS DEFAULTS SAVE & EXIT SETUP
LOAD SETUP DEFAULTS EXIT WITHOUT SAVING
ESC: Quit : Select Item (Shift)F2 : Change Color F5: Old Values
F6: Load BIOS Defaults F7: Load Setup Defaults F10:Save & Exit
Save Data to CMOS & Exit SETUP
(4) Congratulate you have accomplished the BIOS flash procedure.
88

Appendix
Appendix G: Acronyms
Acronyms Meaning
ACPI Advanced Configuration and Power Interface
APM Advanced Power Management
AGP Accelerated Graphics Port
AMR Audio Modem Riser
ACR Advanced Communications Riser
BIOS Basic Input / Output System
CPU Central Processing Unit
CMOS Complementary Metal Oxide Semiconductor
CRIMM Continuity RIMM
CNR Communication and Networking Riser
DMA Direct Memory Access
DMI Desktop Management Interface
DIMM Dual Inline Memory Module
DRM Dual Retention Mechanism
DRAM Dynamic Random Access Memory
DDR Double Data Rate
ECP Extended Capabilities Port
ESCD Extended System Configuration Data
ECC Error Checking and Correcting
E MC Electromagnetic Compatibility
EPP Enhanced Parallel Port
ESD Electrostatic Discharge
FDD Floppy Disk Device
FSB Front Side Bus
HDD Hard Disk Device
IDE Integrated Dual Channel Enhanced
IRQ Interrupt Request
I/O Input / Output
IOAPIC Input Output Advanced Programmable Input Controller
ISA Industry Standard Architecture
LAN Local Area Network
to be continued......
89

GA-8IGX Motherboard
Acronyms Meaning
LBA Logical Block Addressing
LED Light Emitting Diode
MH z Megahertz
MIDI Musical Interface Digital Interface
MTH Memory Translator Hub
MPT Memory Protocol Translator
NI C Network Interface Card
OS Operating System
OEM Original Equipment Manufacturer
PAC PCI A.G.P. Controller
POST Power-On Self Test
PCI Peripheral Component Interconnect
RIMM Rambus in-line Memory Module
SCI Special Circumstance Instructions
SECC Single Edge Contact Cartridge
SRAM Static Random Access Memory
SMP Symmetric Multi-Processing
SMI System Management Interrupt
USB Universal Serial Bus
VID Voltage ID
90
Appendix
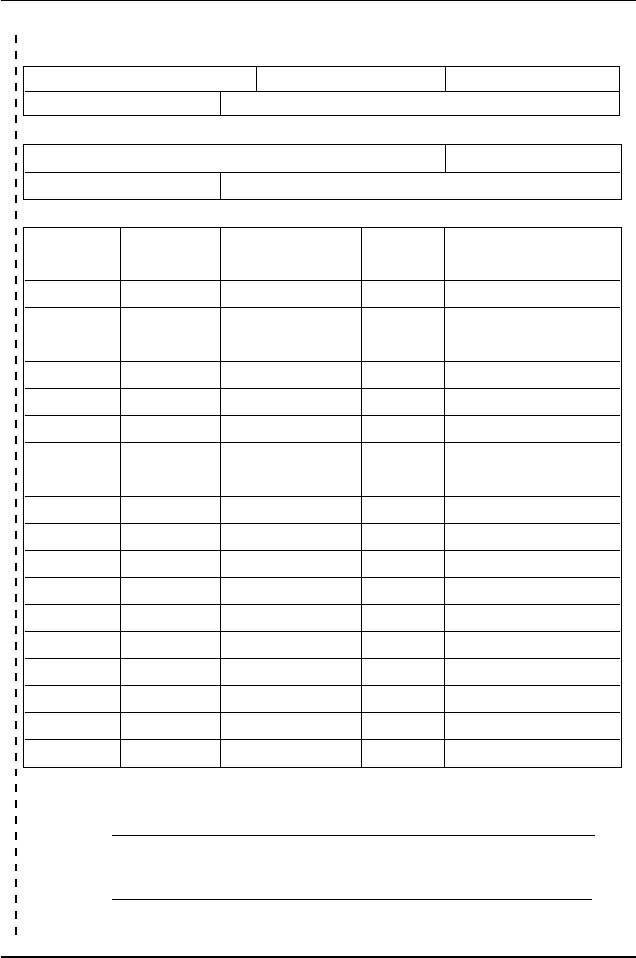
Technical Support/RMA Sheet
Customer/Country: Company: Phone No.:
Contact Person: E-mail Add. :
Model name/Lot Number: PCB revision:
BIOS version: O.S./A.S.:
Hardware Mfs. Model name Size: Driver/Utility:
Configuration
CPU
Memory
Brand
Video Card
Audio Card
HDD
CD-ROM /
DVD-ROM
Modem
Network
AMR / CNR
Keyboard
Mouse
Power supply
Other Device
Problem Description:
91


