Gigabyte 12QM-TVPCI01-1001R: инструкция
Раздел: Бытовая, кухонная техника, электроника и оборудование
Тип: Ресивер/Усилитель
Инструкция к Ресиверу/Усилителю Gigabyte 12QM-TVPCI01-1001R
1-4 Extend the FM antenna and digital TV antenna, and place them on a location
TV Tuner Card
(Note 3)
with better signal reception
.
12QM-TVPCI01-1001R
The hardware installation is then completed!
Now you can connect the computer to an electrical outlet and power on the computer.
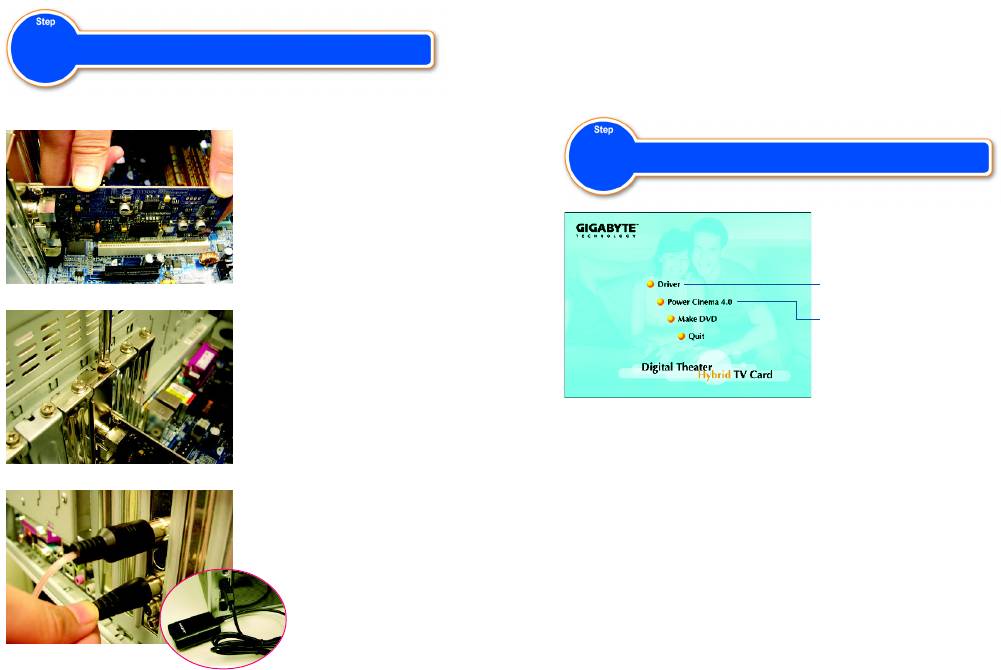
Installation of a TV Tuner Card
Follow the instructions in the next section for driver and software installation for the
1
TV card.
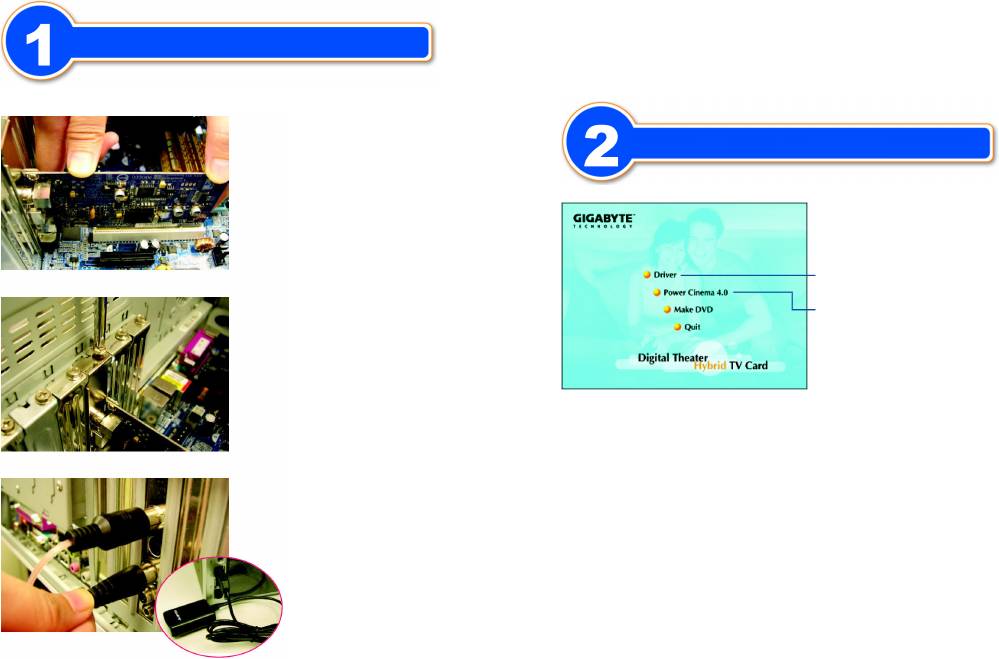
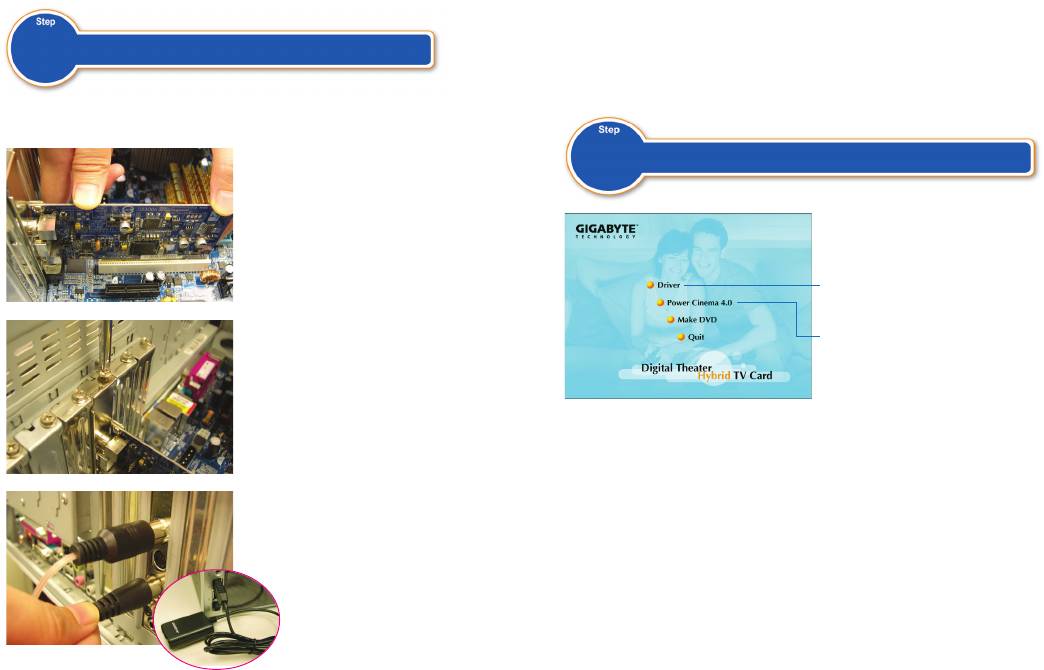
Prior to installation, please check if the motherboard has one open PCI slot.
1-1 Take the TV card out of the anti-static
bag, and carefully, firmly insert the TV
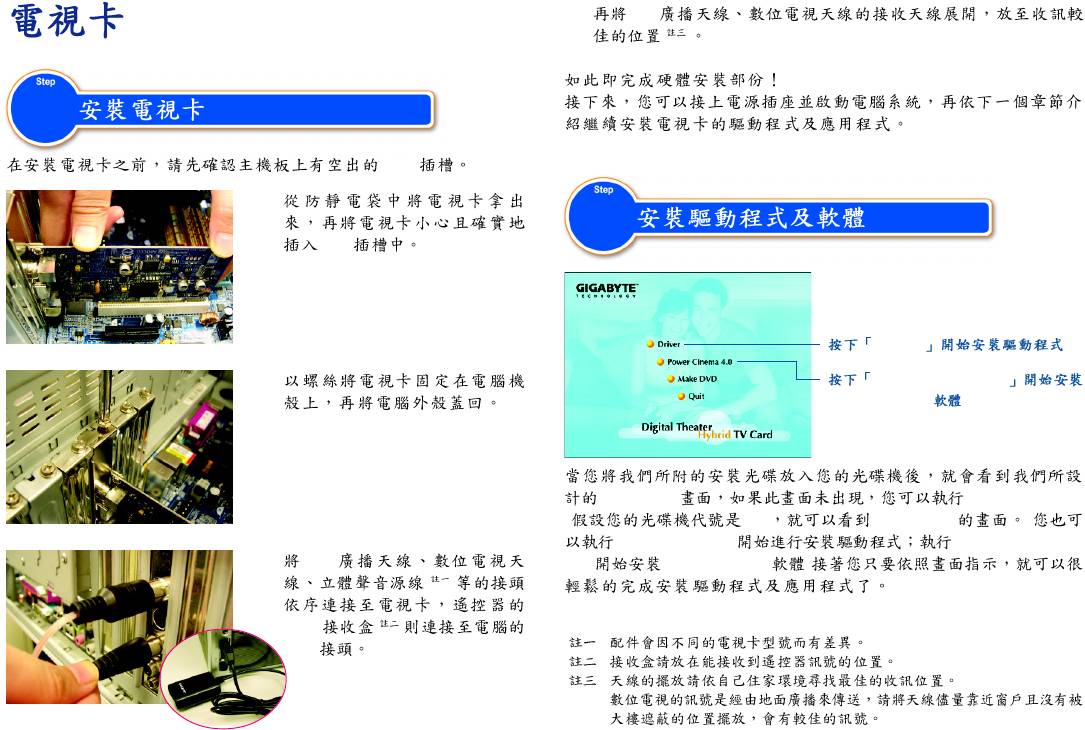
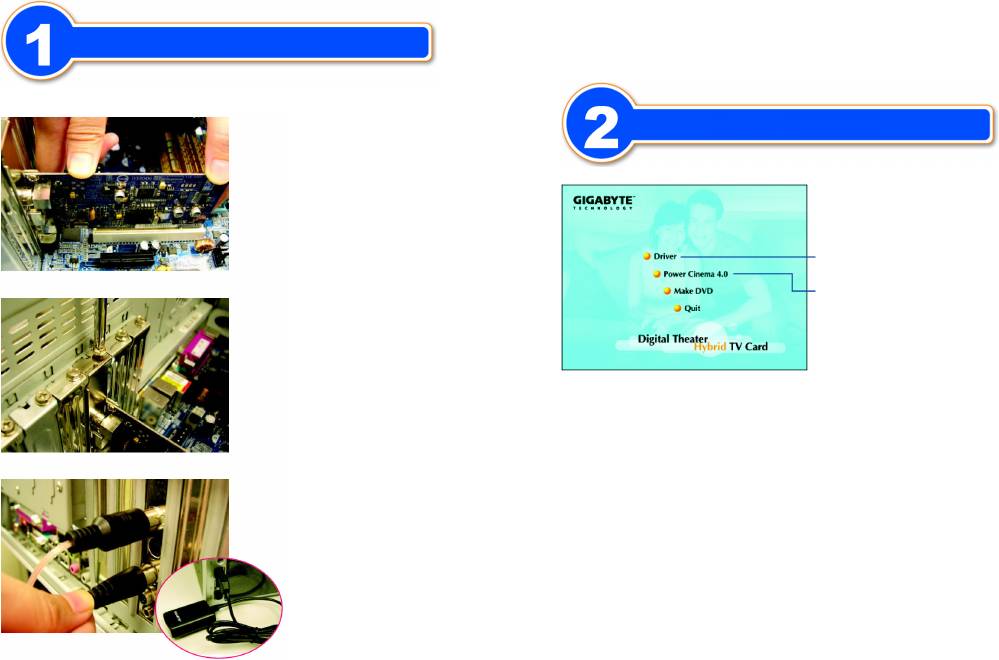
Installation of Driver and Softwares
2
card into the PCI slot.
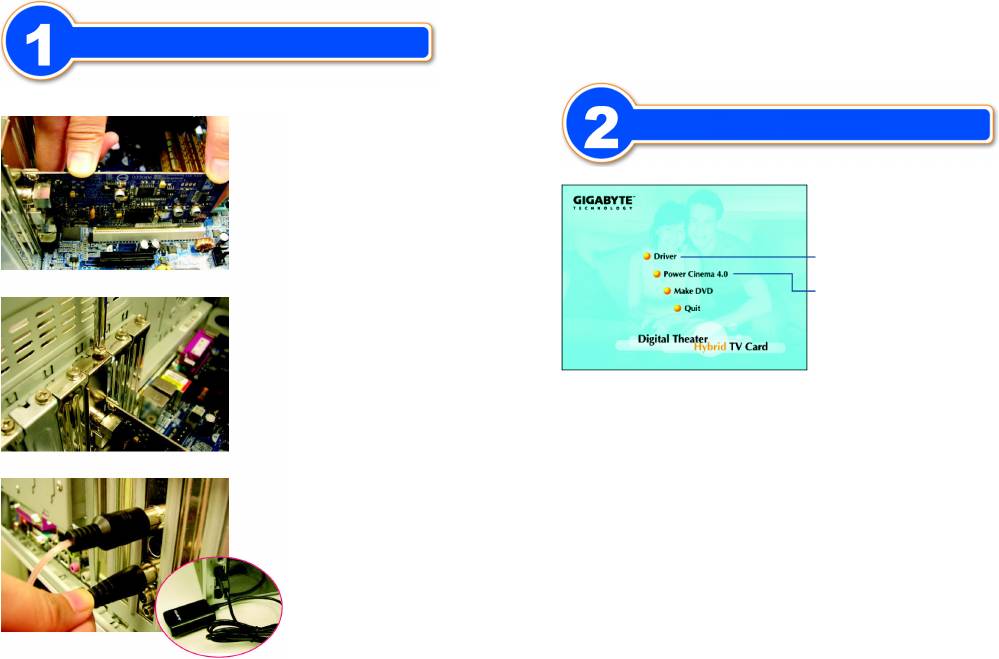
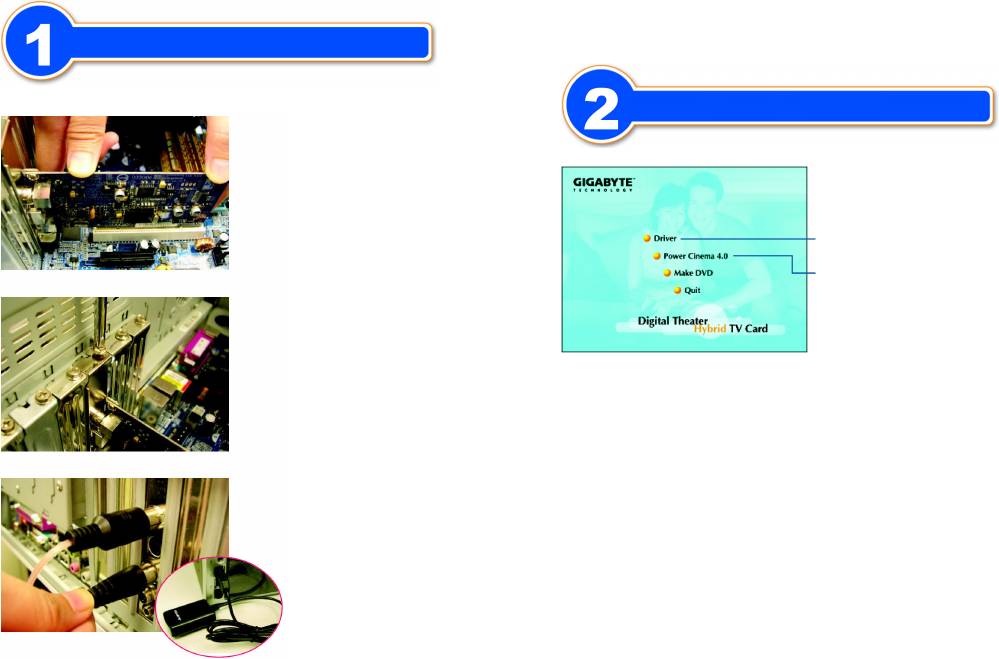
Click "Driver" to install TV card driver.
1-2 Secure the TV card to the computer
Click "Power Cinema 4.0" to install PowerCinema
chassis with screws, and then replace
4.0 for the TV card.
the computer case.
When you place the supplied Installation CD into the CD-ROM drive of your computer,
the AUTORUN screen will appear. If the screen does not appear, you can run "D:
\TVCard.exe"(D stands for the CD-ROM drive) to display the screen. (You can run
"D:\Drv\Setup.exe" to start the Driver installation and run D:\PCinema\Setup.exe" to
1-3 Connect the FM antenna, digital TV
start the PowerCinema installation.) Then follow the on-screen instructions to install
(Note 1)
antenna and stereo sound cable
to
the driver and software with ease.
the TV card. Connect the USB receiver
(Note 2)
for the remote control to a USB port
(Note 1) The accessories may vary depending on different models.
on your computer.
(Note 2) Please place the receiver at a location where remote control signals are available.
(Note 3) Find a location in your house where can get the best reception. The digital TV signals are
transmitted via a ground-based transmitter. Please place the antenna near the window and
away from sheltering buildings as possible as you can for better signal reception.
1-4 FM
( )
1
PCI
1-1
2
PCI
Driver
1-2
Power Cinema 4.0
PowerCinema 4.0
AUTORUN "D:\TVCard.exe"
( D:) AUTORUN (
D:\Drv\Setup.exe D:\PCinema\Setup.
1-3 FM
exe PowerCinema )
( )
( )
USB
( )
USB
( )
( )

1-4 Positionnez l'antenne FM et TV numérique à votre guise afin d'obtenir le meilleur
(note 3)
Carte TV Tuner
signal de réception que possible
.
L'installation hardware est à présent terminée !
Vous pouvez à présent brancher votre ordinateur à une source électrique et le mettre en
route. Suivez les instructions de la section suivante pour l'installation des logiciels et
drivers.
Avant installation, vérifiez si votre carte mère propose un emplacement PCI de libre.
1-1 Sortez la carte TV de son emballage
Lorsque vous insérez le CD d'installation dans votre lecteur CD-ROM, l'écran de
lancement automatique s'affichera. Si cet écran n'apparaît pas, vous pouvez le lancer via
“D:\TVCard.exe” (D étant par exemple la lettre de votre lecteur de CD-ROM). (Vous
pouvez débuter l'installation des drivers via “D:\Drv\Setup.exe” et l'installation logicielle via
“D:\PCinema\Setup.exe”). Suivez ensuite les instructions indiquez sur votre écran.
(Note 1) Accessoires peuvent varier selon le modèle.
(Note 2) Assurez vous de trouvez un emplacement convenable pour permettre la meilleure réception
du signal que possible.
(Note 3) Les signaux TV numériques sont transmis par ondes terrestres, placez votre antenne à
proximité d'une fenêtre pour obtenir un meilleur signal.
plastifié et enfoncez la soigneusement sur
un port PCI disponible.
1-2 Verrouillez la carte à votre boîtier en
utilisant les vis et refermez votre châssis.
1-3 Connectez l'antenne FM, l'antenne
(note 1)
numérique et le câble son stéréo
à la
(note 2)
carte TV. Connectez le récepteur USB
à l'un des ports disponibles de votre
Etape
Installation de votre Carte TV Tuner
Etape
Installation des logiciels et drivers
Cliquez “driver” pour installer les pilotes requis.
Cliquez “Power Cinema 4.0” pour installer le
logiciel de votre carte TV.
machine.
1-4 ichten Sie die FM Antenne und die digitale TV Antenne aus und platzieren Sie diese
(Note 3)
TV Tuner Karte
für optimalen Signalempfang
.
Die Hardware Installation ist damit abgeschlossen!
Nund können Sie den Computer wieder an das Stromnetz anschliessen.
Folgen Sie bitte den Schritten des nächsten Kapitels für Treiber und Software Installation
der TV Karte.
Bevor Sie mit der Installation beginnen, prüfen Sie bitte ob Ihr Mainboard einen freien PCI-Slot hat.
1-1 Nehmen Sie die TV Karte aus der
Wenn Sie die mitgelieferte CD in Ihr CD-ROM Laufwerk einlegen, erscheint ein Fenster
mit “AUTORUN”. Sollte das Fenster nicht erscheinen, können Sie run “D: \TVCard.exe”(D
steht für Ihr CD-ROM Laufwerk). (Geben Sie run “D:\Drv\Setup.exe” ein um die Treiber
Installation und run D:\PCinema\Setup.exe” um die PowerCinema Installation zu starten.)
Folgen Sie dann den Instruktionen um die Treiber und Software einfach zu installieren.
(Note 1) Das Zubehör kann bei unterschiedlichen Modellen variieren.
(Note 2) Bitte platzieren Sie den Empfänger so, dass die Fernbedienung ihre Signale empfangen
kann.
(Note 3) Finden Sie die optimale Lokation für besten Empfang. Die digitalen TV Signale werden via
ground-based Transmitter übertragen. Bitte platzieren Sie die Antenne in der Nähe eines
Fensters und wenn möglich nicht in geschlossenen Gebäuden; so ist der Empfang besser.
Anti-Statik Tüte und setzen Sie diese dann
vorsichtig in den PCI Slot.
1-2 Sichern Sie die TV Karte mit den
Schrauben an der Gehäuserückwand.
1-3 Verbinden Sie die FM Antenne, die
digitale TV Antenne und das Stereo
(Note 1)
Soundkabel
mit der TV Karte.
(Note 2)
Verbinden Sie den USB Empfänger
für die Fernbedienung mit Ihrem
Computer.
Step
Installation der TV Karte
Step
Installation der Treiber und Software
Klick "Driver" um die TVKarten-Treiber zu
installieren.
Klick “Power Cinema 4.0” um PowerCinema zu
installieren 4.0 für die TV Karte.

1-4 Estendi l’ antenna FM e quella per la TV cercando la miglior posizione disponibile per
(Nota3)
TV Tuner Card
ricevere il segnale
.
A questo punto l’ istallazione della scheda e’ completata.
Riaccendete il Vostro computer e seguite le istruzioni nella prossima sezione per l’
installazione dei drivers e il software necessario alla scheda TV.
Controllare che la motherboard abbia uno slot PCI libero.
1-1 Estrai la scheda dal sacchetto antistatico e
Una volta inserito il CD fornito con la scheda TV nel lettore del computer, apparira’
automaticamente la schermata di AUTORUN; se cio’ non dovesse avvenire lanciate
D:\TVcard.exe (dove D identifica la lettera della unita CD-ROM in uso).
In alternativa si puo’ lanciare “D:\Drv\Setup.exe” per l’ installazione manuale dei drivers e
“D:\PCinema\Setup.exe” per l’ installazione manuale di PowerCinema.
(Nota 1) Gli accessori possono variare al variare del modello.
(Nota 2) Posizionare il ricevitore in modo da ricevere il segnale del telecomando.
(Nota 3) Posizionare le antenne in modo da facilitare la ricezione del segnale ad esempio
vicino ad una finestra evitando schermature.
inseriscila in uno slot PCI.
1-2 Assicura la scheda utilizzando l’ apposita
vite e richiudi il computer.
1-3 Connetti l’ antenna FM, l’ antenna TV
digitale e i cavi audio (Nota1). Connetti Il
ricevitore del telecomando (Nota 2) ad una
Step
Installazione della scheda TV Tuner
Step
Installazione dei drivers e del software
Seleziona “Driver” per installare i drivers della
scheda TV.
Seleziona “ Power Cinema 4.0” per installare il
programma necessario alla scheda TV.
porta USB.
1-4 Proszę rozłożyć antenę FM oraz antenę telewizji cyfrowej i umieścić je w miejscu o
(Uwaga 3)
Karta telewizyjna
jak najlepszym odbiorze
.
Urządzenie zostało prawidłowo podłączone!
Krok
Po zamontowaniu karty można komputer podłączyć do źródła zasilania, a następnie go
uruchomić. Aby prawidłowo zainstalować sterownik do karty TV oraz oprogramowanie,
Instalacja cyfrowej karty telewizyjnej
należy stosować się do wskazówek zawartych w kolejnej części instrukcji.
Krok
Przed instalacją proszę sprawdzić czy na płycie głównej znajduje się wolne złącze PCI.
1-1 Proszę wyjąć kartę z antystatycznego
Instalacja sterownika i oprogramowania
opakowania, a następnie ostrożnie, ale
pewnie włożyć kartę TV w złacze PCI.
1-2 Za pomocą śrubokręta należy przykręcić
kartę do obudowy komputera. Następnie
należy zamknąc obudowę.
1-3 Proszę podłączyć antenę FM, antenę
telewizji cyfrowej, oraz kabel dźwięku
stereo do karty TV (Uwaga 1). Następnie
należy umieścić odbiornik USB pilota w
wolnym porcie USB w komputerze
(Uwaga 2).
Naciśnij „Driver” aby zainstalować sterownik do
karty TV.
Naciśnij „Power Cinema 4.0” aby zainstalować
oprogramowanie Power Cinema 4.0 do karty TV.
Po umieszczeniu instalacyjnej płyty CD w napędzie CD-ROM komputera, powinien się
pojawić ekran automatycznego uruchamiania („AUTORUN”). Jeżeli okno się nie pojawiło,
proszę uruchomić „D:\Drv\Setup.exe” (D oznacza napęd CD-ROM) aby je otworzyć
(można również uruchomić „D:\Drv\Setup.exe” aby rozpocząć instalację sterownika, lub
„D:\PCinema\Setup.exe” aby zainstalować oprogramowanie Power Ciemna). Aby
pomyślnie zakończyć instalację w następnej kolejności należy korzystać z instrukcji
pojawiających się na ekranie.
(Uwaga 1) Akcesoria dołączone do karty TV mogą się różnić w zależności od zakupionego modelu.
(Uwaga 2) Proszę umieścić odbiornik w miejscu, gdzie dociera sygnał pilota zdalnego sterowania.
(Uwaga 3) Należy znaleźć takie miejsce w pomieszczeniu, gdzie odbiór będzie najlepszy. Sygnały
telewizji cyfrowej są transmitowane za pomocą naziemnych nadajników. Najlepiej jest
umieścić antenę w pobliżu okna nie zasłanianego przez inne budynki.
1-4 Ðàñòÿíèòå FM-àíòåííó è àíòåííó öèôðîâîãî ÒÂ è ðàçìåñòèòå èõ â
Ïëàòà ÒÂ-òþíåðà
(Çàìå÷.3)
ìåñòàõ íàèëó÷øåãî ïðèåìà ñèãíàëîâ
.
Óñòàíîâêà è ïîäêëþ÷åíèå çàâåðøåíû.
Ïîäêëþ÷èòå êîìïüþòåð ê ñåòè ïèòàíèÿ è âêëþ÷èòå åãî. Óñòàíîâèòå äðàéâåðû è
Óñòàíîâêà ïëàòû ÒÂ-òþíåðà
ïðîãðàììíîå îáåñïå÷åíèå äëÿ ÒÂ-òþíåðà â ñîîòâåòñòâèè ñ ïðèâåäåííûìè â
1
ñëåäóþùåì ðàçäåëå èíñòðóêöèÿìè.
Ïåðåä íà÷àëîì óñòàíîâêè óáåäèòåñü, ÷òî íà âàøåé ñèñòåìíîé ïëàòå èìååòñÿ
ñâîáîäíûé ðàçúåì PCI.
1-1 Èçâëåêèòå ïëàòó ÒÂ-òþíåðà èç
Óñòàíîâêà äðàéâåðà è ÏÎ äëÿ ÒÂ-òþíåðà
àíòèñòàòè÷åñêîé óïàêîâêè è
2
àêêóðàòíî âñòàâüòå åå äî óïîðà â
ðàçúåì PCI.
Âûáåðèòå ïóíêò "Driver" äëÿ óñòàíîâêè
äðàéâåðà ÒÂ-òþíåðà
1-2 Ïðèêðåïèòå ïëàòó ÒÂ-òþíåðà ê
Âûáåðèòå ïóíêò "Power Cinema 4.0" äëÿ
êîðïóñó êîìïüþòåðà ñ ïîìîùüþ
óñòàíîâêè ïðîãðàììû PowerCinema 4.0
âèíòîâ è çàêðîéòå êîðïóñ êîìïüþòåðà.
Âñòàâüòå óñòàíîâî÷íûé êîìïàêò-äèñê ñ äðàéâåðàìè è óòèëèòàìè â CD-äèñêîâîä
âàøåãî êîìïüþòåðà. Ïîÿâèòñÿ îêíî àâòîçàïóñêà. Åñëè àâòîçàïóñê íå ñðàáîòàë,
íàáåðèòå êîìàíäó "D:\TVCard.exe" (ìû ïîëàãàåì, ÷òî CD-äèñêîâîäó
ñîîòâåòñòâóåò óñòðîéñòâî D). (Äëÿ óñòàíîâêè äðàéâåðà ìîæíî íàáðàòü êîìàíäó
1-3 Ïîäêëþ÷èòå ê ðàçúåìàì ïëàòû ÒÂ-
"D:\Drv\Setup.exe", à äëÿ óñòàíîâêè ÏÎ PowerCinema - êîìàíäó
òþíåðà àíòåííó FM-äèàïàçîíà,
D:\PCinema\Setup.exe".) Ïîñëå ýòîãî äëÿ óñòàíîâêè äðàéâåðà è ïðîãðàììíîãî
àíòåííó öèôðîâîãî ÒÂ è
îáåñïå÷åíèÿ ïðîñòî ñëåäóéòå âûâîäèìûì íà ýêðàí èíñòðóêöèÿì.
ñòåðåîôîíè÷åñêèé
(Çàìå÷. 1) Êîìïëåêòàöèè ðàçëè÷íûõ ìîäåëåé ÒÂ-òþíåðà ìîãóò ðàçëè÷àòüñÿ.
(Çàìå÷.1)
àóäèîêàáåëü
. Ïîäêëþ÷èòå
(Çàìå÷. 2) Ðàçìåùàéòå ïðèåìíèê ñèãíàëîâ ïóëüòà ÄÓ â ìåñòå õîðîøåãî ïðèåìà ñèãíàëîâ.
(Çàìå÷.2)
(Çàìå÷. 3) Íàéäèòå â âàøåì äîìå ìåñòî ñ íàèëó÷øèì ïðèåìîì ÒÂ- è ðàäèîñèãíàëîâ. Òðàíñëÿöèÿ
ïðèåìíèê ñèãíàëîâ
ïóëüòà
ñèãíàëîâ öèôðîâîãî Ò ïðîèçâîäèòñÿ ÷åðåç íàçåìíûé ïåðåäàò÷èê. Äëÿ îáåñïå÷åíèÿ
äèñòàíöèîííîãî óïðàâëåíèÿ ê
ëó÷øåãî ïðèåìà ñèãíàëîâ ðàçìåùàéòå àíòåííó âáëèçè îêíà òàêèì îáðàçîì, ÷òîáû åå
ðàçúåìó USB êîìïüþòåðà.
íå çàñëîíÿëè äðóãèå çäàíèÿ.
1-4 Extienda la antena de FM y antena digital de televisión, y los coloca en una ubicación
(Nota 3)
Sintonizadora de TV
donde mejor puede recibir la señal
.
¡La instalación del hardware entonces se completa! Ahora usted puede conectar el
ordenador a la red electrica. Siga las instrucciones en la próxima sección para la
instalación del driver y del software de la sintonizadota de televisión.
Antes de la instalación, por favor chequee si la placa base de su ordenador tiene una ranura PCI libre.
1-1 Sacar la tarjeta de la televisión de la bolsa
Cuándo usted coloque el CD de instalación en la unidad de CD-ROM de su ordenador, la
pantalla de AUTORUN aparecerá. Si en la pantalla no aparece, usted puede ejecutar “D:
TVCard.exe”(D significa la unidad de CD-ROM) demostrar la pantalla. (Usted puede
ejecutar “D:\Drv\Setup.exe” y empezará la instalación del Driver y después ejecutar D:
\PCinema\Setup.exe” para empezar la instalación del software PowerCinema.) Entonces
siga las instrucciones en pantalla para instalar el driver y el software con comodidad.
(Note 1) Los accesorios pueden variar dependiendo de los modelos diferentes.
(Note 2) Colocar por favor el receptor en una ubicación donde las señales del mando a distancia
puedan ser recibidas con facilidad.
(Note 3) Encuentre una ubicación en su casa donde puede obtener la mejor recepción de la señal.
Las señales digitales de la televisión se transmiten vía un transmisor suelo. Coloque por
favor la antena cerca de la ventana y lejos de posibles obstáculos que puedan interferir en la
recepción de la señal.
anti-estática, y con cuidado, meter
firmemente la tarjeta de televisión en la
ranura de PCI de la placa base.
1-2 Fijar la tarjeta de la televisión al chasis del
ordenador con tornillos.
1-3 Conectar la antena de FM, antena digital
de televisión y cable de sonido estéreo
(Nota 1)
a la sintonizadora de televisión.
(Nota 2)
Conecte el receptor USB
para el
mando a distancia a un puerto de USB en
su computadora.
Step
Instalación de la Sintonizadora de TV
Step
Instalación de los Drivers y el Software
Haga click “Driver” para instalar el Driver de
tarjeta de televisión.
Haga clic “Power Cinema 4.0” para instalar el
software PowerCinema 4,0 de la tarjeta de
televisión.
(Not 3)
1-4 FM ve dijital TV Antenlerini sinyal seviyesinin yüksek olduğu bir yere yerleştiriniz
.
TV Kartı
TV kartının donanım montajı tamamlandı.
Şimdi bilgisayarınızın elektrik fişlerini takarak bilgisayarı açabilirsiniz.
Sürücü ve yazılım kurulumları için bir sonraki aşamadaki talimatları takip ediniz.
Kuruluma başlamadan önce anakart üzerinde boş bir PCI yuvanın olup olmadığını kontrol ediniz.
1-1 TV kartını anti-statik poşetinden çıkartıp
Bu ekran, TV Kartı ile birlikte gelen Kurulum CD'sini CD ROM sürücüsüne taktığınızda
otomotik olarak açılır. Eğer bu ekran otomotik olarak açılmazsa, bu ekranı açmak için:
Başlat'ı tıklayıp ardından da gelen menüden Çalıştırı tıklayarak gelen satıra
"D:\TVCard.exe" yazıp tamamı tıklayın. (D sürücüsü örnek olarak verilmiştir. Sizin
bilgisayarınızda CD ROM sürücüsü E, F yada başka bir harf olabilir). Bu ekranı
kullanmadan da Sürücü ve yazılımı yükleyebilirsiniz. Sürücüyü yüklemek için
D:\Drv\Setup.exe 'yi çalıştırın. Power Cinema yazılımı için de D:\PCinema\Setup.exe
çalıştırın. Sürücü ve yazılımın yüklenmesi bu talimatlara göre kolayca yapıl
ır.
(Not 1) Aksesuarlar, modellere bağlı olarak değişebilir.
(Not 2) Lütfen! uzaktan kumanda alıcısını, uzaktan kumandanın görebileceği, uygun bir
yere koyunuz.
(Not 3) Evinizde, anteninizin daha iyi sinyal alabileceği bir yer bulunuz. Daha iyi sinyal
almak için pencere kenarını, mümkünse evin dışında bir yeri tercih ediniz.
PCI slotuna dikkatlice takınız.
1-2 TV kartını bilgisayarın kasasına vidalayıp
kasayı kapatınız.
1-3 FM ve dijital TV antenleri ile stereo ses
(Not 1)
kablosunu TV kartına takınız.
USB bir
arabirim olan uzaktan kumanda aparatını,
bilgisayarınızda boş bir USB yuvasına
Adım
TV Kartının Montajı
Sürücü ve Yazılımın Kurulumu
(Not 2)
takınız.
A
dım
TV Kartının sürücüsünü yüklemek için “Driver”
seçeneğini tıklayınız.
TV Kartı için hazırlanmış olan Power Cinema 4.0
yazılımını kurmak için “Power Cinema 4.0”
seçeneğini tıklayınız.

Troubleshooting
Q: What is digital TV?
Q: Why is the installation of PowerCinema in Windows 2000/Me not available?
A: Unlike the traditional analog broadcasting that is subject to interference and
A: PowerCinema uses a module in Windows XP SP1, so it can only be installed
noise, digital TV transmits and receives pictures and sounds by converting
in Windows XP SP1 or update.
them into digits. Currently there are 3 global digital TV standards: DVB-T, ATSC
and ISDB. Among them, DVB-T is the most popular standard now, and this TV
Q: Why do I get a poor resolution for analog TV?
card supports the DVB-T standard. For more information on DVB, visit the
A: Please make sure that the analog signal source is not interfered. Too many
website at www.dvb.org.
branch cables will weaken the signals. You can install a signal booster to
increase the resolution.
Q: How to switch between analog TV and digital TV?
A: To switch between TV systems, you have to manually change the TV signal
Q: Why can I not find any information in EPG? Why does EPG not display correctly?
sources, and go to [Settings] > [Signal Settings] > [Capture Device] in
A: EPG is only available when the information is provided by your digital TV
PowerCinema to change the setting to [713x BDA Digital Capture] or [713x BDA
service provider. No EPG available indicates tat your service provider does
Analog Capture]. Then perform a channel scanning again, and you can watch
not provide EPG information. Incorrect EPG display may be caused by poor
TV after the scanning is completed.
signal reception. Adjust the antenna location and try again.
Q: Why do I have so few digital channels? Why does the signal delay?
Q: Why is the Time-Shifting function not working?
A: The reason may be that the digital signals received are not strong enough. To
A: Please make sure that the Time-Shifting function is enabled: check TV [Settings]
increase the signal strength, place the digital antenna at an open place or near
> [Signal Settings] and set the [Enable Time-Shifting] to Yes. The Time-Shifting
an outdoor location.
function needs more computer resources, including a Pentium?2.4GHz (or
higher) processor and 1GB free hard disk space.
Q: Why can I not receive digital TV?
A: Please make sure that your location is inside the digital TV (DVB-T) broadcast-
Q: Why does the computer respond slowly?
ing area. Place the digital antenna at an open place or near an outdoor location.
A: Please close other applications, and make sure the computer meets the system
The signal reception may be weak due to the effect of additional sheltering
requirements. In addition, you can close the Time-Shifting function (it is enabled
obstacles.
by default) to free some computer resources.
Q: Why does signal delay happen in recorded programs?
Q: Can this TV card be used in multiple countries?
A: Please make sure the computer meets the system requirements. Do not use
A: GIGABYTE's Digital Theater Hybrid TV Card supports worldwide analog sys-
processor resources during recording. This TV card uses codec technology
tems (NTSC/PAL/SECAM), so it can be used in multiple countries. For digital
and will occupy some processor resource.
TV, DVB-T is currently the most popular standard, so this TV card can be used
in most countries where the DVB-T digital broadcasting is available. To find out
Q: How long can a Time-Shifting recording be preserved? Why can I not watch
which countries support the DVB-T digital broadcasting, visit the website at
previous programs after switching channels?
www.dvb.org or the country-specific digital TV development website.
A: The recording time limit for using the Time-Shifting function is 30 minutes. This
means that only the contents of the latest 30 minutes will be recorded in the hard
Q: Can I connect my computer to other display devices to watch TV?
disk; the contents prior to the 30-minute limit will be automatically erased to
A: Please make sure that the output of your graphics card supports the corre-
allow normal Time-Shifting operations. At least 1GB free hard disk space is
sponding display device. The specifications of the graphics card affect the
recommended for the Time-Shifting function. The Time-Shifting function can
connection.
only record the contents of the channel that you are currently watching. Once
you switch to another channel, the previously recorded contents will be erased
and the current contents will be recorded.
Q: Why can I not wake up the computer with the remote control after entering the
Standby mode?
A: To wake up the computer from the Standby mode, press and hold the power
button on the remote control for 1 second. It may take 5~10 seconds (depending
on the computer status) for the computer to wake up from the Standby mode. In
addition, please make sure that the ACPI power management of your computer
BIOS is set to S1 mode for the remote control, keyboard or mouse to wake up
the computer from the Standby mode. If the setting is S3 mode, you can only
wake up the computer from the Standby mode by pressing the power button of
the computer.
