Yamaha RX-397: CONNECTIONS CAUTION
CONNECTIONS CAUTION: Yamaha RX-397
Table of contents
- CAUTION: READ THIS BEFORE OPERATING YOUR UNIT.
- CONTENTS
- FEATURES SUPPLIED ACCESSORIES
- CONTROLS AND FUNCTIONS Front panel
- CONTROLS AND FUNCTIONS
- Front panel display
- CONTROLS AND FUNCTIONS Rear panel
- Remote control
- CONTROLS AND FUNCTIONS Installing batteries in the remote control Using the remote control
- CONNECTIONS CAUTION
- CONNECTIONS Connecting speakers
- Connecting the AM and FM antennas
- CONNECTIONS Connecting the AM loop antenna
- CONNECTIONS Connecting the power supply cord
- CONNECTIONS Turning on and off this unit
- PLAYING AND RECORDING CAUTION Playing a source
- PLAYING AND RECORDING Adjusting the tonal quality
- Recording a source
- Using the sleep timer
- Muting the sound output
- FM/AM TUNING Automatic tuning
- Manual tuning Automatic preset tuning
- Customized automatic preset tuning
- Manual preset tuning
- Selecting preset stations Exchanging preset stations
- RADIO DATA SYSTEM (EUROPE MODEL ONLY) Receiving Radio Data System stations Changing the Radio Data System mode
- PTY SEEK function
- EON function
- Press STANDBY/ON on the front panel to set ADVANCED SETUP Changing the ADVANCED SETUP menu parameters
- Press STANDBY/ON to confirm your setting.
- General TROUBLESHOOTING Problem
- Tuner Problem
- Remote control Problem
- SPECIFICATIONS
CONNECTIONS
9
PREP
ARA
TION
English
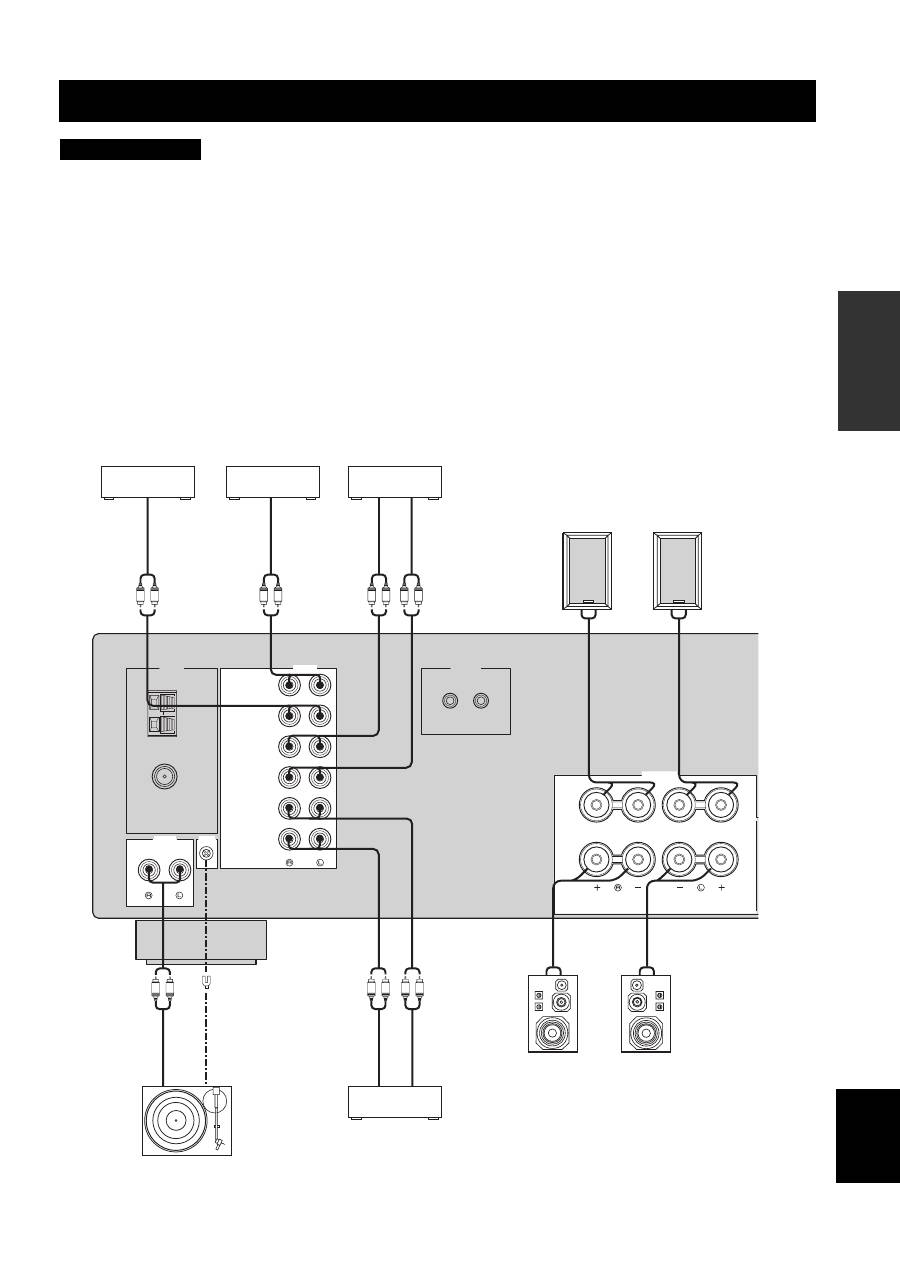
• Do not connect this unit or other components to the main power until all connections between components are complete.
• Do not let the bare speaker wires touch each other or do not let them touch any metal part of this unit. This could damage this unit and/
or the speakers.
• All connections must be correct: L (left) to L, R (right) to R, “+” to “+” and “–” to “–”. If the connections are faulty, no sound will be
heard from the speakers, and if the polarity of the speaker connections is incorrect, the sound will be unnatural and lack bass. Also,
refer to the owner’s manual for each of your components.
• Use the RCA type pin plug cables for audio components except speakers.
y
• The PHONO jacks are designed to connect a turntable with an MM or high-output MC cartridge. If you have a turntable with a low-
output MC cartridge, use an in-line boosting transformer or an MC-head amplifier when connecting your turntable to the PHONO
jacks.
• Connect your turntable to the GND terminal to reduce noise in the signal. However, you may hear less noise without the connection to
the GND terminal for some record players.
CONNECTIONS
CAUTION
GND
AM
ANT
FM
ANT
75
Ω
UNBAL.
CD/DVD
AUX
IN
(PLAY)
IN
(PLAY)
OUT
(REC)
OUT
(REC)
TAPE
MD
AUDIO
TUNER
AUDIO
GND
REMOTE
PHONO
IN
OUT
SPEAKERS
A
B
R
L
L
R
L
R
L
R
L
R
L
R
L
R
+
–
–
+
+
–
–
+
Turntable
CD/DVD player,
etc.
Au
dio
in
MD recorder,
etc.
Tape deck, etc.
Au
di
o ou
t
Au
di
o ou
t
GN
D
Au
di
o ou
t
Au
dio
in
Au
di
o ou
t
MP3 player, etc.
Au
di
o ou
t
Speakers B
Speakers A
