Nikon COOLSHOT: Troubleshooting/Repair
Troubleshooting/Repair: Nikon COOLSHOT
Table of contents
- Cautions before use SAFETY PRECAUTIONS SAFETY PRECAUTIONS CARE AND MAINTENANCE
- Key features Nomenclature/Composition
- Internal display Measurement display mode
- Target priority mode Distance display units Changing battery LED illumination
- Measurement
- Specifications
- Others Troubleshooting/Repair
- Troubleshooting/Repair
Troubleshooting/Repair
Jp
Jp
En
En
Es
Es
Symptom Check Points
Fr
Fr
Español
De
● Replace the battery with a new one.
De
● Be sure that the target shape and condition are appropriate to reflect
It
It
Incorrect result is displayed
the laser beam.
CONTENIDO
Se
● Be sure that nothing, such as leaves or grass, is between the Nikon
Se
Laser Rangefinder and the target.
Nl
Nl
............................... 40-43
Ru
Ru
Características clave .................................................... 44
Pt
the equipment since a unit malfunction may have occurred. Never let anyone other than the official representative of the
Pt
product manufacturer check or repair the Nikon Laser Rangefinder. Failure to follow this instruction could result in injury,
.................................. 45
Pl
Pl
or damage to the product.
............................................................. 46
Fi
Fi
Modo de visualización de la medición ................. 47
No
No
Dk
Dk
........ 48
Cz
Cz
Cambio de la batería ................................................... 49
Ro
Ro
Medición ................................................................... 50-51
Hu
Hu
..................................................... 52-53
Otros ................................................................................. 54
............... 55-56
38 39
Precauciones antes del uso
Jp
Muchas gracias por comprar el Nikon Laser Rangefinder COOLSHOT AS.
Respete estrictamente las
PRECAUCIONES DE SEGURIDAD
Jp
orientaciones siguientes para
En
(Láser)
En
utilizar correctamente el equipo
emitido podría ser nocivo para
Es
La utilización de controles, ajustes o parámetros de procedimiento distintos de los aquí
Es
y evitar accidentes que podrían
su salud. Un producto que haya
haz láser invisible. Asegúrese de
indicados puede provocar una exposición a radiaciones peligrosas.
Fr
sido desmontado
ser peligrosos. Antes de utilizar
respetar lo siguiente:
Fr
reparado pierde la garantía del
De
el producto lea atentamente las
Advertencia
De
〇
fabricante.
"Precauciones antes del uso" y las
It
It
instrucciones de uso correcto que acompañan al producto.
instrucciones de uso correcto que
Se
Rangefinder fuera del alcance de
mientras mira la óptica desde el
Se
〇 Tenga a mano este manual para consultarlo cuando lo precise.
acompañan al producto. Tenga a
los niños cuando lo guarde.
lado del objetivo. Si lo hace sus
Nl
mano este manual para
Nl
〇 No desmonte ni repare este producto usted mismo, puede provocar algún problema grave.
Nikon Laser
ojos podrían verse afectados
consultarlo cuando lo precise.
Ru
Un producto que haya sido desmontado o reparado pierde la garantía del fabricante.
Rangefinder está dañada o si emite
Ru
negativamente o lesionados.
un ruido raro después de una caída
Pt
Pt
o por cualquier otra causa, retire la
● Las especificaciones y el diseño pueden cambiar sin aviso previo.
ADVERTENCIA
Pl
Pl
batería inmediatamente y deje de
● Queda prohibida la reproducción total o parcial (excepto para citas breves en artículos o
Fi
incorrecto que no tenga en cuenta
usarlo.
Fi
instrumento óptico, por ejemplo
revisiones de evaluación) de este manual en cualquier forma sin la autorización previa por
No
este punto puede provocar la muerte
a través de lentes o binoculares, ni
No
escrito de NIKON VISION CO., LTD.
o heridas graves.
tampoco directamente sin protección
Dk
Dk
● NIKON VISION CO., LTD. se reserva el derecho a modificar el contenido explicado en estos
ocular. Si lo hace, su visión podría
PRECAUCIÓN
Cz
Cz
manuales en cualquier momento y sin aviso previo.
resultar dañada.
Ro
cualquier utilización inadecuada que
Ro
ignore el contenido aquí incluido
mediciones, mantenga los dedos
Hu
Hu
puede provocar lesiones o pérdidas
apartados del botón
materiales.
para evitar la emisión accidental de
un haz láser.
período prolongado, retire la batería
del cuerpo.
40 41
Precauciones antes del uso
Jp
PRECAUCIONES DE
PRECAUCIONES DE SEGURIDAD
PRECAUCIONES DE SEGURIDAD
CUIDADO Y MANTENIMIENTO
Almacenamiento
Jp
pongan las ojeras de goma, piezas
En
SEGURIDAD (Monocular)
(Batería de litio)
Precauciones
Lentes
En
pequeñas, etc. en la boca. Si un
aparecer condensación de agua o
Es
emplea
Si se maneja incorrectamente, la
Es
niño se traga alguna de estas
es sumergible, no está diseñado
la lente con un cepillo sin aceite.
moho sobre la superficie de las
un monocular en su sistema óptico
batería pueden romperse y sufrir
Fr
piezas, consulte a un médico
para utilizarlo bajo el agua.
Nikon
Fr
para apuntar al objetivo. Asegúrese
fugas, corroyendo los equipos y
inmediatamente.
como marcas de dedos de la
Laser Rangefinder en un lugar fresco
De
de respetar lo siguiente:
manchando la ropa
De
eliminarse de la superficie del
superficie de las lentes, límpielas
y seco.
It
Asegúrese de respetar lo siguiente:
Advertencia
durante mucho tiempo, algunas
rangefinder lo antes posible,
muy suavemente con un paño de
Después de usarlo en un día lluvioso
It
Se
Nunca mire directamente al sol,
personas pueden notar una
utilizando un paño suave y limpio.
algodón suave y limpio o con un
o por la noche, séquelo a
Se
orientados correctamente.
a una luz intensa ni al haz láser
inflamación de la piel. Si presenta
paño de limpieza de lentes de
temperatura ambiente y guárdelo
Nl
Nl
cuando utilice el Nikon Laser
algún síntoma, deje de utilizarlas
en un coche estacionado en un
calidad sin aceite. Utilice una
en un lugar fresco y seco.
está agotada o en períodos
Ru
Rangefinder.
y consulte inmediatamente a un
Ru
día cálido o soleado, o cerca de un
pequeña cantidad de alcohol puro
prolongados de no utilización.
médico.
Pt
Precauciones
(no desnaturalizado) para limpiar
Pt
Nikon
dañarlo o afectarle negativamente.
las manchas resistentes. No utilice
Pl
extremo de la cámara de la batería.
Pl
Rangefinder, guárdelo en el estuche
Laser Rangefinder, no pulse el
trapos de terciopelo ni papel tisú
junto con llaves o
Fi
flexible.
común dado que pueden rayar las
Fi
botón
bajo la luz solar directa. Los rayos
monedas en un bolsillo o bolsa,
No
.
ultravioleta y el exceso de calor
lentes. Si se ha utilizado un paño
No
podría cortocircuitarse y provocar
o funciona incorrectamente, deje
podrían afectar negativamente a la
para limpiar el cuerpo no debe
Dk
un sobrecalentamiento.
Dk
de usarlo de inmediato y consulte
camina. Si lo hace podría
unidad e incluso dañarla.
usarse para la superficie de la lente.
Cz
a su distribuidor local dónde debe
Cz
provocar lesiones o averías como
llamas. Nunca desmonte la batería.
Cuerpo principal
enviarlo para su reparación.
resultado de tropiezos, golpes
Rangefinder a cambios de
Ro
Ro
a otras personas, caídas u otros
temperatura repentinos, puede
Hu
un paño suave y limpio después de
Hu
accidentes.
condensarse agua en las superficies
entra en contacto con la ropa o la
eliminar suavemente el pelo con un
de las lentes. No utilice el producto
piel, enjuáguela inmediatamente
soplador*. No utilice benceno,
hasta que la condensación se haya
con mucha agua. Si el líquido de
disolvente ni otros limpiadores con
evaporado.
una batería dañada va a parar a los
disolventes orgánicos.
lugar inestable. No respetar esta
ojos, enjuáguelos inmediatamente
* Un soplador es un equipo de para
indicación puede provocar una
con agua limpia y consulte a un
limpieza de goma que sopla aire
caída y causar lesiones o averías.
médico.
por una boquilla.
utilizada para envolver el
regulaciones locales de su zona.
producto y las piezas pequeñas
fuera del alcance de los niños.
42 43
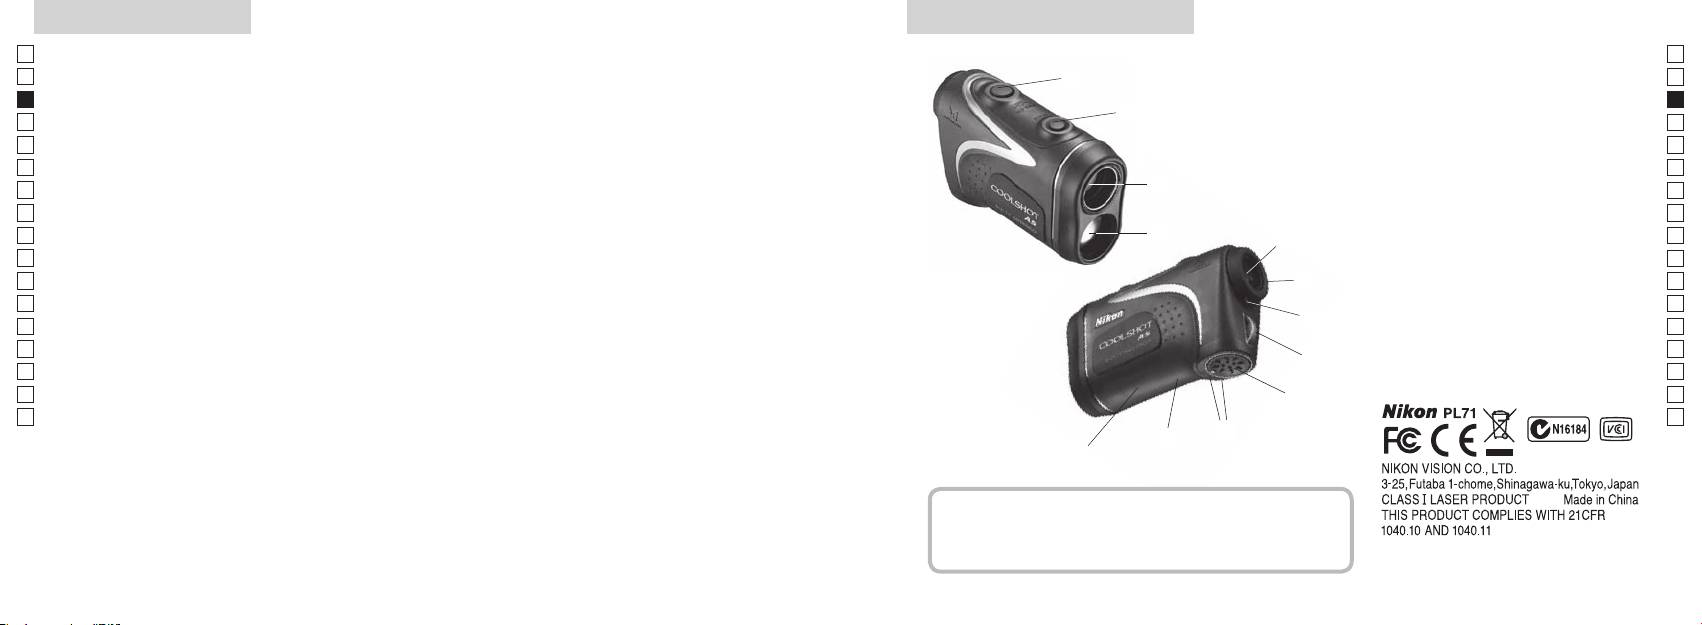
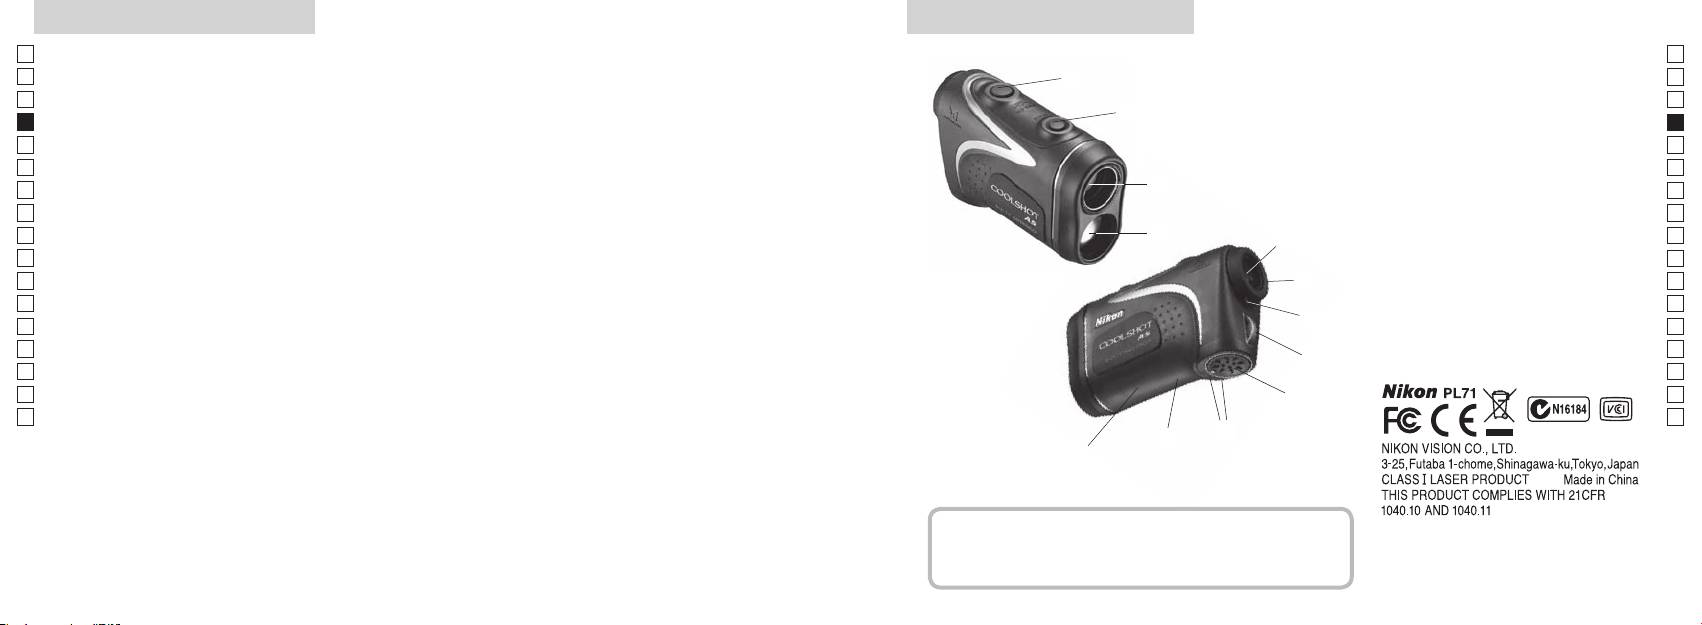
Características clave Nomenclatura/Componentes
Jp
Las condiciones siguientes facilitan la medición:
Jp
1
En
4
En
emisión láser
Es
Es
3
2 Diafragma del detector láser
Fr
Fr
(distancia horizontal ± altura) lo que resulta útil al jugar a
3
De
De
golf
90grados
4
It
It
seleccionables y conmutables
La medición puede resultar imprecisa o fallar en los casos
1
Se
Se
siguientes:
5Ocular monocular de 6x
Nl
elegirse en función del sujeto
Nl
6
Ru
2
5
Ru
7 Índice de dioptrías
Pt
medición continua
8 Argolla para correa
Pt
Pl
espejo, etc.)
6
9 Tapa del compartimento de la batería
Pl
Fi
!p Indicación de tapa del
Fi
7
No
en días lluviosos (NO diseñado para utilizarlo bajo el agua)
compartimento de la batería
No
Dk
Dk
8
!q
Cz
Cz
El Nikon Laser Rangefinder utiliza un haz láser invisible
!w Indicación informativa de la FDA
Ro
9
Ro
para realizar la medición. Mide el tiempo que tarda el
Hu
Hu
haz láser en ir desde el Rangefinder al objetivo y volver.
!p
La reflectividad láser y los resultados de medición
!q
pueden variar en función de las condiciones climáticas
!w
y ambientales, así como del color, acabado superficial,
tamaño, forma y otras características del sujeto.
Componentes
................................. x1
Cinta de cuello .................. x1
Funda blanda .....................x1
Batería de litio (CR2) ........x1
44 45
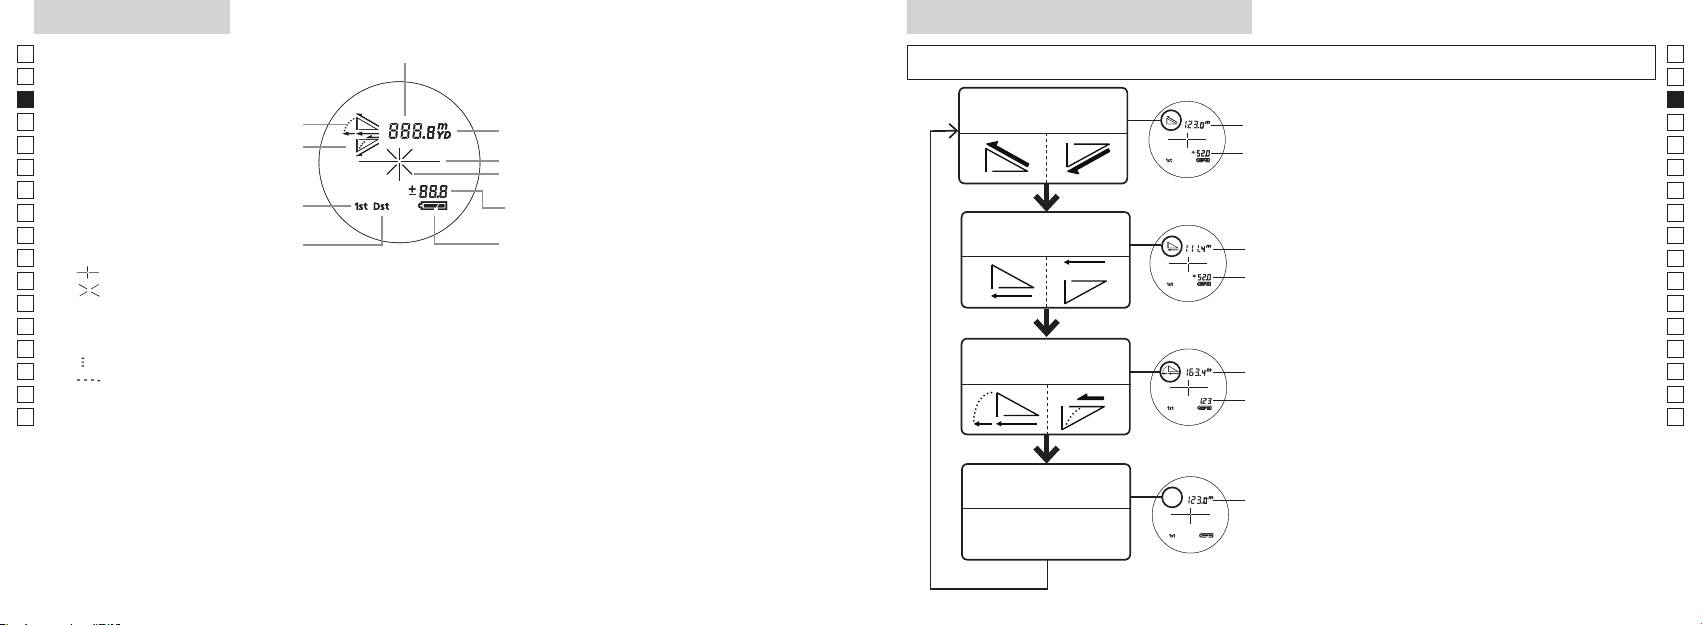
Pantalla interna Modo de visualización de la medición
Jp
Distancia
Jp
dos segundos) para cambiar el modo en el orden mostrado a continuación.
En
En
Es
Es
Modo de distancia
Distancia
Fr
Ascenso
real y altura
Fr
pantalla interna está encendida).
real
De
Descenso
De
Marca de sujeto
Altura
inmediatamente (menos de medio
It
It
Marca de emisión de láser
Se
Se
Altura
Measurement durante menos de dos
Modo de prioridad al primer sujeto
Nl
segundos.
Nl
(distancia real en modo de golf)
Modo de distancia
Ru
Modo de prioridad al sujeto más
Distancia
Ru
horizontal y altura
lejano
horizontal
para cambiar el modo de visualización de la
Pt
Pt
『 』 - Apunte al sujeto que desea medir. Coloque el sujeto en el centro de la retícula.
medición.
Pl
Altura
Pl
『 』 - Aparece mientras se está emitiendo el láser para una medición.
4. Repita los pasos 2 y 3 hasta que se muestre
Fi
el modo deseado.
Fi
Se mantiene presente al realizar una medición simple. Destella mientras se realizan mediciones
No
continuas.
No
*
Si no se pulsan los botones en el orden
Dk
No mire a las lentes del objetivo mientras aparezca esta marca.
Distancia
correcto no se producirá la conmutación.
Dk
『
』 - Se está midiendo
Modo de golf
ajustada en
*
Cambiar de modo después de la medición
Cz
Cz
『
』 - "Medición fallida" o "No se pudo medir"
pendiente
convierte los resultados al nuevo modo.
Ro
Ro
Distancia
*
Después de fijar el modo las mediciones se
Hu
* Normalmente, un LCD aplica una ampliación igual o menor. No obstante, el LCD de este producto se
real
realizan según el nuevo modo.
Hu
amplía con la gran ampliación del ocular. Aunque este LCD se fabricó empleando la tecnología más
avanzada, es imposible eliminar totalmente el polvo. Como resultado, puede verse polvo. No obstante,
no afectará a la precisión de la medición ni a la seguridad de utilización.
Modo de distancia
Distancia
real
real
46 47

Modo de prioridad al sujeto
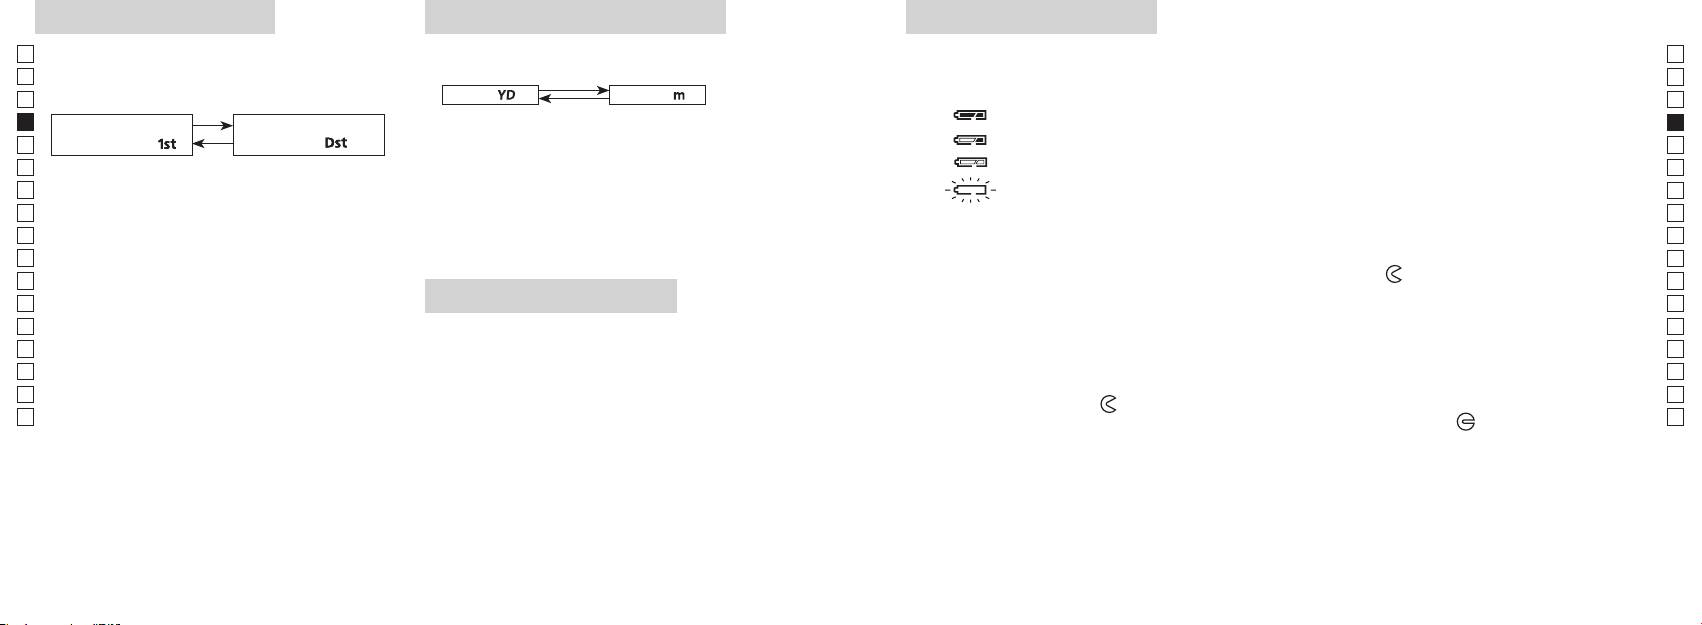
Unidades de indicación de la distancia
Cambio de la batería
Jp
Jp
Tipo de batería: 1 batería de litio CR2 de 3 V
(el ajuste predeterminado de fábrica son las yardas).
En
Indicadores de la carga restante de la batería
En
(el ajuste predeterminado de fábrica es el modo de
Yarda
[ ]
Metro [ ]
Es
* La marca del estado de la batería en la pantalla interna le avisa cuando esta necesita ser sustituida.
Es
: La batería tiene carga suficiente para usarla.
Fr
Modo de prioridad al
Modo de prioridad al
Fr
está encendida).
De
primer sujeto「
」
sujeto más lejano
「
」
De
It
dos segundos. Cuando la unidad de visualización haya
It
interna está encendida).
cambiado, suelte el botón.
Se
Se
3. Una vez fijada la unidad, los resultados se convertirán y
apagará automáticamente. Sustituya la batería.
Nl
visualizarán en la unidad de indicación de la distancia
Nl
Measurement antes que pase medio segundo.
seleccionada.
Ru
Ru
1. Abra la tapa del compartimento de la batería
Siga manteniendo pulsados ambos botones (más
Pt
Con la yema del pulgar, etc. en la parte hundida de la cámara de la tapa de la batería, gire la tapa
Pt
de dos segundos), hasta que conmuten el modo de
en la dirección hacia la marca
. No es fácil de abrir debido a su empaquetadura de goma de
Pl
Pl
Iluminación LED
lejano.
impermeabilidad.
Fi
Fi
3. Suelte ambos botones cuando el modo haya
2. Sustituya la batería vieja por otra nueva
está encendida).
No
cambiado.
No
*
Si no se pulsan los botones en el orden correcto no se
Dk
Dk
producirá la conmutación.
cámara. Si no se inserta la batería correctamente, el rangefinder láser no funcionará.
Cz
*
Si no se produce la conmutación, repita el paso 2.
Cz
*
3. Cierre la tapa del compartimento de la batería
Ro
demasiado oscuras para ver el panel LCD.
Ro
Alinee la marca
con el indicador
●
e inserte la tapa del compartimento de la batería. Con la yema
[
*
Hu
del pulgar, etc., gire la tapa según hacia la marca
Hu
al sujeto más lejano]
la impermeabilización, pero siga girándola del todo hasta que haga tope. Compruebe que la tapa está
Cuando se miden sujetos que se superponen, el modo
a encender el rangefinder láser la iluminación se
de prioridad al sujeto más cercano muestra la distancia
encenderá de nuevo.
cerrada firmemente.
hasta el sujeto más próximo y el modo de prioridad al
Duración de la batería
sujeto más lejano muestra la del sujeto que está más
Funcionamiento continuo: Aprox. 13.000 ciclos (a aprox. 20°C)
lejos.
sujeto, color, etc. Utilícela sólo como orientación.
* La batería suministrada con este rangefinder láser es para comprobar el funcionamiento. Debido a la descarga eléctrica
natural, la duración de la batería será probablemente menor que la antes indicada.
* Si entra agua en el compartimiento de la batería debido a una inmersión, seque bien el compartimiento de la batería y
cambie la batería.
48 49
Jp
Jp
En
En
Es
Es
Fr
Fr
De
De
It
It
Se
Se
Nl
Nl
Ru
Ru
Pt
Pt
Pl
Pl
Fi
Fi
No
No
Dk
Dk
Cz
Cz
Ro
Ro
Hu
Hu
50 51
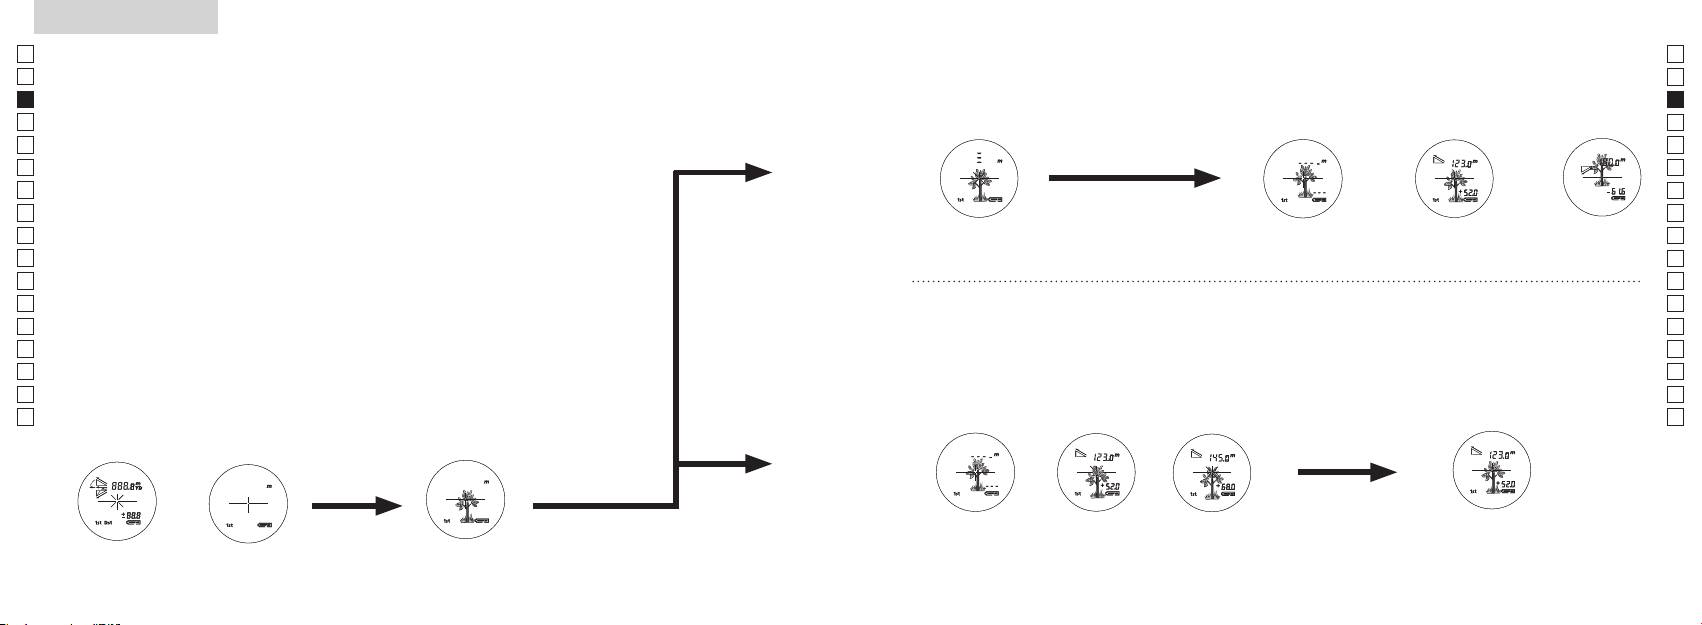
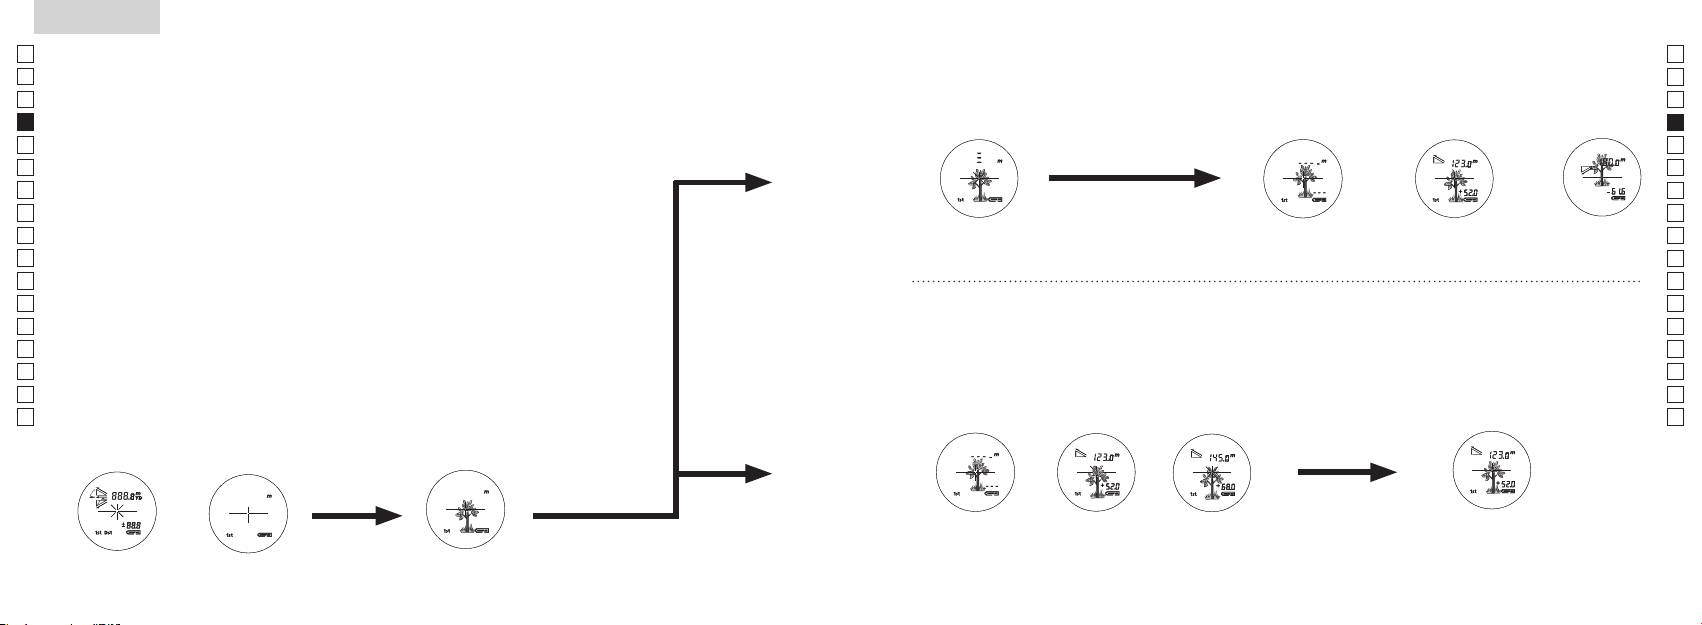
Measurement
1. Press the POWER button for power-on.
(Power turns off 8 seconds after the last
operation.)
Immediately after power-on.
3. Press POWER button once to start single measurement.
4. After measurement, “distance” or “fail to measure” indicator are displayed for 8 seconds, then power turns off. If you press the POWER
button during power-on (while the internal display is lit), another single measurement starts.
unable to measure distance.
3. Keep pressing POWER button to start continuous measurement up to 20 seconds. The internal display shows “distance” and
“fail to measure” indicator alternately.
Note: Laser irradiaton mark is blinking during the measurement.
Note: If you stop pressing the button, the continuous measuremen stops
2. Aim at the target
Positionthetargetatthecenterofthereticle
[Single measurement]
Failure to measure or
unable to measure distance.
[Continuous measurement]
4. After continuous measurement, the measure results are displayed for 8 seconds, then power turns off. If you press the POWER
button during power-on (while the internal display is lit), another measrement starts.
Failure to measure or
Target focusing.
Measuring.
(Initializing)
.
Upward measurement. Downward measurement.
Displays the measured
figure. (Target 1)
Displays the measured figure.
Stand-by.
Displays the measured
figure. (Target 2)
Measurement
1. Press the POWER button for power-on.
(Power turns off 8 seconds after the last
operation.)
Immediately after power-on.
(Initializing)
3. Press POWER button once to start single measurement.
Measuring.
4. After measurement, “distance” or “fail to measure” indicator are displayed for 8 seconds, then power turns off. If you press the POWER
button during power-on (while the internal display is lit), another single measurement starts.
Failure to measure or
unable to measure distance.
Displays the measured
figure. (Target 1)
3. Keep pressing POWER button to start continuous measurement up to 20 seconds. The internal display shows “distance” and
“fail to measure” indicator alternately.
Note: Laser irradiaton mark is blinking during the measurement.
Note: If you stop pressing the button, the continuous measuremen stops
Target focusing.
2. Aim at the target
.
Positionthetargetatthecenterofthereticle
[Single measurement]
Failure to measure or
unable to measure distance.
Upward measurement. Downward measurement.
Displays the measured figure.
[Continuous measurement]
4. After continuous measurement, the measure results are displayed for 8 seconds, then power turns off. If you press the POWER
button during power-on (while the internal display is lit), another measrement starts.
Stand-by.
Displays the measured
figure. (Target 2)
Measurement
1. Press the POWER button for power-on.
(Power turns off 8 seconds after the last
operation.)
Immediately after power-on.
Stand-by.
(Initializing)
2. Aim at the target
.
Positionthetargetatthecenterofthereticle
3. Press POWER button once to start single measurement.
4. After measurement, “distance” or “fail to measure” indicator are displayed for 8 seconds, then power turns off. If you press the POWER
button during power-on (while the internal display is lit), another single measurement starts.
unable to measure distance.
3. Keep pressing POWER button to start continuous measurement up to 20 seconds. The internal display shows “distance” and
“fail to measure” indicator alternately.
Note: Laser irradiaton mark is blinking during the measurement.
Note: If you stop pressing the button, the continuous measuremen stops
[Single measurement]
Failure to measure or
unable to measure distance.
[Continuous measurement]
4. After continuous measurement, the measure results are displayed for 8 seconds, then power turns off. If you press the POWER
button during power-on (while the internal display is lit), another measrement starts.
Failure to measure or
Target focusing.
Measuring.
Upward measurement. Downward measurement.
Displays the measured
figure. (Target 1)
Displays the measured figure.
Displays the measured
figure. (Target 2)
Medición
Precaución — La utilización de controles, ajustes o parámetros de procedimiento distintos de los aquí
【
Medición única
】
indicados puede provocar una exposición a radiaciones peligrosas.
Measurement una vez para iniciar
1. Preparación
una medición única.
Coloque una batería en el compartimento de la batería (consulte "Cambio de la batería").
2. Ojera de goma
Tanto quienes llevan gafas como quienes no lo hacen pueden usar este rangefinder directamente.
3. Ajuste de dioptrías
Ajuste las dioptrías para conseguir una indicación clara del LCD en el visor.
para encender el aparato (confirme que la pantalla interna está encendida). Mire por el
ocular y gire el aro de ajuste de dioptrías en el sentido de las agujas del reloj hasta que el
LCD quede enfocado.
Si gira demasiado el aro, hágalo girar en sentido contrario al de las agujas del reloj y
vuelva a ajustar.
【
Función de medición continua
】
Si no ajusta las dioptrías a su graduación, quizás no pueda enfocar correctamente su sujeto.
4. Medición
Antes de medir asegúrese de confirmar los ajustes de cada modo (Modo de indicación de
*
Consulte en las correspondientes secciones cómo ajustar cada modo.
2. Apunte al sujeto.
la pantalla interna está encendida
Coloque el sujeto en el centro
(Apagado automático después de
de la retícula.
aprox. 8 s sin utilizar)
Inmediatamente
Apuntar al sujeto
después del encendido
(inicializando).
Measurement
1. Press the POWER button for power-on.
(Power turns off 8 seconds after the last
operation.)
Immediately after power-on.
Stand-by.
(Initializing)
2. Aim at the target
.
Positionthetargetatthecenterofthereticle
Target focusing.
[Single measurement]
3. Press POWER button once to start single measurement.
Measuring.
4. After measurement, “distance” or “fail to measure” indicator are displayed for 8 seconds, then power turns off. If you press the POWER
button during power-on (while the internal display is lit), another single measurement starts.
Failure to measure or
Upward measurement. Downward measurement.
unable to measure distance.
Displays the measured figure.
[Continuous measurement]
3. Keep pressing POWER button to start continuous measurement up to 20 seconds. The internal display shows “distance” and
“fail to measure” indicator alternately.
Note: Laser irradiaton mark is blinking during the measurement.
Note: If you stop pressing the button, the continuous measuremen stops
Failure to measure or
unable to measure distance.
4. After continuous measurement, the measure results are displayed for 8 seconds, then power turns off. If you press the POWER
button during power-on (while the internal display is lit), another measrement starts.
Displays the measured
figure. (Target 1)
Displays the measured
figure. (Target 2)
Measurement
1. Press the POWER button for power-on.
(Power turns off 8 seconds after the last
operation.)
Immediately after power-on.
Stand-by.
(Initializing)
2. Aim at the target
.
Positionthetargetatthecenterofthereticle
Target focusing.
[Single measurement]
3. Press POWER button once to start single measurement.
Measuring.
4. After measurement, “distance” or “fail to measure” indicator are displayed for 8 seconds, then power turns off. If you press the POWER
button during power-on (while the internal display is lit), another single measurement starts.
Failure to measure or
Upward measurement. Downward measurement.
unable to measure distance.
Displays the measured figure.
[Continuous measurement]
3. Keep pressing POWER button to start continuous measurement up to 20 seconds. The internal display shows “distance” and
“fail to measure” indicator alternately.
Note: Laser irradiaton mark is blinking during the measurement.
Note: If you stop pressing the button, the continuous measuremen stops
Failure to measure or
unable to measure distance.
Displays the measured
figure. (Target 1)
4. After continuous measurement, the measure results are displayed for 8 seconds, then power turns off. If you press the POWER
button during power-on (while the internal display is lit), another measrement starts.
Displays the measured
figure. (Target 2)
Measurement
1. Press the POWER button for power-on.
(Power turns off 8 seconds after the last
operation.)
Immediately after power-on.
Stand-by.
(Initializing)
2. Aim at the target
.
Positionthetargetatthecenterofthereticle
Target focusing.
[Single measurement]
3. Press POWER button once to start single measurement.
Measuring.
4. After measurement, “distance” or “fail to measure” indicator are displayed for 8 seconds, then power turns off. If you press the POWER
button during power-on (while the internal display is lit), another single measurement starts.
Failure to measure or
unable to measure distance.
3. Keep pressing POWER button to start continuous measurement up to 20 seconds. The internal display shows “distance” and
“fail to measure” indicator alternately.
Note: Laser irradiaton mark is blinking during the measurement.
Note: If you stop pressing the button, the continuous measuremen stops
Failure to measure or
unable to measure distance.
[Continuous measurement]
4. After continuous measurement, the measure results are displayed for 8 seconds, then power turns off. If you press the POWER
button during power-on (while the internal display is lit), another measrement starts.
Upward measurement. Downward measurement.
Displays the measured
figure. (Target 1)
Displays the measured figure.
Displays the measured
figure. (Target 2)
Measurement
1. Press the POWER button for power-on.
(Power turns off 8 seconds after the last
operation.)
Immediately after power-on.
Stand-by.
(Initializing)
2. Aim at the target
.
Positionthetargetatthecenterofthereticle
Target focusing.
[Single measurement]
3. Press POWER button once to start single measurement.
Measuring.
4. After measurement, “distance” or “fail to measure” indicator are displayed for 8 seconds, then power turns off. If you press the POWER
button during power-on (while the internal display is lit), another single measurement starts.
unable to measure distance.
3. Keep pressing POWER button to start continuous measurement up to 20 seconds. The internal display shows “distance” and
“fail to measure” indicator alternately.
Note: Laser irradiaton mark is blinking during the measurement.
Note: If you stop pressing the button, the continuous measuremen stops
unable to measure distance.
4. After continuous measurement, the measure results are displayed for 8 seconds, then power turns off. If you press the POWER
button during power-on (while the internal display is lit), another measrement starts.
[Continuous measurement]
Failure to measure or
Failure to measure or
Upward measurement. Downward measurement.
Displays the measured
figure. (Target 1)
Displays the measured figure.
Displays the measured
figure. (Target 2)
Measurement
1. Press the POWER button for power-on.
(Power turns off 8 seconds after the last
operation.)
Immediately after power-on.
Stand-by.
(Initializing)
2. Aim at the target
.
Positionthetargetatthecenterofthereticle
Target focusing.
[Single measurement]
3. Press POWER button once to start single measurement.
4. After measurement, “distance” or “fail to measure” indicator are displayed for 8 seconds, then power turns off. If you press the POWER
button during power-on (while the internal display is lit), another single measurement starts.
unable to measure distance.
3. Keep pressing POWER button to start continuous measurement up to 20 seconds. The internal display shows “distance” and
“fail to measure” indicator alternately.
Note: Laser irradiaton mark is blinking during the measurement.
Note: If you stop pressing the button, the continuous measuremen stops
unable to measure distance.
4. After continuous measurement, the measure results are displayed for 8 seconds, then power turns off. If you press the POWER
button during power-on (while the internal display is lit), another measrement starts.
[Continuous measurement]
Failure to measure or
Failure to measure or
Measuring.
Upward measurement. Downward measurement.
Displays the measured
figure. (Target 1)
Displays the measured figure.
Displays the measured
figure. (Target 2)
Measurement
1. Press the POWER button for power-on.
(Power turns off 8 seconds after the last
operation.)
Immediately after power-on.
Stand-by.
(Initializing)
2. Aim at the target
.
Positionthetargetatthecenterofthereticle
Target focusing.
[Single measurement]
3. Press POWER button once to start single measurement.
Measuring.
4. After measurement, “distance” or “fail to measure” indicator are displayed for 8 seconds, then power turns off. If you press the POWER
button during power-on (while the internal display is lit), another single measurement starts.
unable to measure distance.
3. Keep pressing POWER button to start continuous measurement up to 20 seconds. The internal display shows “distance” and
“fail to measure” indicator alternately.
Note: Laser irradiaton mark is blinking during the measurement.
Note: If you stop pressing the button, the continuous measuremen stops
unable to measure distance.
4. After continuous measurement, the measure results are displayed for 8 seconds, then power turns off. If you press the POWER
button during power-on (while the internal display is lit), another measrement starts.
[Continuous measurement]
Failure to measure or
Failure to measure or
Upward measurement. Downward measurement.
Displays the measured
figure. (Target 1)
Displays the measured figure.
Displays the measured
figure. (Target 2)
Measurement
1. Press the POWER button for power-on.
(Power turns off 8 seconds after the last
operation.)
Immediately after power-on.
Stand-by.
(Initializing)
2. Aim at the target
.
Positionthetargetatthecenterofthereticle
Target focusing.
[Single measurement]
3. Press POWER button once to start single measurement.
Measuring.
4. After measurement, “distance” or “fail to measure” indicator are displayed for 8 seconds, then power turns off. If you press the POWER
button during power-on (while the internal display is lit), another single measurement starts.
Failure to measure or
unable to measure distance.
Displays the measured
figure. (Target 1)
3. Keep pressing POWER button to start continuous measurement up to 20 seconds. The internal display shows “distance” and
“fail to measure” indicator alternately.
Note: Laser irradiaton mark is blinking during the measurement.
Note: If you stop pressing the button, the continuous measuremen stops
Failure to measure or
unable to measure distance.
Upward measurement. Downward measurement.
Displays the measured figure.
[Continuous measurement]
4. After continuous measurement, the measure results are displayed for 8 seconds, then power turns off. If you press the POWER
button during power-on (while the internal display is lit), another measrement starts.
Displays the measured
figure. (Target 2)
Measurement
1. Press the POWER button for power-on.
(Power turns off 8 seconds after the last
operation.)
Immediately after power-on.
Stand-by.
(Initializing)
2. Aim at the target
.
Positionthetargetatthecenterofthereticle
Target focusing.
[Single measurement]
3. Press POWER button once to start single measurement.
Measuring.
4. After measurement, “distance” or “fail to measure” indicator are displayed for 8 seconds, then power turns off. If you press the POWER
button during power-on (while the internal display is lit), another single measurement starts.
Failure to measure or
unable to measure distance.
3. Keep pressing POWER button to start continuous measurement up to 20 seconds. The internal display shows “distance” and
“fail to measure” indicator alternately.
Note: Laser irradiaton mark is blinking during the measurement.
Note: If you stop pressing the button, the continuous measuremen stops
Failure to measure or
unable to measure distance.
[Continuous measurement]
4. After continuous measurement, the measure results are displayed for 8 seconds, then power turns off. If you press the POWER
button during power-on (while the internal display is lit), another measrement starts.
Upward measurement. Downward measurement.
Displays the measured
figure. (Target 1)
Displays the measured figure.
Displays the measured
figure. (Target 2)
4. Después de la medición, se visualiza el indicador "no se pudo medir" o
"distancia medida" y después se apaga. Si presiona el botón
Measurement
con el aparato encendido (con la pantalla interna encendida),
se inicia otra medición única.
"Medición fallida" o "No se
Medición hacia
Medición hacia
Medición
pudo medir" la distancia
arriba
abajo
Muestra la cifra medida
3. Mantenga pulsado el botón
4. Después de la medición continua, se visualizan los resultados
empezar una medición continua de ocho segundos. La pantalla
de la medición final (distancia medida) durante 8 segundos y
interna muestra alternativamente los indicadores "distancia" y
después se apaga la corriente.
"no se pudo medir".
Si presiona el botón
con el aparato
*
La marca de radiación láser destella durante la medición.
encendido (con la pantalla interna encendida), se inicia otra
*
Si levanta el dedo del botón la medición continua se detiene.
medición.
Al medir una bandera en un recorrido de golf, por ejemplo, utilice el
"Medición fallida"
Muestra la cifra
Muestra la cifra
o "No se pudo
medida (Sujeto 1).
medida (Sujeto 2).
con la función de medición continua para facilitar la medición. Si no
medir" la distancia
hay objetos entre usted y la bandera, el número más pequeño es la
distancia a la bandera a la que apunta.
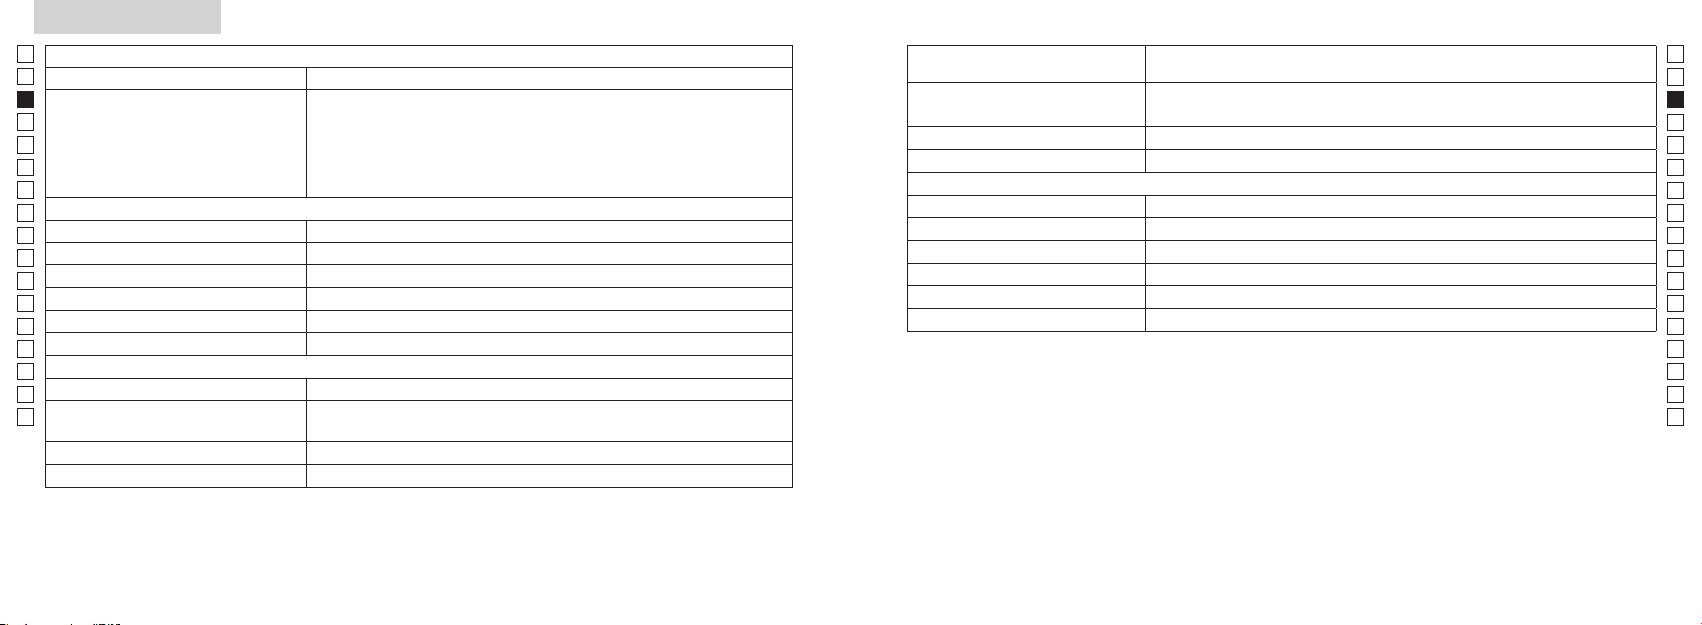
Especificaciones
Jp
Sistema de medición
Cuerpo: Impermeable (profundidad máxima de 1 m durante 10 minutos)*
Jp
(Compartimento de la batería: Resistente al agua**)
En
En
Es
Láser de C
Es
Seguridad
Láser de C
Fr
Fr
Sub-
De
Visualización de distancias (incremento)
De
Medio ambiente
It
It
Láser
Se
Se
Sistema óptico
Clase
Nl
Nl
Aumento (x) 6
Longitud de onda (nm) 905
Ru
Ru
Diámetro efectivo del objetivo (mm) ø21
Duración del impulso (ns) 12
Pt
Pt
Campo de visión angular (real) (˚) 7,5
15
Pl
Pl
Relieve ocular (mm) 18,3
Divergencia del haz (mrad)
Fi
Fi
ø3,5
Humedad de funcionamiento (% RH) 80 o menos (sin condensación)
No
No
-
1
Ajuste de dioptrías ±4 m
Dk
* Modelos impermeables
Dk
Otros
Cz
Cz
sumerge o cae al agua a una profundidad máxima de 1 m durante un máximo de 10 minutos.
Temperatura de funcionamiento (˚C) -10 —
Ro
Ro
El Nikon Laser Rangefinder ofrece las siguientes ventajas:
Hu
Batería de litio CR2 x 1 (3 Vcc)
Hu
Fuente de alimentación
Apagado automático (después de aprox. 8 s sin utilizar)
Al utilizar el Nikon Laser Rangefinder respete lo siguiente:
Dimensiones (L x Al x An) (mm) 113 x 70 x 39
Aprox. 175 (sin batería)
en el dispositivo. Si entra agua en el compartimento de la batería, elimine toda la humedad y deje pasar un tiempo suficiente
para que se seque.
52 53
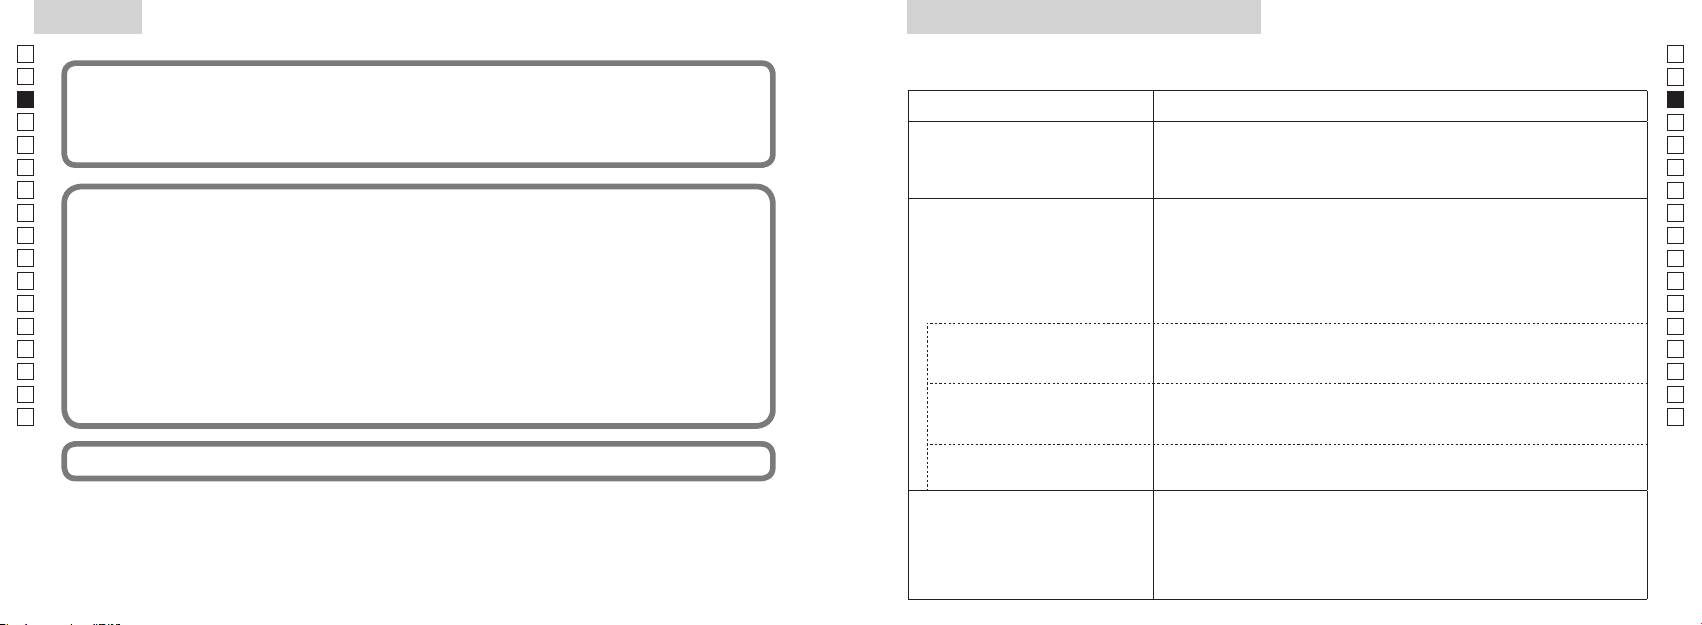
Otros
Solución de problemas/Reparación
Jp
Si su Nikon Laser Rangefinder precisara alguna reparación, póngase en contacto con su distribuidor local o con la tienda donde
Jp
En
En
Es
siguientes:
Es
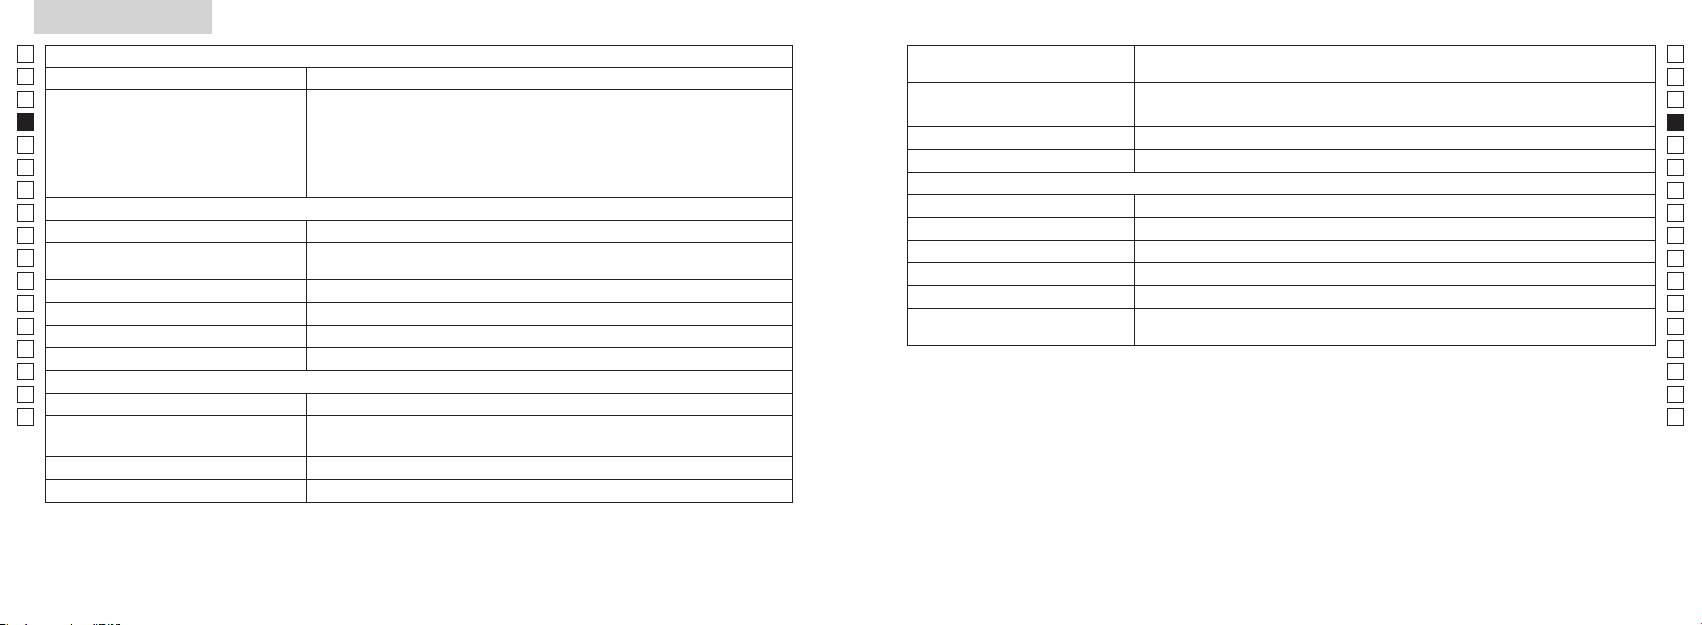
Síntoma Puntos que debe comprobar
Fr
Fr
●
De
funcionamiento no deseado.
De
La unidad no se enciende
parte superior del cuerpo)
It
(el LCD no si ilumina)
● Compruebe la inserción de la batería
It
● Sustituya la batería vieja por otra nueva.
Se
Se
Nl
● Compruebe que no hay nada, como su dedo o una correa, que bloquee el
Nl
diafragma de emisión del láser ni el detector del láser del lado del objetivo.
Ru
Ru
● Compruebe que el diafragma de emisión del láser y el detector del láser del
usa y puede irradiar energía de frecuencia de radio y, si no se instala y usa de conformidad con las instrucciones,
Pt
No es posible medir la distancia
lado del objetivo estén limpios. Límpielos si es necesario.
Pt
podría causar una interferencia perjudicial a las comunicaciones de radio. Sin embargo, no hay garantía de que la
● Compruebe que la forma y el estado del sujeto son adecuados para reflejar el
Pl
Pl
interferencia no ocurra en una instalación particular. Si el equipo provoca perturbaciones en la recepción de radio
haz láser.
Fi
o televisión, lo que se puede comprobar apagando y volviendo a encender el equipo, el usuario debería intentar
Fi
● Sustituya la batería vieja por otra nueva.
corregir la interferencia mediante una o más de las medidas siguientes:
No
No
● Asegúrese de mantener la unidad fija mientras está midiendo.
Dk
Dk
● Compruebe que el sujeto está dentro del rango de medición
medir”)
Cz
Cz
Ro
Ro
Un sujeto cercano, situado dentro
● Compruebe que no hay nada, como hojas o hierba, entre el Nikon Laser
Hu
del rango de medición, no se
Hu
Rangefinder y el sujeto.
puede medir
No puede medirse un objeto más
● Compruebe que no hay nada, como hojas o hierba, entre el Nikon Laser
allá de determinada distancia
Rangefinder y el sujeto.
● Sustituya la batería vieja por otra nueva.
● Compruebe que la forma y el estado del sujeto son adecuados para reflejar el
haz láser.
inestable
● Asegúrese de mantener la unidad fija mientras está midiendo.
● Compruebe que no hay nada, como hojas o hierba, entre el Nikon Laser
Rangefinder y el sujeto.
54 55
Solución de problemas/Reparación
Jp
Jp
En
En
Es
Es
Síntoma Puntos que debe comprobar
Fr
Fr
De
● Sustituya la batería vieja por otra nueva.
De
Français
● Compruebe que la forma y el estado del sujeto son adecuados para reflejar el
It
It
Se visualiza un resultado incorrecto
haz láser.
Se
● Compruebe que no hay nada, como hojas o hierba, entre el Nikon Laser
Se
SOMMAIRE
Rangefinder y el sujeto.
Nl
Nl
............................. 58-61
Ru
Ru
Caractéristiques principales ..................................... 62
Pt
pues puede haberse producido una avería de la unidad. No deje que nadie
Pt
distinto del representante oficial del fabricante del producto revise ni repare el Nikon Laser Rangefinder. No respetar esta
.................................... 63
Pl
Pl
indicación podría provocar lesiones o dañar el producto.
Écran interne .................................................................. 64
Fi
Fi
Mode d'affichage de mesure ................................... 65
No
No
Dk
Dk
................... 66
Cz
Cz
Remplacement de la pile ........................................... 67
Ro
Ro
Mesure ........................................................................ 68-69
Hu
Hu
Spécifications .......................................................... 70-71
Autres ................................................................................ 72
Réparations .............................................................. 73-74
56 57
Précautions avant utilisation
Jp
Respectez à la lettre les
PRÉCAUTIONS DE SÉCURITÉ
Jp
instructions suivantes pour une
Nikon à la portée des enfants.
En
(Laser)
En
utilisation adéquate de votre
Es
L'emploi de commandes, réglages ou procédures autres que ceux spécifiés dans ce manuel
Es
matériel et pour éviter tout
faisceau laser invisible. Veillez à
peut entraîner une exposition à des rayonnements dangereux.
Fr
s'il émet un bruit étrange en raison
risque d'accident. Avant d’utiliser
respecter ce qui suit:
Fr
d'une chute ou d'une autre cause,
De
l'appareil, lisez attentivement les
Attention
De
〇
retirez immédiatement la pile et
« Précautions avant utilisation »
It
cessez d'utiliser l'appareil.
It
et le mode d’emploi qui
Se
regardez l'optique à partir du côté
Se
〇 Conservez ces instructions à portée de main pour référence.
accompagnent l'appareil.
objectif. Sinon, vos yeux pourrait être
Nl
〇 Ne démontez pas et ne réparez pas cet appareil vous-même, car ceci pourrait engendrer un
Conservez ces instructions à
Nl
affectés ou endommagés.
portée de main pour référence.
Ru
Ru
Pt
La garantie constructeur ne s'applique pas aux produits qui ont été démontés ou réparés.
Pt
ATTENTION
d'autres personnes.
Pl
Pl
● Les spécifications et la conception sont sujettes à modification sans préavis.
Fi
en ignorant les points ci-dessous peut
Fi
un autre instrument optique, comme
● Aucune reproduction totale ou partielle de ce manuel, sous quelque forme que ce soit,
No
se traduire par la mort ou de sérieuses
un objectif ou des jumelles, ni à l'œil
No
blessures.
nu. Ceci pourrait endommager vos
Dk
Dk
autorisation écrite de NIKON VISION CO., LTD.
yeux.
PRÉCAUTION
Cz
● NIKON VISION CO., LTD. se réserve le droit de modifier le contenu de ces manuels à tout moment
Cz
Ro
ne placez pas vos doigts à proximité
sans préavis.
en ignorant les points ci-dessous peut
Ro
se traduire par de sérieuses blessures
Hu
Hu
ou des dégâts matériels.
éviter d'allumer le faisceau laser par
accident.
longue période de temps, veuillez
retirer la pile.
Nikon. Le laser
émetteur pourrait être nocif pour
votre santé. La garantie constructeur
ne s'applique pas aux produits qui
ont été démontés
58 59
Précautions avant utilisation
Jp
PRÉCAUTIONS DE SÉCURITÉ
Veillez à respecter ce qui suit:
PRECAUTIONS DE SECURITE
SOINS ET ENTRETIEN
Stockage
Jp
servi à emballer ce produit ou d'autres
(Objectif monoculaire)
Précautions
Lentilles
En
En
peuvent se former sur la surface des
Es
Es
positionnés.
soit étanche, il n'est pas conçu pour
gras pour dépoussiérer la surface
aser Nikon comporte un objectif
Fr
bouche les œilletons en caoutchouc
être utilisé sous l'eau.
des lentilles.
cette raison, rangez le laser
Fr
monoculaire pour viser la cible.
est déchargée et suite à toute
Nikon dans un endroit frais et sec.
De
Veillez à respecter ce qui suit:
De
des enfants avalaient ce type de
longue période de non-utilisation.
doivent être retirés de la surface
saletés comme les traces de doigts
It
Attention
It
de la surface des lentilles, essuyez
pendant la nuit, laissez le sécher
Se
médecin.
du compartiment à pile.
possible au moyen d'un chiffon
doucement avec un chiffon doux et
Se
à proximité de
doux et propre.
propre ou du papier pour lentilles
avant de le ranger dans un endroit frais
Nl
Nl
caoutchouc pendant une longue
non gras de bonne qualité. Un peu
et sec.
laser Nikon.
Ru
période de temps, ils peuvent
ou un sac, il pourrait y avoir un
Ru
dans une voiture par temps chaud
Précautions
provoquer une irritation cutanée.
court-circuit et une surchauffe.
Pt
être utilisé pour éliminer les taches
Pt
Arrêter d'utiliser l'appareil et consultez
produisant de la chaleur. Cela
Pl
Pl
laser Nikon, n'appuyez pas sur le
immédiatement un médecin si cela se
flammes. Ne démontez jamais la pile.
pourrait l'endommager ou affecter
mouchoir en papier
Fi
produisait.
son fonctionnement.
Fi
lithium.
No
pourraient rayer la surface des
No
marchant. Vous pourriez causer
laser Nikon, veillez à le ranger dans sa
lentilles. Un chiffon utilisé pour
Dk
des blessures ou une panne
housse.
endommagée venait à entrer en
Dk
soleil. Les rayons UV et la chaleur
n
Cz
en rencontrant un obstacle, en
contact avec un vêtement ou de
excessive peuvent affecter
réutilisé sur la surface des lentilles.
Cz
touchant d'autres personnes, en
fonctionne pas correctement,
la peau, rincez immédiatement à
son fonctionnement, voire
Ro
Boîtier principal
Ro
tombant ou par le biais d'autres
cessez immédiatement de l'utiliser
l'eau claire. Si du liquide provenant
l'endommager.
Hu
types d'accidents.
et consultez votre revendeur local
d'une pile endommagée entrait
Hu
pour déterminer la destination de
en contact avec les yeux, rincez
réparation.
immédiatement à l'eau claire et
se condenser sur la surface des
toucher et blesser d'autres
consultez un médecin.
PRECAUTIONS DE SECURITE
ni diluant, ni d'autres produits
personnes.
N'utilisez pas l'appareil tant que la
nettoyants contenant des agents
(Pile au lithium)
conformez-vous aux lois de
condensation n'a pas disparu.
organiques.
endroits instables. Ceci pourrait
recyclage locales.
Si elle n'est pas convenablement
* Un soufflet est un élément de
causer des chutes et créer des
manipulée, la pile peut se rompre et fuir,
nettoyage en caoutchouc qui
blessures ou des pannes.
provoquant la corrosion de l'appareil et
souffle de l'air par une petite buse.
des taches sur les vêtements.
60 61
Caractéristiques principales Nomenclature/Composition
Jp
Les conditions suivantes facilitent les mesures :
Jp
1
En
4
En
Ouverture de l'émetteur laser
Es
multicouches
Es
3
2 Ouverture du détecteur laser
Fr
Fr
3
De
De
(distance horizontale ± hauteur), pratique pour le golf.
4
It
Les mesures prises dans les cas suivants peuvent s'avérer
It
5Oculaire monoculaire 6x
facilement permutables
imprécises ou erronées:
1
Se
Se
6
Nl
qui peut être choisi selon la cible
taille
Nl
dioptrique
Ru
2
5
Ru
7 Index dioptrique
active la fonction de mesure en continu
Pt
8 Œillet pour courroie
Pt
Pl
utilisation)
miroir, etc...)
6
9 Couvercle du logement des piles
Pl
Fi
!p
Fi
7
No
couvercle du logement des piles
No
!q Étiquette de référence du produit
Dk
Dk
yeux
8
!w Indications pour la FDA
Cz
Cz
Le télémètre laser Nikon utilise un faisceau laser invisible
Ro
9
Ro
pour effectuer la mesure. Il mesure le temps nécessaire
Hu
Hu
au faisceau laser pour effectuer un aller-retour entre le
!p
télémètre et la cible. La réflectivité du laser et les résultats
!q
de mesure dépendent des conditions environnementales
!w
et climatiques, ainsi que de la couleur, de la finition de
surface, de la taille, de la forme et d'autres caractéristiques
de la cible.
Composition
.............................. x1
................... x1
............................ x1
... x1
62 63

Écran interne
Mode d'affichage de mesure
Jp
Distance
Jp
(pendant moins de 2 secondes) pour modifier le mode selon l'ordre indiqué ci-dessous :
En
En
Es
Es
Mode Distance
1. Mettez l'appareil sous tension (vérifiez que
Distance
Fr
Inclinaison (montée)
réelle et hauteur
Fr
l'écran interne est allumé).
réelle
De
Inclinaison (pente)
2. Appuyez et maintenez enfoncé le bouton
De
Hauteur
It
It
Marque d'irradiation laser
Se
Se
Hauteur
Mesure depuis moins de 2 secondes.
Nl
Nl
Mode Distance
Ru
changer de mode d'affichage de mesure.
Ru
Distance
Indicateur d'état de la pile
horizontale et hauteur
4. Répétez les opérations 2 et 3 jusqu'à ce que le
Pt
horizontale
Pt
mode que vous souhaitez adopter s'affiche.
Pl
『 』
Hauteur
Pl
『 』 - S'affiche lorsque le laser est utilisé pour une mesure.
*
Si vous n'appuyez pas sur les boutons dans
Fi
Fi
Reste affiché pendant une mesure unique. Clignote lors de mesures en continu.
l'ordre prescrit, le changement de mode
No
Ne regardez pas dans l'objectif lorsque ce symbole est affiché.
n'aura pas lieu.
No
Dk
『
』 - Mesure en cours
Réglage
*
Dk
Mode Golf
Distance
Cz
『
』 - Échec de la mesure ou mesure de distance impossible
les résultats dans le nouveau mode.
Cz
de pente
*
Ro
Ro
Distance
effectuées dans le mode adopté.
Hu
* Un LCD emploie généralement un grossissement égal ou inférieur. Cependant, le LCD de ce produit est
réelle
Hu
grossit par le grossissement de l'oculaire. Bien que l'écran LCD ait été fabriqué grâce à la technologie la
Mode Distance
Distance
réelle
réelle
64 65
Mode priorité à la cible
Unités d'affichage de distance
Remplacement de la pile
Jp
Jp
Type de pile :
(Le réglage par défaut est le yard.)
En
Indicateurs de charge de pile
En
[ ]
Es
[ ]Yard
* La marque d'état de la pile indique la nécessité de remplacer la pile sur l'écran interne.
en sortie d'usine)
Es
: Charge suffisante pour le fonctionnement.
Fr
1. Mettez l'appareil sous tension (vérifiez que l'écran
Fr
interne est allumé).
De
「
」
distante
「
」
De
It
: Le niveau de charge de la pile est faible. La pile doit être remplacée.
1. Mettez l'appareil sous tension (vérifiez que l'écran
pendant plus de 2 secondes. Lorsque la nouvelle unité
It
interne est allumé).
Se
d'affichage est adoptée, relâchez la pression sur le
Se
bouton.
automatiquement. Veuillez remplacer la pile.
Nl
Nl
Ru
la demi-seconde qui suit et maintenez la pression.
convertis et affichés dans l'unité choisie.
Ru
1. Ouvrez le couvercle du logement de la pile
Maintenez toujours la pression sur ces deux boutons
Pt
Pt
logement des piles, faites tourner le couvercle vers la marque
Pl
Pl
cause du joint de caoutchouc prévu pour l'étanchéité à l'eau.
la cible distante ou inversement.
Fi
Système d'éclairage DEL
Fi
3. Relâchez les deux boutons une fois que le mode a
2. Remplacez la pile usagée par une pile neuve
No
été sélectionné.
1. Mettez l'appareil sous tension (vérifiez que l'écran
No
*
Si vous n'appuyez pas sur les boutons dans l'ordre
interne est allumé).
Dk
dans le logement de la pile.
Dk
prescrit, le changement de mode n'a pas lieu.
Cz
Cz
*
Si le passage d'un mode à l'autre échoue, répétez à
3. Fermez le couvercle du logement de la pile
Ro
partir de 2.
Ro
*
Alignez la marque
avec l'indicateur
●
Hu
[]
sombres pour voir l'écran LCD.
Hu
partie charnue du pouce, etc., faites tourner le couvercle vers la marque
Lorsque vous mesurez des sujets superposés, le mode
*
tourner jusqu'à l'arrêt du couvercle. Vérifiez que le couvercle est bien fermé.
cible distante permet d'afficher la distance au sujet le
Durée de vie de la pile
plus éloigné.
Fonctionnement continu : °C)
Cette valeur peut varier selon la température et d'autres facteurs tels que forme, couleur, etc. de la cible.
Utiliser uniquement comme indication.
de la pile sera probablement plus courte que la valeur ci-dessus.
* Si de l'eau rentrait dans le compartiment suite à une immersion, séchez bien le logement de la pile, et remplacez la pile.
66 67
Jp
【
Mesure unique
】
Jp
En
3. Appuyez
une fois sur le bouton
En
Es
Es
prendre une mesure unique.
Fr
Fr
De
De
It
It
Se
Se
Nl
Nl
Ru
Ru
Pt
Pt
Pl
Pl
【
Fonction de mesure en continu
】
Fi
Fi
No
No
Dk
Dk
Cz
Cz
Ro
Ro
Hu
Hu
68 69
Measurement
1. Press the POWER button for power-on.
(Power turns off 8 seconds after the last
operation.)
Immediately after power-on.
Stand-by.
(Initializing)
2. Aim at the target
.
Positionthetargetatthecenterofthereticle
Target focusing.
[Single measurement]
3. Press POWER button once to start single measurement.
Measuring.
4. After measurement, “distance” or “fail to measure” indicator are displayed for 8 seconds, then power turns off. If you press the POWER
button during power-on (while the internal display is lit), another single measurement starts.
Failure to measure or
Upward measurement. Downward measurement.
unable to measure distance.
Displays the measured figure.
[Continuous measurement]
3. Keep pressing POWER button to start continuous measurement up to 20 seconds. The internal display shows “distance” and
“fail to measure” indicator alternately.
Note: Laser irradiaton mark is blinking during the measurement.
Note: If you stop pressing the button, the continuous measuremen stops
Failure to measure or
unable to measure distance.
4. After continuous measurement, the measure results are displayed for 8 seconds, then power turns off. If you press the POWER
button during power-on (while the internal display is lit), another measrement starts.
Displays the measured
figure. (Target 1)
Displays the measured
figure. (Target 2)
Measurement
1. Press the POWER button for power-on.
(Power turns off 8 seconds after the last
operation.)
Immediately after power-on.
Stand-by.
(Initializing)
2. Aim at the target
.
Positionthetargetatthecenterofthereticle
Target focusing.
[Single measurement]
3. Press POWER button once to start single measurement.
Measuring.
4. After measurement, “distance” or “fail to measure” indicator are displayed for 8 seconds, then power turns off. If you press the POWER
button during power-on (while the internal display is lit), another single measurement starts.
Failure to measure or
Upward measurement. Downward measurement.
unable to measure distance.
Displays the measured figure.
[Continuous measurement]
3. Keep pressing POWER button to start continuous measurement up to 20 seconds. The internal display shows “distance” and
“fail to measure” indicator alternately.
Note: Laser irradiaton mark is blinking during the measurement.
Note: If you stop pressing the button, the continuous measuremen stops
Failure to measure or
unable to measure distance.
Displays the measured
figure. (Target 1)
4. After continuous measurement, the measure results are displayed for 8 seconds, then power turns off. If you press the POWER
button during power-on (while the internal display is lit), another measrement starts.
Displays the measured
figure. (Target 2)
Measurement
1. Press the POWER button for power-on.
(Power turns off 8 seconds after the last
operation.)
Immediately after power-on.
Stand-by.
(Initializing)
2. Aim at the target
.
Positionthetargetatthecenterofthereticle
Target focusing.
[Single measurement]
3. Press POWER button once to start single measurement.
Measuring.
4. After measurement, “distance” or “fail to measure” indicator are displayed for 8 seconds, then power turns off. If you press the POWER
button during power-on (while the internal display is lit), another single measurement starts.
Failure to measure or
unable to measure distance.
3. Keep pressing POWER button to start continuous measurement up to 20 seconds. The internal display shows “distance” and
“fail to measure” indicator alternately.
Note: Laser irradiaton mark is blinking during the measurement.
Note: If you stop pressing the button, the continuous measuremen stops
Failure to measure or
unable to measure distance.
[Continuous measurement]
4. After continuous measurement, the measure results are displayed for 8 seconds, then power turns off. If you press the POWER
button during power-on (while the internal display is lit), another measrement starts.
Upward measurement. Downward measurement.
Displays the measured
figure. (Target 1)
Displays the measured figure.
Displays the measured
figure. (Target 2)
Measurement
1. Press the POWER button for power-on.
(Power turns off 8 seconds after the last
operation.)
Immediately after power-on.
Stand-by.
(Initializing)
2. Aim at the target
.
Positionthetargetatthecenterofthereticle
Target focusing.
[Single measurement]
3. Press POWER button once to start single measurement.
Measuring.
4. After measurement, “distance” or “fail to measure” indicator are displayed for 8 seconds, then power turns off. If you press the POWER
button during power-on (while the internal display is lit), another single measurement starts.
unable to measure distance.
3. Keep pressing POWER button to start continuous measurement up to 20 seconds. The internal display shows “distance” and
“fail to measure” indicator alternately.
Note: Laser irradiaton mark is blinking during the measurement.
Note: If you stop pressing the button, the continuous measuremen stops
unable to measure distance.
4. After continuous measurement, the measure results are displayed for 8 seconds, then power turns off. If you press the POWER
button during power-on (while the internal display is lit), another measrement starts.
[Continuous measurement]
Failure to measure or
Failure to measure or
Upward measurement. Downward measurement.
Displays the measured
figure. (Target 1)
Displays the measured figure.
Displays the measured
figure. (Target 2)
Measurement
1. Press the POWER button for power-on.
(Power turns off 8 seconds after the last
operation.)
Immediately after power-on.
Stand-by.
(Initializing)
2. Aim at the target
.
Positionthetargetatthecenterofthereticle
Target focusing.
[Single measurement]
3. Press POWER button once to start single measurement.
4. After measurement, “distance” or “fail to measure” indicator are displayed for 8 seconds, then power turns off. If you press the POWER
button during power-on (while the internal display is lit), another single measurement starts.
unable to measure distance.
3. Keep pressing POWER button to start continuous measurement up to 20 seconds. The internal display shows “distance” and
“fail to measure” indicator alternately.
Note: Laser irradiaton mark is blinking during the measurement.
Note: If you stop pressing the button, the continuous measuremen stops
unable to measure distance.
4. After continuous measurement, the measure results are displayed for 8 seconds, then power turns off. If you press the POWER
button during power-on (while the internal display is lit), another measrement starts.
[Continuous measurement]
Failure to measure or
Failure to measure or
Measuring.
Upward measurement. Downward measurement.
Displays the measured
figure. (Target 1)
Displays the measured figure.
Displays the measured
figure. (Target 2)
Measurement
1. Press the POWER button for power-on.
(Power turns off 8 seconds after the last
operation.)
Immediately after power-on.
Stand-by.
(Initializing)
2. Aim at the target
.
Positionthetargetatthecenterofthereticle
Target focusing.
[Single measurement]
3. Press POWER button once to start single measurement.
Measuring.
4. After measurement, “distance” or “fail to measure” indicator are displayed for 8 seconds, then power turns off. If you press the POWER
button during power-on (while the internal display is lit), another single measurement starts.
unable to measure distance.
3. Keep pressing POWER button to start continuous measurement up to 20 seconds. The internal display shows “distance” and
“fail to measure” indicator alternately.
Note: Laser irradiaton mark is blinking during the measurement.
Note: If you stop pressing the button, the continuous measuremen stops
unable to measure distance.
4. After continuous measurement, the measure results are displayed for 8 seconds, then power turns off. If you press the POWER
button during power-on (while the internal display is lit), another measrement starts.
[Continuous measurement]
Failure to measure or
Failure to measure or
Upward measurement. Downward measurement.
Displays the measured
figure. (Target 1)
Displays the measured figure.
Displays the measured
figure. (Target 2)
Measurement
1. Press the POWER button for power-on.
(Power turns off 8 seconds after the last
operation.)
Immediately after power-on.
Stand-by.
(Initializing)
2. Aim at the target
.
Positionthetargetatthecenterofthereticle
Target focusing.
[Single measurement]
3. Press POWER button once to start single measurement.
Measuring.
4. After measurement, “distance” or “fail to measure” indicator are displayed for 8 seconds, then power turns off. If you press the POWER
button during power-on (while the internal display is lit), another single measurement starts.
Failure to measure or
unable to measure distance.
Displays the measured
figure. (Target 1)
3. Keep pressing POWER button to start continuous measurement up to 20 seconds. The internal display shows “distance” and
“fail to measure” indicator alternately.
Note: Laser irradiaton mark is blinking during the measurement.
Note: If you stop pressing the button, the continuous measuremen stops
Failure to measure or
unable to measure distance.
Upward measurement. Downward measurement.
Displays the measured figure.
[Continuous measurement]
4. After continuous measurement, the measure results are displayed for 8 seconds, then power turns off. If you press the POWER
button during power-on (while the internal display is lit), another measrement starts.
Displays the measured
figure. (Target 2)
Measurement
1. Press the POWER button for power-on.
(Power turns off 8 seconds after the last
operation.)
Immediately after power-on.
Stand-by.
(Initializing)
2. Aim at the target
.
Positionthetargetatthecenterofthereticle
Target focusing.
[Single measurement]
3. Press POWER button once to start single measurement.
Measuring.
4. After measurement, “distance” or “fail to measure” indicator are displayed for 8 seconds, then power turns off. If you press the POWER
button during power-on (while the internal display is lit), another single measurement starts.
Failure to measure or
unable to measure distance.
3. Keep pressing POWER button to start continuous measurement up to 20 seconds. The internal display shows “distance” and
“fail to measure” indicator alternately.
Note: Laser irradiaton mark is blinking during the measurement.
Note: If you stop pressing the button, the continuous measuremen stops
Failure to measure or
unable to measure distance.
[Continuous measurement]
4. After continuous measurement, the measure results are displayed for 8 seconds, then power turns off. If you press the POWER
button during power-on (while the internal display is lit), another measrement starts.
Upward measurement. Downward measurement.
Displays the measured
figure. (Target 1)
Displays the measured figure.
Displays the measured
figure. (Target 2)
4. Une fois la mesure effectuée, le témoin
s'affiche pendant 8 secondes, puis l'appareil se met hors tension. Si vous
appuyez sur le bouton
lors du démarrage (pendant que
l'écran interne est éclairé), une autre mesure unique s'initie.
Échec de la mesure
Mesure vers le
Mesure vers le
Mesure
ou mesure de distance
haut.
bas.
impossible.
Affiche les résultats mesurés.
3. Appuyez et maintenez le
4. Suite à une mesure en continu, les résultats de la mesure finale
environ 8 secondes pour prendre une mesure continue. L'écran
(distance mesurée) s'affiche pendant environ 8 secondes, puis
l'appareil s'éteint.
Si vous appuyez sur le bouton
lors du
*
La marque d'irradiation laser clignote pendant la mesure.
démarrage (pendant que l'écran interne est éclairé), une autre
*
Quand vous relâchez la pression sur le bouton, la mesure en
mesure unique s'initie.
continu s'arrête.
Lors de la mesure de la distance d'un drapeau sur un terrain de golf,
Échec de la mesure
Affiche les
Affiche les
ou mesure de distance
résultats mesurés
résultats mesurés
Visez le drapeau en mode de mesure continue pour faciliter la
impossible.
(Cible 1)
(Cible 2)
mesure. Lorsqu'il ne se trouve aucun objet entre vous et le drapeau,
la plus petite valeur est la distance au drapeau que vous visez.
Measurement
1. Press the POWER button for power-on.
(Power turns off 8 seconds after the last
operation.)
Immediately after power-on.
3. Press POWER button once to start single measurement.
4. After measurement, “distance” or “fail to measure” indicator are displayed for 8 seconds, then power turns off. If you press the POWER
button during power-on (while the internal display is lit), another single measurement starts.
unable to measure distance.
3. Keep pressing POWER button to start continuous measurement up to 20 seconds. The internal display shows “distance” and
“fail to measure” indicator alternately.
Note: Laser irradiaton mark is blinking during the measurement.
Note: If you stop pressing the button, the continuous measuremen stops
2. Aim at the target
Positionthetargetatthecenterofthereticle
[Single measurement]
Failure to measure or
unable to measure distance.
[Continuous measurement]
4. After continuous measurement, the measure results are displayed for 8 seconds, then power turns off. If you press the POWER
button during power-on (while the internal display is lit), another measrement starts.
Failure to measure or
Target focusing.
Measuring.
(Initializing)
.
Upward measurement. Downward measurement.
Displays the measured
figure. (Target 1)
Displays the measured figure.
Stand-by.
Displays the measured
figure. (Target 2)
Measurement
1. Press the POWER button for power-on.
(Power turns off 8 seconds after the last
operation.)
Immediately after power-on.
(Initializing)
3. Press POWER button once to start single measurement.
Measuring.
4. After measurement, “distance” or “fail to measure” indicator are displayed for 8 seconds, then power turns off. If you press the POWER
button during power-on (while the internal display is lit), another single measurement starts.
Failure to measure or
unable to measure distance.
Displays the measured
figure. (Target 1)
3. Keep pressing POWER button to start continuous measurement up to 20 seconds. The internal display shows “distance” and
“fail to measure” indicator alternately.
Note: Laser irradiaton mark is blinking during the measurement.
Note: If you stop pressing the button, the continuous measuremen stops
Target focusing.
2. Aim at the target
.
Positionthetargetatthecenterofthereticle
[Single measurement]
Failure to measure or
unable to measure distance.
Upward measurement. Downward measurement.
Displays the measured figure.
[Continuous measurement]
4. After continuous measurement, the measure results are displayed for 8 seconds, then power turns off. If you press the POWER
button during power-on (while the internal display is lit), another measrement starts.
Stand-by.
Displays the measured
figure. (Target 2)
Measurement
1. Press the POWER button for power-on.
(Power turns off 8 seconds after the last
operation.)
Immediately after power-on.
Stand-by.
(Initializing)
2. Aim at the target
.
Positionthetargetatthecenterofthereticle
3. Press POWER button once to start single measurement.
4. After measurement, “distance” or “fail to measure” indicator are displayed for 8 seconds, then power turns off. If you press the POWER
button during power-on (while the internal display is lit), another single measurement starts.
unable to measure distance.
3. Keep pressing POWER button to start continuous measurement up to 20 seconds. The internal display shows “distance” and
“fail to measure” indicator alternately.
Note: Laser irradiaton mark is blinking during the measurement.
Note: If you stop pressing the button, the continuous measuremen stops
[Single measurement]
Failure to measure or
unable to measure distance.
[Continuous measurement]
4. After continuous measurement, the measure results are displayed for 8 seconds, then power turns off. If you press the POWER
button during power-on (while the internal display is lit), another measrement starts.
Failure to measure or
Target focusing.
Measuring.
Upward measurement. Downward measurement.
Displays the measured
figure. (Target 1)
Displays the measured figure.
Displays the measured
figure. (Target 2)
Mesure
Attention — L'emploi de commandes, réglages ou procédures autres que ceux
spécifiés dans ce manuel peut entraîner une exposition à des rayonnements dangereux.
1. Préparation
Installez une pile dans le logement prévu à cet effet. (Reportez-vous à la section
Remplacement de la pile
.)
2. Œilleton en caoutchouc
3. Correction dioptrique
Réglez la correction dioptrique pour obtenir une image nette sur l'écran LCD.
Tournez d'abord la bague de réglage dioptrique dans le sens inverse des aiguilles d'une
en regardant dans l'oculaire, tournez la bague de réglage dioptrique dans le sens horaire
jusqu'à ce que l'affichage soit net.
Si vous tournez trop la bague, tournez-la dans le sens inverse des aiguilles d'une montre
Si la correction dioptrique ne correspond pas à votre vue, vous aurez des difficultés à
effectuer la mise au point sur le sujet.
4. Mesure
*
Veuillez consulter chaque section pour définir chacun des modes.
1. Mettez l'appareil sous tension
2. Visez la cible.
(Vérifiez que l'écran interne est allumé)
centre du réticule.
8 secondes de non-utilisation.)
Cible visée
sous tension (Initialisation)
Spécifications
Jp
Jp
Structure
(Logement de la pile: Étanche à l'eau**)
En
En
Es
Es
Sécurité
Fr
Fr
De
Affichage de distance (incrément)
De
It
Hauteur (3 chiffres inférieurs) :
It
Laser
Se
Se
Classe
Nl
Nl
6
Longueur d'onde (nm) 905
Ru
Ru
Durée d'impulsion (ns) 12
Pt
ø21
Pt
15
Pl
Pl
Champ angulaire (réel) (°) 7,5
Divergence du faisceau (mrad)
Fi
Fi
Dégagement oculaire (mm) 18,3
Humidité ambiante de
No
80 ou moins (sans condensation)
No
ø3,5
fonctionnement (%RH)
Dk
Dk
-
1
Correction dioptrique ±4m
* Modèles étanches
Cz
Cz
Autres
Ro
Ro
Température de fonctionnement (˚C) -10 —
Le télémètre laser Nikon offre les avantages suivants:
Hu
Hu
1 pile CR2 au lithium (3V CC)
Alimentation
Observez les consignes suivantes lors de l'utilisation d'un télémètre laser Nikon :
Dimensions (L x H x l) (mm) 113 x 70 x 39
immergé. Dans ce cas, essuyez soigneusement le logement de la pile et attendez qu'il soit parfaitement sec.
70 71
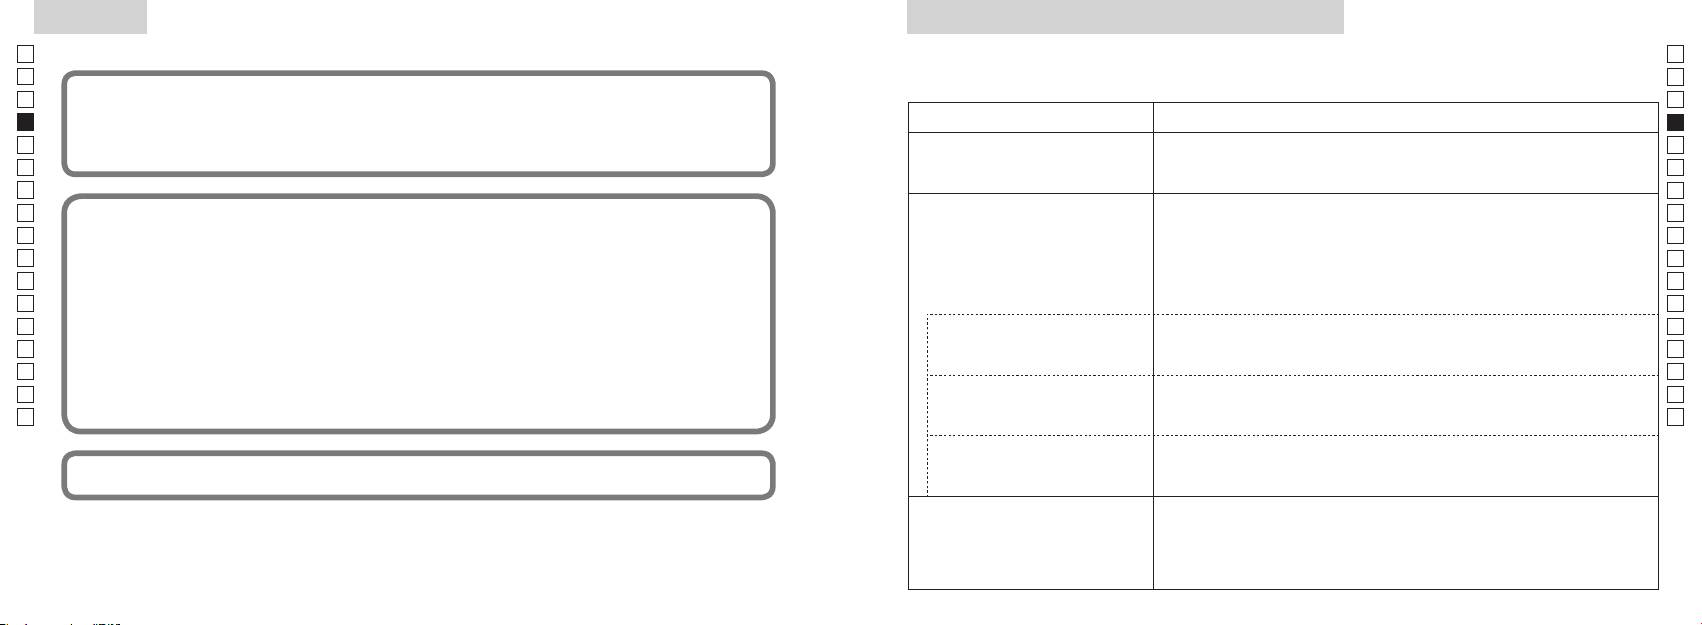
Autres
Guide de dépistage des pannes/Réparations
Jp
Jp
En
En
Es
Es
suivantes :
Symptômes Points à vérifier
Fr
(1) Cet appareil ne doit pas provoquer des brouillages nuisibles et
Fr
(2) Cet appareil doit s'accommoder des brouillages auxquels il est soumis, y compris les brouillages qui peuvent
De
●
De
provoquer des anomalies de fonctionnement.
L'appareil ne s'allume pas
● Vérifiez l'insertion de la pile
It
(l'écran LCD ne s'allume pas)
It
● Remplacez la pile usagée par une pile neuve.
Se
Se
Nl
●
Nl
propagation du faisceau laser ni la réception par le détecteur.
Ru
Ru
ont été fixées dans le but d'apporter une protection raisonnable contre les brouillages des appareils domestiques.
● Assurez-vous que la fenêtre d'émission laser et le détecteur sont propres.
Impossible de mesure la distance
Pt
Pt
Cet appareil produit, utilise et peut émettre des fréquences radioélectriques; s'il n'est pas installé conformément aux
Le cas échéant, nettoyez-les.
Pl
instructions, ces ondes peuvent perturber les radiocommunications. Toutefois, même en cas d'installation conforme
● Assurez-vous que la forme et l'état de la cible permettent la réflexion du laser.
Pl
● Remplacez la pile usagée par une pile neuve.
Fi
Fi
appareil perturbe la réception des émissions de radio ou de télévision, ce dont on peut s'assurer en le mettant sous
No
No
tension puis hors tension, l'utilisateur est invité à prendre les mesures correctives suivantes:
● Veillez à ce que l'appareil soit stable pendant la mesure.
● Assurez-vous que la cible est dans les limites de portée de l'appareil
Dk
Dk
Cz
Cz
Une cible plus proche, située
Ro
Cet appareil numérique de la classe B est conforme à la norme canadienne relative aux équipements susceptibles de
● Veillez à ce qu'aucun obstacle (feuilles, herbes, etc.) ne soit placé entre le
Ro
dans la plage de mesure, ne peut
Hu
provoquer des brouillages.
Hu
pas être mesurée.
Les cibles placées au-delà d'une
● Veillez à ce qu'aucun obstacle (feuilles, herbes, etc.) ne soit placé entre le
certaine distance ne peuvent pas
preuve officielle.
être mesurées.
● Remplacez la pile usagée par une pile neuve.
● Assurez-vous que la forme et l'état de la cible permettent la réflexion du laser.
Les résultats des mesures sont
● Veillez à ce que l'appareil soit stable pendant la mesure.
variables
● Veillez à ce qu'aucun obstacle (feuilles, herbes, etc.) ne soit placé entre le
72 73
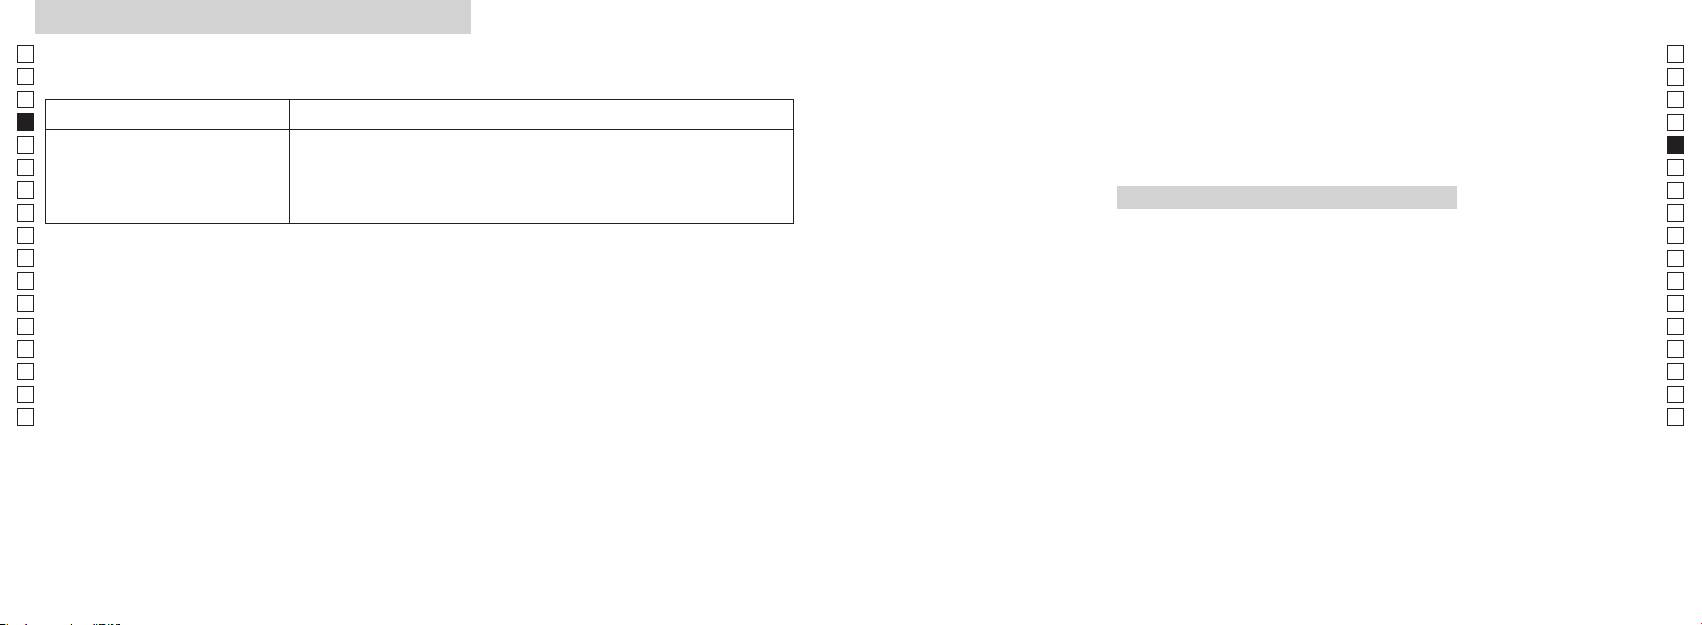
Guide de dépistage des pannes/Réparations
Jp
Jp
En
En
Es
Es
Symptômes Points à vérifier
Fr
Fr
De
De
● Remplacez la pile usagée par une pile neuve.
Deutsch
It
● Assurez-vous que la forme et l'état de la cible permettent la réflexion du laser.
It
Le résultat affiché est incorrect
● Veillez à ce qu'aucun obstacle (feuilles, herbes, etc.) ne soit placé entre le
Se
Se
INHALT
Nl
Nl
Vorsichtshinweise vor der anwendung ......... 76-79
Ru
Ru
Hauptmerkmale ............................................................ 80
Pt
pour qu'il vérifie ou répare l'appareil, car une panne s'est peut-être produite. Ne confiez à personne d'autre qu'un représentant
Pt
........... 81
Pl
Pl
à des blessures ou à une défaillance de l'appareil.
Interne anzeige ............................................................. 82
Fi
Fi
Messanzeigemodus ..................................................... 83
No
No
Dk
Dk
.................................... 84
Cz
Cz
................................................. 85
Ro
Ro
Messung ................................................................... 86-87
Hu
Hu
Technische daten .................................................. 88-89
Anderes ............................................................................ 90
........................................ 91-92
74 75
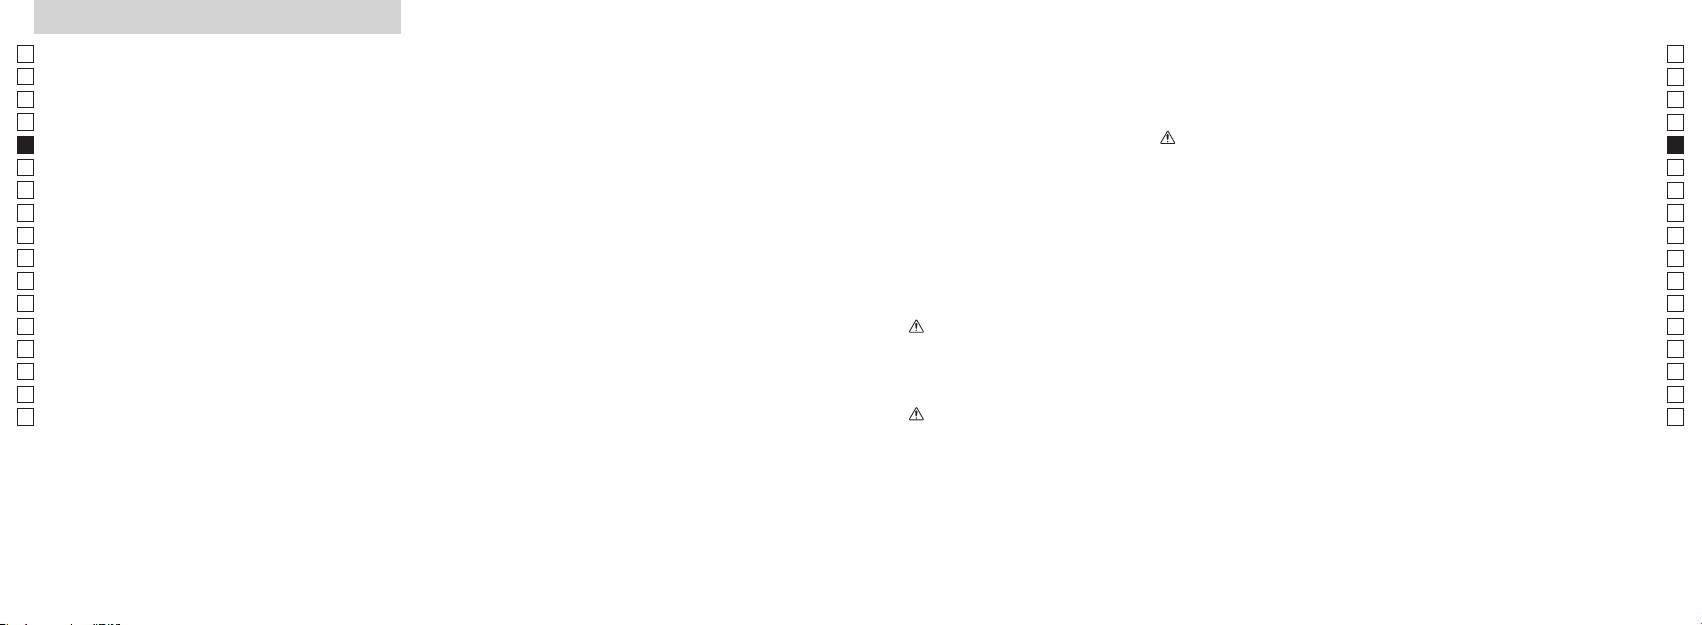
Vorsichtshinweise vor der anwendung
Jp
Bitte beachten Sie sorgfältig die
SICHERHEITSHINWEISE (Laser)
Jp
folgenden Richtlinien, damit Sie
En
En
das Gerät ordnungsgemäß
benutzt einen unsichtbaren Laserstrahl.
neu zusammensetzen oder
Es
Die Verwendung von Einstellelementen oder Justagen oder die Ausführung von anderen als
Es
reparieren. Der ausstrahlende
verwenden und mögliche
Stellen Sie sicher, das Folgende zu
den hierin angegebenen Verfahren können zu einer gefährlichen Strahlenbelastung führen.
Fr
Gefahrenquellen vermeiden
beachten:
Fr
Warnung
De
können. Vor der ersten
De
〇
Drücken Sie nicht die
neu zusammengesetztes oder
Verwendung des Produkts lesen
It
repariertes
It
Anwendung” sowie die Bedienungsanweisung aufmerksam durch.
, wenn Sie von der
Sie bitte die „Vorsichtshinweise
Se
mehr der Herstellergarantie.
Objektivseite in die Optik schauen.
Se
〇 Verwahren Sie dieses Handbuch immer zur einfachen Referenz, und halten Sie es in Reichweite.
vor der Anwendung” sowie die
Bei Nichtbeachtung besteht die
Nl
Bedienungsanweisung
Nl
〇
aufmerksam durch. Verwahren
Ru
Reichweite von Kindern auf.
Ru
Sie dieses Handbuch immer zur
Pt
Pt
einfachen Referenz, und halten
Pl
Sie es in Reichweite.
Pl
Menschen.
●
Fi
Fi
●
einen fremdartigen Ton ab, so
No
WARNUNG
einem anderen optischen Instrument,
No
entnehmen Sie bitte sofort die
Dieser Hinweis warnt davor, dass eine
Dk
Dk
Batterie und verwenden ihn nicht
Nichtbeachtung der betreffenden
auch nicht mit dem bloßen Auge.
Cz
mehr.
Cz
●
oder zum Tod führen kann.
Augen kommen.
Ro
Ro
Hu
VORSICHT
Hu
Dieses Symbol weist Sie auf den
Messtaste, um ein unbeabsichtigtes
Umstand hin, dass eine den im
Abgeben des Laserstrahls zu
Folgenden beschriebenen Inhalt
außer Acht lassende Anwendung zu
vermeiden.
einer möglichen Verletzungen oder
kann.
76 77
Vorsichtshinweise vor der Anwendung
Jp
SICHERHEITSHINWEISE
SICHERHEITSHINWEISE
-
Jp
PFLEGE UND WARTUNG
fallen lassen oder verlieren und es
En
(Monokular)
(Lithiumbatterie)
chend den regionalen Vorschriften.
Objektive
En
dadurch zu Verletzungen oder einer
Es
Aufbewahrung
Fehlfunktion kommt.
SICHERHEITSHINWEISE
Es
nutzt ein Monokular in seinem
die Batterie aufbrechen und lecken,
Fr
Vorsichtsmaßnahmen
einen ölfreien
Fr
wodurch Ausrüstung und Bekleidung
bedingt durch eine hohe
Beutel und andere Kleinteile
De
Objektivreinigungspinsel.
anzuvisieren. Stellen Sie sicher, das
korrodieren können.
Feuchtigkeit, eine
De
unbedingt so aufbewahren, dass er
Folgende zu beachten:
Stellen Sie sicher, das Folgende zu
It
ist er nicht für eine Anwendung
It
Fingerabdrücke von der
beachten:
Schimmelbildung auftreten. Lagern
Warnung
ist.
Se
-
-
Sie daher den Nikon Laser-
Se
chen, sauberen Baumwolltuch oder
Nl
an einem
Verwendung des Nikon-Laser-
Nl
einem ölfreien
Kleinteile etc. in den Mund stecken.
Ru
Ru
direkt in die Sonne, in intensives
weichen, sauberen Tuches so bald wie
Pt
der Nacht lassen Sie den
Pt
Licht oder den Laserstrahl.
werden, müssen Sie sofort einen
möglich entfernt werden.
und ohne Kraftanwendung sauber.
verwendet wird.
Pl
Arzt aufsuchen.
Pl
Vorsichtsmaßnahmen
Fi
Verschmutzungen können mit
kurzschließen.
trocknen, bevor Sie ihn an einem
Fi
heißen oder sonnigen Tag in einem
einem Tropfen reinen (nicht denatu-
, wenn Sie den
nicht zusam-
kühlen, trockenen Ort aufbewahren.
No
Auto, oder bringen Sie ihn nicht in die
No
riertem) Alkohol entfernt werden.
Nikon Laser-
men mit Schlüsseln oder Münzen in
oder Hautentzündungen kommen.
Dk
Samttücher oder gewöhnliche
Dk
nicht verwenden.
einer Tasche oder in einem Beutel, da
Sollte dies vorkommen, stellen Sie
Tücher sind nicht geeignet, da sie
Cz
es sonst zu einem Kurzschluss oder
die Verwendung ein und suchen Sie
Cz
negativ beeinflusst werden.
Überhitzung kommen kann.
unverzüglich einen Arzt auf.
Ro
Ro
Linsenreinigungstuch darf nicht
Hu
oder einer Fehlfunktion kommen,
Flammen aussetzen. Die Batterie
Hu
Tageslicht. Ultraviolette Strahlen
wiederverwendet werden.
da Sie gegen jemanden stoßen,
niemals zerlegen.
die Soft-Tragetasche.
fallen oder sich anderweitig
Hauptkörper
Messeinheit negativ beeinflussen
verletzen können.
Kommt Batterieflüssigkeit einer
kaputten Batterie mit der Kleidung
mit einem weichen, sauberen Tuch,
oder Haut in Berührung, so spülen Sie
so stellen Sie die Anwendung
nachdem Sie Staub mit einem
-
könnte andere Menschen treffen
sofort ein und konsultieren Sie
Blasepinsel* sanft entfernt haben.
treten, wenn der Nikon Laser-
und verletzen.
suchen Sie dann einen Arzt auf. Kommt
Verwenden Sie kein Benzol,
Batterieflüssigkeit mit den Augen in
Verdünner oder andere organische
instable Unterlage stellen. Bei
Kontakt, so spülen Sie diese sofort gut
Reparatur schicken können.
Mittel.
Nichtbeachtung besteht die
bis die Kondensation verdunstet ist.
einen Arzt auf.
78 79

Hauptmerkmale Begriffsbestimmung/Zusammensetzung
Jp
Die folgenden Faktoren erleichtern die Messung:
Jp
1
En
4
En
Es
Es
Mehrschichtenvergütung
3
2 Laser-Detektorblendenöffnung
Fr
Fr
3
De
De
(Horizontalentfernung ± Höhe) angezeigt, die für das
4
It
Messungen können in folgenden Fällen Ungenauigkeiten
It
5Okular des Monokulars 6x
oder Störungen aufweisen:
1
Se
Se
umgeschaltet werden können
6
Nl
Nl
7 Dioptrinindex
Ru
2
5
8 Brückenöse
Ru
Pt
9 Batteriefachabdeckung
Pt
Funktion kontinuierliche Messung
Pl
6
!p
Pl
Spiegel usw.)
Fi
Fi
7
No
!q
No
!w FDA-Informationen
Dk
Dk
8
Cz
Cz
Der Nikon Laser-Entfernungsmesser benutzt für die
Ro
Messung einen unsichtbaren Laserstrahl. Er misst die Zeit,
gemessen
9
Ro
die der Laserstrahl braucht, um von Entfernungsmesser
Hu
Hu
zum Ziel und wieder zurück zu gelangen. Laserstrahl-
!p
Reflexionsvermögen und Messergebnisse können,
!q
entsprechend den klimatischen und Umweltbedingungen,
!w
der Farbe, Oberflächenbeschaffenheit, Größe, Form und
anderen Eigenschaften des Ziels, schwanken.
Zusammensetzung
..................................x1
...................... x1
..............x1
....x1
80 81
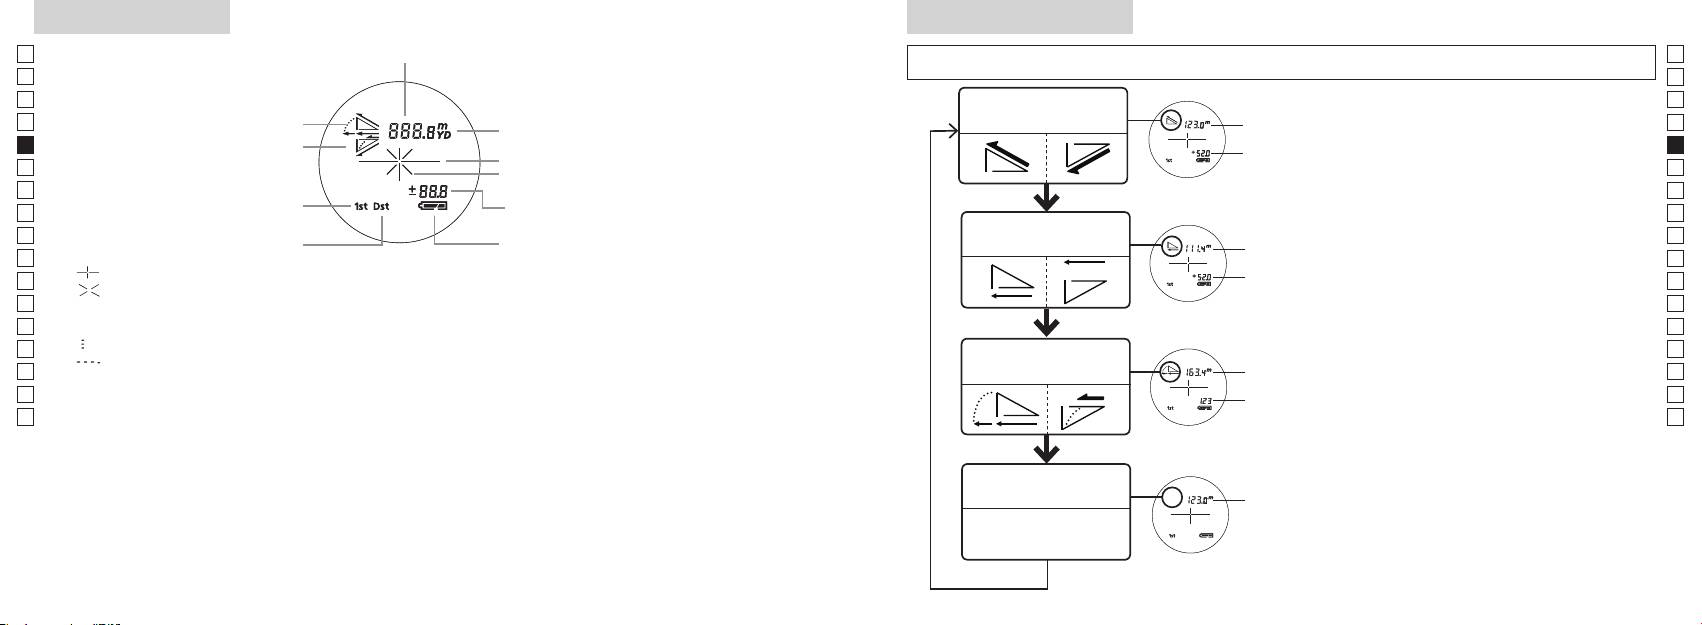
Interne anzeige
Messanzeigemodus
Jp
Jp
En
En
Es
Es
Modus Tatsächliche
Fr
Steigung
Entfernung und Höhe
Fr
Sie, ob das interne Display eingeschaltet
De
ist).
De
Höhe
It
It
Laserstrahlzeichen
und halten Sie dann sofort (innerhalb
Se
Se
Nl
Messtaste innerhalb von 2 Sekunden
Nl
Modus Horizontal-
Horizontal-
Ru
gedrückt.
Ru
entfernung und Höhe
entfernung
Batteriezustand
3. Nehmen Sie Ihren Finger von der
Pt
Pt
『 』
Pl
Höhe
Pl
『 』
Messanzeigemodus umzuschalten.
Fi
Fi
No
Blicken Sie nicht in das Objektiv, wenn diese Markierung angezeigt wird.
der gewünschte Modus angezeigt wird.
No
Dk
『
』 - Messung aktiv
Steigungs-
*
Dk
『
』
Golfmodus
angepasste
die Tasten nicht in richtiger Reihenfolge
Cz
Cz
gedrückt werden.
Ro
Ro
*
Das Umschalten des Modus nach der
Hu
* Normalerweise verwendet ein LC-Display dieselbe oder eine geringere Vergrößerung. Das LC-Display dieses
Hu
den neuen Modus.
*
zu verhindern. Dadurch kann Staub sichtbar werden. Hierdurch wird jedoch nicht die Messgenauigkeit oder die
werden Messungen im neuen Modus
Modus Tatsächliche
durchgeführt.
Entfernung
82 83

Prioritätsmodus ziel
Entfernungsanzeige-einheiten
Wechseln der batterie
Jp
Jp
Art der Batterie: 3V CR2 Lithiumbatterie x1
En
Anzeigen der verbleibenden Batterieladung
En
Es
[ ]
Meter [ ]Yard
* Das Batteriestandzeichen auf dem internen Display warnt, wenn die Batterie ausgetauscht werden muss.
Es
: Batterie besitzt genügend Ladung für den Betrieb.
Fr
「
1
」
「
」
Fr
interne Display eingeschaltet ist).
: Batterieladung ist bereits sehr niedrig. Die Batterie muss bald ausgetauscht werden.
De
De
interne Display eingeschaltet ist).
It
: Batterieladung ist sehr niedrig. Die Batterie muss durch eine neue ersetzt werden.
It
Anzeigeeinheit frei.
Se
blinkend : Die Batterie ist erschöpft. Nachdem die Anzeige drei Mal geblinkt hat, schaltet sich
Se
Nl
von 0,5 Sekunden gedrückt.
Nl
Halten Sie beide Tasten (für mehr als 2 Sekunden)
Ru
1. Öffnen Sie die Batteriefachabdeckung
Ru
Pt
Pt
und drehen Sie die Abdeckung in die Richtung der
-Markierung. Dies kann aufgrund der
werden.
Pl
LED-beleuchtung
Pl
3. Lassen Sie beide Taste los, wenn der Modus
Fi
umgeschaltet wurde.
2. Ersetzen Sie die alte Batterie durch eine neue
Fi
No
*
interne Display eingeschaltet ist).
No
nicht in richtiger Reihenfolge gedrückt werden.
Dk
Dk
*
.
Cz
stattfindet.
auszuschalten.
3. Schließen Sie die Batteriefachabdeckung
Cz
*
Ro
Richten Sie die
-Markierung mit der
●
-Anzeige aus und setzen Sie die Batteriefachabdeckung ein.
Ro
[]
schwach ist, um das LC-Display zu sehen.
-Markierung.
Hu
Hu
Bei der Messung von sich überlappenden Objekten
*
Drehen Sie diese aber weiter, bis die Abdeckung sich nicht mehr weiter dreht. Stellen Sie sicher, dass
diesem Fall bleibt die Beleuchtung aus, wenn der Laser-
die Abdeckung dicht geschlossen ist.
Batterielebensdauer
Dauerbetrieb: Ca. 13.000 mal (bei 20°C)
ersetzen Sie dann die Batterie.
84 85
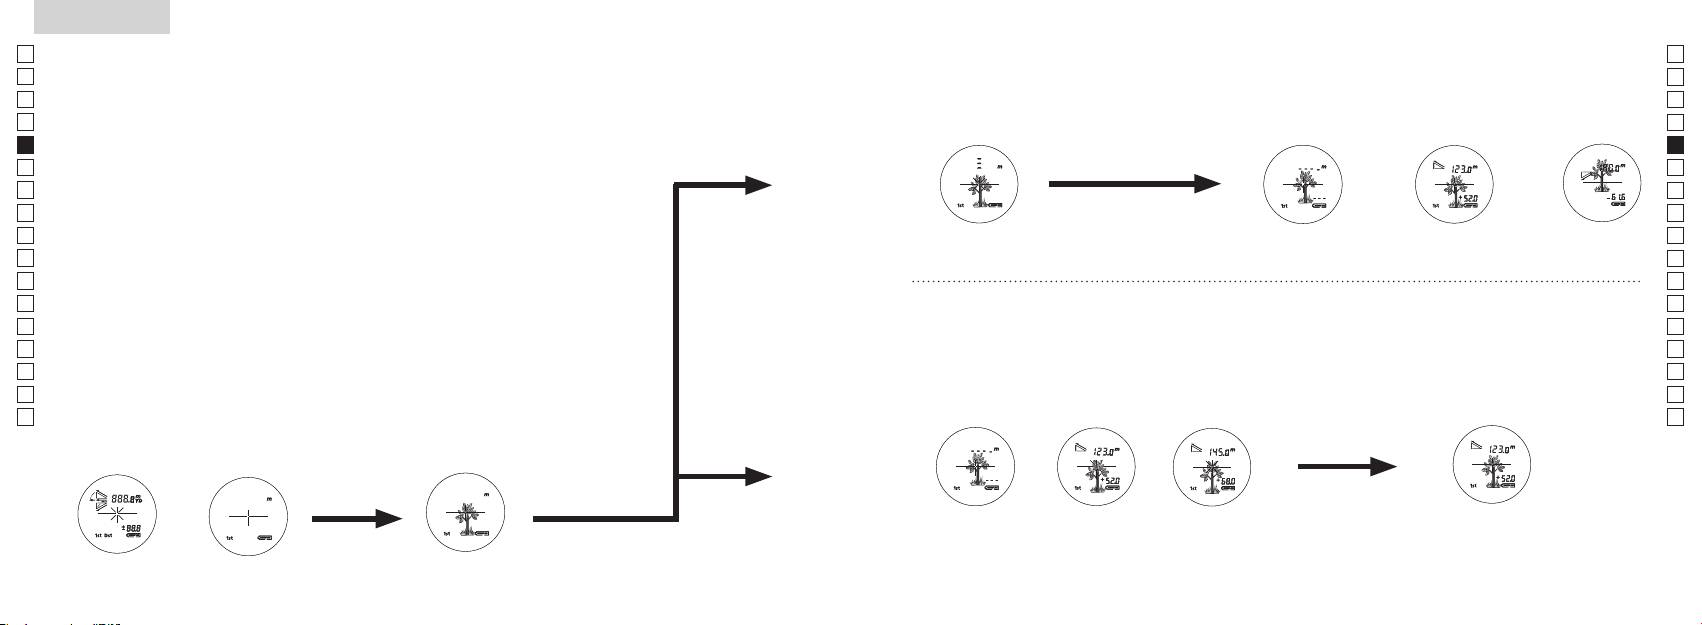
Jp
Jp
En
En
Es
Es
Fr
Fr
De
De
It
It
Se
Se
Nl
Nl
Ru
Ru
Pt
Pt
Pl
Pl
Fi
Fi
No
No
Dk
Dk
Cz
Cz
Ro
Ro
Hu
Hu
86 87
Measurement
1. Press the POWER button for power-on.
(Power turns off 8 seconds after the last
operation.)
Immediately after power-on.
3. Press POWER button once to start single measurement.
4. After measurement, “distance” or “fail to measure” indicator are displayed for 8 seconds, then power turns off. If you press the POWER
button during power-on (while the internal display is lit), another single measurement starts.
unable to measure distance.
3. Keep pressing POWER button to start continuous measurement up to 20 seconds. The internal display shows “distance” and
“fail to measure” indicator alternately.
Note: Laser irradiaton mark is blinking during the measurement.
Note: If you stop pressing the button, the continuous measuremen stops
2. Aim at the target
Positionthetargetatthecenterofthereticle
[Single measurement]
Failure to measure or
unable to measure distance.
[Continuous measurement]
4. After continuous measurement, the measure results are displayed for 8 seconds, then power turns off. If you press the POWER
button during power-on (while the internal display is lit), another measrement starts.
Failure to measure or
Target focusing.
Measuring.
(Initializing)
.
Upward measurement. Downward measurement.
Displays the measured
figure. (Target 1)
Displays the measured figure.
Stand-by.
Displays the measured
figure. (Target 2)
Measurement
1. Press the POWER button for power-on.
(Power turns off 8 seconds after the last
operation.)
Immediately after power-on.
(Initializing)
3. Press POWER button once to start single measurement.
Measuring.
4. After measurement, “distance” or “fail to measure” indicator are displayed for 8 seconds, then power turns off. If you press the POWER
button during power-on (while the internal display is lit), another single measurement starts.
Failure to measure or
unable to measure distance.
Displays the measured
figure. (Target 1)
3. Keep pressing POWER button to start continuous measurement up to 20 seconds. The internal display shows “distance” and
“fail to measure” indicator alternately.
Note: Laser irradiaton mark is blinking during the measurement.
Note: If you stop pressing the button, the continuous measuremen stops
Target focusing.
2. Aim at the target
.
Positionthetargetatthecenterofthereticle
[Single measurement]
Failure to measure or
unable to measure distance.
Upward measurement. Downward measurement.
Displays the measured figure.
[Continuous measurement]
4. After continuous measurement, the measure results are displayed for 8 seconds, then power turns off. If you press the POWER
button during power-on (while the internal display is lit), another measrement starts.
Stand-by.
Displays the measured
figure. (Target 2)
Measurement
1. Press the POWER button for power-on.
(Power turns off 8 seconds after the last
operation.)
Immediately after power-on.
Stand-by.
(Initializing)
2. Aim at the target
.
Positionthetargetatthecenterofthereticle
3. Press POWER button once to start single measurement.
4. After measurement, “distance” or “fail to measure” indicator are displayed for 8 seconds, then power turns off. If you press the POWER
button during power-on (while the internal display is lit), another single measurement starts.
unable to measure distance.
3. Keep pressing POWER button to start continuous measurement up to 20 seconds. The internal display shows “distance” and
“fail to measure” indicator alternately.
Note: Laser irradiaton mark is blinking during the measurement.
Note: If you stop pressing the button, the continuous measuremen stops
[Single measurement]
Failure to measure or
unable to measure distance.
[Continuous measurement]
4. After continuous measurement, the measure results are displayed for 8 seconds, then power turns off. If you press the POWER
button during power-on (while the internal display is lit), another measrement starts.
Failure to measure or
Target focusing.
Measuring.
Upward measurement. Downward measurement.
Displays the measured
figure. (Target 1)
Displays the measured figure.
Displays the measured
figure. (Target 2)
Messung
Vorsicht — Die Verwendung von Einstellelementen oder Justagen oder die Ausführung
【
Einzelne Messung
】
von anderen als den hierin angegebenen Verfahren können zu einer gefährlichen Strahlenbelastung führen.
3. Drücken Sie die
Messtaste einmal, um die
1. Vorbereitung
einzelne Messung zu aktivieren.
2. Gummiaugenmuschel
verwenden.
3. Dioptrineinstellung
Stellen Sie den Dioptrinwert ein, um eine klare LCD-Anzeige im Sucher zu erhalten.
sicher, dass die interne Anzeige eingeschaltet ist). Schauen Sie durch das Okular und
【
Kontinuierliche Messung
】
4. Messung
Stellen Sie vor der Messung sicher, dass der gewünschte Modus eingestellt ist
*
Sehen Sie im entsprechenden Abschnitt nach, wie der einzelne Modus eingestellt wird.
.
ob das interne Display eingeschaltet ist).
(Abschaltautomatik nach ca. 8
Mitte des Fadenkreuzes.
Sekunden ohne Bedienung.)
Sofort nach dem
Standby
Measurement
1. Press the POWER button for power-on.
(Power turns off 8 seconds after the last
operation.)
Immediately after power-on.
Stand-by.
(Initializing)
2. Aim at the target
.
Positionthetargetatthecenterofthereticle
Target focusing.
[Single measurement]
3. Press POWER button once to start single measurement.
Measuring.
4. After measurement, “distance” or “fail to measure” indicator are displayed for 8 seconds, then power turns off. If you press the POWER
button during power-on (while the internal display is lit), another single measurement starts.
Failure to measure or
Upward measurement. Downward measurement.
unable to measure distance.
Displays the measured figure.
[Continuous measurement]
3. Keep pressing POWER button to start continuous measurement up to 20 seconds. The internal display shows “distance” and
“fail to measure” indicator alternately.
Note: Laser irradiaton mark is blinking during the measurement.
Note: If you stop pressing the button, the continuous measuremen stops
Failure to measure or
unable to measure distance.
4. After continuous measurement, the measure results are displayed for 8 seconds, then power turns off. If you press the POWER
button during power-on (while the internal display is lit), another measrement starts.
Displays the measured
figure. (Target 1)
Displays the measured
figure. (Target 2)
Measurement
1. Press the POWER button for power-on.
(Power turns off 8 seconds after the last
operation.)
Immediately after power-on.
Stand-by.
(Initializing)
2. Aim at the target
.
Positionthetargetatthecenterofthereticle
Target focusing.
[Single measurement]
3. Press POWER button once to start single measurement.
Measuring.
4. After measurement, “distance” or “fail to measure” indicator are displayed for 8 seconds, then power turns off. If you press the POWER
button during power-on (while the internal display is lit), another single measurement starts.
Failure to measure or
Upward measurement. Downward measurement.
unable to measure distance.
Displays the measured figure.
[Continuous measurement]
3. Keep pressing POWER button to start continuous measurement up to 20 seconds. The internal display shows “distance” and
“fail to measure” indicator alternately.
Note: Laser irradiaton mark is blinking during the measurement.
Note: If you stop pressing the button, the continuous measuremen stops
Failure to measure or
unable to measure distance.
Displays the measured
figure. (Target 1)
4. After continuous measurement, the measure results are displayed for 8 seconds, then power turns off. If you press the POWER
button during power-on (while the internal display is lit), another measrement starts.
Displays the measured
figure. (Target 2)
Measurement
1. Press the POWER button for power-on.
(Power turns off 8 seconds after the last
operation.)
Immediately after power-on.
Stand-by.
(Initializing)
2. Aim at the target
.
Positionthetargetatthecenterofthereticle
Target focusing.
[Single measurement]
3. Press POWER button once to start single measurement.
Measuring.
4. After measurement, “distance” or “fail to measure” indicator are displayed for 8 seconds, then power turns off. If you press the POWER
button during power-on (while the internal display is lit), another single measurement starts.
Failure to measure or
unable to measure distance.
3. Keep pressing POWER button to start continuous measurement up to 20 seconds. The internal display shows “distance” and
“fail to measure” indicator alternately.
Note: Laser irradiaton mark is blinking during the measurement.
Note: If you stop pressing the button, the continuous measuremen stops
Failure to measure or
unable to measure distance.
[Continuous measurement]
4. After continuous measurement, the measure results are displayed for 8 seconds, then power turns off. If you press the POWER
button during power-on (while the internal display is lit), another measrement starts.
Upward measurement. Downward measurement.
Displays the measured
figure. (Target 1)
Displays the measured figure.
Displays the measured
figure. (Target 2)
Measurement
1. Press the POWER button for power-on.
(Power turns off 8 seconds after the last
operation.)
Immediately after power-on.
Stand-by.
(Initializing)
2. Aim at the target
.
Positionthetargetatthecenterofthereticle
Target focusing.
[Single measurement]
3. Press POWER button once to start single measurement.
Measuring.
4. After measurement, “distance” or “fail to measure” indicator are displayed for 8 seconds, then power turns off. If you press the POWER
button during power-on (while the internal display is lit), another single measurement starts.
unable to measure distance.
3. Keep pressing POWER button to start continuous measurement up to 20 seconds. The internal display shows “distance” and
“fail to measure” indicator alternately.
Note: Laser irradiaton mark is blinking during the measurement.
Note: If you stop pressing the button, the continuous measuremen stops
unable to measure distance.
4. After continuous measurement, the measure results are displayed for 8 seconds, then power turns off. If you press the POWER
button during power-on (while the internal display is lit), another measrement starts.
[Continuous measurement]
Failure to measure or
Failure to measure or
Upward measurement. Downward measurement.
Displays the measured
figure. (Target 1)
Displays the measured figure.
Displays the measured
figure. (Target 2)
Measurement
1. Press the POWER button for power-on.
(Power turns off 8 seconds after the last
operation.)
Immediately after power-on.
Stand-by.
(Initializing)
2. Aim at the target
.
Positionthetargetatthecenterofthereticle
Target focusing.
[Single measurement]
3. Press POWER button once to start single measurement.
4. After measurement, “distance” or “fail to measure” indicator are displayed for 8 seconds, then power turns off. If you press the POWER
button during power-on (while the internal display is lit), another single measurement starts.
unable to measure distance.
3. Keep pressing POWER button to start continuous measurement up to 20 seconds. The internal display shows “distance” and
“fail to measure” indicator alternately.
Note: Laser irradiaton mark is blinking during the measurement.
Note: If you stop pressing the button, the continuous measuremen stops
unable to measure distance.
4. After continuous measurement, the measure results are displayed for 8 seconds, then power turns off. If you press the POWER
button during power-on (while the internal display is lit), another measrement starts.
[Continuous measurement]
Failure to measure or
Failure to measure or
Measuring.
Upward measurement. Downward measurement.
Displays the measured
figure. (Target 1)
Displays the measured figure.
Displays the measured
figure. (Target 2)
Measurement
1. Press the POWER button for power-on.
(Power turns off 8 seconds after the last
operation.)
Immediately after power-on.
Stand-by.
(Initializing)
2. Aim at the target
.
Positionthetargetatthecenterofthereticle
Target focusing.
[Single measurement]
3. Press POWER button once to start single measurement.
Measuring.
4. After measurement, “distance” or “fail to measure” indicator are displayed for 8 seconds, then power turns off. If you press the POWER
button during power-on (while the internal display is lit), another single measurement starts.
unable to measure distance.
3. Keep pressing POWER button to start continuous measurement up to 20 seconds. The internal display shows “distance” and
“fail to measure” indicator alternately.
Note: Laser irradiaton mark is blinking during the measurement.
Note: If you stop pressing the button, the continuous measuremen stops
unable to measure distance.
4. After continuous measurement, the measure results are displayed for 8 seconds, then power turns off. If you press the POWER
button during power-on (while the internal display is lit), another measrement starts.
[Continuous measurement]
Failure to measure or
Failure to measure or
Upward measurement. Downward measurement.
Displays the measured
figure. (Target 1)
Displays the measured figure.
Displays the measured
figure. (Target 2)
Measurement
1. Press the POWER button for power-on.
(Power turns off 8 seconds after the last
operation.)
Immediately after power-on.
Stand-by.
(Initializing)
2. Aim at the target
.
Positionthetargetatthecenterofthereticle
Target focusing.
[Single measurement]
3. Press POWER button once to start single measurement.
Measuring.
4. After measurement, “distance” or “fail to measure” indicator are displayed for 8 seconds, then power turns off. If you press the POWER
button during power-on (while the internal display is lit), another single measurement starts.
Failure to measure or
unable to measure distance.
Displays the measured
figure. (Target 1)
3. Keep pressing POWER button to start continuous measurement up to 20 seconds. The internal display shows “distance” and
“fail to measure” indicator alternately.
Note: Laser irradiaton mark is blinking during the measurement.
Note: If you stop pressing the button, the continuous measuremen stops
Failure to measure or
unable to measure distance.
Upward measurement. Downward measurement.
Displays the measured figure.
[Continuous measurement]
4. After continuous measurement, the measure results are displayed for 8 seconds, then power turns off. If you press the POWER
button during power-on (while the internal display is lit), another measrement starts.
Displays the measured
figure. (Target 2)
Measurement
1. Press the POWER button for power-on.
(Power turns off 8 seconds after the last
operation.)
Immediately after power-on.
Stand-by.
(Initializing)
2. Aim at the target
.
Positionthetargetatthecenterofthereticle
Target focusing.
[Single measurement]
3. Press POWER button once to start single measurement.
Measuring.
4. After measurement, “distance” or “fail to measure” indicator are displayed for 8 seconds, then power turns off. If you press the POWER
button during power-on (while the internal display is lit), another single measurement starts.
Failure to measure or
unable to measure distance.
3. Keep pressing POWER button to start continuous measurement up to 20 seconds. The internal display shows “distance” and
“fail to measure” indicator alternately.
Note: Laser irradiaton mark is blinking during the measurement.
Note: If you stop pressing the button, the continuous measuremen stops
Failure to measure or
unable to measure distance.
[Continuous measurement]
4. After continuous measurement, the measure results are displayed for 8 seconds, then power turns off. If you press the POWER
button during power-on (while the internal display is lit), another measrement starts.
Upward measurement. Downward measurement.
Displays the measured
figure. (Target 1)
Displays the measured figure.
Displays the measured
figure. (Target 2)
4. Nach der Messung wird die Meldung
fehlgeschlagen“ 8 Sekunden lang angezeigt und dann schaltet sich der
aktiv ist) drücken, wird eine
weitere einzelne Messung aktiv.
Messung
Messung
3. Halten Sie die
gedrückt, um die kontinuierliche Messung zu aktivieren. Das
*
Das Laserstrahzeichen blinkt
*
Messung aktiv.
auf.
fehlgeschlagen” oder
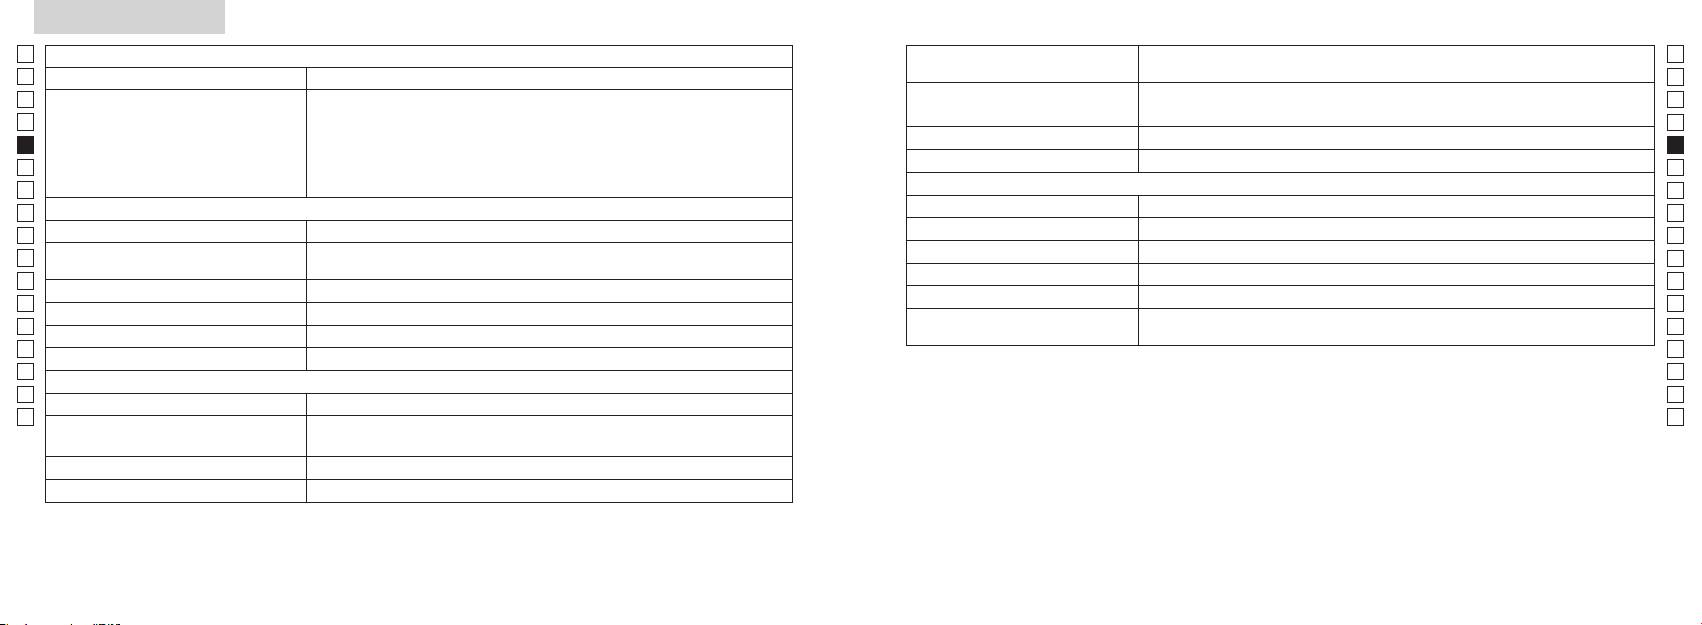
Technische daten
Jp
Messsystem
Jp
Struktur
En
Messbereich
En
Es
Es
Sicherheit
Fr
Fr
De
De
Umwelt
It
It
Laser
Se
Se
Optisches System
Kategorie
Nl
Nl
Vergrößerung (x) 6
(nm) 905
Ru
Ru
Impulsdauer (ns) 12
Pt
ø21
Pt
(mm)
15
Pl
Pl
Sichtwinkel (wahr) (˚) 7,5
Lichtstrahlabweichung (mrad)
Fi
Fi
Abstand der Austrittspupille (mm) 18,3
Betriebsfeuchtigkeit
No
80 oder weniger (ohne Taukondensation)
No
Austrittspupille (mm) ø3,5
(% rel. Feuchtigkeit)
Dk
Dk
-
1
Dioptrineinstellung ±4 m
* Wasserfeste Modelle
Cz
Cz
Anderes
Ro
Ro
Betriebstemperatur (˚C) -10 —
Der Nikon Laser-Entfernungsmesser bietet die folgenden Vorteile:
Hu
Hu
Spannungsquelle
Abschaltautomatik (nach ca. 8 Sekunden ohne Bedienung)
Beachten Sie das Folgende, wenn Sie das Nikon Laser-Entfernungsmesser verwenden.
Maße (L x B x H) (mm) 113 x 70 x 39
Ca. 175 (ohne Batterie)
Sie ihn trocken.
88 89
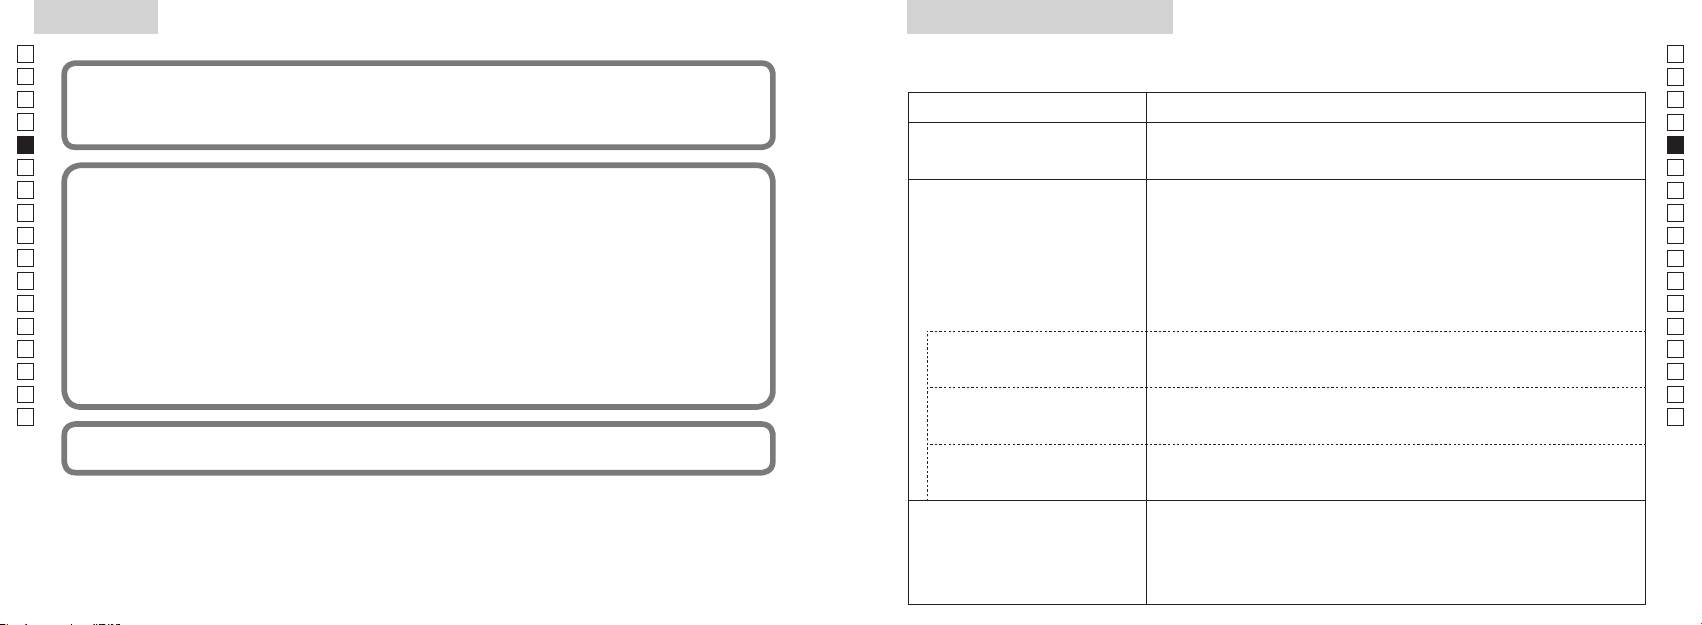
Anderes
Fehlersuche/Reparatur
Fehlersuche/Reparatur
Jp
Jp
En
En
Es
Es
Symptom Korrektur
Fr
Fr
unerwünschten Betrieb verursachen kann.
●
De
De
● Überprüfen Sie die Batterie.
(LC-Display leuchtet nicht)
It
●
It
Se
● Stellen Sie sicher, dass nichts, wie Ihr Finger oder der Trageriemen, die Laser-
Se
Nl
Nl
Objektivseite blockiert.
Ru
verwendet und kann Hochfrequenzenergie ausstrahlen und, wenn nicht in Übereinstimmung mit den Anweisungen
●
Ru
Pt
Detektorblendenöffnung auf der Objektivseite sauber sind. Reinigen Sie diese,
Pt
werden.
falls erforderlich.
Pl
Pl
●
Fi
angeregt zu versuchen, die Störung durch eine oder mehrere der folgenden Maßnahmen zu beheben:
Laserstrahls geeignet sind.
Fi
●
No
No
●
Dk
Dk
●
angezeigt
Cz
Cz
Ro
Ro
●
Hu
Messbereichs erkannt werden,
Hu
können nicht gemessen werden
Beweise gelten.
●
gemessen werden
●
●
Laserstrahls geeignet sind.
Messergebnis ist instabil.
●
●
90 91
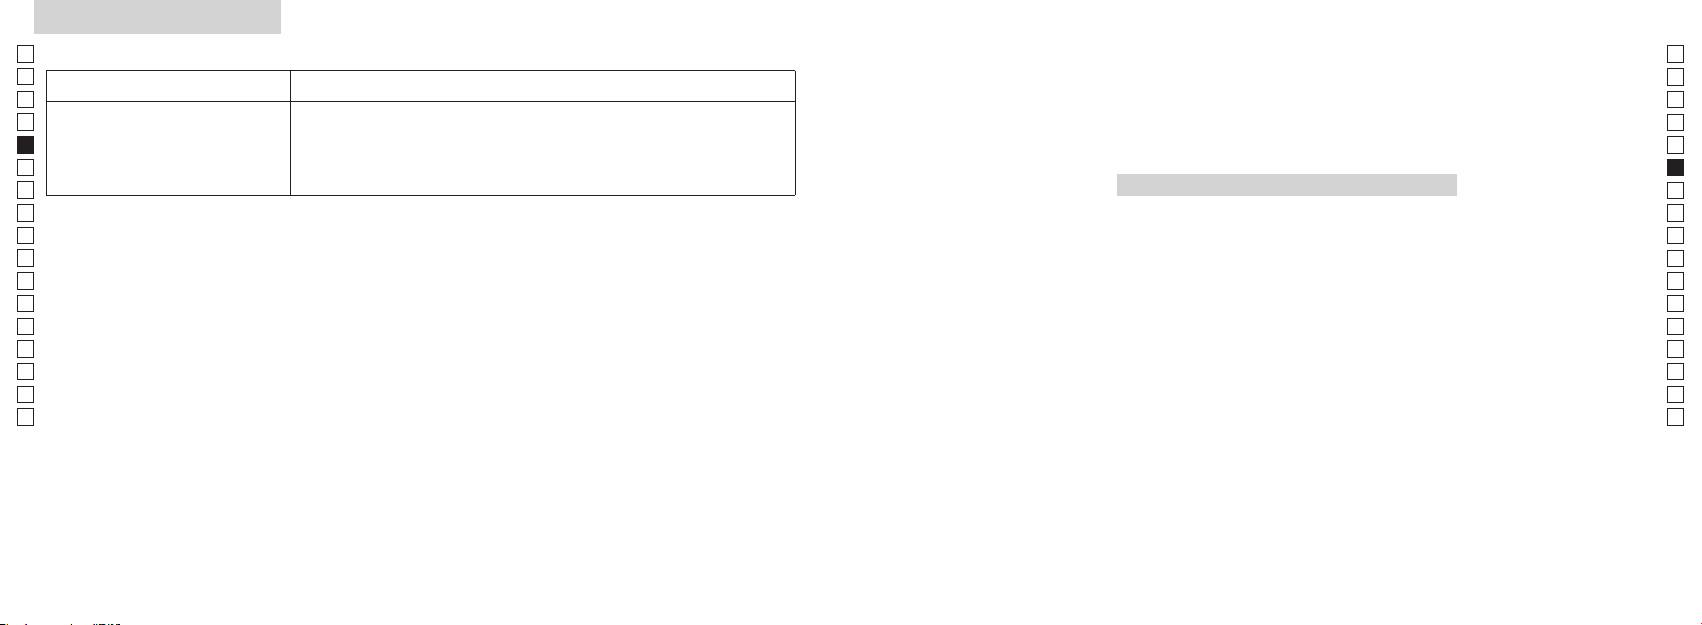
Fehlersuche/Reparatur
Jp
Jp
En
En
Symptom Korrektur
Es
Es
●
Fr
Fr
●
Italiano
De
Laserstrahls geeignet sind.
De
It
●
It
Se
INDICE
Se
Nl
Nl
Avvertenze prima dell'uso ................................. 94-97
Ru
Ru
Caratteristiche fondamentali ................................... 98
Pt
Pt
....... 99
Pl
Pl
Display interno ........................................................... 100
Fi
Fi
Modalità di visualizzazione della
No
No
misurazione ................................................................. 101
Dk
Dk
Cz
Cz
Ro
Ro
..................................................... 102
Hu
Hu
Sostituzione della batteria ..................................... 103
Misurazione ........................................................ 104-105
Specifiche tecniche .......................................... 106-107
Altro ................................................................................ 108
........................ 109-110
92 93
Avvertenze prima dell'uso
Jp
Per poter utilizzare questa
PRECAUZIONI PER LA
il telemetro laser
Jp
apparecchiatura nel modo
Nikon e non eseguire riparazioni
En
SICUREZZA (Laser)
En
corretto ed evitare eventuali
né modifiche al modello. Il fascio
Il telemetro laser Nikon utilizza un
Es
L'uso di comandi, regolazioni o procedure diversi da quelli specificati nel presente manuale
Es
laser emesso può essere dannoso
pericoli, attenersi rigorosamente
fascio laser invisibile.
può causare l'esposizione a radiazioni pericolose.
Fr
per la salute. Lo smontaggio,
alle seguenti indicazioni. Prima
attenzione ai seguenti punti:
Fr
la riparazione di un prodotto o
De
di utilizzare questo prodotto,
Avvertenza
De
〇
eventuali modifiche apportate al
leggere attentamente le
It
modello annullano la validità della
It
istruzioni relative ad un impiego corretto fornite unitamente al prodotto.
"Avvertenze prima dell'uso" e le
Se
garanzia del fabbricante.
Se
〇 Tenere il presente manuale a portata di mano per una facile consultazione.
istruzioni relative ad un impiego
misurazione) guardando nelle
Nl
corretto fornite unitamente al
ottiche dal lato dell'obiettivo. La
Nl
〇 Non smontare o riparare il prodotto personalmente, ciò può causare seri problemi.
fuori dalla portata dei bambini.
prodotto. Tenere il presente
mancata osservanza di questa
Ru
Lo smontaggio o la riparazione in tal modo di un prodotto annulla la validità della garanzia del
Ru
manuale a portata di mano per
avvertenza può causare deficit visivi o
fabbricante.
telemetro laser Nikon risulta
Pt
danneggiare seriamente la vista.
Pt
una facile consultazione.
danneggiato, o se l'unità
Pl
Pl
produce rumori strani a seguito
● Design e dati caratteristici sono soggetti a variazioni senza preavviso.
ntare il laser verso le persone.
Fi
di una caduta o per altre ragioni
Fi
PERICOLO
●
non precisate, rimuovere
No
strumento ottico, ad esempio
No
modo, in tutto o in parte, il presente manuale (salvo brevi citazioni in recensioni o articoli critici).
immediatamente la batteria e non
che la mancata osservanza di quanto
attraverso lenti o binocoli, né ad
Dk
Dk
utilizzare ulteriormente l'unità.
● NIKON VISION CO., LTD. si riserva il diritto di modificare i contenuti del presente manuale in
specificato di seguito durante l'uso
occhio nudo. Ciò può causare lesioni
Cz
Cz
qualsiasi momento e senza preavviso.
può provocare lesioni gravi o il
agli occhi.
decesso.
Ro
Ro
Hu
ATTENZIONE
fase di misurazione, mantenere le
Hu
dita distanti dal tasto
che la mancata osservanza di quanto
specificato di seguito durante l'uso
misurazione) per evitare l'emissione
può essere causa di infortuni o danni
accidentale del fascio laser.
materiali.
estrarre la batteria dal corpo
dell'unità.
94 95
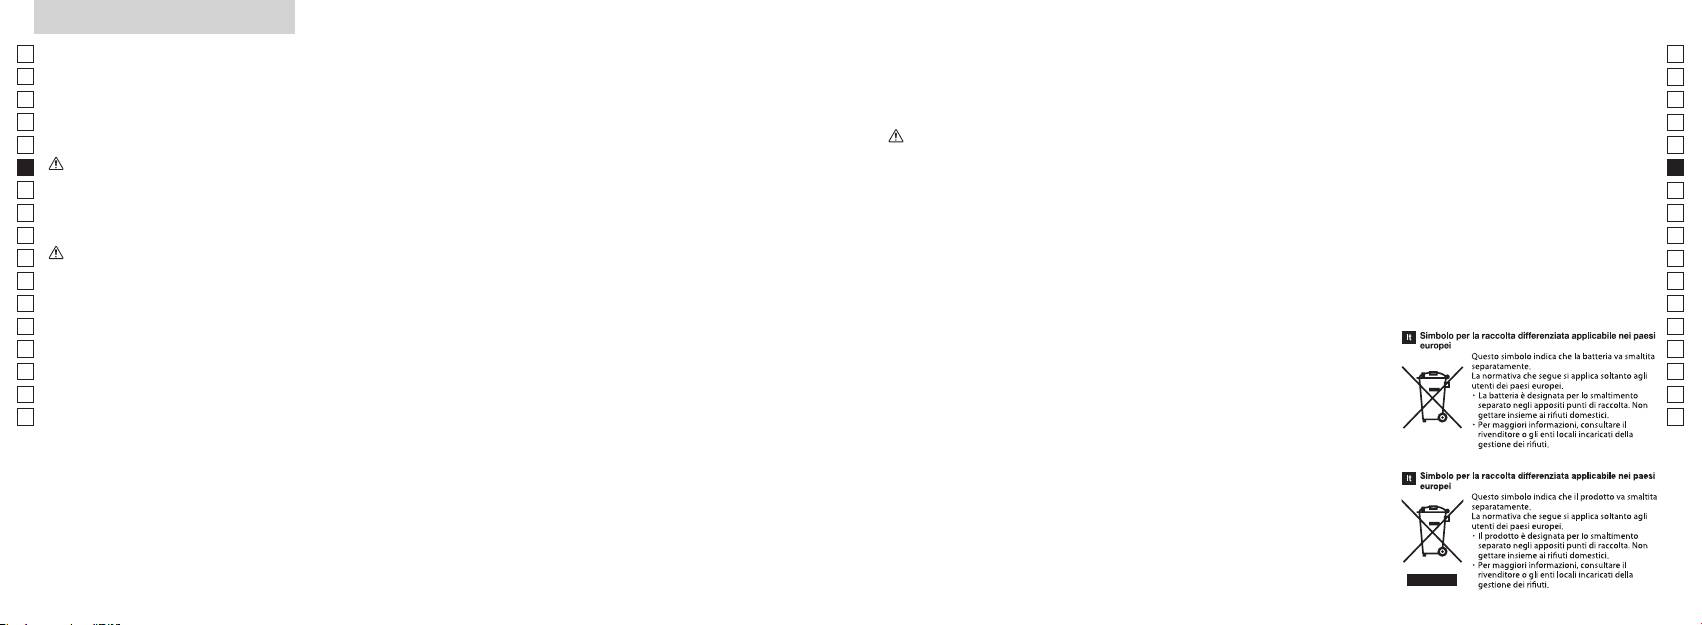
Avvertenze prima dell'uso
Jp
PRECAUZIONI PER LA
cadute con conseguenti lesioni o
PRECAUZIONI PER LA
CURA E MANUTENZIONE
Conservazione
Jp
malfunzionamenti.
alle normative locali.
En
SICUREZZA (Monoculare)
SICUREZZA (Batteria al litio)
Lenti
En
sulla superficie della lente possono
Es
Il telemetro laser Nikon utilizza un
Se trattata in modo errato, la batteria
PRECAUZIONI PER LA
Es
superficie dell'obiettivo, usare un
monoculare nel proprio sistema di
può incrinarsi e provocare perdite,
Fr
di piccole dimensioni fuori dalla
SICUREZZA
pennello morbido privo di sostanze
conservare il telemetro laser Nikon
Fr
ottiche per mirare al bersaglio.
corrodendo le apparecchiature e
portata dei bambini.
Attenzione
oleose.
in un luogo fresco e asciutto.
De
macchiando gli indumenti.
De
It
Avvertenza
in bocca conchiglie oculari in
It
digitali dalla superficie delle lenti,
durante la notte, lasciare asciugare
la batteria
Se
gomma, piccole parti, ecc. In caso
pulire le lenti molto delicatamente
bene a temperatura ambiente,
Se
sole, una luce intensa o il raggio
disposti nel modo corretto.
di ingestione di piccole parti,
con un panno di cotone pulito e
quindi riporre in un luogo fresco e
Nl
laser durante l'uso del telemetro
la batteria
Nl
consultare immediatamente un
gocce di pioggia, schizzi
morbido o con un fazzolettino per
asciutto.
laser Nikon.
esaurita o durante periodi
Ru
medico.
d'acqua, tracce di sabbia e fango
Ru
lenti di qualità non impregnato di
prolungati di inutilizzo.
Attenzione
eventualmente depositatesi sulla
Pt
Pt
telemetro laser Nikon
oculari in gomma, può causare
superficie del corpo del telemetro con
Pl
Pl
in alcuni soggetti infiammazioni
un panno morbido e pulito.
piccola quantità di alcol puro (non
batteria.
Fi
tasto
cutanee. Alla comparsa di un
denaturato). Non usare panni in
Fi
la batteria in tasche
.
qualsiasi sintomo, cessare l'utilizzo
No
velluto o tessuti ordinari, poiché
No
o borse insieme a chiavi o monete
delle conchiglie oculari e consultare
calda o soleggiata o vicino a un
potrebbero graffiare la superficie
Dk
che possono creare un cortocircuito
Dk
camminando. La mancata
immediatamente un medico.
apparecchio che genera calore.
e causare surriscaldamento.
Cz
osservanza di questa avvertenza
Ciò potrebbe danneggiarlo o
utilizzato per pulire il corpo, non
Cz
può causare lesioni o
laser Nikon, conservarlo in una
influire negativamente sul suo
deve essere utilizzato per pulire la
Ro
fiamme libere. Non smontare mai la
Ro
malfunzionamenti a causa di urti
custodia morbida.
funzionamento.
superficie delle lenti.
Hu
batteria.
Hu
contro oggetti o persone, cadute
Corpo principale
o altri incidenti.
funziona correttamente, sospendere
esposto alla luce diretta del sole. I
raggi ultravioletti e il calore eccessivo
batteria entra in contatto con
panno morbido e pulito dopo aver
tenendolo per la cinghietta. In tal
concessionario di zona per ulteriori
possono influire negativamente
gli abiti o la pelle, sciacquare
eliminato la polvere delicatamente
modo si potrebbero urtare altre
immediatamente con abbondante
con un soffiatore*. Non utilizzare
persone causando lesioni.
alla sede di riparazione.
acqua corrente. In caso di contatto
benzene, diluenti o altri detergenti
esposto a improvvisi cambiamenti
con gli occhi del liquido fuoriuscito
contenenti solventi organici.
una posizione instabile. La
di temperatura, sulla superficie
da una batteria, sciacquare
mancata osservanza di questa
delle lenti può formarsi condensa.
immediatamente con acqua corrente,
pulizia in gomma che emette aria
indicazione può causare
Non utilizzare il prodotto finché la
quindi consultare un medico.
da un ugello.
96 97
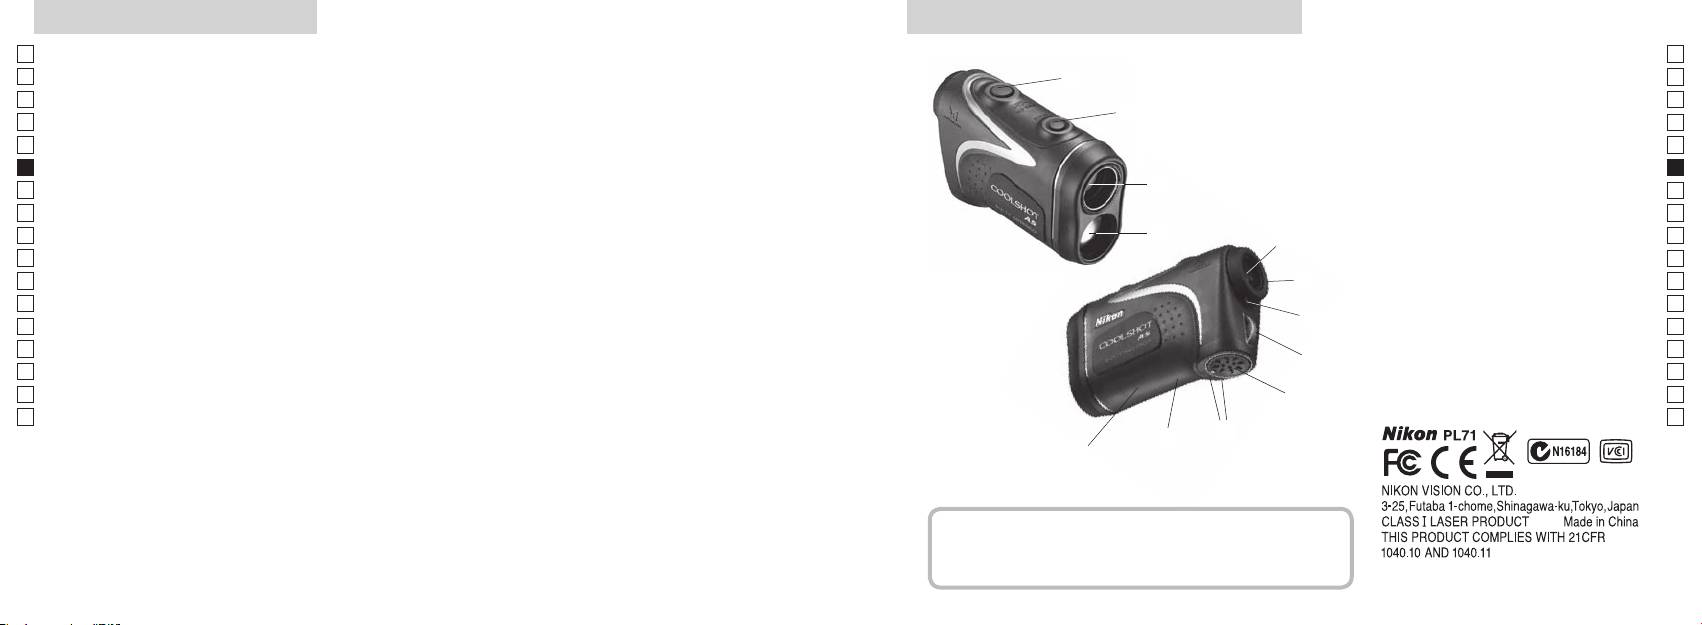
Caratteristiche fondamentali
Nomenclatura/Contenuto della confezione
Jp
Le seguenti condizioni semplificano la misurazione:
Jp
1
En
4
En
Apertura di emissione del fascio laser
Es
Es
3
2 Apertura per il rilevatore laser
Fr
elevato
Fr
dell'inclinazione (distanza orizzontale ± altezza),
3
De
De
informazione di grande utilità nella pratica del golf
4
It
It
visualizzazione della misurazione facilmente commutabili
Le misurazioni effettuate nelle seguenti condizioni possono
1
Se
Se
dare luogo a risultati errati o inaccurati:
5Oculare singolo 6x
Nl
che può essere scelta in base al bersaglio
Nl
6
Ru
sottile
2
5
regolazione diottrica
Ru
Pt
7 Indice di regolazione diottrica
Pt
Pl
6
8 Occhiello per la tracolla
Pl
utilizzo)
specchio, ecc.)
Fi
9 Coperchietto del vano della batteria
Fi
7
No
!p
ultime"
No
Chiudi") relativa al coperchietto del
Dk
Dk
pioggia (NON utilizzare sott'acqua)
8
vano della batteria
Cz
Cz
!q
Ro
9
Ro
Il telemetro laser Nikon utilizza un fascio laser invisibile
!w Indicazioni delle informazioni FDA
Hu
Hu
per la misurazione. Misura il tempo impiegato dal
!p
fascio laser per andare dal telemetro al bersaglio e
!q
tornare indietro. La riflettività del laser e i risultati della
!w
misurazione possono variare in base alle condizioni
climatiche e ambientali, al colore, alla finitura superficiale,
alle dimensioni, alla forma e ad altre caratteristiche del
bersaglio.
Contenuto della confezione
.................................. x1
............................... x1
.......... x1
...... x1
98 99
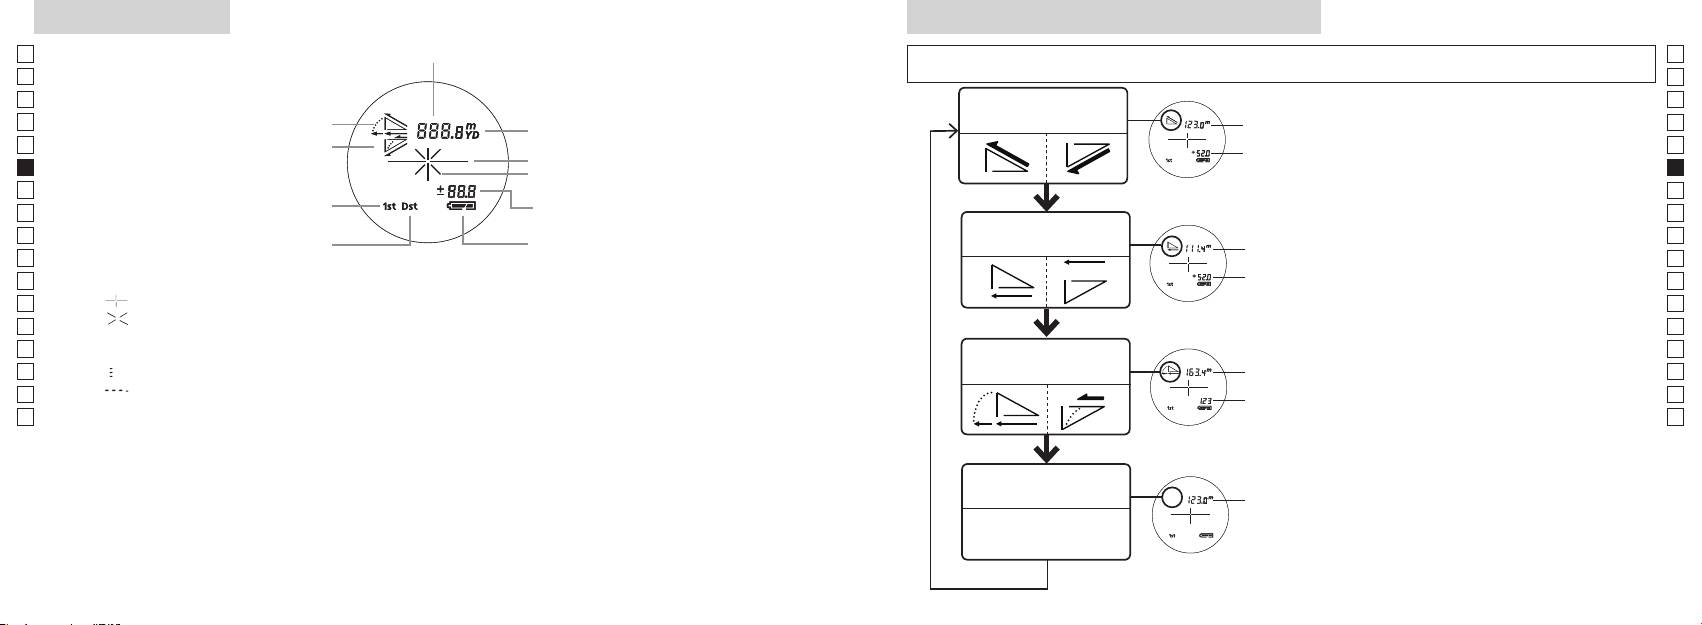
Display interno
Modalità di visualizzazione della misurazione
Jp
Distanza
Jp
En
En
Es
Es
Modalità Distanza
1. Accendere il telemetro (verificare che
Distanza
Fr
Salita
effettiva e altezza
Fr
il display interno sia acceso).
effettiva
De
Declivio
De
Reticolo
Altezza
(MODO), quindi premere
It
It
Simbolo di emissione laser
immediatamente (meno di 0,5
Se
Se
Altezza
secondi) il tasto di accensione
Nl
Nl
Modalità Distanza
Ru
Distanza
Ru
Stato batteria
orizzontale e altezza
Pt
orizzontale
di 2 secondi.
Pt
3.
Pl
Altezza
Pl
Fi
『 』
misurazione) per alternare la
Fi
『 』 - Compare quando viene emesso il fascio laser per una misurazione.
No
modalità di visualizzazione della
No
Rimane fisso durante una misurazione singola. Lampeggia durante una misurazione continua.
misurazione.
Dk
Distanza
Dk
Non guardare nella lente dell'obbiettivo se appare questo simbolo.
Modalità Golf
4. Ripetere i passaggi 2 e 3 finché
con regolazione
Cz
『
』 - Misurazione in corso
Cz
dell'inclinazione
non viene visualizzata la modalità
Ro
『
』 - "Misurazione non riuscita" o "Impossibile effettuare la misurazione"
desiderata.
Ro
Distanza
Hu
effettiva
Se i tasti non vengono premuti
Hu
*
* Solitamente, un display LCD utilizza un ingrandimento analogo o inferiore. Il display LCD di questo
nell'ordine esatto, non sarà possibile
prodotto viene tuttavia ingrandito fortemente dall'oculare. Sebbene il display LCD sia stato realizzato
effettuare la commutazione.
*
Commutando la modalità dopo la
Modalità Distanza
conseguenza la polvere può essere visibile. Ciò, tuttavia, non influisce sulla precisione della misurazione
Distanza
misurazione, i risultati verranno
effettiva
o sulla sicurezza durante l'uso.
effettiva
convertiti nella nuova modalità.
*
Dopo che la modalità sarà stata
impostata, le misurazioni verranno
effettuate nella nuova modalità.
100 101
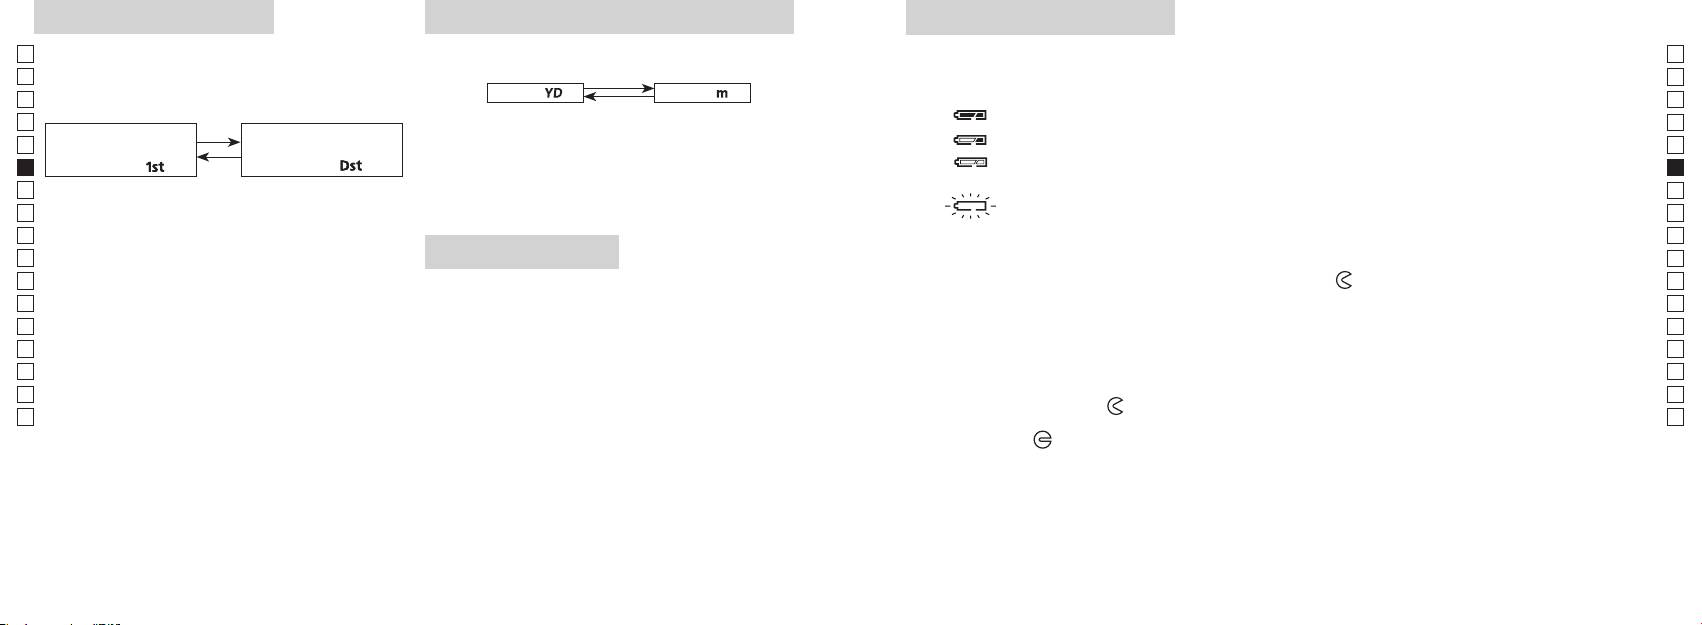
Modalità priorità target
Unità di misura di visualizzazione della distanza
Sostituzione della batteria
Jp
Questo telemetro laser utilizza il sistema di commutazione
Jp
Tipo di batteria: 1 batteria al litio CR2 da 3 V
En
-
Indicatori della carica residua della batteria
En
[ ]
Metri
[ ]Iarde
Es
* Il simbolo delle condizioni della batteria sul display interno avvisa quando la batteria deve essere sostituita.
Es
1. Accendere il telemetro (verificare che il display interno sia
: La batteria dispone di una carica sufficiente per il funzionamento.
Fr
Fr
acceso).
Modalità First Target
Modalità Distant Target
De
De
due secondi. Avvenuta la commutazione dell'unità di misura
It
「
」
distante)
「
」
It
di visualizzazione, rilasciare il tasto.
nuova.
Se
1. Accendere il telemetro (verificare che il display interno sia
Se
convertiti e visualizzati nell'unità di misura di visualizzazione
acceso).
Nl
Nl
della distanza selezionata.
laser si spegne automaticamente. Sostituire la batteria.
Ru
Ru
1. Aprire il coperchietto del vano della batteria
Pt
Pt
Illuminazione LED
Inserire la punta del pollice o un utensile dalla forma simile nella tacca presente sul coperchietto del
secondi.
Pl
1. Accendere il telemetro (verificare che il display interno sia
vano della batteria e ruotarlo in direzione del simbolo
. È possibile che il coperchietto non si apra
Pl
2 secondi) fino alla commutazione tra le modalità First
acceso).
facilmente a causa della guarnizione in gomma di tenuta contro la penetrazione di acqua e polvere.
Fi
Fi
2. Sostituire la batteria vecchia con una nuova
No
No
3. Rilasciare i tasti una volta commutata la modalità.
Dk
*
Dk
*
Se i tasti non vengono premuti nell'ordine esatto, non
impediscono di vedere il pannello LCD.
Cz
.
sarà possibile effettuare la commutazione.
Cz
*
*
Se la commutazione non ha luogo, ripetere il passaggio 2.
il telemetro laser. In tal caso, l'illuminazione sarà disattiva alla
3. Chiudere il coperchietto del vano della batteria
Ro
Ro
successiva accensione dello strumento.
Allineare il simbolo
con l'indicatore
●
e inserire il coperchietto del vano della batteria. Con
[
Hu
Hu
]
la punta del pollice o con un utensile dalla forma simile, ruotare il coperchietto in direzione del
Misurando bersagli sovrapposti, la Modalità First Target
simbolo
. È possibile che il coperchietto non si chiuda facilmente a causa della guarnizione in
gomma di tenuta contro l'infiltrazione di acqua; continuare comunque a ruotarlo fino in fondo finché
non si blocca. Assicurarsi che sia ben chiuso.
Durata della batteria
Funzionamento continuo: circa 13.000 volte (a 20°C)
Il valore riportato può variare a seconda delle condizioni, della temperatura e di altri fattori, quali la forma, il
colore e altre caratteristiche del bersaglio. Utilizzarlo esclusivamente come valore indicativo.
elettrica naturale, la durata della batteria potrebbe essere leggermente inferiore rispetto a quella riportata sopra.
* Nel caso di penetrazione di acqua nel vano della batteria a seguito di immersione, asciugare a fondo il vano della batteria e
102 103
sostituire la batteria.
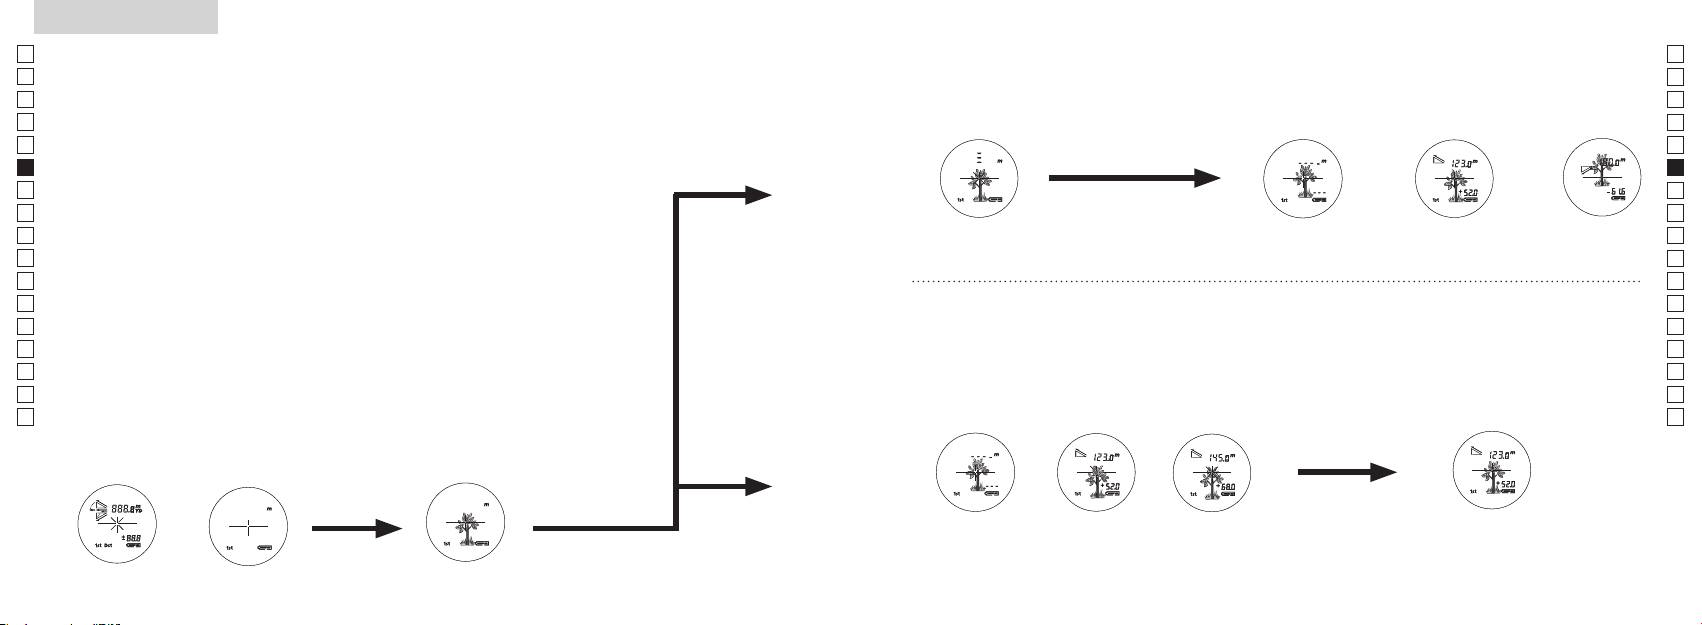
Jp
Jp
En
En
Es
Es
Fr
Fr
De
De
It
It
Se
Se
Nl
Nl
Ru
Ru
Pt
Pt
Pl
Pl
Fi
Fi
No
No
Dk
Dk
Cz
Cz
Ro
Ro
Hu
Hu
104 105
Measurement
1. Press the POWER button for power-on.
(Power turns off 8 seconds after the last
operation.)
Immediately after power-on.
3. Press POWER button once to start single measurement.
4. After measurement, “distance” or “fail to measure” indicator are displayed for 8 seconds, then power turns off. If you press the POWER
button during power-on (while the internal display is lit), another single measurement starts.
unable to measure distance.
3. Keep pressing POWER button to start continuous measurement up to 20 seconds. The internal display shows “distance” and
“fail to measure” indicator alternately.
Note: Laser irradiaton mark is blinking during the measurement.
Note: If you stop pressing the button, the continuous measuremen stops
2. Aim at the target
Positionthetargetatthecenterofthereticle
[Single measurement]
Failure to measure or
unable to measure distance.
[Continuous measurement]
4. After continuous measurement, the measure results are displayed for 8 seconds, then power turns off. If you press the POWER
button during power-on (while the internal display is lit), another measrement starts.
Failure to measure or
Target focusing.
Measuring.
(Initializing)
.
Upward measurement. Downward measurement.
Displays the measured
figure. (Target 1)
Displays the measured figure.
Stand-by.
Displays the measured
figure. (Target 2)
Measurement
1. Press the POWER button for power-on.
(Power turns off 8 seconds after the last
operation.)
Immediately after power-on.
(Initializing)
3. Press POWER button once to start single measurement.
Measuring.
4. After measurement, “distance” or “fail to measure” indicator are displayed for 8 seconds, then power turns off. If you press the POWER
button during power-on (while the internal display is lit), another single measurement starts.
Failure to measure or
unable to measure distance.
Displays the measured
figure. (Target 1)
3. Keep pressing POWER button to start continuous measurement up to 20 seconds. The internal display shows “distance” and
“fail to measure” indicator alternately.
Note: Laser irradiaton mark is blinking during the measurement.
Note: If you stop pressing the button, the continuous measuremen stops
Target focusing.
2. Aim at the target
.
Positionthetargetatthecenterofthereticle
[Single measurement]
Failure to measure or
unable to measure distance.
Upward measurement. Downward measurement.
Displays the measured figure.
[Continuous measurement]
4. After continuous measurement, the measure results are displayed for 8 seconds, then power turns off. If you press the POWER
button during power-on (while the internal display is lit), another measrement starts.
Stand-by.
Displays the measured
figure. (Target 2)
Measurement
1. Press the POWER button for power-on.
(Power turns off 8 seconds after the last
operation.)
Immediately after power-on.
Stand-by.
(Initializing)
2. Aim at the target
.
Positionthetargetatthecenterofthereticle
3. Press POWER button once to start single measurement.
4. After measurement, “distance” or “fail to measure” indicator are displayed for 8 seconds, then power turns off. If you press the POWER
button during power-on (while the internal display is lit), another single measurement starts.
unable to measure distance.
3. Keep pressing POWER button to start continuous measurement up to 20 seconds. The internal display shows “distance” and
“fail to measure” indicator alternately.
Note: Laser irradiaton mark is blinking during the measurement.
Note: If you stop pressing the button, the continuous measuremen stops
[Single measurement]
Failure to measure or
unable to measure distance.
[Continuous measurement]
4. After continuous measurement, the measure results are displayed for 8 seconds, then power turns off. If you press the POWER
button during power-on (while the internal display is lit), another measrement starts.
Failure to measure or
Target focusing.
Measuring.
Upward measurement. Downward measurement.
Displays the measured
figure. (Target 1)
Displays the measured figure.
Displays the measured
figure. (Target 2)
Misurazione
Attenzione — l'uso di comandi, regolazioni o procedure diversi da quelli specificati nel presente manuale
【
Misurazione singola
】
può causare l'esposizione a radiazioni pericolose.
1. Preparazione
avviare una misurazione singola.
Inserire una batteria nell'apposito vano. (Vedere la voce "Sostituzione della batteria")
2. Paraocchio in gomma
Sia coloro che portano gli occhiali sia coloro che non li portano possono utilizzare questo telemetro senza
aggiunta di accessori.
3. Regolazione diottrica
simboli sul display LCD nel mirino. Ruotare anzitutto l'anello di regolazione diottrica
display interno sia acceso). Durante l'osservazione attraverso l'oculare, ruotare l'anello di
regolazione diottrica in senso orario fino alla messa a fuoco dei simboli sul display LCD. Se
【
Funzione di misurazione continua
】
la regolazione. Se non si effettua la regolazione diottrica in modo da adeguarla alla propria
4. Misurazione in corso
della distanza).
*
1. Accendere il telemetro (verificare
2. Mirare al bersaglio.
che il display interno sia acceso).
(spegnimento automatico dopo
del reticolo.
circa 8 secondi di mancato utilizzo.)
Immediatamente dopo
Stand-by
l'accensione (inizializzazione)
Measurement
1. Press the POWER button for power-on.
(Power turns off 8 seconds after the last
operation.)
Immediately after power-on.
Stand-by.
(Initializing)
2. Aim at the target
.
Positionthetargetatthecenterofthereticle
Target focusing.
[Single measurement]
3. Press POWER button once to start single measurement.
Measuring.
4. After measurement, “distance” or “fail to measure” indicator are displayed for 8 seconds, then power turns off. If you press the POWER
button during power-on (while the internal display is lit), another single measurement starts.
Failure to measure or
Upward measurement. Downward measurement.
unable to measure distance.
Displays the measured figure.
[Continuous measurement]
3. Keep pressing POWER button to start continuous measurement up to 20 seconds. The internal display shows “distance” and
“fail to measure” indicator alternately.
Note: Laser irradiaton mark is blinking during the measurement.
Note: If you stop pressing the button, the continuous measuremen stops
Failure to measure or
unable to measure distance.
4. After continuous measurement, the measure results are displayed for 8 seconds, then power turns off. If you press the POWER
button during power-on (while the internal display is lit), another measrement starts.
Displays the measured
figure. (Target 1)
Displays the measured
figure. (Target 2)
Measurement
1. Press the POWER button for power-on.
(Power turns off 8 seconds after the last
operation.)
Immediately after power-on.
Stand-by.
(Initializing)
2. Aim at the target
.
Positionthetargetatthecenterofthereticle
Target focusing.
[Single measurement]
3. Press POWER button once to start single measurement.
Measuring.
4. After measurement, “distance” or “fail to measure” indicator are displayed for 8 seconds, then power turns off. If you press the POWER
button during power-on (while the internal display is lit), another single measurement starts.
Failure to measure or
Upward measurement. Downward measurement.
unable to measure distance.
Displays the measured figure.
[Continuous measurement]
3. Keep pressing POWER button to start continuous measurement up to 20 seconds. The internal display shows “distance” and
“fail to measure” indicator alternately.
Note: Laser irradiaton mark is blinking during the measurement.
Note: If you stop pressing the button, the continuous measuremen stops
Failure to measure or
unable to measure distance.
Displays the measured
figure. (Target 1)
4. After continuous measurement, the measure results are displayed for 8 seconds, then power turns off. If you press the POWER
button during power-on (while the internal display is lit), another measrement starts.
Displays the measured
figure. (Target 2)
Measurement
1. Press the POWER button for power-on.
(Power turns off 8 seconds after the last
operation.)
Immediately after power-on.
Stand-by.
(Initializing)
2. Aim at the target
.
Positionthetargetatthecenterofthereticle
Target focusing.
[Single measurement]
3. Press POWER button once to start single measurement.
Measuring.
4. After measurement, “distance” or “fail to measure” indicator are displayed for 8 seconds, then power turns off. If you press the POWER
button during power-on (while the internal display is lit), another single measurement starts.
Failure to measure or
unable to measure distance.
3. Keep pressing POWER button to start continuous measurement up to 20 seconds. The internal display shows “distance” and
“fail to measure” indicator alternately.
Note: Laser irradiaton mark is blinking during the measurement.
Note: If you stop pressing the button, the continuous measuremen stops
Failure to measure or
unable to measure distance.
[Continuous measurement]
4. After continuous measurement, the measure results are displayed for 8 seconds, then power turns off. If you press the POWER
button during power-on (while the internal display is lit), another measrement starts.
Upward measurement. Downward measurement.
Displays the measured
figure. (Target 1)
Displays the measured figure.
Displays the measured
figure. (Target 2)
Measurement
1. Press the POWER button for power-on.
(Power turns off 8 seconds after the last
operation.)
Immediately after power-on.
Stand-by.
(Initializing)
2. Aim at the target
.
Positionthetargetatthecenterofthereticle
Target focusing.
[Single measurement]
3. Press POWER button once to start single measurement.
Measuring.
4. After measurement, “distance” or “fail to measure” indicator are displayed for 8 seconds, then power turns off. If you press the POWER
button during power-on (while the internal display is lit), another single measurement starts.
unable to measure distance.
3. Keep pressing POWER button to start continuous measurement up to 20 seconds. The internal display shows “distance” and
“fail to measure” indicator alternately.
Note: Laser irradiaton mark is blinking during the measurement.
Note: If you stop pressing the button, the continuous measuremen stops
unable to measure distance.
4. After continuous measurement, the measure results are displayed for 8 seconds, then power turns off. If you press the POWER
button during power-on (while the internal display is lit), another measrement starts.
[Continuous measurement]
Failure to measure or
Failure to measure or
Upward measurement. Downward measurement.
Displays the measured
figure. (Target 1)
Displays the measured figure.
Displays the measured
figure. (Target 2)
Measurement
1. Press the POWER button for power-on.
(Power turns off 8 seconds after the last
operation.)
Immediately after power-on.
Stand-by.
(Initializing)
2. Aim at the target
.
Positionthetargetatthecenterofthereticle
Target focusing.
[Single measurement]
3. Press POWER button once to start single measurement.
4. After measurement, “distance” or “fail to measure” indicator are displayed for 8 seconds, then power turns off. If you press the POWER
button during power-on (while the internal display is lit), another single measurement starts.
unable to measure distance.
3. Keep pressing POWER button to start continuous measurement up to 20 seconds. The internal display shows “distance” and
“fail to measure” indicator alternately.
Note: Laser irradiaton mark is blinking during the measurement.
Note: If you stop pressing the button, the continuous measuremen stops
unable to measure distance.
4. After continuous measurement, the measure results are displayed for 8 seconds, then power turns off. If you press the POWER
button during power-on (while the internal display is lit), another measrement starts.
[Continuous measurement]
Failure to measure or
Failure to measure or
Measuring.
Upward measurement. Downward measurement.
Displays the measured
figure. (Target 1)
Displays the measured figure.
Displays the measured
figure. (Target 2)
Measurement
1. Press the POWER button for power-on.
(Power turns off 8 seconds after the last
operation.)
Immediately after power-on.
Stand-by.
(Initializing)
2. Aim at the target
.
Positionthetargetatthecenterofthereticle
Target focusing.
[Single measurement]
3. Press POWER button once to start single measurement.
Measuring.
4. After measurement, “distance” or “fail to measure” indicator are displayed for 8 seconds, then power turns off. If you press the POWER
button during power-on (while the internal display is lit), another single measurement starts.
unable to measure distance.
3. Keep pressing POWER button to start continuous measurement up to 20 seconds. The internal display shows “distance” and
“fail to measure” indicator alternately.
Note: Laser irradiaton mark is blinking during the measurement.
Note: If you stop pressing the button, the continuous measuremen stops
unable to measure distance.
4. After continuous measurement, the measure results are displayed for 8 seconds, then power turns off. If you press the POWER
button during power-on (while the internal display is lit), another measrement starts.
[Continuous measurement]
Failure to measure or
Failure to measure or
Upward measurement. Downward measurement.
Displays the measured
figure. (Target 1)
Displays the measured figure.
Displays the measured
figure. (Target 2)
Measurement
1. Press the POWER button for power-on.
(Power turns off 8 seconds after the last
operation.)
Immediately after power-on.
Stand-by.
(Initializing)
2. Aim at the target
.
Positionthetargetatthecenterofthereticle
Target focusing.
[Single measurement]
3. Press POWER button once to start single measurement.
Measuring.
4. After measurement, “distance” or “fail to measure” indicator are displayed for 8 seconds, then power turns off. If you press the POWER
button during power-on (while the internal display is lit), another single measurement starts.
Failure to measure or
unable to measure distance.
Displays the measured
figure. (Target 1)
3. Keep pressing POWER button to start continuous measurement up to 20 seconds. The internal display shows “distance” and
“fail to measure” indicator alternately.
Note: Laser irradiaton mark is blinking during the measurement.
Note: If you stop pressing the button, the continuous measuremen stops
Failure to measure or
unable to measure distance.
Upward measurement. Downward measurement.
Displays the measured figure.
[Continuous measurement]
4. After continuous measurement, the measure results are displayed for 8 seconds, then power turns off. If you press the POWER
button during power-on (while the internal display is lit), another measrement starts.
Displays the measured
figure. (Target 2)
Measurement
1. Press the POWER button for power-on.
(Power turns off 8 seconds after the last
operation.)
Immediately after power-on.
Stand-by.
(Initializing)
2. Aim at the target
.
Positionthetargetatthecenterofthereticle
Target focusing.
[Single measurement]
3. Press POWER button once to start single measurement.
Measuring.
4. After measurement, “distance” or “fail to measure” indicator are displayed for 8 seconds, then power turns off. If you press the POWER
button during power-on (while the internal display is lit), another single measurement starts.
Failure to measure or
unable to measure distance.
3. Keep pressing POWER button to start continuous measurement up to 20 seconds. The internal display shows “distance” and
“fail to measure” indicator alternately.
Note: Laser irradiaton mark is blinking during the measurement.
Note: If you stop pressing the button, the continuous measuremen stops
Failure to measure or
unable to measure distance.
[Continuous measurement]
4. After continuous measurement, the measure results are displayed for 8 seconds, then power turns off. If you press the POWER
button during power-on (while the internal display is lit), another measrement starts.
Upward measurement. Downward measurement.
Displays the measured
figure. (Target 1)
Displays the measured figure.
Displays the measured
figure. (Target 2)
4. Dopo la misurazione, l'indicatore "misurazione non riuscita" o "distanza
misurata" viene visualizzato per 8 secondi, quindi il telemetro si spegne.
durante l'accensione (con il display interno acceso) per avviare un'altra
misurazione.
"Misurazione non riuscita"
Misurazione
Misurazione verso
Misurazione in corso
o "Impossibile effettuare la
verso l'alto
il basso
misurazione" della distanza
Visualizza il valore misurato
3. Tenere premuto il tasto
4. Dopo la misurazione continua, i risultati della misurazione finale
misurazione) per avviare la misurazione continua per circa 8
(distanza misurata) vengono visualizzati per circa 8 secondi,
secondi. Il display interno visualizza in alternanza gli indicatori
quindi l'unità si spegne.
"misurazione non riuscita" e "distanza misurata".
*
Il simbolo del fascio laser lampeggia durante la misurazione.
misurazione)
durante l'accensione (con il display interno acceso)
*
Rilasciando il tasto, la misurazione continua si arresta.
si avvia un'altra misurazione.
Durante la misurazione di un'asticella segnabuca in un campo da
"Misurazione non riuscita"
Visualizza il
Visualizza il
o "Impossibile effettuare la
valore misurato
valore misurato
misurazione" della distanza
(bersaglio 1)
(bersaglio 2)
misurazione continua per facilitare la misurazione. Se non vi sono
sarà la distanza dall'asticella segnabuca inquadrata.

Specifiche tecniche
Jp
Sistema di misurazione
Corpo: impermeabile (profondità massima 1 metro per 10 minuti al massimo)*
Jp
Struttura
(Vano della batteria: resistente all'acqua**)
En
Campo di misurazione
En
Es
Laser di C
Es
Normativa di sicurezza
Laser di C
Fr
Distanza effettiva (3 cifre inferiori):
Fr
De
Visualizzazione distanze (incremento)
De
(4 cifre superiori):
Ambiente
It
It
Laser
Se
Se
Sistema ottico
Classe
Nl
Nl
Ingrandimento (x) 6
(nm) 905
Ru
Ru
Diametro effettivo dell'obiettivo (mm) ø21
Durata degli impulsi (ns) 12
Pt
Pt
Campo visivo angolare (reale) (˚) 7,5
15
Pl
Pl
18,3
Divergenza raggio (mrad)
Fi
Fi
ø3,5
Umidità di funzionamento (%RH) 80 o inferiore (senza condensa di rugiada)
No
No
-
1
Regolazione diottrica ±4m
Dk
Dk
* Modelli impermeabili
Altro
Cz
Cz
Temperatura di funzionamento (˚C) -10 —
massimo di 10 minuti senza che il sistema ottico o di rilevazione si danneggi.
Ro
Ro
Il telemetro laser Nikon offre i seguenti vantaggi:
Hu
1 batteria al litio CR2 (CC, 3V)
Hu
Alimentazione
Spegnimento automatico (dopo circa 8 secondi di mancato utilizzo)
113 x 70 x 39
Osservare con attenzione quanto segue durante l'uso del telemetro laser Nikon.
Circa 175 (senza batteria)
quest'ultima potrebbe penetrare all'interno del dispositivo. In tal caso, eliminare qualsiasi traccia di umidità e lasciare asciugare il
vano della batteria.
106 107
Altro
Guida alla soluzione dei problemi di funzionamento/Riparazione
Jp
Jp
En
En
Es
condizioni:
Es
(1) questo dispositivo non può causare interferenze nocive e
Sintomo Punti di controllo
Fr
Fr
(2) questo dispositivo deve accettare qualunque interferenza ricevuta, incluse le interferenze che possono causare
De
operazioni non desiderate.
●
De
(vicinoal bordo, parte superiore del corpo).
It
It
(il display LCD non si illumina)
● Controllare l'inserimento della batteria.
Se
● Sostituire la batteria vecchia con una nuova.
Se
Nl
● Verificare che non vi sia nulla che ostruisce le aperture di emissione e del
Nl
Ru
ragionevole protezione contro le interferenze nocive nelle installazioni residenziali. Questo apparecchio genera,
rilevatore del fascio laser, come ad esempio un dito o la cinghia.
Ru
utilizza e può irradiare energia in radiofrequenza e, se non viene installato e utilizzato in conformità alle istruzioni,
●
Pt
Pt
Impossibile misurare la distanza
lato della lente dell'obiettivo siano puliti. Se necessario, pulirli.
Pl
● Verificare che la forma e le condizioni del bersaglio siano adeguate per
Pl
possano verificarsi in una particolare installazione. Se questo dispositivo provoca interferenze dannose alla ricezione
riflettere il fascio laser.
Fi
radiofonica o televisiva, determinabili con l'accensione e lo spegnimento dell'apparecchio, si consiglia all'utente di
Fi
● Sostituire la batteria vecchia con una nuova.
No
No
●
Dk
Dk
(“Cannot measure”) (“Impossibile
● Verificare che il bersaglio si trovi all'interno del campo di misurazione.
Cz
effettuare la misurazione”).
Cz
Ro
Ro
Regulations (normative canadesi relative ad apparecchi che causano interferenze).
● Verificare che fra il telemetro laser Nikon e il bersaglio non vi sia alcun
Hu
ostacolo, come foglie o erba.
Hu
campo di misurazione
● Verificare che fra il telemetro laser Nikon e il bersaglio non vi sia alcun
situati oltre una certa distanza.
ostacolo, come foglie o erba.
ufficiali.
● Sostituire la batteria vecchia con una nuova.
● Verificare che la forma e le condizioni del bersaglio siano adeguate per
riflettere il fascio laser.
instabile.
●
● Verificare che fra il telemetro laser Nikon e il bersaglio non vi sia alcun
ostacolo, come foglie o erba.
108 109
Guida alla soluzione dei problemi di funzionamento/Riparazione
Jp
Jp
En
En
Es
Es
Sintomo Punti di controllo
Fr
Fr
De
● Sostituire la batteria vecchia con una nuova.
De
Svenska
● Verificare che la forma e le condizioni del bersaglio siano adeguate per riflettere
It
It
Viene visualizzato un risultato errato.
il fascio laser.
Se
● Verificare che fra il telemetro laser Nikon e il bersaglio non vi sia alcun ostacolo,
Se
INNEHÅLL
come foglie o erba.
Nl
Nl
........................................ 112-115
Ru
Ru
Viktiga egenskaper ................................................... 116
Pt
in quanto potrebbe essersi verificato un
Pt
malfunzionamento dell'unità. Non fare mai controllare o riparare il telemetro laser Nikon da persone diverse dal rappresentante
............................. 117
Pl
Pl
autorizzato del fabbricante del prodotto. La mancata osservanza di questa indicazione può causare danni al prodotto o lesioni.
Intern display .............................................................. 118
Fi
Fi
............................................... 119
No
No
Dk
Dk
............................................................ 120
Cz
Cz
Byta batteri .................................................................. 121
Ro
Ro
................................................................ 122-123
Hu
Hu
Specifikationer .................................................. 124-125
Övrigt ............................................................................. 126
................................... 127-128
110 111
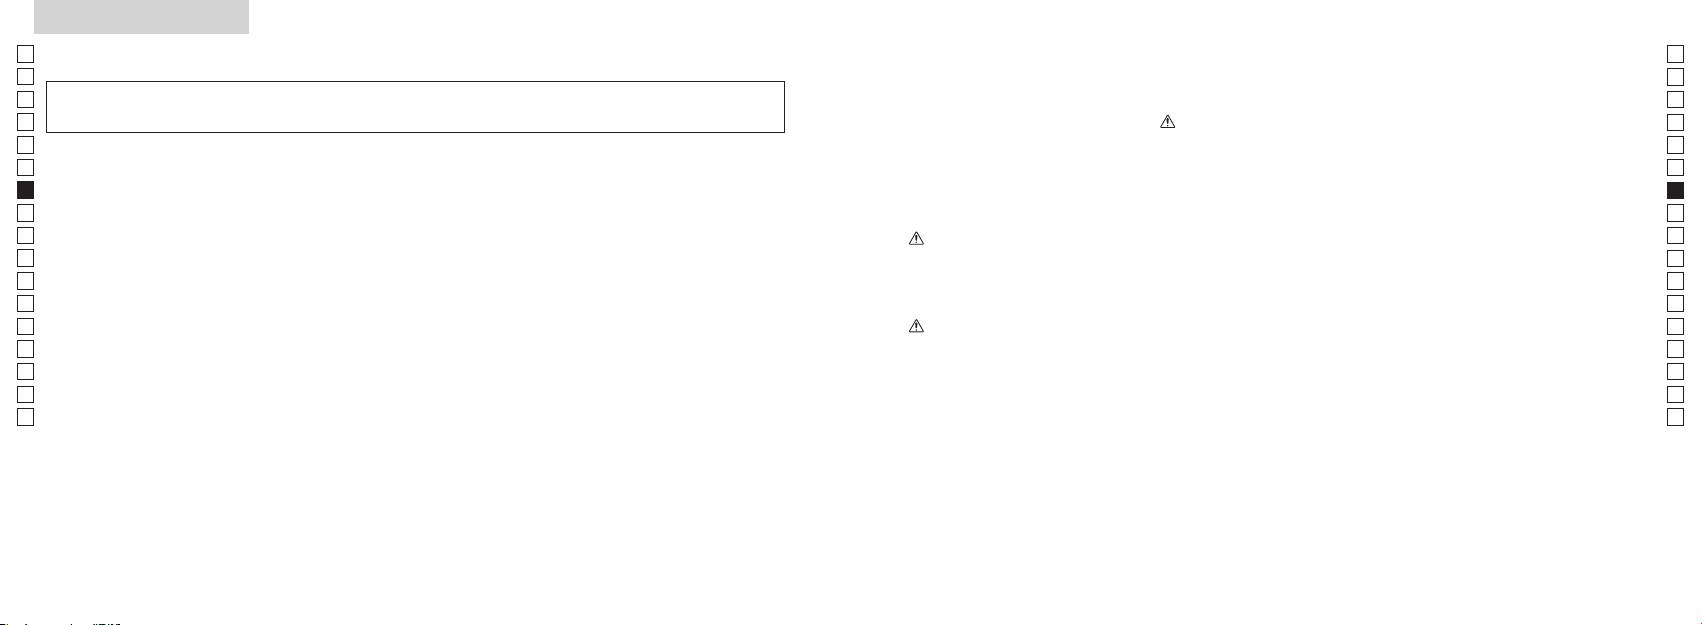
Läs före användning
Jp
Tack för att du har valt att köpa Nikon Laser Rangefinder COOLSHOT AS.
Följ anvisningarna så att du kan
SÄKERHETSÅTGÄRDER (Laser)
Jp
använda utrustningen korrekt
skadas eller om det hörs ett
En
En
och undvika eventuellt farliga
en osynlig laserstråle. Se till att du
Es
Användning av reglage, justeringar eller funktioner för andra ändamål än de avsedda kan
Es
problem. Läs noggrant hela
iakttar följande:
tappats eller av annan anledning
leda till exponering av farlig strålning.
Fr
avsnittet "Läs före användning"
Varning
skall batteriet tas ur omedelbart
Fr
De
samt instruktionerna om korrekt
De
〇
du tittar in i optiken från objektivets
avslutas.
användning innan du använder
It
It
sida. Om inte detta respekteras kan
produkten. Förvara denna
Se
det negativt påverka eller skada
Se
〇
handbok lätt åtkomlig.
ögonen.
Nl
Nl
〇
mot ögonen.
Ru
VARNING
Ru
Pt
Detta betyder att felaktigt bruk och
Pt
underlåtelse att beakta detta innehåll
optiskt instrument, som t.ex. genom
Pl
●
Pl
kan leda till dödsfall eller allvarliga
linser eller kikare, eller med blotta
● Denna manual får inte reproduceras, varken delvis eller i sin helhet (med undantag av korta
Fi
skador.
ögat. Detta kan orsaka synskador.
Fi
citat i artiklar eller recensioner), utan skriftligt tillstånd från NIKON VISION CO., LTD.
No
IAKTTAG FÖRSIKTIGHET
No
●
Detta betyder att felaktigt bruk och
Dk
Dk
helst och utan varsel.
knappen for att undvika att
underlåtelse att beakta innehållet kan
Cz
rikta med laserstrålen.
Cz
leda till personskador eller materiella
Ro
skador.
Ro
tid, ta ut batteriet ur huset.
Hu
Hu
tillverkaren.
112 113
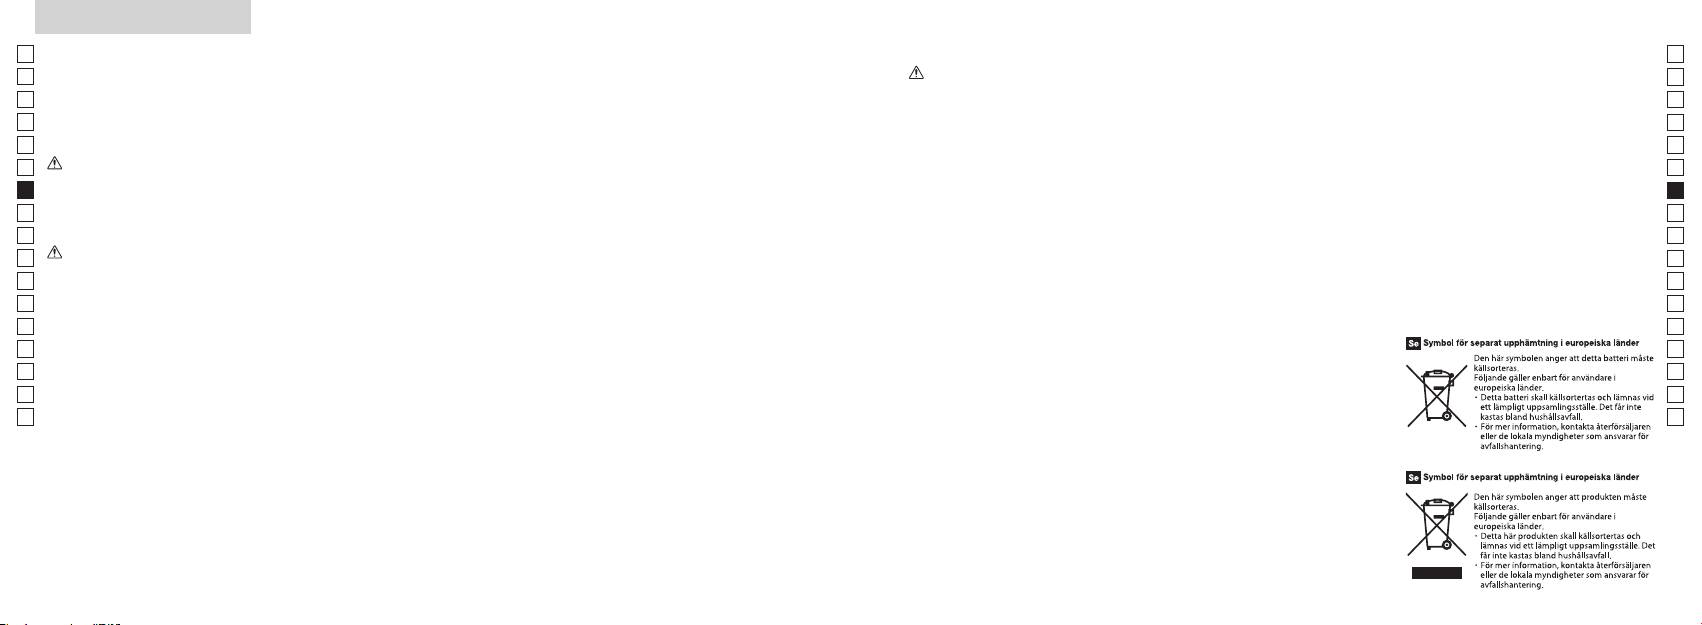
Läs före användning
Jp
SÄKERHETSÅTGÄRDER
SÄKERHETSÅTGÄRDER
SÄKERHETSFÖRESKRIFTER
SKÖTSEL OCH UNDERHÅLL
Lagring
Jp
för att linda in denna produkt i eller
En
(Monokular)
(Litiumbatteri)
Varningar
Linser
En
på linsen på grund av hög
Es
Om batteriet hanteras felaktigt kan
Es
barn.
borttagning av damm från linserna.
Fr
Nikon på en
Fr
system för att sikta på målet. Se till
eller smådelar osv. i munnen. Om
med en mjuk, ren trasa eller oljefri
torr, sval plats.
De
att du iakttar följande:
De
linsduk av hög kvalitet om du
Torka den ordentligt i
It
Varning
Se till att du iakttar följande:
It
rumstemperatur efter att du har haft
Se
snart som möjligt med en mjuk, ren
den ute i regnet, och förvara den
Se
intensivt ljus eller laserstrålen
korrekt positionerade.
trasa.
sedan på en torr, sval plats.
Nl
Nl
eller inflammeras. Om sådana
laseravståndssökare.
Ru
Ru
Varningar
Pt
Pt
vanligt tyg, eftersom detta kan
Pl
batterifacket.
Pl
kan medföra att den skadas eller på
tillsammans med nyckar
Fi
inte på -
göra huset, ska
Fi
,
knappen.
förvaras i det mjuka fodralet.
No
No
det kan kortsluta och resultera i
yta.
Dk
överhettning.
samtidigt som du går. Om detta
Dk
inte fungerar korrekt, bör du avsluta
solljus. Ultravioletta strålar och för
Huset
Cz
ignoreras kan detta resultera i
Cz
skada eller felfunktion, att du går
negativt eller till och med skada
Ro
batteriet.
mjuk ren trasa efter att dammet
Ro
in i någon, slår andra, faller eller
instruktioner om vart du skickar den
den.
Hu
annan olycka.
för reparation.
Hu
inte bensen, förtunning eller andra
organiska lösningsmedel.
hud, spola genast med mycket
orsaka skada.
bildas kondens på linsernas ytor.
som blåser luft ur ett munstycke.
batteri kommer in i ögonen, skölj
ostabil plats. Om detta ignorerars
kondensen har avdunstat.
omedelbart med rent vatten och
kan detta resultera ifall eller
tappande och orsaka skada eller
felfunktion.
lokala förordningar.
114 115

Viktiga egenskaper Terminologi/Sammansättning
Jp
Följande förhållanden gör mätning enklare:
Jp
1
En
4
En
Laseröppning
Es
Es
3
2 Laserdetektoröppning
Fr
Fr
3
De
De
90grader
4
It
mellan
It
5
Mätningen kan leda till bristande precision eller
1
Se
Se
misslyckande i följande fall:
6
Nl
Nl
7 Dioptriindex
Ru
2
5
8 Remögla
Ru
Pt
9 Batterilucka
Pt
Pl
6
!p Indikering för "
ö
Pl
Fi
batteriluckan
Fi
för undervattensbruk)
7
No
!q
No
!w FDA beteckningsinformation
Dk
Dk
Nikon Laser Rangefinder använder en osynlig laserstråle.
8
Cz
Cz
Den mäter tiden det tar för laserstrålen att förflytta
Ro
sig från laseravståndsmätaren till målet och tillbaka.
9
Ro
Laserreflexionsförmågan och mätresultaten kan variera
Hu
Hu
efter klimat- och miljöförhållanden samt färg, struktur,
!p
storlek, form och andra egenskaper hos målet.
!q
!w
Sammansättning
......................................x1
..............................x1
......................x1
........x1
116 117
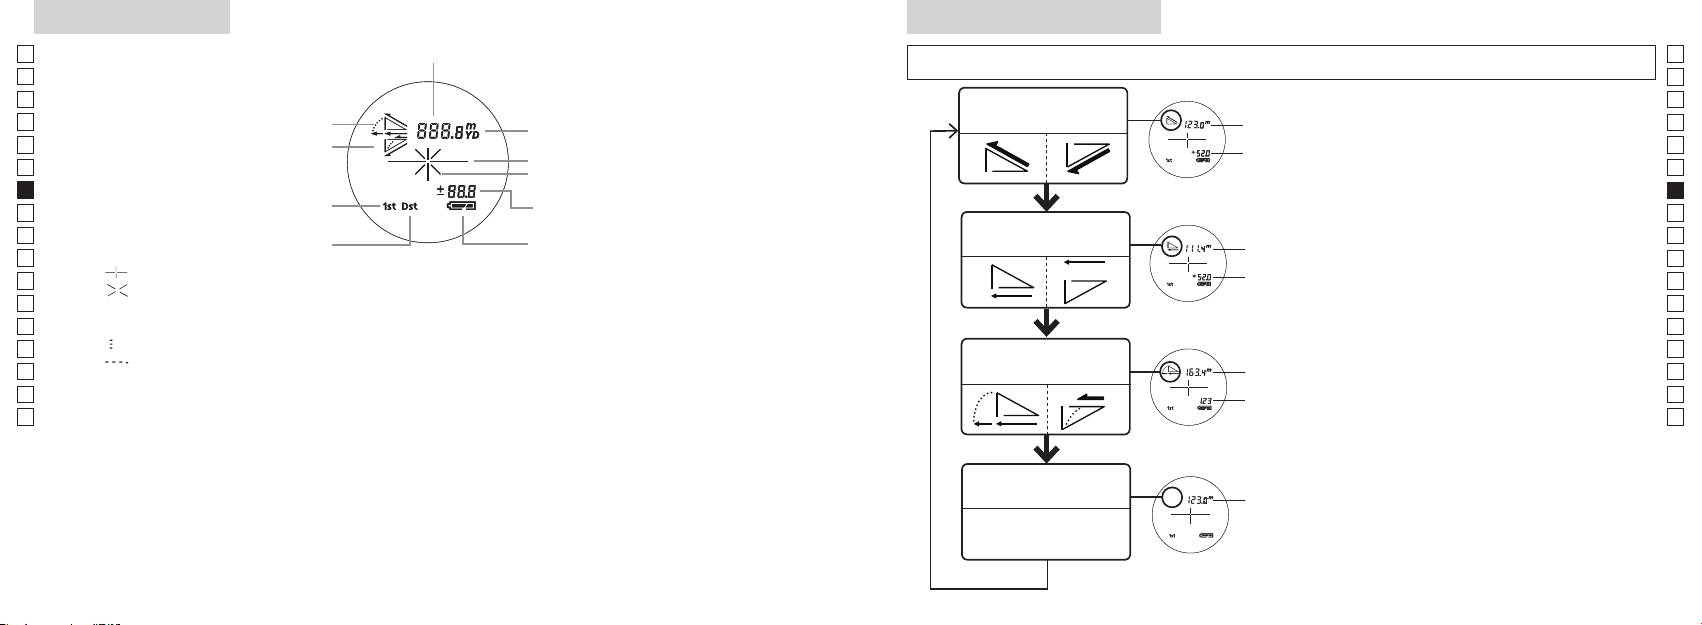
Intern display
Mätningsläge display
Jp
Avstånd
Jp
En
En
Es
Es
Faktiskt avstånd
Faktiskt
Fr
Stigning
och Höjd läge
Fr
avstånd
De
Sluttning
De
Målmarkering
Höjd
It
It
Se
Se
Höjd
Nl
Nl
3.
Horisontellt avstånd
Ru
Horisontellt
Ru
Batteristatus
och Höjdläge
Pt
avstånd
Pt
『 』
Pl
Höjd
Pl
『 』
visas.
Fi
Fi
*
No
No
Dk
『
』
Lutnings
*
Dk
『
』
Golfläge
Ajusterat
Cz
Cz
Avstånd
*
Ro
Ro
Faktiskt
Hu
avstånd
Hu
Faktiskt
Faktiskt
avståndläge
avstånd
118 119
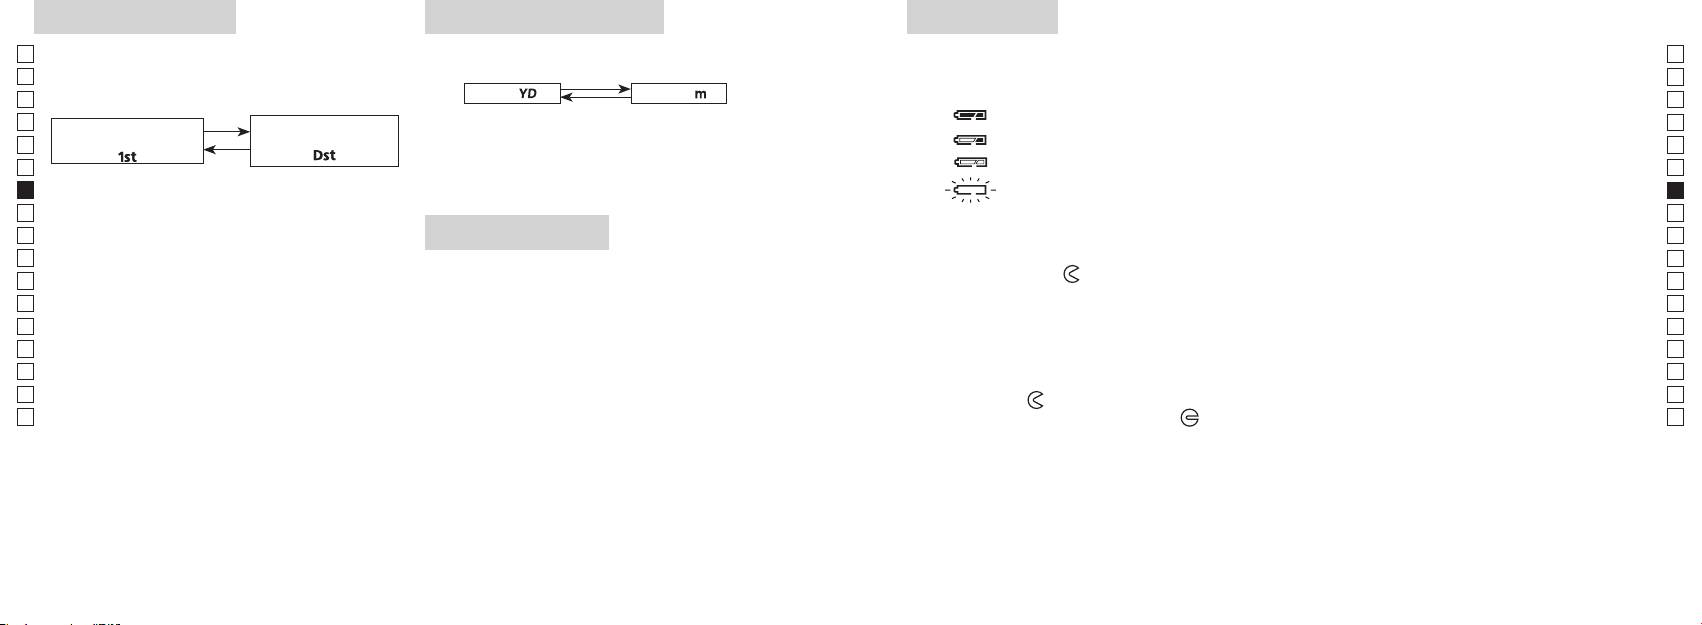
Målprioritetsläge
Distansdisplayenheter
Byta batteri
Jp
Jp
Typ av batteri: 3V CR2 litiumbatteri x1
En
Batteriindikatorer
En
Yard
[ ]
Meter [ ]
Es
Es
Fr
Fr
De
första målet
: Batteriladdningen börjar bli låg. Förbered dig på att byta ut batteriet.
De
「
」
「
」
It
knappen.
It
1.
Se
Se
på).
automatiskt av. Byt batteriet.
Nl
Nl
Ru
Ru
LED-belysning
1. Öppna locket till batterifacket
sekunder.
Pt
Pt
riktning mot
-markeringen. Det kan vara trögt på grund av gummipackningen som skyddar mot
Pl
Pl
vattenintrång.
Fi
Fi
2. Byt ut det gamla batteriet mot ett nytt
*
No
No
för mörka för att visas på LCD-panelen.
*
Dk
Dk
*
.
Cz
Cz
*
3. Stäng locket till batterifacket
Ro
Ro
-markeringen mot
●
Hu
el. likn., vrid batteriluckan mot
Hu
Batteriets livslängd
Kontinuerlig användning: Ca 13.000 gånger (vid 20 °C)
120 121

Jp
Jp
En
En
Es
Es
Fr
Fr
De
De
It
It
Se
Se
Nl
Nl
Ru
Ru
Pt
Pt
Pl
Pl
Fi
Fi
No
No
Dk
Dk
Cz
Cz
Ro
Ro
Hu
Hu
122 123
Measurement
1. Press the POWER button for power-on.
(Power turns off 8 seconds after the last
operation.)
Immediately after power-on.
3. Press POWER button once to start single measurement.
4. After measurement, “distance” or “fail to measure” indicator are displayed for 8 seconds, then power turns off. If you press the POWER
button during power-on (while the internal display is lit), another single measurement starts.
unable to measure distance.
3. Keep pressing POWER button to start continuous measurement up to 20 seconds. The internal display shows “distance” and
“fail to measure” indicator alternately.
Note: Laser irradiaton mark is blinking during the measurement.
Note: If you stop pressing the button, the continuous measuremen stops
2. Aim at the target
Positionthetargetatthecenterofthereticle
[Single measurement]
Failure to measure or
unable to measure distance.
[Continuous measurement]
4. After continuous measurement, the measure results are displayed for 8 seconds, then power turns off. If you press the POWER
button during power-on (while the internal display is lit), another measrement starts.
Failure to measure or
Target focusing.
Measuring.
(Initializing)
.
Upward measurement. Downward measurement.
Displays the measured
figure. (Target 1)
Displays the measured figure.
Stand-by.
Displays the measured
figure. (Target 2)
Measurement
1. Press the POWER button for power-on.
(Power turns off 8 seconds after the last
operation.)
Immediately after power-on.
(Initializing)
3. Press POWER button once to start single measurement.
Measuring.
4. After measurement, “distance” or “fail to measure” indicator are displayed for 8 seconds, then power turns off. If you press the POWER
button during power-on (while the internal display is lit), another single measurement starts.
Failure to measure or
unable to measure distance.
Displays the measured
figure. (Target 1)
3. Keep pressing POWER button to start continuous measurement up to 20 seconds. The internal display shows “distance” and
“fail to measure” indicator alternately.
Note: Laser irradiaton mark is blinking during the measurement.
Note: If you stop pressing the button, the continuous measuremen stops
Target focusing.
2. Aim at the target
.
Positionthetargetatthecenterofthereticle
[Single measurement]
Failure to measure or
unable to measure distance.
Upward measurement. Downward measurement.
Displays the measured figure.
[Continuous measurement]
4. After continuous measurement, the measure results are displayed for 8 seconds, then power turns off. If you press the POWER
button during power-on (while the internal display is lit), another measrement starts.
Stand-by.
Displays the measured
figure. (Target 2)
Measurement
1. Press the POWER button for power-on.
(Power turns off 8 seconds after the last
operation.)
Immediately after power-on.
Stand-by.
(Initializing)
2. Aim at the target
.
Positionthetargetatthecenterofthereticle
3. Press POWER button once to start single measurement.
4. After measurement, “distance” or “fail to measure” indicator are displayed for 8 seconds, then power turns off. If you press the POWER
button during power-on (while the internal display is lit), another single measurement starts.
unable to measure distance.
3. Keep pressing POWER button to start continuous measurement up to 20 seconds. The internal display shows “distance” and
“fail to measure” indicator alternately.
Note: Laser irradiaton mark is blinking during the measurement.
Note: If you stop pressing the button, the continuous measuremen stops
[Single measurement]
Failure to measure or
unable to measure distance.
[Continuous measurement]
4. After continuous measurement, the measure results are displayed for 8 seconds, then power turns off. If you press the POWER
button during power-on (while the internal display is lit), another measrement starts.
Failure to measure or
Target focusing.
Measuring.
Upward measurement. Downward measurement.
Displays the measured
figure. (Target 1)
Displays the measured figure.
Displays the measured
figure. (Target 2)
Mätning
IAKTTAG FÖRSIKTIGHET — Användning av reglage, justeringar eller funktioner för andra ändamål än de
【
Enskild mätning
】
avsedda kan leda till exponering av farlig strålning.
3. Tryck på
knappen en gång för att start en
1. Förberedelse
2. Ögonmussla av gummi
skick.
3. Dioptrijustering
du tittar genom ögonmusslan, rotera dioptrijusteringsringen medurs till dess att LCD
hamnar i fokus.
Om dioptrin inte justeras efter din syn kan du få svårt att korrekt fokusera på dina mål.
【
Funktionen Kontinuerlig mätning
】
4. Mätning
*
2. Sikta mot målet.
hårkorset.
Direkt efter att strömmen
Insiktning
slås på (Initierar).
Measurement
1. Press the POWER button for power-on.
(Power turns off 8 seconds after the last
operation.)
Immediately after power-on.
Stand-by.
(Initializing)
2. Aim at the target
.
Positionthetargetatthecenterofthereticle
Target focusing.
[Single measurement]
3. Press POWER button once to start single measurement.
Measuring.
4. After measurement, “distance” or “fail to measure” indicator are displayed for 8 seconds, then power turns off. If you press the POWER
button during power-on (while the internal display is lit), another single measurement starts.
Failure to measure or
Upward measurement. Downward measurement.
unable to measure distance.
Displays the measured figure.
[Continuous measurement]
3. Keep pressing POWER button to start continuous measurement up to 20 seconds. The internal display shows “distance” and
“fail to measure” indicator alternately.
Note: Laser irradiaton mark is blinking during the measurement.
Note: If you stop pressing the button, the continuous measuremen stops
Failure to measure or
unable to measure distance.
4. After continuous measurement, the measure results are displayed for 8 seconds, then power turns off. If you press the POWER
button during power-on (while the internal display is lit), another measrement starts.
Displays the measured
figure. (Target 1)
Displays the measured
figure. (Target 2)
Measurement
1. Press the POWER button for power-on.
(Power turns off 8 seconds after the last
operation.)
Immediately after power-on.
Stand-by.
(Initializing)
2. Aim at the target
.
Positionthetargetatthecenterofthereticle
Target focusing.
[Single measurement]
3. Press POWER button once to start single measurement.
Measuring.
4. After measurement, “distance” or “fail to measure” indicator are displayed for 8 seconds, then power turns off. If you press the POWER
button during power-on (while the internal display is lit), another single measurement starts.
Failure to measure or
Upward measurement. Downward measurement.
unable to measure distance.
Displays the measured figure.
[Continuous measurement]
3. Keep pressing POWER button to start continuous measurement up to 20 seconds. The internal display shows “distance” and
“fail to measure” indicator alternately.
Note: Laser irradiaton mark is blinking during the measurement.
Note: If you stop pressing the button, the continuous measuremen stops
Failure to measure or
unable to measure distance.
Displays the measured
figure. (Target 1)
4. After continuous measurement, the measure results are displayed for 8 seconds, then power turns off. If you press the POWER
button during power-on (while the internal display is lit), another measrement starts.
Displays the measured
figure. (Target 2)
Measurement
1. Press the POWER button for power-on.
(Power turns off 8 seconds after the last
operation.)
Immediately after power-on.
Stand-by.
(Initializing)
2. Aim at the target
.
Positionthetargetatthecenterofthereticle
Target focusing.
[Single measurement]
3. Press POWER button once to start single measurement.
Measuring.
4. After measurement, “distance” or “fail to measure” indicator are displayed for 8 seconds, then power turns off. If you press the POWER
button during power-on (while the internal display is lit), another single measurement starts.
Failure to measure or
unable to measure distance.
3. Keep pressing POWER button to start continuous measurement up to 20 seconds. The internal display shows “distance” and
“fail to measure” indicator alternately.
Note: Laser irradiaton mark is blinking during the measurement.
Note: If you stop pressing the button, the continuous measuremen stops
Failure to measure or
unable to measure distance.
[Continuous measurement]
4. After continuous measurement, the measure results are displayed for 8 seconds, then power turns off. If you press the POWER
button during power-on (while the internal display is lit), another measrement starts.
Upward measurement. Downward measurement.
Displays the measured
figure. (Target 1)
Displays the measured figure.
Displays the measured
figure. (Target 2)
Measurement
1. Press the POWER button for power-on.
(Power turns off 8 seconds after the last
operation.)
Immediately after power-on.
Stand-by.
(Initializing)
2. Aim at the target
.
Positionthetargetatthecenterofthereticle
Target focusing.
[Single measurement]
3. Press POWER button once to start single measurement.
Measuring.
4. After measurement, “distance” or “fail to measure” indicator are displayed for 8 seconds, then power turns off. If you press the POWER
button during power-on (while the internal display is lit), another single measurement starts.
unable to measure distance.
3. Keep pressing POWER button to start continuous measurement up to 20 seconds. The internal display shows “distance” and
“fail to measure” indicator alternately.
Note: Laser irradiaton mark is blinking during the measurement.
Note: If you stop pressing the button, the continuous measuremen stops
unable to measure distance.
4. After continuous measurement, the measure results are displayed for 8 seconds, then power turns off. If you press the POWER
button during power-on (while the internal display is lit), another measrement starts.
[Continuous measurement]
Failure to measure or
Failure to measure or
Upward measurement. Downward measurement.
Displays the measured
figure. (Target 1)
Displays the measured figure.
Displays the measured
figure. (Target 2)
Measurement
1. Press the POWER button for power-on.
(Power turns off 8 seconds after the last
operation.)
Immediately after power-on.
Stand-by.
(Initializing)
2. Aim at the target
.
Positionthetargetatthecenterofthereticle
Target focusing.
[Single measurement]
3. Press POWER button once to start single measurement.
4. After measurement, “distance” or “fail to measure” indicator are displayed for 8 seconds, then power turns off. If you press the POWER
button during power-on (while the internal display is lit), another single measurement starts.
unable to measure distance.
3. Keep pressing POWER button to start continuous measurement up to 20 seconds. The internal display shows “distance” and
“fail to measure” indicator alternately.
Note: Laser irradiaton mark is blinking during the measurement.
Note: If you stop pressing the button, the continuous measuremen stops
unable to measure distance.
4. After continuous measurement, the measure results are displayed for 8 seconds, then power turns off. If you press the POWER
button during power-on (while the internal display is lit), another measrement starts.
[Continuous measurement]
Failure to measure or
Failure to measure or
Measuring.
Upward measurement. Downward measurement.
Displays the measured
figure. (Target 1)
Displays the measured figure.
Displays the measured
figure. (Target 2)
Measurement
1. Press the POWER button for power-on.
(Power turns off 8 seconds after the last
operation.)
Immediately after power-on.
Stand-by.
(Initializing)
2. Aim at the target
.
Positionthetargetatthecenterofthereticle
Target focusing.
[Single measurement]
3. Press POWER button once to start single measurement.
Measuring.
4. After measurement, “distance” or “fail to measure” indicator are displayed for 8 seconds, then power turns off. If you press the POWER
button during power-on (while the internal display is lit), another single measurement starts.
unable to measure distance.
3. Keep pressing POWER button to start continuous measurement up to 20 seconds. The internal display shows “distance” and
“fail to measure” indicator alternately.
Note: Laser irradiaton mark is blinking during the measurement.
Note: If you stop pressing the button, the continuous measuremen stops
unable to measure distance.
4. After continuous measurement, the measure results are displayed for 8 seconds, then power turns off. If you press the POWER
button during power-on (while the internal display is lit), another measrement starts.
[Continuous measurement]
Failure to measure or
Failure to measure or
Upward measurement. Downward measurement.
Displays the measured
figure. (Target 1)
Displays the measured figure.
Displays the measured
figure. (Target 2)
Measurement
1. Press the POWER button for power-on.
(Power turns off 8 seconds after the last
operation.)
Immediately after power-on.
Stand-by.
(Initializing)
2. Aim at the target
.
Positionthetargetatthecenterofthereticle
Target focusing.
[Single measurement]
3. Press POWER button once to start single measurement.
Measuring.
4. After measurement, “distance” or “fail to measure” indicator are displayed for 8 seconds, then power turns off. If you press the POWER
button during power-on (while the internal display is lit), another single measurement starts.
Failure to measure or
unable to measure distance.
Displays the measured
figure. (Target 1)
3. Keep pressing POWER button to start continuous measurement up to 20 seconds. The internal display shows “distance” and
“fail to measure” indicator alternately.
Note: Laser irradiaton mark is blinking during the measurement.
Note: If you stop pressing the button, the continuous measuremen stops
Failure to measure or
unable to measure distance.
Upward measurement. Downward measurement.
Displays the measured figure.
[Continuous measurement]
4. After continuous measurement, the measure results are displayed for 8 seconds, then power turns off. If you press the POWER
button during power-on (while the internal display is lit), another measrement starts.
Displays the measured
figure. (Target 2)
Measurement
1. Press the POWER button for power-on.
(Power turns off 8 seconds after the last
operation.)
Immediately after power-on.
Stand-by.
(Initializing)
2. Aim at the target
.
Positionthetargetatthecenterofthereticle
Target focusing.
[Single measurement]
3. Press POWER button once to start single measurement.
Measuring.
4. After measurement, “distance” or “fail to measure” indicator are displayed for 8 seconds, then power turns off. If you press the POWER
button during power-on (while the internal display is lit), another single measurement starts.
Failure to measure or
unable to measure distance.
3. Keep pressing POWER button to start continuous measurement up to 20 seconds. The internal display shows “distance” and
“fail to measure” indicator alternately.
Note: Laser irradiaton mark is blinking during the measurement.
Note: If you stop pressing the button, the continuous measuremen stops
Failure to measure or
unable to measure distance.
[Continuous measurement]
4. After continuous measurement, the measure results are displayed for 8 seconds, then power turns off. If you press the POWER
button during power-on (while the internal display is lit), another measrement starts.
Upward measurement. Downward measurement.
Displays the measured
figure. (Target 1)
Displays the measured figure.
Displays the measured
figure. (Target 2)
indikatorn "fail to measure" (Avstånd) eller "fail to
du trycker på
på),
3. Tryck och håll nere
Om du trycker på
*
Laserstrålningsm
*
"Misslyckad
Visar den
Visar den
(Mål 1)
(Mål 2)
avstånd
mellan dig och flaggan.
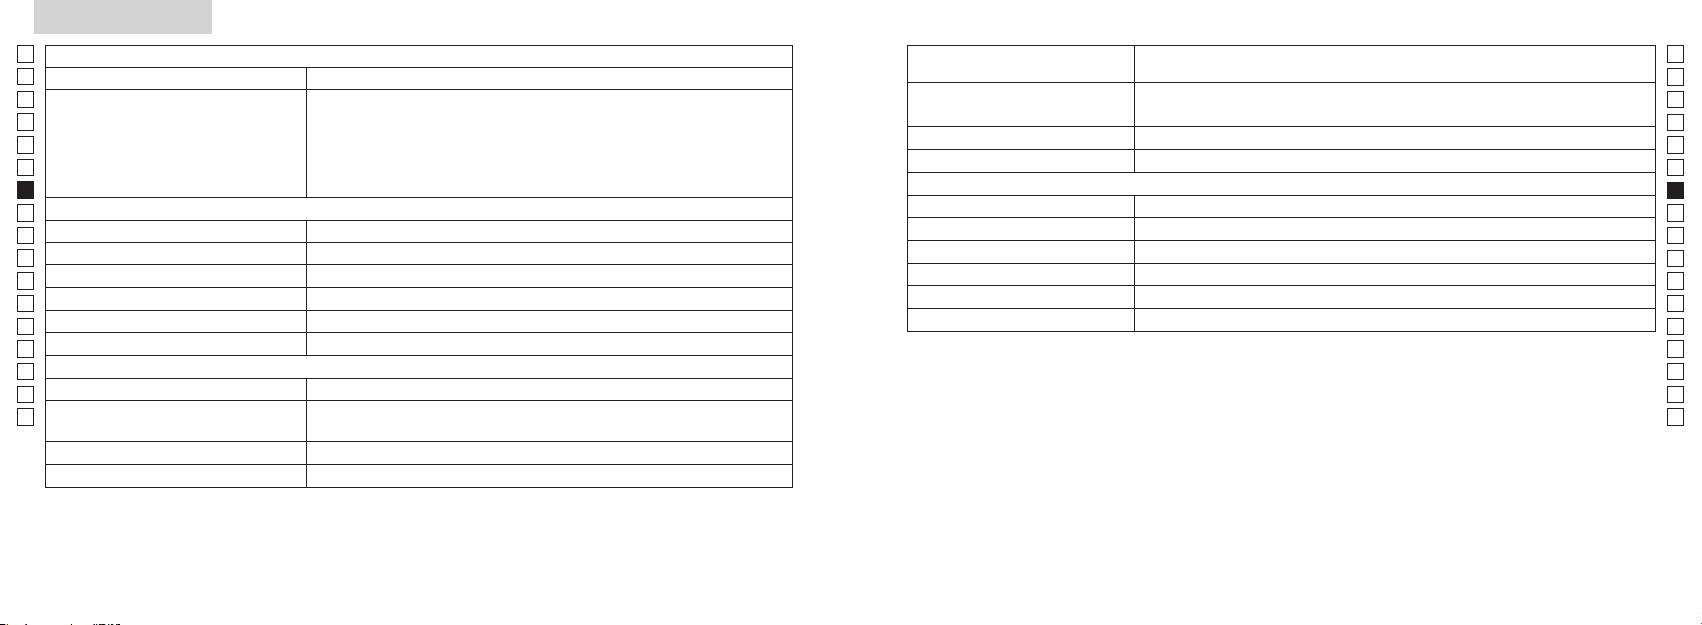
Specifikationer
Jp
Jp
Konstruktion
En
En
Es
Es
Fr
Fr
Horisontellt avstånd, lutningsjusterat avstånd (övre fyrsiffrig):
FCC D
De
Avståndsvisning (ökning)
De
Miljö
It
Höjd (nedre 3-siffrig):
It
Laser
Se
Se
Optiskt system
Klass
Nl
Nl
Förstoringsgrad (x) 6
(nm) 905
Ru
Ru
Objektivets effektiva diameter (mm) ø21
12
Pt
Pt
7,5
15
Pl
Pl
18,3
Strålens avvikelse (mrad)
Fi
Fi
Utgångspupill (mm) ø3,5
Driftsluftfuktighet (%RH) n kondensation)
No
No
-
1
Dioptrijustering ±4m
Dk
Dk
*Vattentäta modeller:
Övrigt
Cz
Cz
Driftstemperatur (˚C) -10 —
djup om 1 meter i upp till 10 minuter.
Ro
Ro
Nikon Laser Rangefinder har följande fördelar:
Hu
CR2 litiumbatteri x 1 (DC 3V)
Hu
Strömförsörjning
Mått (L x H x B) 113 x 70 x 39
Observera följande när du använder Nikon Laser Rangefinder:
Vikt (g) Ca 175 (utan batteri)
124 125

Övrigt
Felsökning/Reparation
Jp
Jp
En
En
Es
Es
Symptom Kontrollpunkter
Fr
Fr
De
●
De
●
It
It
● Byt ut det gamla batteriet mot ett nytt.
Se
Se
Nl
● Se till att inte något, till exempel din hand eller ditt finger, blockerar laserstrålens
Nl
öppning eller laserdetektoröppningen på objektivlinssidan.
Ru
Ru
radiokommunikationer. Det finns emellertid inga garantier för att interferens inte kan uppstå i en specifik installation.
● Se till att laserstrålens öppning och laserdetektoröppningen på objektivlinssidan
Pt
Pt
Pl
●
Pl
● Byt ut det gamla batteriet mot ett nytt.
Fi
Fi
No
●
No
●
Dk
Dk
Cz
Cz
störningsorsakanden utrustning.
Ro
●
Ro
Hu
Rangefinder och målet.
Hu
bevismaterial.
●
Rangefinder och målet.
● Byt ut det gamla batteriet mot ett nytt.
●
●
●
Rangefinder och målet.
126 127
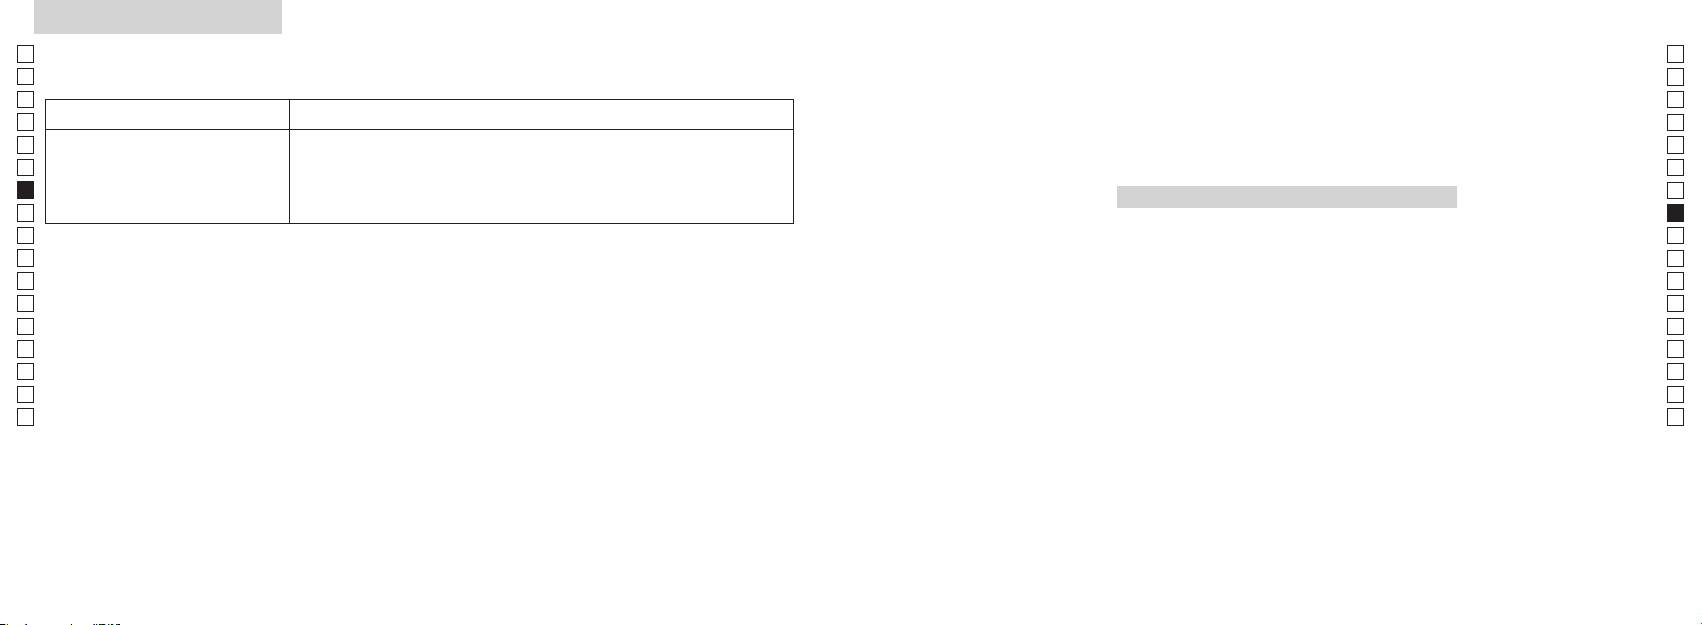
Felsökning/Reparation
Jp
Jp
En
En
Es
Es
Symptom Kontrollpunkter
Fr
Fr
De
De
● Byt ut det gamla batteriet mot ett nytt.
Nederlands
It
●
It
Felaktiga resultat visas
●
Se
Se
Rangefinder och målet.
INHOUD
Nl
Nl
Voorzorgsmaatregelen ................................... 130-133
Ru
Ru
Functieoverzicht ........................................................ 134
Pt
eftersom ett fel kan ha uppstått på enheten.
Pt
kontrollera eller reparera Nikon Laser Rangefinder. Om detta ignoreras kan det leda till personskador eller skador på produkten.
Benamingen/Onderdelen ...................................... 135
Pl
Pl
Interne display ............................................................ 136
Fi
Fi
Weergavemodus metingen ................................... 137
No
No
Doelprioriteitmodus/Eenheden
Dk
Dk
afstandsweergave/LED-verlichting ..................... 138
Cz
Cz
Batterij vervangen ..................................................... 139
Ro
Ro
Meting .................................................................. 140-141
Hu
Hu
Specificaties ........................................................ 142-143
Overig ............................................................................ 144
Problemen oplossen/Reparatie .................. 145-146
128 129

Voorzorgsmaatregelen
Voorzorgsmaatregelen
Jp
Het is belangrijk dat u zich strikt
VEILIGHEIDSINSTRUCTIES
Jp
aan de volgende richtlijnen
op buiten het bereik van kinderen.
En
(Laser)
En
houdt. Alleen dan kunt u
De Nikon laserafstandsmeter maakt
Es
Als u zich bij het bedienen of afstellen van het instrument niet houdt aan de instructies in
Es
optimaal gebruik maken van het
laserafstandsmeter beschadigd
gebruik van een onzichtbare laserstraal.
ditdocument, kan dit blootstelling aan gevaarlijke straling tot gevolg hebben.
Fr
De volgende aandachtspunten zijn
raakt, of als u een vreemd geluid
instrument en gevaarlijke
Fr
daarom belangrijk:
hoort nadat het apparaat is
De
situaties voorkomen. Het is
De
〇 Het is raadzaam dit product pas te gebruiken nadat u de Voorzorgsmaatregelen en
gevallen of door een andere
raadzaam dit product pas te
Waarschuwing
It
oorzaak, moet u de batterij
It
gebruiksinstructies zorgvuldig hebt doorgelezen.
gebruiken nadat u de
Se
Meetknop terwijl u in het objectief
onmiddellijk verwijderen en het
Se
〇 Bewaar deze handleiding in de buurt van uw laserafstandsmeter om hem indien nodig te kunnen
'Voorzorgsmaatregelen' en
kijkt. Als u dit wel doet, dan kunnen
instrument niet meer gebruiken.
Nl
raadplegen.
gebruiksinstructies zorgvuldig
Nl
uw ogen beschadigd raken.
hebt doorgelezen. Bewaar deze
Ru
〇
Ru
handleiding in de buurt van uw
Pt
kan veroorzaken.
Pt
laserafstandsmeter om hem
Pl
indien nodig te kunnen
Pl
optisch instrument, zoals door een
Fi
raadplegen.
lens of verrekijker, en kijk er ook niet
Fi
● De specificaties en het ontwerp kunnen zonder kennisgeving vooraf worden gewijzigd.
No
naar met het blote oog. Uw ogen
No
●
kunnen anders beschadigd raken.
Dk
WAARSCHUWING
Dk
handleiding, hetzij geheel of gedeeltelijk, in welke vorm dan ook (met uitzondering van een kort
Deze aanwijzing maakt u erop attent
Cz
Cz
citaat in een beschouwend artikel of recensie) niet toegestaan.
dan uw vingers uit de buurt van de
dat iedere vorm van incorrect gebruik
zodat u niet
Ro
● NIKON VISION CO., LTD. behoudt zich het recht voor de inhoud van deze handleiding te allen
of veronachtzaming van de hier
Ro
beschreven inhoud mogelijk kan
per ongeluk de laserstraal activeert.
Hu
tijde zonder kennisgeving vooraf te wijzigen.
Hu
leiden tot ernstig letsel of de dood.
instrument langere tijd niet gebruikt.
VOORZICHTIG
Deze aanwijzing maakt u erop attent
laserafstandsmeter niet en breng
dat iedere vorm van incorrect gebruik
geen aanpassingen aan. De laser kan
of veronachtzaming van de hier
schadelijk zijn voor uw gezondheid.
beschreven inhoud mogelijk kan
leiden tot lichamelijk letsel of
aangepast of gerepareerd is, valt niet
onherstelbare beschadiging van
onder de fabrieksgarantie.
eigendommen.
130 131

Voorzorgsmaatregelen
Jp
VEILIGHEIDSINSTRUCTIES
letsel of storing veroorzaken.
De volgende aandachtspunten zijn
VEILIGHEIDSINSTRUCTIES
ONDERHOUD EN OPSLAG
Opslag
Jp
-
daarom belangrijk:
(Monoculair)
Voorzichtig
Lenzen
En
En
riaal en andere kleine onderdelen
de lens beslaan of beschimmelen.
Es
Het optische systeem van de Nikon
Es
buiten het bereik van kinderen.
minpolen op de juiste manier in het
laserafstandsmeter waterdicht is,
voor het stofvrij maken van het
Berg de Nikon laserafstandsmeter
laserafstandsmeter is voorzien van
Fr
instrument.
kunt u het instrument niet onder
lensoppervlak.
daarom op een koele en droge
Fr
een monoculaire kijker waarmee op
rubberen oogschelp of andere
water gebruiken.
plaats op.
De
het doel wordt gericht. De volgende
De
kleine onderdelen in hun mond
of als u het instrument langere tijd
vingerafdrukken, op het
Droog het instrument na gebruik op
It
aandachtspunten zijn belangrijk:
stoppen. Raadpleeg onmiddellijk
niet gaat gebruiken.
It
zand en modder zo snel mogelijk
lensoppervlak verwijdert u heel
een regenachtige dag op
Waarschuwing
Se
een arts als kinderen dergelijke
van de body van de afstandsmeter.
voorzichtig met een schone, zachte
kamertemperatuur en berg hem
Se
onderdelen hebben ingeslikt.
batterijvak.
katoenen doek of een olievrij
vervolgens op een koele en droge
Nl
de zon, een fel licht of de
Nl
samen met
schone doek.
lensdoekje van goede kwaliteit.
plaats op.
laserstraal wanneer u de Nikon
Ru
langere tijd gebruikt, kan uw
sleutels of munten in een zak of tas.
Ru
laserafstandsmeter gebruikt.
huid ontstoken raken. Raadpleeg
Hierdoor kan de batterij kortsluiten
Pt
op een warme of zonnige dag
een kleine hoeveelheid pure alcohol
Pt
Voorzichtig
onmiddellijk een arts als u last krijgt
of oververhit raken.
niet achter in de auto. Bewaar het
Pl
Pl
van ontstekingsverschijnselen.
instrument ook niet in de buurt van
fluwelen doeken of gewone tissues,
Fi
Meetknop wanneer u de Nikon
of vuur. Haal de batterij nooit uit
apparatuur die warmte genereert.
want deze kunnen krassen
Fi
laserafstandsmeter niet gebruikt.
altijd in de beschermtas.
elkaar.
No
Dit kan een nadelig effect hebben op
No
het instrument of hem beschadigen.
reinigen van het lensoppervlak geen
Dk
loopt. Als u dit wel doet dan kunt
Dk
niet goed werkt, gebruik hem dan
doek die ook al is gebruikt voor het
Cz
u mogelijk letsel of een storing in
niet meer en vraag uw plaatselijke
batterij in contact komt met
niet in direct zonlicht liggen.
schoonmaken van de body.
Cz
het instrument veroorzaken door
dealer waar u het instrument ter
kleding of huid, spoel dan direct
Ultraviolette straling en extreme
Ro
Body
Ro
ergens tegenaan te lopen, iemand
reparatie heen kunt sturen.
met veel water. Mocht er vloeistof
hitte kunnen een nadelig effect
Hu
te raken, te vallen of een ander
uit een beschadigde batterij in uw
Hu
hebben op het instrument of zelfs
schoon met een zachte, schone doek
ongeluk te krijgen.
VEILIGHEIDSINSTRUCTIES
ogen komen, spoel dan direct met
beschadiging tot gevolg hebben.
nadat u het eventueel aanwezige
(Lithiumbatterij)
schoon water en raadpleeg een arts.
stof voorzichtig hebt weggeblazen
aan zijn draagriem. U kunt dan
Als u de batterij niet op de juiste
wordt blootgesteld aan plotselinge
iemand raken en eventueel
de batterij aan de plaatselijke
manier behandelt, kan deze barsten
temperatuurwisselingen kan er
benzeen, verdunner of andere
verwonden.
regelgeving.
en gaan lekken. Dit kan leiden tot
condensvorming optreden op
reinigingsmiddelen die organische
corrosie van het instrument en
de lensoppervlakken. U mag het
oplosmiddelen bevatten.
stabiel oppervlak. Doet u dit niet
vlekken veroorzaken op uw kleding.
instrument dan pas weer gebruiken
dan kan het instrument vallen en
nadat het vocht is verdampt.
schoonmaakinstrument dat lucht
blaast uit een mondstuk.
132 133
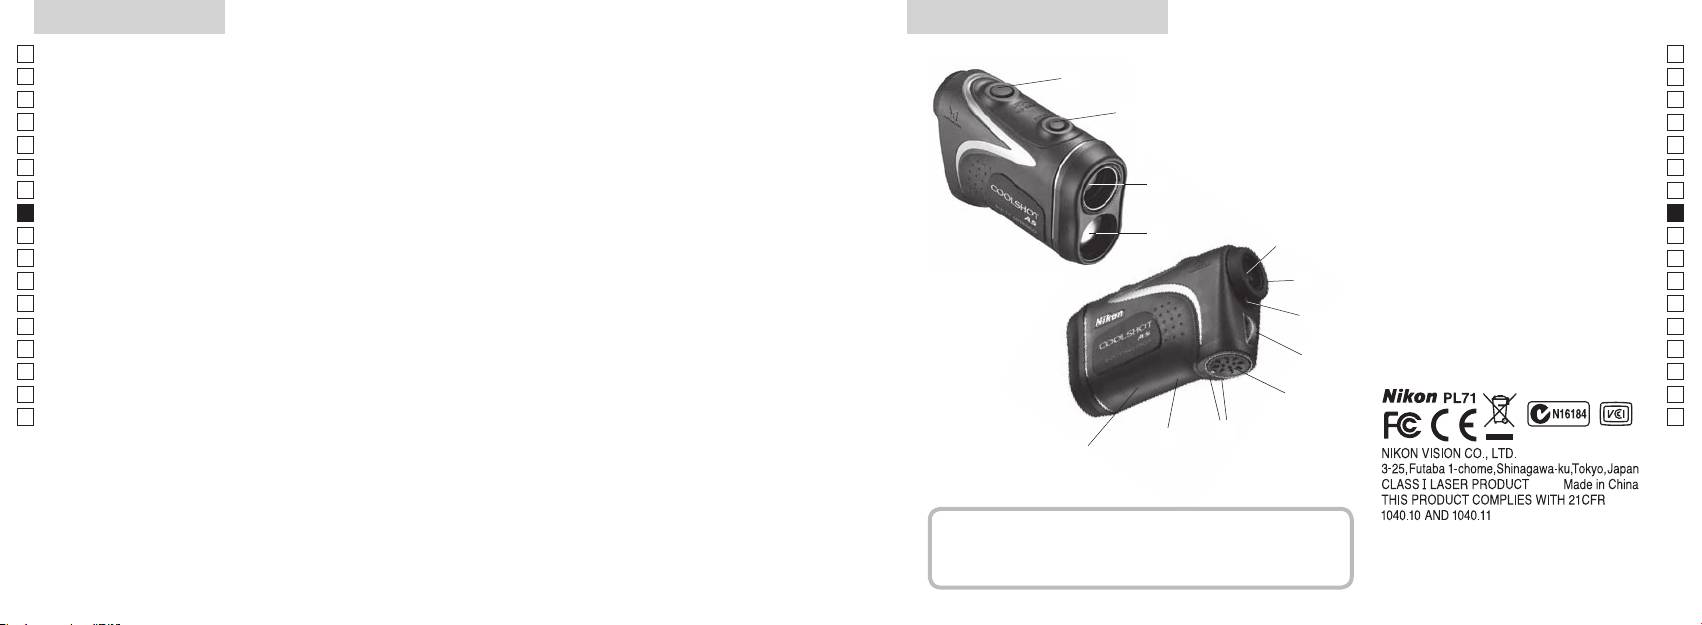
Functieoverzicht Benamingen/Onderdelen
Jp
Onder de volgende omstandigheden is meten
Jp
gemakkelijker:
1
En
4
En
Opening laserstraal
Es
coating
Es
3
2 Opening voor laserdetector
Fr
Fr
3
De
De
4
It
is bij het golfen
90 graden is
It
5Monoculaire zoeker met 6x
1
Se
Se
weergegeven. Hiertussen kan gemakkelijk worden
In de volgende gevallen kunnen metingen onnauwkeurig
vergroting
Nl
gewisseld
zijn of mislukken:
Nl
6
Ru
2
5
Ru
7 Dioptrie-index
doelprioriteitssysteem, waarbij de prioriteit ingesteld kan
Pt
worden afhankelijk van het doel
8 Bevestigingsoog voor draagriem
Pt
Pl
afstandsmeter
6
9 Deksel batterijvak
Pl
wordt de functie continumeting gestart
Fi
!p
Fi
7
No
8sec. niet wordt gebruikt)
batterijvak
No
!q Label met productnummer
Dk
Dk
geactiveerd
8
!w FDA-informatie
Cz
Cz
richting
Ro
9
Ro
Hu
Hu
!p
De Nikon laserafstandsmeter meet met behulp van een
!q
onzichtbare laserstraal. Het instrument meet hoe lang de
!w
laserstraal doet over de afstand tussen de afstandsmeter
en het doel en weer terug. Het reflecterend vermogen van
de laser en de meetresultaten kunnen variëren afhankelijk
van de weers- en omgevingsomstandigheden en de kleur,
Onderdelen
het materiaal, de grootte, de vorm en andere kenmerken
van het doel.
................................... x1
........................x1
................... x1
...x1
134 135
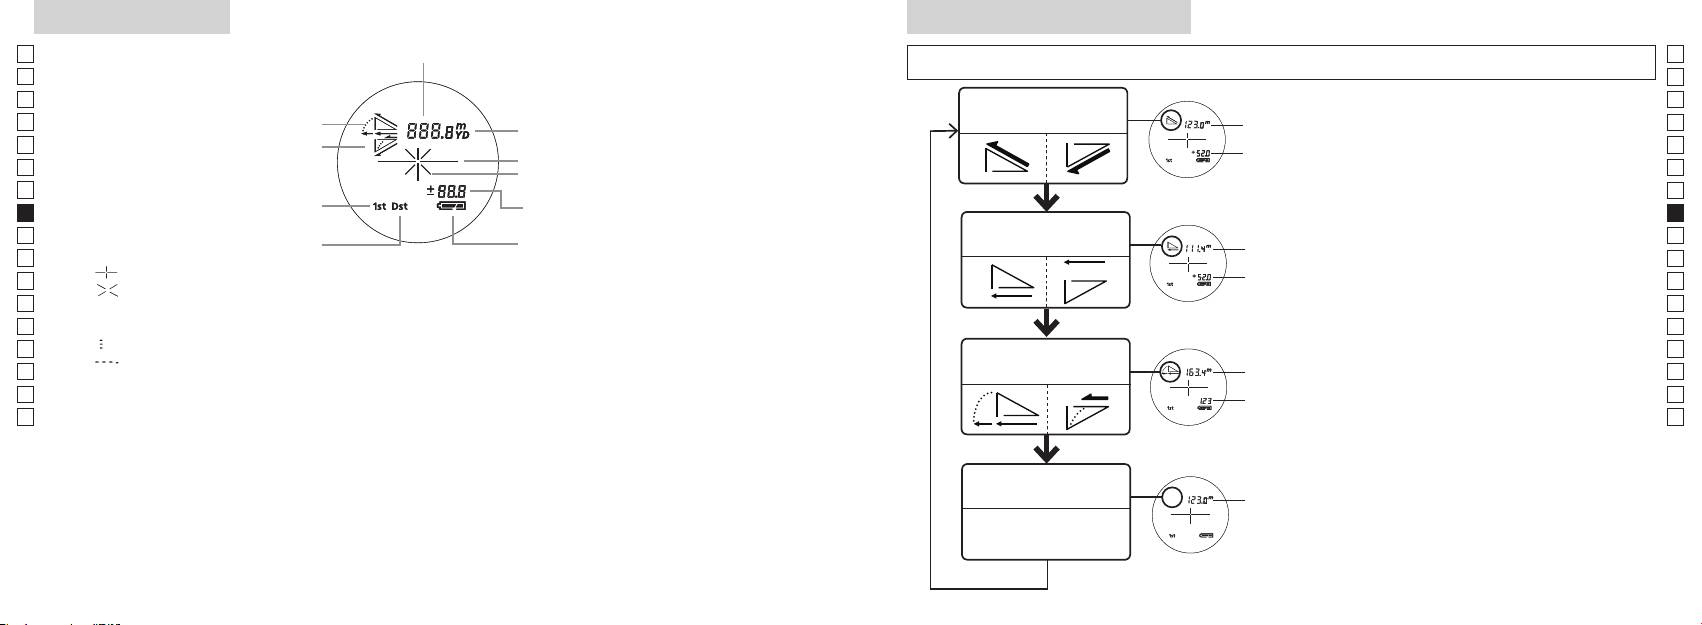
Interne display
Weergavemodus metingen
Jp
Afstand
Jp
dan 2 seconden los om de modus in onderstaande volgorde te wijzigen.
En
En
Es
Es
Werkelijke afstand
Fr
Stijgende hellingshoek
en hoogte modus
Fr
interne display aanstaat).
afstand
De
Dalende hellingshoek
De
Draadkruis
Hoogte
ingedrukt. Laat onmiddellijk daarna (binnen
It
It
Symbool voor laserstraal
Se
Se
Hoogte
korter dan 2 seconden los.
Nl
(werkelijke afstand in de golf-modus)
Nl
Horizontale afstand
Ru
Meetknop als u de weergavemodus voor
Ru
Horizontale
Toestand batterij
en hoogte modus
afstand
metingen wilt wijzigen.
Pt
Pt
『 』
4. Herhaal stappen 2 en 3 totdat de gewenste
Pl
Hoogte
Pl
『 』
modus wordt weergegeven.
Fi
Fi
Blijft zichtbaar tijdens een enkelvoudige meting. Knippert tijdens continumetingen.
*
Als u de knoppen niet in de juiste volgorde
No
Kijk niet in de objectieflens als dit symbool wordt weergegeven.
indrukt, wordt er niet naar de andere
No
Dk
『
』 - Bezig met meten
Afstand
modus overgeschakeld.
Dk
『
』 - De meting is mislukt of de afstand kan niet worden gemeten
Golf-modus
gecorrigeerd
*
Als u na het uitvoeren van een meting een
Cz
Cz
voor helling
andere modus kiest, wordt het resultaat
Ro
Ro
aangepast aan de nieuwe modus.
Hu
* Over het algemeen biedt een LCD-venster een even grote of lagere vergroting. Het LCD-venster van dit
afstand
Hu
*
Als de modus is ingesteld, worden
product wordt echter vergroot door de hoge vergroting van de zoeker. Hoewel bij de fabricage van het
metingen uitgevoerd in de nieuwe modus.
LCD-venster de meest geavanceerde technologie is toegepast, is het niet mogelijk de aanwezigheid
nauwkeurigheid van de meting of de veiligheid tijdens gebruik.
Werkelijke afstand
modus
afstand
136 137
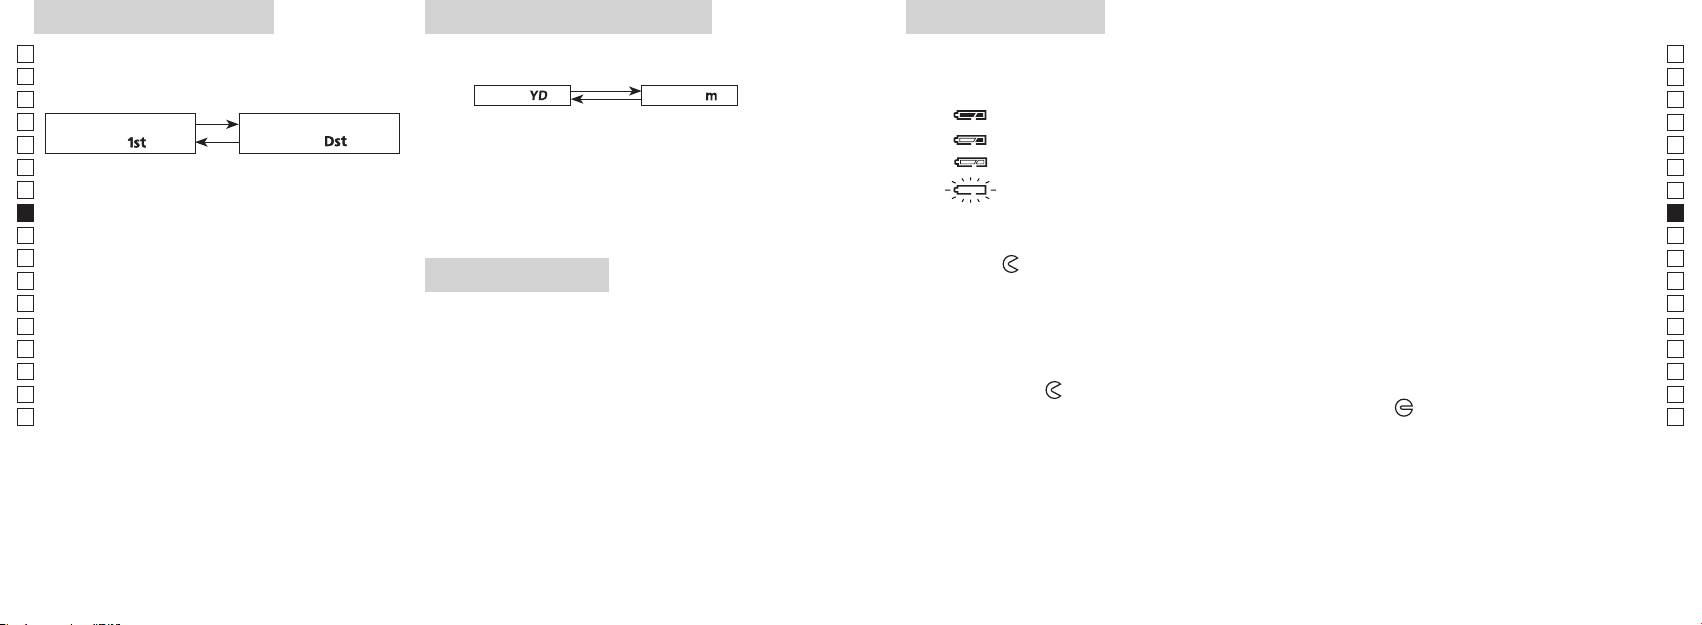
Doelprioriteitmodus
Eenheden afstandsweergave
Batterij vervangen
Jp
Deze laserafstandsmeter maakt gebruik van het systeem
Jp
Type batterij: 3 V CR2 lithiumbatterij x 1
(Standaard fabrieksinstelling is yard.)
En
Symbolen voor resterende batterijlading
En
Es
[ ]
Meter [ ]Yard
* Symbool voor toestand batterij op het interne display waarschuwt wanneer de batterij moet worden vervangen.
Es
: De batterij heeft voldoende lading voor gebruik.
Fr
Fr
aanstaat).
De
doel「
」
doel
「
」
De
It
seconden vast. Laat de knop los als de andere eenheid
: De batterij is bijna leeg. De batterij moet worden vervangen door een nieuwe.
It
display aanstaat).
wordt weergegeven.
Se
knippert : De batterij is leeg. De laserafstandsmeter schakelt automatisch uit nadat het
Se
3. Als u overschakelt naar de andere weergave-eenheid,
symbool drie keer heeft geknipperd. Vervang de batterij.
Nl
ingedrukt terwijl u binnen een halve seconde op de
Nl
worden de resultaten omgerekend en weergegeven in
1. Open het deksel van het batterijvak
Ru
de nieuwe eenheid.
Ru
Houd beide knoppen (langer dan 2 seconden)
Pt
Pt
het
-symbool. Het openen van het deksel kan enige moeite kosten door de rubberen ring, die water
Pl
Pl
LED-verlichting
moet tegenhouden.
3. Laat beide knoppen los als er naar een andere
Fi
2. Vervang de oude batterij door een nieuwe batterij
Fi
modus is overgeschakeld.
No
aanstaat).
*
Als u de knoppen niet in de juiste volgorde indrukt,
No
wordt er niet naar de andere modus overgeschakeld.
wordt aangegeven op een label in het batterijvak. De pluspool moet naar de binnenzijde van het vak
Dk
gericht zijn. De laserafstandsmeter werkt niet als de batterij verkeerd is geplaatst.
Dk
knop korter dan 2 seconden indrukt.
*
Als het overschakelen mislukt, herhaalt u stap 2.
Cz
3. Sluit het deksel van het batterijvak
Cz
*
Ro
[]
LCD-venster te kunnen zien.
Breng het
-teken op een lijn met het
●
Ro
Bij het meten van voorwerpen die deels achter elkaar
*
bijv. de muis van uw duim om het deksel in de richting van het
-teken te draaien. Het sluiten van
Hu
Hu
laserafstandsmeter uit te schakelen. In dat geval is de
het deksel kan enige moeite kosten door de rubberen ring, die water moet tegenhouden. Draai het
tot het dichtstbijzijnde voorwerp weer en de modus
verlichting uitgeschakeld als de laserafstandsmeter weer
deksel tot het niet verder kan. Controleer of het deksel goed is gesloten.
wordt aangezet.
Levensduur van de batterij
Bij continu gebruik: ongeveer 13.000 metingen (bij circa 20°C)
Dit aantal kan afwijken afhankelijk van de omstandigheden, de temperatuur en andere factoren, zoals de
vorm, kleur, enz. van het doel. Dit is slechts een indicatie.
* De batterij die bij deze laserafstandsmeter wordt geleverd is bedoeld om te controleren op het instrument werkt. Als gevolg
van natuurlijke elektrische ontlading, zal de levensduur van deze batterij waarschijnlijk korter zijn dan hierboven aangegeven.
* Als er water in het batterijvak komt doordat het instrument wordt ondergedompeld in water, droog het batterijvak dan
goed en vervang de batterij.
138 139
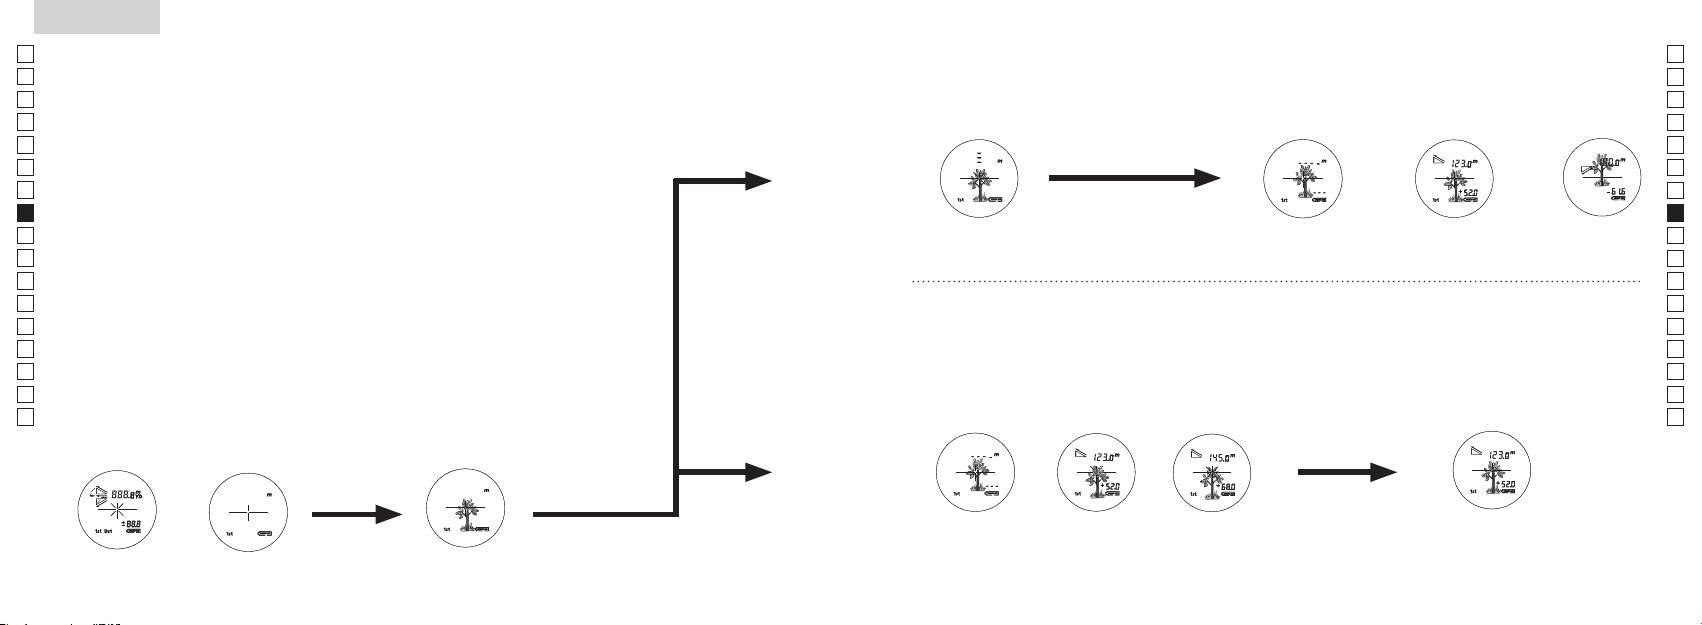
Jp
Jp
En
En
Es
Es
Fr
Fr
De
De
It
It
Se
Se
Nl
Nl
Ru
Ru
Pt
Pt
Pl
Pl
Fi
Fi
No
No
Dk
Dk
Cz
Cz
Ro
Ro
Hu
Hu
140 141
Measurement
1. Press the POWER button for power-on.
(Power turns off 8 seconds after the last
operation.)
Immediately after power-on.
3. Press POWER button once to start single measurement.
4. After measurement, “distance” or “fail to measure” indicator are displayed for 8 seconds, then power turns off. If you press the POWER
button during power-on (while the internal display is lit), another single measurement starts.
unable to measure distance.
3. Keep pressing POWER button to start continuous measurement up to 20 seconds. The internal display shows “distance” and
“fail to measure” indicator alternately.
Note: Laser irradiaton mark is blinking during the measurement.
Note: If you stop pressing the button, the continuous measuremen stops
2. Aim at the target
Positionthetargetatthecenterofthereticle
[Single measurement]
Failure to measure or
unable to measure distance.
[Continuous measurement]
4. After continuous measurement, the measure results are displayed for 8 seconds, then power turns off. If you press the POWER
button during power-on (while the internal display is lit), another measrement starts.
Failure to measure or
Target focusing.
Measuring.
(Initializing)
.
Upward measurement. Downward measurement.
Displays the measured
figure. (Target 1)
Displays the measured figure.
Stand-by.
Displays the measured
figure. (Target 2)
Measurement
1. Press the POWER button for power-on.
(Power turns off 8 seconds after the last
operation.)
Immediately after power-on.
(Initializing)
3. Press POWER button once to start single measurement.
Measuring.
4. After measurement, “distance” or “fail to measure” indicator are displayed for 8 seconds, then power turns off. If you press the POWER
button during power-on (while the internal display is lit), another single measurement starts.
Failure to measure or
unable to measure distance.
Displays the measured
figure. (Target 1)
3. Keep pressing POWER button to start continuous measurement up to 20 seconds. The internal display shows “distance” and
“fail to measure” indicator alternately.
Note: Laser irradiaton mark is blinking during the measurement.
Note: If you stop pressing the button, the continuous measuremen stops
Target focusing.
2. Aim at the target
.
Positionthetargetatthecenterofthereticle
[Single measurement]
Failure to measure or
unable to measure distance.
Upward measurement. Downward measurement.
Displays the measured figure.
[Continuous measurement]
4. After continuous measurement, the measure results are displayed for 8 seconds, then power turns off. If you press the POWER
button during power-on (while the internal display is lit), another measrement starts.
Stand-by.
Displays the measured
figure. (Target 2)
Measurement
1. Press the POWER button for power-on.
(Power turns off 8 seconds after the last
operation.)
Immediately after power-on.
Stand-by.
(Initializing)
2. Aim at the target
.
Positionthetargetatthecenterofthereticle
3. Press POWER button once to start single measurement.
4. After measurement, “distance” or “fail to measure” indicator are displayed for 8 seconds, then power turns off. If you press the POWER
button during power-on (while the internal display is lit), another single measurement starts.
unable to measure distance.
3. Keep pressing POWER button to start continuous measurement up to 20 seconds. The internal display shows “distance” and
“fail to measure” indicator alternately.
Note: Laser irradiaton mark is blinking during the measurement.
Note: If you stop pressing the button, the continuous measuremen stops
[Single measurement]
Failure to measure or
unable to measure distance.
[Continuous measurement]
4. After continuous measurement, the measure results are displayed for 8 seconds, then power turns off. If you press the POWER
button during power-on (while the internal display is lit), another measrement starts.
Failure to measure or
Target focusing.
Measuring.
Upward measurement. Downward measurement.
Displays the measured
figure. (Target 1)
Displays the measured figure.
Displays the measured
figure. (Target 2)
Meting
Voorzichtig
—
als u zich bij het bedienen of afstellen van het apparaat niet houdt aan de instructies in dit
【
Enkelvoudige meting
】
document, kan dit blootstelling aan gevaarlijke straling tot gevolg hebben.
3. Druk één keer op de
Meetknop voor een enkelvoudige
1. Voorbereiding
meting.
2. Rubberen oogschelp
3. Aanpassing van de dioptrie
Stel de dioptrie af om een scherp beeld te krijgen op het LCD-venster in de zoeker.
Meetknop om het instrument aan te zetten (controleer of de interne display aanstaat).
Draai de dioptriering in de richting van de klok terwijl u door de zoeker kijkt totdat u het
LCD-venster scherp kunt zien.
Als u de ring te ver hebt gedraaid, draai de ring dan een eind terug en stel de dioptrie dan
nogmaals af.
Als de dioptrie niet is afgesteld op uw gezichtsvermogen, kan het lastig zijn om goed op
【
Functie voor continumeting
】
het doel te richten.
4. Meten
eenheid voor afstandsweergave) voordat u begint met meten.
*
Raadpleeg elk hoofdstuk om te zien hoe elke modus moet worden ingesteld.
2. Richt op het doel.
(controleer of de interne display aanstaat)
(Automatische uitschakeling als instrument
van het dradenkruis.
ongeveer 8 sec. niet wordt gebruikt)
Onmiddellijk na
Stand-by Richten op het doel
inschakeling (initialiseren)
Measurement
1. Press the POWER button for power-on.
(Power turns off 8 seconds after the last
operation.)
Immediately after power-on.
Stand-by.
(Initializing)
2. Aim at the target
.
Positionthetargetatthecenterofthereticle
Target focusing.
[Single measurement]
3. Press POWER button once to start single measurement.
Measuring.
4. After measurement, “distance” or “fail to measure” indicator are displayed for 8 seconds, then power turns off. If you press the POWER
button during power-on (while the internal display is lit), another single measurement starts.
Failure to measure or
Upward measurement. Downward measurement.
unable to measure distance.
Displays the measured figure.
[Continuous measurement]
3. Keep pressing POWER button to start continuous measurement up to 20 seconds. The internal display shows “distance” and
“fail to measure” indicator alternately.
Note: Laser irradiaton mark is blinking during the measurement.
Note: If you stop pressing the button, the continuous measuremen stops
Failure to measure or
unable to measure distance.
4. After continuous measurement, the measure results are displayed for 8 seconds, then power turns off. If you press the POWER
button during power-on (while the internal display is lit), another measrement starts.
Displays the measured
figure. (Target 1)
Displays the measured
figure. (Target 2)
Measurement
1. Press the POWER button for power-on.
(Power turns off 8 seconds after the last
operation.)
Immediately after power-on.
Stand-by.
(Initializing)
2. Aim at the target
.
Positionthetargetatthecenterofthereticle
Target focusing.
[Single measurement]
3. Press POWER button once to start single measurement.
Measuring.
4. After measurement, “distance” or “fail to measure” indicator are displayed for 8 seconds, then power turns off. If you press the POWER
button during power-on (while the internal display is lit), another single measurement starts.
Failure to measure or
Upward measurement. Downward measurement.
unable to measure distance.
Displays the measured figure.
[Continuous measurement]
3. Keep pressing POWER button to start continuous measurement up to 20 seconds. The internal display shows “distance” and
“fail to measure” indicator alternately.
Note: Laser irradiaton mark is blinking during the measurement.
Note: If you stop pressing the button, the continuous measuremen stops
Failure to measure or
unable to measure distance.
Displays the measured
figure. (Target 1)
4. After continuous measurement, the measure results are displayed for 8 seconds, then power turns off. If you press the POWER
button during power-on (while the internal display is lit), another measrement starts.
Displays the measured
figure. (Target 2)
Measurement
1. Press the POWER button for power-on.
(Power turns off 8 seconds after the last
operation.)
Immediately after power-on.
Stand-by.
(Initializing)
2. Aim at the target
.
Positionthetargetatthecenterofthereticle
Target focusing.
[Single measurement]
3. Press POWER button once to start single measurement.
Measuring.
4. After measurement, “distance” or “fail to measure” indicator are displayed for 8 seconds, then power turns off. If you press the POWER
button during power-on (while the internal display is lit), another single measurement starts.
Failure to measure or
unable to measure distance.
3. Keep pressing POWER button to start continuous measurement up to 20 seconds. The internal display shows “distance” and
“fail to measure” indicator alternately.
Note: Laser irradiaton mark is blinking during the measurement.
Note: If you stop pressing the button, the continuous measuremen stops
Failure to measure or
unable to measure distance.
[Continuous measurement]
4. After continuous measurement, the measure results are displayed for 8 seconds, then power turns off. If you press the POWER
button during power-on (while the internal display is lit), another measrement starts.
Upward measurement. Downward measurement.
Displays the measured
figure. (Target 1)
Displays the measured figure.
Displays the measured
figure. (Target 2)
Measurement
1. Press the POWER button for power-on.
(Power turns off 8 seconds after the last
operation.)
Immediately after power-on.
Stand-by.
(Initializing)
2. Aim at the target
.
Positionthetargetatthecenterofthereticle
Target focusing.
[Single measurement]
3. Press POWER button once to start single measurement.
Measuring.
4. After measurement, “distance” or “fail to measure” indicator are displayed for 8 seconds, then power turns off. If you press the POWER
button during power-on (while the internal display is lit), another single measurement starts.
unable to measure distance.
3. Keep pressing POWER button to start continuous measurement up to 20 seconds. The internal display shows “distance” and
“fail to measure” indicator alternately.
Note: Laser irradiaton mark is blinking during the measurement.
Note: If you stop pressing the button, the continuous measuremen stops
unable to measure distance.
4. After continuous measurement, the measure results are displayed for 8 seconds, then power turns off. If you press the POWER
button during power-on (while the internal display is lit), another measrement starts.
[Continuous measurement]
Failure to measure or
Failure to measure or
Upward measurement. Downward measurement.
Displays the measured
figure. (Target 1)
Displays the measured figure.
Displays the measured
figure. (Target 2)
Measurement
1. Press the POWER button for power-on.
(Power turns off 8 seconds after the last
operation.)
Immediately after power-on.
Stand-by.
(Initializing)
2. Aim at the target
.
Positionthetargetatthecenterofthereticle
Target focusing.
[Single measurement]
3. Press POWER button once to start single measurement.
4. After measurement, “distance” or “fail to measure” indicator are displayed for 8 seconds, then power turns off. If you press the POWER
button during power-on (while the internal display is lit), another single measurement starts.
unable to measure distance.
3. Keep pressing POWER button to start continuous measurement up to 20 seconds. The internal display shows “distance” and
“fail to measure” indicator alternately.
Note: Laser irradiaton mark is blinking during the measurement.
Note: If you stop pressing the button, the continuous measuremen stops
unable to measure distance.
4. After continuous measurement, the measure results are displayed for 8 seconds, then power turns off. If you press the POWER
button during power-on (while the internal display is lit), another measrement starts.
[Continuous measurement]
Failure to measure or
Failure to measure or
Measuring.
Upward measurement. Downward measurement.
Displays the measured
figure. (Target 1)
Displays the measured figure.
Displays the measured
figure. (Target 2)
Measurement
1. Press the POWER button for power-on.
(Power turns off 8 seconds after the last
operation.)
Immediately after power-on.
Stand-by.
(Initializing)
2. Aim at the target
.
Positionthetargetatthecenterofthereticle
Target focusing.
[Single measurement]
3. Press POWER button once to start single measurement.
Measuring.
4. After measurement, “distance” or “fail to measure” indicator are displayed for 8 seconds, then power turns off. If you press the POWER
button during power-on (while the internal display is lit), another single measurement starts.
unable to measure distance.
3. Keep pressing POWER button to start continuous measurement up to 20 seconds. The internal display shows “distance” and
“fail to measure” indicator alternately.
Note: Laser irradiaton mark is blinking during the measurement.
Note: If you stop pressing the button, the continuous measuremen stops
unable to measure distance.
4. After continuous measurement, the measure results are displayed for 8 seconds, then power turns off. If you press the POWER
button during power-on (while the internal display is lit), another measrement starts.
[Continuous measurement]
Failure to measure or
Failure to measure or
Upward measurement. Downward measurement.
Displays the measured
figure. (Target 1)
Displays the measured figure.
Displays the measured
figure. (Target 2)
Measurement
1. Press the POWER button for power-on.
(Power turns off 8 seconds after the last
operation.)
Immediately after power-on.
Stand-by.
(Initializing)
2. Aim at the target
.
Positionthetargetatthecenterofthereticle
Target focusing.
[Single measurement]
3. Press POWER button once to start single measurement.
Measuring.
4. After measurement, “distance” or “fail to measure” indicator are displayed for 8 seconds, then power turns off. If you press the POWER
button during power-on (while the internal display is lit), another single measurement starts.
Failure to measure or
unable to measure distance.
Displays the measured
figure. (Target 1)
3. Keep pressing POWER button to start continuous measurement up to 20 seconds. The internal display shows “distance” and
“fail to measure” indicator alternately.
Note: Laser irradiaton mark is blinking during the measurement.
Note: If you stop pressing the button, the continuous measuremen stops
Failure to measure or
unable to measure distance.
Upward measurement. Downward measurement.
Displays the measured figure.
[Continuous measurement]
4. After continuous measurement, the measure results are displayed for 8 seconds, then power turns off. If you press the POWER
button during power-on (while the internal display is lit), another measrement starts.
Displays the measured
figure. (Target 2)
Measurement
1. Press the POWER button for power-on.
(Power turns off 8 seconds after the last
operation.)
Immediately after power-on.
Stand-by.
(Initializing)
2. Aim at the target
.
Positionthetargetatthecenterofthereticle
Target focusing.
[Single measurement]
3. Press POWER button once to start single measurement.
Measuring.
4. After measurement, “distance” or “fail to measure” indicator are displayed for 8 seconds, then power turns off. If you press the POWER
button during power-on (while the internal display is lit), another single measurement starts.
Failure to measure or
unable to measure distance.
3. Keep pressing POWER button to start continuous measurement up to 20 seconds. The internal display shows “distance” and
“fail to measure” indicator alternately.
Note: Laser irradiaton mark is blinking during the measurement.
Note: If you stop pressing the button, the continuous measuremen stops
Failure to measure or
unable to measure distance.
[Continuous measurement]
4. After continuous measurement, the measure results are displayed for 8 seconds, then power turns off. If you press the POWER
button during power-on (while the internal display is lit), another measrement starts.
Upward measurement. Downward measurement.
Displays the measured
figure. (Target 1)
Displays the measured figure.
Displays the measured
figure. (Target 2)
4. Na meting wordt "de gemeten afstand" of "het symbool voor Meting is
mislukt" gedurende 8 seconden getoond, daarna schakelt het instrument
uit. Als u op de
drukt terwijl het instrument is
ingeschakeld (enhet interne LCD-venster aanstaat), wordt een volgende
enkelvoudige meting gestart.
"De meting is mislukt" of
Omhoog
Omlaag gerichte
Meten
"de afstand kan niet worden
gerichte meting
meting
gemeten"
Toont de gemeten afstand.
3. Houd de
4. Na een continumeting wordt het resultaat van de laatste meting
continumeting van ongeveer 8 seconden te starten. Het interne
(gemeten afstand) gedurende 8 seconden getoond, daarna
LCD-venster toont afwisselend "de gemeten afstand" en "het
schakelt het instrument uit.
symbool voor Meting is mislukt".
Als u op de
drukt terwijl het instrument
*
Het symbool voor laserstraal knippert tijdens het meten.
is ingeschakeld (en het interne LCD-venster aanstaat), wordt een
*
Als u uw vinger van de knop haalt, stopt de continumeting.
volgende enkelvoudige meting gestart.
"De meting is
afstand naar een vlag op een golfbaan wilt meten. De meting is het
mislukt" of "de
gemeten getal
gemeten getal
gemakkelijkst uit te voeren door de vlag te scannen met de functie
afstand kan niet
weer (Doel 1)
weer (Doel 2)
continumeting. Als er zich geen voorwerpen bevinden tussen u en
worden gemeten"
de vlag, geeft de laagste waarde de afstand tot de vlag aan.
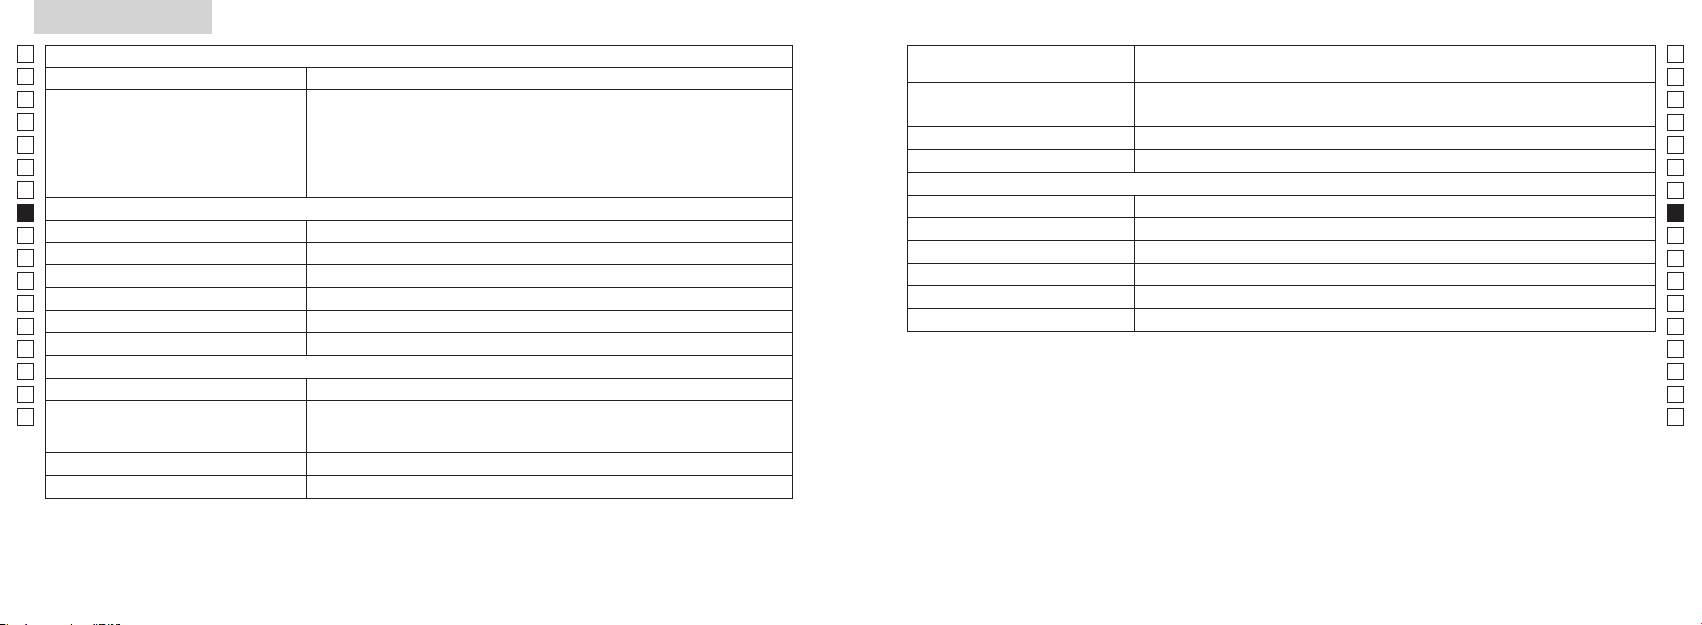
Specificaties
Jp
Meetsysteem
Body: waterdicht (maximale diepte van 1 meter gedurende maximaal 10minuten)*
Jp
Constructie
(Batterijvak: waterbestendig**)
En
Meetbereik
En
Es
Klasse 1M L
Es
Veiligheid
Klasse I L
Fr
Fr
FCC D
De
Afstandsweergave
De
Milieu
It
It
Laser
Se
Se
Optisch systeem
Klasse
Nl
Nl
Vergrotingsfactor (x) 6
(nm) 905
Ru
Ru
ø21
Duur puls (ns) 12
Pt
Pt
Beeldhoek (werkelijk) (˚) 7,5
15
Pl
Pl
Oogafstand (mm) 18,3
Straalafwijking (mrad)
Fi
Fi
Uittredepupil (mm) ø3,5
80 of lager (zonder dauwcondensatie)
No
No
-
1
Aanpassing van de dioptrie ± 4m
Dk
* Waterdichte modellen
Dk
Overig
Deze Nikon laserafstandsmeter is waterdicht, wat inhoudt dat het optisch systeem gegarandeerd schadevrij is te gebruiken tot
Cz
Cz
een diepte van 1 meter gedurende maximaal 10 minuten.
˚C) -10 —
Ro
De Nikon laserafstandsmeter biedt de volgende voordelen:
Ro
1 CR2 lithiumbatterij van 3 V gelijkstroom
Hu
Hu
Voeding
Automatische uitschakeling (als instrument ongeveer 8 sec. niet wordt
omstandigheden en als het regent.
gebruikt).
Afmetingen (L x B x H) (mm) 113 x 70 x 39
De volgende punten zijn van belang voor het gebruik van de Nikon laserafstandsmeter:
Ongeveer 175 gram (zonder batterij)
wordt ondergedompeld. Als er water in het batterijvak is gekomen, verwijdert u het water en laat u het batterijvak goed drogen.
142 143

Overig
Problemen oplossen/Reparatie
Jp
Als uw Nikon laserafstandsmeter moet worden gerepareerd, neem dan contact op met uw plaatselijke dealer of de winkel
Jp
waar u het instrument hebt gekocht. Het is echter zinvol dit pas te doen nadat u de onderstaande tabel met mogelijke
En
En
Dit instrument voldoet aan de normen vastgelegd in deel 15 van de FCC-voorschriften. De werking van het instrument
problemen en oplossingen hebt geraadpleegd.
Es
Es
is afhankelijk van de volgende twee voorwaarden:
Probleem Controlepunten
Fr
(1) Dit instrument mag geen schadelijke interferentie veroorzaken en
Fr
(2) dit instrument moet bestand zijn tegen eventuele interferentie die wordt veroorzaakt door andere apparatuur,
De
●
De
Instrument schakelt niet in
inclusief interferentie die kan leiden tot ongewenst functioneren.
● Controleer of de batterij juist is geplaatst
It
(LCD-venster wordt niet verlicht)
It
● Vervang de batterij.
Se
Se
●
Nl
Uit tests is gebleken dat dit instrument voldoet aan de normen voor een digitaal apparaat van klasse B, conform deel
van de objectieflens niet worden geblokkeerd, bijvoorbeeld door uw vinger of de
Nl
draagriem.
Ru
Ru
zijn opgesteld om een acceptabele bescherming te bieden tegen schadelijke interferentie in een thuisomgeving. Dit
●
De afstand kan niet worden gemeten
Pt
instrument genereert en gebruikt radiogolven en kan radiogolven uitzenden die, bij installatie en gebruik anders dan
Pt
kant van de objectieflens schoon zijn. Reinig de openingen indien nodig.
Pl
● Controleer of de vorm en het materiaal van het doel wel geschikt zijn om de
Pl
een bepaalde omgeving geen interferentie zal optreden. Als dit instrument schadelijke interferentie veroorzaakt in
laserstraal te reflecteren.
Fi
Fi
de ontvangst van radio of televisie, wat kan worden vastgesteld door het instrument uit en in te schakelen, wordt de
● Vervang de batterij.
No
gebruiker aangeraden een of meer van de volgende maatregelen te nemen om deze interferentie op te heffen:
No
● Houd het instrument stil als u een meting uitvoert.
Dk
●
Dk
wordt weergegeven
Cz
Cz
Ro
Het dichtstbijzijnde doel dat zich
Ro
●
binnen het meetbereik bevindt,
Regulations.
Hu
de Nikon laserafstandsmeter en het doel.
Hu
kan niet worden gemeten
●
een bepaalde afstand kan niet
Deze Nikon laserafstandsmeter is een standaard afstandsmeter. Verkregen resultaten kunnen niet als officieel bewijs
de Nikon laserafstandsmeter en het doel.
worden gemeten
worden gebruikt.
● Vervang de batterij.
● Controleer of de vorm en het materiaal van het doel wel geschikt zijn om de
De meetresultaten zijn niet
laserstraal te reflecteren.
consistent
● Houd het instrument stil als u een meting uitvoert.
●
de Nikon laserafstandsmeter en het doel.
144 145
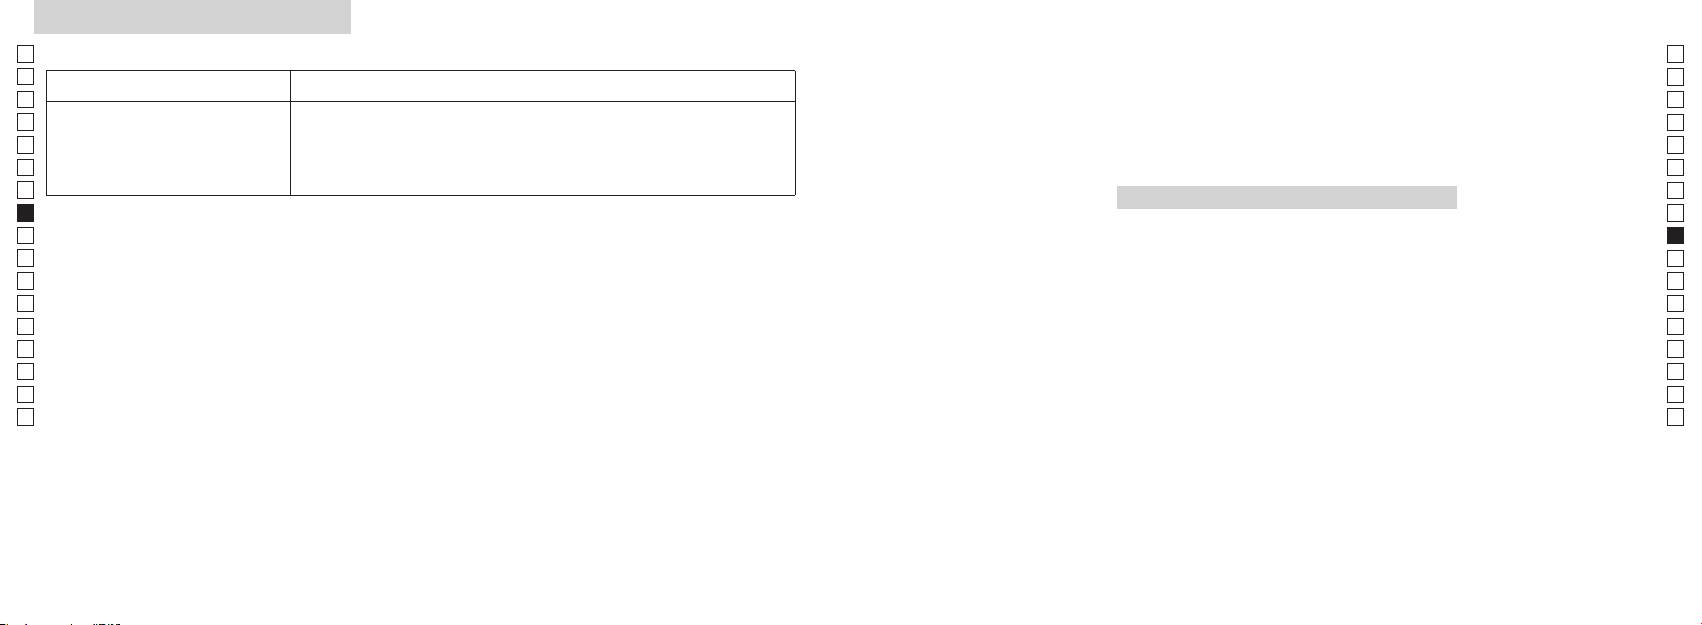
Problemen oplossen/Reparatie
Jp
Jp
En
En
Probleem Controlepunten
Es
Es
● Vervang de batterij.
Fr
Fr
● Controleer of de vorm en het materiaal van het doel wel geschikt zijn om de
De
laserstraal te reflecteren.
De
weergegeven
It
●
It
de Nikon laserafstandsmeter en het doel.
Se
Se
Nl
Als de problemen zich blijven voordoen nadat u de tabel met mogelijke problemen en oplossingen hebt geraadpleegd, neem
Nl
aangezien het apparaat defect kan
Ru
Ru
zijn.
............................................. 148-151
Pt
Pt
dat niet doet, kan dit lichamelijk letsel of beschadiging van het product tot gevolg hebben.
.................................. 152
Pl
Pl
.......................................... 153
Fi
Fi
............................................. 154
No
No
...................... 155
Dk
Dk
Cz
Cz
Ro
Ro
.................................................................... 156
Hu
Hu
........................................................ 157
......................................................... 158-159
.................... 160-161
.......................... 162
................................................................. 163-164
146 147
Jp
Nikon COOLSHOT AS.
Jp
,
En
( )
En
Nikon
Es
, ,
Es
Nikon.
, .
Fr
.
Fr
.
De
.
:
De
〇 ,
It
,
It
,
Se
,
,
Se
.
"
Nl
"
Nl
〇
.
Ru
.
Ru
.
Pt
〇
Nikon
Pt
.
.
.
Pl
,
Pl
,
Fi
Nikon
Fi
.
.
.
No
No
Dk
Dk
,
●
,
Cz
Cz
.
,
;
.
Ro
● , , , (
Ro
.
,
Hu
)
Hu
.
, ,
NIKON VISION CO., LTD.
● NIKON VISION CO., LTD.
.
,
),
.
,
.
,
, ,
,
.
.
148 149
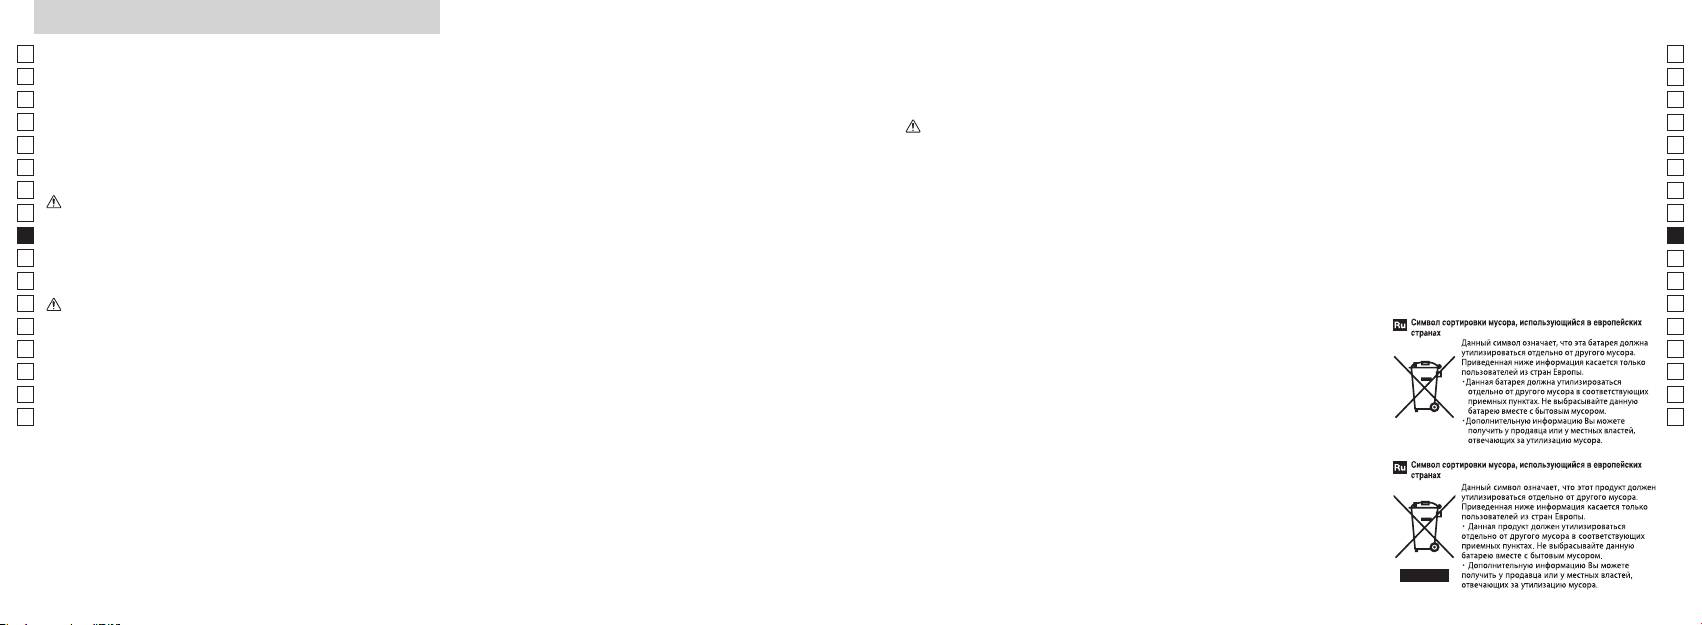
Jp
.
,
Jp
.
En
( )
En
.
.
*
()
Es
,
Es
.
Fr
- .
Fr
,
,
De
De
Nikon
.
.
Nikon,
It
.
,
It
:
:
Se
,
.
.
Se
Nikon
Nl
.
Nl
.
Ru
,
Ru
,
,
.
Pt
.
, .
Pt
,
,
Pl
,
Nikon.
Pl
.
Nikon
.
Fi
.
Fi
,
No
No
,
.
Dk
,
Dk
,
Cz
.
.
.
Cz
. ,
Nikon.
Ro
Ro
,
Hu
Nikon.
Hu
.
.
.
Nikon
.
.
, ,
,
Nikon ,
,
,
,
.
.
Nikon,
.
,
-
.
.
.
150 151
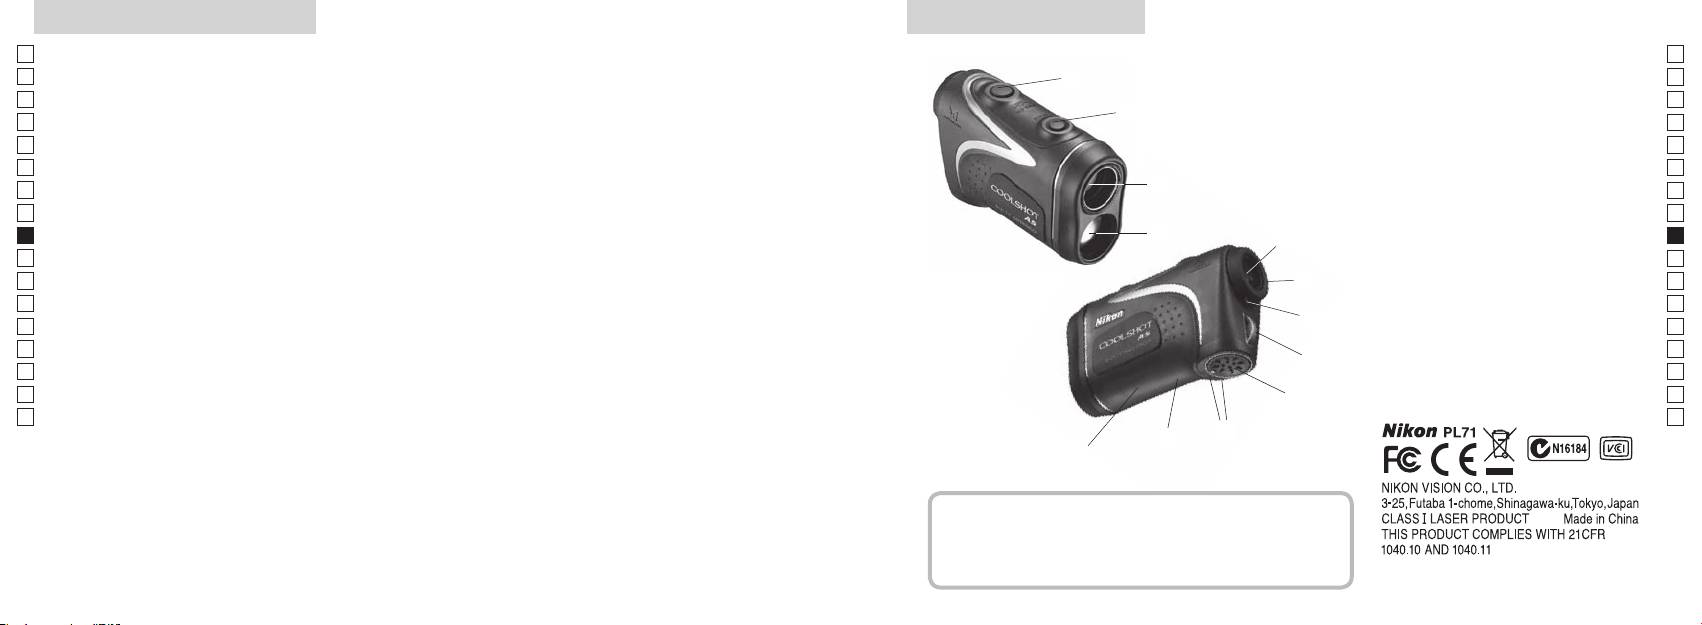
/
Jp
:
Jp
1
En
4
En
Es
Es
, 6-
3
2
Fr
Fr
3
De
De
(
90
4
It
± ).
It
1
Se
Se
:
5 6-
Nl
Nl
Ru
2
5
Ru
6
,
Pt
Pt
Pl
6
7
Pl
..)
Fi
8
Fi
7
No
9
. 8 )
No
!p
Dk
Dk
8
.)
Cz
Cz
!q
Ro
9
Ro
!w FDA
Hu
Hu
!p
!q
!w
Nikon
.
,
.
..........................1 .
........ 1 .
..........1 .
, , ,
(CR2) .................................... 1 .
, .
152 153
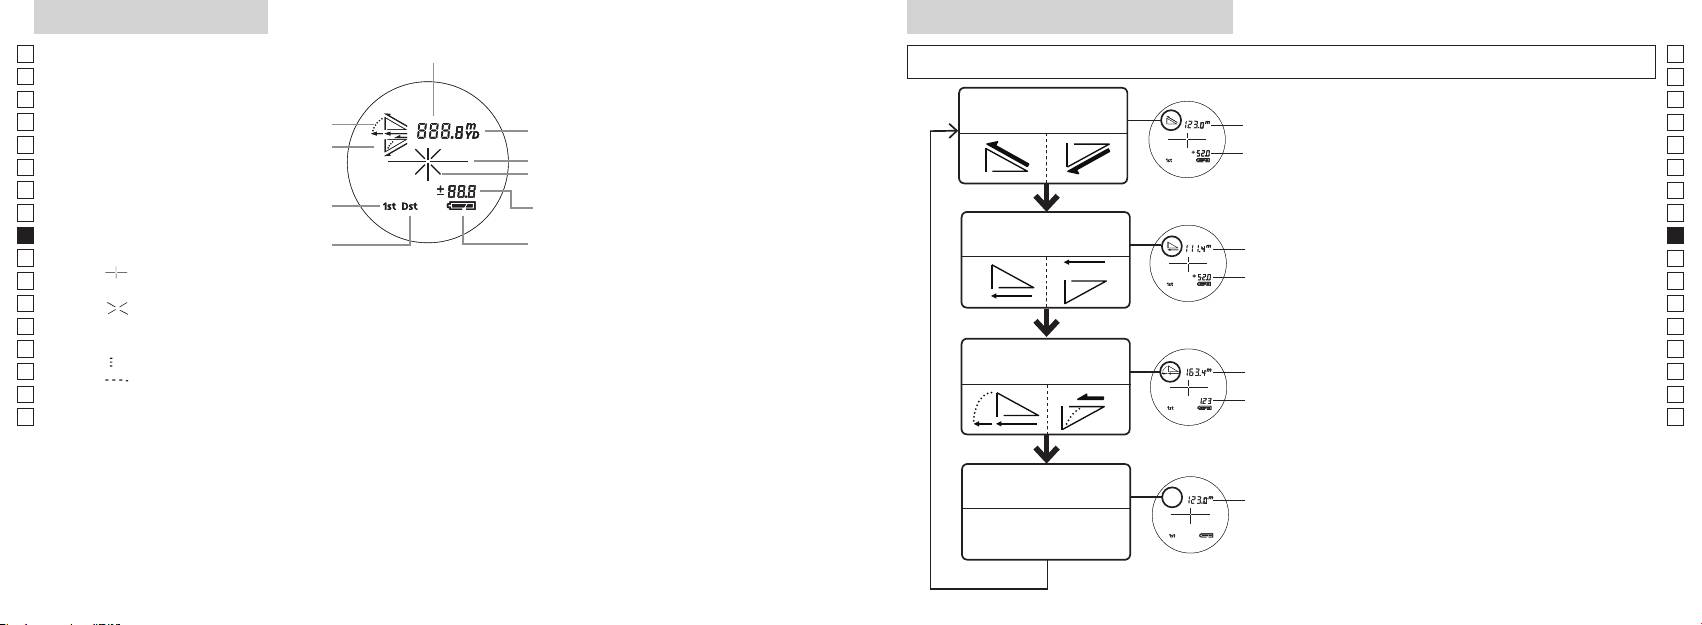
Jp
Jp
En
En
Es
Es
Режим фактического
Fr
расстояния и высоты
Fr
.
De
De
It
It
(
Se
Se
(
0,5 )
Nl
Nl
)
Режим горизонтального
Ru
)
Ru
расстояния и высоты
2 .
Pt
Pt
『 』
Pl
Pl
.
Fi
Fi
『 』 - .
No
.
No
4. 2 3
Dk
Dk
Режим игры в
『
』 -
,
Cz
гольф
Cz
『
』
.
Ro
Ro
*
Hu
* , . ,
,
Hu
.
,
*
. . ,
.
Режим фактического
расстояния
.
*
.
154 155
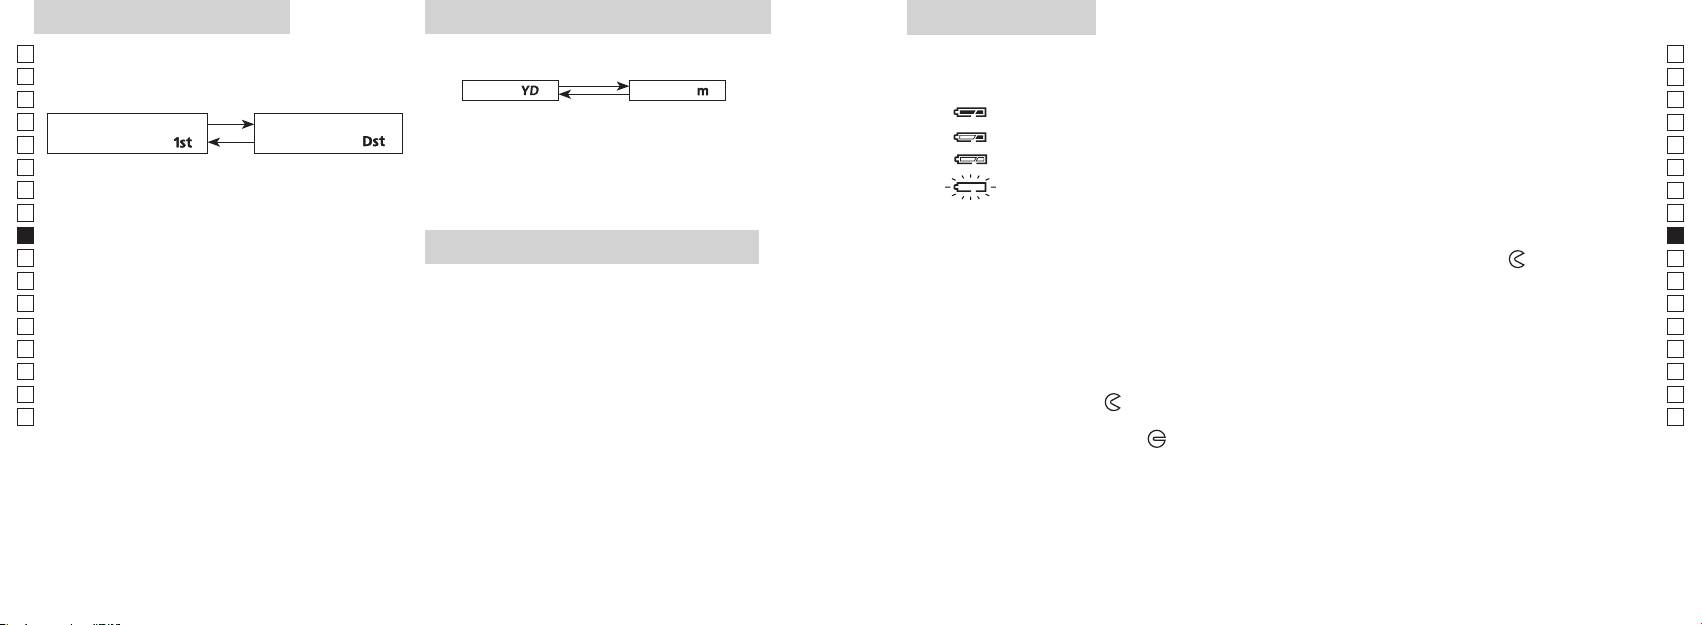
Jp
.
: CR2, 3 , 1 .
Jp
.
( : ).
En
En
( :
[ ]
[ ]
Es
.)
Es
Fr
.
Fr
「
」
「
」
De
De
.
It
It
.
.
Se
3.
: . , ,
Se
. .
Nl
Nl
.
1.
Ru
Ru
( ),
Pt
( 2 ),
,
. -
Pt
Pl
, ,
Pl
.
.
.
Fi
3.
Fi
2.
.
No
2
No
*
.
Dk
.
Dk
*
Cz
(
Cz
2.
).
3.
Ro
Ro
[
*
●
.
Hu
]
.
Hu
( )
,
. - ,
.
,
,
,
—
.
Непрерывная работа: . 13.000 ( . 20 °C)
.. .
* , , .
, .
* (- )
156 157
, .
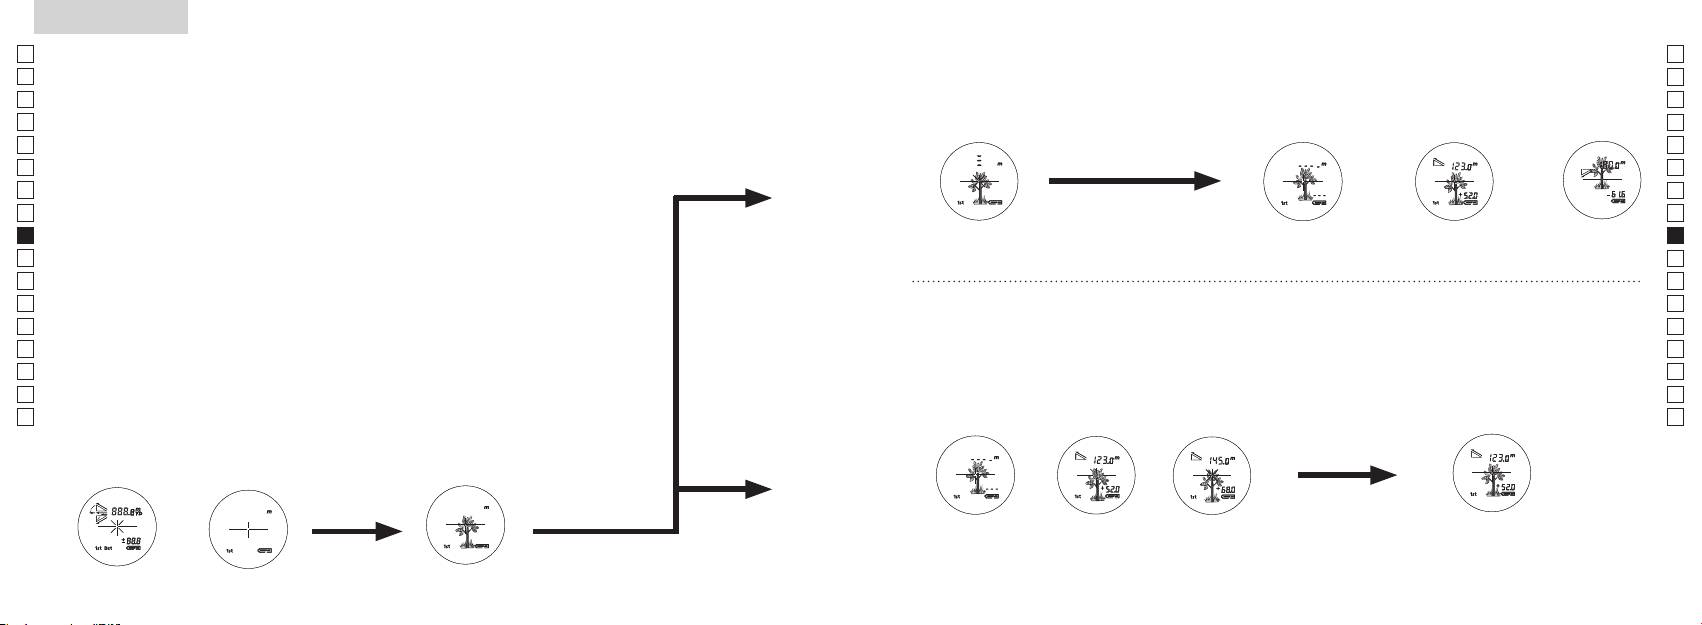
Jp
Jp
En
En
Es
Es
Fr
Fr
De
De
It
It
Se
Se
Nl
Nl
Ru
Ru
Pt
Pt
Pl
Pl
Fi
Fi
No
No
Dk
Dk
Cz
Cz
Ro
Ro
Hu
Hu
158 159
Measurement
1. Press the POWER button for power-on.
(Power turns off 8 seconds after the last
operation.)
Immediately after power-on.
3. Press POWER button once to start single measurement.
4. After measurement, “distance” or “fail to measure” indicator are displayed for 8 seconds, then power turns off. If you press the POWER
button during power-on (while the internal display is lit), another single measurement starts.
unable to measure distance.
3. Keep pressing POWER button to start continuous measurement up to 20 seconds. The internal display shows “distance” and
“fail to measure” indicator alternately.
Note: Laser irradiaton mark is blinking during the measurement.
Note: If you stop pressing the button, the continuous measuremen stops
2. Aim at the target
Positionthetargetatthecenterofthereticle
[Single measurement]
Failure to measure or
unable to measure distance.
[Continuous measurement]
4. After continuous measurement, the measure results are displayed for 8 seconds, then power turns off. If you press the POWER
button during power-on (while the internal display is lit), another measrement starts.
Failure to measure or
Target focusing.
Measuring.
(Initializing)
.
Upward measurement. Downward measurement.
Displays the measured
figure. (Target 1)
Displays the measured figure.
Stand-by.
Displays the measured
figure. (Target 2)
Measurement
1. Press the POWER button for power-on.
(Power turns off 8 seconds after the last
operation.)
Immediately after power-on.
(Initializing)
3. Press POWER button once to start single measurement.
Measuring.
4. After measurement, “distance” or “fail to measure” indicator are displayed for 8 seconds, then power turns off. If you press the POWER
button during power-on (while the internal display is lit), another single measurement starts.
Failure to measure or
unable to measure distance.
Displays the measured
figure. (Target 1)
3. Keep pressing POWER button to start continuous measurement up to 20 seconds. The internal display shows “distance” and
“fail to measure” indicator alternately.
Note: Laser irradiaton mark is blinking during the measurement.
Note: If you stop pressing the button, the continuous measuremen stops
Target focusing.
2. Aim at the target
.
Positionthetargetatthecenterofthereticle
[Single measurement]
Failure to measure or
unable to measure distance.
Upward measurement. Downward measurement.
Displays the measured figure.
[Continuous measurement]
4. After continuous measurement, the measure results are displayed for 8 seconds, then power turns off. If you press the POWER
button during power-on (while the internal display is lit), another measrement starts.
Stand-by.
Displays the measured
figure. (Target 2)
Measurement
1. Press the POWER button for power-on.
(Power turns off 8 seconds after the last
operation.)
Immediately after power-on.
Stand-by.
(Initializing)
2. Aim at the target
.
Positionthetargetatthecenterofthereticle
3. Press POWER button once to start single measurement.
4. After measurement, “distance” or “fail to measure” indicator are displayed for 8 seconds, then power turns off. If you press the POWER
button during power-on (while the internal display is lit), another single measurement starts.
unable to measure distance.
3. Keep pressing POWER button to start continuous measurement up to 20 seconds. The internal display shows “distance” and
“fail to measure” indicator alternately.
Note: Laser irradiaton mark is blinking during the measurement.
Note: If you stop pressing the button, the continuous measuremen stops
[Single measurement]
Failure to measure or
unable to measure distance.
[Continuous measurement]
4. After continuous measurement, the measure results are displayed for 8 seconds, then power turns off. If you press the POWER
button during power-on (while the internal display is lit), another measrement starts.
Failure to measure or
Target focusing.
Measuring.
Upward measurement. Downward measurement.
Displays the measured
figure. (Target 1)
Displays the measured figure.
Displays the measured
figure. (Target 2)
— , ,
【
】
, .
3.
1.
) .
2.
, .
3.
.
.
,
【
】
, .
.
4.
( , ,
).
*
. .
.
.
. 8 ))
.
()
Measurement
1. Press the POWER button for power-on.
(Power turns off 8 seconds after the last
operation.)
Immediately after power-on.
Stand-by.
(Initializing)
2. Aim at the target
.
Positionthetargetatthecenterofthereticle
Target focusing.
[Single measurement]
3. Press POWER button once to start single measurement.
Measuring.
4. After measurement, “distance” or “fail to measure” indicator are displayed for 8 seconds, then power turns off. If you press the POWER
button during power-on (while the internal display is lit), another single measurement starts.
Failure to measure or
Upward measurement. Downward measurement.
unable to measure distance.
Displays the measured figure.
[Continuous measurement]
3. Keep pressing POWER button to start continuous measurement up to 20 seconds. The internal display shows “distance” and
“fail to measure” indicator alternately.
Note: Laser irradiaton mark is blinking during the measurement.
Note: If you stop pressing the button, the continuous measuremen stops
Failure to measure or
unable to measure distance.
4. After continuous measurement, the measure results are displayed for 8 seconds, then power turns off. If you press the POWER
button during power-on (while the internal display is lit), another measrement starts.
Displays the measured
figure. (Target 1)
Displays the measured
figure. (Target 2)
Measurement
1. Press the POWER button for power-on.
(Power turns off 8 seconds after the last
operation.)
Immediately after power-on.
Stand-by.
(Initializing)
2. Aim at the target
.
Positionthetargetatthecenterofthereticle
Target focusing.
[Single measurement]
3. Press POWER button once to start single measurement.
Measuring.
4. After measurement, “distance” or “fail to measure” indicator are displayed for 8 seconds, then power turns off. If you press the POWER
button during power-on (while the internal display is lit), another single measurement starts.
Failure to measure or
Upward measurement. Downward measurement.
unable to measure distance.
Displays the measured figure.
[Continuous measurement]
3. Keep pressing POWER button to start continuous measurement up to 20 seconds. The internal display shows “distance” and
“fail to measure” indicator alternately.
Note: Laser irradiaton mark is blinking during the measurement.
Note: If you stop pressing the button, the continuous measuremen stops
Failure to measure or
unable to measure distance.
Displays the measured
figure. (Target 1)
4. After continuous measurement, the measure results are displayed for 8 seconds, then power turns off. If you press the POWER
button during power-on (while the internal display is lit), another measrement starts.
Displays the measured
figure. (Target 2)
Measurement
1. Press the POWER button for power-on.
(Power turns off 8 seconds after the last
operation.)
Immediately after power-on.
Stand-by.
(Initializing)
2. Aim at the target
.
Positionthetargetatthecenterofthereticle
Target focusing.
[Single measurement]
3. Press POWER button once to start single measurement.
Measuring.
4. After measurement, “distance” or “fail to measure” indicator are displayed for 8 seconds, then power turns off. If you press the POWER
button during power-on (while the internal display is lit), another single measurement starts.
Failure to measure or
unable to measure distance.
3. Keep pressing POWER button to start continuous measurement up to 20 seconds. The internal display shows “distance” and
“fail to measure” indicator alternately.
Note: Laser irradiaton mark is blinking during the measurement.
Note: If you stop pressing the button, the continuous measuremen stops
Failure to measure or
unable to measure distance.
[Continuous measurement]
4. After continuous measurement, the measure results are displayed for 8 seconds, then power turns off. If you press the POWER
button during power-on (while the internal display is lit), another measrement starts.
Upward measurement. Downward measurement.
Displays the measured
figure. (Target 1)
Displays the measured figure.
Displays the measured
figure. (Target 2)
Measurement
1. Press the POWER button for power-on.
(Power turns off 8 seconds after the last
operation.)
Immediately after power-on.
Stand-by.
(Initializing)
2. Aim at the target
.
Positionthetargetatthecenterofthereticle
Target focusing.
[Single measurement]
3. Press POWER button once to start single measurement.
Measuring.
4. After measurement, “distance” or “fail to measure” indicator are displayed for 8 seconds, then power turns off. If you press the POWER
button during power-on (while the internal display is lit), another single measurement starts.
unable to measure distance.
3. Keep pressing POWER button to start continuous measurement up to 20 seconds. The internal display shows “distance” and
“fail to measure” indicator alternately.
Note: Laser irradiaton mark is blinking during the measurement.
Note: If you stop pressing the button, the continuous measuremen stops
unable to measure distance.
4. After continuous measurement, the measure results are displayed for 8 seconds, then power turns off. If you press the POWER
button during power-on (while the internal display is lit), another measrement starts.
[Continuous measurement]
Failure to measure or
Failure to measure or
Upward measurement. Downward measurement.
Displays the measured
figure. (Target 1)
Displays the measured figure.
Displays the measured
figure. (Target 2)
Measurement
1. Press the POWER button for power-on.
(Power turns off 8 seconds after the last
operation.)
Immediately after power-on.
Stand-by.
(Initializing)
2. Aim at the target
.
Positionthetargetatthecenterofthereticle
Target focusing.
[Single measurement]
3. Press POWER button once to start single measurement.
4. After measurement, “distance” or “fail to measure” indicator are displayed for 8 seconds, then power turns off. If you press the POWER
button during power-on (while the internal display is lit), another single measurement starts.
unable to measure distance.
3. Keep pressing POWER button to start continuous measurement up to 20 seconds. The internal display shows “distance” and
“fail to measure” indicator alternately.
Note: Laser irradiaton mark is blinking during the measurement.
Note: If you stop pressing the button, the continuous measuremen stops
unable to measure distance.
4. After continuous measurement, the measure results are displayed for 8 seconds, then power turns off. If you press the POWER
button during power-on (while the internal display is lit), another measrement starts.
[Continuous measurement]
Failure to measure or
Failure to measure or
Measuring.
Upward measurement. Downward measurement.
Displays the measured
figure. (Target 1)
Displays the measured figure.
Displays the measured
figure. (Target 2)
Measurement
1. Press the POWER button for power-on.
(Power turns off 8 seconds after the last
operation.)
Immediately after power-on.
Stand-by.
(Initializing)
2. Aim at the target
.
Positionthetargetatthecenterofthereticle
Target focusing.
[Single measurement]
3. Press POWER button once to start single measurement.
Measuring.
4. After measurement, “distance” or “fail to measure” indicator are displayed for 8 seconds, then power turns off. If you press the POWER
button during power-on (while the internal display is lit), another single measurement starts.
unable to measure distance.
3. Keep pressing POWER button to start continuous measurement up to 20 seconds. The internal display shows “distance” and
“fail to measure” indicator alternately.
Note: Laser irradiaton mark is blinking during the measurement.
Note: If you stop pressing the button, the continuous measuremen stops
unable to measure distance.
4. After continuous measurement, the measure results are displayed for 8 seconds, then power turns off. If you press the POWER
button during power-on (while the internal display is lit), another measrement starts.
[Continuous measurement]
Failure to measure or
Failure to measure or
Upward measurement. Downward measurement.
Displays the measured
figure. (Target 1)
Displays the measured figure.
Displays the measured
figure. (Target 2)
Measurement
1. Press the POWER button for power-on.
(Power turns off 8 seconds after the last
operation.)
Immediately after power-on.
Stand-by.
(Initializing)
2. Aim at the target
.
Positionthetargetatthecenterofthereticle
Target focusing.
[Single measurement]
3. Press POWER button once to start single measurement.
Measuring.
4. After measurement, “distance” or “fail to measure” indicator are displayed for 8 seconds, then power turns off. If you press the POWER
button during power-on (while the internal display is lit), another single measurement starts.
Failure to measure or
unable to measure distance.
Displays the measured
figure. (Target 1)
3. Keep pressing POWER button to start continuous measurement up to 20 seconds. The internal display shows “distance” and
“fail to measure” indicator alternately.
Note: Laser irradiaton mark is blinking during the measurement.
Note: If you stop pressing the button, the continuous measuremen stops
Failure to measure or
unable to measure distance.
Upward measurement. Downward measurement.
Displays the measured figure.
[Continuous measurement]
4. After continuous measurement, the measure results are displayed for 8 seconds, then power turns off. If you press the POWER
button during power-on (while the internal display is lit), another measrement starts.
Displays the measured
figure. (Target 2)
Measurement
1. Press the POWER button for power-on.
(Power turns off 8 seconds after the last
operation.)
Immediately after power-on.
Stand-by.
(Initializing)
2. Aim at the target
.
Positionthetargetatthecenterofthereticle
Target focusing.
[Single measurement]
3. Press POWER button once to start single measurement.
Measuring.
4. After measurement, “distance” or “fail to measure” indicator are displayed for 8 seconds, then power turns off. If you press the POWER
button during power-on (while the internal display is lit), another single measurement starts.
Failure to measure or
unable to measure distance.
3. Keep pressing POWER button to start continuous measurement up to 20 seconds. The internal display shows “distance” and
“fail to measure” indicator alternately.
Note: Laser irradiaton mark is blinking during the measurement.
Note: If you stop pressing the button, the continuous measuremen stops
Failure to measure or
unable to measure distance.
[Continuous measurement]
4. After continuous measurement, the measure results are displayed for 8 seconds, then power turns off. If you press the POWER
button during power-on (while the internal display is lit), another measrement starts.
Upward measurement. Downward measurement.
Displays the measured
figure. (Target 1)
Displays the measured figure.
Displays the measured
figure. (Target 2)
4.
, (
), .
.
3.
4.
( )
. 8 , .
)
, (
*
),
.
.
*
.
,
, .
( 1)
( 2)
,
, .
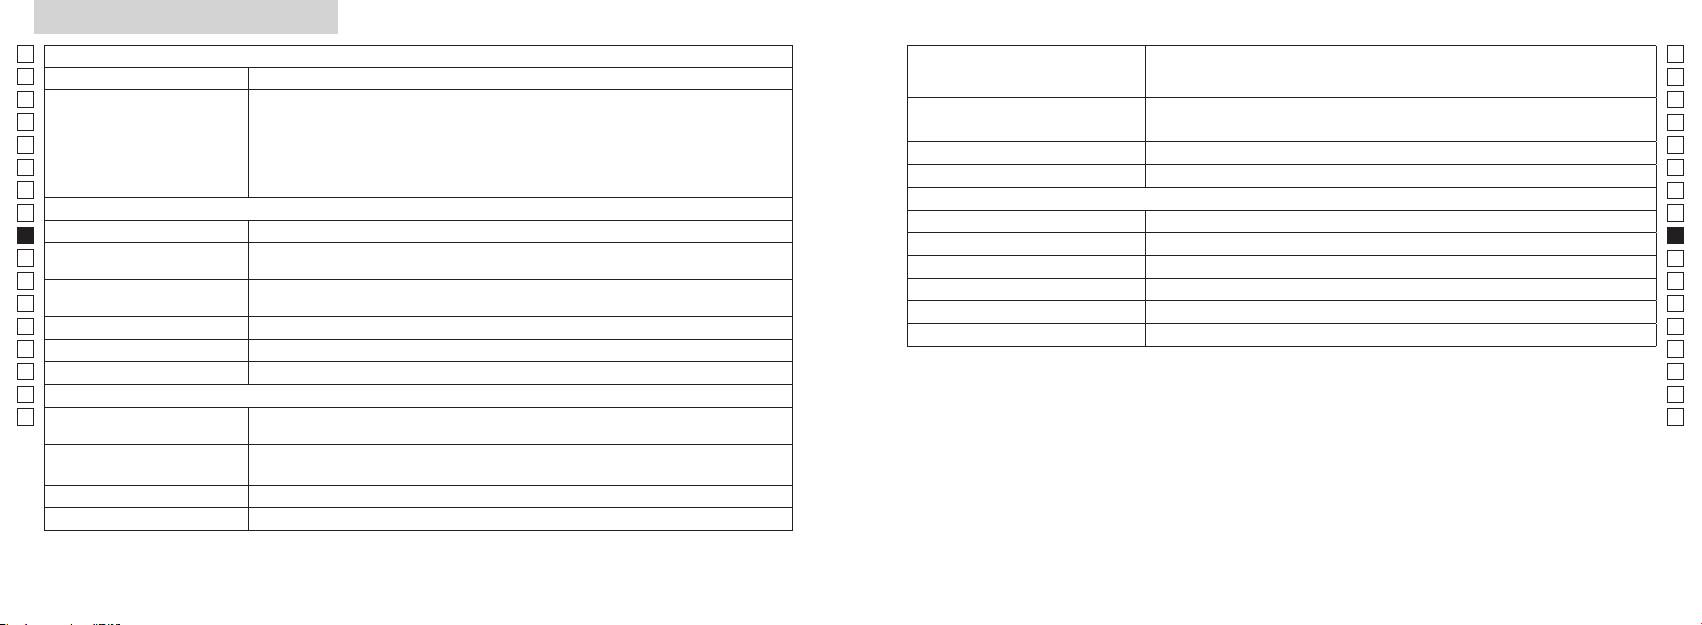
Jp
: ( 1
Jp
10 )*
En
En
( : **)
Es
Es
Fr
( 3- ):
Fr
,
De
De
()
( 4- ):
FCC 15
It
( 3- ):
It
Se
Se
Nl
Nl
6
Ru
Ru
() 905
Pt
ø21
Pt
()
() 12
Pl
Pl
() 15
7,5
Fi
() (˚)
Fi
() : 0,25
No
() 18,3
No
(%) 80 ( )
Dk
() ø3,5
Dk
*
Cz
-
1
±4
Nikon ; ,
Cz
1 10 .
Ro
Ro
Nikon :
Hu
Hu
(˚C)
.
CR2 (3 . ), 1 .
Nikon, :
113 x 70 x 39
() . 175 ( )
. , .
160 161
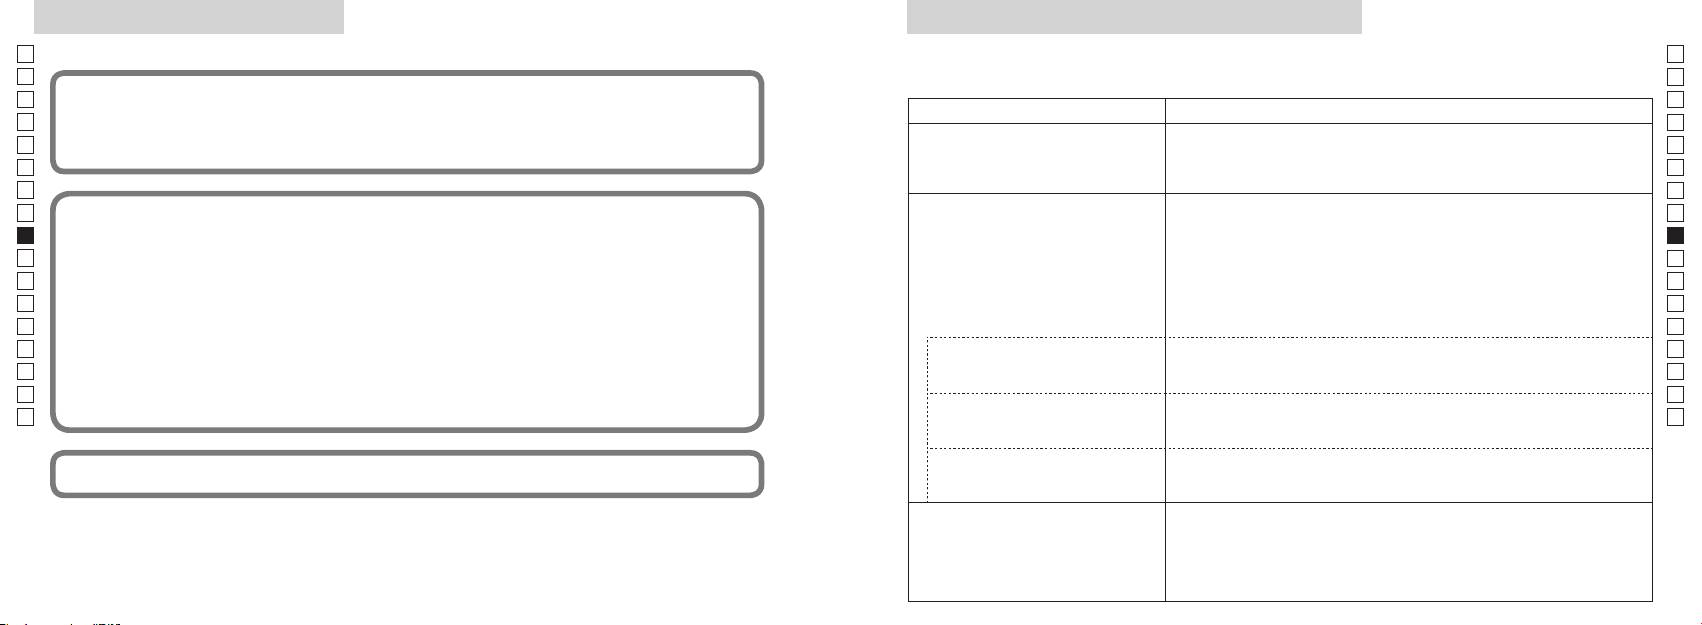
/P
Jp
Jp
En
En
Es
Es
:
Fr
(1) ;
Fr
(2) , ,
●
De
De
( , )
.
It
( )
● ,
It
● .
Se
Se
Nl
B
●
Nl
Ru
.
Ru
. ,
●
Pt
,
Pt
.
.
Pl
.
Pl
●
Fi
Fi
, , ,
.
No
:
● .
No
Dk
● .
Dk
●
Cz
Cz
Ro
B ,
Ro
Hu
●
Hu
,
(, ).
.
●
,
.
(, ).
● .
●
.
● .
●
(, ).
162 163
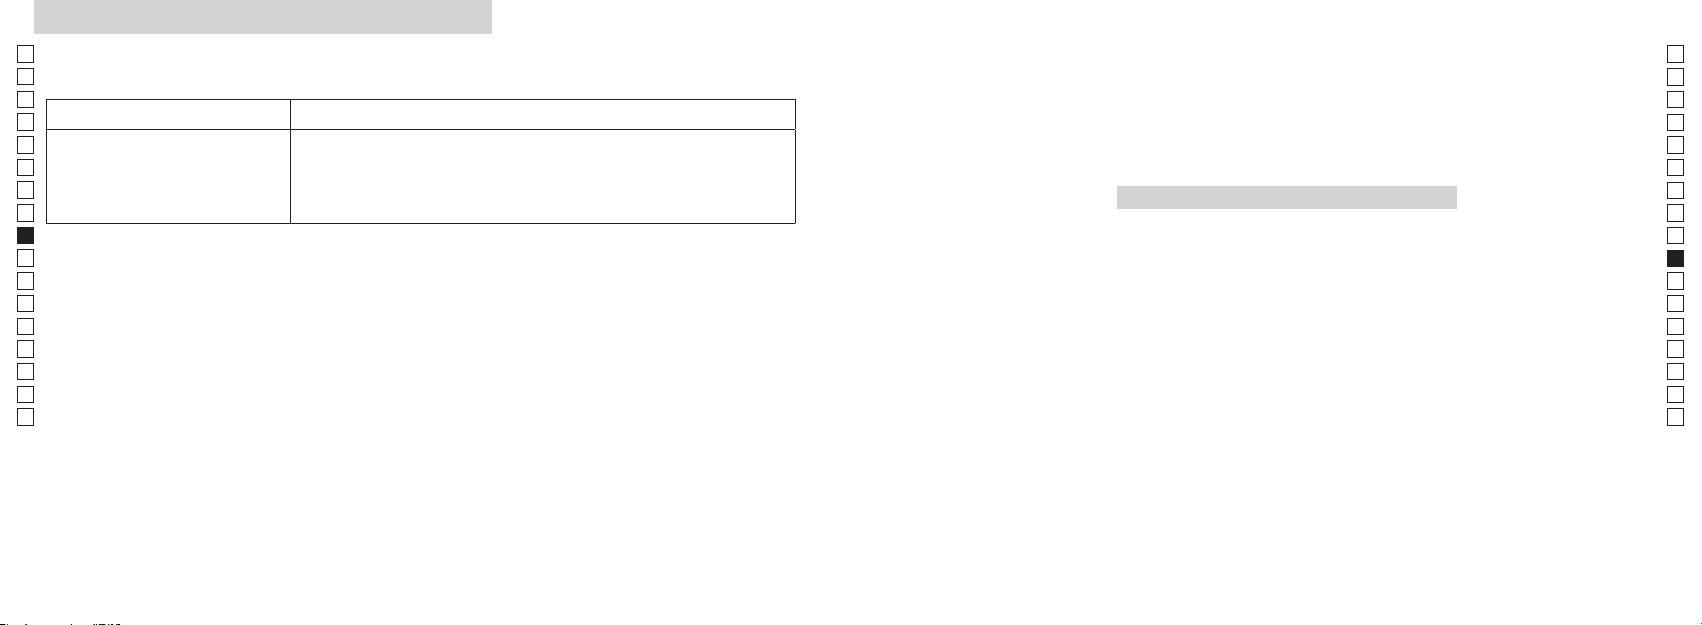
/
Jp
Jp
En
En
Es
Es
Fr
Fr
De
● .
De
Português brasileiro
●
It
It
.
Se
●
Se
CONTEÚDO
(, ).
Nl
Nl
Cuidados antes do uso ................................... 166-169
Ru
Ru
.......................................... 170
Pt
, ,
Pt
.
................................... 171
Pl
Pl
Visor interno ................................................................. 172
Fi
.
Fi
.............................. 173
No
No
Dk
Dk
.. 174
Cz
Cz
Troca da pilha ............................................................... 175
Ro
Ro
................................................................ 176-177
Hu
Hu
..................................................... 178-179
Outros ............................................................................. 180
...................... 181-182
164 165
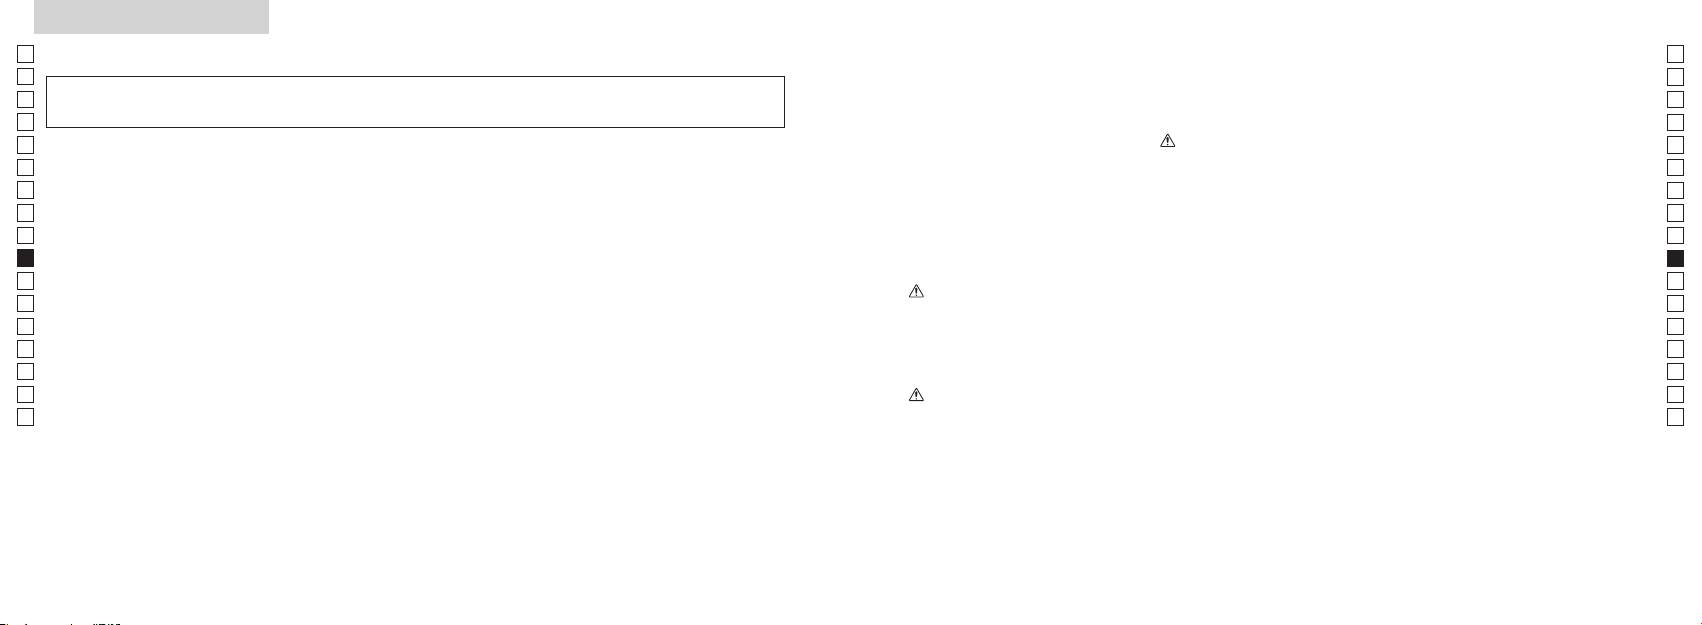
Cuidados antes do uso
Jp
Obrigado por comprar o Telêmetro a Laser COOLSHOT AS da Nikon.
Por favor, siga rigorosamente as
PRECAUÇÕES DE SEGURANÇA
Jp
orientações a seguir, para que
Nikon guardado fora do alcance de
En
(Laser)
En
possa usar o equipamento de
crianças.
O Telêmetro a Laser Nikon emite um
Es
O uso de controles e ajustes ou a execução de procedimentos que não aqueles
Es
forma adequada e evitar
raio laser invisível. Certique-se de que
especificados nestas instruções podem resultar em exposição a radiações perigosas.
Fr
Nikon for danificado ou se este
problemas potencialmente
observa o que segue:
Fr
emitir um som estranho devido à
De
perigosos. Antes de usar este
Advertência
De
〇
queda ou por outra causa, retire
produto, leia atentamente os
It
imediatamente a pilha e pare de
It
sobre o uso correto, que acompanham o produto.
"Cuidados antes do uso" e as
enquanto estiver olhando
Se
usá-lo.
para dentro da óptica do lado da
Se
〇
instruções sobre o uso correto,
objetiva. A falha em fazer isto é poder
Nl
que acompanham o produto.
Nl
〇
afetar negativamente ou danificar os
Mantenha este manual à mão
Ru
em um problema sério.
Ru
olhos.
para fácil consulta.
Pt
Pt
Pl
Pl
ADVERTÊNCIA
●
Fi
Fi
efeito um outro instrumento óptico,
●
No
de que qualquer uso inadequado,
como lentes ou binóculos, e nem
No
ignorando o conteúdo descrito neste
com o olho desprotegido. Isso pode
Dk
Dk
● A NIKON VISION CO., LTD. se reserve o direito de alterar o conteúdo descrito nesses manuais em
documento, pode potencialmente
Cz
qualquer altura e sem aviso prévio.
ha os
Cz
Ro
CUIDADO
Ro
Hu
Hu
acidental do raio laser.
de que qualquer uso inadequado,
ignorando o conteúdo descrito neste
documento, pode potencialmente
período prolongado, retire a pilha do
corpo.
materiais.
o Telêmetro a Laser Nikon. O laser
emitido pode ser prejudicial à
sua saúde. Um produto que foi
fabricante.
166 167
Cuidados antes do uso
Jp
PRECAUÇÕES DE SEGURANÇA
PRECAUÇÕES DE SEGURANÇA
PRECAUÇÕES DE SEGURANÇA
CUIDADOS E MANUTENÇÃO
Armazenagem
Jp
para embalar este produto ou
En
(Monóculo)
(Pilha de lítio)
Cuidados
Lentes
En
outras peças pequenas fora do
ou bolor na superfície da lente
Es
O Telêmetro a Laser Nikon usa um
Se manuseada incorretamente,
alcance de crianças.
Es
superfície da lente, use uma
monóculo no seu sistema óptico de
a pilha pode romper-se e vazar,
Fr
projetado para uso submerso.
escova macia isenta de óleo.
guarde o Telêmetro a Laser Nikon
Fr
modo a mirar o alvo. Certique-se
corroendo o equipamento e
a viseira de borracha ou peças
em local fresco e seco.
De
de que observa o que segue:
manchando roupas.
De
pequenas, etc. na boca. Se uma
removidas da superfície do corpo
Após o uso em um dia chuvoso ou à
Advertência
Certifique-se de que observa o que
It
criança engolir estas peças, consulte
do telêmetro assim que possível,
superfície das lentes, limpe as
noite, limpe-o cuidadosamente à
It
segue:
imediatamente um médico.
Se
usando-se um pano macio, limpo.
lentes suavemente com um pano
temperatura ambiente e guarde-o
Se
diretamente para o sol ou para o
em local fresco e seco.
Nl
raio laser, ao usar o telęmetro a
Nl
usadas por um longo período de
Nikon no carro em um dia quente
papel de boa qualidade e isento
Laser Nikon.
Ru
tempo, algumas pessoas podem
Ru
ou ensolarado, ou perto de
de óleo para limpar lentes. Use
vazia ou durante longos períodos
Cuidados
Pt
equipamento gerador de calor.
uma pequena quantidade de
Pt
ocorrer qualquer sintoma, consulte
Isto pode danificá-lo ou afetá-lo de
Pl
Pl
imediatamente um médico.
forma negativa.
terminal do compartimento da pilha.
Fi
.
Fi
junto com chaves ou
Nikon, guarde-o no estojo macio.
No
exposto à luz solar direta. Os raios
tecido comum, pois podem
moedas em um bolso ou bolsa, pois
No
caminhar. A falha em observar
ultravioleta e o calor excessivo
arranhar a superfície das lentes.
Dk
pode curto-circuitar ou provocar
Dk
podem afetá-lo negativamente ou
Se o pano tiver sido usado para
superaquecimento.
Cz
funcionamento como resultado
interrompa imediatamente o seu
até mesmo danificar a unidade.
Cz
de bater em algo, acertar outras
uso e consulte o seu distribuidor
usado novamente para a
Ro
chamas. Nunca desmonte a pilha.
Ro
pessoas, cair ou outros acidentes.
exposto a mudanças bruscas
superfície da lente.
Hu
Hu
de temperatura, pode ocorrer
Corpo principal
fazer com que acerte outras
entrar em contato com o vestuário
ou a pele, enxágue imediatamente
com um pano macio e limpo,
com muita água. Se o líquido de
depois de soprar ligeiramente a
local instável. A falha em observar
pilhas danificadas entrar nos olhos,
isto pode resultar em que ele caia
enxágue imediatamente com água
use benzeno, solvente ou outros
limpa e, em seguida, consulte um
agentes de limpeza que
ou mau funcionamento.
médico.
contenham solventes orgânicos.
* Um soprador é um equipamento
regulamentos da sua área local.
de limpeza de borracha que
sopra ar por um bocal.
168 169

Principais características Nomenclatura/Composição
Jp
As seguintes condições facilitam a medição:
Jp
1
En
4
En
Es
Es
revestimento multi-camada
3
2
Fr
Fr
3
De
De
(distância horizontal ± altura), o que ajuda muito na prática
aprox. 90 graus
4
It
do golf
It
5Óculo monocular 6x
A medição pode resultar em inexatidão ou falha nos
1
Se
Se
seguintes casos:
6
Nl
Nl
7 Índice de dioptria
Ru
alvo, podendo ser selecionado conforme o alvo
2
5
8 Olhal da alça
Ru
Pt
9 Tampa do compartimento da pilha
Pt
Pl
espelho, etc.)
6
!p
Pl
aproximadamente 8 seg. sem uso)
Fi
Fechar") do compartimento da pilha
Fi
7
No
!q
No
com chuva (NÃO projetado para uso submerso)
!w
Dk
Dk
8
Cz
Cz
Ro
O Telêmetro a Laser Nikon emite um raio laser invisível
9
Ro
para medição. Mede o tempo que o raio laser demora a
Hu
Hu
percorrer a distância do telêmetro ao alvo e o inverso. Os
!p
resultados da refletividade e da medição podem variar
!q
de acordo com as condições climáticas e ambientais, bem
!w
como a cor, o acabamento da superfície, o tamanho, forma
e outras características do alvo.
Composição
................................... x1
................ x1
.....................x1
...........x1
170 171
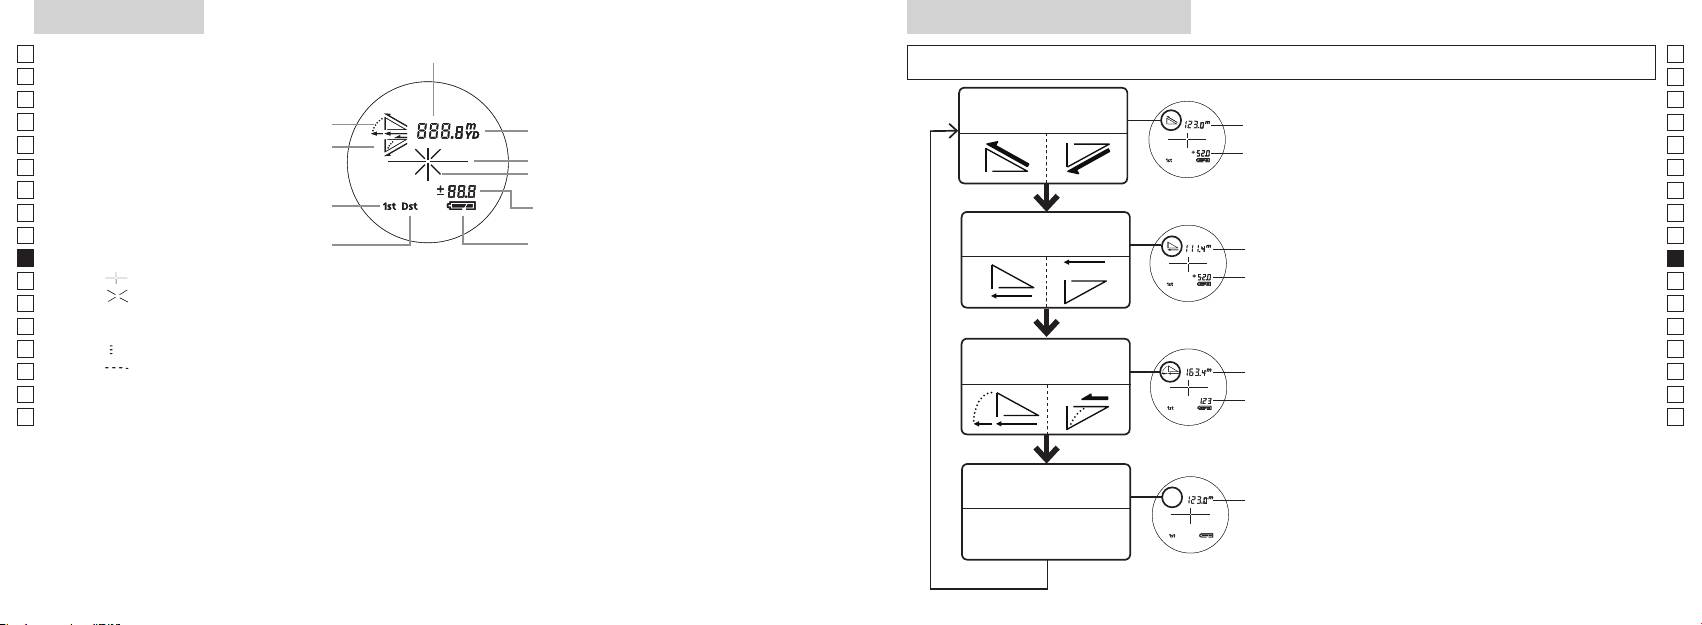
Visor interno
Modo de exibição da medição
Jp
Distância
Jp
de 2 segundos) para comutar o modo na ordem indicada em baixo.
En
En
Es
Es
Distância real e
1. Ligue a energia (confirme se o visor interno
Distância
Fr
Inclinar para cima
modo de altura
Fr
está ligado).
real
De
Inclinar para baixo
De
Marca do alvo
Altura
imediatamente a seguir (em menos que 0,5
It
It
segundo
Se
Se
Altura
Modo de prioridade de primeiro alvo
Nl
(Distância real no ajuste Modo golf)
Nl
Distância horizontal
Ru
Distância
Ru
Modo de prioridade de alvo distante
e modo de altura
horizontal
Pt
Pt
4. Repita os passos 2 e 3 até que o seu modo
Pl
『 』
Altura
Pl
desejado seja exibido.
『 』
Fi
Fi
*
No
Distância
No
Dk
ajustada
『
』 - Medindo agora
*
Dk
Modo golf
pelo
『
converte os resultados para o novo modo.
Cz
』
Cz
declive:
*
Depois que o modo estiver ajustado, as
Ro
Ro
Distância
Hu
real
Hu
mais avançada tecnologia, é impossível eliminar completamente o pó. Como resultado, pode ser
Modo de distância
Distância
real
real
172 173
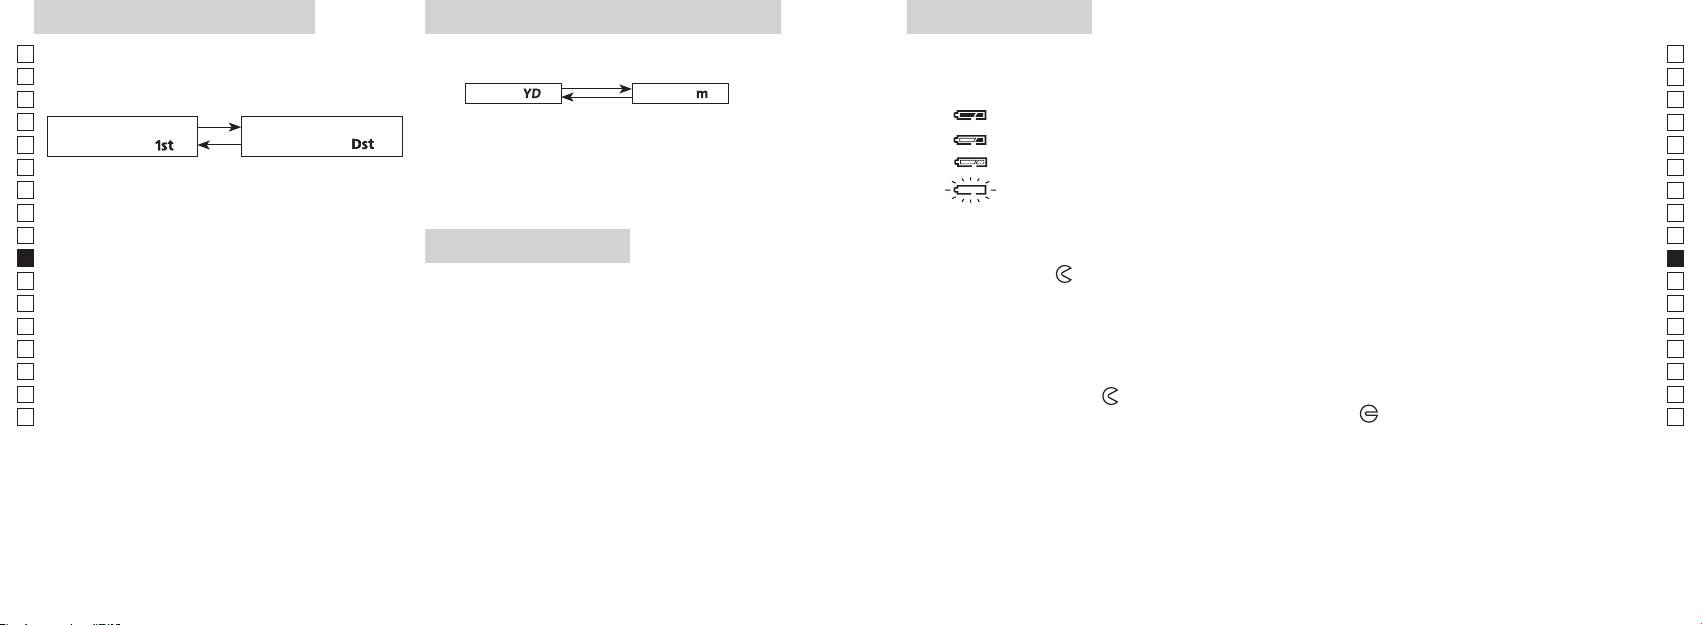
Modo de prioridade de alvo
Unidades de visualização de distância
Troca da pilha
Jp
Jp
Tipo de pilha:
(O ajuste default de fábrica é jardas.)
En
Indicadores de carga remanescente da pilha
En
distante (O ajuste default de fábrica é o Modo prioridade
[ ]
Metro [ ]
Es
* A marca de estado da pilha no visor interno avisa quando a pilha tem de ser trocada.
Es
de primeiro alvo).
1. Ligue a energia (confirme se o visor interno está ligado).
Fr
Fr
Modo de prioridade de
Modo de prioridade de
De
primeiro alvo「
」
alvo distante
「
」
De
It
1. Ligue a energia (confirme se o visor interno está
: Carga da pilha está baixa. A pilha deve ser substituída por uma nova.
It
ligado).
Se
Se
convertidos e exibidos na unidade de medida que você
Nl
Nl
selecionou.
Ru
dentro de 0,5 segundos.
Ru
1. Abra a tampa do compartimento da pilha
Pt
LED de iluminação
Usando a ponta do polegar, etc na parte rebaixada do compartimento da pilha, gire a tampa seguindo
Pt
(mais de 2 segundos) até que sejam comutados os
o indicador
Pl
1. Ligue a energia (confirme se o visor interno está ligado).
Pl
2. Substitua a pilha velha por uma nova
Fi
de Alvo Distante.
Fi
No
No
ligado ou desligado (ON e OFF).
*
Dk
*
Dk
funciona.
escuras para ver o painel LCD.
Cz
*
Cz
3. Feche a tampa do compartimento da pilha
*
Ro
[
Alinhe o indicador
com o indicador
●
e insira a tampa do compartimento da pilha. Usando a
Ro
Distante]
Hu
estará desligada quando o telêmetro a laser for
ponta do polegar, etc., gire a tampa seguindo o indicador
Hu
novamente ligado.
está firmemente fechada.
Vida da pilha
distância do objeto mais afastado.
Operação contínua: Aprox. 13.000 vezes (a aprox. 20°C)
etc. do alvo. Use somente como referência.
descarga elétrica natural, a vida desta pilha provavelmente será mais curta do que a apontada acima.
a seguir.
174 175
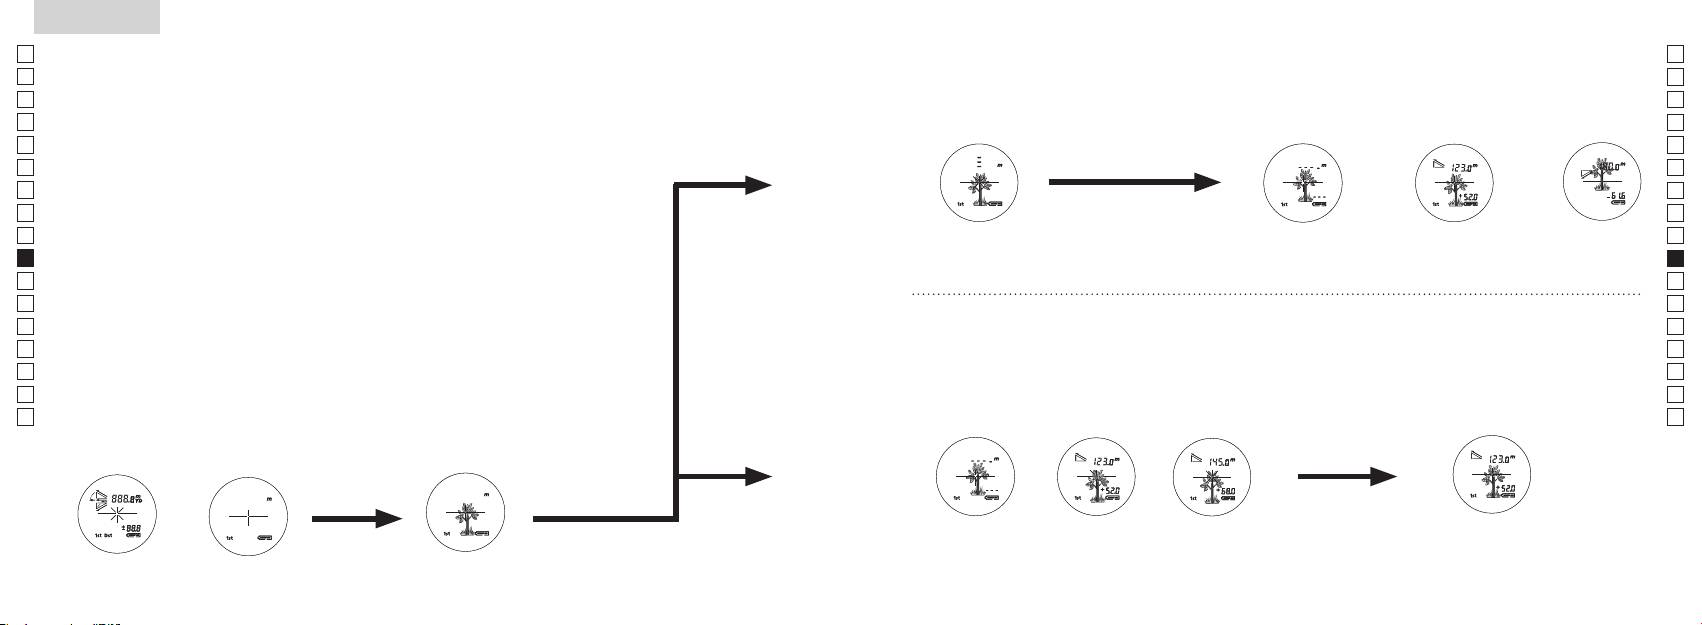
Jp
Jp
En
En
Es
Es
Fr
Fr
De
De
It
It
Se
Se
Nl
Nl
Ru
Ru
Pt
Pt
Pl
Pl
Fi
Fi
No
No
Dk
Dk
Cz
Cz
Ro
Ro
Hu
Hu
176 177
Measurement
1. Press the POWER button for power-on.
(Power turns off 8 seconds after the last
operation.)
Immediately after power-on.
3. Press POWER button once to start single measurement.
4. After measurement, “distance” or “fail to measure” indicator are displayed for 8 seconds, then power turns off. If you press the POWER
button during power-on (while the internal display is lit), another single measurement starts.
unable to measure distance.
3. Keep pressing POWER button to start continuous measurement up to 20 seconds. The internal display shows “distance” and
“fail to measure” indicator alternately.
Note: Laser irradiaton mark is blinking during the measurement.
Note: If you stop pressing the button, the continuous measuremen stops
2. Aim at the target
Positionthetargetatthecenterofthereticle
[Single measurement]
Failure to measure or
unable to measure distance.
[Continuous measurement]
4. After continuous measurement, the measure results are displayed for 8 seconds, then power turns off. If you press the POWER
button during power-on (while the internal display is lit), another measrement starts.
Failure to measure or
Target focusing.
Measuring.
(Initializing)
.
Upward measurement. Downward measurement.
Displays the measured
figure. (Target 1)
Displays the measured figure.
Stand-by.
Displays the measured
figure. (Target 2)
Measurement
1. Press the POWER button for power-on.
(Power turns off 8 seconds after the last
operation.)
Immediately after power-on.
(Initializing)
3. Press POWER button once to start single measurement.
Measuring.
4. After measurement, “distance” or “fail to measure” indicator are displayed for 8 seconds, then power turns off. If you press the POWER
button during power-on (while the internal display is lit), another single measurement starts.
Failure to measure or
unable to measure distance.
Displays the measured
figure. (Target 1)
3. Keep pressing POWER button to start continuous measurement up to 20 seconds. The internal display shows “distance” and
“fail to measure” indicator alternately.
Note: Laser irradiaton mark is blinking during the measurement.
Note: If you stop pressing the button, the continuous measuremen stops
Target focusing.
2. Aim at the target
.
Positionthetargetatthecenterofthereticle
[Single measurement]
Failure to measure or
unable to measure distance.
Upward measurement. Downward measurement.
Displays the measured figure.
[Continuous measurement]
4. After continuous measurement, the measure results are displayed for 8 seconds, then power turns off. If you press the POWER
button during power-on (while the internal display is lit), another measrement starts.
Stand-by.
Displays the measured
figure. (Target 2)
Measurement
1. Press the POWER button for power-on.
(Power turns off 8 seconds after the last
operation.)
Immediately after power-on.
Stand-by.
(Initializing)
2. Aim at the target
.
Positionthetargetatthecenterofthereticle
3. Press POWER button once to start single measurement.
4. After measurement, “distance” or “fail to measure” indicator are displayed for 8 seconds, then power turns off. If you press the POWER
button during power-on (while the internal display is lit), another single measurement starts.
unable to measure distance.
3. Keep pressing POWER button to start continuous measurement up to 20 seconds. The internal display shows “distance” and
“fail to measure” indicator alternately.
Note: Laser irradiaton mark is blinking during the measurement.
Note: If you stop pressing the button, the continuous measuremen stops
[Single measurement]
Failure to measure or
unable to measure distance.
[Continuous measurement]
4. After continuous measurement, the measure results are displayed for 8 seconds, then power turns off. If you press the POWER
button during power-on (while the internal display is lit), another measrement starts.
Failure to measure or
Target focusing.
Measuring.
Upward measurement. Downward measurement.
Displays the measured
figure. (Target 1)
Displays the measured figure.
Displays the measured
figure. (Target 2)
Medição
Cuidado — O uso de controles e ajustes ou a execução de procedimentos que não
【
Medição simples
】
aqueles especificados nestas instruções podem resultar em exposição a radiações perigosas.
1. Preparação
2. Viseira de borracha
óculos.
3. Ajuste da dioptria
Ajuste a dioptria para obter uma imagem nítida LCD no telêmetro.
aparelho (confirme se o visor interno está ligado). Olhando pela lente ocular, gire o anel de
ajuste de dioptrias no sentido horário até que o LCD fique focado.
seguir.
【
Função de medição contínua
】
mirar corretamente no seu objeto.
4. Medição
*
1. Ligue a energia (confirme se
2. Mire no alvo.
o visor interno está ligado).
(Desligamento automático após
retículo.
aproximadamente 8 seg. sem uso.)
Imediatamente após ligar
Mira do alvo
Measurement
1. Press the POWER button for power-on.
(Power turns off 8 seconds after the last
operation.)
Immediately after power-on.
Stand-by.
(Initializing)
2. Aim at the target
.
Positionthetargetatthecenterofthereticle
Target focusing.
[Single measurement]
3. Press POWER button once to start single measurement.
Measuring.
4. After measurement, “distance” or “fail to measure” indicator are displayed for 8 seconds, then power turns off. If you press the POWER
button during power-on (while the internal display is lit), another single measurement starts.
Failure to measure or
Upward measurement. Downward measurement.
unable to measure distance.
Displays the measured figure.
[Continuous measurement]
3. Keep pressing POWER button to start continuous measurement up to 20 seconds. The internal display shows “distance” and
“fail to measure” indicator alternately.
Note: Laser irradiaton mark is blinking during the measurement.
Note: If you stop pressing the button, the continuous measuremen stops
Failure to measure or
unable to measure distance.
4. After continuous measurement, the measure results are displayed for 8 seconds, then power turns off. If you press the POWER
button during power-on (while the internal display is lit), another measrement starts.
Displays the measured
figure. (Target 1)
Displays the measured
figure. (Target 2)
Measurement
1. Press the POWER button for power-on.
(Power turns off 8 seconds after the last
operation.)
Immediately after power-on.
Stand-by.
(Initializing)
2. Aim at the target
.
Positionthetargetatthecenterofthereticle
Target focusing.
[Single measurement]
3. Press POWER button once to start single measurement.
Measuring.
4. After measurement, “distance” or “fail to measure” indicator are displayed for 8 seconds, then power turns off. If you press the POWER
button during power-on (while the internal display is lit), another single measurement starts.
Failure to measure or
Upward measurement. Downward measurement.
unable to measure distance.
Displays the measured figure.
[Continuous measurement]
3. Keep pressing POWER button to start continuous measurement up to 20 seconds. The internal display shows “distance” and
“fail to measure” indicator alternately.
Note: Laser irradiaton mark is blinking during the measurement.
Note: If you stop pressing the button, the continuous measuremen stops
Failure to measure or
unable to measure distance.
Displays the measured
figure. (Target 1)
4. After continuous measurement, the measure results are displayed for 8 seconds, then power turns off. If you press the POWER
button during power-on (while the internal display is lit), another measrement starts.
Displays the measured
figure. (Target 2)
Measurement
1. Press the POWER button for power-on.
(Power turns off 8 seconds after the last
operation.)
Immediately after power-on.
Stand-by.
(Initializing)
2. Aim at the target
.
Positionthetargetatthecenterofthereticle
Target focusing.
[Single measurement]
3. Press POWER button once to start single measurement.
Measuring.
4. After measurement, “distance” or “fail to measure” indicator are displayed for 8 seconds, then power turns off. If you press the POWER
button during power-on (while the internal display is lit), another single measurement starts.
Failure to measure or
unable to measure distance.
3. Keep pressing POWER button to start continuous measurement up to 20 seconds. The internal display shows “distance” and
“fail to measure” indicator alternately.
Note: Laser irradiaton mark is blinking during the measurement.
Note: If you stop pressing the button, the continuous measuremen stops
Failure to measure or
unable to measure distance.
[Continuous measurement]
4. After continuous measurement, the measure results are displayed for 8 seconds, then power turns off. If you press the POWER
button during power-on (while the internal display is lit), another measrement starts.
Upward measurement. Downward measurement.
Displays the measured
figure. (Target 1)
Displays the measured figure.
Displays the measured
figure. (Target 2)
Measurement
1. Press the POWER button for power-on.
(Power turns off 8 seconds after the last
operation.)
Immediately after power-on.
Stand-by.
(Initializing)
2. Aim at the target
.
Positionthetargetatthecenterofthereticle
Target focusing.
[Single measurement]
3. Press POWER button once to start single measurement.
Measuring.
4. After measurement, “distance” or “fail to measure” indicator are displayed for 8 seconds, then power turns off. If you press the POWER
button during power-on (while the internal display is lit), another single measurement starts.
unable to measure distance.
3. Keep pressing POWER button to start continuous measurement up to 20 seconds. The internal display shows “distance” and
“fail to measure” indicator alternately.
Note: Laser irradiaton mark is blinking during the measurement.
Note: If you stop pressing the button, the continuous measuremen stops
unable to measure distance.
4. After continuous measurement, the measure results are displayed for 8 seconds, then power turns off. If you press the POWER
button during power-on (while the internal display is lit), another measrement starts.
[Continuous measurement]
Failure to measure or
Failure to measure or
Upward measurement. Downward measurement.
Displays the measured
figure. (Target 1)
Displays the measured figure.
Displays the measured
figure. (Target 2)
Measurement
1. Press the POWER button for power-on.
(Power turns off 8 seconds after the last
operation.)
Immediately after power-on.
Stand-by.
(Initializing)
2. Aim at the target
.
Positionthetargetatthecenterofthereticle
Target focusing.
[Single measurement]
3. Press POWER button once to start single measurement.
4. After measurement, “distance” or “fail to measure” indicator are displayed for 8 seconds, then power turns off. If you press the POWER
button during power-on (while the internal display is lit), another single measurement starts.
unable to measure distance.
3. Keep pressing POWER button to start continuous measurement up to 20 seconds. The internal display shows “distance” and
“fail to measure” indicator alternately.
Note: Laser irradiaton mark is blinking during the measurement.
Note: If you stop pressing the button, the continuous measuremen stops
unable to measure distance.
4. After continuous measurement, the measure results are displayed for 8 seconds, then power turns off. If you press the POWER
button during power-on (while the internal display is lit), another measrement starts.
[Continuous measurement]
Failure to measure or
Failure to measure or
Measuring.
Upward measurement. Downward measurement.
Displays the measured
figure. (Target 1)
Displays the measured figure.
Displays the measured
figure. (Target 2)
Measurement
1. Press the POWER button for power-on.
(Power turns off 8 seconds after the last
operation.)
Immediately after power-on.
Stand-by.
(Initializing)
2. Aim at the target
.
Positionthetargetatthecenterofthereticle
Target focusing.
[Single measurement]
3. Press POWER button once to start single measurement.
Measuring.
4. After measurement, “distance” or “fail to measure” indicator are displayed for 8 seconds, then power turns off. If you press the POWER
button during power-on (while the internal display is lit), another single measurement starts.
unable to measure distance.
3. Keep pressing POWER button to start continuous measurement up to 20 seconds. The internal display shows “distance” and
“fail to measure” indicator alternately.
Note: Laser irradiaton mark is blinking during the measurement.
Note: If you stop pressing the button, the continuous measuremen stops
unable to measure distance.
4. After continuous measurement, the measure results are displayed for 8 seconds, then power turns off. If you press the POWER
button during power-on (while the internal display is lit), another measrement starts.
[Continuous measurement]
Failure to measure or
Failure to measure or
Upward measurement. Downward measurement.
Displays the measured
figure. (Target 1)
Displays the measured figure.
Displays the measured
figure. (Target 2)
Measurement
1. Press the POWER button for power-on.
(Power turns off 8 seconds after the last
operation.)
Immediately after power-on.
Stand-by.
(Initializing)
2. Aim at the target
.
Positionthetargetatthecenterofthereticle
Target focusing.
[Single measurement]
3. Press POWER button once to start single measurement.
Measuring.
4. After measurement, “distance” or “fail to measure” indicator are displayed for 8 seconds, then power turns off. If you press the POWER
button during power-on (while the internal display is lit), another single measurement starts.
Failure to measure or
unable to measure distance.
Displays the measured
figure. (Target 1)
3. Keep pressing POWER button to start continuous measurement up to 20 seconds. The internal display shows “distance” and
“fail to measure” indicator alternately.
Note: Laser irradiaton mark is blinking during the measurement.
Note: If you stop pressing the button, the continuous measuremen stops
Failure to measure or
unable to measure distance.
Upward measurement. Downward measurement.
Displays the measured figure.
[Continuous measurement]
4. After continuous measurement, the measure results are displayed for 8 seconds, then power turns off. If you press the POWER
button during power-on (while the internal display is lit), another measrement starts.
Displays the measured
figure. (Target 2)
Measurement
1. Press the POWER button for power-on.
(Power turns off 8 seconds after the last
operation.)
Immediately after power-on.
Stand-by.
(Initializing)
2. Aim at the target
.
Positionthetargetatthecenterofthereticle
Target focusing.
[Single measurement]
3. Press POWER button once to start single measurement.
Measuring.
4. After measurement, “distance” or “fail to measure” indicator are displayed for 8 seconds, then power turns off. If you press the POWER
button during power-on (while the internal display is lit), another single measurement starts.
Failure to measure or
unable to measure distance.
3. Keep pressing POWER button to start continuous measurement up to 20 seconds. The internal display shows “distance” and
“fail to measure” indicator alternately.
Note: Laser irradiaton mark is blinking during the measurement.
Note: If you stop pressing the button, the continuous measuremen stops
Failure to measure or
unable to measure distance.
[Continuous measurement]
4. After continuous measurement, the measure results are displayed for 8 seconds, then power turns off. If you press the POWER
button during power-on (while the internal display is lit), another measrement starts.
Upward measurement. Downward measurement.
Displays the measured
figure. (Target 1)
Displays the measured figure.
Displays the measured
figure. (Target 2)
ou
"measured distance" (distância medida) é exibido durante 8 segundos, e
quando a energia estiver ligada (enquanto o visor interno estiver
iluminado),
"incapaz de medir" a
cima
baixo
distância.
medida) é exibido durante 8 segundos, e depois o equipamento
interno exibe o indicador "fail to
desliga-se.
alternadamente com o indicador "measured distance" (distância
quando
medida).
a energia estiver ligada (enquanto o visor interno estiver
*
pisca durante a m
*
Ao medir uma bandeira em um campo de golfe, por exemplo,
ou "incapaz de medir"
medido (Alvo 1)
medido (Alvo 2)
a distância.
entre você e a bandeira, o menor número é a distância até a sua
bandeira alvo.
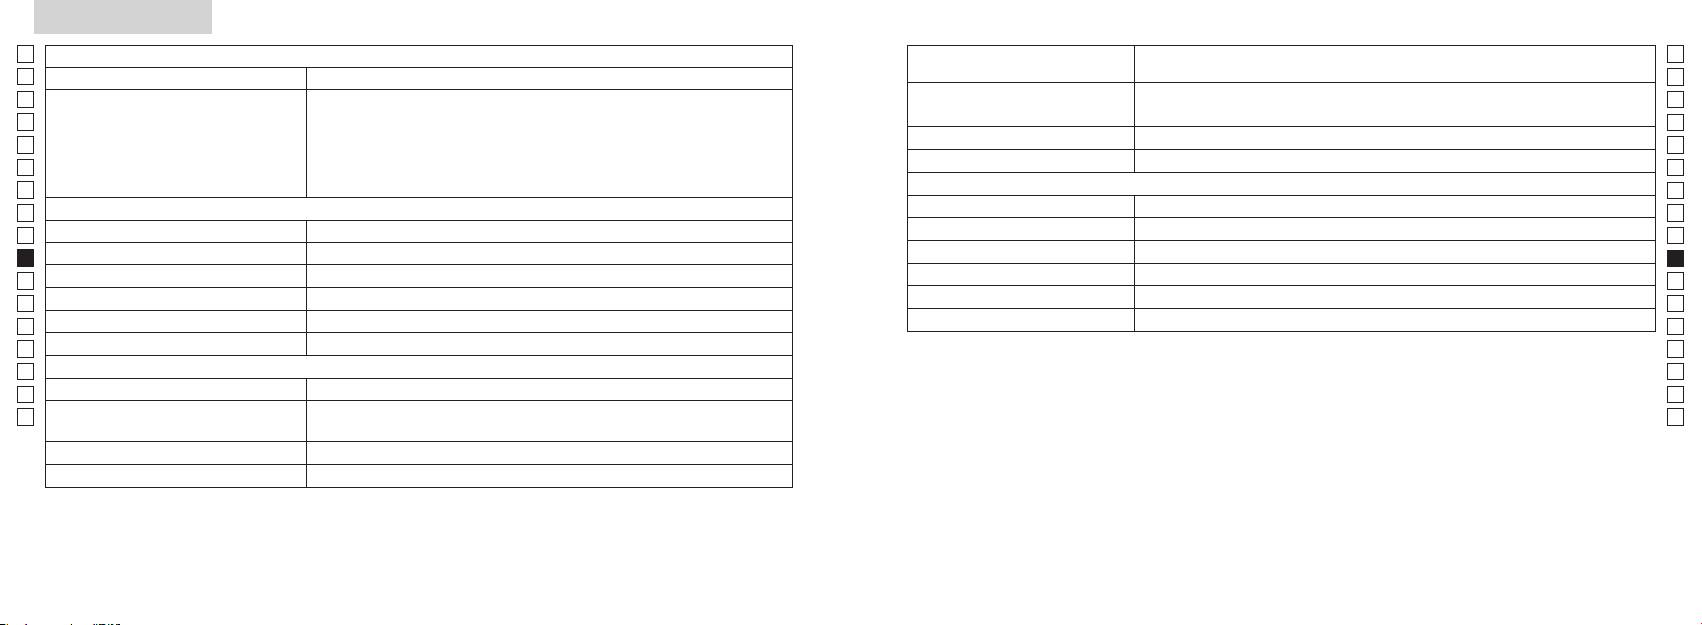
Especificações
Jp
Corpo: à prova d'água (profundidade máxima de 1 metro, por até 10 minutos)*
Jp
(Compartimento da pilha: resistente à água**)
En
En
Es
L
Es
Segurança
L
Fr
Distância real (3 dígitos inferiores):
Fr
De
De
Ambiente
It
It
Laser
Se
Se
Sistema óptico
Classe
Nl
Nl
6
Comprimento de onda (nm) 905
Ru
Ru
Diâmetro efetivo da objetiva (mm) ø21
12
Pt
Pt
7,5
15
Pl
Pl
Alívio dos olhos (mm) 18,3
Divergência de feixe (mrad)
Fi
Fi
ø3,5
80 ou inferior (se
No
No
-
1
Ajuste da dioptria ±4m
Dk
Dk
* Modelos à prova d'água
Outros
Cz
Cz
˚C) -10 —
de 1 metro por até 10 minutos.
Ro
Ro
O Telêmetro a laser Nikon oferece as seguintes vantagens:
Hu
Hu
Fonte de energia
Desligamento automático da energia (após aproximadamente 8 seg. sem uso)
113 x 70 x 39
Observe o seguinte ao usar o Telêmetro a laser Nikon.
Aprox. 175 (sem pilha)
em água. Se entrar água no compartimento da pilha, seque qualquer umidade e aguarde até que o compartimento seque.
178 179
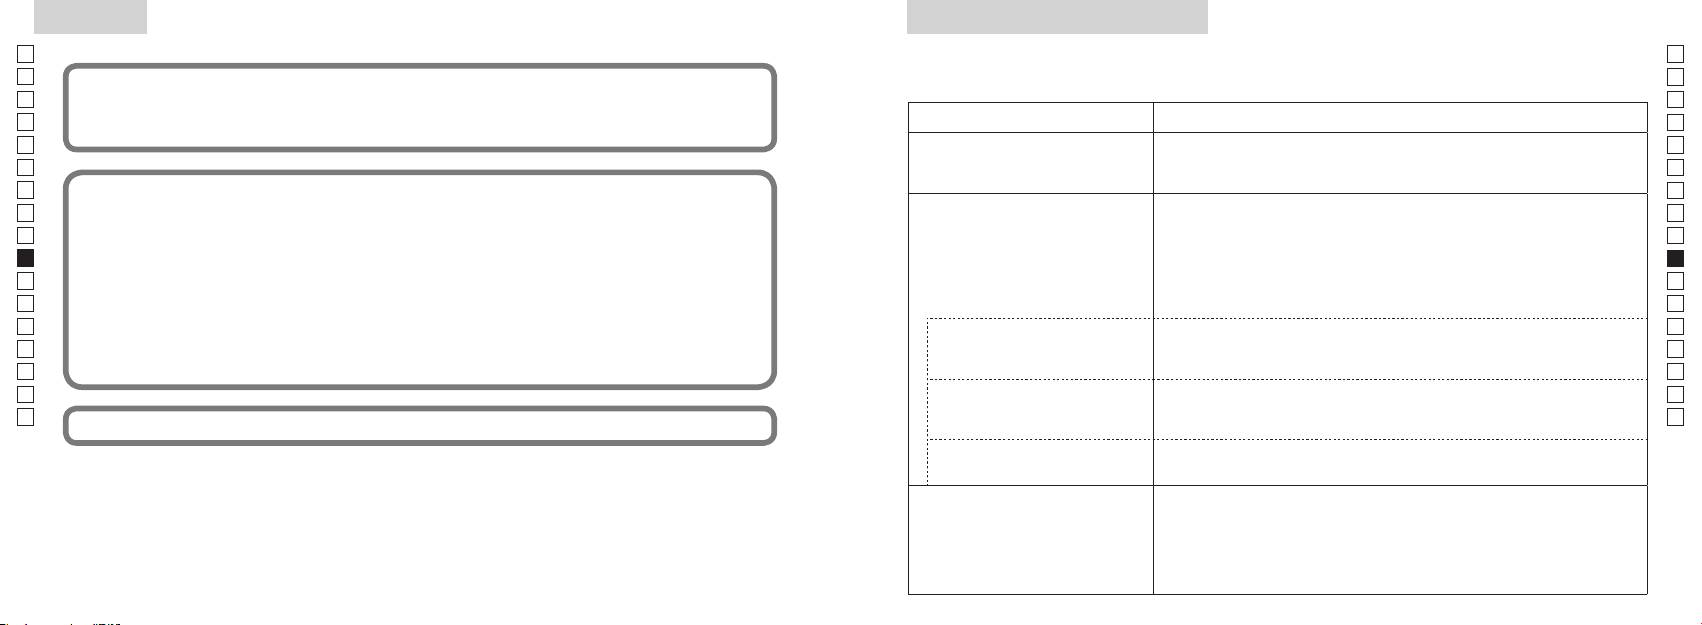
Outros
Problemas e Soluções/Reparo
Jp
Se o seu Telêmetro a laser Nikon precisar de ser reparado, por favor contate o seu distribuidor local quanto a detalhes sobre e para
Jp
En
En
Es
Es
Sintoma Pontos a verificar
Fr
Fr
indesejada.
De
●
De
● Verifique se está colocada uma pilha.
It
It
● Substitua a pilha velha por uma nova.
Se
Se
●
Nl
Nl
Ru
Ru
●
Pt
do lado da lente objectiva estejam limpas. Limpe-os, se necessário.
Pt
●
Pl
Pl
podem ser comprovadas ao desligar e ligar o equipamento, recomenda-se que o usuário tente corrigir a interferência
refletir o raio laser.
Fi
por meio de uma ou mais das medidas a seguir:
● Substitua a pilha velha por uma nova.
Fi
No
No
● Certifique-se de segurar a unidade enquanto mede.
Dk
●
Dk
(Incapaz de medir)
Cz
Cz
Ro
Alvos posicionados mais perto do
Ro
● Certifique-se de que nada, como por exemplo, folhas ou grama, está entre o
que o valor mínimo da faixa de
Hu
Telêmetro a laser Nikon e o alvo.
Hu
Um alvo além de uma determinada
● Certifique-se de que nada, como por exemplo, folhas ou grama, está entre o
Telêmetro a laser Nikon e o alvo.
● Substitua a pilha velha por uma nova.
●
refletir o raio laser.
● Certifique-se de segurar a unidade enquanto mede.
● Certifique-se de que nada, como por exemplo, folhas ou grama, está entre o
Telêmetro a laser Nikon e o alvo.
180 181
Problemas e Soluções/Reparo
Jp
Jp
En
En
Es
Es
Sintoma Pontos a Verificar
Fr
Fr
De
● Substitua a pilha velha por uma nova
De
Polski
●
It
It
O resultado incorreto é exibido
o raio laser.
Se
● Certifique-se de que nada, como por exemplo, folhas ou grama, está entre o
Se
SPIS TREŚCI
Telêmetro a Laser Nikon e o alvo.
Nl
Nl
Uwagi przed rozpoczęciem
Ru
Ru
użytkowania ....................................................... 184-187
Pt
uma vez que pode ter ocorrido uma falha no equipamento. Nunca deixe qualquer
Pt
Kluczowe funkcje ....................................................... 188
Pl
Pl
awartość opakowania .............. 189
Fi
Fi
....................................... 190
No
No
yświetlania ................................ 191
Dk
Dk
ednostki
Cz
Cz
... 192
Ro
Ro
......................................................... 193
Hu
Hu
.................................................................. 194-195
Dane techniczne ............................................... 196-197
Inne ................................................................................. 198
...... 199-200
182 183
Uwagi przed rozpoczęciem użytkowania
Jp
Dziękujemy za zakup produktu Nikon Laser Rangefinder COOLSHOT AS.
W celu właściwego korzystania z
PRZESTROGI DOTYCZĄCE
Jp
urządzenia i uniknięcia zagrożeń
rozmontowywać, modyfikować lub
En
BEZPIECZEŃSTWA (Laser)
En
należy ściśle przestrzegać
naprawiać laserowego dalmierza
Dalmierz laserowy firmy Nikon emituje
Es
Korzystanie z elementów sterowania lub regulacji, czy też wykonywanie procedur w
Es
wymienionych niżej wytycznych.
niewidzialną wiązkę promieni
sposób inny, niż określony w niniejszym podręczniku, może spowodować narażenie na
Fr
Przed rozpoczęciem korzystania
laserowych. Należy stosować się do
być szkodliwy dla zdrowia.
Fr
niebezpieczne promieniowanie.
poniższych wytycznych:
Rozmontowany, zmodyfikowany
De
z tego produktu zapoznaj się
De
lub naprawiony produkt nie jest
dokładnie z działem „Uwagi
Ostrzeżenie
It
It
objęty gwarancją producenta.
〇
przed rozpoczęciem
Se
Se
przed rozpoczęciem użytkowania” oraz z instrukcjami na temat poprawnego użytkowania,
użytkowania” oraz z instrukcjami
pomiar) podczas spoglądania
należy przechowywać w miejscu
Nl
na temat poprawnego
dołączonymi do produktu.
Nl
w optykę od strony obiektywu.
niedostępnym dla dzieci.
użytkowania, dołączonymi do
Ru
〇
Nieprzestrzeganie tej zasady może
Ru
produktu. Przechowuj ten
Pt
sięgnąć.
negatywnie wpłynąć na wzrok lub
obudowy dalmierza laserowego
Pt
podręcznik w łatwo dostępnym
spowodować uszkodzenie oczu.
firmy Nikon lub gdy emitowane
Pl
〇 Nie należy samodzielnie rozmontowywać lub dokonywać napraw tego produktu, gdyż może to
miejscu, aby móc w razie
Pl
są dziwne dźwięki, w wyniku
spowodować wystąpienie poważnych problemów.
potrzeby do niego sięgnąć.
Fi
ieruj wiązki lasera na ludzi.
upuszczenia bądź z innego
Fi
Rozmontowany lub naprawiony produkt nie jest objęty gwarancją producenta.
powodu, należy natychmiast wyjąć
No
No
inny instrument optyczny, na
baterię i zaprzestać użytkowania.
OSTRZEŻENIE
Dk
Dk
● Specyfikacje ikonstrukcja mogą ulec zmianie bez powiadomienia.
przykład soczewkę lub lornetkę,
Cz
ani okiem nieuzbrojonym. Może to
Cz
●
przypomnieniu, iż nieprawidłowe
Ro
korzystanie będące wynikiem
spowodować uszkodzenie wzroku.
wartykułach lubrecenzjach) bez pisemnego upoważnienia od firmy NIKON VISION CO., LTD. jest
Ro
zignorowania niniejszych treści może
Hu
zabronione.
Hu
spowodować poważne obrażenia lub
umieść palce z dala od przycisku
● Firma NIKON VISION CO., LTD. zastrzega sobie prawo do zmiany zawartości niniejszego
śmierć.
podręcznika w dowolnym czasie, bez wcześniejszego powiadomienia.
UWAGA
przypadkowej emisji wiązki laserowej.
przypomnieniu, iż nieprawidłowe
użytkowany przez dłuższy okres
korzystanie będące wynikiem
czasu, wyjmij baterię z korpusu.
zignorowania niniejszych treści może
spowodować poważne obrażenia lub
straty materialne.
184 185
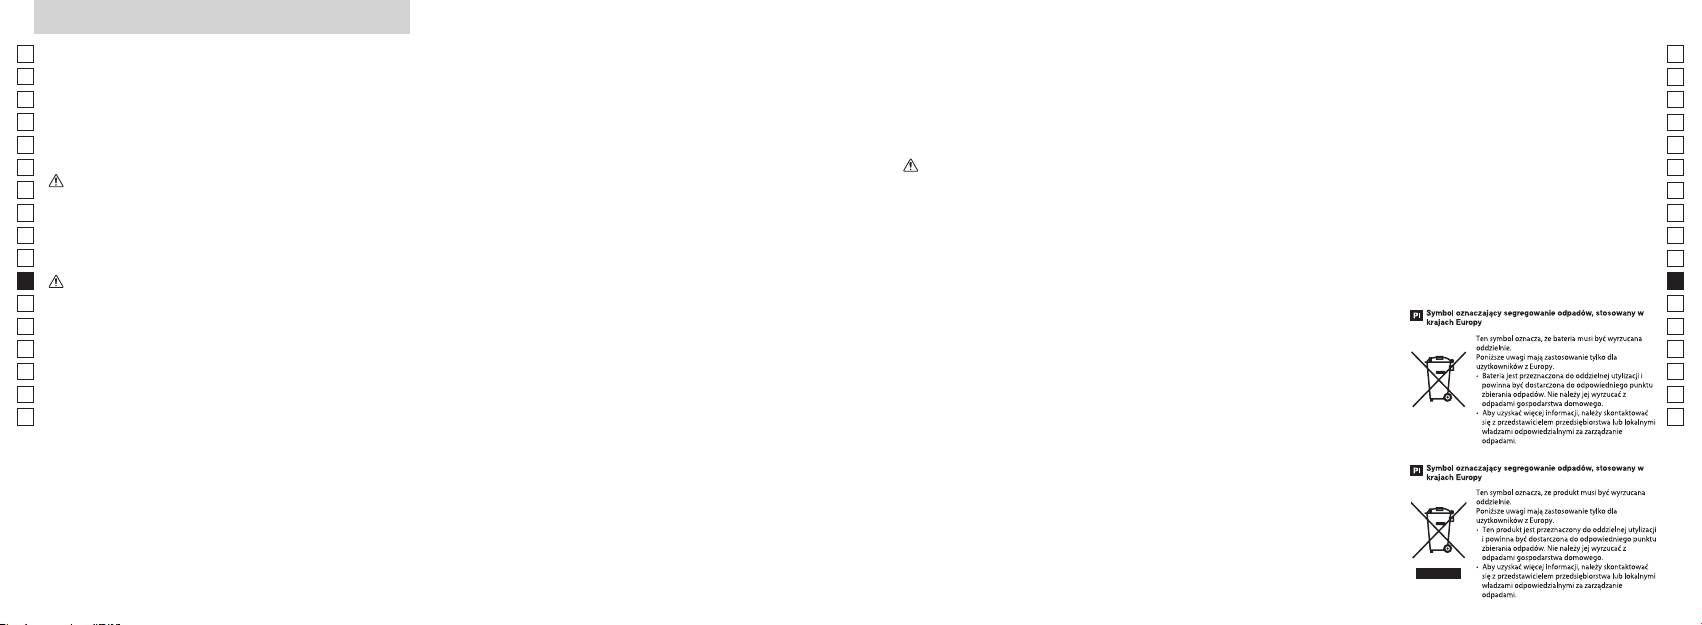
Uwagi przed rozpoczęciem użytkowania
Jp
PRZESTROGI DOTYCZĄCE
obrażeń.
PRZESTROGI DOTYCZĄCE
wodą, a następnie skonsultować się
soczewek może dojść do skroplenia
* Dmuchawa to gumowy przyrząd do
Jp
z lekarzem.
pary wodnej. Nie należy skorzystać
czyszczenia, wydmuchujący
En
BEZPIECZEŃSTWA (Luneta)
BEZPIECZEŃSTWA
En
w niestabilnym miejscu.
z produktu dopóki kondensacja się
powietrze po ściśnięciu.
(Bateria litowa)
Es
Dalmierz laserowy firmy Nikon
Nieprzestrzeganie tej zasady
obowiązującymi przepisami.
utrzymuje.
Es
Przechowywanie
umożliwia ustawianie na cel z
może spowodować upuszczenie
Fr
Fr
wykorzystaniem w systemie
urządzenia i jego uszkodzenie lub
może dojść do rozszczelnienia baterii
PRZESTROGI DOTYCZĄCE
KONSERWACJA
pojawienie się pleśni na powierzchni
De
optycznym lunety. Należy stosować
obrażenia.
i wycieku jej zawartości, co może
BEZPIECZEŃSTWA
Soczewki
De
soczewki może być spowodowane
się do poniższych wytycznych:
spowodować korozję urządzenia i
It
Uwagi
It
Ostrzeżenie
pakowania produktu i inne drobne
poplamić odzież.
powierzchni soczewki należy
tego powodu dalmierz laserowy firmy
Se
Se
przedmioty należy przechowywać
Należy stosować się do poniższych
firmy Nikon jest wodoodporne,
korzystać z miękkiej, nieoleistej
Nikon należy przechowywać w
Nl
w miejscu niedostępnym dla dzieci.
Nikon Rangefinder nie należy
wytycznych:
nie jest on przeznaczony do
szczotki.
Nl
chłodnym i suchym miejscu.
spoglądać bezpośrednio na
Baterię należy wkładać z
użytkowania pod wodą.
Ru
Ru
wkładały sobie do ust gumowe
słońce, źródło intensywnego
uwzględnieniem poprawnego
takich jak odciski palców, z
nocy należy dokładnie osuszyć
Pt
muszle oczne lub inne niewielkie
światła lub promień lasera.
wody, piasku lub błota z
powierzchni soczewki, przetrzyj
Pt
urządzenie w temperaturze
Baterię należy wyjąć, gdy wyczerpie
powierzchnią obudowy dalmierza,
delikatnie soczewki miękką, czystą
Pl
Uwagi
pokojowej, a następnie przechowywać
Pl
taką część, należy natychmiast
się ich ładunek lub w przypadku
należy ją jak najszybciej przetrzeć
szmatką bawełnianą lub wysokiej
w chłodnym i suchym miejscu.
dalmierza
Fi
skonsultować się z lekarzem.
dłuższego okresu niekorzystania z
miękką, czystą i suchą szmatką.
jakości nieoleistą szmatką do
Fi
laserowego Nikon, nie
urządzenia.
soczewek. Użyj niewielkiej ilości
No
No
naciskaj przycisku
gumowej muszli ocznej przez
laserowego firmy Nikon w
czystego alkoholu (nie stosować
Dk
dłuższy czas, może dojść do
złącz gniazda baterii.
denaturatu), aby wytrzeć trwałe
Dk
samochodzie w gorący lub
.
w
smugi. Nie należy korzystać z
Cz
słoneczny dzień, a także w pobliżu
Cz
wystąpienia jakichkolwiek objawów
kieszeni lub w torbie, w której
aksamitnych szmatek lub zwykłych
Ro
podczas przemieszczania się
należy natychmiast skonsultować
znajdują się klucze lub monety,
chusteczek, ponieważ mogą one
Ro
przeciwnym razie może dojść do
pieszo. Nieprzestrzeganie tej
się z lekarzem.
Hu
ponieważ może spowodować to
uszkodzenia urządzenia.
zarysować powierzchnię soczewki.
Hu
zasady może spowodować
przegrzanie urządzenia.
obrażenia w wyniku potrącenia
dalmierza laserowego Nikon, należy
laserowego firmy Nikon na
czyszczenia obudowy, nie powinna
innych osób, upadku lub innych
przechowywać je w miękkim futerale.
bezpośrednie działanie promieni
być ponownie używana do
wypadków.
nie należy demontować baterii.
czyszczenia soczewki.
nie działa poprawnie, przerwij
i wysoka temperatura mogą
Korpus
trzymając ją za pasek. Może to
natychmiast korzystanie i skonsultuj
negatywnie wpłynąć na urządzenie
Korpus należy przetrzeć miękką, czystą i
spowodować uderzenie innej
się z lokalnym sprzedawcą, aby
dotknie odzieży lub skóry, należy
lub doprowadzić do jego uszkodzenia.
suchą szmatką po delikatnym
osoby i doprowadzić do jej
uzyskać informacje, gdzie należy
natychmiast spłukać go dużą ilością
zdmuchnięciu kurzu za pomocą
wysłać urządzenie celem naprawy.
laserowego Nikon w otoczeniu,
dmuchawy*. Nie należy korzystać z
baterii przedostanie się do oczu,
gdzie dochodzi do nagłych zmian
benzenu, rozpuszczalnika lub innych
należy natychmiast przemyć oczy
temperatury, na powierzchni
czyszczących środków organicznych.
186 187
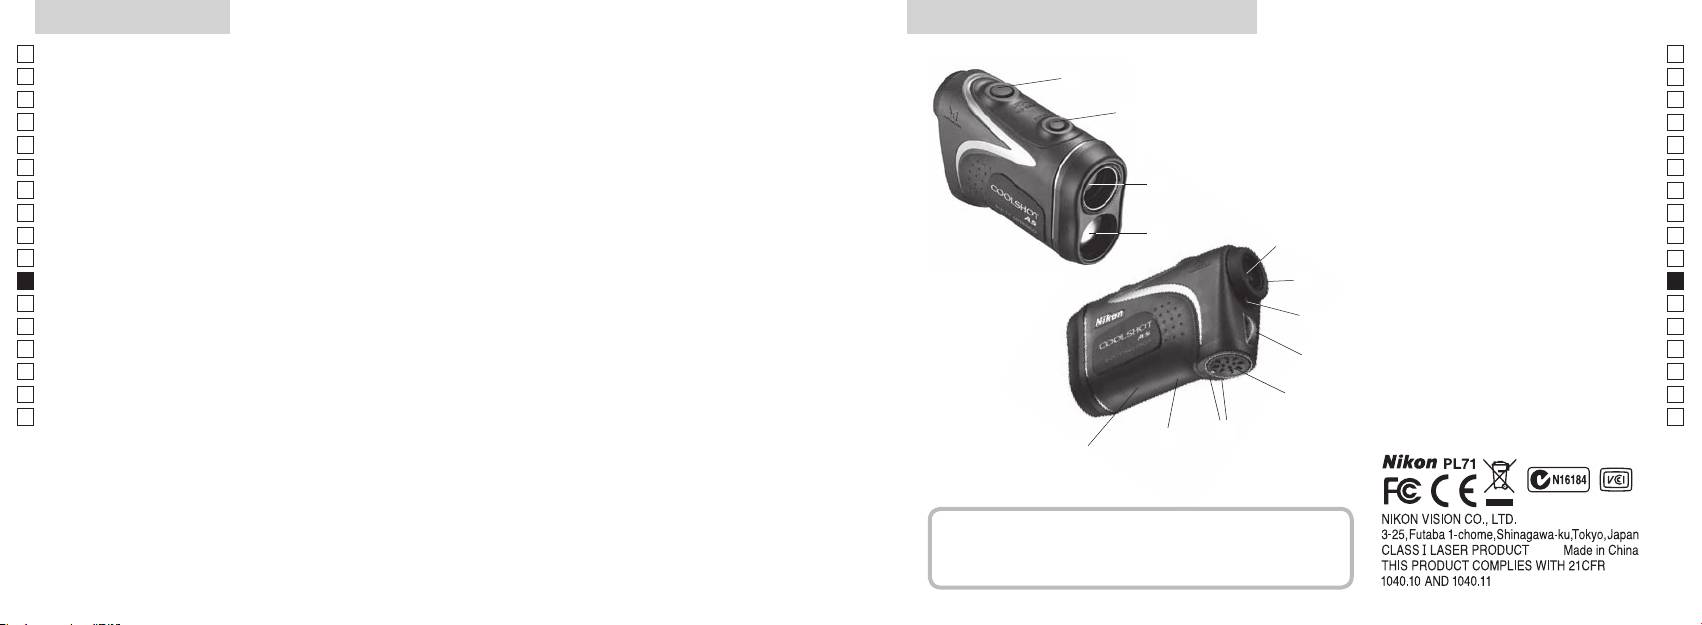
Kluczowe funkcje Nazewnictwo/Zawartość opakowania
Jp
Następujące warunki ułatwiają dokonanie pomiaru:
1
Jp
En
4
En
Es
2 Detektor promienia laserowego
Es
3
Fr
3
Fr
wzniesienia (odległości w poziomie ± wysokości), która jest
4
De
De
przydatna podczas gry w golfa
90stopni
It
It
które można łatwo przełączyć
Pomiar może okazać się niedokładny lub błędny w
1
Se
Se
następujących sytuacjach:
5Okular lunety z 6-krotnym
Nl
stosownie do celu
Nl
powiększeniem
Ru
2
5
Ru
6 ierścień regulacji
Pt
Pt
ciągłego pomiaru
dioptrii
Pl
6
Pl
7 Indeks dioptrażu
nieużytkowania)
Fi
Fi
8 Ucho na pasek
7
No
9
No
Dk
!p amknięciu
Dk
8
Cz
pokrywy komory baterii
Cz
Ro
!q tykieta z
9
Ro
Dalmierz laserowy firmy Nikon emituje niewidzialną wiązkę
objaśnieniami
Hu
Hu
promieni laserowych. Mierzony jest czas, jaki zajmuje
!p
!w Informacje FDA
wiązce przebycie odległości od dalmierza do celu i z
!q
powrotem. Odbicie promienia laserowego i wyniki pomiaru
!w
mogą się różnić w zależności od warunków klimatycznych
i środowiskowych, koloru i wykończenia powierzchni,
rozmiaru, kształtu i innych właściwości celu.
Zawartość opakowania
................................. x1
...................x1
....................x1
........x1
188 189
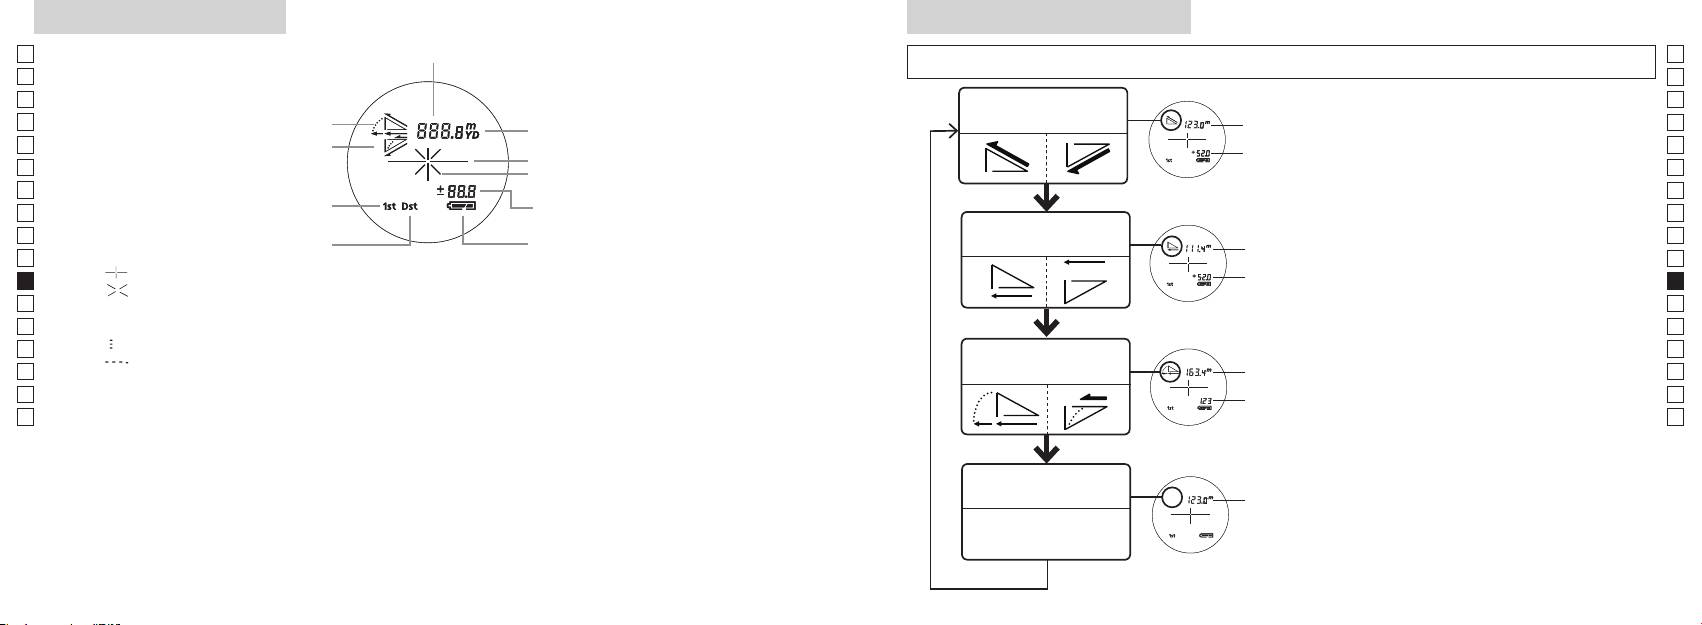
Wyświetlacz wewnętrzny
Tryby pomiaru/Wyświetlania
Jp
Odległość
Jp
En
En
Es
Tryb odległości
Es
Rzeczywista
Fr
rzeczywistej i wysokości
Fr
wewnętrzny ekran jest włączony).
odległość
De
De
Oznaczenie celu
(Tryb), a następnie od razu (w ciągu 0,5
It
It
Oznaczenie promienia lasera
Se
Se
Tryb priorytetu pierwszego planu
Nl
pomiar) przez ok. 2 sekundy.
Nl
trybie gry w golfa)
Tryb odległości w
Ru
3
Odległość w
Ru
Tryb priorytetu drugiego planu
poziomie i wysokości
poziomie
Pt
Pt
『 』 - Skieruj na cel, na którym chcesz dokonać pomiaru. Ustaw cel na środku krzyża nitek.
pomiar), aby zmienić tryb wyświetlania
Pl
Pl
『 』
Fi
ki 2 i 3 do momentu
Fi
No
Nie spoglądaj w soczewkę obiektywu, gdy wyświetlony jest ten znak.
wybrania żądanego trybu.
No
Dk
『
』 - Trwa dokonywanie pomiaru
Odległość z
*
Dk
『
』
Tryb gry w golfa
uwzględnieniem
w odpowiedniej kolejności, tryb nie
Cz
Cz
wzniesienia
zostanie przełączony.
Ro
Ro
Rzeczywista
*
Hu
odległość
spowoduje przekonwertowanie
Hu
wyników na nowy tryb.
zastosowania podczas produkcji ekranu LCD najbardziej zaawansowanych technologii kompletna
*
dokonywane są w nowym trybie.
wpływu na precyzję pomiaru lub bezpieczeństwo podczas korzystania.
Tryb odległości
Rzeczywista
rzeczywistej
odległość
190 191
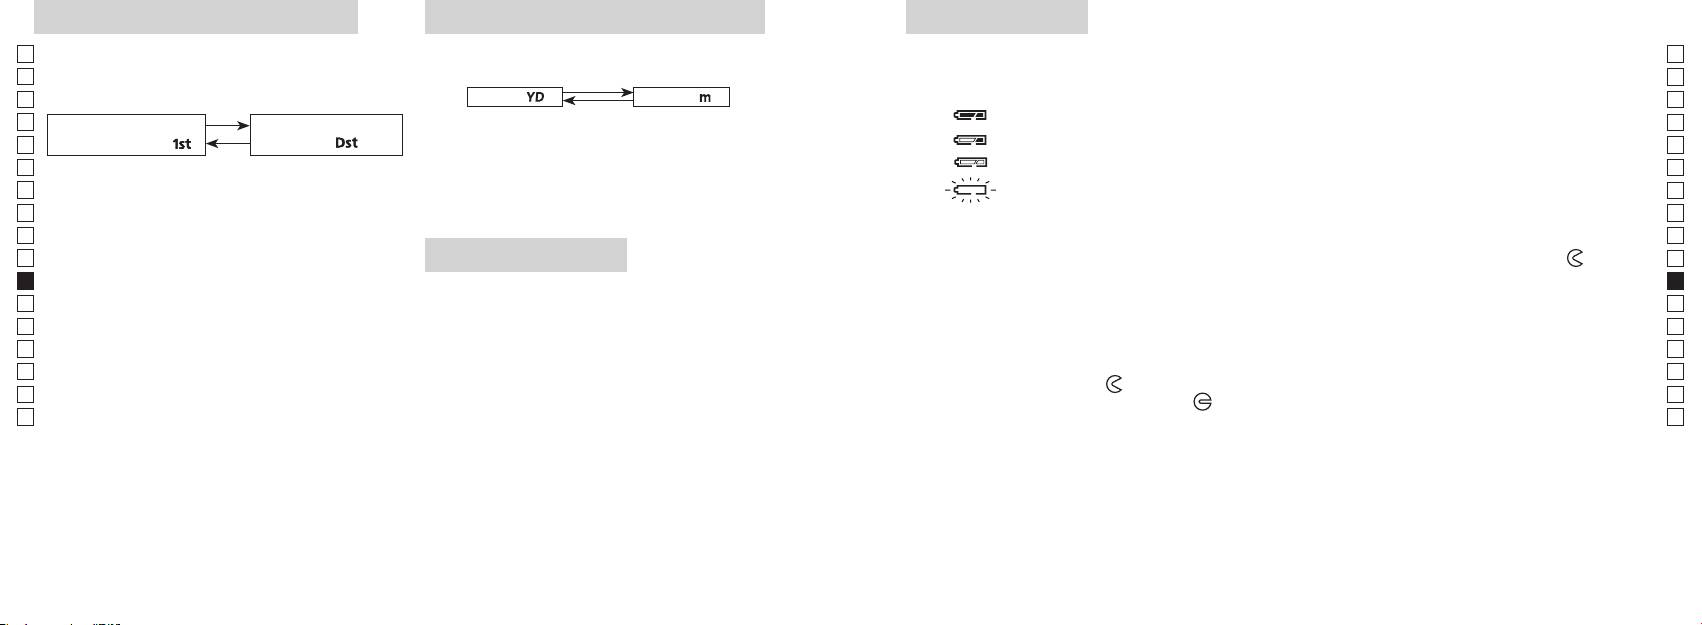
Tryb priorytetu pierwszego planu
Jednostki wyświetlania odległości
Wymiana baterii
Jp
Jp
Rodzaj baterii: Bateria litowa CR2, 3 V x1
(Domyślnym ustawieniem fabrycznym są jardy).
En
Wskaźnik pozostałego ładunku baterii
En
ustawieniem fabrycznym jest tryb priorytetu pierwszego
Es
[ ]
* Oznaczenie stanu baterii w wewnętrznym wyświetlaczu ostrzega o konieczności wymiany baterii.
planu).
Metry [ ]
Es
: Bateria jest naładowana w dostatecznym stopniu.
Fr
Fr
Tryb priorytetu
Tryb priorytetu drugiego
włączony).
De
pierwszego planu「
」
planu
「
」
De
It
It
jest włączony).
zostanie zmieniona, puść przycisk.
Se
Se
Nl
iwyświetlone w wybranej jednostce miary.
Nl
Ru
Ru
1. Otwórz pokrywę komory baterii
0,5 sekundy.
Pt
Naciskaj i przytrzymuj obydwa przyciski (dłużej
Korzystając z kciuka otwórz pokrywę komory baterii, obracając ją w kierunku oznaczenia
Pt
Podświetlenie LED
Pl
niż 2sekundy) do momentu przełączenia trybu
na gumowe uszczelnienia wodoodporne otwarcie pokrywy może być utrudnione.
Pl
1
priorytetu pierwszego planu na tryb priorytetu
2. Wymień zużytą baterię na nową
Fi
włączony).
Fi
drugiego planu.
No
No
*
Dk
poprawnie, dalmierz laserowy nie będzie działał.
kolejności, tryb nie zostanie przełączony.
*
Dk
zbyt słabe, aby panel LCD był widoczny.
3. Zamknij pokrywę komory baterii
Cz
*
Cz
w punkcie 2.
*
ze wskaźnikiem
●
i włóż pokrywę komory baterii. Korzystając z kciuka obróć
Ro
Ro
pokrywę w kierunku oznaczenia
[]
podświetlenie będzie wyłączone po kolejnym włączeniu
Hu
uszczelnienia wodoodporne, należy jednak ją obrócić do momentu zatrzymania. Upewnij się, że
Hu
zasilania dalmierza laserowego.
komora jest bezpiecznie zamknięta.
priorytetu pierwszego planu podawana jest odległość
do najbliższego obiektu, natomiast w trybie priorytetu
Czas pracy baterii
drugiego planu — do najbardziej oddalonego.
Ciągła praca: Około 13.000 cyklów (przy temperaturze ok. 20°C)
celu, kolor itp. Korzystaj z niej wyłącznie w celach orientacyjnych.
ładunku, czas pracy tej baterii prawdopodobnie będzie krótszy niż powyższa wartość.
192 193
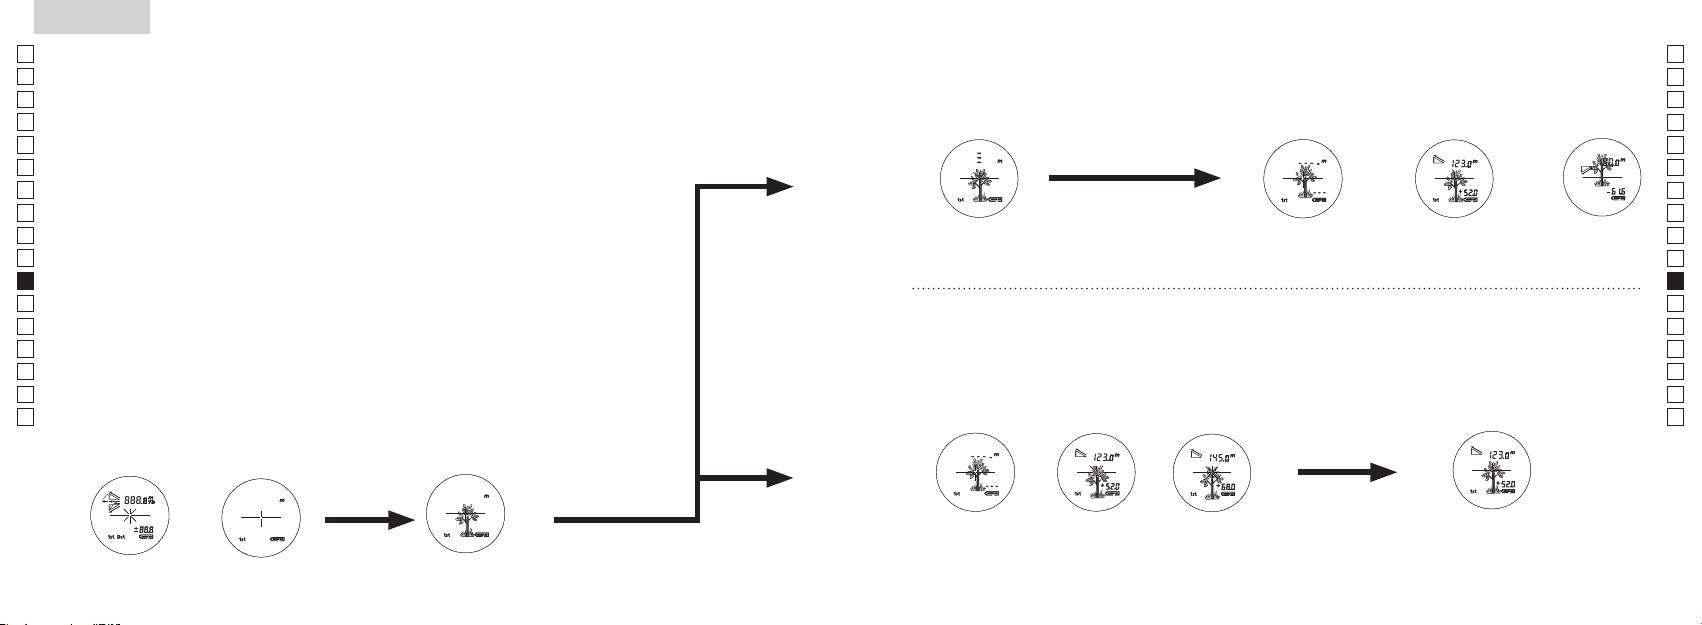
Jp
Jp
En
En
Es
Es
Fr
Fr
De
De
It
It
Se
Se
Nl
Nl
Ru
Ru
Pt
Pt
Pl
Pl
Fi
Fi
No
No
Dk
Dk
Cz
Cz
Ro
Ro
Hu
Hu
194 195
Measurement
1. Press the POWER button for power-on.
(Power turns off 8 seconds after the last
operation.)
Immediately after power-on.
3. Press POWER button once to start single measurement.
4. After measurement, “distance” or “fail to measure” indicator are displayed for 8 seconds, then power turns off. If you press the POWER
button during power-on (while the internal display is lit), another single measurement starts.
unable to measure distance.
3. Keep pressing POWER button to start continuous measurement up to 20 seconds. The internal display shows “distance” and
“fail to measure” indicator alternately.
Note: Laser irradiaton mark is blinking during the measurement.
Note: If you stop pressing the button, the continuous measuremen stops
2. Aim at the target
Positionthetargetatthecenterofthereticle
[Single measurement]
Failure to measure or
unable to measure distance.
[Continuous measurement]
4. After continuous measurement, the measure results are displayed for 8 seconds, then power turns off. If you press the POWER
button during power-on (while the internal display is lit), another measrement starts.
Failure to measure or
Target focusing.
Measuring.
(Initializing)
.
Upward measurement. Downward measurement.
Displays the measured
figure. (Target 1)
Displays the measured figure.
Stand-by.
Displays the measured
figure. (Target 2)
Measurement
1. Press the POWER button for power-on.
(Power turns off 8 seconds after the last
operation.)
Immediately after power-on.
(Initializing)
3. Press POWER button once to start single measurement.
Measuring.
4. After measurement, “distance” or “fail to measure” indicator are displayed for 8 seconds, then power turns off. If you press the POWER
button during power-on (while the internal display is lit), another single measurement starts.
Failure to measure or
unable to measure distance.
Displays the measured
figure. (Target 1)
3. Keep pressing POWER button to start continuous measurement up to 20 seconds. The internal display shows “distance” and
“fail to measure” indicator alternately.
Note: Laser irradiaton mark is blinking during the measurement.
Note: If you stop pressing the button, the continuous measuremen stops
Target focusing.
2. Aim at the target
.
Positionthetargetatthecenterofthereticle
[Single measurement]
Failure to measure or
unable to measure distance.
Upward measurement. Downward measurement.
Displays the measured figure.
[Continuous measurement]
4. After continuous measurement, the measure results are displayed for 8 seconds, then power turns off. If you press the POWER
button during power-on (while the internal display is lit), another measrement starts.
Stand-by.
Displays the measured
figure. (Target 2)
Measurement
1. Press the POWER button for power-on.
(Power turns off 8 seconds after the last
operation.)
Immediately after power-on.
Stand-by.
(Initializing)
2. Aim at the target
.
Positionthetargetatthecenterofthereticle
3. Press POWER button once to start single measurement.
4. After measurement, “distance” or “fail to measure” indicator are displayed for 8 seconds, then power turns off. If you press the POWER
button during power-on (while the internal display is lit), another single measurement starts.
unable to measure distance.
3. Keep pressing POWER button to start continuous measurement up to 20 seconds. The internal display shows “distance” and
“fail to measure” indicator alternately.
Note: Laser irradiaton mark is blinking during the measurement.
Note: If you stop pressing the button, the continuous measuremen stops
[Single measurement]
Failure to measure or
unable to measure distance.
[Continuous measurement]
4. After continuous measurement, the measure results are displayed for 8 seconds, then power turns off. If you press the POWER
button during power-on (while the internal display is lit), another measrement starts.
Failure to measure or
Target focusing.
Measuring.
Upward measurement. Downward measurement.
Displays the measured
figure. (Target 1)
Displays the measured figure.
Displays the measured
figure. (Target 2)
Pomiar
【
Pojedynczy pomiar
】
3. Naciśnij raz przycisk
aby rozpocząć pojedynczy pomiar.
【
Funkcja ciągłego pomiaru
】
2. Skieruj na cel.
wewnętrzny ekran jest włączony)
Ustaw cel na środku krzyża
(Automatyczne wyłączanie zasilania
nitek.
po upływie 8 sekund nieużytkowania)
Natychmiast po włączeniu
Tryb czuwania Ustawianie na celu
(Inicjalizacja).
Measurement
1. Press the POWER button for power-on.
(Power turns off 8 seconds after the last
operation.)
Immediately after power-on.
Stand-by.
(Initializing)
2. Aim at the target
.
Positionthetargetatthecenterofthereticle
Target focusing.
[Single measurement]
3. Press POWER button once to start single measurement.
Measuring.
4. After measurement, “distance” or “fail to measure” indicator are displayed for 8 seconds, then power turns off. If you press the POWER
button during power-on (while the internal display is lit), another single measurement starts.
Failure to measure or
Upward measurement. Downward measurement.
unable to measure distance.
Displays the measured figure.
[Continuous measurement]
3. Keep pressing POWER button to start continuous measurement up to 20 seconds. The internal display shows “distance” and
“fail to measure” indicator alternately.
Note: Laser irradiaton mark is blinking during the measurement.
Note: If you stop pressing the button, the continuous measuremen stops
Failure to measure or
unable to measure distance.
4. After continuous measurement, the measure results are displayed for 8 seconds, then power turns off. If you press the POWER
button during power-on (while the internal display is lit), another measrement starts.
Displays the measured
figure. (Target 1)
Displays the measured
figure. (Target 2)
Measurement
1. Press the POWER button for power-on.
(Power turns off 8 seconds after the last
operation.)
Immediately after power-on.
Stand-by.
(Initializing)
2. Aim at the target
.
Positionthetargetatthecenterofthereticle
Target focusing.
[Single measurement]
3. Press POWER button once to start single measurement.
Measuring.
4. After measurement, “distance” or “fail to measure” indicator are displayed for 8 seconds, then power turns off. If you press the POWER
button during power-on (while the internal display is lit), another single measurement starts.
Failure to measure or
Upward measurement. Downward measurement.
unable to measure distance.
Displays the measured figure.
[Continuous measurement]
3. Keep pressing POWER button to start continuous measurement up to 20 seconds. The internal display shows “distance” and
“fail to measure” indicator alternately.
Note: Laser irradiaton mark is blinking during the measurement.
Note: If you stop pressing the button, the continuous measuremen stops
Failure to measure or
unable to measure distance.
Displays the measured
figure. (Target 1)
4. After continuous measurement, the measure results are displayed for 8 seconds, then power turns off. If you press the POWER
button during power-on (while the internal display is lit), another measrement starts.
Displays the measured
figure. (Target 2)
Measurement
1. Press the POWER button for power-on.
(Power turns off 8 seconds after the last
operation.)
Immediately after power-on.
Stand-by.
(Initializing)
2. Aim at the target
.
Positionthetargetatthecenterofthereticle
Target focusing.
[Single measurement]
3. Press POWER button once to start single measurement.
Measuring.
4. After measurement, “distance” or “fail to measure” indicator are displayed for 8 seconds, then power turns off. If you press the POWER
button during power-on (while the internal display is lit), another single measurement starts.
Failure to measure or
unable to measure distance.
3. Keep pressing POWER button to start continuous measurement up to 20 seconds. The internal display shows “distance” and
“fail to measure” indicator alternately.
Note: Laser irradiaton mark is blinking during the measurement.
Note: If you stop pressing the button, the continuous measuremen stops
Failure to measure or
unable to measure distance.
[Continuous measurement]
4. After continuous measurement, the measure results are displayed for 8 seconds, then power turns off. If you press the POWER
button during power-on (while the internal display is lit), another measrement starts.
Upward measurement. Downward measurement.
Displays the measured
figure. (Target 1)
Displays the measured figure.
Displays the measured
figure. (Target 2)
Measurement
1. Press the POWER button for power-on.
(Power turns off 8 seconds after the last
operation.)
Immediately after power-on.
Stand-by.
(Initializing)
2. Aim at the target
.
Positionthetargetatthecenterofthereticle
Target focusing.
[Single measurement]
3. Press POWER button once to start single measurement.
Measuring.
4. After measurement, “distance” or “fail to measure” indicator are displayed for 8 seconds, then power turns off. If you press the POWER
button during power-on (while the internal display is lit), another single measurement starts.
unable to measure distance.
3. Keep pressing POWER button to start continuous measurement up to 20 seconds. The internal display shows “distance” and
“fail to measure” indicator alternately.
Note: Laser irradiaton mark is blinking during the measurement.
Note: If you stop pressing the button, the continuous measuremen stops
unable to measure distance.
4. After continuous measurement, the measure results are displayed for 8 seconds, then power turns off. If you press the POWER
button during power-on (while the internal display is lit), another measrement starts.
[Continuous measurement]
Failure to measure or
Failure to measure or
Upward measurement. Downward measurement.
Displays the measured
figure. (Target 1)
Displays the measured figure.
Displays the measured
figure. (Target 2)
Measurement
1. Press the POWER button for power-on.
(Power turns off 8 seconds after the last
operation.)
Immediately after power-on.
Stand-by.
(Initializing)
2. Aim at the target
.
Positionthetargetatthecenterofthereticle
Target focusing.
[Single measurement]
3. Press POWER button once to start single measurement.
4. After measurement, “distance” or “fail to measure” indicator are displayed for 8 seconds, then power turns off. If you press the POWER
button during power-on (while the internal display is lit), another single measurement starts.
unable to measure distance.
3. Keep pressing POWER button to start continuous measurement up to 20 seconds. The internal display shows “distance” and
“fail to measure” indicator alternately.
Note: Laser irradiaton mark is blinking during the measurement.
Note: If you stop pressing the button, the continuous measuremen stops
unable to measure distance.
4. After continuous measurement, the measure results are displayed for 8 seconds, then power turns off. If you press the POWER
button during power-on (while the internal display is lit), another measrement starts.
[Continuous measurement]
Failure to measure or
Failure to measure or
Measuring.
Upward measurement. Downward measurement.
Displays the measured
figure. (Target 1)
Displays the measured figure.
Displays the measured
figure. (Target 2)
Measurement
1. Press the POWER button for power-on.
(Power turns off 8 seconds after the last
operation.)
Immediately after power-on.
Stand-by.
(Initializing)
2. Aim at the target
.
Positionthetargetatthecenterofthereticle
Target focusing.
[Single measurement]
3. Press POWER button once to start single measurement.
Measuring.
4. After measurement, “distance” or “fail to measure” indicator are displayed for 8 seconds, then power turns off. If you press the POWER
button during power-on (while the internal display is lit), another single measurement starts.
unable to measure distance.
3. Keep pressing POWER button to start continuous measurement up to 20 seconds. The internal display shows “distance” and
“fail to measure” indicator alternately.
Note: Laser irradiaton mark is blinking during the measurement.
Note: If you stop pressing the button, the continuous measuremen stops
unable to measure distance.
4. After continuous measurement, the measure results are displayed for 8 seconds, then power turns off. If you press the POWER
button during power-on (while the internal display is lit), another measrement starts.
[Continuous measurement]
Failure to measure or
Failure to measure or
Upward measurement. Downward measurement.
Displays the measured
figure. (Target 1)
Displays the measured figure.
Displays the measured
figure. (Target 2)
Measurement
1. Press the POWER button for power-on.
(Power turns off 8 seconds after the last
operation.)
Immediately after power-on.
Stand-by.
(Initializing)
2. Aim at the target
.
Positionthetargetatthecenterofthereticle
Target focusing.
[Single measurement]
3. Press POWER button once to start single measurement.
Measuring.
4. After measurement, “distance” or “fail to measure” indicator are displayed for 8 seconds, then power turns off. If you press the POWER
button during power-on (while the internal display is lit), another single measurement starts.
Failure to measure or
unable to measure distance.
Displays the measured
figure. (Target 1)
3. Keep pressing POWER button to start continuous measurement up to 20 seconds. The internal display shows “distance” and
“fail to measure” indicator alternately.
Note: Laser irradiaton mark is blinking during the measurement.
Note: If you stop pressing the button, the continuous measuremen stops
Failure to measure or
unable to measure distance.
Upward measurement. Downward measurement.
Displays the measured figure.
[Continuous measurement]
4. After continuous measurement, the measure results are displayed for 8 seconds, then power turns off. If you press the POWER
button during power-on (while the internal display is lit), another measrement starts.
Displays the measured
figure. (Target 2)
Measurement
1. Press the POWER button for power-on.
(Power turns off 8 seconds after the last
operation.)
Immediately after power-on.
Stand-by.
(Initializing)
2. Aim at the target
.
Positionthetargetatthecenterofthereticle
Target focusing.
[Single measurement]
3. Press POWER button once to start single measurement.
Measuring.
4. After measurement, “distance” or “fail to measure” indicator are displayed for 8 seconds, then power turns off. If you press the POWER
button during power-on (while the internal display is lit), another single measurement starts.
Failure to measure or
unable to measure distance.
3. Keep pressing POWER button to start continuous measurement up to 20 seconds. The internal display shows “distance” and
“fail to measure” indicator alternately.
Note: Laser irradiaton mark is blinking during the measurement.
Note: If you stop pressing the button, the continuous measuremen stops
Failure to measure or
unable to measure distance.
[Continuous measurement]
4. After continuous measurement, the measure results are displayed for 8 seconds, then power turns off. If you press the POWER
button during power-on (while the internal display is lit), another measrement starts.
Upward measurement. Downward measurement.
Displays the measured
figure. (Target 1)
Displays the measured figure.
Displays the measured
figure. (Target 2)
Uwaga — korzystanie z elementów sterowania lub regulacji, czy też wykonywanie
procedur w sposób inny, niż określony w niniejszym podręczniku, może spowodować narażenie na
wskaźnik
niebezpieczne promieniowanie.
1. Przygotowanie
wyświetlacz jest aktywny) rozpoczyna się kolejny pomiar pojedynczy.
2. Gumowa muszla oczna
3. Regulacja dioptrii
Najpierw obróć do końca pierścień regulacji dioptrii w kierunku przeciwnym do ruchu
niepowodzeniem” lub brak
możliwości dokonania
okular, obróć pierścień regulacji dioptrii w prawo, do momentu gdy obraz na ekranie LCD
pomiaru”
będzieostry.
3. Naciśnij i przytrzymaj przycisk
nie być możliwe.
(pomierzona odległość) będzie wyświetlany przez 8 sekund, a
4. Pomiar
następnie zasilanie jest wyłączane.
*
Oznaczenie promienia lasera miga podczas pomiaru.
wewnętrzny wyświetlacz jest aktywny) rozpoczyna się kolejny
*
Informacje na temat ustawiania poszczególnych trybów znajdują się w odpowiednich sekcjach.
*
pomiar pojedynczy.
golfa, skorzystaj z trybu priorytetu pierwszego planu. Aby dokonać
niepowodzeniem”
pomierzonej
pomierzonej
łatwego pomiaru, przeskanuj chorągiewkę z użyciem funkcji
lub brak możliwości
wartości (Cel 1).
wartości (Cel 2).
dokonania pomiaru”
nie ma innych obiektów, najniższa wartość będzie rzeczywistą
odległością od chorągiewki.
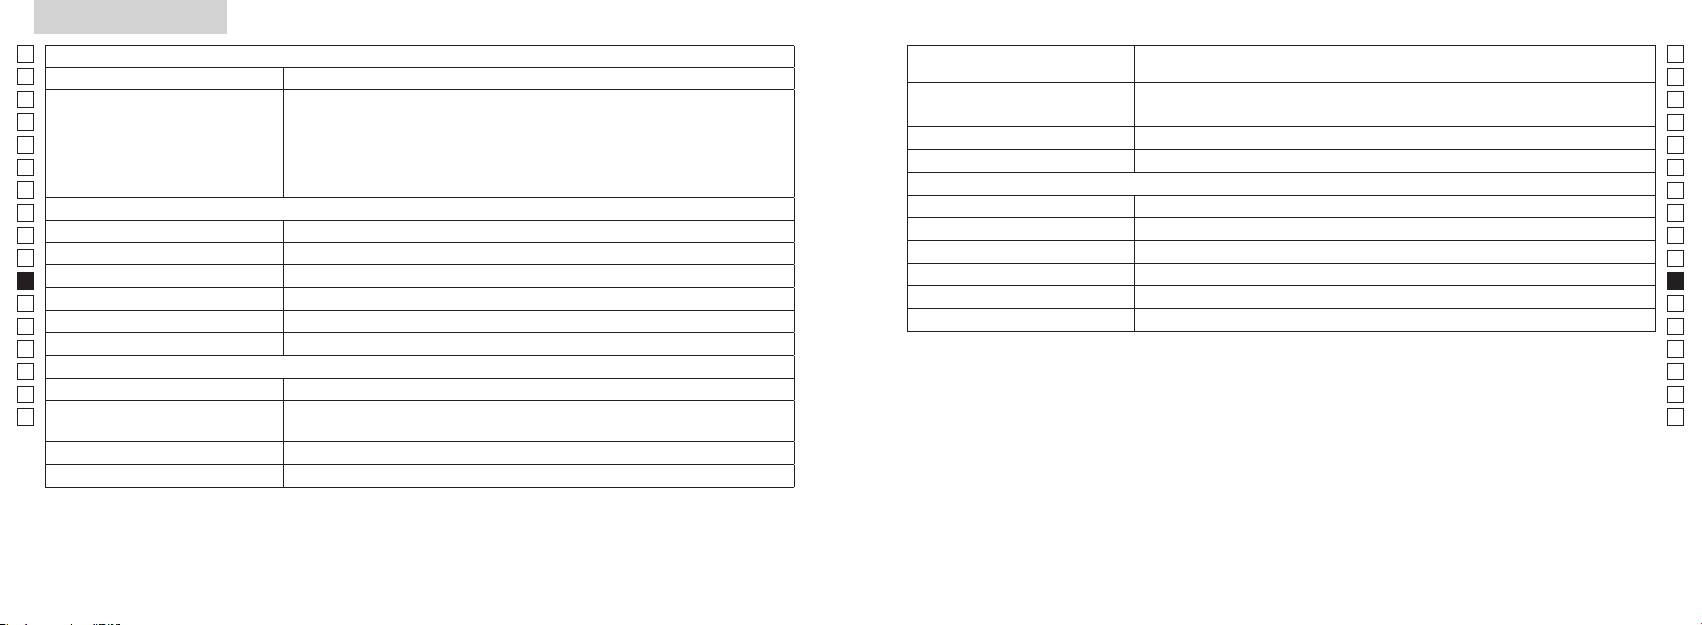
Dane techniczne
Jp
System pomiaru
Korpus: wodoodporny (maksymalna głębokość zanurzenia: 1 metr, przez 10 minut)*
Jp
Budowa
(Komora baterii: wodoodporna**)
En
En
Es
Laserowy K
Es
Rzeczywista odległość (górny, 4-cyfrowy): co 0,5 m
Bezpieczeństwo
Laserowy K
Fr
Rzeczywista odległość (dolny, 3-cyfrowy): co 1 m
Fr
De
De
(przyrost)
co 0,2 m
Środowisko
It
It
Laser
Se
Se
Układ optyczny
Klasa
Nl
Nl
6
Długość fali (nm) 905
Ru
Ru
ø21
Czas trwania impulsu (ns) 12
Pt
Pt
7,5
15
Pl
Pl
Oddalenie źrenicy wyjściowej (mm) 18,3
Rozbieżność wiązki (mrad)
Fi
Fi
Źrenica wyjściowa (mm) ø3,5
80 lub mniej (bez kondensacji)
No
No
-
1
Regulacja dioptrii ±4 m
Dk
Dk
* Modele wodoszczelne
Inne
Cz
Cz
Temperatura pracy (˚C) -10 —
10minut, system optyczny ani obserwacyjny nie ulegną uszkodzeniu.
Ro
Ro
Dalmierz laserowy Nikon oferuje następujące zalety:
Hu
1x bateria litowa CR2 (DC 3V)
Hu
Źródło zasilania
Automatyczne wyłączanie zasilania (po upływie 8 sekund nieużytkowania)
113 x 70 x 39
Podczas korzystania z dalmierza laserowego Nikon należy stosować się do następujących zaleceń:
Masa (g) Około 175 (bez baterii)
** Komora baterii jest uszczelniona. Mimo to woda może dostać się do środka, jeśli dalmierz laserowy zostanie zanurzony w wodzie.
196 197
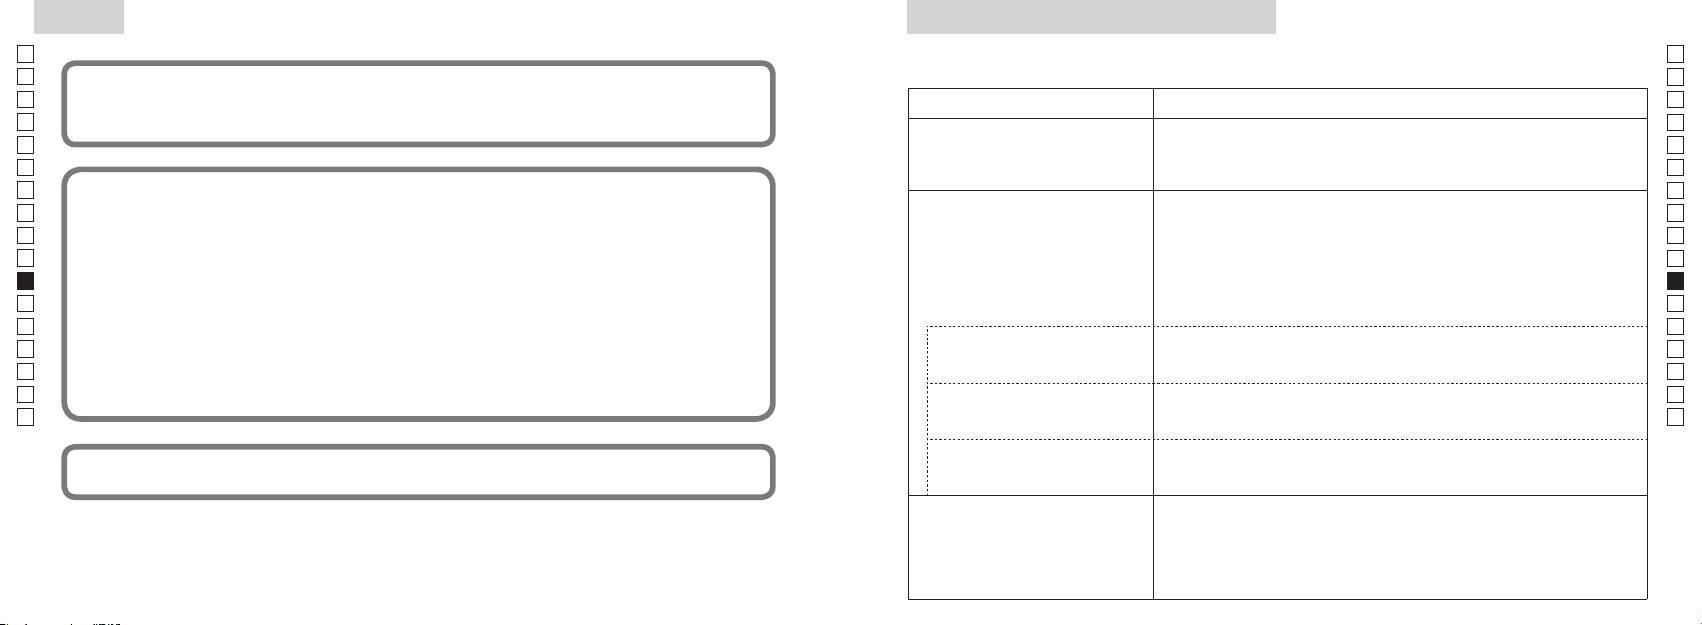
Inne
Rozwiązywanie problemów/Naprawa
Jp
Jp
En
Urządzenie jest zgodne z częścią 15 zasad FCC. Działanie musi odbywać się z uwzględnieniem dwóch warunków:
En
Es
(1) Urządzenie nie może powodować szkodliwych zakłóceń, a także
Es
Problem Wykonaj czynności
(2) Urządzenie musi być odporne na zakłócenia, włącznie z zakłóceniami mogącymi spowodować niepożądane
Fr
Fr
operacje.
●
De
Urządzenie nie włącza się
(bliższa strona, górna część korpusu)
De
(ekran LCD nie podświetla się)
● Sprawdź, czy poprawnie włożono baterię
It
It
●
Se
Niniejsze urządzenie zostało przetestowane i jest zgodne z ograniczeniami przewidzianymi dla urządzeń
Se
● Upewnij się, że żaden obiekt, taki jak palec lub pasek, nie blokuje emitera
Nl
Nl
w celu zapewnienia właściwej ochrony przeciwko szkodliwemu wpływowi urządzenia na terenach mieszkalnych.
promienia laserowego ani detektora promienia laserowego po stronie
Ru
Urządzenie generuje, korzysta z, a także emituje energię w postaci fal radiowych. Instalacja i korzystanie w sposób
soczewek obiektywu.
Ru
● Upewnij się, że emiter promienia laserowego i detektor promienia laserowego
Pt
Nie można pomierzyć odległości
Pt
Pl
● Upewnij się, że kształt i stan celu jest odpowiedni do tego, aby odbić promień
Pl
szkodliwych zakłóceń w odbiorze sygnału radiowego lub telewizyjnego, co można sprawdzić poprzez wyłączenie i
lasera.
Fi
włączenie urządzenia, sugeruje się, aby użytkownik wykonał próbę skorygowania zakłóceń, wykonując przynajmniej
Fi
●
jedną z poniższych czynności:
No
No
● Upewnij się, że urządzenie jest w stabilnej pozycji podczas pomiaru.
Dk
Dk
● Upewnij się, że cel znajduje się w zakresie pomiaru
Cz
Cz
Niniejsze urządzenie cyfrowe klasy B spełnia wszystkie wymogi kanadyjskich przepisów dotyczących urządzeń
Ro
Bliższy cel, zlokalizowany w
Ro
● Upewnij się, że między dalmierzem laserowym Nikon a celem nie znajdują się
ramach zakresu pomiaru, nie
Hu
żadne obiekty, takie jak liście czy trawa.
Hu
może być pomierzone
● Upewnij się, że między dalmierzem laserowym Nikon a celem nie znajdują się
obiektów, których odległość
żadne obiekty, takie jak liście czy trawa.
w charakterze oficjalnego dowodu.
przekracza możliwości urządzenia
●
● Upewnij się, że kształt i stan celu jest odpowiedni do tego, aby odbić promień
lasera.
● Upewnij się, że urządzenie jest w stabilnej pozycji podczas pomiaru.
● Upewnij się, że między dalmierzem laserowym Nikon a celem nie znajdują się
żadne obiekty, takie jak liście czy trawa.
198 199
Rozwiązywanie problemów/Naprawa
Jp
Jp
En
En
Es
Es
Problem Wykonaj czynności
Fr
Fr
Suomi
De
●
De
● Upewnij się, że kształt i stan celu jest odpowiedni do tego, aby odbić promień
It
It
lasera.
SISÄLTÖ
Se
● Upewnij się, że między dalmierzem laserowym Nikon a celem nie znajdują się
Se
żadne obiekty, takie jak liście czy trawa.
Nl
Nl
........................... 202-205
Ru
Ru
RNaprawy błąd nadal występuje, skontaktuj się z lokalnym
....................................................... 206
Pt
sprzedawcą celem sprawdzenia lub naprawy urządzenia, ponieważ mogła wystąpić awaria. Czynność sprawdzenia lub naprawy
Pt
Kokoonpano ......................................... 207
Pl
Pl
mogą wystąpić obrażenia lub uszkodzenia produktu.
........................................................... 208
Fi
Fi
................................................... 209
No
No
Dk
Dk
............................................................... 210
Cz
Cz
........................................................ 211
Ro
Ro
Mittaus .................................................................. 212-213
Hu
Hu
Tekniset tiedot ................................................... 214-215
Muuta ............................................................................ 216
Korjaus ......................................... 217-218
200 201
Huomautukset ennen käyttöä
Jp
Noudata tarkasti seuraavia
TURVALLISUUSHUOMAUTUKSET
Jp
ohjeita, jotta voisit käyttää
poissa lasten ulottuvilta.
En
(Laser)
En
etäisyysmittaria oikein ja ilman
Es
Ohjainten, säätimien tai toimintojen käyttäminen muuhun tarkoitukseen tai muulla kuin
kotelo vahingoittuu tai jos
Es
ongelmia. Ennen kuin käytät tätä
Huomioi
tässä esitetyllä tavalla voi aiheuttaa altistumisen säteilylle.
Fr
tuotetta, lue huolellisesti
seuraavat seikat:
Fr
esimerkiksi maahan putoamisen
"käyttöä edeltävät
Varoitus
De
De
〇
huomautukset" ja ohjeet
It
It
tuotteen oikeaa käyttöä varten.
-painiketta silloin, kun katsot optisiin
Se
Se
〇
Pidä ohjeet aina saatavilla
ohjeen laiminlyönti voi aiheuttaa
Nl
tietojen tarkistamista varten.
Nl
〇
vahinkoa silmillesi.
Ru
Valmistajan takuu ei koske osiin purettua tai itse korjattua laitetta.
Ru
Pt
VAROITUS
Pt
Pl
●
Pl
optisella instrumentilla kuten
●
Fi
laiminlyöden voi aiheuttaa vakavan
Fi
loukkaantumisen tai kuoleman.
No
No
-yhtiön antamaa kirjallista lupaa.
HUOMAUTUS
Dk
Dk
●
vamma.
Cz
Cz
tahansa ilman ennakkoilmoitusta.
voi aiheuttaa vakavia vammoja tai
-
Ro
Ro
aineellista vahinkoa.
Hu
Hu
poista paristo laitteesta.
terveydelle. Valmistajan takuu ei
korjattua tuotetta.
202 203
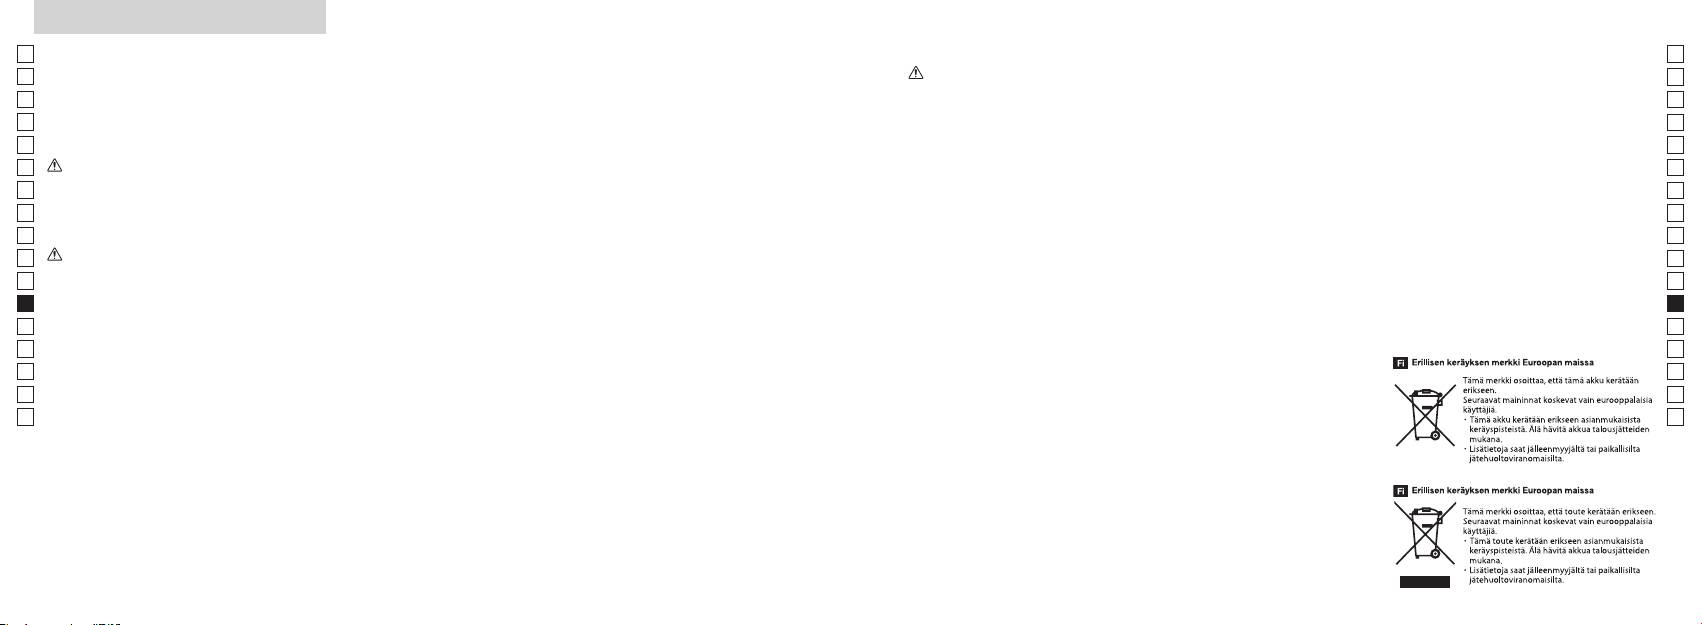
Huomautukset ennen käyttöä
Jp
TURVALLISUUSHUOMAUTUKSET
lasten ulottuville.
TURVALLISUUSHUOMAUTUKSET
TURVALLISUUSHUOMAUTUKSET
HOITO JA KUNNOSSAPITO
Säilytys
Jp
En
(Monokulaari)
(Litiumparisto)
Huomautus
Lenssit
En
Es
Es
hometta. Siksi Nikon Laser
ne voivat vahingoittua tai vuotaa,
Fr
Rangefinder
Fr
Huomioi
aiheuttaa laitteen ruostumista ja tahria
De
De
seuraavat seikat:
vaatteita.
hoitoon.
mutatahrat on poistettava
paikassa.
It
Varoitus
Huomioi seuraavat seikat:
It
varovasti kuivalla, puhtaalla
paristo
Se
Se
voimakkaaseen valoon tai laser-
kangaspyyhkeen avulla.
tai iltana, kuivaa se huolellisesti
Nl
on poistettava, kun ne ovat
Nl
Ru
Ru
autoon kuumana tai aurinkoisena
denaturoitua) pinttyneiden
Pt
Huomautus
Pt
samettikangasta tai tavallista
Pl
Pl
Se voi vahingoittaa laitetta tai
tuotetta avaimien tai
Fi
-painiketta.
naarmuttaa linssin pintaa. Kun
Fi
kolikoiden kanssa samassa taskussa
No
rungon
No
tai pussissa, se voi oikosulkeutua ja
suoraan auringonpaisteeseen.
Dk
aiheuttaa ylikuumenemisen.
Dk
linssin pintaa.
Cz
saadaksesi ohjeet korjattavaksi
Cz
Päärunko
paikkaan, kaadut tai aiheutat muun
Ro
Ro
onnettomuuden tai loukkaantumisen.
puhaltimen* avulla puhdista pinta
Hu
Hu
Se voi osua johonkin ja aiheuttaa
muutoksille, linssin pintaan saattaa
loukkaantumisen.
muuta orgaanista liuotinta
tuotetta, ennen kuin kosteus on
haihtunut.
aiheuttaa kaatumisen tai putoamisen
joka puhaltaa ilman pois
ja loukkaantumisen tai vikatoiminnan.
suuttimesta.
mukaisesti.
204 205

Pääominaisuudet Nimikkeet/Kokoonpano
Jp
Seuraavat olosuhteet helpottavat mittaamista:
Jp
1
En
4
En
Es
Es
3
2 Lasertunnistimen aukko
Fr
Fr
3
De
De
4
It
vaihdettavissa
Mittaustulos voi olla epätarkka tai virheellinen
It
56-kertaisella suurennuksella
seuraavissa tapauksissa:
1
Se
Se
valita kohteen mukaan
varustettu okulaari
Nl
Nl
6 D
Ru
painaminen mahdollistaa jatkuvan mittaustoiminnon
2
5
Ru
7 Diopterin indeksi
Pt
8
Pt
8sekuntia)
Pl
6
9
Pl
Fi
!p AKiinni"-
Fi
7
No
No
!q Tyyppitarra
Dk
Dk
Nikon Laser -etäisyysmittarissa käytetään mittaukseen
8
!w
Cz
Cz
näkymätöntä lasersädettä. Se mittaa ajan, jonka lasersäde
Ro
tarvitsee kulkiessaan etäisyysmittarilta kohteelle ja
9
Ro
takaisin. Laserheijastuksen laatu ja mittaustulokset
Hu
Hu
vaihtelevat ilmaston ja ympäristöolosuhteiden sekä
!p
kohteen värin, pinnanlaadun, koon, muodon ja muiden
!q
ominaisuuksien mukaan.
!w
Kokoonpano
.................................. x1
......................... x1
................ x1
........ x1
206 207
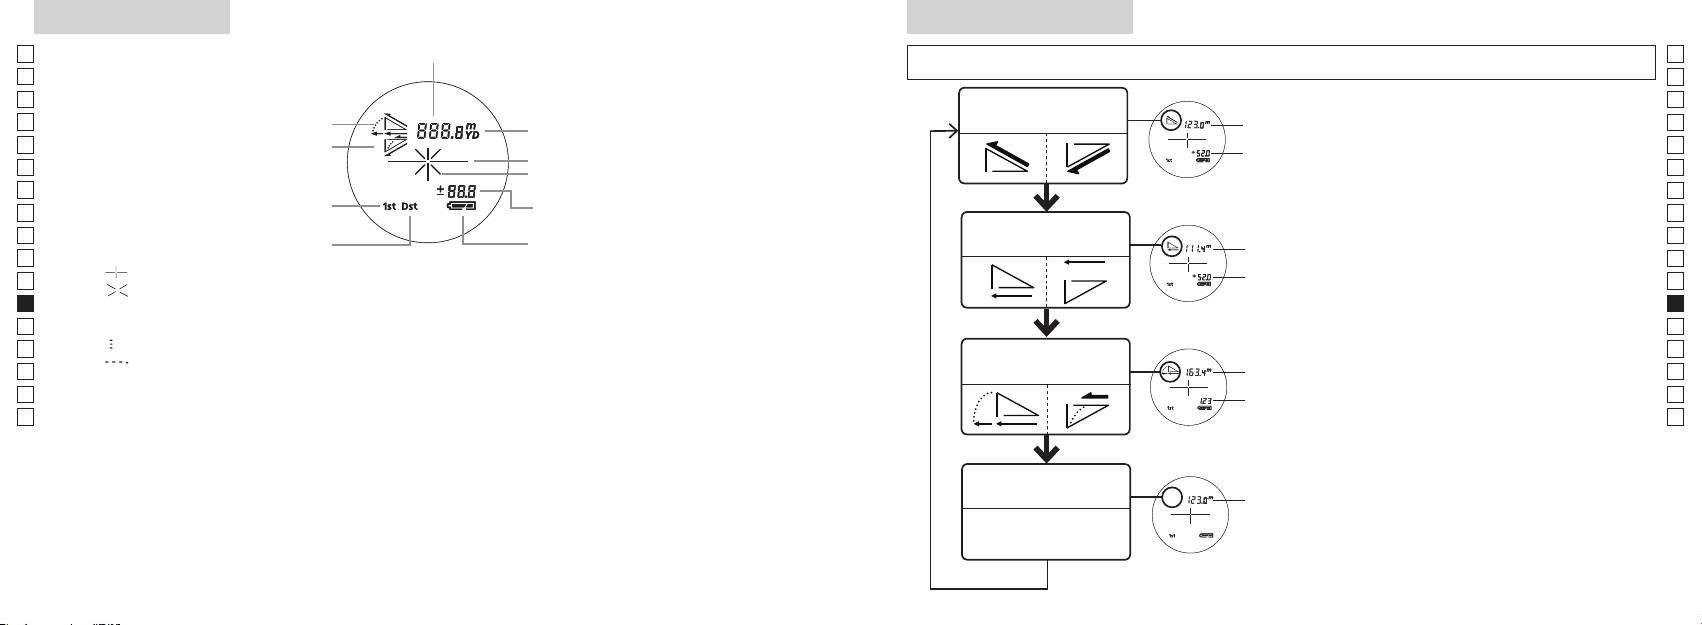
Sisäinen näyttö
Mittaustilan näyttö
Jp
Jp
En
En
Es
Es
Todellisen etäisyyden
Todellinen
Fr
Nouseva
ja korkeuden tila
Fr
De
Laskeva
De
Kohdemerkki
Korkeus
It
It
Se
Se
Nl
Nl
Vaakasuoran etäisyyden
Ru
Vaakasuora
Ru
Kaukaisen kohteen esivalintatila
ja korkeuden tila
Pt
-painiketta.
Pt
『 』
4. Toista vaiheet 2 ja 3, kunnes haluamaasi
Pl
Korkeus
Pl
『 』
Fi
Fi
*
No
No
Dk
『
』
*
Dk
『
』
Golf-tila
Kulmakorjattu
Cz
Cz
mukaan.
Ro
Ro
Todellinen
*
Hu
mittaukset suoritetaan valitsemasi uuden
Hu
Todellisen
Todellinen
etäisyyden tila
208 209
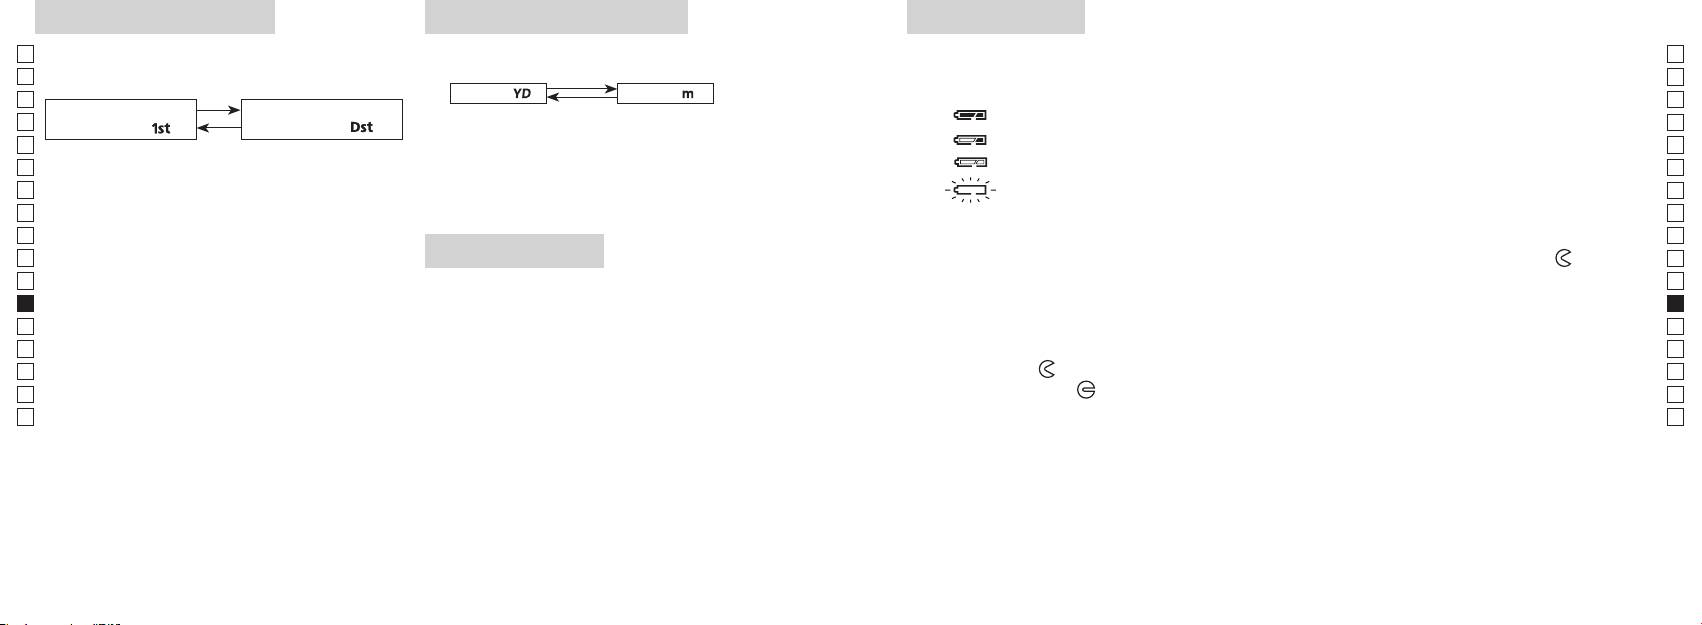
Esivalintatila
Etäisyyden näyttöyksiköt
Pariston vaihto
Jp
Jp
Paristotyyppi: 1 litiumparisto 3V CR2
Tehdasasetus on jaardeina.
En
Pariston jäljellä olevan varauksen merkkivalo
En
aardit
[ ]
Metrit [ ]
Es
Es
Kaukaisen kohteen
Fr
Fr
esivalintatila「
」
esivalintatila
「
」
De
De
It
It
vaihtunut, vapauta painike.
Se
Se
sammuu automaattisesti. Vaihda paristo.
Nl
Nl
Ru
Ru
1. Avaa paristolokeron kansi
Pt
esivalintatila ja kaukaisen kohteen esivalintatila
LED-valaistus
-merkin
Pt
vaihtuvat.
Pl
osoittamaan suuntaan. Avaaminen voi olla hankalaa vesitiiviin sovituksen ja kumitiivisteen vuoksi.
Pl
3. Vapauta molemmat painikkeet, kun tila on
2. Vaihda uusi paristo vanhan tilalle
Fi
Fi
vaihtunut.
No
*
No
vaihtoa ei tapahdu.
Dk
3. Sulje paristolokeron kansi
Dk
*
*
Cz
Kohdista
●
Cz
paneelin katseluun.
Ro
tms. kansi auki
-merkin osoittamaan suuntaan. Kannen kiinnitys voi olla hankalaa vesitiiviin ja
[
*
Ro
esivalintatila]
Hu
Hu
hyvin kiinni.
Pariston kestoaika
Jatkuva käyttö:
kaukaisimpaan kohteeseen.
210 211
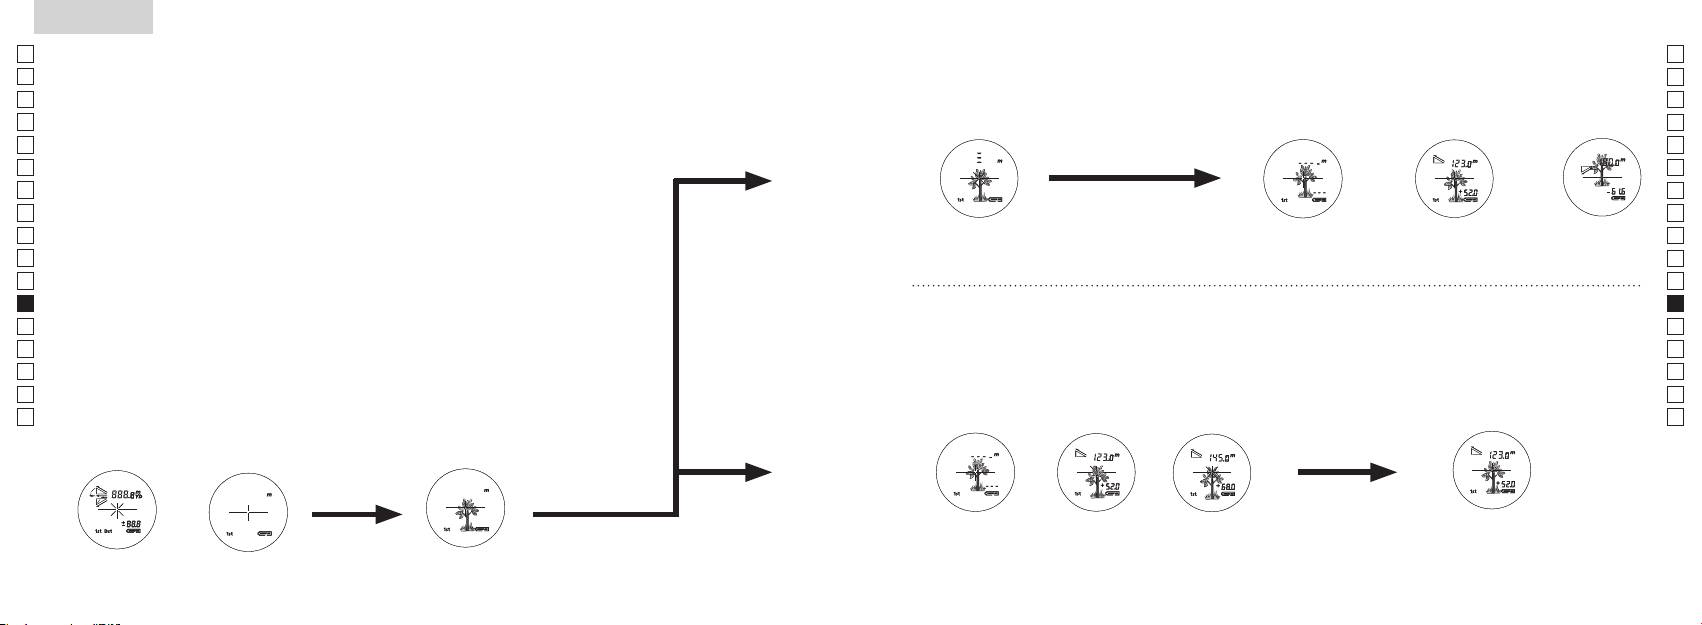
Jp
Jp
En
En
Es
Es
Fr
Fr
De
De
It
It
Se
Se
Nl
Nl
Ru
Ru
Pt
Pt
Pl
Pl
Fi
Fi
No
No
Dk
Dk
Cz
Cz
Ro
Ro
Hu
Hu
212 213
Measurement
1. Press the POWER button for power-on.
(Power turns off 8 seconds after the last
operation.)
Immediately after power-on.
3. Press POWER button once to start single measurement.
4. After measurement, “distance” or “fail to measure” indicator are displayed for 8 seconds, then power turns off. If you press the POWER
button during power-on (while the internal display is lit), another single measurement starts.
unable to measure distance.
3. Keep pressing POWER button to start continuous measurement up to 20 seconds. The internal display shows “distance” and
“fail to measure” indicator alternately.
Note: Laser irradiaton mark is blinking during the measurement.
Note: If you stop pressing the button, the continuous measuremen stops
2. Aim at the target
Positionthetargetatthecenterofthereticle
[Single measurement]
Failure to measure or
unable to measure distance.
[Continuous measurement]
4. After continuous measurement, the measure results are displayed for 8 seconds, then power turns off. If you press the POWER
button during power-on (while the internal display is lit), another measrement starts.
Failure to measure or
Target focusing.
Measuring.
(Initializing)
.
Upward measurement. Downward measurement.
Displays the measured
figure. (Target 1)
Displays the measured figure.
Stand-by.
Displays the measured
figure. (Target 2)
Measurement
1. Press the POWER button for power-on.
(Power turns off 8 seconds after the last
operation.)
Immediately after power-on.
(Initializing)
3. Press POWER button once to start single measurement.
Measuring.
4. After measurement, “distance” or “fail to measure” indicator are displayed for 8 seconds, then power turns off. If you press the POWER
button during power-on (while the internal display is lit), another single measurement starts.
Failure to measure or
unable to measure distance.
Displays the measured
figure. (Target 1)
3. Keep pressing POWER button to start continuous measurement up to 20 seconds. The internal display shows “distance” and
“fail to measure” indicator alternately.
Note: Laser irradiaton mark is blinking during the measurement.
Note: If you stop pressing the button, the continuous measuremen stops
Target focusing.
2. Aim at the target
.
Positionthetargetatthecenterofthereticle
[Single measurement]
Failure to measure or
unable to measure distance.
Upward measurement. Downward measurement.
Displays the measured figure.
[Continuous measurement]
4. After continuous measurement, the measure results are displayed for 8 seconds, then power turns off. If you press the POWER
button during power-on (while the internal display is lit), another measrement starts.
Stand-by.
Displays the measured
figure. (Target 2)
Measurement
1. Press the POWER button for power-on.
(Power turns off 8 seconds after the last
operation.)
Immediately after power-on.
Stand-by.
(Initializing)
2. Aim at the target
.
Positionthetargetatthecenterofthereticle
3. Press POWER button once to start single measurement.
4. After measurement, “distance” or “fail to measure” indicator are displayed for 8 seconds, then power turns off. If you press the POWER
button during power-on (while the internal display is lit), another single measurement starts.
unable to measure distance.
3. Keep pressing POWER button to start continuous measurement up to 20 seconds. The internal display shows “distance” and
“fail to measure” indicator alternately.
Note: Laser irradiaton mark is blinking during the measurement.
Note: If you stop pressing the button, the continuous measuremen stops
[Single measurement]
Failure to measure or
unable to measure distance.
[Continuous measurement]
4. After continuous measurement, the measure results are displayed for 8 seconds, then power turns off. If you press the POWER
button during power-on (while the internal display is lit), another measrement starts.
Failure to measure or
Target focusing.
Measuring.
Upward measurement. Downward measurement.
Displays the measured
figure. (Target 1)
Displays the measured figure.
Displays the measured
figure. (Target 2)
Mittaus
Huomautus — ohjainten, säätimien tai toimintojen käyttäminen muuhun
【
Yksittäinen mittaus
】
tarkoitukseen tai muulla kuin tässä esitetyllä tavalla voi altistaa säteilylle.
1. Valmistelut
2. Kuminen silmäsuppilo
3. Diopterin säätö
【
Jatkuva mittaustoiminto
】
4. Mittaus käynnissä
*
.
Sijoita kohde ristikon keskelle.
(Automaattinen virrankatkaisu
tapahtuu noin 8 sekunnin kuluttua)
Valmiustila
Measurement
1. Press the POWER button for power-on.
(Power turns off 8 seconds after the last
operation.)
Immediately after power-on.
Stand-by.
(Initializing)
2. Aim at the target
.
Positionthetargetatthecenterofthereticle
Target focusing.
[Single measurement]
3. Press POWER button once to start single measurement.
Measuring.
4. After measurement, “distance” or “fail to measure” indicator are displayed for 8 seconds, then power turns off. If you press the POWER
button during power-on (while the internal display is lit), another single measurement starts.
Failure to measure or
Upward measurement. Downward measurement.
unable to measure distance.
Displays the measured figure.
[Continuous measurement]
3. Keep pressing POWER button to start continuous measurement up to 20 seconds. The internal display shows “distance” and
“fail to measure” indicator alternately.
Note: Laser irradiaton mark is blinking during the measurement.
Note: If you stop pressing the button, the continuous measuremen stops
Failure to measure or
unable to measure distance.
4. After continuous measurement, the measure results are displayed for 8 seconds, then power turns off. If you press the POWER
button during power-on (while the internal display is lit), another measrement starts.
Displays the measured
figure. (Target 1)
Displays the measured
figure. (Target 2)
Measurement
1. Press the POWER button for power-on.
(Power turns off 8 seconds after the last
operation.)
Immediately after power-on.
Stand-by.
(Initializing)
2. Aim at the target
.
Positionthetargetatthecenterofthereticle
Target focusing.
[Single measurement]
3. Press POWER button once to start single measurement.
Measuring.
4. After measurement, “distance” or “fail to measure” indicator are displayed for 8 seconds, then power turns off. If you press the POWER
button during power-on (while the internal display is lit), another single measurement starts.
Failure to measure or
Upward measurement. Downward measurement.
unable to measure distance.
Displays the measured figure.
[Continuous measurement]
3. Keep pressing POWER button to start continuous measurement up to 20 seconds. The internal display shows “distance” and
“fail to measure” indicator alternately.
Note: Laser irradiaton mark is blinking during the measurement.
Note: If you stop pressing the button, the continuous measuremen stops
Failure to measure or
unable to measure distance.
Displays the measured
figure. (Target 1)
4. After continuous measurement, the measure results are displayed for 8 seconds, then power turns off. If you press the POWER
button during power-on (while the internal display is lit), another measrement starts.
Displays the measured
figure. (Target 2)
Measurement
1. Press the POWER button for power-on.
(Power turns off 8 seconds after the last
operation.)
Immediately after power-on.
Stand-by.
(Initializing)
2. Aim at the target
.
Positionthetargetatthecenterofthereticle
Target focusing.
[Single measurement]
3. Press POWER button once to start single measurement.
Measuring.
4. After measurement, “distance” or “fail to measure” indicator are displayed for 8 seconds, then power turns off. If you press the POWER
button during power-on (while the internal display is lit), another single measurement starts.
Failure to measure or
unable to measure distance.
3. Keep pressing POWER button to start continuous measurement up to 20 seconds. The internal display shows “distance” and
“fail to measure” indicator alternately.
Note: Laser irradiaton mark is blinking during the measurement.
Note: If you stop pressing the button, the continuous measuremen stops
Failure to measure or
unable to measure distance.
[Continuous measurement]
4. After continuous measurement, the measure results are displayed for 8 seconds, then power turns off. If you press the POWER
button during power-on (while the internal display is lit), another measrement starts.
Upward measurement. Downward measurement.
Displays the measured
figure. (Target 1)
Displays the measured figure.
Displays the measured
figure. (Target 2)
Measurement
1. Press the POWER button for power-on.
(Power turns off 8 seconds after the last
operation.)
Immediately after power-on.
Stand-by.
(Initializing)
2. Aim at the target
.
Positionthetargetatthecenterofthereticle
Target focusing.
[Single measurement]
3. Press POWER button once to start single measurement.
Measuring.
4. After measurement, “distance” or “fail to measure” indicator are displayed for 8 seconds, then power turns off. If you press the POWER
button during power-on (while the internal display is lit), another single measurement starts.
unable to measure distance.
3. Keep pressing POWER button to start continuous measurement up to 20 seconds. The internal display shows “distance” and
“fail to measure” indicator alternately.
Note: Laser irradiaton mark is blinking during the measurement.
Note: If you stop pressing the button, the continuous measuremen stops
unable to measure distance.
4. After continuous measurement, the measure results are displayed for 8 seconds, then power turns off. If you press the POWER
button during power-on (while the internal display is lit), another measrement starts.
[Continuous measurement]
Failure to measure or
Failure to measure or
Upward measurement. Downward measurement.
Displays the measured
figure. (Target 1)
Displays the measured figure.
Displays the measured
figure. (Target 2)
Measurement
1. Press the POWER button for power-on.
(Power turns off 8 seconds after the last
operation.)
Immediately after power-on.
Stand-by.
(Initializing)
2. Aim at the target
.
Positionthetargetatthecenterofthereticle
Target focusing.
[Single measurement]
3. Press POWER button once to start single measurement.
4. After measurement, “distance” or “fail to measure” indicator are displayed for 8 seconds, then power turns off. If you press the POWER
button during power-on (while the internal display is lit), another single measurement starts.
unable to measure distance.
3. Keep pressing POWER button to start continuous measurement up to 20 seconds. The internal display shows “distance” and
“fail to measure” indicator alternately.
Note: Laser irradiaton mark is blinking during the measurement.
Note: If you stop pressing the button, the continuous measuremen stops
unable to measure distance.
4. After continuous measurement, the measure results are displayed for 8 seconds, then power turns off. If you press the POWER
button during power-on (while the internal display is lit), another measrement starts.
[Continuous measurement]
Failure to measure or
Failure to measure or
Measuring.
Upward measurement. Downward measurement.
Displays the measured
figure. (Target 1)
Displays the measured figure.
Displays the measured
figure. (Target 2)
Measurement
1. Press the POWER button for power-on.
(Power turns off 8 seconds after the last
operation.)
Immediately after power-on.
Stand-by.
(Initializing)
2. Aim at the target
.
Positionthetargetatthecenterofthereticle
Target focusing.
[Single measurement]
3. Press POWER button once to start single measurement.
Measuring.
4. After measurement, “distance” or “fail to measure” indicator are displayed for 8 seconds, then power turns off. If you press the POWER
button during power-on (while the internal display is lit), another single measurement starts.
unable to measure distance.
3. Keep pressing POWER button to start continuous measurement up to 20 seconds. The internal display shows “distance” and
“fail to measure” indicator alternately.
Note: Laser irradiaton mark is blinking during the measurement.
Note: If you stop pressing the button, the continuous measuremen stops
unable to measure distance.
4. After continuous measurement, the measure results are displayed for 8 seconds, then power turns off. If you press the POWER
button during power-on (while the internal display is lit), another measrement starts.
[Continuous measurement]
Failure to measure or
Failure to measure or
Upward measurement. Downward measurement.
Displays the measured
figure. (Target 1)
Displays the measured figure.
Displays the measured
figure. (Target 2)
Measurement
1. Press the POWER button for power-on.
(Power turns off 8 seconds after the last
operation.)
Immediately after power-on.
Stand-by.
(Initializing)
2. Aim at the target
.
Positionthetargetatthecenterofthereticle
Target focusing.
[Single measurement]
3. Press POWER button once to start single measurement.
Measuring.
4. After measurement, “distance” or “fail to measure” indicator are displayed for 8 seconds, then power turns off. If you press the POWER
button during power-on (while the internal display is lit), another single measurement starts.
Failure to measure or
unable to measure distance.
Displays the measured
figure. (Target 1)
3. Keep pressing POWER button to start continuous measurement up to 20 seconds. The internal display shows “distance” and
“fail to measure” indicator alternately.
Note: Laser irradiaton mark is blinking during the measurement.
Note: If you stop pressing the button, the continuous measuremen stops
Failure to measure or
unable to measure distance.
Upward measurement. Downward measurement.
Displays the measured figure.
[Continuous measurement]
4. After continuous measurement, the measure results are displayed for 8 seconds, then power turns off. If you press the POWER
button during power-on (while the internal display is lit), another measrement starts.
Displays the measured
figure. (Target 2)
Measurement
1. Press the POWER button for power-on.
(Power turns off 8 seconds after the last
operation.)
Immediately after power-on.
Stand-by.
(Initializing)
2. Aim at the target
.
Positionthetargetatthecenterofthereticle
Target focusing.
[Single measurement]
3. Press POWER button once to start single measurement.
Measuring.
4. After measurement, “distance” or “fail to measure” indicator are displayed for 8 seconds, then power turns off. If you press the POWER
button during power-on (while the internal display is lit), another single measurement starts.
Failure to measure or
unable to measure distance.
3. Keep pressing POWER button to start continuous measurement up to 20 seconds. The internal display shows “distance” and
“fail to measure” indicator alternately.
Note: Laser irradiaton mark is blinking during the measurement.
Note: If you stop pressing the button, the continuous measuremen stops
Failure to measure or
unable to measure distance.
[Continuous measurement]
4. After continuous measurement, the measure results are displayed for 8 seconds, then power turns off. If you press the POWER
button during power-on (while the internal display is lit), another measrement starts.
Upward measurement. Downward measurement.
Displays the measured
figure. (Target 1)
Displays the measured figure.
Displays the measured
figure. (Target 2)
aktiivinen),
mittaus" ja
-painiketta virran ollessa
*
ttauksen ajan.
*
kuvan (kohde 1)
kuvan (kohde 2)
mitata".
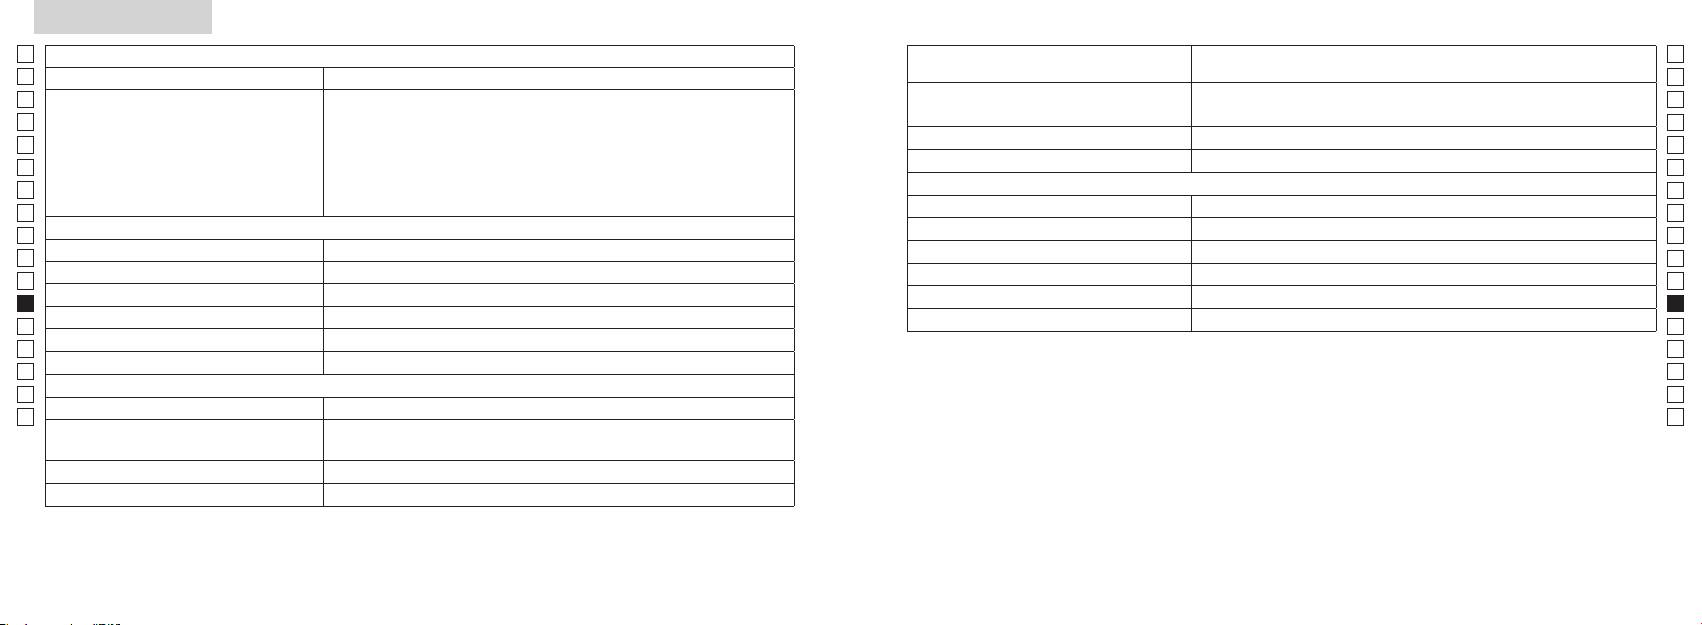
Tekniset tiedot
Jp
Jp
Rakenne
En
Mittausalue
En
Es
Luokan 1M L
Es
Turvallisuus
Luokan I L
Fr
Fr
FCC osa15 A
De
De
It
It
Laser
Se
Se
Luokka
Nl
Nl
Aallonpituus (nm) 905
Ru
Ru
Suurennus ( x ) 6
12
Pt
Pt
ø 21
15
Pl
Pl
7,5
Suuntapoikkeama (mrad)
Fi
Fi
18,3
80 tai alle (ei kastekondensaatiota)
No
No
ø 3,5
Dk
Dk
-
1
* Vesitiiviit mallit
±4 m
Cz
Cz
Muuta
Ro
Ro
˚C) -10 ...
Nikon Laser -etäisyysmittari tarjoaa seuraavia etuja:
Hu
Hu
CR2-litiumparisto, 1 kpl (3V DC)
Huomioi seuraavat asiat Nikon Laser-etäisyysmittarin käytössä.
Mitat (pituus x korkeus x leveys) (mm) 113 x 70 x 39
Noin 175 (ilman paristoa)
214 215
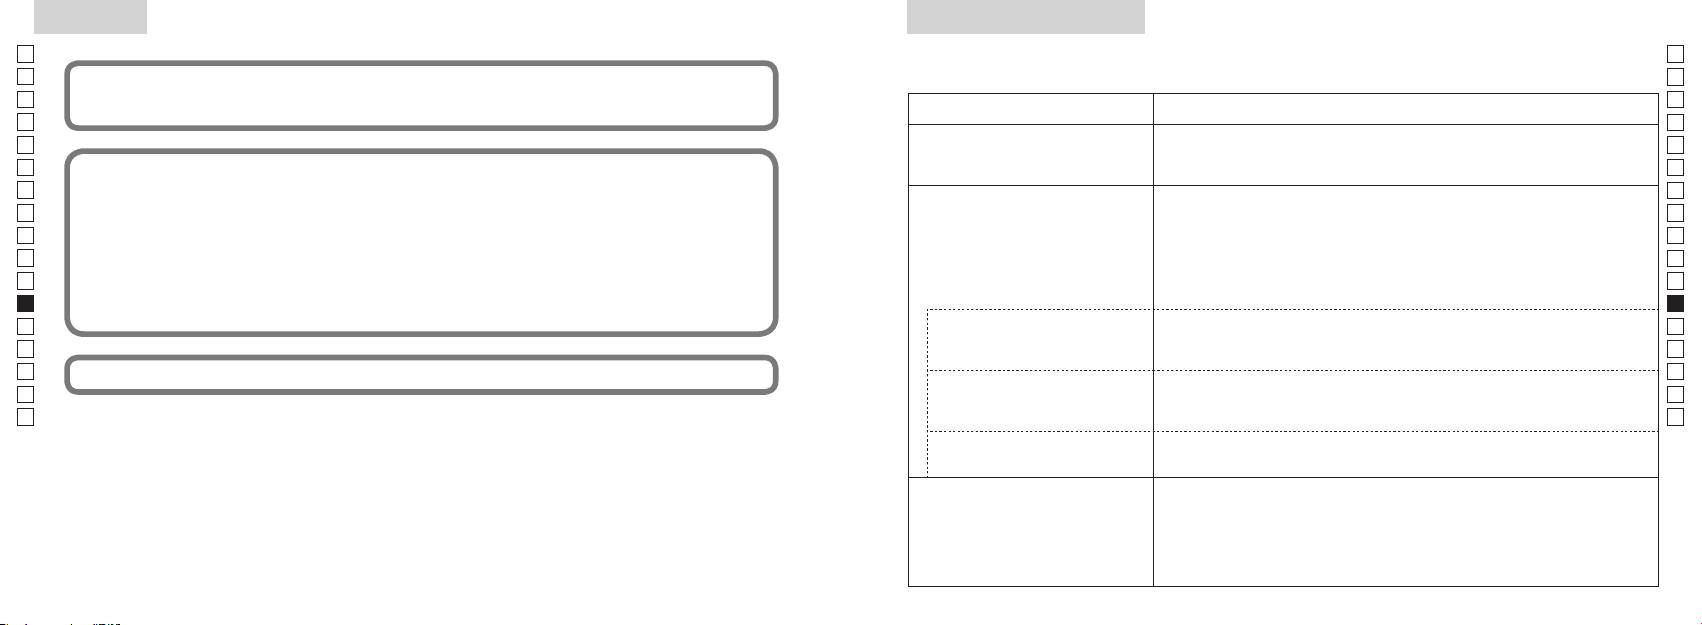
Muuta
Vianetsintä/korjaus
Jp
Jp
En
En
Es
Es
Oire Tarkistuskohdat
Fr
Fr
●
De
De
● Tarkasta pariston asento
It
● Vaihda uusi paristo vanhan tilalle
It
Se
Se
●
Nl
ja lasertunnistimen aukkoa objektiivin linssin puolella.
Nl
●
Ru
Ru
linssin puolella ovat puhtaat. Tarvittaessa puhdista ne.
Pt
Pt
●
Pl
varten.
Pl
● Vaihda uusi paristo vanhan tilalle.
Fi
Fi
No
●
No
●
Dk
Dk
Cz
Cz
Ro
Ro
●
Hu
mitata
Hu
●
olevaa kohdetta ei voi mitata.
● Vaihda uusi paristo vanhan tilalle.
●
varten.
Mittaustulos vaihtelee.
●
●
216 217
Vianetsintä/Korjaus
Jp
Jp
En
En
Es
Es
Oire Tarkistuskohdat
Fr
Fr
De
● Vaihda uusi paristo vanhan tilalle.
De
Norsk
●
It
It
varten.
Se
●
Se
INNHOLD
Nl
Nl
Forsiktighetsregler før bruk .......................... 220-223
Ru
Ru
Nøkkelfunksjoner ...................................................... 224
Pt
Pt
Sammensetning ............................ 225
Pl
Pl
Internt display ............................................................. 226
Fi
Fi
Målingsvisningsmodus ........................................... 227
No
No
Dk
Dk
A ........ 228
Cz
Cz
Skifte batteri ................................................................ 229
Ro
Ro
Måling ................................................................... 230-231
Hu
Hu
Spesifikasjoner .................................................. 232-233
Annet ............................................................................. 234
Reparasjon .................................... 235-236
218 219
Forsiktighetsregler før bruk
Jp
Takk for at du har kjøpt en Nikon Laser Rangefinder COOLSHOT AS.
Følg disse retningslinjene nøye
SIKKERHETSTILTAK (Laser)
Jp
slik at du bruker utstyret på
Nikons laseravstandsmåler bruker en
laseravstandsmåleren utenfor
En
En
riktig måte og unngår potensielt
usynlig laserstråle. Følg disse
barns rekkevidde.
Es
Annen bruk av kontrollene eller justeringer eller annen utførelse av prosedyrer enn det
Es
farlige situasjoner. Før du bruker
retningslinjene nøye:
avstandsmålerens
som oppgis her, kan føre til eksponering av farlig stråling.
Fr
dette produktet, ber vi deg lese
Advarsel
deksel er skadet, eller hvis det
Fr
Trykk ikke ned
kommer en rar lyd etter et fall eller
De
grundig Forsiktighetsregler før
De
〇 Før du bruker dette produktet, ber vi deg lese "Forsiktighetsregler før bruk" og instruksjonene
måle-knappen mens du ser inn i
av en annen grunn, må du straks
bruk og instruksjonene for riktig
It
ta ut batteriet og slutte å bruke
It
optikken fra objektivsiden. Hvis du
for riktig bruk som følger med produktet.
bruk som følger med produktet.
Se
gjør det, kan det skade øynene eller
enheten.
Se
〇 Oppbevar disse instruksjonene på et lett tilgjengelig sted for enkel referanse.
Oppbevar disse instruksjonene
påvirke dem på en negativ måte.
Nl
på et lett tilgjengelig sted for
Nl
〇 Du må ikke demontere eller reparere dette produktet selv, det kan føre til et alvorlig problem.
enkel referanse.
Ru
Ru
Pt
Du må ikke se på laseren med
Pt
ADVARSEL
et annet optisk instrument, for
Pl
● Spesifikasjoner og design kan endres uten varsel.
Pl
Dette symbolet advarer deg om
eksempel linser eller kikkerter, og
● Det er ikke tillatt å reprodusere denne manualen helt eller delvis (med unntak for korte sitater i
Fi
Fi
risikoen for at feilaktig bruk som ikke
heller ikke med det blotte øye. Dette
produktartikler eller anmeldelser) uten skriftlig godkjenning fra NIKON VISION CO., LTD.
No
tar hensyn til innholdet som beskrives
kan føre til skade på øynene.
No
● NIKON VISION CO., LTD. forbeholder seg retten til å endre innholdet som beskrives i disse
her, kan forårsake død eller alvorlige
Dk
Dk
instruksjonene når som helst og uten forutgående varsel.
personskader.
fingrene borte fra
Cz
måle-knappen for å unngå at du
Cz
FORSIKTIG
sender ut laserstrålen ved et uhell.
Ro
Dette symbolet advarer deg om
Ro
risikoen for at feilaktig bruk som ikke
Hu
Hu
i en lenger periode, må du ta ut
tar hensyn til innholdet som beskrives
batteriet.
her, kan forårsake personskade eller
materiell skade.
reparere Nikon-laseravstandsmåleren.
Laserstrålen som sendes ut, kan
være skadelig.
demontert, er
ikke garantert av produsenten.
220 221
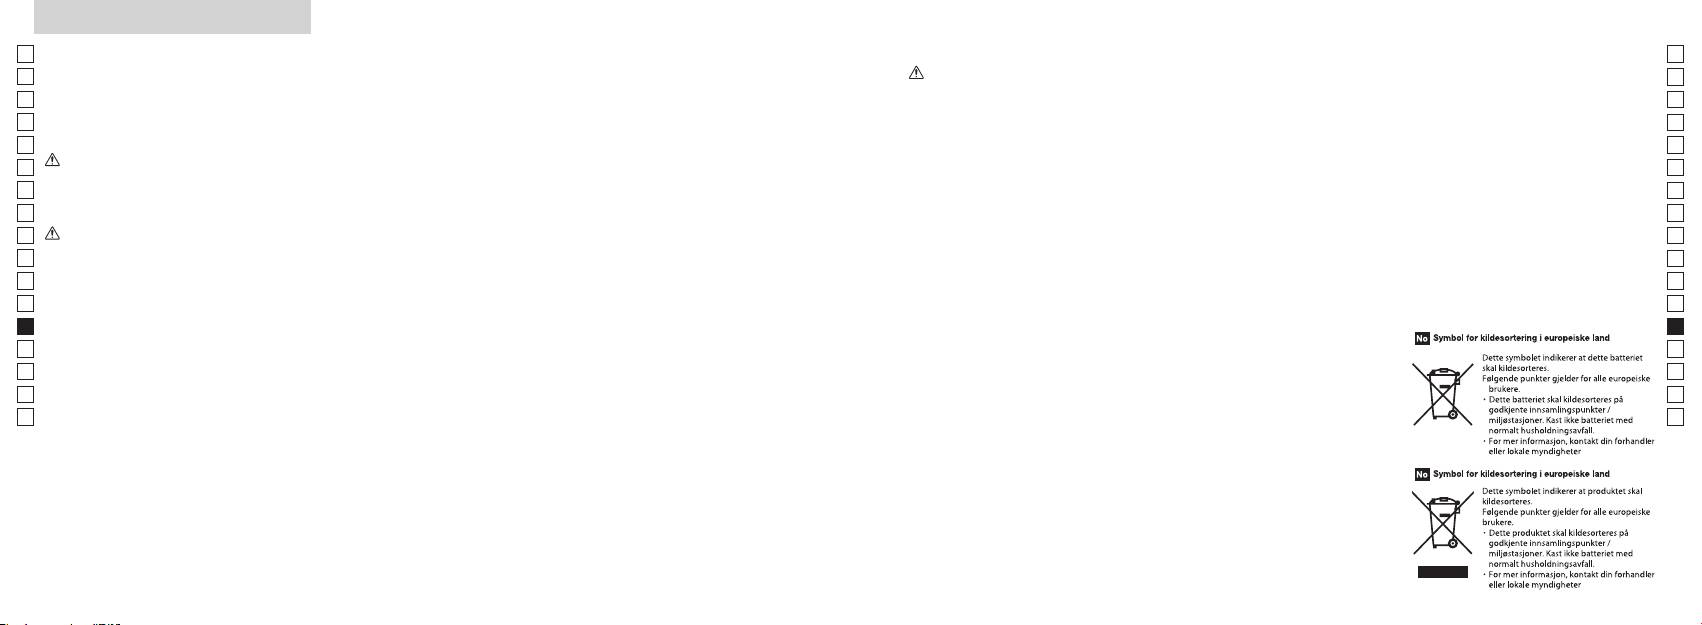
Forsiktighetsregler før bruk
Jp
SIKKERHETSTILTAK
brukes for innpakning av produktet,
SIKKERHETSTILTAK
SIKKERHETSTILTAK
STELL OG VEDLIKEHOLD
Oppbevaring
Jp
eller andre små deler, ute av
En
(Monokular)
(Litium-batteri)
Forsiktig
Objektiv
En
rekkevidde for barn.
mugg på objektivoverflaten ved høy
Nikon-laseravstandsmåleren
Hvis batteriet behandles på feil måte,
Es
Es
fuktighet. Nikon-
benytter et monokular i det optiske
kan det sprekke og lekke, noe som
laseravstandsmåleren er vannfast, er
objektivets overflate, kan du bruke
Fr
øyemuslinger av gummi eller små
den ikke konstruert for bruk under
en myk, oljefri børste.
laseravstandsmåleren må derfor
systemet for å sikte på målet. Følg
Fr
kan føre til korrosjon på utstyr og
deler osv. i munnen. Hvis et barn
De
disse retningslinjene nøye:
flekker på klær.
vann.
oppbevares på et kjølig, tørt sted.
De
svelger en slik del, må du straks ta
Advarsel
Følg disse retningslinjene nøye:
smuss som f.eks. fingeravtrykk fra
Hvis enheten har vært brukt i
It
kontakt med lege.
It
huset på avstandsmåleren så raskt
batteriet
objektivets overflate, tørker du
regnvær eller om natten, må den
Se
-polene plassert riktig vei.
som mulig med en myk, ren klut.
objektivet svært forsiktig med en
tørkes grundig ved romtemperatur
Se
lys eller mot laserstrålen når du
øyemuslinger av gummi i en
myk, ren bomullsklut eller oljefritt
og oppbevares på et kjølig, tørt sted.
Nl
bruker Nikon Laser Rangefinder.
Batteriet bør tas ut når det er utgått
Nl
lengre periode, kan det oppstå
eller hvis utstyret ikke skal brukes på
laseravstandsmåleren ligge i bilen
linsepapir av høy kvalitet. Bruk litt
Ru
Forsiktig
hudinflammasjon. Hvis det oppstår
Ru
lenge.
på en varm eller solrik dag eller i
ren alkohol (ikke denaturert) for å
symptomer på dette, må du slutte å
Pt
nærheten av utstyr som genererer
tørke bort vanskelige flekker. Bruk
Pt
måle-knappen når Nikon-
bruke den og straks ta kontakt med
kortsluttes.
varme. Dette kan ødelegge eller
ikke fløyelsstoff eller vanlig papir.
Pl
Pl
laseravstandsmåleren ikke er i
en lege.
påvirke den på en negativ måte.
Dette kan lage riper på objektivet.
Fi
bruk.
sammen med nøkler eller mynter
Hvis en klut er brukt til rengjøring
Fi
Du må ikke bruke dette produktet
laseravstandsmåleren med deg, bør
No
i en lomme eller veske. Det kan
laseravstandsmåleren ligge i direkte
av huset, bør den ikke brukes om
No
mens du går. Hvis du gjør det, kan
du ha den i det myke etuiet.
føre til overoppvarming eller til at
sollys. Ultrafiolette stråler og høy
igjen til objektivets overflate.
Dk
det forårsake skade eller feil som
Dk
batteriet kortsluttes.
varme kan påvirke enheten på en
Hus
Cz
et resultat av at du går på noe,
ikke fungerer som den skal, må du
negativ måte eller ødelegge den.
Cz
treffer andre, faller eller andre
straks slutte å bruke den og spør din
Ro
vann eller flammer. Batteriet må
myk, ren klut etter at du har blåst
Ro
uhell.
lokale forhandler om hvor du skal
aldri demonteres.
utsettes for plutselige
Hu
vekk støv forsiktig med en
sende den for reparasjon.
Hu
temperaturendringer, kan
blåsebelg*. Ikke bruk benzen,
bærestroppen. Den kan treffe
det forekomme kondens på
tynner eller andre
noen og forårsake skade.
kommer i kontakt med klær eller
objektivoverflatene. Du må ikke
rengjøringsmidler som inneholder
hud, må du skylle umiddelbart med
bruke produktet før kondensen har
løsningsmidler.
produktet på et ustabilt sted. Hvis
mye vann. Hvis det kommer væske
fordampet.
du gjør det, kan det føre til at
fra et ødelagt batteri inn i øyet, må
rengjøringsutstyr av gummi som
produktet faller ned og blir skadet
du straks skylle med rent vann og
blåser luft gjennom en dyse.
eller ikke fungerer.
deretter ta kontakt med lege.
regelverket på stedet.
222 223

Nøkkelfunksjoner Nomenklatur/Sammensetning
Jp
Følgende forhold gjør målingen enklere:
Jp
1
En
4
En
pning for laserstråle
Es
Es
3
2 Laserdetektoråpning
Fr
Fr
avstand ± høyde), noe som er nyttig hvis du spiller golf
3 MODUS-knapp
De
De
4 Måleknapp
It
skifte
Målingen kan være unøyaktig eller feilaktig i følgende
It
56x monokulært okular
tilfeller:
1
Se
Se
henhold til mål, blir benyttet
6 Diopterjusteringsring
Nl
Nl
7 Diopterindeks
Ru
aktiverer funksjonen for kontinuerlig måling
2
5
8 Hull for stropp
Ru
Pt
9 Deksel for batterirom
Pt
Pl
6
!p Symbol for åpentukket deksel for
Pl
konstruert for bruk under vann)
Fi
batterirom
Fi
7
No
!q
No
Nikon-laseravstandsmåleren bruker en usynlig laserstråle
!w Visning av FDA-informasjon
Dk
Dk
for måling. Den måler hvor lang tid det tar for laserstrålen
8
Cz
Cz
å gå fra avstandsmåleren til målet og tilbake igjen.
Ro
Laserens reflektivitet og måleresultater kan variere etter
9
Ro
klimatiske og miljømessige forhold så vel som farge,
Hu
Hu
overflatebehandling, størrelse, form og andre egenskaper
!p
ved målet.
!q
!w
Sammensetning
...................................... x1
.................... x1
......................... x1
....... x1
224 225

Internt display
Målingsvisningsmodus
Jp
Avstand
Jp
for å endre modus i rekkefølgen som vises nedenfor.
En
En
Es
Es
Modus for faktisk
1. Slå på strømmen (kontroller at det interne
Faktisk
Fr
Helling opp
avstand og høyde
Fr
displayet er på).
avstand
De
Helling ned
2. Trykk på og hold MODUS-knappen nede,
De
Målmerke
Høyde
trykk deretter straks ned (etter mindre enn
It
It
Laserstrålemerke
Se
Se
Høyde (faktisk avstand i
enn 2 sekunder.
Nl
innstilling for golf-modus)
Nl
Modus for horisontal
Ru
å skifte målingsvisningsmodus.
Horisontal
Ru
Batteritilstand
avstand og høyde
avstand
vises.
Pt
Pt
『 』
Pl
Høyde
*
Hvis du ikke trykker på knappene i riktig
Pl
『 』 - Vises når laseren brukes til måling.
rekkefølge, vil det ikke bli skiftet.
Fi
Fi
Til stede hele tiden under enkeltmåling. Blinker under kontinuerlig måling.
*
Hvis du skifter modus etter måling,
No
Se ikke inn i objektivlinsen når dette merket vises.
No
konverteres resultatene til den nye
Dk
『
』 - Måler nå
Hellings-
modusen.
Dk
『
』 - "Mislyktes i å måle" eller "Kan ikke måle"
Golf-modus
justert
Cz
*
Når modusen er angitt, utføres målingene i
Cz
avstand
den nye modusen.
Ro
Ro
Faktisk
Hu
* Vanligvis bruker en LCD samme eller lavere forstørrelse. Men LCD-en i dette produktet forstørres
avstand
Hu
med den høye forstørrelsen til okularet. Selv om denne LCD-en ble produsert ved hjelp av den mest
avanserte teknologien, er det umulig å eliminere støvproblemet fullstendig. Som et resultat av dette
kan det være du ser støv. Det vil imidlertid ikke ha noen betydning for målingens nøyaktighet eller for
sikkerheten.
Modus for faktisk
Faktisk
avstand
avstand
226 227
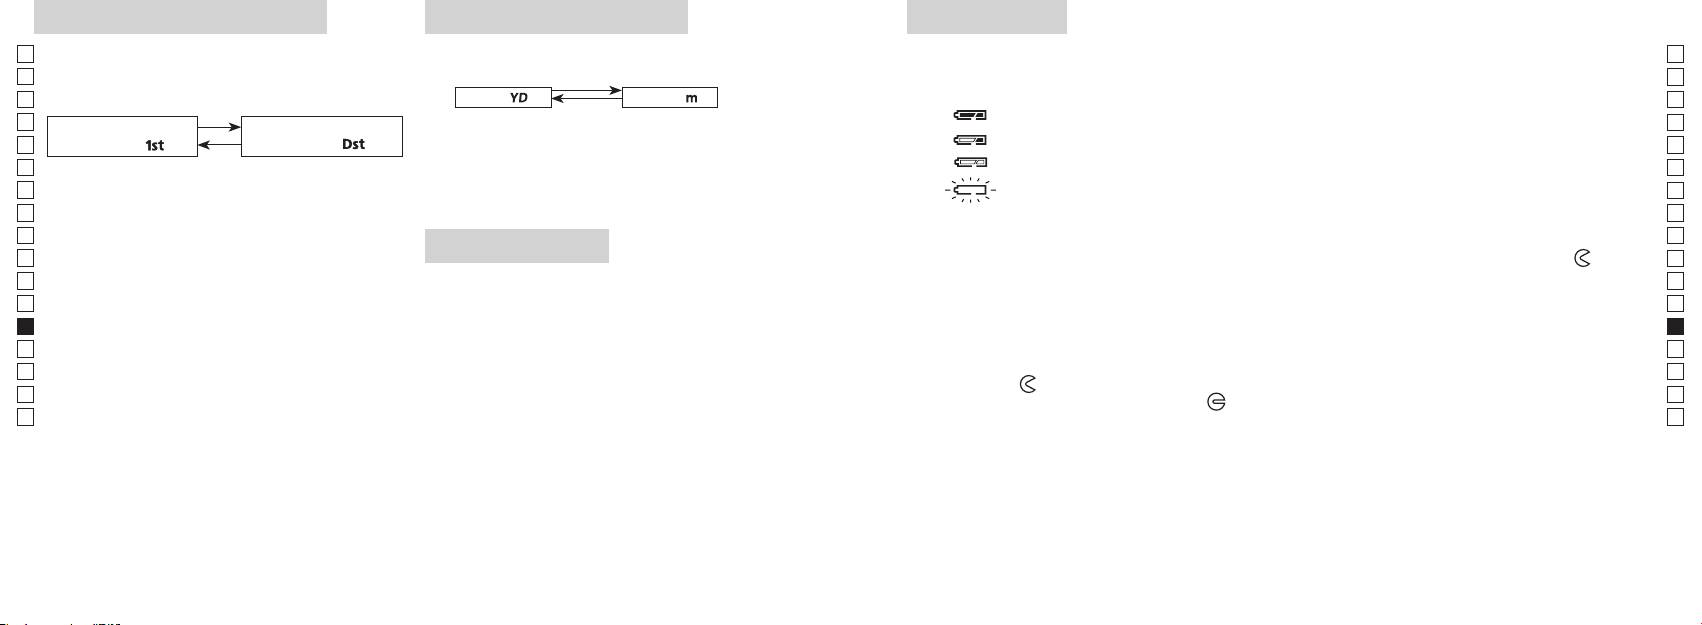
Modus for prioritering av mål
Avstandsvisningsenheter
Skifte batteri
Jp
Denne laseravstandsmåleren bruker modus for
Jp
Batteritype: 3 V CR2 litium-batteri x1
(Standardinnstilling er yard.)
En
Indikatorer for mengde av gjenværende batteri
En
av fjernt mål (standardinnstillingen er modus for
Es
[ ]
Meter [ ]Yard
* Batteritilstandsmerke i internt display varsler når batteriet må skiftes.
Es
prioritering av første mål).
: Batteriet har nok strøm og kan brukes.
Fr
1. Slå på strømmen (kontroller at det interne displayet er på).
Fr
Modus for prioritering av
Modus for prioritering av
2. Trykk på og hold MODUS-knappen nede i mer enn to
: Batteriet begynner å bli svakt. Forbered deg på å skifte batteriet.
De
første mål「
」
fjernt mål
「
」
De
sekunder. Når visningsenheten er skiftet, slipper du
It
: Batteriet er svakt. Batteriet bør skiftes ut med et nytt batteri.
It
1. Slå på strømmen (kontroller at det interne displayet
knappen.
Se
er på).
3. Når enheten er angitt, vil resultatene bli konvertert og
blinker : Batteriet er utladet. Når indikatoren har blinket tre ganger, slår laseravstandsmåleren
Se
2. Trykk på og hold MODUS-knappen nede, trykk
vist i den avstandsvisningsenheten du har valgt.
seg automatisk av. Skift ut batteriet.
Nl
Nl
Ru
Ru
mindre enn 0,5 sekund.
1. Åpne dekselet på batterirommet
Pt
Fortsett å trykke på og holde begge knappene nede
LED-belysning
Bruk tommelen e.l. i innfellingen i dekselet på batterirommet og vri dekselet i retning mot
-merket.
Pt
(mer enn 2 sekunder) til modusen for prioritering
Pl
1. Slå på strømmen (kontroller at det interne displayet er på).
Det kan være litt vanskelig å åpne på grunn av gummipakningen som beskytter mot vann.
Pl
av første mål og modus for prioritering av fjernt mål
2. Ved å trykke på MODUS-knappen i mindre enn
2. Skift ut det gamle batteriet med et nytt
Fi
Fi
skifter.
No
3. Slipp begge knappene når modus er skiftet.
No
*
Dk
*
Hvis du ikke trykker på knappene i riktig rekkefølge,
riktig måte, vil laseravstandsmåleren ikke fungere.
Dk
visning på LCD-panelet.
vil det ikke bli skiftet.
3. Lukk dekselet på batterirommet
Cz
*
Cz
*
Hvis det ikke skjer et skifte, kan du gjenta trinn 2.
laseravstandsmåleren. Hvis du gjør det, vil belysningen
-merket i forhold til indikatoren
●
og sett batteriet inn i batterirommet. Ved hjelp av
Ro
Ro
[
være av når du slår på laseravstandsmåleren igjen.
tommelen e.l. vrir du dekselet mot
-merket. Det kan være litt vanskelig å lukke på grunn av
Hu
prioritering av fjernt mål]
gummipakningen som beskytter mot vann, men fortsett å vri til det stopper. Kontroller at dekselet er
Hu
Når du måler overlappende objekter, viser modus for
helt lukket.
prioritering av første mål avstanden til det nærmeste
Batterilevetid
objektet, og modus for prioritering av fjernt mål viser
Kontinuerlig drift: Ca. 13.000 ganger (ved ca. 20 °C)
avstanden til det fjerneste objektet.
Dette tallet kan variere etter tilstand, temperatur og andre faktorer, f.eks. målets form, farge osv. Brukes bare
som en veiledning.
* Batteriet som følger med denne laseravstandsmåleren er beregnet for driftskontroll. Batteriets levetid vil imidlertid på grunn
av naturlig elektrisk utlading sannsynligvis være kortere enn det som står ovenfor.
* Hvis det kommer vann inn i batterirommet pga. nedsenking, må du tørke batterirommet godt og skifte ut batteriet.
228 229
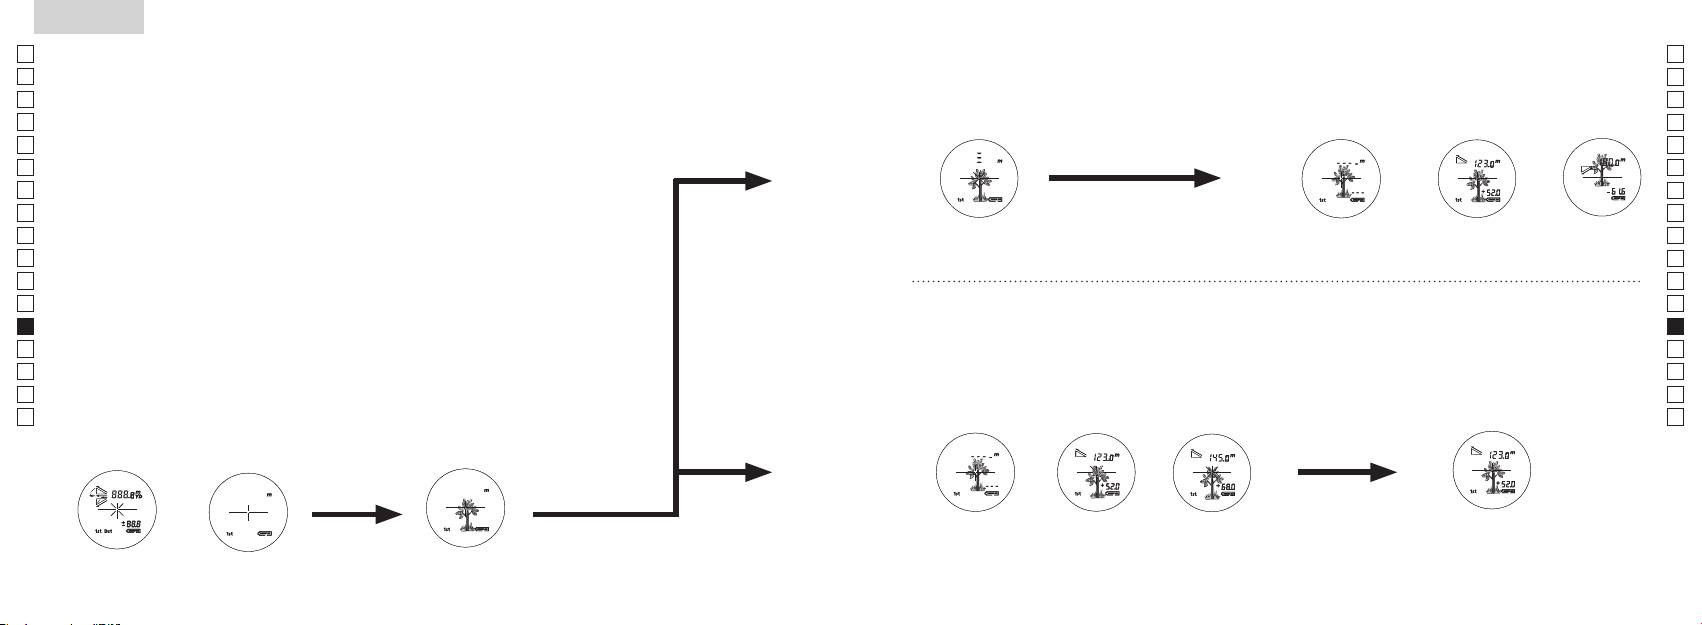
Jp
Jp
En
En
Es
Es
Fr
Fr
De
De
It
It
Se
Se
Nl
Nl
Ru
Ru
Pt
Pt
Pl
Pl
Fi
Fi
No
No
Dk
Dk
Cz
Cz
Ro
Ro
Hu
Hu
230 231
Measurement
1. Press the POWER button for power-on.
(Power turns off 8 seconds after the last
operation.)
Immediately after power-on.
3. Press POWER button once to start single measurement.
4. After measurement, “distance” or “fail to measure” indicator are displayed for 8 seconds, then power turns off. If you press the POWER
button during power-on (while the internal display is lit), another single measurement starts.
unable to measure distance.
3. Keep pressing POWER button to start continuous measurement up to 20 seconds. The internal display shows “distance” and
“fail to measure” indicator alternately.
Note: Laser irradiaton mark is blinking during the measurement.
Note: If you stop pressing the button, the continuous measuremen stops
2. Aim at the target
Positionthetargetatthecenterofthereticle
[Single measurement]
Failure to measure or
unable to measure distance.
[Continuous measurement]
4. After continuous measurement, the measure results are displayed for 8 seconds, then power turns off. If you press the POWER
button during power-on (while the internal display is lit), another measrement starts.
Failure to measure or
Target focusing.
Measuring.
(Initializing)
.
Upward measurement. Downward measurement.
Displays the measured
figure. (Target 1)
Displays the measured figure.
Stand-by.
Displays the measured
figure. (Target 2)
Measurement
1. Press the POWER button for power-on.
(Power turns off 8 seconds after the last
operation.)
Immediately after power-on.
(Initializing)
3. Press POWER button once to start single measurement.
Measuring.
4. After measurement, “distance” or “fail to measure” indicator are displayed for 8 seconds, then power turns off. If you press the POWER
button during power-on (while the internal display is lit), another single measurement starts.
Failure to measure or
unable to measure distance.
Displays the measured
figure. (Target 1)
3. Keep pressing POWER button to start continuous measurement up to 20 seconds. The internal display shows “distance” and
“fail to measure” indicator alternately.
Note: Laser irradiaton mark is blinking during the measurement.
Note: If you stop pressing the button, the continuous measuremen stops
Target focusing.
2. Aim at the target
.
Positionthetargetatthecenterofthereticle
[Single measurement]
Failure to measure or
unable to measure distance.
Upward measurement. Downward measurement.
Displays the measured figure.
[Continuous measurement]
4. After continuous measurement, the measure results are displayed for 8 seconds, then power turns off. If you press the POWER
button during power-on (while the internal display is lit), another measrement starts.
Stand-by.
Displays the measured
figure. (Target 2)
Measurement
1. Press the POWER button for power-on.
(Power turns off 8 seconds after the last
operation.)
Immediately after power-on.
Stand-by.
(Initializing)
2. Aim at the target
.
Positionthetargetatthecenterofthereticle
3. Press POWER button once to start single measurement.
4. After measurement, “distance” or “fail to measure” indicator are displayed for 8 seconds, then power turns off. If you press the POWER
button during power-on (while the internal display is lit), another single measurement starts.
unable to measure distance.
3. Keep pressing POWER button to start continuous measurement up to 20 seconds. The internal display shows “distance” and
“fail to measure” indicator alternately.
Note: Laser irradiaton mark is blinking during the measurement.
Note: If you stop pressing the button, the continuous measuremen stops
[Single measurement]
Failure to measure or
unable to measure distance.
[Continuous measurement]
4. After continuous measurement, the measure results are displayed for 8 seconds, then power turns off. If you press the POWER
button during power-on (while the internal display is lit), another measrement starts.
Failure to measure or
Target focusing.
Measuring.
Upward measurement. Downward measurement.
Displays the measured
figure. (Target 1)
Displays the measured figure.
Displays the measured
figure. (Target 2)
Måling
Forsiktig — Bruk av kontroller, justering eller utførelse av prosedyrer på andre måter enn det som
【
Enkeltmåling
】
beskrives her, kan føre til eksponering av farlig stråling.
3. Trykk på
1. Klargjøring
gang for å starte enkeltmåling.
Sett inn et batteri i batterirommet. (Se "Skifte batterier").
2. Øyemusling av gummi
Både brillebrukere og andre kan bruke denne avstandsmåleren som den er.
3. Diopterjustering
Roter først diopterjusteringsringen mot urviseren til den stopper helt opp. Trykk deretter
Samtidig som du ser gjennom okularet, roterer du diopterjusteringen med urviseren til
LCD-displayet kommer i fokus.
Hvis du roterer ringen for mye, må du rotere den mot urviseren og justere den på nytt.
Hvis diopteret ikke justeres slik at det passer med ditt syn, vil du kanskje ikke kunne sikte
skikkelig på objektet.
【
Funksjon for kontinuerlig måling
】
4. Måle
Før du foretar en måling, må du kontrollere hver modusinnstilling
*
Se de respektive delene om hvordan du angir hver modus.
1. Slå på strømmen (kontroller at
2. Sikt på målet.
det interne displayet er på).
(Automatisk avstenging etter ca.
retikkelen (trådkorset).
8sek. uten betjening)
Umiddelbart etter at strømmen
Standby Målfokusering
er slått på (initialiserer)
Measurement
1. Press the POWER button for power-on.
(Power turns off 8 seconds after the last
operation.)
Immediately after power-on.
Stand-by.
(Initializing)
2. Aim at the target
.
Positionthetargetatthecenterofthereticle
Target focusing.
[Single measurement]
3. Press POWER button once to start single measurement.
Measuring.
4. After measurement, “distance” or “fail to measure” indicator are displayed for 8 seconds, then power turns off. If you press the POWER
button during power-on (while the internal display is lit), another single measurement starts.
Failure to measure or
Upward measurement. Downward measurement.
unable to measure distance.
Displays the measured figure.
[Continuous measurement]
3. Keep pressing POWER button to start continuous measurement up to 20 seconds. The internal display shows “distance” and
“fail to measure” indicator alternately.
Note: Laser irradiaton mark is blinking during the measurement.
Note: If you stop pressing the button, the continuous measuremen stops
Failure to measure or
unable to measure distance.
4. After continuous measurement, the measure results are displayed for 8 seconds, then power turns off. If you press the POWER
button during power-on (while the internal display is lit), another measrement starts.
Displays the measured
figure. (Target 1)
Displays the measured
figure. (Target 2)
Measurement
1. Press the POWER button for power-on.
(Power turns off 8 seconds after the last
operation.)
Immediately after power-on.
Stand-by.
(Initializing)
2. Aim at the target
.
Positionthetargetatthecenterofthereticle
Target focusing.
[Single measurement]
3. Press POWER button once to start single measurement.
Measuring.
4. After measurement, “distance” or “fail to measure” indicator are displayed for 8 seconds, then power turns off. If you press the POWER
button during power-on (while the internal display is lit), another single measurement starts.
Failure to measure or
Upward measurement. Downward measurement.
unable to measure distance.
Displays the measured figure.
[Continuous measurement]
3. Keep pressing POWER button to start continuous measurement up to 20 seconds. The internal display shows “distance” and
“fail to measure” indicator alternately.
Note: Laser irradiaton mark is blinking during the measurement.
Note: If you stop pressing the button, the continuous measuremen stops
Failure to measure or
unable to measure distance.
Displays the measured
figure. (Target 1)
4. After continuous measurement, the measure results are displayed for 8 seconds, then power turns off. If you press the POWER
button during power-on (while the internal display is lit), another measrement starts.
Displays the measured
figure. (Target 2)
Measurement
1. Press the POWER button for power-on.
(Power turns off 8 seconds after the last
operation.)
Immediately after power-on.
Stand-by.
(Initializing)
2. Aim at the target
.
Positionthetargetatthecenterofthereticle
Target focusing.
[Single measurement]
3. Press POWER button once to start single measurement.
Measuring.
4. After measurement, “distance” or “fail to measure” indicator are displayed for 8 seconds, then power turns off. If you press the POWER
button during power-on (while the internal display is lit), another single measurement starts.
Failure to measure or
unable to measure distance.
3. Keep pressing POWER button to start continuous measurement up to 20 seconds. The internal display shows “distance” and
“fail to measure” indicator alternately.
Note: Laser irradiaton mark is blinking during the measurement.
Note: If you stop pressing the button, the continuous measuremen stops
Failure to measure or
unable to measure distance.
[Continuous measurement]
4. After continuous measurement, the measure results are displayed for 8 seconds, then power turns off. If you press the POWER
button during power-on (while the internal display is lit), another measrement starts.
Upward measurement. Downward measurement.
Displays the measured
figure. (Target 1)
Displays the measured figure.
Displays the measured
figure. (Target 2)
Measurement
1. Press the POWER button for power-on.
(Power turns off 8 seconds after the last
operation.)
Immediately after power-on.
Stand-by.
(Initializing)
2. Aim at the target
.
Positionthetargetatthecenterofthereticle
Target focusing.
[Single measurement]
3. Press POWER button once to start single measurement.
Measuring.
4. After measurement, “distance” or “fail to measure” indicator are displayed for 8 seconds, then power turns off. If you press the POWER
button during power-on (while the internal display is lit), another single measurement starts.
unable to measure distance.
3. Keep pressing POWER button to start continuous measurement up to 20 seconds. The internal display shows “distance” and
“fail to measure” indicator alternately.
Note: Laser irradiaton mark is blinking during the measurement.
Note: If you stop pressing the button, the continuous measuremen stops
unable to measure distance.
4. After continuous measurement, the measure results are displayed for 8 seconds, then power turns off. If you press the POWER
button during power-on (while the internal display is lit), another measrement starts.
[Continuous measurement]
Failure to measure or
Failure to measure or
Upward measurement. Downward measurement.
Displays the measured
figure. (Target 1)
Displays the measured figure.
Displays the measured
figure. (Target 2)
Measurement
1. Press the POWER button for power-on.
(Power turns off 8 seconds after the last
operation.)
Immediately after power-on.
Stand-by.
(Initializing)
2. Aim at the target
.
Positionthetargetatthecenterofthereticle
Target focusing.
[Single measurement]
3. Press POWER button once to start single measurement.
4. After measurement, “distance” or “fail to measure” indicator are displayed for 8 seconds, then power turns off. If you press the POWER
button during power-on (while the internal display is lit), another single measurement starts.
unable to measure distance.
3. Keep pressing POWER button to start continuous measurement up to 20 seconds. The internal display shows “distance” and
“fail to measure” indicator alternately.
Note: Laser irradiaton mark is blinking during the measurement.
Note: If you stop pressing the button, the continuous measuremen stops
unable to measure distance.
4. After continuous measurement, the measure results are displayed for 8 seconds, then power turns off. If you press the POWER
button during power-on (while the internal display is lit), another measrement starts.
[Continuous measurement]
Failure to measure or
Failure to measure or
Measuring.
Upward measurement. Downward measurement.
Displays the measured
figure. (Target 1)
Displays the measured figure.
Displays the measured
figure. (Target 2)
Measurement
1. Press the POWER button for power-on.
(Power turns off 8 seconds after the last
operation.)
Immediately after power-on.
Stand-by.
(Initializing)
2. Aim at the target
.
Positionthetargetatthecenterofthereticle
Target focusing.
[Single measurement]
3. Press POWER button once to start single measurement.
Measuring.
4. After measurement, “distance” or “fail to measure” indicator are displayed for 8 seconds, then power turns off. If you press the POWER
button during power-on (while the internal display is lit), another single measurement starts.
unable to measure distance.
3. Keep pressing POWER button to start continuous measurement up to 20 seconds. The internal display shows “distance” and
“fail to measure” indicator alternately.
Note: Laser irradiaton mark is blinking during the measurement.
Note: If you stop pressing the button, the continuous measuremen stops
unable to measure distance.
4. After continuous measurement, the measure results are displayed for 8 seconds, then power turns off. If you press the POWER
button during power-on (while the internal display is lit), another measrement starts.
[Continuous measurement]
Failure to measure or
Failure to measure or
Upward measurement. Downward measurement.
Displays the measured
figure. (Target 1)
Displays the measured figure.
Displays the measured
figure. (Target 2)
Measurement
1. Press the POWER button for power-on.
(Power turns off 8 seconds after the last
operation.)
Immediately after power-on.
Stand-by.
(Initializing)
2. Aim at the target
.
Positionthetargetatthecenterofthereticle
Target focusing.
[Single measurement]
3. Press POWER button once to start single measurement.
Measuring.
4. After measurement, “distance” or “fail to measure” indicator are displayed for 8 seconds, then power turns off. If you press the POWER
button during power-on (while the internal display is lit), another single measurement starts.
Failure to measure or
unable to measure distance.
Displays the measured
figure. (Target 1)
3. Keep pressing POWER button to start continuous measurement up to 20 seconds. The internal display shows “distance” and
“fail to measure” indicator alternately.
Note: Laser irradiaton mark is blinking during the measurement.
Note: If you stop pressing the button, the continuous measuremen stops
Failure to measure or
unable to measure distance.
Upward measurement. Downward measurement.
Displays the measured figure.
[Continuous measurement]
4. After continuous measurement, the measure results are displayed for 8 seconds, then power turns off. If you press the POWER
button during power-on (while the internal display is lit), another measrement starts.
Displays the measured
figure. (Target 2)
Measurement
1. Press the POWER button for power-on.
(Power turns off 8 seconds after the last
operation.)
Immediately after power-on.
Stand-by.
(Initializing)
2. Aim at the target
.
Positionthetargetatthecenterofthereticle
Target focusing.
[Single measurement]
3. Press POWER button once to start single measurement.
Measuring.
4. After measurement, “distance” or “fail to measure” indicator are displayed for 8 seconds, then power turns off. If you press the POWER
button during power-on (while the internal display is lit), another single measurement starts.
Failure to measure or
unable to measure distance.
3. Keep pressing POWER button to start continuous measurement up to 20 seconds. The internal display shows “distance” and
“fail to measure” indicator alternately.
Note: Laser irradiaton mark is blinking during the measurement.
Note: If you stop pressing the button, the continuous measuremen stops
Failure to measure or
unable to measure distance.
[Continuous measurement]
4. After continuous measurement, the measure results are displayed for 8 seconds, then power turns off. If you press the POWER
button during power-on (while the internal display is lit), another measrement starts.
Upward measurement. Downward measurement.
Displays the measured
figure. (Target 1)
Displays the measured figure.
Displays the measured
figure. (Target 2)
indikatoren eller "målt
avstand" vises i 8 sekunder, deretter slås strømmen av. Hvis du
trykker på
knappen når strømmen er på (mens det
interne displayet er på), starter en annen enkeltmåling.
"Mislyktes i å måle" eller
Måling oppover Måling nedover
Måle
"Kan ikke måle" avstand
Viser den målte avstanden
3. Trykk og hold på
måling i ca. 8 sekunder. Det interne displayet viser vekselvis
avstand) i ca. 8 sekunder, deretter slås strømmen av.
indikatoren "mislykket måling" og "målt avstand".
Hvis du trykker på
knappen når strømmen er på
*
Laserstrålingsmerket blinker under målingen.
(mens det interne displayet er på), starter en annen måling.
*
Hvis du slipper fingeren fra knappen, stopper kontinuerlig
måling.
Når du for eksempel måler et hullflagg på en golfbane, må du
"Mislyktes i å måle"
Viser den målte
Viser den målte
bruke modus for prioritering av første mål. Søk etter flagget med
eller "Kan ikke måle"
avstanden (mål 1)
avstanden (mål 2)
funksjonen for kontinuerlig måling for å måle på en enkel måte.
avstand
Hvis det ikke er noen objekter mellom deg og flagget, er det
laveste tallet avstanden til flagget.
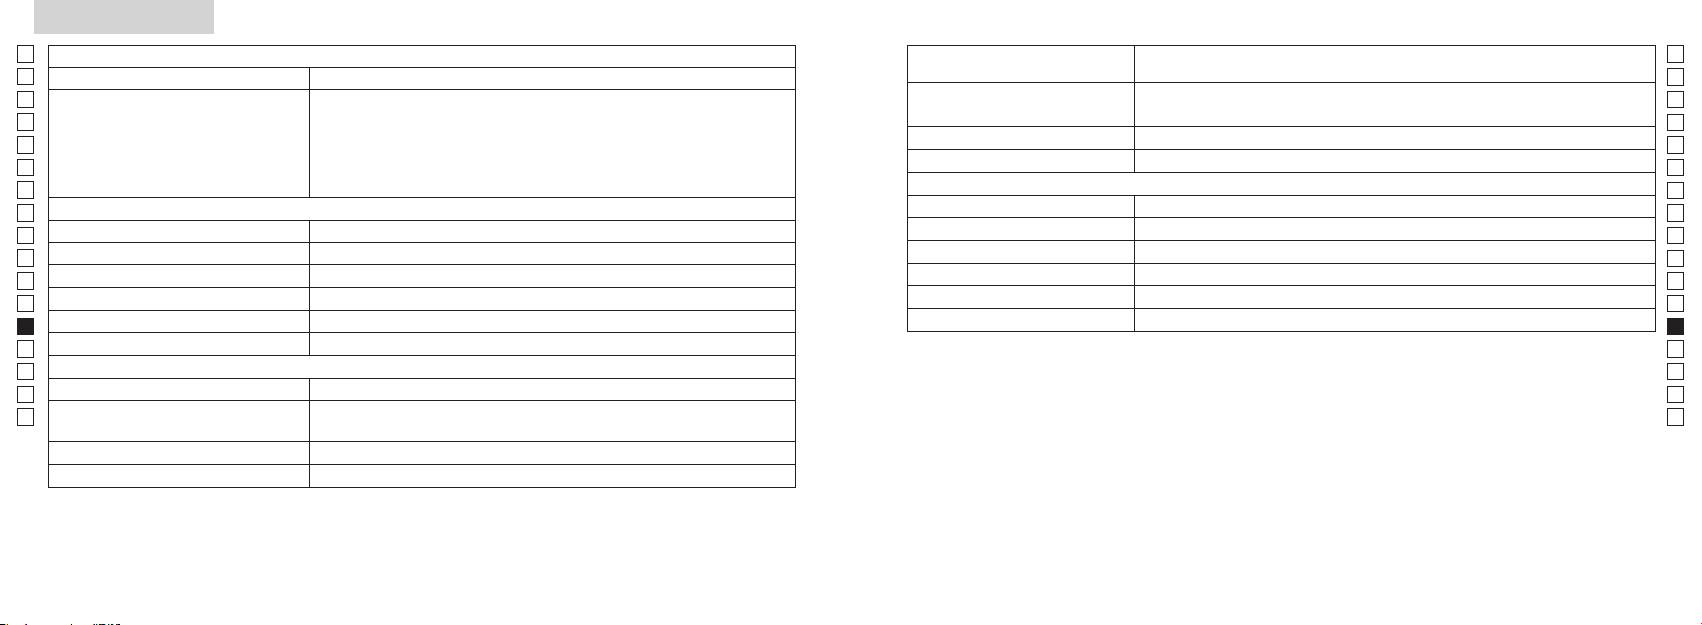
Spesifikasjoner
Jp
Målesystem
Hus: Vanntett (maksimumsdybde på 1 meter i opptil 10 minutter)*
Jp
Konstruksjon
(Batterirom: Vannbestandig**)
En
Måleområde
En
Es
Klasse 1M L
Es
Sikkerhet
Klasse I L
Fr
Faktisk avstand (nedre 3 tall):
Fr
De
Avstandsdisplay (trinnvis økning)
De
Miljø
It
Høyde (nedre 3 tall):
It
Laser
Se
Se
Optisk system
Klasse
Nl
Nl
Forstørrelse (x) 6
Bølgelengde (nm) 905
Ru
Ru
ø21
12
Pt
Pt
Vinkel på synsfelt (virkelig) (˚) 7,5
15
Pl
Pl
Øyestykke (mm) 18,3
Strålingsdivergens (mrad)
Fi
Fi
Utgangspupill (mm) ø3,5
Fuktighet ved drift (% RF) 80 eller mindre (uten kondensering)
No
No
-
1
Diopterjustering ± 4 m
Dk
Dk
* Vanntette modeller
Annet
Cz
Denne Nikon-laseravstandsmåleren er vannfast, og det vil ikke bli skader på det optiske systemet hvis den senkes ned eller
Cz
Driftstemperatur (˚C) -10 —
mistes i vann med en maksimal dybde på 1 meter i opptil 10 minutter.
Ro
Ro
Nikon-laseravstandsmåleren har følgende fordeler:
Hu
CR2 litium-batteri x 1 (DC 3 V)
Hu
Strømkilde
Automatisk avstenging (etter ca. 8 sek. uten betjening)
Dimensjoner (L x H x B) (mm) 113 x 70 x 39
Vær oppmerksom på følgende når du bruker Nikon-laseravstandsmåleren:
Vekt (g) Ca. 175 (uten batteri)
** Batterirommet er vannbestandig, ikke vanntett. Det kan komme vann inn i laseravstandsmåleren hvis den senkes ned i vann.
Hvis det kommer vann inn i batteriromet, må all fuktighet tørkes bort og batterirommet må få tid til å tørke.
232 233
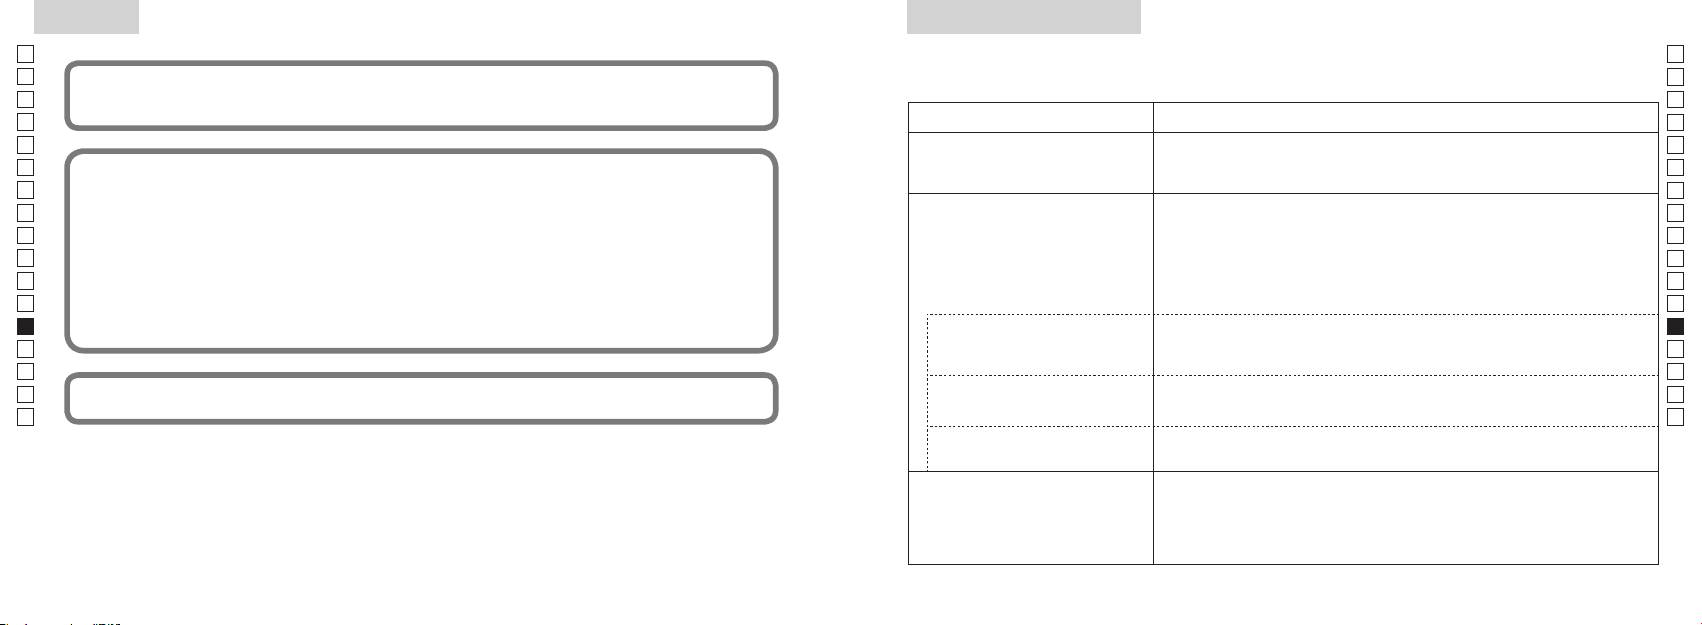
Annet
Feilsøking/Reparasjon
Jp
Hvis din Nikon-laseravstandsmåler må repareres, kan du ta kontakt med din lokale forhandler eller med butikken der du kjøpte
Jp
En
Denne enheten etterkommer kravene i del 15 i FCC-reglene. Bruk av enheten er underlagt følgende to betingelser:
En
Es
1. Denne enheten må ikke forårsake sjenerende interferens, og
Es
2. Denne enheten må tåle alle typer interferens, inkludert interferens som kan føre til uønskede virkninger.
Symptom Sjekkpunkt
Fr
Fr
De
●
De
It
Dette utstyret er testet og funnet å overholde grensene for en digital enhet i klasse B, i henhold til del 15 i FCC-
● Kontroller at batteriet er satt inn riktig
(LCD lyser ikke)
It
● Skift ut det gamle batteriet med et nytt.
Se
Se
fra en installasjon i en bolig. Utstyret genererer, benytter og kan sende ut radiofrekvensenergi og kan, hvis det
Nl
Nl
ikke monteres og brukes i henhold til instruksjonene, føre til skadelig interferens for radiokommunikasjon. Det er
● Kontroller at det ikke er noe, f.eks. en finger eller en stropp, som blokkerer
åpningen for laserstrålen og laserdetektoren på objektivlinsesiden.
Ru
imidlertid ingen garanti for at det ikke vil være interferens i en bestemt installasjon. Hvis dette utstyret gir sjenerende
Ru
● Kontroller at åpningen for laserstrålen og laserdetektoren på objektivlinsesiden
interferens for radio- eller TV-mottak, noe som kan avgjøres ved å slå utstyret av og på igjen, anbefales det at
Kan ikke måle avstanden
Pt
er rene. Rengjør dem hvis det er nødvendig.
Pt
brukeren prøver å korrigere interferensen ved hjelp av ett av disse tiltakene:
Pl
● Kontroller at målets form og tilstand er slik at det reflekterer laserstrålen.
Pl
● Skift ut det gamle batteriet med et nytt.
Fi
Fi
No
●
No
● Kontroller at målet er innenfor måleområdet
Dk
Dk
Cz
Cz
Denne laseravstandsmåleren fra Nikon er en grunnleggende avstandsmåler. Resultater fra den kan ikke brukes som
Ro
Nærmere mål, innenfor
● Sørg for at det ikke er noe, for eksempel blader eller gress, mellom Nikon-
Ro
formelle bevis.
måleområdet, kan ikke måles
laseravstandsmåleren og målet.
Hu
Hu
Mål ut over en bestemt avstand
● Sørg for at det ikke er noe, for eksempel blader eller gress, mellom Nikon-
kan ikke måles
laseravstandsmåleren og målet.
● Skift ut batteriet med et nytt.
● Kontroller at målets form og tilstand er slik at det reflekterer laserstrålen.
Måleresultat er ustabilt
●
● Sørg for at det ikke er noe, for eksempel blader eller gress, mellom Nikon-
laseravstandsmåleren og målet.
234 235
Feilsøking/Reparasjon
Jp
Jp
En
En
Es
Es
Symptom Sjekkpunkt
Fr
Fr
De
De
● Skift ut batteriet med et nytt.
It
● Kontroller at målets form og tilstand er slik at det reflekterer laserstrålen.
It
Feilaktig resultat vises
Dansk
● Sørg for at det ikke er noe, for eksempel blader eller gress, mellom Nikon-
Se
Se
laseravstandsmåleren og målet.
Nl
Nl
INDHOLD
Ru
Ru
Hvis det fremdeles er problemer etter at du har sett i FReparasjonstabellen, må du ta kontakt med din lokale
Forholdsregler før brug .................................. 238-241
Pt
siden det kan ha oppstått en funksjonsfeil. La aldri noen andre enn den offisielle
Pt
representanten for produsenten kontrollere eller reparere Nikon-laseravstandsmåleren. Hvis du ikke følger disse instruksjonene,
Vigtige funktioner ..................................................... 242
Pl
Pl
kan det føre til skade på person eller produkt.
........................ 243
Fi
Fi
Internt display ............................................................. 244
No
No
Funktion for visning af måling .............................. 245
Dk
Dk
Cz
Cz
........................... 246
Ro
Ro
Udskiftning af batteri ............................................... 247
Hu
Hu
Måling ................................................................... 248-249
Specifikationer .................................................. 250-251
Andet ............................................................................. 252
................................... 253-254
236 237
Forholdsregler før brug
Jp
Tak, fordi du har anskaffet en Nikon laser-afstandsmåler COOLSHOT AS.
Overhold følgende retningslinjer
SIKKERHEDSFORHOLDSREGLER
Jp
nøje, så du kan bruge udstyret
afstandsmåleren uden for børns
En
(Laser)
En
korrekt og undgå potentielle
rækkevidde.
Nikon laser-afstandsmåleren bruger en
Es
Anden brug af betjeninger og justeringer eller udførelse af andre procedurer end dem, der er
Es
farlige problemer. Før brugen af
usynlig laserstråle. Sørg for at
specificeret heri, kan resultere i udsættelse for farlig bestråling.
Fr
laser-afstandsmålerens huset er
dette produkt skal du læse
overholde følgende:
Fr
beskadiget, eller hvis den udsender
De
"Forholdsregler før brug" og
Advarsel
De
〇 Før brugen af dette produkt skal du læse alle "Sikkerhedsforholdsregler før brug", og
underlige lyde efter at være tabt
instruktionerne for korrekt brug,
,
It
eller af anden årsag, skal du straks
It
instruktioner om korrekt brug, der følger med produktet.
der følger med produktet.
mens du ser ind i optikken fra
Se
fjerne batteriet og stoppe brugen
frontlinsens side. Hvis dette ikke
Se
〇 Opbevar denne vejledning i nærheden, så du kan slå op i den efter behov.
Opbevar denne vejledning i
af enheden.
Nl
overholdes, kan det skade eller
nærheden, så du kan slå op i den
Nl
〇 Adskil, eller reparer ikke selv dette produkt, da det kan give alvorlige problemer.
ødelægge dit syn.
efter behov.
Ru
Ru
Pt
Pt
● Specifikationer og design kan ændres uden varsel.
ADVARSEL
mennesker.
Pl
Pl
Denne angivelse advarer dig om, at al
● Al gengivelse i nogen som helst form af denne vejledning, i sin helhed eller delvist (bortset fra
Fi
ukorrekt brug, der ikke overholder
Fi
instrumenter, såsom gennem linser
korte citater til anmelderartikler eller tidsskrifter) er forbudt uden skriftlig tilladelse fra NIKON
No
indholdet beskrevet i dette
eller kikkert og heller ikke med det
No
VISION CO., LTD.
dokument, kan resultere i fare for død
blotte øje. Det kan beskadige øjnene.
Dk
Dk
● NIKON VISION CO., LTD. forbeholder sig ret til, når som helst at ændre indholdet i disse
eller alvorlig personskade.
Cz
Cz
vejledninger uden forudgående varsel.
FORSIGTIG
Ro
Denne angivelse advarer dig om, at al
knappen for at undgå utilsigtet
Ro
ukorrekt brug, der ikke overholder
udsendelse af laserstrålen.
Hu
Hu
indholdet beskrevet i dette
dokument, kan resultere i potentiel
ikke skal bruges i en længere periode.
personskade eller tab af materiel.
afstandsmåleren. Den udsendte
laserstråle kan være skadelig for
mere under producentens garanti.
238 239
Forholdsregler før brug
Jp
SIKKERHEDSFORHOLDSREGLER
SIKKERHEDSFORHOLDSREGLER
SIKKERHEDSFORHOLDSREGLER
PLEJE OG VEDLIGEHOLDELSE
Opbevaring
Jp
eller andre mindre dele var
En
(Monocular)
(Litium-batteri)
Forsigtig
Linser
En
indpakket i, uden for børns
linserne på grund af høj fugtighed.
Es
Nikon laser-afstandsmåleren
Hvis batteriet behandles ukorrekt
Es
rækkevidde.
er vandfast, er den ikke designet til
børste uden olie.
Derfor skal du opbevare Nikon laser-
anvender en monocular i sit optiske
kan der opstå åbninger i det, og det
Fr
at være under vand.
afstandsmåleren på et køligt, tørt
Fr
system til at sigte mod målet. Sørg
kan lække, og korrodere udstyret og
gummiøjestykker og lign. små dele
fingeraftryk, fra linserne ved at
sted.
De
for at overholde følgende:
plette tøj.
De
i munden. Hvis børn sluger sådanne
skal hurtigst muligt fjernes fra
aftørre disse meget forsigtigt med
It
Advarsel
Sørg for at overholde følgende:
dele, søges straks læge.
It
afstandsmålerens overflade ved
en blød, ren bomuldsklud eller en
nat, skal du lade den tørre grundigt
Se
brug af en blød, ren klud.
speciel oliefri serviet beregnet til
ved stuetemperatur og derefter
Se
et stærkt lys eller laserstrålen,
korrekt placeret.
i længere tid, kan det give
linser. Brug en lille smule ren sprit
lægge den et køligt, tørt sted.
Nl
når du bruger Nikon
Nl
betændelse i huden. Hvis der opstår
afstandsmåleren i bilen på en
(ikke denatureret) til at aftørre
laserafstandsmåleren.
afladet eller under længere
Ru
symptomer på øjenbetændelse, skal
Ru
varm solskinsdag, eller tæt ved
fastsiddende smuds. Brug ikke
perioder, hvor apparatet ikke
Pt
Forsigtig
du straks ophøre med brugen og
varmeudviklende udstyr. Det kan
frottéklude eller almindeligt stof, da
Pt
anvendes.
-
søge læge.
skade eller forringe den.
det kan ridse linsen. Når kluden har
Pl
Pl
afstandsmåleren, skal du ikke
været brugt til rengøring af huset,
slutklemme.
Fi
knappen.
afstandsmåleren i dens bløde etui,
afstandsmåleren i direkte sol.
må den ikke bruges igen til linserne.
Fi
sammen med nøgler
når du bærer den.
No
Ultraviolette stråler og meget varme
Huset
No
eller mønter i en lomme eller taske,
du går. Hvis dette ikke overholdes,
kan påvirke enheden negativt eller
Dk
da det kan kortslutte på grund af
Dk
kan det medføre personskade
ikke fungerer korrekt, skal du straks
ødelægge den.
overophedning.
blød, ren klud efter at have fjernet
Cz
eller fejlfunktion, da man kan gå
standse brugen af den og kontakte
Cz
støvet forsigtigt med en blæser*.
ind i noget, ramme andre, falde
den lokale forhandler for at få
udsættes for pludselige
Ro
åben ild. Skil aldrig batteriet ad.
Brug ikke benzen, fortynder eller
Ro
eller udsætte sig for andre ulykker.
anvisning om, hvor den skal sendes
temperaturændringer, kan der
Hu
andre organiske midler.
hen til reparation.
Hu
opstå vandkondensering på
nakkerem. Det kan ramme nogen
linseoverfladerne. Brug den ikke, før
kommer i kontakt med tøj eller hud,
af gummi. som blæser luft fra en
og forårsage skade.
kondensen er fordampet.
skal man straks skylle i rigeligt vand.
dyse.
Hvis væske fra et beskadiget batteri
ustabilt sted. Det kan falde ned og
kommer i øjet, skal man straks skylle
blive beskadiget eller forårsage
i rent vand og søge læge.
skade.
man følge de lokale bestemmelser
herfor.
240 241
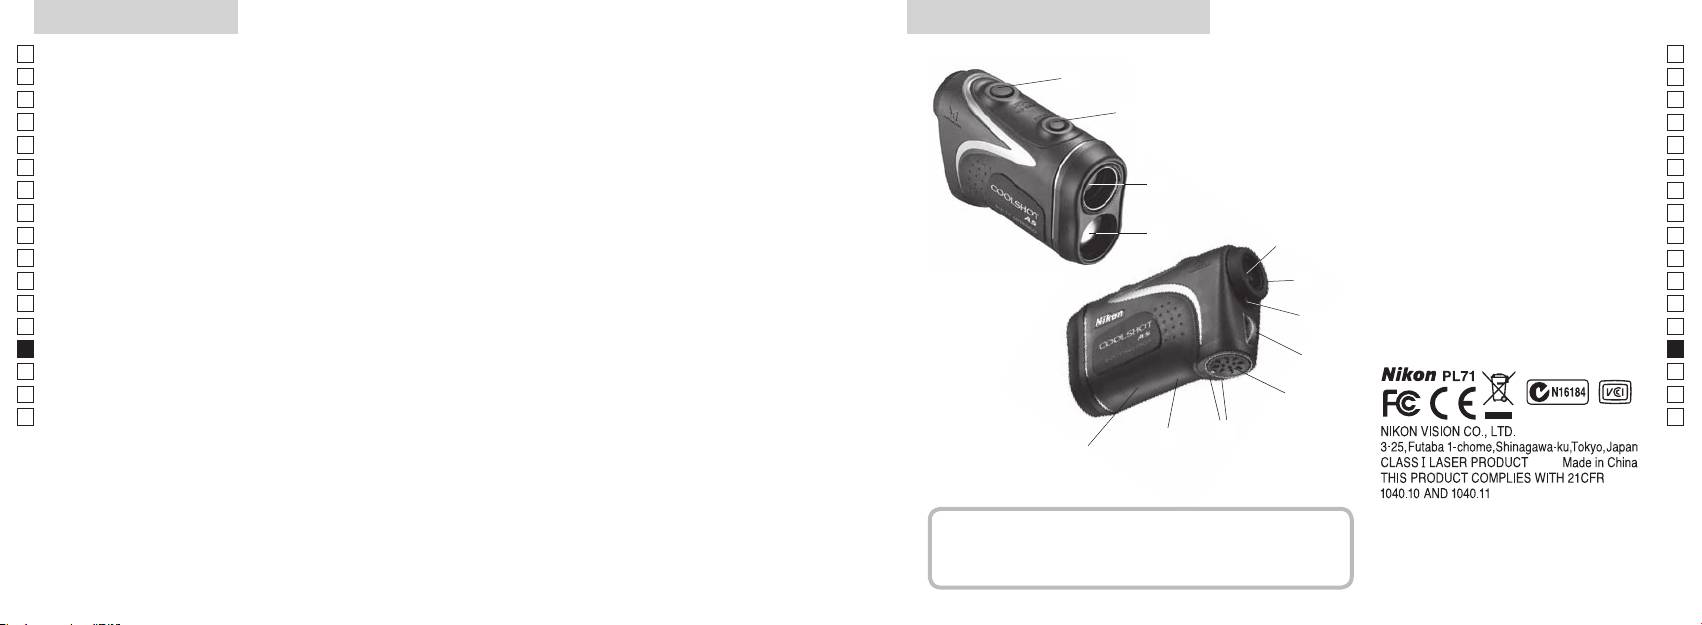
Vigtige funktioner Nomenklatur/Medfølgende dele
Jp
Følgende forhold gør målingen lettere:
Jp
1
En
4
En
Laser udsendelsesblænde
Es
Es
3
2 Laser detektorblænde
Fr
Fr
afstand ± højde), som er nyttig ved golfspil
3
De
De
4
It
skifte mellem
Målingen kan være unøjagtig under følgende forhold:
It
56 x monocular øjestykke
1
Se
Se
vælges efter målet
6
Nl
Nl
7 Diopterindeks
Ru
målingsfunktionen
2
5
8 Øje til nakkerem
Ru
spejl, o.lign)
Pt
9 Batterikammerdæksel
Pt
Pl
6
!p Lukket"-angivelse for
Pl
brug under vand)
Fi
batterikammerdæksel
Fi
7
No
!q Mærkat med produktnummer
No
Nikon laser-afstandsmåleren bruger en usynlig laserstråle
!w Indikation af FDA oplysninger
Dk
Dk
til måling. Den måler tiden laserstrålen bruger til at
8
Cz
Cz
bevæge sig fra afstandsmåleren til målet og tilbage igen.
Ro
Laser reflektivitet og målingsresultater kan variere efter
9
Ro
klimatiske og omgivende forhold, samt efter farven,
Hu
Hu
overfladefinish, størrelse, form og andre egenskaber ved
!p
målet.
!q
!w
Medfølgende dele
......................................x1
.......................... x1
...........................x1
.....x1
242 243
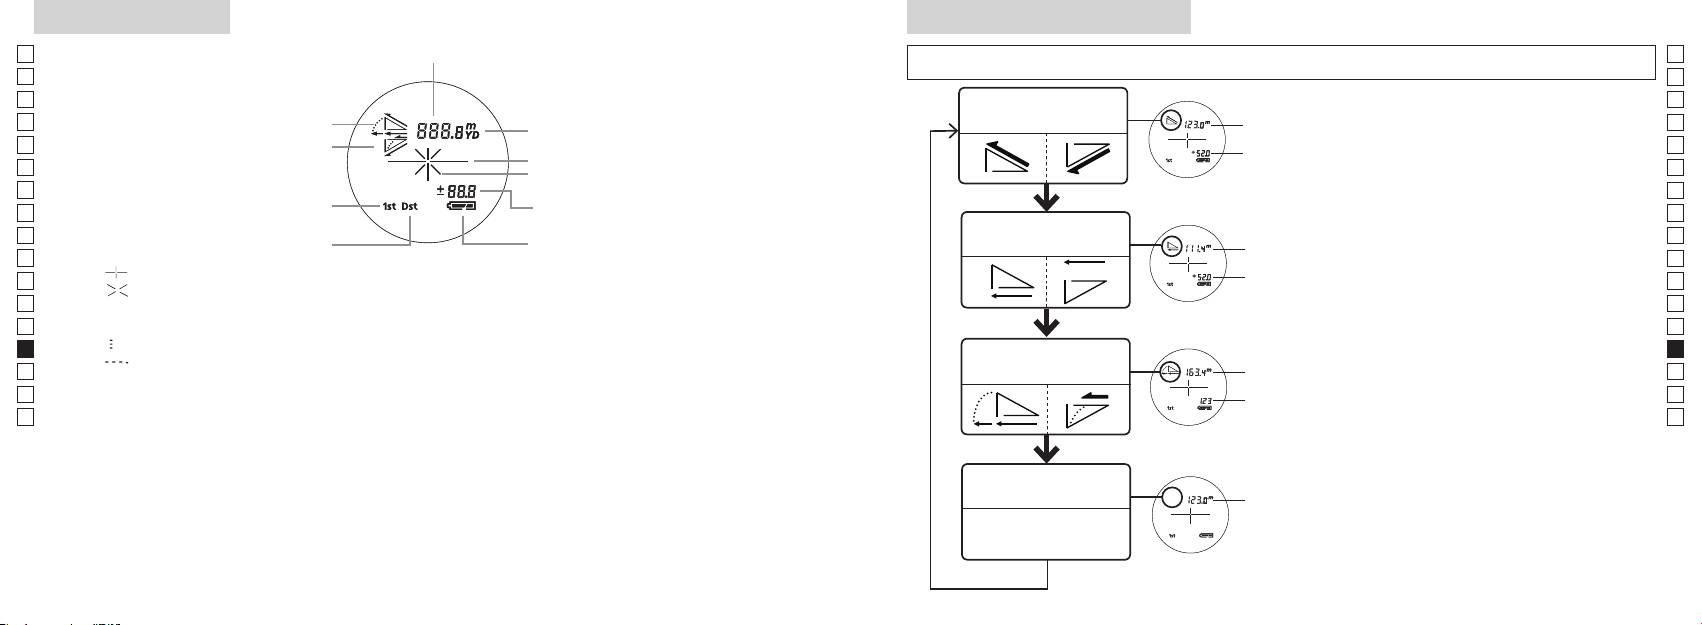
Internt display
Funktion for visning af måling
Jp
Afstand
Jp
sek.), for at skifte funktionen i rækkefølgen, der vises nedenfor.
En
En
Es
Es
Funktion for faktisk
1. Tænd for strømmen (Kontrollér, at det interne
Faktisk
Fr
Opadgående
afstand og højde
Fr
display er tændt).
afstand
De
Nedadgående
De
Målmærke
Højde
tryk derefter straks (mindre end 0,5 sek.) på
It
It
Laserirradiationsmærke
Se
Se
Højde (faktisk afstand ved
i 2 sekunder.
Nl
Nl
indstilling for golffunktion)
Funktion for vandret
Ru
for at skifte visningsmåden for måling.
Vandret
Ru
Batteritilstand
afstand og højde
Pt
afstand
Pt
『 』
funktion vises.
Pl
Højde
Pl
『 』 - Vises, mens laseren udsendes til en måling.
*
Hvis der ikke trykkes på knapperne i den
Fi
Fi
Forbliver vist under enkelt måling. Blinker under fortsatte målinger.
rette rækkefølge, skiftes der ikke.
No
Se ikke ind i frontlinsen, når dette mærke vises.
Skift af funktion efter måling konverterer
No
*
Dk
『
』 - Måler nu
Hældnings-
resultaterne til den nye funktion.
Dk
『
』 - "Måling mislykket" eller "Kunne ikke måle"
Golffunktion
justeret
*
Cz
Cz
afstand
målinger i den nye funktion.
Ro
Ro
Faktisk
Hu
afstand
Hu
produkt bliver forstørret af øjestykkets store forstørrelse. Selv om LCD-displayet er fremstillet med brug
af den mest avancerede teknologi, så er det umuligt at fjerne støv fuldstændigt. Derfor kan der måske
ses støv. Det vil imidlertid ikke påvirke målingens nøjagtighed eller brugssikkerheden.
Funktion for faktisk
Faktisk
afstand
afstand
244 245
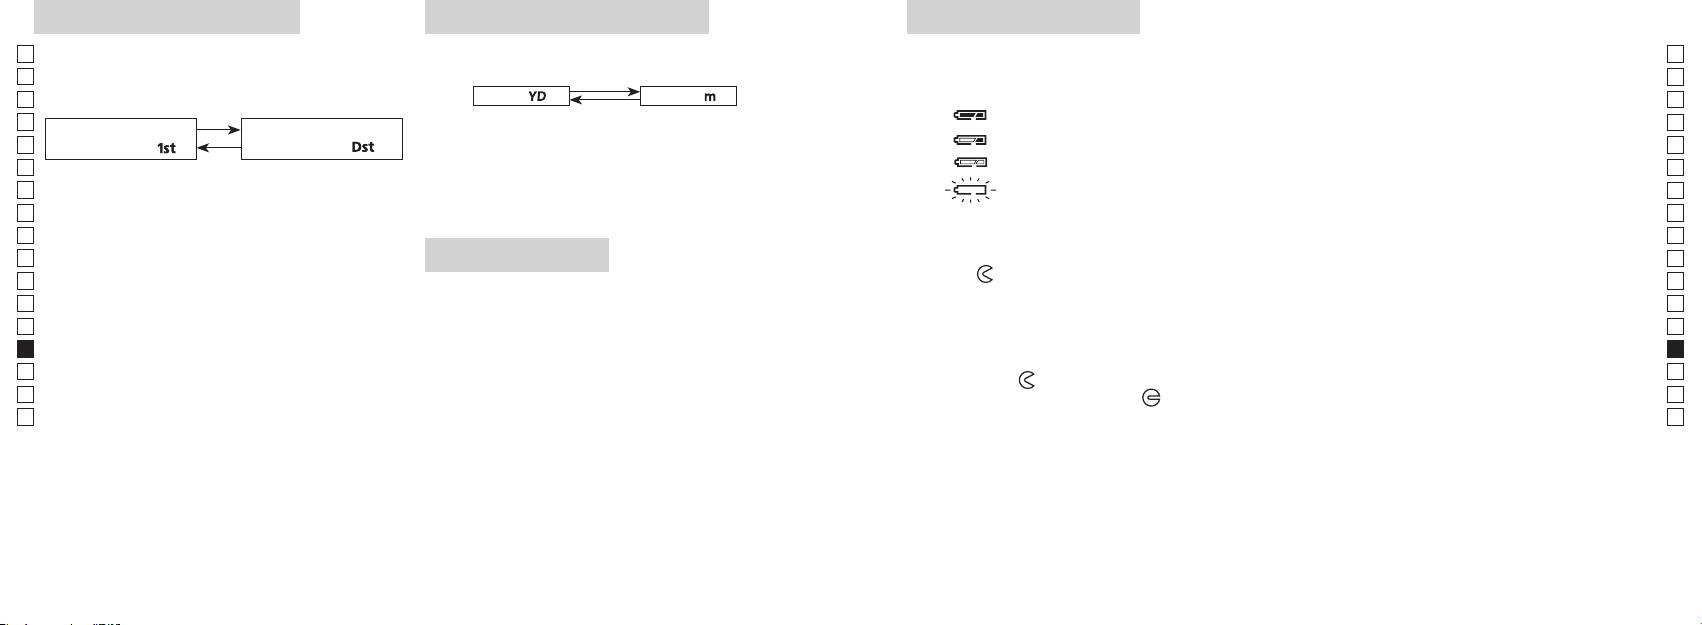
Enheder for afstandsvisning
Udskiftning af batteriFunktion for målprioritet
Jp
Denne laser-afstandsmåler anvender et system der
Jp
Batteritype: 3 V CR2 lithium batteri x1
(Fabriksstandardindstilling er yard.)
En
Indikatorer for batteriniveau
En
Es
[ ]
Meter [ ]Yard
* Mærke for batteristatus i det interne display vil advare, når batteriet skal udskiftes.
Es
nærmeste mål.)
: Batteriet er tilstrækkeligt opladet til brug.
Fr
1. Tænd for strømmen (Kontrollér, at det interne display er
Fr
tændt).
: Batteriet begynder at være afladet. Batteriet skal snart udskiftes.
De
nærmeste mål「
」
fjerneste mål
「
」
De
It
: Batteriniveauet er lavt. Batteriet skal udskiftes med et nyt.
It
1. Tænd for strømmen (Kontrollér, at det interne
sekunder. Når visningsenheden har skiftet, slippes
Se
display er tændt).
knappen.
Se
3. Når enheden er indstillet, bliver resultaterne konverteret
afstandsmåleren automatisk. Udskift batteriet.
Nl
Nl
og vist i den måleenhed, du har valgt for afstand.
Ru
Ru
nede i 0,5 sekund.
1. Åbn batteridækslet
Pt
Fortsæt med at trykke og holde nede på begge
Ved brug af tommelfingeren eller lign. i batteridækslets fordybning drejes dækslet i retning mod
Pt
LED-belysning
knapper (mere end 2 sekunder), indtil funktion for
-mærket. Det er måske ikke let at åbne på grund af den vandtætte gummipakning.
Pl
Pl
1. Tænd for strømmen (Kontrollér, at det interne display er
2. Udskift det gamle batteri med et nyt
Fi
Fi
har skiftet.
tændt).
No
3. Slip begge knapper, når funktionen har skiftet.
No
*
Hvis der ikke trykkes på knapperne i den rette
korrekt, fungerer laser-afstandsmåleren ikke.
Dk
Dk
rækkefølge, skiftes der ikke.
3. Luk batteridækslet
*
Cz
Cz
*
Hvis skiftningen ikke lykkes, gentages trin 2.
LCD-panelet.
Tilpas
-mærket med
●
-indikatoren, og indsæt batteridækslet. Ved brug af tommelfingeren eller
Ro
Ro
*
lign. drejes dækslet mod
-mærket. Den kan være lidt svært at lukke på grund af den vandtætte
[
Hu
afstandsmåleren. Hvis det gøres, vil belysningen være
gummipakning, men fortsæt med at dreje det, så langt det kan komme. Kontroller, at dækslet er
Hu
]
slukket, når laser-afstandsmåleren tændes igen.
korrekt lukket.
Når der måles afstand til mål, der overlapper hinanden,
Batterilevetid
viser funktion for prioritet til nærmeste mål afstanden til
Fortsat drift: Ca. 13.000 gange (ved ca. 20°C)
det nærmeste mål, og funktion for prioritet til fjerneste
Dette tal kan være lidt anderledes alt efter tilstanden, temperatur, og andre faktorer, såsom målets form, farve,
mål viser afstanden til det fjerneste mål.
mv. Det er kun et vejledende tal.
afladning vil levetiden af dette batteri sandsynligvis være kortere, end angivet ovenfor.
* Hvis der kommer vand ind i batterikammeret på grund af neddypning, skal du aftørre al fugt og lade kammeret tørre helt,
før batteriet lægges i igen.
246 247
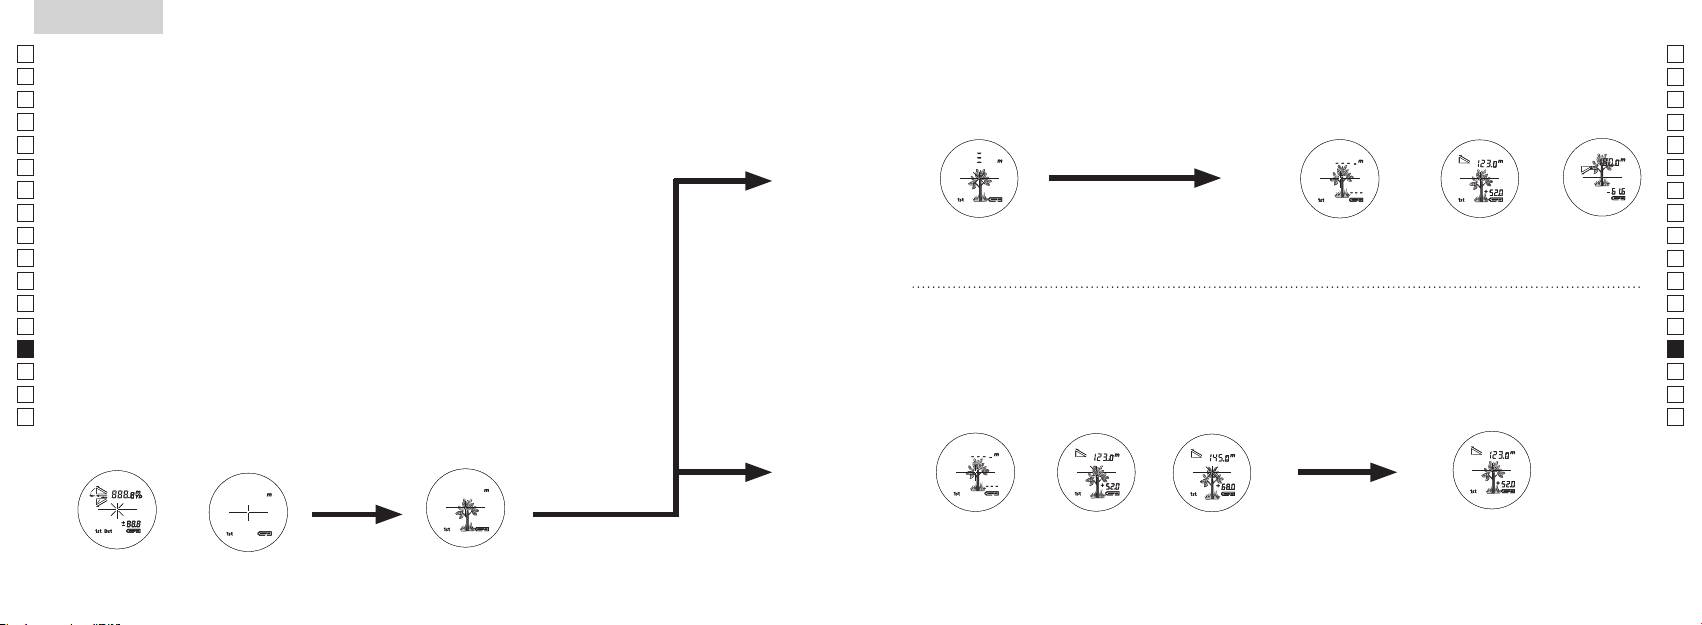
Jp
Jp
En
En
Es
Es
Fr
Fr
De
De
It
It
Se
Se
Nl
Nl
Ru
Ru
Pt
Pt
Pl
Pl
Fi
Fi
No
No
Dk
Dk
Cz
Cz
Ro
Ro
Hu
Hu
248 249
Measurement
1. Press the POWER button for power-on.
(Power turns off 8 seconds after the last
operation.)
Immediately after power-on.
3. Press POWER button once to start single measurement.
4. After measurement, “distance” or “fail to measure” indicator are displayed for 8 seconds, then power turns off. If you press the POWER
button during power-on (while the internal display is lit), another single measurement starts.
unable to measure distance.
3. Keep pressing POWER button to start continuous measurement up to 20 seconds. The internal display shows “distance” and
“fail to measure” indicator alternately.
Note: Laser irradiaton mark is blinking during the measurement.
Note: If you stop pressing the button, the continuous measuremen stops
2. Aim at the target
Positionthetargetatthecenterofthereticle
[Single measurement]
Failure to measure or
unable to measure distance.
[Continuous measurement]
4. After continuous measurement, the measure results are displayed for 8 seconds, then power turns off. If you press the POWER
button during power-on (while the internal display is lit), another measrement starts.
Failure to measure or
Target focusing.
Measuring.
(Initializing)
.
Upward measurement. Downward measurement.
Displays the measured
figure. (Target 1)
Displays the measured figure.
Stand-by.
Displays the measured
figure. (Target 2)
Measurement
1. Press the POWER button for power-on.
(Power turns off 8 seconds after the last
operation.)
Immediately after power-on.
(Initializing)
3. Press POWER button once to start single measurement.
Measuring.
4. After measurement, “distance” or “fail to measure” indicator are displayed for 8 seconds, then power turns off. If you press the POWER
button during power-on (while the internal display is lit), another single measurement starts.
Failure to measure or
unable to measure distance.
Displays the measured
figure. (Target 1)
3. Keep pressing POWER button to start continuous measurement up to 20 seconds. The internal display shows “distance” and
“fail to measure” indicator alternately.
Note: Laser irradiaton mark is blinking during the measurement.
Note: If you stop pressing the button, the continuous measuremen stops
Target focusing.
2. Aim at the target
.
Positionthetargetatthecenterofthereticle
[Single measurement]
Failure to measure or
unable to measure distance.
Upward measurement. Downward measurement.
Displays the measured figure.
[Continuous measurement]
4. After continuous measurement, the measure results are displayed for 8 seconds, then power turns off. If you press the POWER
button during power-on (while the internal display is lit), another measrement starts.
Stand-by.
Displays the measured
figure. (Target 2)
Measurement
1. Press the POWER button for power-on.
(Power turns off 8 seconds after the last
operation.)
Immediately after power-on.
Stand-by.
(Initializing)
2. Aim at the target
.
Positionthetargetatthecenterofthereticle
3. Press POWER button once to start single measurement.
4. After measurement, “distance” or “fail to measure” indicator are displayed for 8 seconds, then power turns off. If you press the POWER
button during power-on (while the internal display is lit), another single measurement starts.
unable to measure distance.
3. Keep pressing POWER button to start continuous measurement up to 20 seconds. The internal display shows “distance” and
“fail to measure” indicator alternately.
Note: Laser irradiaton mark is blinking during the measurement.
Note: If you stop pressing the button, the continuous measuremen stops
[Single measurement]
Failure to measure or
unable to measure distance.
[Continuous measurement]
4. After continuous measurement, the measure results are displayed for 8 seconds, then power turns off. If you press the POWER
button during power-on (while the internal display is lit), another measrement starts.
Failure to measure or
Target focusing.
Measuring.
Upward measurement. Downward measurement.
Displays the measured
figure. (Target 1)
Displays the measured figure.
Displays the measured
figure. (Target 2)
Måling
Advarsel — Brug af betjeninger og justeringer eller udførsel af andre
【
Enkelt måling
】
procedurer end dem, der er specificeret heri, kan resultere i udsættelse for farlig bestråling.
3. Tryk på
1. Forberedelse
én gang for at begynde en enkel
måling.
Læg et batteri i batterikammeret. (Se "Udskiftning af batteri")
2. Gummiøjestykke
Både brillebærere og ikke brillebærere kan bruge denne afstandsmåler, som den er.
3. Justering af diopter
Drej først diopterjusteringshjulet mod uret, indtil det ikke kan komme længere.
at det interne display er tændt). Mens du kigger gennem øjestykket, drejes
diopterjusteringshjulet med uret, indtil LCD-visningen kommer i fokus.
Hvis du drejer hjulet for meget med uret, drejes det meget tilbage mod uret, og
justér derefter igen.
Hvis diopter ikke justeres efter dit syn, kan du ikke fokusere tydeligt på dit motiv.
【
Funktion for fortsat måling
】
4. Måling
*
Se venligst hver afsnit for indstilling af hver funktion.
1. Tænd for strømmen (Kontrollér,
2. Sigt mod målet.
at det interne display er tændt)
(Automatisk slukning efter
trådkorset.
ca. 8. sek. uden betjening)
Straks efter tænding
Stand-by Sigter mod målet
(initialiserer)
Measurement
1. Press the POWER button for power-on.
(Power turns off 8 seconds after the last
operation.)
Immediately after power-on.
Stand-by.
(Initializing)
2. Aim at the target
.
Positionthetargetatthecenterofthereticle
Target focusing.
[Single measurement]
3. Press POWER button once to start single measurement.
Measuring.
4. After measurement, “distance” or “fail to measure” indicator are displayed for 8 seconds, then power turns off. If you press the POWER
button during power-on (while the internal display is lit), another single measurement starts.
Failure to measure or
Upward measurement. Downward measurement.
unable to measure distance.
Displays the measured figure.
[Continuous measurement]
3. Keep pressing POWER button to start continuous measurement up to 20 seconds. The internal display shows “distance” and
“fail to measure” indicator alternately.
Note: Laser irradiaton mark is blinking during the measurement.
Note: If you stop pressing the button, the continuous measuremen stops
Failure to measure or
unable to measure distance.
4. After continuous measurement, the measure results are displayed for 8 seconds, then power turns off. If you press the POWER
button during power-on (while the internal display is lit), another measrement starts.
Displays the measured
figure. (Target 1)
Displays the measured
figure. (Target 2)
Measurement
1. Press the POWER button for power-on.
(Power turns off 8 seconds after the last
operation.)
Immediately after power-on.
Stand-by.
(Initializing)
2. Aim at the target
.
Positionthetargetatthecenterofthereticle
Target focusing.
[Single measurement]
3. Press POWER button once to start single measurement.
Measuring.
4. After measurement, “distance” or “fail to measure” indicator are displayed for 8 seconds, then power turns off. If you press the POWER
button during power-on (while the internal display is lit), another single measurement starts.
Failure to measure or
Upward measurement. Downward measurement.
unable to measure distance.
Displays the measured figure.
[Continuous measurement]
3. Keep pressing POWER button to start continuous measurement up to 20 seconds. The internal display shows “distance” and
“fail to measure” indicator alternately.
Note: Laser irradiaton mark is blinking during the measurement.
Note: If you stop pressing the button, the continuous measuremen stops
Failure to measure or
unable to measure distance.
Displays the measured
figure. (Target 1)
4. After continuous measurement, the measure results are displayed for 8 seconds, then power turns off. If you press the POWER
button during power-on (while the internal display is lit), another measrement starts.
Displays the measured
figure. (Target 2)
Measurement
1. Press the POWER button for power-on.
(Power turns off 8 seconds after the last
operation.)
Immediately after power-on.
Stand-by.
(Initializing)
2. Aim at the target
.
Positionthetargetatthecenterofthereticle
Target focusing.
[Single measurement]
3. Press POWER button once to start single measurement.
Measuring.
4. After measurement, “distance” or “fail to measure” indicator are displayed for 8 seconds, then power turns off. If you press the POWER
button during power-on (while the internal display is lit), another single measurement starts.
Failure to measure or
unable to measure distance.
3. Keep pressing POWER button to start continuous measurement up to 20 seconds. The internal display shows “distance” and
“fail to measure” indicator alternately.
Note: Laser irradiaton mark is blinking during the measurement.
Note: If you stop pressing the button, the continuous measuremen stops
Failure to measure or
unable to measure distance.
[Continuous measurement]
4. After continuous measurement, the measure results are displayed for 8 seconds, then power turns off. If you press the POWER
button during power-on (while the internal display is lit), another measrement starts.
Upward measurement. Downward measurement.
Displays the measured
figure. (Target 1)
Displays the measured figure.
Displays the measured
figure. (Target 2)
Measurement
1. Press the POWER button for power-on.
(Power turns off 8 seconds after the last
operation.)
Immediately after power-on.
Stand-by.
(Initializing)
2. Aim at the target
.
Positionthetargetatthecenterofthereticle
Target focusing.
[Single measurement]
3. Press POWER button once to start single measurement.
Measuring.
4. After measurement, “distance” or “fail to measure” indicator are displayed for 8 seconds, then power turns off. If you press the POWER
button during power-on (while the internal display is lit), another single measurement starts.
unable to measure distance.
3. Keep pressing POWER button to start continuous measurement up to 20 seconds. The internal display shows “distance” and
“fail to measure” indicator alternately.
Note: Laser irradiaton mark is blinking during the measurement.
Note: If you stop pressing the button, the continuous measuremen stops
unable to measure distance.
4. After continuous measurement, the measure results are displayed for 8 seconds, then power turns off. If you press the POWER
button during power-on (while the internal display is lit), another measrement starts.
[Continuous measurement]
Failure to measure or
Failure to measure or
Upward measurement. Downward measurement.
Displays the measured
figure. (Target 1)
Displays the measured figure.
Displays the measured
figure. (Target 2)
Measurement
1. Press the POWER button for power-on.
(Power turns off 8 seconds after the last
operation.)
Immediately after power-on.
Stand-by.
(Initializing)
2. Aim at the target
.
Positionthetargetatthecenterofthereticle
Target focusing.
[Single measurement]
3. Press POWER button once to start single measurement.
4. After measurement, “distance” or “fail to measure” indicator are displayed for 8 seconds, then power turns off. If you press the POWER
button during power-on (while the internal display is lit), another single measurement starts.
unable to measure distance.
3. Keep pressing POWER button to start continuous measurement up to 20 seconds. The internal display shows “distance” and
“fail to measure” indicator alternately.
Note: Laser irradiaton mark is blinking during the measurement.
Note: If you stop pressing the button, the continuous measuremen stops
unable to measure distance.
4. After continuous measurement, the measure results are displayed for 8 seconds, then power turns off. If you press the POWER
button during power-on (while the internal display is lit), another measrement starts.
[Continuous measurement]
Failure to measure or
Failure to measure or
Measuring.
Upward measurement. Downward measurement.
Displays the measured
figure. (Target 1)
Displays the measured figure.
Displays the measured
figure. (Target 2)
Measurement
1. Press the POWER button for power-on.
(Power turns off 8 seconds after the last
operation.)
Immediately after power-on.
Stand-by.
(Initializing)
2. Aim at the target
.
Positionthetargetatthecenterofthereticle
Target focusing.
[Single measurement]
3. Press POWER button once to start single measurement.
Measuring.
4. After measurement, “distance” or “fail to measure” indicator are displayed for 8 seconds, then power turns off. If you press the POWER
button during power-on (while the internal display is lit), another single measurement starts.
unable to measure distance.
3. Keep pressing POWER button to start continuous measurement up to 20 seconds. The internal display shows “distance” and
“fail to measure” indicator alternately.
Note: Laser irradiaton mark is blinking during the measurement.
Note: If you stop pressing the button, the continuous measuremen stops
unable to measure distance.
4. After continuous measurement, the measure results are displayed for 8 seconds, then power turns off. If you press the POWER
button during power-on (while the internal display is lit), another measrement starts.
[Continuous measurement]
Failure to measure or
Failure to measure or
Upward measurement. Downward measurement.
Displays the measured
figure. (Target 1)
Displays the measured figure.
Displays the measured
figure. (Target 2)
Measurement
1. Press the POWER button for power-on.
(Power turns off 8 seconds after the last
operation.)
Immediately after power-on.
Stand-by.
(Initializing)
2. Aim at the target
.
Positionthetargetatthecenterofthereticle
Target focusing.
[Single measurement]
3. Press POWER button once to start single measurement.
Measuring.
4. After measurement, “distance” or “fail to measure” indicator are displayed for 8 seconds, then power turns off. If you press the POWER
button during power-on (while the internal display is lit), another single measurement starts.
Failure to measure or
unable to measure distance.
Displays the measured
figure. (Target 1)
3. Keep pressing POWER button to start continuous measurement up to 20 seconds. The internal display shows “distance” and
“fail to measure” indicator alternately.
Note: Laser irradiaton mark is blinking during the measurement.
Note: If you stop pressing the button, the continuous measuremen stops
Failure to measure or
unable to measure distance.
Upward measurement. Downward measurement.
Displays the measured figure.
[Continuous measurement]
4. After continuous measurement, the measure results are displayed for 8 seconds, then power turns off. If you press the POWER
button during power-on (while the internal display is lit), another measrement starts.
Displays the measured
figure. (Target 2)
Measurement
1. Press the POWER button for power-on.
(Power turns off 8 seconds after the last
operation.)
Immediately after power-on.
Stand-by.
(Initializing)
2. Aim at the target
.
Positionthetargetatthecenterofthereticle
Target focusing.
[Single measurement]
3. Press POWER button once to start single measurement.
Measuring.
4. After measurement, “distance” or “fail to measure” indicator are displayed for 8 seconds, then power turns off. If you press the POWER
button during power-on (while the internal display is lit), another single measurement starts.
Failure to measure or
unable to measure distance.
3. Keep pressing POWER button to start continuous measurement up to 20 seconds. The internal display shows “distance” and
“fail to measure” indicator alternately.
Note: Laser irradiaton mark is blinking during the measurement.
Note: If you stop pressing the button, the continuous measuremen stops
Failure to measure or
unable to measure distance.
[Continuous measurement]
4. After continuous measurement, the measure results are displayed for 8 seconds, then power turns off. If you press the POWER
button during power-on (while the internal display is lit), another measrement starts.
Upward measurement. Downward measurement.
Displays the measured
figure. (Target 1)
Displays the measured figure.
Displays the measured
figure. (Target 2)
indikator for "måling mislykket" eller
"målt afstand" i 8 sekunder, derefter slukkes. Hvis du trykker på
-knappen under opstart (mens det interne display
er aktivt), begynder en anden enkel måling.
Måler
"Måling mislykket"
Måling opad Måling nedad
eller "Kunne ikke
Viser det målte tal
måle" afstand
3. Tryk på
måling i 8 sekunder. Det interne display viser enten indikator for
måling i 8 sekunder, derefter slukkes.
"måling mislykket" eller "målt afstand".
Hvis du trykker på
-knappen under opstart (mens
*
Symbolet for laserudsendelse blinker under målingen.
det interne display er aktivt), begynder en anden måling.
*
Hvis du ophører med at trykke på knappen, stopper den
fortsatte måling.
Når du f.eks. måler en markørpind på en golfbane, skal du bruge
"Måling mislykket"
Viser det målte tal
Viser det målte tal
eller "Kunne ikke
(mål 1)
(mål 2)
markørpinden med funktion for fortsat måling. Hvis der ikke er
måle" afstand
nogen genstande mellem dig og markørpinden, er afstanden til
markørpinden det mindste tal.
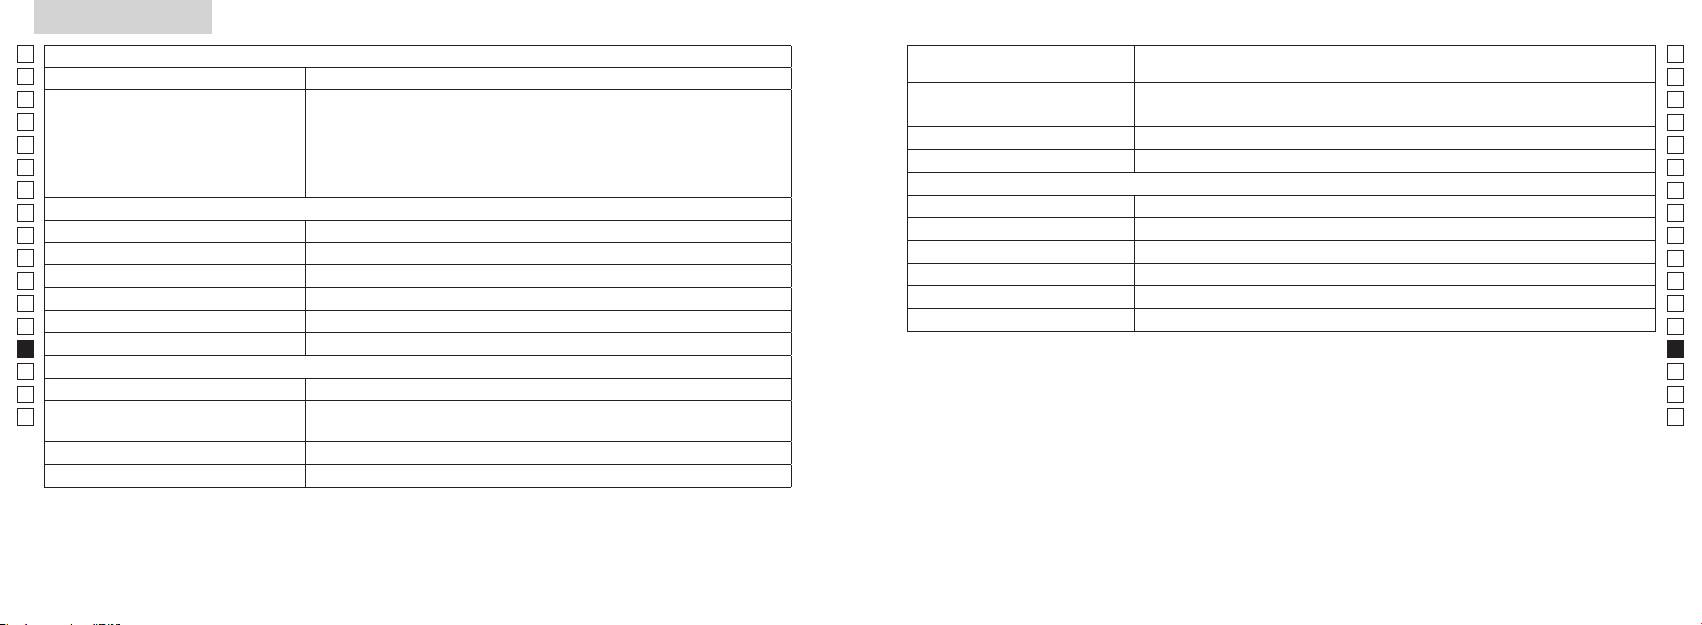
Specifikationer
Jp
Målingssystem
Hus: Vandtæt (maksimal dybde på 1 meter i op til 10 minutter)*
Jp
Struktur
(Batterikammer: Vandtæt**)
En
Målingsområde
En
Es
Klasse 1M L
Es
Sikkerhed
Klasse 1 L
Fr
Faktisk afstand (nederste 3-cifrede)
Fr
De
Afstandsvisning (interval)
De
Miljø
It
It
Laser
Se
Se
Optisk system
Klasse
Nl
Nl
Forstørrelse (x) 6
Bølgelængde (nm) 905
Ru
Ru
ø21
12
Pt
Pt
Rektangulært synsfelt (reelt) (°) 7,5
15
Pl
Pl
Øjenafstand (mm) 18,3
Stråledivergens (mrad)
Fi
Fi
Udgangspupil (mm) ø3,5
Fugtighed under betjening (%RH) 80 eller mindre (uden dugdannelse)
No
No
-
1
±4m
Dk
Dk
*Vandtætte modeller
Andet
Cz
Denne Nikon laser-afstandsmåler er vandtæt, og det optiske system eller iagttagelsen vil ikke blive påvirket, hvis enheden
Cz
Betjeningstemperatur (˚C) -10 —
nedsænkes eller falder i vand til en maksimal dybde på 1 meter i op til 10 minutter.
Ro
Ro
Nikon laser-afstandsmåleren har følgende fordele:
Hu
CR2 lithium batteri x 1 (DC 3V)
Hu
Strømkilde
Automatisk slukning (efter ca. 8. sek. uden betjening)
Mål (D x B x H) (mm) 113 x 70 x 39
Bemærk følgende under brug af Nikon laser-afstandsmåler.
Vægt (g) Ca. 175 g (uden batteri)
vand.
** Batterikammeret er vandfast, ikke vandtæt. Der kan trænge vand ind i enheden, hvis Nikon laser-afstandsmåleren nedsænkes i
vand. Hvis der kommer vand ind i batterikammeret, skal du aftørre al fugt og lade kammeret tørre helt.
250 251
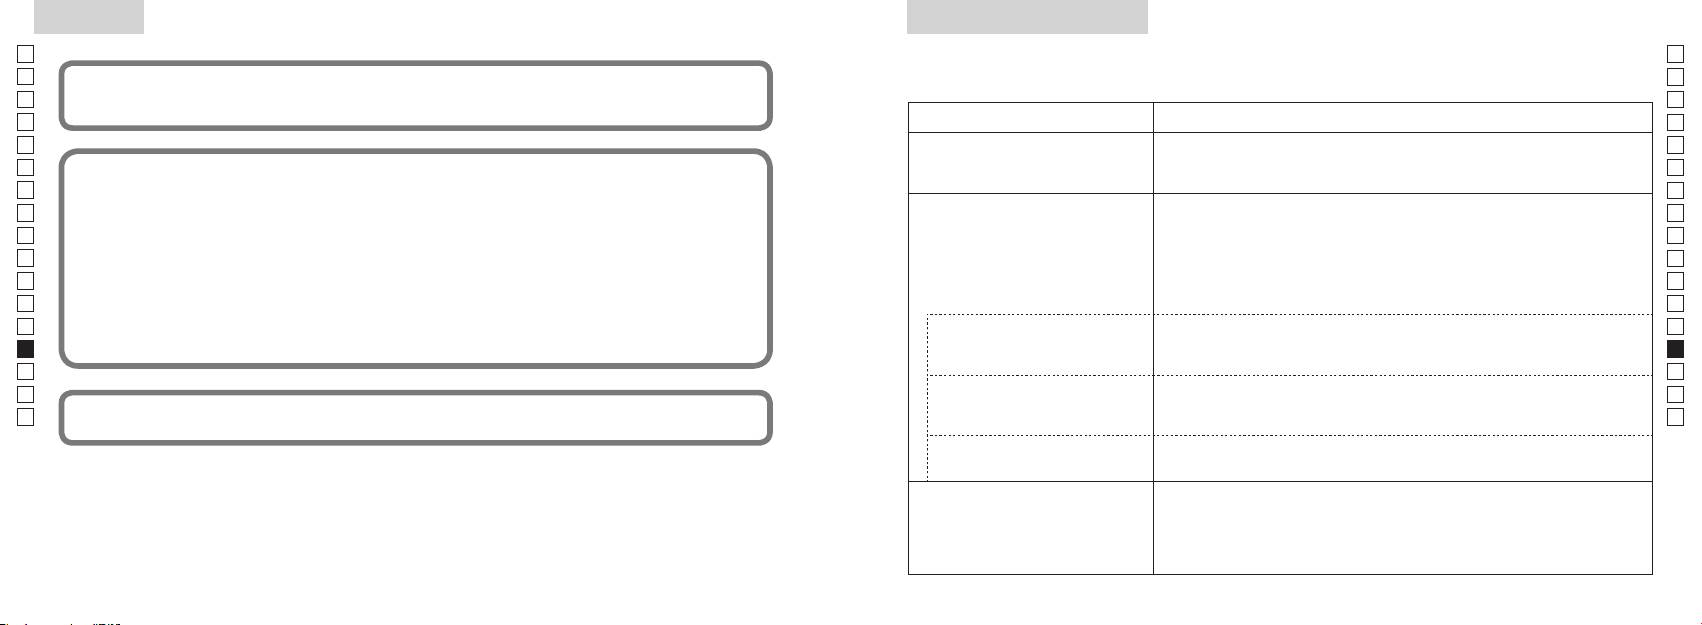
Andet
Fejlfinding/Reparation
Jp
Hvis din Nikon laser-afstandsmåler skulle få behov for reparation, bedes du kontakte din lokale forhandler eller butikken, hvor
Jp
En
Denne enhed overholder Del 15 i FCC-bestemmelserne. Brug er underlagt følgende to betingelser:
En
Es
(1) Denne enhed må ikke forårsage skadelig interferens, og
Es
(2) Denne enhed skal acceptere enhver modtaget interferens, inklusive interferens, der kan forårsage uønsket drift.
Symptom Punkter, der skal kontrolleres
Fr
Fr
De
●
De
It
Dette udstyr er blevet testet og fundet i overensstemmelse med grænserne for en Klasse B digital enhed, der
● Kontrollér, at batteriet er korrekt ilagt
(LCD tænder ikke)
It
● Udskift batteriet med et nyt.
Se
Se
beskyttelse mod skadelig interferens i beboelsesinstallationer. Dette udstyr genererer, bruger og kan udsende
Nl
● Kontroller, at der ikke er noget, såsom din hånd eller en rem, der blokerer for
Nl
radiofrekvensenergi og , hvis ikke installeret og brugt i overensstemmelse med instruktionerne, kan det forårsage
laserudsendelsesblænden og laserdetektoren ud for frontlinsen.
Ru
skadelig interferens for radiokommunikationer. Der er imidlertid ingen garanti for, at interferens ikke vil opstå i en
Ru
● Kontroller, at laserudsendelseblænden og laserdetektoren på frontlinsesiden er
bestemt installation. Hvis dette ustyr forårsager skadelig interferens til radio- eller tv-modtagelse, hvilket kan afgøres
Kan ikke måle afstanden
Pt
rene. Rengør dem om nødvendigt.
Pt
ved at slukke og tænde for udstyret, opfordres brugeren til at prøve at korrigere interferensen ved at foretage en eller
Pl
● Kontrollér, at målets form og tilstand er velegnet til at reflektere laserstrålen.
flere af følgende handlinger:
Pl
● Udskift batteriet med et nyt.
Fi
Fi
No
● Hold enheden rolig under målingen.
No
● Kontrollér, at målet er inden for målingsområdet
Dk
Dk
Cz
Cz
Tættere mål, der befinder sig
Ro
● Sørg for, at der ikke er noget, såsom græs eller blade, mellem Nikon laser-
Ro
inden for målingsområdet, kan
Denne Nikon laser-afstandsmåler er er basal afstandsmåler. Dens resultater kan ikke bruges som officielt
Hu
afstandsmåleren og målet.
Hu
ikke måles
bevismateriale.
Mål udover en vis afstand kan
● Sørg for, at der ikke er noget, såsom græs eller blade, mellem Nikon laser-
ikke måles
afstandsmåleren og målet.
● Udskift batteriet med et nyt.
● Kontrollér, at målets form og tilstand er velegnet til at reflektere laserstrålen.
Målingsresultat er ustabilt
● Hold enheden rolig under målingen.
● Sørg for, at der ikke er noget, såsom græs eller blade, mellem Nikon laser-
afstandsmåleren og målet.
252 253
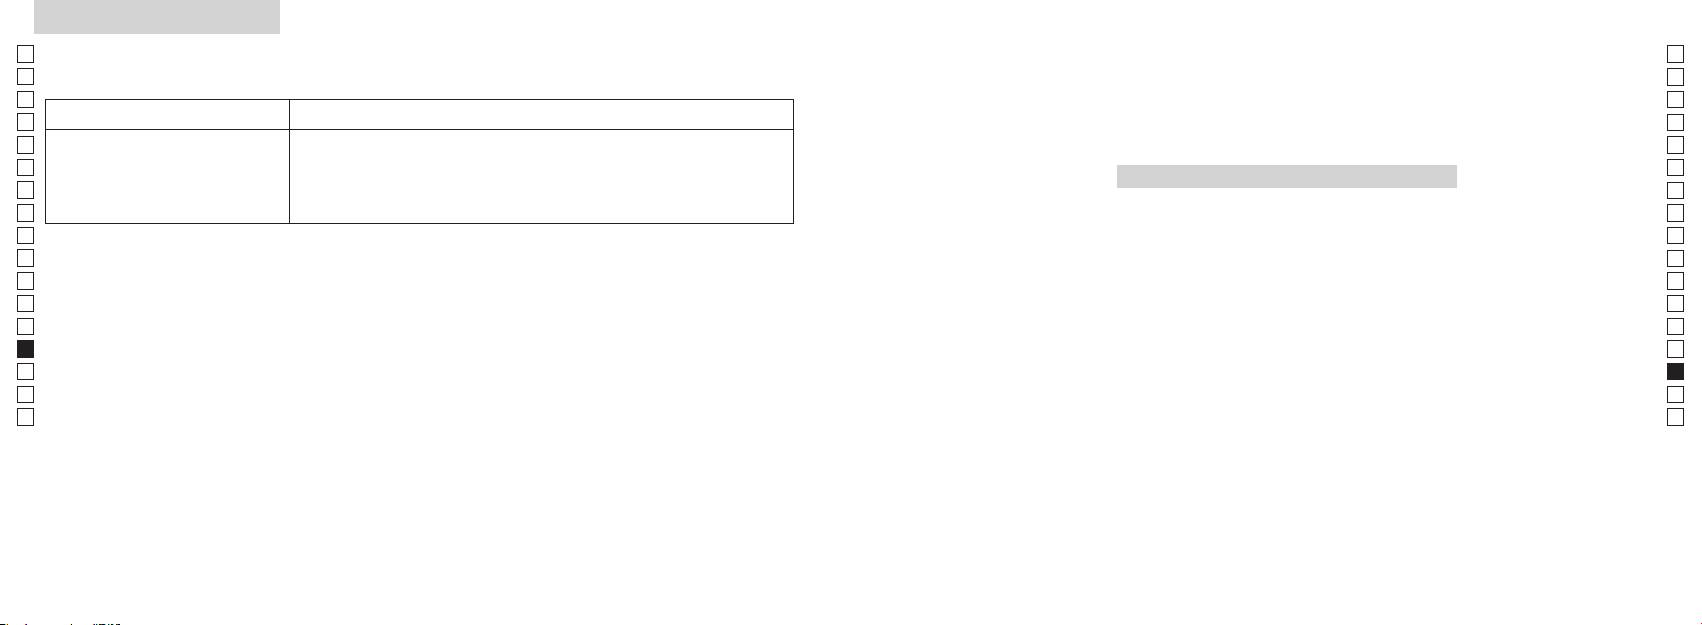
Fejlfinding/Reparation
Jp
Jp
En
En
Es
Es
Symptom Punkter, der skal kontrolleres
Fr
Fr
Česky
De
De
● Udskift batteriet med et nyt.
It
● Kontrollér, at målets form og tilstand er velegnet til at reflektere laserstrålen.
It
Der vises ukorrekt resultat
OBSAH
● Sørg for, at der ikke er noget, såsom græs eller blade, mellem Nikon laser-
Se
Se
afstandsmåleren og målet.
Nl
Nl
Upozornění před použitím ........................... 256-259
Ru
Ru
Hvis problemet vedvarer efter konsultering af FReparationsoversigten, bedes du kontakte din lokale forhandler
Nejdůležitější vlastnosti .......................................... 260
Pt
, da en fejlfunktion må være opstået. Lad aldrig andre end en autoriseret repræsentant for
Pt
Složení ............................................................. 261
producenten kontrollere eller reparere din Nikon laser-afstandsmåler. Hvis denne instruktion ikke overholdes, kan det føre til
Pl
Pl
Vnitřní displej .............................................................. 262
personskade eller skade på produktet.
Fi
Režim zobrazení měření ......................................... 263
Fi
No
No
Dk
............................................................. 264
Dk
Cz
Výměna baterie .......................................................... 265
Cz
Ro
Měření .................................................................. 266-267
Ro
Hu
Specifikace .......................................................... 268-269
Hu
Ostatní ........................................................................... 270
Opravy .............................. 271-272
254 255
Upozornění před použitím
Jp
Děkujeme, že jste si zakoupili laserový dálkoměr Nikon COOLSHOT AS.
Dodržujte prosím důsledně
BEZPEČNOSTNÍ OPATŘENÍ
Jp
následující instrukce, abyste
Nikon mimo dosah dětí.
En
(Laser)
En
mohli správně používat zařízení a
Laserový dálkoměr Nikon používá
Es
Používání ovládacích prvků, provádění nastavení nebo vykonávání postupů jinak, než jak
v důsledku pádu nebo z jiného
Es
zabránili potenciálně
neviditelný laserový paprsek. Důsledně
popisuje tato příručka, může mít za následek vystavení se nebezpečnému záření.
Fr
důvodu poškozené tělo nebo
nebezpečným problémům. Před
dodržujte následující:
Fr
vydává neobvyklý zvuk, ihned
používáním tohoto výrobku si
Varování
De
De
vyjměte baterii a přestaňte jej
〇
pečlivě přečtěte kapitolu
It
používat.
It
ke správnému používání, které jsou k výrobku přiloženy.
„Upozornění před použitím“ a
,
Se
zatímco se díváte do optiky ze
Se
〇
instrukce pro správné užívání,
Nl
které jsou přiloženy k výrobku.
Nl
〇 Výrobek nerozebírejte a neopravujte svépomocí, může to vést k závažným problémům.
Mějte tuto příručku v dosahu pro
to může negativně ovlivnit nebo
Ru
Na výrobek, který byl rozebrán nebo opravován, se nevztahuje záruka výrobce.
Ru
poškodit váš zrak.
snadné nahlédnutí.
Pt
Pt
Pl
● Technické parametry a design mohou být bez oznámení změněny.
Pl
VAROVÁNÍ
Nedívejte se do laseru přes jiný
●
Fi
Tímto symbolem varujeme uživatele,
Fi
No
dalekohled, ani pouhým okem. Mohlo
No
●
by mohlo mít za následek smrt nebo
by to vést k poškození zraku.
Dk
Dk
vážný úraz.
Cz
Cz
POZOR
Ro
Tímto symbolem varujeme uživatele,
,
Ro
že jakékoliv nesprávné užití
abyste zamezili náhodnému vyslání
Hu
Hu
nedodržující zde popsané zásady by
laserového paprsku.
mohlo mít za následek vážný úraz
nebo hmotnou ztrátu.
nepoužíváte, vyjměte z těla baterii.
nerozebírejte ani neprovádějte
technické úpravy a opravy. Vyzařující
laser může škodit vašemu zdraví.
Na produkt, který byl rozebrán,
opravován nebo technicky upraven,
se nevztahuje záruka výrobce.
256 257

Upozornění před použitím
Jp
BEZPEČNOSTNÍ OPATŘENÍ
BEZPEČNOSTNÍ OPATŘENÍ
Jp
BEZPEČNOSTNÍ OPATŘENÍ
OŠETŘOVÁNÍ A ÚDRŽBA
Skladování
tohoto výrobku nebo jiných malých
En
(Monokulární objektiv)
(Lithiová baterie)
Upozornění
Čočky
En
Es
Laserový dálkoměr Nikon je
Es
vodotěsný, není navržen pro
kondenzovaná voda nebo plíseň.
vybaven monokulárním objektivem
může prasknout a vytéci, což vede ke
Fr
používání pod vodou.
dálkoměr
Fr
sloužícím k zaměření cíle. Důsledně
korozi zařízení a zašpinění oděvu.
De
Nikon na chladném a suchém místě.
dodržujte následující:
Důsledně dodržujte následující:
De
být co nejdříve odstraněny z
otisky prstů odstraníte z povrchu
It
Varování
vyhledejte lékaře.
It
povrchu tělesa dálkoměru s pomocí
noci nechte přístroj důkladně
umístěnými.
Se
bavlněnou utěrkou nebo kvalitním
vyschnout za pokojové teploty a
Se
Nikon se nikdy nedívejte přímo do
hadříku.
poté jej uložte na chladné a suché
Nl
slunce, intenzivního světla nebo
vybita nebo se přístroj delší dobu
Nl
místo.
laserového paprsku.
nepoužívá.
Ru
jakýchkoli symptomů přestaňte
Ru
Nikon v blízkosti zdrojů tepla nebo
odolných šmouh použijte malé
Upozornění
přístroj používat a okamžitě
Pt
Pt
vprostoru pro baterii.
vyhledejte lékaře.
vautě. To by ho mohlo poškodit
denaturovaného) lihu. Nepoužívejte
Pl
Pl
nebo negativně ovlivnit.
nebo mincemi v kapse nebo vaku,
Fi
přenášíte, uložte ho do měkkého
Fi
protože by se mohla zkratovat
.
pouzdra.
No
No
azpůsobit přehřátí.
Ultrafialové paprsky a nadměrné
přístroje, byste již neměli znovu
Dk
Dk
chůzi. Nedodržení tohoto pokynu
přestal správně pracovat, ihned
teplo mohou jednotku negativně
nebo plamenu. Nikdy baterii
Cz
může vést ke zranění nebo poruše
jej přestaňte používat a požádejte
Cz
ovlivnit nebo dokonce poškodit.
nerozebírejte.
v důsledku nárazu do předmětů,
svého prodejce o pokyny, kam
Ro
Hlavní tělo
Ro
nárazů do osob, pádu a jiných
zaslat přístroj k opravě.
vystaven náhlým změnám teploty,
Hu
Hu
nehod.
baterie dostane do kontaktu s
kondenzovat voda. Nepoužívejte
řemínek. Může to vést k zasažení
výrobek, dokud se kondenzace
zasažená místa okamžitě velkým
Nepoužívejte benzen, ředidlo nebo
jiných osob a způsobení zranění.
neodpaří.
kapalina z poškozené baterie vnikne
organická rozpouštědla.
nestabilní místo. Nedodržení
* Ofukovací balónek je pryžový
tohoto pokynu může vést kpádu
balónek s tryskou, z níž fouká
nebo upuštění a způsobení
vzduch.
zranění nebo poruchy.
smístními předpisy.
258 259

Nejdůležitější vlastnosti Název/Složení
Jp
Měření je snazší za následujících podmínek:
Jp
1
En
4
En
Výstupní apertura laseru
Es
Es
3
2 Apertura laserového detektoru
Fr
Fr
3
De
De
4
It
snadno přepínat
V následujících případech může být měření nepřesné nebo
It
neproveditelné:
1
Se
Se
56x zvětšující (monokulární) okulár
Nl
měření) se zapne funkce nepřetržitého měření
Nl
6 roužek dioptrické korekce
Ru
2
5
Ru
7 Stupnice dioptrické korekce
Pt
8
Pt
Pl
6
9 Kryt prostoru pro baterii
Pl
Fi
!p avřeného
Fi
7
No
prostoru pro baterii
No
Laserový dálkoměr Nikon měří pomocí neviditelného
!q
Dk
Dk
laserového paprsku. Měří dobu, za kterou laserový
8
!w
Cz
Cz
paprsek doputuje od dálkoměru k cíli a zpět. Odrazivost
Ro
laseru a výsledky měření se mohou měnit podle
9
Ro
klimatických podmínek a okolního prostředí, dále pak v
Hu
Hu
závislosti na barvě, povrchové úpravě, rozměrech, tvaru a
!p
dalších vlastnostech cíle.
!q
!w
Složení
......................................x1
...............x1
...............x1
...x1
260 261
Vnitřní displej
Režim zobrazení měření
Jp
Vzdálenost
Jp
En
En
Es
Es
Režim skutečné
Fr
Náklon nahoru
vzdálenosti a výšky
Fr
vzdálenost
vnitřní displej zapnutý).
De
Sklon dolů
De
Výška
It
It
Se
Se
Výška
dobu kratší než 2 sekundy.
Režim priority prvního cíle
Nl
Nl
Režim horizontální
Ru
Vodorovná
Ru
Režim priority vzdáleného cíle
Stav baterie
vzdálenosti a výšky
přepnutí režimu zobrazení Měření.
Pt
vzdálenost
Pt
『 』
4. Opakujte kroky 2 a 3, dokud se nezobrazí
Pl
Výška
Pl
『 』
požadovaný režim.
Fi
Fi
No
správném pořadí, režim se nepřepne.
No
Dk
『
』
Vzdálenost
Dk
『
』
Režim Golf
upravená
Cz
Cz
o sklon
Ro
Ro
novém režimu.
Hu
* LCD displeje se obvykle používají s jednotkovým nebo menším zvětšením. V tomto výrobku se však
vzdálenost
Hu
technologie, není možné zcela eliminovat prach. V důsledku toho může být prach vidět. Nemá však vliv
Režim skutečné
vzdálenosti
vzdálenost
262 263
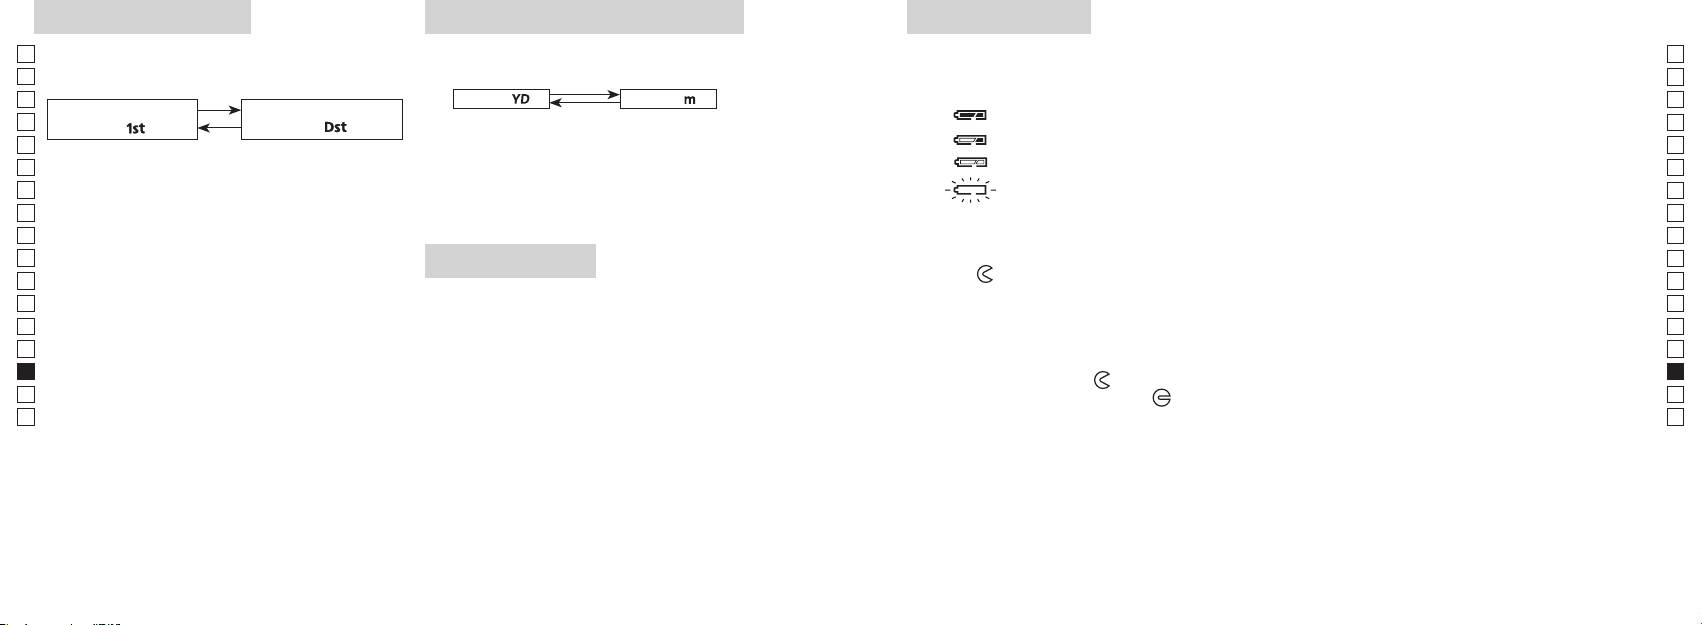
Režim priority cíle
Jednotka zobrazení vzdálenosti
Výměna baterie
Jp
Laserový dálkoměr využívá systém přepínání režimu
Výsledky měření se zobrazují v metrech nebo yardech.
Jp
Typ baterie: lithiová baterie CR2 3V x1
priority prvního cíle a režimu priority vzdáleného cíle
(Výchozí tovární nastavení je yard).
En
Indikace zbývající kapacity baterie
En
(výchozí tovární nastavení je režim priority prvního cíle).
Es
[ ]
* Symbol stavu baterie na vnitřním displeji upozorňuje na nutnost výměny baterie.
Metry [ ]Yardy
Es
Režim priority prvního
Režim priority vzdáleného
Fr
Fr
cíle「
」
cíle
「
」
zapnutý).
De
De
It
: Baterie je téměř vybitá. Měli byste baterii vyměnit za novou.
It
zapnutý).
Se
uvolněte.
Se
automaticky vypne. Vyměňte baterii.
Nl
Nl
ve zvolené jednotce vzdálenosti.
Ru
Ru
1. Otevřete kryt prostoru pro baterii
Pt
2sekundy), než se režim priority prvního cíle přepne
Pt
LED přisvícení
na režim priority vzdáleného cíle nebo naopak.
Pl
Pl
2. Starou baterii vyměňte za novou
Fi
Fi
*
zapnutý).
No
režim se nepřepne.
No
Dk
*
dálkoměr nebude pracovat.
Dk
3. Zavřete kryt prostoru pro baterii
Cz
*
Cz
[]
●
údaje na displeji.
Ro
Ro
*
Hu
priority prvního cíle vzdálenost nejbližšího předmětu,
dálkoměru. V tomto případě bude přisvícení při příštím
Hu
a režim priority vzdáleného cíle zobrazuje vzdálenost
zapnutí laserového dálkoměru vypnuto.
Životnost baterie
nejvzdálenějšího předmětu.
Trvalý provoz:
bude životnost této baterie pravděpodobně nižší, než je uvedeno výše.
264 265
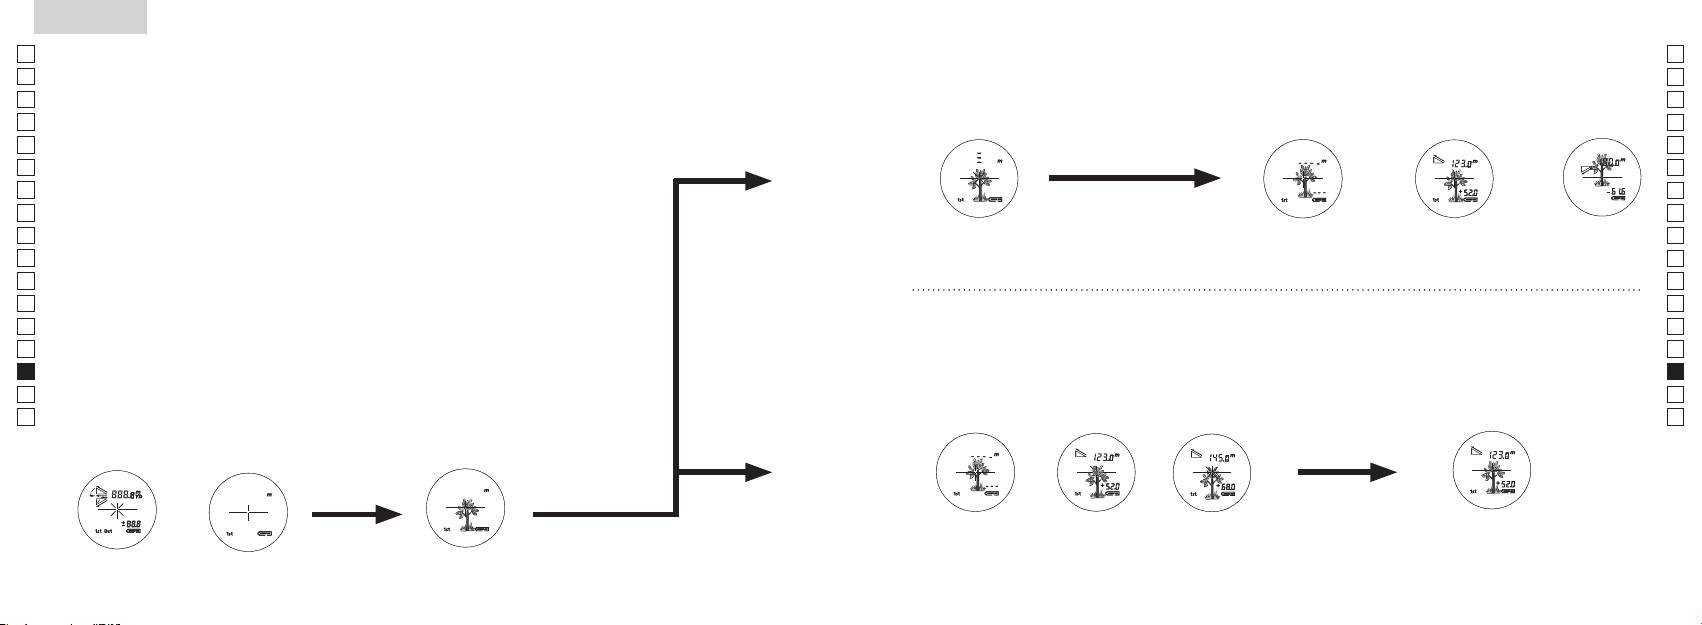
Jp
Jp
En
En
Es
Es
Fr
Fr
De
De
It
It
Se
Se
Nl
Nl
Ru
Ru
Pt
Pt
Pl
Pl
Fi
Fi
No
No
Dk
Dk
Cz
Cz
Ro
Ro
Hu
Hu
266 267
Measurement
1. Press the POWER button for power-on.
(Power turns off 8 seconds after the last
operation.)
Immediately after power-on.
3. Press POWER button once to start single measurement.
4. After measurement, “distance” or “fail to measure” indicator are displayed for 8 seconds, then power turns off. If you press the POWER
button during power-on (while the internal display is lit), another single measurement starts.
unable to measure distance.
3. Keep pressing POWER button to start continuous measurement up to 20 seconds. The internal display shows “distance” and
“fail to measure” indicator alternately.
Note: Laser irradiaton mark is blinking during the measurement.
Note: If you stop pressing the button, the continuous measuremen stops
2. Aim at the target
Positionthetargetatthecenterofthereticle
[Single measurement]
Failure to measure or
unable to measure distance.
[Continuous measurement]
4. After continuous measurement, the measure results are displayed for 8 seconds, then power turns off. If you press the POWER
button during power-on (while the internal display is lit), another measrement starts.
Failure to measure or
Target focusing.
Measuring.
(Initializing)
.
Upward measurement. Downward measurement.
Displays the measured
figure. (Target 1)
Displays the measured figure.
Stand-by.
Displays the measured
figure. (Target 2)
Measurement
1. Press the POWER button for power-on.
(Power turns off 8 seconds after the last
operation.)
Immediately after power-on.
(Initializing)
3. Press POWER button once to start single measurement.
Measuring.
4. After measurement, “distance” or “fail to measure” indicator are displayed for 8 seconds, then power turns off. If you press the POWER
button during power-on (while the internal display is lit), another single measurement starts.
Failure to measure or
unable to measure distance.
Displays the measured
figure. (Target 1)
3. Keep pressing POWER button to start continuous measurement up to 20 seconds. The internal display shows “distance” and
“fail to measure” indicator alternately.
Note: Laser irradiaton mark is blinking during the measurement.
Note: If you stop pressing the button, the continuous measuremen stops
Target focusing.
2. Aim at the target
.
Positionthetargetatthecenterofthereticle
[Single measurement]
Failure to measure or
unable to measure distance.
Upward measurement. Downward measurement.
Displays the measured figure.
[Continuous measurement]
4. After continuous measurement, the measure results are displayed for 8 seconds, then power turns off. If you press the POWER
button during power-on (while the internal display is lit), another measrement starts.
Stand-by.
Displays the measured
figure. (Target 2)
Measurement
1. Press the POWER button for power-on.
(Power turns off 8 seconds after the last
operation.)
Immediately after power-on.
Stand-by.
(Initializing)
2. Aim at the target
.
Positionthetargetatthecenterofthereticle
3. Press POWER button once to start single measurement.
4. After measurement, “distance” or “fail to measure” indicator are displayed for 8 seconds, then power turns off. If you press the POWER
button during power-on (while the internal display is lit), another single measurement starts.
unable to measure distance.
3. Keep pressing POWER button to start continuous measurement up to 20 seconds. The internal display shows “distance” and
“fail to measure” indicator alternately.
Note: Laser irradiaton mark is blinking during the measurement.
Note: If you stop pressing the button, the continuous measuremen stops
[Single measurement]
Failure to measure or
unable to measure distance.
[Continuous measurement]
4. After continuous measurement, the measure results are displayed for 8 seconds, then power turns off. If you press the POWER
button during power-on (while the internal display is lit), another measrement starts.
Failure to measure or
Target focusing.
Measuring.
Upward measurement. Downward measurement.
Displays the measured
figure. (Target 1)
Displays the measured figure.
Displays the measured
figure. (Target 2)
Měření
Pozor — Používání ovládacích prvků, provádění nastavení nebo vykonávání postupů jinak, než jak
【
Jedno měření
】
popisuje tato příručka, může mít za následek vystavení se nebezpečnému záření.
1. Příprava
spustíte jedno měření.
2. Gumová očnice
Laserový dálkoměr mohou bez úprav používat lidé s brýlemi i bez brýlí.
3. Dioptrická korekce
dioptrické korekce tak dlouho, až se LCD displej zaostří.
【
Funkce nepřetržitého měření
】
cíl.
4. Měření
jednotka zobrazení vzdálenosti).
*
Nastavení jednotlivých režimů viz příslušné kapitoly.
zda je vnitřní displej zapnutý).
Umístěte cíl do středu nitkového kříže.
(Automatické vypnutí přibližně po
Ihned po zapnutí
Míření na cíl
(inicializace)
Measurement
1. Press the POWER button for power-on.
(Power turns off 8 seconds after the last
operation.)
Immediately after power-on.
Stand-by.
(Initializing)
2. Aim at the target
.
Positionthetargetatthecenterofthereticle
Target focusing.
[Single measurement]
3. Press POWER button once to start single measurement.
Measuring.
4. After measurement, “distance” or “fail to measure” indicator are displayed for 8 seconds, then power turns off. If you press the POWER
button during power-on (while the internal display is lit), another single measurement starts.
Failure to measure or
Upward measurement. Downward measurement.
unable to measure distance.
Displays the measured figure.
[Continuous measurement]
3. Keep pressing POWER button to start continuous measurement up to 20 seconds. The internal display shows “distance” and
“fail to measure” indicator alternately.
Note: Laser irradiaton mark is blinking during the measurement.
Note: If you stop pressing the button, the continuous measuremen stops
Failure to measure or
unable to measure distance.
4. After continuous measurement, the measure results are displayed for 8 seconds, then power turns off. If you press the POWER
button during power-on (while the internal display is lit), another measrement starts.
Displays the measured
figure. (Target 1)
Displays the measured
figure. (Target 2)
Measurement
1. Press the POWER button for power-on.
(Power turns off 8 seconds after the last
operation.)
Immediately after power-on.
Stand-by.
(Initializing)
2. Aim at the target
.
Positionthetargetatthecenterofthereticle
Target focusing.
[Single measurement]
3. Press POWER button once to start single measurement.
Measuring.
4. After measurement, “distance” or “fail to measure” indicator are displayed for 8 seconds, then power turns off. If you press the POWER
button during power-on (while the internal display is lit), another single measurement starts.
Failure to measure or
Upward measurement. Downward measurement.
unable to measure distance.
Displays the measured figure.
[Continuous measurement]
3. Keep pressing POWER button to start continuous measurement up to 20 seconds. The internal display shows “distance” and
“fail to measure” indicator alternately.
Note: Laser irradiaton mark is blinking during the measurement.
Note: If you stop pressing the button, the continuous measuremen stops
Failure to measure or
unable to measure distance.
Displays the measured
figure. (Target 1)
4. After continuous measurement, the measure results are displayed for 8 seconds, then power turns off. If you press the POWER
button during power-on (while the internal display is lit), another measrement starts.
Displays the measured
figure. (Target 2)
Measurement
1. Press the POWER button for power-on.
(Power turns off 8 seconds after the last
operation.)
Immediately after power-on.
Stand-by.
(Initializing)
2. Aim at the target
.
Positionthetargetatthecenterofthereticle
Target focusing.
[Single measurement]
3. Press POWER button once to start single measurement.
Measuring.
4. After measurement, “distance” or “fail to measure” indicator are displayed for 8 seconds, then power turns off. If you press the POWER
button during power-on (while the internal display is lit), another single measurement starts.
Failure to measure or
unable to measure distance.
3. Keep pressing POWER button to start continuous measurement up to 20 seconds. The internal display shows “distance” and
“fail to measure” indicator alternately.
Note: Laser irradiaton mark is blinking during the measurement.
Note: If you stop pressing the button, the continuous measuremen stops
Failure to measure or
unable to measure distance.
[Continuous measurement]
4. After continuous measurement, the measure results are displayed for 8 seconds, then power turns off. If you press the POWER
button during power-on (while the internal display is lit), another measrement starts.
Upward measurement. Downward measurement.
Displays the measured
figure. (Target 1)
Displays the measured figure.
Displays the measured
figure. (Target 2)
Measurement
1. Press the POWER button for power-on.
(Power turns off 8 seconds after the last
operation.)
Immediately after power-on.
Stand-by.
(Initializing)
2. Aim at the target
.
Positionthetargetatthecenterofthereticle
Target focusing.
[Single measurement]
3. Press POWER button once to start single measurement.
Measuring.
4. After measurement, “distance” or “fail to measure” indicator are displayed for 8 seconds, then power turns off. If you press the POWER
button during power-on (while the internal display is lit), another single measurement starts.
unable to measure distance.
3. Keep pressing POWER button to start continuous measurement up to 20 seconds. The internal display shows “distance” and
“fail to measure” indicator alternately.
Note: Laser irradiaton mark is blinking during the measurement.
Note: If you stop pressing the button, the continuous measuremen stops
unable to measure distance.
4. After continuous measurement, the measure results are displayed for 8 seconds, then power turns off. If you press the POWER
button during power-on (while the internal display is lit), another measrement starts.
[Continuous measurement]
Failure to measure or
Failure to measure or
Upward measurement. Downward measurement.
Displays the measured
figure. (Target 1)
Displays the measured figure.
Displays the measured
figure. (Target 2)
Measurement
1. Press the POWER button for power-on.
(Power turns off 8 seconds after the last
operation.)
Immediately after power-on.
Stand-by.
(Initializing)
2. Aim at the target
.
Positionthetargetatthecenterofthereticle
Target focusing.
[Single measurement]
3. Press POWER button once to start single measurement.
4. After measurement, “distance” or “fail to measure” indicator are displayed for 8 seconds, then power turns off. If you press the POWER
button during power-on (while the internal display is lit), another single measurement starts.
unable to measure distance.
3. Keep pressing POWER button to start continuous measurement up to 20 seconds. The internal display shows “distance” and
“fail to measure” indicator alternately.
Note: Laser irradiaton mark is blinking during the measurement.
Note: If you stop pressing the button, the continuous measuremen stops
unable to measure distance.
4. After continuous measurement, the measure results are displayed for 8 seconds, then power turns off. If you press the POWER
button during power-on (while the internal display is lit), another measrement starts.
[Continuous measurement]
Failure to measure or
Failure to measure or
Measuring.
Upward measurement. Downward measurement.
Displays the measured
figure. (Target 1)
Displays the measured figure.
Displays the measured
figure. (Target 2)
Measurement
1. Press the POWER button for power-on.
(Power turns off 8 seconds after the last
operation.)
Immediately after power-on.
Stand-by.
(Initializing)
2. Aim at the target
.
Positionthetargetatthecenterofthereticle
Target focusing.
[Single measurement]
3. Press POWER button once to start single measurement.
Measuring.
4. After measurement, “distance” or “fail to measure” indicator are displayed for 8 seconds, then power turns off. If you press the POWER
button during power-on (while the internal display is lit), another single measurement starts.
unable to measure distance.
3. Keep pressing POWER button to start continuous measurement up to 20 seconds. The internal display shows “distance” and
“fail to measure” indicator alternately.
Note: Laser irradiaton mark is blinking during the measurement.
Note: If you stop pressing the button, the continuous measuremen stops
unable to measure distance.
4. After continuous measurement, the measure results are displayed for 8 seconds, then power turns off. If you press the POWER
button during power-on (while the internal display is lit), another measrement starts.
[Continuous measurement]
Failure to measure or
Failure to measure or
Upward measurement. Downward measurement.
Displays the measured
figure. (Target 1)
Displays the measured figure.
Displays the measured
figure. (Target 2)
Measurement
1. Press the POWER button for power-on.
(Power turns off 8 seconds after the last
operation.)
Immediately after power-on.
Stand-by.
(Initializing)
2. Aim at the target
.
Positionthetargetatthecenterofthereticle
Target focusing.
[Single measurement]
3. Press POWER button once to start single measurement.
Measuring.
4. After measurement, “distance” or “fail to measure” indicator are displayed for 8 seconds, then power turns off. If you press the POWER
button during power-on (while the internal display is lit), another single measurement starts.
Failure to measure or
unable to measure distance.
Displays the measured
figure. (Target 1)
3. Keep pressing POWER button to start continuous measurement up to 20 seconds. The internal display shows “distance” and
“fail to measure” indicator alternately.
Note: Laser irradiaton mark is blinking during the measurement.
Note: If you stop pressing the button, the continuous measuremen stops
Failure to measure or
unable to measure distance.
Upward measurement. Downward measurement.
Displays the measured figure.
[Continuous measurement]
4. After continuous measurement, the measure results are displayed for 8 seconds, then power turns off. If you press the POWER
button during power-on (while the internal display is lit), another measrement starts.
Displays the measured
figure. (Target 2)
Measurement
1. Press the POWER button for power-on.
(Power turns off 8 seconds after the last
operation.)
Immediately after power-on.
Stand-by.
(Initializing)
2. Aim at the target
.
Positionthetargetatthecenterofthereticle
Target focusing.
[Single measurement]
3. Press POWER button once to start single measurement.
Measuring.
4. After measurement, “distance” or “fail to measure” indicator are displayed for 8 seconds, then power turns off. If you press the POWER
button during power-on (while the internal display is lit), another single measurement starts.
Failure to measure or
unable to measure distance.
3. Keep pressing POWER button to start continuous measurement up to 20 seconds. The internal display shows “distance” and
“fail to measure” indicator alternately.
Note: Laser irradiaton mark is blinking during the measurement.
Note: If you stop pressing the button, the continuous measuremen stops
Failure to measure or
unable to measure distance.
[Continuous measurement]
4. After continuous measurement, the measure results are displayed for 8 seconds, then power turns off. If you press the POWER
button during power-on (while the internal display is lit), another measrement starts.
Upward measurement. Downward measurement.
Displays the measured
figure. (Target 1)
Displays the measured figure.
Displays the measured
figure. (Target 2)
indikace
se jedno další měření.
Chyba při měření“
Měření s náklonem
Měření se
nebo měření nelze
nahoru
sklonem dolů
provést
3. Chcete-li spustit nepřetržité měření, přibližně 8 sekund podržte
při měření“.
*
Během měření bliká symbol laserového záření.
spustí se další měření.
*
Chyba při měření“
nebo měření nelze
naměřené
naměřené
provést
hodnoty (cíl 1)
hodnoty (cíl 2)
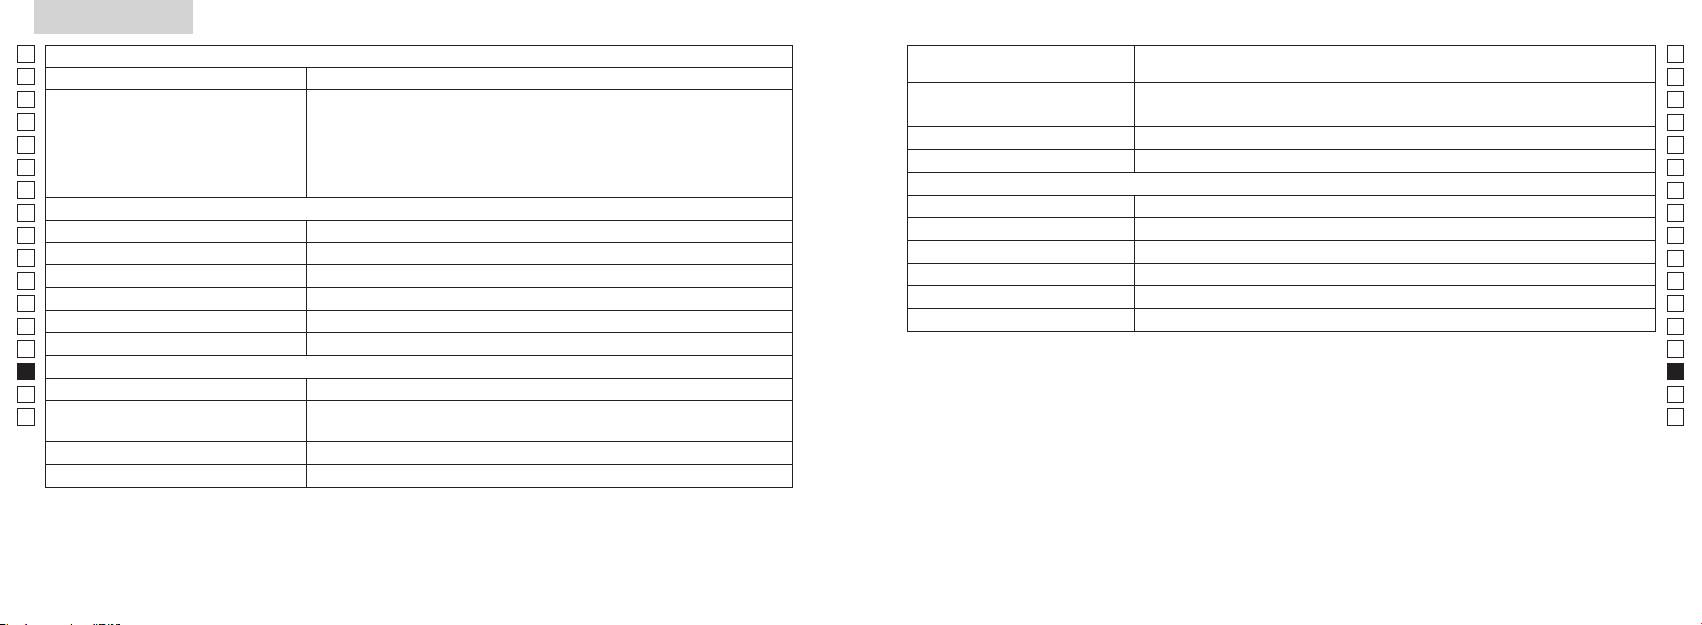
Specifikace
Jp
Měřicí systém
Tělo: vodotěsné (maximální hloubka 1 metr, nejvýše 10 minut)*
Jp
Konstrukce
En
Rozsah měření
En
Es
Laserový Výrobek T
Es
Laserový Výrobek T
Fr
Fr
O
De
De
It
It
Laser
Se
Se
Optický systém
Třída
Nl
Nl
6
Vlnová délka (nm) 905
Ru
Ru
ø21
Délka pulsu (ns) 12
Pt
Pt
7,5
15
Pl
Pl
18,3
Divergence paprsku (mrad) Horizontální: 0,25
Fi
Fi
Výstupní pupila (mm) ø3,5
80 a méně (bez kondenzace)
No
No
-
1
Dioptrická korekce ±4m
Dk
Dk
* Vodotěsné modely
Ostatní
Cz
Tento laserový dálkoměr Nikon je vodotěsný, jeho optický ani pozorovací systém se nepoškodí, pokud je ponořen nebo upuštěn
Cz
˚C)
do vody do hloubky maximálně 1 m po dobu nejvýše 10 minut.
Ro
Ro
Laserový dálkoměr Nikon nabízí následující výhody:
Hu
1x lithiová baterie CR2 (3V stejnosm.)
Hu
Rozměry (H x Š x V) (mm) 113 x 70 x 39
Při používání laserového dálkoměru Nikon dodržujte následující pokyny:
Hmotnost (g) Cca 175 (bez baterie)
268 269
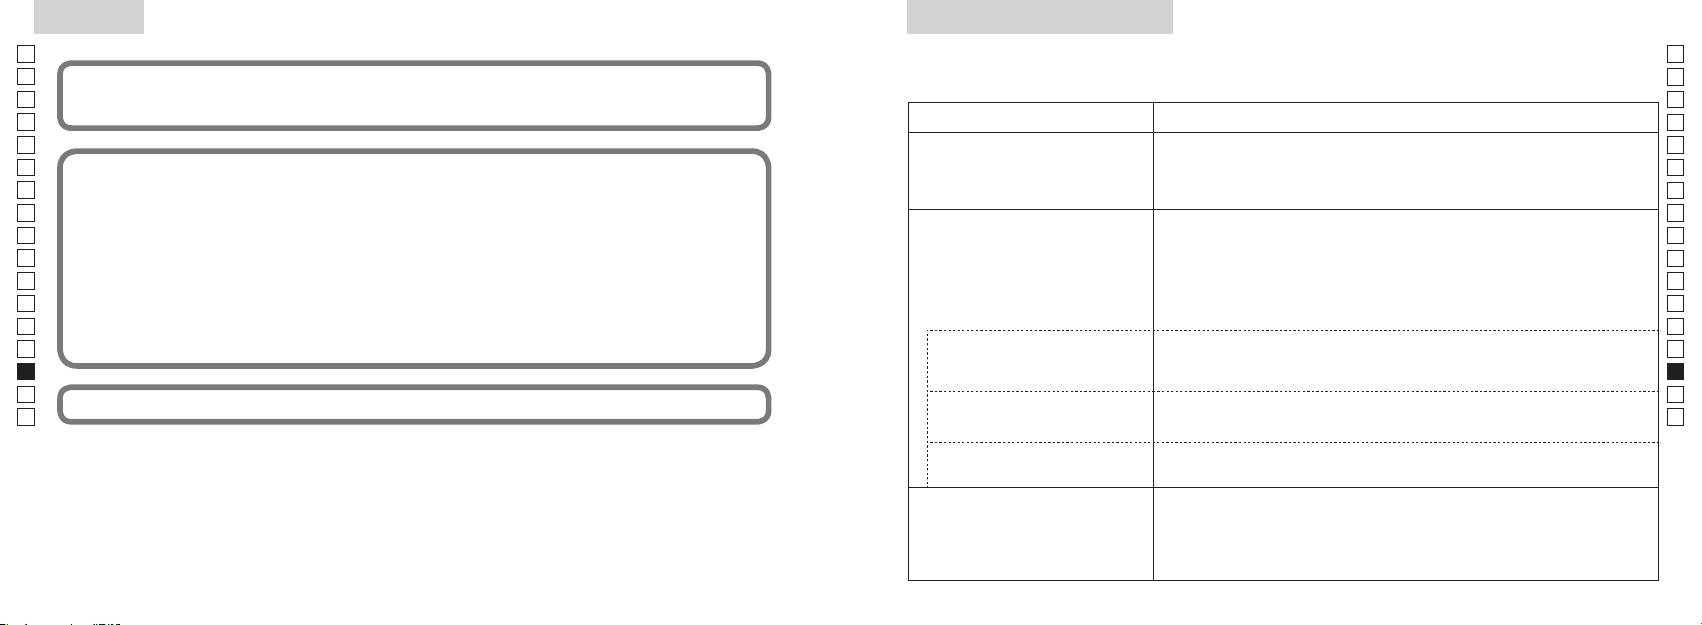
Ostatní
Řešení problémů/Opravy
Jp
Jp
En
En
Es
(1) tento přístroj nesmí působit rušení,
Es
Symptom Zkontrolujte
Fr
Fr
De
●
De
It
strany přístroje.
It
(displej se nerozsvítí)
●
Se
Se
● Vyměňte baterii za novou.
Nl
Nl
● Dbejte, aby nic, například prst nebo řemínek, nezakrývalo výstupní aperturu
Ru
Ru
laseru a aperturu laserového detektoru na straně s objektivem.
Pt
● Dbejte, aby výstupní apertura laseru a apertura laserového detektoru na straně
Pt
následujících opatření:
Nelze měřit vzdálenost
Pl
Pl
● Dbejte, aby tvar a stav cíle byly vhodné pro odraz laserového paprsku.
Fi
Fi
● Vyměňte baterii za novou.
No
No
Tento digitální přístroj třídy B splňuje veškeré požadavky kanadských předpisů pro zařízení způsobující rušení.
●
Dk
Dk
● Dbejte, aby cíl ležel v rámci rozsahu měření.
Cz
Cz
Ro
Ro
Nelze měřit bližší cíl ležící
● Dbejte, aby mezi laserovým dálkoměrem Nikon a cílem nic nepřekáželo,
Hu
Hu
vrozsahu měření
například listí nebo tráva.
● Dbejte, aby mezi laserovým dálkoměrem Nikon a cílem nic nepřekáželo,
vzdáleností
například listí nebo tráva.
● Vyměňte baterii za novou.
● Dbejte, aby tvar a stav cíle byly vhodné pro odraz laserového paprsku.
Výsledek měření je nestabilní
●
● Dbejte, aby mezi laserovým dálkoměrem Nikon a cílem nic nepřekáželo,
například listí nebo tráva.
270 271
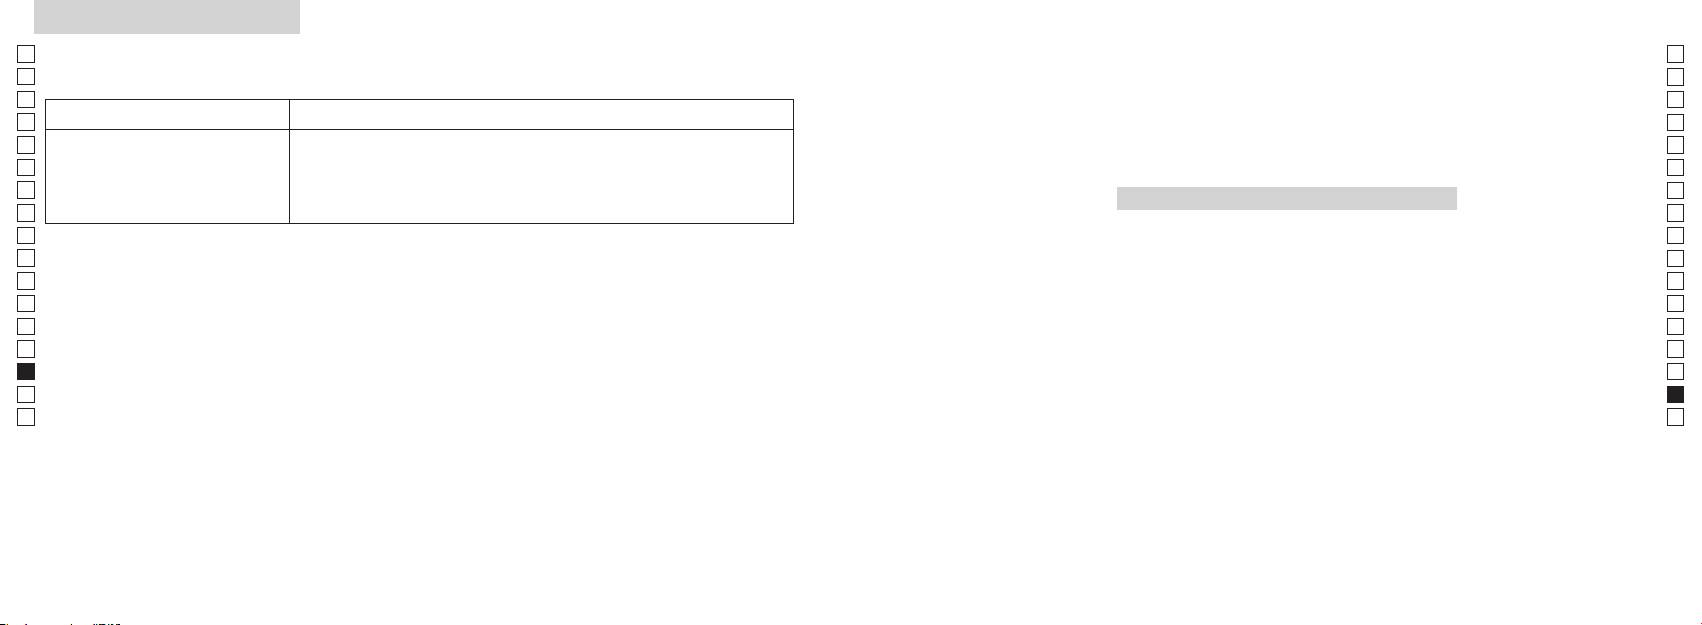
Řešení problémů/Opravy
Jp
Jp
En
En
Es
Es
Symptom Zkontrolujte
Fr
Fr
De
De
● Vyměňte baterii za novou.
Română
It
● Dbejte, aby tvar a stav cíle byly vhodné pro odraz laserového paprsku.
It
● Dbejte, aby mezi laserovým dálkoměrem Nikon a cílem nic nepřekáželo,
Se
Se
například listí nebo tráva.
CUPRINS
Nl
Nl
............... 274-277
Ru
Ru
Caracteristici principale ........................................... 278
Pt
a opravy přístroje, protože může být porouchaný. Nikdy nenechte laserový dálkoměr Nikon kontrolovat nebo opravovat někoho
Pt
jiného než oficiálního zástupce výrobce. Nedodržení tohoto pokynu může vést k úrazu nebo k poškození výrobku.
.................................... 279
Pl
Pl
Afișajul intern .............................................................. 280
Fi
Fi
Mod de afișare a măsurării ..................................... 281
No
No
Dk
Dk
I .................................... 282
Cz
Cz
Înlocuirea bateriei ..................................................... 283
Ro
Ro
Măsurare .............................................................. 284-285
Hu
Hu
........................................................... 286-287
Altele .............................................................................. 288
reparare ................................................................ 289-290
272 273
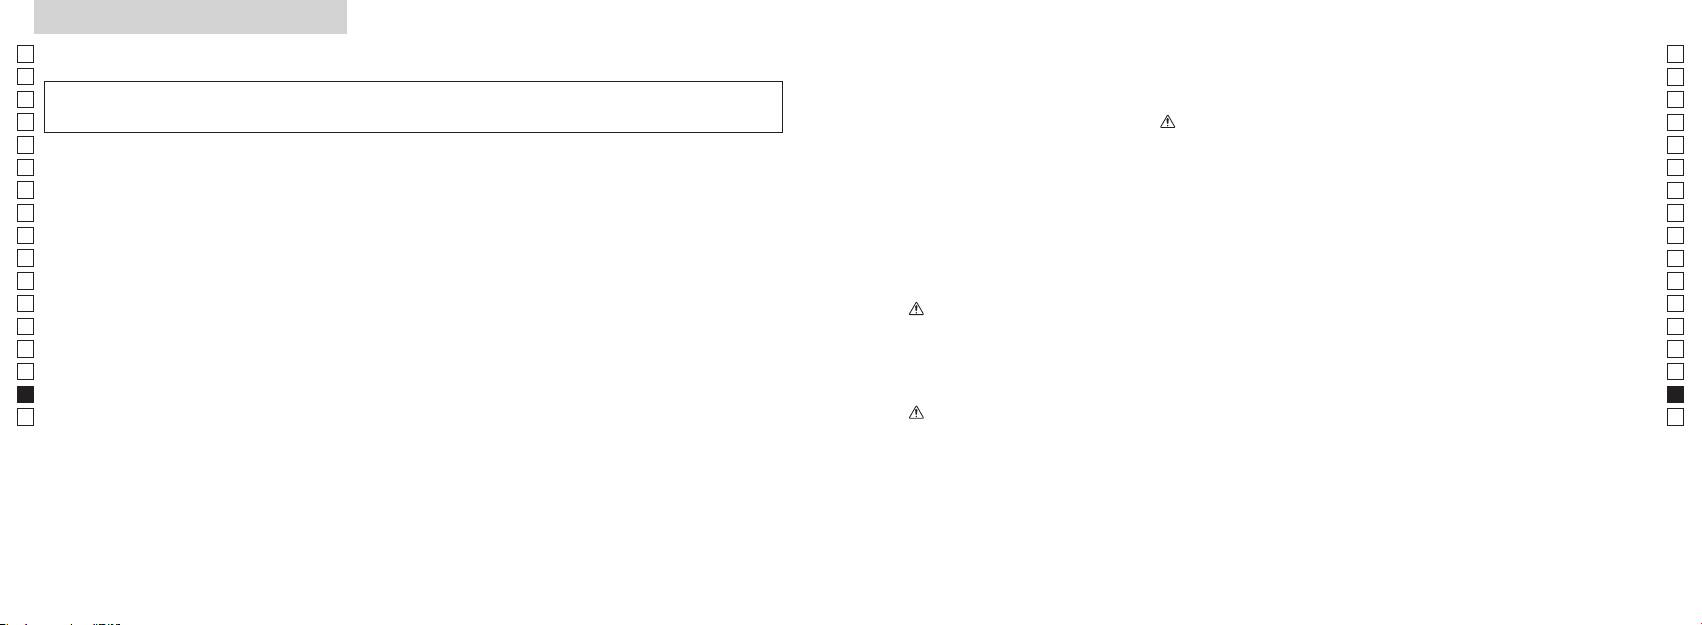
Avertismente înainte de utilizare
Jp
Respectaţi cu stricteţe
MĂSURI DE PROTECŢIE (Laser)
Jp
instrucţiunile ce urmează pentru
En
Telemetrul laser Nikon folosește un
departe de accesul copiilor când
En
o utilizare corectă a
fascicul de raze laser invizibile.
este depozitat.
Es
Folosirea dispozitivelor de comandă și reglare, sau efectuarea de proceduri altele decât cele
Es
echipamentului și pentru a evita
telemetrului
specificate aici, pot duce la expunerea la radiaţii periculoase.
Fr
laser Nikon este deteriorat, sau
eventualele probleme
Avertisment
Fr
dacă emite un sunet ciudat datorită
De
periculoase. Înainte de a utiliza
De
〇
Măsurare
produsul, citiţi în întregime
It
optic din partea obiectivului.
bateriile imediat
It
“Avertismente înainte de
Se
Nerespectarea acesteia vă poate
aparatului.
Se
〇
utilizare” și instrucţiunile pentru
afecta negativ sau vă poate leza ochii.
Nl
utilizare corectă ce însoţesc
Nl
〇
produsul. Păstraţi aceste
Ru
Un produs care a fost demontat sau reparat nu este garantat de către producător.
Ru
instrucţiuni la îndemână pentru
Pt
Pt
consultare ulterioară.
instrument optic, precum lentile sau
Pl
●
Pl
binoclu și nici cu ochiul liber. Acest
●
Fi
lucru poate cauza afectarea ochilor.
Fi
AVERTISMENT
No
No
CO., LTD.
asupra faptului că orice utilizare
Dk
Dk
●
pentru a evita
Cz
oricând și fără notificare prealabilă.
descris aici, poate provoca moartea
emiterea accidentală a fasciculului
Cz
Ro
sau rănirea gravă.
laser.
Ro
Hu
ATENŢIE
Hu
bateriile din corpul acestuia.
asupra faptului că orice utilizare
telemetrul laser Nikon. Laserul radiant
descris aici, poate duce la rănire sau
poate fi dăunător pentru sănătatea
pierderi materiale.
de către producător.
274 275
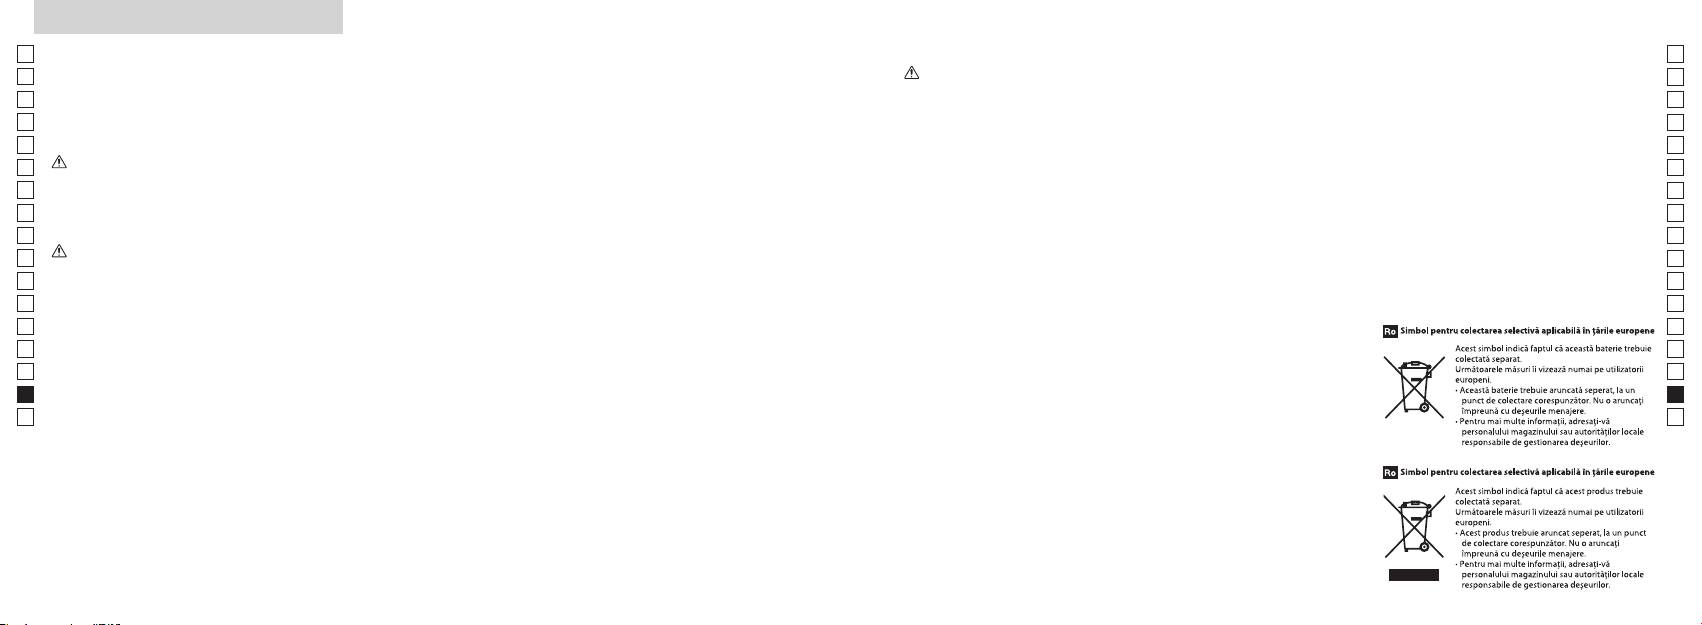
Avertismente înainte de utilizare
Jp
MĂSURI DE PROTECŢIE
MĂSURI DE PROTECŢIE
MĂSURI DE PROTECŢIE
ÎNGRIJIRE ȘI ÎNTREŢINERE
Păstrarea
Jp
vizoarele de cauciuc sau piesele
(Monocular)
(Bateria cu litiu)
Avertismente
Lentilele
En
En
Es
Telemetrul laser Nikon folosește un
Dacă este mânuită incorect, bateria se
Es
este etanș la apă, nu este proiectat
se producă condens sau mucegai.
poate fisura și poate curge, corodând
Fr
pentru folosire subacvatică.
moale fără ulei.
telemetrul laser
Fr
echipamentul și pătând hainele.
cauciucate poate provoca la unele
De
De
persoane inflamarea pielii. Dacă
urme, cum ar fi amprentele, de pe
Avertisment
următoarele:
It
It
corpului telemetrului cât mai
bateria
Se
curând posibil, folosind o cârpă
ușor lentilele cu o cârpă moale de
temperatura camerei, apoi
Se
soare, spre o lumină puternică
moale și curată.
Nl
Bateria trebuie scoasă când este
Nl
speciale pentru lentile, fără ulei.
uscat.
telemetrul laser Nikon.
Ru
Ru
lungi de nefolosire.
Avertismente
Pt
Pt
telemetrul
generează căldură. Aceasta poate
Pl
compartimentul bateriei.
Pl
distribuitorul dvs. local pentru a vă
avea efecte negative asupra lui, ori
Fi
.
obișnuite, deoarece acestea pot
Fi
No
monezi, pot face scurtcircuit și se
No
lumina directă a soarelui. Razele
Dk
poate produce răniri sau
Dk
ultraviolete și căldura excesivă pot
Cz
afecta negativ unitatea sau chiar o
Cz
cineva, lovirii altora, căderii sau
pot avaria.
echipamentului.
Ro
bateria.
Ro
altor accidente.
Corpul principal
Hu
Hu
expus la modificări bruște de
temperatură, este posibil ca pe
cu o cârpă moale și curată după ce
vătămări.
cu multă apă. Dacă lichidul dintr-o
instabil. Nerespectarea acesteia
când condensul nu s-a evaporat.
poate duce la cădere și poate
un medic.
* O suflantă este un echipament de
pentru ambalarea acestui produs
regulile din zona dvs.
aer dintr-o duză.
sau alte piese mici departe de
accesul copiilor.
276 277

Caracteristici principale Nomenclatură/Compoziţie
Jp
Următoarele condiţii fac măsurarea mai ușoară:
Jp
1
En
4
En
Deschidere emisie laser
Es
Es
3
2 Deschidere detector laser
Fr
Fr
3
De
De
aproape de 90 de grade
4
It
modul care poate fi comutat facil
It
56x oculare monoculare
Măsurarea poate duce la inexactităţi sau nereușite în
1
Se
Se
următoarele cazuri:
6
Nl
Nl
7 Index dioptrii
Ru
2
5
8
Ru
Pt
9 Capacul compartimentului bateriei
Pt
inactivitate)
Pl
etc.)
6
!p Închis" pe capacul
Pl
Fi
compartimentului bateriei
Fi
(NU este conceput pentru utilizarea subacvatică)
7
No
!q
No
!w
Dk
Dk
Telemetrul laser Nikon folosește un fascicul de raze laser
8
Cz
Cz
invizibile pentru măsurare. El măsoară timpul necesar
Ro
fasciculului laser să călătorească de la telemetru până
9
Ro
la ţintă și înapoi. Reflectivitatea laserului și rezultatele
Hu
Hu
măsurării pot varia conform condiţiilor climatice și de
!p
mediu, ca și culorii, finisajului suprafeţei, mărimii, formei
!q
și altor caracteristici ale ţintei.
!w
Compoziţie
...............................x1
.....................x1
..........................x1
......x1
278 279
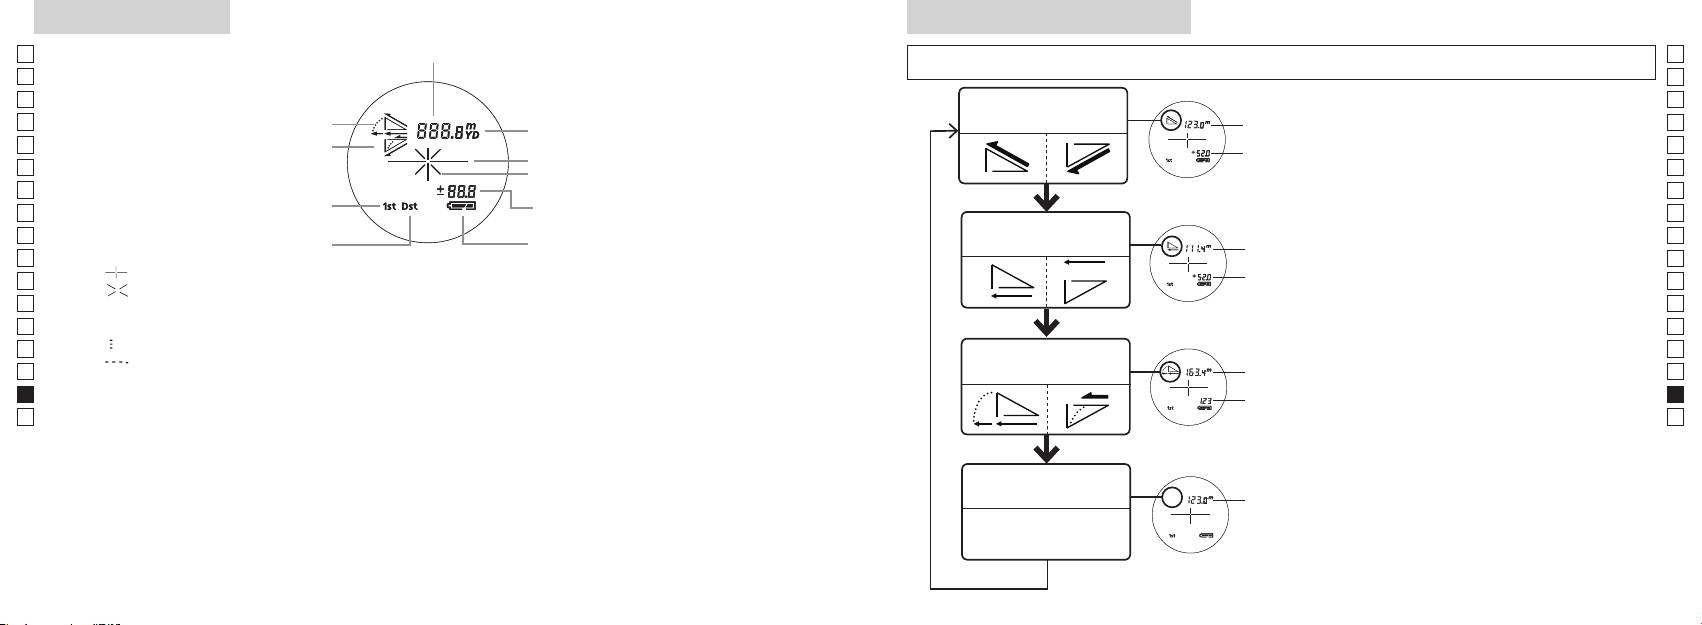
Afișajul intern
Mod de afișare a măsurării
Jp
Jp
En
En
Es
Es
Modul distanţă
Fr
efectivă şi înălţime
Fr
intern este pornit).
efectivă
De
De
It
It
Marcaj iradiere laser
secun
Se
Se
Nl
Nl
modului pentru golf)
Modul distanţă
Ru
Măsurare pentru a comuta modul de
Ru
Starea bateriei
orizontală şi înălţime
Pt
orizontală
afișare a măsurării.
Pt
『 』
până când este
Pl
Pl
『 』 - Apare când laserul este iradiat pentru o măsurare.
afișat modul dorit.
Fi
Fi
*
No
ordinea corectă, comutarea nu va avea
No
Dk
『
』 - Acum se măsoară
loc.
Dk
『
』
Modul golf
*
Comutarea modului după măsurare
Cz
Cz
Ro
Ro
*
După ce modul este fixat, măsurările
Hu
* De obicei, un ecran LCD prezintă o mărire egală sau mai redusă. Totuși, ecranul LCD al acestui produs este
efectivă
Hu
amplificat de nivelul ridicat de mărire a ocularului. Cu toate că acest LCD a fost fabricat folosind cea mai
avansată tehnologie, este imposibil să se elimine complet praful. Ca rezultat, praful poate fi observat.
Modul distanţă
efectivă
efectivă
280 281

Mod de prioritate a ţintei
Unităţi de afișare a distanţei
Înlocuirea bateriei
Jp
Acest telemetru laser utilizează sistemul de comutare la
Jp
Tipul bateriei: Baterie cu litiu 3V CR2 x1
En
Indicatoare privind nivelul remanent al bateriei
En
(Setarea implicită din fabrică este modul de prioritate a
[ ]
Es
Metru [ ]Yard
Es
: Bateria are suficientă tensiune pentru a fi folosită.
Fr
Modul de prioritate
Modul de prioritate
Fr
pornit).
De
De
「
」
「
」
It
mult de două secunde. Când unitatea de afișare a fost
It
Se
pornit).
clipire : Bateria este descărcată. După ce indicatorul clipește de trei ori, telemetrul cu laser se
Se
3. După ce s-a reglat unitatea de măsură, rezultatele vor
Nl
Nl
Ru
Ru
1. Deschideţi capacul compartimentului bateriei
Pt
Pt
butoane (mai mult de 2 secunde), până când modul
Iluminare cu LED
Pl
Pl
Fi
Fi
2. Înlocuiţi bateria veche cu una nouă
No
No
comutat.
Dk
*
*
Dk
comutarea nu va avea loc.
Cz
Cz
*
*
3. Închideţi capacul compartimentului bateriei
Ro
alimentării telemetrului laser. În acest caz, iluminarea cu
Ro
[
cu indicatorul
●
Hu
]
. Acesta ar putea să nu se
Hu
pornită din nou.
La măsurarea obiectelor suprapuse, modul de prioritate
Durata de viaţă a bateriei
Funcţionare continuă: De aprox. 13.000 de ori (la aprox. 20°C)
bateria.
282 283
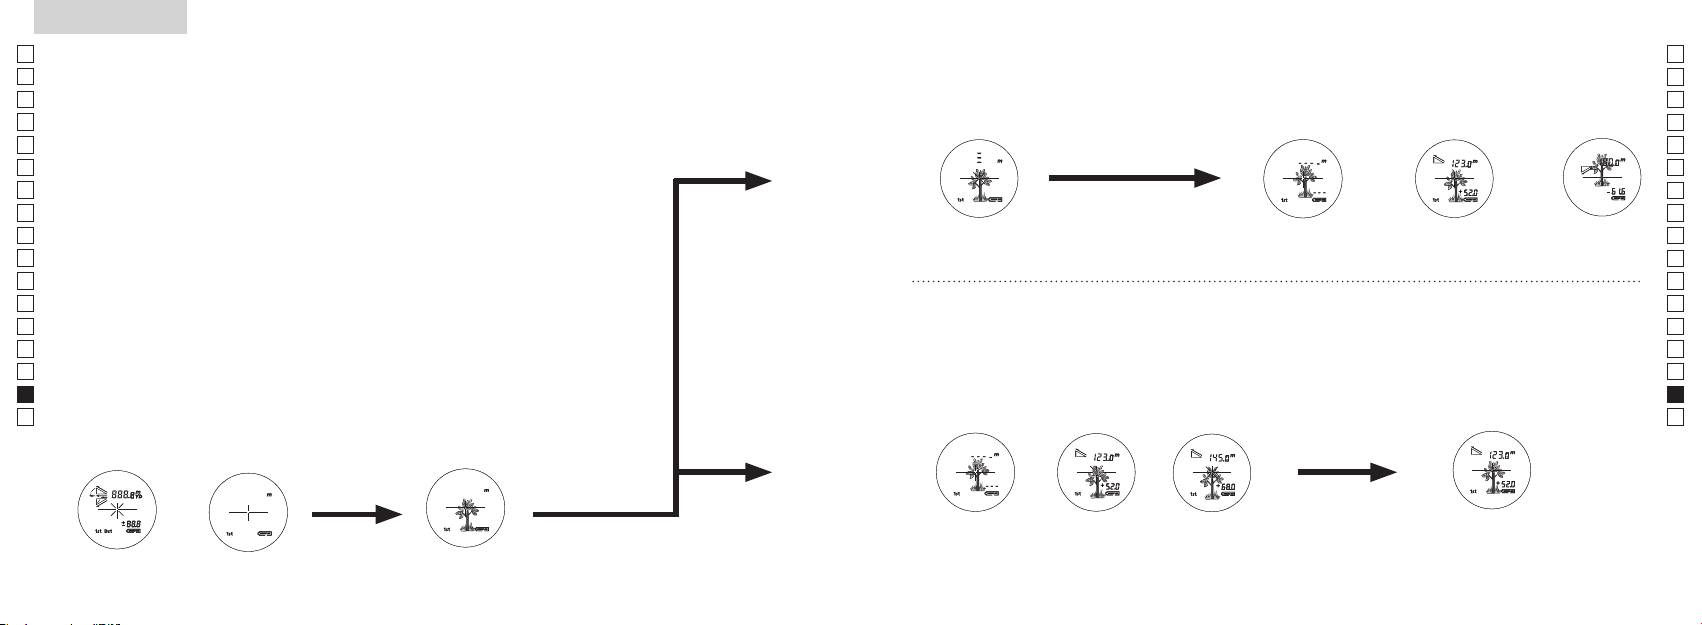
Jp
Jp
En
En
Es
Es
Fr
Fr
De
De
It
It
Se
Se
Nl
Nl
Ru
Ru
Pt
Pt
Pl
Pl
Fi
Fi
No
No
Dk
Dk
Cz
Cz
Ro
Ro
Hu
Hu
284 285
Measurement
1. Press the POWER button for power-on.
(Power turns off 8 seconds after the last
operation.)
Immediately after power-on.
3. Press POWER button once to start single measurement.
4. After measurement, “distance” or “fail to measure” indicator are displayed for 8 seconds, then power turns off. If you press the POWER
button during power-on (while the internal display is lit), another single measurement starts.
unable to measure distance.
3. Keep pressing POWER button to start continuous measurement up to 20 seconds. The internal display shows “distance” and
“fail to measure” indicator alternately.
Note: Laser irradiaton mark is blinking during the measurement.
Note: If you stop pressing the button, the continuous measuremen stops
2. Aim at the target
Positionthetargetatthecenterofthereticle
[Single measurement]
Failure to measure or
unable to measure distance.
[Continuous measurement]
4. After continuous measurement, the measure results are displayed for 8 seconds, then power turns off. If you press the POWER
button during power-on (while the internal display is lit), another measrement starts.
Failure to measure or
Target focusing.
Measuring.
(Initializing)
.
Upward measurement. Downward measurement.
Displays the measured
figure. (Target 1)
Displays the measured figure.
Stand-by.
Displays the measured
figure. (Target 2)
Measurement
1. Press the POWER button for power-on.
(Power turns off 8 seconds after the last
operation.)
Immediately after power-on.
(Initializing)
3. Press POWER button once to start single measurement.
Measuring.
4. After measurement, “distance” or “fail to measure” indicator are displayed for 8 seconds, then power turns off. If you press the POWER
button during power-on (while the internal display is lit), another single measurement starts.
Failure to measure or
unable to measure distance.
Displays the measured
figure. (Target 1)
3. Keep pressing POWER button to start continuous measurement up to 20 seconds. The internal display shows “distance” and
“fail to measure” indicator alternately.
Note: Laser irradiaton mark is blinking during the measurement.
Note: If you stop pressing the button, the continuous measuremen stops
Target focusing.
2. Aim at the target
.
Positionthetargetatthecenterofthereticle
[Single measurement]
Failure to measure or
unable to measure distance.
Upward measurement. Downward measurement.
Displays the measured figure.
[Continuous measurement]
4. After continuous measurement, the measure results are displayed for 8 seconds, then power turns off. If you press the POWER
button during power-on (while the internal display is lit), another measrement starts.
Stand-by.
Displays the measured
figure. (Target 2)
Measurement
1. Press the POWER button for power-on.
(Power turns off 8 seconds after the last
operation.)
Immediately after power-on.
Stand-by.
(Initializing)
2. Aim at the target
.
Positionthetargetatthecenterofthereticle
3. Press POWER button once to start single measurement.
4. After measurement, “distance” or “fail to measure” indicator are displayed for 8 seconds, then power turns off. If you press the POWER
button during power-on (while the internal display is lit), another single measurement starts.
unable to measure distance.
3. Keep pressing POWER button to start continuous measurement up to 20 seconds. The internal display shows “distance” and
“fail to measure” indicator alternately.
Note: Laser irradiaton mark is blinking during the measurement.
Note: If you stop pressing the button, the continuous measuremen stops
[Single measurement]
Failure to measure or
unable to measure distance.
[Continuous measurement]
4. After continuous measurement, the measure results are displayed for 8 seconds, then power turns off. If you press the POWER
button during power-on (while the internal display is lit), another measrement starts.
Failure to measure or
Target focusing.
Measuring.
Upward measurement. Downward measurement.
Displays the measured
figure. (Target 1)
Displays the measured figure.
Displays the measured
figure. (Target 2)
Măsurare
Atenţie — Flosirea dispozitivelor de comandă şi reglare sau efectuarea de proceduri altele decât cele
【
Măsurarea simplă
】
specificate aici pot duce la expunerea la radiaţii periculoase.
Măsurare o singură dată pentru a
1. Pregătire
porni măsurarea simplă.
2. Bonetă de cauciuc
3. Reglajul dioptric
din nou.
【
Funcţie de măsurare contină
】
corect subiectul.
4. Măsurare
*
.
afișajul intern este pornit)
(Oprire automată după aproximativ
vizorului.
8 secunde de inactivitate)
Imediat după pornire
Aşteptare
Measurement
1. Press the POWER button for power-on.
(Power turns off 8 seconds after the last
operation.)
Immediately after power-on.
Stand-by.
(Initializing)
2. Aim at the target
.
Positionthetargetatthecenterofthereticle
Target focusing.
[Single measurement]
3. Press POWER button once to start single measurement.
Measuring.
4. After measurement, “distance” or “fail to measure” indicator are displayed for 8 seconds, then power turns off. If you press the POWER
button during power-on (while the internal display is lit), another single measurement starts.
Failure to measure or
Upward measurement. Downward measurement.
unable to measure distance.
Displays the measured figure.
[Continuous measurement]
3. Keep pressing POWER button to start continuous measurement up to 20 seconds. The internal display shows “distance” and
“fail to measure” indicator alternately.
Note: Laser irradiaton mark is blinking during the measurement.
Note: If you stop pressing the button, the continuous measuremen stops
Failure to measure or
unable to measure distance.
4. After continuous measurement, the measure results are displayed for 8 seconds, then power turns off. If you press the POWER
button during power-on (while the internal display is lit), another measrement starts.
Displays the measured
figure. (Target 1)
Displays the measured
figure. (Target 2)
Measurement
1. Press the POWER button for power-on.
(Power turns off 8 seconds after the last
operation.)
Immediately after power-on.
Stand-by.
(Initializing)
2. Aim at the target
.
Positionthetargetatthecenterofthereticle
Target focusing.
[Single measurement]
3. Press POWER button once to start single measurement.
Measuring.
4. After measurement, “distance” or “fail to measure” indicator are displayed for 8 seconds, then power turns off. If you press the POWER
button during power-on (while the internal display is lit), another single measurement starts.
Failure to measure or
Upward measurement. Downward measurement.
unable to measure distance.
Displays the measured figure.
[Continuous measurement]
3. Keep pressing POWER button to start continuous measurement up to 20 seconds. The internal display shows “distance” and
“fail to measure” indicator alternately.
Note: Laser irradiaton mark is blinking during the measurement.
Note: If you stop pressing the button, the continuous measuremen stops
Failure to measure or
unable to measure distance.
Displays the measured
figure. (Target 1)
4. After continuous measurement, the measure results are displayed for 8 seconds, then power turns off. If you press the POWER
button during power-on (while the internal display is lit), another measrement starts.
Displays the measured
figure. (Target 2)
Measurement
1. Press the POWER button for power-on.
(Power turns off 8 seconds after the last
operation.)
Immediately after power-on.
Stand-by.
(Initializing)
2. Aim at the target
.
Positionthetargetatthecenterofthereticle
Target focusing.
[Single measurement]
3. Press POWER button once to start single measurement.
Measuring.
4. After measurement, “distance” or “fail to measure” indicator are displayed for 8 seconds, then power turns off. If you press the POWER
button during power-on (while the internal display is lit), another single measurement starts.
Failure to measure or
unable to measure distance.
3. Keep pressing POWER button to start continuous measurement up to 20 seconds. The internal display shows “distance” and
“fail to measure” indicator alternately.
Note: Laser irradiaton mark is blinking during the measurement.
Note: If you stop pressing the button, the continuous measuremen stops
Failure to measure or
unable to measure distance.
[Continuous measurement]
4. After continuous measurement, the measure results are displayed for 8 seconds, then power turns off. If you press the POWER
button during power-on (while the internal display is lit), another measrement starts.
Upward measurement. Downward measurement.
Displays the measured
figure. (Target 1)
Displays the measured figure.
Displays the measured
figure. (Target 2)
Measurement
1. Press the POWER button for power-on.
(Power turns off 8 seconds after the last
operation.)
Immediately after power-on.
Stand-by.
(Initializing)
2. Aim at the target
.
Positionthetargetatthecenterofthereticle
Target focusing.
[Single measurement]
3. Press POWER button once to start single measurement.
Measuring.
4. After measurement, “distance” or “fail to measure” indicator are displayed for 8 seconds, then power turns off. If you press the POWER
button during power-on (while the internal display is lit), another single measurement starts.
unable to measure distance.
3. Keep pressing POWER button to start continuous measurement up to 20 seconds. The internal display shows “distance” and
“fail to measure” indicator alternately.
Note: Laser irradiaton mark is blinking during the measurement.
Note: If you stop pressing the button, the continuous measuremen stops
unable to measure distance.
4. After continuous measurement, the measure results are displayed for 8 seconds, then power turns off. If you press the POWER
button during power-on (while the internal display is lit), another measrement starts.
[Continuous measurement]
Failure to measure or
Failure to measure or
Upward measurement. Downward measurement.
Displays the measured
figure. (Target 1)
Displays the measured figure.
Displays the measured
figure. (Target 2)
Measurement
1. Press the POWER button for power-on.
(Power turns off 8 seconds after the last
operation.)
Immediately after power-on.
Stand-by.
(Initializing)
2. Aim at the target
.
Positionthetargetatthecenterofthereticle
Target focusing.
[Single measurement]
3. Press POWER button once to start single measurement.
4. After measurement, “distance” or “fail to measure” indicator are displayed for 8 seconds, then power turns off. If you press the POWER
button during power-on (while the internal display is lit), another single measurement starts.
unable to measure distance.
3. Keep pressing POWER button to start continuous measurement up to 20 seconds. The internal display shows “distance” and
“fail to measure” indicator alternately.
Note: Laser irradiaton mark is blinking during the measurement.
Note: If you stop pressing the button, the continuous measuremen stops
unable to measure distance.
4. After continuous measurement, the measure results are displayed for 8 seconds, then power turns off. If you press the POWER
button during power-on (while the internal display is lit), another measrement starts.
[Continuous measurement]
Failure to measure or
Failure to measure or
Measuring.
Upward measurement. Downward measurement.
Displays the measured
figure. (Target 1)
Displays the measured figure.
Displays the measured
figure. (Target 2)
Measurement
1. Press the POWER button for power-on.
(Power turns off 8 seconds after the last
operation.)
Immediately after power-on.
Stand-by.
(Initializing)
2. Aim at the target
.
Positionthetargetatthecenterofthereticle
Target focusing.
[Single measurement]
3. Press POWER button once to start single measurement.
Measuring.
4. After measurement, “distance” or “fail to measure” indicator are displayed for 8 seconds, then power turns off. If you press the POWER
button during power-on (while the internal display is lit), another single measurement starts.
unable to measure distance.
3. Keep pressing POWER button to start continuous measurement up to 20 seconds. The internal display shows “distance” and
“fail to measure” indicator alternately.
Note: Laser irradiaton mark is blinking during the measurement.
Note: If you stop pressing the button, the continuous measuremen stops
unable to measure distance.
4. After continuous measurement, the measure results are displayed for 8 seconds, then power turns off. If you press the POWER
button during power-on (while the internal display is lit), another measrement starts.
[Continuous measurement]
Failure to measure or
Failure to measure or
Upward measurement. Downward measurement.
Displays the measured
figure. (Target 1)
Displays the measured figure.
Displays the measured
figure. (Target 2)
Measurement
1. Press the POWER button for power-on.
(Power turns off 8 seconds after the last
operation.)
Immediately after power-on.
Stand-by.
(Initializing)
2. Aim at the target
.
Positionthetargetatthecenterofthereticle
Target focusing.
[Single measurement]
3. Press POWER button once to start single measurement.
Measuring.
4. After measurement, “distance” or “fail to measure” indicator are displayed for 8 seconds, then power turns off. If you press the POWER
button during power-on (while the internal display is lit), another single measurement starts.
Failure to measure or
unable to measure distance.
Displays the measured
figure. (Target 1)
3. Keep pressing POWER button to start continuous measurement up to 20 seconds. The internal display shows “distance” and
“fail to measure” indicator alternately.
Note: Laser irradiaton mark is blinking during the measurement.
Note: If you stop pressing the button, the continuous measuremen stops
Failure to measure or
unable to measure distance.
Upward measurement. Downward measurement.
Displays the measured figure.
[Continuous measurement]
4. After continuous measurement, the measure results are displayed for 8 seconds, then power turns off. If you press the POWER
button during power-on (while the internal display is lit), another measrement starts.
Displays the measured
figure. (Target 2)
Measurement
1. Press the POWER button for power-on.
(Power turns off 8 seconds after the last
operation.)
Immediately after power-on.
Stand-by.
(Initializing)
2. Aim at the target
.
Positionthetargetatthecenterofthereticle
Target focusing.
[Single measurement]
3. Press POWER button once to start single measurement.
Measuring.
4. After measurement, “distance” or “fail to measure” indicator are displayed for 8 seconds, then power turns off. If you press the POWER
button during power-on (while the internal display is lit), another single measurement starts.
Failure to measure or
unable to measure distance.
3. Keep pressing POWER button to start continuous measurement up to 20 seconds. The internal display shows “distance” and
“fail to measure” indicator alternately.
Note: Laser irradiaton mark is blinking during the measurement.
Note: If you stop pressing the button, the continuous measuremen stops
Failure to measure or
unable to measure distance.
[Continuous measurement]
4. After continuous measurement, the measure results are displayed for 8 seconds, then power turns off. If you press the POWER
button during power-on (while the internal display is lit), another measrement starts.
Upward measurement. Downward measurement.
Displays the measured
figure. (Target 1)
Displays the measured figure.
Displays the measured
figure. (Target 2)
4. După măsurare este afișată "eroare măsurare"
butonul
afișajul intern este aprins), pornește o altă măsurare simplă.
Măsurare
"Imposibilitate de a măsura"
Afișează figura măsurată
4. După măsurarea continuă sunt afișate rezultatele măsurării finale
măsurarea continuă pentru aproximativ 8 secunde. Afișajul intern
măsurare" și
se oprește.
*
Marcajul de iradiere cu laser
măsurării.
măsurare.
*
oprește.
Afișează figura
Afișează figura
sau "Imposibilitate de
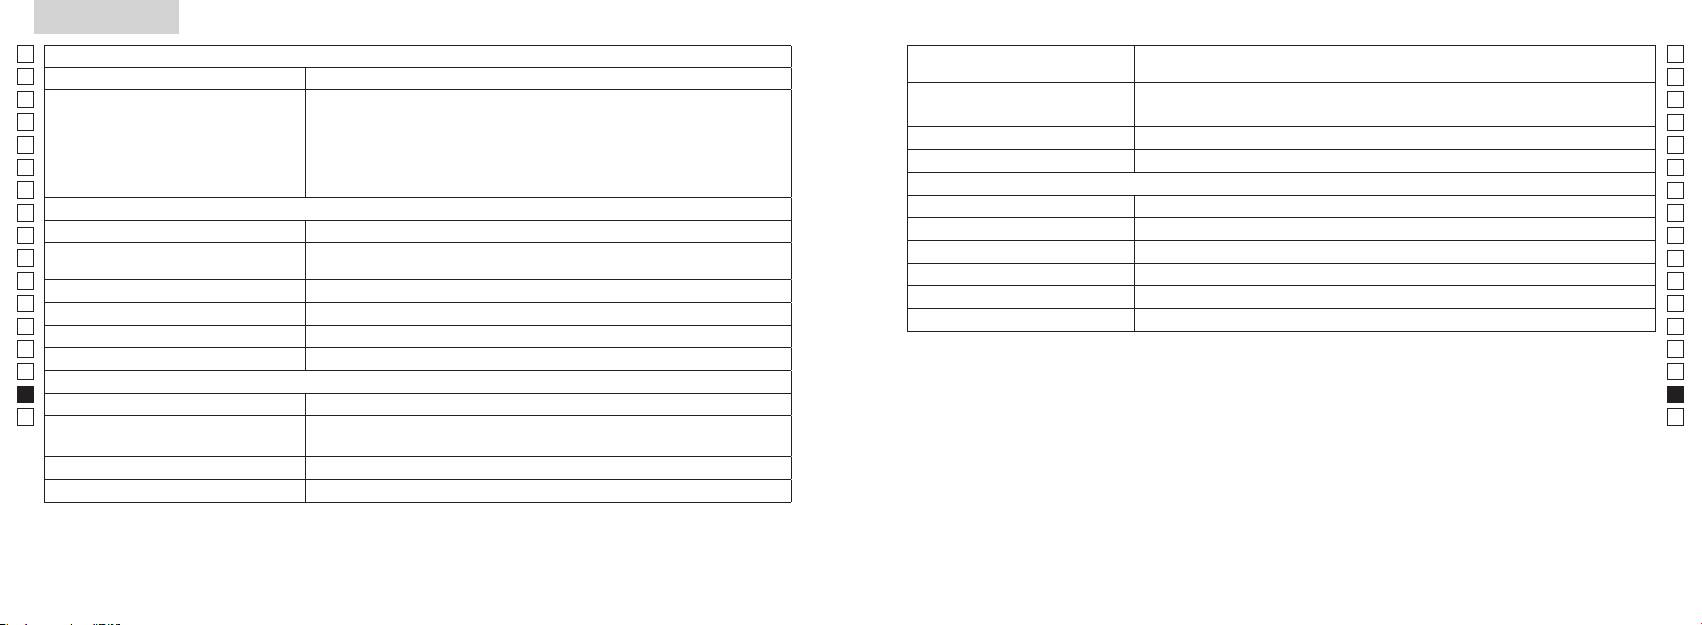
Specificaţii
Jp
Sistem de măsurare
Jp
Structură
(Compartimentul bateriei: Rezistent la apă**)
En
Intervalul de măsurare
En
Es
Es
Fr
Fr
FCC artea 15 Sub-
De
De
Mediu
It
It
Laser
Se
Se
Sistemul optic
Clasa
Nl
Nl
Mărire (x) 6
Lungimea de undă (nm) 905
Ru
Ru
Diametru efectiv al lentilelor obiectivului
Durata impulsului (ns) 12
Pt
ø21
Pt
(mm)
15
Pl
Pl
Câmp angular de vedere (real) (°) 7,5
(mrad)
Fi
Fi
Compensare pentru ochi (mm) 18,3
rouă de condensare)
No
No
ø3,5
Dk
Dk
-
1
Reglajul dioptric ±4m
* Modele rezistente la apă
Cz
Cz
Altele
adâncime maximă de 1 metru timp de până la 10 minute.
Ro
Ro
˚C) -10 —
Telemetrul laser Nikon oferă următoarele avantaje:
Hu
Hu
Baterie cu litiu CR2 x 1 (3V CC)
Sursă de alimentare
Oprire automată (după aproximativ 8 secunde de inactivitate)
Aveţi în vedere următoarele la folosirea telemetrului laser Nikon.
Dimensiuni (L x l x Î) (mm) 113 x 70 x 39
aprox. 175 (fără baterie)
286 287
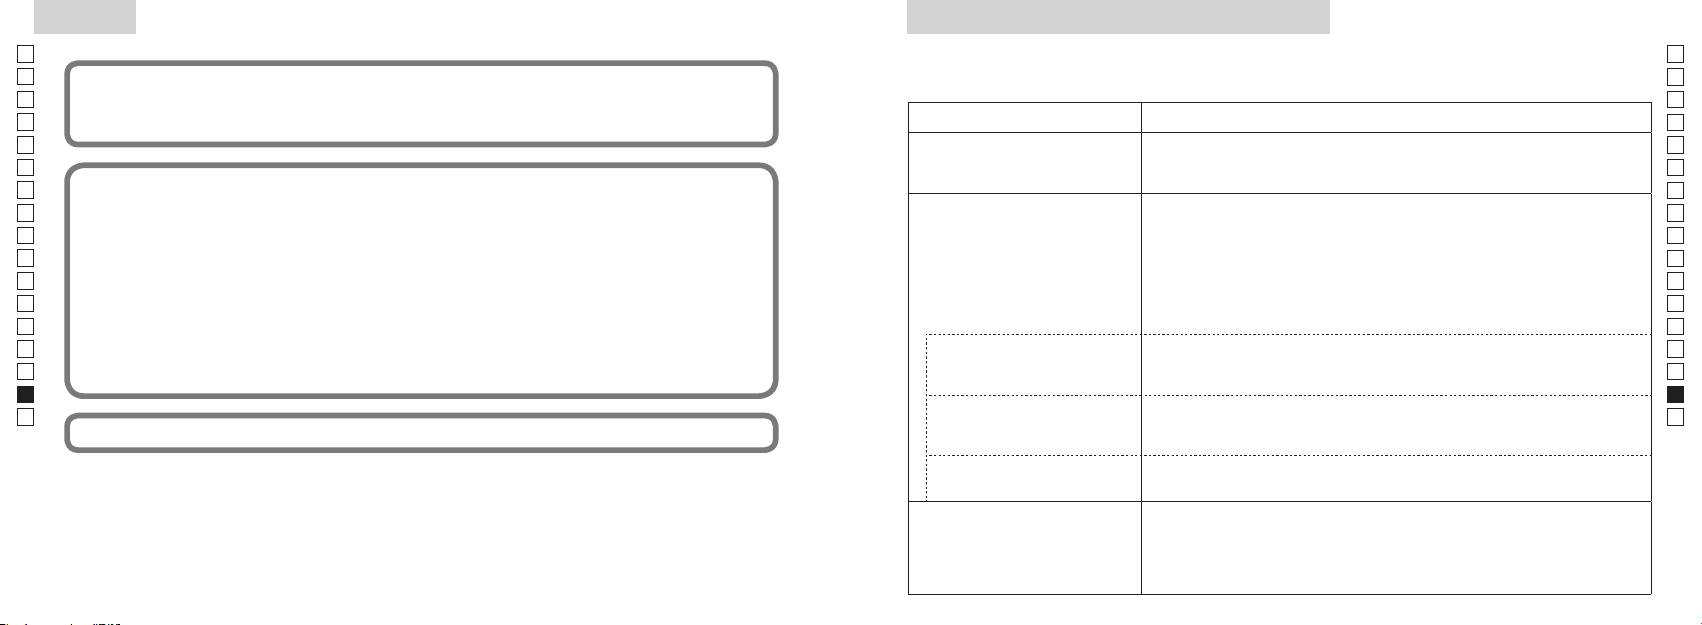
Altele
Detectare și remediere defecţiuni/Reparare
Jp
Jp
En
En
Es
Es
Simptom Puncte de verificare
Fr
Fr
nedorită.
De
●
De
Aparatul nu pornește
●
It
It
Acest echipament a fost testat și s-a stabilit că el corespunde cu limitele pentru un dispozitiv digital pentru clasa B,
●
Se
Se
●
Nl
Nl
nu blochează orificiul pentru raza laser și orificiul detectorului laser de pe partea
Ru
Ru
lentilei obiectivului.
Pt
●
Pt
Pl
Pl
●
Fi
laser.
Fi
●
No
No
Dk
●
Dk
●
Cz
măsura”)
Cz
Ro
Ro
Hu
●
Hu
Acest telemetru laser Nikon este un telemetru de bază. Rezultatele lui nu pot fi folosite ca dovezi oficiale.
frunze sau iarbă.
nu poate fi măsurată
●
frunze sau iarbă.
●
●
Rezultatul măsurării este instabil
●
●
frunze sau iarbă.
288 289
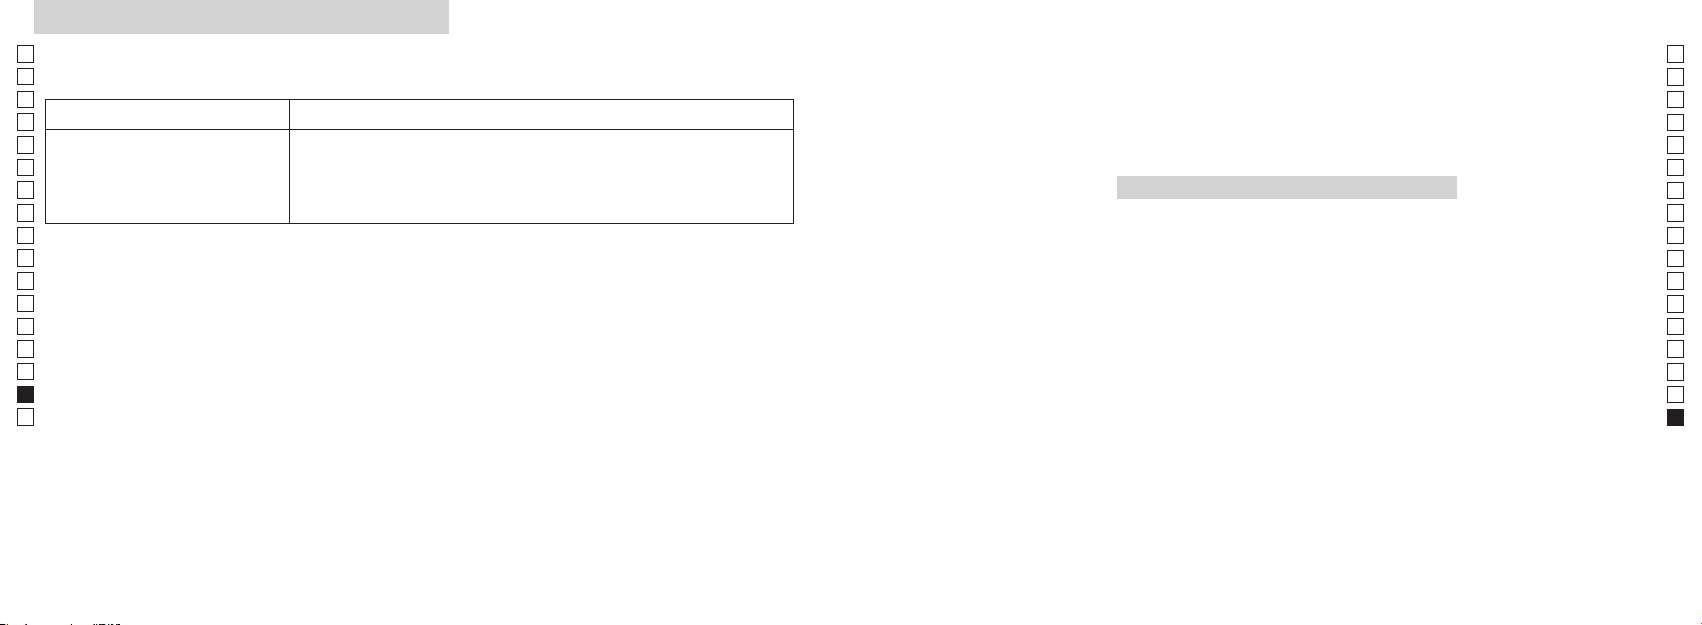
Detectare și remediere defecţiuni/Reparare
Jp
Jp
En
En
Es
Es
Simptom Puncte de verificare
Fr
Fr
De
●
Magyar
De
●
It
It
laser.
Se
●
TARTALOMJEGYZÉK
Se
frunze sau iarbă.
Nl
Nl
Használat előtti figyelmeztetések ............... 292-295
Ru
Ru
Legfontosabb tulajdonságok ................................. 296
Pt
Pt
Felépítés .............................................. 297
Pl
Pl
Belső kijelző .................................................................. 298
Fi
Fi
Méréskijelző mód ....................................................... 299
No
No
Távolságkijelzés
Dk
Dk
........................ 300
Cz
Cz
.................................................................. 301
Ro
Ro
Mérés ..................................................................... 302-303
Hu
Hu
Specifikációk ...................................................... 304-305
......................................................................... 306
avítás ........................................ 307-308
290 291
Használat előtti figyelmeztetések
Jp
Köszönjük, hogy a Nikon COOLSHOT AS lézeres távolságmérőt vásárolta meg.
A berendezés megfelelő
BIZTONSÁGI ÓVINTÉZKEDÉSEK
Jp
használata és a lehetséges
gyerekek által nem elérhető helyen
En
(Lézer)
En
veszélyt jelentő problémák
tárolja.
A Nikon lézeres távolságmérő
Es
Az itt meghatározottaktól eltérő ellenőrzési, beállítási vagy kivitelezési eljárások
Es
elkerülése érdekében szigorúan
láthatatlan lézersugarat használ.
alkalmazása veszélyes sugárterhelést eredményezhet.
Fr
Mindenképpen tartsa be az alábbi
burkolata megsérül, vagy ha furcsa
tartsa be a következő
Fr
hangot ad ki, mert leejtette vagy
De
irányelveket. A termék
pontokat:
De
〇
más dolog történt vele, akkor
használata előtt alaposan
Figyelmeztetés
It
azonnal vegye ki az elemet és ne
It
figyelmeztetések" c. részt és a helyes használatra vonatkozó utasításokat.
FMérés
olvassa el a termékhez mellékelt
Se
gombot, amikor a tárgylencse felőli
használja tovább a készüléket.
Se
〇 A könnyű tájékozódás érdekében tartsa ezt a kézikönyvet elérhető helyen.
"Használat előtti
oldalról néz bele az optikába. Ha nem
Nl
figyelmeztetések" c.
Nl
〇 Önkényesen ne szerelje szét vagy próbálja megjavítani a terméket, mert ez komoly problémát
így cselekszik, az rossz hatással lehet
dokumentumot és a helyes
Ru
okozhat.
Ru
a szemére vagy károsíthatja azt.
használatra vonatkozó
Pt
Szétszerelt vagy javított termékre a gyártó nem vállal garanciát.
Pt
utasításokat. A könnyű
Pl
tájékozódás érdekében tartsa ezt
Pl
● A műszaki adatok és a kivitel előzetes értesítés nélkül megváltozhatnak.
Fi
a kézikönyvet elérhető helyen.
eszközökön, például lencséken vagy
Fi
●
No
távcsöveken keresztül, valamint
No
egészben és részleteiben sem másolható (kivéve a kritikai cikkekben vagy áttekintésekben
Dk
FIGYELMEZTETÉS
Dk
használt rövid idézeteket).
megsérülhet a szeme.
Cz
Cz
● A NIKON VISION CO., LTD. fenntartja magának a jogot, hogy e kézikönyvekben leírt tartalmakat
itt leírtakat figyelmen kívül hagyva
rakja a FMérés gombra,
Ro
bármikor, előzetes értesítés nélkül megváltoztassa.
bármilyen helytelen használat halált
Ro
vagy súlyos sérülést okozhat.
hogy véletlenül se bocsássa ki a
Hu
Hu
lézersugarat.
VIGYÁZAT
használja, vegye ki belőle az elemet.
itt leírtakat figyelmen kívül hagyva
bármilyen helytelen használat
megjavítani a Nikon lézeres
sérülést vagy anyagi károkat
távolságmérőt. A kibocsátott
eredményezhet.
lézersugár ártalmas lehet az
egészségre. Szétszerelt, átalakított
vagy javítani próbált termékre a
gyártó nem vállal garanciát.
292 293
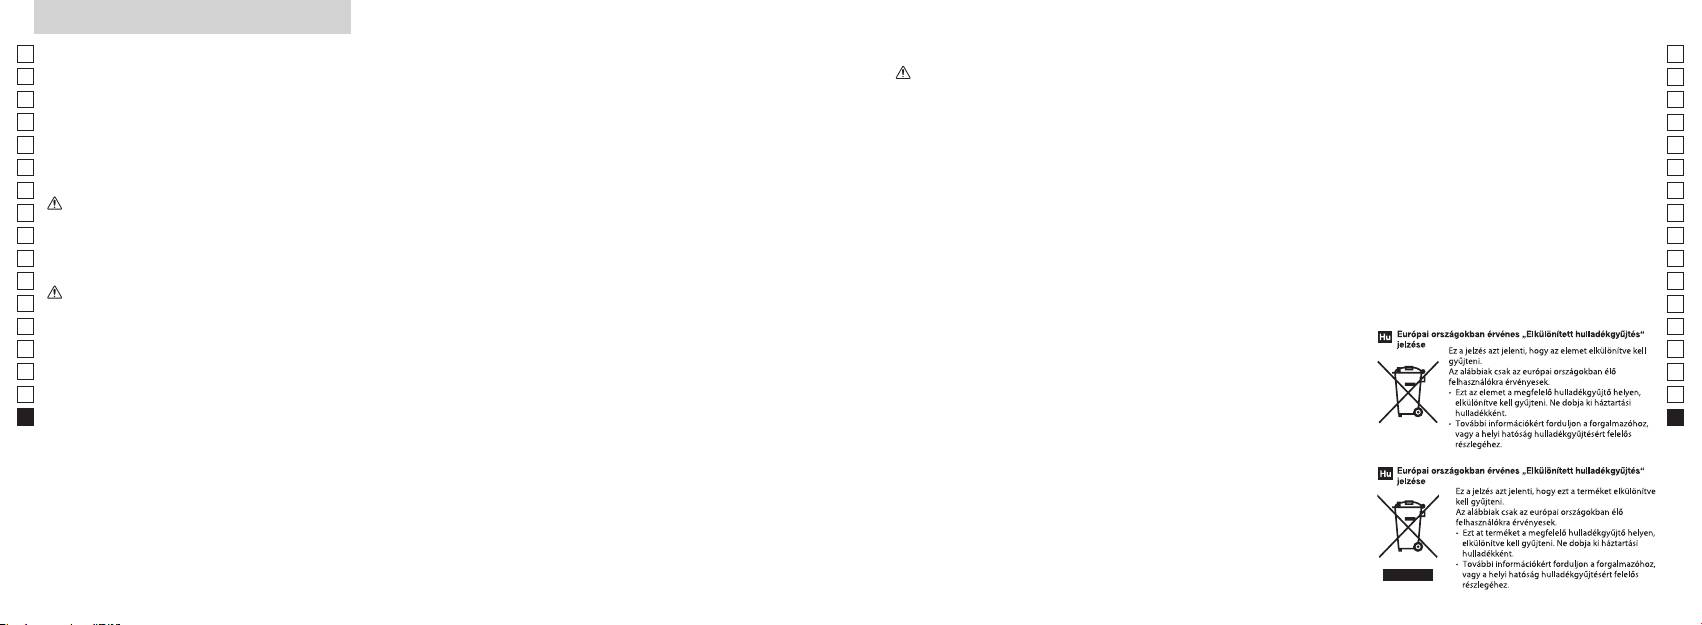
Használat előtti figyelmeztetések
Jp
BIZTONSÁGI
BIZTONSÁGI ÓVINTÉZKEDÉSEK
BIZTONSÁGI ÓVINTÉZKEDÉSEK
ÁPOLÁS ÉS KARBANTARTÁS
Tárolás
Jp
Ha ezt nem tartja be, leeshet vagy
En
ÓVINTÉZKEDÉSEK
(Lítium elem)
Vigyázat
Lencsék
En
leejtheti, ami sérülést vagy hibás
(Egylencsés kivitel)
felületére lecsapódhat a víz vagy
Es
Az elemet helytelenül kezelve az
működést okozhat.
Es
vízálló, nem víz alatti használatra
felületéről, akkor finom olajmentes
A Nikon lézeres távolságmérő a
megrepedhet és kifolyhat, ezzel
Fr
készült.
kefét használjon.
lézeres távolságmérőt száraz, hűvös
Fr
céltárgy távolságának méréséhez
korrodálják a berendezést és
csomagolásához használt műanyag
helyen tárolja.
De
egylencsés kivitelt használ optikai
beszennyezik a ruházatot.
De
tasakot gyermekek által nem
került esővizet, vizet, homokot és
szennyeződéseket vagy foltokat
Az esős időben vagy éjszaka használt
It
rendszerében. Mindenképpen tartsa
Mindenképpen tartsa be az alábbi
elérhető helyen tartsa.
sarat egyből törölje le puha, tiszta
úgy távolíthat el a lencse
készüléket utána szobahőmérsékleten
It
be az alábbi pontokat:
pontokat:
Se
ruhával.
felületéről, hogy egy puha, tiszta
szárítsa meg, és hűvös, száraz helyen
Se
elemet
Figyelmeztetés
gumi szemkagylókat vagy kis
pamutruhával vagy minőségi
tárolja.
Nl
megfelelő irányba állítva helyezze
Nl
alkatrészeket stb. tegyenek a
távolságmérőt meleg vagy napos
olajmentes lencsetörlő kendővel
be.
Ru
használatakor soha ne nézzen
szájukba. Ha a gyerekek lenyelnek
Ru
időben az autóban, vagy hőforrás
nagyon óvatosan letörli azt. A
közvetlenül a napba, erős
ilyen alkatrészeket, azonnal
Pt
makacs foltokat kis mennyiségű
Pt
huzamosabb ideig nem használja.
fényforrásba vagy a lézersugárba.
forduljon orvoshoz.
negatív hatással lehet rá.
tiszta (nem denaturált) alkohollal
Pl
Pl
törölheti le. Ne használjon bársony
Vigyázat
kivezetését.
Fi
szemkagylót, az bizonyos
hagyja kint közvetlen napsütésben.
vagy közönséges szövet
Fi
F
a zsebében vagy
embereknél bőrgyulladást okozhat.
No
Az ultraibolya sugarak és a túlzott
törlőkendőt, mert ezek
Mérés gombot, amikor nem
táskájában kulcsokkal vagy
No
Ha bármilyen tünet előfordul,
meleg negatív hatással lehetnek az
megkarcolhatják a lencse felületét.
használja a Nikon lézeres
pénzérmékkel együtt, mert ettől
Dk
ne használja tovább és azonnal
Dk
egységre, vagy akár tönkre is tehetik
Amennyiben a törlőruhát már
távolságmérőt.
rövidre záródhat és túlmelegedhet.
Cz
forduljon orvoshoz.
azt.
használta a ház tisztításához, az a
Cz
lencsefelület tisztítására már nem
Ro
közben. Ha ezt nem tartja be, az
hatásának, és soha ne szerelje szét.
Ro
a szállítás közben tartsa a puha
esetén a Nikon lézeres
alkalmas.
sérülést vagy hibás működést
Hu
tokban.
Hu
távolságmérő lencséjének
okozhat, hiszen nekimehet
Géptest
felületeire pára csapódhat le.
bárminek, megüthet másokat,
folyadék hozzáér a ruhájához
nem működne megfelelően,
A lecsapódott folyadék
a készülék leeshet vagy egyéb
vagy a bőréhez, azonnal öblítse le
törlőkendővel tisztítsa meg,
egyáltalán ne használja tovább, és
elpárolgásáig ne használja a
balesetek történhetnek.
bő vízzel. Ha egy sérült elemből
miután egy lefúvóval óvatosan
kérdezze meg a helyi kereskedőjét,
terméket.
folyadék kerül a szemébe, azonnal
lefújta róla a port. Ne használjon
hova kell elküldeni javításra.
fogva. Így ugyanis megüthet
öblítse ki tiszta vízzel, majd
benzint, hígítót vagy más, szerves
másokat és sérülést okozhat.
forduljon orvoshoz.
oldószert tartalmazó tisztítókat.
* A lefúvó egy gumi
kell kezelni, tartsa be a helyi
tisztítóberendezés, ami levegőt
szabályozásokat.
fúj ki egy fúvókából.
294 295

Legfontosabb tulajdonságok Elnevezések/Felépítés
Jp
A következő feltételek egyszerűsítik a mérést:
Jp
1
En
4
En
Lézerkibocsátó nyílás
Es
Es
bevonattal
3
2 Lézerérzékelő nyílás
Fr
Fr
3
De
De
(vízszintes távolság ± magasság), ami hasznos a golfnál
4 Mérés gomb
It
Mérési pontatlanság vagy hiba a következő esetekben
It
56x-os nagyítású egyszemes lencse
választhat
fordulhat elő:
1
Se
Se
6 Dioptriaállító gyűrű
Nl
Céltárgy elsőbbségét átkapcsoló rendszert alkalmaz
Nl
7 Dioptriaindex
Ru
Mérés gombot hosszan megnyomva
2
5
8 Szíj befűzőlyuk
Ru
folyamatos mérés funkciót végezhet
Pt
9
Pt
Pl
6
!p
Pl
Fi
irányának jelölése
Fi
7
No
!q Termékszám címkéje
S
No
!w FDA adat jelzése
Dk
Dk
A Nikon lézeres távolságmérő láthatatlan lézersugarat
8
Cz
Cz
használ a távolság meghatározásához. Megméri azt
Ro
az időt, amely alatt a lézersugár megteszi az utat a
9
Ro
távolságmérőtől a célig és vissza. A lézer visszaverődése
Hu
Hu
és a mérési eredmények változhatnak az időjárási és
!p
környezeti viszonyoktól, valamint a céltárgy színétől,
!q
felületi kikészítésétől, méretétől, formájától és egyéb
!w
jellemzőitől függően.
Felépítés
.................................. 1 db
...................... 1 db
....................... 1 db
..... 1 db
296 297
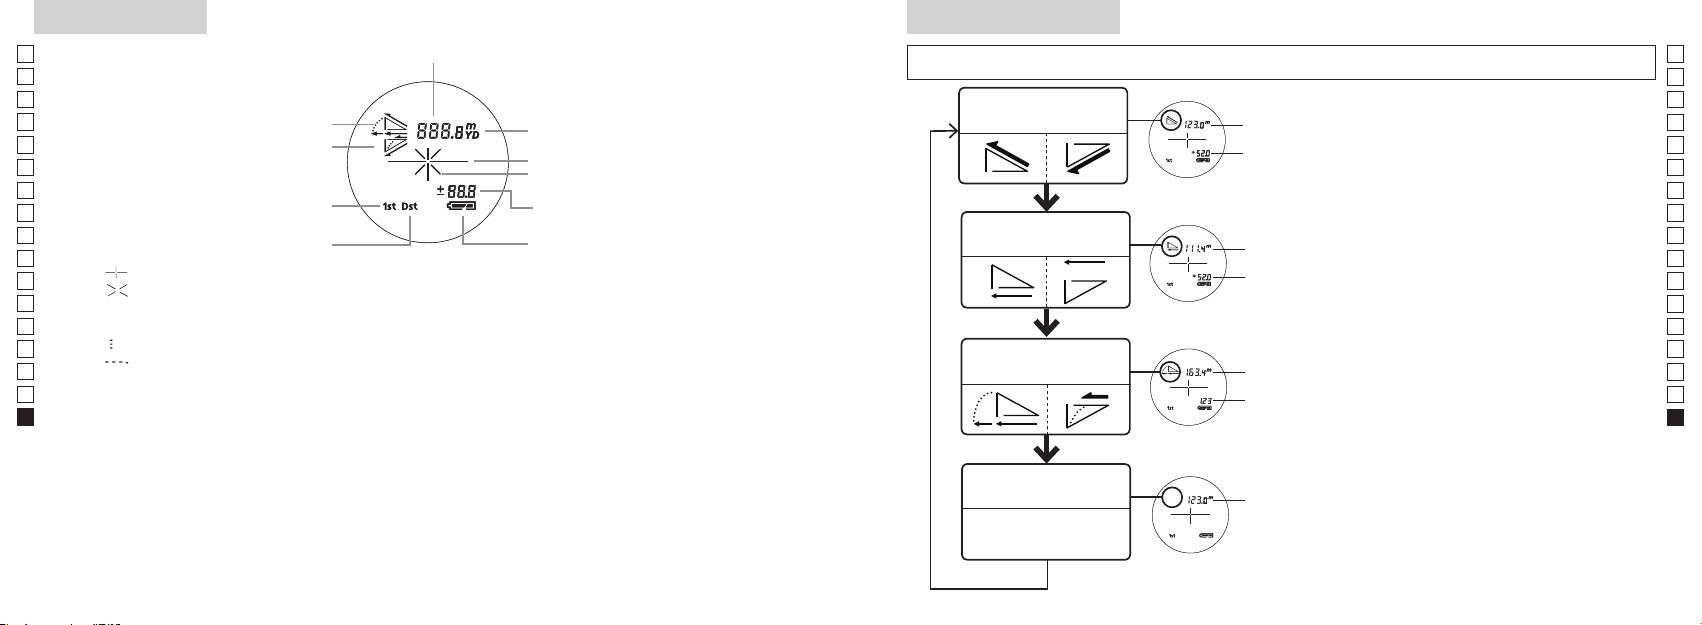
Belső kijelző
Méréskijelző mód
Jp
Távolság
Jp
kevesebb ideig), hogy az üzemmódot az alábbi sorrendben változtassa.
En
En
Es
Es
Tényleges távolság és
1. Kapcsolja be a gépet (ellenőrizze, hogy a
Tényleges
Fr
magasság üzemmód
Fr
belső kijelző bekapcsolt-e).
távolság
De
Lejtés
De
Céltárgy jele
Magasság
gombot, majd azonnal (0,5 másodpercen
It
It
Lézerkibocsátás jele
belül) nyomja
Se
Se
Magasság (aktuális távolság a golf
gombot 2 másodpercnél rövidebb ideig.
Nl
3. A Mérés kijelző üzemmód kapcsolásához
Nl
üzemmód beállításnál)
Vízszintes távolság és
Ru
Vízszintes
Ru
Távoli céltárgy elsőbbsége üzemmód
magasság üzemmód
Pt
távolság
gombról.
Pt
『 』 - Célozza be a mérni kívánt tárgyat. Állítsa be a célt a hajszálkereszt közepére.
4. Ismételgesse a 2. és 3. lépéseket a kívánt
Pl
Magasság
Pl
『 』 - A méréshez a lézersugár kibocsátása közben jelenik meg.
üzemmód megjelenéséig.
Fi
Fi
Az egyszeri mérés időtartama alatt végig látható. Folyamatos mérés közben villog.
*
Ha a gombokat nem a helyes sorrendben
No
Ne nézzen bele az objektívlencsébe, míg ez a jel látható.
nyomja meg, a gép nem kapcsol át.
No
Dk
『
』 - Mérés folyamatban
Lejtéshez
*
Az üzemmódot a mérés után átkapcsolva
Dk
『
』 - "Hibás a mérés" vagy "Nem lehet mérni"
Golf üzemmód
igazított
a gép átalakítja az eredményeket az új
Cz
Cz
távolság
üzemmódhoz.
Ro
Ro
* Az LCD általában azonos vagy kisebb nagyítást alkalmaz. Azonban e termék LCD kijelzőjét felnagyítja
Tényleges
*
Miután beállította az üzemmódot, a gép
Hu
a szemkagyló nagymértékű nagyítása. Bár az LCD előállításához a legkorszerűbb technológiát
távolság
a méréseket az új üzemmódban végzi el.
Hu
Használat közben azonban ez nem befolyásolja a mérés pontosságát vagy biztonságát.
Tényleges távolság
Tényleges
üzemmód
távolság
298 299
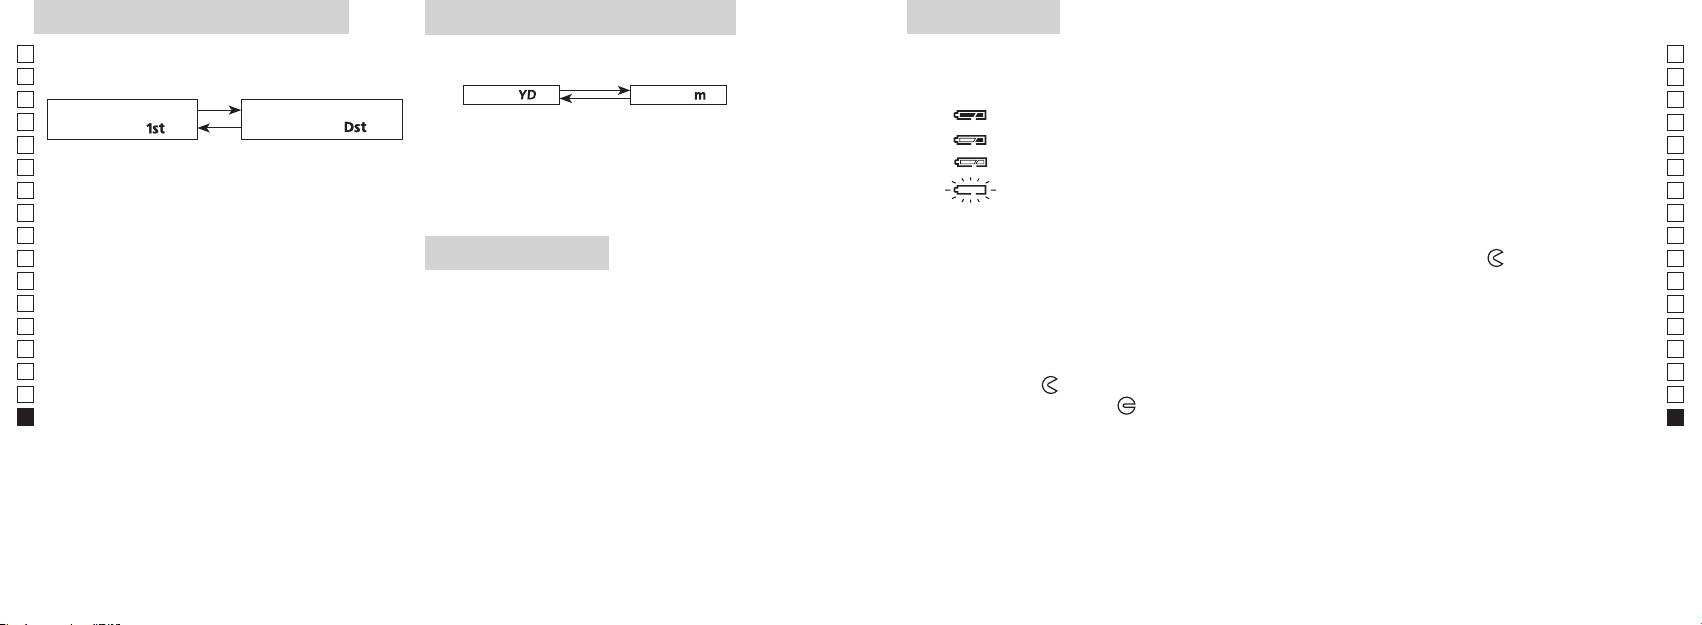
Céltárgy elsőbbsége üzemmód
Távolságkijelzés mértékegysége
Elem cseréje
Jp
A mérési eredmények yardban és méterben jeleníthetők
Jp
Elem típusa: 1 db 3 V-os CR2 lítium elem
elsőbbsége közötti átkapcsoló rendszert alkalmazza (a
meg (a gyári beállítás a yard).
En
Elem maradék töltésének kijelzése
En
gyári alapbeállítás az első céltárgy elsőbbsége).
[ ]
Es
Méter [ ]Yard
* A belső kijelzőn az elemállapot jelzése figyelmeztet, hogy mikor kell az elemet kicserélni.
Es
Távoli céltárgy elsőbbsége
1. Kapcsolja be a gépet (ellenőrizze, hogy a belső kijelző
: Az elem töltése elegendő a működéshez.
Fr
Fr
üzemmód「
」
üzemmód
「
」
bekapcsolt-e).
: Az elem lemerülőben van. Készüljön fel az elemcserére.
De
De
1. Kapcsolja be a gépet (ellenőrizze, hogy a belső
It
: Az elem töltöttségi szintje alacsony. Cserélje le egy újra.
mint két másodpercig. Amikor a kijelző bekapcsolt,
It
kijelző bekapcsolt-e).
engedje el a gombot.
Se
villog : Az elem teljesen lemerült. Miután a jel háromszor villog, a lézeres távolságmérő
Se
3. A mértékegység beállítása után a gép átalakítja az
automatikusan kikapcsol. Cserélje le az elemet.
Nl
Nl
eredményeket és a kiválasztott módon jeleníti meg.
másodpercen belül.
Ru
Ru
Mindkét gombot tartsa folyamatosan (2
1. Nyissa ki az elemrekesz fedelét
Pt
másodpercnél tovább) lenyomva, amíg a gép át
Az elemrekesz-fedél bemélyedő részét pl. a hüvelykujjpárnájával fordítsa el a
jel irányába.
Pt
LED-es világítás
nem kapcsol az első és a távoli céltárgy elsőbbsége
Pl
Avízállóságot biztosító gumitömítése miatt nehezen nyílhat.
Pl
1. Kapcsolja be a gépet (ellenőrizze, hogy a belső kijelző
üzemmódok között.
2. Cserélje le a régi elemet egy újra
Fi
bekapcsolt-e).
Fi
3. Az üzemmód bekapcsolásakor engedje el mindkét
No
gombot.
No
Dk
*
Ha a gombokat nem a helyes sorrendben nyomja
megfelelően helyezi be, a lézeres távolságmérő nem fog működni.
Dk
meg, a gép nem kapcsol át.
*
3. Zárja be az elemrekesz fedelét
Cz
Cz
*
Ha a gép nem kapcsol át, ismételje meg a 2. lépést.
sötét az LCD panel megtekintéséhez.
Igazítsa a
jelet a
●
Ro
*
Ro
fordítsa el a fedelet a
irányba. A vízállóságot biztosító gumitömítése miatt nehezen záródhat, de
[]
Hu
Hu
világítás ki lesz kapcsolva a lézeres távolságmérő újbóli
elsőbbsége üzemmód a legközelebb, a Távoli céltárgy
bekapcsolásakor.
Elem élettartama
elsőbbsége üzemmód pedig a legmesszebb lévő tárgy
Folyamatos üzem: Körülbelül 13.000 alkalom (kb. 20 °C-on)
távolságát mutatja.
színétől stb. függően. Csak útmutatóként használja.
élettartama valószínűleg rövidebb lesz a fentiekben megadottnál.
* Ha a készülék vízbe esik és emiatt elázik az elemkamra, akkor jól szárítsa ki, majd cserélje le az elemet.
300 301
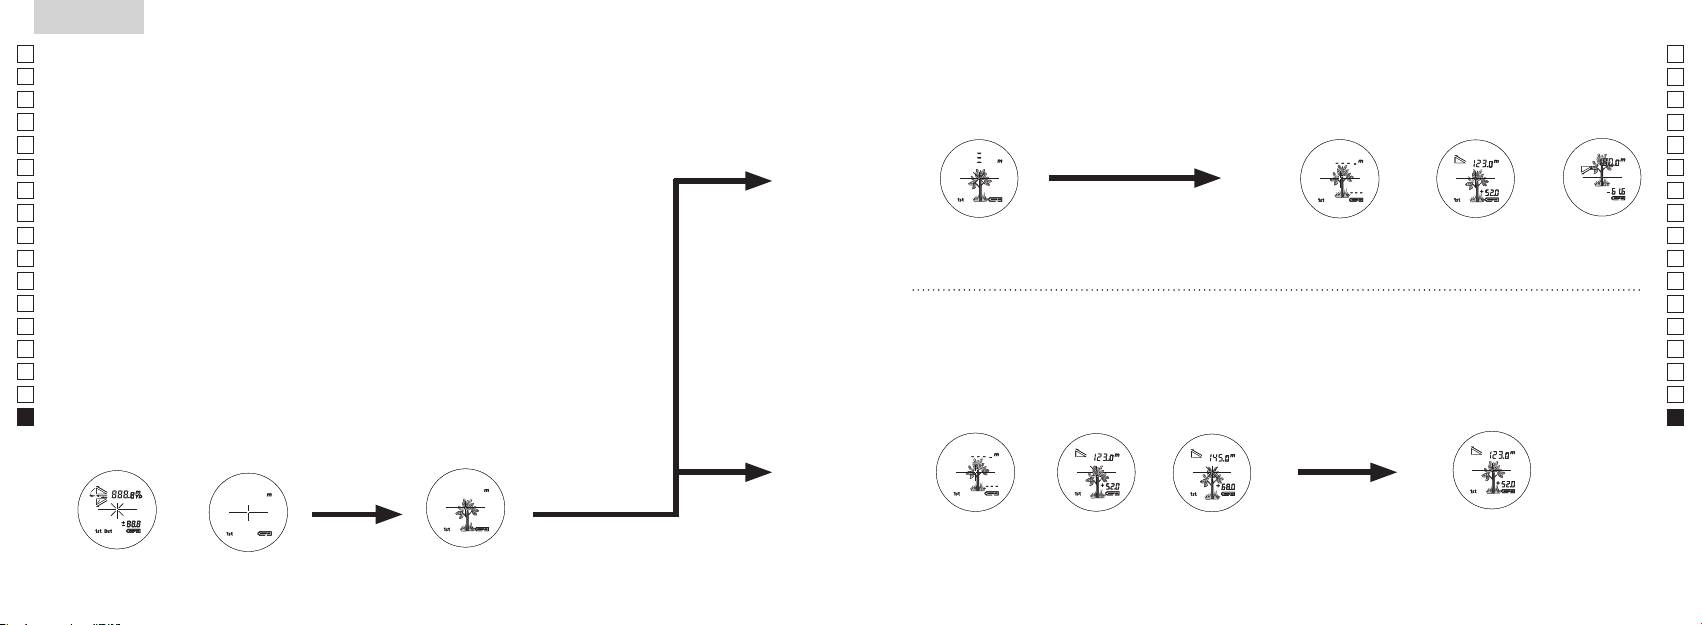
Jp
Jp
En
En
Es
Es
Fr
Fr
De
De
It
It
Se
Se
Nl
Nl
Ru
Ru
Pt
Pt
Pl
Pl
Fi
Fi
No
No
Dk
Dk
Cz
Cz
Ro
Ro
Hu
Hu
302 303
Measurement
1. Press the POWER button for power-on.
(Power turns off 8 seconds after the last
operation.)
Immediately after power-on.
3. Press POWER button once to start single measurement.
4. After measurement, “distance” or “fail to measure” indicator are displayed for 8 seconds, then power turns off. If you press the POWER
button during power-on (while the internal display is lit), another single measurement starts.
unable to measure distance.
3. Keep pressing POWER button to start continuous measurement up to 20 seconds. The internal display shows “distance” and
“fail to measure” indicator alternately.
Note: Laser irradiaton mark is blinking during the measurement.
Note: If you stop pressing the button, the continuous measuremen stops
2. Aim at the target
Positionthetargetatthecenterofthereticle
[Single measurement]
Failure to measure or
unable to measure distance.
[Continuous measurement]
4. After continuous measurement, the measure results are displayed for 8 seconds, then power turns off. If you press the POWER
button during power-on (while the internal display is lit), another measrement starts.
Failure to measure or
Target focusing.
Measuring.
(Initializing)
.
Upward measurement. Downward measurement.
Displays the measured
figure. (Target 1)
Displays the measured figure.
Stand-by.
Displays the measured
figure. (Target 2)
Measurement
1. Press the POWER button for power-on.
(Power turns off 8 seconds after the last
operation.)
Immediately after power-on.
(Initializing)
3. Press POWER button once to start single measurement.
Measuring.
4. After measurement, “distance” or “fail to measure” indicator are displayed for 8 seconds, then power turns off. If you press the POWER
button during power-on (while the internal display is lit), another single measurement starts.
Failure to measure or
unable to measure distance.
Displays the measured
figure. (Target 1)
3. Keep pressing POWER button to start continuous measurement up to 20 seconds. The internal display shows “distance” and
“fail to measure” indicator alternately.
Note: Laser irradiaton mark is blinking during the measurement.
Note: If you stop pressing the button, the continuous measuremen stops
Target focusing.
2. Aim at the target
.
Positionthetargetatthecenterofthereticle
[Single measurement]
Failure to measure or
unable to measure distance.
Upward measurement. Downward measurement.
Displays the measured figure.
[Continuous measurement]
4. After continuous measurement, the measure results are displayed for 8 seconds, then power turns off. If you press the POWER
button during power-on (while the internal display is lit), another measrement starts.
Stand-by.
Displays the measured
figure. (Target 2)
Measurement
1. Press the POWER button for power-on.
(Power turns off 8 seconds after the last
operation.)
Immediately after power-on.
Stand-by.
(Initializing)
2. Aim at the target
.
Positionthetargetatthecenterofthereticle
3. Press POWER button once to start single measurement.
4. After measurement, “distance” or “fail to measure” indicator are displayed for 8 seconds, then power turns off. If you press the POWER
button during power-on (while the internal display is lit), another single measurement starts.
unable to measure distance.
3. Keep pressing POWER button to start continuous measurement up to 20 seconds. The internal display shows “distance” and
“fail to measure” indicator alternately.
Note: Laser irradiaton mark is blinking during the measurement.
Note: If you stop pressing the button, the continuous measuremen stops
[Single measurement]
Failure to measure or
unable to measure distance.
[Continuous measurement]
4. After continuous measurement, the measure results are displayed for 8 seconds, then power turns off. If you press the POWER
button during power-on (while the internal display is lit), another measrement starts.
Failure to measure or
Target focusing.
Measuring.
Upward measurement. Downward measurement.
Displays the measured
figure. (Target 1)
Displays the measured figure.
Displays the measured
figure. (Target 2)
Mérés
Vigyázat — Az itt meghatározottaktól eltérő ellenőrzési, beállítási, kivitelezési eljárások alkalmazása
【
Egyszeri mérés
】
veszélyes sugárterhelést eredményezhet.
egyszer nyomja meg a
1. Előkészítés
2. Gumi szemkagyló
Szemüvegesek és szemüveget nem viselők is használhatják ezt a távolságmérőt módosítás nélkül.
3. Dioptria beállítása
Állítsa be a dioptriát úgy, hogy tiszta képet kapjon az LCD kijelzőn a keresőben.
szemkagylóba belenézve jobbra forgassa el a dioptriabeállító gyűrűt, amíg az LCD kijelző
fókuszba nem kerül.
Ha túlságosan eltekeri a gyűrűt, fordítsa határozottan vissza, majd állítsa be újra.
Ha a dioptriát nem szabályozza be látásának megfelelően, képtelen lesz a céltárgyat
helyesen fókuszba állítani.
【
Folyamatos mérési funkció
】
4. Mérés
*
Az egyes üzemmódok beállításához lásd az adott szakaszokat.
1. Kapcsolja be a gépet (ellenőrizze,
2. Állítsa a keresőt a céltárgyra.
hogy a belső kijelző bekapcsolt-e).
Állítsa be a célt a hajszálkereszt
(A gép automatikusan kikapcsol
közepére.
kb. 8 mp tétlenség után.)
Közvetlenül a bekapcsolás
Készenléti állapot
Tárgy becélzása
után (inicializálás)
Measurement
1. Press the POWER button for power-on.
(Power turns off 8 seconds after the last
operation.)
Immediately after power-on.
Stand-by.
(Initializing)
2. Aim at the target
.
Positionthetargetatthecenterofthereticle
Target focusing.
[Single measurement]
3. Press POWER button once to start single measurement.
Measuring.
4. After measurement, “distance” or “fail to measure” indicator are displayed for 8 seconds, then power turns off. If you press the POWER
button during power-on (while the internal display is lit), another single measurement starts.
Failure to measure or
Upward measurement. Downward measurement.
unable to measure distance.
Displays the measured figure.
[Continuous measurement]
3. Keep pressing POWER button to start continuous measurement up to 20 seconds. The internal display shows “distance” and
“fail to measure” indicator alternately.
Note: Laser irradiaton mark is blinking during the measurement.
Note: If you stop pressing the button, the continuous measuremen stops
Failure to measure or
unable to measure distance.
4. After continuous measurement, the measure results are displayed for 8 seconds, then power turns off. If you press the POWER
button during power-on (while the internal display is lit), another measrement starts.
Displays the measured
figure. (Target 1)
Displays the measured
figure. (Target 2)
Measurement
1. Press the POWER button for power-on.
(Power turns off 8 seconds after the last
operation.)
Immediately after power-on.
Stand-by.
(Initializing)
2. Aim at the target
.
Positionthetargetatthecenterofthereticle
Target focusing.
[Single measurement]
3. Press POWER button once to start single measurement.
Measuring.
4. After measurement, “distance” or “fail to measure” indicator are displayed for 8 seconds, then power turns off. If you press the POWER
button during power-on (while the internal display is lit), another single measurement starts.
Failure to measure or
Upward measurement. Downward measurement.
unable to measure distance.
Displays the measured figure.
[Continuous measurement]
3. Keep pressing POWER button to start continuous measurement up to 20 seconds. The internal display shows “distance” and
“fail to measure” indicator alternately.
Note: Laser irradiaton mark is blinking during the measurement.
Note: If you stop pressing the button, the continuous measuremen stops
Failure to measure or
unable to measure distance.
Displays the measured
figure. (Target 1)
4. After continuous measurement, the measure results are displayed for 8 seconds, then power turns off. If you press the POWER
button during power-on (while the internal display is lit), another measrement starts.
Displays the measured
figure. (Target 2)
Measurement
1. Press the POWER button for power-on.
(Power turns off 8 seconds after the last
operation.)
Immediately after power-on.
Stand-by.
(Initializing)
2. Aim at the target
.
Positionthetargetatthecenterofthereticle
Target focusing.
[Single measurement]
3. Press POWER button once to start single measurement.
Measuring.
4. After measurement, “distance” or “fail to measure” indicator are displayed for 8 seconds, then power turns off. If you press the POWER
button during power-on (while the internal display is lit), another single measurement starts.
Failure to measure or
unable to measure distance.
3. Keep pressing POWER button to start continuous measurement up to 20 seconds. The internal display shows “distance” and
“fail to measure” indicator alternately.
Note: Laser irradiaton mark is blinking during the measurement.
Note: If you stop pressing the button, the continuous measuremen stops
Failure to measure or
unable to measure distance.
[Continuous measurement]
4. After continuous measurement, the measure results are displayed for 8 seconds, then power turns off. If you press the POWER
button during power-on (while the internal display is lit), another measrement starts.
Upward measurement. Downward measurement.
Displays the measured
figure. (Target 1)
Displays the measured figure.
Displays the measured
figure. (Target 2)
Measurement
1. Press the POWER button for power-on.
(Power turns off 8 seconds after the last
operation.)
Immediately after power-on.
Stand-by.
(Initializing)
2. Aim at the target
.
Positionthetargetatthecenterofthereticle
Target focusing.
[Single measurement]
3. Press POWER button once to start single measurement.
Measuring.
4. After measurement, “distance” or “fail to measure” indicator are displayed for 8 seconds, then power turns off. If you press the POWER
button during power-on (while the internal display is lit), another single measurement starts.
unable to measure distance.
3. Keep pressing POWER button to start continuous measurement up to 20 seconds. The internal display shows “distance” and
“fail to measure” indicator alternately.
Note: Laser irradiaton mark is blinking during the measurement.
Note: If you stop pressing the button, the continuous measuremen stops
unable to measure distance.
4. After continuous measurement, the measure results are displayed for 8 seconds, then power turns off. If you press the POWER
button during power-on (while the internal display is lit), another measrement starts.
[Continuous measurement]
Failure to measure or
Failure to measure or
Upward measurement. Downward measurement.
Displays the measured
figure. (Target 1)
Displays the measured figure.
Displays the measured
figure. (Target 2)
Measurement
1. Press the POWER button for power-on.
(Power turns off 8 seconds after the last
operation.)
Immediately after power-on.
Stand-by.
(Initializing)
2. Aim at the target
.
Positionthetargetatthecenterofthereticle
Target focusing.
[Single measurement]
3. Press POWER button once to start single measurement.
4. After measurement, “distance” or “fail to measure” indicator are displayed for 8 seconds, then power turns off. If you press the POWER
button during power-on (while the internal display is lit), another single measurement starts.
unable to measure distance.
3. Keep pressing POWER button to start continuous measurement up to 20 seconds. The internal display shows “distance” and
“fail to measure” indicator alternately.
Note: Laser irradiaton mark is blinking during the measurement.
Note: If you stop pressing the button, the continuous measuremen stops
unable to measure distance.
4. After continuous measurement, the measure results are displayed for 8 seconds, then power turns off. If you press the POWER
button during power-on (while the internal display is lit), another measrement starts.
[Continuous measurement]
Failure to measure or
Failure to measure or
Measuring.
Upward measurement. Downward measurement.
Displays the measured
figure. (Target 1)
Displays the measured figure.
Displays the measured
figure. (Target 2)
Measurement
1. Press the POWER button for power-on.
(Power turns off 8 seconds after the last
operation.)
Immediately after power-on.
Stand-by.
(Initializing)
2. Aim at the target
.
Positionthetargetatthecenterofthereticle
Target focusing.
[Single measurement]
3. Press POWER button once to start single measurement.
Measuring.
4. After measurement, “distance” or “fail to measure” indicator are displayed for 8 seconds, then power turns off. If you press the POWER
button during power-on (while the internal display is lit), another single measurement starts.
unable to measure distance.
3. Keep pressing POWER button to start continuous measurement up to 20 seconds. The internal display shows “distance” and
“fail to measure” indicator alternately.
Note: Laser irradiaton mark is blinking during the measurement.
Note: If you stop pressing the button, the continuous measuremen stops
unable to measure distance.
4. After continuous measurement, the measure results are displayed for 8 seconds, then power turns off. If you press the POWER
button during power-on (while the internal display is lit), another measrement starts.
[Continuous measurement]
Failure to measure or
Failure to measure or
Upward measurement. Downward measurement.
Displays the measured
figure. (Target 1)
Displays the measured figure.
Displays the measured
figure. (Target 2)
Measurement
1. Press the POWER button for power-on.
(Power turns off 8 seconds after the last
operation.)
Immediately after power-on.
Stand-by.
(Initializing)
2. Aim at the target
.
Positionthetargetatthecenterofthereticle
Target focusing.
[Single measurement]
3. Press POWER button once to start single measurement.
Measuring.
4. After measurement, “distance” or “fail to measure” indicator are displayed for 8 seconds, then power turns off. If you press the POWER
button during power-on (while the internal display is lit), another single measurement starts.
Failure to measure or
unable to measure distance.
Displays the measured
figure. (Target 1)
3. Keep pressing POWER button to start continuous measurement up to 20 seconds. The internal display shows “distance” and
“fail to measure” indicator alternately.
Note: Laser irradiaton mark is blinking during the measurement.
Note: If you stop pressing the button, the continuous measuremen stops
Failure to measure or
unable to measure distance.
Upward measurement. Downward measurement.
Displays the measured figure.
[Continuous measurement]
4. After continuous measurement, the measure results are displayed for 8 seconds, then power turns off. If you press the POWER
button during power-on (while the internal display is lit), another measrement starts.
Displays the measured
figure. (Target 2)
Measurement
1. Press the POWER button for power-on.
(Power turns off 8 seconds after the last
operation.)
Immediately after power-on.
Stand-by.
(Initializing)
2. Aim at the target
.
Positionthetargetatthecenterofthereticle
Target focusing.
[Single measurement]
3. Press POWER button once to start single measurement.
Measuring.
4. After measurement, “distance” or “fail to measure” indicator are displayed for 8 seconds, then power turns off. If you press the POWER
button during power-on (while the internal display is lit), another single measurement starts.
Failure to measure or
unable to measure distance.
3. Keep pressing POWER button to start continuous measurement up to 20 seconds. The internal display shows “distance” and
“fail to measure” indicator alternately.
Note: Laser irradiaton mark is blinking during the measurement.
Note: If you stop pressing the button, the continuous measuremen stops
Failure to measure or
unable to measure distance.
[Continuous measurement]
4. After continuous measurement, the measure results are displayed for 8 seconds, then power turns off. If you press the POWER
button during power-on (while the internal display is lit), another measrement starts.
Upward measurement. Downward measurement.
Displays the measured
figure. (Target 1)
Displays the measured figure.
Displays the measured
figure. (Target 2)
4. Mérés után 8 másodpercre megjelenik a "hibás mérés" vagy a
"mért távolság" jelzés, aztán a gép kikapcsol. Ha megnyomja a
gombot a bekapcsolás közben (míg a belső
kijelző világít), egy új egyszeri mérés indul el.
"Hibás a mérés" vagy
Mérés felfelé Mérés lefelé
Mérés
"Nem lehet mérni" a
távolságot
Megjelenik a mért alak
3. Nyomja le és tartsa lenyomva a
4. Folyamatos mérés után kb. 8 másodpercre megjelenik a végső
másodpercig a folyamatos mérés elindításához. A belső kijelző a
mérés (mért távolság), aztán a gép kikapcsol.
"hibás mérés" és a "mért távolság" jelzést mutatja felváltva.
Ha megnyomja a
gombot a bekapcsolás
*
A lézersugárzás jele villog a mérés közben.
közben (míg a belső kijelző világít), elindul egy másik mérés.
*
Ha ujját leveszi a gombról, megáll a folyamatos mérés.
Amikor például egy golfpályán a kitűzőzászló nyelének távolságát
"Hibás a mérés" vagy
Megjelenik a mért
Megjelenik a mért
"Nem lehet mérni" a
alak (1. céltárgy)
alak (2. céltárgy)
zászlónyelet a folyamatos mérés funkcióval letapogatva könnyen
távolságot
megkapja az eredményt. Amennyiben Ön és a kitűzőzászló között
nincsenek tárgyak, a legkisebb szám mutatja a célba vett zászló
távolságát.
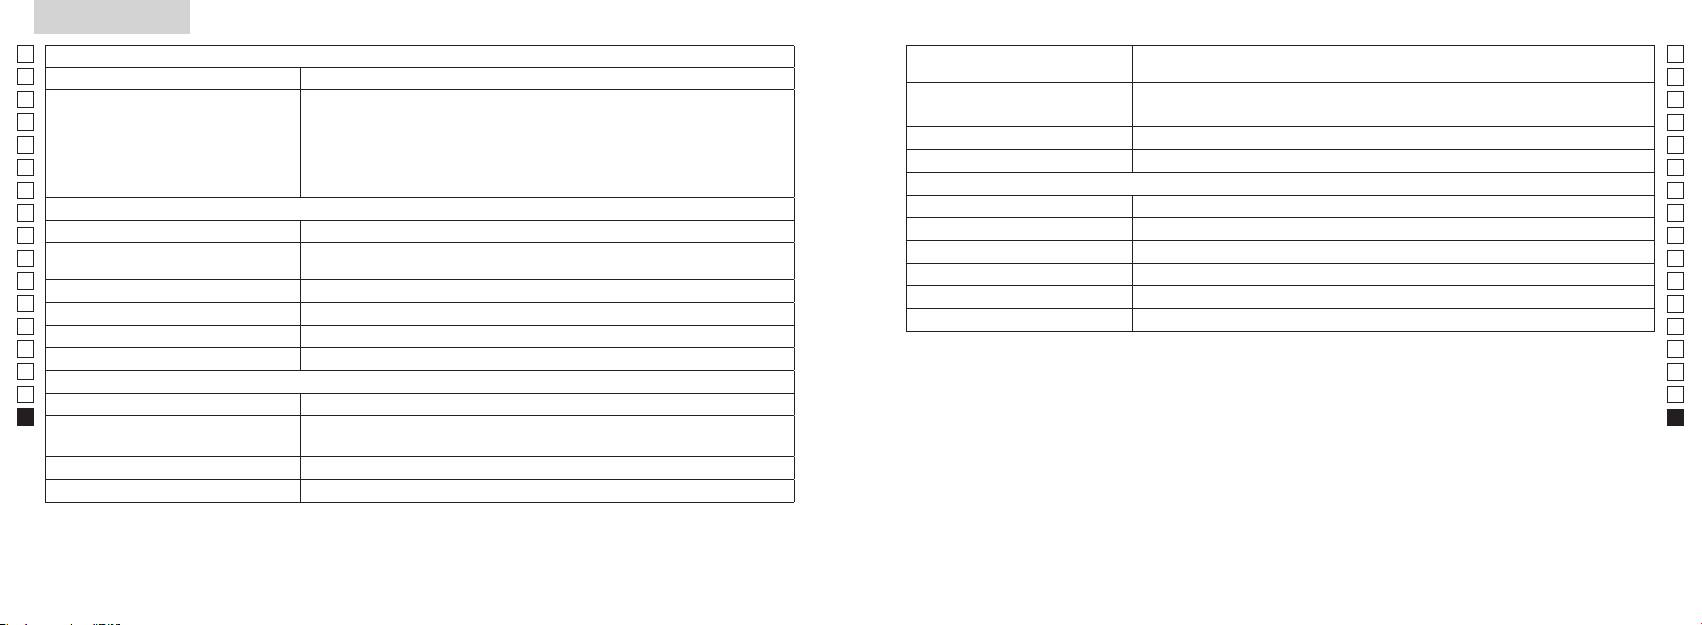
Specifikációk
Jp
Mérőrendszer
Ház: Vízhatlan (legnagyobb mélység 1 méter, legfeljebb 10 percig)*
Jp
Szerkezet
En
Mérési távolság
En
Es
Es
Biztonság
Fr
Fr
FCC 15. Rész, B S:
De
Távolság kijelzése (növekedés)
De
Környezet
It
It
Lézer
Se
Se
Optikai rendszer
Osztály
Nl
Nl
Nagyítás ( x ) 6
Hullámhossz (nm) 905
Ru
Ru
Az objektívlencse tényleges átmérője
Impulzushossz (ns) 12
Pt
ø 21
Pt
(mm)
15
Pl
Pl
Valós látószög (˚) 7,5
Sugárdivergencia (mrad)
Fi
Fi
Betekintési távolság (mm) 18,3
Működési páratartalom (%RH) 80 vagy kevesebb (pára kicsapódása nélkül)
No
No
Betekintő lencse (mm) ø 3,5
Dk
Dk
-
1
Dioptria beállítása ±4 m
* Vízhatlan modellek
Cz
A Nikon lézeres távolságmérő vízhatlan, optikai és megfigyelő rendszere nem károsodik, ha akár 10 perc időtartamra legfeljebb
Cz
1méter mély vízbe meríti vagy ejti.
Ro
Ro
Működési hőmérséklet (˚C) -10 —
A Nikon lézeres távolságmérő a következő előnyöket kínálja:
Hu
Hu
1 db CR2 lítium elem (3 V DC)
Áramforrás
Automatikus kikapcsolás (kb. 8 mp tétlenség után)
A Nikon lézeres távolságmérő használata során tartsa be a következőket:
Méretek (H x M x Sz) (mm) 113 x 70 x 39
Tömeg (g) Körülbelül 175 (elem nélkül)
** Az elemrekesz vízálló, nem vízhatlan. Ha a távolságmérőt vízbe meríti, az eszköz beázhat. Ha víz kerül az elemrekeszbe, törölje ki
onnan az összes nedvességet, és hagyjon időt a kiszáradására.
304 305
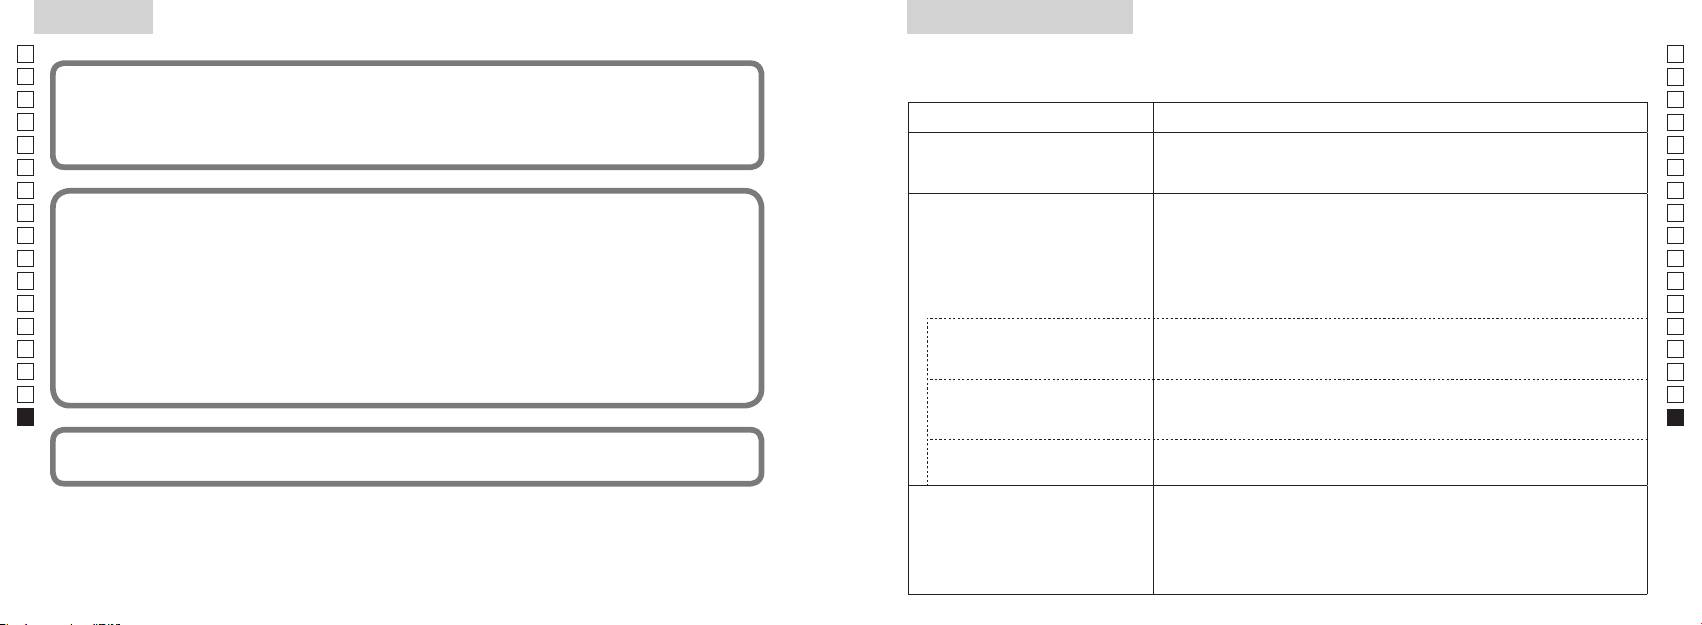
Egyebek
Hibakeresés/Javítás
Jp
Ha Nikon lézeres távolságmérőjét javítani kell, lépjen kapcsolatba a helyi viszonteladóval vagy azzal szaküzlettel, ahol vásárolta.
Jp
Havító táblázatot.
En
A berendezés eleget tesz az FCC szabályok 15. részében foglaltaknak. Az üzemeltetés a következő két feltétellel
En
Es
lehetséges:
Es
Hibajelenség Megoldási javaslatok
Fr
Fr
De
eredményezhetnek.
●
De
Az egység nem kapcsol be
●
It
(Az LCD nem világít)
It
● Cserélje le az elemet egy újra.
Se
Se
●
Nl
Nl
akadályozza az objektívlencse oldalán lévő lézerkibocsátó és -érzékelő rekeszt.
Ru
Ru
nyújtanak a káros interferenciák ellen, mikor a készüléket lakóövezetben használja. A készülék rádiófrekvenciás
●
Pt
energiát hoz létre, használ, és képes kisugározni. Ha nem az előírásoknak megfelelően szereli össze és használja, az
Nem lehet megmérni a távolságot
-érzékelő rekeszek tiszták. Szükség esetén tisztítsa meg őket.
Pt
● Nézze meg, hogy a céltárgy alakja és állapota alkalmas-e a lézersugár
Pl
Pl
esetben nem fordul elő interferencia. Ha ez a készülék olyan káros zavart okoz a rádiós vagy televíziós vételben,
visszaverésére.
Fi
amely megszüntethető a berendezés ki- és bekapcsolásával, akkor a következő intézkedésekkel próbálja meg
● Cserélje le az elemet egy újra.
Fi
No
megszüntetni a zavart:
No
● Mérés közben biztosan tartsa az egységet.
Dk
● A céltárgy a mérési tartományon belül legyen.
Dk
meg
Cz
Cz
Ro
A mérési tartománynál közelebb
Ro
●
lévő céltárgyak távolságát nem
Hu
céltárgy és a Nikon lézeres távolságmérő között.
Hu
lehet megmérni.
Bizonyos távolságon kívül eső
●
bizonyítékként.
céltárgyak nem mérhetők
céltárgy és a Nikon lézeres távolságmérő között.
● Cserélje le az elemet egy újra.
● Nézze meg, hogy a céltárgy alakja és állapota alkalmas-e a lézersugár
visszaverésére.
A mérési eredmény ingadozik
● Mérés közben biztosan tartsa az egységet.
●
céltárgy és a Nikon lézeres távolságmérő között.
306 307

Hibakeresés/Javítás
Jp
En
Es
Hibajelenség Megoldási javaslatok
Fr
De
● Cserélje le az elemet egy újra.
● Nézze meg, hogy a céltárgy alakja és állapota alkalmas-e a lézersugár
It
Helytelen eredmény jelenik meg
visszaverésére.
Se
●
és a Nikon lézeres távolságmérő között.
Nl
Ru
Pt
mivel valószínűleg hibásan működik.
Nikon lézeres távolságmérőt, csak a gyártó hivatalos képviselőjének. Sérülést vagy kárt okozhat a termékben, ha ezt az utasítást
Pl
nem tartja be.
Fi
No
Dk
Cz
Ro
Hu
308

NIKON VISION CO., LTD.
住所:〒 142-0043 東京都品川区二葉 1 丁目 3 番 25 号
