Nikon 70-200mm-f4G-ED-AF-S-VR-Zoom-Nikkor: instruction
Class: Photo and Video Accessories
Type:
Manual for Nikon 70-200mm-f4G-ED-AF-S-VR-Zoom-Nikkor
Table of contents
- For Your Safety
- Parts of the Lens
- Compatibility Focus
- A/M (Autofocus with Manual Override/AF Priority) The Focus Limit Switch Zoom and Depth of Field Aperture
- Built-in Flash Units Vibration Reduction Using the Vibration Reduction ON/OFF Switch Using the Vibration Reduction Mode Switch
- Using Vibration Reduction: Notes
- The Lens Hood Focusing Screens
- The Optional RT-1 Tripod Collar Ring Attaching the Tripod Collar Ring Positioning the Camera Removing the Tripod Collar Ring
- Lens Care Supplied Accessories Compatible Accessories
- Specifications

Jp
En
De
Fr
Es
Sv
AF
AF‑S NIKKOR 70‑200mm f/4G ED VR
Ru
‑
S NIKKOR 70
Nano Crystal Coat
Nl
Pt
使用説明書
Manuale d’uso
User’s Manual
Návod k obsluze
Pb
‑
200mm f/4G ED VR
Benutzerhandbuch
Užívateľská príručka
It
Manuel d’utilisation
Manualul utilizatorului
Cz
Manual del usuario
Посібник користувача
Användarhandbok
使用说明书
Sk
Pykoводство пользoвaтеля
使用說明書
Ro
Gebruikshandleiding
사용설명서
Manual do utilizador
Manual bagi Pengguna
Ua
Manual do usuário
Ck
使用説明書の内容が破損などによって判読できなくなったときは、
ニコンサービス機関にて新しい使用説明書をお求め下さい(有料)。
Ch
No reproduction in any form of this manual, in whole or in part
(except for brief quotation in critical articles or reviews), may be
Kr
made without written authorization from NIKON CORPORATION.
Id
Ar
Printed in Thailand
© 2012 Nikon Corporation 7MAA84K3-03 pG12
Cover_03

Jp
安全上のご注意
お使いになる前に「安全上のご注意」をよくお読みの上、正しくお使いください。この「安全上のご
Jp
注意」は、製品を安全に正しく使用し、あなたや他の人々への危害や財産への損害を未然に防止する
ために重要な内容を記載しています。お読みになった後は、お使いになる方がいつでも見られるとこ
ろに必ず保管してください。
表示と意味は次のようになっています。
この表示を無視して、誤った取り扱いをすると、人が死亡または重傷を負う可能
警告
A
性が想定される内容を示しています。
この表示を無視して、誤った取り扱いをすると、人が傷害を負う可能性が想定さ
注意
A
れる内容および物的損害の発生が想定される内容を示しています。
お守りいただく内容の種類を、次の絵表示で区分し、説明しています。
絵表示の例
L
記号は、注意(警告を含む)を促す内容を告げるものです。図の中や近くに具体的な注意
I
内容(左図の場合は感電注意)が描かれています。
F
記号は、禁止の行為(してはいけないこと)を告げるものです。図の中や近くに具体的な
E
禁止内容(左図の場合は分解禁止)が描かれています。
D
記号は、行為を強制すること(必ずすること)を告げるものです。図の中や近くに具体的
K
な強制内容(左図の場合はバッテリーを取り出す)が描かれています。
警告
注意
A
A
分解したり、修理や改造をしないこと
ぬれた手でさわらないこと
E
感電したり、異常動作をしてケガの原因と
I
感電の原因になることがあります。
分解禁止
なります。
感電注意
落下などによって破損し、内部が露出した
製品は、幼児の手の届くところに置かない
G
A
ときは、露出部に手を触れないこと
ケガの原因になることがあります。
接触禁止
保管注意
感電したり、破損部でケガをする原因とな
ります。カメラのバッテリー、電源を抜い
逆光撮影では、太陽を画角から充分にずら
C
て、ニコンサービス機関に修理を依頼して
すこと
すぐに修
ください。
太陽光がカメラ内部で焦点を結び、火災の
理依頼を
A
原因になることがあります。画角から太陽
使用注意
熱くなる、煙が出る、こげ臭いなどの異常
をわずかに外しても火災の原因になるこ
時は、すみやかにカメラのバッテリーを取
K
とがあります。
バッテリー
り出すこと
使用しないときは、レンズにキャップを付け
を取る
そのまま使用すると火災、やけどの原因と
るか、太陽光のあたらない所に保管すること
なります。バッテリーを取り出す際、やけ
A
太陽光が焦点を結び、火災の原因になるこ
どに充分注意してください。バッテリーを
保管注意
C
とがあります。
すぐに修
抜いて、ニコンサービス機関に修理を依頼
理依頼を
してください。
三脚にカメラやレンズを取り付けたまま
移動しないこと
水につけたり、水をかけたり、雨にぬらし
A
転倒したりぶつけたりして、ケガの原因に
たりしないこと
J
移動注意
なることがあります。
水かけ禁止
発火したり感電の原因となります。
窓を閉め切った自動車の中や直射日光が
引火、爆発のおそれのある場所では使用し
当たる場所など、異常に温度が高くなる場
ないこと
所に放置しないこと
F
F
プロパンガス・ガソリンなど引火性ガスや
放置禁止
内部の部品に悪影響を与え、火災の原因に
使用禁止
粉塵の発生する場所で使用すると、爆発や
なることがあります。
火災の原因となります。
レンズまたはカメラで直接太陽や強い光
を見ないこと
F
使用禁止
失明や視力障害の原因となります。
2
Jp_03

各部の名称
Jp
3
Jp_03
w e
r t y u i o !0q
!1 !2 !3 !4
!9!8
!5
!6 !7
@0
■
三脚座リングは別売です。※
q
フード着脱指標
.....................................P. 8
!2
フォーカス制限切り換え
スイッチ
w
フォーカスリング
................................P. 5
..............................................P. 5
距離目盛
!3
手ブレ補正スイッチ
e
...........................P. 6
!4
手ブレ補正モード切り換え
距離目盛基準線
r
スイッチ
..............................................P. 7
t
ズームリング
.........................................P. 6
!5
フード
........................................................P. 8
y
焦点距離目盛
.........................................P. 6
!6
フード取り付け指標
...........................P. 8
u
焦点距離目盛指標
!7
フードセット指標
................................P. 8
i
レンズ着脱指標
※
!8
位置指標(
90
°)
.................................P. 9
o
レンズマウントゴムリング
..........P. 10
※
!9
三脚座リング
......................................P. 9
!0
CPU
信号接点
.....................................P. 10
※
@0
三脚座リング止めノブ
...................P. 9
!1
フォーカスモード切り換え
スイッチ
..............................................P. 5

このたびはニッコールレンズをお買い上げくださいまして、誠にありがとうござ
います。ご使用の前に、この使用説明書をよくお読みの上、正しくお使いください。
Jp
また、カメラの使用説明書もご覧ください。
•
DX
フォーマットのニコンデジタル一眼レフカメラ(
D300
シリーズ、
D7000
など)に装着すると、対角線画角は
22
°
50
′—
8
°となり、
35 mm
判換算では焦
点距離約
105
—
300 mm
相当のレンズになります。
■
使用できる機能
カメラによって、使用できる機能には制限・制約がありますので、カメラの使用
説明書でもご確認ください。
○:使用可
×:使用不可
露出(撮影)モード 機能
カメラ
※
2
※
3
※
4
P
S A M AF
VR
FX
フォーマット
/DX
フォーマットの二コンデジタル
一 眼 レ フ カ メ ラ、
F6
、
F5
、
F100
、
F80
シ リ ー ズ、
○ ○ ○ ○ ○ ○
ニコン
U2
、ニコン
U
※
1
プロネア
600i
、プロネア
S
○ ○ ○ ○ ○ ×
F4
シリーズ、
F90X
シリーズ、
F90
シリーズ、
F70D
○ ○ × × ○ ×
ニコン
Us
、
F60D
、
F50D
、
F-401
シリーズ ○ ○ ○ ○ × ×
F-801
シリーズ、
F-601M
○ ○ × × × ×
F3AF
、
F-601
、
F-501
、
MF
カメラ(
F-601M
を除く) × × × × × ×
※
1 M
モードの設定はありません。
※
2 P
には
AUTO
(オート)モード、シーンモード(イメージプログラムモード)を含みます。
※
3 AF
:オートフォーカス
※
4 VR
:手ブレ補正
4
Jp_03

■
ピント合わせの方法
ご使用のカメラや撮影目的によって、下表のようなピント合わせが選択できます。
Jp
•
カメラのフォーカスモードについては、カメラの使用説明書をご覧ください。
カメラの
レンズのフォーカスモード
カメラ
フォーカス
A/M M
モード
マニュアル
FX
フォー マ ッ ト
/DX
フォー マ ッ トの
オート優先オート
フォーカス
二コン デ ジ タル一 眼 レフカメ ラ、
F6
、
AF
フォーカス
(フォーカス
F5
、
F4
シリーズ、
F100
、
F90X
シリーズ、
エイド可)
F90
シ リ ー ズ、
F80
シ リ ー ズ、
F70D
、
ニコン
U2
、ニコン
U
、プロネア
600i
、
マニュアルフォーカス
MF
プロネア
S
(フォーカスエイド可)
ニコン
Us
、
F60D
、
F50D
、
F-801
シリー
AF
マニュアルフォーカス
ズ、
F-401
シリーズ、
F-601M
MF
(
F-601M
を除きフォーカスエイド可)
A/M
(オート優先オートフォーカスモード)の使い方
z
レンズのフォーカスモード切り換えスイッチを
[A/M]
にセットする
x
オートフォーカス撮影時、カメラのシャッターボタンを半押ししたまま、ある
いは
AF
作動(
AF-ON
)ボタンを保持したまま、フォーカスリングを手で回転
させる
•
フォーカスリングを回転させても、瞬時にはマニュアルフォーカスに切り換
わりません。
•
カメラのシャッターボタンの半押しや
AF
作動(
AF-ON
)ボタンを再度操作
するとオートフォーカスで撮影が可能となります。
フォーカス制限切り換えスイッチの使い方
オートフォーカスで撮影する場合に使える機能です。
FULL
:撮影距離が
3 m
未満を含む場合にセットします。
∞
3 m
:撮影距離が常に
3 m
以上の場合にセットします。ピント
合わせの時間を短縮できます。
5
Jp_03

■
ズーミングと被写界深度
Jp
撮影を行う場合は、ズームリングを回転させ(焦点距離が変化します)、構図を決
めてからピント合わせを行ってください。プレビュー(絞り込み)機構を持つカ
メラでは、撮影前にファインダー内で被写界深度を確認できます。
•
詳しい被写界深度は、被写界深度表(
P. 210
)をご覧ください。
•
距離目盛は目安であり、被写体までの距離を保証するものではありません。また、
遠景撮影でも被写界深度などの影響により∞マークに届かない位置でピントが
合う場合があります。
■
絞り値の設定
絞り値は、カメラ側で設定してください。
■
カメラの内蔵フラッシュ使用時のご注意
ケラレを防止するために、レンズのフードは取り外して使用してください。
※
カメラの内蔵フラッシュのケラレとは、フラッシュの光がレンズの先端でさえぎられて影に
なり、画像に映り込む現象です。
■
手ブレ補正機能
※
手ブレ補正機能を使用すると、使わないときと比べ約
5
段分
シャッタースピー
ドを遅くして撮影できるため、シャッタースピードの選択範囲が広がり、幅広い
領域で手持ち撮影が可能です。
(※当社測定条件によります。また、手ブレ補正効果は、撮影者や撮影条件によって異なります。)
手ブレ補正スイッチの使い方
ON
:シャッターボタンを半押しすると、手ブレを補正します。ファ
インダー像のブレも補正するため、ピント合わせが容易で、フレー
ミングしやすくなります。
OFF
:手ブレを補正しません。
6
Jp_03

手ブレ補正モード切り換えスイッチの使い方
手ブレ補正スイッチを[
Jp
ON
]にし、手ブレ補正モード切り換えスイッチを設定し
ます。
NORMAL
:静止して撮影するときなど、比較的ブレの少ない場合
の手ブレを補正します。
ACTIVE
:乗り物に乗っている場合や歩きながら撮影する場合など、
揺れの激しい条件でのブレから通常の手ブレまで補正します。
手ブレ補正使用時のご注意
•
手ブレ補正が使用できないカメラ(
P. 4
)では、必ず、手ブレ補正スイッチを[
OFF
]
にしてください。特にプロネア
600i
では、このスイッチを[
ON
]にしたまま
にすると、電池の消耗が早くなることがありますのでご注意ください。
•
シャッターボタンを半押し後、ファインダー像が安定してから撮影することを
おすすめします。
•
手ブレ補正の原理上、シャッターレリーズ後にファインダー像がわずかに動く
ことがありますが、異常ではありません。
•
流し撮りする場合は、
NORMAL
モードにする事をおすすめします。
NORMAL
モードでは、流し撮りなどでカメラの向きを大きく変えた場合、流した方向の
手ブレ補正は機能しません。例えば、横方向に流し撮りすると、縦方向の手ブ
レだけが補正されます。
•
手ブレ補正中にカメラの電源を
OFF
にしたり、レンズを取り外したりしないで
ください(その状態でレンズを振るとカタカタ音がすることがありますが、故
障ではありません。カメラの電源スイッチを再度
ON
にすれば、音は消えます)。
•
内蔵フラッシュ搭載のカメラで、内蔵フラッシュ充電中は、手ブレ補正は行い
ません。
•
三脚を使用するときは、手ブレ補正スイッチを[
OFF
]にしてください。ただし、
三脚を使っても雲台を固定しないときや、一脚を使用するときには、スイッチ
を[
ON
]にすることをおすすめします。
7
Jp_03
■
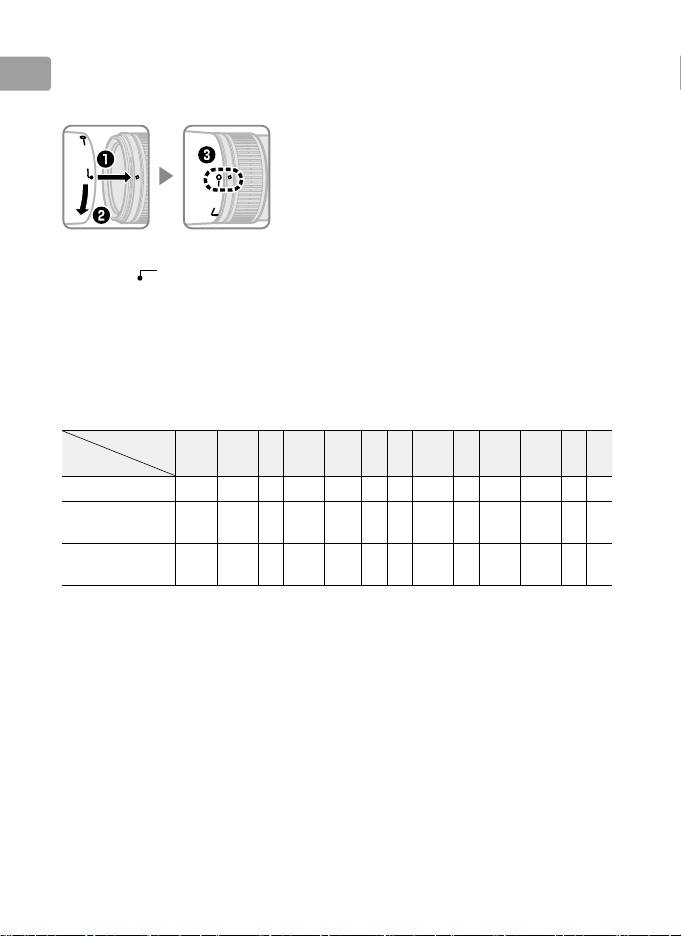
フードの使い方
Jp
画像に悪影響を及ぼす光線をカットし、レンズ面の保護にも役立ちます。
取り付け方
•
フード着脱指標(●)とフードセット指標(
)
が合っていることを確認してください(
e
)。
•
フード先端を強くつかむと着脱が困難になります。着脱の際は、フード取り付
け指標( )付近を持って回転させてください。
•
フードが正しく取り付けられないと画像にケラレを生じますのでご注意くださ
い。
•
収納時はフードを逆向きにしてレンズに取り付けられます。着脱の際は、フー
ドセット指標(
)付近を持って回転させてください。
■
ファインダースクリーンとの組み合わせ
スクリーン
EC-B
A B C E
G1 G2 G3 G4 J L M U
カメラ
EC-E
F6
◎ ◎ — ◎ — — — — — ◎ ◎ ◎
◎
F5+DP-30
◎ ◎ ○ ◎ ◎
◎ ◎ ◎
(
+0.5
)
◎
◎
◎
○
◎
◎
F5+DA-30
○
◎
◎
(
+1.0
)
(
+0.5
)
(
+0.5
)
(
–1.0
)
(
+0.5
)
(
+1.0
)
構図の決定やピント合わせの目的には
◎
:
好適です。
○
:
視野の一部が多少見にくくなりますが、撮影結果には全く影響がありません。
—
:
各カメラに存在しないファインダースクリーンです。
(
)
:
中央部重点測光時の補正値です。
F6
カメラの場合、測光値の補正は、カメラのカスタ
ムメニュー[
b6
:スクリーン補正]を[
BorE
以外]にセットして行います。
B
型およ
び
E
型以外を使用する場合は、補正量が
0
でも、[
BorE
以外]にセットしてください。
F5
カメラの場合は、カスタムセッティング
No.18
の設定で測光値の補正を行います。
詳しくはカメラの使用説明書をご覧ください。
空欄
:
使用不適当です。ただし、
M
スクリーンの場合、撮影倍率
1/1
倍以上の近接撮影に用い
るため、この限りではありません。
ご注意
F5
カメラの場合、マルチパターン測光は
A
、
B
、
E
、
EC-B
、
EC-E
、
J
、
L
スクリー
ンのみ可能です。
8
Jp_03
三脚座リング
RT-1
(別売)の使い方
三脚リング止めノブをゆるめると、カメラごと任意に回転させて画面の縦位置と
Jp
横位置が変えられます。
三脚の形状によっては、カメラのグリップを握った状態でカメラを回転した際、
三脚に手がぶつかることがありますのでご注意ください。
カメラや三脚の固定方法などの撮影条件によっては、カメラボディの三脚ネジ
穴を使用して撮影した方がブレを抑えられる場合があります。
三脚に取り付けて使用するときは、三脚座リング止めノブを必ず完全に締め
A
ること
注意
不意に外れて、ケガの原因になることがあります。
9
Jp_03
6
4
7
5
■
•
•
取り付け方
z
三脚座リング止めノブを緩める(
q
)
x
三脚座リング止めノブを手前に引きながら(
w
)、リン
グを開く(
e
)
c
三脚座リングにレンズを入れる(
r
)
v
三脚座リング止めノブを手前に引きながら(
t
)、リン
グを閉める(
y
)
•
三脚座リングを無理に押し込まないように注意して
ください。手を挟む危険があります。
b
三脚座リング止めノブを締める(
u
)
カメラ位置の変更
•
レンズの三脚座リング止めノブを緩め(
q
)、カメラ位
置(縦/横)に応じて位置指標を合わせ(
w
)、三脚座
リング止めノブを締めて固定します(
e
)。

Jp
10
Jp_03
4
取り外し方
z
三脚座リング止めノブを緩める(
q
)
x
三脚座リング止めノブを手前に引きながら(
w
)、リン
グを開いて(
e
)、レンズを取り外す(
r
)
■
レンズのお手入れと取り扱い上のご注意
•
フードをレンズに装着した状態で、フードだけを持たないでください。
•
CPU
信号接点は汚さないようにご注意ください。
•
レンズマウントゴムリングが破損した場合は、そのまま使用せず販売店または
ニコンサービス機関に修理を依頼してください。
•
レンズ面の清掃は、ホコリを拭う程度にしてください。指紋がついたときは、
柔らかい清潔な木綿の布に無水アルコール(エタノール)または市販のレンズ
クリーナーを少量湿らせ、レンズの中心から外周へ渦巻状に、拭きムラ、拭き
残りのないように注意して拭いてください。
•
シンナーやベンジンなどの有機溶剤は絶対に使用しないでください。
•
レンズ表面の汚れや傷を防ぐためには、
NC
フィルターをお使いいただけます。
また、レンズのフードも役立ちます。
•
レンズをケースに入れるときは、必ずレンズキャップと裏ぶたを取り付けてく
ださい。
•
レンズを長期間使用しないときは、カビやサビを防ぐために、高温多湿のとこ
ろを避けて風通しのよい場所に保管してください。また、直射日光のあたると
ころ、ナフタリンや樟脳のあるところも避けてください。
•
レンズを水に濡らすと、部品がサビつくなどして故障の原因となりますのでご
注意ください。
•
ストーブの前など、高温になるところに置かないでください。極端に温度が高く
なると、外観の一部に使用している強化プラスチックが変形することがあります。
■
付属アクセサリー
•
67 mm
スプリング式レンズキャップ
LC-67
•
裏ぶた
LF-4
•
バヨネットフード
HB-60
•
ソフトケース
CL-1225

■
使用できるアクセサリー
•
67 mm
ネジ込み式フィルター
Jp
•
三脚座リング
RT-1
※
※
•
AF-I/AF-S
テレコンバーター
TC-14E/TC-14E
Ⅱ
/TC-17E
Ⅱ
/TC-20E
/
※
※
TC-20E
Ⅱ
/TC-20E
Ⅲ
※
オートフォーカスが
F8
対応のカメラに装着した場合を除き、オートフォーカス不可。
■
仕様
型式 ニコン
F
マウント
CPU
内蔵
G
タイプ、
AF-S
レンズ
焦点距離
70 mm
—
200 mm
最大口径比
1
:
4
レンズ構成
14
群
20
枚(
ED
レンズ
3
枚、ナノクリスタルコートあり)
34
°
20
′—
12
°
20
′
(
35mm
判一眼レフカメラ、
FX
フォーマットの
デジタル一眼レフカメラ)
画角
22
°
50
′—
8
°
(
DX
フォーマットのデジタル一眼レフカメラ
)
27
°
40
′—
9
°
50
′
(
IX240
カメラ)
焦点距離目盛
70
、
85
、
105
、
135
、
200 mm
撮影距離情報 カメラへの撮影距離情報を出力可能
ズーミング ズームリングによる回転式
IF
(ニコン内焦)方式、超音波モーターによるオートフォーカス、
ピント合わせ
マニュアルフォーカス可能
手ブレ補正 ボイスコイルモーター(
VCM
)によるレンズシフト方式
撮影距離目盛 ∞~
1 m
最短撮影距離 撮像面から
1 m
(ズーム全域)
絞り羽根枚数
9
枚(円形絞り)
絞り方式 自動絞り
絞りの範囲
f/4
—
32
測光方式 開放測光
フォーカス制限
FULL
(∞~
1 m
)と∞
—
3 m
の
2
段切り換え
切り換えスイッチ
アタッチメントサイズ
67 mm
(
P=0.75 mm
)
約
78 mm
(最大径)×
178.5 mm
(レンズマウント基準面から
寸法
レンズ先端まで)
質量 約
850 g
※
仕様、外観の一部を、改善のため予告なく変更することがあります。
11
Jp_03

En
For Your Safety
A
CAUTIONS
•
Do not disassemble.
Touching the internal parts of the camera or lens could
En
result in injury.
In the event of malfunction, the product should be repaired
only by a qualified technician.
Should the product break open as the result
of a fall or other accident, remove the camera battery and/or disconnect
the AC adapter and then take the product to a Nikon-authorized service
center for inspection.
•
Turn the camera off immediately in the event of malfunction.
Should you notice
smoke or an unusual smell coming from the equipment, immediately
unplug the AC adapter and remove the camera battery, taking care to
avoid burns.
Continued operation could result in fire or injury.
After
removing the battery, take the equipment to a Nikon-authorized service
center for inspection.
•
Do not use in the presence of flammable gas.
Operating electronic equipment in
the presence of flammable gas could result in explosion or fire.
•
Do not look at the sun through the lens or the camera viewfinder.
Viewing the sun
or other bright light source through the lens or viewfinder could cause
permanent visual impairment.
•
Keep out of reach of children.
Failure to observe this precaution could result in
injury.
•
Observe the following precautions when handling the lens and camera:
-
Keep the lens and camera dry.
Failure to observe this precaution could
result in fire or electric shock.
-
Do not handle the lens or camera with wet hands.
Failure to observe this
precaution could result in electric shock.
-
Keep the sun well out of the frame when shooting backlit subjects.
Sunlight focused into the camera when the sun is in or close to the frame
could cause a fire.
-
If the lens will not be used for an extended period, attach the front and
rear lens caps and store the lens out of direct sunlight.
If left in direct
sunlight, the lens could focus the sun’s rays onto flammable objects,
causing fire.
•
Do not carry tripods with a lens or camera attached.
You could trip or accidentally
strike others, resulting in injury.
•
Do not leave the lens where it will be exposed to extremely high temperatures, such as
in an enclosed automobile or in direct sunlight.
Failure to observe this precaution
could adversely affect the lens’ internal parts, causing fire.
12
En_03
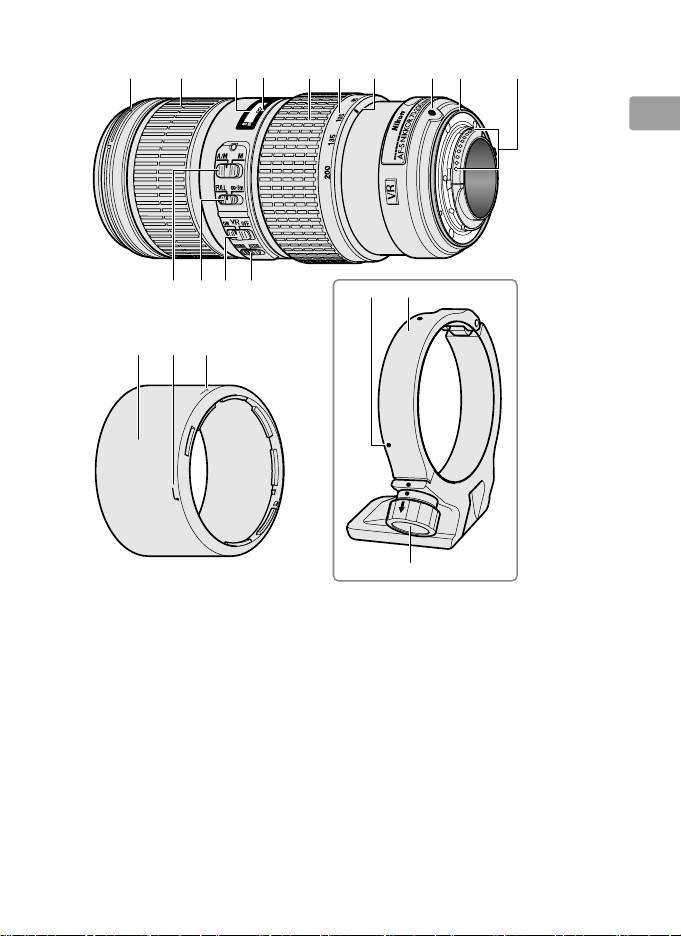
Parts of the Lens
En
13
En_03
w e
r t y u i o !0q
!1 !2 !3 !4
!9!8
!5
!6 !7
@0
■
*
Optional.
q Lens hood mounting mark .......18
!2 Focus limit switch ...........................15
w Focus ring ............................................15
!3 Vibration reduction ON/OFF
e Focus distance indicator
switch ...............................................16
r Focus distance mark
!4 Vibration reduction mode
t Zoom ring ............................................15
switch ...............................................16
y Focal length scale ...........................15
!5 Lens hood ............................................18
u Focal length mark
!6 Lens hood alignment mark ......18
i Lens mounting mark
!7 Lens hood lock mark .....................18
o Rubber lens-mount gasket .......20
!8 Position indices (90°) * ..................19
!0 CPU contacts .....................................20
!9 Tripod collar ring * ..........................19
!1 Focus-mode switch ....................... 15
@0 Tripod collar ring attachment
knob * ............................................... 19

Thank you for your purchase of an AF‑S NIKKOR 70‑200mm f/4G ED VR
lens.
Before using this product, please carefully read both these
instructions and the camera manual.
En
Note: When mounted on a DX-format digital single-lens reflex camera such as
the D7000 or cameras in the D300 series, this lens has an angle of view of
22° 50′ – 8° and a focal length equivalent to 105 – 300 mm (35 mm format).
■
Compatibility
Check marks (“✔“) indicate supported features, dashes (“—”) features
that are not supported.
Some limitations may apply; see the camera
manual for details.
Exposure (Shooting) mode
Function
4
5
6
Camera
P
S A M AF
VR
Nikon FX-format and DX-format digital single-lens reflex cameras,
✔ ✔ ✔ ✔ ✔ ✔
1
1
1
F6, F5, F100, F/N80-series
, F/N75-series
, F/N65-series
1
2
Pronea 600i/6i
, Pronea S
✔ ✔ ✔ ✔ ✔
—
1
1
1
F4-series, F90X/N90s
, F90-series/N90
, F70-series/N70
✔ ✔
— —
✔
—
1
1
1
F60-series/N60
, F/N55-series
, F50-series/N50
, F-401x/
✔ ✔ ✔ ✔
— —
1
1
1
N5005
, F-401s/N4004s
, F-401/N4004
1
1
1
F-801s/N8008s
, F-801/N8008
, F-601m/N6000
✔ ✔
— — — —
1
3
F3AF, F-601/N6006
, F-501/N2020
, Nikon manual focus
—
1
cameras (excluding F-601m/N6000
)
1
N-series cameras and Pronea
3
N2020 sold in U. S. A. and Canada only.
6i sold in U. S. A. only.
4
Includes AUTO and scene (Digital Vari-
2
Exposure mode M (manual)
Program) modes.
not available.
5
Autofocus.
6
Vibration reduction.
■
Focus
Supported focus modes are shown in the following table (for information
on camera focus modes, see the camera manual).
Camera
Lens focus mode
Camera
focus mode
A/M M
Nikon FX-format and DX-format digital single-lens
Autofocus with
Manual focus
reflex cameras, F6, F5, F4-series, F100, F90X/N90s *,
AF
manual override
with electronic
F90-series/N90 *, F/N80-series *, F/N75-series *, F70-
(AF priority)
rangefinder
series/N70 *, F/N65-series *, Pronea 600i/6i *, Pronea S
MF
Manual focus (electronic
F60-series/N60 *, F/N55-series *, F50-series/N50 *,
rangefinder available with all
F-801s/N8008s *, F-801/N8008 *, F-601
m/N6000 *,
AF, MF
cameras except F-601
m/
F-401x/N5005 *, F-401s/N4004s *, F-401/N4004 *
N6000 *)
*
N-series cameras and Pronea 6i sold in U. S. A. only.
14
En_03

A/M (Autofocus with Manual Override/AF Priority)
To focus using autofocus with manual override (A/M):
z
Slide the lens focus-mode switch to A/M.
En
x
Focus.
If desired, autofocus can be over‑ridden by rotating the lens focus
ring while the shutter‑release button is pressed halfway (or, if the
camera is equipped with an AF-ON button, while the AF-ON button
is pressed); note that the ring must be rotated a short distance before
autofocus is over‑ridden.
To refocus using autofocus, press the
shutter‑release button halfway or press the AF-ON button again.
The Focus Limit Switch
This switch determines the focus distance limits for autofocus.
FULL: Select this option for subjects that may be closer than
3 m (9.84 ft).
∞–3 m: If your subject will always be at distance of at least
3 m (9.84 ft), select this option for faster focusing.
■
Zoom and Depth of Field
Before focusing, rotate the zoom ring to adjust the focal length and frame
the photograph.
If the camera offers depth‑of‑field preview (stop down),
depth of field can be previewed in the viewfinder (see page 210 for more
information).
Note: Note that the focus distance indicator is intended only as a guide and
may not accurately show the distance to the subject and may, due to depth
of field or other factors, not show ∞ when the camera is focused on a distant
object.
■
Aperture
Aperture is adjusted using camera controls.
15
En_03

■
Built-in Flash Units
When using the built‑in flash on cameras equipped with a built‑in flash
unit, remove the lens hood to prevent vignetting (shadows created
En
where the end of the lens obscures the built‑in flash).
■
Vibration Reduction
Vibration reduction reduces blur caused by camera shake, allowing
shutter speeds up to five stops slower than would otherwise be the case
(Nikon measurements; effects vary with the photographer and shooting
conditions).
This increases the range of shutter speeds available and
permits hand‑held, tripod‑free photography in a wide range of situations.
Using the Vibration Reduction ON/OFF Switch
Select ON to enable vibration reduction.
Vibration reduction is
activated when the shutter‑release button is pressed
halfway, reducing the effects of camera shake for
improved framing and focus.
Select OFF to turn vibration reduction off.
Using the Vibration Reduction Mode Switch
The vibration reduction mode switch is used to select the vibration
reduction mode when vibration reduction is on.
Select NORMAL to reduce the effects of vibration when
photographing from a fixed position and in other
situations with comparatively little camera motion.
Select ACTIVE to reduce the effects of vibration when
shooting from a moving vehicle, while walking, and in
other situations with active camera motion.
16
En_03

Using Vibration Reduction: Notes
•
Slide the vibration reduction switch to OFF if the camera does not
support vibration reduction (pg. 14).
Leaving vibration reduction on
may greatly increase the drain on the battery, particularly in the case of
En
Pronea 600i/6i cameras.
•
When using vibration reduction, press the shutter‑release button
halfway and wait for the image in the viewfinder to stabilize before
pressing the shutter‑release button the rest of the way down.
•
When vibration reduction is active, the image in the viewfinder may be
blurred after the shutter is released.
This does not indicate a
malfunction.
•
Slide the vibration reduction mode switch to NORMAL for panning
shots. When the camera is panned, vibration reduction applies only to
motion that is not part of the pan (if the camera is panned horizontally,
for example, vibration reduction will be applied only to vertical shake),
making it much easier to pan the camera smoothly in a wide arc.
•
Do not turn the camera off or remove the lens while vibration reduction
is in effect.
If power to the lens is cut while vibration reduction is on, the
lens may rattle when shaken.
This is not a malfunction, and can be
corrected by reattaching the lens and turning the camera on.
•
If the camera is equipped with a built‑in flash, vibration reduction will
be disabled while the flash charges.
•
Turn vibration reduction off when the camera is securely mounted on a
tripod, but leave it on if the tripod head is not secured or when using a
monopod.
17
En_03
■
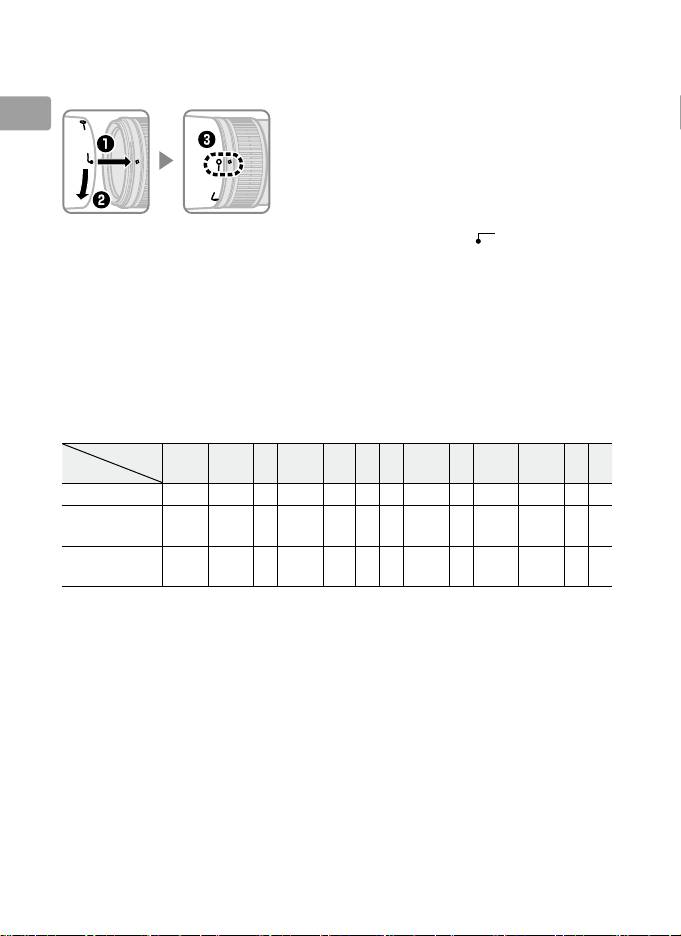
The Lens Hood
The lens hoods protect the lens and block stray light that would
otherwise cause flare or ghosting.
En
Align the lens hood lock mark (—) with the
lens hood mounting mark (●) on the lens (e).
When attaching or removing the hood, hold it near the symbol on its
base and avoid gripping it too tightly.
Vignetting may occur if the hood is
not correctly attached.
The hood can be reversed and mounted on the lens when not in use.
When the hood is reversed, it can be attached and removed by rotating it
while holding it near the lock mark (—).
■
Focusing Screens
The following cameras support a variety of focusing screens for use in
different situations.
Screen
EC‑B
Camera A B C E
EC‑E G1 G2 G3 G4 J L M U
F6
—
— — — — —
F5+DP-30
(+0.5)
F5+DA-30
(+1.0)
(+0.5)
(+0.5)
(–1.0)
(+0.5)
(+1.0)
: Recommended.
: Vignetting visible in viewfinder (photographs are not affected).
—: Not compatible with camera.
( ): Figures in parentheses give the exposure compensation for center-
weighted metering.
Select “Other screen” for Custom Setting b6
(“Screen comp.”) when adjusting exposure compensation for the F6;
note that with screens other than B or E, “Other screen” must be
selected even when the value for exposure compensation is 0.
Exposure compensation for the F5 can be adjusted using Custom
Setting 18; see the camera manual for details.
Empty cell: Not suited to use with this lens.
Note that type M screens can
however be used for photomicrography and macro photography at
magnifications of 1 : 1 or higher.
Note: The F5 supports matrix metering with A, B, E, EC-B/EC-E, J, and L
18
focusing screens only.
En_03
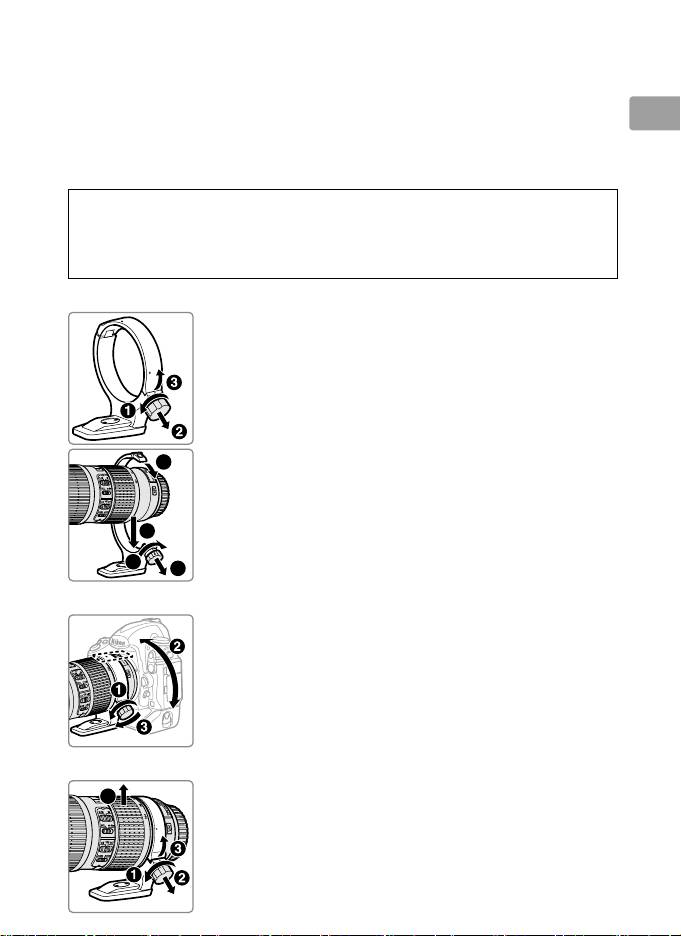
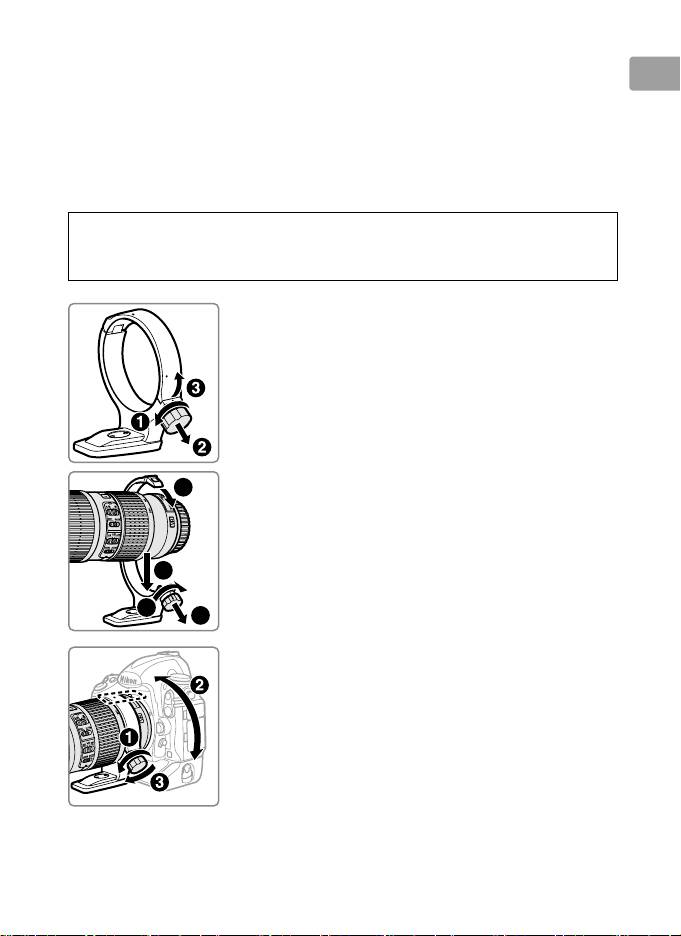
The Optional RT-1 Tripod Collar Ring
Loosen the tripod collar ring attachment knob to rotate the camera to the
desired position and orient the display horizontally or vertically. Note that
your hand may come into contact with the tripod if you rotate the camera
En
while holding it by the handgrip. Depending on how the camera or
tripod is attached, camera shake may be reduced by attaching the tripod
to the camera tripod mount.
A
WARNING
Fully tighten the tripod collar ring attachment knob when attaching
tripod collar ring.
Failure to observe this precaution could result in the
tripod collar ring becoming detached from the lens, causing injury.
Attaching the Tripod Collar Ring
19
En_03
6
4
7
5
z
Loosen the tripod collar ring attachment knob
(q).
x
Open the ring.
Pull the attachment knob toward you (w) and
open the ring (e).
c
Place the lens in the ring (r).
v
Close the ring.
Pull the attachment knob toward you (t) and close
the ring (y).
Do not use excessive force, as your
hand could be caught in the ring.
b
Tighten the attachment knob (u).
Positioning the Camera
Loosen the attachment knob (q), adjust the position
indices to the desired vertical or horizontal orientation
(w), and then tighten the attachment knob (e).
Removing the Tripod Collar Ring
4
■
z
Loosen the attachment knob (q).
x
Remove the ring.
Pulling the attachment knob toward you (w), open
(e) and remove the lens (r).

■
Lens Care
•
Do not pick up or hold the lens or camera using only the lens hood.
•
Keep the CPU contacts clean.
En
•
Should the rubber lens‑mount gasket be damaged, cease use
immediately and take the lens to a Nikon‑authorized service center for
repair.
•
Use a blower to remove dust and lint from the lens surfaces.
To remove
smudges and fingerprints, apply a small amount of ethanol or lens
cleaner to a soft, clean cotton cloth or lens‑cleaning tissue and clean
from the center outwards using a circular motion, taking care not to
leave smears or touch the glass with your fingers.
•
Never use organic solvents such as paint thinner or benzene to clean
the lens.
•
The lens hood or NC filters can be used to protect the front lens
element.
•
Attach the front and rear caps before placing the lens in its flexible
pouch.
•
If the lens will not be used for an extended period, store it in a cool, dry
location to prevent mold and rust.
Do not store in direct sunlight or
with naphtha or camphor moth balls.
•
Keep the lens dry.
Rusting of the internal mechanism can cause
irreparable damage.
•
Leaving the lens in extremely hot locations could damage or warp parts
made from reinforced plastic.
■
Supplied Accessories
•
67 mm snap‑on Front Lens Cap LC‑67
•
Rear Lens Cap LF‑4
•
Bayonet Hood HB‑60
•
Flexible Lens Pouch CL‑1225
■
Compatible Accessories
•
67 mm screw‑on filters
•
Tripod collar ring RT‑1
•
AF‑I/AF‑S Teleconverters TC‑14E/TC‑14E II/TC‑17E II */TC‑20E */
TC‑20E II */TC‑20E III *
*
Autofocus is available only with cameras that offer f/8 support.
20
En_03
