Nikon GP-1-DSLR: instruction
Class: Portable audio
Type: Radio
Manual for Nikon GP-1-DSLR
Table of contents
- For Your Safety
- Notices
- The GP-1 and Supplied Accessories
- Features of the GP-1
- Turning the GP-1 on and Off
- Cameras with Ten-pin Remote Terminals
- Cameras with Accessory Terminals
- Disconnecting the GP-1
- Mounting the GP-1 on the Camera Strap
- The GPS Signal
- Coordinated Universal Time (UTC)
- Auto Meter Off
- GPS data for D90 digital cameras
- Notes on the GP-1
- Precautions for Use
- Specifi cations
- Connecting the GP-1 to a Computer
1SJOUFEJO+BQBO
4#M/
.8%/

En
1
Table of Contents
Table of Contents
For Your Safety ................................................2
Not ic e s .............................................................3
Introduction .................................................... 4
The GP-1 and Supplied Accessories .................4
Parts of the GP-1 .............................................5
Features of the GP-1 ........................................5
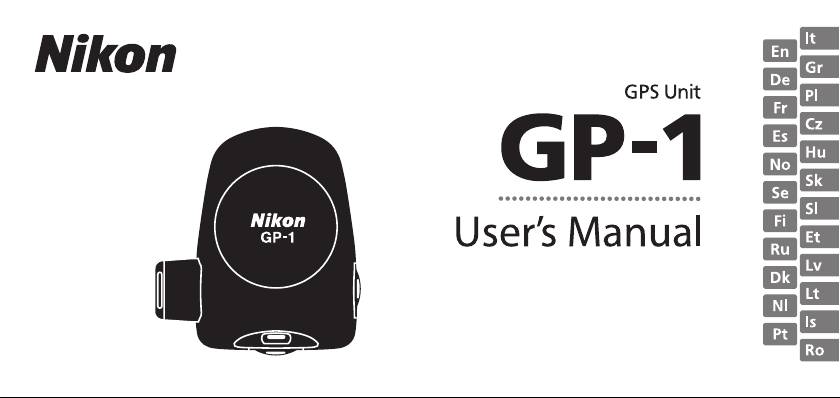
GPS Unit GP-1
Supported Cameras .........................................6
Turning the GP-1 on and Off ............................6
Connecting the GP-1 .......................................7
Connecting the Optional MC-DC2 ....................9
User’s Manual
Mounting the GP-1 on the Camera ..................9
Recording GPS Data ....................................... 11
Notes on the GP-1 .......................................... 15
Precautions for Use ....................................... 16
Specifi cations ................................................ 17

En
2
For Your Safety
For Your Safety
To prevent damage to your Nikon product or injury to yourself or to
• Do not subject to high temperatures: Do not leave the device in areas sub-
others, read the following safety precautions in their entirety before
ject to extremely high temperatures, such as in a closed vehicle on a
using this equipment.
Keep these safety instructions where all those
hot day.
Failure to observe this precaution could result in damage to
who use the product will read them.
the casing or internal circuitry, causing fi re.
• Do not disassemble: Touching the product’s internal parts could result
Notice for customers in Europe
in injury.
In the event of malfunction, the product should be repaired
This symbol indicates that this product is to be col-
only by a qualifi ed technician.
Should the product break open as the
lected separately.
result of a fall or other accident, disconnect the device and take it to a
Nikon-authorized service center for inspection.
The following apply only to users in European coun-
• Keep dry: Do not immerse in or expose to water or handle with wet
tries:
hands.
Failure to observe this precaution could result in fi re or electric
• This product is designated for separate collection at
shock.
an appropriate collection point.
Do not dispose of as
• Do not use in the presence of fl ammable gas: Do not use electronic equip-
household waste.
ment in the presence of fl ammable gas, as this could result in explo-
• For more information, contact the retailer or the local
sion or fi re.
authorities in charge of waste management.
• Keep out of reach of children: Failure to observe this precaution could re-
sult in injury.
• Request permission before using the device in an airplane or a medical facility:
This device emits radio-frequency radiation that could interfere with
navigational or medical equipment.

En
3
Notices
Notices
Notices for Customers in the U.S.A.
CAUTIONS
Federal Communications Com mis sion (FCC) Radio Frequency Interference
Modifi cations
Statement
The FCC requires the user to be notifi ed that any changes or modifi ca-
This equipment has been tested and found to comply with the limits
tions made to this device that are not expressly approved by Nikon Cor-
for a Class B digital device, pursuant to Part 15 of the FCC rules.
These
poration may void the user’s au thor i ty to operate the equipment.
limits are designed to provide rea son able pro tec tion against harmful
Notice for Customers in the State of California
in ter fer ence in a res i den tial in stal la tion.
This equip ment gen er ates,
WARNING: Handling the cord on this product will expose you to lead,
uses, and can radiate radio fre quen cy energy and, if not installed and
a chemical known to the State of California to cause birth defects or
used in ac cor dance with the instructions, may cause harmful in ter -
other reproductive harm.
Wash hands after handling.
f e r e n c e t o r a d i o c o m m u n i c a t i o n s .
How ev er, there is no guar an tee that
in ter fer ence will not occur in a par tic u lar in stal la tion.
If this equipment
Nikon Inc.,
does cause harmful in ter fer ence to radio or television reception, which
1300 Walt Whitman Road, Melville, New York
can be de ter mined by turn ing the equipment off and on, the user is
11747-3064, U. S. A.
en cour aged to try to correct the in ter fer ence by one or more of the fol-
Tel.: 631-547-4200
low ing mea sures:
Notice for Customers in Canada
• Reorient or relocate the receiving an ten na.
CAUTION
• Increase the separation between the equip ment and receiver.
This Class B digital apparatus complies with Canadian ICES-003.
• Connect the equipment to an outlet on a circuit diff erent from that to
ATTENTION
which the receiver is con nect ed.
Cet appareil numérique de la classe B est conforme à la norme NMB-
• Consult the dealer or an experienced radio/TV technician for help.
003 du Canada.

En
4
Introduction
Introduction
Thank you for your purchase of a GP-1 GPS unit, a
Confi rm that the package contains the following
camera accessory that records the latitude, longitude,
items:
altitude, and Coordinated Universal Time (UTC) with
❑ GP-1 GPS unit
your photographs (for a list of compatible cameras,
❑ GP1-CA10 cable for ten-pin remote terminals
see page 6).
Be sure to read this manual thoroughly
❑ GP1-CA90 cable for accessory terminals
before use.
❑ GP1-CL1 strap adapter
❑ Manual (this pamphlet)
❑ Warranty
D
D
Terminology
Terminology
Function names diff er from camera to camera.
See your
camera manual for details.
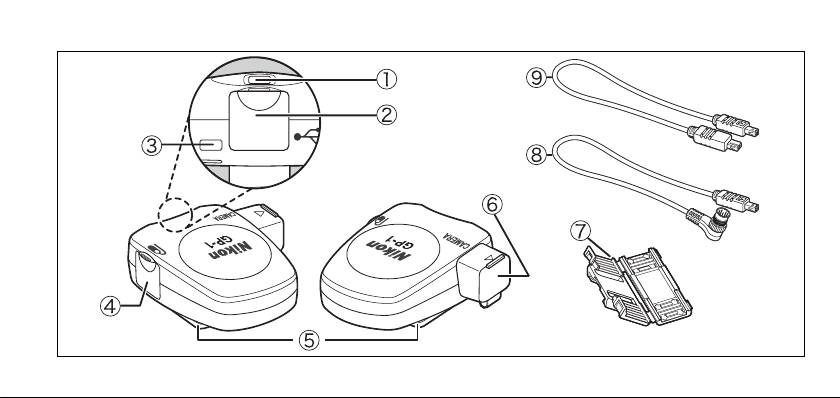
The GP-1 and Supplied Accessories
The GP-1 and Supplied Accessories

En
5
Parts of the GP-1
Parts of the GP-1
Refer to the illustration inside the front cover of this
manual.
햲 LED .........................................................................................11
햳 USB terminal ...................................................................... 18
햴 Eyelet for strap (strap available separately; use cell
phone strap or other similar strap)
햵 Accessory terminal for optional MC-DC2 remote
cord ..........................................................................................9
햶 Mount ...............................................................................9, 10
햷 Connection terminal for GP1-CA10 or
GP1- C A90 .......................................................................... 7, 8
햸 GP1-CL1 strap adapter ................................................... 10
햹 GP1-CA10 cable for connection to cameras
with ten-pin remote terminals ......................................7
햺 GP1-CA90 cable for connection to cameras
with accessory terminals .................................................8
Features of the GP-1
Features of the GP-1
When connected to a camera that supports GPS, the
GP-1 records location information with photographs
(if desired, an optional MC-DC2 remote cord for re-
mote shutter release can be connected via the GP-1).
En
6
Supported Cameras
Supported Cameras
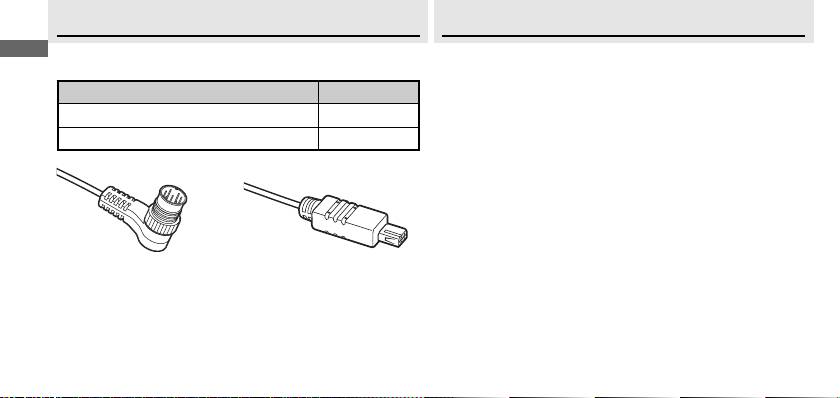
The GP-1 can be used with the following cameras:
Camera
Camera
Required cable
Required cable
D3, D700, D300, D2X, D2XS, D2HS, D200 GP1-CA10
D90 GP1-CA90
GP1-CA10 cable for ten-pin
GP1-CA90 cable for
remote terminals
accessory terminals
Turning the GP-1 on and Off
Turning the GP-1 on and Off
The GP-1 is not equipped with a battery or on/off
switch: power is supplied from the camera.
The GP-1
turns off only when the cable connecting it to the cam-
era is disconnected; even when the camera is off , the
GP-1 continues to receive GPS data.
For more informa-
tion, see “Recording GPS Data” (page 13).
En
7
Connecting the GP-1
Connecting the GP-1
Page 1 of 2
Page 1 of 2
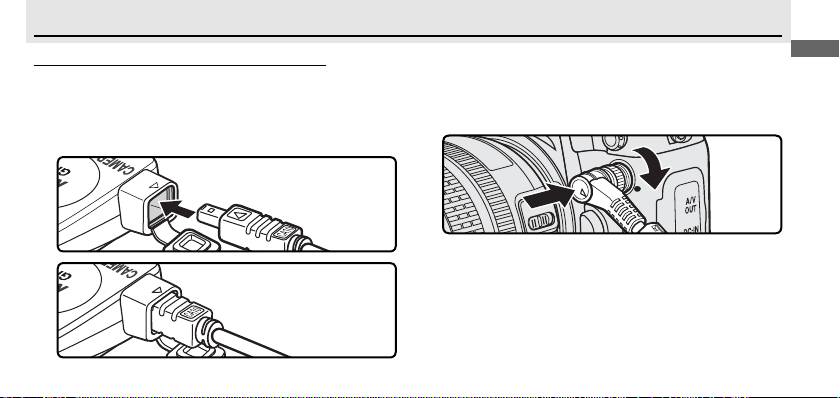
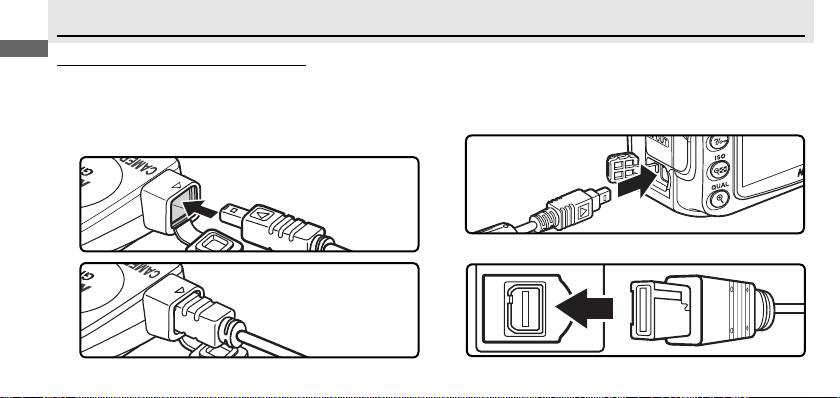
Cameras with Ten-pin Remote Terminals
Cameras with Ten-pin Remote Terminals
Aligning the mark on the connector with the mark
3
on the camera body, insert the ten-pin connec-
Turn the camera off .
1
tor into the camera’s ten-pin remote terminal and
Insert the GP1-CA10 cable (햹) into the connection
tighten the locking nut.
2
terminal (햷).
Connecting the GP1-CA10 to a D3 digital camera
En
8
Connecting the GP-1
Connecting the GP-1
Page 2 of 2
Page 2 of 2
Cameras with Accessory Terminals
Cameras with Accessory Terminals
Open the camera accessory terminal cover and
3
insert the GP1-CA90 as shown.
Be sure that the
Turn the camera off .
1
connector is in the correct orientation; do not use
Insert the GP1-CA90 cable (햺) into the connection
force.
2
terminal (햷).
Connecting the GP1-CA90 to a D90 digital camera
En
9
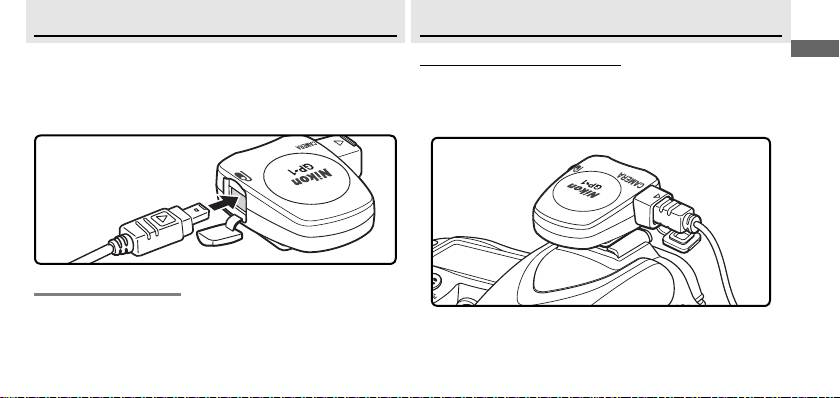
Connecting the Optional MC-DC2
Connecting the Optional MC-DC2
An optional MC-DC2 remote cord for remote shutter re -
lease can be connected to the GP-1 accessory terminal
(햵).
When connecting the MC-DC2, be sure the con-
nector is in the correct orientation; do not use force.
Mounting the GP-1 on the Camera
Mounting the GP-1 on the Camera
Page 1 of 2
Page 1 of 2
The Camera Accessory Shoe
The Camera Accessory Shoe
The GP-1 is equipped with a mount (햶) that fi ts the
camera accessory shoe.
Slide the GP-1 onto the cam-
era accessory shoe as shown.
D
D
Disconnecting the GP-1
Disconnecting the GP-1
Turn the camera off , disconnect the cable, and then re-
place the ten-pin terminal cap or close the accessory
terminal cover.
En
10
Mounting the GP-1 on the Camera
Mounting the GP-1 on the Camera
Page 2 of 2
Page 2 of 2
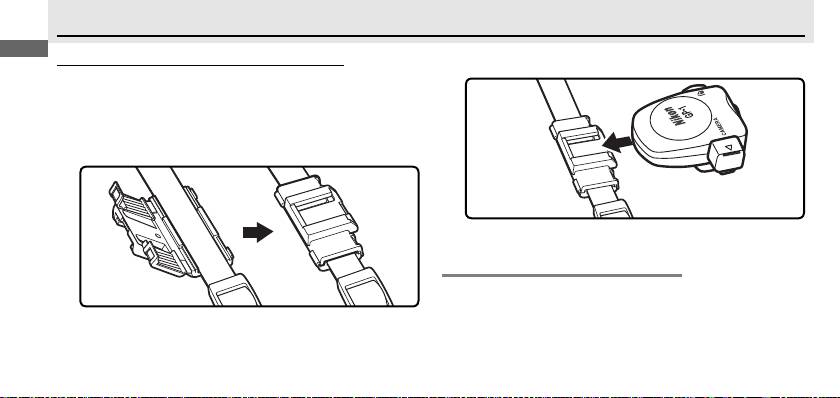
Mounting the GP-1 on the Camera Strap
Mounting the GP-1 on the Camera Strap
Mount the GP-1 on the camera strap as shown (햶).
2
The supplied strap adapter (햸) can be used to attach
the GP-1 to the camera strap.
Attach the strap adapter as shown.
Do not attach
1
the adapter where the strap is doubled.
D
D
Mounting the GP-1 on the Camera Strap
Mounting the GP-1 on the Camera Strap
Note that the built-in GPS antenna may sometimes not
be in the correct orientation when the GP-1 is mounted
on the camera strap, and that signal quality may drop as
a result.
En
11
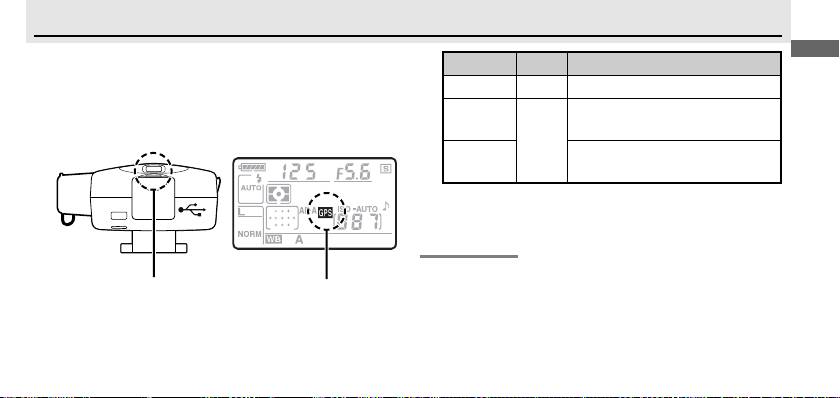
LED
LED
O
O
icon
icon
Status
Status
Blinks red Blinks GPS data not recorded.
Blinks
Three satellites detected; GPS
green
data recorded.
On
On
Four or more satellites detected;
(green)
GPS data are more accurate.
Recording GPS Data
Recording GPS Data
Page 1 of 4
Page 1 of 4
Connect the GP-1 (page 7 , 8) and turn the camera
1
on.
The GP-1 LED (햲) will light and a O icon will be
displayed in the control panel on top of the cam-
era.
LED O icon (illustration shows
control panel for the D90
digital camera)
D
D
The GPS Signal
The GPS Signal
GPS data will be recorded only if the GP-1 is able to de-
tect three or more satellites.
If no signal is received from
the GP-1 for over two seconds, the O icon will no longer
be displayed in the control panel and no GPS data will
be recorded.
En
12
Recording GPS Data
Recording GPS Data
Page 2 of 4
Page 2 of 4
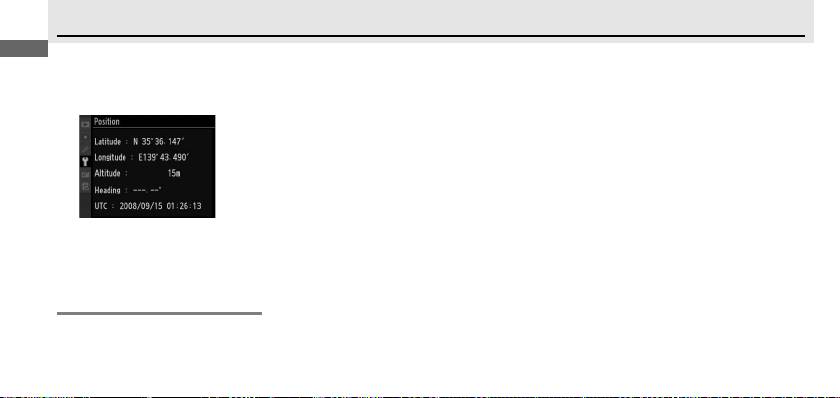
To view GPS data, select GPS > Position in the camera setup menu (this option is not available with D2X,
2
D2XS, D2HS, and D200 cameras).
The current latitude, longitude, altitude, and Coordinated Universal Time
(UTC) will be displayed (the example below shows the display for D90 digital cameras).
D
D
Coordinated Universal Time (UTC)
Coordinated Universal Time (UTC)
The Coordinated Universal Time (UTC) received from the GPS satellite is recorded separately from the time provided
by the camera clock.

En
13
Recording GPS Data
Recording GPS Data
Page 3 of 4
Page 3 of 4
Take pictures.
GPS data will be recorded with each photograph.
3
D
D
Auto Meter Off
Auto Meter Off
If Enable is selected for GPS > Auto meter off in the setup menu for D3, D700, D300, and D90 cameras, the exposure
meters will turn off automatically after the time specifi ed in the camera Custom Settings menu.
This reduces the drain
on the battery but may prevent GPS data from being recorded if the exposure meters are not activated until immedi-
ately before the picture is taken.
Check that the O icon is displayed before shooting.
The GP-1 periodically acquires
GPS data when the camera or exposure meters are off , although the LED will not light.
If no operations are performed
for about three hours, the GP-1 will turn off .
When a D2X, D2XS, D2HS, or D200 camera is connected, or a D3, D700, D300, or D90 camera is connected with Dis-
able selected for GPS > Auto meter off , the exposure meters will not turn off while the GP-1 is connected.
The drain
on the camera battery can be reduced by turning the camera off when not in use.
En
14
Recording GPS Data
Recording GPS Data
Page 4 of 4
Page 4 of 4
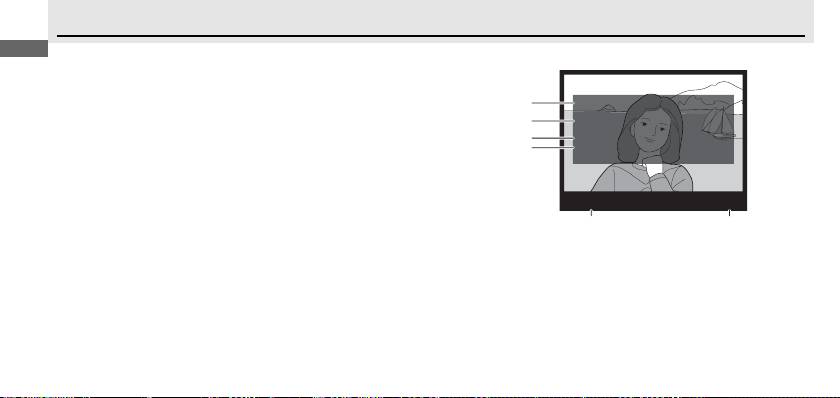
To view the GPS data recorded with each photo-
GPS data for D90 digital cameras
4
graph, press the K button and display the pho-
tographs full frame.
The photo info display will
:
1
LATITUDE
.
N
:
35
º
36. 371'
contain a page listing GPS data for the current
2
LONGITUDE
:
E
:
139
º
43. 696'
photograph.
3
ALTITUDE
:
35m
4
TIME(UTC)
:
2008
/
09
/
15
:
01
:
15
:
29
N
I
KO
N
D
90
12/12
65
햲 Latitude
햶 Camera name
햳 Longitude
햷 Frame number/Total
햴 Altitude
number of images
햵 Coordinated Universal
Time (UTC)

En
The GP-1 does not supply the compass heading.
Local geographic and atmospheric conditions may prevent or
delay the acquisition of GPS data.
The GP-1 may be unable to receive GPS data indoors, underground, or in the
vicinity of large structures, trees, or other objects that block or refl ect satellite signals.
The positions of GPS sat-
ellites are continuously changing, preventing or delaying the acquisition of GPS data at certain hours of the day.
The presence of cellular telephones or other devices that transmit on frequencies close to those of GPS satellites
may also interfere with the acquisition of GPS data.
Note that the GP-1 may take several minutes to reacquire a signal if the unit has not been used for an extended
period or has been moved a great distance since GPS data were last received.
15
Notes on the GP-1
Notes on the GP-1

En
• Do not drop: The product may malfunction if subjected to strong shocks or vibration.
• Keep dry: This product is not waterproof, and may malfunction if immersed in or exposed to water.
• Avoid sudden changes in temperature: Sudden changes in temperature, such as occur when entering or leaving a
heated building on a cold day, can cause condensation inside the device. To prevent condensation, place the
device in a carrying case or plastic bag before exposing it to sudden changes in temperature.
• Keep away from strong magnetic fi elds: Do not use or store this device in the vicinity of equipment that generates
strong electromagnetic radiation or magnetic fi elds. Strong static charges or the magnetic fi elds produced by
equipment such as radio transmitters could aff ect the product’s internal circuitry.
• A note on electronic devices: In extremely rare instances, a strong external static charge may cause the device to
stop functioning.
Turn the camera off and disconnect and reconnect the GP-1.
In the event of continued mal-
function, contact your retailer or Nikon-authorized service representative.
16
Precautions for Use
Precautions for Use
This product shall not be exported without authorization from the appropriate governmental authorities.

En
17
Supported cameras
Supported cameras Nikon D3, D700, D300, D2X, D2XS, D2HS, D200, and D90 digital cameras
Receiver
Receiver Tracking channels: 18 (SBAS compliant)
Acquisition times
Acquisition times
*
*
Cold start: Approx. 45 s Hot start: Approx. 5 s
Update rate
Update rate Once per second
Data format
Data format NMEA (National Marine Electronics Association) version 2.3 (compatible with version 3.01)
Geodesics
Geodesics WGS84
GPS accuracy
GPS accuracy
*
*
Horizontal: 10 m/33 ft. RMS
Interfaces
Interfaces Connection and accessory terminals, USB
Average power consumption
Average power consumption 180 mW
Operating temperature
Operating temperature 0 °C – 40 °C/32 °F – 104 °F
Dimensions (W × H × D)
Dimensions (W × H × D) Approx. 45.5 × 25.5 × 50 mm/1.8 × 1.0 × 2.0 in.
Weight
Weight Approx. 24 g/0.85 oz.
Length of cable
Length of cable Approx. 25 cm/10 in. (GP1-CA10 and GP1-CA90)
Compatible accessories
Compatible accessories MC-DC2 remote cord (available separately) UC-E4 USB cable (supplied with digital SLR cameras)
* Under open sky (no obstructions nearby)
Specifi cations
Specifi cations

En
18
Connecting the GP-1 to a Computer
Connecting the GP-1 to a Computer
The GP-1 can supply GPS data to a computer for use with mapping software and other applications.
Connect the
UC-E4 USB cable supplied with your digital camera to the GP-1 USB terminal (햳) and connect the cable to the
computer.
Power is supplied from the computer.
Drivers for Windows XP and Windows Vista are available from the
following Nikon websites, together with other information on using the GP-1 with a computer:
• For users in the U.S.A.: http://www.nikonusa.com/
• For users in Europe and Africa: http://www.europe-nikon.com/support
• For users in Asia, Oceania, and the Middle East: http://www.nikon-asia.com/
If the GP-1 is connected simultaneously to both a camera and a computer, GPS data will be supplied to the com-
puter only.
