Nikon COOLSHOT: instruction
Class: Optics
Type:
Manual for Nikon COOLSHOT
Table of contents
- Cautions before use SAFETY PRECAUTIONS SAFETY PRECAUTIONS CARE AND MAINTENANCE
- Key features Nomenclature/Composition
- Internal display Measurement display mode
- Target priority mode Distance display units Changing battery LED illumination
- Measurement
- Specifications
- Others Troubleshooting/Repair
- Troubleshooting/Repair
Jp
En
Es
Fr
De
It
Se
Nl
Ru
Pt
Pl
Fi
No
Dk
Cz
Ro
Hu
使用説明書 /Instruction manual/Manual de instrucciones/
Manuel d’utilisation/Bedienungsanleitung/Manuale di istruzioni/Bruksanvisning/
Gebruiksaanwijzing/P /Manual de instruções/Instrukcją
obsługi/Käyttöohje/Instruksjonsmanual/Brugsvejledning/Návod k použití/Manual de
instrucţiuni/Kezelési útmutató

日本語
.......................................... p. 4-20
English ....................................... p. 21-38
Español ...................................... p. 39-56
Français ...................................... p. 57-74
Deutsch ....................................... s. 75-92
Italiano ..................................... p. 93-110
Svenska .................................. s. 111-128
Nederlands ............................ p. 129-146
............................. c. 147-164
Português brasileiro ............. p. 165-182
Polski ...................................... s. 183-200
Suomi .................................... .
s. 201-218
Norsk ...................................... s. 219-236
Dansk ..................................... p. 237-254
Česky ...................................... s. 255-272
Română .................................. p. 273-290
Magyar .................................. 291-308. o.
はじめに
Jp
Jp
このたびは、ニコン携帯型レーザー距離計COOLSHOT AS をお買い上げいただきまして、まことにありがとうございます。
En
En
Es
日本語
ここに規定した以外の手順による制御や調整は、危険なレーザー放射の被ばくをもたらします。
Es
Fr
Fr
○ 製品をご使用の前に、この使用説明書の「安全上・使用上のご注意」をよくお読みのうえ、正しくお使いください。
De
De
○ お読みになった後は、いつも手元に置いてご利用ください。
It
目次
It
○ お客様ご自身での修理や分解は、重大な事故の原因となりますのでおやめください。また、万一修理や分解をされた
Se
Se
はじめに ....................................................... 5
場合は、メーカーの保証の対象外となりますのでご注意ください。
Nl
Nl
安全上・使用上のご注意 ....................... 6 -7
● 仕様・外観などは改善のため予告なしに変更する場合があります。
Ru
Ru
特徴 ............................................................... 8
● この「使用説明書」に掲載されている文章・イラスト等の無断転載を禁じます。
Pt
Pt
● 使用説明書の誤りなどについての補償はご容赦ください。
各部名称/構成 ........................................... 9
Pl
Pl
内部表示 .................................................... 10
Fi
Fi
No
測定表示モード ........................................ 11
No
Dk
距離優先モード/距離表示単位/
Dk
Cz
LED 照明 .................................................. 12
Cz
Ro
電池交換 .................................................... 13
Ro
Hu
測定 ..................................................... 14-15
Hu
仕様 ..................................................... 16-17
受信妨害について .................................... 18
測定結果について .................................... 18
修理 .................................................... 19 - 20
アフターサービスについて ..................... 20
4 5
安全上・使用上のご注意
Jp
この使用説明書には、あなたや他の人
・距離を測定しないときは電源オン/ 測定
・ストラップを持って振り回さないでくだ
して、正しくセットしてください。
・直射日光にさらされる場所に、この製品
本体
Jp
への危害や財産への損害を未然に防ぎ、
ボタンから指を外してください。不用意
さい。人に当たり、けがの原因となるこ
・リチウム電池が消耗したり、長時間使用
を放置しないでください。紫外線や太陽
・本体のお手入れは、ブロア( 注 ) でゴミ
En
En
この製品を安全にお使いいただくため
にレーザー光が投光されないようにする
とがあります。
しないときは、リチウム電池を取り出し
熱による本体への影響が予想されます。
やホコリを軽く吹き払ったあと、柔ら
Es
に、守っていただきたい事項を示して
Es
ためです。
・この製品を不安定な場所に置かないでく
ておいてください。
・寒い戸外から温かい室内に入ったときや、
かい清潔な布で軽く拭いてください。
います。内容をよく理解してから、製
Fr
・長時間使用しないときは、電池を外して
ださい。倒れたり、落ちたりしてけがや
・電池ボックスの端子をショートさせない
夏の涼しい室内から湿度の高い戸外に出
ベンジンやシンナーなどの有機溶剤や、
Fr
品をご使用ください。
ください。
故障の原因となることがあります。
De
でください。
たときなど、急激な温度変化によって、
有機溶剤を含むクリーナーなどを汚れ
De
・製品の分解、改造、修理は絶対に行なわ
・この製品の包装に使用されているポリ袋
・電池をコインや鍵などが入ったポケット
一時的にレンズ面が曇ることがあります。
落としに使わないでください。
It
警告
It
ないでください。レーザー光の放射によ
などを、小さなお子さまの手の届くとこ
や鞄で持ち運ばないでください。電池が
曇りがなくなるまで、使用しないでくだ
(注)ブロア:ノズルから空気をいきお
この表示を無視して、誤った取り扱いをす
Se
り、人体に悪影響がおよぶ場合がありま
ろに置かないでください。
Se
ショートし、高温になる原因となります。
いよく吹き出すことができるゴム
ると、人が死亡または重傷を負う可能性が
さい。
す。万一分解された場合、メーカー保証
・目当てゴムなど、お子さまが誤って飲む
Nl
・リチウム電池を水や火の中に入れたり、
製の清掃道具
Nl
想定される内容を示しています。
は受けられません。
ことがないようにしてください。万一、
Ru
分解したりしないでください。
Ru
注意
・お子さまの手の届かないところに保管し
飲みこんだ場合は、直ちに医師に相談し
保守・手入れ
・リチウム電池を充電しないでください。
保管
Pt
この表示を無視して、誤った取り扱いをす
てください。
てください。
レンズ
Pt
・湿気の多いところでの保管は、レンズ
・リチウム電池から漏れた液が体についた
ると、人が傷害を負う可能性が想定される
・落下などにより本体カバーが破損したり
・この製品の長時間使用を繰り返しますと、
・レンズ面上のほこりは、柔らかい、油気
Pl
面にカビや水滴による曇りが生じやす
Pl
内容および物的損害の発生が想定される内
ときは、水でよく洗い流してください。
カラカラと内部で音がしたりする場合は、
ゴム製の目当てにより、皮膚に炎症を起
のないハケで払うようにして取り除いて
Fi
くなります。風通しのよい、乾燥した
容を示しています。
直ちに使用を中止し、電池を取り外して
こすことがあります。もし、疑わしい症
また目や口に入ったときはよく洗い流し
Fi
ください。
場所に保管してください。とくに、雨
No
ください。
状が現れましたら、直ちに使用を中止し、
た後、直ちに医師の診察を受けてくださ
・レンズ面上の指紋や汚れは、メガネ拭き
No
レーザーに関する安全上のご注意
の日などに使用されたときは、室内で
医師に相談してください。
い。
Dk
専用の布(市販品)で拭き取るか、ガーゼ
Dk
ニコンレーザー距離計は、目に見えない
充分に乾かしてから保管してください。
単眼鏡に関する安全上のご注意
・この製品を持ち運ぶときは、ソフトケー
・リチウム電池を廃棄するときは、各自治
または専用のクリーニングペーパー(カメ
Cz
レーザー光を使用しています。次のことに
ニコンレーザー距離計は、目標物をとらえ
Cz
スに収納してください。
体の指示に従ってください。
十分注意してください。
ラ店などで市販されているシリコンが含
Ro
るために、光学系に単眼鏡を採用していま
・理由の如何を問わず、正常に作動しない
Ro
まれていないもの)に少量の無水アルコー
警告
す。次のことに十分注意してください。
ときは、ニコンレーザー距離計の使用を
Hu
使用上のご注意
ルを含ませて、軽く拭き取ってください。
Hu
・レーザー光の投光窓をのぞき込んで、電
警告
中止し、ニコンのサービス機関にご相談
注意
身近な布やビロード、なめし革などでか
源オン/ 測定ボタン(測定用)を押さない
・太陽や強い光、レーザーを絶対に直接見
ください。
・本製品は防水構造になっておりますが、
ら拭きしますと、レンズ面にキズを付け
でください。視力障害の原因となること
ないでください。
水中では使用しないでください。
があります。
ることがあります。また、一度本体の清
リチウム電池に関するご注意
注意
・雨・水滴・砂や泥がついたときは、柔ら
・人の目は狙わないでください。
リチウム電池は誤った使い方をすると破裂
掃に使用した布は、レンズ面の清掃に使
・ニコンレーザー距離計を使用しないとき
かい清潔な布ですみやかに拭き取るよう
・人に向かって、レーザー光を投光しない
する恐れがあり、また液漏れをおこして機
用しないでください。
は、電源をオンにしないでください。
にしてください。
でください。
器を腐食させたり、手や衣類などを汚す原
・この製品を歩行中に使用しないでくださ
・炎天下の自動車の中や、ヒーターなど高
・ レンズや双眼鏡などの光学的手段を使用し
因となります。次のことを必ず守ってくだ
い。衝突や転倒により、けがや故障の原
温の発熱体の前にこの製品を放置しない
て、レーザー光を観察しないでください。
さい。
因となることがあります。
視力障害の原因となることがあります。
でください。
・+(プラス)と−(マイナス)の向きを確認
6 7
特徴
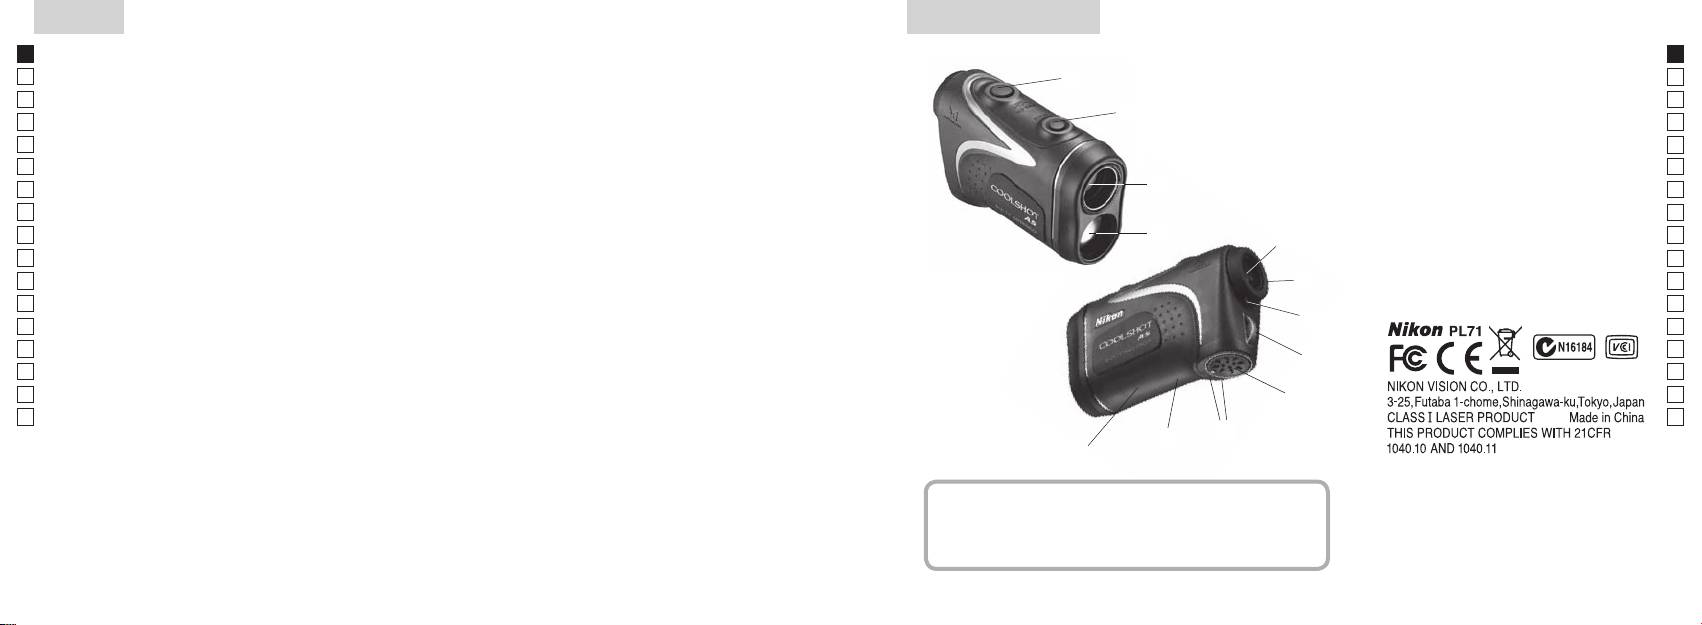
各部名称/構成
Jp
‐
測定可能直線距離:4 .5 -550 メートル / 5 -600 ヤード
次のような場合、測定がより容易に行えます。
1 単眼鏡対物レンズ/
Jp
‐
多層膜コーティングを施した、6 倍の高性能ファインダー
‐天候が曇りの場合
不可視レーザー光投光窓
En
4
En
2 レーザー光受光窓
‐のぞきやすい大きな接眼レンズ径
‐目標物の色が明るい場合
Es
Es
‐G モードでは、ゴルフで有用な加減算距離(水平距離 ±
‐目標物の反射率が高い場合
3
3 MODE ボタン
Fr
Fr
高さ)を表示
‐目標物のサイズが大きい場合
4 電源オン/ 測定ボタン
De
De
‐ファインダー内の測定表示モードは4 種類切り換え可能
‐目標物の反射面に対するレーザーの入射角が直角に近い
5 6 倍単眼鏡接眼レンズ
It
It
‐
目標物に合わせて選べる「距離優先切り
換
えシステム」搭載
場合
6 接眼目当て兼視度調節リング
1
Se
Se
‐ボタンを押し続ければ連続測定可能な「コンティニュア
7 指標
ただし次のような場合は、測定値がばらついたり、測定で
Nl
ス機能」搭載
8 ストラップ取り付け部
Nl
きないときがあります。
Ru
‐オートパワーオフ(操作終了約 8 秒後)
2
5
9電池室ふた
Ru
‐目標物の反射面の面積が小さいときや細長いとき
‐前回終了時の設定からの再スタート
Pt
!p 電池室ふた開閉マーク
Pt
‐目標物の表面がレーザー光を乱反射しやすいとき
‐雨の日でも安心して使える防水・防滴構造(水中での使
Pl
!q 製造番号ラベル
‐目標物の表面がレーザー光を反射しないとき
6
Pl
用はできません)
Fi
!w FDA 説明表示
‐目標物の表面がレーザー光を全反射するとき(ガラス面、
Fi
‐目に見えないレーザー光(EN/IECクラス 1 M)を使用
7
No
鏡面)
No
‐目標物が黒色のとき
Dk
Dk
ニコンレーザー距離計は、測定光としてレーザー
8
‐目標物の測定面が階段状になっているとき
Cz
Cz
を使用し、照射から目標物に反射して受光するま
‐降雪、降雨時や、霧が出ているとき
Ro
9
Ro
での所要時間を計測していますので、測定場所の
‐ガラス越しに測定する場合
Hu
Hu
天候・環境や、目標物の色、表面の状態、大きさ
‐反射面に対して、斜めから測定する場合
!p
や形など、目標物の全ての要素がレーザーの反射
!q
‐目標物が移動や振動していて静止していないとき
!w
性能やその測定結果に影響します。
‐目標物の前を、他の物体が横切るとき
‐水面を測定する場合
構成
・本体×1
・ネックストラップ×1
・ソフトケース×1
・リチウム電池(CR2)×1
8 9
内部表示
測定表示モード
Jp
距離表示
Jp
MODE ボタンを押したまますぐに電源オン/ 測定ボタンを押す(2秒未満)と、以下の順番で変わります。
En
En
Es
A モード
1.電源をオン(内部表示点灯状態)にします。
Es
Fr
2.MODE ボタンを押し続けた状態で、すぐに
Fr
打ち上げ表示
直線距離
距離単位表示 (m/YD)
(0.5 秒以内に)電源オン / 測定ボタンを押します
De
De
打ち下ろし表示
高さ
(2秒未満)。
It
ターゲットマーク
It
3.電源オン / 測定ボタンから指を離すと、測定表示
レーザー光照射マーク
Se
モードが変わります。
Se
高さ表示(G モード時は直線距離)
Nl
近距離優先マーク
4.手順 2、3 の作業を繰り返し、設定します。
Nl
H モード
Ru
*ボタンを押す順番を間違えると切り換わりません。
Ru
遠距離優先マーク
電池残量表示
水平距離
*測定後にモードの切り換えを行うと、そのモード
Pt
Pt
の値に変換されて表示します。
Pl
高さ
*モード変更後に測定を行うと、結果は変更後のモー
『 』 -距離を測りたい目標物を狙います。十字線の中心に目標物を重ねます。
Pl
ドでの値が表示されます。
Fi
『
』 -レーザー光照射中に表示されます。単発測定時は測定中に、コンティニュアス測距機能使用時は点滅表
Fi
No
示されます。表示中は対物レンズを覗かないでください。
No
Dk
『
』 -測定中
Dk
G モード
『
』 -測定失敗、または測定不能
Cz
加減算距離
Cz
Ro
Ro
直線距離
Hu
Hu
*通常、ファインダー内の液晶表示器(LCD)は、等倍か低倍率で観察されていますが、本製品の場合、接眼レンズ
により
高倍率に拡大されて観察されます。また、液晶表示器は高度な技術により製造されていますが、技術的に
ごみなどを完全になくすことはできません。そのため、ごみなどが入り込んでいる場合もありますが、測定精度
には影響がありませんので、安心してご使用ください。
D モード
直線距離
表示なし
10 11
距離優先モード
距離表示単位
電池交換
Jp
このニコンレーザー距離計は、近距離優先モード/遠距
・ 使用電池の種類:
Jp
ヤードとメートルで測定結果を表示します
離優先モード搭載の距離優先切り換えシステムを搭載し
En
3Vリチウム電池CR2 ×1 本
En
( 出荷時の設定はヤードです)。
ています ( 出荷時の設定は、近距離優先モードです)。
Es
・ 電池残量表示
Es
[ ]
メートル [ ]ヤード
近距離優先モード
遠距離優先モード
Fr
* 内部表示の電池マークの状態で、電池の交換時期を警告します。
Fr
「
「
」
」
1.電源をオン ( 内部表示点灯状態 ) にします。
De
点灯: 電池容量が十分あり、使用可能な状態です。
De
2.MODE ボタンを2秒以上押して、単位が変わったら
It
1.
電源をオン(内部表示点灯状態)にします
。
ボタンから指を離します。
点灯: 電池容量が低下しています。電池交換の準備をしてください。
It
Se
2.
MODE ボタンを押し続けた状態で、すぐに(0 .5
3.設定後の表示は、その単位に換算されて表示されます。
Se
点灯: 電池容量が低下しました。電池を交換してください。
秒以内に)電源オン / 測定ボタンを押し、近距離優
Nl
Nl
先モードと遠距離優先モードの表示が切り換わる
点滅: 電池容量がありません。点滅3回で自動電源オフになります。
Ru
まで2つのボタンを押し続けます ( 2秒以上)。
Ru
電池を交換してください。
Pt
3.モードが変わったら、両方のボタンから指を離し
Pt
ます。
1 .本体底部にある電池室ふたをはずします。
Pl
Pl
*ボタンを押す順番を間違えると切り換わりません。
電池室ふたにある凹凸に親指の腹などを当て、
マークの方向に回します。防滴対策用ゴムパッキンに
Fi
*表示が切り換わらない時は、手順 2 の操作をやり
LED 照明
Fi
より蓋の回転が重いことがあります。
直してください。
No
No
2 .古い電池を新しい電池と交換します。
1.電源をオン(内部表示点灯状態)にします。
Dk
Dk
2.MODE ボタンを押す(2 秒未満)と、LED 照明のオン・
極性を間違わないように、電池室内の電池挿入マークにしたがって、装填してください。プラス(+)が
Cz
[近距離優先モード/遠距離優先モード]
オフが行えます。
内側になります。誤った装填をした場合、電源は入らないようになっています。
Cz
*暗くて液晶表示が確認できない時に使用してください。
Ro
重なり合った目標物を測定した場合、得られた距離結果
3 .電池室の蓋を取り付けます。
Ro
*電源のオフでも LED 照明はオフになります。なお、
から、近距離優先モードでは最も近い距離を、遠距離優
Hu
マークと指標の●を合わせて電池室の蓋をはめ込み、 マークの方向に親指の腹などで押し付けな
Hu
電源を再度オンにした時は、LED 照明はオフ状態です。
先モードでは最も遠い距離を測定結果として表示します。
がら回してください。防滴効果を確保するために、ゴムパッキンを使用していますので、最後まで確実
に回し、固定されたことを確認してください。
・電池寿命
連続測定回数:約 13,000 回(約 20 ˚C の場合)
この測定回数は、環境、温度、目標物の状態(形・色など)により変化しますので、目安としてください。
*付属の電池は、機能確認用電池です。自然放電により、表記の寿命より早く消耗することがあります。
*本体の水没により電池室に水が入ったときは、電池室をよく乾燥させて、電池を交換してください。
12 13
Jp
【単発測定】
Jp
En
3.
電源オン/
測定ボタンを一度押
4. 測定完了後、「測定の可否」または「測定距離」が約8秒間表示され、
En
して、単発測定を行います。
その後電源オフとなります。
Es
Es
電源オンの間(内部表示点灯中)に、
電源オン/
測定ボタンを押す
Fr
と再度測定を開始します。
Fr
De
De
It
It
Se
Se
Nl
Nl
Ru
測定中
測定不能・失敗 見上げた測定 見下ろした測定
Ru
Pt
測定値表示
Pt
Pl
Pl
Fi
Fi
【コンティニュアス測距機能】
No
No
3.
電源オン/
測定ボタンを押し続けると、約 8 秒間連
4.コンティニュアス測距終了後、最終測定の結果
Dk
続で測定を行い、内部表示が「測定の可否」、「測定距離」
(測定距離)が約8秒間表示され、その後電源がオ
Dk
を表示するために変化します。
フになります。
Cz
Cz
*測定中はレーザー照射マークが点滅します。
電源オンの間(内部表示点灯中)に、
電源オン/
測
Ro
*ボタンから指を外すと、コンティニュアス測距は終
定ボタンを押すと再度測定を開始します。
Ro
Hu
了します。
Hu
ゴルフでグリーン上のピンフラッグを測定するとき
測定不能・失敗 測定値表示
測定値表示
は、近距離優先モードに設定して、コンティニュアス
(目標 1)
(目標 2)
測距機能でピンフラッグをスキャンすると測定が簡単
に行えます。ピンフラッグとの間に何も無いときは、
最も近い距離がピンフラッグまでの距離となります。
14 15
Measurement
1. Press the POWER button for power-on.
(Power turns off 8 seconds after the last
operation.)
Immediately after power-on.
Stand-by.
(Initializing)
2. Aim at the target
.
Positionthetargetatthecenterofthereticle
Target focusing.
[Single measurement]
3. Press POWER button once to start single measurement.
4. After measurement, “distance” or “fail to measure” indicator are displayed for 8 seconds, then power turns off. If you press the POWER
button during power-on (while the internal display is lit), another single measurement starts.
unable to measure distance.
3. Keep pressing POWER button to start continuous measurement up to 20 seconds. The internal display shows “distance” and
“fail to measure” indicator alternately.
Note: Laser irradiaton mark is blinking during the measurement.
Note: If you stop pressing the button, the continuous measuremen stops
unable to measure distance.
4. After continuous measurement, the measure results are displayed for 8 seconds, then power turns off. If you press the POWER
button during power-on (while the internal display is lit), another measrement starts.
[Continuous measurement]
Failure to measure or
Failure to measure or
Measuring.
Upward measurement. Downward measurement.
Displays the measured
figure. (Target 1)
Displays the measured figure.
Displays the measured
figure. (Target 2)
Measurement
1. Press the POWER button for power-on.
(Power turns off 8 seconds after the last
operation.)
Immediately after power-on.
Stand-by.
(Initializing)
2. Aim at the target
.
Positionthetargetatthecenterofthereticle
Target focusing.
[Single measurement]
3. Press POWER button once to start single measurement.
Measuring.
4. After measurement, “distance” or “fail to measure” indicator are displayed for 8 seconds, then power turns off. If you press the POWER
button during power-on (while the internal display is lit), another single measurement starts.
Failure to measure or
Upward measurement. Downward measurement.
unable to measure distance.
Displays the measured figure.
[Continuous measurement]
3. Keep pressing POWER button to start continuous measurement up to 20 seconds. The internal display shows “distance” and
“fail to measure” indicator alternately.
Note: Laser irradiaton mark is blinking during the measurement.
Note: If you stop pressing the button, the continuous measuremen stops
Failure to measure or
unable to measure distance.
4. After continuous measurement, the measure results are displayed for 8 seconds, then power turns off. If you press the POWER
button during power-on (while the internal display is lit), another measrement starts.
Displays the measured
figure. (Target 1)
Displays the measured
figure. (Target 2)
Measurement
1. Press the POWER button for power-on.
(Power turns off 8 seconds after the last
operation.)
Immediately after power-on.
Stand-by.
(Initializing)
2. Aim at the target
.
Positionthetargetatthecenterofthereticle
Target focusing.
[Single measurement]
3. Press POWER button once to start single measurement.
Measuring.
4. After measurement, “distance” or “fail to measure” indicator are displayed for 8 seconds, then power turns off. If you press the POWER
button during power-on (while the internal display is lit), another single measurement starts.
Failure to measure or
Upward measurement. Downward measurement.
unable to measure distance.
Displays the measured figure.
[Continuous measurement]
3. Keep pressing POWER button to start continuous measurement up to 20 seconds. The internal display shows “distance” and
“fail to measure” indicator alternately.
Note: Laser irradiaton mark is blinking during the measurement.
Note: If you stop pressing the button, the continuous measuremen stops
Failure to measure or
unable to measure distance.
Displays the measured
figure. (Target 1)
4. After continuous measurement, the measure results are displayed for 8 seconds, then power turns off. If you press the POWER
button during power-on (while the internal display is lit), another measrement starts.
Displays the measured
figure. (Target 2)
Measurement
1. Press the POWER button for power-on.
(Power turns off 8 seconds after the last
operation.)
Immediately after power-on.
Stand-by.
(Initializing)
2. Aim at the target
.
Positionthetargetatthecenterofthereticle
Target focusing.
[Single measurement]
3. Press POWER button once to start single measurement.
Measuring.
4. After measurement, “distance” or “fail to measure” indicator are displayed for 8 seconds, then power turns off. If you press the POWER
button during power-on (while the internal display is lit), another single measurement starts.
unable to measure distance.
3. Keep pressing POWER button to start continuous measurement up to 20 seconds. The internal display shows “distance” and
“fail to measure” indicator alternately.
Note: Laser irradiaton mark is blinking during the measurement.
Note: If you stop pressing the button, the continuous measuremen stops
unable to measure distance.
4. After continuous measurement, the measure results are displayed for 8 seconds, then power turns off. If you press the POWER
button during power-on (while the internal display is lit), another measrement starts.
[Continuous measurement]
Failure to measure or
Failure to measure or
Upward measurement. Downward measurement.
Displays the measured
figure. (Target 1)
Displays the measured figure.
Displays the measured
figure. (Target 2)
Measurement
1. Press the POWER button for power-on.
(Power turns off 8 seconds after the last
operation.)
Immediately after power-on.
Stand-by.
(Initializing)
2. Aim at the target
.
Positionthetargetatthecenterofthereticle
Target focusing.
[Single measurement]
3. Press POWER button once to start single measurement.
Measuring.
4. After measurement, “distance” or “fail to measure” indicator are displayed for 8 seconds, then power turns off. If you press the POWER
button during power-on (while the internal display is lit), another single measurement starts.
Failure to measure or
unable to measure distance.
3. Keep pressing POWER button to start continuous measurement up to 20 seconds. The internal display shows “distance” and
“fail to measure” indicator alternately.
Note: Laser irradiaton mark is blinking during the measurement.
Note: If you stop pressing the button, the continuous measuremen stops
Failure to measure or
unable to measure distance.
[Continuous measurement]
4. After continuous measurement, the measure results are displayed for 8 seconds, then power turns off. If you press the POWER
button during power-on (while the internal display is lit), another measrement starts.
Upward measurement. Downward measurement.
Displays the measured
figure. (Target 1)
Displays the measured figure.
Displays the measured
figure. (Target 2)
Measurement
1. Press the POWER button for power-on.
(Power turns off 8 seconds after the last
operation.)
Immediately after power-on.
Stand-by.
(Initializing)
2. Aim at the target
.
Positionthetargetatthecenterofthereticle
Target focusing.
[Single measurement]
3. Press POWER button once to start single measurement.
Measuring.
4. After measurement, “distance” or “fail to measure” indicator are displayed for 8 seconds, then power turns off. If you press the POWER
button during power-on (while the internal display is lit), another single measurement starts.
Failure to measure or
unable to measure distance.
Displays the measured
figure. (Target 1)
3. Keep pressing POWER button to start continuous measurement up to 20 seconds. The internal display shows “distance” and
“fail to measure” indicator alternately.
Note: Laser irradiaton mark is blinking during the measurement.
Note: If you stop pressing the button, the continuous measuremen stops
Failure to measure or
unable to measure distance.
Upward measurement. Downward measurement.
Displays the measured figure.
[Continuous measurement]
4. After continuous measurement, the measure results are displayed for 8 seconds, then power turns off. If you press the POWER
button during power-on (while the internal display is lit), another measrement starts.
Displays the measured
figure. (Target 2)
Measurement
1. Press the POWER button for power-on.
(Power turns off 8 seconds after the last
operation.)
Immediately after power-on.
Stand-by.
(Initializing)
2. Aim at the target
.
Positionthetargetatthecenterofthereticle
Target focusing.
[Single measurement]
3. Press POWER button once to start single measurement.
Measuring.
4. After measurement, “distance” or “fail to measure” indicator are displayed for 8 seconds, then power turns off. If you press the POWER
button during power-on (while the internal display is lit), another single measurement starts.
unable to measure distance.
3. Keep pressing POWER button to start continuous measurement up to 20 seconds. The internal display shows “distance” and
“fail to measure” indicator alternately.
Note: Laser irradiaton mark is blinking during the measurement.
Note: If you stop pressing the button, the continuous measuremen stops
unable to measure distance.
4. After continuous measurement, the measure results are displayed for 8 seconds, then power turns off. If you press the POWER
button during power-on (while the internal display is lit), another measrement starts.
[Continuous measurement]
Failure to measure or
Failure to measure or
Upward measurement. Downward measurement.
Displays the measured
figure. (Target 1)
Displays the measured figure.
Displays the measured
figure. (Target 2)
Measurement
1. Press the POWER button for power-on.
(Power turns off 8 seconds after the last
operation.)
Immediately after power-on.
Stand-by.
(Initializing)
2. Aim at the target
.
Positionthetargetatthecenterofthereticle
Target focusing.
[Single measurement]
3. Press POWER button once to start single measurement.
Measuring.
4. After measurement, “distance” or “fail to measure” indicator are displayed for 8 seconds, then power turns off. If you press the POWER
button during power-on (while the internal display is lit), another single measurement starts.
Failure to measure or
unable to measure distance.
3. Keep pressing POWER button to start continuous measurement up to 20 seconds. The internal display shows “distance” and
“fail to measure” indicator alternately.
Note: Laser irradiaton mark is blinking during the measurement.
Note: If you stop pressing the button, the continuous measuremen stops
Failure to measure or
unable to measure distance.
[Continuous measurement]
4. After continuous measurement, the measure results are displayed for 8 seconds, then power turns off. If you press the POWER
button during power-on (while the internal display is lit), another measrement starts.
Upward measurement. Downward measurement.
Displays the measured
figure. (Target 1)
Displays the measured figure.
Displays the measured
figure. (Target 2)
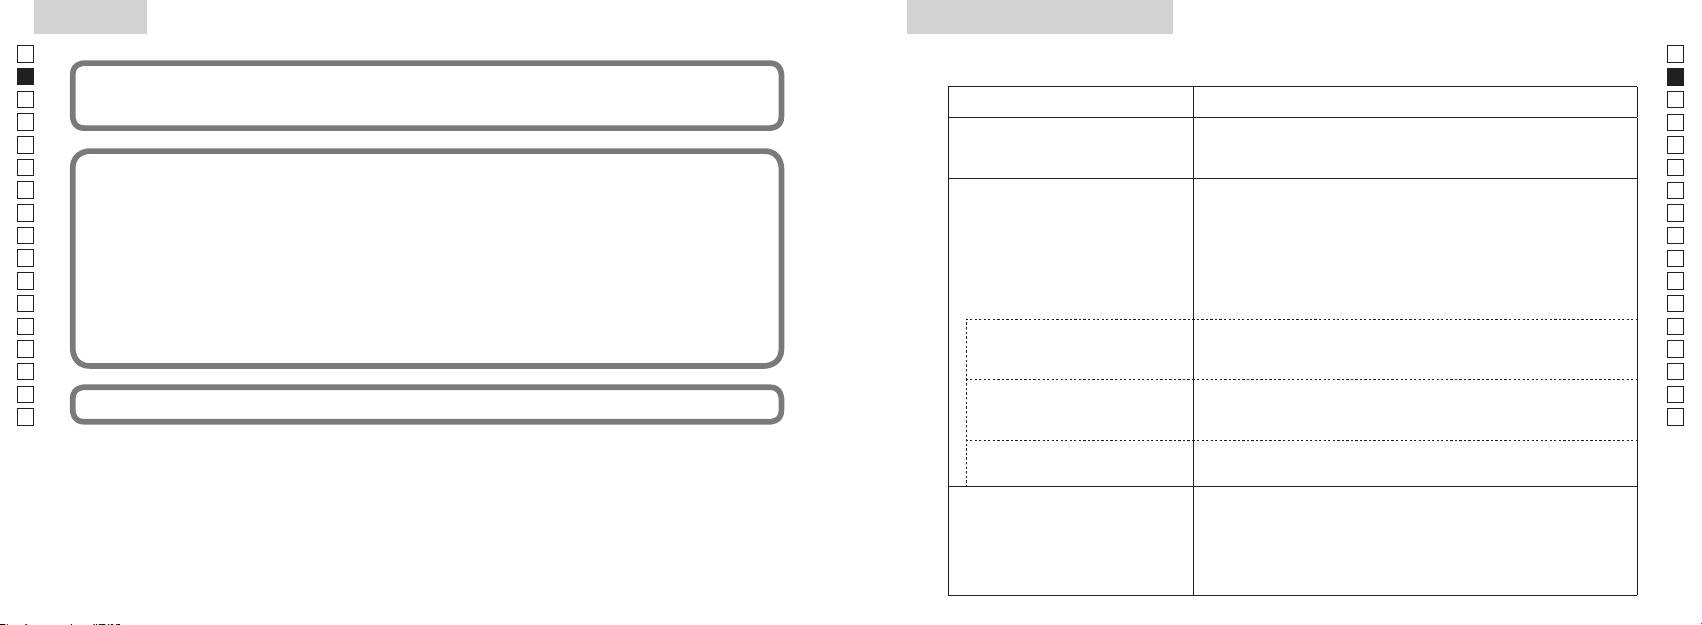
測定
4 .測定
測定を始める前に、各モード(測定表示/距離優先/距離表示単位)の設定を確認してください。
*各モードの設定方法については、それぞれの項目を参照してください。
1.電源をオン(内部表示点灯状
2.照準をします。十字の中心
態)にします。
に目標を重ねます。
(ボタン操作をしない場合は、
約8秒で電源オフになります。)
電源オン直後
スタンバイ状態
照準中
(イニシャライズ)
Measurement
1. Press the POWER button for power-on.
(Power turns off 8 seconds after the last
operation.)
Immediately after power-on.
3. Press POWER button once to start single measurement.
4. After measurement, “distance” or “fail to measure” indicator are displayed for 8 seconds, then power turns off. If you press the POWER
button during power-on (while the internal display is lit), another single measurement starts.
unable to measure distance.
3. Keep pressing POWER button to start continuous measurement up to 20 seconds. The internal display shows “distance” and
“fail to measure” indicator alternately.
Note: Laser irradiaton mark is blinking during the measurement.
Note: If you stop pressing the button, the continuous measuremen stops
2. Aim at the target
Positionthetargetatthecenterofthereticle
[Single measurement]
Failure to measure or
unable to measure distance.
[Continuous measurement]
4. After continuous measurement, the measure results are displayed for 8 seconds, then power turns off. If you press the POWER
button during power-on (while the internal display is lit), another measrement starts.
Failure to measure or
Target focusing.
Measuring.
(Initializing)
.
Upward measurement. Downward measurement.
Displays the measured
figure. (Target 1)
Displays the measured figure.
Stand-by.
Displays the measured
figure. (Target 2)
Measurement
1. Press the POWER button for power-on.
(Power turns off 8 seconds after the last
operation.)
Immediately after power-on.
(Initializing)
3. Press POWER button once to start single measurement.
Measuring.
4. After measurement, “distance” or “fail to measure” indicator are displayed for 8 seconds, then power turns off. If you press the POWER
button during power-on (while the internal display is lit), another single measurement starts.
Failure to measure or
unable to measure distance.
Displays the measured
figure. (Target 1)
3. Keep pressing POWER button to start continuous measurement up to 20 seconds. The internal display shows “distance” and
“fail to measure” indicator alternately.
Note: Laser irradiaton mark is blinking during the measurement.
Note: If you stop pressing the button, the continuous measuremen stops
Target focusing.
2. Aim at the target
.
Positionthetargetatthecenterofthereticle
[Single measurement]
Failure to measure or
unable to measure distance.
Upward measurement. Downward measurement.
Displays the measured figure.
[Continuous measurement]
4. After continuous measurement, the measure results are displayed for 8 seconds, then power turns off. If you press the POWER
button during power-on (while the internal display is lit), another measrement starts.
Stand-by.
Displays the measured
figure. (Target 2)
Measurement
1. Press the POWER button for power-on.
(Power turns off 8 seconds after the last
operation.)
Immediately after power-on.
Stand-by.
(Initializing)
2. Aim at the target
.
Positionthetargetatthecenterofthereticle
3. Press POWER button once to start single measurement.
4. After measurement, “distance” or “fail to measure” indicator are displayed for 8 seconds, then power turns off. If you press the POWER
button during power-on (while the internal display is lit), another single measurement starts.
unable to measure distance.
3. Keep pressing POWER button to start continuous measurement up to 20 seconds. The internal display shows “distance” and
“fail to measure” indicator alternately.
Note: Laser irradiaton mark is blinking during the measurement.
Note: If you stop pressing the button, the continuous measuremen stops
[Single measurement]
Failure to measure or
unable to measure distance.
[Continuous measurement]
4. After continuous measurement, the measure results are displayed for 8 seconds, then power turns off. If you press the POWER
button during power-on (while the internal display is lit), another measrement starts.
Failure to measure or
Target focusing.
Measuring.
Upward measurement. Downward measurement.
Displays the measured
figure. (Target 1)
Displays the measured figure.
Displays the measured
figure. (Target 2)
注意─ここに規定した以外の手順による制御や調整は、危険なレーザー放射の被ばくをもたらします。
1 .準備
リチウム電池(CR2 ) を電池室に装填します。([ 電池交換 ] の項参照)
2 .目当てゴム
眼鏡装用の有無にかかわらず、そのままご利用できます。
3 .視度調整
使用者の視度に合わせて、ファインダー内の LCD 表示がはっきり見えるように調整します。
視度調整リングを反時計回りに止まるまで回します。次に、電源オン/ 測定ボタンを押して
電源をオン(内部表示点灯状態)にして、接眼部を覗きながら視度調整リングを時計回りに回
し、LCD 表示がはっきり見える位置で止めます。回しすぎたときは、視度調整リングを反
時計回りに大きく回して調整をやりなおしてください。調整が不十分ですと、目標物を正確
に照準できないことがあります。
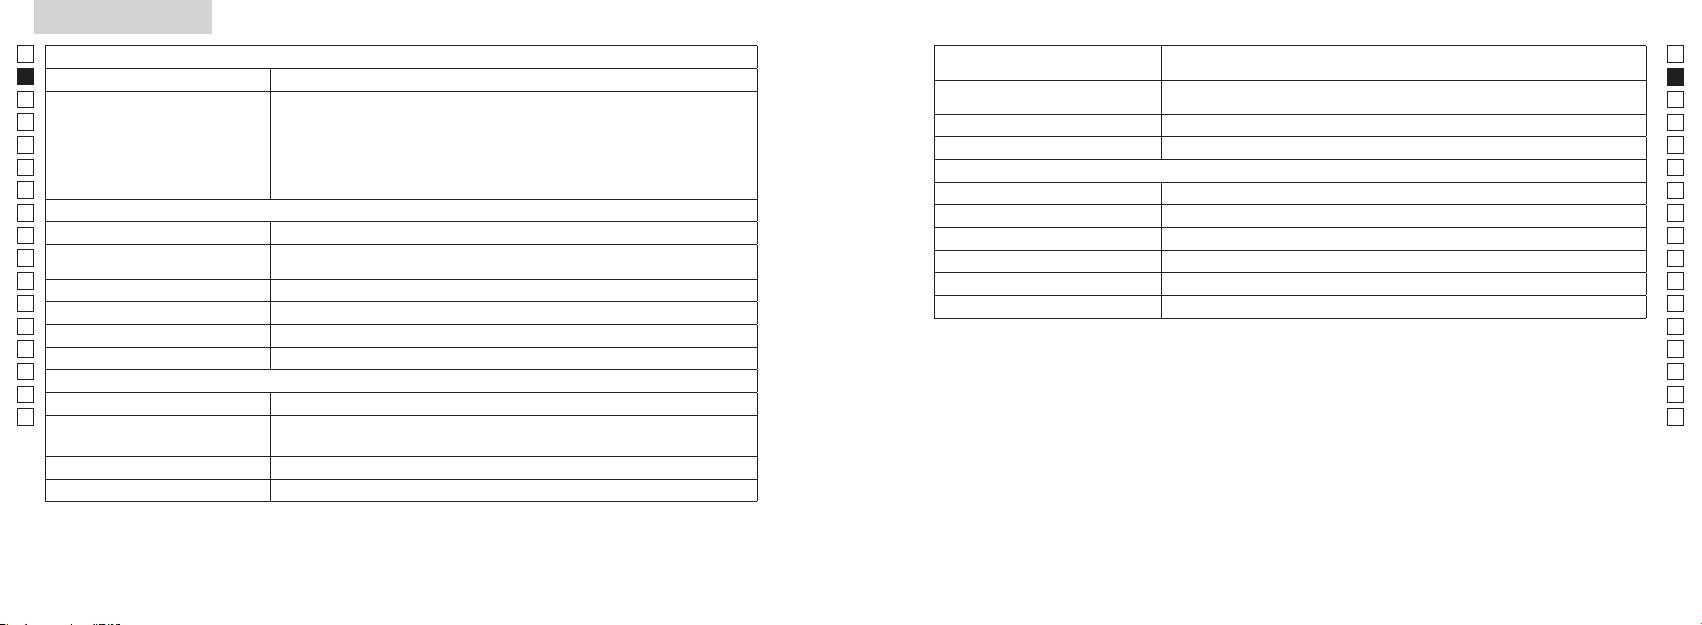
仕様
Jp
測定系
防水(水深 1m、10 分相当)*
Jp
構造
En
測定範囲 直線距離:4.5-550 メートル /5-600 ヤード
(電池室は防滴構造 JIS 保護等級1)**
En
Es
距離表示ステップ
Class 1M Laser Product (EN/IEC60825-1:2007)
Es
直線距離(上段4桁):0 .5m/yd. 単位
安全
Class I Laser Product (FDA/21 CFR Part 1040.
Fr
Fr
直線距離(下段3桁):1 m/yd. 単位
10:1985)
De
適合規格
De
水平距離/ 加減算距離 ( 上段4桁 ):
FCC Part15 SubpartB class B, EU:EMC directive,
電波規格
It
0.2 m/yd. 単位
AS/NZS, VCCI class B
It
Se
高さ(下段3桁):
0.2 m/yd. 単位(100 m/yd. 未満 )
環境 RoHS, WEEE
Se
1m/yd. 単位(100 m/yd. 以上)
Nl
レーザー
Nl
クラス EN/IEC クラス 1M
Ru
光学系
Ru
波長(nm) 905
Pt
倍率(x) 6
Pt
パルス幅(ns) 12
対物レンズ有効径(mm) ∅ 21
Pl
Pl
出力(W) 15
実視界(˚) 7.5
Fi
ビーム広がり角(mrad) 垂直 :1.8、水平 :0.25
Fi
アイレリーフ(mm) 18.3
No
動作湿度(%RH) 80 以下( 結露なきこと)
No
ひとみ径(mm) ∅ 3.5
Dk
-1
Dk
視度調節範囲 ±4m
* 防水型
Cz
この製品は1m の水深に10 分間水没させても内部光学系に異常がなく、観察に支障のない防水設計になっています。
その他
Cz
・雨風の当たる場所や、湿気の多い場所などの悪条件下で使用しても、内部機能を損ねることがない。
Ro
動作温度(˚C) -10 〜 +50
Ro
・乾燥窒素の充填により、曇りやカビが生じにくい。
Hu
CR2リチウム電池 ×1、DC3V
などの特徴がありますが、次の点にご注意の上、ご使用ください。
Hu
電源
オートパワーオフ機能(約 8 秒)
・密閉構造ではありませんので、水中での使用や強い水流で洗うことは行わないでください。
・本体可動部に水滴が付いたときは操作することをやめ、水滴を拭き取るようにしてください。
大きさ(長さ × 高さ × 幅)
113x70x39
(mm)
**電池室は防滴仕様です。水没させると浸水します。浸水したときは、水滴を拭き取り、よく乾燥させてください。
質量(重さ )(g) 約 175(電池を除く)
16 17
テレビやラジオなどの受信妨害について
修理
Jp
この装置は、情報処理装置等電波障害自主規制協議会(VCCI) の基準に基づくクラスB情報技術装置です。この装
ニコンレーザー距離計の修理が必要になった場合は、ニコンのサービス機関、またはご購入店までお申しつけください。
Jp
置は、家庭環境での使用を目的としていますが、この装置がラジオやテレビジョン受信機に近接して使用されると、
なお、まずご自身で、下記の事故点検表により点検をお願いいたします。
En
En
受信障害を引き起こすことがあります。使用説明書に従って、正しい取り扱いをしてください。
Es
Es
テレビやラジオなどの受信障害を防止するために、次のような項目にご注意ください。
現象 点検項目
Fr
Fr
・ テレビやラジオなどから、本装置を遠ざけてご使用ください。
電源が入らない
●電源オン/ 測定ボタンを押してください(本体上面手前)。
De
De
・ テレビやラジオなどのアンテナを、受信障害が生じない位置や方向にしてください。
(液晶が表示されな
●電池の装着状況を点検してください。
It
・ アンテナ線は、同軸ケーブルを使用してください。
It
い)
●電池を新しいものと交換してください。
Se
本装置がテレビやラジオなどの受信に影響をあたえているかどうかは、本装置の電源をオン・オフすることで確認
Se
できます。
●対物レンズ側のレーザー光投光窓・受光窓が、指やストラップでふさがれていないか
Nl
Nl
テレビやラジオなどに受信障害が生じている場合は、上記の項目を再点検してください。それでも改善されない場
確認してください。
Ru
Ru
合は、ニコンのサービス機関、またはご購入店にご相談ください。
●対物レンズ側のレーザー光投光窓・受光窓が汚れていないか確認の上、清掃してくだ
Pt
距離測定ができない
Pt
さい。
Pl
Pl
●目標物がレーザー光を反射するのに問題のない形状・状態か確認してください。
Fi
●電池を新しいものと交換してください。
Fi
No
No
●測定中に、本体が動かずに保持されているか確認してください。
測定不能の表示し
Dk
Dk
●測距範囲内に目標物があるか確認してください。
か出ない
Cz
測距範囲:4.5 〜 550 メートル/5 〜 600 ヤード
Cz
測定結果について
Ro
Ro
測定可能範囲の近
Hu
本装置は簡易距離計です。測定結果は、公的な証明等には使用できません。
Hu
距離が測定できな
●目標物との間に木の葉やガラスなどの遮蔽物がないか確認してください。
い
ある距離以遠が測
●目標物との間に木の葉やガラスなどの遮蔽物がないか確認してください。
定できない
●電池を新しいものと交換してください。
●目標物がレーザー光を反射するのに問題のない形状・状態か確認してください。
測定値が安定しない
●測定中に、本体が動かずに保持されているか確認してください。
●目標物との間に木の葉やガラスなどの遮蔽物がないか確認してください。
18 19
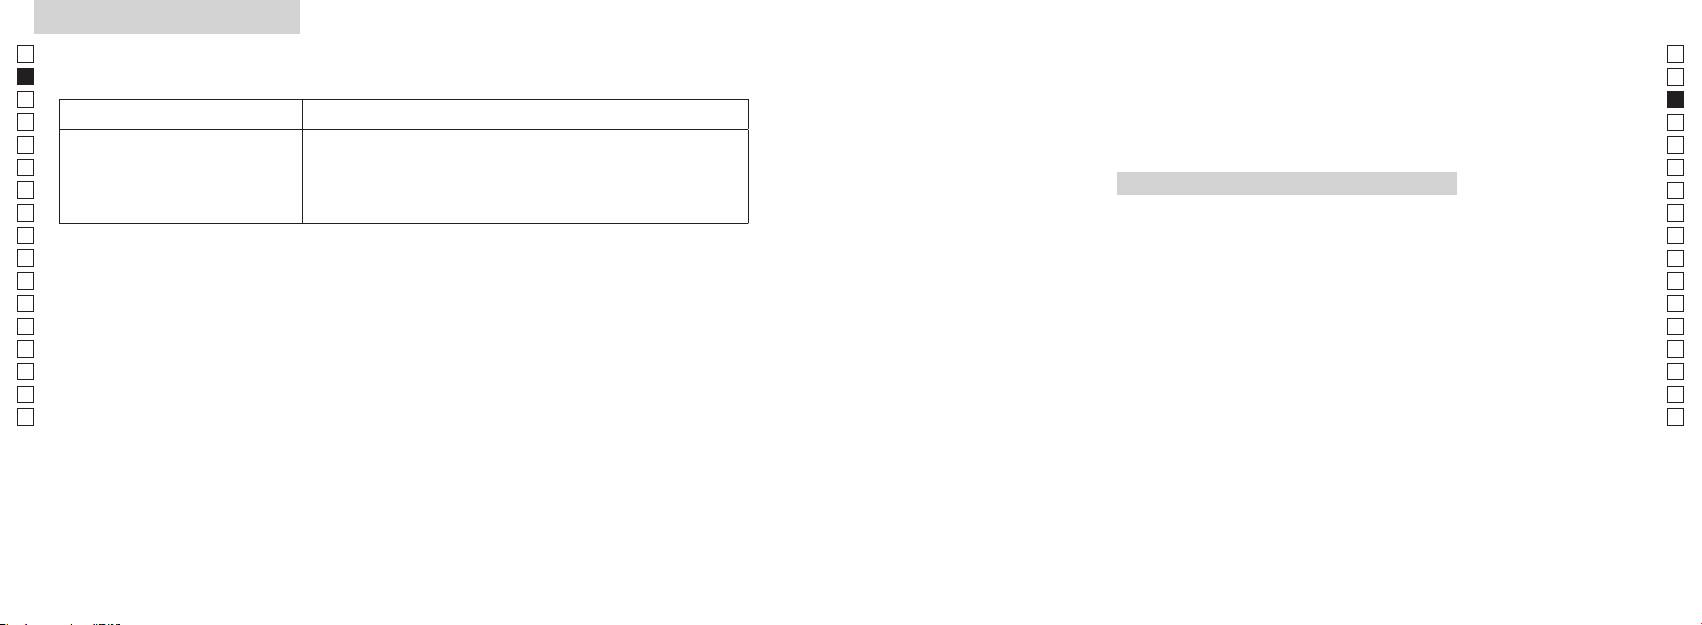
修理
Jp
Jp
En
En
現象 点検項目
Es
Es
●電池を新しいものと交換してください。
Fr
Fr
●
目標物がレーザー光を反射するのに問題のない形状・状態か確認してくださ
De
間違った測定値が表示される
De
い。
English
It
●目標物との間に木の葉やガラスなどの遮蔽物がないか確認してください。
It
Se
Se
CONTENTS
点検の結果、症状が改善されないときは、本体の故障が考えられますので、メーカーによる修理・点検を依頼して
Nl
Nl
ください。
Cautions before use .............................................. 22-25
Ru
Ru
メーカー以外による修理点検は、危険ですので絶対に行わないでください。
Key features .................................................................... 26
Pt
Pt
Nomenclature/Composition .................................... 27
Pl
Pl
Internal display .............................................................. 28
Fi
Fi
Measurement display mode ..................................... 29
No
No
アフターサービスについて
Target priority mode/Distance display units/
Dk
Dk
LED illumination ........................................................... 30
お買い上げいただきましたニコンレーザー距離計を、安心してご愛用いただきますよう、次のとおり修理・アフターサー
Cz
Cz
ビスを行っております。
Changing battery ......................................................... 31
Ro
Ro
・本製品の補修用性能部品は、製造打ち切り後も 5 年間を目安に保有しております。したがいまして、修理可能期間は
Measurement .......................................................... 32-33
Hu
Hu
部品保有期間内とさせていただきます。なお、ご使用いただいております製品が修理可能期間内であるかどうかにつ
Specifications .......................................................... 34-35
きましては、ニコンのサービス機関へお問い合わせください。
Others ............................................................................... 36
付記
Troubleshooting/Repair ...................................... 37-38
水没、火災、落下等による故障または破損で全損と認められる場合は、修理が不可能となります。なお、この故障また
は破損の程度の判定はニコンのサービス機関におまかせください。
消耗品について
・消耗品につきましては、ご購入店または、ニコンのサービス機関にお問い合わせください。
20 21
Cautions before use
Jp
Thank you for purchasing the Nikon Laser Rangefinder COOLSHOT AS.
Please observe the following
SAFETY PRECAUTIONS (Laser)
repaired is not guaranteed by the
Jp
guidelines strictly so you can use
manufacturer.
En
The Nikon Laser Rangefinder uses an
En
the equipment properly and
invisible laser beam. Be sure to
Es
Use of controls or adjustments or performance of procedures other than those specified
Es
avoid potentially hazardous
observe the following:
out of reach of children when
herein may result in hazardous radiation exposure.
Fr
problems. Before using this
Warning
stored.
Fr
De
product, read thoroughly the
De
〇 Before using this product, read thoroughly the “Cautions before use” and instructions on correct
Measurement button while
body cover is damaged, or if it
“Cautions before use” and
It
It
looking into the optics from the
emits a strange sound due to
usage accompanying the product.
instructions on correct usage
Se
objective side. Failure to do this may
dropping or some other cause,
Se
〇 Keep this manual within reach for easy reference.
accompanying the product.
negatively affect or damage your
remove the battery immediately
Nl
Keep this manual within reach
Nl
〇 Do not disassemble or repair this product by yourself, this may result in a serious problem.
eyes.
and stop using.
for easy reference.
Ru
A product that has been disassembled or repaired is not guaranteed by the manufacturer.
Ru
Pt
Pt
WARNING
Pl
● Specifications and design are subject to change without notice.
Pl
This indication alerts you to the fact
optical instrument such as through
● No reproduction in any form of this manual, in whole or in part (except for brief quotation in
Fi
that any improper use ignoring the
lenses or binoculars, nor with the
Fi
critical articles or reviews), may be made without written authorization from NIKON VISION CO.,
No
contents described herein can result
naked eye. This may result in damage
No
LTD.
in potential death or serious injury.
to the eyes.
Dk
Dk
● NIKON VISION CO., LTD. reserves the right to change the contents described in these manuals at
CAUTION
Cz
Cz
any time and without prior notice.
This indication alerts you to the fact
Ro
that any improper use ignoring the
Ro
accidentally emitting the laser
contents described herein can result
Hu
Hu
beam.
in potential injury or material loss.
period, please remove the battery
from the body.
the Nikon Laser Rangefinder. The
emitting laser may be harmful to
your health. A product that has
22 23
Cautions before use
Jp
SAFETY PRECAUTIONS
SAFETY PRECAUTIONS
SAFETY PRECAUTIONS
CARE AND MAINTENANCE
Storage
Jp
rubber eyecup or small parts,
En
(Monocular)
(Lithium battery)
Cautions
Lenses
En
etc. into their mouths. If children
occur on the lens surface because
Es
The Nikon Laser Rangefinder
If handled incorrectly, the battery
Es
swallow such parts, consult a
Rangefinder is waterproof, it is not
surface, use a soft oil-free brush.
of high humidity. Therefore, store
employs a monocular in its optical
may rupture and leak, corroding
Fr
doctor immediately.
designed for use underwater.
the Nikon Laser Rangefinder in a
Fr
system in order to aim at the target.
equipment and staining clothing.
like fingerprints from the lens
cool, dry place.
De
Be sure to observe the following:
Be sure to observe the following:
De
long period of time, some people
be removed from the rangefinder
surface, wipe the lenses very gently
After use on a rainy day or at night,
It
Warning
may suffer skin inflammation. If any
It
body surface as soon as possible,
with a soft clean cotton cloth or
thoroughly dry it at room
poles positioned correctly.
Se
symptoms occur, stop using it and
using a soft, clean cloth.
quality oil-free lens tissue. Use a
temperature, then store in a cool,
Se
intense light or the laser beam
consult a doctor immediately.
small quantity of pure alcohol (not
dry place.
Nl
when using the Nikon Laser
when exhausted or during
Nl
Rangefinder in a car on a hot or
denatured) to wipe stubborn
Rangefinder.
extended periods of non-use.
Ru
Rangefinder, store it in the soft
Ru
sunny day, or near heat-generating
smudges. Do not use velvet cloth
Cautions
case.
Pt
equipment. This may damage or
or ordinary tissue, as it may scratch
Pt
the battery chamber.
negatively affect it.
the lens surface. Once the cloth has
Pl
together with keys
Pl
Rangefinder, do not push the
should fail to operate correctly,
been used for cleaning the body, it
or coins in a pocket or bag, it may
Fi
discontinue use immediately and
Rangefinder in direct sunlight.
should not be used again for the
Fi
short and cause overheating.
consult with your local dealer for
No
Ultraviolet rays and excessive heat
lens surface.
No
walking. Failure to observe this
instructions on where to send it for
may negatively affect or even
Dk
or a flame. Never disassemble the
may cause injury or malfunction
Dk
repair.
damage the unit.
Main body
battery.
Cz
as a result of walking into
Cz
something, hitting others, falling
exposed to sudden changes in
clean cloth after blowing away dust
Ro
Ro
or other accidents.
temperature, water condensation
with a blower* lightly. Do not use
Hu
comes into contact with clothing or
Hu
may occur on lens surfaces. Do
benzene, thinner, or other cleaners
skin, rinse immediately with plenty
strap. This may result in hitting
not use the product until the
containing organic solvents.
of water. If liquid from a damaged
others and cause injury.
condensation has evaporated.
* A blower is rubber cleaning
battery enters the eyes, rinse
equipment that blows air from a
immediately with clean water, then
an unstable place. Failure to
nozzle.
consult a doctor.
observe this may result in falling
or dropping and cause injury or
follow your local area regulations.
malfunction.
this product or other small parts
out of reach of children.
24 25
Key features
Nomenclature/Composition
Jp
The following conditions makes measuring easier:
Jp
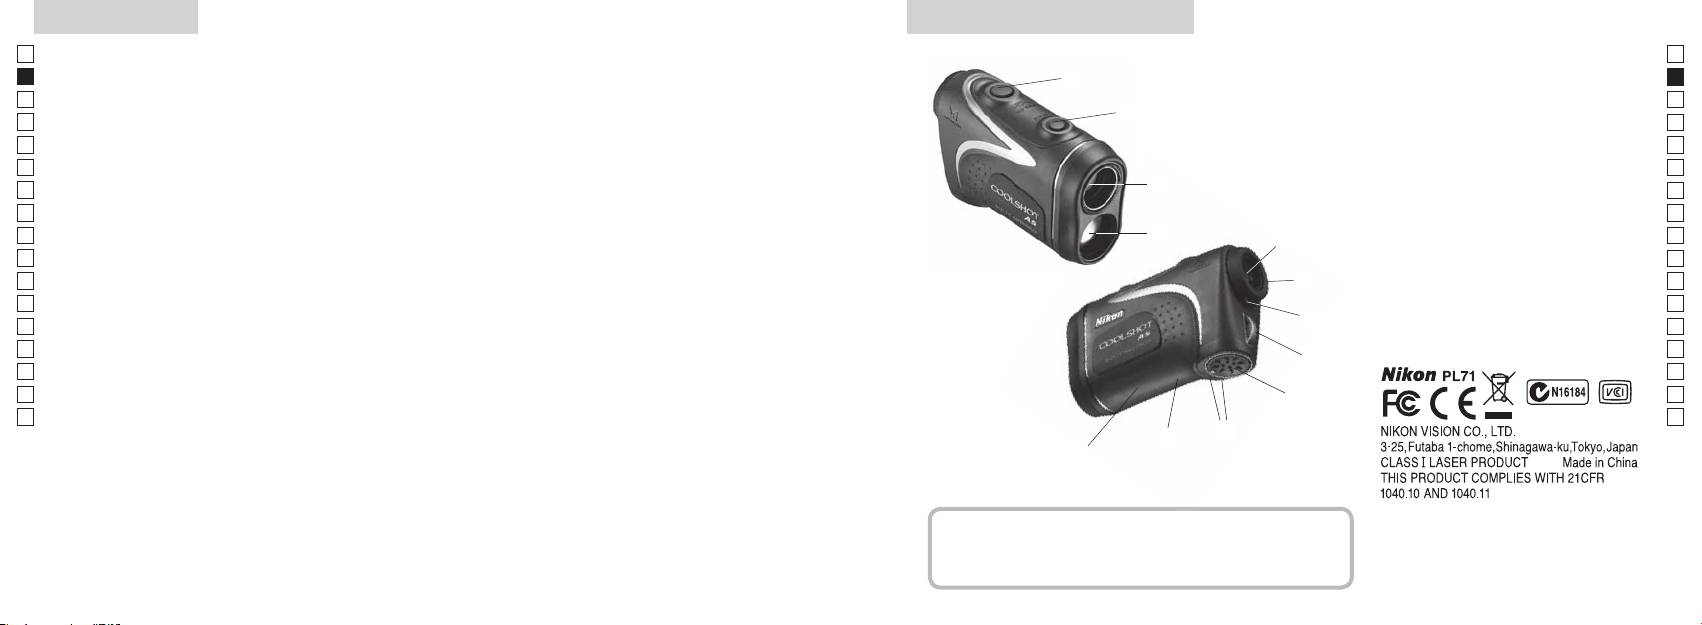
1
En
4
En
Laser emission aperture
Es
Es
3
2 Laser detector aperture
Fr
Fr
3
De
(Horizontal distance ± Height) which is useful for golf
De
4
It
degrees
It
56x monocular eyepiece
can be easily switched
1
Se
Se
6
Measurement may result in inaccuracy or failure in
Nl
Nl
chosen according to the target, is employed
7 Diopter index
the following cases:
Ru
2
5
8 Strap eyelet
Ru
Pt
button enables continuous measurement function
9 Battery chamber cover
Pt
Pl
6
!p
Pl
unoperated)
rangefinder
Fi
indication
Fi
7
No
!q
No
etc.)
!w FDA information indication
Dk
designed for underwater usage)
Dk
8
Cz
Cz
Ro
9
Ro
The Nikon Laser Rangefinder uses an invisible
Hu
Hu
laser beam for measuring. It measures the time the
!p
!q
laser beam takes to travel from the rangefinder
!w
to the target and back. Laser reflectivity and
measurement results may vary according to
climatic and environmental conditions, as well
as the color, surface finish, size, shape and other
Composition
characteristics of the target.
...................................... x1
Neckstrap ............................x1
Soft case .............................. x1
Lithium battery (CR2) ..... x1
26 27
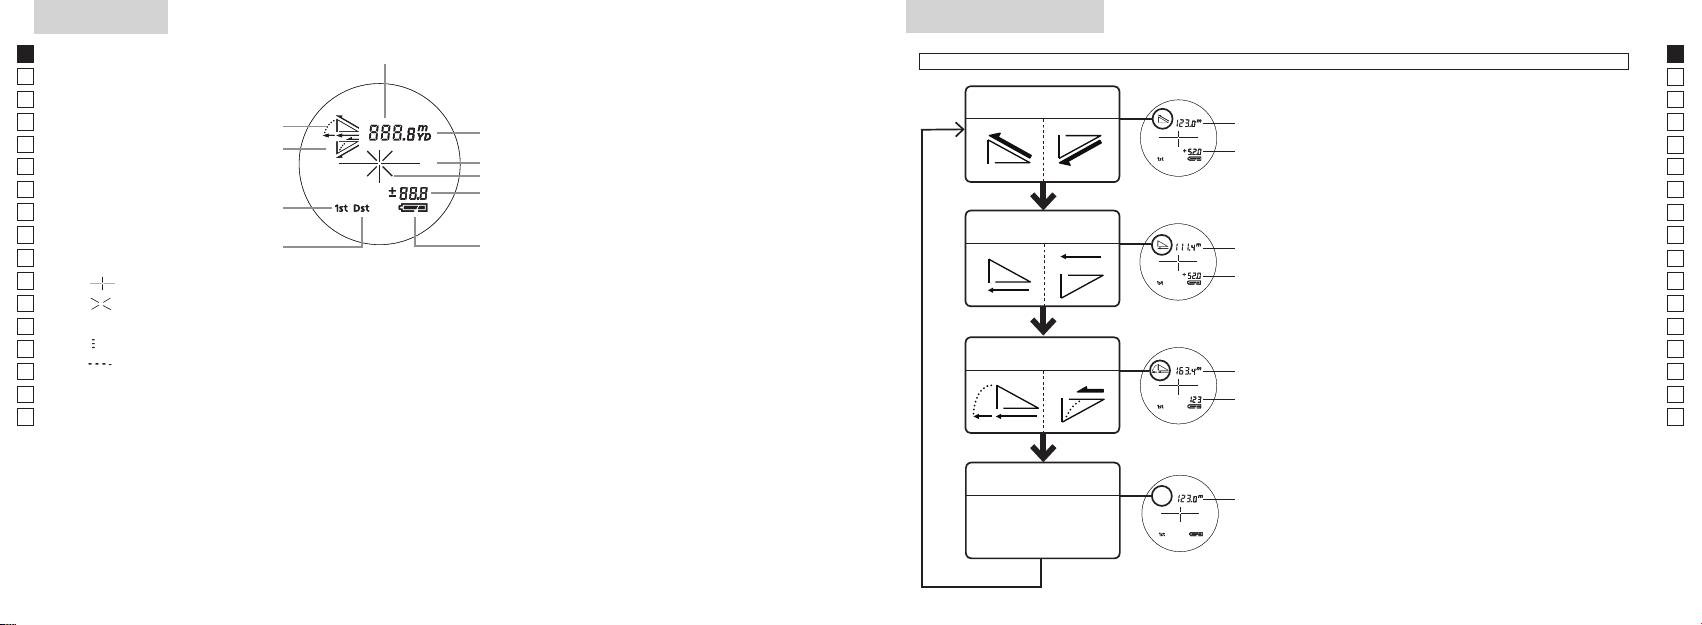
Internal display
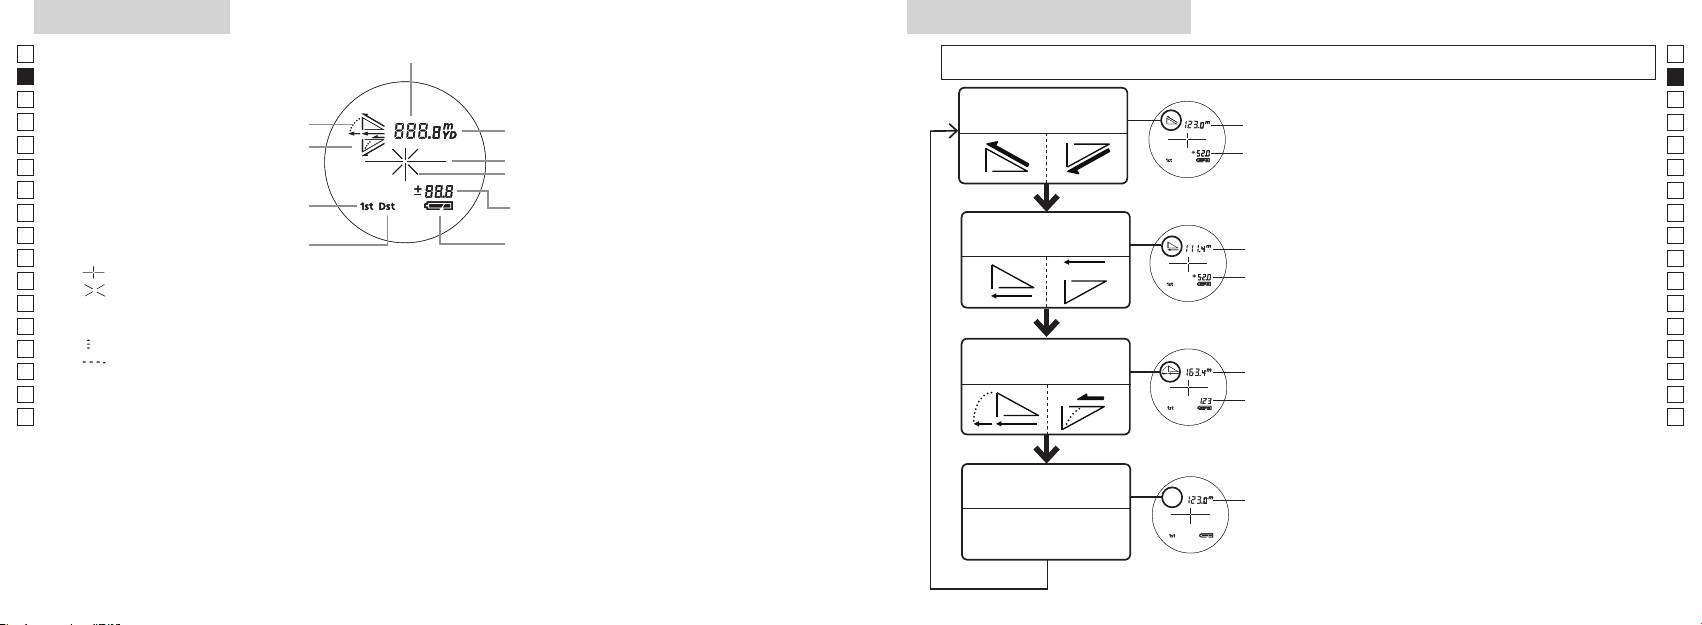
Measurement display mode
Jp
Distance
Jp
than 2 seconds) to change the mode in the order shown below.
En
En
Es
Es
Actual Distance
1. Turn on the power (Confirm the internal display
Actual
Fr
Incline
and Height Mode
Fr
is on).
Distance
De
Decline
De
Target mark
Height
immediately (less than 0.5 second) depress the
It
It
Laser irradiation mark
Se
Se
Height
seconds.
Nl
Nl
3. Release your finger from the
Horizontal Distance
Ru
to switch the
Horizontal
Ru
Battery condition
and Height Mode
Measurement display mode.
Pt
Distance
Pt
『 』
4. Repeat steps 2 and 3 until your desired mode is
Pl
Height
Pl
『 』 - Appears while the laser is being irradiated for a measurement.
displayed.
Fi
Fi
Remains present during single measurement. Blinks during continuous measurements.
*
If the buttons are not pressed in the correct
No
Do not look into the objective lens while this mark is shown.
order, switching will not take place.
No
Dk
『
』 - Now measuring
Slope
*
Switching the mode after measurement
Dk
『
』 - "Failure to measure" or "Unable to measure"
Golf Mode
Adjusted
converts the results to the new mode.
Cz
Cz
Distance
*
After the mode is set, measurements are
Ro
Ro
Actual
performed in the new mode.
Hu
* Usually, an LCD employs equal or lower magnification. However the LCD of this product is magnified
Distance
Hu
by the high magnification of the eyepiece. Although this LCD was produced using the most advanced
technology, it is impossible to eliminate dust completely. As a result, dust may be seen. It will not,
however, affect measurement accuracy or safety during use.
Actual Distance
Actual
Mode
Distance
28 29
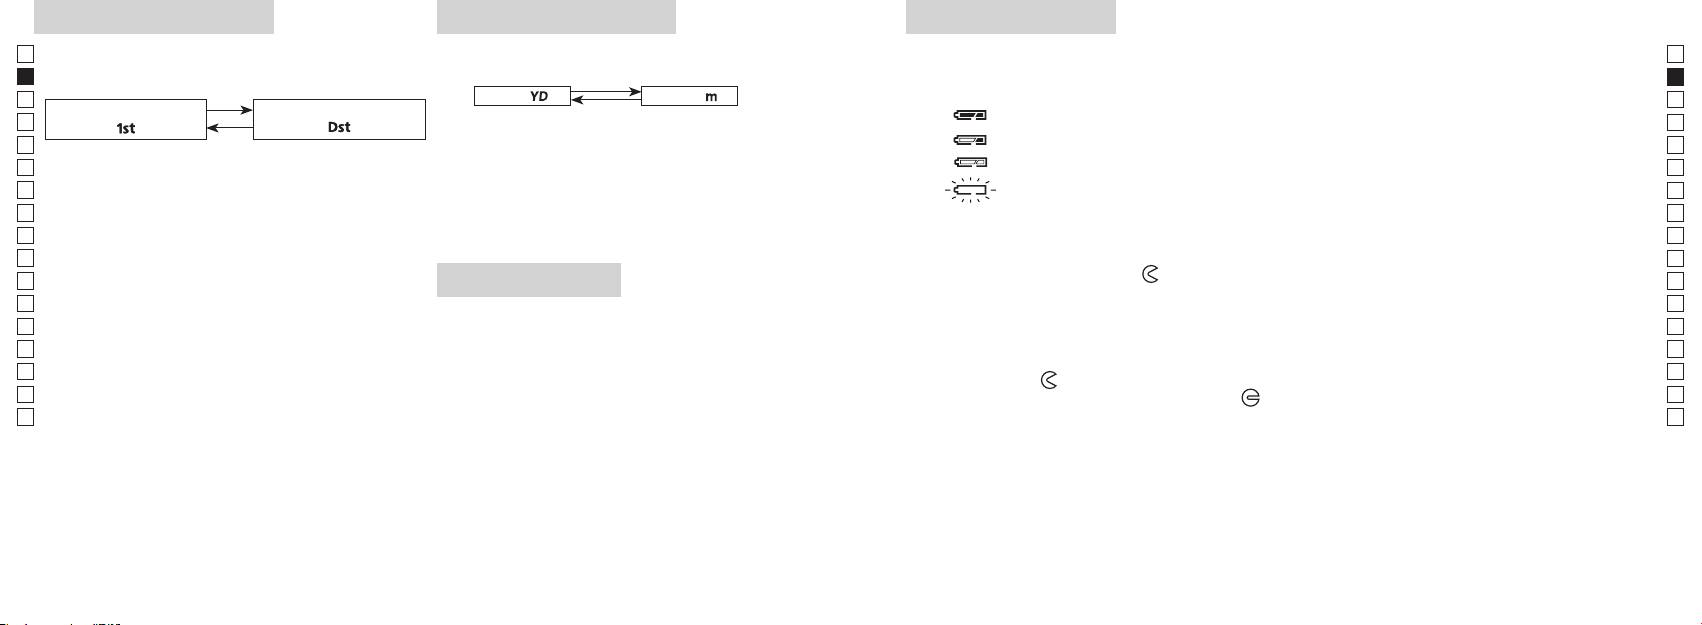
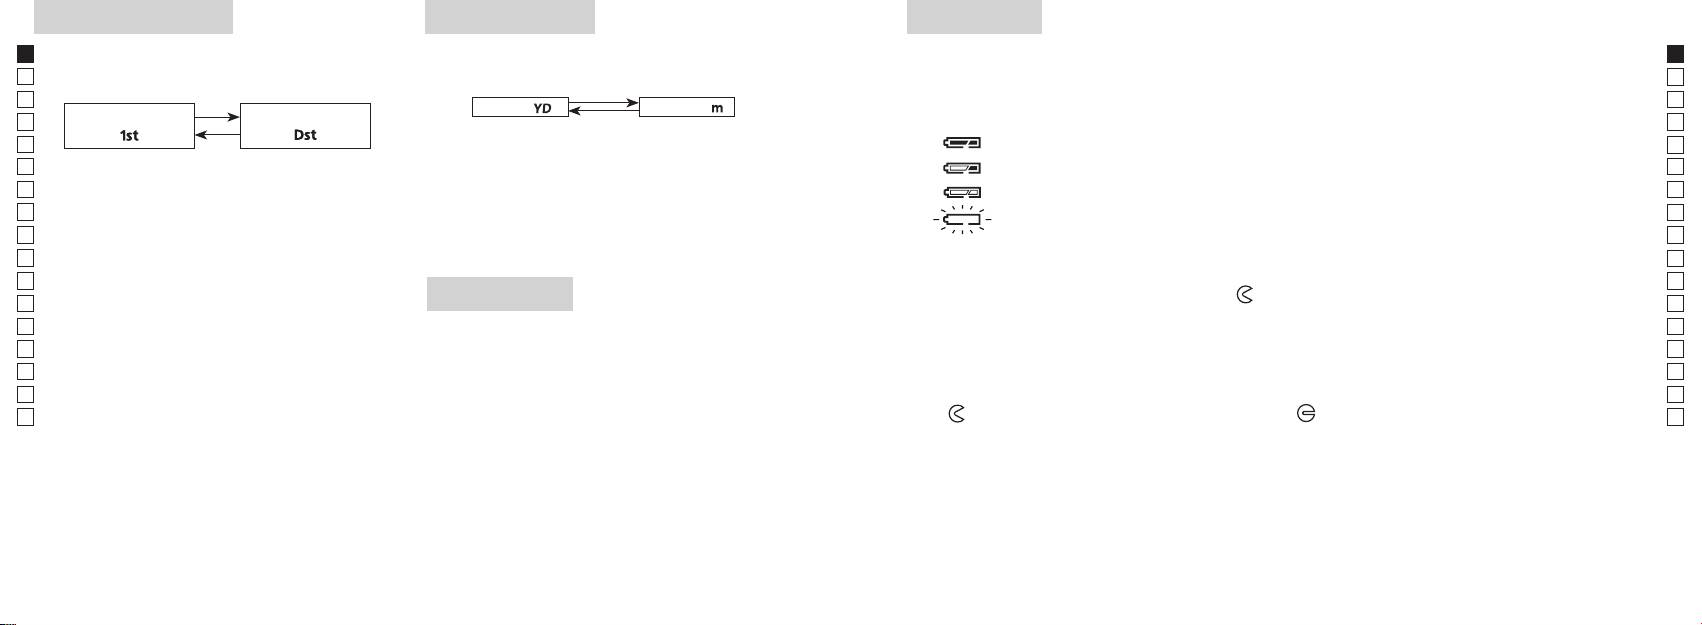
Target priority mode
Distance display units
Changing battery
Jp
Jp
Type of battery: 3V CR2 lithium battery x1
(Factory default setting is yard.)
En
Battery remaining amount indicators
En
Es
[ ]
Meter [ ]Yard
* Battery condition mark in the internal display warns when the battery needs to be replaced.
Es
: Battery has enough power for use.
Fr
1. Turn on the power (Confirm the internal display is
Fr
「
」
「
」
on).
De
De
1. Turn on the power (Confirm the internal display is on).
It
: Battery level is low. Battery should be replaced with a new one.
It
Se
release the button.
flashing : Battery is exhausted. After the indicator flashes three times, the laser rangefinder
Se
Continue to press and hold both buttons (more than
3. After the unit is set, results will be converted and
Nl
Nl
displayed in the selected distance display unit.
Ru
Ru
1. Open the battery chamber cover
Pt
3. Release both buttons when the mode is switched.
Using the ball of the thumb, etc. in the recessed part of the battery chamber cover, rotate the cover in
Pt
*
If the buttons are not pressed in the correct order,
the direction toward the
mark. It may not open easily due to its rubber packing for water resistance.
Pl
Pl
switching will not take place.
LED illumination
2. Replace the old battery with a new one
Fi
Fi
*
If switching fails to take place, repeat Step 2.
1. Turn on the power (Confirm the internal display is on).
No
No
not inserted correctly, the laser rangefinder will not operate.
Dk
Dk
3. Close the battery chamber cover
Cz
*
Cz
mode displays the distance of the closest subject and
Align the
mark with the indicator
●
and insert the battery chamber cover. Using the ball of the
to view the LCD panel.
Ro
Ro
thumb, etc., turn the cover towards the
mark. It may not close easily due to the rubber packing
*
Hu
subject.
for water resistance, but continue to turn it all the way until it stops. Confirm that the cover is securely
Hu
closed.
power is turned on again.
Battery life
Continuous operation: Approx. 13,000 times (at approx. 20°C)
This figure may differ according to condition, temperature, and other factors such as target shape, color, etc. Use
only as a guide.
* The battery supplied with this Laser Rangefinder is for operation checking. Due to natural electrical discharge, the life of this
battery will likely be shorter than that noted above.
* If water enters the battery chamber due to submersion, dry the battery chamber well, then replace the battery.
30 31
Jp
Jp
En
En
Es
Es
Fr
Fr
De
De
It
It
Se
Se
Nl
Nl
Ru
Ru
Pt
Pt
Pl
Pl
Fi
Fi
No
No
Dk
Dk
Cz
Cz
Ro
Ro
Hu
Hu
32 33
Measurement
1. Press the POWER button for power-on.
(Power turns off 8 seconds after the last
operation.)
Immediately after power-on.
3. Press POWER button once to start single measurement.
4. After measurement, “distance” or “fail to measure” indicator are displayed for 8 seconds, then power turns off. If you press the POWER
button during power-on (while the internal display is lit), another single measurement starts.
unable to measure distance.
3. Keep pressing POWER button to start continuous measurement up to 20 seconds. The internal display shows “distance” and
“fail to measure” indicator alternately.
Note: Laser irradiaton mark is blinking during the measurement.
Note: If you stop pressing the button, the continuous measuremen stops
2. Aim at the target
Positionthetargetatthecenterofthereticle
[Single measurement]
Failure to measure or
unable to measure distance.
[Continuous measurement]
4. After continuous measurement, the measure results are displayed for 8 seconds, then power turns off. If you press the POWER
button during power-on (while the internal display is lit), another measrement starts.
Failure to measure or
Target focusing.
Measuring.
(Initializing)
.
Upward measurement. Downward measurement.
Displays the measured
figure. (Target 1)
Displays the measured figure.
Stand-by.
Displays the measured
figure. (Target 2)
Measurement
1. Press the POWER button for power-on.
(Power turns off 8 seconds after the last
operation.)
Immediately after power-on.
(Initializing)
3. Press POWER button once to start single measurement.
Measuring.
4. After measurement, “distance” or “fail to measure” indicator are displayed for 8 seconds, then power turns off. If you press the POWER
button during power-on (while the internal display is lit), another single measurement starts.
Failure to measure or
unable to measure distance.
Displays the measured
figure. (Target 1)
3. Keep pressing POWER button to start continuous measurement up to 20 seconds. The internal display shows “distance” and
“fail to measure” indicator alternately.
Note: Laser irradiaton mark is blinking during the measurement.
Note: If you stop pressing the button, the continuous measuremen stops
Target focusing.
2. Aim at the target
.
Positionthetargetatthecenterofthereticle
[Single measurement]
Failure to measure or
unable to measure distance.
Upward measurement. Downward measurement.
Displays the measured figure.
[Continuous measurement]
4. After continuous measurement, the measure results are displayed for 8 seconds, then power turns off. If you press the POWER
button during power-on (while the internal display is lit), another measrement starts.
Stand-by.
Displays the measured
figure. (Target 2)
Measurement
1. Press the POWER button for power-on.
(Power turns off 8 seconds after the last
operation.)
Immediately after power-on.
Stand-by.
(Initializing)
2. Aim at the target
.
Positionthetargetatthecenterofthereticle
3. Press POWER button once to start single measurement.
4. After measurement, “distance” or “fail to measure” indicator are displayed for 8 seconds, then power turns off. If you press the POWER
button during power-on (while the internal display is lit), another single measurement starts.
unable to measure distance.
3. Keep pressing POWER button to start continuous measurement up to 20 seconds. The internal display shows “distance” and
“fail to measure” indicator alternately.
Note: Laser irradiaton mark is blinking during the measurement.
Note: If you stop pressing the button, the continuous measuremen stops
[Single measurement]
Failure to measure or
unable to measure distance.
[Continuous measurement]
4. After continuous measurement, the measure results are displayed for 8 seconds, then power turns off. If you press the POWER
button during power-on (while the internal display is lit), another measrement starts.
Failure to measure or
Target focusing.
Measuring.
Upward measurement. Downward measurement.
Displays the measured
figure. (Target 1)
Displays the measured figure.
Displays the measured
figure. (Target 2)
Measurement
Caution — use of controls or adjustments or performance of procedures other than
【
Single measurement
】
those specified herein may result in hazardous radiation exposure.
1. Preparing
Measurement button once to
start single measurement.
Install a battery in the battery chamber. (See "Changing Battery")
2. Rubber eyecup
Both eyeglass wearers and non-wearers can use this rangefinder as it is.
3. Diopter adjustment
Adjust diopter to obtain a clear LCD indication in the viewfinder.
First, rotate the diopter adjustment ring counterclockwise until it comes to a complete
(Confirm the
internal display is on)
ring clockwise until the LCD comes into focus.
If you rotate the ring too much, rotate it counterclockwise substantially then adjust it again.
If the diopter is not adjusted to correspond to your eyesight, you may not be able to
correctly aim at your subject.
【
Continuous measurement function
】
4. Measuring
*
1. Turn on the power (Confirm
2. Aim at the target.
the internal display is on).
(Automatic power shut-off after
of the reticle.
approx. 8 sec. unattended.)
Immediately after power-on
Stand-by Target aiming
(Initializing)
Measurement
1. Press the POWER button for power-on.
(Power turns off 8 seconds after the last
operation.)
Immediately after power-on.
Stand-by.
(Initializing)
2. Aim at the target
.
Positionthetargetatthecenterofthereticle
Target focusing.
[Single measurement]
3. Press POWER button once to start single measurement.
Measuring.
4. After measurement, “distance” or “fail to measure” indicator are displayed for 8 seconds, then power turns off. If you press the POWER
button during power-on (while the internal display is lit), another single measurement starts.
Failure to measure or
Upward measurement. Downward measurement.
unable to measure distance.
Displays the measured figure.
[Continuous measurement]
3. Keep pressing POWER button to start continuous measurement up to 20 seconds. The internal display shows “distance” and
“fail to measure” indicator alternately.
Note: Laser irradiaton mark is blinking during the measurement.
Note: If you stop pressing the button, the continuous measuremen stops
Failure to measure or
unable to measure distance.
4. After continuous measurement, the measure results are displayed for 8 seconds, then power turns off. If you press the POWER
button during power-on (while the internal display is lit), another measrement starts.
Displays the measured
figure. (Target 1)
Displays the measured
figure. (Target 2)
Measurement
1. Press the POWER button for power-on.
(Power turns off 8 seconds after the last
operation.)
Immediately after power-on.
Stand-by.
(Initializing)
2. Aim at the target
.
Positionthetargetatthecenterofthereticle
Target focusing.
[Single measurement]
3. Press POWER button once to start single measurement.
Measuring.
4. After measurement, “distance” or “fail to measure” indicator are displayed for 8 seconds, then power turns off. If you press the POWER
button during power-on (while the internal display is lit), another single measurement starts.
Failure to measure or
Upward measurement. Downward measurement.
unable to measure distance.
Displays the measured figure.
[Continuous measurement]
3. Keep pressing POWER button to start continuous measurement up to 20 seconds. The internal display shows “distance” and
“fail to measure” indicator alternately.
Note: Laser irradiaton mark is blinking during the measurement.
Note: If you stop pressing the button, the continuous measuremen stops
Failure to measure or
unable to measure distance.
Displays the measured
figure. (Target 1)
4. After continuous measurement, the measure results are displayed for 8 seconds, then power turns off. If you press the POWER
button during power-on (while the internal display is lit), another measrement starts.
Displays the measured
figure. (Target 2)
Measurement
1. Press the POWER button for power-on.
(Power turns off 8 seconds after the last
operation.)
Immediately after power-on.
Stand-by.
(Initializing)
2. Aim at the target
.
Positionthetargetatthecenterofthereticle
Target focusing.
[Single measurement]
3. Press POWER button once to start single measurement.
Measuring.
4. After measurement, “distance” or “fail to measure” indicator are displayed for 8 seconds, then power turns off. If you press the POWER
button during power-on (while the internal display is lit), another single measurement starts.
Failure to measure or
unable to measure distance.
3. Keep pressing POWER button to start continuous measurement up to 20 seconds. The internal display shows “distance” and
“fail to measure” indicator alternately.
Note: Laser irradiaton mark is blinking during the measurement.
Note: If you stop pressing the button, the continuous measuremen stops
Failure to measure or
unable to measure distance.
[Continuous measurement]
4. After continuous measurement, the measure results are displayed for 8 seconds, then power turns off. If you press the POWER
button during power-on (while the internal display is lit), another measrement starts.
Upward measurement. Downward measurement.
Displays the measured
figure. (Target 1)
Displays the measured figure.
Displays the measured
figure. (Target 2)
Measurement
1. Press the POWER button for power-on.
(Power turns off 8 seconds after the last
operation.)
Immediately after power-on.
Stand-by.
(Initializing)
2. Aim at the target
.
Positionthetargetatthecenterofthereticle
Target focusing.
[Single measurement]
3. Press POWER button once to start single measurement.
Measuring.
4. After measurement, “distance” or “fail to measure” indicator are displayed for 8 seconds, then power turns off. If you press the POWER
button during power-on (while the internal display is lit), another single measurement starts.
unable to measure distance.
3. Keep pressing POWER button to start continuous measurement up to 20 seconds. The internal display shows “distance” and
“fail to measure” indicator alternately.
Note: Laser irradiaton mark is blinking during the measurement.
Note: If you stop pressing the button, the continuous measuremen stops
unable to measure distance.
4. After continuous measurement, the measure results are displayed for 8 seconds, then power turns off. If you press the POWER
button during power-on (while the internal display is lit), another measrement starts.
[Continuous measurement]
Failure to measure or
Failure to measure or
Upward measurement. Downward measurement.
Displays the measured
figure. (Target 1)
Displays the measured figure.
Displays the measured
figure. (Target 2)
Measurement
1. Press the POWER button for power-on.
(Power turns off 8 seconds after the last
operation.)
Immediately after power-on.
Stand-by.
(Initializing)
2. Aim at the target
.
Positionthetargetatthecenterofthereticle
Target focusing.
[Single measurement]
3. Press POWER button once to start single measurement.
4. After measurement, “distance” or “fail to measure” indicator are displayed for 8 seconds, then power turns off. If you press the POWER
button during power-on (while the internal display is lit), another single measurement starts.
unable to measure distance.
3. Keep pressing POWER button to start continuous measurement up to 20 seconds. The internal display shows “distance” and
“fail to measure” indicator alternately.
Note: Laser irradiaton mark is blinking during the measurement.
Note: If you stop pressing the button, the continuous measuremen stops
unable to measure distance.
4. After continuous measurement, the measure results are displayed for 8 seconds, then power turns off. If you press the POWER
button during power-on (while the internal display is lit), another measrement starts.
[Continuous measurement]
Failure to measure or
Failure to measure or
Measuring.
Upward measurement. Downward measurement.
Displays the measured
figure. (Target 1)
Displays the measured figure.
Displays the measured
figure. (Target 2)
Measurement
1. Press the POWER button for power-on.
(Power turns off 8 seconds after the last
operation.)
Immediately after power-on.
Stand-by.
(Initializing)
2. Aim at the target
.
Positionthetargetatthecenterofthereticle
Target focusing.
[Single measurement]
3. Press POWER button once to start single measurement.
Measuring.
4. After measurement, “distance” or “fail to measure” indicator are displayed for 8 seconds, then power turns off. If you press the POWER
button during power-on (while the internal display is lit), another single measurement starts.
unable to measure distance.
3. Keep pressing POWER button to start continuous measurement up to 20 seconds. The internal display shows “distance” and
“fail to measure” indicator alternately.
Note: Laser irradiaton mark is blinking during the measurement.
Note: If you stop pressing the button, the continuous measuremen stops
unable to measure distance.
4. After continuous measurement, the measure results are displayed for 8 seconds, then power turns off. If you press the POWER
button during power-on (while the internal display is lit), another measrement starts.
[Continuous measurement]
Failure to measure or
Failure to measure or
Upward measurement. Downward measurement.
Displays the measured
figure. (Target 1)
Displays the measured figure.
Displays the measured
figure. (Target 2)
Measurement
1. Press the POWER button for power-on.
(Power turns off 8 seconds after the last
operation.)
Immediately after power-on.
Stand-by.
(Initializing)
2. Aim at the target
.
Positionthetargetatthecenterofthereticle
Target focusing.
[Single measurement]
3. Press POWER button once to start single measurement.
Measuring.
4. After measurement, “distance” or “fail to measure” indicator are displayed for 8 seconds, then power turns off. If you press the POWER
button during power-on (while the internal display is lit), another single measurement starts.
Failure to measure or
unable to measure distance.
Displays the measured
figure. (Target 1)
3. Keep pressing POWER button to start continuous measurement up to 20 seconds. The internal display shows “distance” and
“fail to measure” indicator alternately.
Note: Laser irradiaton mark is blinking during the measurement.
Note: If you stop pressing the button, the continuous measuremen stops
Failure to measure or
unable to measure distance.
Upward measurement. Downward measurement.
Displays the measured figure.
[Continuous measurement]
4. After continuous measurement, the measure results are displayed for 8 seconds, then power turns off. If you press the POWER
button during power-on (while the internal display is lit), another measrement starts.
Displays the measured
figure. (Target 2)
Measurement
1. Press the POWER button for power-on.
(Power turns off 8 seconds after the last
operation.)
Immediately after power-on.
Stand-by.
(Initializing)
2. Aim at the target
.
Positionthetargetatthecenterofthereticle
Target focusing.
[Single measurement]
3. Press POWER button once to start single measurement.
Measuring.
4. After measurement, “distance” or “fail to measure” indicator are displayed for 8 seconds, then power turns off. If you press the POWER
button during power-on (while the internal display is lit), another single measurement starts.
Failure to measure or
unable to measure distance.
3. Keep pressing POWER button to start continuous measurement up to 20 seconds. The internal display shows “distance” and
“fail to measure” indicator alternately.
Note: Laser irradiaton mark is blinking during the measurement.
Note: If you stop pressing the button, the continuous measuremen stops
Failure to measure or
unable to measure distance.
[Continuous measurement]
4. After continuous measurement, the measure results are displayed for 8 seconds, then power turns off. If you press the POWER
button during power-on (while the internal display is lit), another measrement starts.
Upward measurement. Downward measurement.
Displays the measured
figure. (Target 1)
Displays the measured figure.
Displays the measured
figure. (Target 2)
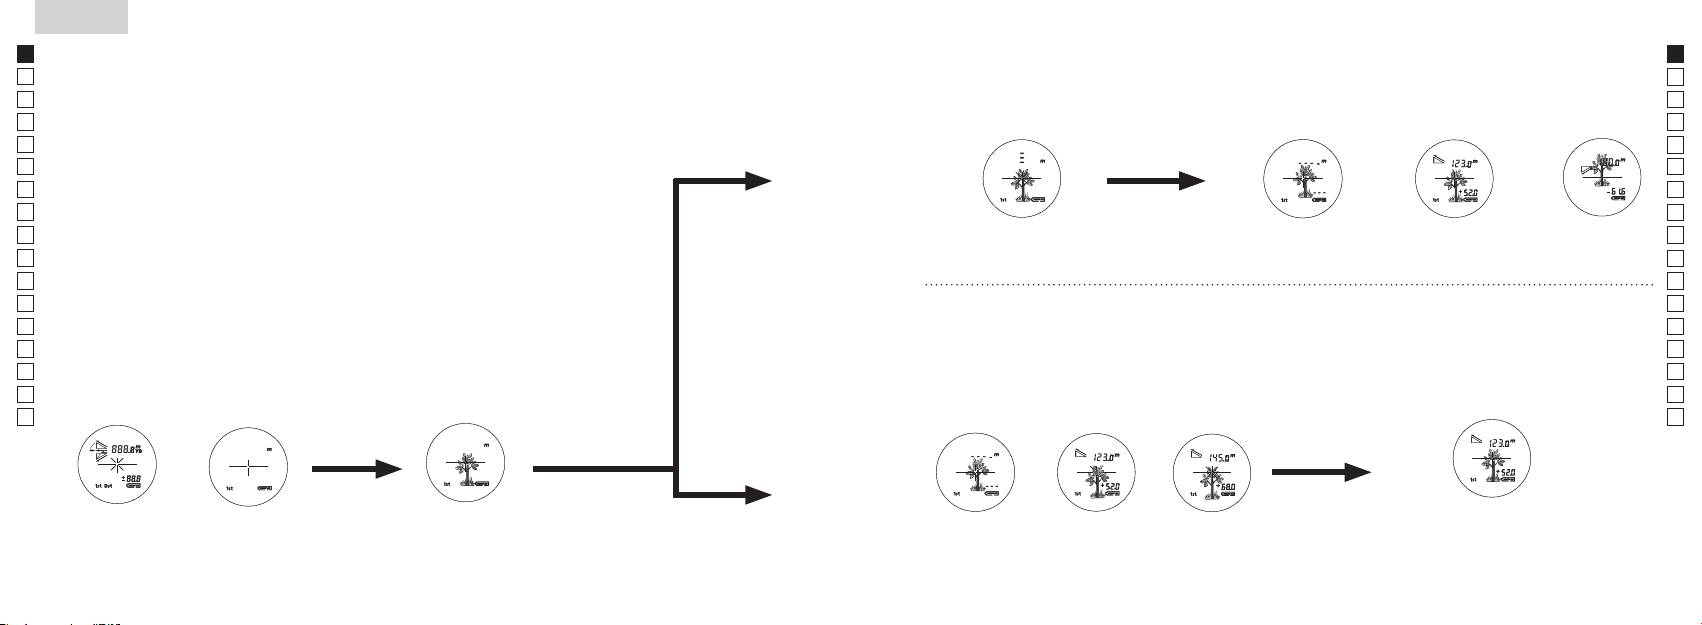
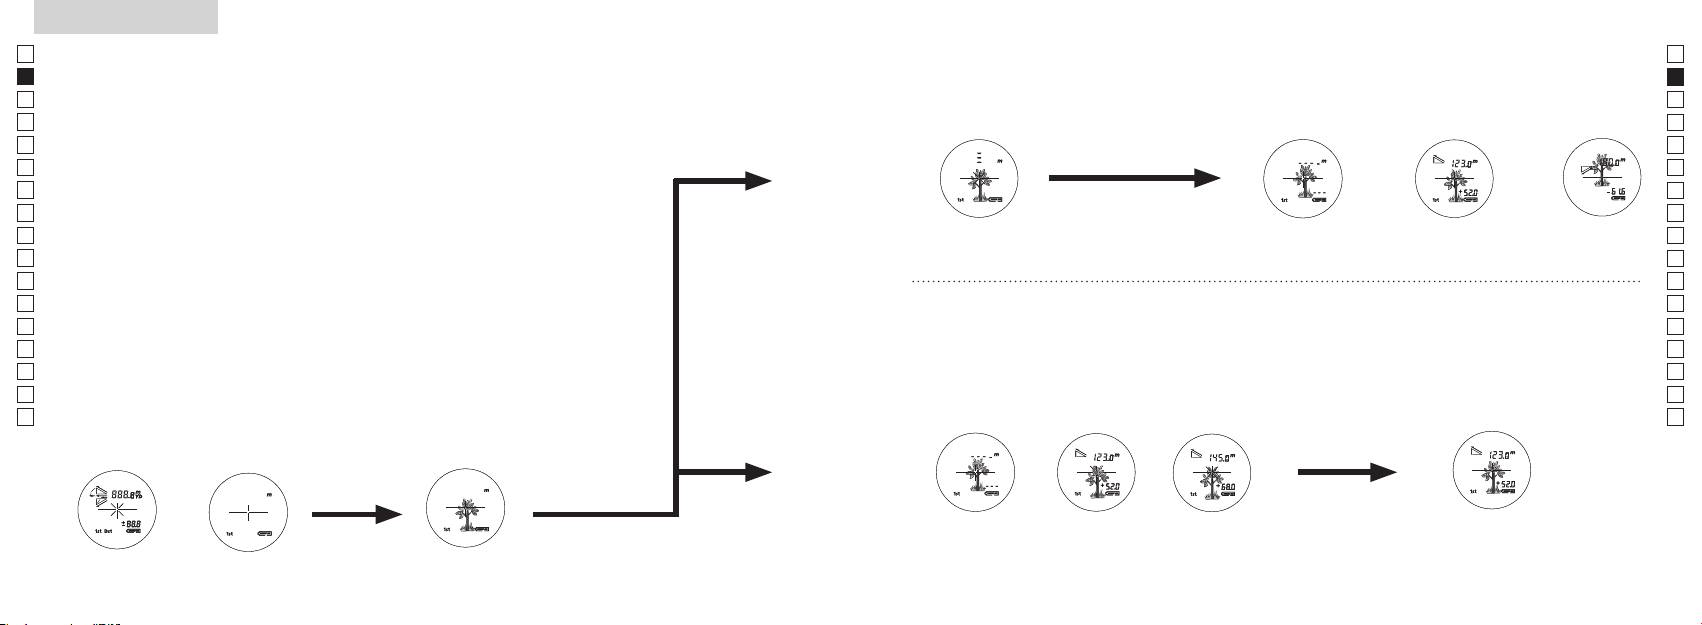
4. After measurement, the "fail to measure" indicator or "measured distance"
is displayed for 8 seconds, then power turns off. If you press the
Measurement
button during power-on (while the internal display is on),
another single measurement starts.
"Failure to measure" or "Unable
Upward
Downward
Measuring
to measure" distance
measurement
measurement
Displays the measured figure
4. After continuous measurement, the results of final
measurement for approx. 8 seconds. The internal display shows "fail to
measurement (measured distance) is displayed for approx.
measure" indicator and "measured distance" alternately.
8 seconds, then power turns off.
*
The laser irradiation mark blinks during the measurement.
If you press the
button during
*
If you release your finger from the button, continuous measurement
power-on (while the internal display is on), another
stops.
measurement starts.
"Failure to measure" or
Displays the
Displays the
"Unable to measure"
measured figure
measured figure
distance
(Target 1)
(Target 2)
between you and the pinflag, the smallest number is the distance to
your targeted pinflag.
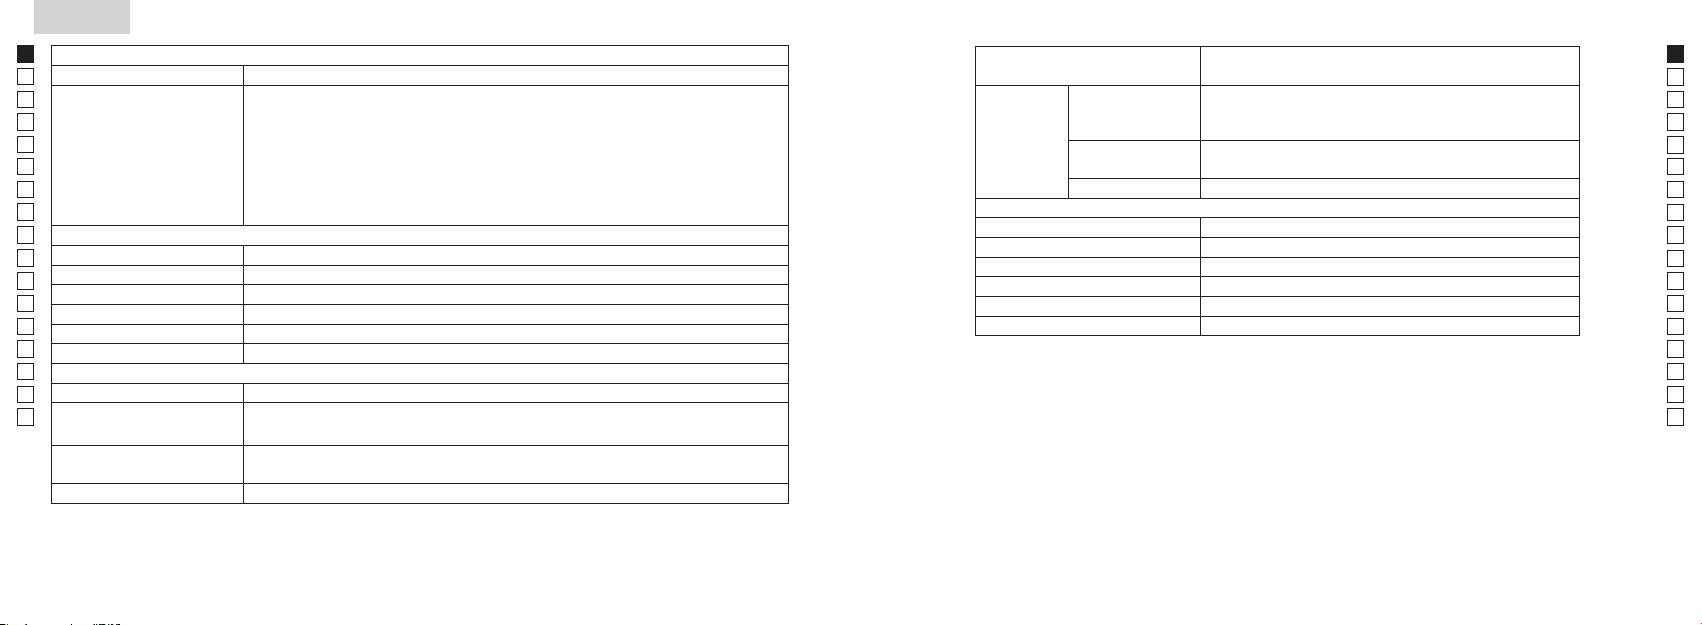
Specifications
Jp
Measurement system
Jp
Structure
En
Measurement range
En
Es
Safety
Es
Fr
Fr
De
Distance display (increment)
De
It
Height (lower 3-digit):
Laser
It
Se
Class
Se
Nl
Optical system
(nm) 905
Nl
Ru
Magnification (x) 6
12
Ru
Pt
ø21
15
Pt
(mm)
Pl
Beam divergence (mrad) Vertical: 1.8, Horizontal: 0.25
Pl
Angular field of view (real) (˚) 7.5
Fi
Operating humidity (%RH) 80 or less (without dew condensation)
Fi
18.3
No
No
ø3.5
* Waterproof models
Dk
Dk
-
1
Diopter adjustment ±4m
This Nikon Laser Rangefinder is waterproof, and will suffer no damage to the optical system nor observation if
Cz
submerged or dropped in water to a maximum depth of 1 meter for up to 10 minutes.
Cz
Others
Ro
The Nikon Laser Rangefinder offers the following advantages:
Ro
Operating temperature (˚C) -10 —
Hu
Hu
CR2 lithium battery x 1 (DC 3V)
Observe the following when using the Nikon Laser Rangefinder:
Automatic power shut-off (after approx. 8 sec. unoperated)
113 x 70 x 39
Approx. 175 (without battery)
water. If water enters the battery chamber, wipe out any moisture and allow time for the chamber to dry.
34 35
Others
Troubleshooting/Repair
Jp
If your Nikon Laser Rangefinder should require repair, please contact your local dealer or the store where you
Jp
En
En
Es
(1) This device may not cause harmful interference, and
Symptom Check Points
Es
(2) This device must accept any interference received, including interference that may cause undesired operation.
Fr
Fr
●
Unit does not turn on
De
● Check the battery insertion
De
(LCD fails to illuminate)
It
● Replace the battery with a new one.
It
Se
● Be sure that nothing, such as your finger or a strap, is blocking the
Se
harmful interference in a residential installation. This equipment generates, uses and can radiate radio frequency
laser emission aperture and laser detector aperture on the objective
Nl
Nl
energy and, if not installed and used in accordance with the instructions, may cause harmful interference to radio
lens side.
Ru
communications. However, there is no guarantee that interference will not occur in a particular installation. If this
Ru
● Be sure that the laser emission aperture and laser detector aperture
equipment does cause harmful interference to radio or television reception, which can be determined by turning
Unable to measure the distance
Pt
on the objective lens side are clean. Clean them if necessary.
Pt
the equipment off and on, the user is encouraged to try to correct the interference by one or more of the following
● Be sure that the target shape and condition are appropriate to reflect
Pl
measures:
Pl
the laser beam.
Fi
● Replace the battery with a new one.
Fi
No
No
● Be sure to hold the unit steady while measuring.
Dk
● Be sure the target is within measurement range
Dk
Cz
Cz
Ro
Closer target, located inside the
Ro
This Nikon Laser Rangefinder is a basic rangefinder. Its results cannot be used as official evidence.
● Be sure that nothing, such as leaves or grass, is between the Nikon
measurement range, cannot be
Hu
Laser Rangefinder and the target.
Hu
measured
Target beyond a certain distance
● Be sure that nothing, such as leaves or grass, is between the Nikon
cannot be measured
Laser Rangefinder and the target.
● Replace the battery with a new one.
● Be sure that the target shape and condition are appropriate to reflect
the laser beam.
Measurement result is unstable
● Be sure to hold the unit steady while measuring.
● Be sure that nothing, such as leaves or grass, is between the Nikon
Laser Rangefinder and the target.
36 37
Troubleshooting/Repair
Jp
Jp
En
En
Es
Es
Symptom Check Points
Fr
Fr
Español
De
● Replace the battery with a new one.
De
● Be sure that the target shape and condition are appropriate to reflect
It
It
Incorrect result is displayed
the laser beam.
CONTENIDO
Se
● Be sure that nothing, such as leaves or grass, is between the Nikon
Se
Laser Rangefinder and the target.
Nl
Nl
............................... 40-43
Ru
Ru
Características clave .................................................... 44
Pt
the equipment since a unit malfunction may have occurred. Never let anyone other than the official representative of the
Pt
product manufacturer check or repair the Nikon Laser Rangefinder. Failure to follow this instruction could result in injury,
.................................. 45
Pl
Pl
or damage to the product.
............................................................. 46
Fi
Fi
Modo de visualización de la medición ................. 47
No
No
Dk
Dk
........ 48
Cz
Cz
Cambio de la batería ................................................... 49
Ro
Ro
Medición ................................................................... 50-51
Hu
Hu
..................................................... 52-53
Otros ................................................................................. 54
............... 55-56
38 39
