Nikon COOLSHOT – page 8
Manual for Nikon COOLSHOT
Table of contents
- Cautions before use SAFETY PRECAUTIONS SAFETY PRECAUTIONS CARE AND MAINTENANCE
- Key features Nomenclature/Composition
- Internal display Measurement display mode
- Target priority mode Distance display units Changing battery LED illumination
- Measurement
- Specifications
- Others Troubleshooting/Repair
- Troubleshooting/Repair
Afișajul intern
Mod de afișare a măsurării
Jp
Jp
En
En
Es
Es
Modul distanţă
Fr
efectivă şi înălţime
Fr
intern este pornit).
efectivă
De
De
It
It
Marcaj iradiere laser
secun
Se
Se
Nl
Nl
modului pentru golf)
Modul distanţă
Ru
Măsurare pentru a comuta modul de
Ru
Starea bateriei
orizontală şi înălţime
Pt
orizontală
afișare a măsurării.
Pt
『 』
până când este
Pl
Pl
『 』 - Apare când laserul este iradiat pentru o măsurare.
afișat modul dorit.
Fi
Fi
*
No
ordinea corectă, comutarea nu va avea
No
Dk
『
』 - Acum se măsoară
loc.
Dk
『
』
Modul golf
*
Comutarea modului după măsurare
Cz
Cz
Ro
Ro
*
După ce modul este fixat, măsurările
Hu
* De obicei, un ecran LCD prezintă o mărire egală sau mai redusă. Totuși, ecranul LCD al acestui produs este
efectivă
Hu
amplificat de nivelul ridicat de mărire a ocularului. Cu toate că acest LCD a fost fabricat folosind cea mai
avansată tehnologie, este imposibil să se elimine complet praful. Ca rezultat, praful poate fi observat.
Modul distanţă
efectivă
efectivă
280 281

Mod de prioritate a ţintei
Unităţi de afișare a distanţei
Înlocuirea bateriei
Jp
Acest telemetru laser utilizează sistemul de comutare la
Jp
Tipul bateriei: Baterie cu litiu 3V CR2 x1
En
Indicatoare privind nivelul remanent al bateriei
En
(Setarea implicită din fabrică este modul de prioritate a
[ ]
Es
Metru [ ]Yard
Es
: Bateria are suficientă tensiune pentru a fi folosită.
Fr
Modul de prioritate
Modul de prioritate
Fr
pornit).
De
De
「
」
「
」
It
mult de două secunde. Când unitatea de afișare a fost
It
Se
pornit).
clipire : Bateria este descărcată. După ce indicatorul clipește de trei ori, telemetrul cu laser se
Se
3. După ce s-a reglat unitatea de măsură, rezultatele vor
Nl
Nl
Ru
Ru
1. Deschideţi capacul compartimentului bateriei
Pt
Pt
butoane (mai mult de 2 secunde), până când modul
Iluminare cu LED
Pl
Pl
Fi
Fi
2. Înlocuiţi bateria veche cu una nouă
No
No
comutat.
Dk
*
*
Dk
comutarea nu va avea loc.
Cz
Cz
*
*
3. Închideţi capacul compartimentului bateriei
Ro
alimentării telemetrului laser. În acest caz, iluminarea cu
Ro
[
cu indicatorul
●
Hu
]
. Acesta ar putea să nu se
Hu
pornită din nou.
La măsurarea obiectelor suprapuse, modul de prioritate
Durata de viaţă a bateriei
Funcţionare continuă: De aprox. 13.000 de ori (la aprox. 20°C)
bateria.
282 283
Jp
Jp
En
En
Es
Es
Fr
Fr
De
De
It
It
Se
Se
Nl
Nl
Ru
Ru
Pt
Pt
Pl
Pl
Fi
Fi
No
No
Dk
Dk
Cz
Cz
Ro
Ro
Hu
Hu
284 285
Measurement
1. Press the POWER button for power-on.
(Power turns off 8 seconds after the last
operation.)
Immediately after power-on.
3. Press POWER button once to start single measurement.
4. After measurement, “distance” or “fail to measure” indicator are displayed for 8 seconds, then power turns off. If you press the POWER
button during power-on (while the internal display is lit), another single measurement starts.
unable to measure distance.
3. Keep pressing POWER button to start continuous measurement up to 20 seconds. The internal display shows “distance” and
“fail to measure” indicator alternately.
Note: Laser irradiaton mark is blinking during the measurement.
Note: If you stop pressing the button, the continuous measuremen stops
2. Aim at the target
Positionthetargetatthecenterofthereticle
[Single measurement]
Failure to measure or
unable to measure distance.
[Continuous measurement]
4. After continuous measurement, the measure results are displayed for 8 seconds, then power turns off. If you press the POWER
button during power-on (while the internal display is lit), another measrement starts.
Failure to measure or
Target focusing.
Measuring.
(Initializing)
.
Upward measurement. Downward measurement.
Displays the measured
figure. (Target 1)
Displays the measured figure.
Stand-by.
Displays the measured
figure. (Target 2)
Measurement
1. Press the POWER button for power-on.
(Power turns off 8 seconds after the last
operation.)
Immediately after power-on.
(Initializing)
3. Press POWER button once to start single measurement.
Measuring.
4. After measurement, “distance” or “fail to measure” indicator are displayed for 8 seconds, then power turns off. If you press the POWER
button during power-on (while the internal display is lit), another single measurement starts.
Failure to measure or
unable to measure distance.
Displays the measured
figure. (Target 1)
3. Keep pressing POWER button to start continuous measurement up to 20 seconds. The internal display shows “distance” and
“fail to measure” indicator alternately.
Note: Laser irradiaton mark is blinking during the measurement.
Note: If you stop pressing the button, the continuous measuremen stops
Target focusing.
2. Aim at the target
.
Positionthetargetatthecenterofthereticle
[Single measurement]
Failure to measure or
unable to measure distance.
Upward measurement. Downward measurement.
Displays the measured figure.
[Continuous measurement]
4. After continuous measurement, the measure results are displayed for 8 seconds, then power turns off. If you press the POWER
button during power-on (while the internal display is lit), another measrement starts.
Stand-by.
Displays the measured
figure. (Target 2)
Measurement
1. Press the POWER button for power-on.
(Power turns off 8 seconds after the last
operation.)
Immediately after power-on.
Stand-by.
(Initializing)
2. Aim at the target
.
Positionthetargetatthecenterofthereticle
3. Press POWER button once to start single measurement.
4. After measurement, “distance” or “fail to measure” indicator are displayed for 8 seconds, then power turns off. If you press the POWER
button during power-on (while the internal display is lit), another single measurement starts.
unable to measure distance.
3. Keep pressing POWER button to start continuous measurement up to 20 seconds. The internal display shows “distance” and
“fail to measure” indicator alternately.
Note: Laser irradiaton mark is blinking during the measurement.
Note: If you stop pressing the button, the continuous measuremen stops
[Single measurement]
Failure to measure or
unable to measure distance.
[Continuous measurement]
4. After continuous measurement, the measure results are displayed for 8 seconds, then power turns off. If you press the POWER
button during power-on (while the internal display is lit), another measrement starts.
Failure to measure or
Target focusing.
Measuring.
Upward measurement. Downward measurement.
Displays the measured
figure. (Target 1)
Displays the measured figure.
Displays the measured
figure. (Target 2)
Măsurare
Atenţie — Flosirea dispozitivelor de comandă şi reglare sau efectuarea de proceduri altele decât cele
【
Măsurarea simplă
】
specificate aici pot duce la expunerea la radiaţii periculoase.
Măsurare o singură dată pentru a
1. Pregătire
porni măsurarea simplă.
2. Bonetă de cauciuc
3. Reglajul dioptric
din nou.
【
Funcţie de măsurare contină
】
corect subiectul.
4. Măsurare
*
.
afișajul intern este pornit)
(Oprire automată după aproximativ
vizorului.
8 secunde de inactivitate)
Imediat după pornire
Aşteptare
Measurement
1. Press the POWER button for power-on.
(Power turns off 8 seconds after the last
operation.)
Immediately after power-on.
Stand-by.
(Initializing)
2. Aim at the target
.
Positionthetargetatthecenterofthereticle
Target focusing.
[Single measurement]
3. Press POWER button once to start single measurement.
Measuring.
4. After measurement, “distance” or “fail to measure” indicator are displayed for 8 seconds, then power turns off. If you press the POWER
button during power-on (while the internal display is lit), another single measurement starts.
Failure to measure or
Upward measurement. Downward measurement.
unable to measure distance.
Displays the measured figure.
[Continuous measurement]
3. Keep pressing POWER button to start continuous measurement up to 20 seconds. The internal display shows “distance” and
“fail to measure” indicator alternately.
Note: Laser irradiaton mark is blinking during the measurement.
Note: If you stop pressing the button, the continuous measuremen stops
Failure to measure or
unable to measure distance.
4. After continuous measurement, the measure results are displayed for 8 seconds, then power turns off. If you press the POWER
button during power-on (while the internal display is lit), another measrement starts.
Displays the measured
figure. (Target 1)
Displays the measured
figure. (Target 2)
Measurement
1. Press the POWER button for power-on.
(Power turns off 8 seconds after the last
operation.)
Immediately after power-on.
Stand-by.
(Initializing)
2. Aim at the target
.
Positionthetargetatthecenterofthereticle
Target focusing.
[Single measurement]
3. Press POWER button once to start single measurement.
Measuring.
4. After measurement, “distance” or “fail to measure” indicator are displayed for 8 seconds, then power turns off. If you press the POWER
button during power-on (while the internal display is lit), another single measurement starts.
Failure to measure or
Upward measurement. Downward measurement.
unable to measure distance.
Displays the measured figure.
[Continuous measurement]
3. Keep pressing POWER button to start continuous measurement up to 20 seconds. The internal display shows “distance” and
“fail to measure” indicator alternately.
Note: Laser irradiaton mark is blinking during the measurement.
Note: If you stop pressing the button, the continuous measuremen stops
Failure to measure or
unable to measure distance.
Displays the measured
figure. (Target 1)
4. After continuous measurement, the measure results are displayed for 8 seconds, then power turns off. If you press the POWER
button during power-on (while the internal display is lit), another measrement starts.
Displays the measured
figure. (Target 2)
Measurement
1. Press the POWER button for power-on.
(Power turns off 8 seconds after the last
operation.)
Immediately after power-on.
Stand-by.
(Initializing)
2. Aim at the target
.
Positionthetargetatthecenterofthereticle
Target focusing.
[Single measurement]
3. Press POWER button once to start single measurement.
Measuring.
4. After measurement, “distance” or “fail to measure” indicator are displayed for 8 seconds, then power turns off. If you press the POWER
button during power-on (while the internal display is lit), another single measurement starts.
Failure to measure or
unable to measure distance.
3. Keep pressing POWER button to start continuous measurement up to 20 seconds. The internal display shows “distance” and
“fail to measure” indicator alternately.
Note: Laser irradiaton mark is blinking during the measurement.
Note: If you stop pressing the button, the continuous measuremen stops
Failure to measure or
unable to measure distance.
[Continuous measurement]
4. After continuous measurement, the measure results are displayed for 8 seconds, then power turns off. If you press the POWER
button during power-on (while the internal display is lit), another measrement starts.
Upward measurement. Downward measurement.
Displays the measured
figure. (Target 1)
Displays the measured figure.
Displays the measured
figure. (Target 2)
Measurement
1. Press the POWER button for power-on.
(Power turns off 8 seconds after the last
operation.)
Immediately after power-on.
Stand-by.
(Initializing)
2. Aim at the target
.
Positionthetargetatthecenterofthereticle
Target focusing.
[Single measurement]
3. Press POWER button once to start single measurement.
Measuring.
4. After measurement, “distance” or “fail to measure” indicator are displayed for 8 seconds, then power turns off. If you press the POWER
button during power-on (while the internal display is lit), another single measurement starts.
unable to measure distance.
3. Keep pressing POWER button to start continuous measurement up to 20 seconds. The internal display shows “distance” and
“fail to measure” indicator alternately.
Note: Laser irradiaton mark is blinking during the measurement.
Note: If you stop pressing the button, the continuous measuremen stops
unable to measure distance.
4. After continuous measurement, the measure results are displayed for 8 seconds, then power turns off. If you press the POWER
button during power-on (while the internal display is lit), another measrement starts.
[Continuous measurement]
Failure to measure or
Failure to measure or
Upward measurement. Downward measurement.
Displays the measured
figure. (Target 1)
Displays the measured figure.
Displays the measured
figure. (Target 2)
Measurement
1. Press the POWER button for power-on.
(Power turns off 8 seconds after the last
operation.)
Immediately after power-on.
Stand-by.
(Initializing)
2. Aim at the target
.
Positionthetargetatthecenterofthereticle
Target focusing.
[Single measurement]
3. Press POWER button once to start single measurement.
4. After measurement, “distance” or “fail to measure” indicator are displayed for 8 seconds, then power turns off. If you press the POWER
button during power-on (while the internal display is lit), another single measurement starts.
unable to measure distance.
3. Keep pressing POWER button to start continuous measurement up to 20 seconds. The internal display shows “distance” and
“fail to measure” indicator alternately.
Note: Laser irradiaton mark is blinking during the measurement.
Note: If you stop pressing the button, the continuous measuremen stops
unable to measure distance.
4. After continuous measurement, the measure results are displayed for 8 seconds, then power turns off. If you press the POWER
button during power-on (while the internal display is lit), another measrement starts.
[Continuous measurement]
Failure to measure or
Failure to measure or
Measuring.
Upward measurement. Downward measurement.
Displays the measured
figure. (Target 1)
Displays the measured figure.
Displays the measured
figure. (Target 2)
Measurement
1. Press the POWER button for power-on.
(Power turns off 8 seconds after the last
operation.)
Immediately after power-on.
Stand-by.
(Initializing)
2. Aim at the target
.
Positionthetargetatthecenterofthereticle
Target focusing.
[Single measurement]
3. Press POWER button once to start single measurement.
Measuring.
4. After measurement, “distance” or “fail to measure” indicator are displayed for 8 seconds, then power turns off. If you press the POWER
button during power-on (while the internal display is lit), another single measurement starts.
unable to measure distance.
3. Keep pressing POWER button to start continuous measurement up to 20 seconds. The internal display shows “distance” and
“fail to measure” indicator alternately.
Note: Laser irradiaton mark is blinking during the measurement.
Note: If you stop pressing the button, the continuous measuremen stops
unable to measure distance.
4. After continuous measurement, the measure results are displayed for 8 seconds, then power turns off. If you press the POWER
button during power-on (while the internal display is lit), another measrement starts.
[Continuous measurement]
Failure to measure or
Failure to measure or
Upward measurement. Downward measurement.
Displays the measured
figure. (Target 1)
Displays the measured figure.
Displays the measured
figure. (Target 2)
Measurement
1. Press the POWER button for power-on.
(Power turns off 8 seconds after the last
operation.)
Immediately after power-on.
Stand-by.
(Initializing)
2. Aim at the target
.
Positionthetargetatthecenterofthereticle
Target focusing.
[Single measurement]
3. Press POWER button once to start single measurement.
Measuring.
4. After measurement, “distance” or “fail to measure” indicator are displayed for 8 seconds, then power turns off. If you press the POWER
button during power-on (while the internal display is lit), another single measurement starts.
Failure to measure or
unable to measure distance.
Displays the measured
figure. (Target 1)
3. Keep pressing POWER button to start continuous measurement up to 20 seconds. The internal display shows “distance” and
“fail to measure” indicator alternately.
Note: Laser irradiaton mark is blinking during the measurement.
Note: If you stop pressing the button, the continuous measuremen stops
Failure to measure or
unable to measure distance.
Upward measurement. Downward measurement.
Displays the measured figure.
[Continuous measurement]
4. After continuous measurement, the measure results are displayed for 8 seconds, then power turns off. If you press the POWER
button during power-on (while the internal display is lit), another measrement starts.
Displays the measured
figure. (Target 2)
Measurement
1. Press the POWER button for power-on.
(Power turns off 8 seconds after the last
operation.)
Immediately after power-on.
Stand-by.
(Initializing)
2. Aim at the target
.
Positionthetargetatthecenterofthereticle
Target focusing.
[Single measurement]
3. Press POWER button once to start single measurement.
Measuring.
4. After measurement, “distance” or “fail to measure” indicator are displayed for 8 seconds, then power turns off. If you press the POWER
button during power-on (while the internal display is lit), another single measurement starts.
Failure to measure or
unable to measure distance.
3. Keep pressing POWER button to start continuous measurement up to 20 seconds. The internal display shows “distance” and
“fail to measure” indicator alternately.
Note: Laser irradiaton mark is blinking during the measurement.
Note: If you stop pressing the button, the continuous measuremen stops
Failure to measure or
unable to measure distance.
[Continuous measurement]
4. After continuous measurement, the measure results are displayed for 8 seconds, then power turns off. If you press the POWER
button during power-on (while the internal display is lit), another measrement starts.
Upward measurement. Downward measurement.
Displays the measured
figure. (Target 1)
Displays the measured figure.
Displays the measured
figure. (Target 2)
4. După măsurare este afișată "eroare măsurare"
butonul
afișajul intern este aprins), pornește o altă măsurare simplă.
Măsurare
"Imposibilitate de a măsura"
Afișează figura măsurată
4. După măsurarea continuă sunt afișate rezultatele măsurării finale
măsurarea continuă pentru aproximativ 8 secunde. Afișajul intern
măsurare" și
se oprește.
*
Marcajul de iradiere cu laser
măsurării.
măsurare.
*
oprește.
Afișează figura
Afișează figura
sau "Imposibilitate de
Specificaţii
Jp
Sistem de măsurare
Jp
Structură
(Compartimentul bateriei: Rezistent la apă**)
En
Intervalul de măsurare
En
Es
Es
Fr
Fr
FCC artea 15 Sub-
De
De
Mediu
It
It
Laser
Se
Se
Sistemul optic
Clasa
Nl
Nl
Mărire (x) 6
Lungimea de undă (nm) 905
Ru
Ru
Diametru efectiv al lentilelor obiectivului
Durata impulsului (ns) 12
Pt
ø21
Pt
(mm)
15
Pl
Pl
Câmp angular de vedere (real) (°) 7,5
(mrad)
Fi
Fi
Compensare pentru ochi (mm) 18,3
rouă de condensare)
No
No
ø3,5
Dk
Dk
-
1
Reglajul dioptric ±4m
* Modele rezistente la apă
Cz
Cz
Altele
adâncime maximă de 1 metru timp de până la 10 minute.
Ro
Ro
˚C) -10 —
Telemetrul laser Nikon oferă următoarele avantaje:
Hu
Hu
Baterie cu litiu CR2 x 1 (3V CC)
Sursă de alimentare
Oprire automată (după aproximativ 8 secunde de inactivitate)
Aveţi în vedere următoarele la folosirea telemetrului laser Nikon.
Dimensiuni (L x l x Î) (mm) 113 x 70 x 39
aprox. 175 (fără baterie)
286 287
Altele
Detectare și remediere defecţiuni/Reparare
Jp
Jp
En
En
Es
Es
Simptom Puncte de verificare
Fr
Fr
nedorită.
De
●
De
Aparatul nu pornește
●
It
It
Acest echipament a fost testat și s-a stabilit că el corespunde cu limitele pentru un dispozitiv digital pentru clasa B,
●
Se
Se
●
Nl
Nl
nu blochează orificiul pentru raza laser și orificiul detectorului laser de pe partea
Ru
Ru
lentilei obiectivului.
Pt
●
Pt
Pl
Pl
●
Fi
laser.
Fi
●
No
No
Dk
●
Dk
●
Cz
măsura”)
Cz
Ro
Ro
Hu
●
Hu
Acest telemetru laser Nikon este un telemetru de bază. Rezultatele lui nu pot fi folosite ca dovezi oficiale.
frunze sau iarbă.
nu poate fi măsurată
●
frunze sau iarbă.
●
●
Rezultatul măsurării este instabil
●
●
frunze sau iarbă.
288 289
Detectare și remediere defecţiuni/Reparare
Jp
Jp
En
En
Es
Es
Simptom Puncte de verificare
Fr
Fr
De
●
Magyar
De
●
It
It
laser.
Se
●
TARTALOMJEGYZÉK
Se
frunze sau iarbă.
Nl
Nl
Használat előtti figyelmeztetések ............... 292-295
Ru
Ru
Legfontosabb tulajdonságok ................................. 296
Pt
Pt
Felépítés .............................................. 297
Pl
Pl
Belső kijelző .................................................................. 298
Fi
Fi
Méréskijelző mód ....................................................... 299
No
No
Távolságkijelzés
Dk
Dk
........................ 300
Cz
Cz
.................................................................. 301
Ro
Ro
Mérés ..................................................................... 302-303
Hu
Hu
Specifikációk ...................................................... 304-305
......................................................................... 306
avítás ........................................ 307-308
290 291
Használat előtti figyelmeztetések
Jp
Köszönjük, hogy a Nikon COOLSHOT AS lézeres távolságmérőt vásárolta meg.
A berendezés megfelelő
BIZTONSÁGI ÓVINTÉZKEDÉSEK
Jp
használata és a lehetséges
gyerekek által nem elérhető helyen
En
(Lézer)
En
veszélyt jelentő problémák
tárolja.
A Nikon lézeres távolságmérő
Es
Az itt meghatározottaktól eltérő ellenőrzési, beállítási vagy kivitelezési eljárások
Es
elkerülése érdekében szigorúan
láthatatlan lézersugarat használ.
alkalmazása veszélyes sugárterhelést eredményezhet.
Fr
Mindenképpen tartsa be az alábbi
burkolata megsérül, vagy ha furcsa
tartsa be a következő
Fr
hangot ad ki, mert leejtette vagy
De
irányelveket. A termék
pontokat:
De
〇
más dolog történt vele, akkor
használata előtt alaposan
Figyelmeztetés
It
azonnal vegye ki az elemet és ne
It
figyelmeztetések" c. részt és a helyes használatra vonatkozó utasításokat.
FMérés
olvassa el a termékhez mellékelt
Se
gombot, amikor a tárgylencse felőli
használja tovább a készüléket.
Se
〇 A könnyű tájékozódás érdekében tartsa ezt a kézikönyvet elérhető helyen.
"Használat előtti
oldalról néz bele az optikába. Ha nem
Nl
figyelmeztetések" c.
Nl
〇 Önkényesen ne szerelje szét vagy próbálja megjavítani a terméket, mert ez komoly problémát
így cselekszik, az rossz hatással lehet
dokumentumot és a helyes
Ru
okozhat.
Ru
a szemére vagy károsíthatja azt.
használatra vonatkozó
Pt
Szétszerelt vagy javított termékre a gyártó nem vállal garanciát.
Pt
utasításokat. A könnyű
Pl
tájékozódás érdekében tartsa ezt
Pl
● A műszaki adatok és a kivitel előzetes értesítés nélkül megváltozhatnak.
Fi
a kézikönyvet elérhető helyen.
eszközökön, például lencséken vagy
Fi
●
No
távcsöveken keresztül, valamint
No
egészben és részleteiben sem másolható (kivéve a kritikai cikkekben vagy áttekintésekben
Dk
FIGYELMEZTETÉS
Dk
használt rövid idézeteket).
megsérülhet a szeme.
Cz
Cz
● A NIKON VISION CO., LTD. fenntartja magának a jogot, hogy e kézikönyvekben leírt tartalmakat
itt leírtakat figyelmen kívül hagyva
rakja a FMérés gombra,
Ro
bármikor, előzetes értesítés nélkül megváltoztassa.
bármilyen helytelen használat halált
Ro
vagy súlyos sérülést okozhat.
hogy véletlenül se bocsássa ki a
Hu
Hu
lézersugarat.
VIGYÁZAT
használja, vegye ki belőle az elemet.
itt leírtakat figyelmen kívül hagyva
bármilyen helytelen használat
megjavítani a Nikon lézeres
sérülést vagy anyagi károkat
távolságmérőt. A kibocsátott
eredményezhet.
lézersugár ártalmas lehet az
egészségre. Szétszerelt, átalakított
vagy javítani próbált termékre a
gyártó nem vállal garanciát.
292 293
Használat előtti figyelmeztetések
Jp
BIZTONSÁGI
BIZTONSÁGI ÓVINTÉZKEDÉSEK
BIZTONSÁGI ÓVINTÉZKEDÉSEK
ÁPOLÁS ÉS KARBANTARTÁS
Tárolás
Jp
Ha ezt nem tartja be, leeshet vagy
En
ÓVINTÉZKEDÉSEK
(Lítium elem)
Vigyázat
Lencsék
En
leejtheti, ami sérülést vagy hibás
(Egylencsés kivitel)
felületére lecsapódhat a víz vagy
Es
Az elemet helytelenül kezelve az
működést okozhat.
Es
vízálló, nem víz alatti használatra
felületéről, akkor finom olajmentes
A Nikon lézeres távolságmérő a
megrepedhet és kifolyhat, ezzel
Fr
készült.
kefét használjon.
lézeres távolságmérőt száraz, hűvös
Fr
céltárgy távolságának méréséhez
korrodálják a berendezést és
csomagolásához használt műanyag
helyen tárolja.
De
egylencsés kivitelt használ optikai
beszennyezik a ruházatot.
De
tasakot gyermekek által nem
került esővizet, vizet, homokot és
szennyeződéseket vagy foltokat
Az esős időben vagy éjszaka használt
It
rendszerében. Mindenképpen tartsa
Mindenképpen tartsa be az alábbi
elérhető helyen tartsa.
sarat egyből törölje le puha, tiszta
úgy távolíthat el a lencse
készüléket utána szobahőmérsékleten
It
be az alábbi pontokat:
pontokat:
Se
ruhával.
felületéről, hogy egy puha, tiszta
szárítsa meg, és hűvös, száraz helyen
Se
elemet
Figyelmeztetés
gumi szemkagylókat vagy kis
pamutruhával vagy minőségi
tárolja.
Nl
megfelelő irányba állítva helyezze
Nl
alkatrészeket stb. tegyenek a
távolságmérőt meleg vagy napos
olajmentes lencsetörlő kendővel
be.
Ru
használatakor soha ne nézzen
szájukba. Ha a gyerekek lenyelnek
Ru
időben az autóban, vagy hőforrás
nagyon óvatosan letörli azt. A
közvetlenül a napba, erős
ilyen alkatrészeket, azonnal
Pt
makacs foltokat kis mennyiségű
Pt
huzamosabb ideig nem használja.
fényforrásba vagy a lézersugárba.
forduljon orvoshoz.
negatív hatással lehet rá.
tiszta (nem denaturált) alkohollal
Pl
Pl
törölheti le. Ne használjon bársony
Vigyázat
kivezetését.
Fi
szemkagylót, az bizonyos
hagyja kint közvetlen napsütésben.
vagy közönséges szövet
Fi
F
a zsebében vagy
embereknél bőrgyulladást okozhat.
No
Az ultraibolya sugarak és a túlzott
törlőkendőt, mert ezek
Mérés gombot, amikor nem
táskájában kulcsokkal vagy
No
Ha bármilyen tünet előfordul,
meleg negatív hatással lehetnek az
megkarcolhatják a lencse felületét.
használja a Nikon lézeres
pénzérmékkel együtt, mert ettől
Dk
ne használja tovább és azonnal
Dk
egységre, vagy akár tönkre is tehetik
Amennyiben a törlőruhát már
távolságmérőt.
rövidre záródhat és túlmelegedhet.
Cz
forduljon orvoshoz.
azt.
használta a ház tisztításához, az a
Cz
lencsefelület tisztítására már nem
Ro
közben. Ha ezt nem tartja be, az
hatásának, és soha ne szerelje szét.
Ro
a szállítás közben tartsa a puha
esetén a Nikon lézeres
alkalmas.
sérülést vagy hibás működést
Hu
tokban.
Hu
távolságmérő lencséjének
okozhat, hiszen nekimehet
Géptest
felületeire pára csapódhat le.
bárminek, megüthet másokat,
folyadék hozzáér a ruhájához
nem működne megfelelően,
A lecsapódott folyadék
a készülék leeshet vagy egyéb
vagy a bőréhez, azonnal öblítse le
törlőkendővel tisztítsa meg,
egyáltalán ne használja tovább, és
elpárolgásáig ne használja a
balesetek történhetnek.
bő vízzel. Ha egy sérült elemből
miután egy lefúvóval óvatosan
kérdezze meg a helyi kereskedőjét,
terméket.
folyadék kerül a szemébe, azonnal
lefújta róla a port. Ne használjon
hova kell elküldeni javításra.
fogva. Így ugyanis megüthet
öblítse ki tiszta vízzel, majd
benzint, hígítót vagy más, szerves
másokat és sérülést okozhat.
forduljon orvoshoz.
oldószert tartalmazó tisztítókat.
* A lefúvó egy gumi
kell kezelni, tartsa be a helyi
tisztítóberendezés, ami levegőt
szabályozásokat.
fúj ki egy fúvókából.
294 295
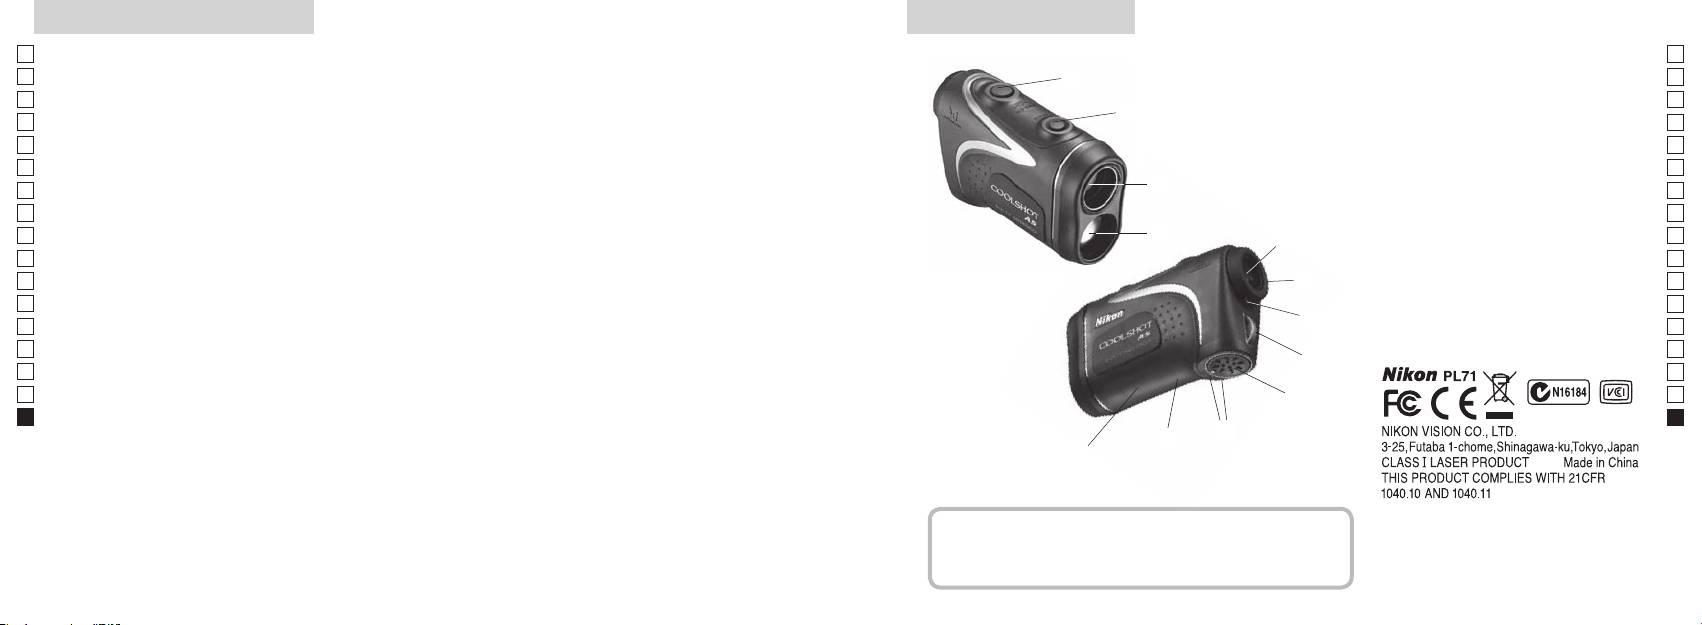
Legfontosabb tulajdonságok Elnevezések/Felépítés
Jp
A következő feltételek egyszerűsítik a mérést:
Jp
1
En
4
En
Lézerkibocsátó nyílás
Es
Es
bevonattal
3
2 Lézerérzékelő nyílás
Fr
Fr
3
De
De
(vízszintes távolság ± magasság), ami hasznos a golfnál
4 Mérés gomb
It
Mérési pontatlanság vagy hiba a következő esetekben
It
56x-os nagyítású egyszemes lencse
választhat
fordulhat elő:
1
Se
Se
6 Dioptriaállító gyűrű
Nl
Céltárgy elsőbbségét átkapcsoló rendszert alkalmaz
Nl
7 Dioptriaindex
Ru
Mérés gombot hosszan megnyomva
2
5
8 Szíj befűzőlyuk
Ru
folyamatos mérés funkciót végezhet
Pt
9
Pt
Pl
6
!p
Pl
Fi
irányának jelölése
Fi
7
No
!q Termékszám címkéje
S
No
!w FDA adat jelzése
Dk
Dk
A Nikon lézeres távolságmérő láthatatlan lézersugarat
8
Cz
Cz
használ a távolság meghatározásához. Megméri azt
Ro
az időt, amely alatt a lézersugár megteszi az utat a
9
Ro
távolságmérőtől a célig és vissza. A lézer visszaverődése
Hu
Hu
és a mérési eredmények változhatnak az időjárási és
!p
környezeti viszonyoktól, valamint a céltárgy színétől,
!q
felületi kikészítésétől, méretétől, formájától és egyéb
!w
jellemzőitől függően.
Felépítés
.................................. 1 db
...................... 1 db
....................... 1 db
..... 1 db
296 297
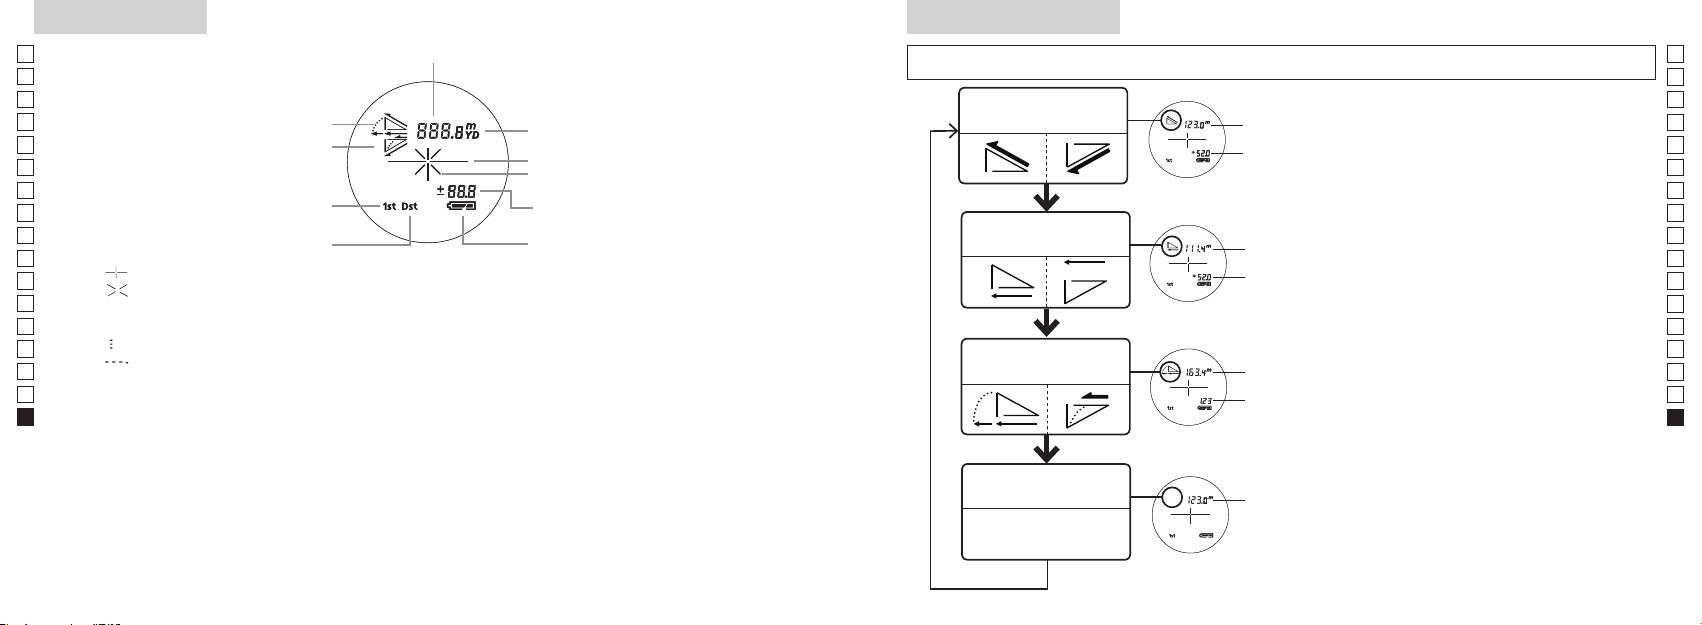
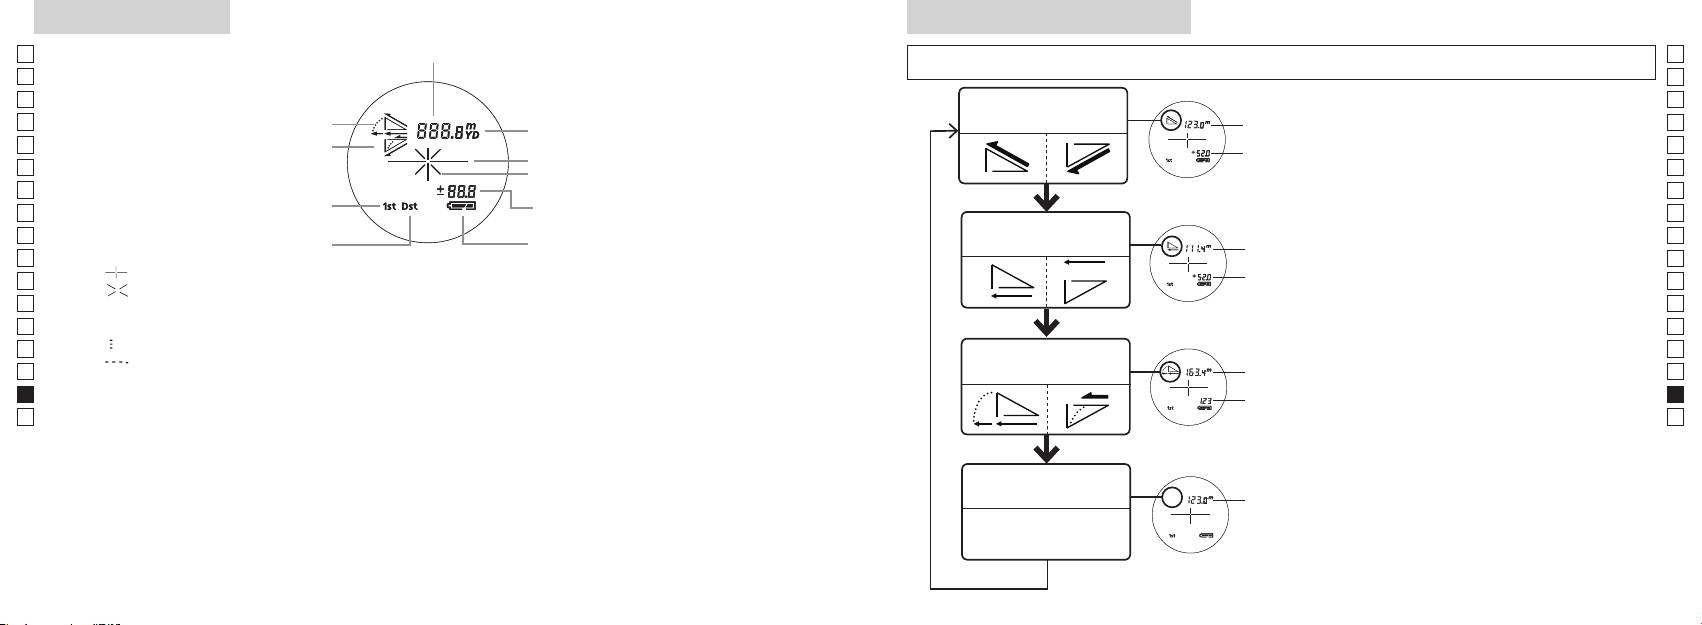
Belső kijelző
Méréskijelző mód
Jp
Távolság
Jp
kevesebb ideig), hogy az üzemmódot az alábbi sorrendben változtassa.
En
En
Es
Es
Tényleges távolság és
1. Kapcsolja be a gépet (ellenőrizze, hogy a
Tényleges
Fr
magasság üzemmód
Fr
belső kijelző bekapcsolt-e).
távolság
De
Lejtés
De
Céltárgy jele
Magasság
gombot, majd azonnal (0,5 másodpercen
It
It
Lézerkibocsátás jele
belül) nyomja
Se
Se
Magasság (aktuális távolság a golf
gombot 2 másodpercnél rövidebb ideig.
Nl
3. A Mérés kijelző üzemmód kapcsolásához
Nl
üzemmód beállításnál)
Vízszintes távolság és
Ru
Vízszintes
Ru
Távoli céltárgy elsőbbsége üzemmód
magasság üzemmód
Pt
távolság
gombról.
Pt
『 』 - Célozza be a mérni kívánt tárgyat. Állítsa be a célt a hajszálkereszt közepére.
4. Ismételgesse a 2. és 3. lépéseket a kívánt
Pl
Magasság
Pl
『 』 - A méréshez a lézersugár kibocsátása közben jelenik meg.
üzemmód megjelenéséig.
Fi
Fi
Az egyszeri mérés időtartama alatt végig látható. Folyamatos mérés közben villog.
*
Ha a gombokat nem a helyes sorrendben
No
Ne nézzen bele az objektívlencsébe, míg ez a jel látható.
nyomja meg, a gép nem kapcsol át.
No
Dk
『
』 - Mérés folyamatban
Lejtéshez
*
Az üzemmódot a mérés után átkapcsolva
Dk
『
』 - "Hibás a mérés" vagy "Nem lehet mérni"
Golf üzemmód
igazított
a gép átalakítja az eredményeket az új
Cz
Cz
távolság
üzemmódhoz.
Ro
Ro
* Az LCD általában azonos vagy kisebb nagyítást alkalmaz. Azonban e termék LCD kijelzőjét felnagyítja
Tényleges
*
Miután beállította az üzemmódot, a gép
Hu
a szemkagyló nagymértékű nagyítása. Bár az LCD előállításához a legkorszerűbb technológiát
távolság
a méréseket az új üzemmódban végzi el.
Hu
Használat közben azonban ez nem befolyásolja a mérés pontosságát vagy biztonságát.
Tényleges távolság
Tényleges
üzemmód
távolság
298 299
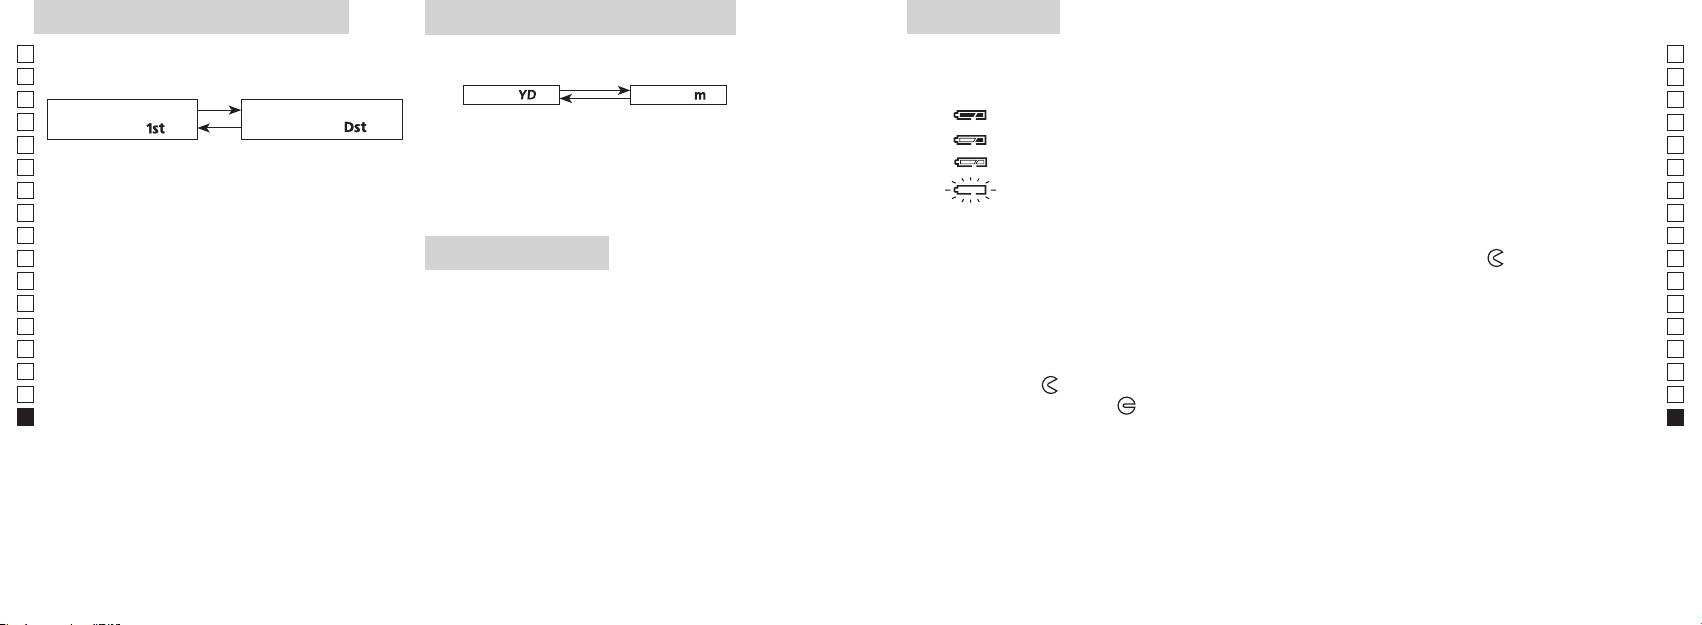
Céltárgy elsőbbsége üzemmód
Távolságkijelzés mértékegysége
Elem cseréje
Jp
A mérési eredmények yardban és méterben jeleníthetők
Jp
Elem típusa: 1 db 3 V-os CR2 lítium elem
elsőbbsége közötti átkapcsoló rendszert alkalmazza (a
meg (a gyári beállítás a yard).
En
Elem maradék töltésének kijelzése
En
gyári alapbeállítás az első céltárgy elsőbbsége).
[ ]
Es
Méter [ ]Yard
* A belső kijelzőn az elemállapot jelzése figyelmeztet, hogy mikor kell az elemet kicserélni.
Es
Távoli céltárgy elsőbbsége
1. Kapcsolja be a gépet (ellenőrizze, hogy a belső kijelző
: Az elem töltése elegendő a működéshez.
Fr
Fr
üzemmód「
」
üzemmód
「
」
bekapcsolt-e).
: Az elem lemerülőben van. Készüljön fel az elemcserére.
De
De
1. Kapcsolja be a gépet (ellenőrizze, hogy a belső
It
: Az elem töltöttségi szintje alacsony. Cserélje le egy újra.
mint két másodpercig. Amikor a kijelző bekapcsolt,
It
kijelző bekapcsolt-e).
engedje el a gombot.
Se
villog : Az elem teljesen lemerült. Miután a jel háromszor villog, a lézeres távolságmérő
Se
3. A mértékegység beállítása után a gép átalakítja az
automatikusan kikapcsol. Cserélje le az elemet.
Nl
Nl
eredményeket és a kiválasztott módon jeleníti meg.
másodpercen belül.
Ru
Ru
Mindkét gombot tartsa folyamatosan (2
1. Nyissa ki az elemrekesz fedelét
Pt
másodpercnél tovább) lenyomva, amíg a gép át
Az elemrekesz-fedél bemélyedő részét pl. a hüvelykujjpárnájával fordítsa el a
jel irányába.
Pt
LED-es világítás
nem kapcsol az első és a távoli céltárgy elsőbbsége
Pl
Avízállóságot biztosító gumitömítése miatt nehezen nyílhat.
Pl
1. Kapcsolja be a gépet (ellenőrizze, hogy a belső kijelző
üzemmódok között.
2. Cserélje le a régi elemet egy újra
Fi
bekapcsolt-e).
Fi
3. Az üzemmód bekapcsolásakor engedje el mindkét
No
gombot.
No
Dk
*
Ha a gombokat nem a helyes sorrendben nyomja
megfelelően helyezi be, a lézeres távolságmérő nem fog működni.
Dk
meg, a gép nem kapcsol át.
*
3. Zárja be az elemrekesz fedelét
Cz
Cz
*
Ha a gép nem kapcsol át, ismételje meg a 2. lépést.
sötét az LCD panel megtekintéséhez.
Igazítsa a
jelet a
●
Ro
*
Ro
fordítsa el a fedelet a
irányba. A vízállóságot biztosító gumitömítése miatt nehezen záródhat, de
[]
Hu
Hu
világítás ki lesz kapcsolva a lézeres távolságmérő újbóli
elsőbbsége üzemmód a legközelebb, a Távoli céltárgy
bekapcsolásakor.
Elem élettartama
elsőbbsége üzemmód pedig a legmesszebb lévő tárgy
Folyamatos üzem: Körülbelül 13.000 alkalom (kb. 20 °C-on)
távolságát mutatja.
színétől stb. függően. Csak útmutatóként használja.
élettartama valószínűleg rövidebb lesz a fentiekben megadottnál.
* Ha a készülék vízbe esik és emiatt elázik az elemkamra, akkor jól szárítsa ki, majd cserélje le az elemet.
300 301
Jp
Jp
En
En
Es
Es
Fr
Fr
De
De
It
It
Se
Se
Nl
Nl
Ru
Ru
Pt
Pt
Pl
Pl
Fi
Fi
No
No
Dk
Dk
Cz
Cz
Ro
Ro
Hu
Hu
302 303
Measurement
1. Press the POWER button for power-on.
(Power turns off 8 seconds after the last
operation.)
Immediately after power-on.
3. Press POWER button once to start single measurement.
4. After measurement, “distance” or “fail to measure” indicator are displayed for 8 seconds, then power turns off. If you press the POWER
button during power-on (while the internal display is lit), another single measurement starts.
unable to measure distance.
3. Keep pressing POWER button to start continuous measurement up to 20 seconds. The internal display shows “distance” and
“fail to measure” indicator alternately.
Note: Laser irradiaton mark is blinking during the measurement.
Note: If you stop pressing the button, the continuous measuremen stops
2. Aim at the target
Positionthetargetatthecenterofthereticle
[Single measurement]
Failure to measure or
unable to measure distance.
[Continuous measurement]
4. After continuous measurement, the measure results are displayed for 8 seconds, then power turns off. If you press the POWER
button during power-on (while the internal display is lit), another measrement starts.
Failure to measure or
Target focusing.
Measuring.
(Initializing)
.
Upward measurement. Downward measurement.
Displays the measured
figure. (Target 1)
Displays the measured figure.
Stand-by.
Displays the measured
figure. (Target 2)
Measurement
1. Press the POWER button for power-on.
(Power turns off 8 seconds after the last
operation.)
Immediately after power-on.
(Initializing)
3. Press POWER button once to start single measurement.
Measuring.
4. After measurement, “distance” or “fail to measure” indicator are displayed for 8 seconds, then power turns off. If you press the POWER
button during power-on (while the internal display is lit), another single measurement starts.
Failure to measure or
unable to measure distance.
Displays the measured
figure. (Target 1)
3. Keep pressing POWER button to start continuous measurement up to 20 seconds. The internal display shows “distance” and
“fail to measure” indicator alternately.
Note: Laser irradiaton mark is blinking during the measurement.
Note: If you stop pressing the button, the continuous measuremen stops
Target focusing.
2. Aim at the target
.
Positionthetargetatthecenterofthereticle
[Single measurement]
Failure to measure or
unable to measure distance.
Upward measurement. Downward measurement.
Displays the measured figure.
[Continuous measurement]
4. After continuous measurement, the measure results are displayed for 8 seconds, then power turns off. If you press the POWER
button during power-on (while the internal display is lit), another measrement starts.
Stand-by.
Displays the measured
figure. (Target 2)
Measurement
1. Press the POWER button for power-on.
(Power turns off 8 seconds after the last
operation.)
Immediately after power-on.
Stand-by.
(Initializing)
2. Aim at the target
.
Positionthetargetatthecenterofthereticle
3. Press POWER button once to start single measurement.
4. After measurement, “distance” or “fail to measure” indicator are displayed for 8 seconds, then power turns off. If you press the POWER
button during power-on (while the internal display is lit), another single measurement starts.
unable to measure distance.
3. Keep pressing POWER button to start continuous measurement up to 20 seconds. The internal display shows “distance” and
“fail to measure” indicator alternately.
Note: Laser irradiaton mark is blinking during the measurement.
Note: If you stop pressing the button, the continuous measuremen stops
[Single measurement]
Failure to measure or
unable to measure distance.
[Continuous measurement]
4. After continuous measurement, the measure results are displayed for 8 seconds, then power turns off. If you press the POWER
button during power-on (while the internal display is lit), another measrement starts.
Failure to measure or
Target focusing.
Measuring.
Upward measurement. Downward measurement.
Displays the measured
figure. (Target 1)
Displays the measured figure.
Displays the measured
figure. (Target 2)
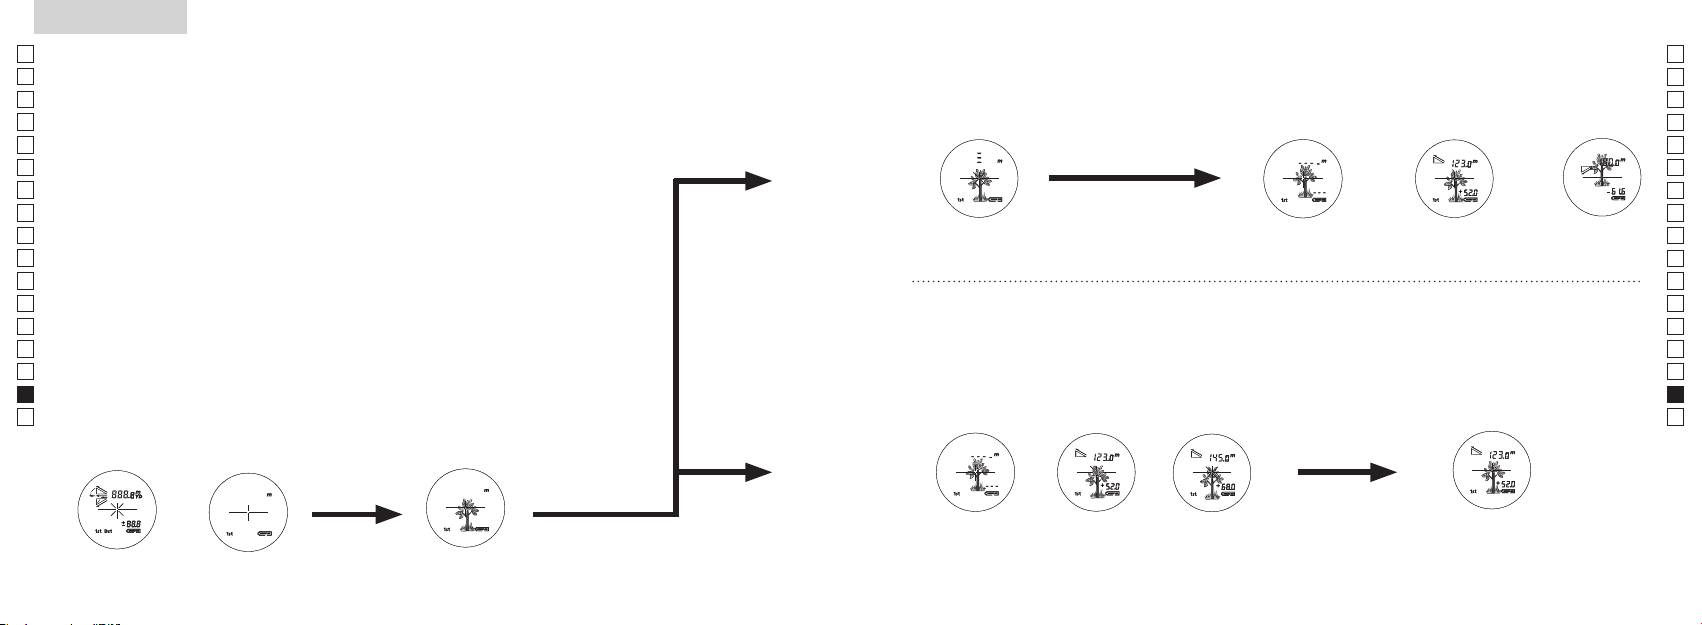
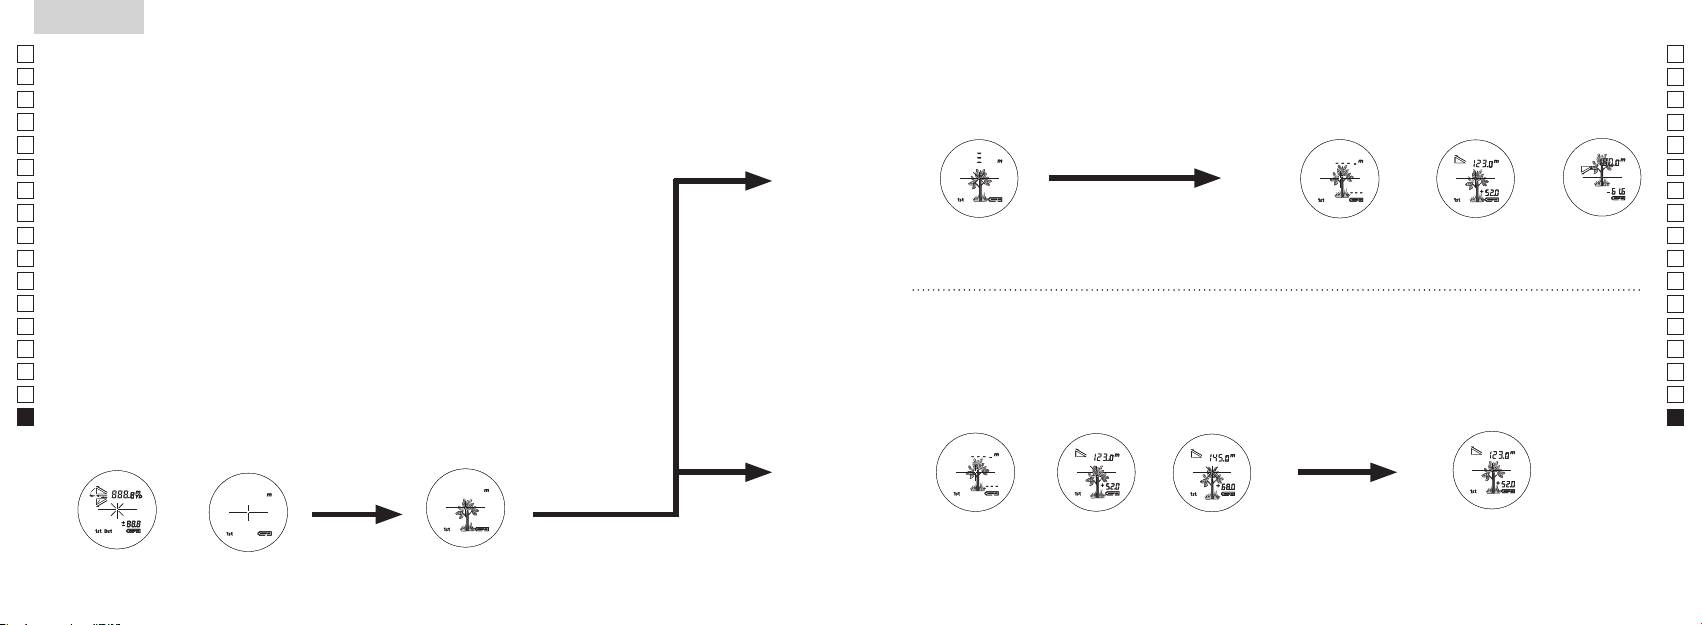
Mérés
Vigyázat — Az itt meghatározottaktól eltérő ellenőrzési, beállítási, kivitelezési eljárások alkalmazása
【
Egyszeri mérés
】
veszélyes sugárterhelést eredményezhet.
egyszer nyomja meg a
1. Előkészítés
2. Gumi szemkagyló
Szemüvegesek és szemüveget nem viselők is használhatják ezt a távolságmérőt módosítás nélkül.
3. Dioptria beállítása
Állítsa be a dioptriát úgy, hogy tiszta képet kapjon az LCD kijelzőn a keresőben.
szemkagylóba belenézve jobbra forgassa el a dioptriabeállító gyűrűt, amíg az LCD kijelző
fókuszba nem kerül.
Ha túlságosan eltekeri a gyűrűt, fordítsa határozottan vissza, majd állítsa be újra.
Ha a dioptriát nem szabályozza be látásának megfelelően, képtelen lesz a céltárgyat
helyesen fókuszba állítani.
【
Folyamatos mérési funkció
】
4. Mérés
*
Az egyes üzemmódok beállításához lásd az adott szakaszokat.
1. Kapcsolja be a gépet (ellenőrizze,
2. Állítsa a keresőt a céltárgyra.
hogy a belső kijelző bekapcsolt-e).
Állítsa be a célt a hajszálkereszt
(A gép automatikusan kikapcsol
közepére.
kb. 8 mp tétlenség után.)
Közvetlenül a bekapcsolás
Készenléti állapot
Tárgy becélzása
után (inicializálás)
Measurement
1. Press the POWER button for power-on.
(Power turns off 8 seconds after the last
operation.)
Immediately after power-on.
Stand-by.
(Initializing)
2. Aim at the target
.
Positionthetargetatthecenterofthereticle
Target focusing.
[Single measurement]
3. Press POWER button once to start single measurement.
Measuring.
4. After measurement, “distance” or “fail to measure” indicator are displayed for 8 seconds, then power turns off. If you press the POWER
button during power-on (while the internal display is lit), another single measurement starts.
Failure to measure or
Upward measurement. Downward measurement.
unable to measure distance.
Displays the measured figure.
[Continuous measurement]
3. Keep pressing POWER button to start continuous measurement up to 20 seconds. The internal display shows “distance” and
“fail to measure” indicator alternately.
Note: Laser irradiaton mark is blinking during the measurement.
Note: If you stop pressing the button, the continuous measuremen stops
Failure to measure or
unable to measure distance.
4. After continuous measurement, the measure results are displayed for 8 seconds, then power turns off. If you press the POWER
button during power-on (while the internal display is lit), another measrement starts.
Displays the measured
figure. (Target 1)
Displays the measured
figure. (Target 2)
Measurement
1. Press the POWER button for power-on.
(Power turns off 8 seconds after the last
operation.)
Immediately after power-on.
Stand-by.
(Initializing)
2. Aim at the target
.
Positionthetargetatthecenterofthereticle
Target focusing.
[Single measurement]
3. Press POWER button once to start single measurement.
Measuring.
4. After measurement, “distance” or “fail to measure” indicator are displayed for 8 seconds, then power turns off. If you press the POWER
button during power-on (while the internal display is lit), another single measurement starts.
Failure to measure or
Upward measurement. Downward measurement.
unable to measure distance.
Displays the measured figure.
[Continuous measurement]
3. Keep pressing POWER button to start continuous measurement up to 20 seconds. The internal display shows “distance” and
“fail to measure” indicator alternately.
Note: Laser irradiaton mark is blinking during the measurement.
Note: If you stop pressing the button, the continuous measuremen stops
Failure to measure or
unable to measure distance.
Displays the measured
figure. (Target 1)
4. After continuous measurement, the measure results are displayed for 8 seconds, then power turns off. If you press the POWER
button during power-on (while the internal display is lit), another measrement starts.
Displays the measured
figure. (Target 2)
Measurement
1. Press the POWER button for power-on.
(Power turns off 8 seconds after the last
operation.)
Immediately after power-on.
Stand-by.
(Initializing)
2. Aim at the target
.
Positionthetargetatthecenterofthereticle
Target focusing.
[Single measurement]
3. Press POWER button once to start single measurement.
Measuring.
4. After measurement, “distance” or “fail to measure” indicator are displayed for 8 seconds, then power turns off. If you press the POWER
button during power-on (while the internal display is lit), another single measurement starts.
Failure to measure or
unable to measure distance.
3. Keep pressing POWER button to start continuous measurement up to 20 seconds. The internal display shows “distance” and
“fail to measure” indicator alternately.
Note: Laser irradiaton mark is blinking during the measurement.
Note: If you stop pressing the button, the continuous measuremen stops
Failure to measure or
unable to measure distance.
[Continuous measurement]
4. After continuous measurement, the measure results are displayed for 8 seconds, then power turns off. If you press the POWER
button during power-on (while the internal display is lit), another measrement starts.
Upward measurement. Downward measurement.
Displays the measured
figure. (Target 1)
Displays the measured figure.
Displays the measured
figure. (Target 2)
Measurement
1. Press the POWER button for power-on.
(Power turns off 8 seconds after the last
operation.)
Immediately after power-on.
Stand-by.
(Initializing)
2. Aim at the target
.
Positionthetargetatthecenterofthereticle
Target focusing.
[Single measurement]
3. Press POWER button once to start single measurement.
Measuring.
4. After measurement, “distance” or “fail to measure” indicator are displayed for 8 seconds, then power turns off. If you press the POWER
button during power-on (while the internal display is lit), another single measurement starts.
unable to measure distance.
3. Keep pressing POWER button to start continuous measurement up to 20 seconds. The internal display shows “distance” and
“fail to measure” indicator alternately.
Note: Laser irradiaton mark is blinking during the measurement.
Note: If you stop pressing the button, the continuous measuremen stops
unable to measure distance.
4. After continuous measurement, the measure results are displayed for 8 seconds, then power turns off. If you press the POWER
button during power-on (while the internal display is lit), another measrement starts.
[Continuous measurement]
Failure to measure or
Failure to measure or
Upward measurement. Downward measurement.
Displays the measured
figure. (Target 1)
Displays the measured figure.
Displays the measured
figure. (Target 2)
Measurement
1. Press the POWER button for power-on.
(Power turns off 8 seconds after the last
operation.)
Immediately after power-on.
Stand-by.
(Initializing)
2. Aim at the target
.
Positionthetargetatthecenterofthereticle
Target focusing.
[Single measurement]
3. Press POWER button once to start single measurement.
4. After measurement, “distance” or “fail to measure” indicator are displayed for 8 seconds, then power turns off. If you press the POWER
button during power-on (while the internal display is lit), another single measurement starts.
unable to measure distance.
3. Keep pressing POWER button to start continuous measurement up to 20 seconds. The internal display shows “distance” and
“fail to measure” indicator alternately.
Note: Laser irradiaton mark is blinking during the measurement.
Note: If you stop pressing the button, the continuous measuremen stops
unable to measure distance.
4. After continuous measurement, the measure results are displayed for 8 seconds, then power turns off. If you press the POWER
button during power-on (while the internal display is lit), another measrement starts.
[Continuous measurement]
Failure to measure or
Failure to measure or
Measuring.
Upward measurement. Downward measurement.
Displays the measured
figure. (Target 1)
Displays the measured figure.
Displays the measured
figure. (Target 2)
Measurement
1. Press the POWER button for power-on.
(Power turns off 8 seconds after the last
operation.)
Immediately after power-on.
Stand-by.
(Initializing)
2. Aim at the target
.
Positionthetargetatthecenterofthereticle
Target focusing.
[Single measurement]
3. Press POWER button once to start single measurement.
Measuring.
4. After measurement, “distance” or “fail to measure” indicator are displayed for 8 seconds, then power turns off. If you press the POWER
button during power-on (while the internal display is lit), another single measurement starts.
unable to measure distance.
3. Keep pressing POWER button to start continuous measurement up to 20 seconds. The internal display shows “distance” and
“fail to measure” indicator alternately.
Note: Laser irradiaton mark is blinking during the measurement.
Note: If you stop pressing the button, the continuous measuremen stops
unable to measure distance.
4. After continuous measurement, the measure results are displayed for 8 seconds, then power turns off. If you press the POWER
button during power-on (while the internal display is lit), another measrement starts.
[Continuous measurement]
Failure to measure or
Failure to measure or
Upward measurement. Downward measurement.
Displays the measured
figure. (Target 1)
Displays the measured figure.
Displays the measured
figure. (Target 2)
Measurement
1. Press the POWER button for power-on.
(Power turns off 8 seconds after the last
operation.)
Immediately after power-on.
Stand-by.
(Initializing)
2. Aim at the target
.
Positionthetargetatthecenterofthereticle
Target focusing.
[Single measurement]
3. Press POWER button once to start single measurement.
Measuring.
4. After measurement, “distance” or “fail to measure” indicator are displayed for 8 seconds, then power turns off. If you press the POWER
button during power-on (while the internal display is lit), another single measurement starts.
Failure to measure or
unable to measure distance.
Displays the measured
figure. (Target 1)
3. Keep pressing POWER button to start continuous measurement up to 20 seconds. The internal display shows “distance” and
“fail to measure” indicator alternately.
Note: Laser irradiaton mark is blinking during the measurement.
Note: If you stop pressing the button, the continuous measuremen stops
Failure to measure or
unable to measure distance.
Upward measurement. Downward measurement.
Displays the measured figure.
[Continuous measurement]
4. After continuous measurement, the measure results are displayed for 8 seconds, then power turns off. If you press the POWER
button during power-on (while the internal display is lit), another measrement starts.
Displays the measured
figure. (Target 2)
Measurement
1. Press the POWER button for power-on.
(Power turns off 8 seconds after the last
operation.)
Immediately after power-on.
Stand-by.
(Initializing)
2. Aim at the target
.
Positionthetargetatthecenterofthereticle
Target focusing.
[Single measurement]
3. Press POWER button once to start single measurement.
Measuring.
4. After measurement, “distance” or “fail to measure” indicator are displayed for 8 seconds, then power turns off. If you press the POWER
button during power-on (while the internal display is lit), another single measurement starts.
Failure to measure or
unable to measure distance.
3. Keep pressing POWER button to start continuous measurement up to 20 seconds. The internal display shows “distance” and
“fail to measure” indicator alternately.
Note: Laser irradiaton mark is blinking during the measurement.
Note: If you stop pressing the button, the continuous measuremen stops
Failure to measure or
unable to measure distance.
[Continuous measurement]
4. After continuous measurement, the measure results are displayed for 8 seconds, then power turns off. If you press the POWER
button during power-on (while the internal display is lit), another measrement starts.
Upward measurement. Downward measurement.
Displays the measured
figure. (Target 1)
Displays the measured figure.
Displays the measured
figure. (Target 2)
4. Mérés után 8 másodpercre megjelenik a "hibás mérés" vagy a
"mért távolság" jelzés, aztán a gép kikapcsol. Ha megnyomja a
gombot a bekapcsolás közben (míg a belső
kijelző világít), egy új egyszeri mérés indul el.
"Hibás a mérés" vagy
Mérés felfelé Mérés lefelé
Mérés
"Nem lehet mérni" a
távolságot
Megjelenik a mért alak
3. Nyomja le és tartsa lenyomva a
4. Folyamatos mérés után kb. 8 másodpercre megjelenik a végső
másodpercig a folyamatos mérés elindításához. A belső kijelző a
mérés (mért távolság), aztán a gép kikapcsol.
"hibás mérés" és a "mért távolság" jelzést mutatja felváltva.
Ha megnyomja a
gombot a bekapcsolás
*
A lézersugárzás jele villog a mérés közben.
közben (míg a belső kijelző világít), elindul egy másik mérés.
*
Ha ujját leveszi a gombról, megáll a folyamatos mérés.
Amikor például egy golfpályán a kitűzőzászló nyelének távolságát
"Hibás a mérés" vagy
Megjelenik a mért
Megjelenik a mért
"Nem lehet mérni" a
alak (1. céltárgy)
alak (2. céltárgy)
zászlónyelet a folyamatos mérés funkcióval letapogatva könnyen
távolságot
megkapja az eredményt. Amennyiben Ön és a kitűzőzászló között
nincsenek tárgyak, a legkisebb szám mutatja a célba vett zászló
távolságát.
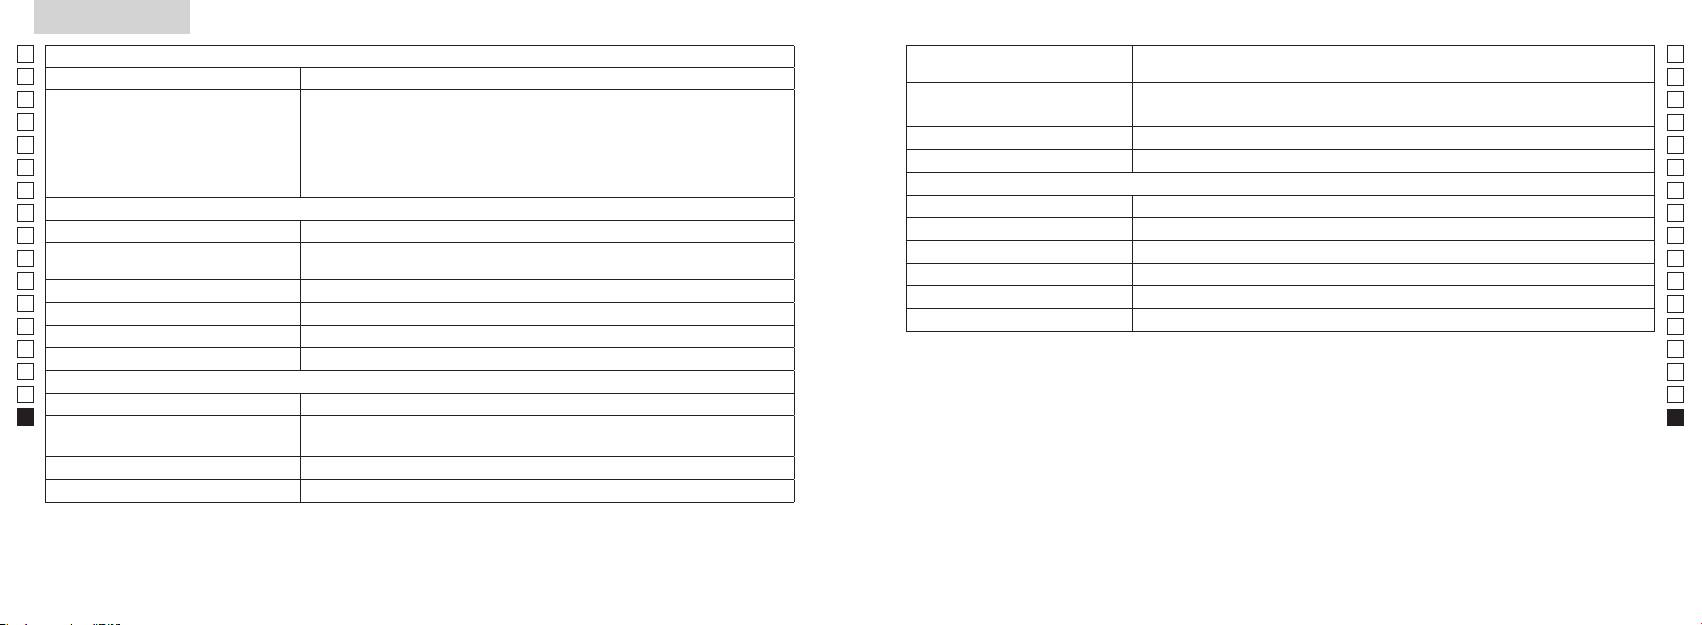
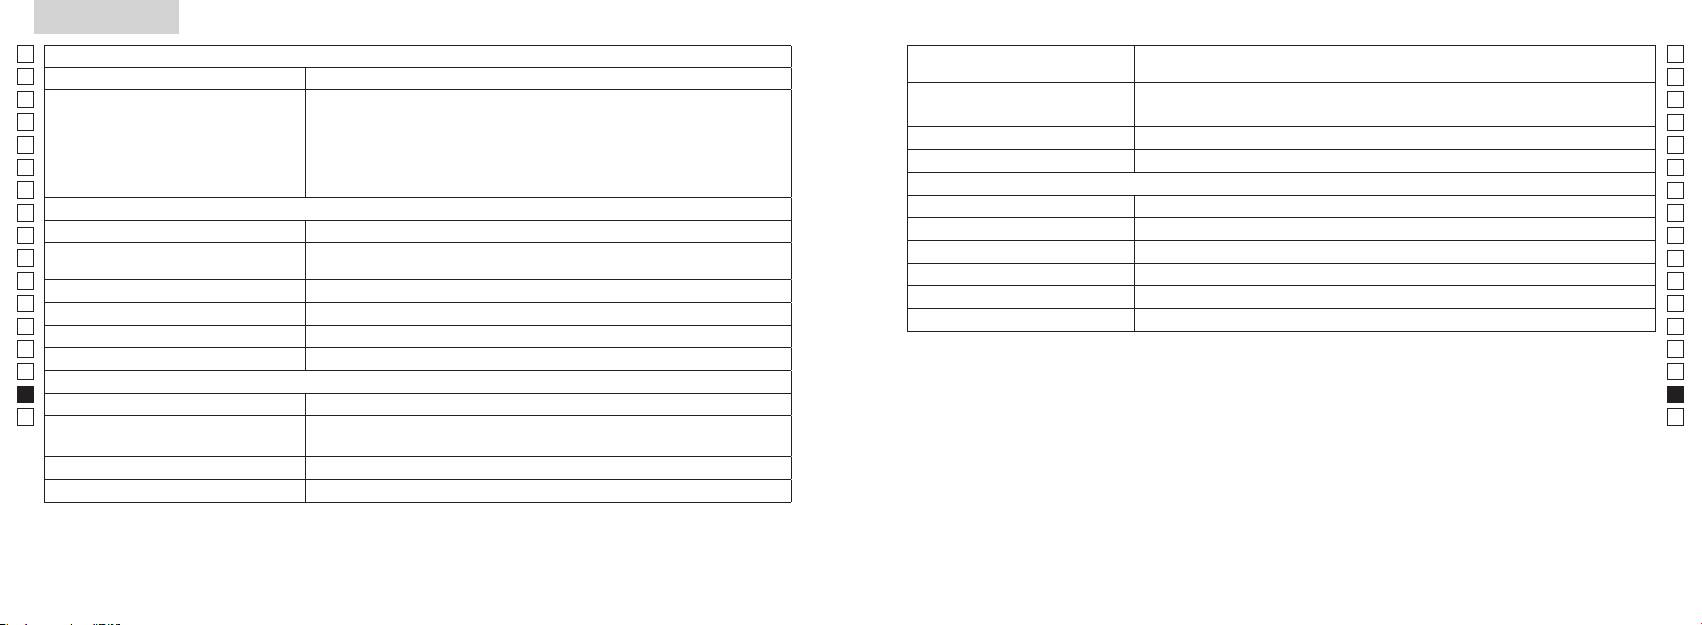
Specifikációk
Jp
Mérőrendszer
Ház: Vízhatlan (legnagyobb mélység 1 méter, legfeljebb 10 percig)*
Jp
Szerkezet
En
Mérési távolság
En
Es
Es
Biztonság
Fr
Fr
FCC 15. Rész, B S:
De
Távolság kijelzése (növekedés)
De
Környezet
It
It
Lézer
Se
Se
Optikai rendszer
Osztály
Nl
Nl
Nagyítás ( x ) 6
Hullámhossz (nm) 905
Ru
Ru
Az objektívlencse tényleges átmérője
Impulzushossz (ns) 12
Pt
ø 21
Pt
(mm)
15
Pl
Pl
Valós látószög (˚) 7,5
Sugárdivergencia (mrad)
Fi
Fi
Betekintési távolság (mm) 18,3
Működési páratartalom (%RH) 80 vagy kevesebb (pára kicsapódása nélkül)
No
No
Betekintő lencse (mm) ø 3,5
Dk
Dk
-
1
Dioptria beállítása ±4 m
* Vízhatlan modellek
Cz
A Nikon lézeres távolságmérő vízhatlan, optikai és megfigyelő rendszere nem károsodik, ha akár 10 perc időtartamra legfeljebb
Cz
1méter mély vízbe meríti vagy ejti.
Ro
Ro
Működési hőmérséklet (˚C) -10 —
A Nikon lézeres távolságmérő a következő előnyöket kínálja:
Hu
Hu
1 db CR2 lítium elem (3 V DC)
Áramforrás
Automatikus kikapcsolás (kb. 8 mp tétlenség után)
A Nikon lézeres távolságmérő használata során tartsa be a következőket:
Méretek (H x M x Sz) (mm) 113 x 70 x 39
Tömeg (g) Körülbelül 175 (elem nélkül)
** Az elemrekesz vízálló, nem vízhatlan. Ha a távolságmérőt vízbe meríti, az eszköz beázhat. Ha víz kerül az elemrekeszbe, törölje ki
onnan az összes nedvességet, és hagyjon időt a kiszáradására.
304 305
Egyebek
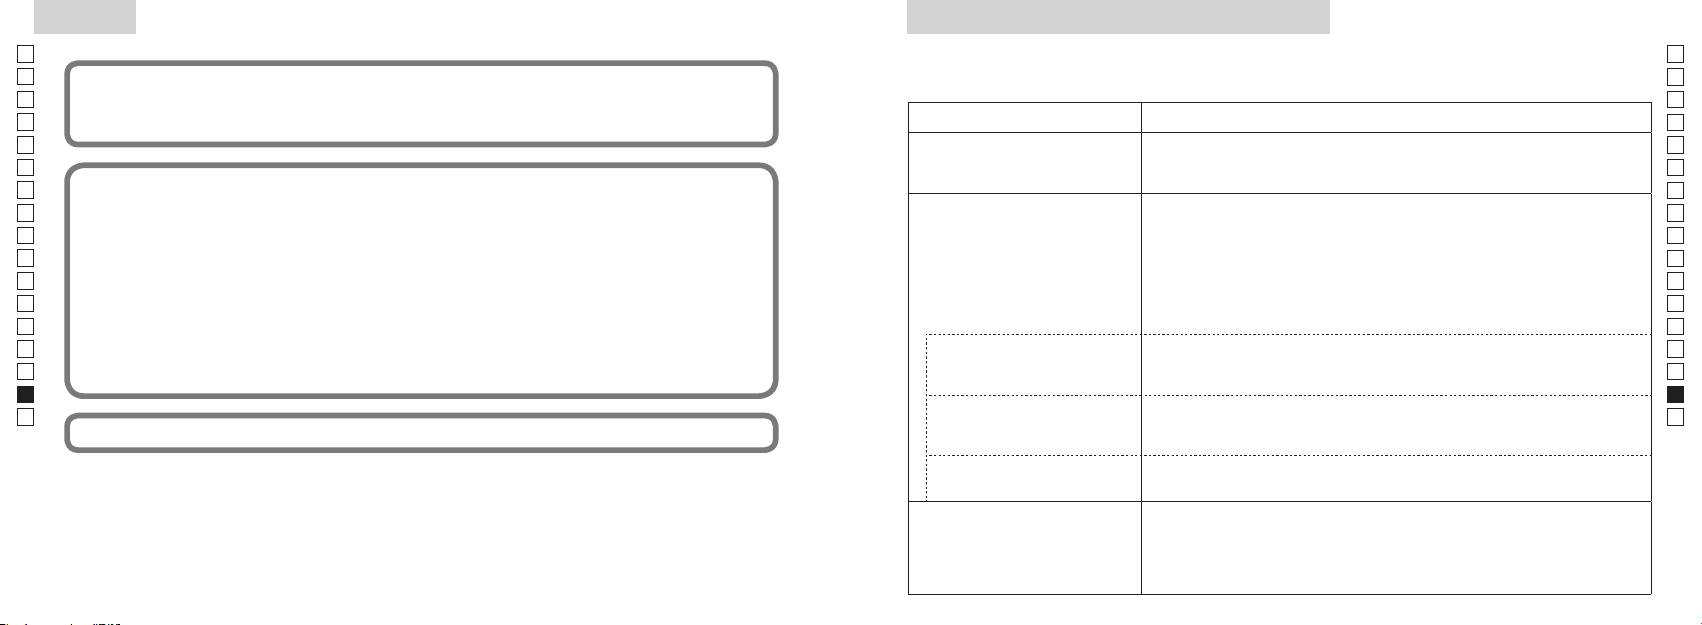
Hibakeresés/Javítás
Jp
Ha Nikon lézeres távolságmérőjét javítani kell, lépjen kapcsolatba a helyi viszonteladóval vagy azzal szaküzlettel, ahol vásárolta.
Jp
Havító táblázatot.
En
A berendezés eleget tesz az FCC szabályok 15. részében foglaltaknak. Az üzemeltetés a következő két feltétellel
En
Es
lehetséges:
Es
Hibajelenség Megoldási javaslatok
Fr
Fr
De
eredményezhetnek.
●
De
Az egység nem kapcsol be
●
It
(Az LCD nem világít)
It
● Cserélje le az elemet egy újra.
Se
Se
●
Nl
Nl
akadályozza az objektívlencse oldalán lévő lézerkibocsátó és -érzékelő rekeszt.
Ru
Ru
nyújtanak a káros interferenciák ellen, mikor a készüléket lakóövezetben használja. A készülék rádiófrekvenciás
●
Pt
energiát hoz létre, használ, és képes kisugározni. Ha nem az előírásoknak megfelelően szereli össze és használja, az
Nem lehet megmérni a távolságot
-érzékelő rekeszek tiszták. Szükség esetén tisztítsa meg őket.
Pt
● Nézze meg, hogy a céltárgy alakja és állapota alkalmas-e a lézersugár
Pl
Pl
esetben nem fordul elő interferencia. Ha ez a készülék olyan káros zavart okoz a rádiós vagy televíziós vételben,
visszaverésére.
Fi
amely megszüntethető a berendezés ki- és bekapcsolásával, akkor a következő intézkedésekkel próbálja meg
● Cserélje le az elemet egy újra.
Fi
No
megszüntetni a zavart:
No
● Mérés közben biztosan tartsa az egységet.
Dk
● A céltárgy a mérési tartományon belül legyen.
Dk
meg
Cz
Cz
Ro
A mérési tartománynál közelebb
Ro
●
lévő céltárgyak távolságát nem
Hu
céltárgy és a Nikon lézeres távolságmérő között.
Hu
lehet megmérni.
Bizonyos távolságon kívül eső
●
bizonyítékként.
céltárgyak nem mérhetők
céltárgy és a Nikon lézeres távolságmérő között.
● Cserélje le az elemet egy újra.
● Nézze meg, hogy a céltárgy alakja és állapota alkalmas-e a lézersugár
visszaverésére.
A mérési eredmény ingadozik
● Mérés közben biztosan tartsa az egységet.
●
céltárgy és a Nikon lézeres távolságmérő között.
306 307

Hibakeresés/Javítás
Jp
En
Es
Hibajelenség Megoldási javaslatok
Fr
De
● Cserélje le az elemet egy újra.
● Nézze meg, hogy a céltárgy alakja és állapota alkalmas-e a lézersugár
It
Helytelen eredmény jelenik meg
visszaverésére.
Se
●
és a Nikon lézeres távolságmérő között.
Nl
Ru
Pt
mivel valószínűleg hibásan működik.
Nikon lézeres távolságmérőt, csak a gyártó hivatalos képviselőjének. Sérülést vagy kárt okozhat a termékben, ha ezt az utasítást
Pl
nem tartja be.
Fi
No
Dk
Cz
Ro
Hu
308

NIKON VISION CO., LTD.
住所:〒 142-0043 東京都品川区二葉 1 丁目 3 番 25 号
