Nikon COOLSHOT – page 4
Manual for Nikon COOLSHOT
Table of contents
- Cautions before use SAFETY PRECAUTIONS SAFETY PRECAUTIONS CARE AND MAINTENANCE
- Key features Nomenclature/Composition
- Internal display Measurement display mode
- Target priority mode Distance display units Changing battery LED illumination
- Measurement
- Specifications
- Others Troubleshooting/Repair
- Troubleshooting/Repair
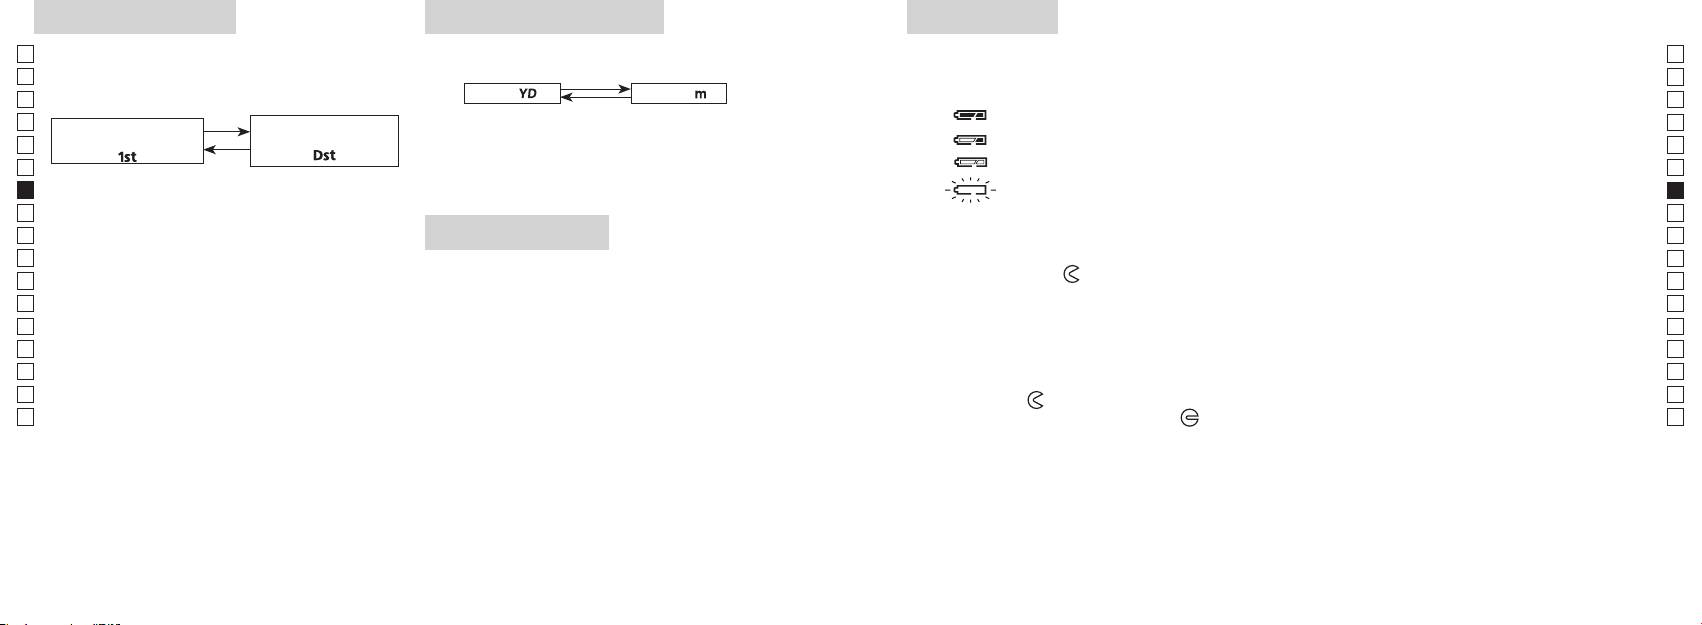
Målprioritetsläge
Distansdisplayenheter
Byta batteri
Jp
Jp
Typ av batteri: 3V CR2 litiumbatteri x1
En
Batteriindikatorer
En
Yard
[ ]
Meter [ ]
Es
Es
Fr
Fr
De
första målet
: Batteriladdningen börjar bli låg. Förbered dig på att byta ut batteriet.
De
「
」
「
」
It
knappen.
It
1.
Se
Se
på).
automatiskt av. Byt batteriet.
Nl
Nl
Ru
Ru
LED-belysning
1. Öppna locket till batterifacket
sekunder.
Pt
Pt
riktning mot
-markeringen. Det kan vara trögt på grund av gummipackningen som skyddar mot
Pl
Pl
vattenintrång.
Fi
Fi
2. Byt ut det gamla batteriet mot ett nytt
*
No
No
för mörka för att visas på LCD-panelen.
*
Dk
Dk
*
.
Cz
Cz
*
3. Stäng locket till batterifacket
Ro
Ro
-markeringen mot
●
Hu
el. likn., vrid batteriluckan mot
Hu
Batteriets livslängd
Kontinuerlig användning: Ca 13.000 gånger (vid 20 °C)
120 121

Jp
Jp
En
En
Es
Es
Fr
Fr
De
De
It
It
Se
Se
Nl
Nl
Ru
Ru
Pt
Pt
Pl
Pl
Fi
Fi
No
No
Dk
Dk
Cz
Cz
Ro
Ro
Hu
Hu
122 123
Measurement
1. Press the POWER button for power-on.
(Power turns off 8 seconds after the last
operation.)
Immediately after power-on.
3. Press POWER button once to start single measurement.
4. After measurement, “distance” or “fail to measure” indicator are displayed for 8 seconds, then power turns off. If you press the POWER
button during power-on (while the internal display is lit), another single measurement starts.
unable to measure distance.
3. Keep pressing POWER button to start continuous measurement up to 20 seconds. The internal display shows “distance” and
“fail to measure” indicator alternately.
Note: Laser irradiaton mark is blinking during the measurement.
Note: If you stop pressing the button, the continuous measuremen stops
2. Aim at the target
Positionthetargetatthecenterofthereticle
[Single measurement]
Failure to measure or
unable to measure distance.
[Continuous measurement]
4. After continuous measurement, the measure results are displayed for 8 seconds, then power turns off. If you press the POWER
button during power-on (while the internal display is lit), another measrement starts.
Failure to measure or
Target focusing.
Measuring.
(Initializing)
.
Upward measurement. Downward measurement.
Displays the measured
figure. (Target 1)
Displays the measured figure.
Stand-by.
Displays the measured
figure. (Target 2)
Measurement
1. Press the POWER button for power-on.
(Power turns off 8 seconds after the last
operation.)
Immediately after power-on.
(Initializing)
3. Press POWER button once to start single measurement.
Measuring.
4. After measurement, “distance” or “fail to measure” indicator are displayed for 8 seconds, then power turns off. If you press the POWER
button during power-on (while the internal display is lit), another single measurement starts.
Failure to measure or
unable to measure distance.
Displays the measured
figure. (Target 1)
3. Keep pressing POWER button to start continuous measurement up to 20 seconds. The internal display shows “distance” and
“fail to measure” indicator alternately.
Note: Laser irradiaton mark is blinking during the measurement.
Note: If you stop pressing the button, the continuous measuremen stops
Target focusing.
2. Aim at the target
.
Positionthetargetatthecenterofthereticle
[Single measurement]
Failure to measure or
unable to measure distance.
Upward measurement. Downward measurement.
Displays the measured figure.
[Continuous measurement]
4. After continuous measurement, the measure results are displayed for 8 seconds, then power turns off. If you press the POWER
button during power-on (while the internal display is lit), another measrement starts.
Stand-by.
Displays the measured
figure. (Target 2)
Measurement
1. Press the POWER button for power-on.
(Power turns off 8 seconds after the last
operation.)
Immediately after power-on.
Stand-by.
(Initializing)
2. Aim at the target
.
Positionthetargetatthecenterofthereticle
3. Press POWER button once to start single measurement.
4. After measurement, “distance” or “fail to measure” indicator are displayed for 8 seconds, then power turns off. If you press the POWER
button during power-on (while the internal display is lit), another single measurement starts.
unable to measure distance.
3. Keep pressing POWER button to start continuous measurement up to 20 seconds. The internal display shows “distance” and
“fail to measure” indicator alternately.
Note: Laser irradiaton mark is blinking during the measurement.
Note: If you stop pressing the button, the continuous measuremen stops
[Single measurement]
Failure to measure or
unable to measure distance.
[Continuous measurement]
4. After continuous measurement, the measure results are displayed for 8 seconds, then power turns off. If you press the POWER
button during power-on (while the internal display is lit), another measrement starts.
Failure to measure or
Target focusing.
Measuring.
Upward measurement. Downward measurement.
Displays the measured
figure. (Target 1)
Displays the measured figure.
Displays the measured
figure. (Target 2)
Mätning
IAKTTAG FÖRSIKTIGHET — Användning av reglage, justeringar eller funktioner för andra ändamål än de
【
Enskild mätning
】
avsedda kan leda till exponering av farlig strålning.
3. Tryck på
knappen en gång för att start en
1. Förberedelse
2. Ögonmussla av gummi
skick.
3. Dioptrijustering
du tittar genom ögonmusslan, rotera dioptrijusteringsringen medurs till dess att LCD
hamnar i fokus.
Om dioptrin inte justeras efter din syn kan du få svårt att korrekt fokusera på dina mål.
【
Funktionen Kontinuerlig mätning
】
4. Mätning
*
2. Sikta mot målet.
hårkorset.
Direkt efter att strömmen
Insiktning
slås på (Initierar).
Measurement
1. Press the POWER button for power-on.
(Power turns off 8 seconds after the last
operation.)
Immediately after power-on.
Stand-by.
(Initializing)
2. Aim at the target
.
Positionthetargetatthecenterofthereticle
Target focusing.
[Single measurement]
3. Press POWER button once to start single measurement.
Measuring.
4. After measurement, “distance” or “fail to measure” indicator are displayed for 8 seconds, then power turns off. If you press the POWER
button during power-on (while the internal display is lit), another single measurement starts.
Failure to measure or
Upward measurement. Downward measurement.
unable to measure distance.
Displays the measured figure.
[Continuous measurement]
3. Keep pressing POWER button to start continuous measurement up to 20 seconds. The internal display shows “distance” and
“fail to measure” indicator alternately.
Note: Laser irradiaton mark is blinking during the measurement.
Note: If you stop pressing the button, the continuous measuremen stops
Failure to measure or
unable to measure distance.
4. After continuous measurement, the measure results are displayed for 8 seconds, then power turns off. If you press the POWER
button during power-on (while the internal display is lit), another measrement starts.
Displays the measured
figure. (Target 1)
Displays the measured
figure. (Target 2)
Measurement
1. Press the POWER button for power-on.
(Power turns off 8 seconds after the last
operation.)
Immediately after power-on.
Stand-by.
(Initializing)
2. Aim at the target
.
Positionthetargetatthecenterofthereticle
Target focusing.
[Single measurement]
3. Press POWER button once to start single measurement.
Measuring.
4. After measurement, “distance” or “fail to measure” indicator are displayed for 8 seconds, then power turns off. If you press the POWER
button during power-on (while the internal display is lit), another single measurement starts.
Failure to measure or
Upward measurement. Downward measurement.
unable to measure distance.
Displays the measured figure.
[Continuous measurement]
3. Keep pressing POWER button to start continuous measurement up to 20 seconds. The internal display shows “distance” and
“fail to measure” indicator alternately.
Note: Laser irradiaton mark is blinking during the measurement.
Note: If you stop pressing the button, the continuous measuremen stops
Failure to measure or
unable to measure distance.
Displays the measured
figure. (Target 1)
4. After continuous measurement, the measure results are displayed for 8 seconds, then power turns off. If you press the POWER
button during power-on (while the internal display is lit), another measrement starts.
Displays the measured
figure. (Target 2)
Measurement
1. Press the POWER button for power-on.
(Power turns off 8 seconds after the last
operation.)
Immediately after power-on.
Stand-by.
(Initializing)
2. Aim at the target
.
Positionthetargetatthecenterofthereticle
Target focusing.
[Single measurement]
3. Press POWER button once to start single measurement.
Measuring.
4. After measurement, “distance” or “fail to measure” indicator are displayed for 8 seconds, then power turns off. If you press the POWER
button during power-on (while the internal display is lit), another single measurement starts.
Failure to measure or
unable to measure distance.
3. Keep pressing POWER button to start continuous measurement up to 20 seconds. The internal display shows “distance” and
“fail to measure” indicator alternately.
Note: Laser irradiaton mark is blinking during the measurement.
Note: If you stop pressing the button, the continuous measuremen stops
Failure to measure or
unable to measure distance.
[Continuous measurement]
4. After continuous measurement, the measure results are displayed for 8 seconds, then power turns off. If you press the POWER
button during power-on (while the internal display is lit), another measrement starts.
Upward measurement. Downward measurement.
Displays the measured
figure. (Target 1)
Displays the measured figure.
Displays the measured
figure. (Target 2)
Measurement
1. Press the POWER button for power-on.
(Power turns off 8 seconds after the last
operation.)
Immediately after power-on.
Stand-by.
(Initializing)
2. Aim at the target
.
Positionthetargetatthecenterofthereticle
Target focusing.
[Single measurement]
3. Press POWER button once to start single measurement.
Measuring.
4. After measurement, “distance” or “fail to measure” indicator are displayed for 8 seconds, then power turns off. If you press the POWER
button during power-on (while the internal display is lit), another single measurement starts.
unable to measure distance.
3. Keep pressing POWER button to start continuous measurement up to 20 seconds. The internal display shows “distance” and
“fail to measure” indicator alternately.
Note: Laser irradiaton mark is blinking during the measurement.
Note: If you stop pressing the button, the continuous measuremen stops
unable to measure distance.
4. After continuous measurement, the measure results are displayed for 8 seconds, then power turns off. If you press the POWER
button during power-on (while the internal display is lit), another measrement starts.
[Continuous measurement]
Failure to measure or
Failure to measure or
Upward measurement. Downward measurement.
Displays the measured
figure. (Target 1)
Displays the measured figure.
Displays the measured
figure. (Target 2)
Measurement
1. Press the POWER button for power-on.
(Power turns off 8 seconds after the last
operation.)
Immediately after power-on.
Stand-by.
(Initializing)
2. Aim at the target
.
Positionthetargetatthecenterofthereticle
Target focusing.
[Single measurement]
3. Press POWER button once to start single measurement.
4. After measurement, “distance” or “fail to measure” indicator are displayed for 8 seconds, then power turns off. If you press the POWER
button during power-on (while the internal display is lit), another single measurement starts.
unable to measure distance.
3. Keep pressing POWER button to start continuous measurement up to 20 seconds. The internal display shows “distance” and
“fail to measure” indicator alternately.
Note: Laser irradiaton mark is blinking during the measurement.
Note: If you stop pressing the button, the continuous measuremen stops
unable to measure distance.
4. After continuous measurement, the measure results are displayed for 8 seconds, then power turns off. If you press the POWER
button during power-on (while the internal display is lit), another measrement starts.
[Continuous measurement]
Failure to measure or
Failure to measure or
Measuring.
Upward measurement. Downward measurement.
Displays the measured
figure. (Target 1)
Displays the measured figure.
Displays the measured
figure. (Target 2)
Measurement
1. Press the POWER button for power-on.
(Power turns off 8 seconds after the last
operation.)
Immediately after power-on.
Stand-by.
(Initializing)
2. Aim at the target
.
Positionthetargetatthecenterofthereticle
Target focusing.
[Single measurement]
3. Press POWER button once to start single measurement.
Measuring.
4. After measurement, “distance” or “fail to measure” indicator are displayed for 8 seconds, then power turns off. If you press the POWER
button during power-on (while the internal display is lit), another single measurement starts.
unable to measure distance.
3. Keep pressing POWER button to start continuous measurement up to 20 seconds. The internal display shows “distance” and
“fail to measure” indicator alternately.
Note: Laser irradiaton mark is blinking during the measurement.
Note: If you stop pressing the button, the continuous measuremen stops
unable to measure distance.
4. After continuous measurement, the measure results are displayed for 8 seconds, then power turns off. If you press the POWER
button during power-on (while the internal display is lit), another measrement starts.
[Continuous measurement]
Failure to measure or
Failure to measure or
Upward measurement. Downward measurement.
Displays the measured
figure. (Target 1)
Displays the measured figure.
Displays the measured
figure. (Target 2)
Measurement
1. Press the POWER button for power-on.
(Power turns off 8 seconds after the last
operation.)
Immediately after power-on.
Stand-by.
(Initializing)
2. Aim at the target
.
Positionthetargetatthecenterofthereticle
Target focusing.
[Single measurement]
3. Press POWER button once to start single measurement.
Measuring.
4. After measurement, “distance” or “fail to measure” indicator are displayed for 8 seconds, then power turns off. If you press the POWER
button during power-on (while the internal display is lit), another single measurement starts.
Failure to measure or
unable to measure distance.
Displays the measured
figure. (Target 1)
3. Keep pressing POWER button to start continuous measurement up to 20 seconds. The internal display shows “distance” and
“fail to measure” indicator alternately.
Note: Laser irradiaton mark is blinking during the measurement.
Note: If you stop pressing the button, the continuous measuremen stops
Failure to measure or
unable to measure distance.
Upward measurement. Downward measurement.
Displays the measured figure.
[Continuous measurement]
4. After continuous measurement, the measure results are displayed for 8 seconds, then power turns off. If you press the POWER
button during power-on (while the internal display is lit), another measrement starts.
Displays the measured
figure. (Target 2)
Measurement
1. Press the POWER button for power-on.
(Power turns off 8 seconds after the last
operation.)
Immediately after power-on.
Stand-by.
(Initializing)
2. Aim at the target
.
Positionthetargetatthecenterofthereticle
Target focusing.
[Single measurement]
3. Press POWER button once to start single measurement.
Measuring.
4. After measurement, “distance” or “fail to measure” indicator are displayed for 8 seconds, then power turns off. If you press the POWER
button during power-on (while the internal display is lit), another single measurement starts.
Failure to measure or
unable to measure distance.
3. Keep pressing POWER button to start continuous measurement up to 20 seconds. The internal display shows “distance” and
“fail to measure” indicator alternately.
Note: Laser irradiaton mark is blinking during the measurement.
Note: If you stop pressing the button, the continuous measuremen stops
Failure to measure or
unable to measure distance.
[Continuous measurement]
4. After continuous measurement, the measure results are displayed for 8 seconds, then power turns off. If you press the POWER
button during power-on (while the internal display is lit), another measrement starts.
Upward measurement. Downward measurement.
Displays the measured
figure. (Target 1)
Displays the measured figure.
Displays the measured
figure. (Target 2)
indikatorn "fail to measure" (Avstånd) eller "fail to
du trycker på
på),
3. Tryck och håll nere
Om du trycker på
*
Laserstrålningsm
*
"Misslyckad
Visar den
Visar den
(Mål 1)
(Mål 2)
avstånd
mellan dig och flaggan.
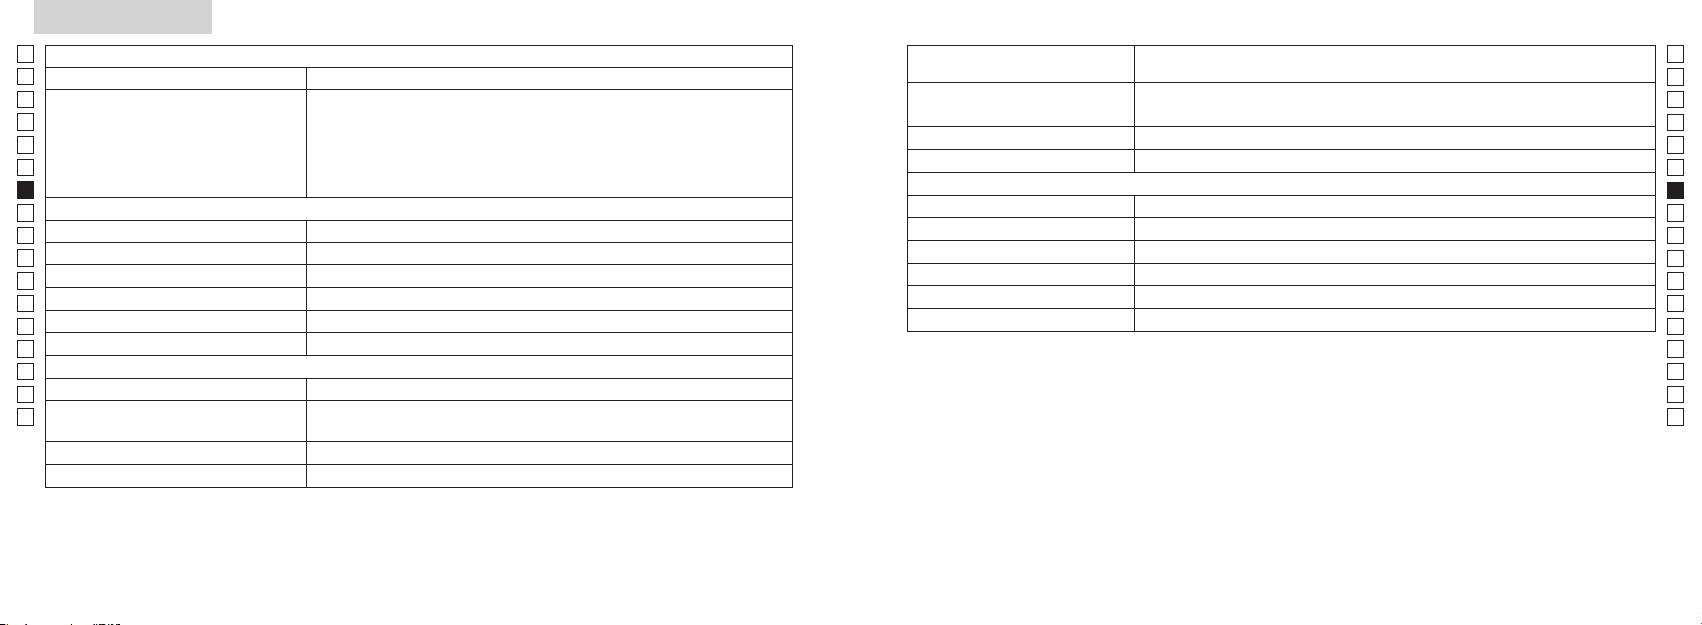
Specifikationer
Jp
Jp
Konstruktion
En
En
Es
Es
Fr
Fr
Horisontellt avstånd, lutningsjusterat avstånd (övre fyrsiffrig):
FCC D
De
Avståndsvisning (ökning)
De
Miljö
It
Höjd (nedre 3-siffrig):
It
Laser
Se
Se
Optiskt system
Klass
Nl
Nl
Förstoringsgrad (x) 6
(nm) 905
Ru
Ru
Objektivets effektiva diameter (mm) ø21
12
Pt
Pt
7,5
15
Pl
Pl
18,3
Strålens avvikelse (mrad)
Fi
Fi
Utgångspupill (mm) ø3,5
Driftsluftfuktighet (%RH) n kondensation)
No
No
-
1
Dioptrijustering ±4m
Dk
Dk
*Vattentäta modeller:
Övrigt
Cz
Cz
Driftstemperatur (˚C) -10 —
djup om 1 meter i upp till 10 minuter.
Ro
Ro
Nikon Laser Rangefinder har följande fördelar:
Hu
CR2 litiumbatteri x 1 (DC 3V)
Hu
Strömförsörjning
Mått (L x H x B) 113 x 70 x 39
Observera följande när du använder Nikon Laser Rangefinder:
Vikt (g) Ca 175 (utan batteri)
124 125

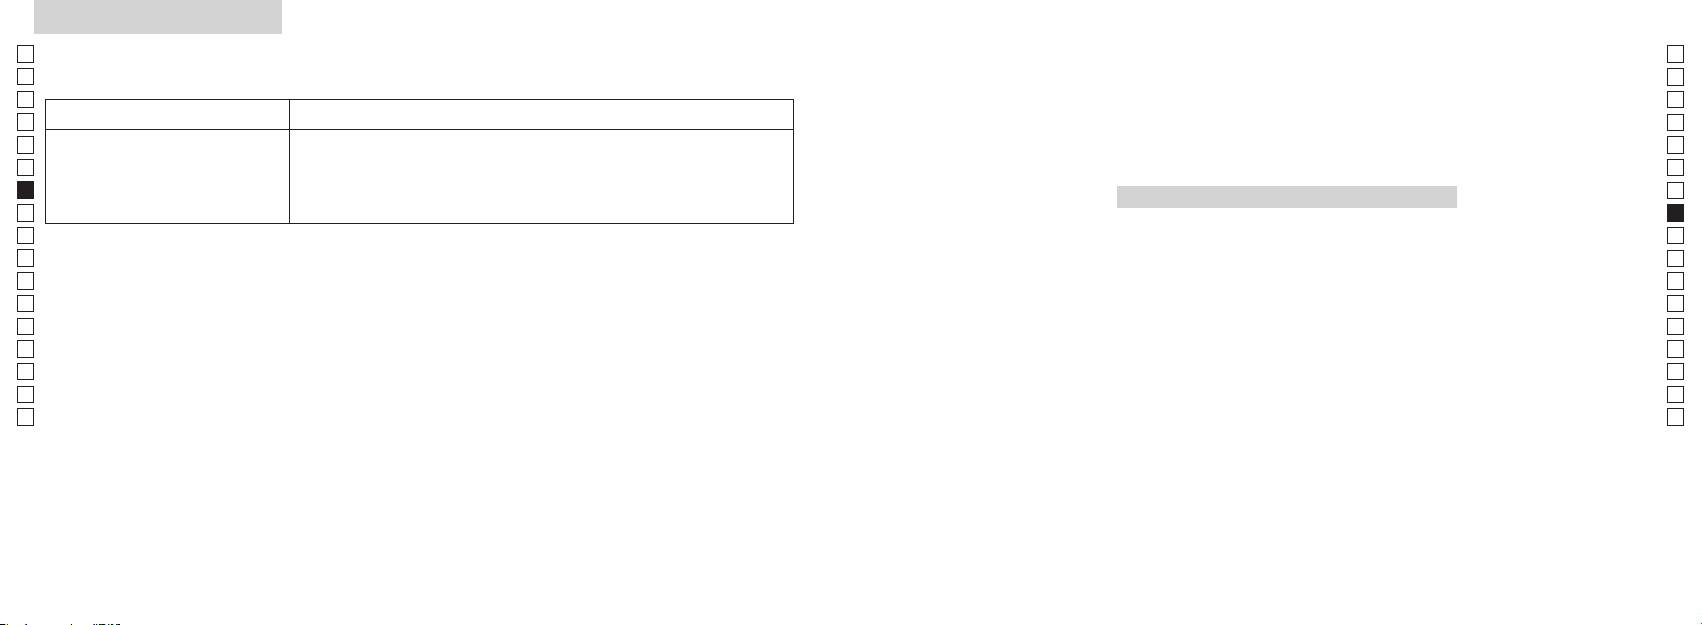
Övrigt
Felsökning/Reparation
Jp
Jp
En
En
Es
Es
Symptom Kontrollpunkter
Fr
Fr
De
●
De
●
It
It
● Byt ut det gamla batteriet mot ett nytt.
Se
Se
Nl
● Se till att inte något, till exempel din hand eller ditt finger, blockerar laserstrålens
Nl
öppning eller laserdetektoröppningen på objektivlinssidan.
Ru
Ru
radiokommunikationer. Det finns emellertid inga garantier för att interferens inte kan uppstå i en specifik installation.
● Se till att laserstrålens öppning och laserdetektoröppningen på objektivlinssidan
Pt
Pt
Pl
●
Pl
● Byt ut det gamla batteriet mot ett nytt.
Fi
Fi
No
●
No
●
Dk
Dk
Cz
Cz
störningsorsakanden utrustning.
Ro
●
Ro
Hu
Rangefinder och målet.
Hu
bevismaterial.
●
Rangefinder och målet.
● Byt ut det gamla batteriet mot ett nytt.
●
●
●
Rangefinder och målet.
126 127
Felsökning/Reparation
Jp
Jp
En
En
Es
Es
Symptom Kontrollpunkter
Fr
Fr
De
De
● Byt ut det gamla batteriet mot ett nytt.
Nederlands
It
●
It
Felaktiga resultat visas
●
Se
Se
Rangefinder och målet.
INHOUD
Nl
Nl
Voorzorgsmaatregelen ................................... 130-133
Ru
Ru
Functieoverzicht ........................................................ 134
Pt
eftersom ett fel kan ha uppstått på enheten.
Pt
kontrollera eller reparera Nikon Laser Rangefinder. Om detta ignoreras kan det leda till personskador eller skador på produkten.
Benamingen/Onderdelen ...................................... 135
Pl
Pl
Interne display ............................................................ 136
Fi
Fi
Weergavemodus metingen ................................... 137
No
No
Doelprioriteitmodus/Eenheden
Dk
Dk
afstandsweergave/LED-verlichting ..................... 138
Cz
Cz
Batterij vervangen ..................................................... 139
Ro
Ro
Meting .................................................................. 140-141
Hu
Hu
Specificaties ........................................................ 142-143
Overig ............................................................................ 144
Problemen oplossen/Reparatie .................. 145-146
128 129

Voorzorgsmaatregelen
Voorzorgsmaatregelen
Jp
Het is belangrijk dat u zich strikt
VEILIGHEIDSINSTRUCTIES
Jp
aan de volgende richtlijnen
op buiten het bereik van kinderen.
En
(Laser)
En
houdt. Alleen dan kunt u
De Nikon laserafstandsmeter maakt
Es
Als u zich bij het bedienen of afstellen van het instrument niet houdt aan de instructies in
Es
optimaal gebruik maken van het
laserafstandsmeter beschadigd
gebruik van een onzichtbare laserstraal.
ditdocument, kan dit blootstelling aan gevaarlijke straling tot gevolg hebben.
Fr
De volgende aandachtspunten zijn
raakt, of als u een vreemd geluid
instrument en gevaarlijke
Fr
daarom belangrijk:
hoort nadat het apparaat is
De
situaties voorkomen. Het is
De
〇 Het is raadzaam dit product pas te gebruiken nadat u de Voorzorgsmaatregelen en
gevallen of door een andere
raadzaam dit product pas te
Waarschuwing
It
oorzaak, moet u de batterij
It
gebruiksinstructies zorgvuldig hebt doorgelezen.
gebruiken nadat u de
Se
Meetknop terwijl u in het objectief
onmiddellijk verwijderen en het
Se
〇 Bewaar deze handleiding in de buurt van uw laserafstandsmeter om hem indien nodig te kunnen
'Voorzorgsmaatregelen' en
kijkt. Als u dit wel doet, dan kunnen
instrument niet meer gebruiken.
Nl
raadplegen.
gebruiksinstructies zorgvuldig
Nl
uw ogen beschadigd raken.
hebt doorgelezen. Bewaar deze
Ru
〇
Ru
handleiding in de buurt van uw
Pt
kan veroorzaken.
Pt
laserafstandsmeter om hem
Pl
indien nodig te kunnen
Pl
optisch instrument, zoals door een
Fi
raadplegen.
lens of verrekijker, en kijk er ook niet
Fi
● De specificaties en het ontwerp kunnen zonder kennisgeving vooraf worden gewijzigd.
No
naar met het blote oog. Uw ogen
No
●
kunnen anders beschadigd raken.
Dk
WAARSCHUWING
Dk
handleiding, hetzij geheel of gedeeltelijk, in welke vorm dan ook (met uitzondering van een kort
Deze aanwijzing maakt u erop attent
Cz
Cz
citaat in een beschouwend artikel of recensie) niet toegestaan.
dan uw vingers uit de buurt van de
dat iedere vorm van incorrect gebruik
zodat u niet
Ro
● NIKON VISION CO., LTD. behoudt zich het recht voor de inhoud van deze handleiding te allen
of veronachtzaming van de hier
Ro
beschreven inhoud mogelijk kan
per ongeluk de laserstraal activeert.
Hu
tijde zonder kennisgeving vooraf te wijzigen.
Hu
leiden tot ernstig letsel of de dood.
instrument langere tijd niet gebruikt.
VOORZICHTIG
Deze aanwijzing maakt u erop attent
laserafstandsmeter niet en breng
dat iedere vorm van incorrect gebruik
geen aanpassingen aan. De laser kan
of veronachtzaming van de hier
schadelijk zijn voor uw gezondheid.
beschreven inhoud mogelijk kan
leiden tot lichamelijk letsel of
aangepast of gerepareerd is, valt niet
onherstelbare beschadiging van
onder de fabrieksgarantie.
eigendommen.
130 131

Voorzorgsmaatregelen
Jp
VEILIGHEIDSINSTRUCTIES
letsel of storing veroorzaken.
De volgende aandachtspunten zijn
VEILIGHEIDSINSTRUCTIES
ONDERHOUD EN OPSLAG
Opslag
Jp
-
daarom belangrijk:
(Monoculair)
Voorzichtig
Lenzen
En
En
riaal en andere kleine onderdelen
de lens beslaan of beschimmelen.
Es
Het optische systeem van de Nikon
Es
buiten het bereik van kinderen.
minpolen op de juiste manier in het
laserafstandsmeter waterdicht is,
voor het stofvrij maken van het
Berg de Nikon laserafstandsmeter
laserafstandsmeter is voorzien van
Fr
instrument.
kunt u het instrument niet onder
lensoppervlak.
daarom op een koele en droge
Fr
een monoculaire kijker waarmee op
rubberen oogschelp of andere
water gebruiken.
plaats op.
De
het doel wordt gericht. De volgende
De
kleine onderdelen in hun mond
of als u het instrument langere tijd
vingerafdrukken, op het
Droog het instrument na gebruik op
It
aandachtspunten zijn belangrijk:
stoppen. Raadpleeg onmiddellijk
niet gaat gebruiken.
It
zand en modder zo snel mogelijk
lensoppervlak verwijdert u heel
een regenachtige dag op
Waarschuwing
Se
een arts als kinderen dergelijke
van de body van de afstandsmeter.
voorzichtig met een schone, zachte
kamertemperatuur en berg hem
Se
onderdelen hebben ingeslikt.
batterijvak.
katoenen doek of een olievrij
vervolgens op een koele en droge
Nl
de zon, een fel licht of de
Nl
samen met
schone doek.
lensdoekje van goede kwaliteit.
plaats op.
laserstraal wanneer u de Nikon
Ru
langere tijd gebruikt, kan uw
sleutels of munten in een zak of tas.
Ru
laserafstandsmeter gebruikt.
huid ontstoken raken. Raadpleeg
Hierdoor kan de batterij kortsluiten
Pt
op een warme of zonnige dag
een kleine hoeveelheid pure alcohol
Pt
Voorzichtig
onmiddellijk een arts als u last krijgt
of oververhit raken.
niet achter in de auto. Bewaar het
Pl
Pl
van ontstekingsverschijnselen.
instrument ook niet in de buurt van
fluwelen doeken of gewone tissues,
Fi
Meetknop wanneer u de Nikon
of vuur. Haal de batterij nooit uit
apparatuur die warmte genereert.
want deze kunnen krassen
Fi
laserafstandsmeter niet gebruikt.
altijd in de beschermtas.
elkaar.
No
Dit kan een nadelig effect hebben op
No
het instrument of hem beschadigen.
reinigen van het lensoppervlak geen
Dk
loopt. Als u dit wel doet dan kunt
Dk
niet goed werkt, gebruik hem dan
doek die ook al is gebruikt voor het
Cz
u mogelijk letsel of een storing in
niet meer en vraag uw plaatselijke
batterij in contact komt met
niet in direct zonlicht liggen.
schoonmaken van de body.
Cz
het instrument veroorzaken door
dealer waar u het instrument ter
kleding of huid, spoel dan direct
Ultraviolette straling en extreme
Ro
Body
Ro
ergens tegenaan te lopen, iemand
reparatie heen kunt sturen.
met veel water. Mocht er vloeistof
hitte kunnen een nadelig effect
Hu
te raken, te vallen of een ander
uit een beschadigde batterij in uw
Hu
hebben op het instrument of zelfs
schoon met een zachte, schone doek
ongeluk te krijgen.
VEILIGHEIDSINSTRUCTIES
ogen komen, spoel dan direct met
beschadiging tot gevolg hebben.
nadat u het eventueel aanwezige
(Lithiumbatterij)
schoon water en raadpleeg een arts.
stof voorzichtig hebt weggeblazen
aan zijn draagriem. U kunt dan
Als u de batterij niet op de juiste
wordt blootgesteld aan plotselinge
iemand raken en eventueel
de batterij aan de plaatselijke
manier behandelt, kan deze barsten
temperatuurwisselingen kan er
benzeen, verdunner of andere
verwonden.
regelgeving.
en gaan lekken. Dit kan leiden tot
condensvorming optreden op
reinigingsmiddelen die organische
corrosie van het instrument en
de lensoppervlakken. U mag het
oplosmiddelen bevatten.
stabiel oppervlak. Doet u dit niet
vlekken veroorzaken op uw kleding.
instrument dan pas weer gebruiken
dan kan het instrument vallen en
nadat het vocht is verdampt.
schoonmaakinstrument dat lucht
blaast uit een mondstuk.
132 133
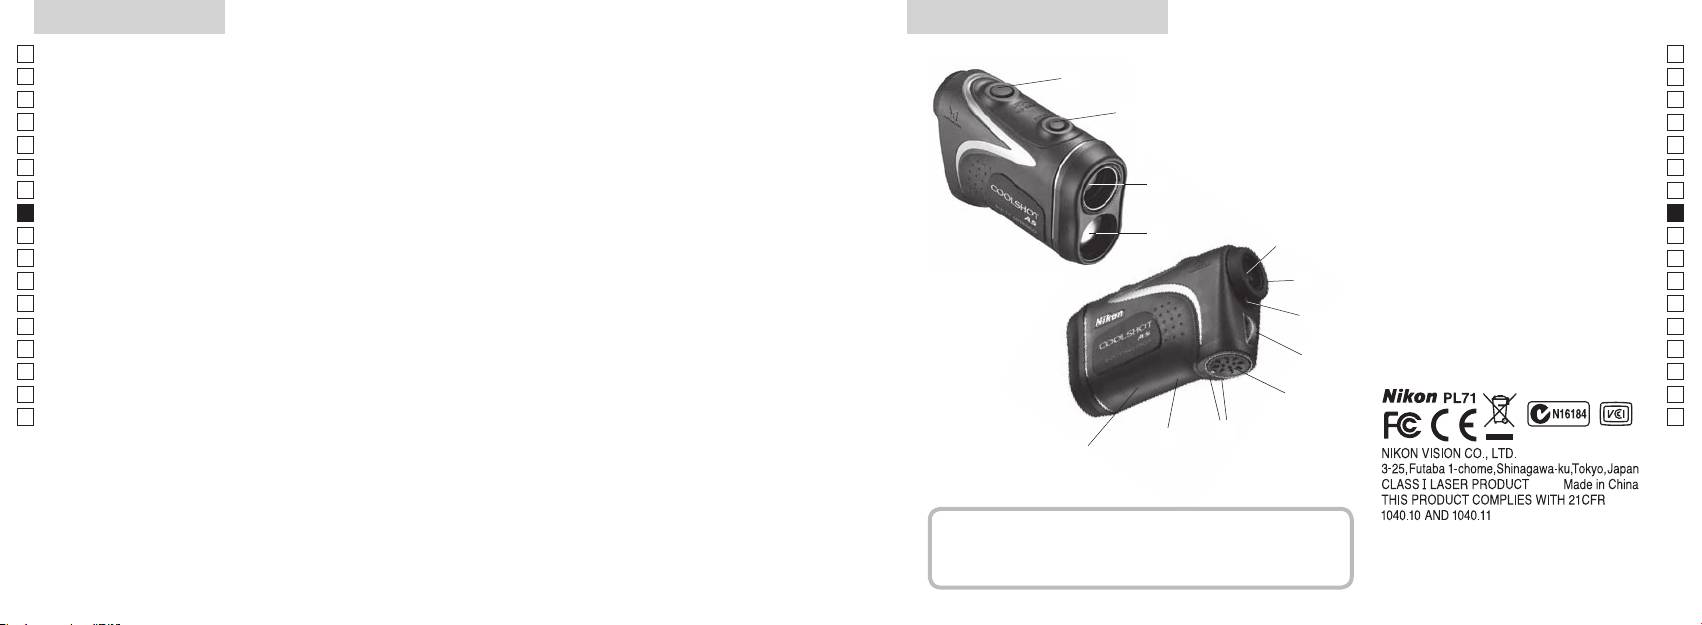
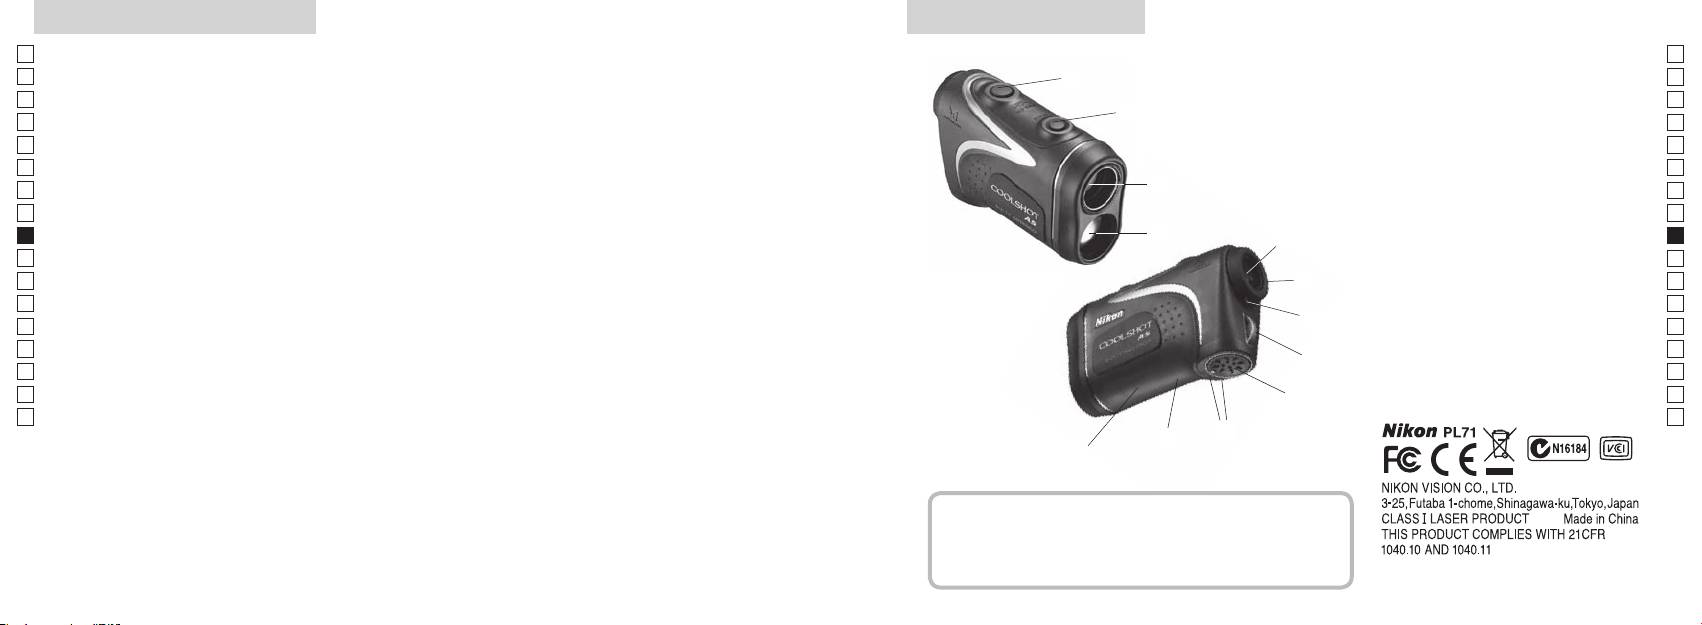
Functieoverzicht Benamingen/Onderdelen
Jp
Onder de volgende omstandigheden is meten
Jp
gemakkelijker:
1
En
4
En
Opening laserstraal
Es
coating
Es
3
2 Opening voor laserdetector
Fr
Fr
3
De
De
4
It
is bij het golfen
90 graden is
It
5Monoculaire zoeker met 6x
1
Se
Se
weergegeven. Hiertussen kan gemakkelijk worden
In de volgende gevallen kunnen metingen onnauwkeurig
vergroting
Nl
gewisseld
zijn of mislukken:
Nl
6
Ru
2
5
Ru
7 Dioptrie-index
doelprioriteitssysteem, waarbij de prioriteit ingesteld kan
Pt
worden afhankelijk van het doel
8 Bevestigingsoog voor draagriem
Pt
Pl
afstandsmeter
6
9 Deksel batterijvak
Pl
wordt de functie continumeting gestart
Fi
!p
Fi
7
No
8sec. niet wordt gebruikt)
batterijvak
No
!q Label met productnummer
Dk
Dk
geactiveerd
8
!w FDA-informatie
Cz
Cz
richting
Ro
9
Ro
Hu
Hu
!p
De Nikon laserafstandsmeter meet met behulp van een
!q
onzichtbare laserstraal. Het instrument meet hoe lang de
!w
laserstraal doet over de afstand tussen de afstandsmeter
en het doel en weer terug. Het reflecterend vermogen van
de laser en de meetresultaten kunnen variëren afhankelijk
van de weers- en omgevingsomstandigheden en de kleur,
Onderdelen
het materiaal, de grootte, de vorm en andere kenmerken
van het doel.
................................... x1
........................x1
................... x1
...x1
134 135
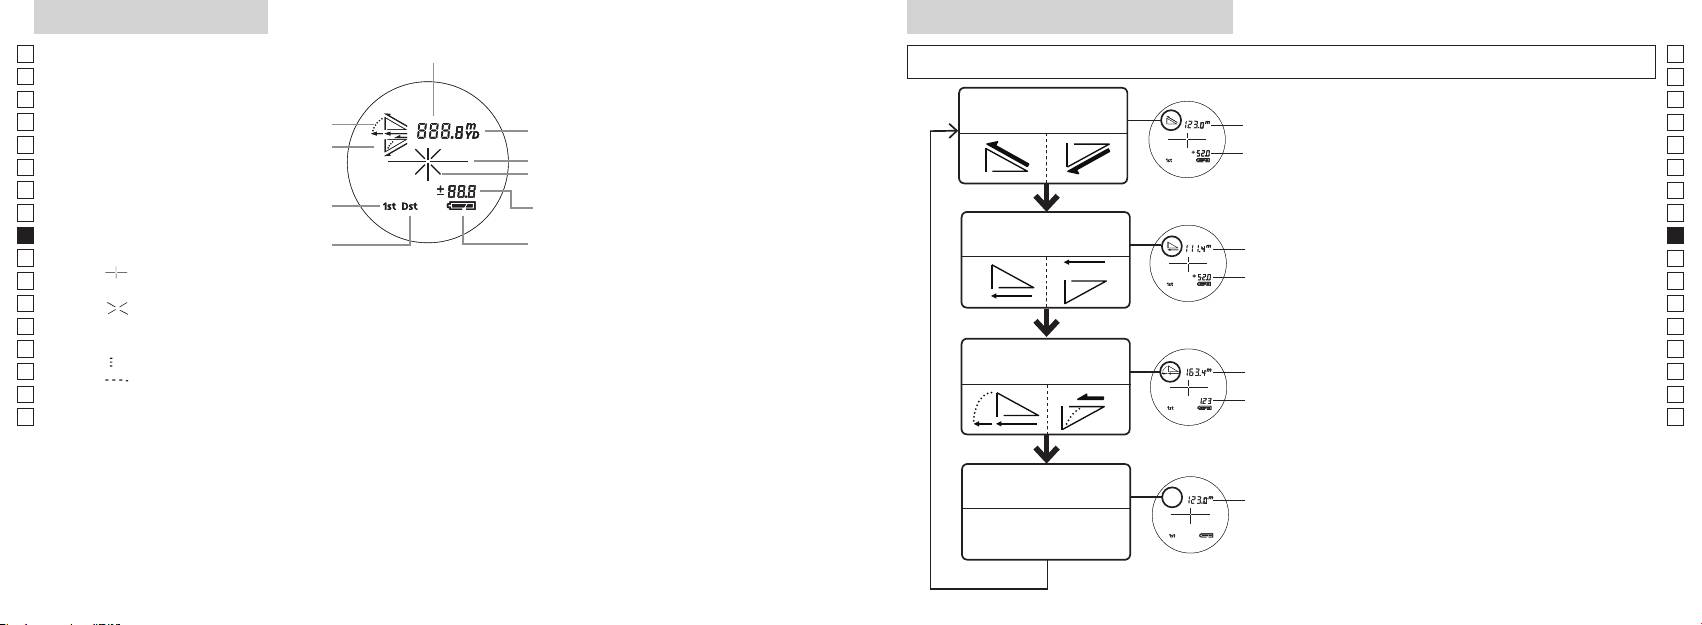
Interne display
Weergavemodus metingen
Jp
Afstand
Jp
dan 2 seconden los om de modus in onderstaande volgorde te wijzigen.
En
En
Es
Es
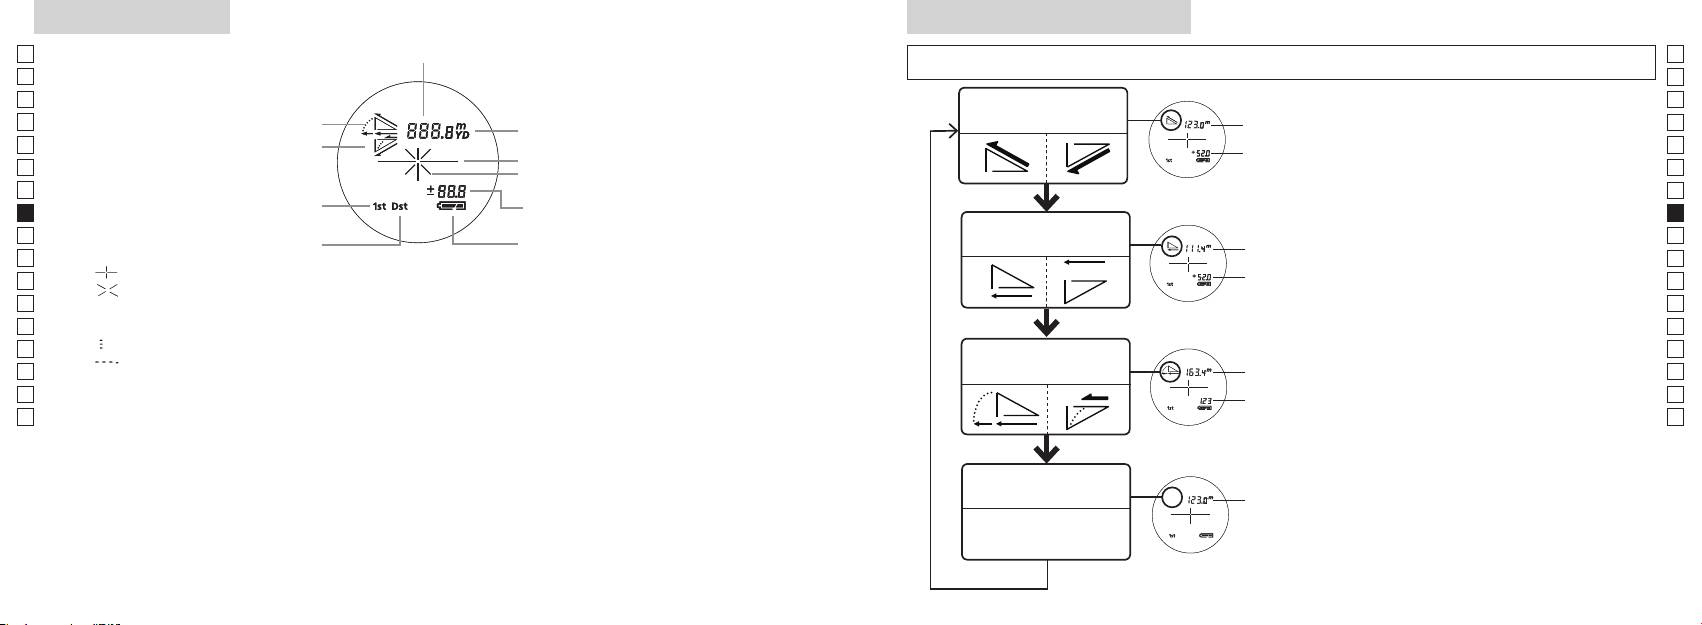
Werkelijke afstand
Fr
Stijgende hellingshoek
en hoogte modus
Fr
interne display aanstaat).
afstand
De
Dalende hellingshoek
De
Draadkruis
Hoogte
ingedrukt. Laat onmiddellijk daarna (binnen
It
It
Symbool voor laserstraal
Se
Se
Hoogte
korter dan 2 seconden los.
Nl
(werkelijke afstand in de golf-modus)
Nl
Horizontale afstand
Ru
Meetknop als u de weergavemodus voor
Ru
Horizontale
Toestand batterij
en hoogte modus
afstand
metingen wilt wijzigen.
Pt
Pt
『 』
4. Herhaal stappen 2 en 3 totdat de gewenste
Pl
Hoogte
Pl
『 』
modus wordt weergegeven.
Fi
Fi
Blijft zichtbaar tijdens een enkelvoudige meting. Knippert tijdens continumetingen.
*
Als u de knoppen niet in de juiste volgorde
No
Kijk niet in de objectieflens als dit symbool wordt weergegeven.
indrukt, wordt er niet naar de andere
No
Dk
『
』 - Bezig met meten
Afstand
modus overgeschakeld.
Dk
『
』 - De meting is mislukt of de afstand kan niet worden gemeten
Golf-modus
gecorrigeerd
*
Als u na het uitvoeren van een meting een
Cz
Cz
voor helling
andere modus kiest, wordt het resultaat
Ro
Ro
aangepast aan de nieuwe modus.
Hu
* Over het algemeen biedt een LCD-venster een even grote of lagere vergroting. Het LCD-venster van dit
afstand
Hu
*
Als de modus is ingesteld, worden
product wordt echter vergroot door de hoge vergroting van de zoeker. Hoewel bij de fabricage van het
metingen uitgevoerd in de nieuwe modus.
LCD-venster de meest geavanceerde technologie is toegepast, is het niet mogelijk de aanwezigheid
nauwkeurigheid van de meting of de veiligheid tijdens gebruik.
Werkelijke afstand
modus
afstand
136 137
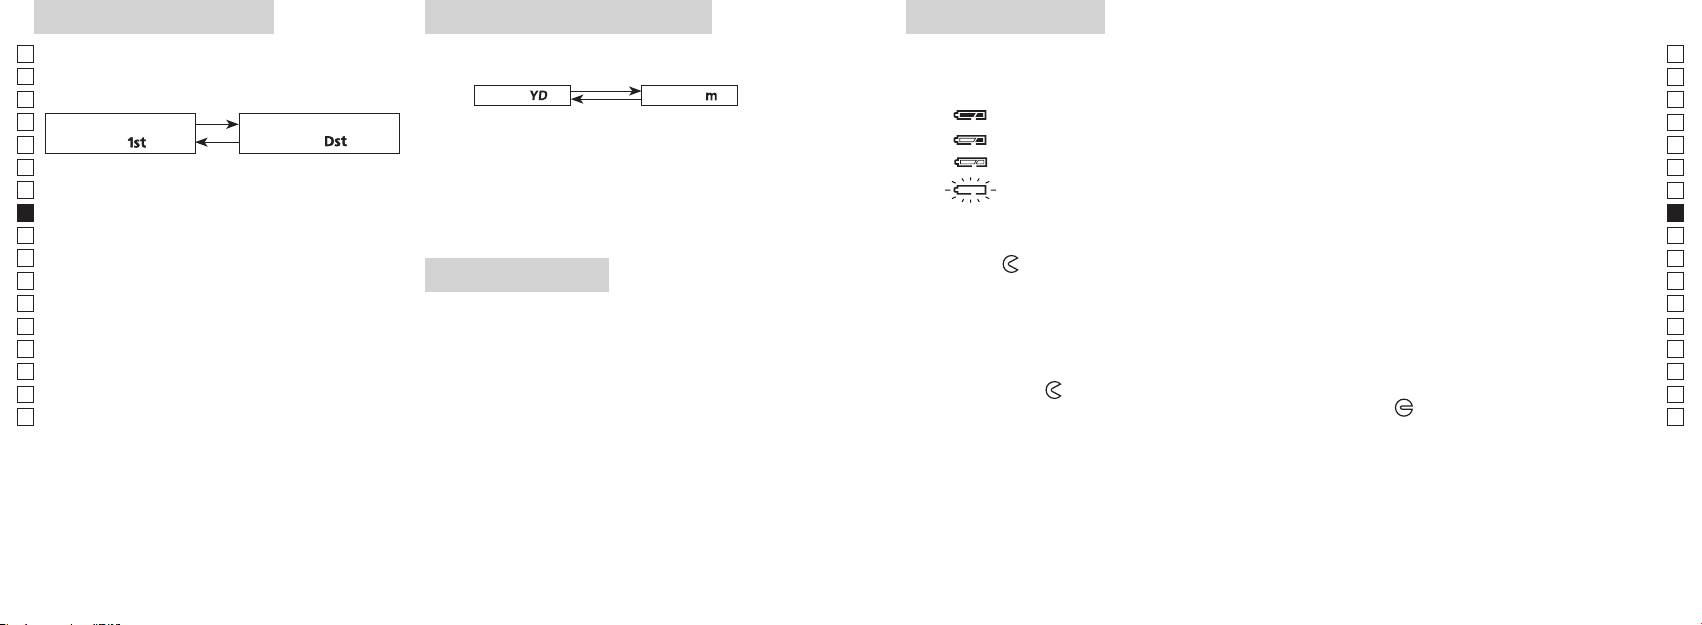
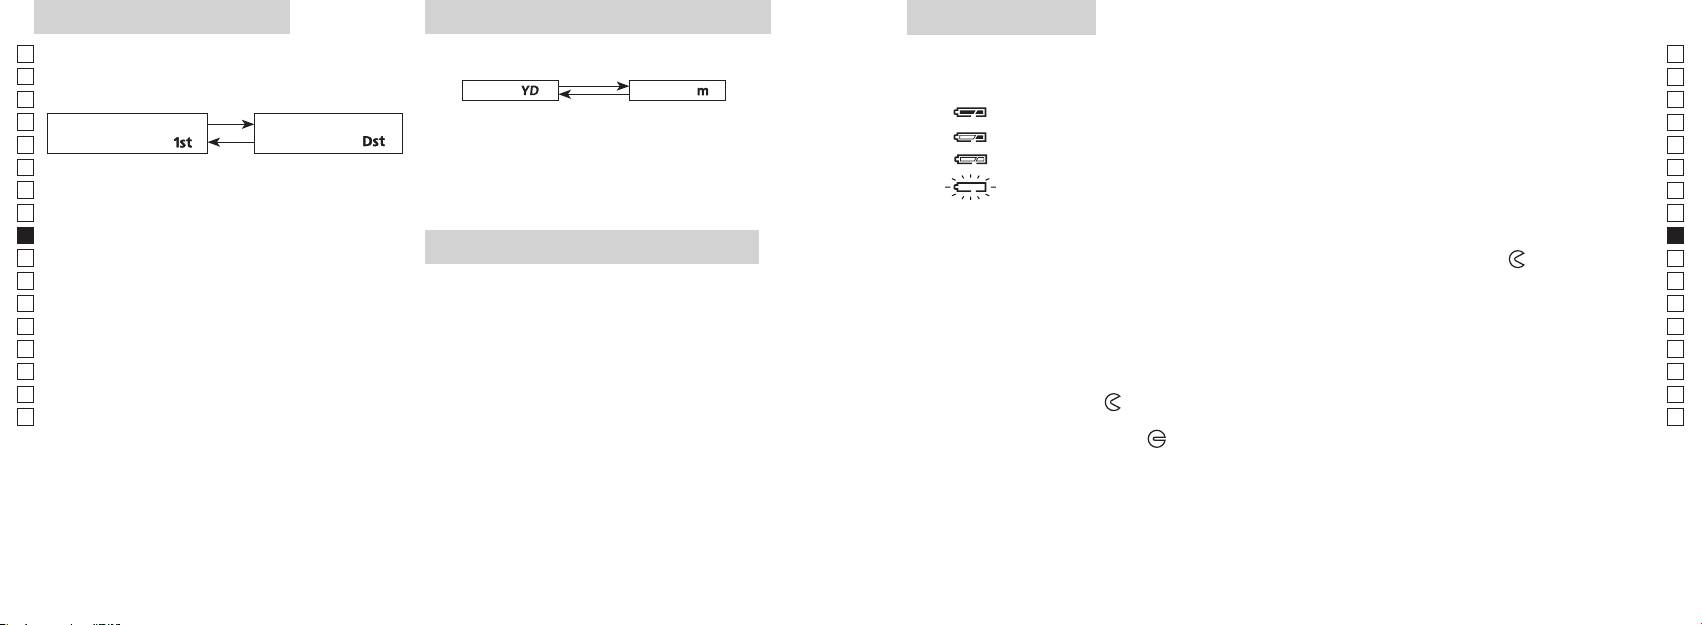
Doelprioriteitmodus
Eenheden afstandsweergave
Batterij vervangen
Jp
Deze laserafstandsmeter maakt gebruik van het systeem
Jp
Type batterij: 3 V CR2 lithiumbatterij x 1
(Standaard fabrieksinstelling is yard.)
En
Symbolen voor resterende batterijlading
En
Es
[ ]
Meter [ ]Yard
* Symbool voor toestand batterij op het interne display waarschuwt wanneer de batterij moet worden vervangen.
Es
: De batterij heeft voldoende lading voor gebruik.
Fr
Fr
aanstaat).
De
doel「
」
doel
「
」
De
It
seconden vast. Laat de knop los als de andere eenheid
: De batterij is bijna leeg. De batterij moet worden vervangen door een nieuwe.
It
display aanstaat).
wordt weergegeven.
Se
knippert : De batterij is leeg. De laserafstandsmeter schakelt automatisch uit nadat het
Se
3. Als u overschakelt naar de andere weergave-eenheid,
symbool drie keer heeft geknipperd. Vervang de batterij.
Nl
ingedrukt terwijl u binnen een halve seconde op de
Nl
worden de resultaten omgerekend en weergegeven in
1. Open het deksel van het batterijvak
Ru
de nieuwe eenheid.
Ru
Houd beide knoppen (langer dan 2 seconden)
Pt
Pt
het
-symbool. Het openen van het deksel kan enige moeite kosten door de rubberen ring, die water
Pl
Pl
LED-verlichting
moet tegenhouden.
3. Laat beide knoppen los als er naar een andere
Fi
2. Vervang de oude batterij door een nieuwe batterij
Fi
modus is overgeschakeld.
No
aanstaat).
*
Als u de knoppen niet in de juiste volgorde indrukt,
No
wordt er niet naar de andere modus overgeschakeld.
wordt aangegeven op een label in het batterijvak. De pluspool moet naar de binnenzijde van het vak
Dk
gericht zijn. De laserafstandsmeter werkt niet als de batterij verkeerd is geplaatst.
Dk
knop korter dan 2 seconden indrukt.
*
Als het overschakelen mislukt, herhaalt u stap 2.
Cz
3. Sluit het deksel van het batterijvak
Cz
*
Ro
[]
LCD-venster te kunnen zien.
Breng het
-teken op een lijn met het
●
Ro
Bij het meten van voorwerpen die deels achter elkaar
*
bijv. de muis van uw duim om het deksel in de richting van het
-teken te draaien. Het sluiten van
Hu
Hu
laserafstandsmeter uit te schakelen. In dat geval is de
het deksel kan enige moeite kosten door de rubberen ring, die water moet tegenhouden. Draai het
tot het dichtstbijzijnde voorwerp weer en de modus
verlichting uitgeschakeld als de laserafstandsmeter weer
deksel tot het niet verder kan. Controleer of het deksel goed is gesloten.
wordt aangezet.
Levensduur van de batterij
Bij continu gebruik: ongeveer 13.000 metingen (bij circa 20°C)
Dit aantal kan afwijken afhankelijk van de omstandigheden, de temperatuur en andere factoren, zoals de
vorm, kleur, enz. van het doel. Dit is slechts een indicatie.
* De batterij die bij deze laserafstandsmeter wordt geleverd is bedoeld om te controleren op het instrument werkt. Als gevolg
van natuurlijke elektrische ontlading, zal de levensduur van deze batterij waarschijnlijk korter zijn dan hierboven aangegeven.
* Als er water in het batterijvak komt doordat het instrument wordt ondergedompeld in water, droog het batterijvak dan
goed en vervang de batterij.
138 139
Jp
Jp
En
En
Es
Es
Fr
Fr
De
De
It
It
Se
Se
Nl
Nl
Ru
Ru
Pt
Pt
Pl
Pl
Fi
Fi
No
No
Dk
Dk
Cz
Cz
Ro
Ro
Hu
Hu
140 141
Measurement
1. Press the POWER button for power-on.
(Power turns off 8 seconds after the last
operation.)
Immediately after power-on.
3. Press POWER button once to start single measurement.
4. After measurement, “distance” or “fail to measure” indicator are displayed for 8 seconds, then power turns off. If you press the POWER
button during power-on (while the internal display is lit), another single measurement starts.
unable to measure distance.
3. Keep pressing POWER button to start continuous measurement up to 20 seconds. The internal display shows “distance” and
“fail to measure” indicator alternately.
Note: Laser irradiaton mark is blinking during the measurement.
Note: If you stop pressing the button, the continuous measuremen stops
2. Aim at the target
Positionthetargetatthecenterofthereticle
[Single measurement]
Failure to measure or
unable to measure distance.
[Continuous measurement]
4. After continuous measurement, the measure results are displayed for 8 seconds, then power turns off. If you press the POWER
button during power-on (while the internal display is lit), another measrement starts.
Failure to measure or
Target focusing.
Measuring.
(Initializing)
.
Upward measurement. Downward measurement.
Displays the measured
figure. (Target 1)
Displays the measured figure.
Stand-by.
Displays the measured
figure. (Target 2)
Measurement
1. Press the POWER button for power-on.
(Power turns off 8 seconds after the last
operation.)
Immediately after power-on.
(Initializing)
3. Press POWER button once to start single measurement.
Measuring.
4. After measurement, “distance” or “fail to measure” indicator are displayed for 8 seconds, then power turns off. If you press the POWER
button during power-on (while the internal display is lit), another single measurement starts.
Failure to measure or
unable to measure distance.
Displays the measured
figure. (Target 1)
3. Keep pressing POWER button to start continuous measurement up to 20 seconds. The internal display shows “distance” and
“fail to measure” indicator alternately.
Note: Laser irradiaton mark is blinking during the measurement.
Note: If you stop pressing the button, the continuous measuremen stops
Target focusing.
2. Aim at the target
.
Positionthetargetatthecenterofthereticle
[Single measurement]
Failure to measure or
unable to measure distance.
Upward measurement. Downward measurement.
Displays the measured figure.
[Continuous measurement]
4. After continuous measurement, the measure results are displayed for 8 seconds, then power turns off. If you press the POWER
button during power-on (while the internal display is lit), another measrement starts.
Stand-by.
Displays the measured
figure. (Target 2)
Measurement
1. Press the POWER button for power-on.
(Power turns off 8 seconds after the last
operation.)
Immediately after power-on.
Stand-by.
(Initializing)
2. Aim at the target
.
Positionthetargetatthecenterofthereticle
3. Press POWER button once to start single measurement.
4. After measurement, “distance” or “fail to measure” indicator are displayed for 8 seconds, then power turns off. If you press the POWER
button during power-on (while the internal display is lit), another single measurement starts.
unable to measure distance.
3. Keep pressing POWER button to start continuous measurement up to 20 seconds. The internal display shows “distance” and
“fail to measure” indicator alternately.
Note: Laser irradiaton mark is blinking during the measurement.
Note: If you stop pressing the button, the continuous measuremen stops
[Single measurement]
Failure to measure or
unable to measure distance.
[Continuous measurement]
4. After continuous measurement, the measure results are displayed for 8 seconds, then power turns off. If you press the POWER
button during power-on (while the internal display is lit), another measrement starts.
Failure to measure or
Target focusing.
Measuring.
Upward measurement. Downward measurement.
Displays the measured
figure. (Target 1)
Displays the measured figure.
Displays the measured
figure. (Target 2)
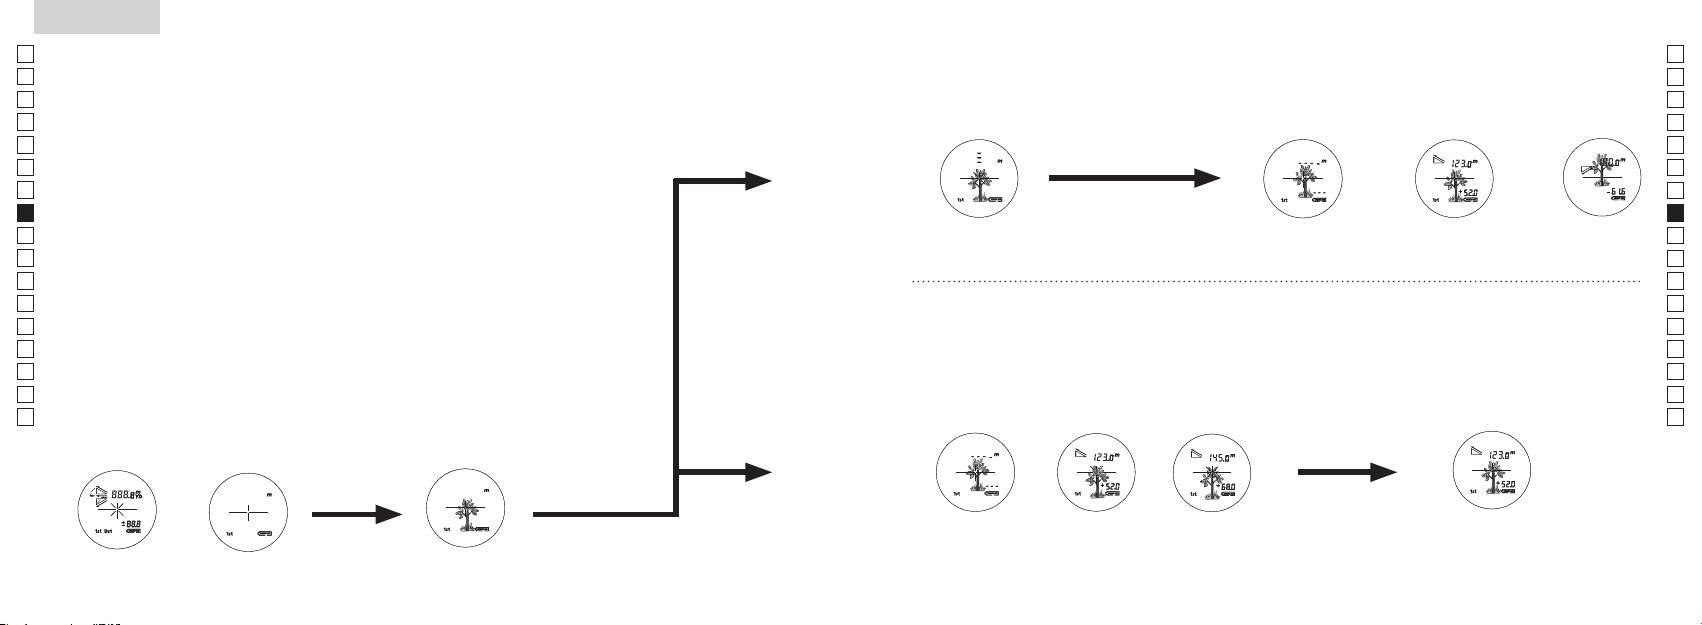
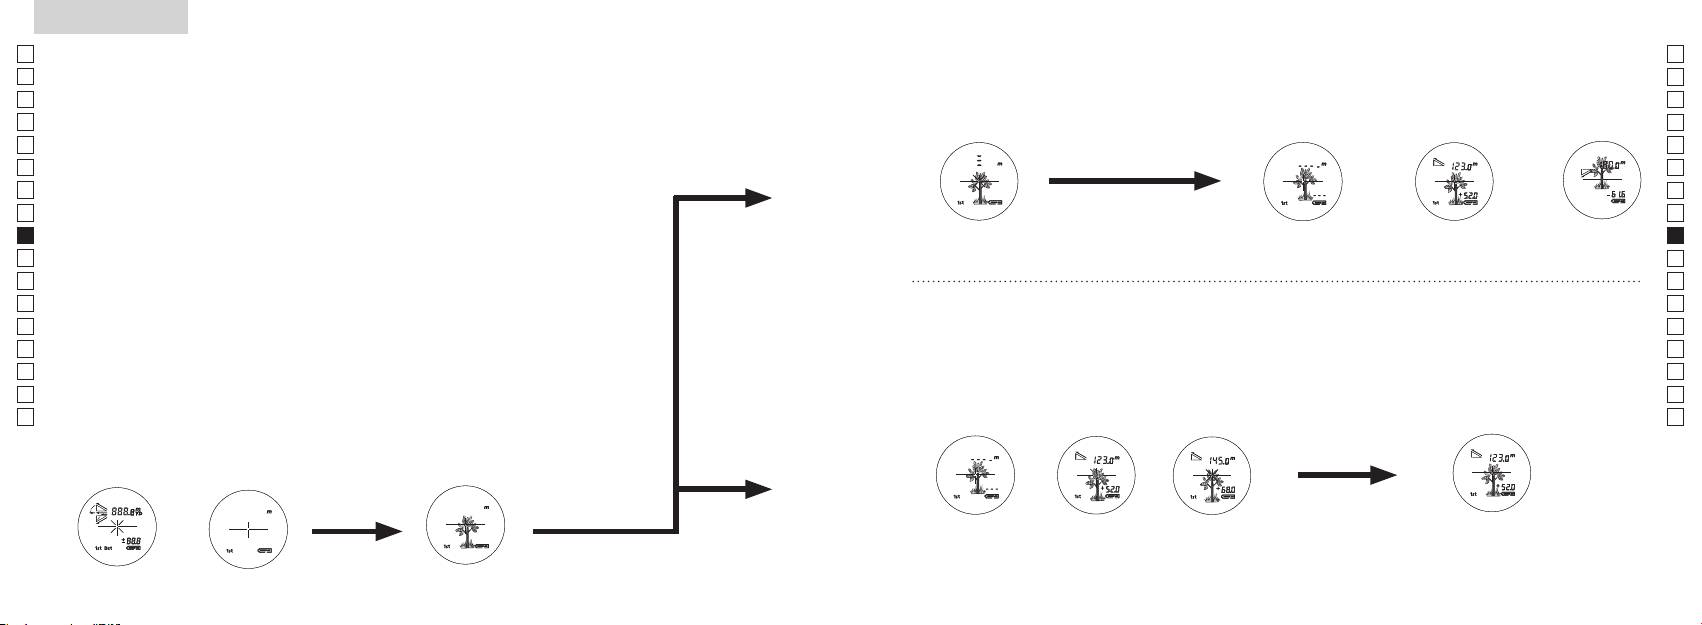
Meting
Voorzichtig
—
als u zich bij het bedienen of afstellen van het apparaat niet houdt aan de instructies in dit
【
Enkelvoudige meting
】
document, kan dit blootstelling aan gevaarlijke straling tot gevolg hebben.
3. Druk één keer op de
Meetknop voor een enkelvoudige
1. Voorbereiding
meting.
2. Rubberen oogschelp
3. Aanpassing van de dioptrie
Stel de dioptrie af om een scherp beeld te krijgen op het LCD-venster in de zoeker.
Meetknop om het instrument aan te zetten (controleer of de interne display aanstaat).
Draai de dioptriering in de richting van de klok terwijl u door de zoeker kijkt totdat u het
LCD-venster scherp kunt zien.
Als u de ring te ver hebt gedraaid, draai de ring dan een eind terug en stel de dioptrie dan
nogmaals af.
Als de dioptrie niet is afgesteld op uw gezichtsvermogen, kan het lastig zijn om goed op
【
Functie voor continumeting
】
het doel te richten.
4. Meten
eenheid voor afstandsweergave) voordat u begint met meten.
*
Raadpleeg elk hoofdstuk om te zien hoe elke modus moet worden ingesteld.
2. Richt op het doel.
(controleer of de interne display aanstaat)
(Automatische uitschakeling als instrument
van het dradenkruis.
ongeveer 8 sec. niet wordt gebruikt)
Onmiddellijk na
Stand-by Richten op het doel
inschakeling (initialiseren)
Measurement
1. Press the POWER button for power-on.
(Power turns off 8 seconds after the last
operation.)
Immediately after power-on.
Stand-by.
(Initializing)
2. Aim at the target
.
Positionthetargetatthecenterofthereticle
Target focusing.
[Single measurement]
3. Press POWER button once to start single measurement.
Measuring.
4. After measurement, “distance” or “fail to measure” indicator are displayed for 8 seconds, then power turns off. If you press the POWER
button during power-on (while the internal display is lit), another single measurement starts.
Failure to measure or
Upward measurement. Downward measurement.
unable to measure distance.
Displays the measured figure.
[Continuous measurement]
3. Keep pressing POWER button to start continuous measurement up to 20 seconds. The internal display shows “distance” and
“fail to measure” indicator alternately.
Note: Laser irradiaton mark is blinking during the measurement.
Note: If you stop pressing the button, the continuous measuremen stops
Failure to measure or
unable to measure distance.
4. After continuous measurement, the measure results are displayed for 8 seconds, then power turns off. If you press the POWER
button during power-on (while the internal display is lit), another measrement starts.
Displays the measured
figure. (Target 1)
Displays the measured
figure. (Target 2)
Measurement
1. Press the POWER button for power-on.
(Power turns off 8 seconds after the last
operation.)
Immediately after power-on.
Stand-by.
(Initializing)
2. Aim at the target
.
Positionthetargetatthecenterofthereticle
Target focusing.
[Single measurement]
3. Press POWER button once to start single measurement.
Measuring.
4. After measurement, “distance” or “fail to measure” indicator are displayed for 8 seconds, then power turns off. If you press the POWER
button during power-on (while the internal display is lit), another single measurement starts.
Failure to measure or
Upward measurement. Downward measurement.
unable to measure distance.
Displays the measured figure.
[Continuous measurement]
3. Keep pressing POWER button to start continuous measurement up to 20 seconds. The internal display shows “distance” and
“fail to measure” indicator alternately.
Note: Laser irradiaton mark is blinking during the measurement.
Note: If you stop pressing the button, the continuous measuremen stops
Failure to measure or
unable to measure distance.
Displays the measured
figure. (Target 1)
4. After continuous measurement, the measure results are displayed for 8 seconds, then power turns off. If you press the POWER
button during power-on (while the internal display is lit), another measrement starts.
Displays the measured
figure. (Target 2)
Measurement
1. Press the POWER button for power-on.
(Power turns off 8 seconds after the last
operation.)
Immediately after power-on.
Stand-by.
(Initializing)
2. Aim at the target
.
Positionthetargetatthecenterofthereticle
Target focusing.
[Single measurement]
3. Press POWER button once to start single measurement.
Measuring.
4. After measurement, “distance” or “fail to measure” indicator are displayed for 8 seconds, then power turns off. If you press the POWER
button during power-on (while the internal display is lit), another single measurement starts.
Failure to measure or
unable to measure distance.
3. Keep pressing POWER button to start continuous measurement up to 20 seconds. The internal display shows “distance” and
“fail to measure” indicator alternately.
Note: Laser irradiaton mark is blinking during the measurement.
Note: If you stop pressing the button, the continuous measuremen stops
Failure to measure or
unable to measure distance.
[Continuous measurement]
4. After continuous measurement, the measure results are displayed for 8 seconds, then power turns off. If you press the POWER
button during power-on (while the internal display is lit), another measrement starts.
Upward measurement. Downward measurement.
Displays the measured
figure. (Target 1)
Displays the measured figure.
Displays the measured
figure. (Target 2)
Measurement
1. Press the POWER button for power-on.
(Power turns off 8 seconds after the last
operation.)
Immediately after power-on.
Stand-by.
(Initializing)
2. Aim at the target
.
Positionthetargetatthecenterofthereticle
Target focusing.
[Single measurement]
3. Press POWER button once to start single measurement.
Measuring.
4. After measurement, “distance” or “fail to measure” indicator are displayed for 8 seconds, then power turns off. If you press the POWER
button during power-on (while the internal display is lit), another single measurement starts.
unable to measure distance.
3. Keep pressing POWER button to start continuous measurement up to 20 seconds. The internal display shows “distance” and
“fail to measure” indicator alternately.
Note: Laser irradiaton mark is blinking during the measurement.
Note: If you stop pressing the button, the continuous measuremen stops
unable to measure distance.
4. After continuous measurement, the measure results are displayed for 8 seconds, then power turns off. If you press the POWER
button during power-on (while the internal display is lit), another measrement starts.
[Continuous measurement]
Failure to measure or
Failure to measure or
Upward measurement. Downward measurement.
Displays the measured
figure. (Target 1)
Displays the measured figure.
Displays the measured
figure. (Target 2)
Measurement
1. Press the POWER button for power-on.
(Power turns off 8 seconds after the last
operation.)
Immediately after power-on.
Stand-by.
(Initializing)
2. Aim at the target
.
Positionthetargetatthecenterofthereticle
Target focusing.
[Single measurement]
3. Press POWER button once to start single measurement.
4. After measurement, “distance” or “fail to measure” indicator are displayed for 8 seconds, then power turns off. If you press the POWER
button during power-on (while the internal display is lit), another single measurement starts.
unable to measure distance.
3. Keep pressing POWER button to start continuous measurement up to 20 seconds. The internal display shows “distance” and
“fail to measure” indicator alternately.
Note: Laser irradiaton mark is blinking during the measurement.
Note: If you stop pressing the button, the continuous measuremen stops
unable to measure distance.
4. After continuous measurement, the measure results are displayed for 8 seconds, then power turns off. If you press the POWER
button during power-on (while the internal display is lit), another measrement starts.
[Continuous measurement]
Failure to measure or
Failure to measure or
Measuring.
Upward measurement. Downward measurement.
Displays the measured
figure. (Target 1)
Displays the measured figure.
Displays the measured
figure. (Target 2)
Measurement
1. Press the POWER button for power-on.
(Power turns off 8 seconds after the last
operation.)
Immediately after power-on.
Stand-by.
(Initializing)
2. Aim at the target
.
Positionthetargetatthecenterofthereticle
Target focusing.
[Single measurement]
3. Press POWER button once to start single measurement.
Measuring.
4. After measurement, “distance” or “fail to measure” indicator are displayed for 8 seconds, then power turns off. If you press the POWER
button during power-on (while the internal display is lit), another single measurement starts.
unable to measure distance.
3. Keep pressing POWER button to start continuous measurement up to 20 seconds. The internal display shows “distance” and
“fail to measure” indicator alternately.
Note: Laser irradiaton mark is blinking during the measurement.
Note: If you stop pressing the button, the continuous measuremen stops
unable to measure distance.
4. After continuous measurement, the measure results are displayed for 8 seconds, then power turns off. If you press the POWER
button during power-on (while the internal display is lit), another measrement starts.
[Continuous measurement]
Failure to measure or
Failure to measure or
Upward measurement. Downward measurement.
Displays the measured
figure. (Target 1)
Displays the measured figure.
Displays the measured
figure. (Target 2)
Measurement
1. Press the POWER button for power-on.
(Power turns off 8 seconds after the last
operation.)
Immediately after power-on.
Stand-by.
(Initializing)
2. Aim at the target
.
Positionthetargetatthecenterofthereticle
Target focusing.
[Single measurement]
3. Press POWER button once to start single measurement.
Measuring.
4. After measurement, “distance” or “fail to measure” indicator are displayed for 8 seconds, then power turns off. If you press the POWER
button during power-on (while the internal display is lit), another single measurement starts.
Failure to measure or
unable to measure distance.
Displays the measured
figure. (Target 1)
3. Keep pressing POWER button to start continuous measurement up to 20 seconds. The internal display shows “distance” and
“fail to measure” indicator alternately.
Note: Laser irradiaton mark is blinking during the measurement.
Note: If you stop pressing the button, the continuous measuremen stops
Failure to measure or
unable to measure distance.
Upward measurement. Downward measurement.
Displays the measured figure.
[Continuous measurement]
4. After continuous measurement, the measure results are displayed for 8 seconds, then power turns off. If you press the POWER
button during power-on (while the internal display is lit), another measrement starts.
Displays the measured
figure. (Target 2)
Measurement
1. Press the POWER button for power-on.
(Power turns off 8 seconds after the last
operation.)
Immediately after power-on.
Stand-by.
(Initializing)
2. Aim at the target
.
Positionthetargetatthecenterofthereticle
Target focusing.
[Single measurement]
3. Press POWER button once to start single measurement.
Measuring.
4. After measurement, “distance” or “fail to measure” indicator are displayed for 8 seconds, then power turns off. If you press the POWER
button during power-on (while the internal display is lit), another single measurement starts.
Failure to measure or
unable to measure distance.
3. Keep pressing POWER button to start continuous measurement up to 20 seconds. The internal display shows “distance” and
“fail to measure” indicator alternately.
Note: Laser irradiaton mark is blinking during the measurement.
Note: If you stop pressing the button, the continuous measuremen stops
Failure to measure or
unable to measure distance.
[Continuous measurement]
4. After continuous measurement, the measure results are displayed for 8 seconds, then power turns off. If you press the POWER
button during power-on (while the internal display is lit), another measrement starts.
Upward measurement. Downward measurement.
Displays the measured
figure. (Target 1)
Displays the measured figure.
Displays the measured
figure. (Target 2)
4. Na meting wordt "de gemeten afstand" of "het symbool voor Meting is
mislukt" gedurende 8 seconden getoond, daarna schakelt het instrument
uit. Als u op de
drukt terwijl het instrument is
ingeschakeld (enhet interne LCD-venster aanstaat), wordt een volgende
enkelvoudige meting gestart.
"De meting is mislukt" of
Omhoog
Omlaag gerichte
Meten
"de afstand kan niet worden
gerichte meting
meting
gemeten"
Toont de gemeten afstand.
3. Houd de
4. Na een continumeting wordt het resultaat van de laatste meting
continumeting van ongeveer 8 seconden te starten. Het interne
(gemeten afstand) gedurende 8 seconden getoond, daarna
LCD-venster toont afwisselend "de gemeten afstand" en "het
schakelt het instrument uit.
symbool voor Meting is mislukt".
Als u op de
drukt terwijl het instrument
*
Het symbool voor laserstraal knippert tijdens het meten.
is ingeschakeld (en het interne LCD-venster aanstaat), wordt een
*
Als u uw vinger van de knop haalt, stopt de continumeting.
volgende enkelvoudige meting gestart.
"De meting is
afstand naar een vlag op een golfbaan wilt meten. De meting is het
mislukt" of "de
gemeten getal
gemeten getal
gemakkelijkst uit te voeren door de vlag te scannen met de functie
afstand kan niet
weer (Doel 1)
weer (Doel 2)
continumeting. Als er zich geen voorwerpen bevinden tussen u en
worden gemeten"
de vlag, geeft de laagste waarde de afstand tot de vlag aan.
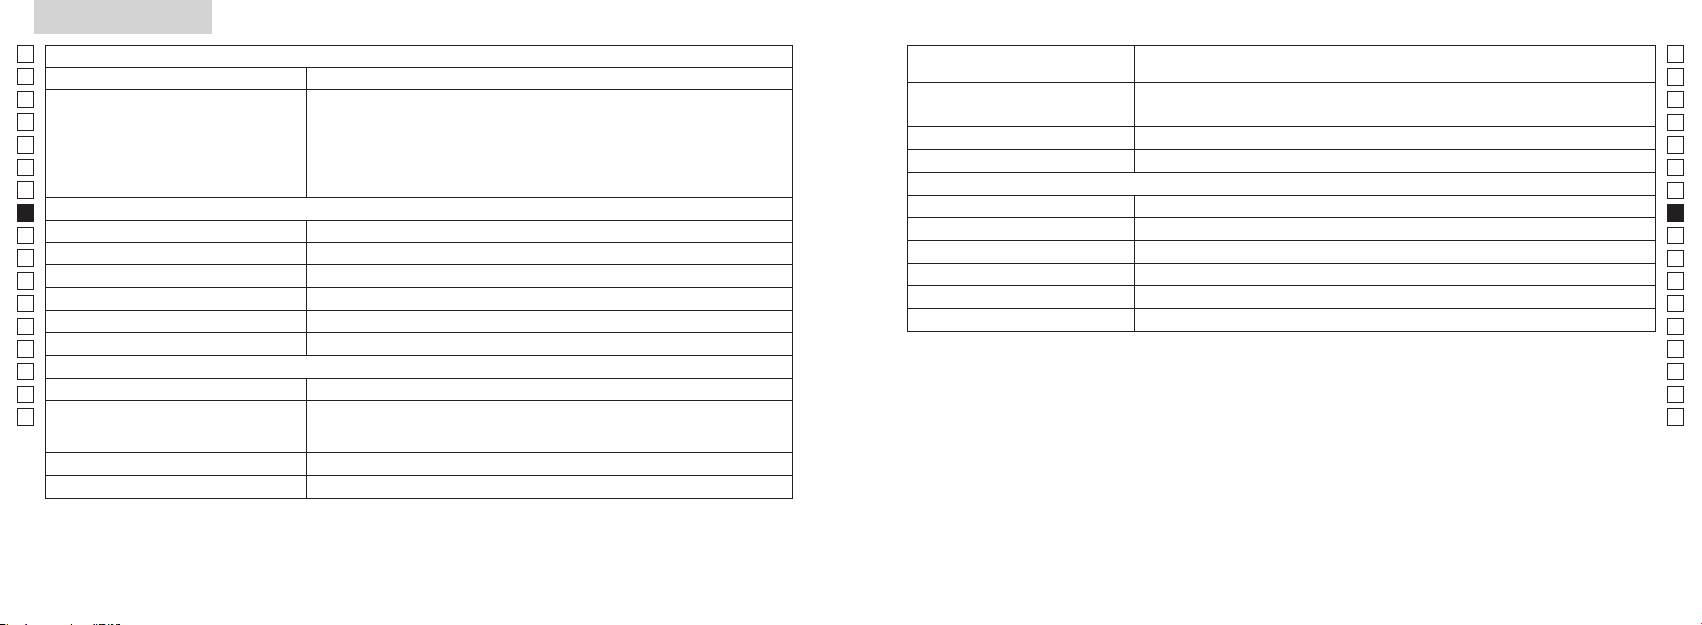
Specificaties
Jp
Meetsysteem
Body: waterdicht (maximale diepte van 1 meter gedurende maximaal 10minuten)*
Jp
Constructie
(Batterijvak: waterbestendig**)
En
Meetbereik
En
Es
Klasse 1M L
Es
Veiligheid
Klasse I L
Fr
Fr
FCC D
De
Afstandsweergave
De
Milieu
It
It
Laser
Se
Se
Optisch systeem
Klasse
Nl
Nl
Vergrotingsfactor (x) 6
(nm) 905
Ru
Ru
ø21
Duur puls (ns) 12
Pt
Pt
Beeldhoek (werkelijk) (˚) 7,5
15
Pl
Pl
Oogafstand (mm) 18,3
Straalafwijking (mrad)
Fi
Fi
Uittredepupil (mm) ø3,5
80 of lager (zonder dauwcondensatie)
No
No
-
1
Aanpassing van de dioptrie ± 4m
Dk
* Waterdichte modellen
Dk
Overig
Deze Nikon laserafstandsmeter is waterdicht, wat inhoudt dat het optisch systeem gegarandeerd schadevrij is te gebruiken tot
Cz
Cz
een diepte van 1 meter gedurende maximaal 10 minuten.
˚C) -10 —
Ro
De Nikon laserafstandsmeter biedt de volgende voordelen:
Ro
1 CR2 lithiumbatterij van 3 V gelijkstroom
Hu
Hu
Voeding
Automatische uitschakeling (als instrument ongeveer 8 sec. niet wordt
omstandigheden en als het regent.
gebruikt).
Afmetingen (L x B x H) (mm) 113 x 70 x 39
De volgende punten zijn van belang voor het gebruik van de Nikon laserafstandsmeter:
Ongeveer 175 gram (zonder batterij)
wordt ondergedompeld. Als er water in het batterijvak is gekomen, verwijdert u het water en laat u het batterijvak goed drogen.
142 143

Overig
Problemen oplossen/Reparatie
Jp
Als uw Nikon laserafstandsmeter moet worden gerepareerd, neem dan contact op met uw plaatselijke dealer of de winkel
Jp
waar u het instrument hebt gekocht. Het is echter zinvol dit pas te doen nadat u de onderstaande tabel met mogelijke
En
En
Dit instrument voldoet aan de normen vastgelegd in deel 15 van de FCC-voorschriften. De werking van het instrument
problemen en oplossingen hebt geraadpleegd.
Es
Es
is afhankelijk van de volgende twee voorwaarden:
Probleem Controlepunten
Fr
(1) Dit instrument mag geen schadelijke interferentie veroorzaken en
Fr
(2) dit instrument moet bestand zijn tegen eventuele interferentie die wordt veroorzaakt door andere apparatuur,
De
●
De
Instrument schakelt niet in
inclusief interferentie die kan leiden tot ongewenst functioneren.
● Controleer of de batterij juist is geplaatst
It
(LCD-venster wordt niet verlicht)
It
● Vervang de batterij.
Se
Se
●
Nl
Uit tests is gebleken dat dit instrument voldoet aan de normen voor een digitaal apparaat van klasse B, conform deel
van de objectieflens niet worden geblokkeerd, bijvoorbeeld door uw vinger of de
Nl
draagriem.
Ru
Ru
zijn opgesteld om een acceptabele bescherming te bieden tegen schadelijke interferentie in een thuisomgeving. Dit
●
De afstand kan niet worden gemeten
Pt
instrument genereert en gebruikt radiogolven en kan radiogolven uitzenden die, bij installatie en gebruik anders dan
Pt
kant van de objectieflens schoon zijn. Reinig de openingen indien nodig.
Pl
● Controleer of de vorm en het materiaal van het doel wel geschikt zijn om de
Pl
een bepaalde omgeving geen interferentie zal optreden. Als dit instrument schadelijke interferentie veroorzaakt in
laserstraal te reflecteren.
Fi
Fi
de ontvangst van radio of televisie, wat kan worden vastgesteld door het instrument uit en in te schakelen, wordt de
● Vervang de batterij.
No
gebruiker aangeraden een of meer van de volgende maatregelen te nemen om deze interferentie op te heffen:
No
● Houd het instrument stil als u een meting uitvoert.
Dk
●
Dk
wordt weergegeven
Cz
Cz
Ro
Het dichtstbijzijnde doel dat zich
Ro
●
binnen het meetbereik bevindt,
Regulations.
Hu
de Nikon laserafstandsmeter en het doel.
Hu
kan niet worden gemeten
●
een bepaalde afstand kan niet
Deze Nikon laserafstandsmeter is een standaard afstandsmeter. Verkregen resultaten kunnen niet als officieel bewijs
de Nikon laserafstandsmeter en het doel.
worden gemeten
worden gebruikt.
● Vervang de batterij.
● Controleer of de vorm en het materiaal van het doel wel geschikt zijn om de
De meetresultaten zijn niet
laserstraal te reflecteren.
consistent
● Houd het instrument stil als u een meting uitvoert.
●
de Nikon laserafstandsmeter en het doel.
144 145
Problemen oplossen/Reparatie
Jp
Jp
En
En
Probleem Controlepunten
Es
Es
● Vervang de batterij.
Fr
Fr
● Controleer of de vorm en het materiaal van het doel wel geschikt zijn om de
De
laserstraal te reflecteren.
De
weergegeven
It
●
It
de Nikon laserafstandsmeter en het doel.
Se
Se
Nl
Als de problemen zich blijven voordoen nadat u de tabel met mogelijke problemen en oplossingen hebt geraadpleegd, neem
Nl
aangezien het apparaat defect kan
Ru
Ru
zijn.
............................................. 148-151
Pt
Pt
dat niet doet, kan dit lichamelijk letsel of beschadiging van het product tot gevolg hebben.
.................................. 152
Pl
Pl
.......................................... 153
Fi
Fi
............................................. 154
No
No
...................... 155
Dk
Dk
Cz
Cz
Ro
Ro
.................................................................... 156
Hu
Hu
........................................................ 157
......................................................... 158-159
.................... 160-161
.......................... 162
................................................................. 163-164
146 147
Jp
Nikon COOLSHOT AS.
Jp
,
En
( )
En
Nikon
Es
, ,
Es
Nikon.
, .
Fr
.
Fr
.
De
.
:
De
〇 ,
It
,
It
,
Se
,
,
Se
.
"
Nl
"
Nl
〇
.
Ru
.
Ru
.
Pt
〇
Nikon
Pt
.
.
.
Pl
,
Pl
,
Fi
Nikon
Fi
.
.
.
No
No
Dk
Dk
,
●
,
Cz
Cz
.
,
;
.
Ro
● , , , (
Ro
.
,
Hu
)
Hu
.
, ,
NIKON VISION CO., LTD.
● NIKON VISION CO., LTD.
.
,
),
.
,
.
,
, ,
,
.
.
148 149
Jp
.
,
Jp
.
En
( )
En
.
.
*
()
Es
,
Es
.
Fr
- .
Fr
,
,
De
De
Nikon
.
.
Nikon,
It
.
,
It
:
:
Se
,
.
.
Se
Nikon
Nl
.
Nl
.
Ru
,
Ru
,
,
.
Pt
.
, .
Pt
,
,
Pl
,
Nikon.
Pl
.
Nikon
.
Fi
.
Fi
,
No
No
,
.
Dk
,
Dk
,
Cz
.
.
.
Cz
. ,
Nikon.
Ro
Ro
,
Hu
Nikon.
Hu
.
.
.
Nikon
.
.
, ,
,
Nikon ,
,
,
,
.
.
Nikon,
.
,
-
.
.
.
150 151
/
Jp
:
Jp
1
En
4
En
Es
Es
, 6-
3
2
Fr
Fr
3
De
De
(
90
4
It
± ).
It
1
Se
Se
:
5 6-
Nl
Nl
Ru
2
5
Ru
6
,
Pt
Pt
Pl
6
7
Pl
..)
Fi
8
Fi
7
No
9
. 8 )
No
!p
Dk
Dk
8
.)
Cz
Cz
!q
Ro
9
Ro
!w FDA
Hu
Hu
!p
!q
!w
Nikon
.
,
.
..........................1 .
........ 1 .
..........1 .
, , ,
(CR2) .................................... 1 .
, .
152 153
Jp
Jp
En
En
Es
Es
Режим фактического
Fr
расстояния и высоты
Fr
.
De
De
It
It
(
Se
Se
(
0,5 )
Nl
Nl
)
Режим горизонтального
Ru
)
Ru
расстояния и высоты
2 .
Pt
Pt
『 』
Pl
Pl
.
Fi
Fi
『 』 - .
No
.
No
4. 2 3
Dk
Dk
Режим игры в
『
』 -
,
Cz
гольф
Cz
『
』
.
Ro
Ro
*
Hu
* , . ,
,
Hu
.
,
*
. . ,
.
Режим фактического
расстояния
.
*
.
154 155
Jp
.
: CR2, 3 , 1 .
Jp
.
( : ).
En
En
( :
[ ]
[ ]
Es
.)
Es
Fr
.
Fr
「
」
「
」
De
De
.
It
It
.
.
Se
3.
: . , ,
Se
. .
Nl
Nl
.
1.
Ru
Ru
( ),
Pt
( 2 ),
,
. -
Pt
Pl
, ,
Pl
.
.
.
Fi
3.
Fi
2.
.
No
2
No
*
.
Dk
.
Dk
*
Cz
(
Cz
2.
).
3.
Ro
Ro
[
*
●
.
Hu
]
.
Hu
( )
,
. - ,
.
,
,
,
—
.
Непрерывная работа: . 13.000 ( . 20 °C)
.. .
* , , .
, .
* (- )
156 157
, .
Jp
Jp
En
En
Es
Es
Fr
Fr
De
De
It
It
Se
Se
Nl
Nl
Ru
Ru
Pt
Pt
Pl
Pl
Fi
Fi
No
No
Dk
Dk
Cz
Cz
Ro
Ro
Hu
Hu
158 159
Measurement
1. Press the POWER button for power-on.
(Power turns off 8 seconds after the last
operation.)
Immediately after power-on.
3. Press POWER button once to start single measurement.
4. After measurement, “distance” or “fail to measure” indicator are displayed for 8 seconds, then power turns off. If you press the POWER
button during power-on (while the internal display is lit), another single measurement starts.
unable to measure distance.
3. Keep pressing POWER button to start continuous measurement up to 20 seconds. The internal display shows “distance” and
“fail to measure” indicator alternately.
Note: Laser irradiaton mark is blinking during the measurement.
Note: If you stop pressing the button, the continuous measuremen stops
2. Aim at the target
Positionthetargetatthecenterofthereticle
[Single measurement]
Failure to measure or
unable to measure distance.
[Continuous measurement]
4. After continuous measurement, the measure results are displayed for 8 seconds, then power turns off. If you press the POWER
button during power-on (while the internal display is lit), another measrement starts.
Failure to measure or
Target focusing.
Measuring.
(Initializing)
.
Upward measurement. Downward measurement.
Displays the measured
figure. (Target 1)
Displays the measured figure.
Stand-by.
Displays the measured
figure. (Target 2)
Measurement
1. Press the POWER button for power-on.
(Power turns off 8 seconds after the last
operation.)
Immediately after power-on.
(Initializing)
3. Press POWER button once to start single measurement.
Measuring.
4. After measurement, “distance” or “fail to measure” indicator are displayed for 8 seconds, then power turns off. If you press the POWER
button during power-on (while the internal display is lit), another single measurement starts.
Failure to measure or
unable to measure distance.
Displays the measured
figure. (Target 1)
3. Keep pressing POWER button to start continuous measurement up to 20 seconds. The internal display shows “distance” and
“fail to measure” indicator alternately.
Note: Laser irradiaton mark is blinking during the measurement.
Note: If you stop pressing the button, the continuous measuremen stops
Target focusing.
2. Aim at the target
.
Positionthetargetatthecenterofthereticle
[Single measurement]
Failure to measure or
unable to measure distance.
Upward measurement. Downward measurement.
Displays the measured figure.
[Continuous measurement]
4. After continuous measurement, the measure results are displayed for 8 seconds, then power turns off. If you press the POWER
button during power-on (while the internal display is lit), another measrement starts.
Stand-by.
Displays the measured
figure. (Target 2)
Measurement
1. Press the POWER button for power-on.
(Power turns off 8 seconds after the last
operation.)
Immediately after power-on.
Stand-by.
(Initializing)
2. Aim at the target
.
Positionthetargetatthecenterofthereticle
3. Press POWER button once to start single measurement.
4. After measurement, “distance” or “fail to measure” indicator are displayed for 8 seconds, then power turns off. If you press the POWER
button during power-on (while the internal display is lit), another single measurement starts.
unable to measure distance.
3. Keep pressing POWER button to start continuous measurement up to 20 seconds. The internal display shows “distance” and
“fail to measure” indicator alternately.
Note: Laser irradiaton mark is blinking during the measurement.
Note: If you stop pressing the button, the continuous measuremen stops
[Single measurement]
Failure to measure or
unable to measure distance.
[Continuous measurement]
4. After continuous measurement, the measure results are displayed for 8 seconds, then power turns off. If you press the POWER
button during power-on (while the internal display is lit), another measrement starts.
Failure to measure or
Target focusing.
Measuring.
Upward measurement. Downward measurement.
Displays the measured
figure. (Target 1)
Displays the measured figure.
Displays the measured
figure. (Target 2)
— , ,
【
】
, .
3.
1.
) .
2.
, .
3.
.
.
,
【
】
, .
.
4.
( , ,
).
*
. .
.
.
. 8 ))
.
()
Measurement
1. Press the POWER button for power-on.
(Power turns off 8 seconds after the last
operation.)
Immediately after power-on.
Stand-by.
(Initializing)
2. Aim at the target
.
Positionthetargetatthecenterofthereticle
Target focusing.
[Single measurement]
3. Press POWER button once to start single measurement.
Measuring.
4. After measurement, “distance” or “fail to measure” indicator are displayed for 8 seconds, then power turns off. If you press the POWER
button during power-on (while the internal display is lit), another single measurement starts.
Failure to measure or
Upward measurement. Downward measurement.
unable to measure distance.
Displays the measured figure.
[Continuous measurement]
3. Keep pressing POWER button to start continuous measurement up to 20 seconds. The internal display shows “distance” and
“fail to measure” indicator alternately.
Note: Laser irradiaton mark is blinking during the measurement.
Note: If you stop pressing the button, the continuous measuremen stops
Failure to measure or
unable to measure distance.
4. After continuous measurement, the measure results are displayed for 8 seconds, then power turns off. If you press the POWER
button during power-on (while the internal display is lit), another measrement starts.
Displays the measured
figure. (Target 1)
Displays the measured
figure. (Target 2)
Measurement
1. Press the POWER button for power-on.
(Power turns off 8 seconds after the last
operation.)
Immediately after power-on.
Stand-by.
(Initializing)
2. Aim at the target
.
Positionthetargetatthecenterofthereticle
Target focusing.
[Single measurement]
3. Press POWER button once to start single measurement.
Measuring.
4. After measurement, “distance” or “fail to measure” indicator are displayed for 8 seconds, then power turns off. If you press the POWER
button during power-on (while the internal display is lit), another single measurement starts.
Failure to measure or
Upward measurement. Downward measurement.
unable to measure distance.
Displays the measured figure.
[Continuous measurement]
3. Keep pressing POWER button to start continuous measurement up to 20 seconds. The internal display shows “distance” and
“fail to measure” indicator alternately.
Note: Laser irradiaton mark is blinking during the measurement.
Note: If you stop pressing the button, the continuous measuremen stops
Failure to measure or
unable to measure distance.
Displays the measured
figure. (Target 1)
4. After continuous measurement, the measure results are displayed for 8 seconds, then power turns off. If you press the POWER
button during power-on (while the internal display is lit), another measrement starts.
Displays the measured
figure. (Target 2)
Measurement
1. Press the POWER button for power-on.
(Power turns off 8 seconds after the last
operation.)
Immediately after power-on.
Stand-by.
(Initializing)
2. Aim at the target
.
Positionthetargetatthecenterofthereticle
Target focusing.
[Single measurement]
3. Press POWER button once to start single measurement.
Measuring.
4. After measurement, “distance” or “fail to measure” indicator are displayed for 8 seconds, then power turns off. If you press the POWER
button during power-on (while the internal display is lit), another single measurement starts.
Failure to measure or
unable to measure distance.
3. Keep pressing POWER button to start continuous measurement up to 20 seconds. The internal display shows “distance” and
“fail to measure” indicator alternately.
Note: Laser irradiaton mark is blinking during the measurement.
Note: If you stop pressing the button, the continuous measuremen stops
Failure to measure or
unable to measure distance.
[Continuous measurement]
4. After continuous measurement, the measure results are displayed for 8 seconds, then power turns off. If you press the POWER
button during power-on (while the internal display is lit), another measrement starts.
Upward measurement. Downward measurement.
Displays the measured
figure. (Target 1)
Displays the measured figure.
Displays the measured
figure. (Target 2)
Measurement
1. Press the POWER button for power-on.
(Power turns off 8 seconds after the last
operation.)
Immediately after power-on.
Stand-by.
(Initializing)
2. Aim at the target
.
Positionthetargetatthecenterofthereticle
Target focusing.
[Single measurement]
3. Press POWER button once to start single measurement.
Measuring.
4. After measurement, “distance” or “fail to measure” indicator are displayed for 8 seconds, then power turns off. If you press the POWER
button during power-on (while the internal display is lit), another single measurement starts.
unable to measure distance.
3. Keep pressing POWER button to start continuous measurement up to 20 seconds. The internal display shows “distance” and
“fail to measure” indicator alternately.
Note: Laser irradiaton mark is blinking during the measurement.
Note: If you stop pressing the button, the continuous measuremen stops
unable to measure distance.
4. After continuous measurement, the measure results are displayed for 8 seconds, then power turns off. If you press the POWER
button during power-on (while the internal display is lit), another measrement starts.
[Continuous measurement]
Failure to measure or
Failure to measure or
Upward measurement. Downward measurement.
Displays the measured
figure. (Target 1)
Displays the measured figure.
Displays the measured
figure. (Target 2)
Measurement
1. Press the POWER button for power-on.
(Power turns off 8 seconds after the last
operation.)
Immediately after power-on.
Stand-by.
(Initializing)
2. Aim at the target
.
Positionthetargetatthecenterofthereticle
Target focusing.
[Single measurement]
3. Press POWER button once to start single measurement.
4. After measurement, “distance” or “fail to measure” indicator are displayed for 8 seconds, then power turns off. If you press the POWER
button during power-on (while the internal display is lit), another single measurement starts.
unable to measure distance.
3. Keep pressing POWER button to start continuous measurement up to 20 seconds. The internal display shows “distance” and
“fail to measure” indicator alternately.
Note: Laser irradiaton mark is blinking during the measurement.
Note: If you stop pressing the button, the continuous measuremen stops
unable to measure distance.
4. After continuous measurement, the measure results are displayed for 8 seconds, then power turns off. If you press the POWER
button during power-on (while the internal display is lit), another measrement starts.
[Continuous measurement]
Failure to measure or
Failure to measure or
Measuring.
Upward measurement. Downward measurement.
Displays the measured
figure. (Target 1)
Displays the measured figure.
Displays the measured
figure. (Target 2)
Measurement
1. Press the POWER button for power-on.
(Power turns off 8 seconds after the last
operation.)
Immediately after power-on.
Stand-by.
(Initializing)
2. Aim at the target
.
Positionthetargetatthecenterofthereticle
Target focusing.
[Single measurement]
3. Press POWER button once to start single measurement.
Measuring.
4. After measurement, “distance” or “fail to measure” indicator are displayed for 8 seconds, then power turns off. If you press the POWER
button during power-on (while the internal display is lit), another single measurement starts.
unable to measure distance.
3. Keep pressing POWER button to start continuous measurement up to 20 seconds. The internal display shows “distance” and
“fail to measure” indicator alternately.
Note: Laser irradiaton mark is blinking during the measurement.
Note: If you stop pressing the button, the continuous measuremen stops
unable to measure distance.
4. After continuous measurement, the measure results are displayed for 8 seconds, then power turns off. If you press the POWER
button during power-on (while the internal display is lit), another measrement starts.
[Continuous measurement]
Failure to measure or
Failure to measure or
Upward measurement. Downward measurement.
Displays the measured
figure. (Target 1)
Displays the measured figure.
Displays the measured
figure. (Target 2)
Measurement
1. Press the POWER button for power-on.
(Power turns off 8 seconds after the last
operation.)
Immediately after power-on.
Stand-by.
(Initializing)
2. Aim at the target
.
Positionthetargetatthecenterofthereticle
Target focusing.
[Single measurement]
3. Press POWER button once to start single measurement.
Measuring.
4. After measurement, “distance” or “fail to measure” indicator are displayed for 8 seconds, then power turns off. If you press the POWER
button during power-on (while the internal display is lit), another single measurement starts.
Failure to measure or
unable to measure distance.
Displays the measured
figure. (Target 1)
3. Keep pressing POWER button to start continuous measurement up to 20 seconds. The internal display shows “distance” and
“fail to measure” indicator alternately.
Note: Laser irradiaton mark is blinking during the measurement.
Note: If you stop pressing the button, the continuous measuremen stops
Failure to measure or
unable to measure distance.
Upward measurement. Downward measurement.
Displays the measured figure.
[Continuous measurement]
4. After continuous measurement, the measure results are displayed for 8 seconds, then power turns off. If you press the POWER
button during power-on (while the internal display is lit), another measrement starts.
Displays the measured
figure. (Target 2)
Measurement
1. Press the POWER button for power-on.
(Power turns off 8 seconds after the last
operation.)
Immediately after power-on.
Stand-by.
(Initializing)
2. Aim at the target
.
Positionthetargetatthecenterofthereticle
Target focusing.
[Single measurement]
3. Press POWER button once to start single measurement.
Measuring.
4. After measurement, “distance” or “fail to measure” indicator are displayed for 8 seconds, then power turns off. If you press the POWER
button during power-on (while the internal display is lit), another single measurement starts.
Failure to measure or
unable to measure distance.
3. Keep pressing POWER button to start continuous measurement up to 20 seconds. The internal display shows “distance” and
“fail to measure” indicator alternately.
Note: Laser irradiaton mark is blinking during the measurement.
Note: If you stop pressing the button, the continuous measuremen stops
Failure to measure or
unable to measure distance.
[Continuous measurement]
4. After continuous measurement, the measure results are displayed for 8 seconds, then power turns off. If you press the POWER
button during power-on (while the internal display is lit), another measrement starts.
Upward measurement. Downward measurement.
Displays the measured
figure. (Target 1)
Displays the measured figure.
Displays the measured
figure. (Target 2)
4.
, (
), .
.
3.
4.
( )
. 8 , .
)
, (
*
),
.
.
*
.
,
, .
( 1)
( 2)
,
, .
