Nikon COOLSHOT – page 3
Manual for Nikon COOLSHOT
Table of contents
- Cautions before use SAFETY PRECAUTIONS SAFETY PRECAUTIONS CARE AND MAINTENANCE
- Key features Nomenclature/Composition
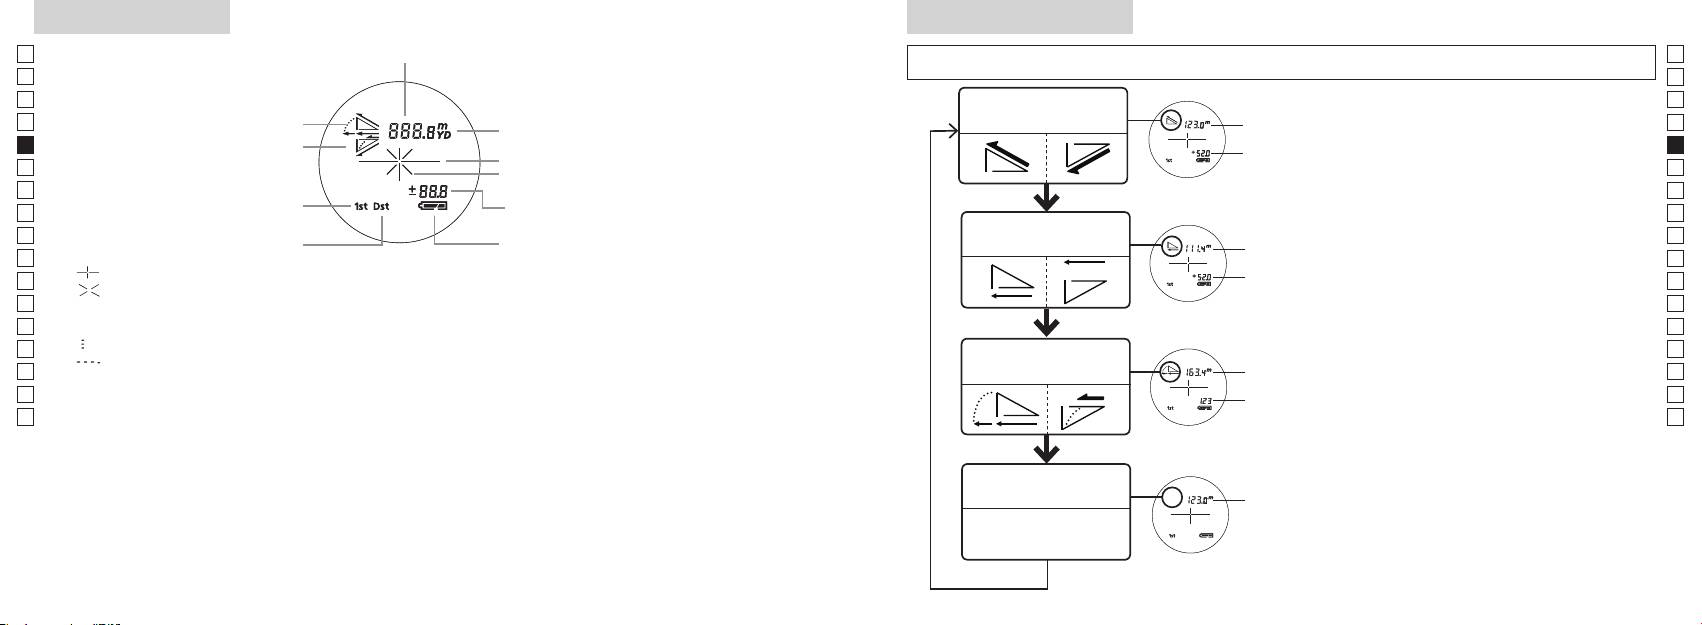
- Internal display Measurement display mode
- Target priority mode Distance display units Changing battery LED illumination
- Measurement
- Specifications
- Others Troubleshooting/Repair
- Troubleshooting/Repair

Hauptmerkmale Begriffsbestimmung/Zusammensetzung
Jp
Die folgenden Faktoren erleichtern die Messung:
Jp
1
En
4
En
Es
Es
Mehrschichtenvergütung
3
2 Laser-Detektorblendenöffnung
Fr
Fr
3
De
De
(Horizontalentfernung ± Höhe) angezeigt, die für das
4
It
Messungen können in folgenden Fällen Ungenauigkeiten
It
5Okular des Monokulars 6x
oder Störungen aufweisen:
1
Se
Se
umgeschaltet werden können
6
Nl
Nl
7 Dioptrinindex
Ru
2
5
8 Brückenöse
Ru
Pt
9 Batteriefachabdeckung
Pt
Funktion kontinuierliche Messung
Pl
6
!p
Pl
Spiegel usw.)
Fi
Fi
7
No
!q
No
!w FDA-Informationen
Dk
Dk
8
Cz
Cz
Der Nikon Laser-Entfernungsmesser benutzt für die
Ro
Messung einen unsichtbaren Laserstrahl. Er misst die Zeit,
gemessen
9
Ro
die der Laserstrahl braucht, um von Entfernungsmesser
Hu
Hu
zum Ziel und wieder zurück zu gelangen. Laserstrahl-
!p
Reflexionsvermögen und Messergebnisse können,
!q
entsprechend den klimatischen und Umweltbedingungen,
!w
der Farbe, Oberflächenbeschaffenheit, Größe, Form und
anderen Eigenschaften des Ziels, schwanken.
Zusammensetzung
..................................x1
...................... x1
..............x1
....x1
80 81
Interne anzeige
Messanzeigemodus
Jp
Jp
En
En
Es
Es
Modus Tatsächliche
Fr
Steigung
Entfernung und Höhe
Fr
Sie, ob das interne Display eingeschaltet
De
ist).
De
Höhe
It
It
Laserstrahlzeichen
und halten Sie dann sofort (innerhalb
Se
Se
Nl
Messtaste innerhalb von 2 Sekunden
Nl
Modus Horizontal-
Horizontal-
Ru
gedrückt.
Ru
entfernung und Höhe
entfernung
Batteriezustand
3. Nehmen Sie Ihren Finger von der
Pt
Pt
『 』
Pl
Höhe
Pl
『 』
Messanzeigemodus umzuschalten.
Fi
Fi
No
Blicken Sie nicht in das Objektiv, wenn diese Markierung angezeigt wird.
der gewünschte Modus angezeigt wird.
No
Dk
『
』 - Messung aktiv
Steigungs-
*
Dk
『
』
Golfmodus
angepasste
die Tasten nicht in richtiger Reihenfolge
Cz
Cz
gedrückt werden.
Ro
Ro
*
Das Umschalten des Modus nach der
Hu
* Normalerweise verwendet ein LC-Display dieselbe oder eine geringere Vergrößerung. Das LC-Display dieses
Hu
den neuen Modus.
*
zu verhindern. Dadurch kann Staub sichtbar werden. Hierdurch wird jedoch nicht die Messgenauigkeit oder die
werden Messungen im neuen Modus
Modus Tatsächliche
durchgeführt.
Entfernung
82 83

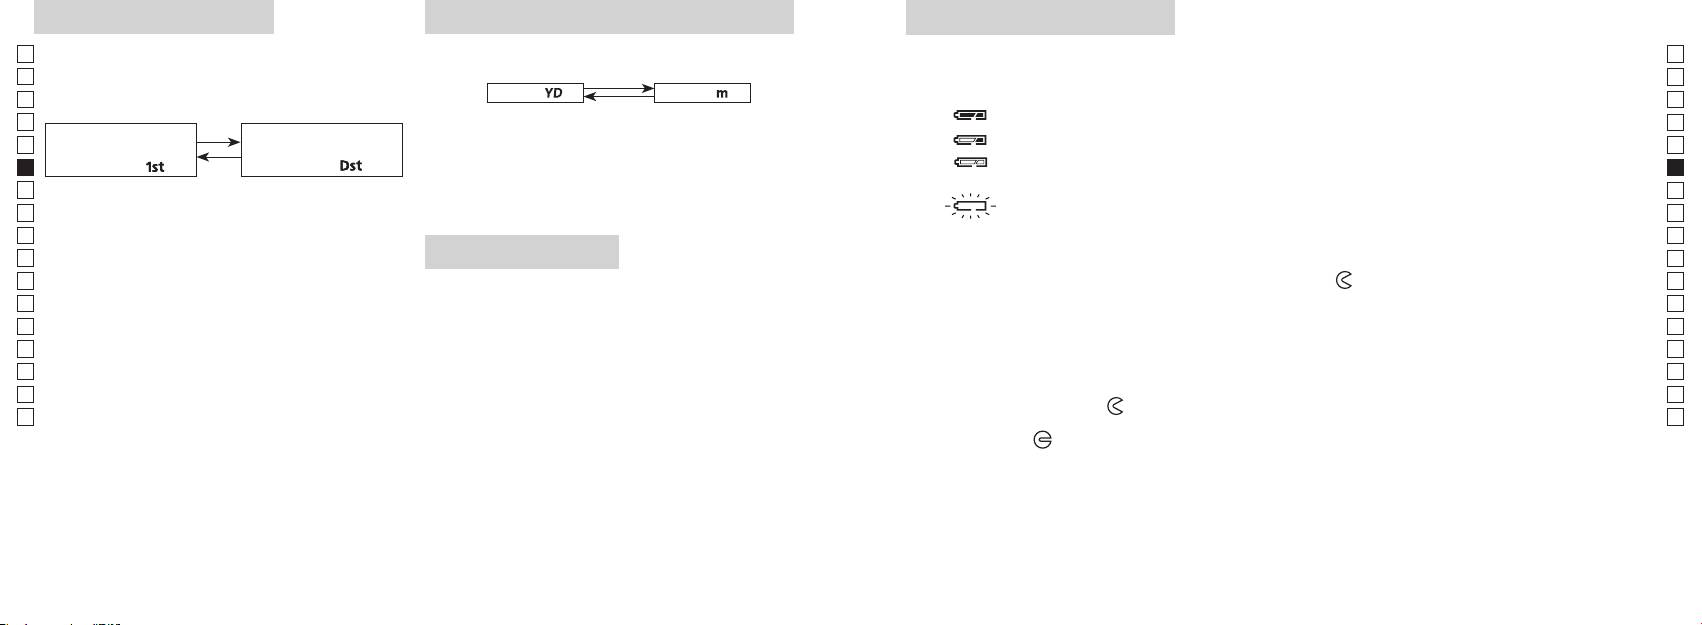
Prioritätsmodus ziel
Entfernungsanzeige-einheiten
Wechseln der batterie
Jp
Jp
Art der Batterie: 3V CR2 Lithiumbatterie x1
En
Anzeigen der verbleibenden Batterieladung
En
Es
[ ]
Meter [ ]Yard
* Das Batteriestandzeichen auf dem internen Display warnt, wenn die Batterie ausgetauscht werden muss.
Es
: Batterie besitzt genügend Ladung für den Betrieb.
Fr
「
1
」
「
」
Fr
interne Display eingeschaltet ist).
: Batterieladung ist bereits sehr niedrig. Die Batterie muss bald ausgetauscht werden.
De
De
interne Display eingeschaltet ist).
It
: Batterieladung ist sehr niedrig. Die Batterie muss durch eine neue ersetzt werden.
It
Anzeigeeinheit frei.
Se
blinkend : Die Batterie ist erschöpft. Nachdem die Anzeige drei Mal geblinkt hat, schaltet sich
Se
Nl
von 0,5 Sekunden gedrückt.
Nl
Halten Sie beide Tasten (für mehr als 2 Sekunden)
Ru
1. Öffnen Sie die Batteriefachabdeckung
Ru
Pt
Pt
und drehen Sie die Abdeckung in die Richtung der
-Markierung. Dies kann aufgrund der
werden.
Pl
LED-beleuchtung
Pl
3. Lassen Sie beide Taste los, wenn der Modus
Fi
umgeschaltet wurde.
2. Ersetzen Sie die alte Batterie durch eine neue
Fi
No
*
interne Display eingeschaltet ist).
No
nicht in richtiger Reihenfolge gedrückt werden.
Dk
Dk
*
.
Cz
stattfindet.
auszuschalten.
3. Schließen Sie die Batteriefachabdeckung
Cz
*
Ro
Richten Sie die
-Markierung mit der
●
-Anzeige aus und setzen Sie die Batteriefachabdeckung ein.
Ro
[]
schwach ist, um das LC-Display zu sehen.
-Markierung.
Hu
Hu
Bei der Messung von sich überlappenden Objekten
*
Drehen Sie diese aber weiter, bis die Abdeckung sich nicht mehr weiter dreht. Stellen Sie sicher, dass
diesem Fall bleibt die Beleuchtung aus, wenn der Laser-
die Abdeckung dicht geschlossen ist.
Batterielebensdauer
Dauerbetrieb: Ca. 13.000 mal (bei 20°C)
ersetzen Sie dann die Batterie.
84 85
Jp
Jp
En
En
Es
Es
Fr
Fr
De
De
It
It
Se
Se
Nl
Nl
Ru
Ru
Pt
Pt
Pl
Pl
Fi
Fi
No
No
Dk
Dk
Cz
Cz
Ro
Ro
Hu
Hu
86 87
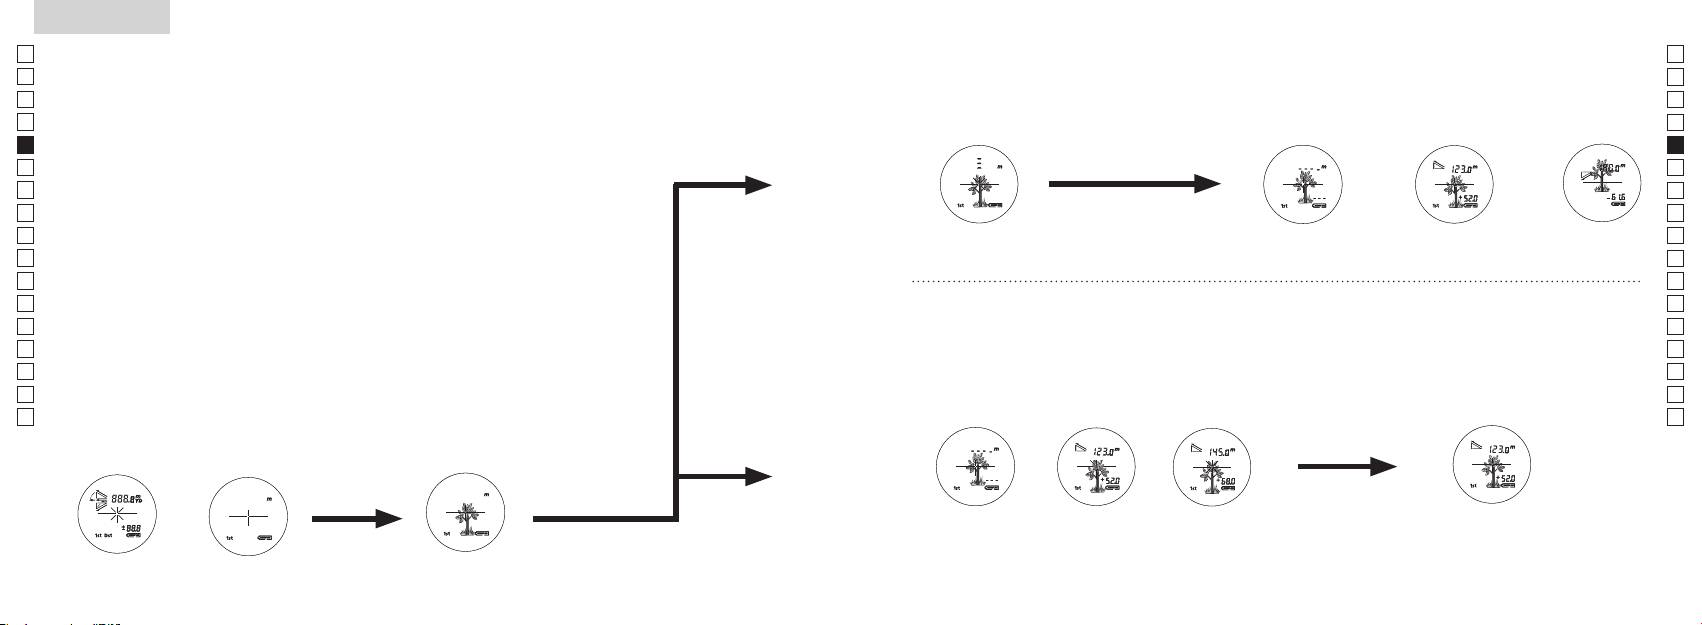
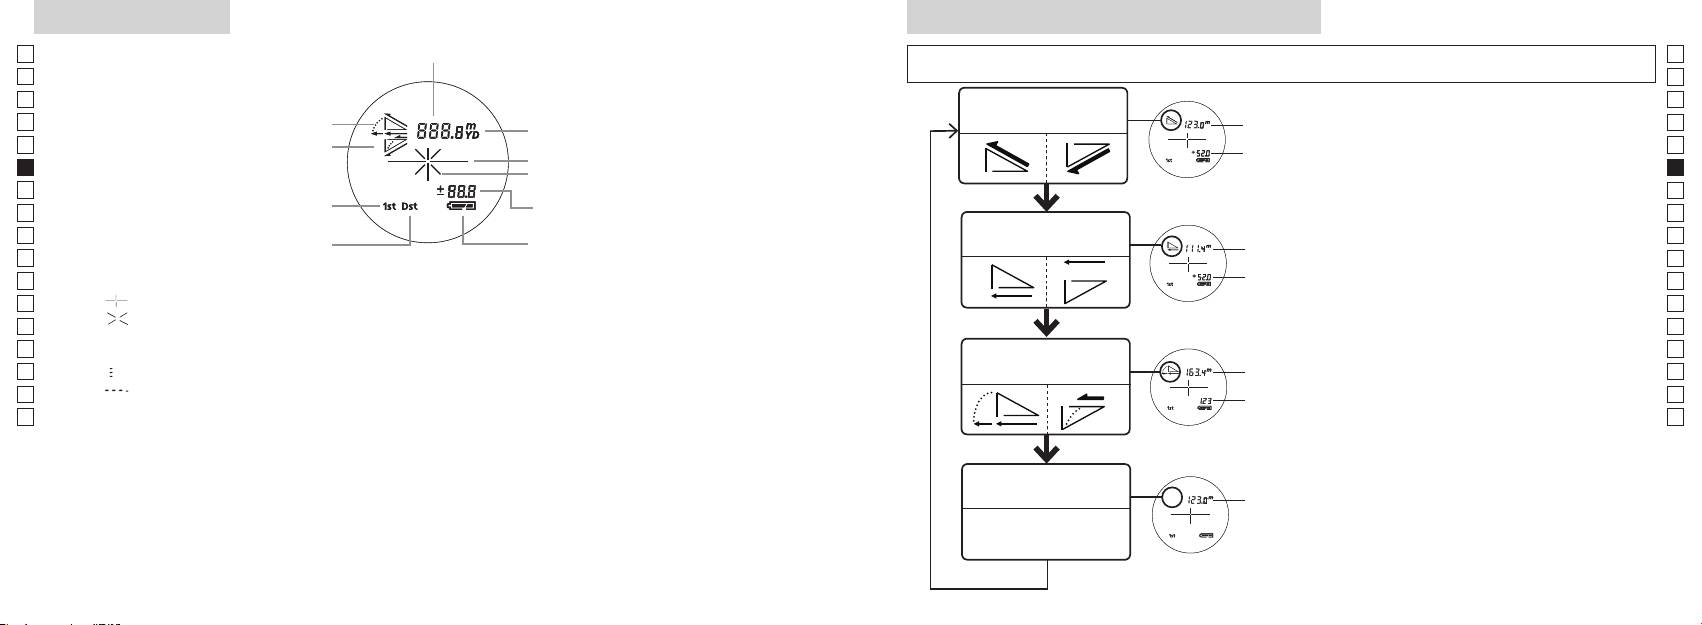
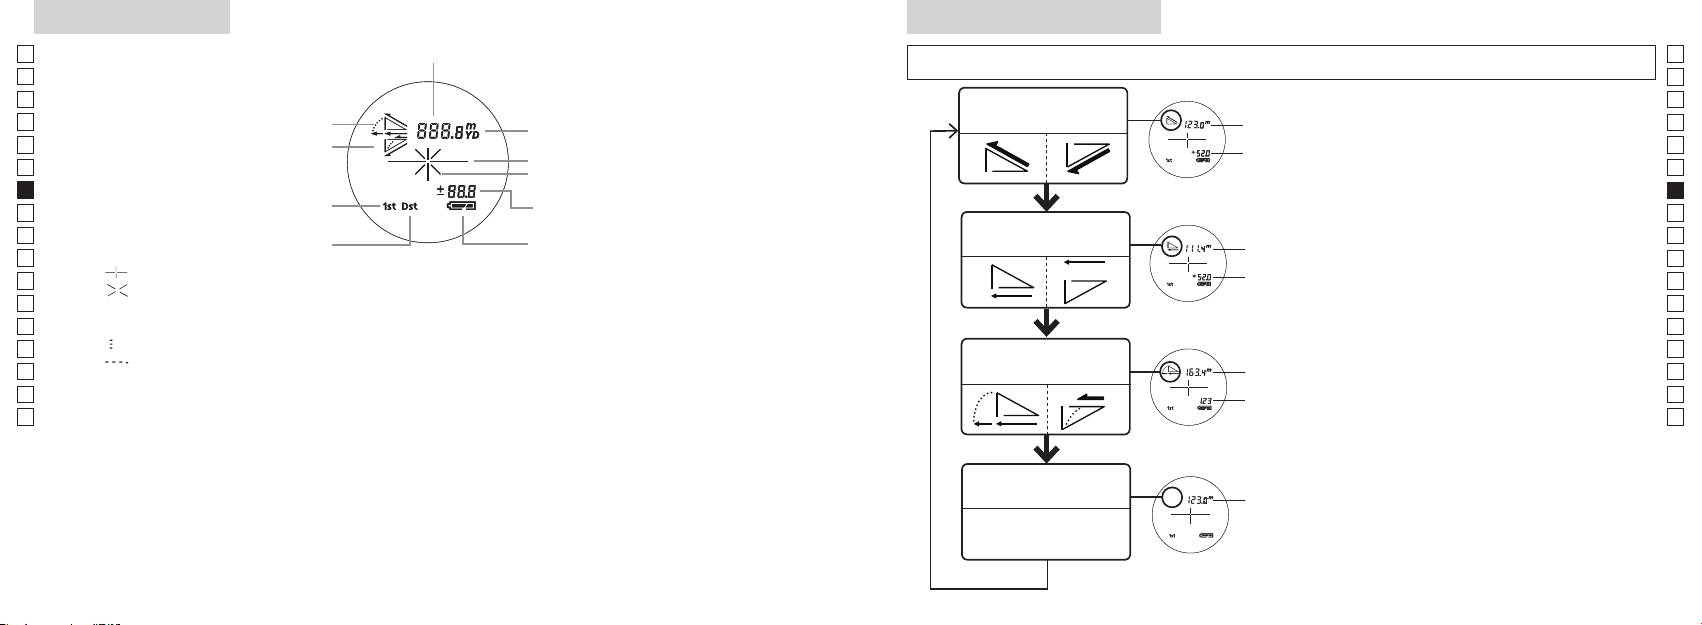
Measurement
1. Press the POWER button for power-on.
(Power turns off 8 seconds after the last
operation.)
Immediately after power-on.
3. Press POWER button once to start single measurement.
4. After measurement, “distance” or “fail to measure” indicator are displayed for 8 seconds, then power turns off. If you press the POWER
button during power-on (while the internal display is lit), another single measurement starts.
unable to measure distance.
3. Keep pressing POWER button to start continuous measurement up to 20 seconds. The internal display shows “distance” and
“fail to measure” indicator alternately.
Note: Laser irradiaton mark is blinking during the measurement.
Note: If you stop pressing the button, the continuous measuremen stops
2. Aim at the target
Positionthetargetatthecenterofthereticle
[Single measurement]
Failure to measure or
unable to measure distance.
[Continuous measurement]
4. After continuous measurement, the measure results are displayed for 8 seconds, then power turns off. If you press the POWER
button during power-on (while the internal display is lit), another measrement starts.
Failure to measure or
Target focusing.
Measuring.
(Initializing)
.
Upward measurement. Downward measurement.
Displays the measured
figure. (Target 1)
Displays the measured figure.
Stand-by.
Displays the measured
figure. (Target 2)
Measurement
1. Press the POWER button for power-on.
(Power turns off 8 seconds after the last
operation.)
Immediately after power-on.
(Initializing)
3. Press POWER button once to start single measurement.
Measuring.
4. After measurement, “distance” or “fail to measure” indicator are displayed for 8 seconds, then power turns off. If you press the POWER
button during power-on (while the internal display is lit), another single measurement starts.
Failure to measure or
unable to measure distance.
Displays the measured
figure. (Target 1)
3. Keep pressing POWER button to start continuous measurement up to 20 seconds. The internal display shows “distance” and
“fail to measure” indicator alternately.
Note: Laser irradiaton mark is blinking during the measurement.
Note: If you stop pressing the button, the continuous measuremen stops
Target focusing.
2. Aim at the target
.
Positionthetargetatthecenterofthereticle
[Single measurement]
Failure to measure or
unable to measure distance.
Upward measurement. Downward measurement.
Displays the measured figure.
[Continuous measurement]
4. After continuous measurement, the measure results are displayed for 8 seconds, then power turns off. If you press the POWER
button during power-on (while the internal display is lit), another measrement starts.
Stand-by.
Displays the measured
figure. (Target 2)
Measurement
1. Press the POWER button for power-on.
(Power turns off 8 seconds after the last
operation.)
Immediately after power-on.
Stand-by.
(Initializing)
2. Aim at the target
.
Positionthetargetatthecenterofthereticle
3. Press POWER button once to start single measurement.
4. After measurement, “distance” or “fail to measure” indicator are displayed for 8 seconds, then power turns off. If you press the POWER
button during power-on (while the internal display is lit), another single measurement starts.
unable to measure distance.
3. Keep pressing POWER button to start continuous measurement up to 20 seconds. The internal display shows “distance” and
“fail to measure” indicator alternately.
Note: Laser irradiaton mark is blinking during the measurement.
Note: If you stop pressing the button, the continuous measuremen stops
[Single measurement]
Failure to measure or
unable to measure distance.
[Continuous measurement]
4. After continuous measurement, the measure results are displayed for 8 seconds, then power turns off. If you press the POWER
button during power-on (while the internal display is lit), another measrement starts.
Failure to measure or
Target focusing.
Measuring.
Upward measurement. Downward measurement.
Displays the measured
figure. (Target 1)
Displays the measured figure.
Displays the measured
figure. (Target 2)
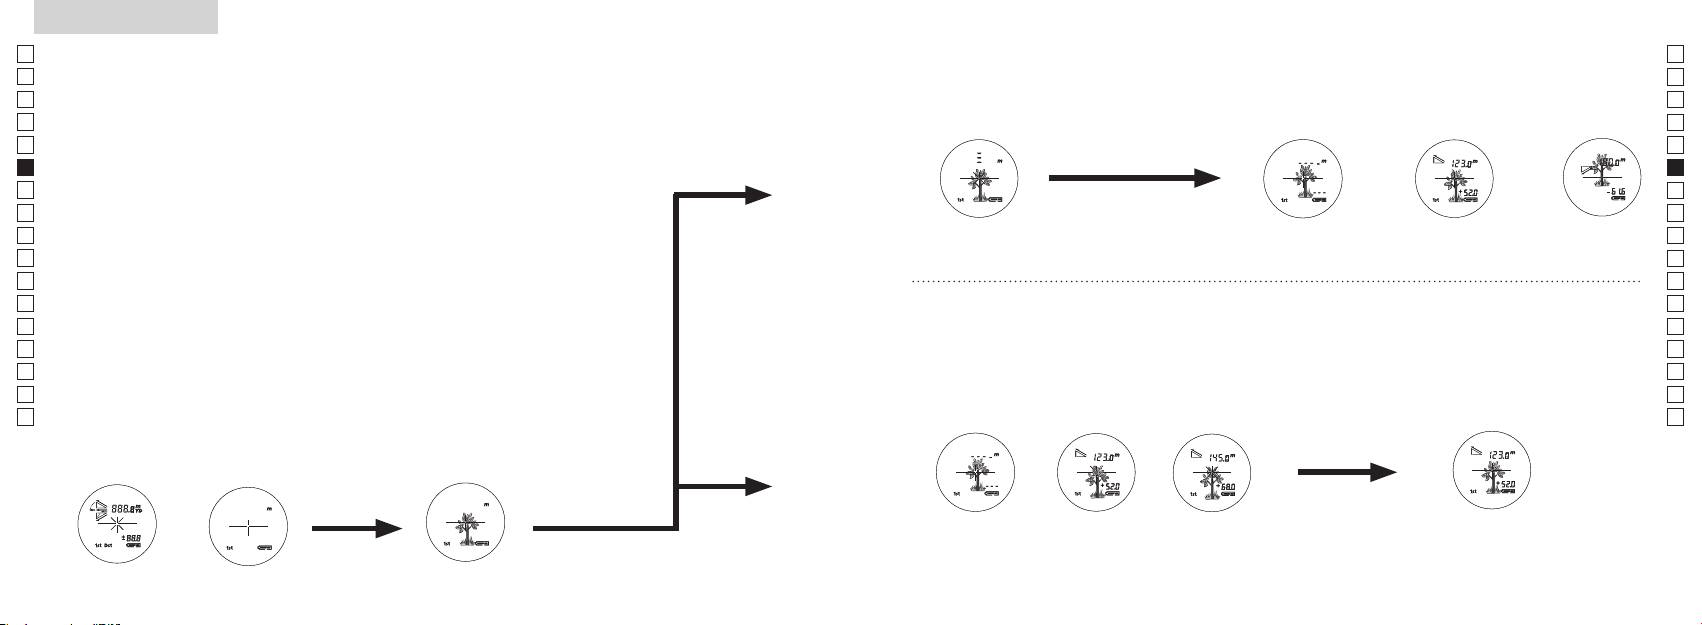
Messung
Vorsicht — Die Verwendung von Einstellelementen oder Justagen oder die Ausführung
【
Einzelne Messung
】
von anderen als den hierin angegebenen Verfahren können zu einer gefährlichen Strahlenbelastung führen.
3. Drücken Sie die
Messtaste einmal, um die
1. Vorbereitung
einzelne Messung zu aktivieren.
2. Gummiaugenmuschel
verwenden.
3. Dioptrineinstellung
Stellen Sie den Dioptrinwert ein, um eine klare LCD-Anzeige im Sucher zu erhalten.
sicher, dass die interne Anzeige eingeschaltet ist). Schauen Sie durch das Okular und
【
Kontinuierliche Messung
】
4. Messung
Stellen Sie vor der Messung sicher, dass der gewünschte Modus eingestellt ist
*
Sehen Sie im entsprechenden Abschnitt nach, wie der einzelne Modus eingestellt wird.
.
ob das interne Display eingeschaltet ist).
(Abschaltautomatik nach ca. 8
Mitte des Fadenkreuzes.
Sekunden ohne Bedienung.)
Sofort nach dem
Standby
Measurement
1. Press the POWER button for power-on.
(Power turns off 8 seconds after the last
operation.)
Immediately after power-on.
Stand-by.
(Initializing)
2. Aim at the target
.
Positionthetargetatthecenterofthereticle
Target focusing.
[Single measurement]
3. Press POWER button once to start single measurement.
Measuring.
4. After measurement, “distance” or “fail to measure” indicator are displayed for 8 seconds, then power turns off. If you press the POWER
button during power-on (while the internal display is lit), another single measurement starts.
Failure to measure or
Upward measurement. Downward measurement.
unable to measure distance.
Displays the measured figure.
[Continuous measurement]
3. Keep pressing POWER button to start continuous measurement up to 20 seconds. The internal display shows “distance” and
“fail to measure” indicator alternately.
Note: Laser irradiaton mark is blinking during the measurement.
Note: If you stop pressing the button, the continuous measuremen stops
Failure to measure or
unable to measure distance.
4. After continuous measurement, the measure results are displayed for 8 seconds, then power turns off. If you press the POWER
button during power-on (while the internal display is lit), another measrement starts.
Displays the measured
figure. (Target 1)
Displays the measured
figure. (Target 2)
Measurement
1. Press the POWER button for power-on.
(Power turns off 8 seconds after the last
operation.)
Immediately after power-on.
Stand-by.
(Initializing)
2. Aim at the target
.
Positionthetargetatthecenterofthereticle
Target focusing.
[Single measurement]
3. Press POWER button once to start single measurement.
Measuring.
4. After measurement, “distance” or “fail to measure” indicator are displayed for 8 seconds, then power turns off. If you press the POWER
button during power-on (while the internal display is lit), another single measurement starts.
Failure to measure or
Upward measurement. Downward measurement.
unable to measure distance.
Displays the measured figure.
[Continuous measurement]
3. Keep pressing POWER button to start continuous measurement up to 20 seconds. The internal display shows “distance” and
“fail to measure” indicator alternately.
Note: Laser irradiaton mark is blinking during the measurement.
Note: If you stop pressing the button, the continuous measuremen stops
Failure to measure or
unable to measure distance.
Displays the measured
figure. (Target 1)
4. After continuous measurement, the measure results are displayed for 8 seconds, then power turns off. If you press the POWER
button during power-on (while the internal display is lit), another measrement starts.
Displays the measured
figure. (Target 2)
Measurement
1. Press the POWER button for power-on.
(Power turns off 8 seconds after the last
operation.)
Immediately after power-on.
Stand-by.
(Initializing)
2. Aim at the target
.
Positionthetargetatthecenterofthereticle
Target focusing.
[Single measurement]
3. Press POWER button once to start single measurement.
Measuring.
4. After measurement, “distance” or “fail to measure” indicator are displayed for 8 seconds, then power turns off. If you press the POWER
button during power-on (while the internal display is lit), another single measurement starts.
Failure to measure or
unable to measure distance.
3. Keep pressing POWER button to start continuous measurement up to 20 seconds. The internal display shows “distance” and
“fail to measure” indicator alternately.
Note: Laser irradiaton mark is blinking during the measurement.
Note: If you stop pressing the button, the continuous measuremen stops
Failure to measure or
unable to measure distance.
[Continuous measurement]
4. After continuous measurement, the measure results are displayed for 8 seconds, then power turns off. If you press the POWER
button during power-on (while the internal display is lit), another measrement starts.
Upward measurement. Downward measurement.
Displays the measured
figure. (Target 1)
Displays the measured figure.
Displays the measured
figure. (Target 2)
Measurement
1. Press the POWER button for power-on.
(Power turns off 8 seconds after the last
operation.)
Immediately after power-on.
Stand-by.
(Initializing)
2. Aim at the target
.
Positionthetargetatthecenterofthereticle
Target focusing.
[Single measurement]
3. Press POWER button once to start single measurement.
Measuring.
4. After measurement, “distance” or “fail to measure” indicator are displayed for 8 seconds, then power turns off. If you press the POWER
button during power-on (while the internal display is lit), another single measurement starts.
unable to measure distance.
3. Keep pressing POWER button to start continuous measurement up to 20 seconds. The internal display shows “distance” and
“fail to measure” indicator alternately.
Note: Laser irradiaton mark is blinking during the measurement.
Note: If you stop pressing the button, the continuous measuremen stops
unable to measure distance.
4. After continuous measurement, the measure results are displayed for 8 seconds, then power turns off. If you press the POWER
button during power-on (while the internal display is lit), another measrement starts.
[Continuous measurement]
Failure to measure or
Failure to measure or
Upward measurement. Downward measurement.
Displays the measured
figure. (Target 1)
Displays the measured figure.
Displays the measured
figure. (Target 2)
Measurement
1. Press the POWER button for power-on.
(Power turns off 8 seconds after the last
operation.)
Immediately after power-on.
Stand-by.
(Initializing)
2. Aim at the target
.
Positionthetargetatthecenterofthereticle
Target focusing.
[Single measurement]
3. Press POWER button once to start single measurement.
4. After measurement, “distance” or “fail to measure” indicator are displayed for 8 seconds, then power turns off. If you press the POWER
button during power-on (while the internal display is lit), another single measurement starts.
unable to measure distance.
3. Keep pressing POWER button to start continuous measurement up to 20 seconds. The internal display shows “distance” and
“fail to measure” indicator alternately.
Note: Laser irradiaton mark is blinking during the measurement.
Note: If you stop pressing the button, the continuous measuremen stops
unable to measure distance.
4. After continuous measurement, the measure results are displayed for 8 seconds, then power turns off. If you press the POWER
button during power-on (while the internal display is lit), another measrement starts.
[Continuous measurement]
Failure to measure or
Failure to measure or
Measuring.
Upward measurement. Downward measurement.
Displays the measured
figure. (Target 1)
Displays the measured figure.
Displays the measured
figure. (Target 2)
Measurement
1. Press the POWER button for power-on.
(Power turns off 8 seconds after the last
operation.)
Immediately after power-on.
Stand-by.
(Initializing)
2. Aim at the target
.
Positionthetargetatthecenterofthereticle
Target focusing.
[Single measurement]
3. Press POWER button once to start single measurement.
Measuring.
4. After measurement, “distance” or “fail to measure” indicator are displayed for 8 seconds, then power turns off. If you press the POWER
button during power-on (while the internal display is lit), another single measurement starts.
unable to measure distance.
3. Keep pressing POWER button to start continuous measurement up to 20 seconds. The internal display shows “distance” and
“fail to measure” indicator alternately.
Note: Laser irradiaton mark is blinking during the measurement.
Note: If you stop pressing the button, the continuous measuremen stops
unable to measure distance.
4. After continuous measurement, the measure results are displayed for 8 seconds, then power turns off. If you press the POWER
button during power-on (while the internal display is lit), another measrement starts.
[Continuous measurement]
Failure to measure or
Failure to measure or
Upward measurement. Downward measurement.
Displays the measured
figure. (Target 1)
Displays the measured figure.
Displays the measured
figure. (Target 2)
Measurement
1. Press the POWER button for power-on.
(Power turns off 8 seconds after the last
operation.)
Immediately after power-on.
Stand-by.
(Initializing)
2. Aim at the target
.
Positionthetargetatthecenterofthereticle
Target focusing.
[Single measurement]
3. Press POWER button once to start single measurement.
Measuring.
4. After measurement, “distance” or “fail to measure” indicator are displayed for 8 seconds, then power turns off. If you press the POWER
button during power-on (while the internal display is lit), another single measurement starts.
Failure to measure or
unable to measure distance.
Displays the measured
figure. (Target 1)
3. Keep pressing POWER button to start continuous measurement up to 20 seconds. The internal display shows “distance” and
“fail to measure” indicator alternately.
Note: Laser irradiaton mark is blinking during the measurement.
Note: If you stop pressing the button, the continuous measuremen stops
Failure to measure or
unable to measure distance.
Upward measurement. Downward measurement.
Displays the measured figure.
[Continuous measurement]
4. After continuous measurement, the measure results are displayed for 8 seconds, then power turns off. If you press the POWER
button during power-on (while the internal display is lit), another measrement starts.
Displays the measured
figure. (Target 2)
Measurement
1. Press the POWER button for power-on.
(Power turns off 8 seconds after the last
operation.)
Immediately after power-on.
Stand-by.
(Initializing)
2. Aim at the target
.
Positionthetargetatthecenterofthereticle
Target focusing.
[Single measurement]
3. Press POWER button once to start single measurement.
Measuring.
4. After measurement, “distance” or “fail to measure” indicator are displayed for 8 seconds, then power turns off. If you press the POWER
button during power-on (while the internal display is lit), another single measurement starts.
Failure to measure or
unable to measure distance.
3. Keep pressing POWER button to start continuous measurement up to 20 seconds. The internal display shows “distance” and
“fail to measure” indicator alternately.
Note: Laser irradiaton mark is blinking during the measurement.
Note: If you stop pressing the button, the continuous measuremen stops
Failure to measure or
unable to measure distance.
[Continuous measurement]
4. After continuous measurement, the measure results are displayed for 8 seconds, then power turns off. If you press the POWER
button during power-on (while the internal display is lit), another measrement starts.
Upward measurement. Downward measurement.
Displays the measured
figure. (Target 1)
Displays the measured figure.
Displays the measured
figure. (Target 2)
4. Nach der Messung wird die Meldung
fehlgeschlagen“ 8 Sekunden lang angezeigt und dann schaltet sich der
aktiv ist) drücken, wird eine
weitere einzelne Messung aktiv.
Messung
Messung
3. Halten Sie die
gedrückt, um die kontinuierliche Messung zu aktivieren. Das
*
Das Laserstrahzeichen blinkt
*
Messung aktiv.
auf.
fehlgeschlagen” oder
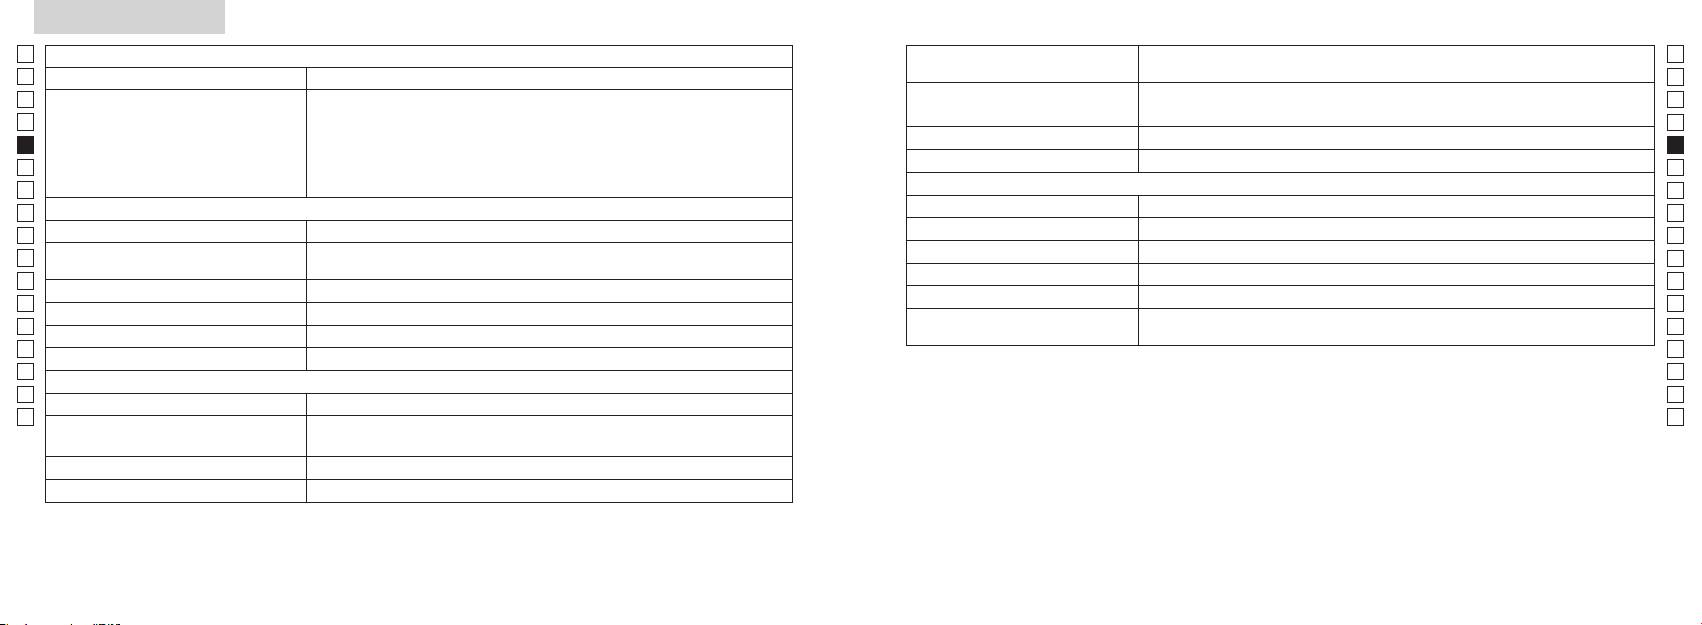
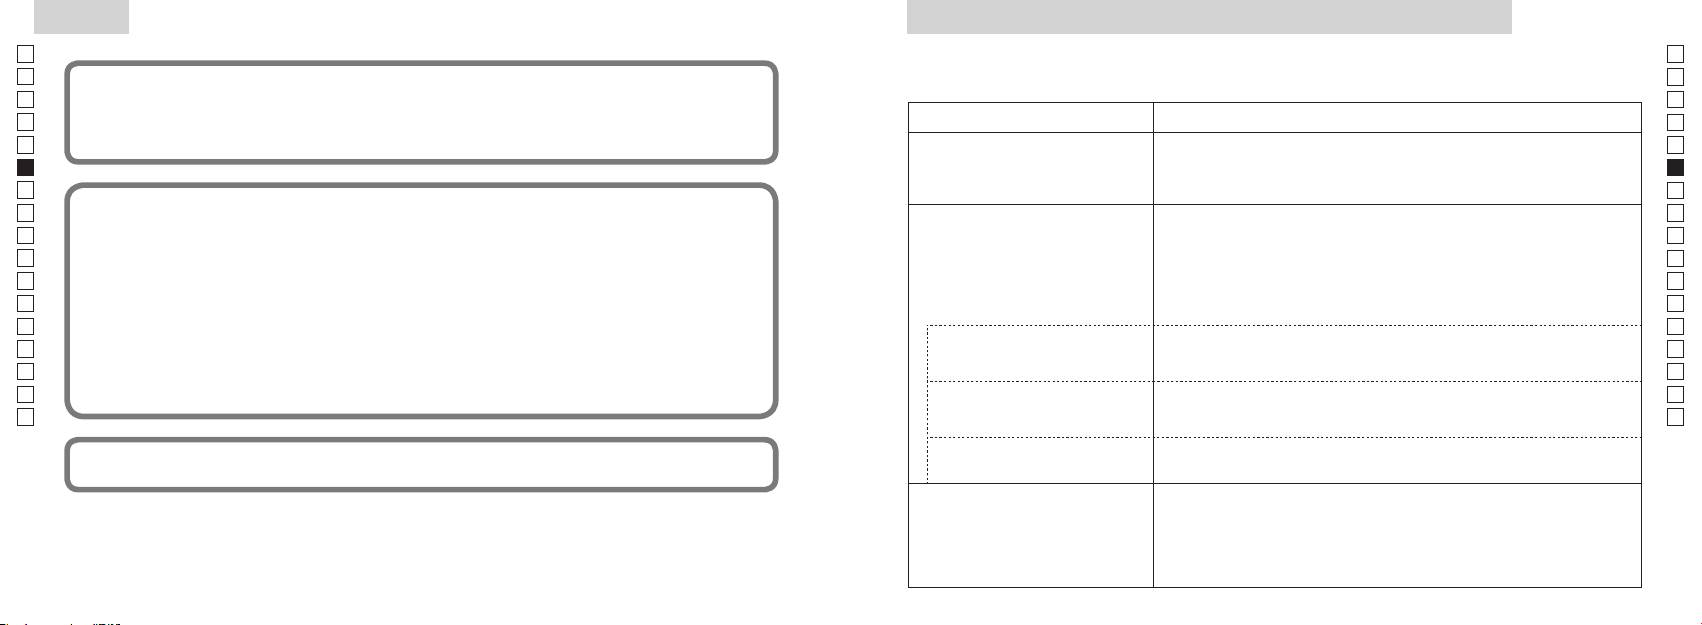
Technische daten
Jp
Messsystem
Jp
Struktur
En
Messbereich
En
Es
Es
Sicherheit
Fr
Fr
De
De
Umwelt
It
It
Laser
Se
Se
Optisches System
Kategorie
Nl
Nl
Vergrößerung (x) 6
(nm) 905
Ru
Ru
Impulsdauer (ns) 12
Pt
ø21
Pt
(mm)
15
Pl
Pl
Sichtwinkel (wahr) (˚) 7,5
Lichtstrahlabweichung (mrad)
Fi
Fi
Abstand der Austrittspupille (mm) 18,3
Betriebsfeuchtigkeit
No
80 oder weniger (ohne Taukondensation)
No
Austrittspupille (mm) ø3,5
(% rel. Feuchtigkeit)
Dk
Dk
-
1
Dioptrineinstellung ±4 m
* Wasserfeste Modelle
Cz
Cz
Anderes
Ro
Ro
Betriebstemperatur (˚C) -10 —
Der Nikon Laser-Entfernungsmesser bietet die folgenden Vorteile:
Hu
Hu
Spannungsquelle
Abschaltautomatik (nach ca. 8 Sekunden ohne Bedienung)
Beachten Sie das Folgende, wenn Sie das Nikon Laser-Entfernungsmesser verwenden.
Maße (L x B x H) (mm) 113 x 70 x 39
Ca. 175 (ohne Batterie)
Sie ihn trocken.
88 89
Anderes
Fehlersuche/Reparatur
Fehlersuche/Reparatur
Jp
Jp
En
En
Es
Es
Symptom Korrektur
Fr
Fr
unerwünschten Betrieb verursachen kann.
●
De
De
● Überprüfen Sie die Batterie.
(LC-Display leuchtet nicht)
It
●
It
Se
● Stellen Sie sicher, dass nichts, wie Ihr Finger oder der Trageriemen, die Laser-
Se
Nl
Nl
Objektivseite blockiert.
Ru
verwendet und kann Hochfrequenzenergie ausstrahlen und, wenn nicht in Übereinstimmung mit den Anweisungen
●
Ru
Pt
Detektorblendenöffnung auf der Objektivseite sauber sind. Reinigen Sie diese,
Pt
werden.
falls erforderlich.
Pl
Pl
●
Fi
angeregt zu versuchen, die Störung durch eine oder mehrere der folgenden Maßnahmen zu beheben:
Laserstrahls geeignet sind.
Fi
●
No
No
●
Dk
Dk
●
angezeigt
Cz
Cz
Ro
Ro
●
Hu
Messbereichs erkannt werden,
Hu
können nicht gemessen werden
Beweise gelten.
●
gemessen werden
●
●
Laserstrahls geeignet sind.
Messergebnis ist instabil.
●
●
90 91
Fehlersuche/Reparatur
Jp
Jp
En
En
Symptom Korrektur
Es
Es
●
Fr
Fr
●
Italiano
De
Laserstrahls geeignet sind.
De
It
●
It
Se
INDICE
Se
Nl
Nl
Avvertenze prima dell'uso ................................. 94-97
Ru
Ru
Caratteristiche fondamentali ................................... 98
Pt
Pt
....... 99
Pl
Pl
Display interno ........................................................... 100
Fi
Fi
Modalità di visualizzazione della
No
No
misurazione ................................................................. 101
Dk
Dk
Cz
Cz
Ro
Ro
..................................................... 102
Hu
Hu
Sostituzione della batteria ..................................... 103
Misurazione ........................................................ 104-105
Specifiche tecniche .......................................... 106-107
Altro ................................................................................ 108
........................ 109-110
92 93
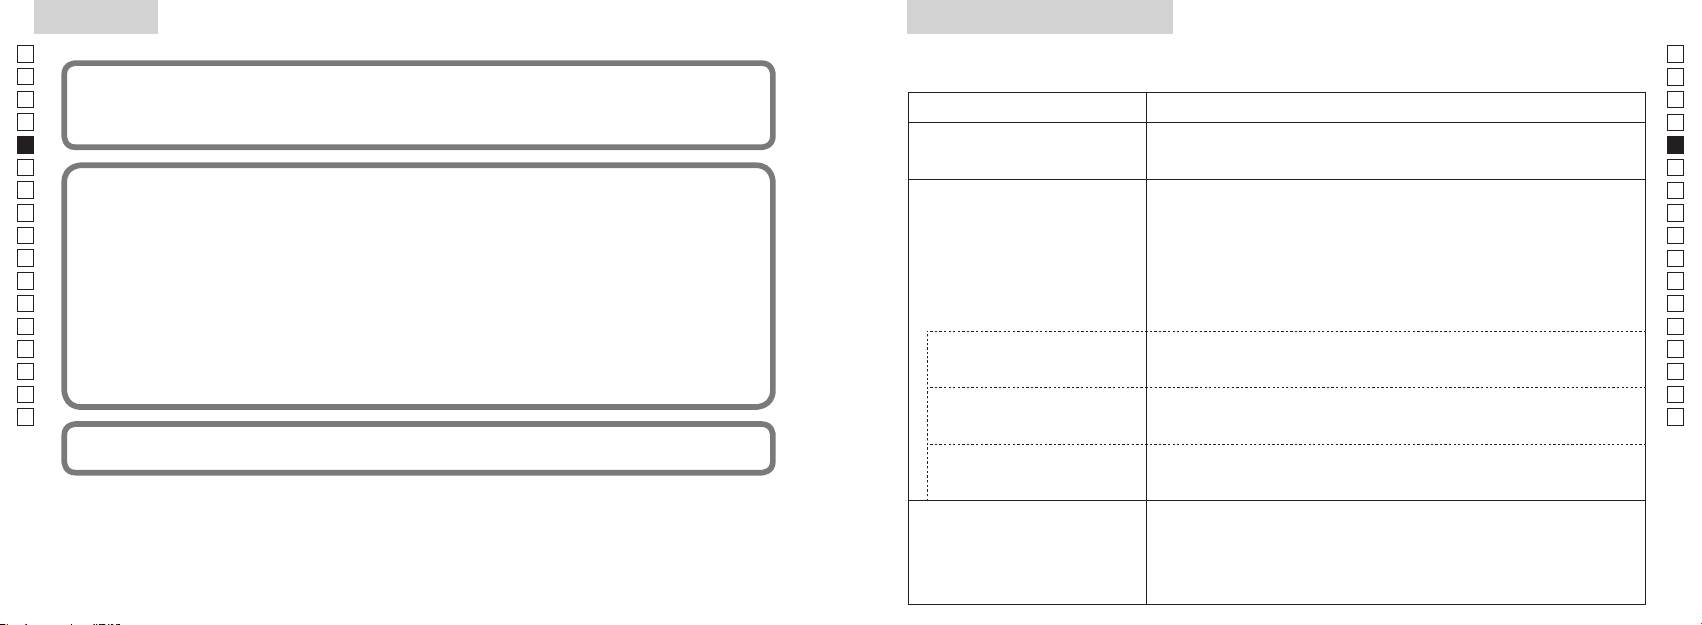
Avvertenze prima dell'uso
Jp
Per poter utilizzare questa
PRECAUZIONI PER LA
il telemetro laser
Jp
apparecchiatura nel modo
Nikon e non eseguire riparazioni
En
SICUREZZA (Laser)
En
corretto ed evitare eventuali
né modifiche al modello. Il fascio
Il telemetro laser Nikon utilizza un
Es
L'uso di comandi, regolazioni o procedure diversi da quelli specificati nel presente manuale
Es
laser emesso può essere dannoso
pericoli, attenersi rigorosamente
fascio laser invisibile.
può causare l'esposizione a radiazioni pericolose.
Fr
per la salute. Lo smontaggio,
alle seguenti indicazioni. Prima
attenzione ai seguenti punti:
Fr
la riparazione di un prodotto o
De
di utilizzare questo prodotto,
Avvertenza
De
〇
eventuali modifiche apportate al
leggere attentamente le
It
modello annullano la validità della
It
istruzioni relative ad un impiego corretto fornite unitamente al prodotto.
"Avvertenze prima dell'uso" e le
Se
garanzia del fabbricante.
Se
〇 Tenere il presente manuale a portata di mano per una facile consultazione.
istruzioni relative ad un impiego
misurazione) guardando nelle
Nl
corretto fornite unitamente al
ottiche dal lato dell'obiettivo. La
Nl
〇 Non smontare o riparare il prodotto personalmente, ciò può causare seri problemi.
fuori dalla portata dei bambini.
prodotto. Tenere il presente
mancata osservanza di questa
Ru
Lo smontaggio o la riparazione in tal modo di un prodotto annulla la validità della garanzia del
Ru
manuale a portata di mano per
avvertenza può causare deficit visivi o
fabbricante.
telemetro laser Nikon risulta
Pt
danneggiare seriamente la vista.
Pt
una facile consultazione.
danneggiato, o se l'unità
Pl
Pl
produce rumori strani a seguito
● Design e dati caratteristici sono soggetti a variazioni senza preavviso.
ntare il laser verso le persone.
Fi
di una caduta o per altre ragioni
Fi
PERICOLO
●
non precisate, rimuovere
No
strumento ottico, ad esempio
No
modo, in tutto o in parte, il presente manuale (salvo brevi citazioni in recensioni o articoli critici).
immediatamente la batteria e non
che la mancata osservanza di quanto
attraverso lenti o binocoli, né ad
Dk
Dk
utilizzare ulteriormente l'unità.
● NIKON VISION CO., LTD. si riserva il diritto di modificare i contenuti del presente manuale in
specificato di seguito durante l'uso
occhio nudo. Ciò può causare lesioni
Cz
Cz
qualsiasi momento e senza preavviso.
può provocare lesioni gravi o il
agli occhi.
decesso.
Ro
Ro
Hu
ATTENZIONE
fase di misurazione, mantenere le
Hu
dita distanti dal tasto
che la mancata osservanza di quanto
specificato di seguito durante l'uso
misurazione) per evitare l'emissione
può essere causa di infortuni o danni
accidentale del fascio laser.
materiali.
estrarre la batteria dal corpo
dell'unità.
94 95
Avvertenze prima dell'uso
Jp
PRECAUZIONI PER LA
cadute con conseguenti lesioni o
PRECAUZIONI PER LA
CURA E MANUTENZIONE
Conservazione
Jp
malfunzionamenti.
alle normative locali.
En
SICUREZZA (Monoculare)
SICUREZZA (Batteria al litio)
Lenti
En
sulla superficie della lente possono
Es
Il telemetro laser Nikon utilizza un
Se trattata in modo errato, la batteria
PRECAUZIONI PER LA
Es
superficie dell'obiettivo, usare un
monoculare nel proprio sistema di
può incrinarsi e provocare perdite,
Fr
di piccole dimensioni fuori dalla
SICUREZZA
pennello morbido privo di sostanze
conservare il telemetro laser Nikon
Fr
ottiche per mirare al bersaglio.
corrodendo le apparecchiature e
portata dei bambini.
Attenzione
oleose.
in un luogo fresco e asciutto.
De
macchiando gli indumenti.
De
It
Avvertenza
in bocca conchiglie oculari in
It
digitali dalla superficie delle lenti,
durante la notte, lasciare asciugare
la batteria
Se
gomma, piccole parti, ecc. In caso
pulire le lenti molto delicatamente
bene a temperatura ambiente,
Se
sole, una luce intensa o il raggio
disposti nel modo corretto.
di ingestione di piccole parti,
con un panno di cotone pulito e
quindi riporre in un luogo fresco e
Nl
laser durante l'uso del telemetro
la batteria
Nl
consultare immediatamente un
gocce di pioggia, schizzi
morbido o con un fazzolettino per
asciutto.
laser Nikon.
esaurita o durante periodi
Ru
medico.
d'acqua, tracce di sabbia e fango
Ru
lenti di qualità non impregnato di
prolungati di inutilizzo.
Attenzione
eventualmente depositatesi sulla
Pt
Pt
telemetro laser Nikon
oculari in gomma, può causare
superficie del corpo del telemetro con
Pl
Pl
in alcuni soggetti infiammazioni
un panno morbido e pulito.
piccola quantità di alcol puro (non
batteria.
Fi
tasto
cutanee. Alla comparsa di un
denaturato). Non usare panni in
Fi
la batteria in tasche
.
qualsiasi sintomo, cessare l'utilizzo
No
velluto o tessuti ordinari, poiché
No
o borse insieme a chiavi o monete
delle conchiglie oculari e consultare
calda o soleggiata o vicino a un
potrebbero graffiare la superficie
Dk
che possono creare un cortocircuito
Dk
camminando. La mancata
immediatamente un medico.
apparecchio che genera calore.
e causare surriscaldamento.
Cz
osservanza di questa avvertenza
Ciò potrebbe danneggiarlo o
utilizzato per pulire il corpo, non
Cz
può causare lesioni o
laser Nikon, conservarlo in una
influire negativamente sul suo
deve essere utilizzato per pulire la
Ro
fiamme libere. Non smontare mai la
Ro
malfunzionamenti a causa di urti
custodia morbida.
funzionamento.
superficie delle lenti.
Hu
batteria.
Hu
contro oggetti o persone, cadute
Corpo principale
o altri incidenti.
funziona correttamente, sospendere
esposto alla luce diretta del sole. I
raggi ultravioletti e il calore eccessivo
batteria entra in contatto con
panno morbido e pulito dopo aver
tenendolo per la cinghietta. In tal
concessionario di zona per ulteriori
possono influire negativamente
gli abiti o la pelle, sciacquare
eliminato la polvere delicatamente
modo si potrebbero urtare altre
immediatamente con abbondante
con un soffiatore*. Non utilizzare
persone causando lesioni.
alla sede di riparazione.
acqua corrente. In caso di contatto
benzene, diluenti o altri detergenti
esposto a improvvisi cambiamenti
con gli occhi del liquido fuoriuscito
contenenti solventi organici.
una posizione instabile. La
di temperatura, sulla superficie
da una batteria, sciacquare
mancata osservanza di questa
delle lenti può formarsi condensa.
immediatamente con acqua corrente,
pulizia in gomma che emette aria
indicazione può causare
Non utilizzare il prodotto finché la
quindi consultare un medico.
da un ugello.
96 97
Caratteristiche fondamentali
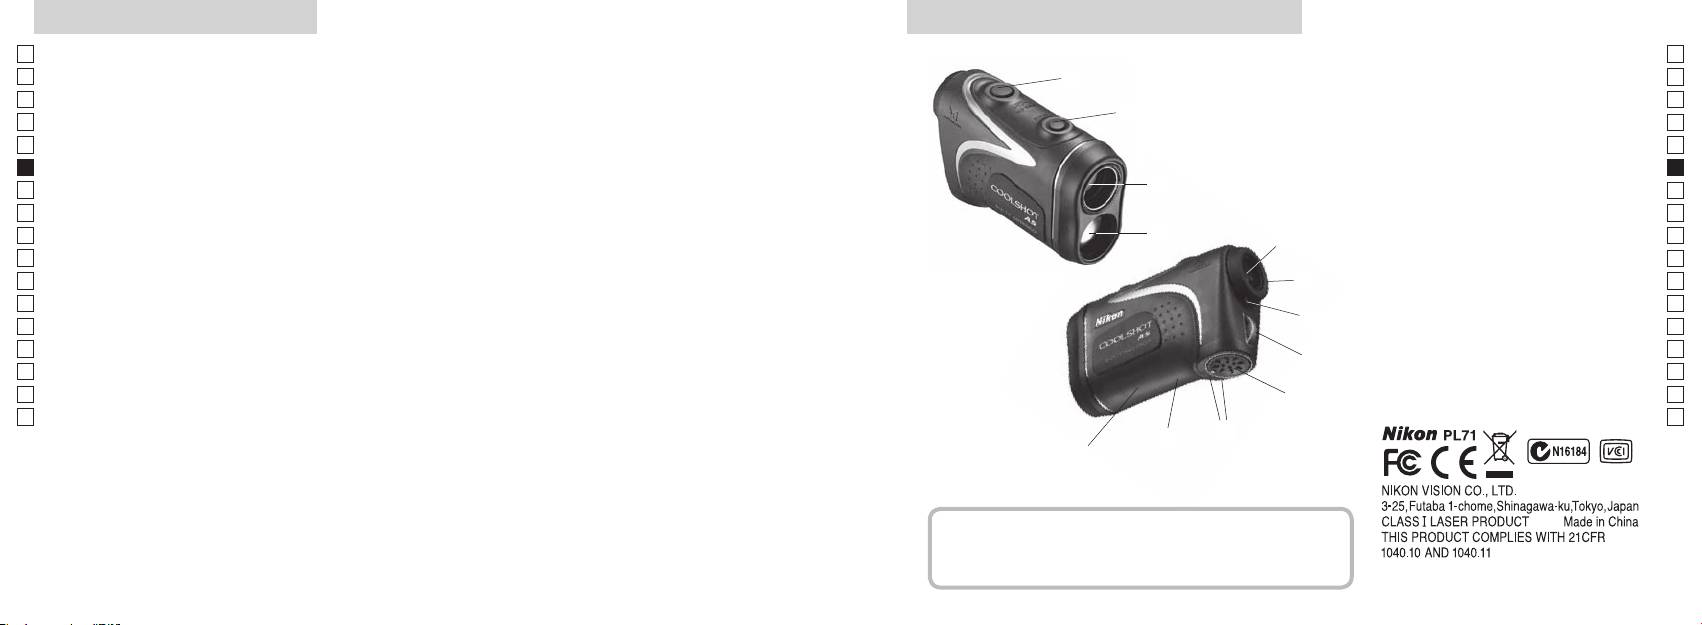
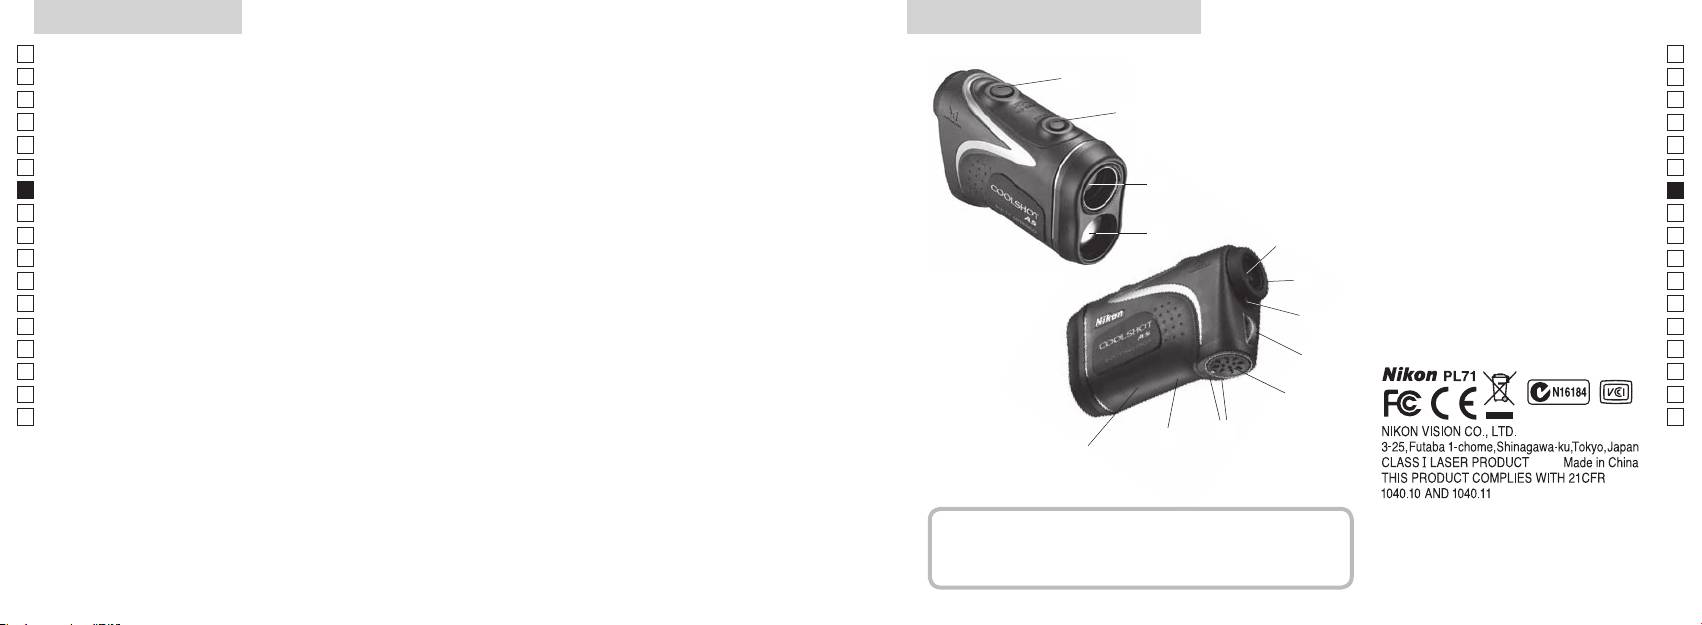
Nomenclatura/Contenuto della confezione
Jp
Le seguenti condizioni semplificano la misurazione:
Jp
1
En
4
En
Apertura di emissione del fascio laser
Es
Es
3
2 Apertura per il rilevatore laser
Fr
elevato
Fr
dell'inclinazione (distanza orizzontale ± altezza),
3
De
De
informazione di grande utilità nella pratica del golf
4
It
It
visualizzazione della misurazione facilmente commutabili
Le misurazioni effettuate nelle seguenti condizioni possono
1
Se
Se
dare luogo a risultati errati o inaccurati:
5Oculare singolo 6x
Nl
che può essere scelta in base al bersaglio
Nl
6
Ru
sottile
2
5
regolazione diottrica
Ru
Pt
7 Indice di regolazione diottrica
Pt
Pl
6
8 Occhiello per la tracolla
Pl
utilizzo)
specchio, ecc.)
Fi
9 Coperchietto del vano della batteria
Fi
7
No
!p
ultime"
No
Chiudi") relativa al coperchietto del
Dk
Dk
pioggia (NON utilizzare sott'acqua)
8
vano della batteria
Cz
Cz
!q
Ro
9
Ro
Il telemetro laser Nikon utilizza un fascio laser invisibile
!w Indicazioni delle informazioni FDA
Hu
Hu
per la misurazione. Misura il tempo impiegato dal
!p
fascio laser per andare dal telemetro al bersaglio e
!q
tornare indietro. La riflettività del laser e i risultati della
!w
misurazione possono variare in base alle condizioni
climatiche e ambientali, al colore, alla finitura superficiale,
alle dimensioni, alla forma e ad altre caratteristiche del
bersaglio.
Contenuto della confezione
.................................. x1
............................... x1
.......... x1
...... x1
98 99
Display interno
Modalità di visualizzazione della misurazione
Jp
Distanza
Jp
En
En
Es
Es
Modalità Distanza
1. Accendere il telemetro (verificare che
Distanza
Fr
Salita
effettiva e altezza
Fr
il display interno sia acceso).
effettiva
De
Declivio
De
Reticolo
Altezza
(MODO), quindi premere
It
It
Simbolo di emissione laser
immediatamente (meno di 0,5
Se
Se
Altezza
secondi) il tasto di accensione
Nl
Nl
Modalità Distanza
Ru
Distanza
Ru
Stato batteria
orizzontale e altezza
Pt
orizzontale
di 2 secondi.
Pt
3.
Pl
Altezza
Pl
Fi
『 』
misurazione) per alternare la
Fi
『 』 - Compare quando viene emesso il fascio laser per una misurazione.
No
modalità di visualizzazione della
No
Rimane fisso durante una misurazione singola. Lampeggia durante una misurazione continua.
misurazione.
Dk
Distanza
Dk
Non guardare nella lente dell'obbiettivo se appare questo simbolo.
Modalità Golf
4. Ripetere i passaggi 2 e 3 finché
con regolazione
Cz
『
』 - Misurazione in corso
Cz
dell'inclinazione
non viene visualizzata la modalità
Ro
『
』 - "Misurazione non riuscita" o "Impossibile effettuare la misurazione"
desiderata.
Ro
Distanza
Hu
effettiva
Se i tasti non vengono premuti
Hu
*
* Solitamente, un display LCD utilizza un ingrandimento analogo o inferiore. Il display LCD di questo
nell'ordine esatto, non sarà possibile
prodotto viene tuttavia ingrandito fortemente dall'oculare. Sebbene il display LCD sia stato realizzato
effettuare la commutazione.
*
Commutando la modalità dopo la
Modalità Distanza
conseguenza la polvere può essere visibile. Ciò, tuttavia, non influisce sulla precisione della misurazione
Distanza
misurazione, i risultati verranno
effettiva
o sulla sicurezza durante l'uso.
effettiva
convertiti nella nuova modalità.
*
Dopo che la modalità sarà stata
impostata, le misurazioni verranno
effettuate nella nuova modalità.
100 101
Modalità priorità target
Unità di misura di visualizzazione della distanza
Sostituzione della batteria
Jp
Questo telemetro laser utilizza il sistema di commutazione
Jp
Tipo di batteria: 1 batteria al litio CR2 da 3 V
En
-
Indicatori della carica residua della batteria
En
[ ]
Metri
[ ]Iarde
Es
* Il simbolo delle condizioni della batteria sul display interno avvisa quando la batteria deve essere sostituita.
Es
1. Accendere il telemetro (verificare che il display interno sia
: La batteria dispone di una carica sufficiente per il funzionamento.
Fr
Fr
acceso).
Modalità First Target
Modalità Distant Target
De
De
due secondi. Avvenuta la commutazione dell'unità di misura
It
「
」
distante)
「
」
It
di visualizzazione, rilasciare il tasto.
nuova.
Se
1. Accendere il telemetro (verificare che il display interno sia
Se
convertiti e visualizzati nell'unità di misura di visualizzazione
acceso).
Nl
Nl
della distanza selezionata.
laser si spegne automaticamente. Sostituire la batteria.
Ru
Ru
1. Aprire il coperchietto del vano della batteria
Pt
Pt
Illuminazione LED
Inserire la punta del pollice o un utensile dalla forma simile nella tacca presente sul coperchietto del
secondi.
Pl
1. Accendere il telemetro (verificare che il display interno sia
vano della batteria e ruotarlo in direzione del simbolo
. È possibile che il coperchietto non si apra
Pl
2 secondi) fino alla commutazione tra le modalità First
acceso).
facilmente a causa della guarnizione in gomma di tenuta contro la penetrazione di acqua e polvere.
Fi
Fi
2. Sostituire la batteria vecchia con una nuova
No
No
3. Rilasciare i tasti una volta commutata la modalità.
Dk
*
Dk
*
Se i tasti non vengono premuti nell'ordine esatto, non
impediscono di vedere il pannello LCD.
Cz
.
sarà possibile effettuare la commutazione.
Cz
*
*
Se la commutazione non ha luogo, ripetere il passaggio 2.
il telemetro laser. In tal caso, l'illuminazione sarà disattiva alla
3. Chiudere il coperchietto del vano della batteria
Ro
Ro
successiva accensione dello strumento.
Allineare il simbolo
con l'indicatore
●
e inserire il coperchietto del vano della batteria. Con
[
Hu
Hu
]
la punta del pollice o con un utensile dalla forma simile, ruotare il coperchietto in direzione del
Misurando bersagli sovrapposti, la Modalità First Target
simbolo
. È possibile che il coperchietto non si chiuda facilmente a causa della guarnizione in
gomma di tenuta contro l'infiltrazione di acqua; continuare comunque a ruotarlo fino in fondo finché
non si blocca. Assicurarsi che sia ben chiuso.
Durata della batteria
Funzionamento continuo: circa 13.000 volte (a 20°C)
Il valore riportato può variare a seconda delle condizioni, della temperatura e di altri fattori, quali la forma, il
colore e altre caratteristiche del bersaglio. Utilizzarlo esclusivamente come valore indicativo.
elettrica naturale, la durata della batteria potrebbe essere leggermente inferiore rispetto a quella riportata sopra.
* Nel caso di penetrazione di acqua nel vano della batteria a seguito di immersione, asciugare a fondo il vano della batteria e
102 103
sostituire la batteria.
Jp
Jp
En
En
Es
Es
Fr
Fr
De
De
It
It
Se
Se
Nl
Nl
Ru
Ru
Pt
Pt
Pl
Pl
Fi
Fi
No
No
Dk
Dk
Cz
Cz
Ro
Ro
Hu
Hu
104 105
Measurement
1. Press the POWER button for power-on.
(Power turns off 8 seconds after the last
operation.)
Immediately after power-on.
3. Press POWER button once to start single measurement.
4. After measurement, “distance” or “fail to measure” indicator are displayed for 8 seconds, then power turns off. If you press the POWER
button during power-on (while the internal display is lit), another single measurement starts.
unable to measure distance.
3. Keep pressing POWER button to start continuous measurement up to 20 seconds. The internal display shows “distance” and
“fail to measure” indicator alternately.
Note: Laser irradiaton mark is blinking during the measurement.
Note: If you stop pressing the button, the continuous measuremen stops
2. Aim at the target
Positionthetargetatthecenterofthereticle
[Single measurement]
Failure to measure or
unable to measure distance.
[Continuous measurement]
4. After continuous measurement, the measure results are displayed for 8 seconds, then power turns off. If you press the POWER
button during power-on (while the internal display is lit), another measrement starts.
Failure to measure or
Target focusing.
Measuring.
(Initializing)
.
Upward measurement. Downward measurement.
Displays the measured
figure. (Target 1)
Displays the measured figure.
Stand-by.
Displays the measured
figure. (Target 2)
Measurement
1. Press the POWER button for power-on.
(Power turns off 8 seconds after the last
operation.)
Immediately after power-on.
(Initializing)
3. Press POWER button once to start single measurement.
Measuring.
4. After measurement, “distance” or “fail to measure” indicator are displayed for 8 seconds, then power turns off. If you press the POWER
button during power-on (while the internal display is lit), another single measurement starts.
Failure to measure or
unable to measure distance.
Displays the measured
figure. (Target 1)
3. Keep pressing POWER button to start continuous measurement up to 20 seconds. The internal display shows “distance” and
“fail to measure” indicator alternately.
Note: Laser irradiaton mark is blinking during the measurement.
Note: If you stop pressing the button, the continuous measuremen stops
Target focusing.
2. Aim at the target
.
Positionthetargetatthecenterofthereticle
[Single measurement]
Failure to measure or
unable to measure distance.
Upward measurement. Downward measurement.
Displays the measured figure.
[Continuous measurement]
4. After continuous measurement, the measure results are displayed for 8 seconds, then power turns off. If you press the POWER
button during power-on (while the internal display is lit), another measrement starts.
Stand-by.
Displays the measured
figure. (Target 2)
Measurement
1. Press the POWER button for power-on.
(Power turns off 8 seconds after the last
operation.)
Immediately after power-on.
Stand-by.
(Initializing)
2. Aim at the target
.
Positionthetargetatthecenterofthereticle
3. Press POWER button once to start single measurement.
4. After measurement, “distance” or “fail to measure” indicator are displayed for 8 seconds, then power turns off. If you press the POWER
button during power-on (while the internal display is lit), another single measurement starts.
unable to measure distance.
3. Keep pressing POWER button to start continuous measurement up to 20 seconds. The internal display shows “distance” and
“fail to measure” indicator alternately.
Note: Laser irradiaton mark is blinking during the measurement.
Note: If you stop pressing the button, the continuous measuremen stops
[Single measurement]
Failure to measure or
unable to measure distance.
[Continuous measurement]
4. After continuous measurement, the measure results are displayed for 8 seconds, then power turns off. If you press the POWER
button during power-on (while the internal display is lit), another measrement starts.
Failure to measure or
Target focusing.
Measuring.
Upward measurement. Downward measurement.
Displays the measured
figure. (Target 1)
Displays the measured figure.
Displays the measured
figure. (Target 2)
Misurazione
Attenzione — l'uso di comandi, regolazioni o procedure diversi da quelli specificati nel presente manuale
【
Misurazione singola
】
può causare l'esposizione a radiazioni pericolose.
1. Preparazione
avviare una misurazione singola.
Inserire una batteria nell'apposito vano. (Vedere la voce "Sostituzione della batteria")
2. Paraocchio in gomma
Sia coloro che portano gli occhiali sia coloro che non li portano possono utilizzare questo telemetro senza
aggiunta di accessori.
3. Regolazione diottrica
simboli sul display LCD nel mirino. Ruotare anzitutto l'anello di regolazione diottrica
display interno sia acceso). Durante l'osservazione attraverso l'oculare, ruotare l'anello di
regolazione diottrica in senso orario fino alla messa a fuoco dei simboli sul display LCD. Se
【
Funzione di misurazione continua
】
la regolazione. Se non si effettua la regolazione diottrica in modo da adeguarla alla propria
4. Misurazione in corso
della distanza).
*
1. Accendere il telemetro (verificare
2. Mirare al bersaglio.
che il display interno sia acceso).
(spegnimento automatico dopo
del reticolo.
circa 8 secondi di mancato utilizzo.)
Immediatamente dopo
Stand-by
l'accensione (inizializzazione)
Measurement
1. Press the POWER button for power-on.
(Power turns off 8 seconds after the last
operation.)
Immediately after power-on.
Stand-by.
(Initializing)
2. Aim at the target
.
Positionthetargetatthecenterofthereticle
Target focusing.
[Single measurement]
3. Press POWER button once to start single measurement.
Measuring.
4. After measurement, “distance” or “fail to measure” indicator are displayed for 8 seconds, then power turns off. If you press the POWER
button during power-on (while the internal display is lit), another single measurement starts.
Failure to measure or
Upward measurement. Downward measurement.
unable to measure distance.
Displays the measured figure.
[Continuous measurement]
3. Keep pressing POWER button to start continuous measurement up to 20 seconds. The internal display shows “distance” and
“fail to measure” indicator alternately.
Note: Laser irradiaton mark is blinking during the measurement.
Note: If you stop pressing the button, the continuous measuremen stops
Failure to measure or
unable to measure distance.
4. After continuous measurement, the measure results are displayed for 8 seconds, then power turns off. If you press the POWER
button during power-on (while the internal display is lit), another measrement starts.
Displays the measured
figure. (Target 1)
Displays the measured
figure. (Target 2)
Measurement
1. Press the POWER button for power-on.
(Power turns off 8 seconds after the last
operation.)
Immediately after power-on.
Stand-by.
(Initializing)
2. Aim at the target
.
Positionthetargetatthecenterofthereticle
Target focusing.
[Single measurement]
3. Press POWER button once to start single measurement.
Measuring.
4. After measurement, “distance” or “fail to measure” indicator are displayed for 8 seconds, then power turns off. If you press the POWER
button during power-on (while the internal display is lit), another single measurement starts.
Failure to measure or
Upward measurement. Downward measurement.
unable to measure distance.
Displays the measured figure.
[Continuous measurement]
3. Keep pressing POWER button to start continuous measurement up to 20 seconds. The internal display shows “distance” and
“fail to measure” indicator alternately.
Note: Laser irradiaton mark is blinking during the measurement.
Note: If you stop pressing the button, the continuous measuremen stops
Failure to measure or
unable to measure distance.
Displays the measured
figure. (Target 1)
4. After continuous measurement, the measure results are displayed for 8 seconds, then power turns off. If you press the POWER
button during power-on (while the internal display is lit), another measrement starts.
Displays the measured
figure. (Target 2)
Measurement
1. Press the POWER button for power-on.
(Power turns off 8 seconds after the last
operation.)
Immediately after power-on.
Stand-by.
(Initializing)
2. Aim at the target
.
Positionthetargetatthecenterofthereticle
Target focusing.
[Single measurement]
3. Press POWER button once to start single measurement.
Measuring.
4. After measurement, “distance” or “fail to measure” indicator are displayed for 8 seconds, then power turns off. If you press the POWER
button during power-on (while the internal display is lit), another single measurement starts.
Failure to measure or
unable to measure distance.
3. Keep pressing POWER button to start continuous measurement up to 20 seconds. The internal display shows “distance” and
“fail to measure” indicator alternately.
Note: Laser irradiaton mark is blinking during the measurement.
Note: If you stop pressing the button, the continuous measuremen stops
Failure to measure or
unable to measure distance.
[Continuous measurement]
4. After continuous measurement, the measure results are displayed for 8 seconds, then power turns off. If you press the POWER
button during power-on (while the internal display is lit), another measrement starts.
Upward measurement. Downward measurement.
Displays the measured
figure. (Target 1)
Displays the measured figure.
Displays the measured
figure. (Target 2)
Measurement
1. Press the POWER button for power-on.
(Power turns off 8 seconds after the last
operation.)
Immediately after power-on.
Stand-by.
(Initializing)
2. Aim at the target
.
Positionthetargetatthecenterofthereticle
Target focusing.
[Single measurement]
3. Press POWER button once to start single measurement.
Measuring.
4. After measurement, “distance” or “fail to measure” indicator are displayed for 8 seconds, then power turns off. If you press the POWER
button during power-on (while the internal display is lit), another single measurement starts.
unable to measure distance.
3. Keep pressing POWER button to start continuous measurement up to 20 seconds. The internal display shows “distance” and
“fail to measure” indicator alternately.
Note: Laser irradiaton mark is blinking during the measurement.
Note: If you stop pressing the button, the continuous measuremen stops
unable to measure distance.
4. After continuous measurement, the measure results are displayed for 8 seconds, then power turns off. If you press the POWER
button during power-on (while the internal display is lit), another measrement starts.
[Continuous measurement]
Failure to measure or
Failure to measure or
Upward measurement. Downward measurement.
Displays the measured
figure. (Target 1)
Displays the measured figure.
Displays the measured
figure. (Target 2)
Measurement
1. Press the POWER button for power-on.
(Power turns off 8 seconds after the last
operation.)
Immediately after power-on.
Stand-by.
(Initializing)
2. Aim at the target
.
Positionthetargetatthecenterofthereticle
Target focusing.
[Single measurement]
3. Press POWER button once to start single measurement.
4. After measurement, “distance” or “fail to measure” indicator are displayed for 8 seconds, then power turns off. If you press the POWER
button during power-on (while the internal display is lit), another single measurement starts.
unable to measure distance.
3. Keep pressing POWER button to start continuous measurement up to 20 seconds. The internal display shows “distance” and
“fail to measure” indicator alternately.
Note: Laser irradiaton mark is blinking during the measurement.
Note: If you stop pressing the button, the continuous measuremen stops
unable to measure distance.
4. After continuous measurement, the measure results are displayed for 8 seconds, then power turns off. If you press the POWER
button during power-on (while the internal display is lit), another measrement starts.
[Continuous measurement]
Failure to measure or
Failure to measure or
Measuring.
Upward measurement. Downward measurement.
Displays the measured
figure. (Target 1)
Displays the measured figure.
Displays the measured
figure. (Target 2)
Measurement
1. Press the POWER button for power-on.
(Power turns off 8 seconds after the last
operation.)
Immediately after power-on.
Stand-by.
(Initializing)
2. Aim at the target
.
Positionthetargetatthecenterofthereticle
Target focusing.
[Single measurement]
3. Press POWER button once to start single measurement.
Measuring.
4. After measurement, “distance” or “fail to measure” indicator are displayed for 8 seconds, then power turns off. If you press the POWER
button during power-on (while the internal display is lit), another single measurement starts.
unable to measure distance.
3. Keep pressing POWER button to start continuous measurement up to 20 seconds. The internal display shows “distance” and
“fail to measure” indicator alternately.
Note: Laser irradiaton mark is blinking during the measurement.
Note: If you stop pressing the button, the continuous measuremen stops
unable to measure distance.
4. After continuous measurement, the measure results are displayed for 8 seconds, then power turns off. If you press the POWER
button during power-on (while the internal display is lit), another measrement starts.
[Continuous measurement]
Failure to measure or
Failure to measure or
Upward measurement. Downward measurement.
Displays the measured
figure. (Target 1)
Displays the measured figure.
Displays the measured
figure. (Target 2)
Measurement
1. Press the POWER button for power-on.
(Power turns off 8 seconds after the last
operation.)
Immediately after power-on.
Stand-by.
(Initializing)
2. Aim at the target
.
Positionthetargetatthecenterofthereticle
Target focusing.
[Single measurement]
3. Press POWER button once to start single measurement.
Measuring.
4. After measurement, “distance” or “fail to measure” indicator are displayed for 8 seconds, then power turns off. If you press the POWER
button during power-on (while the internal display is lit), another single measurement starts.
Failure to measure or
unable to measure distance.
Displays the measured
figure. (Target 1)
3. Keep pressing POWER button to start continuous measurement up to 20 seconds. The internal display shows “distance” and
“fail to measure” indicator alternately.
Note: Laser irradiaton mark is blinking during the measurement.
Note: If you stop pressing the button, the continuous measuremen stops
Failure to measure or
unable to measure distance.
Upward measurement. Downward measurement.
Displays the measured figure.
[Continuous measurement]
4. After continuous measurement, the measure results are displayed for 8 seconds, then power turns off. If you press the POWER
button during power-on (while the internal display is lit), another measrement starts.
Displays the measured
figure. (Target 2)
Measurement
1. Press the POWER button for power-on.
(Power turns off 8 seconds after the last
operation.)
Immediately after power-on.
Stand-by.
(Initializing)
2. Aim at the target
.
Positionthetargetatthecenterofthereticle
Target focusing.
[Single measurement]
3. Press POWER button once to start single measurement.
Measuring.
4. After measurement, “distance” or “fail to measure” indicator are displayed for 8 seconds, then power turns off. If you press the POWER
button during power-on (while the internal display is lit), another single measurement starts.
Failure to measure or
unable to measure distance.
3. Keep pressing POWER button to start continuous measurement up to 20 seconds. The internal display shows “distance” and
“fail to measure” indicator alternately.
Note: Laser irradiaton mark is blinking during the measurement.
Note: If you stop pressing the button, the continuous measuremen stops
Failure to measure or
unable to measure distance.
[Continuous measurement]
4. After continuous measurement, the measure results are displayed for 8 seconds, then power turns off. If you press the POWER
button during power-on (while the internal display is lit), another measrement starts.
Upward measurement. Downward measurement.
Displays the measured
figure. (Target 1)
Displays the measured figure.
Displays the measured
figure. (Target 2)
4. Dopo la misurazione, l'indicatore "misurazione non riuscita" o "distanza
misurata" viene visualizzato per 8 secondi, quindi il telemetro si spegne.
durante l'accensione (con il display interno acceso) per avviare un'altra
misurazione.
"Misurazione non riuscita"
Misurazione
Misurazione verso
Misurazione in corso
o "Impossibile effettuare la
verso l'alto
il basso
misurazione" della distanza
Visualizza il valore misurato
3. Tenere premuto il tasto
4. Dopo la misurazione continua, i risultati della misurazione finale
misurazione) per avviare la misurazione continua per circa 8
(distanza misurata) vengono visualizzati per circa 8 secondi,
secondi. Il display interno visualizza in alternanza gli indicatori
quindi l'unità si spegne.
"misurazione non riuscita" e "distanza misurata".
*
Il simbolo del fascio laser lampeggia durante la misurazione.
misurazione)
durante l'accensione (con il display interno acceso)
*
Rilasciando il tasto, la misurazione continua si arresta.
si avvia un'altra misurazione.
Durante la misurazione di un'asticella segnabuca in un campo da
"Misurazione non riuscita"
Visualizza il
Visualizza il
o "Impossibile effettuare la
valore misurato
valore misurato
misurazione" della distanza
(bersaglio 1)
(bersaglio 2)
misurazione continua per facilitare la misurazione. Se non vi sono
sarà la distanza dall'asticella segnabuca inquadrata.

Specifiche tecniche
Jp
Sistema di misurazione
Corpo: impermeabile (profondità massima 1 metro per 10 minuti al massimo)*
Jp
Struttura
(Vano della batteria: resistente all'acqua**)
En
Campo di misurazione
En
Es
Laser di C
Es
Normativa di sicurezza
Laser di C
Fr
Distanza effettiva (3 cifre inferiori):
Fr
De
Visualizzazione distanze (incremento)
De
(4 cifre superiori):
Ambiente
It
It
Laser
Se
Se
Sistema ottico
Classe
Nl
Nl
Ingrandimento (x) 6
(nm) 905
Ru
Ru
Diametro effettivo dell'obiettivo (mm) ø21
Durata degli impulsi (ns) 12
Pt
Pt
Campo visivo angolare (reale) (˚) 7,5
15
Pl
Pl
18,3
Divergenza raggio (mrad)
Fi
Fi
ø3,5
Umidità di funzionamento (%RH) 80 o inferiore (senza condensa di rugiada)
No
No
-
1
Regolazione diottrica ±4m
Dk
Dk
* Modelli impermeabili
Altro
Cz
Cz
Temperatura di funzionamento (˚C) -10 —
massimo di 10 minuti senza che il sistema ottico o di rilevazione si danneggi.
Ro
Ro
Il telemetro laser Nikon offre i seguenti vantaggi:
Hu
1 batteria al litio CR2 (CC, 3V)
Hu
Alimentazione
Spegnimento automatico (dopo circa 8 secondi di mancato utilizzo)
113 x 70 x 39
Osservare con attenzione quanto segue durante l'uso del telemetro laser Nikon.
Circa 175 (senza batteria)
quest'ultima potrebbe penetrare all'interno del dispositivo. In tal caso, eliminare qualsiasi traccia di umidità e lasciare asciugare il
vano della batteria.
106 107
Altro
Guida alla soluzione dei problemi di funzionamento/Riparazione
Jp
Jp
En
En
Es
condizioni:
Es
(1) questo dispositivo non può causare interferenze nocive e
Sintomo Punti di controllo
Fr
Fr
(2) questo dispositivo deve accettare qualunque interferenza ricevuta, incluse le interferenze che possono causare
De
operazioni non desiderate.
●
De
(vicinoal bordo, parte superiore del corpo).
It
It
(il display LCD non si illumina)
● Controllare l'inserimento della batteria.
Se
● Sostituire la batteria vecchia con una nuova.
Se
Nl
● Verificare che non vi sia nulla che ostruisce le aperture di emissione e del
Nl
Ru
ragionevole protezione contro le interferenze nocive nelle installazioni residenziali. Questo apparecchio genera,
rilevatore del fascio laser, come ad esempio un dito o la cinghia.
Ru
utilizza e può irradiare energia in radiofrequenza e, se non viene installato e utilizzato in conformità alle istruzioni,
●
Pt
Pt
Impossibile misurare la distanza
lato della lente dell'obiettivo siano puliti. Se necessario, pulirli.
Pl
● Verificare che la forma e le condizioni del bersaglio siano adeguate per
Pl
possano verificarsi in una particolare installazione. Se questo dispositivo provoca interferenze dannose alla ricezione
riflettere il fascio laser.
Fi
radiofonica o televisiva, determinabili con l'accensione e lo spegnimento dell'apparecchio, si consiglia all'utente di
Fi
● Sostituire la batteria vecchia con una nuova.
No
No
●
Dk
Dk
(“Cannot measure”) (“Impossibile
● Verificare che il bersaglio si trovi all'interno del campo di misurazione.
Cz
effettuare la misurazione”).
Cz
Ro
Ro
Regulations (normative canadesi relative ad apparecchi che causano interferenze).
● Verificare che fra il telemetro laser Nikon e il bersaglio non vi sia alcun
Hu
ostacolo, come foglie o erba.
Hu
campo di misurazione
● Verificare che fra il telemetro laser Nikon e il bersaglio non vi sia alcun
situati oltre una certa distanza.
ostacolo, come foglie o erba.
ufficiali.
● Sostituire la batteria vecchia con una nuova.
● Verificare che la forma e le condizioni del bersaglio siano adeguate per
riflettere il fascio laser.
instabile.
●
● Verificare che fra il telemetro laser Nikon e il bersaglio non vi sia alcun
ostacolo, come foglie o erba.
108 109
Guida alla soluzione dei problemi di funzionamento/Riparazione
Jp
Jp
En
En
Es
Es
Sintomo Punti di controllo
Fr
Fr
De
● Sostituire la batteria vecchia con una nuova.
De
Svenska
● Verificare che la forma e le condizioni del bersaglio siano adeguate per riflettere
It
It
Viene visualizzato un risultato errato.
il fascio laser.
Se
● Verificare che fra il telemetro laser Nikon e il bersaglio non vi sia alcun ostacolo,
Se
INNEHÅLL
come foglie o erba.
Nl
Nl
........................................ 112-115
Ru
Ru
Viktiga egenskaper ................................................... 116
Pt
in quanto potrebbe essersi verificato un
Pt
malfunzionamento dell'unità. Non fare mai controllare o riparare il telemetro laser Nikon da persone diverse dal rappresentante
............................. 117
Pl
Pl
autorizzato del fabbricante del prodotto. La mancata osservanza di questa indicazione può causare danni al prodotto o lesioni.
Intern display .............................................................. 118
Fi
Fi
............................................... 119
No
No
Dk
Dk
............................................................ 120
Cz
Cz
Byta batteri .................................................................. 121
Ro
Ro
................................................................ 122-123
Hu
Hu
Specifikationer .................................................. 124-125
Övrigt ............................................................................. 126
................................... 127-128
110 111
Läs före användning
Jp
Tack för att du har valt att köpa Nikon Laser Rangefinder COOLSHOT AS.
Följ anvisningarna så att du kan
SÄKERHETSÅTGÄRDER (Laser)
Jp
använda utrustningen korrekt
skadas eller om det hörs ett
En
En
och undvika eventuellt farliga
en osynlig laserstråle. Se till att du
Es
Användning av reglage, justeringar eller funktioner för andra ändamål än de avsedda kan
Es
problem. Läs noggrant hela
iakttar följande:
tappats eller av annan anledning
leda till exponering av farlig strålning.
Fr
avsnittet "Läs före användning"
Varning
skall batteriet tas ur omedelbart
Fr
De
samt instruktionerna om korrekt
De
〇
du tittar in i optiken från objektivets
avslutas.
användning innan du använder
It
It
sida. Om inte detta respekteras kan
produkten. Förvara denna
Se
det negativt påverka eller skada
Se
〇
handbok lätt åtkomlig.
ögonen.
Nl
Nl
〇
mot ögonen.
Ru
VARNING
Ru
Pt
Detta betyder att felaktigt bruk och
Pt
underlåtelse att beakta detta innehåll
optiskt instrument, som t.ex. genom
Pl
●
Pl
kan leda till dödsfall eller allvarliga
linser eller kikare, eller med blotta
● Denna manual får inte reproduceras, varken delvis eller i sin helhet (med undantag av korta
Fi
skador.
ögat. Detta kan orsaka synskador.
Fi
citat i artiklar eller recensioner), utan skriftligt tillstånd från NIKON VISION CO., LTD.
No
IAKTTAG FÖRSIKTIGHET
No
●
Detta betyder att felaktigt bruk och
Dk
Dk
helst och utan varsel.
knappen for att undvika att
underlåtelse att beakta innehållet kan
Cz
rikta med laserstrålen.
Cz
leda till personskador eller materiella
Ro
skador.
Ro
tid, ta ut batteriet ur huset.
Hu
Hu
tillverkaren.
112 113
Läs före användning
Jp
SÄKERHETSÅTGÄRDER
SÄKERHETSÅTGÄRDER
SÄKERHETSFÖRESKRIFTER
SKÖTSEL OCH UNDERHÅLL
Lagring
Jp
för att linda in denna produkt i eller
En
(Monokular)
(Litiumbatteri)
Varningar
Linser
En
på linsen på grund av hög
Es
Om batteriet hanteras felaktigt kan
Es
barn.
borttagning av damm från linserna.
Fr
Nikon på en
Fr
system för att sikta på målet. Se till
eller smådelar osv. i munnen. Om
med en mjuk, ren trasa eller oljefri
torr, sval plats.
De
att du iakttar följande:
De
linsduk av hög kvalitet om du
Torka den ordentligt i
It
Varning
Se till att du iakttar följande:
It
rumstemperatur efter att du har haft
Se
snart som möjligt med en mjuk, ren
den ute i regnet, och förvara den
Se
intensivt ljus eller laserstrålen
korrekt positionerade.
trasa.
sedan på en torr, sval plats.
Nl
Nl
eller inflammeras. Om sådana
laseravståndssökare.
Ru
Ru
Varningar
Pt
Pt
vanligt tyg, eftersom detta kan
Pl
batterifacket.
Pl
kan medföra att den skadas eller på
tillsammans med nyckar
Fi
inte på -
göra huset, ska
Fi
,
knappen.
förvaras i det mjuka fodralet.
No
No
det kan kortsluta och resultera i
yta.
Dk
överhettning.
samtidigt som du går. Om detta
Dk
inte fungerar korrekt, bör du avsluta
solljus. Ultravioletta strålar och för
Huset
Cz
ignoreras kan detta resultera i
Cz
skada eller felfunktion, att du går
negativt eller till och med skada
Ro
batteriet.
mjuk ren trasa efter att dammet
Ro
in i någon, slår andra, faller eller
instruktioner om vart du skickar den
den.
Hu
annan olycka.
för reparation.
Hu
inte bensen, förtunning eller andra
organiska lösningsmedel.
hud, spola genast med mycket
orsaka skada.
bildas kondens på linsernas ytor.
som blåser luft ur ett munstycke.
batteri kommer in i ögonen, skölj
ostabil plats. Om detta ignorerars
kondensen har avdunstat.
omedelbart med rent vatten och
kan detta resultera ifall eller
tappande och orsaka skada eller
felfunktion.
lokala förordningar.
114 115
Viktiga egenskaper Terminologi/Sammansättning
Jp
Följande förhållanden gör mätning enklare:
Jp
1
En
4
En
Laseröppning
Es
Es
3
2 Laserdetektoröppning
Fr
Fr
3
De
De
90grader
4
It
mellan
It
5
Mätningen kan leda till bristande precision eller
1
Se
Se
misslyckande i följande fall:
6
Nl
Nl
7 Dioptriindex
Ru
2
5
8 Remögla
Ru
Pt
9 Batterilucka
Pt
Pl
6
!p Indikering för "
ö
Pl
Fi
batteriluckan
Fi
för undervattensbruk)
7
No
!q
No
!w FDA beteckningsinformation
Dk
Dk
Nikon Laser Rangefinder använder en osynlig laserstråle.
8
Cz
Cz
Den mäter tiden det tar för laserstrålen att förflytta
Ro
sig från laseravståndsmätaren till målet och tillbaka.
9
Ro
Laserreflexionsförmågan och mätresultaten kan variera
Hu
Hu
efter klimat- och miljöförhållanden samt färg, struktur,
!p
storlek, form och andra egenskaper hos målet.
!q
!w
Sammansättning
......................................x1
..............................x1
......................x1
........x1
116 117
Intern display
Mätningsläge display
Jp
Avstånd
Jp
En
En
Es
Es
Faktiskt avstånd
Faktiskt
Fr
Stigning
och Höjd läge
Fr
avstånd
De
Sluttning
De
Målmarkering
Höjd
It
It
Se
Se
Höjd
Nl
Nl
3.
Horisontellt avstånd
Ru
Horisontellt
Ru
Batteristatus
och Höjdläge
Pt
avstånd
Pt
『 』
Pl
Höjd
Pl
『 』
visas.
Fi
Fi
*
No
No
Dk
『
』
Lutnings
*
Dk
『
』
Golfläge
Ajusterat
Cz
Cz
Avstånd
*
Ro
Ro
Faktiskt
Hu
avstånd
Hu
Faktiskt
Faktiskt
avståndläge
avstånd
118 119
