Nikon COOLSHOT – page 5
Manual for Nikon COOLSHOT
Table of contents
- Cautions before use SAFETY PRECAUTIONS SAFETY PRECAUTIONS CARE AND MAINTENANCE
- Key features Nomenclature/Composition
- Internal display Measurement display mode
- Target priority mode Distance display units Changing battery LED illumination
- Measurement
- Specifications
- Others Troubleshooting/Repair
- Troubleshooting/Repair
Jp
: ( 1
Jp
10 )*
En
En
( : **)
Es
Es
Fr
( 3- ):
Fr
,
De
De
()
( 4- ):
FCC 15
It
( 3- ):
It
Se
Se
Nl
Nl
6
Ru
Ru
() 905
Pt
ø21
Pt
()
() 12
Pl
Pl
() 15
7,5
Fi
() (˚)
Fi
() : 0,25
No
() 18,3
No
(%) 80 ( )
Dk
() ø3,5
Dk
*
Cz
-
1
±4
Nikon ; ,
Cz
1 10 .
Ro
Ro
Nikon :
Hu
Hu
(˚C)
.
CR2 (3 . ), 1 .
Nikon, :
113 x 70 x 39
() . 175 ( )
. , .
160 161
/P
Jp
Jp
En
En
Es
Es
:
Fr
(1) ;
Fr
(2) , ,
●
De
De
( , )
.
It
( )
● ,
It
● .
Se
Se
Nl
B
●
Nl
Ru
.
Ru
. ,
●
Pt
,
Pt
.
.
Pl
.
Pl
●
Fi
Fi
, , ,
.
No
:
● .
No
Dk
● .
Dk
●
Cz
Cz
Ro
B ,
Ro
Hu
●
Hu
,
(, ).
.
●
,
.
(, ).
● .
●
.
● .
●
(, ).
162 163
/
Jp
Jp
En
En
Es
Es
Fr
Fr
De
● .
De
Português brasileiro
●
It
It
.
Se
●
Se
CONTEÚDO
(, ).
Nl
Nl
Cuidados antes do uso ................................... 166-169
Ru
Ru
.......................................... 170
Pt
, ,
Pt
.
................................... 171
Pl
Pl
Visor interno ................................................................. 172
Fi
.
Fi
.............................. 173
No
No
Dk
Dk
.. 174
Cz
Cz
Troca da pilha ............................................................... 175
Ro
Ro
................................................................ 176-177
Hu
Hu
..................................................... 178-179
Outros ............................................................................. 180
...................... 181-182
164 165
Cuidados antes do uso
Jp
Obrigado por comprar o Telêmetro a Laser COOLSHOT AS da Nikon.
Por favor, siga rigorosamente as
PRECAUÇÕES DE SEGURANÇA
Jp
orientações a seguir, para que
Nikon guardado fora do alcance de
En
(Laser)
En
possa usar o equipamento de
crianças.
O Telêmetro a Laser Nikon emite um
Es
O uso de controles e ajustes ou a execução de procedimentos que não aqueles
Es
forma adequada e evitar
raio laser invisível. Certique-se de que
especificados nestas instruções podem resultar em exposição a radiações perigosas.
Fr
Nikon for danificado ou se este
problemas potencialmente
observa o que segue:
Fr
emitir um som estranho devido à
De
perigosos. Antes de usar este
Advertência
De
〇
queda ou por outra causa, retire
produto, leia atentamente os
It
imediatamente a pilha e pare de
It
sobre o uso correto, que acompanham o produto.
"Cuidados antes do uso" e as
enquanto estiver olhando
Se
usá-lo.
para dentro da óptica do lado da
Se
〇
instruções sobre o uso correto,
objetiva. A falha em fazer isto é poder
Nl
que acompanham o produto.
Nl
〇
afetar negativamente ou danificar os
Mantenha este manual à mão
Ru
em um problema sério.
Ru
olhos.
para fácil consulta.
Pt
Pt
Pl
Pl
ADVERTÊNCIA
●
Fi
Fi
efeito um outro instrumento óptico,
●
No
de que qualquer uso inadequado,
como lentes ou binóculos, e nem
No
ignorando o conteúdo descrito neste
com o olho desprotegido. Isso pode
Dk
Dk
● A NIKON VISION CO., LTD. se reserve o direito de alterar o conteúdo descrito nesses manuais em
documento, pode potencialmente
Cz
qualquer altura e sem aviso prévio.
ha os
Cz
Ro
CUIDADO
Ro
Hu
Hu
acidental do raio laser.
de que qualquer uso inadequado,
ignorando o conteúdo descrito neste
documento, pode potencialmente
período prolongado, retire a pilha do
corpo.
materiais.
o Telêmetro a Laser Nikon. O laser
emitido pode ser prejudicial à
sua saúde. Um produto que foi
fabricante.
166 167
Cuidados antes do uso
Jp
PRECAUÇÕES DE SEGURANÇA
PRECAUÇÕES DE SEGURANÇA
PRECAUÇÕES DE SEGURANÇA
CUIDADOS E MANUTENÇÃO
Armazenagem
Jp
para embalar este produto ou
En
(Monóculo)
(Pilha de lítio)
Cuidados
Lentes
En
outras peças pequenas fora do
ou bolor na superfície da lente
Es
O Telêmetro a Laser Nikon usa um
Se manuseada incorretamente,
alcance de crianças.
Es
superfície da lente, use uma
monóculo no seu sistema óptico de
a pilha pode romper-se e vazar,
Fr
projetado para uso submerso.
escova macia isenta de óleo.
guarde o Telêmetro a Laser Nikon
Fr
modo a mirar o alvo. Certique-se
corroendo o equipamento e
a viseira de borracha ou peças
em local fresco e seco.
De
de que observa o que segue:
manchando roupas.
De
pequenas, etc. na boca. Se uma
removidas da superfície do corpo
Após o uso em um dia chuvoso ou à
Advertência
Certifique-se de que observa o que
It
criança engolir estas peças, consulte
do telêmetro assim que possível,
superfície das lentes, limpe as
noite, limpe-o cuidadosamente à
It
segue:
imediatamente um médico.
Se
usando-se um pano macio, limpo.
lentes suavemente com um pano
temperatura ambiente e guarde-o
Se
diretamente para o sol ou para o
em local fresco e seco.
Nl
raio laser, ao usar o telęmetro a
Nl
usadas por um longo período de
Nikon no carro em um dia quente
papel de boa qualidade e isento
Laser Nikon.
Ru
tempo, algumas pessoas podem
Ru
ou ensolarado, ou perto de
de óleo para limpar lentes. Use
vazia ou durante longos períodos
Cuidados
Pt
equipamento gerador de calor.
uma pequena quantidade de
Pt
ocorrer qualquer sintoma, consulte
Isto pode danificá-lo ou afetá-lo de
Pl
Pl
imediatamente um médico.
forma negativa.
terminal do compartimento da pilha.
Fi
.
Fi
junto com chaves ou
Nikon, guarde-o no estojo macio.
No
exposto à luz solar direta. Os raios
tecido comum, pois podem
moedas em um bolso ou bolsa, pois
No
caminhar. A falha em observar
ultravioleta e o calor excessivo
arranhar a superfície das lentes.
Dk
pode curto-circuitar ou provocar
Dk
podem afetá-lo negativamente ou
Se o pano tiver sido usado para
superaquecimento.
Cz
funcionamento como resultado
interrompa imediatamente o seu
até mesmo danificar a unidade.
Cz
de bater em algo, acertar outras
uso e consulte o seu distribuidor
usado novamente para a
Ro
chamas. Nunca desmonte a pilha.
Ro
pessoas, cair ou outros acidentes.
exposto a mudanças bruscas
superfície da lente.
Hu
Hu
de temperatura, pode ocorrer
Corpo principal
fazer com que acerte outras
entrar em contato com o vestuário
ou a pele, enxágue imediatamente
com um pano macio e limpo,
com muita água. Se o líquido de
depois de soprar ligeiramente a
local instável. A falha em observar
pilhas danificadas entrar nos olhos,
isto pode resultar em que ele caia
enxágue imediatamente com água
use benzeno, solvente ou outros
limpa e, em seguida, consulte um
agentes de limpeza que
ou mau funcionamento.
médico.
contenham solventes orgânicos.
* Um soprador é um equipamento
regulamentos da sua área local.
de limpeza de borracha que
sopra ar por um bocal.
168 169
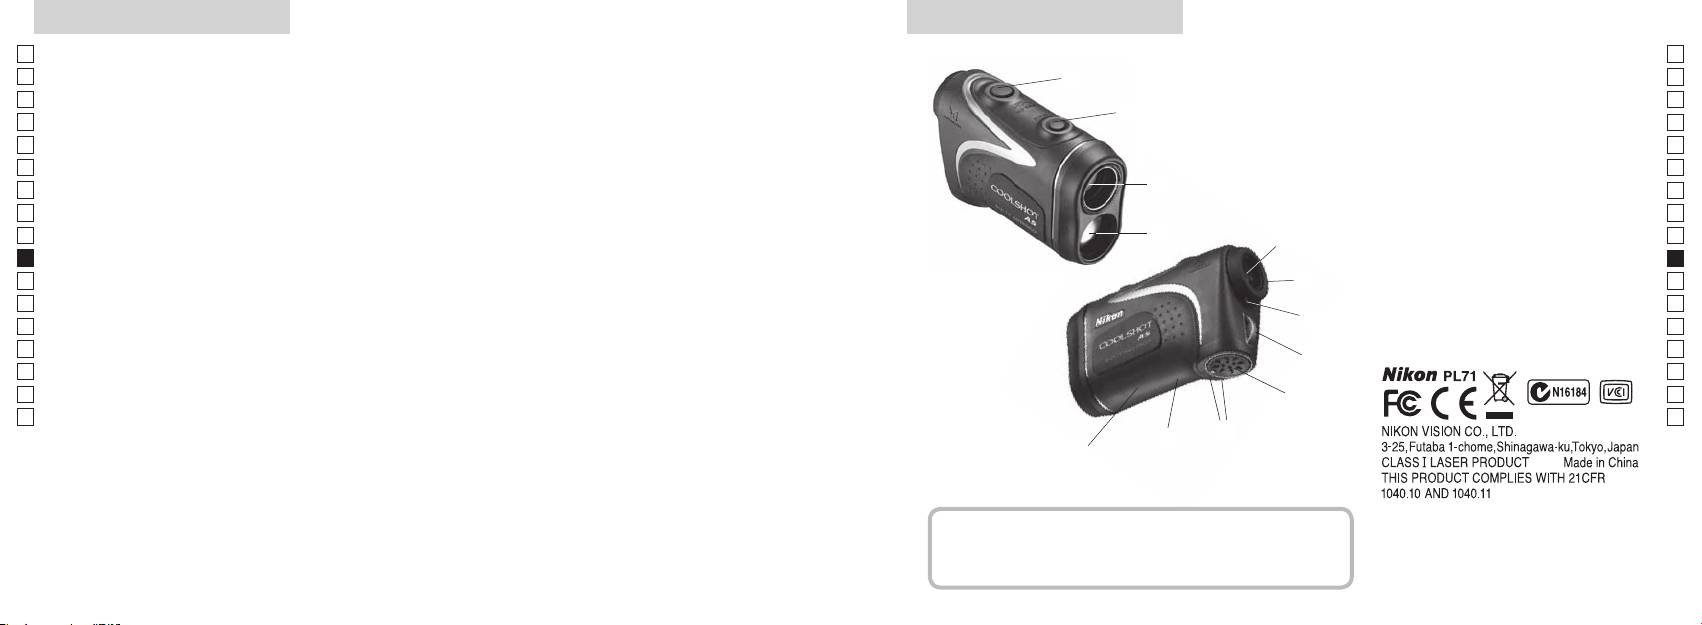
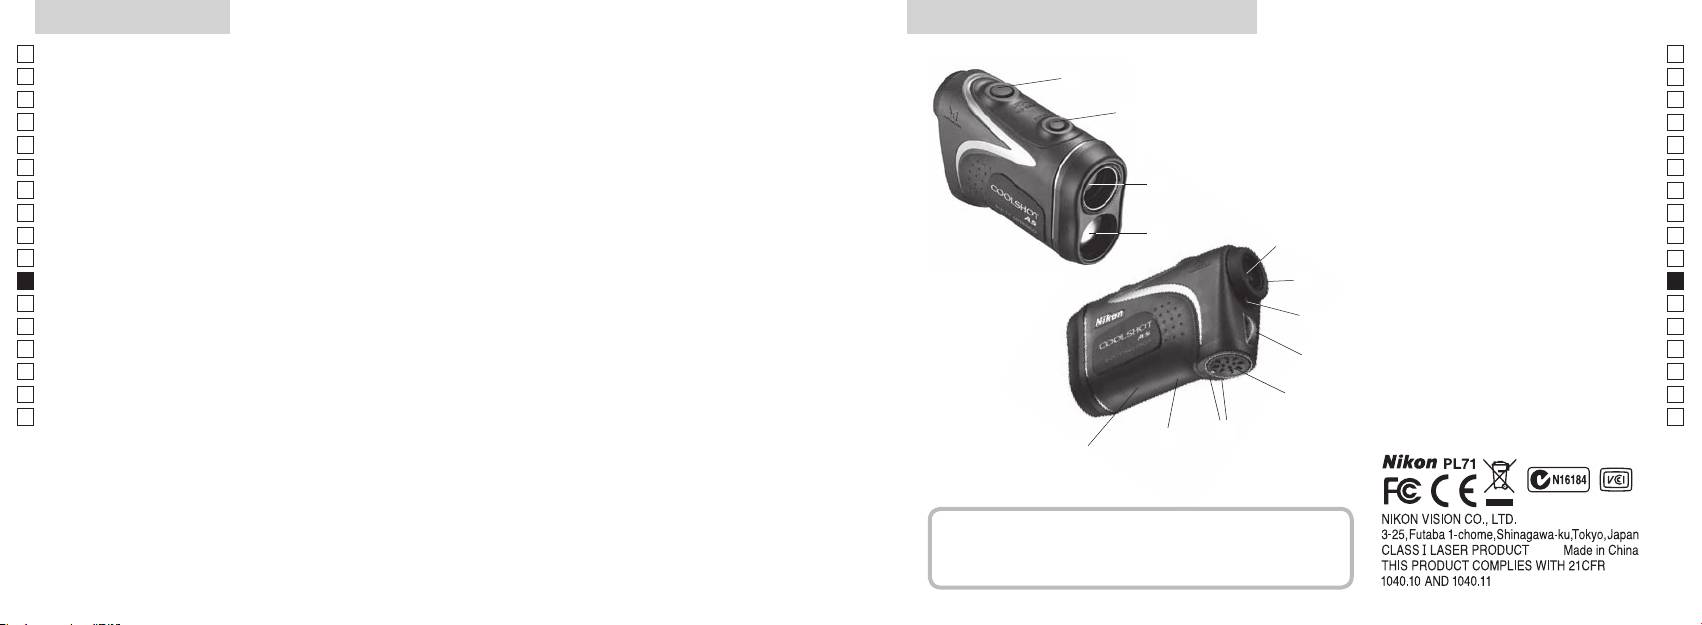
Principais características Nomenclatura/Composição
Jp
As seguintes condições facilitam a medição:
Jp
1
En
4
En
Es
Es
revestimento multi-camada
3
2
Fr
Fr
3
De
De
(distância horizontal ± altura), o que ajuda muito na prática
aprox. 90 graus
4
It
do golf
It
5Óculo monocular 6x
A medição pode resultar em inexatidão ou falha nos
1
Se
Se
seguintes casos:
6
Nl
Nl
7 Índice de dioptria
Ru
alvo, podendo ser selecionado conforme o alvo
2
5
8 Olhal da alça
Ru
Pt
9 Tampa do compartimento da pilha
Pt
Pl
espelho, etc.)
6
!p
Pl
aproximadamente 8 seg. sem uso)
Fi
Fechar") do compartimento da pilha
Fi
7
No
!q
No
com chuva (NÃO projetado para uso submerso)
!w
Dk
Dk
8
Cz
Cz
Ro
O Telêmetro a Laser Nikon emite um raio laser invisível
9
Ro
para medição. Mede o tempo que o raio laser demora a
Hu
Hu
percorrer a distância do telêmetro ao alvo e o inverso. Os
!p
resultados da refletividade e da medição podem variar
!q
de acordo com as condições climáticas e ambientais, bem
!w
como a cor, o acabamento da superfície, o tamanho, forma
e outras características do alvo.
Composição
................................... x1
................ x1
.....................x1
...........x1
170 171
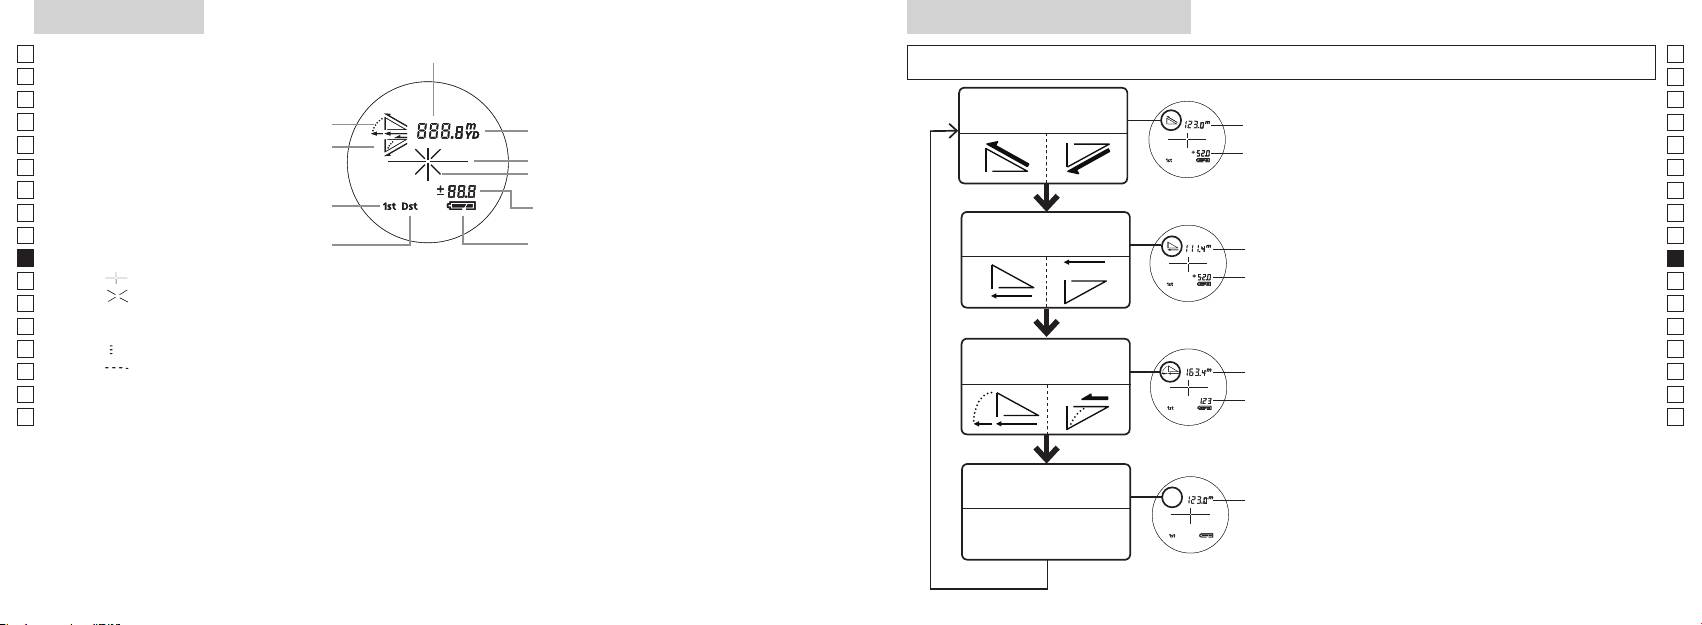
Visor interno
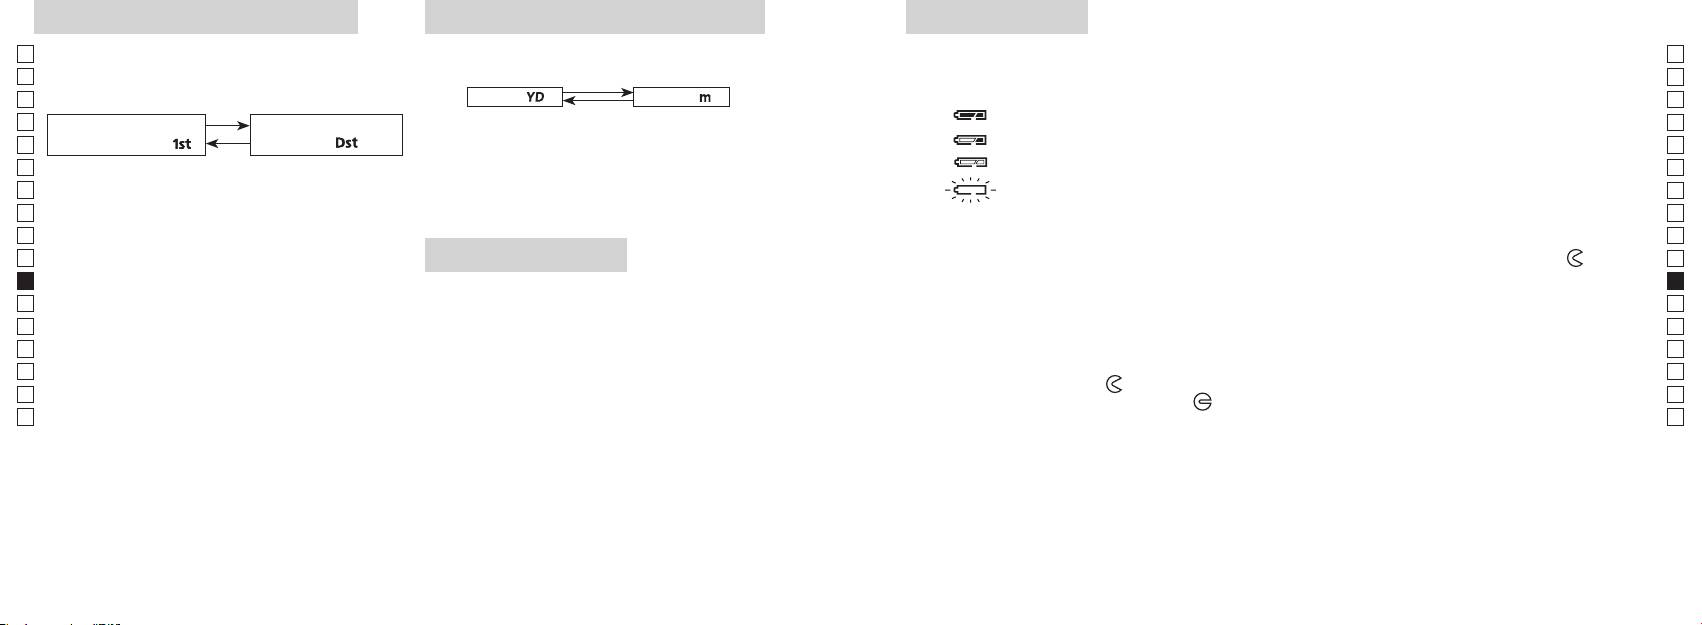
Modo de exibição da medição
Jp
Distância
Jp
de 2 segundos) para comutar o modo na ordem indicada em baixo.
En
En
Es
Es
Distância real e
1. Ligue a energia (confirme se o visor interno
Distância
Fr
Inclinar para cima
modo de altura
Fr
está ligado).
real
De
Inclinar para baixo
De
Marca do alvo
Altura
imediatamente a seguir (em menos que 0,5
It
It
segundo
Se
Se
Altura
Modo de prioridade de primeiro alvo
Nl
(Distância real no ajuste Modo golf)
Nl
Distância horizontal
Ru
Distância
Ru
Modo de prioridade de alvo distante
e modo de altura
horizontal
Pt
Pt
4. Repita os passos 2 e 3 até que o seu modo
Pl
『 』
Altura
Pl
desejado seja exibido.
『 』
Fi
Fi
*
No
Distância
No
Dk
ajustada
『
』 - Medindo agora
*
Dk
Modo golf
pelo
『
converte os resultados para o novo modo.
Cz
』
Cz
declive:
*
Depois que o modo estiver ajustado, as
Ro
Ro
Distância
Hu
real
Hu
mais avançada tecnologia, é impossível eliminar completamente o pó. Como resultado, pode ser
Modo de distância
Distância
real
real
172 173
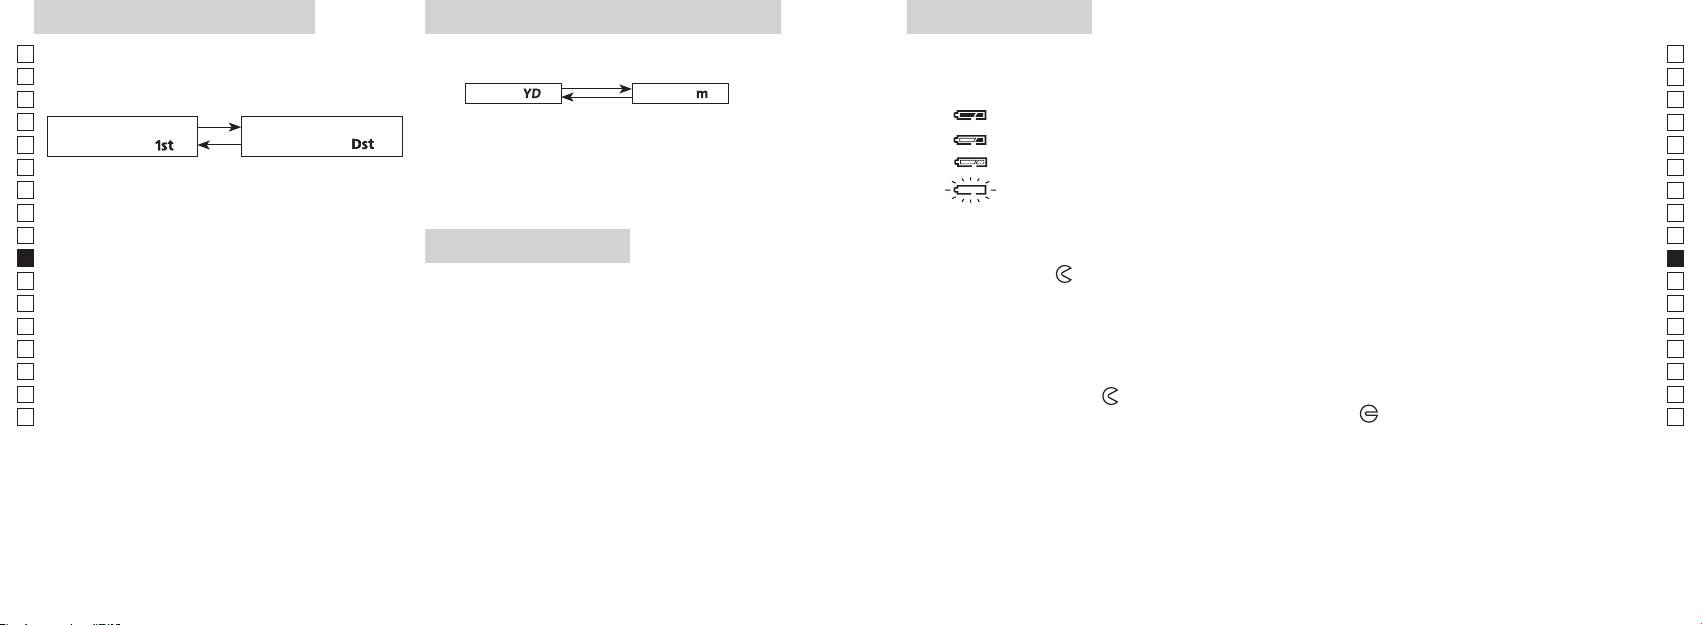
Modo de prioridade de alvo
Unidades de visualização de distância
Troca da pilha
Jp
Jp
Tipo de pilha:
(O ajuste default de fábrica é jardas.)
En
Indicadores de carga remanescente da pilha
En
distante (O ajuste default de fábrica é o Modo prioridade
[ ]
Metro [ ]
Es
* A marca de estado da pilha no visor interno avisa quando a pilha tem de ser trocada.
Es
de primeiro alvo).
1. Ligue a energia (confirme se o visor interno está ligado).
Fr
Fr
Modo de prioridade de
Modo de prioridade de
De
primeiro alvo「
」
alvo distante
「
」
De
It
1. Ligue a energia (confirme se o visor interno está
: Carga da pilha está baixa. A pilha deve ser substituída por uma nova.
It
ligado).
Se
Se
convertidos e exibidos na unidade de medida que você
Nl
Nl
selecionou.
Ru
dentro de 0,5 segundos.
Ru
1. Abra a tampa do compartimento da pilha
Pt
LED de iluminação
Usando a ponta do polegar, etc na parte rebaixada do compartimento da pilha, gire a tampa seguindo
Pt
(mais de 2 segundos) até que sejam comutados os
o indicador
Pl
1. Ligue a energia (confirme se o visor interno está ligado).
Pl
2. Substitua a pilha velha por uma nova
Fi
de Alvo Distante.
Fi
No
No
ligado ou desligado (ON e OFF).
*
Dk
*
Dk
funciona.
escuras para ver o painel LCD.
Cz
*
Cz
3. Feche a tampa do compartimento da pilha
*
Ro
[
Alinhe o indicador
com o indicador
●
e insira a tampa do compartimento da pilha. Usando a
Ro
Distante]
Hu
estará desligada quando o telêmetro a laser for
ponta do polegar, etc., gire a tampa seguindo o indicador
Hu
novamente ligado.
está firmemente fechada.
Vida da pilha
distância do objeto mais afastado.
Operação contínua: Aprox. 13.000 vezes (a aprox. 20°C)
etc. do alvo. Use somente como referência.
descarga elétrica natural, a vida desta pilha provavelmente será mais curta do que a apontada acima.
a seguir.
174 175
Jp
Jp
En
En
Es
Es
Fr
Fr
De
De
It
It
Se
Se
Nl
Nl
Ru
Ru
Pt
Pt
Pl
Pl
Fi
Fi
No
No
Dk
Dk
Cz
Cz
Ro
Ro
Hu
Hu
176 177
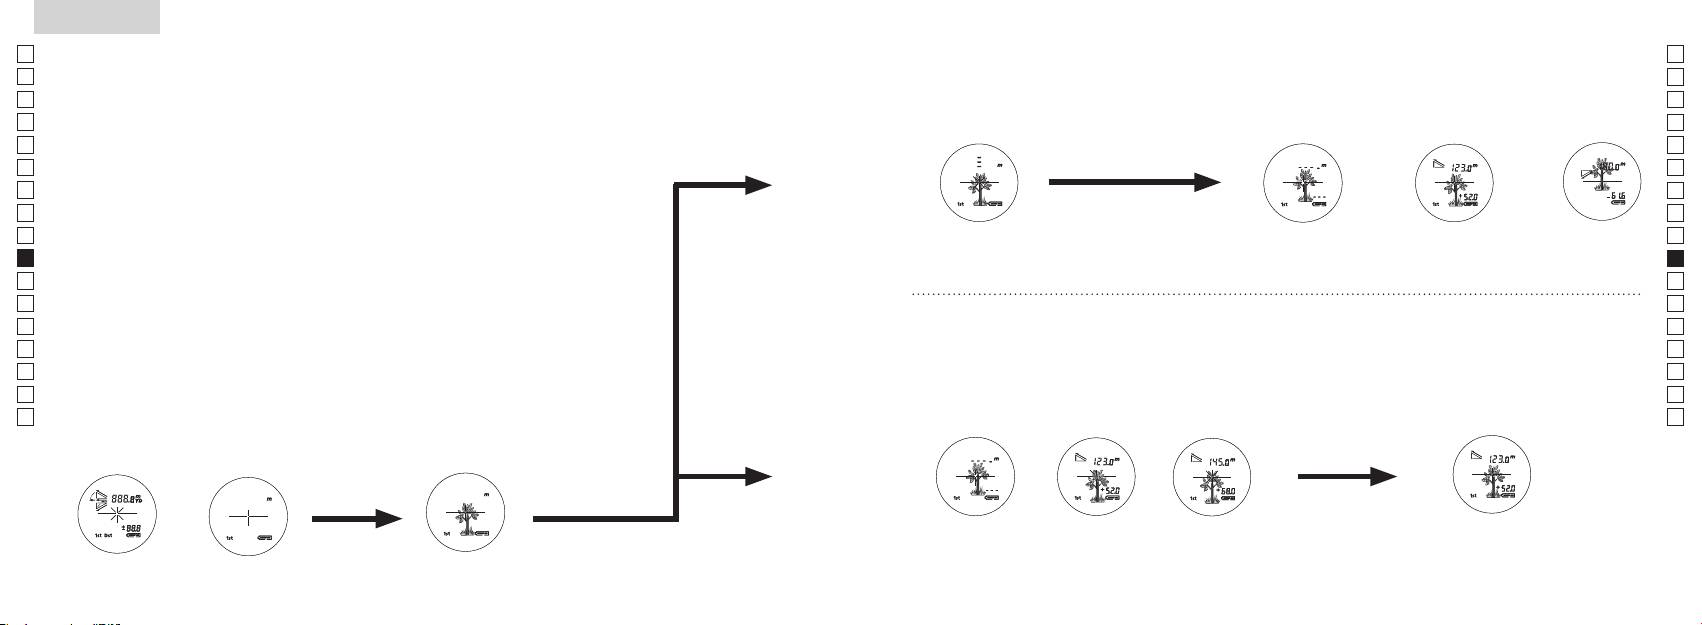
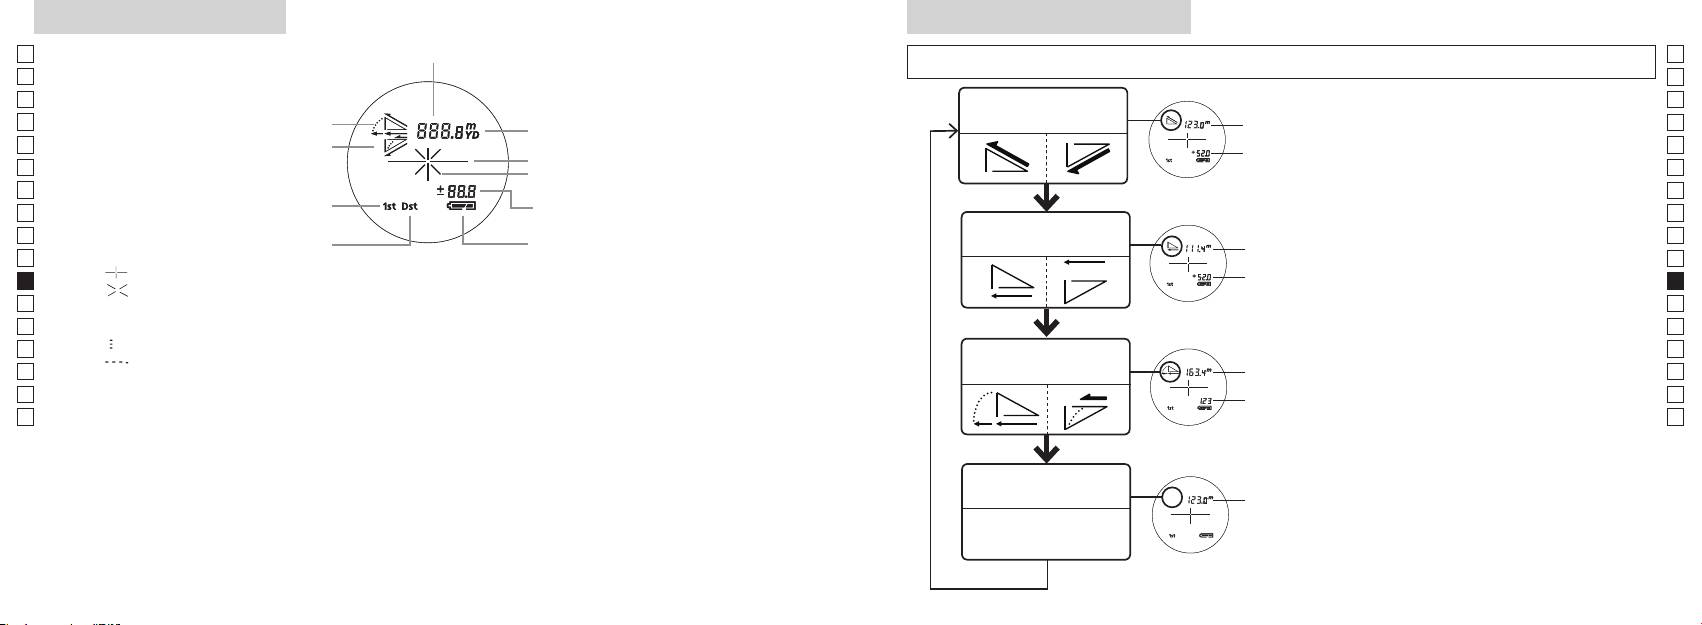
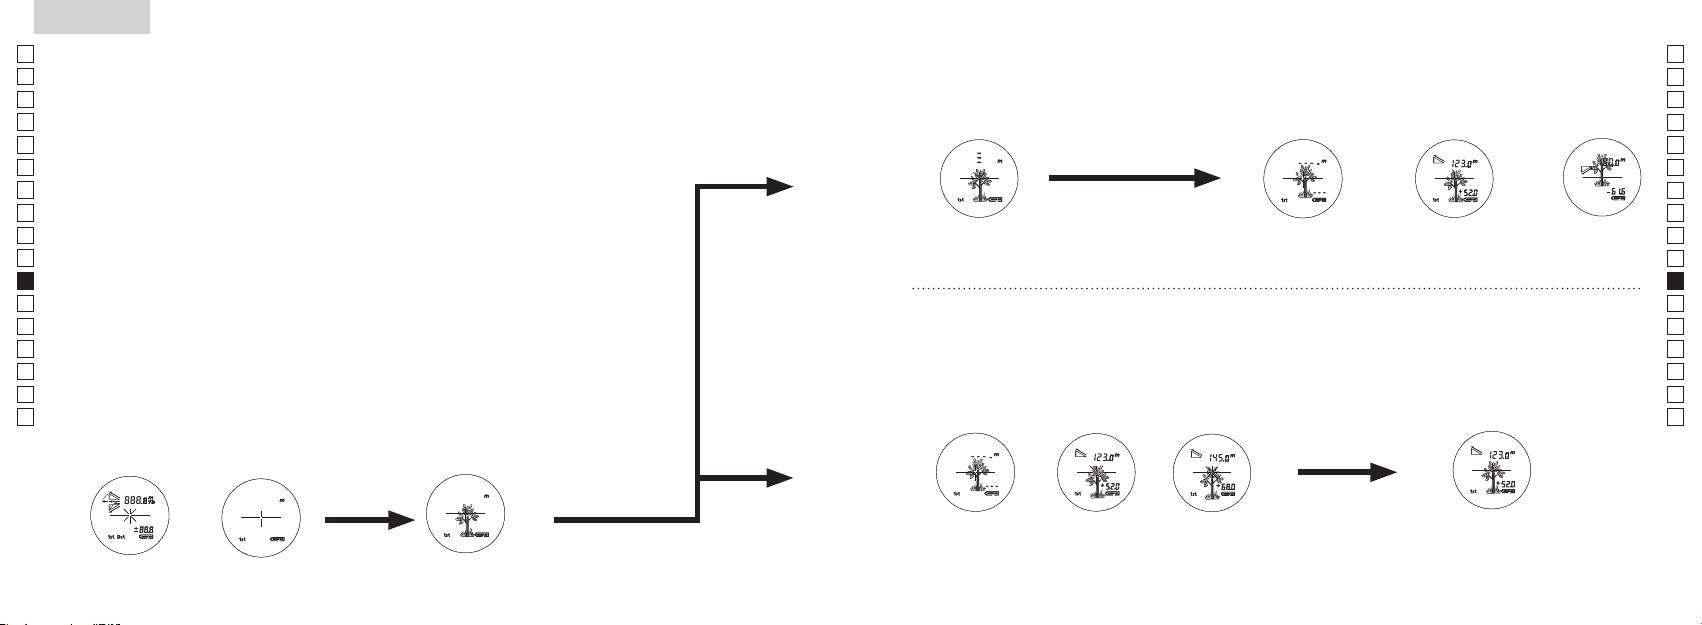
Measurement
1. Press the POWER button for power-on.
(Power turns off 8 seconds after the last
operation.)
Immediately after power-on.
3. Press POWER button once to start single measurement.
4. After measurement, “distance” or “fail to measure” indicator are displayed for 8 seconds, then power turns off. If you press the POWER
button during power-on (while the internal display is lit), another single measurement starts.
unable to measure distance.
3. Keep pressing POWER button to start continuous measurement up to 20 seconds. The internal display shows “distance” and
“fail to measure” indicator alternately.
Note: Laser irradiaton mark is blinking during the measurement.
Note: If you stop pressing the button, the continuous measuremen stops
2. Aim at the target
Positionthetargetatthecenterofthereticle
[Single measurement]
Failure to measure or
unable to measure distance.
[Continuous measurement]
4. After continuous measurement, the measure results are displayed for 8 seconds, then power turns off. If you press the POWER
button during power-on (while the internal display is lit), another measrement starts.
Failure to measure or
Target focusing.
Measuring.
(Initializing)
.
Upward measurement. Downward measurement.
Displays the measured
figure. (Target 1)
Displays the measured figure.
Stand-by.
Displays the measured
figure. (Target 2)
Measurement
1. Press the POWER button for power-on.
(Power turns off 8 seconds after the last
operation.)
Immediately after power-on.
(Initializing)
3. Press POWER button once to start single measurement.
Measuring.
4. After measurement, “distance” or “fail to measure” indicator are displayed for 8 seconds, then power turns off. If you press the POWER
button during power-on (while the internal display is lit), another single measurement starts.
Failure to measure or
unable to measure distance.
Displays the measured
figure. (Target 1)
3. Keep pressing POWER button to start continuous measurement up to 20 seconds. The internal display shows “distance” and
“fail to measure” indicator alternately.
Note: Laser irradiaton mark is blinking during the measurement.
Note: If you stop pressing the button, the continuous measuremen stops
Target focusing.
2. Aim at the target
.
Positionthetargetatthecenterofthereticle
[Single measurement]
Failure to measure or
unable to measure distance.
Upward measurement. Downward measurement.
Displays the measured figure.
[Continuous measurement]
4. After continuous measurement, the measure results are displayed for 8 seconds, then power turns off. If you press the POWER
button during power-on (while the internal display is lit), another measrement starts.
Stand-by.
Displays the measured
figure. (Target 2)
Measurement
1. Press the POWER button for power-on.
(Power turns off 8 seconds after the last
operation.)
Immediately after power-on.
Stand-by.
(Initializing)
2. Aim at the target
.
Positionthetargetatthecenterofthereticle
3. Press POWER button once to start single measurement.
4. After measurement, “distance” or “fail to measure” indicator are displayed for 8 seconds, then power turns off. If you press the POWER
button during power-on (while the internal display is lit), another single measurement starts.
unable to measure distance.
3. Keep pressing POWER button to start continuous measurement up to 20 seconds. The internal display shows “distance” and
“fail to measure” indicator alternately.
Note: Laser irradiaton mark is blinking during the measurement.
Note: If you stop pressing the button, the continuous measuremen stops
[Single measurement]
Failure to measure or
unable to measure distance.
[Continuous measurement]
4. After continuous measurement, the measure results are displayed for 8 seconds, then power turns off. If you press the POWER
button during power-on (while the internal display is lit), another measrement starts.
Failure to measure or
Target focusing.
Measuring.
Upward measurement. Downward measurement.
Displays the measured
figure. (Target 1)
Displays the measured figure.
Displays the measured
figure. (Target 2)
Medição
Cuidado — O uso de controles e ajustes ou a execução de procedimentos que não
【
Medição simples
】
aqueles especificados nestas instruções podem resultar em exposição a radiações perigosas.
1. Preparação
2. Viseira de borracha
óculos.
3. Ajuste da dioptria
Ajuste a dioptria para obter uma imagem nítida LCD no telêmetro.
aparelho (confirme se o visor interno está ligado). Olhando pela lente ocular, gire o anel de
ajuste de dioptrias no sentido horário até que o LCD fique focado.
seguir.
【
Função de medição contínua
】
mirar corretamente no seu objeto.
4. Medição
*
1. Ligue a energia (confirme se
2. Mire no alvo.
o visor interno está ligado).
(Desligamento automático após
retículo.
aproximadamente 8 seg. sem uso.)
Imediatamente após ligar
Mira do alvo
Measurement
1. Press the POWER button for power-on.
(Power turns off 8 seconds after the last
operation.)
Immediately after power-on.
Stand-by.
(Initializing)
2. Aim at the target
.
Positionthetargetatthecenterofthereticle
Target focusing.
[Single measurement]
3. Press POWER button once to start single measurement.
Measuring.
4. After measurement, “distance” or “fail to measure” indicator are displayed for 8 seconds, then power turns off. If you press the POWER
button during power-on (while the internal display is lit), another single measurement starts.
Failure to measure or
Upward measurement. Downward measurement.
unable to measure distance.
Displays the measured figure.
[Continuous measurement]
3. Keep pressing POWER button to start continuous measurement up to 20 seconds. The internal display shows “distance” and
“fail to measure” indicator alternately.
Note: Laser irradiaton mark is blinking during the measurement.
Note: If you stop pressing the button, the continuous measuremen stops
Failure to measure or
unable to measure distance.
4. After continuous measurement, the measure results are displayed for 8 seconds, then power turns off. If you press the POWER
button during power-on (while the internal display is lit), another measrement starts.
Displays the measured
figure. (Target 1)
Displays the measured
figure. (Target 2)
Measurement
1. Press the POWER button for power-on.
(Power turns off 8 seconds after the last
operation.)
Immediately after power-on.
Stand-by.
(Initializing)
2. Aim at the target
.
Positionthetargetatthecenterofthereticle
Target focusing.
[Single measurement]
3. Press POWER button once to start single measurement.
Measuring.
4. After measurement, “distance” or “fail to measure” indicator are displayed for 8 seconds, then power turns off. If you press the POWER
button during power-on (while the internal display is lit), another single measurement starts.
Failure to measure or
Upward measurement. Downward measurement.
unable to measure distance.
Displays the measured figure.
[Continuous measurement]
3. Keep pressing POWER button to start continuous measurement up to 20 seconds. The internal display shows “distance” and
“fail to measure” indicator alternately.
Note: Laser irradiaton mark is blinking during the measurement.
Note: If you stop pressing the button, the continuous measuremen stops
Failure to measure or
unable to measure distance.
Displays the measured
figure. (Target 1)
4. After continuous measurement, the measure results are displayed for 8 seconds, then power turns off. If you press the POWER
button during power-on (while the internal display is lit), another measrement starts.
Displays the measured
figure. (Target 2)
Measurement
1. Press the POWER button for power-on.
(Power turns off 8 seconds after the last
operation.)
Immediately after power-on.
Stand-by.
(Initializing)
2. Aim at the target
.
Positionthetargetatthecenterofthereticle
Target focusing.
[Single measurement]
3. Press POWER button once to start single measurement.
Measuring.
4. After measurement, “distance” or “fail to measure” indicator are displayed for 8 seconds, then power turns off. If you press the POWER
button during power-on (while the internal display is lit), another single measurement starts.
Failure to measure or
unable to measure distance.
3. Keep pressing POWER button to start continuous measurement up to 20 seconds. The internal display shows “distance” and
“fail to measure” indicator alternately.
Note: Laser irradiaton mark is blinking during the measurement.
Note: If you stop pressing the button, the continuous measuremen stops
Failure to measure or
unable to measure distance.
[Continuous measurement]
4. After continuous measurement, the measure results are displayed for 8 seconds, then power turns off. If you press the POWER
button during power-on (while the internal display is lit), another measrement starts.
Upward measurement. Downward measurement.
Displays the measured
figure. (Target 1)
Displays the measured figure.
Displays the measured
figure. (Target 2)
Measurement
1. Press the POWER button for power-on.
(Power turns off 8 seconds after the last
operation.)
Immediately after power-on.
Stand-by.
(Initializing)
2. Aim at the target
.
Positionthetargetatthecenterofthereticle
Target focusing.
[Single measurement]
3. Press POWER button once to start single measurement.
Measuring.
4. After measurement, “distance” or “fail to measure” indicator are displayed for 8 seconds, then power turns off. If you press the POWER
button during power-on (while the internal display is lit), another single measurement starts.
unable to measure distance.
3. Keep pressing POWER button to start continuous measurement up to 20 seconds. The internal display shows “distance” and
“fail to measure” indicator alternately.
Note: Laser irradiaton mark is blinking during the measurement.
Note: If you stop pressing the button, the continuous measuremen stops
unable to measure distance.
4. After continuous measurement, the measure results are displayed for 8 seconds, then power turns off. If you press the POWER
button during power-on (while the internal display is lit), another measrement starts.
[Continuous measurement]
Failure to measure or
Failure to measure or
Upward measurement. Downward measurement.
Displays the measured
figure. (Target 1)
Displays the measured figure.
Displays the measured
figure. (Target 2)
Measurement
1. Press the POWER button for power-on.
(Power turns off 8 seconds after the last
operation.)
Immediately after power-on.
Stand-by.
(Initializing)
2. Aim at the target
.
Positionthetargetatthecenterofthereticle
Target focusing.
[Single measurement]
3. Press POWER button once to start single measurement.
4. After measurement, “distance” or “fail to measure” indicator are displayed for 8 seconds, then power turns off. If you press the POWER
button during power-on (while the internal display is lit), another single measurement starts.
unable to measure distance.
3. Keep pressing POWER button to start continuous measurement up to 20 seconds. The internal display shows “distance” and
“fail to measure” indicator alternately.
Note: Laser irradiaton mark is blinking during the measurement.
Note: If you stop pressing the button, the continuous measuremen stops
unable to measure distance.
4. After continuous measurement, the measure results are displayed for 8 seconds, then power turns off. If you press the POWER
button during power-on (while the internal display is lit), another measrement starts.
[Continuous measurement]
Failure to measure or
Failure to measure or
Measuring.
Upward measurement. Downward measurement.
Displays the measured
figure. (Target 1)
Displays the measured figure.
Displays the measured
figure. (Target 2)
Measurement
1. Press the POWER button for power-on.
(Power turns off 8 seconds after the last
operation.)
Immediately after power-on.
Stand-by.
(Initializing)
2. Aim at the target
.
Positionthetargetatthecenterofthereticle
Target focusing.
[Single measurement]
3. Press POWER button once to start single measurement.
Measuring.
4. After measurement, “distance” or “fail to measure” indicator are displayed for 8 seconds, then power turns off. If you press the POWER
button during power-on (while the internal display is lit), another single measurement starts.
unable to measure distance.
3. Keep pressing POWER button to start continuous measurement up to 20 seconds. The internal display shows “distance” and
“fail to measure” indicator alternately.
Note: Laser irradiaton mark is blinking during the measurement.
Note: If you stop pressing the button, the continuous measuremen stops
unable to measure distance.
4. After continuous measurement, the measure results are displayed for 8 seconds, then power turns off. If you press the POWER
button during power-on (while the internal display is lit), another measrement starts.
[Continuous measurement]
Failure to measure or
Failure to measure or
Upward measurement. Downward measurement.
Displays the measured
figure. (Target 1)
Displays the measured figure.
Displays the measured
figure. (Target 2)
Measurement
1. Press the POWER button for power-on.
(Power turns off 8 seconds after the last
operation.)
Immediately after power-on.
Stand-by.
(Initializing)
2. Aim at the target
.
Positionthetargetatthecenterofthereticle
Target focusing.
[Single measurement]
3. Press POWER button once to start single measurement.
Measuring.
4. After measurement, “distance” or “fail to measure” indicator are displayed for 8 seconds, then power turns off. If you press the POWER
button during power-on (while the internal display is lit), another single measurement starts.
Failure to measure or
unable to measure distance.
Displays the measured
figure. (Target 1)
3. Keep pressing POWER button to start continuous measurement up to 20 seconds. The internal display shows “distance” and
“fail to measure” indicator alternately.
Note: Laser irradiaton mark is blinking during the measurement.
Note: If you stop pressing the button, the continuous measuremen stops
Failure to measure or
unable to measure distance.
Upward measurement. Downward measurement.
Displays the measured figure.
[Continuous measurement]
4. After continuous measurement, the measure results are displayed for 8 seconds, then power turns off. If you press the POWER
button during power-on (while the internal display is lit), another measrement starts.
Displays the measured
figure. (Target 2)
Measurement
1. Press the POWER button for power-on.
(Power turns off 8 seconds after the last
operation.)
Immediately after power-on.
Stand-by.
(Initializing)
2. Aim at the target
.
Positionthetargetatthecenterofthereticle
Target focusing.
[Single measurement]
3. Press POWER button once to start single measurement.
Measuring.
4. After measurement, “distance” or “fail to measure” indicator are displayed for 8 seconds, then power turns off. If you press the POWER
button during power-on (while the internal display is lit), another single measurement starts.
Failure to measure or
unable to measure distance.
3. Keep pressing POWER button to start continuous measurement up to 20 seconds. The internal display shows “distance” and
“fail to measure” indicator alternately.
Note: Laser irradiaton mark is blinking during the measurement.
Note: If you stop pressing the button, the continuous measuremen stops
Failure to measure or
unable to measure distance.
[Continuous measurement]
4. After continuous measurement, the measure results are displayed for 8 seconds, then power turns off. If you press the POWER
button during power-on (while the internal display is lit), another measrement starts.
Upward measurement. Downward measurement.
Displays the measured
figure. (Target 1)
Displays the measured figure.
Displays the measured
figure. (Target 2)
ou
"measured distance" (distância medida) é exibido durante 8 segundos, e
quando a energia estiver ligada (enquanto o visor interno estiver
iluminado),
"incapaz de medir" a
cima
baixo
distância.
medida) é exibido durante 8 segundos, e depois o equipamento
interno exibe o indicador "fail to
desliga-se.
alternadamente com o indicador "measured distance" (distância
quando
medida).
a energia estiver ligada (enquanto o visor interno estiver
*
pisca durante a m
*
Ao medir uma bandeira em um campo de golfe, por exemplo,
ou "incapaz de medir"
medido (Alvo 1)
medido (Alvo 2)
a distância.
entre você e a bandeira, o menor número é a distância até a sua
bandeira alvo.
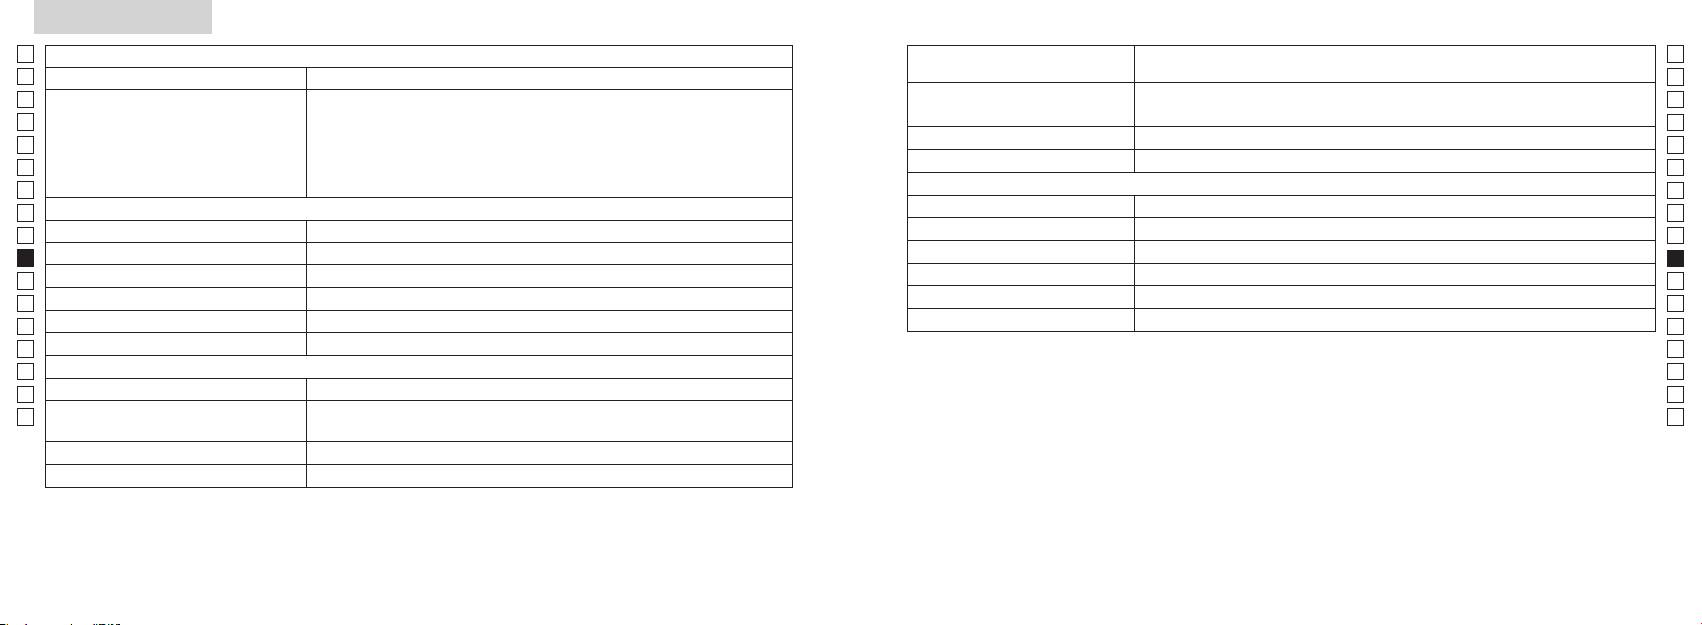
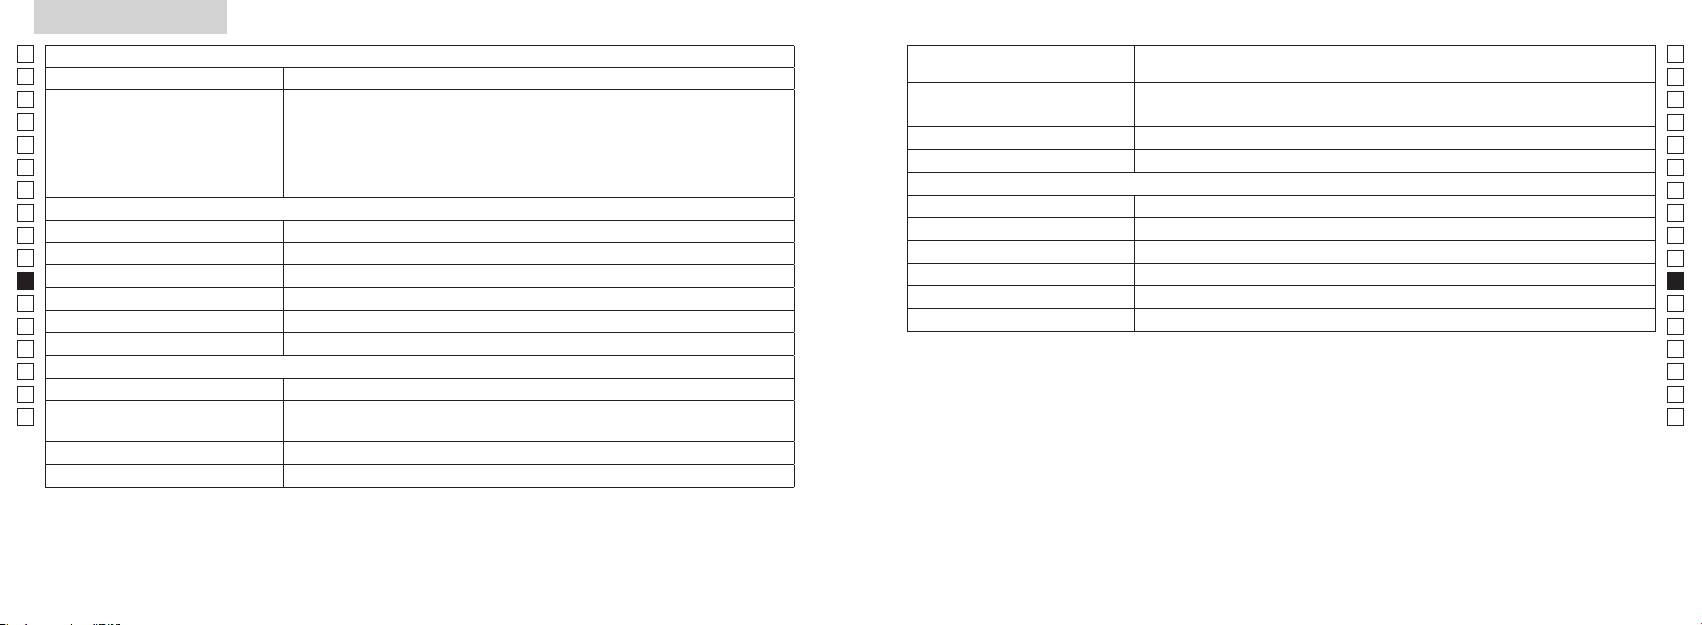
Especificações
Jp
Corpo: à prova d'água (profundidade máxima de 1 metro, por até 10 minutos)*
Jp
(Compartimento da pilha: resistente à água**)
En
En
Es
L
Es
Segurança
L
Fr
Distância real (3 dígitos inferiores):
Fr
De
De
Ambiente
It
It
Laser
Se
Se
Sistema óptico
Classe
Nl
Nl
6
Comprimento de onda (nm) 905
Ru
Ru
Diâmetro efetivo da objetiva (mm) ø21
12
Pt
Pt
7,5
15
Pl
Pl
Alívio dos olhos (mm) 18,3
Divergência de feixe (mrad)
Fi
Fi
ø3,5
80 ou inferior (se
No
No
-
1
Ajuste da dioptria ±4m
Dk
Dk
* Modelos à prova d'água
Outros
Cz
Cz
˚C) -10 —
de 1 metro por até 10 minutos.
Ro
Ro
O Telêmetro a laser Nikon oferece as seguintes vantagens:
Hu
Hu
Fonte de energia
Desligamento automático da energia (após aproximadamente 8 seg. sem uso)
113 x 70 x 39
Observe o seguinte ao usar o Telêmetro a laser Nikon.
Aprox. 175 (sem pilha)
em água. Se entrar água no compartimento da pilha, seque qualquer umidade e aguarde até que o compartimento seque.
178 179
Outros
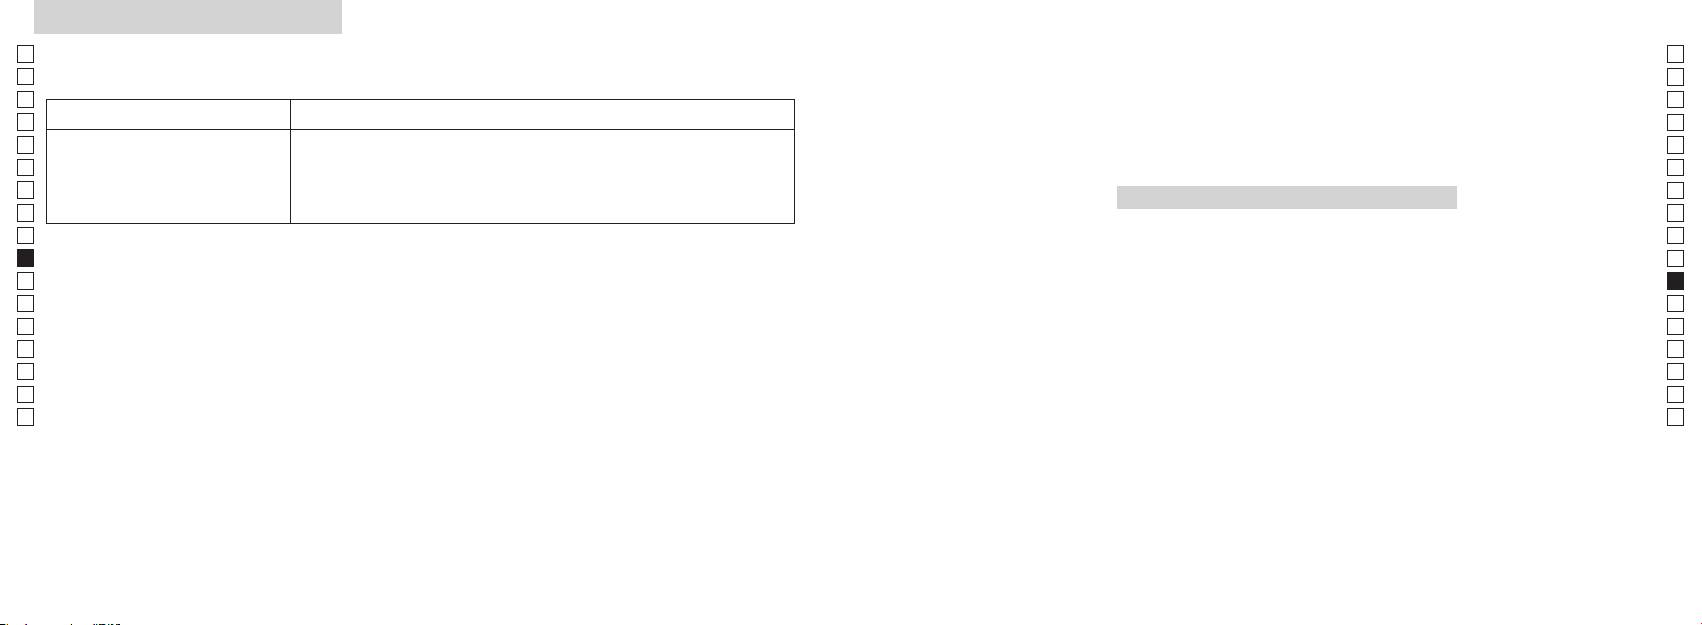
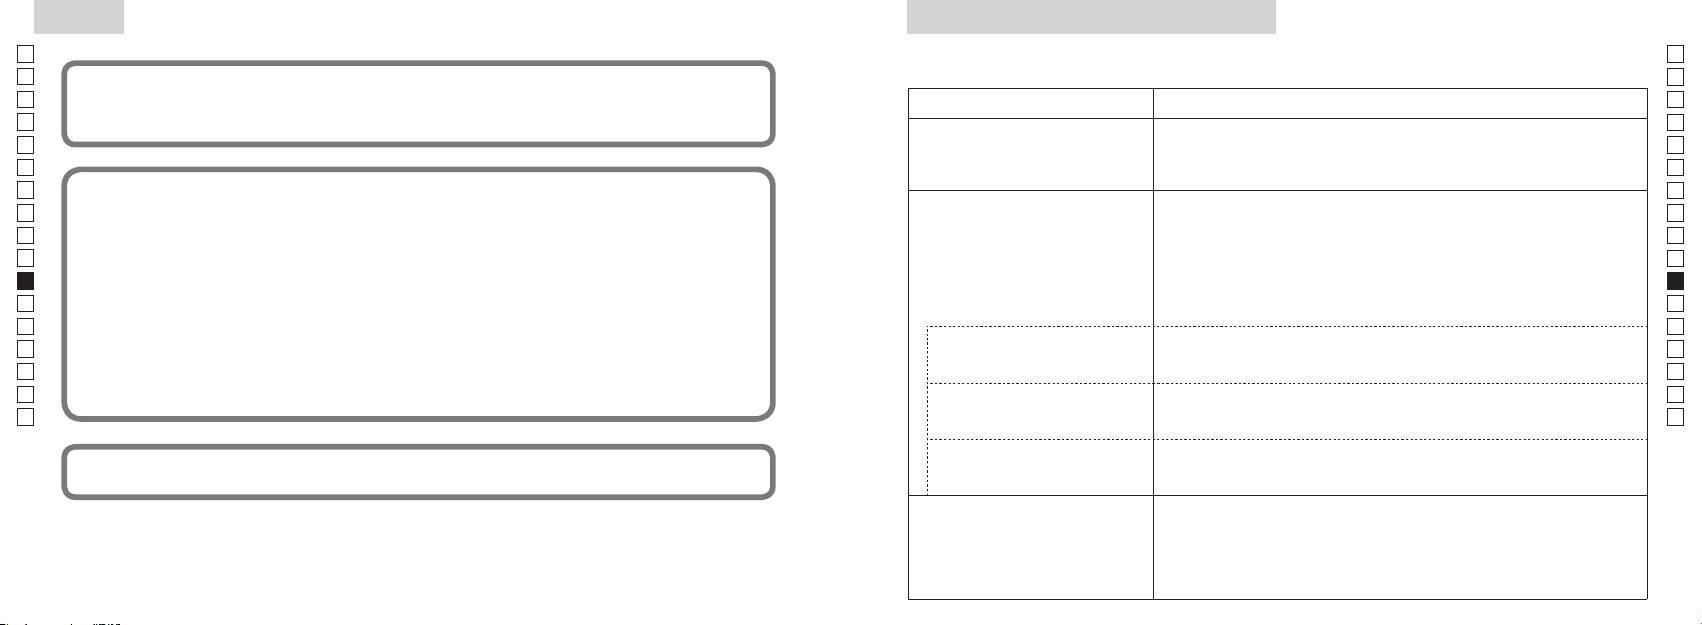
Problemas e Soluções/Reparo
Jp
Se o seu Telêmetro a laser Nikon precisar de ser reparado, por favor contate o seu distribuidor local quanto a detalhes sobre e para
Jp
En
En
Es
Es
Sintoma Pontos a verificar
Fr
Fr
indesejada.
De
●
De
● Verifique se está colocada uma pilha.
It
It
● Substitua a pilha velha por uma nova.
Se
Se
●
Nl
Nl
Ru
Ru
●
Pt
do lado da lente objectiva estejam limpas. Limpe-os, se necessário.
Pt
●
Pl
Pl
podem ser comprovadas ao desligar e ligar o equipamento, recomenda-se que o usuário tente corrigir a interferência
refletir o raio laser.
Fi
por meio de uma ou mais das medidas a seguir:
● Substitua a pilha velha por uma nova.
Fi
No
No
● Certifique-se de segurar a unidade enquanto mede.
Dk
●
Dk
(Incapaz de medir)
Cz
Cz
Ro
Alvos posicionados mais perto do
Ro
● Certifique-se de que nada, como por exemplo, folhas ou grama, está entre o
que o valor mínimo da faixa de
Hu
Telêmetro a laser Nikon e o alvo.
Hu
Um alvo além de uma determinada
● Certifique-se de que nada, como por exemplo, folhas ou grama, está entre o
Telêmetro a laser Nikon e o alvo.
● Substitua a pilha velha por uma nova.
●
refletir o raio laser.
● Certifique-se de segurar a unidade enquanto mede.
● Certifique-se de que nada, como por exemplo, folhas ou grama, está entre o
Telêmetro a laser Nikon e o alvo.
180 181
Problemas e Soluções/Reparo
Jp
Jp
En
En
Es
Es
Sintoma Pontos a Verificar
Fr
Fr
De
● Substitua a pilha velha por uma nova
De
Polski
●
It
It
O resultado incorreto é exibido
o raio laser.
Se
● Certifique-se de que nada, como por exemplo, folhas ou grama, está entre o
Se
SPIS TREŚCI
Telêmetro a Laser Nikon e o alvo.
Nl
Nl
Uwagi przed rozpoczęciem
Ru
Ru
użytkowania ....................................................... 184-187
Pt
uma vez que pode ter ocorrido uma falha no equipamento. Nunca deixe qualquer
Pt
Kluczowe funkcje ....................................................... 188
Pl
Pl
awartość opakowania .............. 189
Fi
Fi
....................................... 190
No
No
yświetlania ................................ 191
Dk
Dk
ednostki
Cz
Cz
... 192
Ro
Ro
......................................................... 193
Hu
Hu
.................................................................. 194-195
Dane techniczne ............................................... 196-197
Inne ................................................................................. 198
...... 199-200
182 183
Uwagi przed rozpoczęciem użytkowania
Jp
Dziękujemy za zakup produktu Nikon Laser Rangefinder COOLSHOT AS.
W celu właściwego korzystania z
PRZESTROGI DOTYCZĄCE
Jp
urządzenia i uniknięcia zagrożeń
rozmontowywać, modyfikować lub
En
BEZPIECZEŃSTWA (Laser)
En
należy ściśle przestrzegać
naprawiać laserowego dalmierza
Dalmierz laserowy firmy Nikon emituje
Es
Korzystanie z elementów sterowania lub regulacji, czy też wykonywanie procedur w
Es
wymienionych niżej wytycznych.
niewidzialną wiązkę promieni
sposób inny, niż określony w niniejszym podręczniku, może spowodować narażenie na
Fr
Przed rozpoczęciem korzystania
laserowych. Należy stosować się do
być szkodliwy dla zdrowia.
Fr
niebezpieczne promieniowanie.
poniższych wytycznych:
Rozmontowany, zmodyfikowany
De
z tego produktu zapoznaj się
De
lub naprawiony produkt nie jest
dokładnie z działem „Uwagi
Ostrzeżenie
It
It
objęty gwarancją producenta.
〇
przed rozpoczęciem
Se
Se
przed rozpoczęciem użytkowania” oraz z instrukcjami na temat poprawnego użytkowania,
użytkowania” oraz z instrukcjami
pomiar) podczas spoglądania
należy przechowywać w miejscu
Nl
na temat poprawnego
dołączonymi do produktu.
Nl
w optykę od strony obiektywu.
niedostępnym dla dzieci.
użytkowania, dołączonymi do
Ru
〇
Nieprzestrzeganie tej zasady może
Ru
produktu. Przechowuj ten
Pt
sięgnąć.
negatywnie wpłynąć na wzrok lub
obudowy dalmierza laserowego
Pt
podręcznik w łatwo dostępnym
spowodować uszkodzenie oczu.
firmy Nikon lub gdy emitowane
Pl
〇 Nie należy samodzielnie rozmontowywać lub dokonywać napraw tego produktu, gdyż może to
miejscu, aby móc w razie
Pl
są dziwne dźwięki, w wyniku
spowodować wystąpienie poważnych problemów.
potrzeby do niego sięgnąć.
Fi
ieruj wiązki lasera na ludzi.
upuszczenia bądź z innego
Fi
Rozmontowany lub naprawiony produkt nie jest objęty gwarancją producenta.
powodu, należy natychmiast wyjąć
No
No
inny instrument optyczny, na
baterię i zaprzestać użytkowania.
OSTRZEŻENIE
Dk
Dk
● Specyfikacje ikonstrukcja mogą ulec zmianie bez powiadomienia.
przykład soczewkę lub lornetkę,
Cz
ani okiem nieuzbrojonym. Może to
Cz
●
przypomnieniu, iż nieprawidłowe
Ro
korzystanie będące wynikiem
spowodować uszkodzenie wzroku.
wartykułach lubrecenzjach) bez pisemnego upoważnienia od firmy NIKON VISION CO., LTD. jest
Ro
zignorowania niniejszych treści może
Hu
zabronione.
Hu
spowodować poważne obrażenia lub
umieść palce z dala od przycisku
● Firma NIKON VISION CO., LTD. zastrzega sobie prawo do zmiany zawartości niniejszego
śmierć.
podręcznika w dowolnym czasie, bez wcześniejszego powiadomienia.
UWAGA
przypadkowej emisji wiązki laserowej.
przypomnieniu, iż nieprawidłowe
użytkowany przez dłuższy okres
korzystanie będące wynikiem
czasu, wyjmij baterię z korpusu.
zignorowania niniejszych treści może
spowodować poważne obrażenia lub
straty materialne.
184 185
Uwagi przed rozpoczęciem użytkowania
Jp
PRZESTROGI DOTYCZĄCE
obrażeń.
PRZESTROGI DOTYCZĄCE
wodą, a następnie skonsultować się
soczewek może dojść do skroplenia
* Dmuchawa to gumowy przyrząd do
Jp
z lekarzem.
pary wodnej. Nie należy skorzystać
czyszczenia, wydmuchujący
En
BEZPIECZEŃSTWA (Luneta)
BEZPIECZEŃSTWA
En
w niestabilnym miejscu.
z produktu dopóki kondensacja się
powietrze po ściśnięciu.
(Bateria litowa)
Es
Dalmierz laserowy firmy Nikon
Nieprzestrzeganie tej zasady
obowiązującymi przepisami.
utrzymuje.
Es
Przechowywanie
umożliwia ustawianie na cel z
może spowodować upuszczenie
Fr
Fr
wykorzystaniem w systemie
urządzenia i jego uszkodzenie lub
może dojść do rozszczelnienia baterii
PRZESTROGI DOTYCZĄCE
KONSERWACJA
pojawienie się pleśni na powierzchni
De
optycznym lunety. Należy stosować
obrażenia.
i wycieku jej zawartości, co może
BEZPIECZEŃSTWA
Soczewki
De
soczewki może być spowodowane
się do poniższych wytycznych:
spowodować korozję urządzenia i
It
Uwagi
It
Ostrzeżenie
pakowania produktu i inne drobne
poplamić odzież.
powierzchni soczewki należy
tego powodu dalmierz laserowy firmy
Se
Se
przedmioty należy przechowywać
Należy stosować się do poniższych
firmy Nikon jest wodoodporne,
korzystać z miękkiej, nieoleistej
Nikon należy przechowywać w
Nl
w miejscu niedostępnym dla dzieci.
Nikon Rangefinder nie należy
wytycznych:
nie jest on przeznaczony do
szczotki.
Nl
chłodnym i suchym miejscu.
spoglądać bezpośrednio na
Baterię należy wkładać z
użytkowania pod wodą.
Ru
Ru
wkładały sobie do ust gumowe
słońce, źródło intensywnego
uwzględnieniem poprawnego
takich jak odciski palców, z
nocy należy dokładnie osuszyć
Pt
muszle oczne lub inne niewielkie
światła lub promień lasera.
wody, piasku lub błota z
powierzchni soczewki, przetrzyj
Pt
urządzenie w temperaturze
Baterię należy wyjąć, gdy wyczerpie
powierzchnią obudowy dalmierza,
delikatnie soczewki miękką, czystą
Pl
Uwagi
pokojowej, a następnie przechowywać
Pl
taką część, należy natychmiast
się ich ładunek lub w przypadku
należy ją jak najszybciej przetrzeć
szmatką bawełnianą lub wysokiej
w chłodnym i suchym miejscu.
dalmierza
Fi
skonsultować się z lekarzem.
dłuższego okresu niekorzystania z
miękką, czystą i suchą szmatką.
jakości nieoleistą szmatką do
Fi
laserowego Nikon, nie
urządzenia.
soczewek. Użyj niewielkiej ilości
No
No
naciskaj przycisku
gumowej muszli ocznej przez
laserowego firmy Nikon w
czystego alkoholu (nie stosować
Dk
dłuższy czas, może dojść do
złącz gniazda baterii.
denaturatu), aby wytrzeć trwałe
Dk
samochodzie w gorący lub
.
w
smugi. Nie należy korzystać z
Cz
słoneczny dzień, a także w pobliżu
Cz
wystąpienia jakichkolwiek objawów
kieszeni lub w torbie, w której
aksamitnych szmatek lub zwykłych
Ro
podczas przemieszczania się
należy natychmiast skonsultować
znajdują się klucze lub monety,
chusteczek, ponieważ mogą one
Ro
przeciwnym razie może dojść do
pieszo. Nieprzestrzeganie tej
się z lekarzem.
Hu
ponieważ może spowodować to
uszkodzenia urządzenia.
zarysować powierzchnię soczewki.
Hu
zasady może spowodować
przegrzanie urządzenia.
obrażenia w wyniku potrącenia
dalmierza laserowego Nikon, należy
laserowego firmy Nikon na
czyszczenia obudowy, nie powinna
innych osób, upadku lub innych
przechowywać je w miękkim futerale.
bezpośrednie działanie promieni
być ponownie używana do
wypadków.
nie należy demontować baterii.
czyszczenia soczewki.
nie działa poprawnie, przerwij
i wysoka temperatura mogą
Korpus
trzymając ją za pasek. Może to
natychmiast korzystanie i skonsultuj
negatywnie wpłynąć na urządzenie
Korpus należy przetrzeć miękką, czystą i
spowodować uderzenie innej
się z lokalnym sprzedawcą, aby
dotknie odzieży lub skóry, należy
lub doprowadzić do jego uszkodzenia.
suchą szmatką po delikatnym
osoby i doprowadzić do jej
uzyskać informacje, gdzie należy
natychmiast spłukać go dużą ilością
zdmuchnięciu kurzu za pomocą
wysłać urządzenie celem naprawy.
laserowego Nikon w otoczeniu,
dmuchawy*. Nie należy korzystać z
baterii przedostanie się do oczu,
gdzie dochodzi do nagłych zmian
benzenu, rozpuszczalnika lub innych
należy natychmiast przemyć oczy
temperatury, na powierzchni
czyszczących środków organicznych.
186 187
Kluczowe funkcje Nazewnictwo/Zawartość opakowania
Jp
Następujące warunki ułatwiają dokonanie pomiaru:
1
Jp
En
4
En
Es
2 Detektor promienia laserowego
Es
3
Fr
3
Fr
wzniesienia (odległości w poziomie ± wysokości), która jest
4
De
De
przydatna podczas gry w golfa
90stopni
It
It
które można łatwo przełączyć
Pomiar może okazać się niedokładny lub błędny w
1
Se
Se
następujących sytuacjach:
5Okular lunety z 6-krotnym
Nl
stosownie do celu
Nl
powiększeniem
Ru
2
5
Ru
6 ierścień regulacji
Pt
Pt
ciągłego pomiaru
dioptrii
Pl
6
Pl
7 Indeks dioptrażu
nieużytkowania)
Fi
Fi
8 Ucho na pasek
7
No
9
No
Dk
!p amknięciu
Dk
8
Cz
pokrywy komory baterii
Cz
Ro
!q tykieta z
9
Ro
Dalmierz laserowy firmy Nikon emituje niewidzialną wiązkę
objaśnieniami
Hu
Hu
promieni laserowych. Mierzony jest czas, jaki zajmuje
!p
!w Informacje FDA
wiązce przebycie odległości od dalmierza do celu i z
!q
powrotem. Odbicie promienia laserowego i wyniki pomiaru
!w
mogą się różnić w zależności od warunków klimatycznych
i środowiskowych, koloru i wykończenia powierzchni,
rozmiaru, kształtu i innych właściwości celu.
Zawartość opakowania
................................. x1
...................x1
....................x1
........x1
188 189
Wyświetlacz wewnętrzny
Tryby pomiaru/Wyświetlania
Jp
Odległość
Jp
En
En
Es
Tryb odległości
Es
Rzeczywista
Fr
rzeczywistej i wysokości
Fr
wewnętrzny ekran jest włączony).
odległość
De
De
Oznaczenie celu
(Tryb), a następnie od razu (w ciągu 0,5
It
It
Oznaczenie promienia lasera
Se
Se
Tryb priorytetu pierwszego planu
Nl
pomiar) przez ok. 2 sekundy.
Nl
trybie gry w golfa)
Tryb odległości w
Ru
3
Odległość w
Ru
Tryb priorytetu drugiego planu
poziomie i wysokości
poziomie
Pt
Pt
『 』 - Skieruj na cel, na którym chcesz dokonać pomiaru. Ustaw cel na środku krzyża nitek.
pomiar), aby zmienić tryb wyświetlania
Pl
Pl
『 』
Fi
ki 2 i 3 do momentu
Fi
No
Nie spoglądaj w soczewkę obiektywu, gdy wyświetlony jest ten znak.
wybrania żądanego trybu.
No
Dk
『
』 - Trwa dokonywanie pomiaru
Odległość z
*
Dk
『
』
Tryb gry w golfa
uwzględnieniem
w odpowiedniej kolejności, tryb nie
Cz
Cz
wzniesienia
zostanie przełączony.
Ro
Ro
Rzeczywista
*
Hu
odległość
spowoduje przekonwertowanie
Hu
wyników na nowy tryb.
zastosowania podczas produkcji ekranu LCD najbardziej zaawansowanych technologii kompletna
*
dokonywane są w nowym trybie.
wpływu na precyzję pomiaru lub bezpieczeństwo podczas korzystania.
Tryb odległości
Rzeczywista
rzeczywistej
odległość
190 191
Tryb priorytetu pierwszego planu
Jednostki wyświetlania odległości
Wymiana baterii
Jp
Jp
Rodzaj baterii: Bateria litowa CR2, 3 V x1
(Domyślnym ustawieniem fabrycznym są jardy).
En
Wskaźnik pozostałego ładunku baterii
En
ustawieniem fabrycznym jest tryb priorytetu pierwszego
Es
[ ]
* Oznaczenie stanu baterii w wewnętrznym wyświetlaczu ostrzega o konieczności wymiany baterii.
planu).
Metry [ ]
Es
: Bateria jest naładowana w dostatecznym stopniu.
Fr
Fr
Tryb priorytetu
Tryb priorytetu drugiego
włączony).
De
pierwszego planu「
」
planu
「
」
De
It
It
jest włączony).
zostanie zmieniona, puść przycisk.
Se
Se
Nl
iwyświetlone w wybranej jednostce miary.
Nl
Ru
Ru
1. Otwórz pokrywę komory baterii
0,5 sekundy.
Pt
Naciskaj i przytrzymuj obydwa przyciski (dłużej
Korzystając z kciuka otwórz pokrywę komory baterii, obracając ją w kierunku oznaczenia
Pt
Podświetlenie LED
Pl
niż 2sekundy) do momentu przełączenia trybu
na gumowe uszczelnienia wodoodporne otwarcie pokrywy może być utrudnione.
Pl
1
priorytetu pierwszego planu na tryb priorytetu
2. Wymień zużytą baterię na nową
Fi
włączony).
Fi
drugiego planu.
No
No
*
Dk
poprawnie, dalmierz laserowy nie będzie działał.
kolejności, tryb nie zostanie przełączony.
*
Dk
zbyt słabe, aby panel LCD był widoczny.
3. Zamknij pokrywę komory baterii
Cz
*
Cz
w punkcie 2.
*
ze wskaźnikiem
●
i włóż pokrywę komory baterii. Korzystając z kciuka obróć
Ro
Ro
pokrywę w kierunku oznaczenia
[]
podświetlenie będzie wyłączone po kolejnym włączeniu
Hu
uszczelnienia wodoodporne, należy jednak ją obrócić do momentu zatrzymania. Upewnij się, że
Hu
zasilania dalmierza laserowego.
komora jest bezpiecznie zamknięta.
priorytetu pierwszego planu podawana jest odległość
do najbliższego obiektu, natomiast w trybie priorytetu
Czas pracy baterii
drugiego planu — do najbardziej oddalonego.
Ciągła praca: Około 13.000 cyklów (przy temperaturze ok. 20°C)
celu, kolor itp. Korzystaj z niej wyłącznie w celach orientacyjnych.
ładunku, czas pracy tej baterii prawdopodobnie będzie krótszy niż powyższa wartość.
192 193
Jp
Jp
En
En
Es
Es
Fr
Fr
De
De
It
It
Se
Se
Nl
Nl
Ru
Ru
Pt
Pt
Pl
Pl
Fi
Fi
No
No
Dk
Dk
Cz
Cz
Ro
Ro
Hu
Hu
194 195
Measurement
1. Press the POWER button for power-on.
(Power turns off 8 seconds after the last
operation.)
Immediately after power-on.
3. Press POWER button once to start single measurement.
4. After measurement, “distance” or “fail to measure” indicator are displayed for 8 seconds, then power turns off. If you press the POWER
button during power-on (while the internal display is lit), another single measurement starts.
unable to measure distance.
3. Keep pressing POWER button to start continuous measurement up to 20 seconds. The internal display shows “distance” and
“fail to measure” indicator alternately.
Note: Laser irradiaton mark is blinking during the measurement.
Note: If you stop pressing the button, the continuous measuremen stops
2. Aim at the target
Positionthetargetatthecenterofthereticle
[Single measurement]
Failure to measure or
unable to measure distance.
[Continuous measurement]
4. After continuous measurement, the measure results are displayed for 8 seconds, then power turns off. If you press the POWER
button during power-on (while the internal display is lit), another measrement starts.
Failure to measure or
Target focusing.
Measuring.
(Initializing)
.
Upward measurement. Downward measurement.
Displays the measured
figure. (Target 1)
Displays the measured figure.
Stand-by.
Displays the measured
figure. (Target 2)
Measurement
1. Press the POWER button for power-on.
(Power turns off 8 seconds after the last
operation.)
Immediately after power-on.
(Initializing)
3. Press POWER button once to start single measurement.
Measuring.
4. After measurement, “distance” or “fail to measure” indicator are displayed for 8 seconds, then power turns off. If you press the POWER
button during power-on (while the internal display is lit), another single measurement starts.
Failure to measure or
unable to measure distance.
Displays the measured
figure. (Target 1)
3. Keep pressing POWER button to start continuous measurement up to 20 seconds. The internal display shows “distance” and
“fail to measure” indicator alternately.
Note: Laser irradiaton mark is blinking during the measurement.
Note: If you stop pressing the button, the continuous measuremen stops
Target focusing.
2. Aim at the target
.
Positionthetargetatthecenterofthereticle
[Single measurement]
Failure to measure or
unable to measure distance.
Upward measurement. Downward measurement.
Displays the measured figure.
[Continuous measurement]
4. After continuous measurement, the measure results are displayed for 8 seconds, then power turns off. If you press the POWER
button during power-on (while the internal display is lit), another measrement starts.
Stand-by.
Displays the measured
figure. (Target 2)
Measurement
1. Press the POWER button for power-on.
(Power turns off 8 seconds after the last
operation.)
Immediately after power-on.
Stand-by.
(Initializing)
2. Aim at the target
.
Positionthetargetatthecenterofthereticle
3. Press POWER button once to start single measurement.
4. After measurement, “distance” or “fail to measure” indicator are displayed for 8 seconds, then power turns off. If you press the POWER
button during power-on (while the internal display is lit), another single measurement starts.
unable to measure distance.
3. Keep pressing POWER button to start continuous measurement up to 20 seconds. The internal display shows “distance” and
“fail to measure” indicator alternately.
Note: Laser irradiaton mark is blinking during the measurement.
Note: If you stop pressing the button, the continuous measuremen stops
[Single measurement]
Failure to measure or
unable to measure distance.
[Continuous measurement]
4. After continuous measurement, the measure results are displayed for 8 seconds, then power turns off. If you press the POWER
button during power-on (while the internal display is lit), another measrement starts.
Failure to measure or
Target focusing.
Measuring.
Upward measurement. Downward measurement.
Displays the measured
figure. (Target 1)
Displays the measured figure.
Displays the measured
figure. (Target 2)
Pomiar
【
Pojedynczy pomiar
】
3. Naciśnij raz przycisk
aby rozpocząć pojedynczy pomiar.
【
Funkcja ciągłego pomiaru
】
2. Skieruj na cel.
wewnętrzny ekran jest włączony)
Ustaw cel na środku krzyża
(Automatyczne wyłączanie zasilania
nitek.
po upływie 8 sekund nieużytkowania)
Natychmiast po włączeniu
Tryb czuwania Ustawianie na celu
(Inicjalizacja).
Measurement
1. Press the POWER button for power-on.
(Power turns off 8 seconds after the last
operation.)
Immediately after power-on.
Stand-by.
(Initializing)
2. Aim at the target
.
Positionthetargetatthecenterofthereticle
Target focusing.
[Single measurement]
3. Press POWER button once to start single measurement.
Measuring.
4. After measurement, “distance” or “fail to measure” indicator are displayed for 8 seconds, then power turns off. If you press the POWER
button during power-on (while the internal display is lit), another single measurement starts.
Failure to measure or
Upward measurement. Downward measurement.
unable to measure distance.
Displays the measured figure.
[Continuous measurement]
3. Keep pressing POWER button to start continuous measurement up to 20 seconds. The internal display shows “distance” and
“fail to measure” indicator alternately.
Note: Laser irradiaton mark is blinking during the measurement.
Note: If you stop pressing the button, the continuous measuremen stops
Failure to measure or
unable to measure distance.
4. After continuous measurement, the measure results are displayed for 8 seconds, then power turns off. If you press the POWER
button during power-on (while the internal display is lit), another measrement starts.
Displays the measured
figure. (Target 1)
Displays the measured
figure. (Target 2)
Measurement
1. Press the POWER button for power-on.
(Power turns off 8 seconds after the last
operation.)
Immediately after power-on.
Stand-by.
(Initializing)
2. Aim at the target
.
Positionthetargetatthecenterofthereticle
Target focusing.
[Single measurement]
3. Press POWER button once to start single measurement.
Measuring.
4. After measurement, “distance” or “fail to measure” indicator are displayed for 8 seconds, then power turns off. If you press the POWER
button during power-on (while the internal display is lit), another single measurement starts.
Failure to measure or
Upward measurement. Downward measurement.
unable to measure distance.
Displays the measured figure.
[Continuous measurement]
3. Keep pressing POWER button to start continuous measurement up to 20 seconds. The internal display shows “distance” and
“fail to measure” indicator alternately.
Note: Laser irradiaton mark is blinking during the measurement.
Note: If you stop pressing the button, the continuous measuremen stops
Failure to measure or
unable to measure distance.
Displays the measured
figure. (Target 1)
4. After continuous measurement, the measure results are displayed for 8 seconds, then power turns off. If you press the POWER
button during power-on (while the internal display is lit), another measrement starts.
Displays the measured
figure. (Target 2)
Measurement
1. Press the POWER button for power-on.
(Power turns off 8 seconds after the last
operation.)
Immediately after power-on.
Stand-by.
(Initializing)
2. Aim at the target
.
Positionthetargetatthecenterofthereticle
Target focusing.
[Single measurement]
3. Press POWER button once to start single measurement.
Measuring.
4. After measurement, “distance” or “fail to measure” indicator are displayed for 8 seconds, then power turns off. If you press the POWER
button during power-on (while the internal display is lit), another single measurement starts.
Failure to measure or
unable to measure distance.
3. Keep pressing POWER button to start continuous measurement up to 20 seconds. The internal display shows “distance” and
“fail to measure” indicator alternately.
Note: Laser irradiaton mark is blinking during the measurement.
Note: If you stop pressing the button, the continuous measuremen stops
Failure to measure or
unable to measure distance.
[Continuous measurement]
4. After continuous measurement, the measure results are displayed for 8 seconds, then power turns off. If you press the POWER
button during power-on (while the internal display is lit), another measrement starts.
Upward measurement. Downward measurement.
Displays the measured
figure. (Target 1)
Displays the measured figure.
Displays the measured
figure. (Target 2)
Measurement
1. Press the POWER button for power-on.
(Power turns off 8 seconds after the last
operation.)
Immediately after power-on.
Stand-by.
(Initializing)
2. Aim at the target
.
Positionthetargetatthecenterofthereticle
Target focusing.
[Single measurement]
3. Press POWER button once to start single measurement.
Measuring.
4. After measurement, “distance” or “fail to measure” indicator are displayed for 8 seconds, then power turns off. If you press the POWER
button during power-on (while the internal display is lit), another single measurement starts.
unable to measure distance.
3. Keep pressing POWER button to start continuous measurement up to 20 seconds. The internal display shows “distance” and
“fail to measure” indicator alternately.
Note: Laser irradiaton mark is blinking during the measurement.
Note: If you stop pressing the button, the continuous measuremen stops
unable to measure distance.
4. After continuous measurement, the measure results are displayed for 8 seconds, then power turns off. If you press the POWER
button during power-on (while the internal display is lit), another measrement starts.
[Continuous measurement]
Failure to measure or
Failure to measure or
Upward measurement. Downward measurement.
Displays the measured
figure. (Target 1)
Displays the measured figure.
Displays the measured
figure. (Target 2)
Measurement
1. Press the POWER button for power-on.
(Power turns off 8 seconds after the last
operation.)
Immediately after power-on.
Stand-by.
(Initializing)
2. Aim at the target
.
Positionthetargetatthecenterofthereticle
Target focusing.
[Single measurement]
3. Press POWER button once to start single measurement.
4. After measurement, “distance” or “fail to measure” indicator are displayed for 8 seconds, then power turns off. If you press the POWER
button during power-on (while the internal display is lit), another single measurement starts.
unable to measure distance.
3. Keep pressing POWER button to start continuous measurement up to 20 seconds. The internal display shows “distance” and
“fail to measure” indicator alternately.
Note: Laser irradiaton mark is blinking during the measurement.
Note: If you stop pressing the button, the continuous measuremen stops
unable to measure distance.
4. After continuous measurement, the measure results are displayed for 8 seconds, then power turns off. If you press the POWER
button during power-on (while the internal display is lit), another measrement starts.
[Continuous measurement]
Failure to measure or
Failure to measure or
Measuring.
Upward measurement. Downward measurement.
Displays the measured
figure. (Target 1)
Displays the measured figure.
Displays the measured
figure. (Target 2)
Measurement
1. Press the POWER button for power-on.
(Power turns off 8 seconds after the last
operation.)
Immediately after power-on.
Stand-by.
(Initializing)
2. Aim at the target
.
Positionthetargetatthecenterofthereticle
Target focusing.
[Single measurement]
3. Press POWER button once to start single measurement.
Measuring.
4. After measurement, “distance” or “fail to measure” indicator are displayed for 8 seconds, then power turns off. If you press the POWER
button during power-on (while the internal display is lit), another single measurement starts.
unable to measure distance.
3. Keep pressing POWER button to start continuous measurement up to 20 seconds. The internal display shows “distance” and
“fail to measure” indicator alternately.
Note: Laser irradiaton mark is blinking during the measurement.
Note: If you stop pressing the button, the continuous measuremen stops
unable to measure distance.
4. After continuous measurement, the measure results are displayed for 8 seconds, then power turns off. If you press the POWER
button during power-on (while the internal display is lit), another measrement starts.
[Continuous measurement]
Failure to measure or
Failure to measure or
Upward measurement. Downward measurement.
Displays the measured
figure. (Target 1)
Displays the measured figure.
Displays the measured
figure. (Target 2)
Measurement
1. Press the POWER button for power-on.
(Power turns off 8 seconds after the last
operation.)
Immediately after power-on.
Stand-by.
(Initializing)
2. Aim at the target
.
Positionthetargetatthecenterofthereticle
Target focusing.
[Single measurement]
3. Press POWER button once to start single measurement.
Measuring.
4. After measurement, “distance” or “fail to measure” indicator are displayed for 8 seconds, then power turns off. If you press the POWER
button during power-on (while the internal display is lit), another single measurement starts.
Failure to measure or
unable to measure distance.
Displays the measured
figure. (Target 1)
3. Keep pressing POWER button to start continuous measurement up to 20 seconds. The internal display shows “distance” and
“fail to measure” indicator alternately.
Note: Laser irradiaton mark is blinking during the measurement.
Note: If you stop pressing the button, the continuous measuremen stops
Failure to measure or
unable to measure distance.
Upward measurement. Downward measurement.
Displays the measured figure.
[Continuous measurement]
4. After continuous measurement, the measure results are displayed for 8 seconds, then power turns off. If you press the POWER
button during power-on (while the internal display is lit), another measrement starts.
Displays the measured
figure. (Target 2)
Measurement
1. Press the POWER button for power-on.
(Power turns off 8 seconds after the last
operation.)
Immediately after power-on.
Stand-by.
(Initializing)
2. Aim at the target
.
Positionthetargetatthecenterofthereticle
Target focusing.
[Single measurement]
3. Press POWER button once to start single measurement.
Measuring.
4. After measurement, “distance” or “fail to measure” indicator are displayed for 8 seconds, then power turns off. If you press the POWER
button during power-on (while the internal display is lit), another single measurement starts.
Failure to measure or
unable to measure distance.
3. Keep pressing POWER button to start continuous measurement up to 20 seconds. The internal display shows “distance” and
“fail to measure” indicator alternately.
Note: Laser irradiaton mark is blinking during the measurement.
Note: If you stop pressing the button, the continuous measuremen stops
Failure to measure or
unable to measure distance.
[Continuous measurement]
4. After continuous measurement, the measure results are displayed for 8 seconds, then power turns off. If you press the POWER
button during power-on (while the internal display is lit), another measrement starts.
Upward measurement. Downward measurement.
Displays the measured
figure. (Target 1)
Displays the measured figure.
Displays the measured
figure. (Target 2)
Uwaga — korzystanie z elementów sterowania lub regulacji, czy też wykonywanie
procedur w sposób inny, niż określony w niniejszym podręczniku, może spowodować narażenie na
wskaźnik
niebezpieczne promieniowanie.
1. Przygotowanie
wyświetlacz jest aktywny) rozpoczyna się kolejny pomiar pojedynczy.
2. Gumowa muszla oczna
3. Regulacja dioptrii
Najpierw obróć do końca pierścień regulacji dioptrii w kierunku przeciwnym do ruchu
niepowodzeniem” lub brak
możliwości dokonania
okular, obróć pierścień regulacji dioptrii w prawo, do momentu gdy obraz na ekranie LCD
pomiaru”
będzieostry.
3. Naciśnij i przytrzymaj przycisk
nie być możliwe.
(pomierzona odległość) będzie wyświetlany przez 8 sekund, a
4. Pomiar
następnie zasilanie jest wyłączane.
*
Oznaczenie promienia lasera miga podczas pomiaru.
wewnętrzny wyświetlacz jest aktywny) rozpoczyna się kolejny
*
Informacje na temat ustawiania poszczególnych trybów znajdują się w odpowiednich sekcjach.
*
pomiar pojedynczy.
golfa, skorzystaj z trybu priorytetu pierwszego planu. Aby dokonać
niepowodzeniem”
pomierzonej
pomierzonej
łatwego pomiaru, przeskanuj chorągiewkę z użyciem funkcji
lub brak możliwości
wartości (Cel 1).
wartości (Cel 2).
dokonania pomiaru”
nie ma innych obiektów, najniższa wartość będzie rzeczywistą
odległością od chorągiewki.
Dane techniczne
Jp
System pomiaru
Korpus: wodoodporny (maksymalna głębokość zanurzenia: 1 metr, przez 10 minut)*
Jp
Budowa
(Komora baterii: wodoodporna**)
En
En
Es
Laserowy K
Es
Rzeczywista odległość (górny, 4-cyfrowy): co 0,5 m
Bezpieczeństwo
Laserowy K
Fr
Rzeczywista odległość (dolny, 3-cyfrowy): co 1 m
Fr
De
De
(przyrost)
co 0,2 m
Środowisko
It
It
Laser
Se
Se
Układ optyczny
Klasa
Nl
Nl
6
Długość fali (nm) 905
Ru
Ru
ø21
Czas trwania impulsu (ns) 12
Pt
Pt
7,5
15
Pl
Pl
Oddalenie źrenicy wyjściowej (mm) 18,3
Rozbieżność wiązki (mrad)
Fi
Fi
Źrenica wyjściowa (mm) ø3,5
80 lub mniej (bez kondensacji)
No
No
-
1
Regulacja dioptrii ±4 m
Dk
Dk
* Modele wodoszczelne
Inne
Cz
Cz
Temperatura pracy (˚C) -10 —
10minut, system optyczny ani obserwacyjny nie ulegną uszkodzeniu.
Ro
Ro
Dalmierz laserowy Nikon oferuje następujące zalety:
Hu
1x bateria litowa CR2 (DC 3V)
Hu
Źródło zasilania
Automatyczne wyłączanie zasilania (po upływie 8 sekund nieużytkowania)
113 x 70 x 39
Podczas korzystania z dalmierza laserowego Nikon należy stosować się do następujących zaleceń:
Masa (g) Około 175 (bez baterii)
** Komora baterii jest uszczelniona. Mimo to woda może dostać się do środka, jeśli dalmierz laserowy zostanie zanurzony w wodzie.
196 197
Inne
Rozwiązywanie problemów/Naprawa
Jp
Jp
En
Urządzenie jest zgodne z częścią 15 zasad FCC. Działanie musi odbywać się z uwzględnieniem dwóch warunków:
En
Es
(1) Urządzenie nie może powodować szkodliwych zakłóceń, a także
Es
Problem Wykonaj czynności
(2) Urządzenie musi być odporne na zakłócenia, włącznie z zakłóceniami mogącymi spowodować niepożądane
Fr
Fr
operacje.
●
De
Urządzenie nie włącza się
(bliższa strona, górna część korpusu)
De
(ekran LCD nie podświetla się)
● Sprawdź, czy poprawnie włożono baterię
It
It
●
Se
Niniejsze urządzenie zostało przetestowane i jest zgodne z ograniczeniami przewidzianymi dla urządzeń
Se
● Upewnij się, że żaden obiekt, taki jak palec lub pasek, nie blokuje emitera
Nl
Nl
w celu zapewnienia właściwej ochrony przeciwko szkodliwemu wpływowi urządzenia na terenach mieszkalnych.
promienia laserowego ani detektora promienia laserowego po stronie
Ru
Urządzenie generuje, korzysta z, a także emituje energię w postaci fal radiowych. Instalacja i korzystanie w sposób
soczewek obiektywu.
Ru
● Upewnij się, że emiter promienia laserowego i detektor promienia laserowego
Pt
Nie można pomierzyć odległości
Pt
Pl
● Upewnij się, że kształt i stan celu jest odpowiedni do tego, aby odbić promień
Pl
szkodliwych zakłóceń w odbiorze sygnału radiowego lub telewizyjnego, co można sprawdzić poprzez wyłączenie i
lasera.
Fi
włączenie urządzenia, sugeruje się, aby użytkownik wykonał próbę skorygowania zakłóceń, wykonując przynajmniej
Fi
●
jedną z poniższych czynności:
No
No
● Upewnij się, że urządzenie jest w stabilnej pozycji podczas pomiaru.
Dk
Dk
● Upewnij się, że cel znajduje się w zakresie pomiaru
Cz
Cz
Niniejsze urządzenie cyfrowe klasy B spełnia wszystkie wymogi kanadyjskich przepisów dotyczących urządzeń
Ro
Bliższy cel, zlokalizowany w
Ro
● Upewnij się, że między dalmierzem laserowym Nikon a celem nie znajdują się
ramach zakresu pomiaru, nie
Hu
żadne obiekty, takie jak liście czy trawa.
Hu
może być pomierzone
● Upewnij się, że między dalmierzem laserowym Nikon a celem nie znajdują się
obiektów, których odległość
żadne obiekty, takie jak liście czy trawa.
w charakterze oficjalnego dowodu.
przekracza możliwości urządzenia
●
● Upewnij się, że kształt i stan celu jest odpowiedni do tego, aby odbić promień
lasera.
● Upewnij się, że urządzenie jest w stabilnej pozycji podczas pomiaru.
● Upewnij się, że między dalmierzem laserowym Nikon a celem nie znajdują się
żadne obiekty, takie jak liście czy trawa.
198 199
