Nikon Multi-Power Battery Pack G02: instruction
Class: Photo and Video Accessories
Type:
Manual for Nikon Multi-Power Battery Pack G02
Table of contents
- Safety Precautions Precautions for Use
- D Notice for Customers in the U.S.A. Notice for Customers in Canada
- The MB-D11 and Supplied Accessories Using the Optional EH-5a AC Adapter and EP-5B Power Connector
- The MB-D11 Control Lock
- Removing the Battery Pack
- Inserting Batteries
- Battery Level Battery Info
- Removing Batteries
- Speci cations
Jp
Hu
En
Sk
De
Sl
Fr
Et
Multi-Power Battery Pack
Es
Lv
No
Lt
Sv
Is
Fl
Ro
Ru
Ua
Dk
Ck
Nl
Ch
Pt
Kr
It
Th
Gr
Id
Pl
Printed in China
Tr
Cz
SB0H01(W0)
Ar
© 2010 Nikon Corporation
6MFC01W0-01 G02
01
!9
A
q
w
!2
e
!7
r
!3
!8
t
y
!4
@1
@0
u
!1
!5
i
o
!0
!6
B C
E
q
w
q
q
w
w
D
F G IH
q
w
q
q
w
w

目次
安全上のご注意...........................................2
Jp
本製品の使用上のご注意...........................5
はじめに......................................................6
本体と付属品..............................................6
MB-D11 と付属品を確認する.............6
ACアダプター EH-5a とパワーコネク
マルチパワーバッテリーパック
ター EP-5B について(別売)...............6
各部名称......................................................7
縦位置シャッターボタン、
縦位置マルチセレクター、
MB-D11
縦位置コマンドダイヤル.......................7
縦位置 AE/AF ロックボタン................7
ロックレバー(MB-D11)....................7
バッテリーパックの準備...........................8
バッテリーパックの取り付け方............8
バッテリーパックの取り外し方............8
使用説明書
バッテリーの入れ方...............................9
バッテリーの取り外し方....................11
仕様...........................................................12
1
1
安全上のご注意
お使いになる前に「安全上のご注意」をよくお読
お守りいただく内容の種類を、次の絵表示で区分
Jp
警告
(バッテリーパックについて)
みの上、正しい方法でお使いください。
し、説明しています。
この「安全上のご注意」は製品を安全に正しくお
絵表示の例
落下などによって破損し、内部が露出したと
使いいただき、あなたや他の人々への危害や財産
接触禁止
きは、露出部に手を触れないこと
記号は、注意(警告を含む)を促す内容を告
への損害を未然に防止するために重要な内容を記
感電や破損部でのけがの原因となります。
げるものです。図の中や近くに具体的な注意内容
載しています。内容を理解してから本文をお読み
(左図の場合は感電注意)が描かれています。
電池を取り出して、販売店またはニコンサー
すぐに
いただき、お読みになった後は、お使いになる方
ビス機関に修理を依頼してください。
記号は、禁止(してはいけないこと)の行為を
修理依頼を
がいつでも見られるところに必ず保管してくださ
告げるものです。図の中や近くに具体的な禁止内
熱くなる、煙が出る、こげ臭いなどの異常時は、
い。
容(左図の場合は分解禁止)が描かれています。
速やかに電池を取り出すこと
表示と意味は次のようになっています。
記号は、行為を強制すること(必ずすること)
電池を取る
そのまま使用すると、火災ややけどの原因と
を告げるものです。図の中や近くに具体的な強制
なります。電池を取り出す際は、やけどに充
この表示を無視して、誤った取り扱いをする
内容(左図の場合は電池を取り出す)が描かれて
分ご注意ください。
危険
と、人が死亡または重傷を負う可能性が高い
います。
すぐに
と想定される内容を示しています。
電池を取り出して、販売店またはニコンサー
修理依頼を
ビス機関に修理を依頼してください。
この表示を無視して、誤った取り扱いをす
警告
(バッテリーパックについて)
警告
ると、人が死亡または重傷を負う可能性が
水につけたり、水をかけたり、雨にぬらした
想定される内容を示しています。
りしないこと
電源接点(図 A‒
e
)をショートさせないこと
水かけ禁止
発火や感電の原因となります。
この表示を無視して、誤った取り扱いをす
液もれ、発熱、破裂の原因となります。
警告
ると、人が傷害を負う可能性が想定される
引火、爆発のおそれのある場所では使用しな
注意
電池を入れた単 3 形電池ホルダー MS-D11 の
内容および物的損害の発生が想定される内
いこと
電源接点(図 A‒
@1
)、および EN-EL15 ホルダー
容を示しています。
プロパンガス、ガソリンなどの引火性ガスや
MS-D11EN の電源接点(図 A‒
!8
、
!9
)を
使用禁止
粉塵の発生する場所で使用すると、爆発や火
警告
ショートさせないこと
災の原因となります。
液もれ、発熱、破裂の原因となります。
幼児の口に入る小さな付属品は、幼児の手の
分解したり、修理や改造をしないこと
届かないところに置くこと
感電や異常動作によるけがの原因となります。
分解禁止
幼児の飲み込みの原因となります。
放置禁止
万一飲み込んだ場合は直ちに医師にご相談く
ださい。
指定の電池を使用すること
指定以外のものを使用すると、火災や感電の
警告
原因となります。
2
注意
(バッテリーパックについて)
危険
(専用リチウムイオン充電池について)
警告
(専用リチウムイオン充電池について)
Jp
ネックレス、ヘアピンなどの金属製のものと
充電の際に所定の充電時間を超えても充電が完
ぬれた手でさわらないこと
一緒に持ち運んだり、保管しないこと
了しないときは、充電をやめること
感電の原因となることがあります。
感電注意
警告
ショートして液もれ、発熱、破裂の原因とな
液もれ、発熱、破裂の原因となります。
幼児の手の届かないところに置くこと
危険
ります。
バッテリーをリサイクルするときや、やむな
けがの原因となることがあります。
持ち運ぶときは端子カバーをつけてください。
放置禁止
く廃棄するときは、テープなどで接点部を絶
Li-ion リチャージャブルバッテリー EN-EL15
縁すること
三脚に本製品とカメラを取り付けたまま移動
に対応していない機器には使用しないこと
他の金属と接触すると、発熱、破裂、発火の
しないこと
液もれ、発熱の原因となります。
原因となります。
転倒したりぶつけたりしてケガの原因になる
警告
移動注意
使用禁止
ことがあります。
Li-ion リチャージャブルバッテリー EN-EL15
ニコンサービス機関やリサイクル協力店へご
は、MB-D11 に対応しています。
持参くださるか、お住まいの自治体の規則に
従って廃棄してください。
バッテリー
からもれた液が目に入ったときは、
長期間使用しないときは電池を外すこと
禁止
すぐにきれいな水で洗い、医師の治療を受ける
バッテリー
からもれた液が皮膚や衣類に付着
電池の液もれにより、火災やけが、周囲を汚
こと
したときは、すぐにきれいな水で洗うこと
損する原因となることがあります。
危険
そのままにしておくと、目に傷害を与える原
そのままにしておくと、皮膚がかぶれたりす
警告
電池を取る
因となります。
る原因となります。
危険
(専用リチウムイオン充電池について)
警告
(専用リチウムイオン充電池について)
注意
(専用リチウムイオン充電池について)
バッテリーを火に入れたり、加熱しないこと
バッテリーは幼児の手の届かないところに置
バッテリーに強い衝撃を与えたり、投げたり
液もれ、発熱、破裂の原因となります。
くこと
しないこと
禁止
幼児の飲み込みの原因となります。
液もれ、発熱、破裂の原因となることがあり
注意
バッテリーをショート、分解しないこと
保管注意
ます。
万一飲み込んだ場合は直ちに医師にご相談く
液もれ、発熱、破裂の原因となります。
分解禁止
ださい。
専用の充電器を使用すること
水につけたり、ぬらさないこと
危険
液もれ、発熱、破裂の原因となります。
液もれ、発熱の原因となります。
危険
水かけ禁止
(アルカリ電池、リチウム電池について)
変色や変形、そのほか今までと異なることに
電池からもれた液が目に入ったときは、すぐに
気づいたときは、使用しないこと
きれいな水で洗い、医師の治療を受けること
警告
液もれ、発熱、破裂の原因となります。
そのままにしておくと、目に傷害を与える原
危険
因となります。
3

Jp
警告
警告
危険
(ニッケル水素充電池について)
(
アルカリ電池、リチウム電池について
)
(
アルカリ電池、リチウム電池について
)
新しい電池と使用した電池、種類やメーカー
外装チューブをはがしたり、傷を付けないこ
の異なる電池をまぜて使用しないこと
充電式電池以外は充電しないこと
禁止
と
液もれ、発熱、破裂の原因となります。
液もれ、発熱の原因となります。
禁止
警告
液もれ、発熱、破裂の原因になります。
電池の「+」と「ー」の向きを間違えないよ
使い切った電池はすぐに器具から取り出すこと
うにすること
電池を火に入れたり、加熱しないこと
液もれ、発熱、破裂の原因となります。
警告
電池を取る
液もれ、発熱、破裂の原因となります。
液もれ、発熱、破裂の原因となります。
禁止
電池を廃棄するときは、テープなどで接点部
専用の充電器を使用すること
電池をショート、分解しないこと
を絶縁すること
液もれ、発熱、破裂の原因となります。
危険
液もれ、発熱、破裂の原因となります。
分解禁止
他の金属と接触すると、発熱、破裂、発火の
ネックレス、ヘアピンなどの金属製のものと
原因となります。
電池に表示された警告・注意を守ること
警告
一緒に持ち運んだり、保管しないこと
お住まいの自治体の規則に従って正しく廃棄
液もれ、発熱、破裂の原因となります。
危険
警告
液もれ、発熱、破裂の原因となります。
してください。
使用説明書に表示された電池を使用すること
電池からもれた液が皮膚や衣類に付着したと
液もれ、発熱、破裂の原因となります。
きは、すぐにきれいな水で洗うこと
(ニッケル水素充電池について)
警告
警告
そのままにしておくと、皮膚がかぶれたりす
警告
新しい電池と使用した電池、種類やメーカー
外装チューブをはがしたり、キズをつけない
る原因となります。
の異なる電池をまぜて使用しないこと
こと
禁止
液もれ、発熱、破裂の原因となります。
また、外装チューブがはがれたり、キズがつ
警告
いている電池は絶対に使用しないこと
電池は幼児の手の届かないところに置くこと
危険
(ニッケル水素充電池について)
液もれ、発熱、破裂の原因になります。
幼児の飲み込みの原因となります。
電池からもれた液が目に入ったときは、すぐに
万一飲み込んだ場合はただちに医師にご相談
保管注意
きれいな水で洗い、医師の治療を受けること
電池に表示された警告、注意を守ること
ください。
そのままにしておくと、目に傷害を与える原
液もれ、発熱、破裂の原因となります。
危険
警告
電池の「+」と「ー」の向きを間違えないよ
因となります。
使用説明書に表示された電池を使用すること
うにすること
電池を火に入れたり、加熱しないこと
警告
液もれ、発熱、破裂の原因となります。
液もれ、発熱、破裂の原因となります。
警告
液もれ、発熱、破裂の原因となります。
禁止
電池は幼児の手の届かないところに置くこと
水につけたり、ぬらさないこと
電池をショート、分解しないこと
幼児の飲み込みの原因となります。
液もれ、発熱の原因となります。
水かけ禁止
液もれ、発熱、破裂の原因となります。
万一飲み込んだ場合は直ちに医師にご相談く
分解禁止
保管注意
ださい。
4
本製品の使用上のご注意
•MB-D11 に対応していないカメラには、使用し
●
電波障害自主規制について
警告
(ニッケル水素充電池について)
Jp
ないでください。
この装置は、クラス B 情報技術装置です。この
水につけたり、ぬらさないこと
•本書に記載されていないバッテリー、電池および
装置は、家庭環境で使用することを目的として
液もれ、発熱の原因となります。
電池ホルダーは使用しないでください。
水かけ禁止
いますが、この装置がラジオやテレビジョン受
変色や変形、そのほか今までと異なることに
•金属製品などによりバッテリーパックの電源接点
信機に近接して使用されると、受信障害を引き
気づいたときは使用しないこと
がショートするおそれがありますので、バッテ
起こすことがあります。
使用禁止
液もれ、発熱、破裂の原因となります。
リーパックを保管したり、持ち運ぶときは、付属
使用説明書に従って正しい取り扱いをしてくだ
充電の際に所定の充電時間を超えても充電が
の接点端子キャップを付けてください。
さい。
完了しない場合には、充電をやめること
•単 3 形電池ホルダーまたは EN-EL15 ホルダー
警告
液もれ、発熱の原因となります。
VCCI-B
に電池を装着したまま単体で携帯するときは、他
電池をリサイクルするときや、やむなく廃棄
の金属などとの接触によるショートを防ぐため、
するときは、テープなどで接点部を絶縁する
電池を取り出すか、ケースなどに収納してくださ
こと
い。
他の金属と接触すると、発熱、破裂、発火の
原因となります。
警告
•MB-D11 をカメラに取り付けたり取り外す際に、
ニコンサービス機関やリサイクル協力店へご
カメラのメモリーカードアクセスランプが点灯す
持参くださるか、お住まいの自治体の規則に
ることがありますが故障ではありません。
従って廃棄してください。
•万一、異常や不具合が起きたときは、すぐに使用
電池からもれた液が皮膚や衣類に付着したと
を中止して販売店またはニコンサービス機関に修
きは、すぐにきれいな水で洗うこと
理を依頼してください。
そのままにしておくと、皮膚がかぶれたりす
警告
る原因となります。
•MB-D11 に電源スイッチはありません。電源の
ON(オン)・OFF(オフ)の切り換えは、カメ
ラの電源スイッチを使用してください。
注意
(ニッケル水素充電池について)
電池に強い衝撃を与えたり、投げたりしない
こと
液もれ、発熱、破裂の原因となることがあり
注意
ます。
5
はじめに
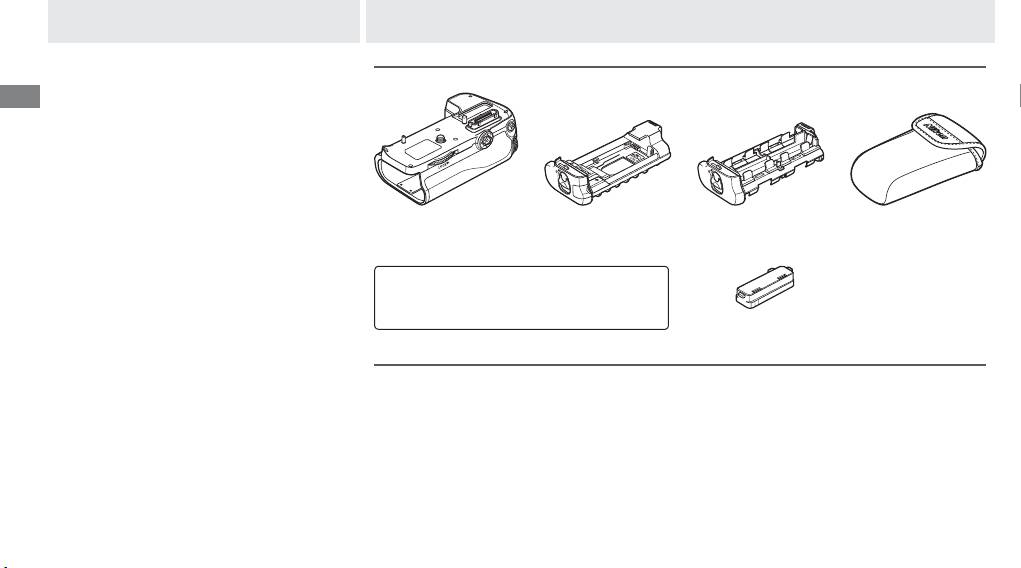
本体と付属品
このたびはマルチパワーバッテリーパック
MB-D11 と付属品を確認する
Jp
MB-D11 をお買い上げくださいまして、誠に
以下のものがすべてそろっていることを確認してください。
ありがとうございます。
※バッテリー、電池は別売です。
MB-
D11
は、ニコンデジタル一眼レフカメラ
専用のバッテリーパックです。MB-
D11
をデ
ジタルカメラに取り付けると、Li-ion リチャー
ジャブルバッテリー EN-EL15(1 個)、または
単 3 形電池(アルカリ電池、ニッケル水素充電
池、リチウム電池のいずれかのうち、同じ種類
の電池 6 本)を電源として使用することができ
ます。
EN-EL15 ホルダー
単 3 形ホルダー
ホルダーケース
MB-D11
MS-D11EN
MS-D11
また、カメラ本体にバッテリーを挿入したまま
MB-
D11
を取り付けたときは、カメラ側の設定
• 使用説明書(本書)
によってバッテリーの使用順序を決めることが
ご購入時、MS-D11EN は MB-D11 に装着されて
います。MS-D11EN の取り外し方については、P.9
できます。
• 保証書
「バッテリーの入れ方」の手順 1 をご覧ください。
接点端子キャップ
さらに、縦位置での撮影に操作しやすい縦位置
シャッターボタン、縦位置マルチセレクター、
AC アダプター EH-5a とパワーコネクター EP-5B について(別売)
縦位置メインコマンドダイヤル、縦位置サブコ
マンドダイヤルと縦位置 AE/AF ロックボタン
別売の AC アダプター EH-5a とパワーコネクター EP-5B を使うと、長時間カメラを使用する
を装備しています。
ときに安定して電源を供給できます。MB-D11 と AC アダプターを組み合わせて使う場合は、
ご使用の前に、本書およびカメラの使用説明書
EN-EL15 の代わりに、パワーコネクター EP-5B をバッテリーホルダー MS-D11EN に装着し
をよくお読みください。
てから、AC アダプターに接続します。
なお、MB-D11 に対応したカメラについては、
・パワーコネクター EP-5B をホルダーに取り付ける方法については、P.9「パワーコネクター
ご使用のカメラの使用説明書でご確認くださ
EP-5B の入れ方」をご覧ください。
い。
・パワーコネクター EP-5B と AC アダプター EH-5a の接続方法については、EP-5B の使用説
明書をご覧ください。
6
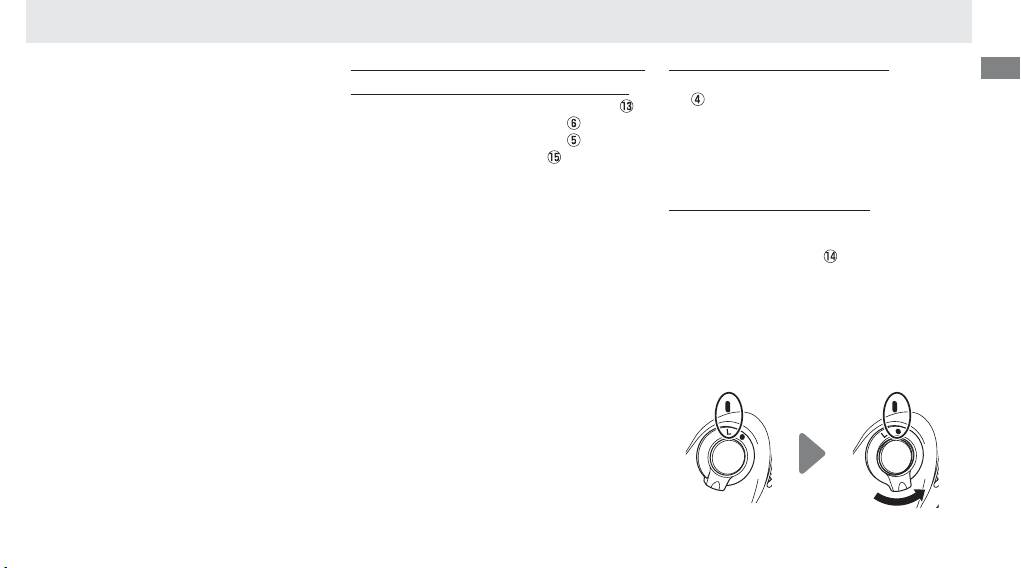
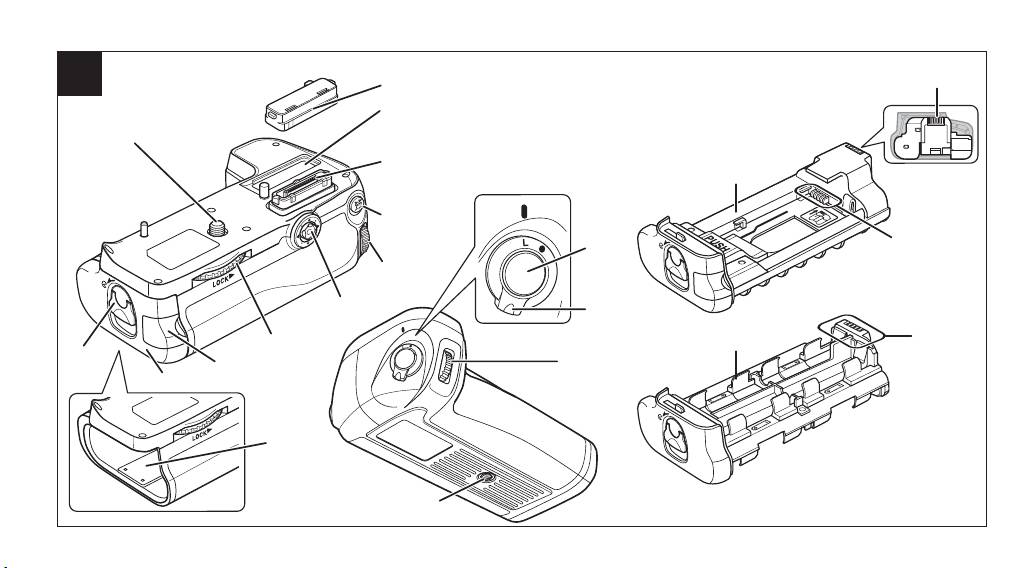
各部名称(図 A)
q
接点端子キャップ
縦位置シャッターボタン、縦位置マルチ
縦位置 AE/AF ロックボタン
Jp
w
MB-D11 用接点カバーホルダー
MB-D11 は縦位置 AE/AF ロックボタン(図
セレクター、縦位置コマンドダイヤル
e
電源接点 / 信号接点
A‒
)を搭載しています。このボタンの機
MB-D11 は縦位置シャッターボタン(図 A‒ )、
r
縦位置 AE/AF ロックボタン
能はカメラのカスタムメニュー f[操作]→
縦位置マルチセレクター(図 A‒
)、縦位置
[MB-D11 の
4
ボタンの機能]で設定できま
t
縦位置メインコマンドダイヤル
メインコマンドダイヤル(図 A‒
)、縦位置
す。
y
縦位置マルチセレクター
サブコマンドダイヤル(図 A‒
)を搭載して
います。これらの機能はカメラ本体と同様で
詳しくはカメラの使用説明書をご覧ください。
u
カメラ取り付けノブ
す。また、カメラのカスタムメニュー f[操作]
i
パワーコネクターカバー
ロックレバー(MB-D11)
でコマンドダイヤルの機能を変更した場合は、
o
バッテリー室カバー
MB-D11 の各ボタンやダイヤル、マルチセレ
MB-D11 の機能も変更されます。
!0
バッテリー室
クターを不用意に操作しないよう、MB-D11
詳しくはカメラの使用説明書をご覧ください。
!1
バッテリー室カバー開閉ノブ
にはロックレバー ( 図 A‒
) を装備しています。
MB-D11 のボタン、ダイヤルを操作する場合
!2
カメラ取り付けネジ
は、ロックレバーを回して、ロックを解除して
!3
縦位置シャッターボタン
ください。
!4
ロックレバー
•ロックレバーは電源スイッチではありませ
!5
縦位置サブコマンドダイヤル
ん。カメラの電源の ON(オン)・OFF(オフ)
!6
三脚ネジ穴
はカメラ本体の電源スイッチで切り換えて
!7
EN-EL15 ホルダー MS-D11EN
ください。
!8
電源接点
!9
EN-EL15 ホルダー電源接点
@0
単 3 形電池ホルダー MS-D11
@1
単 3 形電池ホルダー電源接点
ロックの状態 ロック解除の状態
7
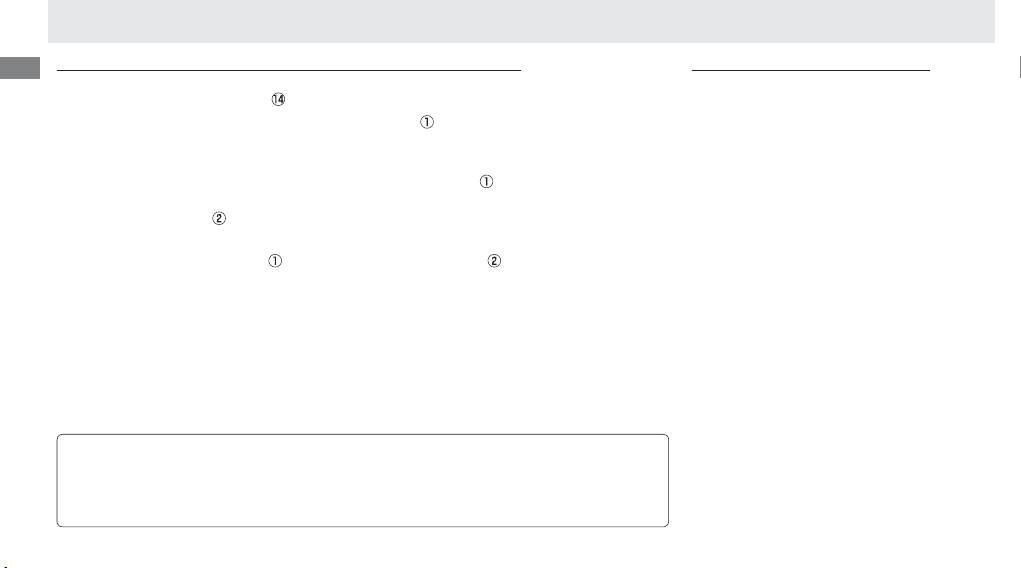
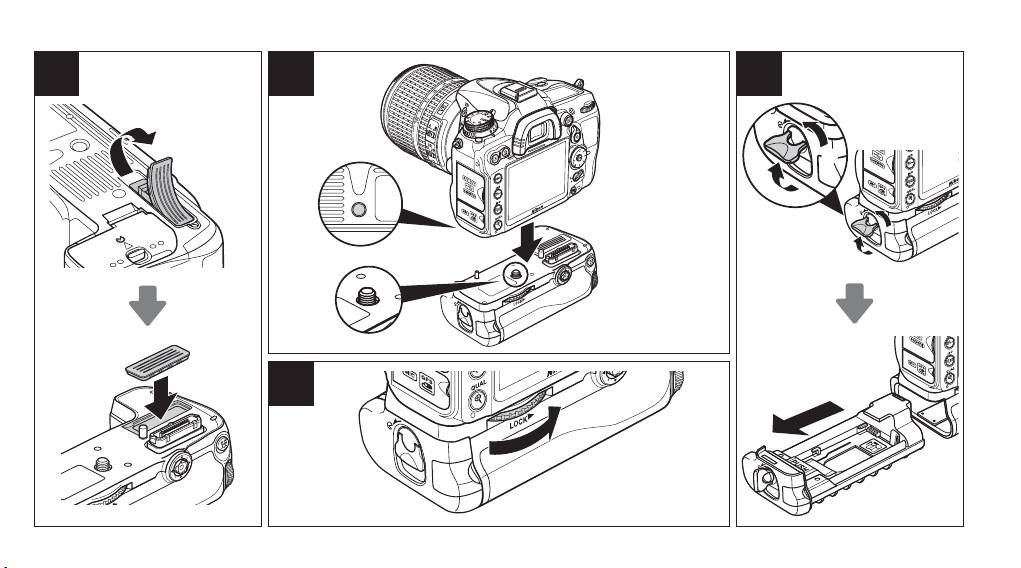
バッテリーパックの準備
バッテリーパックの取り付け方
(イラストは D7000 を使用しています)
バッテリーパックの取り外し方
Jp
MB-D11 を取り付ける前に、カメラ本体の電源が OFF(オフ)になっていること、および
MB-D11 を取り外す場合は、カメラの電源を
MB-D11 のロックレバー(図 A‒
)が L 側にセットされていることを確認してください。
必ず OFF(オフ)にし、MB-D11 のロックレ
バーを L 側にセットしてから、カメラ取り付
1. MB-D11 の電源接点端子キャップを取り外す(図 A‒
)
けノブを LOCK
▼
の指標の反対方向に回して
•MB-D11 をカメラ本体に取り付けていないときには、必ず接点端子キャップを MB-D11
取り外します。
に取り付けてください。
2. カメラの底面にある MB-D11 用接点カバーを取り外す(図 B‒ )
•取り外したカメラの MB-D11 用接点カバーは、MB-D11 用接点カバーホルダーに収納し
てください(
図B
‒ )。
3. MB-D11 をカメラに取り付ける
•カメラの三脚ネジ穴(
図C
‒ )とカメラ取り付けネジ(
図C
‒ )を合わせて、カメラ取り
付けノブを LOCK
▼
の指標の方向に回して固定します(図D)。
•カメラにバッテリーを挿入したまま、MB-D11 を取り付けることができます。初期設定では、
MB-D11 に装着したバッテリーから使用して、残量がなくなり次第、カメラ側のバッテリー
を使用します。カメラのカスタムメニュー d[撮影・記録・表示]→[電池の使用順序]で、
MB-D11 側とカメラ側のどちらのバッテリーから使用するかを設定できます。
詳しくはカメラの使用説明書をご覧ください。
•紛失を防ぐため、取り外したカメラの MB-D11 用接点カバーは、MB-D11 用接点カバーホルダー
に必ず収納してください。また、MB-D11 の接点端子キャップはなくさないように保管してくださ
い。
•ベローズ PB-6 をカメラに取り付ける場合は、オート接写リング PK-13 と PB-6D を併用して使用
してください。
8
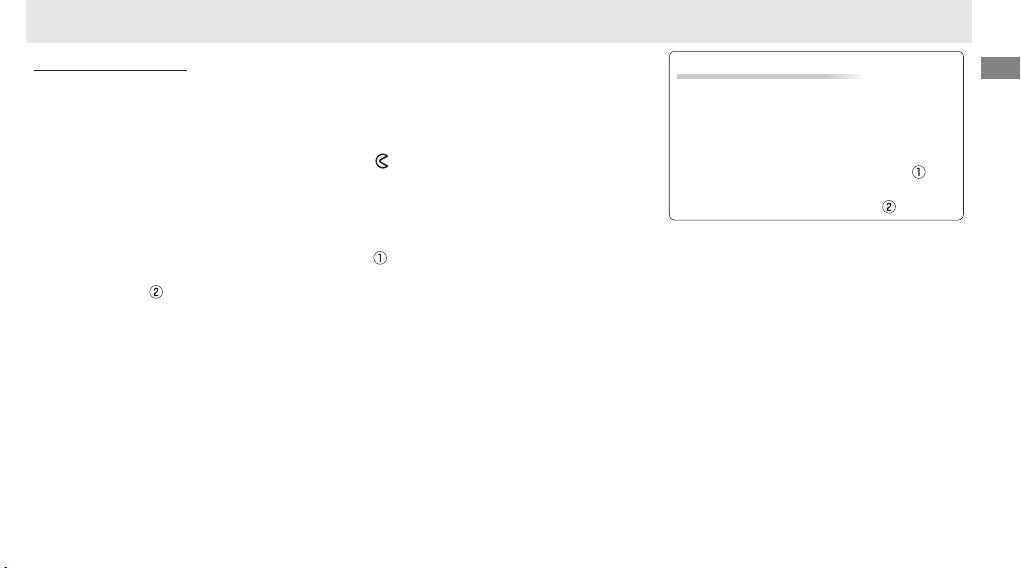
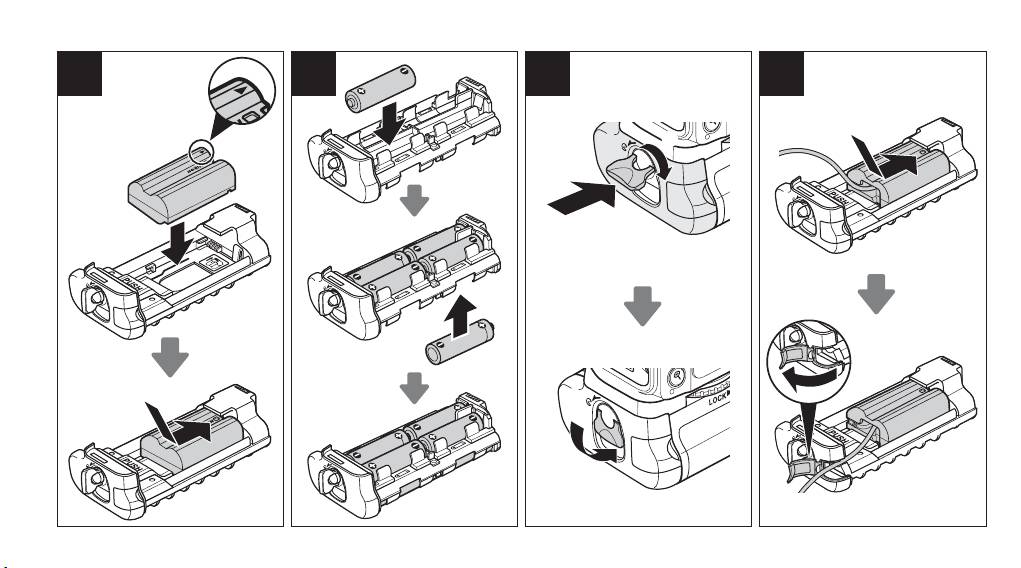
バッテリーの入れ方
パワーコネクター EP-5B の入れ方
Jp
MB-D11 は Li-ion リチャージャブルバッテリー EN-EL15(1 個)、または単 3 形電池(6 本)を使用
手順 2 で、パワーコネクター EP-5B の▲マー
します。
クを EN-EL15 ホルダー MS-D11EN 内にある
バッテリーを装着する前に、カメラ本体の電源が OFF(オフ)になっていることと、MB-D11
電源接点の方向に向け、EP-5B の切り欠き部分
のロックレバーが L 側にセットされていることを確認してください。
をホルダーの突起に合わせて上に置き、軽く下
に押しながら、電源接点の方向にカチッと音が
1. MB-D11 側面のバッテリー室カバー開閉ノブを
側に回してバッテリー室カバーを開け、
して止まるまでスライドさせます(図I‒
)。
MB-D11 に装着されているホルダーを取り外す(図 E)
ホルダーのパワーコネクターカバーを開けて、
2. バッテリーまたは単 3 形電池をホルダーに装着する
EP-5B のコードを通します(図I‒
)。
【EN-EL15 使用時】
EN-EL15 の▲マークをホルダー内にある電源接点の方向に向け、EN-EL15 の切り欠き部分
をホルダーの突起に合わせて上に置きます(図F‒
)。
EN-EL15 を軽く下に押しながら、電源接点の方向にカチッと音がして止まるまでスライドさ
せます(図F‒
)。
【単 3 形電池使用時】
単 3 形電池 6 本をホルダー内の表示に合わせ、+と−の向きに注意しながらホルダーに装着
します(図G)。
3. バッテリーまたは単 3 形電池を装着したホルダーを MB-D11 に挿入し、バッテリー室カバー
開閉ノブを図 H のように回してロックする
•バッテリー室カバーを閉めてから、バッテリー室カバー開閉ノブを回してロックしてくだ
さい。
4. カメラの電源を ON(オン)にして、カメラの表示パネル、またはファインダー内表示でバッ
テリーの残量を確認する
•カメラの電源を ON にして作動しない場合は、バッテリーが正しく装着されているかご確認
ください。
9
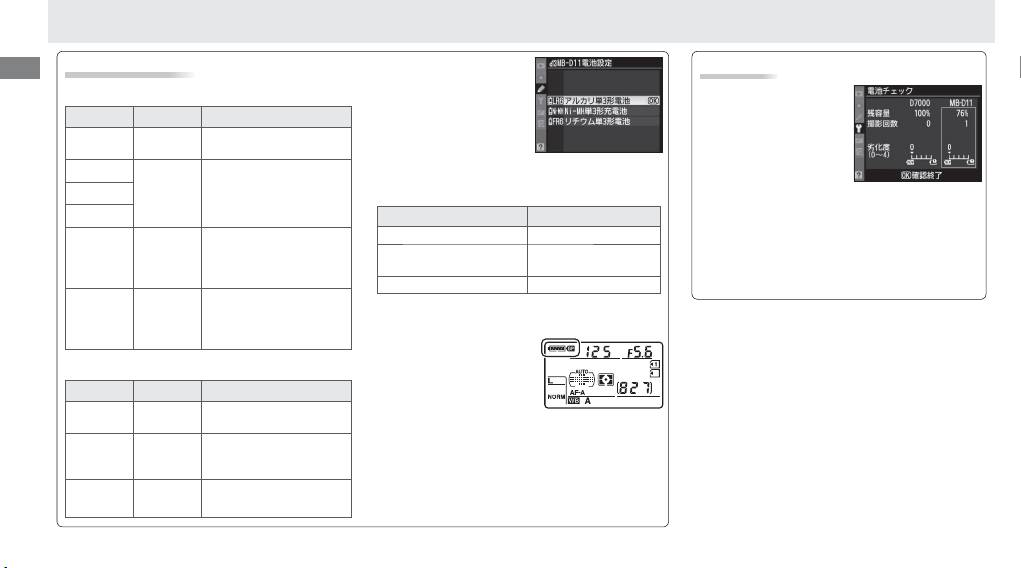
バッテリー残量の表示
•
単 3 形電池を使用する場
電池チェック
Jp
合、より正確な残量表示を
【EN-EL15 使用時】
EN-EL15を装着した
行うため、カメラのカス
MB-D11使用時には、
タムメニュー d[撮影・記
表示パネル
ファインダー
意味
セットアップメニューで
録・ 表 示 ]→[MB-D11
バッテリーの残量は充分に
もバッテリーの残量を確
L
表示なし
電池設定]を、使用する単
残っています。
認できます。
3 形電池の種類に合わせて
K
MB-
D11
に装着した
次のように設定してください。間違った設定をする
バッテリーの残量が減り始
J
表示なし
バッテリーの情報は、画
と、カメラが正常に作動しないことがあります。
めました。
面の右側に表示されます。表示される内容につ
I
設定
使用する電池の種類
いては、カメラの使用説明書をご覧ください。
バッテリーの残量は残りわ
1
アルカリ単 3 形電池 アルカリ単 3 形電池
ずかです。予備のバッテ
2
Ni-MH 単 3 形充電池 ニッケル水素単 3 形
※
単 3 形電池を使用している場合は、残容量に
H d
リーを準備するか、バッテ
充電池
バッテリーの残量表示のアイコンが表示されま
リーを充電してください。
3
リチウム単 3 形電池 リチウム単 3 形電池
す。その他の項目は表示されません。
バッテリーが消耗して撮影
H
できません。バッテリーを
•MB-D11 を長期間使用しないときには、バッテ
d
※メニュー画面、および表示パネルは D7000 を使用
交換するか、バッテリーを
リーまたは単 3 形電池を取り出してください。
(点滅)
(点滅)
しています。
充電してください。
•
カメラのカスタムメニュー
d[ 撮影・記録・表示]
【単 3 形電池使用時】
→[ 電池の使用順序]で
表示パネル
ファインダー
意味
MB-D11 側とカメラ側の
電池の残量は充分に残って
どちらのバッテリーから使
L
表示なし
います。
用するかを設定できます。MB-D11側のバッテリー
電池の残量は残りわずかで
を使用しているときのみ、表示パネルに
s
アイ
I d
す。予備の電池を準備して
コンが点灯します。
s
アイコンが点滅していると
ください。
きは、バッテリー室カバーがロックされていませ
ん。バッテリー室カバーを閉めてから、バッテリー
H
d
撮影できません。電池を交
換してください。
室カバー開閉ノブを回してロックしてください。
(点滅)
(点滅)
10
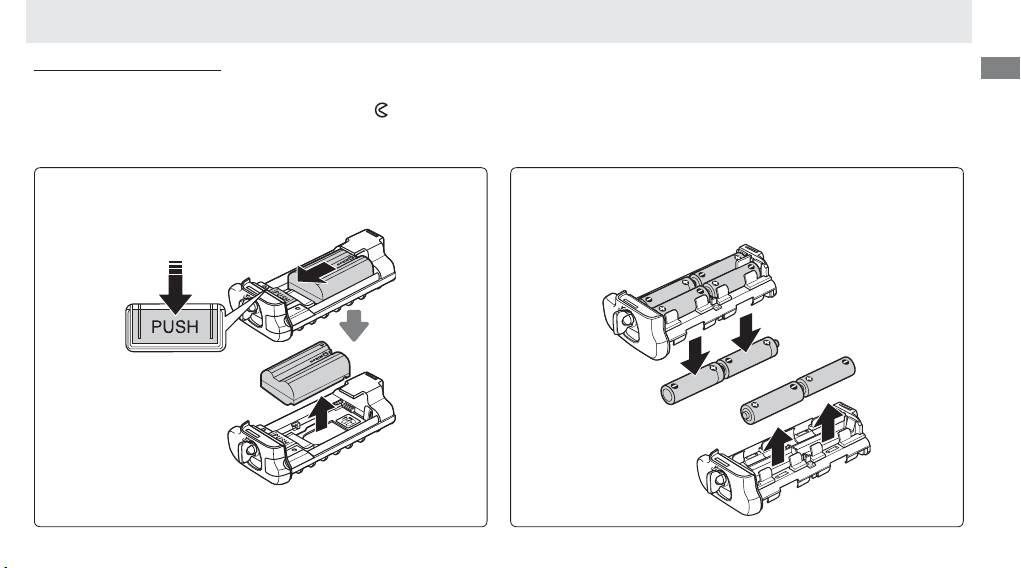
バッテリーの取り外し方
Jp
バッテリーの取り外しの際には、バッテリーやホルダーが落下しないようにご注意ください。
1.
MB-D11 側面のバッテリー室カバー開閉ノブを 側に回してバッテリー室カバーを開け、
MB-D11 に装着されているホルダーを取り外す(図 E)
2. ホルダーからバッテリーを取り外す
【EN-EL15 使用時】
【単 3 形電池使用時】
ホルダーの「PUSH」ボタンを押しながら、バッテリーを「PUSH」
下図のように装着した電池を、全て取り外してください。取り外しの
ボタンの方向へスライドさせて取り外します。
際は、電池が落下しないようにご注意ください。
• パワーコネクターEP-5Bをホルダーから取り外す方法は、
EN-EL15の場合と同じです。
11
仕様
電源
Li-ion リチャージャブルバッテリー EN-EL15(1 個)、または単 3 形電池(アル
Jp
カリ電池、ニッケル水素充電池、リチウム電池のいずれかのうち、同じ種類の電池
6本)、AC アダプター EH-5a(パワーコネクター EP-5B と組み合わせて使用)
使用温度 0 〜 40℃
寸法(W ×H×D) 約133×50×73mm
質量 ・約 245g(MS-D11EN 装着時)
・約 335g(MS-D11EN、別売の EN-EL15 装着時)
・約 275g(MS-D11EN、別売の EP-5B 装着時)
・約 245g(MS-D11 装着時)
・約 390g(MS-D11、市販の単 3 形電池 6 本装着時)
•仕様、外観の一部を、改善のため予告なく変更することがあります。
D
EN-EL15 を低温時に使用する場合について
低温時(約 10℃以下)に消耗したバッテリーを使用すると、カメラが作動しないことがあります。低
温時には充分に充電されたバッテリーを使用し、保温した予備のバッテリーを用意して温めながら交
互に使用してください。低温のために一時的に性能が低下して使えなかったバッテリーでも、常温に
戻ると使えることがあります。
D
単 3 形電池の使用について
•
アルカリ電池を使用した場合、他の電源と比較して撮影できるコマ数が少なくなることがあります。
アルカリ電池は緊急用として使用してください。また、低温時のご使用はおすすめできません。
•
電池のメーカーや銘柄によっては、使用できないことや、撮影できるコマ数が極端に少ないことがあ
ります。
•
周囲の温度が 20℃よりも低い環境で使用するときは、撮影できるコマ数が減少することがあります。
•
電池の使用推奨期間内であっても、保管状態によっては撮影できるコマ数が減少したり、使用できな
いことがあります。
12

Table of Contents
Safety Precautions ......................................................2
Notice for Customers in Europe................................2
Precautions for Use .....................................................2
En
Introduction ...............................................................4
The MB-D11 and Accessories ........................................4
The MB-D11 and Supplied Accessories .....................4
Using the Optional EH-5a AC Adapter and EP-5B
Power Connector ....................................................4
Parts of the MB-D11 ....................................................5
The MB-D11 Shutter-Release Button, Multi Selector,
Command Dials, and AE-L/AF-L Button ....................5
The MB-D11 Control Lock ........................................5
MB-D11 Multi-Power Battery Pack
Using the Battery Pack ................................................6
Attaching the Battery Pack .....................................6
User’s Manual
Removing the Battery Pack .....................................6
Inserting Batteries .................................................7
Removing Batteries ................................................9
Speci cations ............................................................10
1
To ensure proper operation, read this manual
thoroughly before using this product.
After
En
reading, be sure to keep it where it can be seen
by all those who use the product.
2
Notice for Customers in Europe
Safety Precautions
Precautions for Use
• The MB-D11 is for use with compatible cameras
• The memory card access lamp may light up
only.
when the MB-D11 is attached or removed from
• Do not use with batteries and battery holders
the camera, but this is not malfunction.
not recommended in this manual.
• Should you notice smoke or an unusual smell
• To prevent electrical shorts caused by metal ob-
or noise from the battery pack, discontinue use
Notice for Customers in Europe
jects touching the power terminals, replace the
immediately.
After removing the batteries, take
contact cap when the MB-D11 is not in use.
the device to the retailer or a Nikon-authorized
CAUTION
• When a battery holder is removed from the
service representative for inspection.
RISK OF EXPLOSION IF BATTERY IS REPLACED BY
MB-D11, remove the batteries or place the holder
• The MB-D11 is not equipped with a power
AN INCORRECT TYPE. DISPOSE OF USED BAT-
or cover in the holder case to prevent electrical
switch.
Use the camera power switch to turn
TERIES ACCORDING TO THE INSTRUCTIONS.
shorts caused by contact with other metal ob-
the power on or o .
jects.
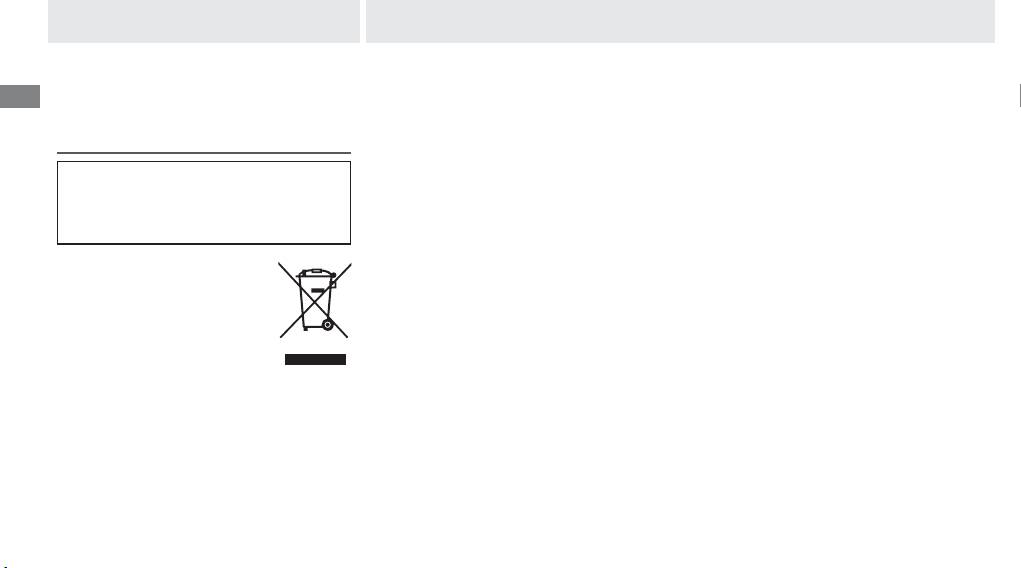
This symbol indicates that this prod-
uct is to be collected separately.
The following apply only to users in
European countries:
• This product is designated for
separate collection at an appro-
priate collection point. Do not dispose of as
household waste.
• For more information, contact the retailer or the
local authorities in charge of waste manage-
ment.
D Notice for Customers in the U.S.A.
Notice for Customers in Canada
Federal Communications Commission (FCC) Radio Frequency Interference Statement
CAUTION
En
This equipment has been tested and found to
This Class B digital apparatus complies with
com ply with the limits for a Class B digital device,
Canadian ICES-003.
pursuant to Part 15 of the FCC rules.
These limits
ATTENTION
are designed to provide rea son able pro tec tion
Cet appareil numérique de la classe B est confor-
against harmful in ter fer ence in a res i den tial in stal -
me à la norme NMB-003 du Can a da.
la tion.
This equip ment gen er ates, uses, and can
radiate radio fre quen cy en er gy and, if not in stalled
CAUTION
and used in ac cor dance with the instructions, may
Modi cations: The FCC requires the user to be noti-
cause harmful in ter fer ence to radio com mu ni c-
ed that any changes or mod i ca tions made to
a tions.
How ev er, there is no guar an tee that in ter -
this device that are not ex press ly ap proved by
fer ence will not occur in a par tic u lar in stal la tion.
If
Nikon Corporation may void the user’s au thor i ty
this equip ment does cause harm ful in ter fer ence to
to operate the equipment.
radio or tele vi sion re cep tion, which can be de ter -
Nikon Inc.,
mined by turn ing the equipment o and on, the
user is en cour aged to try to correct the in ter fer ence
1300 Walt Whitman Road, Melville, New York
by one or more of the fol low ing mea sures:
11747-3064, U.S.A.
• Reorient or relocate the receiving an ten na.
Tel.: 631-547-4200
• Increase the separation between the equip ment
and re ceiv er.
• Connect the equipment into an outlet on a cir-
cuit di er ent from that to which the receiver is
con nect ed.
• Consult the dealer or an experienced radio/tele-
vision tech ni cian for help.
3
Introduction The MB-D11 and Accessories
Thank you for your purchase of an MB-D11
multi-power battery pack for use with all
En
Nikon single-lens re ex digital cameras that
list the MB-D11 as a compatible accessory in
the camera manual.
The MB-D11 takes one
EN-EL15 rechargeable battery or six AA bat-
teries (alkaline, Ni-MH, or lithium) and includes
an alternate shutter-release button, AEL/AFL
button, multi selector, and main and sub-com-
mand dials for taking pictures in “tall” (portrait)
orientation.
Camera menu options allow the
user to choose whether the camera battery or
The MS-D11EN is inserted in the MB-D11 at
the batteries in the MB-D11 are used rst; see
shipment.
See “Inserting Batteries” for informa-
the camera manual for details.
tion on removing the battery holder.
4
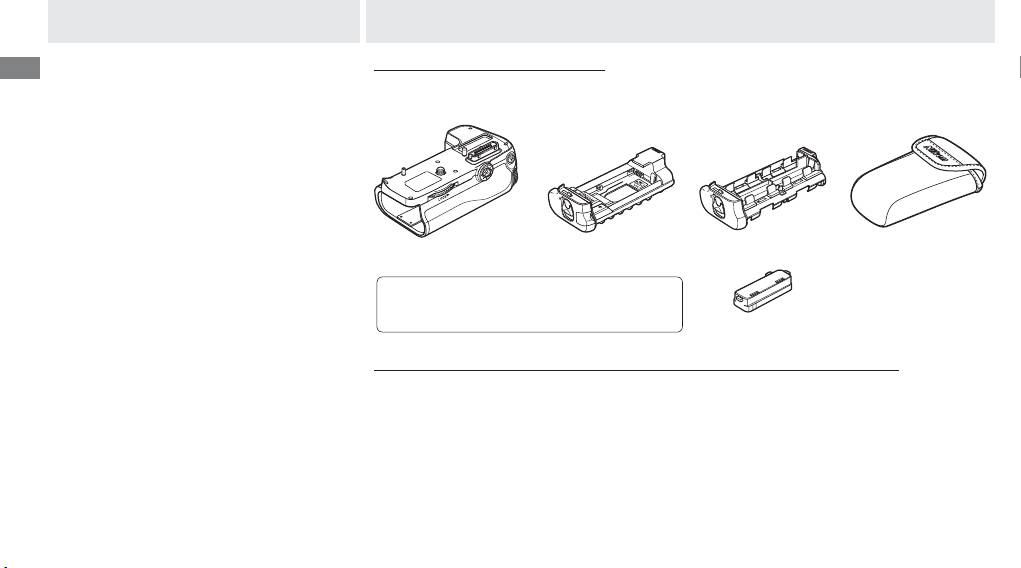
The MB-D11 and Supplied Accessories
The MB-D11 and Supplied Accessories
Con rm that the following items are supplied with the MB-D11 (batteries are sold separately).
MB-D11 MS-D11EN holder for
MS-D11 holder for
Holder case
EN-EL15 batteries
AA batteries
• User’s manual
(this manual)
• Warranty
Contact cap
Using the Optional EH-5a AC Adapter and EP-5B Power Connector
The optional EH-5a AC adapter and EP-5B power connector provide a reliable power source when
the camera is used for extended periods.
To use an AC adapter with the MB-D11, insert the
EP-5B into the MS-D11EN battery holder as described on page 7 and then connect the EH-5a as
described in the documentation provided with the EP-5B.
