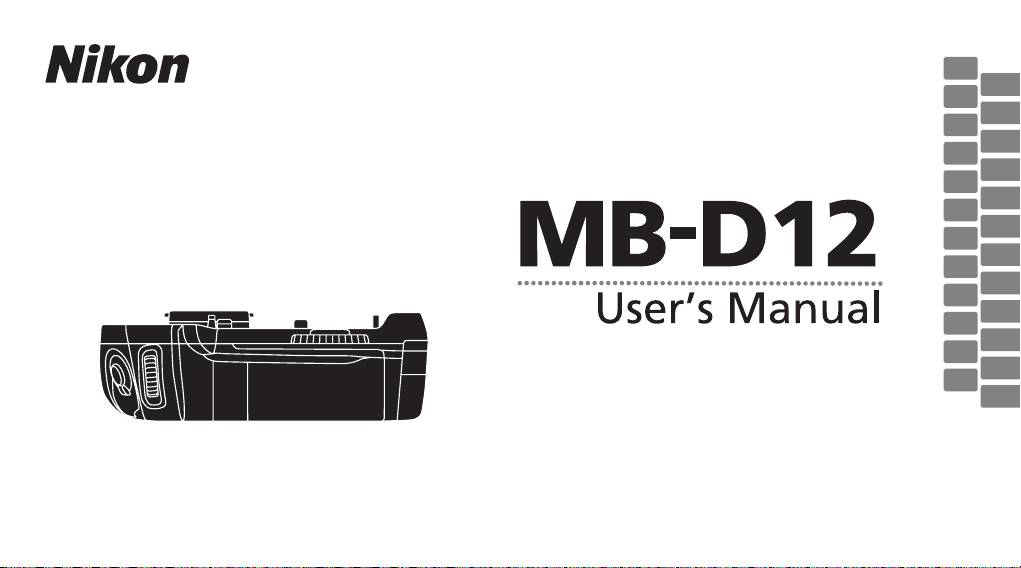
Nikon MB-D12: instruction
Class: Portable audio
Type: Radio
Manual for Nikon MB-D12
Table of contents
- MB-D12 Multi-Power Battery Pack
- Safety Precautions Precautions for Use
- Notice for Customers in Canada
- The MB-D12 and Supplied Accessories Using the Optional BL-5 Battery-Chamber Cover Power Connector
- The MB-D12 Control Lock
- Removing the Battery Pack
- Inserting Batteries
- Battery Level Battery Info
- Removing Batteries
- Specifi cations
En
Gr
De
Pl
Fr
Cz
Es
Hu
Multi-Power Battery Pack
No
Sk
Sv
Sl
Fi
Et
Ru
Lv
Dk
Lt
Nl
Is
Pt
Ro
It
Ua
q
A
w
!7
!9
e
!2
!8
r
!3
t
@0
y
@1
!4
u
!1
i
!5
o
!0
@2
!6
B C
E
F
q
w
q
q
q
w
w
D
w
G H JI
q
q
w
q
w
w

Table of Contents
Safety Precautions ......................................................2
En
Notice for Customers in Europe................................2
Precautions for Use .....................................................2
Introduction ...............................................................4
The MB-D12 and Accessories ........................................4
The MB-D12 and Supplied Accessories .....................4
Using the Optional EH-5a/EH-5b AC Adapter and
EP-5B Power Connector ...........................................4
Using the Optional BL-5 Battery-Chamber Cover ......4
Parts of the MB-D12 ....................................................5
The MB-D12 Shutter-Release Button, Multi Selector,
MB-D12 Multi-Power Battery Pack
Command Dials, and AFON Button .........................5
The MB-D12 Control Lock ........................................5
Using the Battery Pack ................................................6
User’s Manual
Attaching the Battery Pack .....................................6
Removing the Battery Pack .....................................6
Inserting Batteries .................................................7
Removing Batteries ................................................9
Specifi cations ............................................................10
1

To ensure proper operation, read this manual
En
thoroughly before using this product.
After
reading, be sure to keep it where it can be seen
by all those who use the product.
2
Notice for Customers in Europe
Safety Precautions
Precautions for Use
• The MB-D12 is for use with compatible cameras
• The memory card access lamp may light up
only.
when the MB-D12 is attached or removed from
• Do not use with batteries and battery holders
the camera, but this is not malfunction.
not recommended in this manual.
• Should you notice smoke or an unusual smell
• To prevent electrical shorts caused by metal ob-
or noise from the battery pack, discontinue use
Notice for Customers in Europe
jects touching the power terminals, replace the
immediately.
After removing the batteries, take
contact cap when the MB-D12 is not in use.
the device to the retailer or a Nikon-authorized
CAUTION
• When a battery holder is removed from the
service representative for inspection.
RISK OF EXPLOSION IF BATTERY IS REPLACED BY
MB-D12, remove the batteries or place the holder
• The MB-D12 is not equipped with a power
AN INCORRECT TYPE. DISPOSE OF USED BAT-
or cover in the holder case to prevent electrical
switch.
Use the camera power switch to turn
TERIES ACCORDING TO THE INSTRUCTIONS.
shorts caused by contact with other metal ob-
the power on or off .
jects.
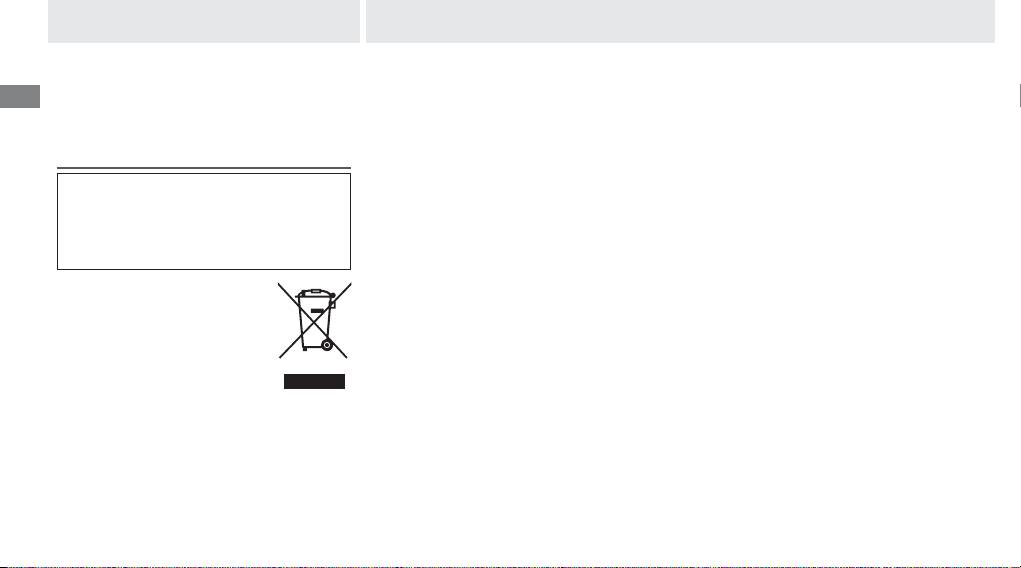
This symbol indicates that this prod-
uct is to be collected separately.
The following apply only to users in
European countries:
• This product is designated for
separate collection at an appro-
priate collection point. Do not dispose of as
household waste.
• For more information, contact the retailer or the
local authorities in charge of waste manage-
ment.
D Notice for Customers in the U.S.A.
Notice for Customers in Canada
En
Federal Communications Commission (FCC) Radio Frequency Interference Statement
CAUTION
This equipment has been tested and found to
This Class B digital apparatus complies with
com ply with the limits for a Class B digital device,
Canadian ICES-003.
pursuant to Part 15 of the FCC rules.
These limits
ATTENTION
are designed to provide rea son able pro tec tion
Cet appareil numérique de la classe B est confor-
against harmful in ter fer ence in a res i den tial in stal -
me à la norme NMB-003 du Can a da.
la tion.
This equip ment gen er ates, uses, and can
radiate radio fre quen cy en er gy and, if not in stalled
CAUTION
and used in ac cor dance with the instructions, may
Modifi cations: The FCC requires the user to be noti-
cause harmful in ter fer ence to radio com mu ni c-
fi ed that any changes or mod i fi ca tions made to
a tions.
How ev er, there is no guar an tee that in ter -
this device that are not ex press ly ap proved by
fer ence will not occur in a par tic u lar in stal la tion.
If
Nikon Corporation may void the user’s au thor i ty
this equip ment does cause harm ful in ter fer ence to
to operate the equipment.
radio or tele vi sion re cep tion, which can be de ter -
Nikon Inc.,
mined by turn ing the equipment off and on, the
user is en cour aged to try to correct the in ter fer ence
1300 Walt Whitman Road, Melville, New York
by one or more of the fol low ing mea sures:
11747-3064, U.S.A.
• Reorient or relocate the receiving an ten na.
Tel.: 631-547-4200
• Increase the separation between the equip ment
and re ceiv er.
• Connect the equipment into an outlet on a cir-
cuit diff er ent from that to which the receiver is
con nect ed.
• Consult the dealer or an experienced radio/tele-
vision tech ni cian for help.
3
Introduction The MB-D12 and Accessories
Thank you for your purchase of an MB-D12
En
multi-power battery pack for use with all
Nikon single-lens refl ex digital cameras that
list the MB-D12 as a compatible accessory in
the camera manual.
The MB-D12 takes one
EN-EL15 or EN-EL18 rechargeable battery or
eight AA batteries (alkaline, Ni-MH, or lithium)
and includes an alternate shutter-release but-
ton, AFON button, multi selector, and main and
sub-command dials for taking pictures in “tall”
(portrait) orientation.
Camera menu options
The MS-D12EN is inserted in the MB-D12 at shipment. See “Inserting Batteries”
allow the user to choose whether the camera
for information on removing the battery holder.
battery or the batteries in the MB-D12 are used
fi rst; see the camera manual for details.
4
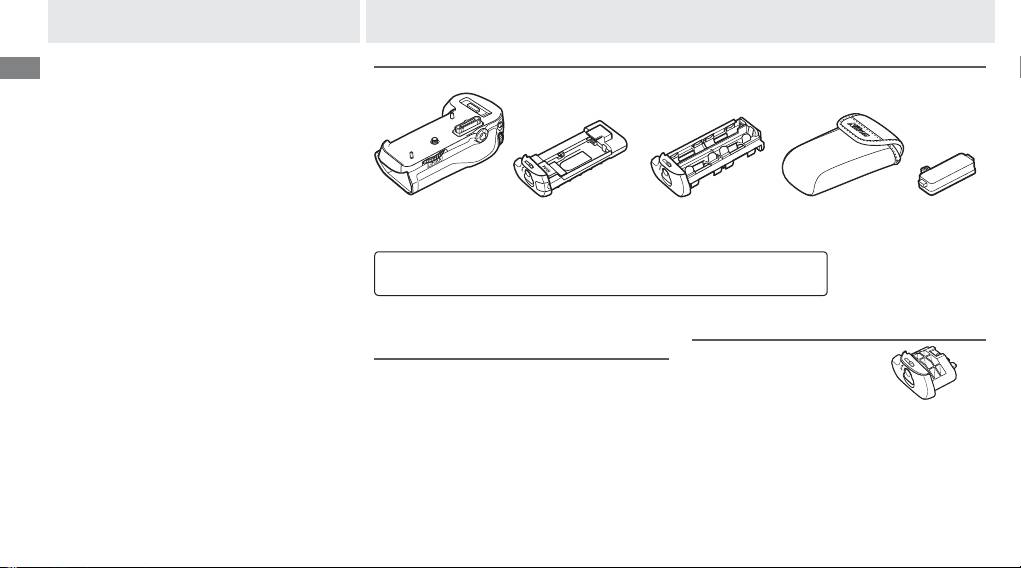
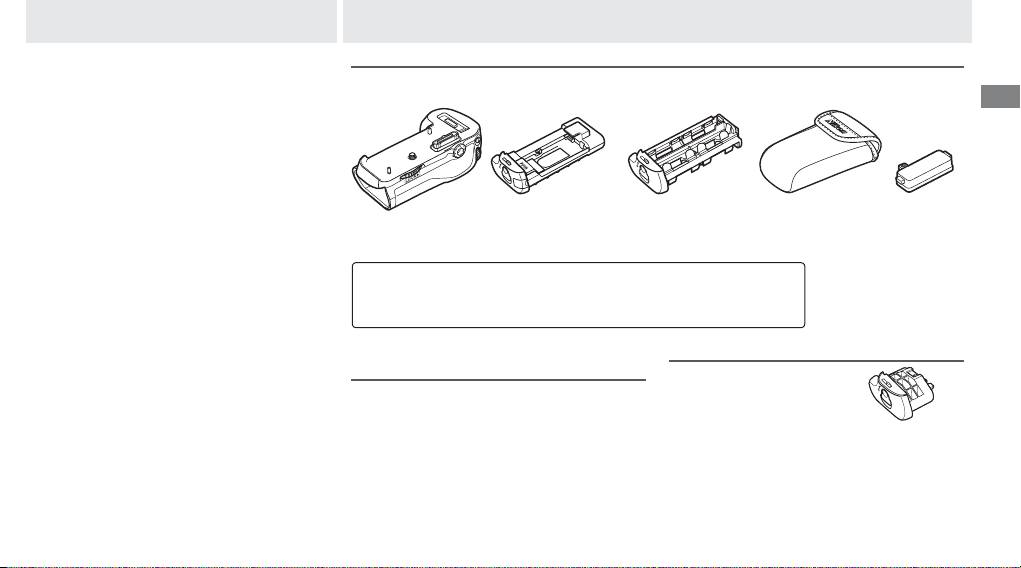
The MB-D12 and Supplied Accessories
The MB-D12 and Supplied Accessories
Confi rm that the following items are supplied with the MB-D12 (batteries are sold separately).
MB-D12
MS-D12EN holder for
MS-D12 holder for
Holder case
Contact cap
EN-EL15 batteries
AA batteries
• User’s manual
(this manual)
• Warranty
Using the Optional EH-5a/EH-5b AC Adapter and EP-5B
Using the Optional BL-5 Battery-Chamber Cover
Power Connector
A BL-5 battery-chamber
The optional EH-5a/EH-5b AC adapter and
cover (available separate-
EP-5B power connector provide a reliable
ly) is required when using
power source when the camera is used for ex-
EN-EL18 batteries.
BL-5 battery-
BL-5 battery-
tended periods.
To use an AC adapter with the
chamber cover
chamber cover
MB-D12, insert the EP-5B into the MS-D12EN
battery holder as described on page 7 and
then connect the EH-5a/EH-5b as described in
the documentation provided with the EP-5B.
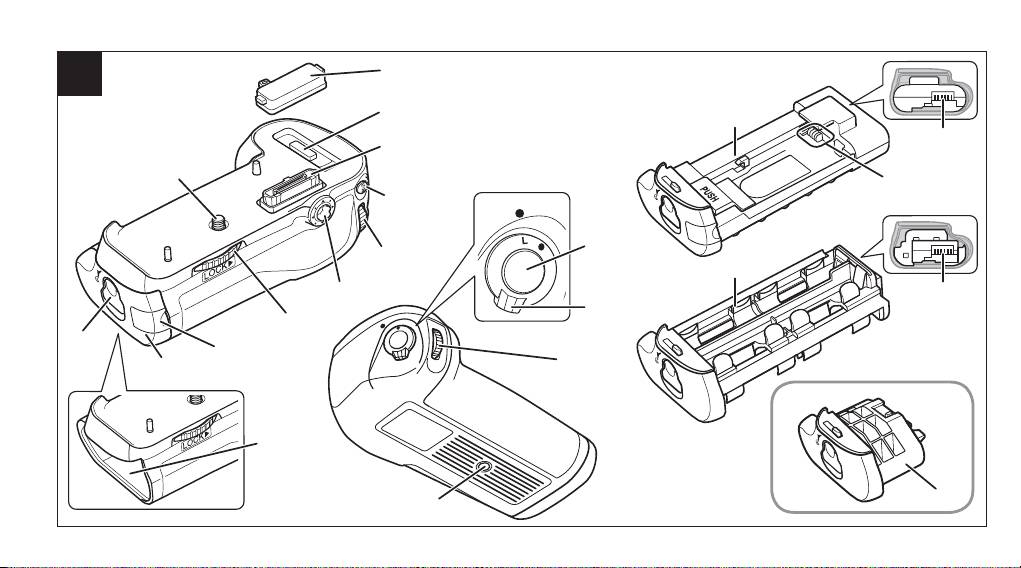
Parts of the MB-D12 (Figure A)
q Contact cap
En
w Holder for camera contact cover
e Power/signal contacts
r AFON button
t Main command dial
y Multi selector
u Attachment wheel
i Holder power connector cover
o Battery-chamber cover
!0 Battery chamber
!1 Battery-chamber latch
!2 Mounting screw
!3 Shutter-release button
!4 Control lock
!5 Sub-command dial
!6 Tripod socket
!7 MS-D12EN holder for EN-EL15 batteries
!8 Power terminals
!9 Power terminals (MS-D12EN battery holder)
@0 MS-D12 holder for AA batteries
@1 Power terminals (MS-D12 battery holder)
@2 BL-5 battery-chamber cover (available sep-
arately)
5
The MB-D12 Shutter-Release Button, Multi Selector, Command Dials, and AFON Button
The MB-D12 Shutter-Release Button, Multi Selector, Command Dials, and AFON Button
The MB-D12 is equipped with a shutter-release button (Figure A-
!3
), multi selector (Figure A-
y
),
main command dial (Figure A-
t
), sub-command dial (Figure A-
!5
), and AFON button (Figure A-
r
)
for use when taking photographs in vertical (“tall,” or portrait) orientation.
These controls perform
the same functions as the corresponding controls on the camera.
See the camera manual for
more information.
Changes to
Multi selector center button
,
Customize command dials
, and
Assign MB-D12
AF-ON
in the camera Custom Settings menu (Group f) also apply to the multi selector, command
dials, and AFON button on the MB-D12. Regardless of the option selected for
Multi selector
,
pressing the center of the MB-D12 multi selector will not activate the exposure meters.
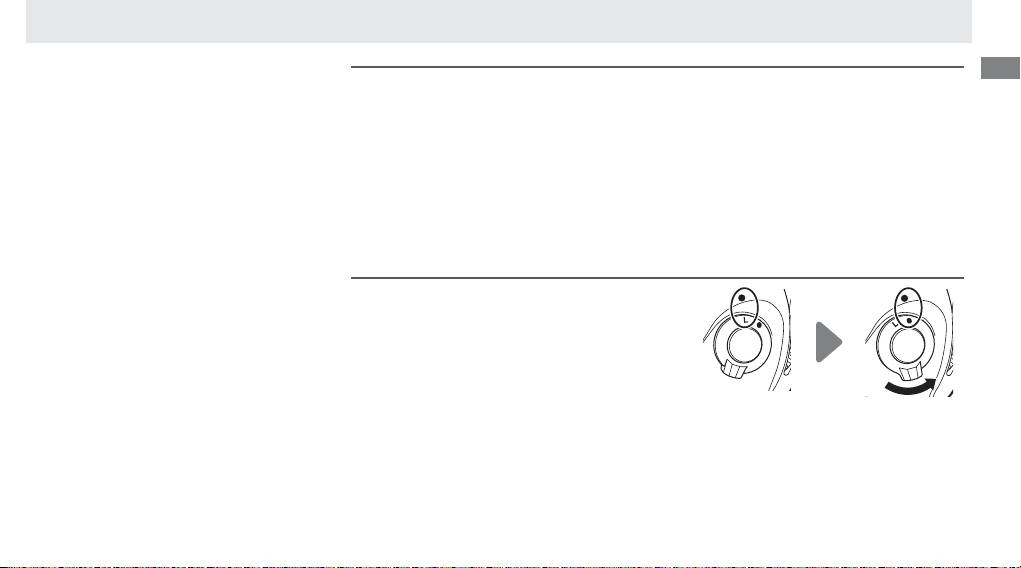
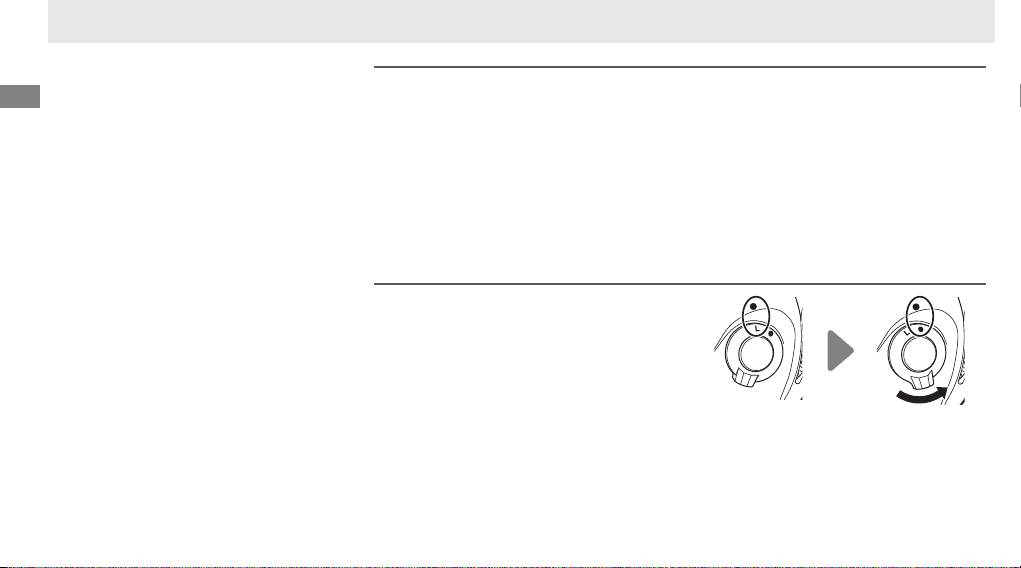
The MB-D12 Control Lock
The MB-D12 Control Lock
The control lock (Figure A-
!4
) locks the con-
trols on the MB-D12 to prevent unintended
use.
Before using these controls to take photo-
graphs in vertical (portrait) orientation, release
the lock as shown at right.
The control lock is not a power switch.
Use the
camera power switch to turn the camera on
Locked Unlocked
and o .

Using the Battery Pack
En
6
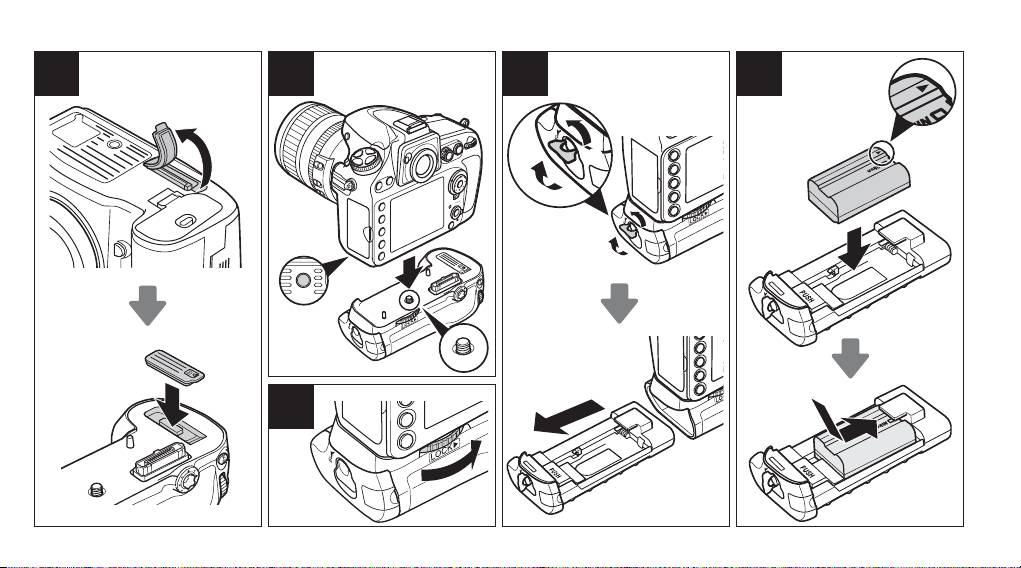
Attaching the Battery Pack
Attaching the Battery Pack
Before attaching the battery pack, be sure that the camera is off and that the MB-D12 control lock
(Figure A-
!4
) is in the L position (the illustrations show the D800).
1 Remove the contact cap (Figure A-
q
) from the battery pack.
2 The contacts for the MB-D12 are in the base of the camera, where they are protected by a con-
tact cover.
Remove the contact cover as shown in Figure B-
q
and place it in the contact cover
holder on the MB-D12 (Figure B-
w
).
3 Position the MB-D12, keeping the MB-D12 mounting screw (Figure C-
w
) aligned with the cam-
era tripod socket (Figure C-
q
) and tighten the attachment wheel by rotating it in the direction
shown by the LOCK arrow (Figure D).
There is no need to remove the battery from the camera
before connecting the MB-D12.
At default settings, the battery inserted in the camera will be
used only after the battery in the MB-D12 is exhausted.
The
Battery order
option in the cam-
era Custom Settings menu (Group d) can be used to change the order in which the batteries
are used.
Be sure to place the camera contact cover in the contact cover holder and to keep the MB-D12 con-
tact cap in a safe place to prevent loss.
A PB-6D and PK-13 auto-extension ring are required when using PB-6 bellows focusing attachment
with the MB-D12.
Removing the Battery Pack
Removing the Battery Pack
To remove the MB-D12, turn the camera off
and set the control lock on the MB-D12 to L,
then loosen the attachment wheel and re-
move the MB-D12.
Be sure to replace the con-
tact cover on the camera and the contact cap
on the MB-D12 when the battery pack is not
in use.
En
7
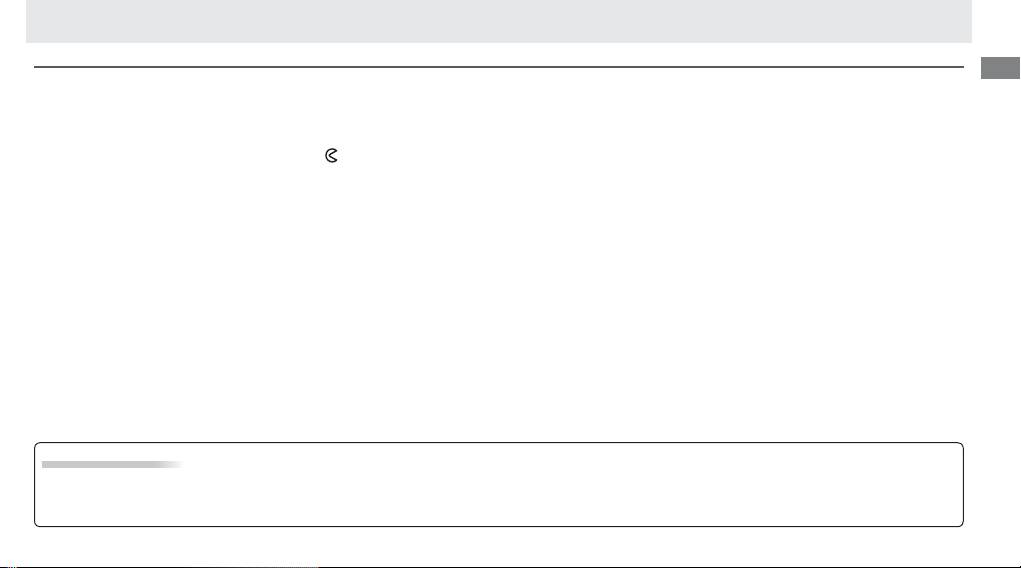
Inserting Batteries
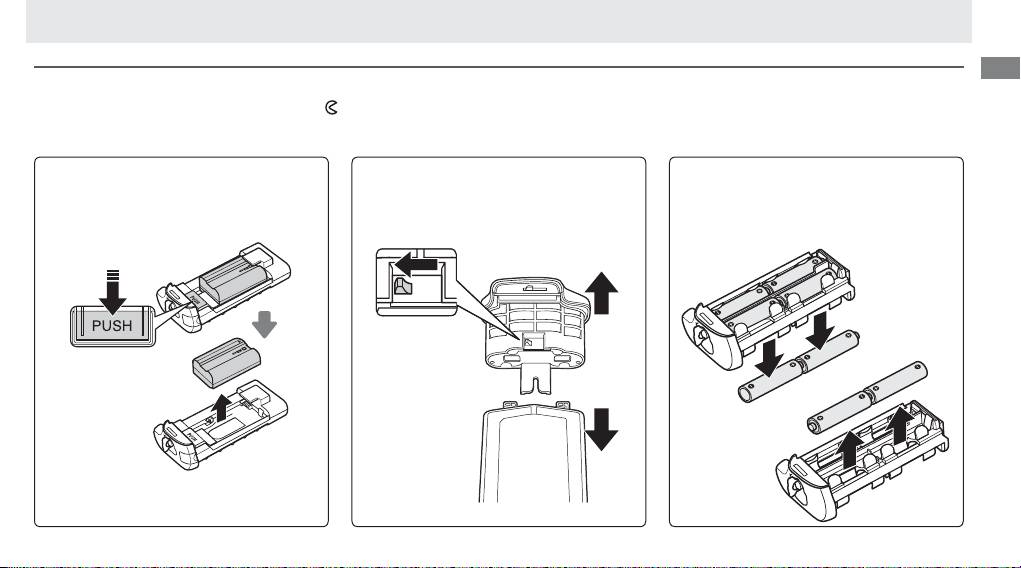
Inserting Batteries
The MB-D12 can be used with one EN-EL15 or EN-EL18 rechargeable Li-ion battery, or with eight AA batteries. A BL-5 battery-chamber cover (avail-
able separately) is required when using an EN-EL18 battery.
Before inserting batteries, be sure that the camera is off and that the MB-D12 control lock is in the L position.
1 Turn the MB-D12 battery-chamber latch to
and remove the battery holder (Figure E).
2 Ready the batteries as described below.
EN-EL15: Matching the indentations on the battery to the projections on the MS-D12EN holder, insert the battery with the arrow (▲) on the bat-
tery toward the battery holder power terminals (Figure F-
q
).
Press the battery lightly downward and slide it in the direction of the arrow until
the power terminals click into place (Figure F-
w
).
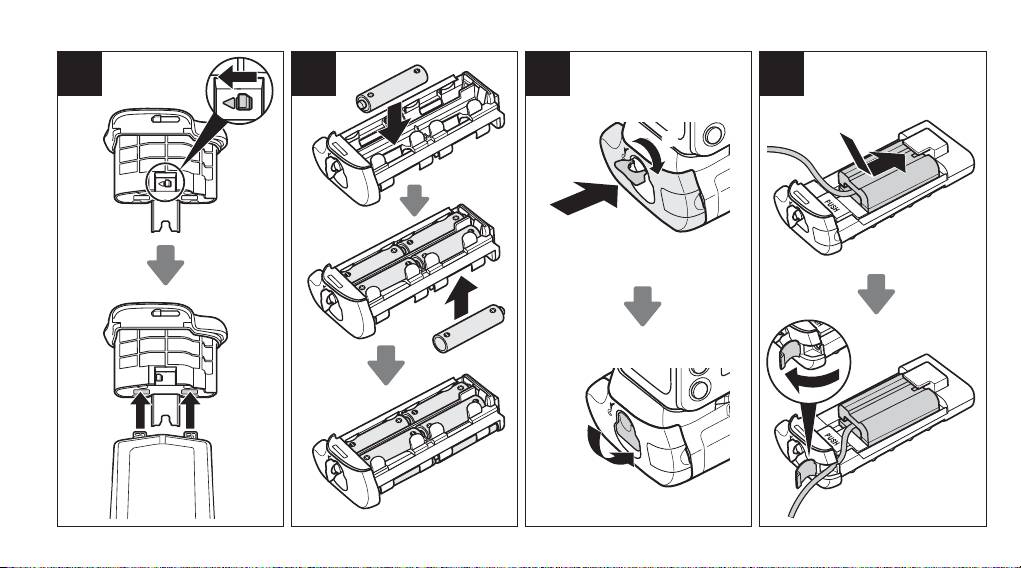
EN-EL18: If the battery release on the optional BL-5 battery-chamber cover is positioned so that the arrow Y is visible, slide the battery release to
cover the arrow (Figure G-
q
). Insert the two projections on the battery into the matching slots on the BL-5 (Figure G-
w
) and confi rm that the
battery release has slid aside to reveal the arrow.
AA batteries:
Place eight AA batteries in the MS-D12 battery holder as shown in Figure H, making sure that the batteries are in the correct orientation.
3
Insert the battery holder in the MB-D12 and latch the battery-chamber cover (Figure I). Make sure the holder is fully inserted before turning the latch.
4 Turn the camera on and check the battery level in the control panel or viewfi nder. If the camera does not turn on, check that the battery is cor-
rectly inserted.
The EP-5B Power Connector
When using the EP-5B power connector, insert it into the MS-D12EN holder with the arrow (▲) on the connector toward the battery power terminals.
Press
the connector lightly downward and slide it in the direction of the arrow until the power terminals click into place (Figure J-
q
).
Open the holder power
connector cover and pass the EP-5B power cable through the opening (Figure J-
w
).
En
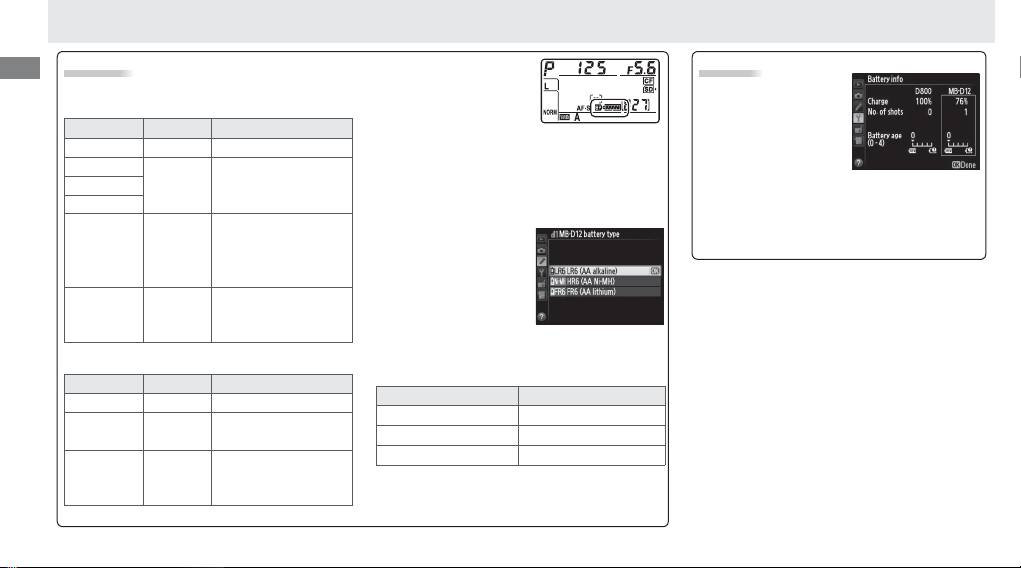
Battery Level
An option in Group d of
Battery Info
the camera Custom Set-
The camera displays battery level as follows:
Battery information
tings menu can be used
EN-EL15/EN-EL18
(including calibration
to change the order in
information for EN-EL18
Control panel Viewfi nder Description
which the batteries are used.
When the camera
batteries) can be viewed
L
— Battery fully charged.
is drawing power from the MB-D12, a
s
icon
from the camera setup
K
is displayed in the control panel.
If the
s
icon
Battery partially
menu (the camera bat-
J
—
blinks, the battery-chamber cover is not locked.
discharged.
tery is listed on the left, the MB-D12 on the
Close and latch the battery-chamber cover.
I
right). Only the battery level icon is shown
Low battery.
Ready
To ensure that the
when AA batteries are used. See the camera
fully-charged spare
camera shows the cor-
H d
manual for details.
battery or charge
rect battery level when
battery.
AA batteries are used,
Battery exhausted.
choose the appropriate
H
d
Charge or exchange
option for
MB-D12 bat-
(blinks)
(blinks)
battery.
tery type
in the camera Custom Settings menu
(Group d).
If the correct option is not selected,
AA Batteries
the camera may fail to function as expected.
Control panel Viewfi nder Description
Option Battery type
L
—
Charge remaining.
1
LR6 (AA alkaline) AA alkaline (LR6)
Low batteries.
Ready
I d
2
HR6 (AA Ni-MH) AA Ni-MH (HR6)
spare batteries.
3
FR6 (AA lithium) AA Lithium (FR6)
Batteries exhausted.
H
d
Shutter release
Remove the batteries when the MB-D12 is not
(blinks)
(blinks)
disabled.
in use.
Note: The illustrations on this page are from the
D800.
8
En
9
Removing Batteries
Removing Batteries
Be careful not to drop batteries or the holder.
1 Turn the MB-D12 battery-chamber latch to
and remove the battery holder (Figure E).
2 Remove the battery or batteries from the holder.
EN-EL15
EN-EL18
AA Batteries
While pressing the holder PUSH button, slide
Slide the battery release in the direction
Remove the batteries as shown.
Be careful
the battery toward the button.
The battery
indicated by the arrow (Y) and remove the
not to drop the batteries when removing
can then be removed as shown.
battery-chamber cover.
them from the holder.
The procedure for removing the EP-5B power
connector is the same as that for the EN-EL15.
Specifi cations
Power source One EN-EL15 or EN-EL18 rechargeable Li-ion battery, eight LR6 alkaline, HR6 Ni-MH, or FR6 lithium AA batteries, or EH-5b/EH-5a/
En
EH-5 AC adapter (requires EP-5B power connector)
Operating temperature 0 – 40 °C (32 – 104 °F)
Dimensions (W × H × D) Approx. 151 × 50 × 81 mm (6.0 × 2.0 × 3.2 in.)
Weight Approx. 365 g (12.9 oz) with MS-D12EN and optional EN-EL15 battery
Approx. 460 g (16.3 oz) with MS-D12 and eight AA batteries (available separately from third-party suppliers)
Approx. 310 g (11.0 oz) with MS-D12EN and optional EP-5B power connector
Approx. 425 g (15.0 oz) with optional BL-5 and EN-EL18 battery
Approx. 280 g (9.9 oz) with MS-D12EN
Approx. 270 g (9.6 oz) with MS-D12
Specifi cations and design are subject to change without notice.
D EN-EL15 and EN-EL18 Batteries
The performance of EN-EL15 and EN-EL18 batteries drops at temperatures below about 10 °C (50 °F).
Be sure the battery is fully charged and keep a warm
spare battery on hand ready to exchange as necessary.
Cold batteries will recover some of their charge when warmed.
D AA Batteries
Due to their limited capacity, AA LR6 alkaline batteries should be used only when no other alternative is available.
The capacity of AA batteries varies with make and storage conditions and may in some instances be extremely low; in some cases, AA batteries may cease
to function before their expiry date.
Note that the capacity of AA batteries may drop at temperatures below 20 °C (68 °F).
Use is not recommended at low
temperatures.
D Frame Advance Rate
EN-EL18 and AA batteries support higher frame advance rates than the EN-EL15; note, however, that in the case of AA batteries the frame advance rate will
drop at low temperatures or if the batteries are low. For more information on frame advance rates, see the camera manual.
10

Inhaltsverzeichnis
Sicherheitshinweise ....................................................2
Hinweis für Kunden in Europa .................................2
Gebrauchshinweise .....................................................2
De
Einführung .................................................................3
MB-D12 und Zubehör ..................................................3
Das MB-D12 und das im Lieferumfang enthaltene
Zubehör .................................................................3
Verwendung des optionalen Netzadapters EH-5a/
EH-5b und des Akkufacheinsatzes EP-5B ..................3
Verwenden der Optionalen Akkufachabdeckung BL-5
...4
Komponenten des MB-D12 ..........................................4
Multifunktionshandgriff MB-D12
Auslöser, Multifunktionswähler, Einstellräder
und AFON-Taste des MB-D12 ..................................4
Die Auslösesperre des MB-D12 ................................4
Benutzerhandbuch
Verwenden des Batterieteils ........................................5
Anbringen des Multifunktionshandgriff s .................5
Abnehmen des Multifunktionshandgriff s ................5
Einsetzen von Akkus oder Batterien ........................6
Herausnehmen der Batterien bzw. der Akkus ..........8
Technische Daten ........................................................9
1
Bitte lesen Sie diese Anleitung vor der Verwen-
dung des Multifunktionshandgriff s aufmerksam
De
durch. Bewahren Sie die Anleitung stets griff bereit
auf, so dass sie allen Personen, die den Multifunk-
tionshandgriff verwenden, direkt zugänglich ist.
2
Hinweis für Kunden in Europa
Sicherheitshinweise
Gebrauchshinweise
• Das MB-D12 kann nur mit kompatiblen Kameras
• Die Zugriff slampe der Speicherkarte könnte
verwendet werden.
aufl euchten, wenn das MB-D12 an die Kamera
•
Verwenden Sie das Batterieteil nur mit Batterien
angebracht oder von der Kamera entfernt wird.
bzw. Akkus oder Batteriehaltern, die in dieser Be-
Dies stellt jedoch keine Fehlfunktion dar.
dienungsanleitung empfohlen werden.
• Falls vom Multifunktionshandgriff Rauch oder
• Damit keine Metallobjekte die Kontakte für die
ungewöhnliche Gerüche oder Geräusche aus-
Hinweis für Kunden in Europa
Spannungsversorgung berühren und eventuell
gehen, sollten Sie das Gerät sofort außer Betrieb
VORSICHT
einen Kurzschluss verursachen, muss bei Nicht-
nehmen. Nehmen Sie die Batterien bzw. Akkus
WENN DER FALSCHE AKKUTYP VERWENDET
benutzung des MB-D12 die Kontaktabdeckung
aus dem Multifunktionshandgriff , und lassen Sie
WIRD, BESTEHT EXPLOSIONSGEFAHR. ENTSOR-
aufgesetzt werden.
ihn von Ihrem Fachhändler oder vom Nikon-
GEN SIE GEBRAUCHTE AKKUS NACH DEN GEL-
• Wird ein Akkuhalter vom MB-D12 entfernt,
Kundendienst überprüfen.
TENDEN VORSCHRIFTEN.
müssen die Batterien zur Vermeidung von
• Das MB-D12 verfügt über keinen Ein-/Ausschal-
Kurzschlüssen, wie sie durch die Berührung mit
ter. Das Gerät wird über den Ein-/Ausschalter der
Durch dieses Symbol wird ange-
anderen Metallobjekten auftreten können, ent-
Kamera gesteuert.
zeigt, dass dieses Produkt getrennt
nommen oder der Halter bzw. die Abdeckung
entsorgt werden muss.
ins Halterfach gelegt werden.
Folgendes gilt für Verbraucher in
europäischen Ländern:
• Dieses Produkt muss an einer
geeigneten Sammelstelle separat entsorgt wer-
den. Eine Entsorgung über den Hausmüll ist un-
zulässig.
•
Weitere Informationen erhalten Sie bei Ihrem
Fachhändler oder bei den für die Abfallentsor-
gung zuständigen Behörden bzw. Unternehmen.
Einführung MB-D12 und Zubehör
Vielen Dank, dass Sie sich für den Kauf des Multi-
funktionshandgriff s MB-D12 entschieden haben.
Der MB-D12 kann mit allen digitalen Spiegelre-
De
fl exkameras von Nikon, die das MB-D12 als kom-
patibles Zubehörteil in der Bedienungsanleitung
der Kamera auff ühren, verwendet werden. Der
MB-D12 nimmt einen Akku vom Typ EN-EL15
oder EN-EL18 oder acht Batterien der Größe AA
(Alkaline, Ni-MH oder Lithium) auf und ist mit
einem separaten Auslöser, einer AFON-Taste,
einem Multifunktionswähler und zwei Einstellrä-
dern ausgestattet, um Bilder im “Hochformat” auf-
zunehmen. Mit den Menüoptionen der Kamera
kann der Benutzer wählen, ob der Kameraakku
oder die Akkus bzw. Batterien im MB-D12 zuerst
verwendet werden sollen; lesen Sie hinsichtlich
weiterer Einzelheiten die Bedienungsanleitung
der Kamera.
3
Der MB-D12 und das im Lieferumfang enthaltene Zubehör
Der MB-D12 und das im Lieferumfang enthaltene Zubehör
Versichern Sie sich, dass die folgenden Bestandteile im Lieferumfang des MB-D12 enthalten sind (Akkus
und Batterien sind separat erhältlich).
Verwendung des optionalen Netzadapters EH-5a/
Verwendung des optionalen Netzadapters EH-5a/
EH-5b und des Akkufacheinsatzes EP-5B
Halter MS-D12EN für
Halter MS-D12 für
Haltertasche
Kontaktabe-
MB-D12
Akkus des Typs EN-EL15
Mignonzellen
deckung
• Benutzerhandbuch
Der MS-D12EN wird beim Versand in den MB-D12 eingelegt. Siehe hinsicht-
(diese Anleitung)
lich weiterer Informationen zum Abnehmen des Batteriehalters den Ab-
• Garantie
schnitt “Einsetzen von Akkus oder Batterien”.
Verwenden der optionalen Akkufachabdeckung BL-5
EH-5b und des Akkufacheinsatzes EP-5B
Eine Akkufachabdeckung
Der optionale Netzadapter EH-5a/EH-5b und der Ak-
BL-5 (separat erhältlich) ist
kufacheinsatz EP-5B stellen eine zuverlässige Strom-
erforderlich, wenn Akkus
quelle beim Einsatz der Kamera über eine längere Be-
vom Typ EN-EL18 verwen-
Akkufachabde-
Akkufachabde-
triebszeit dar. Um einen Netzadapter mit dem MB-D12
det werden.
ckung BL-5
ckung BL-5
zu verwenden, schieben Sie den EP-5B in den Ak-
kuhalter MS-D12EN, wie auf Seite 6 beschrieben, und
schließen Sie dann den EH-5a/EH-5b wie in der dem
EP-5B beiliegenden Dokumentation beschrieben an.
Komponenten des MB-D12 (Abbildung A)
q Kontaktabdeckung
w Halter für die Abdeckung des Kamerakontakts
De
e Anschluss-/elektrische Kontakte
r AFON-Taste
t Hinteres Einstellrad
y Multifunktionswähler
u Adapterrad
i Abdeckung des Akkufacheinsatzhalters
o Batteriefach Abdeckung
!0 Batteriefach
!1 Batteriefach Verriegelung
!2 Befestigungsschraube
!3 Auslöser
!4 Auslösesperre
!5 Vorderes Einstellrad
!6 Stativgewinde
!7 Halter MS-D12EN für Batterien des Typs
EN-EL15
!8 Kontakte für die Spannungsversorgung
!9 Kontakte für die Spannungsversorgung
(Akkuhalter MS-D12EN)
@0 Halter MS-D12 für Mignonzellen
@1 Kontakte für die Spannungsversorgung
(Batteriehalter MS-D12)
@2 Akkufachabdeckung BL-5 (separat erhältlich)
4
Auslöser, Multifunktionswähler, Einstellräder und AFON-Taste des MB-D12
Auslöser, Multifunktionswähler, Einstellräder und AFON-Taste des MB-D12
Der MB-D12 verfügt über einen Auslöser (Abbildung A-
!3
), einen Multifunktionswähler (Abbildung
A-
y
), ein hinteres Einstellrad (Abbildung A-
t
), ein vorderes Einstellrad (Abbildung A-
!5
) und eine
AFON-Taste (Abbildung A-
r
). Verwenden Sie diese Funktionen, wenn Sie Aufnahmen im Hochformat
machen. Diese Bedienelemente haben die gleichen Funktionen wie die entsprechenden Bedienele-
mente der Kamera. Weitere Informationen nden Sie in der Bedienungsanleitung der Kamera.
Änderungen der Optionen
Mitteltaste
,
Einstellräder
und
AF-ON-Taste des MB-D12
im Menü der
Individualfunktionen der Kamera (Gruppe f) gelten auch für den Multifunktionswähler, die Einstellräder
und die AFON-Taste am MB-D12. Die Belichtungsmesssysteme werden, unabhängig von der für den
Multifunktionswähler
gewählten Option, nicht durch Drücken der Mitteltaste des Multifunktionswäh-
lers am MB-D12 aktiviert.
Die Auslösesperre des MB-D12
Die Auslösesperre des MB-D12
Die Auslösesperre (Abbildung A-
!4
) sperrt die
Steuerelemente am MB-D12, um eine unbeab-
sichtigte Benutzung zu verhindern. Lösen Sie die
Auslösesperre, wie rechts abgebildet, bevor Sie
diese Steuerelemente verwenden, um Fotogra-
en im Hochformat aufzunehmen.
Die Auslösesperre ist kein Ein-/Ausschalter. Ver-
Verriegelt Entriegelt
wenden Sie den Ein-/Ausschalter der Kamera, um
diese ein- oder auszuschalten.

Verwenden des Batterieteils
De
5
Anbringen des Multifunktionshandgriff s
Anbringen des Multifunktionshandgriff s
Stellen Sie vor dem Anbringen des Batterieteils MB-D12 sicher, dass die Kamera ausgeschaltet ist und
sich die Auslösesperre (Abbildung A-
!4
) am Multifunktionshandgriff in der Position L befi ndet (die Ab-
bildungen zeigen die D800).
1 Nehmen Sie die Kontaktabdeckung (Abbildung A-
q
) vom Akku ab.
2 Die Kontakte für den MB-D12 befi nden sich am Boden der Kamera, an dem sie durch eine Kontaktab-
deckung geschützt werden. Nehmen Sie die Kontaktabdeckung wie in Abbildung B-
q
dargestellt ab
und legen Sie sie in den Kontaktabdeckungshalter des MB-D12 (Abbildung B-
w
).
3 Positionieren Sie den MB-D12 so, dass seine Befestigungsschraube (Abbildung C-
w
) am Stativge-
winde der Kamera (Abbildung C-
q
) ausgerichtet ist, und ziehen Sie das Ansatzrad fest, indem Sie
es in die durch den LOCK-Pfeil (Abbildung D) dargestellte Richtung drehen. Der Akku muss vor dem
Anschließen des MB-D12 nicht aus der Kamera genommen werden. Bei den Standardeinstellungen
greift die Kamera erst dann auf den Kameraakku zu, wenn die Batterie im MB-D12 entladen ist. Mit
der Option
Akkureihenfolge
im Menü der Individualfunktionen der Kamera (Gruppe d) kann die
Reihenfolge geändert werden, in der die Akkus bzw. Batterien verwendet werden.
Denken Sie daran, die Kamera-Kontaktabdeckung in den Kontaktabdeckungshalter zu legen und die
Kontaktabdeckung des MB-D12 an einem sicheren Ort aufzubewahren, damit Sie sie nicht verlieren.
Automatik-Zwischenringe vom Typ PB-6D und PK-13 sind erforderlich, wenn das Balgengerät PB-6
mit dem MB-D12 verwendet wird.
Abnehmen des Multifunktionshandgriff s
Abnehmen des Multifunktionshandgriff s
Schalten Sie die Kamera aus, wenn Sie den
MB-D12 von der Kamera abnehmen wollen, und
stellen Sie die Auslösesperre des MB-D12 auf L,
lösen Sie anschließend das Adapterrad und neh-
men Sie das MB-D12 ab. Stellen Sie sicher, dass Sie
die Kontaktabdeckungen wieder auf die Kontakte
der Kamera und des MB-D12 setzen, wenn der
Akku nicht verwendet wird.
De
6
Einsetzen von Akkus oder Batterien
Einsetzen von Akkus oder Batterien
Der MB-D12 kann mit einem Lithium-Ionen-Akku vom Typ EN-EL15 oder EN-EL18 oder mit acht Batterien der Größe AA verwendet werden. Eine Akkufachabdeckung
vom Typ BL-5 (separat erhältlich) ist erforderlich, wenn ein Akku vom Typ EN-EL18 verwendet wird.
Stellen Sie vor dem Einlegen des Akkus oder der Batterien sicher, dass die Kamera ausgeschaltet ist und dass sich die Auslösesperre des MB-D12 in der L-Position befi ndet.
1 Drehen Sie die Batteriefach -Verriegelung des MB-D12 auf und nehmen Sie den Batteriehalter ab (Abbildung E).
2 Bereiten Sie den Akku bzw. die Batterien wie unten beschrieben vor.
EN-EL15: Richten Sie die Vertiefungen des Akkus an den Ausbuchtungen des Halters MS-D12EN aus, und setzen Sie den Akku mit dem Pfeil (▲) in Richtung
der Kontakte für die Spannungsversorgung des Akkuhalters ein (Abbildung F-
q
). Drücken Sie den Akku leicht nach unten und schieben Sie ihn in Pfeilrich-
tung, bis die Kontakte für die Spannungsversorgung einrasten (Abbildung F-
w
).
EN-EL18: Wenn die Akku-Entriegelung an der optionalen Akkufachabdeckung BL-5 so ausgerichtet ist, dass der Pfeil Y sichtbar ist, schieben Sie die Akku-
Entriegelung über den Pfeil (Abbildung G-
q
). Setzen Sie den Akku mit seinen zwei Ausbuchtungen in die passenden Fächer an der BL-5 (Abbildung G-
w
)
ein und überprüfen Sie, ob die Akku-Entriegelung so zur Seite geschoben wurde, dass der Pfeil sichtbar ist.
AA-Batterien: Setzen Sie acht Batterien der Größe AA in den Batteriehalter MS-D12 wie in Abbildung H abgebildet ein. Achten Sie darauf, dass die Batterien
richtig herum eingelegt werden.
3 Schieben Sie den Akkuhalter in den
MB-D12
und verriegeln Sie die Akkufachabdeckung (Abbildung
I)
. Vergewissern Sie sich, dass der Halter vollständig
eingeschoben ist, bevor Sie den Verschluss umdrehen.
4 Schalten Sie die Kamera ein und überprüfen Sie die Batteriekapazität auf dem oberen Display oder im Sucher. Falls sich die Kamera nicht einschalten lässt,
überprüfen Sie, ob die Batterien bzw. der Akku korrekt eingelegt wurden.
Der Akkufacheinsatz EP-5B
Wenn Sie den Akkufacheinsatz EP-5B verwenden, schieben Sie ihn so in den Akkuhalter MS-D12EN, dass der Pfeil (▲) auf dem Einsatz in die Richtung der
Kontakte für die Spannungsversorgung weist. Drücken Sie den Einsatz leicht nach unten und schieben Sie ihn in Pfeilrichtung, bis die Kontakte einrasten
(Abbildung J-
q
). Öff nen Sie die Abdeckung des Akkufacheinsatzhalters und führen Sie das Netzkabel des EP-5B durch die Öff nung (Abbildung J-
w
).
