Cambridge Audio Azur 740C: 740C azur
740C azur: Cambridge Audio Azur 740C
740C azur
9
ENGLISH
Programming disc play
1. Ensure that a disc is loaded and the player is in Standby mode.
2. Press
Program
on the remote control. The Program set-up will appear
in the display.
3. Using the
Skip/Scan
(
Skip
on the remote) buttons, skip to the track
number that you want to program as your first track (or press the
actual track number on the remote).
4. Press
Program
. The desired track is now entered and the program
number increases by one.
5. Repeat steps three and four until all your desired tracks are entered.
6. Press
Play
. The programmed tracks will play.
7. You can use the
Skip
and
Search
functions on your remote control to
move through your programmed selection in the same way as normal
playback.
8. Pressing
Stop
once will stop play and pressing
Stop
twice at any time
will wipe the program and return the player to stopped mode.
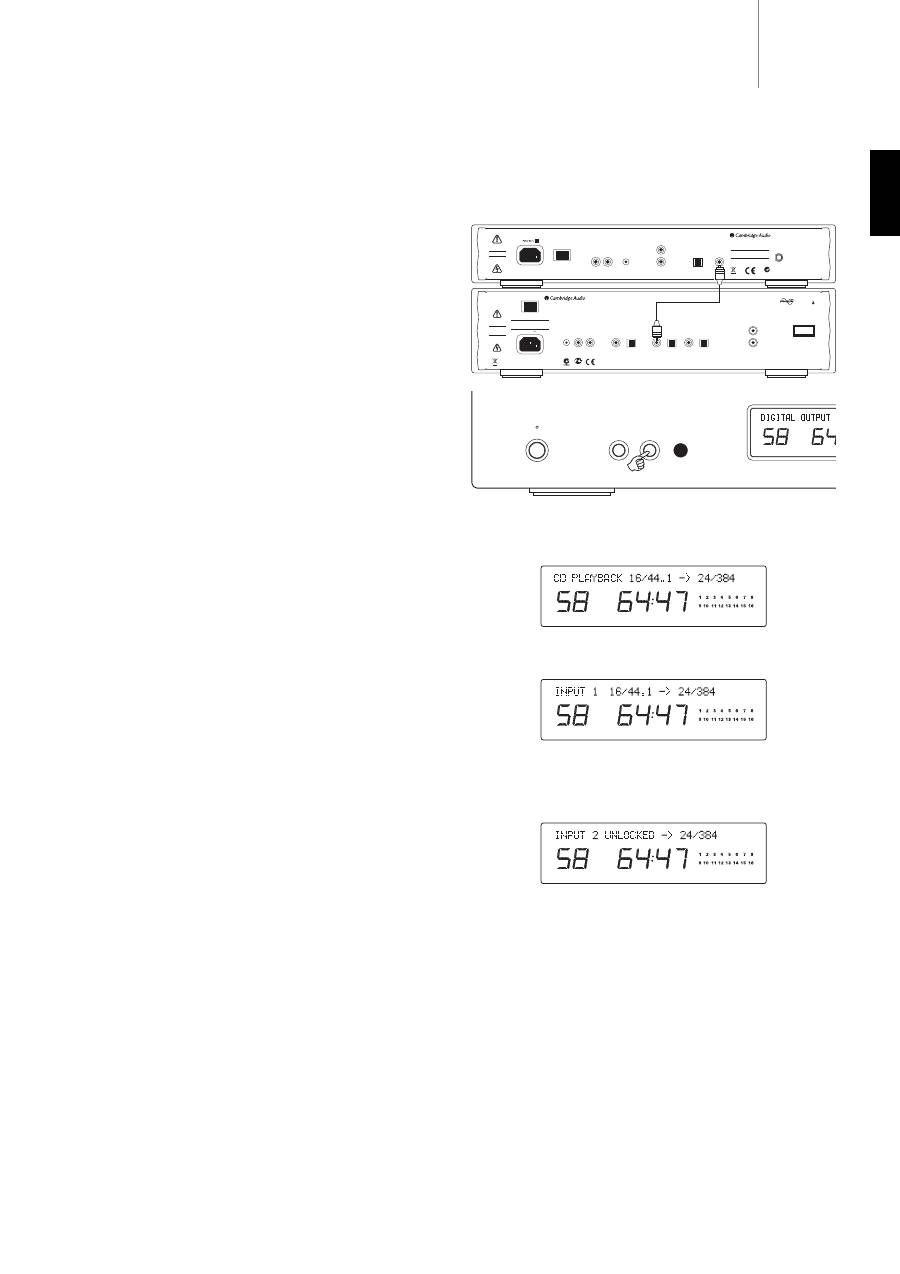
To access external digital sources connected to the rear of the 740C,
press the
Select
button (on front panel or remote) to change between
CD playback, Digital Input 1 and Digital Input 2.
CD playback
The 16 bit/44.1kHz sampling data on a standard CD is upsampled to 24
bit/384kHz for best possible sound quality.
Digital Input 1/2
Press
Select
again to select Digital Input 1.
The incoming word length (16 to 24 bit) and sample rate will be
displayed along with the indication that the data is being upsampled to
24 bit/384kHz. Note that rather than exact word width, some sources
report data as either 20 bit maximum (displayed as < = 20) or 24 bit
maximum (displayed as < = 24).
If no digital signal is present, the display will show “UNLOCKED” and the
output will be muted.
Press
Select
again to select Digital Input 2.
External digital sources
Standby / On
Select
Menu
Aerial
Input
50 Ohms
F-Type
Aerial
Input
50 Ohms
F-Type
Line Output
Line Output
Right
Right
Left
Left
IR Emitter
In
In
Out
Control Bus
Toslink
Optical
Digital Outputs
On
Off
Power
Manufactured in an
ISO9002 approved facility
S/P DIF
Co-axial
Caution
Risk of electric shock.
Do not open.
Avis
Risque de choc electrique.
Ne pas ouvrir.
Achtung
Vorm öffnen des gerätes.
Netzstecker ziehen.
Power Rating:
230V AC ~ 50Hz
www.cambridge-audio.com
Designed in London, England
azur 640T DAB/FM Tuner V2.0
Max Power Consumption:
15W
N1863
Off
Power
On
Manufactured in an
ISO9002 approved facility
This device complies with
part 15 of FCC rules
Caution
Risk of electric shock.
Do not open.
Avis
Risque de choc electrique.
Ne pas ouvrir.
Achtung
Vorm öffnen des gerätes.
Netzstecker ziehen.
Digital Outputs
Power AC
IR Emitter
In
In
Out
Control Bus
S/P DIF
Co-axial
Toslink
Optical
Digital Inputs 1
S/P DIF
Co-axial
Toslink
Optical
Digital Inputs 2
S/P DIF
Co-axial
Toslink
Optical
Class 1 Laser Product
Luokan 1 Laserplaite
Klass 1 Laserapparat
Designed in London, England
Incorporating
Q5
™
from:
ANAGRAM
TECHNOLOGIES
Line Output
Line Output
Right
Right
Left
Left
azur 740C Upsampling
Compact Disc Player
www.cambridge-audio.com
Power Rating:
230V AC ~ 50Hz
Max Power Consumption:
25W
AЯ
46
740C
640T
V2.0

10
The 740C has a custom-made display on the front of the unit showing
the current status and allowing access to the 740C System
Configuration menus. The 740C features some advanced settings that
allow its use to be customised to user preference.
Menu structure
Press the
Menu
button to scroll through the menus, then use the
Select
button to scroll through the options/sub menus of that menu. Press the
Menu
button again to move to the next menu, or after a few seconds the
display will return to the default main menu.
Digital outputs
The digital outputs can be set to two options:
1. Output the raw data from the CD (or digital input) with no processing.
2. Upsampled data processing by the DSP to greater resolution.
Press
Select
to switch between DSP Upsample or Pass Through.
For DSP upsampling the sample frequency, word width and dither are
set by the next three available menus.
Digital out sample frequency
The digital output sample frequency (note this is different to the main
audio output sample frequency which is fixed at 384kHz for best sound
quality) can be set to 48, 96 or 192kHz (the maximum frequency
supported by SPDIF/Toslink):
Press
Select
to switch between the frequency options.
Digital out word width
The digital output word width can be set to 16, 20 or 24 bit (note this is
different to the main audio output word width which is fixed at 24 bit for
best sound quality):
Press
Select
to switch between the word width options.
CD player setup
Default screen
Digital output
Digital out sample frequency
Digital out word width
Digital out dither on/off
Input 1 naming
Input 2 naming
Software version
(Note: If Pass Through is selected here,
the next three menus are bypassed.)
Digital out dither
Dithering is a process where pseudo random noise is added to a signal
to remove quantisation effects that cause harmonic distortion and
replace them with a slightly increased noise floor. The process can
improve the perceived quality of digitised audio signals as a small
decrease in signal to noise ration (especially where the noise is random)
is much preferably to harmonic distortion to the human ear.
The 740C is able to add what is called Triangular Probability Density
Function dither to the upsampled Digital Output signals. Normally, dither
will have already been added to any CD or source material during its
mastering process so the default for this option is off. However if a
source with no dither is used (perhaps an off board A/D converter etc)
TPDF dither can be turned on:
Press
Select
to switch between Dither On and Dither Off.
Changing input names / source naming
The 2 digital inputs can be renamed to reflect the actual source units
you have connected to the 740C. Press the
Menu
button to scroll to
either the Digital Input 1 or Digital Input 2 naming menus:
Press
Select
to start changing the name of the input. The first editable
character will begin to flash. Use the
Stop
button to go up through the
alphabet/available characters, and
Play/Pause
to scroll down. To accept
your character selection, move to the next character by using the
Skip/Scan
buttons:
To save and exit, press
Select
. To cancel and exit, press
Menu
.
Software version
Displays the currently loaded software version:
Table of contents
- 740C azur
- 740C azur
- 740C azur
- 740C azur
- 740C azur
- 740C azur
- 740C azur
- 740C azur
- 740C azur
- 740C azur
- 740C azur
- 740C azur
- 740C azur
- 740C azur
- 740C azur
- 740C azur
- 740C azur
- 740C azur
- 740C azur
- 740C azur
- 740C azur
- 740C azur
- 740C azur
- 740C azur
- 740C azur
- 740C azur
- 740C azur
- 740C azur
- 740C azur
- 740C azur
- 740C azur
- 740C azur
- 740C azur
- 740C azur
- 740C azur
- 740C azur
