Cambridge Audio Azur 740C: 740C azur
740C azur: Cambridge Audio Azur 740C
740C azur
7
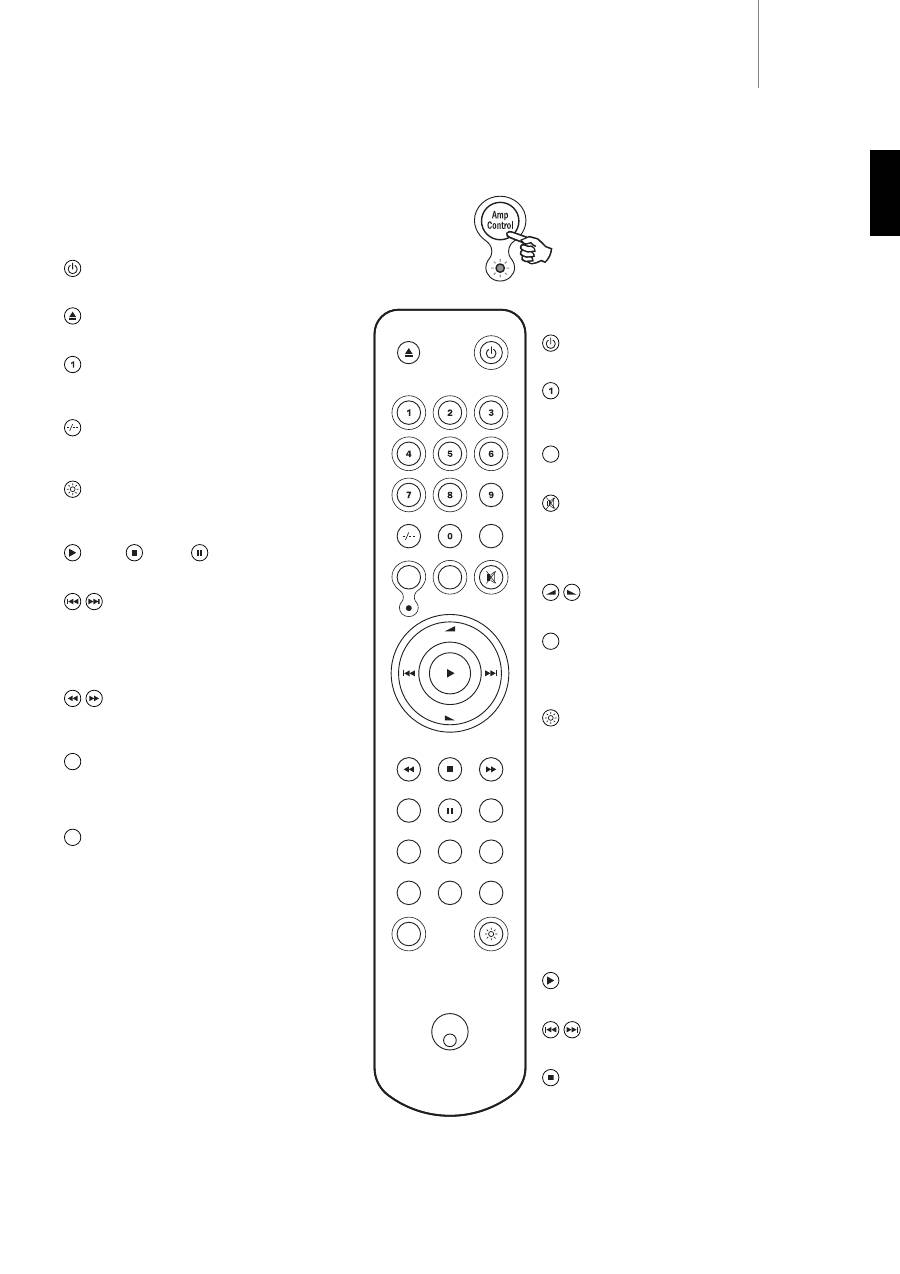
The 740C is supplied with an Azur Navigator remote control that
operates both this CD player and other Cambridge Audio Azur amplifiers.
Insert the supplied AAA batteries to use.
Note: The remote may be in Amp mode when first activated. Please refer
to the Amp Control section for more information.
Standby/On
Switches the unit between On and Standby mode.
Open/Close
Opens and closes the disc tray.
Numerical Track select
Press the number of the desired track. The track will then
be played from the start of the track.
Track select
To select a track number greater than ten, press -/--
followed by the track number.
Bright
Alters the brightness of the display backlight. There are
three levels of brightness: Bright, Normal, and Off.
Play / Stop / Pause
Press the relevant button to play, stop or pause the CD.
Skip
Right Skip - Press once to skip forward by one track on the
CD. Press and hold to skip forwards through tracks.
Left Skip - Press once to skip backward by one track on
the CD. Press and hold to skip backwards through tracks.
Search
Press and hold to search within the selected track. Right
button to fast forward, left button to rewind.
Menu
Press to access the 740C menu system on the front panel
display. Please refer to the ‘CD player setup’ section of
this manual for more information.
Select
Press to accept the item/function highlighted in the
display menu. Please refer to the ‘CD player setup’ section
of this manual for more information.
Program, Remain, A-B, Repeat, Intro,
Random, Space
Read the ‘Operating instructions’ section of this manual
for information on the functions of these buttons.
Remote control
Amp Control mode
The 740A/C remote control comes with an Amplifier
Control button, that when pressed, puts the remote
into Amp mode, allowing operation of a Cambridge
Audio Azur amplifier. When pressed, the LED will light
up for 7 seconds (to let you know you are in Amp
mode), and will then flash when any of the relevant
circled Amp buttons is pressed. All other remote
buttons are inactive when in Amp mode.
The functions relevant to the amplifier are as follows:
Standby/On
Switches the amplifier between On and Standby mode.
Numerical buttons 1-6
Press to change the input source to the amplifier. Button
6 toggles Tape Monitor on/off.
Mode
Press to switch between Volume and Balance modes.
Mute
Mutes the audio on the amplifier. The mute mode is
indicated by MUTE appearing and the volume level being
replaced by two flashing dashes in the display. Press
again to cancel mute.
Volume
Increase or decrease the volume of the amplifier output.
Speaker A/B
Press to scroll through the speaker sets connected to the
loudspeaker terminals on the back panel (speaker sets A,
B or A and B).
Bright
Adjust the backlight of the front panel display; bright, dim
or off.
To exit Amp mode (and return to CD mode), press the
Amp
Control
button again (the LED will light up for one second).
iPod
TM
compatibility
The 740A/C remote can also control the basic functions of
Apple iPod’s when mounted in Apple’s Universal Dock (or
other docks compatible with the Apple Remote). Refer to
your dock’s instruction manual on how to connect it to
your amplifier. To use the Azur remote to control the
docked iPod, put the remote into Amp mode and press
one of the following buttons:
Play/Pause
Press to play the iPod, press again to pause play.
Skip
Press once to skip forwards or backwards one track.
Menu
Press to return to the iPod main menu.
Remote control of matching products
Vol
Vol
Random
Repeat
Select
Remain
A - B
Menu
Space
Speaker
A/B
Intro
Mode
Prog
Amp
Control
Menu
Select
Mode
Speaker
A/B
ENGLISH

8
Operating instructions
Loading and unloading discs
1. Press the
Standby/On
switch.
2. Press the
Open/Close
button.
3. When the disc tray has opened fully, place a disc carefully in the tray
with the label side facing up.
4. To close the disc tray, press the
Open/Close
button again. When the
tray, with a correctly loaded disc, is fully closed the disc will start
turning automatically. After the CD player has read the disc it will be
ready to play. Pressing
Play
will also close the tray and start playing
the disc.
5. The disc tray can be opened at any time by pressing the
Open/Close
button. Only remove the disc after the tray has fully opened.
Note:
- Do not put anything except a Compact Disc into the tray, foreign objects
may damage the mechanism.
- Do not force the tray by hand during the opening and closing
operations.
- To avoid dirt and dust entering the mechanism, keep the disc tray
closed.
- If the Compact Disc is seriously scratched or too dirty the player may
not be able to read it or play it.
- Never load more than one disc into the disc tray at one time.
Normal disc play
1. Switch on your amplifier and set its input selector to the correct
position. Adjust the volume control to a minimum.
2. Press the
Standby/On
switch.
3. Press the
Open/Close
button to open the disc tray, and load a disc.
4. Press the
Open/Close
button again to close the tray. The CD player
will read the disc and enter Standby mode. Alternatively pressing
Play
will close the tray and start playing the disc.
5. Press the
Play
button. The disc will start playing from the beginning
of the first track. When the last track has finished playing, the CD
player will return to Standby mode.
6. To stop the disc at any point press the
Stop
button. Pressing the
Pause
button while the disc is playing will pause the disc. When the
disc is paused the display will flash, play can be resumed by pressing
the
Play
button again.
Locating a specific track
1. Ensure that a disc is loaded.
2. Pressing the right
Skip/Scan
(
Skip
on remote) button once will
forward the CD by one track. Repeat as necessary.
3. Press
Play
. The disc will play to the end of the disc and then return to
Standby mode.
4. Pressing the left
Skip/Scan
(
Skip
on remote) button will access the
previous track.
Locating a particular point in a track
1. Ensure that the disc is playing the desired track.
2. Press and hold the right
Skip/Scan
button (
Search
on remote), the
CD will then fast forward within the track.
3. Release the button when the desired time has been reached. Play
will resume.
4. Press and hold the left
Skip/Scan
(
Search
on remote) button, the CD
will then rewind within the track.
Repeating discs and tracks
1. Ensure that the disc is playing.
2. Press the
Repeat
button on the remote control. ‘Repeat All’ will
appear on the display. The whole disc will now be repeated until the
function is turned off.
3. To repeat a specific track press
Repeat
twice while the track is
playing. ‘Repeat’ will appear on the display and the selected track will
now be repeated until the function is turned off.
4. Press
Repeat
again to turn off the repeat function.
Playing tracks in a random order
1. Ensure that a disc is loaded and the player is in Standby mode.
2. Press the
Random
button on the remote control. ‘Random’ will
appear on the display.
3. Press
Play
. The CD Player will now play the entire disc in a random
order.
4. Press
Random
to exit Random function. The disc will continue playing
to the end in the correct order.
5. Press the
Stop
button at any time to stop the disc.
Using the Intro function
1. Ensure that a disc is loaded. The player can be in Standby mode or
playing.
2. Press
Intro
on the remote control. If the player is in Standby mode it
will automatically play the first ten seconds of each track and then
return to Standby mode. If a disc is being played when
Intro
is
pressed the player will progress to the next track and play the first ten
seconds of any remaining tracks.
3. Press
Intro
again at any time to enter normal play mode.
Using the A-B function
1. Ensure that the disc is playing, press
A-B
on the remote control. This
will allow you to continuously repeat a specific section of a track.
2. Press the
Repeat
button on the remote control at the beginning of the
section you want to loop. The A-B icon will be displayed and the player
will memorise the time A-B was pressed.
3. Press
A-B
again at the end of the section that you want to loop. The
player will now continuously repeat the selected section.
4. Press
A-B
again to return to normal play mode.
Using the Remain function
1. Ensure that the disc is playing.
2. Press the
Remain
button on the remote control once to display the
time remaining on the track playing.
3. Press
Remain
a second time to show remaining number of tracks
and total disc time remaining.
4. Press
Remain
again to return to normal play mode.
Using the Space function
1. Ensure that a disc is loaded. The player can be in Standby mode or
playing.
2. Press
Space
on the remote control. ‘Space’ will appear on the display
and a four second gap will be put between each track played.
Table of contents
- 740C azur
- 740C azur
- 740C azur
- 740C azur
- 740C azur
- 740C azur
- 740C azur
- 740C azur
- 740C azur
- 740C azur
- 740C azur
- 740C azur
- 740C azur
- 740C azur
- 740C azur
- 740C azur
- 740C azur
- 740C azur
- 740C azur
- 740C azur
- 740C azur
- 740C azur
- 740C azur
- 740C azur
- 740C azur
- 740C azur
- 740C azur
- 740C azur
- 740C azur
- 740C azur
- 740C azur
- 740C azur
- 740C azur
- 740C azur
- 740C azur
- 740C azur
