Sigma ELECTRONIC FLASH EF-610 DG SUPER SO-ADI (ソニー用): WIRELESS FLASH
WIRELESS FLASH: Sigma ELECTRONIC FLASH EF-610 DG SUPER SO-ADI (ソニー用)
WIRELESS FLASH
When you use the “Wireless Flash” mode, you can take pictures with a more three-dimensional effect
by shadow, or you can make natural image by shadow depending on the flash position, without any
extension cord connecting the camera body and the flash. In the case of the EF-610 DG SUPER
SO-ADI, communication between the camera body and the flash will be done by the means of the light
of the flash. In the “Wireless Flash” mode, the camera will calculate the correct exposure automatically.
◆ In this instruction, we call a flash unit, which is attached to the camera body the “Controller”, and we
call a flash unit at a remote position the “off-camera flash”.
◆ It would be helpful to use a mini-stand when the flash unit is separated from the camera. The
mini-stand has a threaded hole to attach the flash unit to a tripod.
◆ Make sure not to position the flash your picture area.
◆ Place the flash approximately between 0.5m~5m(1.5-5.6ft) range, and camera approximately
1m~5m(3-16ft) range from the subject.
◆ In case of other people using Wireless Flash mode near you, your flash may be influenced by the
other person’s flash and your flash may fire. In this circumstance, please set your flash to a
different channel; from that of the other person’s flash. Please refer to above settings.
A. USING THE SIGNAL OF BUILT-IN FLASH AS A TRIGGER.
1. Set the camera to the wireless flash mode.
◆ Since the settings vary depending on the camera model, please refer to the instruction manual for
your camera.
2. Set the camera’s exposure mode to P,A,S or M.
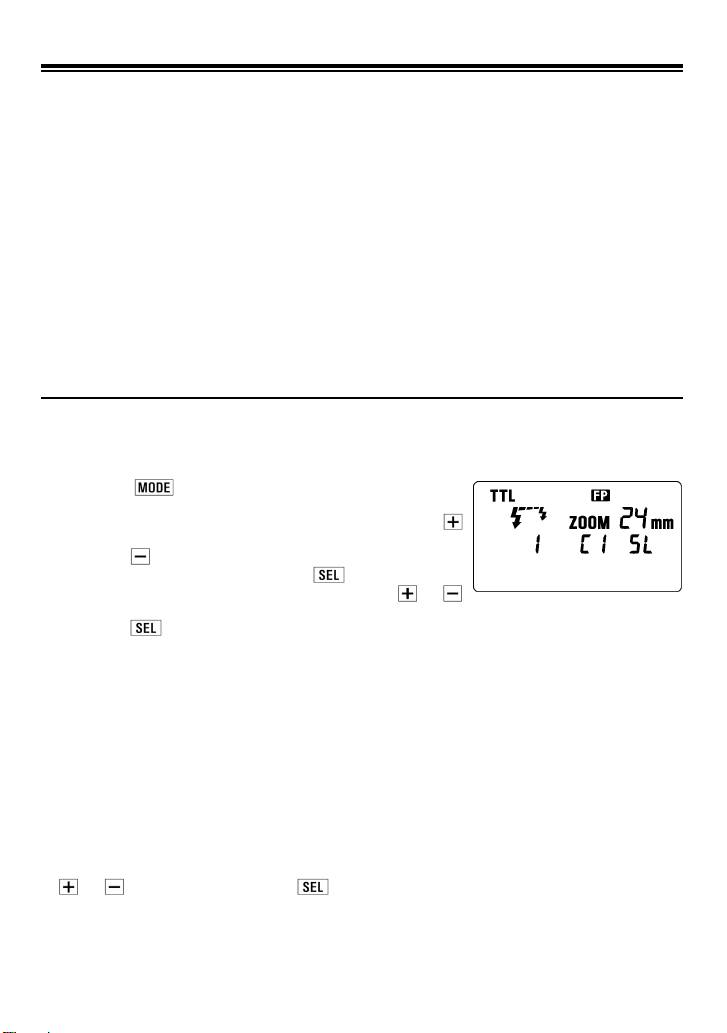
3. Press the
button of the flashgun until the off-camera
flash display appears.
4. Set the off-camera flash number to 1 by pressing the
button.
5. Press the
button to set the Flash Mode to TTL.
6. Channel information will blink when the
button is pressed.
7. Set the channel number (C1 - C4) by pressing
or
button.
8. Press the
button, the indicator will stop blinking.
9. Attach the flashgun to the camera body and press the shutter button halfway (the channel number
is recorded to the camera).
10. Remove your flash from the camera and place it at the desired position.
11. Pop-up the built-in flash of your camera, and confirm that it is fully charged.
◆ In wireless flash mode, AF Auxiliary Light will blink to indicate that the flash is fully charged.
12. Adjust the focus of your camera for taking picture.
◆ The EF-610 DG SUPER SO-ADI will fire when the built-in flash fires. The camera’s built-in flash is
fired only for control of the EF-610 DG SUPER SO-ADI. The illimunation of the subject is done by
the EF-610 DG SUPER SO-ADI. The camera will control the flash power as a TTL Auto flash, to
obtain the correct exposure.
◆ Depending on the shutter speed, it will be switched automatically to normal flash or high speed sync
flash.
◆ When the camera’s exposure mode is set to M, it will be manual wireless flash. After setting the
channel number, the flash power level will blink. Set the desired flash power output by pressing the
or button and then press the button to stop the display blinking.
20
B. USING THE SIGNAL OF THE FLASH THAT IS ATTACHED TO THE
CAMERA AS THE TRIGGER
For Wireless Flash, two or more EF-610 DG SUPER SO-ADI flash units are necessary. EF-530 DG
SUPER SO-ADI can be used only with off-camera mode. Depending on the flash unit model of
off-camera flash, it is necessary to change the control mode of the controller. Please see the below
chart. (EF-610 DG SUPER SO-ADI can be used for the controller).
Flashgun model can be
EF-530 DG SUPER SO-ADI
EF-610 DG SUPER SO-ADI
used for off-camera flash
EF-610 DG SUPER SO-ADI
Control Mode
+
-
Camera model can be
α700, α900 α900
used with off-camera flash
It is possible to control up to 3
It is possible to control 2
groups;Controller, Off-Camera
groups;Controller and Off-Camera
Flash 1 and Off-Camera Flash 2.
Flash.
Ratio-Flash Control setting
It is possible to set flash-ratio of
Controller : It is possible to set the
each group from 5 levels or
ratio of off-camera flash to 1:2 or
without falsh.
2:1.
TTL Auto flash, High Speed Sync
TTL Auto flash, High Speed Sync
Flash Mode
Flash (TTL, M), Manual flash
Flash (TTL)
B-1.In the case of using only off-camera flash
Camera and Controller Setting
1. Set the camera to the wireless flash mode.
◆ Since the settings vary depending on the camera model, please refer to the instruction manual for
your camera.
2. Set the camera’s exposure mode to P,A,S or M.
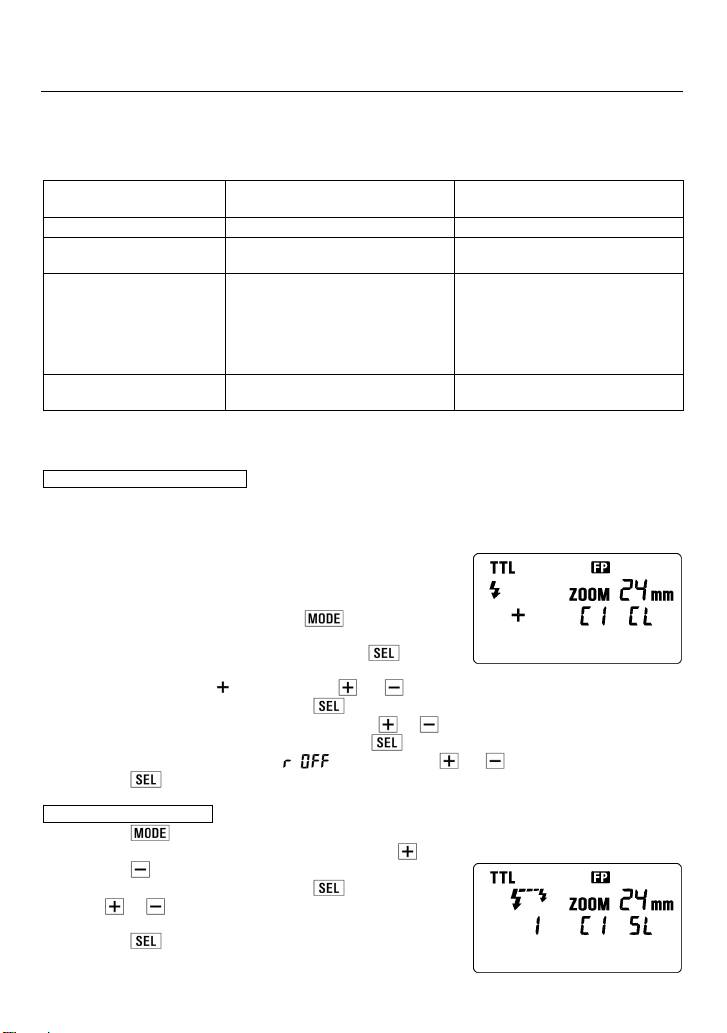
3. Attach the flashgun to the camera body.
4. The flashgun’s LCD panel will be switched to the controller
setting display automatically. (If the LCD panel will not be
switched automatically, press the
button until the
controller setting display appears.)
5. The control mode display will blink when the
button is
pressed.
6. Set the control mode to
by pressing the or button.
7. Channel information will blink when the
button is pressed.
8. Set the channel number (C1 - C4) by pressing the
or
button.
9. The ratio-flash control display will blink when the
button is pressed.
10. Set the ratio-flash control mode to [
] by pressing the or button.
11. Press the
button again, the display will stop blinking.
Off-Camera Flash Setting
12. Press the button until the off-camera flash display appears.
13. Set the off-camera flash number to 1 by pressing the
button.
14. Press the
button to set the flash mode to TTL.
15. Channel information will blink when the
button is pressed.
16. Press
or
button to choose the same channel number as
set on the controller.
17. Press the
button, the indicator stops blinking.
18. Place the off-camera flash at the desired position.
19. Check that both flashes are fully charged.
21
◆ Ready light lamp will light, and the AF Auxiliary lamp will blink to indicate that the flash is ready for
shooting.
20. Adjust the focus on the subject, and take the picture.
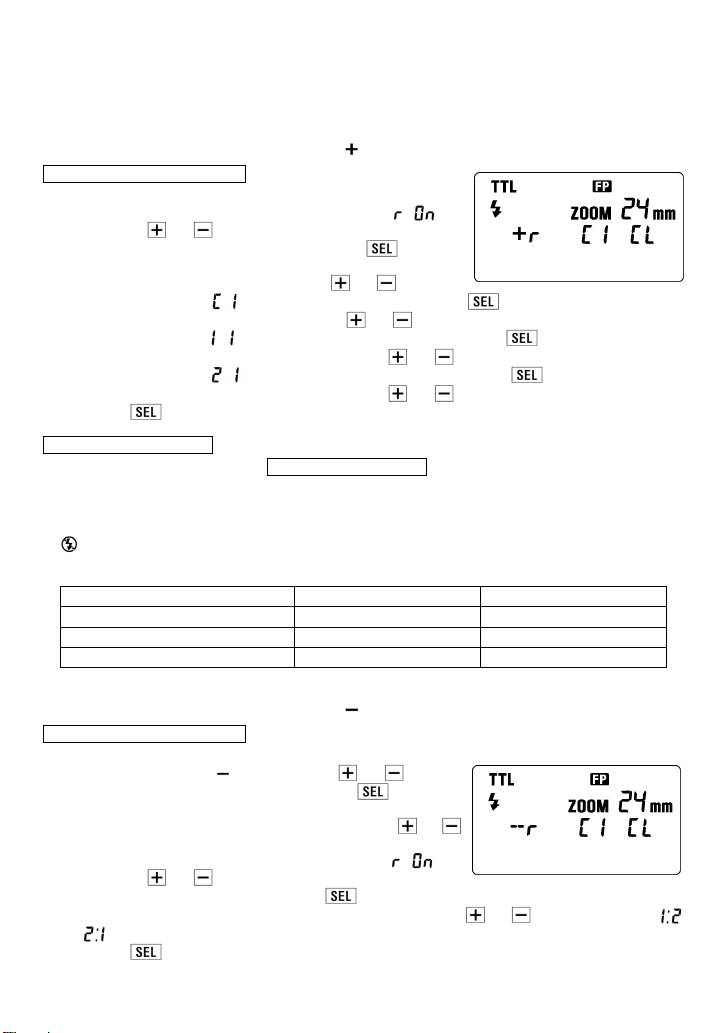
B-2. Ratio-Flash Control (Control Mode )
Camera and Controller setting
1. Process the same setting from step 1 to 9 of B-1.
2. Set the ratio-flash control mode display to the [
] by
pressing the
or button.
3. The flash mode display will blink when the
button is
pressed.
4. Set the flash mode to TTL by pressing the
or button.
5. The ratio-flash display [
] of the controller will blink when the button is pressed.
6. Set the ratio of the controller by pressing the
or button.
7. The ratio-flash display [
] of Off-Camera Flash 1 will blink when the button is pressed.
8. Set the ratio of Off-Camera Flash 1 by pressing the
or button.
9. The ratio-flash display [
] of Off-Camera Flash 2 will blink when the button is pressed.
10. Set the ratio of Off-Camera Flash 2 by pressing the
or button.
11. Press the
button, the indicator stops blinking.
Off-Camera Flash Setting
12. Process the same setting of B-1 Off-Camera Flash Setting.
◆ If the off-camera flash unit is plural, allocate the desired off camera flash number to each unit.
◆ It is possible to set the flash ratio for the controller, Off-Camera Flash 1 and Off-Camera Flash 2 as
follows.
(without flash)、1、2、4、8、16
The ratio of flash output amount is setting the value of each unit / total value.
[Example]
Setting value Ratio of flash amount
Controller 2 2/7
Off-Camera Flash 1 1 1/7
Off-Camera Flash 2 4 4/7
B-3. Ratio-Flash Control (Control Mode )
Camera and Controller setting
1. Process the same setting from step 1 to 6 of B-1.
2. Set the control mode to
by pressing the or button.
3. Channel information will blink when the
button is
pressed.
4. Set the channel number (C1 – C4) by pressing
or
button.
5. Set the ratio-flash control mode display to the [
] by
pressing the
or button.
6. The ratio-flash display will blink when the
button is pressed.
7. Set the ratio of the controller: Off-Camera Flash by pressing the
or button.(Select the
or
.)
8. Press the
button, the indicator stops blinking.
22
Оглавление
- 安全上のご注意
- 各部の名称(1 ページ)
- 発光部のセット
- 液晶パネルの照明
- 連続撮影時のご注意
- ハイスピードシンクロ撮影(HSS 発光)
- バウンス撮影
- スレーブ発光
- 主要諸元
- PRECAUTIONS
- DESCRIPTION OF THE PARTS
- ADJUSTING THE FLASH HEAD
- TTL AUTO FLASH
- MANUAL FLASH OPERATION
- MULTI FLASH MODE
- WIRELESS FLASH
- SLAVE FLASH
- SPECIFICATIONS
- VORSICHTSMAßNAHMEN
- BESCHREIBUNG DER TEILE
- EINSTELLEN DES BLITZKOPFES
- BELEUCHTUNG DER LCD
- GRENZEN DER SERIENAUSLÖSUNG
- EINSTELLLICHT
- KABELLOSES BLITZEN
- „SLAVE“ GERÄT
- TECHNISCHE DATEN
- PRECAUTIONS
- DESCRIPTION DES ELEMENTS
- AJUSTEMENT DE LA TETE FLASH
- RETRO ECLAIRAGE DE L'ECRAN LCD
- LIMITES DES PRISES DE VUE CONSECUTIVES AU FLASH
- MODE DE FLASH STROBOSCOPIQUE (MULTI FLASH)
- FLASH DISTANT SANS CORDON (Wireless)
- FLASH ESCLAVE
- CARACTERISTIQUES TECHNIQUES
- PRECAUCIONES
- DESCRIPCIÓN DE LAS PARTES
- AJUSTE DEL CABEZAL DEL FLASH
- ILUMINACIÓN DE LA PANTALLA LCD
- LIMITACIONES DEL DISPARO CONTINUO
- MODO DE MULTI FLASH (Estroboscópico)
- CONTROL REMOTO DEL FLASH
- FLASH ESCLAVO
- ESPECIFICACIONES
- ATTENZIONE
- DESCRIZIONE DELLE PARTI
- REGOLAZIONE DELLA TESTA DEL FLASH
- FLASH AUTOMATICO TTL
- FLASH MANUALE
- MODALITÀ MULTI FLASH
- FLASH TELECOMANDATO SENZA FILI (WIRELESS)
- FLASH AUSILIARIO
- SPECIFICHE
- BEMÆRK
- BESKRIVELSE AF FLASHENS DELE
- JUSTERING AF FLASHHOVEDET
- LCD-DISPLAY BELYSNING
- KONTINUERLIG OPTAGELSE
- PILOT-LYS
- TRÅDLØS FLASH
- SLAVE-FLASH
- SPECIFIKATIONER
- VOORZORGSMAATREGELEN
- OMSCHRIJVING VAN DE ONDERDELEN
- HET AFSTELLEN VAN DE FLITSKOP
- VERLICHTING VAN HET LCD DISPLAY
- MAXIMALE PRESTATIES BIJ CONTINU FOTOGRAFEREN.
- MEERVOUDIG FLITSEN
- DRAADLOOS FLITSEN
- SLAVE FUNCTIE
- TECHNISCHE GEGEVENS:
- 사용상 주의점
- 각부의 명칭
- 플래시 헤드 조정
- LCD 패널 조명
- 연속 촬영시 주의점
- 모델링 플래시
- 무선 플래시
- 슬레이브 플래시
- 제품 사양
- ПРЕДОСТОРОЖНОСТИ
- ОПИСАНИЕ СОСТАВНЫХ ЧАСТЕЙ
- НАСТРОЙКА ГОЛОВКИ ВСПЫШКИ
- ОСВЕЩЕНИЕ ЖК ПАНЕЛИ
- ОГРАНИЧЕНИЯ ДЛЯ НЕПРЕРЫВНОЙ СЪМКИ
- ВЫСОКОСКОРОСТНАЯ
- НАПРАВЛЕННОСТЬ ВСПЫШКИ
- ДОПОЛНИТЕЛЬНАЯ ВСПЫШКА
- ХАРАКТЕРИСТИКИ
