Gigabyte GA-8IG1000MT: Chapter 4 Technical Reference
Chapter 4 Technical Reference: Gigabyte GA-8IG1000MT

English
Chapter 4 Technical Reference
™
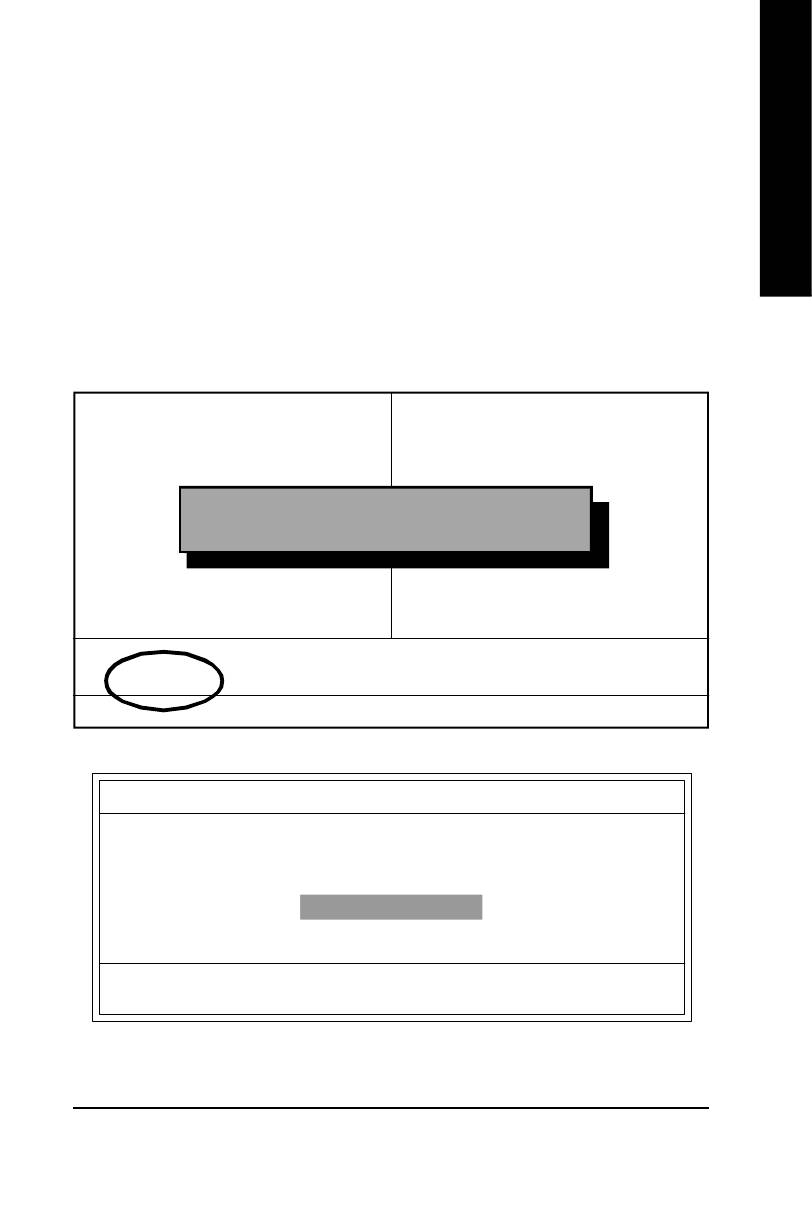
@BIOS
Introduction
™
Gigabyte announces @BIOS
Windows BIOS live update utility
Have you ever updated BIOS by yourself? Or like
many other people, you just know what BIOS is,
but always hesitate to update it? Because you think
updating newest BIOS is unnecessary and actually
you don't know how to update it.
Maybe not like others, you are very experienced in BIOS updating and spend quite a lot of time
to do it. But of course you don’t like to do it too much. First, download different BIOS from website and
then switch the operating system to DOS mode. Secondly, use different flash utility to update BIOS.
The above process is not a interesting job. Besides, always be carefully to store the BIOS source code
correctly in your disks as if you update the wrong BIOS, it will be a nightmare.
Certainly, you wonder why motherboard vendors could not just do something right to save your
time and effort and save you from the lousy BIOS updating work? Here it comes! Now Gigabyte
announces @BIOS— the first Windows BIOS live update utility. This is a smart BIOS update software.
It could help you to download the BIOS from internetand update it. Not like the other BIOS update
software, it's a Windows utility. With the help of "@BIOS", BIOS updating is no more than a click.
Besides, no matter which mainboard you are using, if it’s a Gigabyte's product*, @BIOS help you
to maintain the BIOS. This utility could detect your correct mainboard model and help you to choose the
BIOS accordingly. It then downloads the BIOS from the nearest Gigabyte ftp site automatically. There
are several different choices; you could use "Internet Update" to download and update your BIOS
directly. Or you may want to keep a backup for your current BIOS, just choose "Save Current BIOS"
to save it first. You make a wise choice to use Gigabyte, and @BIOS update your BIOS smartly. You
are now worry free from updating wrong BIOS, and capable to maintain and manage your BIOS
easily. Again, Gigabyte's innovative product erects a milestone in mainboard industries.
For such a wonderful software, how much it costs? Impossible! It's free! Now, if you buy a
Gigabyte's motherboard, you could find this amazing software in the attached driver CD. But please
remember, connected to internet at first, then you could have a internet BIOS update from your
Gigabyte @BIOS.
- 61 -
Technical Reference
8ig1000mt_1001_t.p65 2003/4/15, 下午 03:1261

™
EasyTune
4 Introduction
™
Gigabyte announces EasyTune
4
Windows based Overclocking utility
English
EasyTune 4 carries on the heritage so as to pave the way for future generations.
Overclock might be one of the most common issues
in computer field. But have many users ever tried it?
The answer is probably "no". Because "Overclock"
is thought to be very difficult and includes a lot of
technical know-how, sometimes "Overclock" is
even considered as special skills found only in some
enthusiasts. But as to the experts in "Overclock",
what's the truth? They may spend quite a lot of time
and money to study, try and use many different
hardware or BIOS tools to do "Overclock". And even with these technologies, they still learn that it's
quite a risk because the safety and stability of an "Overclock" system is unknown. Now everything
is different because of a Windows based overclocking utility "EasyTune 4" --announced by Gigabyte.
This windows based utility has totally changed the gaming rule of "Overclock". This is the first
windows based overclocking utility is suitable for both normal and power users. Users can choose
either "Easy Mode" or "Advanced Mode" for overclocking at their convenience. For users who
choose "Easy Mode", they just need to click "Auto Optimize" to have autoed and immediate CPU
overclocking. This software will then overdrive CPU speed automatically with the result being shown
in the control panel. If users prefer "Overclock" by them, there is also another choice. Click "Advanced
Mode" to enjoy "sport drive" class Overclocking user interface. "Advanced Mode", allows users to
change the system bus / AGP / Memory working frequency in small increments to get ultimate system
performance. It operates in coordination with Gigabyte motherboards. Besides, it is different from other
traditional over-clocking methods, EasyTune 4 doesn't require users to change neither BIOS nor
hardware switch/ jumper setting; on the other hand, they can do "Overclock" at easy step . Therefore,
this is a safer way for "Overclock" as nothing is changed on software or hardware. If user runs
EasyTune 4 over system's limitation, the biggest lost is only to restart the computer again and the side
effect is then well controlled. Moreover, if one well-performed system speed has been tested in
EasyTune 4, user can "Save" this setting and "Load" it in next time. Obviously, Gigabyte EasyTune
4 has already turned the "Overclock" technology toward to a newer generation. This wonderful
software is now free bundled in Gigabyte motherboard attached in driver CD. Users may make a test
drive of "EasyTune 4" to find out more amazing features by themselves.
*Some Gigabyte products are not fully supported by EasyTune 4. Please find the products supported
list in the web site.
*Any "Overclocking action" is at user's risk, Gigabyte Technology will not be responsible for any
damage or instability to your processor, motherboard, or any other components.
GA-8IG1000MT Motherboard
- 62 -
8ig1000mt_1001_t.p65 2003/4/15, 下午 03:1262
English
Flash BIOS Method Introduction
Method 1 : Q-Flash
A. What is Q-Flash Utility?
Q-Flash utility is a pre-O.S. BIOS flash utility enables users to update its BIOS within BIOS
mode, no more fooling around any OS.
B. How to use Q-Flash?
a. After power on the computer, pressing <Del> immediately during POST (Power On Self Test) it will
allow you to enter AWARD BIOS CMOS SETUP, then press <F8> to enter Q-Flash utility.
CMOS Setup Utility-Copyright (C) 1984-2003 Award Software
} Standard CMOS Features
Load Fail-Safe Defaults
} Advanced BIOS Features
Load Optimized Defaults
} Integrated Peripherals
Set Supervisor Password
} Power Management Setup
Set User Password
Enter Q-Flash Utility (Y/N)? Y
} PnP/PCI Configurations
Save & Exit Setup
} PC Health Status
Exit Without Saving
} Frequency/Voltage Control
ESC: Quit higf: Select Item
F8: Q-Flash F10: Save & Exit Setup
Tim e, Date, Hard Disk Type...
b. Q-Flash Utility
Q-Flash Utility v1.30
Flash Type/Size ......................................................... SST 49LF002A 256K
Keep DMI Data Enable
Update BIOS from Floppy
Save BIOS to Floppy
Enter : Run h/i : Move ESC : Reset F10 : Power Off
- 63 -
Technical Reference
8ig1000mt_1001_t.p65 2003/4/15, 下午 03:1263
Load BIOS From Floppy
!In the A:drive, insert the "BIOS" diskette, then Press Enter to Run.
1 File(s)
English
xxxx.xxx 256K
Total size: 1.39M Free size: 1.14M
F5: Refresh DEL: Delete
Where xxxx.xxx is name of the BIOS file.
! Press Enter to Run.
Are you sure to update BIOS?
[Enter] to contiune or [ESC] to abort ...
! Press Enter to Run.
!! Copy BIOS Completed - Pass !!
Please press any key to continue ...
Congratulation! You have completed the flashed and now can restart system.
GA-8IG1000MT Motherboard
- 64 -
8ig1000mt_1001_t.p65 2003/4/15, 下午 03:1264
English
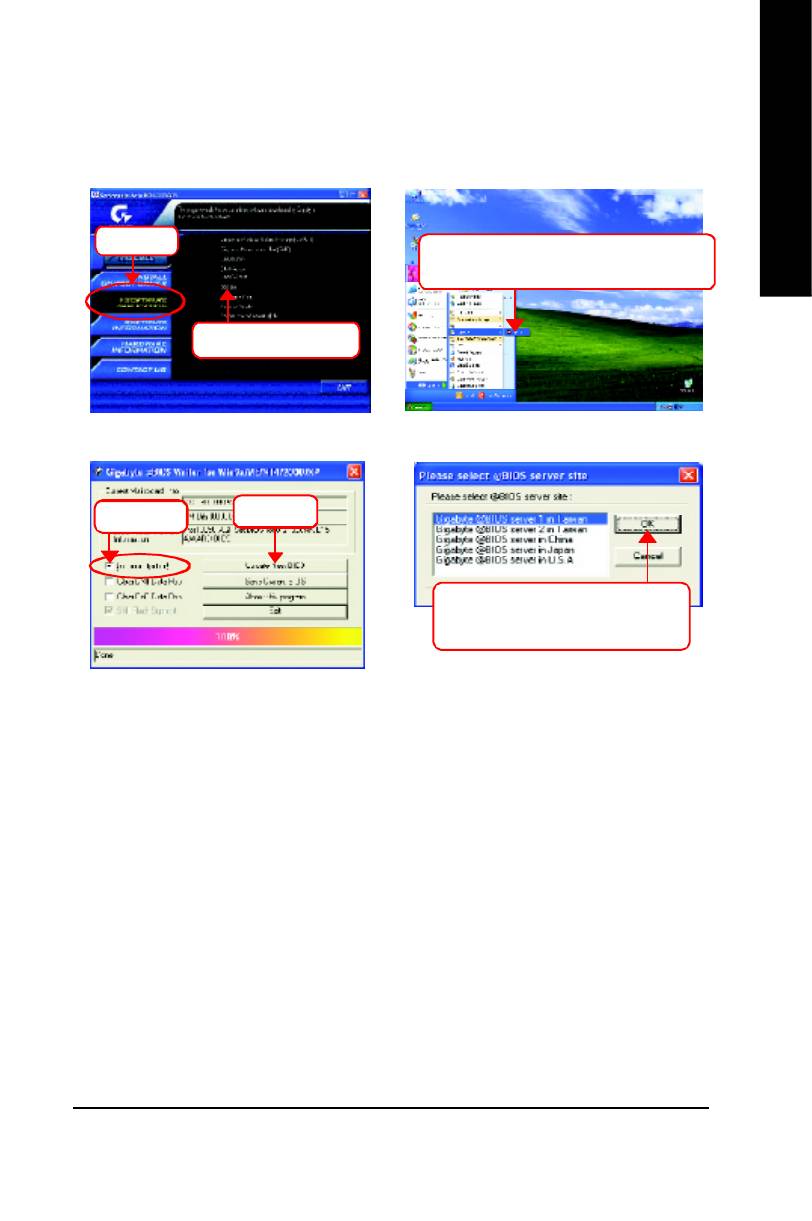
Method 2 : @BIOS Utility
™
If you don't have DOS boot disk, we recommend that you used Gigabyte @BIOS
program to flash
BIOS.
Press here.
2. Click Start/ All Programs/ GIGABYTE/
@BIOS.
1. Click "@BIOS" item.
(1)
(2)
Click here
3.Click "P".
4. Please select @BIOS sever site,
then Click "OK".
(3)
(4)
Methods and steps:
I. Update BIOS through Internet
a. Click "Internet Update" icon
b. Click "Update New BIOS" icon
™
c. Select @BIOS
sever
d. Select the exact model name on your motherboard.
e. System will automatically download and update the BIOS.
- 65 -
Technical Reference
8ig1000mt_1001_t.p65 2003/4/15, 下午 03:1265

II. Update BIOS NOT through Internet:
a. Do not click "Internet Update" icon
b. Click "Update New BIOS"
c. Please select "All Files" in dialog box while opening the old file.
English
d. Please search for BIOS unzip file, downloading from internet or any other methods (such as:
IG1000MT.F1).
e. Complete update process following the instruction.
III. Save BIOS
In the very beginning, there is "Save Current BIOS" icon shown in dialog box. It means to save the
current BIOS version.
IV. Check out supported motherboard and Flash ROM:
In the very beginning, there is "About this program" icon shown in dialog box. It can help you check
out which kind of motherboard and which brand of Flash ROM are supported.
Note:
a. In method I, if it shows two or more motherboard's model names to be selected, please make
sure your motherboard's model name again. Selecting wrong model name will cause the
system unbooted.
b. In method II, be sure that motherboard's model name in BIOS unzip file are the same as your
motherboard's. Otherwise, your system won't boot.
™
c. In method I, if the BIOS file you need cannot be found in @BIOS
server, please go onto
Gigabyte's web site for downloading and updating it according to method II.
d. Please note that any interruption during updating will cause system unbooted
GA-8IG1000MT Motherboard
- 66 -
8ig1000mt_1001_t.p65 2003/4/15, 下午 03:1266

English
Revision History2-/4-/6-Channel Audio Function Introuction
The installation of windows 98SE/2K/ME/XP is very simple. Please follow next step to install the
function!
Stereo Speakers Connection and Settings:
We recommend that you use the speaker with amplifier to acqiire the best sound effect if the stereo output
is applied.
STEP 1:
Connect the stereo speakers or earphone to "Line
Out".
Line Out
STEP 2 :
After installation of the audio driver, you'll find an
icon on the taskbar's status area. Click the
audio icon "Sound Effect" from the windows tray at
the bottom of the screen.
STEP 3:
Select "Speaker Configuration", and choose the
"2 channel for stereo speakers out put".
- 67 -
Technical Reference
8ig1000mt_1001_t.p65 2003/4/15, 下午 03:1267
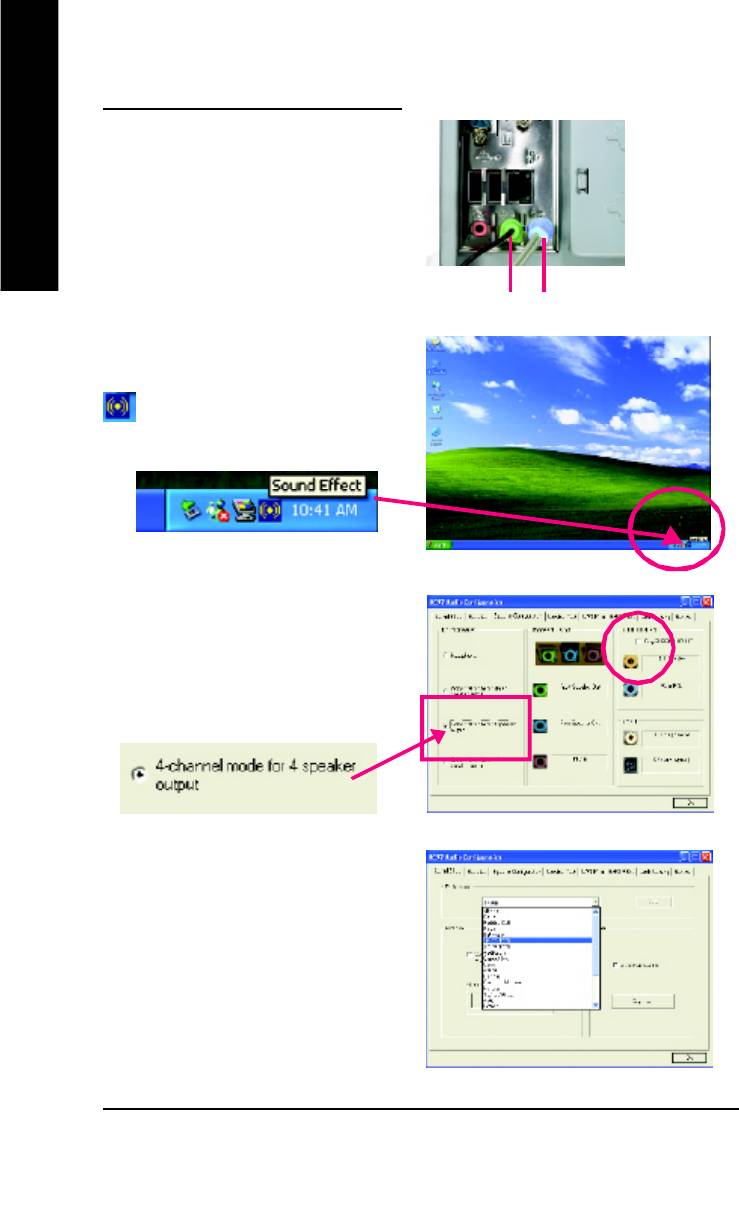
4 Channel Analog Audio Output Mode
STEP 1 :
Connect the front channels to "Line Out",
English
the rear channels to "Line In".
Line Out Line In
STEP 2 :
After installation of the audio driver, you'll find an
icon on the taskbar's status area. Click the
audio icon "Sound Effect" from the windows tray at
the bottom of the screen.
STEP 3 :
Select "Speaker Configuration", and choose the
"4 channel for 4 speakers out put".
Disable "Only SURROUND-KIT", and press
"OK".
When the "Environment settings" is "None", the
sound would be performed as stereo mode
(2 channels output). Please select the other
settings for 4 channels output.
GA-8IG1000MT Motherboard
- 68 -
8ig1000mt_1001_t.p65 2003/4/15, 下午 03:1268

English
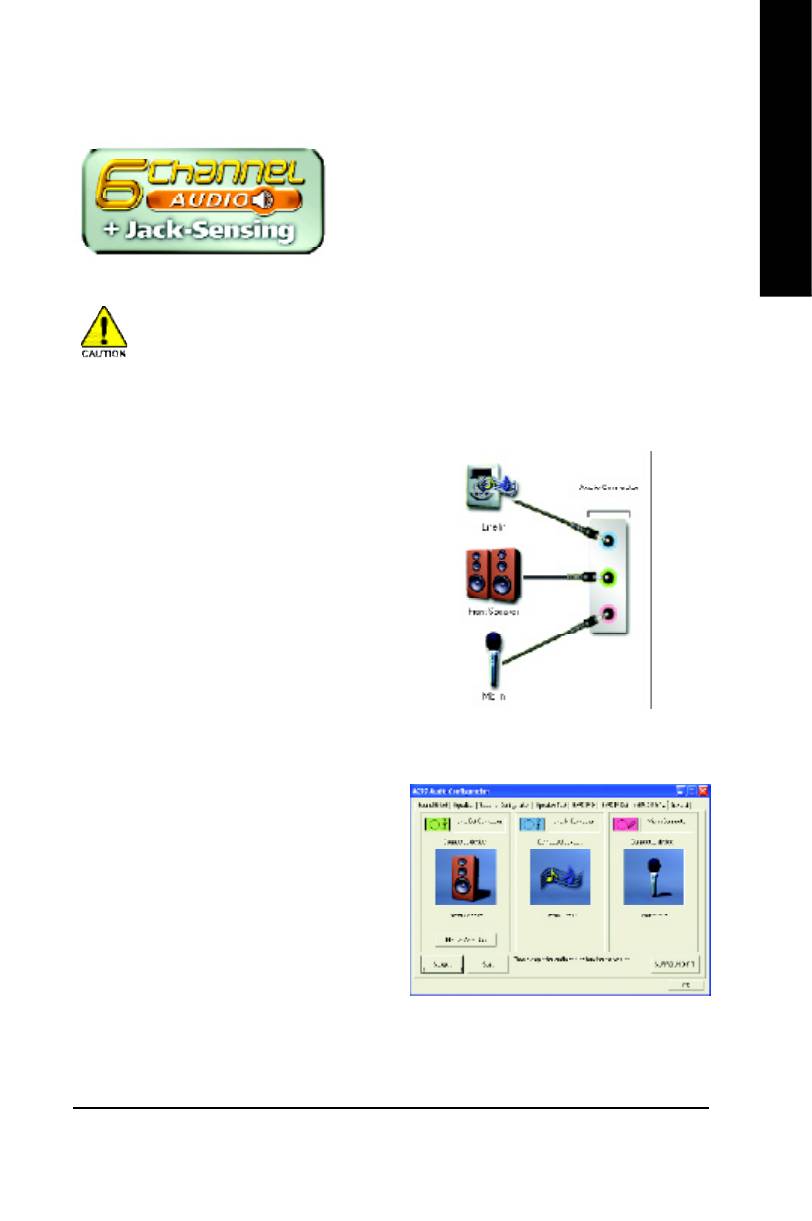
Basic 6 Channel Analog Audio Output Mode
Use the back audio panel to connect the audio out-
put without any additional module.
STEP 1 :
Connect the front channels to "Line Out",the rear
Line In
channels to "Line In", and the Center/Subwoofer
channels to "MIC In".
M IC In
Line Out
STEP 2 :
After installation of the audio driver, you'll find an
icon on the taskbar's status area. Click the
audio icon "Sound Effect" from the windows tray at
the bottom of the screen.
STEP 3 :
Select "Speaker Configuration", and choose the
"6 channel for 5.1 speakers out put".
Disable "Only SURROUND-KIT" and pess "OK".
- 69 -
Technical Reference
8ig1000mt_1001_t.p65 2003/4/15, 下午 03:1269
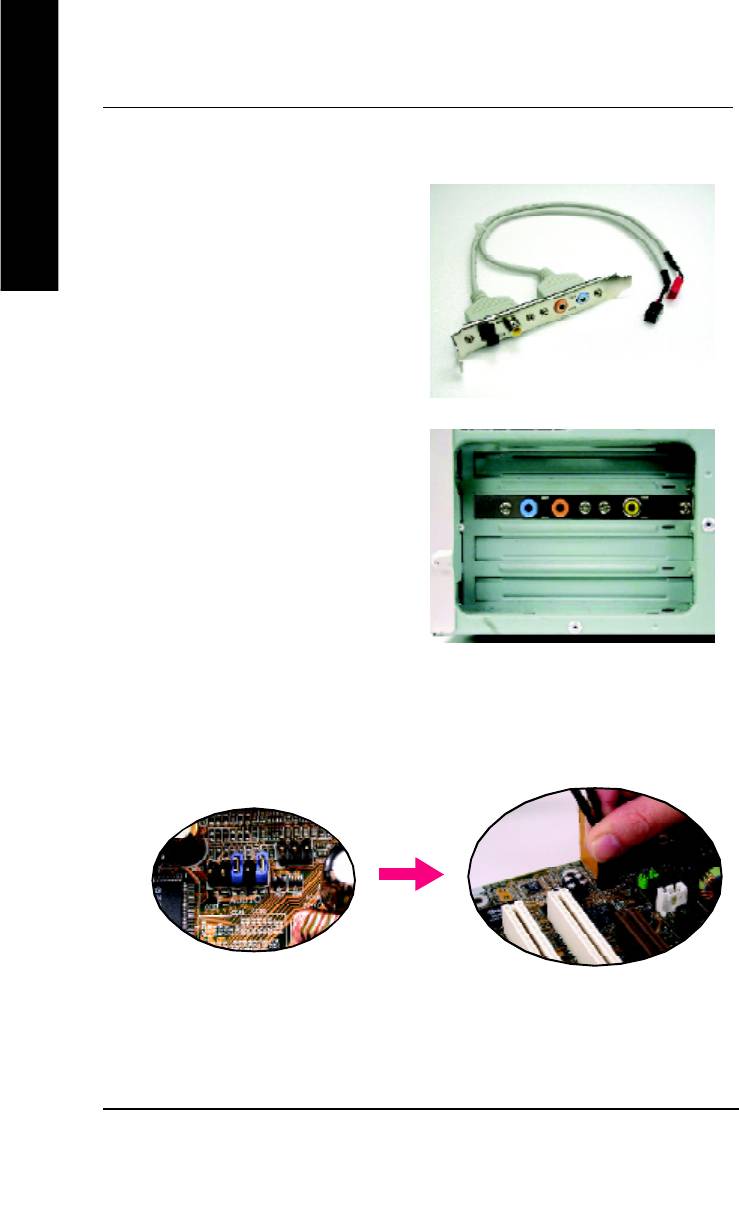
Advanced 6 Channel Analog Audio Output M ode (using Audio Combo Kit,Optional Device):
(Audio Combo Kit provides SPDIF output port : optical & coaxis and SURROUND-KIT : Rear R/L & CEN
/Subwoofer)
English
SURROUND-KIT access analog output to rear
channels and Center/Subwoofer channels. It is the
best solution if you need 6 channel output, Line In
and MIC at the same time. "SURROUND-KIT" is
included in the GIGABYTE unique "Audio Com bo
Kit" as picture.
STEP 1 :
Insert the "SURROUND-KIT" in the back of the case
,and fix it with the screw.
STEP 2 :
Connect the "SURROUND-KIT" to SUR_CEN on
the M/B.
GA-8IG1000MT Motherboard
- 70 -
8ig1000mt_1001_t.p65 2003/4/15, 下午 03:1270
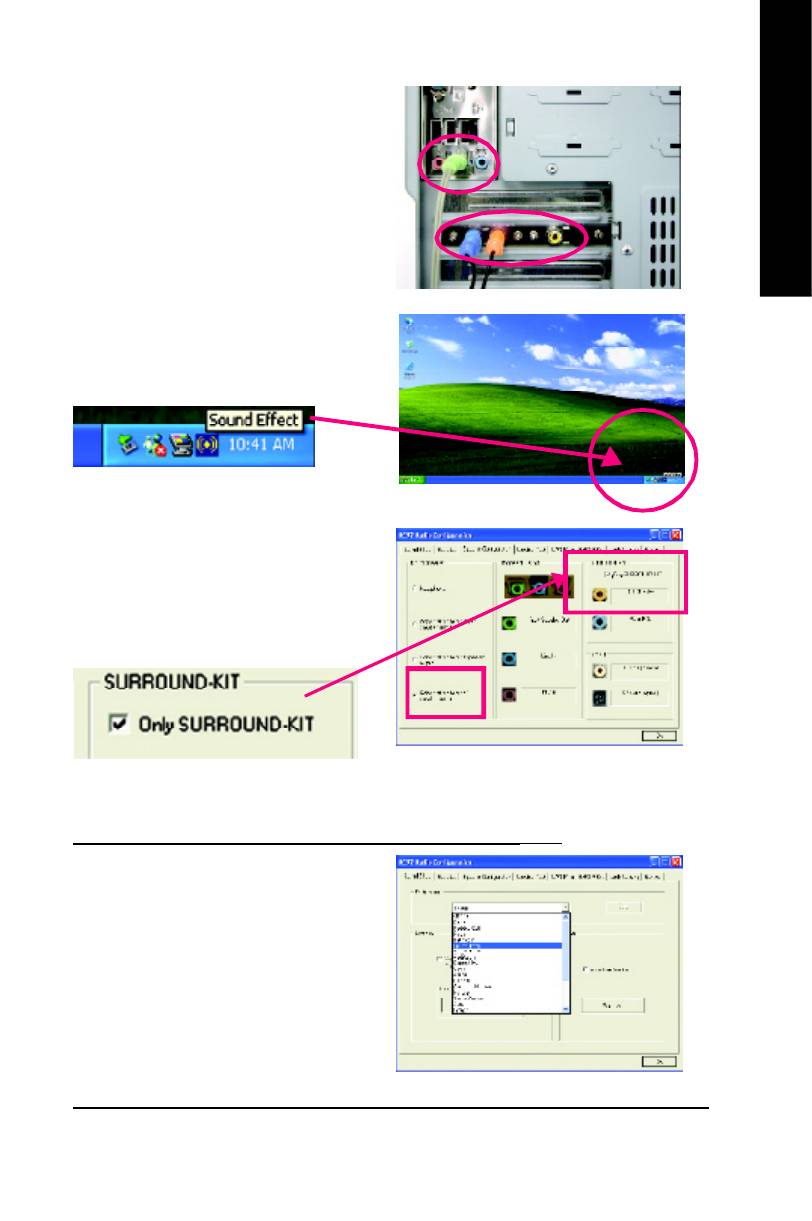
English
STEP 3 :
Connect the front channels to back audio panel's
"Line Out", the rear channels to SURROUND-KIT's
REAR R/L, and the Center/Subwoofer channels to
SURROUND-KIT's SUB CENTER.
STEP 4 :
Click the audio icon "Sound Effect" from the win-
dows tray at the bottom of the screen.
STEP 5 :
Select "Speaker Configuration", and choose the "6
channels for 5.1 speakers out put".
Enable "Only SURROUND-KIT" and press "OK".
Basic & Advanced 6 Channel Analog Audio Output ModeNotes:
When the "Environment settings" is "None", the sound
would be perform ed as stereo m ode(2 channels
output). Please select the other settings for 6
channels output.
- 71 -
Technical Reference
8ig1000mt_1001_t.p65 2003/4/15, 下午 03:1271
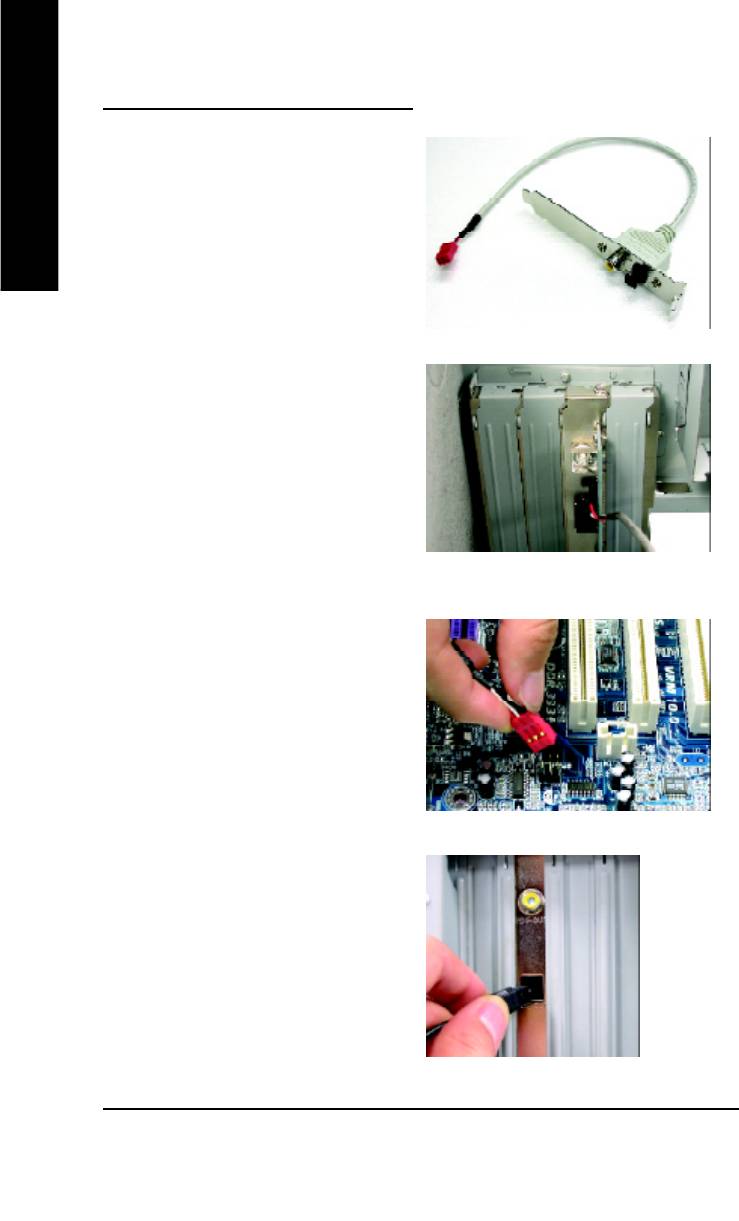
SPDIF Output Device (Optional Device)
A "SPDIF output" device is available on the
motherboard. Cable with rear bracket is provided
English
and could link to the "SPDIF output" connector (As
picture.) For the further linkage to decoder, rear
bracket provides coaxial cable and Fiber
connecting port.
1. Connect the SPDIF output device to the rear
bracket of PC, and fix it with screw.
2. Connect SPDIF device to the m otherboard.
3. Connect SPDIF to the SPDIF decoder.
GA-8IG1000MT Motherboard
- 72 -
8ig1000mt_1001_t.p65 2003/4/15, 下午 03:1272
English
Jack-Sensing Introuction
Jack-Sensing provides audio connectors error-detection
function.
Install Microsoft DirectX8.1 before to enable Jack-Sensing support for Windows 98/98SE/2000
/M E.
Jack-Sensing includes 2 parts: AUTO and M ANUAL. Following is an example for 2 channels
(Windows XP):
Introduction of audio connectors
You may connect CDROM, Walkman or others
audio input devices to Line In jack, speakers,
earphone or others output devices to Line Out jack,
and microphone to M IC In jack.
Auto-detecting:
Please connect the devices to the right jacks as
above. A window will appear as right picture if you
setup the devices properly.
Please note that 3D audio function will only appear
when 3D audio inputs.
- 73 -
Technical Reference
8ig1000mt_1001_t.p65 2003/4/15, 下午 03:1273
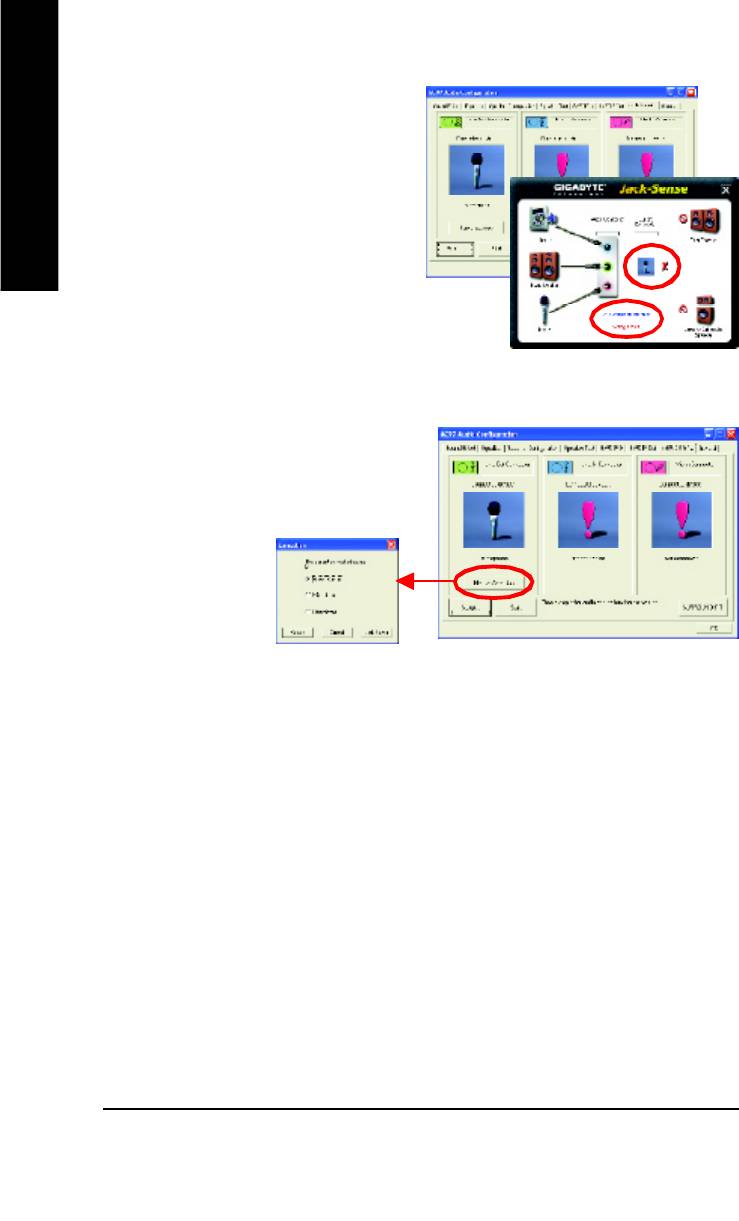
If you set wrong with the connectors, the warning
message will come out as right picture.
English
Manual setting:
If the device picture shows different from what you
set, please press "Manual Selection" to set.
GA-8IG1000MT Motherboard
- 74 -
8ig1000mt_1001_t.p65 2003/4/15, 下午 03:1274

English
- 75 -
Technical Reference
8ig1000mt_1001_t.p65 2003/4/15, 下午 03:1275

English
GA-8IG1000MT Motherboard
- 76 -
8ig1000mt_1001_t.p65 2003/4/15, 下午 03:1276


