Gigabyte GA-8GEMT4: 2-/4-/6-Channel Audio Function Introduction
2-/4-/6-Channel Audio Function Introduction: Gigabyte GA-8GEMT4
English
Revision History
2-/4-/6-Channel Audio Function
Introduction
The installation of windows 98SE/2K/ME/XP is very simple. Please follow next step to install the
function!
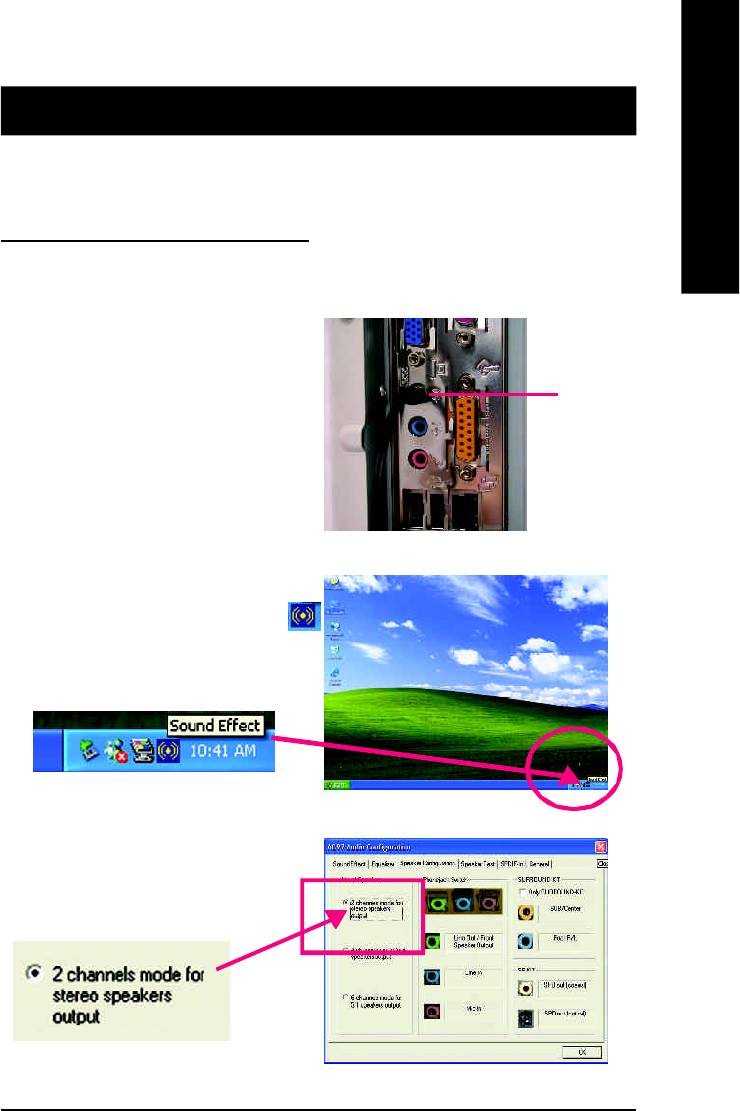
Stereo Speakers Connection and Settings:
We recommend that you use the speaker with amplifier to acquire the best sound effect if the stereo output is
applied.
STEP 1:
Connect the stereo speakers or earphone to “Line Out”.
Line Out
STEP 2 :
After installation of the audio driver, you ‘ll find an
icon on the taskbar’s status area. Click the audio icon
“Sound Effect” from the windows tray at the bottom of
the screen.
STEP 3:
Select “Speaker Configuration”, and choose the
“2 channels for stereo speakers out put”.
- 67 -
Technical Reference
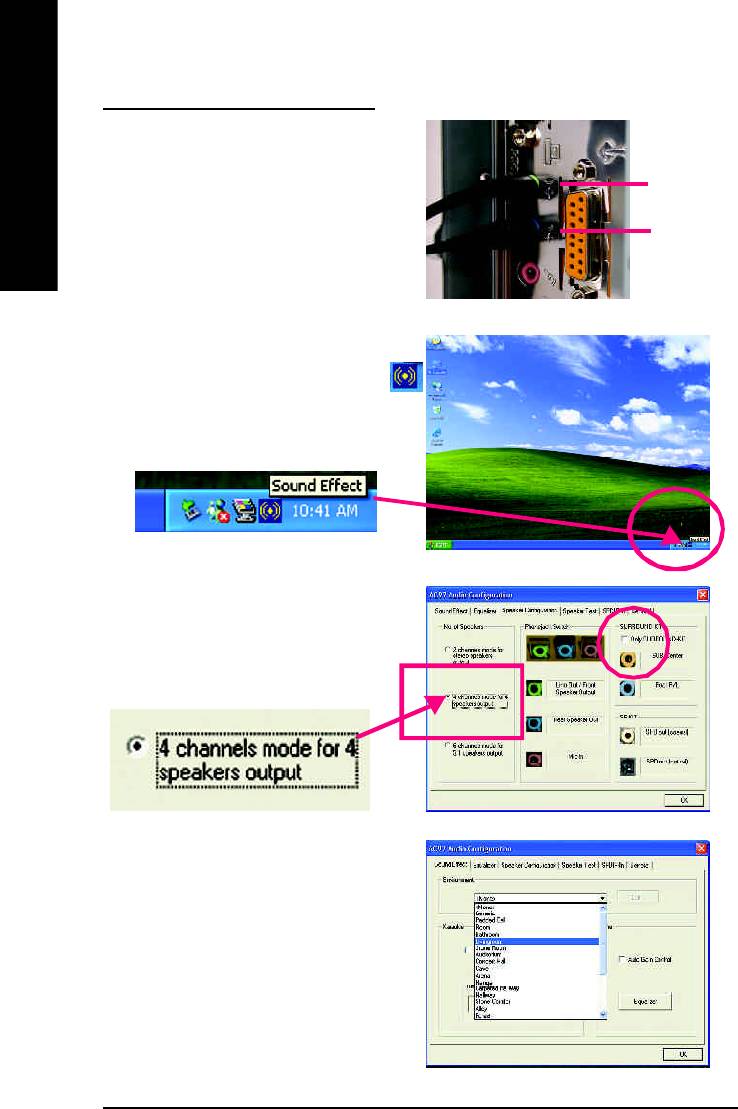
4 Channel Analog Audio Output Mode
STEP 1 :
Connect the front channels to “Line Out”,the rear
channels to “Line In”.
Line Out
English
Line In
STEP 2 :
After installation of the audio driver, you ‘ll find an
icon on the taskbar’s status area. Click the audio icon
“Sound Effect” from the windows tray at the bottom of
the screen.
STEP 3 :
Select “Speaker Configuration”, and choose the “4
channels for 4 speakers out put”.
Disable “Only SURROUND-KIT”, and press “OK”.
When the “Environment settings” is “None”, the
sound would be performed as stereo mode
(2 channels output). Please select the other settings
for 4 channels output.
- 68 -GA-8GEMT4 Series Motherboard
English
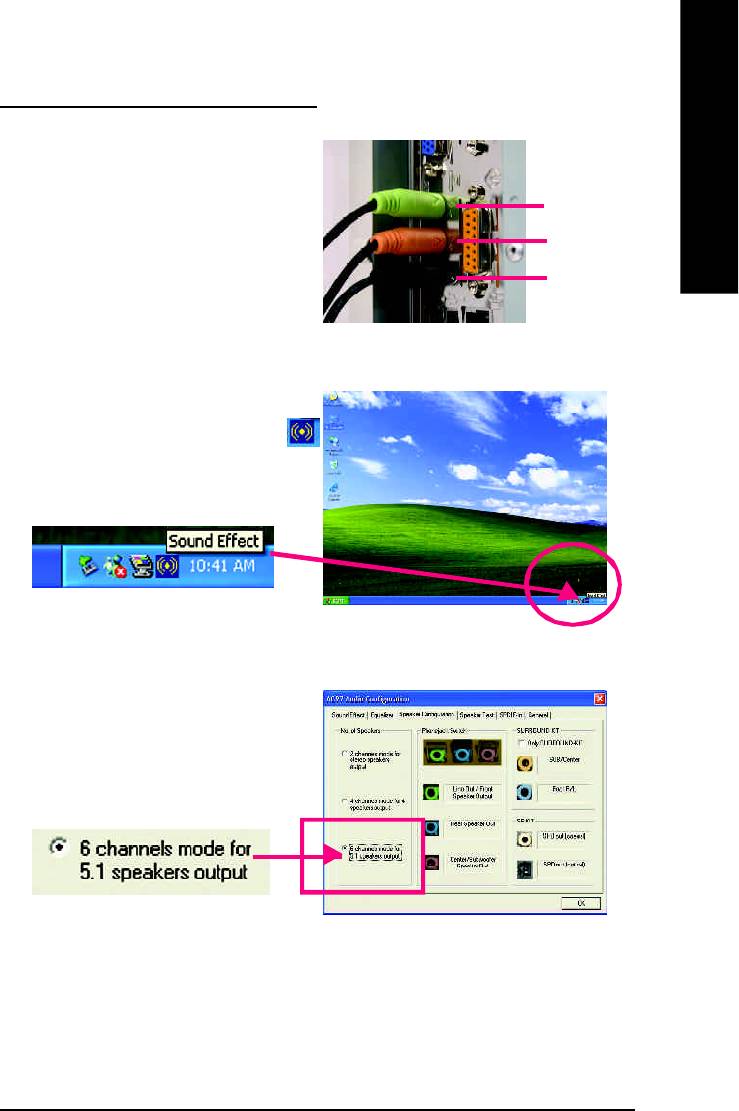
Basic 6 Channel Analog Audio Output Mode
Use the back audio panel to connect the audio output
without any additional module.
STEP 1 :
Line Out
Connect the front channels to “Line Out”,the rear chan-
Line In
nels to “Line In”, and the Center/Subwoofer channels
to “MIC In ”.
MIC In
STEP 2 :
After installation of the audio driver, you ‘ll find an
icon on the taskbar’s status area. Click the audio icon
“Sound Effect” from the windows tray at the bottom of
the screen.
STEP 3 :
Select “Speaker Configuration”, and choose the
“6 channels for 5.1 speakers out put”.
Disable “Only SURROUND-KIT” and pess “OK”
- 69 -
Technical Reference
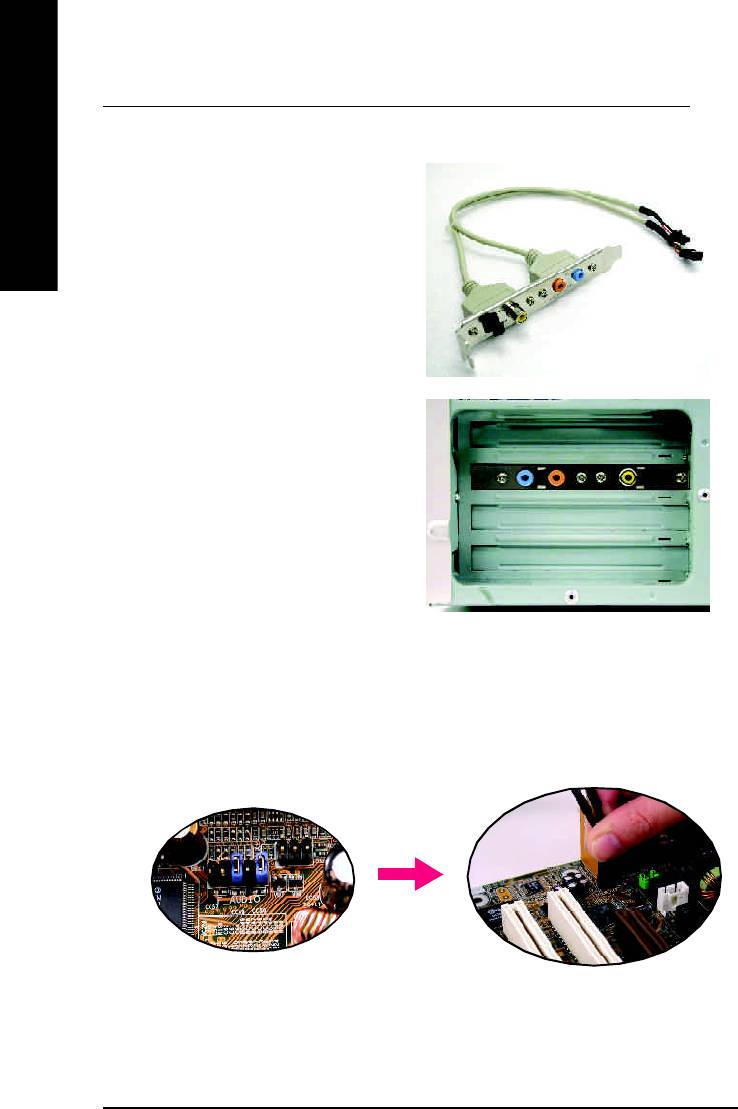
Advanced 6 Channel Analog Audio Output Mode (using Audio Combo Kit,Optional Device):
(Audio Combo Kit provides SPDIF output port : optical & coaxis and SURROUND-KIT : Rear R/L &
Center/subwoofer)
English
SURROUND-KIT access analog output to rear
channels and Center/Subwoofer channels. It is the best
solution if you need 6 channel output, Line In and MIC
at the same time. "SURROUND-KIT" is included in the
GIGABYTE unique "Audio Combo Kit" as picture.
STEP 1 :
Insert the “Audio Combo Kit” in the back of the case ,
and fix it with the screw.
STEP 2 :
Connect the ”SURROUND-KIT” to SUR_CEN on the
M/B.
- 70 -GA-8GEMT4 Series Motherboard
English
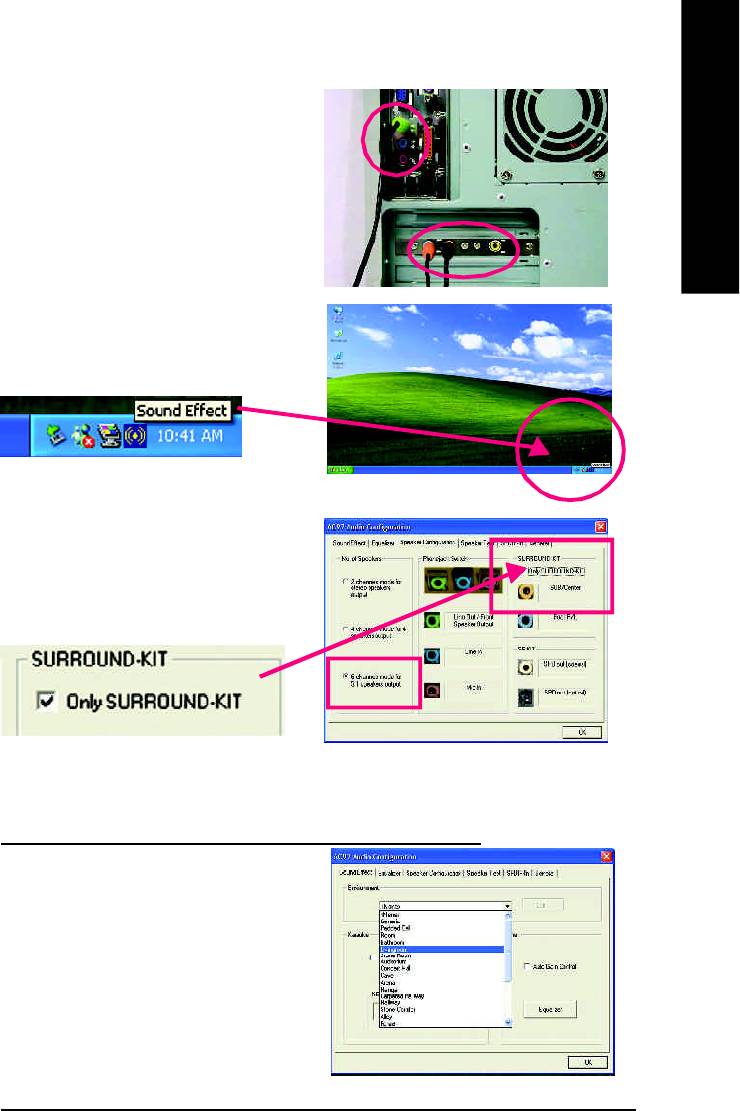
STEP 3 :
Connect the front channels to back audio panel’s
“Line Out”, the rear channels to SURROUND-KIT’s
REAR R/L, and the Center/Subwoofer channels to
SURROUND-KIT’s SUB CENTER.
STEP 4 :
Click the audio icon "Sound Effect" from the windows
tray at the bottom of the screen.
STEP 5 :
Select "Speaker Configuration", and choose the "6
channels for 5.1 speakers out put".
Enable "Only SURROUND-KIT" and press "OK".
Basic & Advanced 6 Channel Analog Audio Output ModeNotes:
When the "Environment settings" is "None", the sound
would be performed as stereo mode(2 channels
output). Please select the other settings for 6 channels
output.
- 71 -
Technical Reference
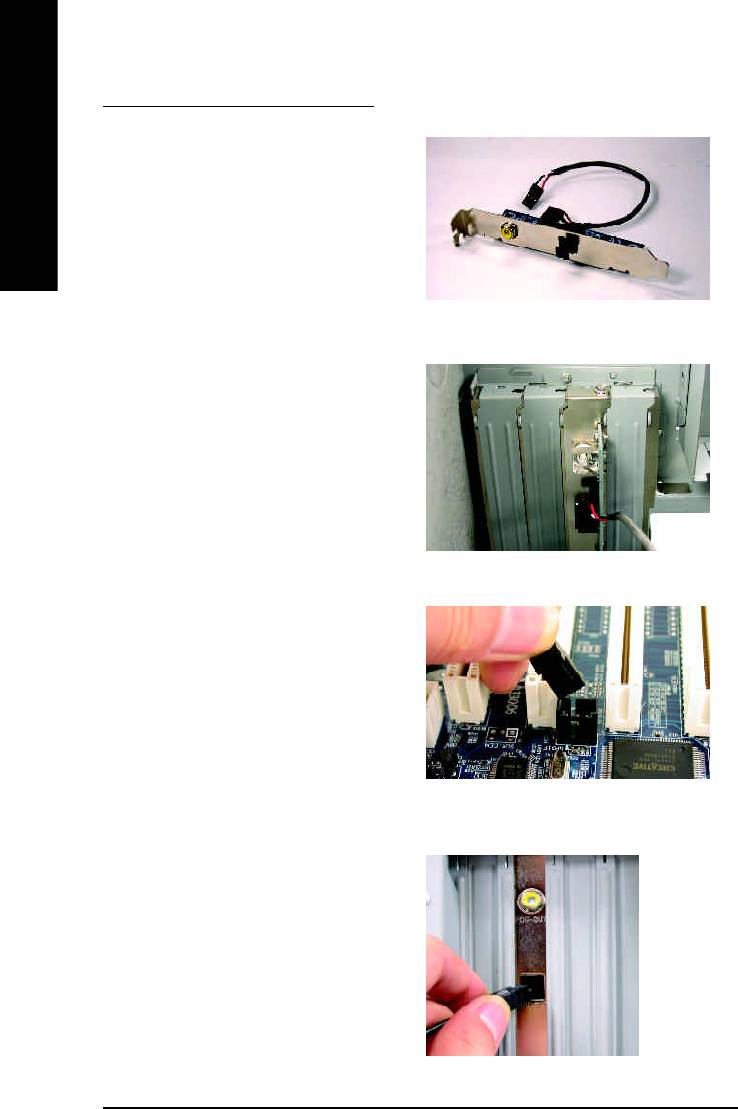
SPDIF Output Device (Optional Device)
A “SPDIF output” device is available on the
motherboard. Cable with rear bracket is provided
English
and could link to the “SPDIF output” connector
(As picture.) For the further linkage to decoder,
rear bracket provides coaxial cable and Fiber
connecting port.
1. Connect the SPDIF output device to the rear
bracket of PC, and fix it with screw.
2. Connect SPDIF wire to the motherboard.
3. Connect co-axial or optical output to the SPDIF
decoder.
- 72 -GA-8GEMT4 Series Motherboard

English
- 73 -
Technical Reference

English
- 74 -GA-8GEMT4 Series Motherboard
English
Revision History
Chapter 5 Appendix
Picture below are shown in Windows XP (CD driver version 1.0)
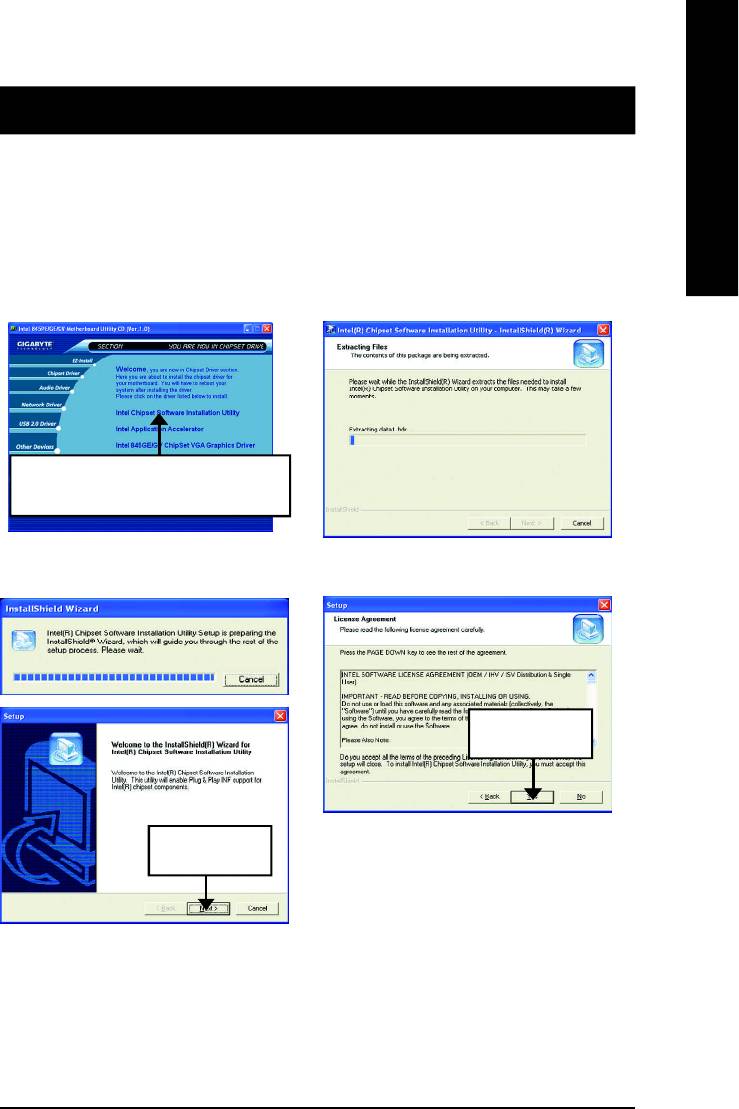
Appendix A: Chipset Driver Installation
A. Intel Chipset Software Installation Utility:
Insert the driver CD-title that came with your motherboard into your CD-ROM driver, the driver
CD-title will auto start and show the installation guide. If not, please double click the CD-ROM device
icon in "My computer", and execute the setup.exe.
1.Click "Intel Chipset Software Installation
Utility" item.
(1)
(2)
3.Click "Yes".
(4)
2.Click "Next".
(3)
- 75 -
Appendix
English
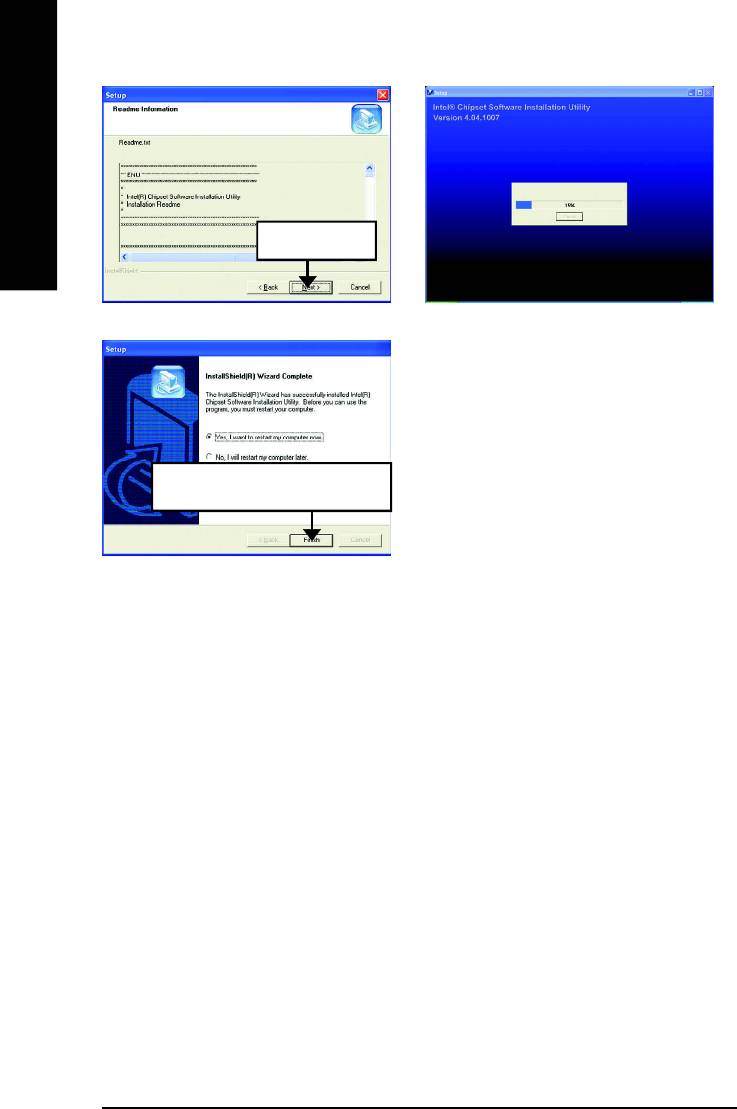
4Click "Next".
(6)(5)
5.Click "Finish" to restart computer.
(7)
- 76 -GA-8GEMT4 Series Motherboard
English
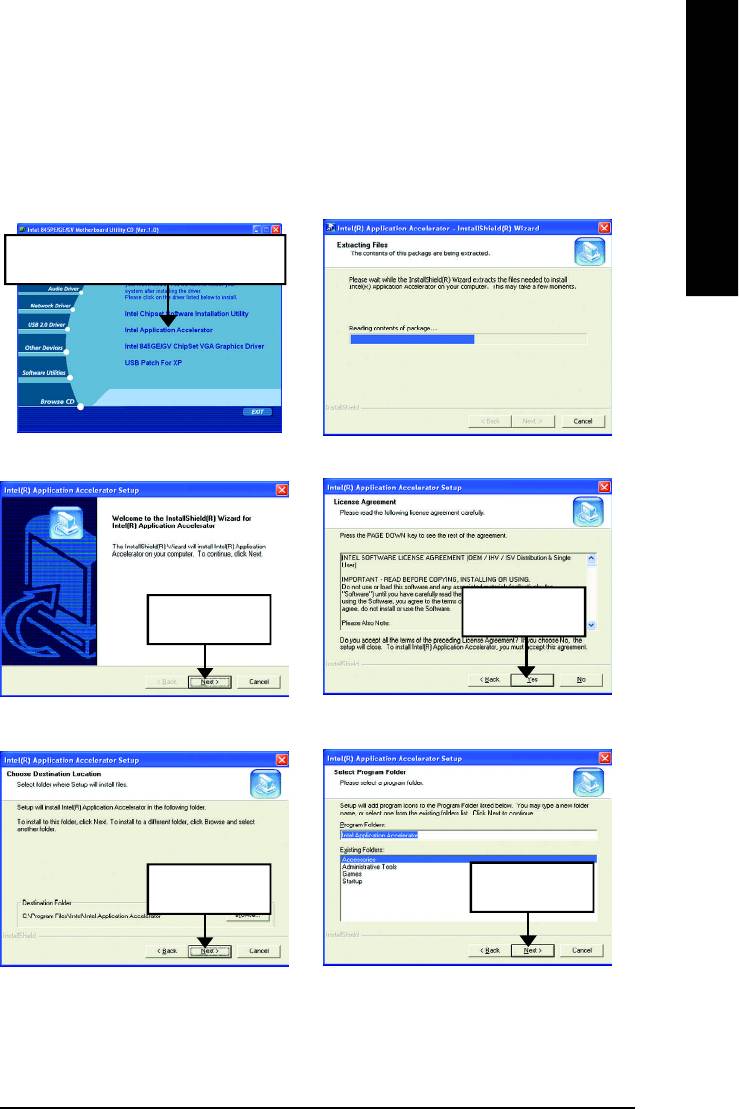
B. Intel Application Accelerator
Insert the driver CD-title that came with your motherboard into your CD-ROM driver, the driver
CD-title will auto start and show the installation guide. If not, please double click the CD-ROM device
icon in "My computer", and execute the setup.exe.
1.Click "Intel Application Accelerator" item.
(1)
(2)
3.Click "Yes".
2.Click "Next".
(3)
(4)
4.Click "Next".
5.Click "Next".
(5)
(6)
- 77 -
Appendix
English
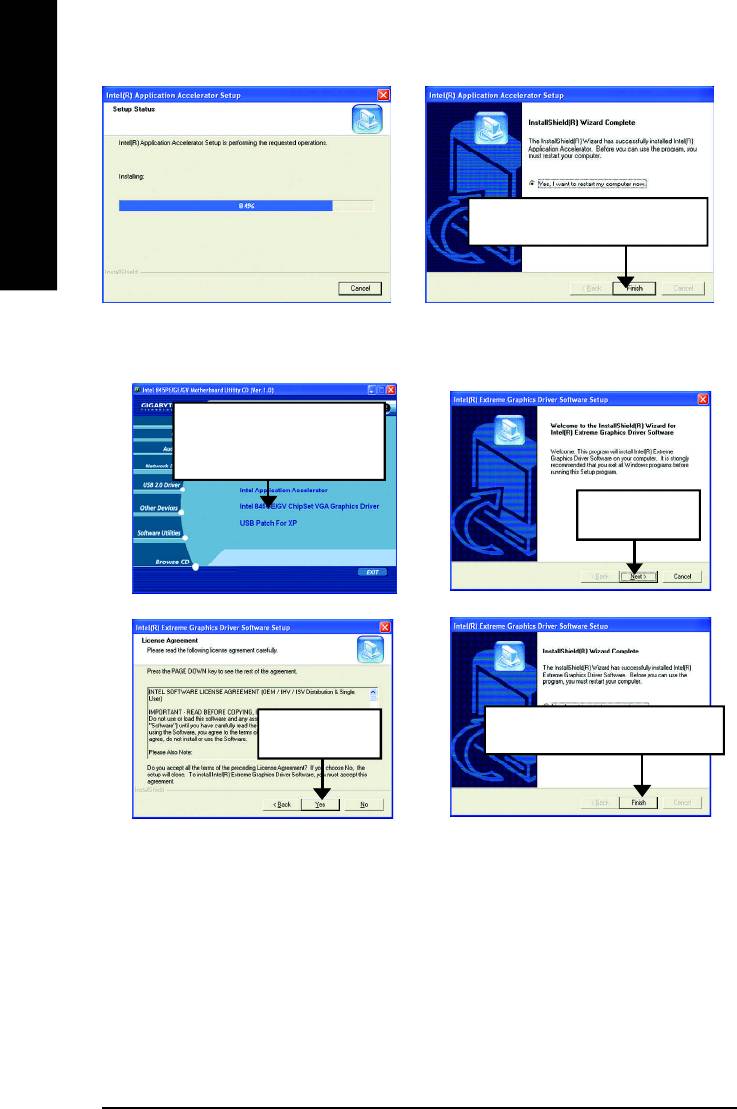
6.Click "Finish" to restart computer.
(7)
(8)
C. Intel 845GE/GV ChipSet VGA Graphics Driver
1.Click "Intel 845GE/GV
ChipSet VGA Graphics Driver"
item.
2.Click "Next".
(1)
(2)
3.Click "Yes".
4.Click "Finish" to restart computer.
(3)
(4)
d. USB Patch Driver For XP
Enable S3 for USB Device Setup is preparing the InstallShield(R) Wizard which will guide you
through the setup process.
- 78 -GA-8GEMT4 Series Motherboard
English
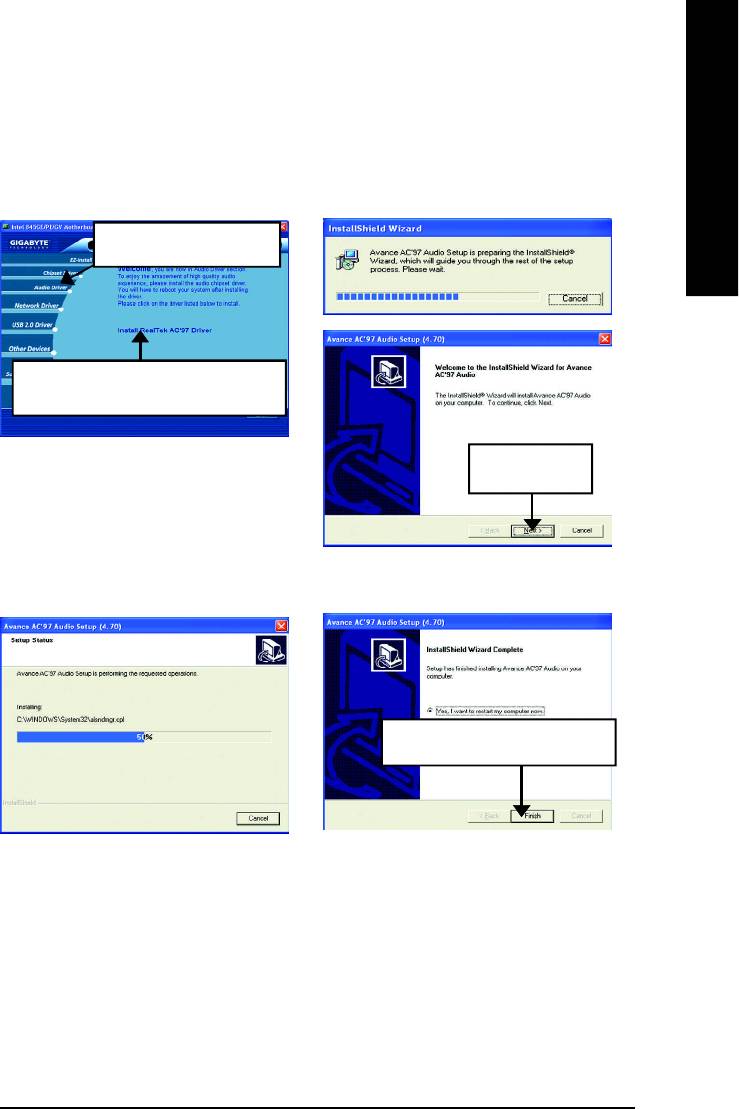
Appendix B: RealTek AC’97 Audio Driver
Revision History
Insert the driver CD-title that came with your motherboard into your CD-ROM driver, the driver
CD-title will auto start and show the installation guide. If not, please double click the CD-ROM device
icon in "My computer", and execute the setup.exe.
Press "Audio Driver" icon.
1.Click "Install RealTek AC’97 Driver"
item.
(1)
2.Click "Next".
(2)
3.Click "Finish" to restart computer.
(3)
(4)
- 79 -
Appendix
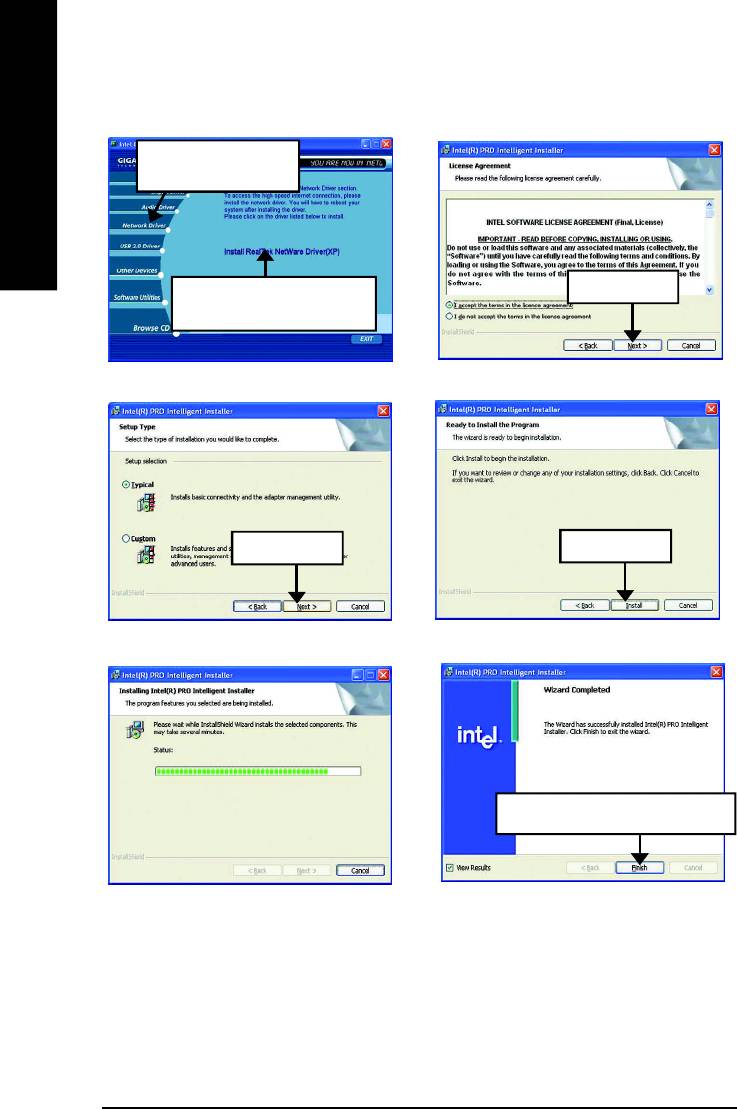
Appendix C: Intel Network Driver Installation (*)
Press "Network Driver"
icon.
English
1.Click "Install Intel Netware
2.Click "Next".
Driver(XP)".
(1)
(2)
3.Click "Next".
4.Click "Install".
(3)
(4)
5.Click "Finish" to restart computer.
(5)
(6)
(*) For GA-8GEMT4 only
- 80 -GA-8GEMT4 Series Motherboard
English
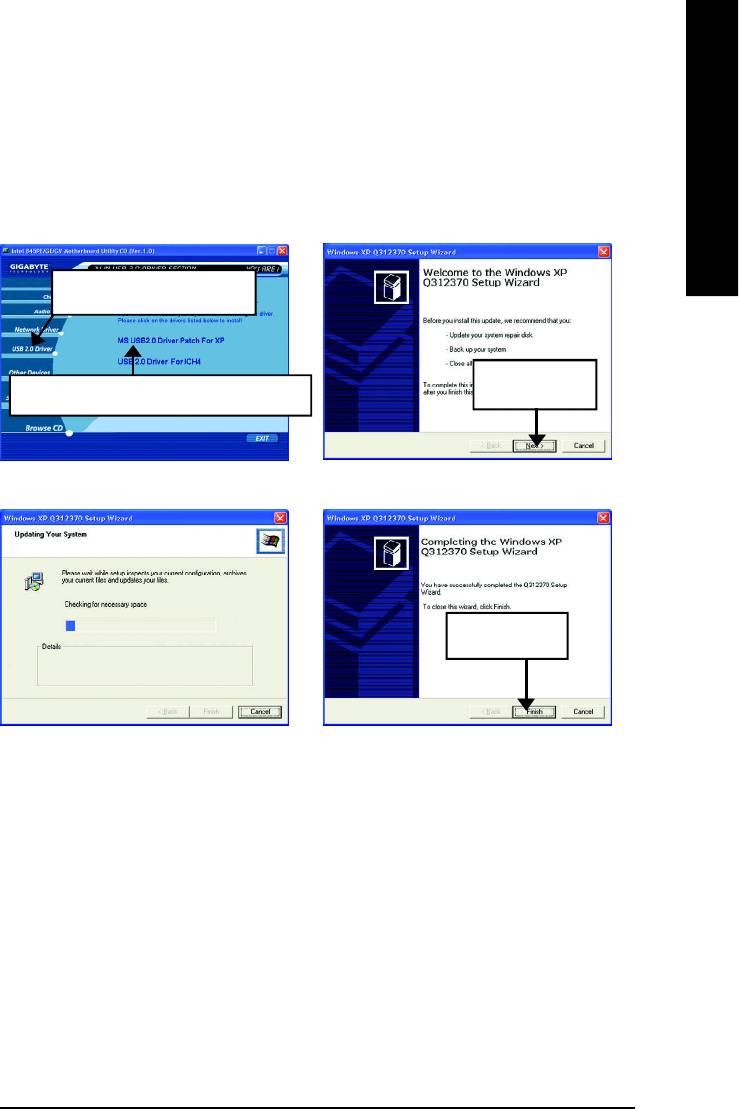
Appendix D: USB 2.0 Driver Installation
A. USB 2.0 Driver Patch For XP:
Insert the driver CD-title that came with your motherboard into your CD-ROM driver, the driver
CD-title will auto start and show the installation guide. If not, please double click the CD-ROM device
icon in "My computer", and execute the setup.exe.
Press "USB 2.0 Driver" icon.
2.Click "Next".
1.Click "MS USB 2.0 Driver Patch For XP" .
(1)
(2)
3.Click "Finish".
(3)
(4)
- 81 -
Appendix
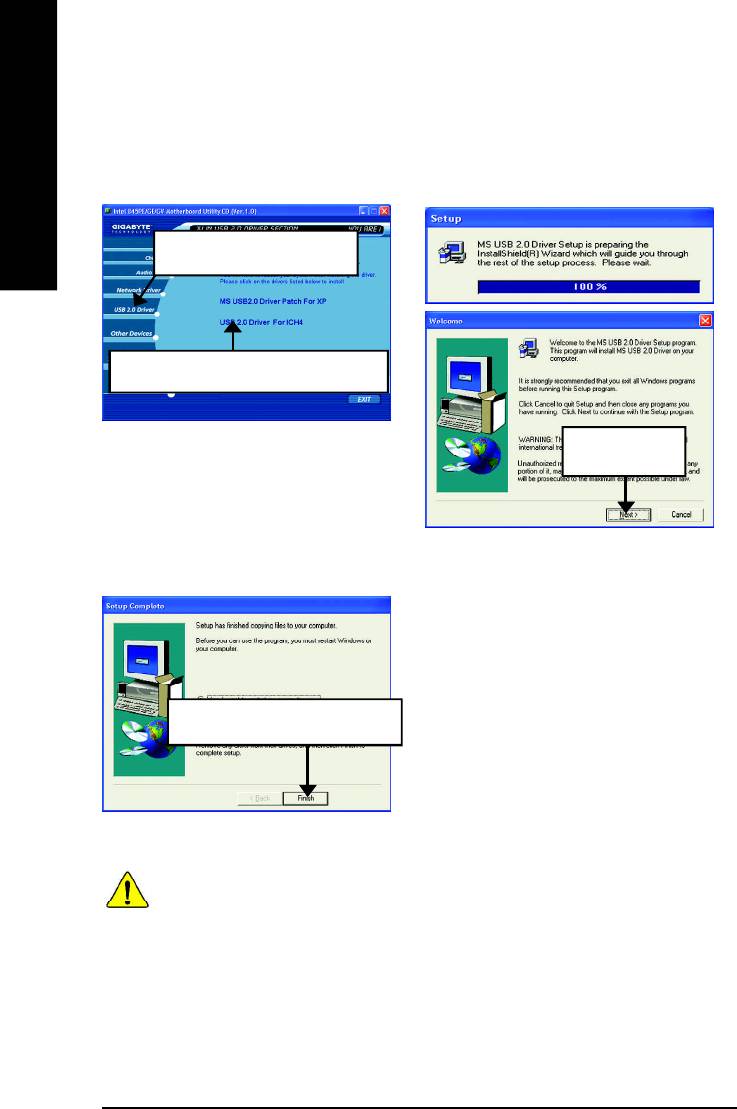
B. USB 2.0 Driver For ICH4:
Insert the driver CD-title that came with your motherboard into your CD-ROM driver, the driver
CD-title will auto start and show the installation guide. If not, please double click the CD-ROM device
icon in "My computer", and execute the setup.exe.
English
Press "USB 2.0 Driver" icon.
1.Click "USB 2.0 Driver For ICH4" .
(1)
2.Click "Next".
(2)
3.Click "Finish" to restart computer.
(3)
If there is any problem occurred during USB2.0 device installing, using or upgrading. Please
visit Microsoft or GIGABYTE website for downloading the latest drivers.
- 82 -GA-8GEMT4 Series Motherboard
English
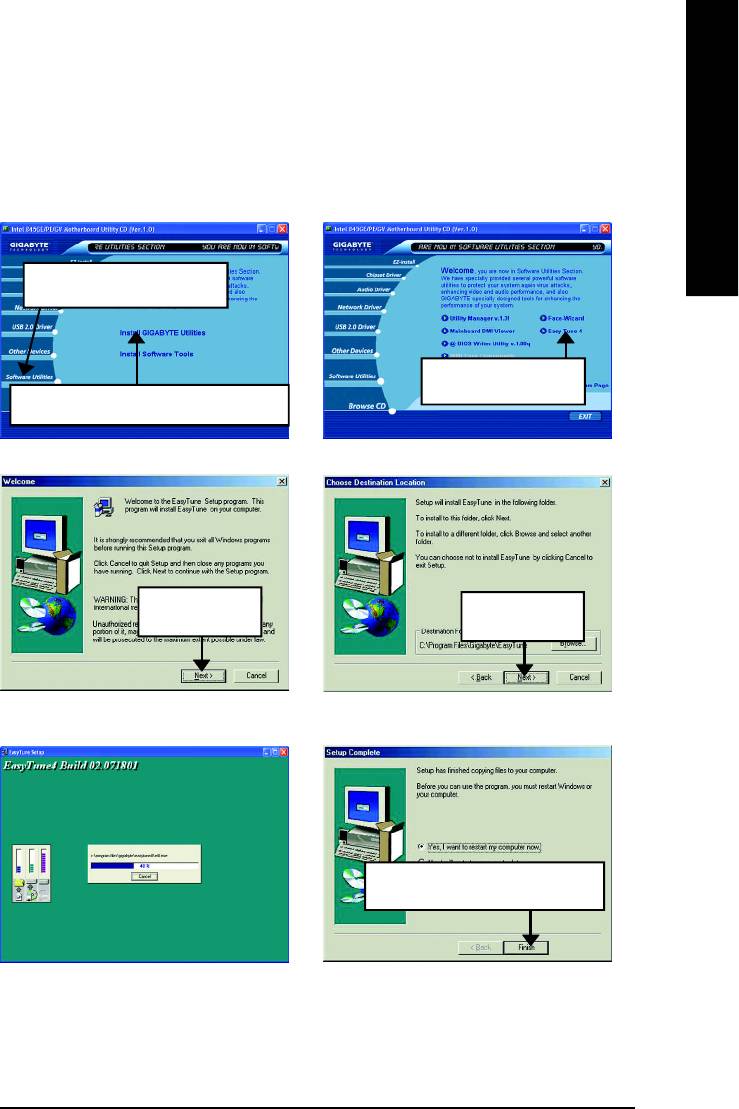
Appendix E: EasyTune 4 Utilities Installation
Revision History
Insert the driver CD-title that came with your motherboard into your CD-ROM driver, the driver
CD-title will auto start and show the installation guide. If not, please double click the CD-ROM device
icon in "My computer", and execute the setup.exe.
Press "Software Utilities" icon.
2.Click "Easy Tune 4".
1.Click "Install GIGABYTE Utilities" item.
(1)
(2)
3.Click "Next".
4.Click "Next".
(3) (4)
5.Click "Finish" to restart computer.
(5)
(6)
- 83 -
Appendix

Appendix F: Acronyms
Acronyms Meaning
ACPI Advanced Configuration and Power Interface
APM Advanced Power Management
English
AGP Accelerated Graphics Port
AMR Audio Modem Riser
ACR Advanced Communications Riser
BIOS Basic Input / Output System
CPU Central Processing Unit
CMOS Complementary Metal Oxide Semiconductor
CRIMM Continuity RIMM
CNR Communication and Networking Riser
DMA Direct Memory Access
DMI Desktop Management Interface
DIMM Dual Inline Memory Module
DRM Dual Retention Mechanism
DRAM Dynamic Random Access Memory
DDR Double Data Rate
ECP Extended Capabilities Port
ESCD Extended System Configuration Data
ECC Error Checking and Correcting
EMC Electromagnetic Compatibility
EPP Enhanced Parallel Port
ESD Electrostatic Discharge
FDD Floppy Disk Device
FSB Front Side Bus
HDD Hard Disk Device
IDE Integrated Dual Channel Enhanced
IRQ Interrupt Request
I/O Input / Output
IOAPIC Input Output Advanced Programmable Input Controller
ISA Industry Standard Architecture
LAN Local Area Network
to be continued......
- 84 -GA-8GEMT4 Series Motherboard

English
Acronyms Meaning
LBA Logical Block Addressing
LED Light Emitting Diode
MHz Megahertz
MIDI Musical Interface Digital Interface
MTH Memory Translator Hub
MPT Memory Protocol Translator
NIC Network Interface Card
OS Operating System
OEM Original Equipment Manufacturer
PAC PCI A.G.P. Controller
POST Power-On Self Test
PCI Peripheral Component Interconnect
RIMM Rambus in-line Memory Module
SCI Special Circumstance Instructions
SECC Single Edge Contact Cartridge
SRAM Static Random Access Memory
SMP Symmetric Multi-Processing
SMI System Management Interrupt
USB Universal Serial Bus
VID Voltage ID
- 85 -
Appendix

&
Technical Support/RMA Sheet
Customer/Country: Company: Phone No.:
Contact Person: E-mail Add. :
English
Model name/Lot Number: PCB revision:
BIOS version: O.S./A.S.:
Hardware Mfs. Model name Size: Driver/Utility:
Configuration
CPU
Memory
Brand
Video Card
Audio Card
HDD
CD-ROM /
DVD-ROM
Modem
Network
AMR / CNR
Keyboard
Mouse
Power supply
Other Device
Problem Description:
&
- 86 -GA-8GEMT4 Series Motherboard

English
- 87 -
MEMO

English
- 88 -GA-8GEMT4 Series Motherboard

English
- 89 -
MEMO

English
- 90 -GA-8GEMT4 Series Motherboard

English
- 91 -
MEMO

English
- 92 -GA-8GEMT4 Series Motherboard

English
- 93 -
MEMO


