Gigabyte GA-8I845GE775-G: Chapter 4 Appendix
Chapter 4 Appendix: Gigabyte GA-8I845GE775-G

English
Chapter 4 Appendix
4-1 Unique Software Utilities
4-1-1 Xpress Recovery Introduction
What is Xpress Recovery ?
Xpress Recovery is a utility used to back up and restore an OS partition.
If the hard drive is not working properly, the user can restore the drive to
its original state.
1. Supports FAT16, FAT32, and NTFS formats
2. Must be connected to the IDE1 Master
3. Allows installation of only one OS
4. Must be used with an IDE hard disk supporting HPA
5. The first partition must be set as the boot partition. When the boot partition is backed up,
please do not alter its size.
6. Xpress Recovery is recommended when using Ghost to return boot manager to NTFS
format.
How to use the Xpress Recovery
1. Boot from CD-ROM (BMP Mode)
Enter the BIOS menu, select "Advanced BIOS Feature" and set to boot from CD-ROM. Insert the
provided driver CD into your CD drive, then save and exit the BIOS menu. Once the computer has
restarted, the phrase "Boot from CD:" will appear at the bottom left-hand corner of the screen. When
"Boot from CD:" appears, press any key to enter Xpress Recovery.
Once you have completed this step, subsequent access to Xpress Recovery can also function by
pressing the F9 key during computer power on.
.
.
Verifying DMI Pool Data
Boot from CD:
Boot from CD:
Xpress Recovery V1.0 (C) Copy Right 2003. GIGABYTE Technology CO. , Ltd.
1. Execute Backup Utility
2. Execute Restore Utility
3. Remove Backup Image
4. Set Password
5. Exit and Restart
Build 2011
Appendix- 49 -
2. Press F9 during powering on the computer. (Text Mode)
Press F9 during powering on the computer .
Award Modular BIOS v6.00PG, An Energy Star Al ly
English
Copyright (C) 1984-2004, Award Software, Inc.
Intel 865PE AGPSet BIOS for 8IPE1000MT F1
Check System Health OK
.
.
.
Press DEL to enter SETUP / Q-Flash, F9 For Xpress Recovery
F9 For Xpress Recovery
08/16/2002-I845GE-6A69YG01C-00
Xpress Recovery V1.0 (C) Copy Right 2003. GIGABYTE Technology CO. , Ltd.
1. Execute Backup Utility
2. Execute Restore Utility
3. Remove Backup Image
4. Set Password
5. Exit and Restart
1. If you have already entered Xpress Recovery by booting from the CD-ROM, you can enter
Xpress Recovery in the future by pressing the F9 key.
2. System storage capacity as well as drive reading/writing speed will affect backup speed.
3. It is recommended that Xpress Recovery be immediately installed after OS and all required
driver and software installations are complete.
GA-8I845GE775-G Motherboard - 50 -

English
1. Execute Backup Utility:
Press B to Backup your System or Esc to Exit
The backup utility will automatically scan your system and back up data as a backup image in your hard
drive.
Not all systems support access to Xpress Recovery by pressing the F9 key during computer power
on. If this is the case, please use the boot from CD-ROM method to enter Xpress Recovery.
2. Execute Restore Utility:
This program will recover your system to factory default.
Press R to restore your system back to factory default or press Esc to exit
Restores backup image to original state.
3. Remove Backup Image:
Remove backup image. Are you sure? (Y/N)
Remove the backup image.
4. Set Password:
Please input a 4-16 character long password (a-z or 0-9) or press Esc to exit
You can set a password to enter Xpress Recovery to protect your hard disk data. Once this is done,
password input will be required to enter Xpress Recovery during the next as well as subsequent system
restarts. If you wish to remove the need for password entry, please select "Set Password" and under
"New Password/Confirm Password", make sure there is no entry and then press "Enter" to remove
password requirement.
5. Exit and Restart:
Exit and restart your computer.
Appendix- 51 -

4-1-2 Flash BIOS Method Introduction
TM
Method 1 : Q-Flash
Utility
TM
Q-Flash
is a BIOS flash utility embedded in Flash ROM. With this utility,
English
users only have to stay in the BIOS menu when they want to update
TM
BIOS. Q-Flash
allows users to flash BIOS without any utility in DOS or
TM
Windows. Using Q-Flash
indicating no more fooling around with any complicated instructions and
operating system since it is in the BIOS menu.
Please note that because updating BIOS has potential risk, please do it with caution!! We are
sorry that Gigabyte Technology Co., Ltd is not responsible for damages of system because of
incorrect manipulation of updating BIOS to avoid any claims from end-users.
Before You Begin:
TM
Before you start updating BIOS with the Q-Flash
utility, please follow the steps below first.
1. Download the latest BIOS for your motherboard from Gigabyte's website.
2. Extract the BIOS file downloaded and save the BIOS file (the one with model name.Fxx. For example,
8KNXPU.Fba) to a floppy disk.
3. Reboot your PC and press Del to enter BIOS menu.
The BIOS upgrading guides below are separated into two parts.
If your motherboard has dual-BIOS, please refer to Part One.
If your motherboard has single-BIOS, please refer to Part Two.
Part One:
TM
Updating BIOS with Q-Flash
Utility on Dual BIOS Motherboards.
Some of Gigabyte motherboards are equipped with dual BIOS. In the BIOS menu of the motherboards
supporting Q-Flash and Dual BIOS, the Q-Flash utility and Dual BIOS utility are combined in the same
screen. This section only deals with how to use Q-Flash utility.
In the following sections, we take GA-8KNXP Ultra as the example to guide you how to flash BIOS
from an older version to the latest version. For example, from Fa3 to Fba.
Award Modular BIOS v6.00PG, An Energy Star Ally
Copyright (C) 1984-2003, Award Software, Inc.
Intel i875P AGPset BIOS for 8KNXP Ultra Fa3
The BIOS file is Fa3
Check System Health OK , VCore = 1.5250
Main Processor : Intel Pentium(R) 4 1.6GHz (133x12)
before updating
<CPUID : 0F27 Patch ID : 0027>
Memory Testing : 131072K OK
Memory Frequency 266 MHz in Single Channel
Primary Master : FUJITSU MPE3170AT ED-03-08
Primary Slave : None
Secondary Master : CREATIVEDVD-RM DVD1242E BC101
Secondary Slave : None
Press DEL to enter SETUP / Dual BIOS / Q-Flash / F9 For Xpress Recovery
08/07/2003-i875P-6A79BG03C-00
GA-8I845GE775-G Motherboard - 52 -
TM
English
Entering the Q-Flash
utility:
Step1: To use Q-Flash utility, you must press Del in the boot screen to enter BIOS menu.
CMOS Setup Utility-Copyright (C) 1984-2004 Award Software
Standard CMOS Features
Select Language
Advanced BIOS Features
Load Fail-Safe Defaults
Integrated Peripherals
Load Optimized Defaults
Power Management Setup
Set Supervisor Password
PnP/PCI Configurations
Set User Password
PC Health Status
Save & Exit Setup
MB Intelligent Tweaker(M.I.T.)
Exit Without Saving
ESC: Quit F3: Change Language
F8: Dual BIOS/Q-Flash F10: Save & Exit Setup
Time, Date, Hard Disk Type...
Step 2: Press F8 button on your keyboard and then Y button to enter the Dual BIOS/Q-Flash utility.
TM
Exploring the Q-Flash
/ Dual BIOS utility screen
The Q-Flash / Dual BIOS utility screen consists of the following key components.
Dual BIOS Utility
Dual BIOS utility bar
Boot From......................................... Main Bios
Main ROM Type/Size.............................SST 49LF003A 512K
Backup ROM Type/Size.........................SST 49LF003A 512K
Task menu for
Wide Range Protection Disable
Dual BIOS
Boot From Main Bios
Auto Recovery Enable
utility
Halt On Error Disable
Copy Main ROM Data to Backup
Load Default Settings
Save Settings to CMOS
Q-Flash Utility
TM
Q-Flash
utility title
Load Main BIOS from Floppy
Task menu for
bar
Load Backup BIOS from Floppy
TM
Save Main BIOS to Floppy
Q-Flash
utility
Save Backup BIOS to Floppy
Enter : Run :Move ESC:Reset F10:Power Off
Action bar
Task menu for Dual BIOS utility:
Contains the names of eight tasks and two item showing information about the BIOS ROM type. Blocking a
task and pressing Enter key on your keyboard to enable execution of the task.
Task menu for Q-Flash utility:
Contains the names of four tasks. Blocking a task and pressing Enter key on your keyboard to enable execu-
tion of the task.
Action bar:
Contains the names of four actions needed to operate the Q-Flash/Dual BIOS utility. Pressing the buttons
mentioned on your keyboards to perform these actions.
Appendix- 53 -
TM
Using the Q-Flash
utility:
This section tells you how to update BIOS using the Q-Flash utility. As described in the "Before you begin"
section above, you must prepare a floppy disk having the BIOS file for your motherboard and insert it to your
computer. If you have already put the floppy disk into your system and have entered the Q-Flash utility,
English
please follow the steps below to flash BIOS.
Steps:
1. Press arrow buttons on your keyboard to move the light bar to "Load Main BIOS from Floppy" item in
the Q-Flash menu and press Enter button.
Later, you will see a box pop up showing the BIOS files you previously downloaded to the floppy disk.
If you want to save the current BIOS for backup purpose, you can begin Step 1 with "Save Main
BIOS to Floppy" item.
2. Move to the BIOS file you want to flash and press Enter.
In this example, we only download one BIOS file to the floppy disk so only one BIOS file,
8KNXPU.Fba, is listed.
Please confirm again you have the correct BIOS file for your motherboard.
Dual BIOS Utility
Boot From......................................... Main Bios
Main ROM Type/Size.............................SST 49LF003A 512K
Backup ROM Type/Size.........................SST 49LF003A 512K
Wide Range Protection Disable
Boot From Main Bios
1 file(s) found
8KNXPU.Fba 512K
BIOS file in the floppy
Auto Recovery Enable
Halt On Error Disable
disk.
Total size : 1.39M Free size : 911.50K
Copy Main ROM Data to Backup
F5 : Refresh DEL : Delete
Load Default Settings
Save Settings to CMOS
Q-Flash Utility
Load Main BIOS from Floppy
Load Backup BIOS from Floppy
Save Main BIOS to Floppy
Save Backup BIOS to Floppy
Enter : Run :Move ESC:Reset F10:Power Off
After pressing Enter, you'll then see the progress of reading the BIOS file from the floppy disk.
Dual BIOS Utility
Boot From......................................... Main Bios
Main ROM Type/Size.............................SST 49LF003A 512K
Backup ROM Type/Size.........................SST 49LF003A 512K
Wide Range Protection Disable
Boot From Main Bios
Reading BIOS file from floppy ...
Auto Recovery Enable
Do not turn off power or
>>>>>>>>>>>>>>.....................
Halt On Error Disable
reset your system at this
Copy Main ROM Data to Backup
Don't Turn Off Power or Reset System
Load Default Settings
stage!!
Save Settings to CMOS
Q-Flash Utility
Load Main BIOS from Floppy
Load Backup BIOS from Floppy
Save Main BIOS to Floppy
Save Backup BIOS to Floppy
Enter : Run :Move ESC:Reset F10:Power Off
After BIOS file is read, you'll see a confirmation dialog box asking you "Are you sure to update BIOS?"
GA-8I845GE775-G Motherboard - 54 -

3. Press Y button on your keyboard after you are sure to update BIOS.
English
Then it will begin to update BIOS. The progress of updating BIOS will be displayed.
Please do not take out the floppy disk when it begins flashing BIOS.
4. Press any keys to return to the Q-Flash menu when the BIOS updating procedure is completed.
Dual BIOS Utility
Boot From......................................... Main Bios
Main ROM Type/Size.............................SST 49LF003A 512K
Backup ROM Type/Size.........................SST 49LF003A 512K
Wide Range Protection Disable
You can repeat Step 1 to
Boot From Main Bios
Auto Recovery Enable
!! Copy BIOS completed - Pass !!
4 to flash the backup
Halt On Error Disable
BIOS, too.
Copy Main ROM Data to Backup
Please press any key to continue
Load Default Settings
Save Settings to CMOS
Q-Flash Utility
Load Main BIOS from Floppy
Load Backup BIOS from Floppy
Save Main BIOS to Floppy
Save Backup BIOS to Floppy
Enter : Run :Move ESC:Reset F10:Power Off
5. Press Esc and then Y button to exit the Q-Flash utility. The computer will restart automatically after
you exit Q-Flash.
Dual BIOS Utility
Boot From......................................... Main Bios
Main ROM Type/Size.............................SST 49LF003A 512K
Backup ROM Type/Size.........................SST 49LF003A 512K
Wide Range Protection Disable
Boot From Main Bios
Auto Recovery Enable
Are you sure to RESET ?
Halt On Error Disable
Copy Main ROM Data to Backup
[Enter] to continure or [Esc] to abort...
Load Default Settings
Save Settings to CMOS
Q-Flash Utility
Load Main BIOS from Floppy
Load Backup BIOS from Floppy
Save Main BIOS to Floppy
Save Backup BIOS to Floppy
Enter : Run :Move ESC:Reset F10:Power Off
After system reboots, you may find the BIOS version on your boot screen becomes the one you flashed.
Award Modular BIOS v6.00PG, An Energy Star Ally
Copyright (C) 1984-2003, Award Software, Inc.
Intel i875P AGPset BIOS for 8KNXP Ultra Fba
The BIOS file
Check System Health OK , VCore = 1.5250
Main Processor : Intel Pentium(R) 4 1.6GHz (133x12)
becomes Fba after
<CPUID : 0F27 Patch ID : 0027>
Memory Testing : 131072K OK
updating.
Memory Frequency 266 MHz in Single Channel
Primary Master : FUJITSU MPE3170AT ED-03-08
Primary Slave : None
Secondary Master : CREATIVEDVD-RM DVD1242E BC101
Secondary Slave : None
Press DEL to enter SETUP / Dual BIOS / Q-Flash / F9 For Xpress Recovery
09/23/2003-i875P-6A79BG03C-00
Appendix- 55 -
6. Press Del to enter BIOS menu after system reboots. When you are in BIOS menu, move to
Load Fail-Safe Defaults item and press Enter to load BIOS Fail-Safe Defaults. Normally the system
redetects all devices after BIOS has been upgraded. Therefore, we highly recommend reloading the
BIOS defaults after BIOS has been upgraded.
English
CMOS Setup Utility-Copyright (C) 1984-2004 Award Software
Standard CMOS Features
Select Language
Advanced BIOS Features
Load Fail-Safe Defaults
Integrated Peripherals
Load Optimized Defaults
Power Management Setup
Load Fail-Safe Defaults (Y/N)? Y
Set Supervisor Password
PnP/PCI Configurations
Set User Password
PC Health Status
Save & Exit Setup
MB Intelligent Tweaker(M.I.T.)
Exit Without Saving
ESC: Quit F3: Change Language
F8: Dual BIOS/Q-Flash F10: Save & Exit Setup
Time, Date, Hard Disk Type...
Press Y on your keyboard to load defaults.
7. Select Save & Exit Setup item to save the settings to CMOS and exit the BIOS menu.
System will reboot after you exit the BIOS menu. The procedure is completed.
CMOS Setup Utility-Copyright (C) 1984-2004 Award Software
Standard CMOS Features
Select Language
Advanced BIOS Features
Load Fail-Safe Defaults
Integrated Peripherals
Load Optimized Defaults
Power Management Setup
Save to CMOS and EXIT (Y/N)? Y
Set Supervisor Password
PnP/PCI Configurations
Set User Password
PC Health Status
Save & Exit Setup
MB Intelligent Tweaker(M.I.T.)
Exit Without Saving
ESC: Quit F3: Change Language
F8: Dual BIOS/Q-Flash F10: Save & Exit Setup
Time, Date, Hard Disk Type...
Press Y on your keyboard to save and exit.
Part Two:
TM
Updating BIOS with Q-Flash
Utility on Single-BIOS Motherboards.
TM
This part guides users of single-BIOS motherboards how to update BIOS using the Q-Flash
utility.
CMOS Setup Utility-Copyright (C) 1984-2004 Award Software
Standard CMOS Features
Top Performance
Advanced BIOS Features
Load Fail-Safe Defaults
Integrated Peripherals
Load Optimized Defaults
Power Management Setup
Set Supervisor Password
PnP/PCI Configurations
Set User Password
PC Health Status
Save & Exit Setup
MB Intelligent Tweaker(M.I.T.)
Exit Without Saving
ESC: Quit F3: Change Language
F8: Q-Flash F10: Save & Exit Setup
Time, Date, Hard Disk Type...
GA-8I845GE775-G Motherboard - 56 -
TM
English
Exploring the Q-Flash
utility screen
The Q-FlashBIOS utility screen consists of the following key components.
TM
Q-Flash Utility V1.30
Q-Flash
utility bar
Flash Type/Size.................................SST 49LF003A 256K
Keep DMI Data Enable
Task menu for
Update BIOS from Floppy
TM
Q-Flash
utility
Save BIOS to Floppy
Enter : Run :Move ESC:Reset F10:Power Off
Action bar
Task menu for Q-Flash utility:
Contains the names of three tasks. Blocking a task and pressing Enter key on your keyboard to enable
execution of the task.
Action bar:
Contains the names of four actions needed to operate the Q-Flash utility. Pressing the buttons mentioned on
your keyboards to perform these actions.
TM
Using the Q-Flash
utility:
This section tells you how to update BIOS using the Q-Flash utility. As described in the "Before you begin"
section above, you must prepare a floppy disk having the BIOS file for your motherboard and insert it to your
computer. If you have already put the floppy disk into your system and have entered the Q-Flash utility,
please follow the steps below to flash BIOS.
Steps:
1. Press arrow buttons on your keyboard to move the light bar to "Update BIOS from Floppy" item in the
Q-Flash menu and press Enter button.
Later, you will see a box pop up showing the BIOS files you previously downloaded to the floppy disk.
If you want to save the current BIOS for backup purpose, you can begin Step 1 with "Save BIOS
to Floppy" item.
2. Move to the BIOS file you want to flash and press Enter.
In this example, we only download one BIOS file to the floppy disk so only one BIOS file,
8GE800.F4, is listed.
Please confirm again you have the correct BIOS file for your motherboard.
Q-Flash Utility V1.30
Flash Type/Size.................................SST 49LF003A 256K
1 file(s) found
8GE800.F4 256K
Keep DMI Data Enable
BIOS file in the floppy
Update BIOS from Floppy
Save BIOS to Floppy
disk.
Total size : 1.39M Free size : 1.14M
Enter : Run :Move ESC:Reset F10:Power Off
F5 : Refresh DEL : Delete
Q-Flash Utility V1.30
Flash Type/Size.................................SST 49LF003A 256K
Reading BIOS file from floppy ...
Keep DMI Data Enable
Do not turn off power or
>>>>>>>>>>>>>>.....................
Update BIOS from Floppy
reset your system at
Save BIOS to Floppy
Enter : Run :Move ESC:Reset F10:Power Off
Don't Turn Off Power or Reset System
this stage!!
After BIOS file is read, you'll see a confirmation dialog box asking you "Are you sure to update BIOS?"
Please do not take out the floppy disk when it begins flashing BIOS.
Appendix- 57 -
3. Press Y button on your keyboard after you are sure to update BIOS.
Then it will begin to update BIOS. The progress of updating BIOS will be shown at the same time.
Q-Flash Utility V1.30
Flash Type/Size.................................SST 49LF003A 256K
English
Keep DMI Data Enable
Updating BIOS Now
Do not turn off power or
>>>>>>>>>>>>>>>>>>>.........................
Update BIOS from Floppy
Save BIOS to Floppy
reset your system
Enter : Run :Move ESC:Reset F10:Power Off
Don't Turn Off Power or Reset System
at this stage!!
4. Press any keys to return to the Q-Flash menu when the BIOS updating procedure is completed.
Q-Flash Utility V1.30
Flash Type/Size.................................SST 49LF003A 256K
Keep DMI Data Enable
!! Copy BIOS completed - Pass !!
Update BIOS from Floppy
Save BIOS to Floppy
Please press any key to continue
Enter : Run :Move ESC:Reset F10:Power Off
5. Press Esc and then Y button to exit the Q-Flash utility. The computer will restart automatically after
you exit Q-Flash.
Q-Flash Utility V1.30
Flash Type/Size.................................SST 49LF003A 256K
Keep DMI Data Enable
Are you sure to RESET ?
Update BIOS from Floppy
Save BIOS to Floppy
[Enter] to continure or [Esc] to abort...
Enter : Run :Move ESC:Reset F10:Power Off
After system reboots, you may find the BIOS version on your boot screen becomes the one you flashed.
Award Modular BIOS v6.00PG, An Energy Star Ally
Copyright (C) 1984-2003, Award Software, Inc.
Intel 845GE AGPSet BIOS for 8GE800 F4
The BIOS file
Check System Health OK
Main Processor : Intel Pentium(R) 4 1.7GHz (100x17.0)
becomes F4 after
<CPUID : 0F0A Patch ID : 0009>
Memory Testing : 122880K OK + 8192K Shared Memory
updating
Primary Master : FUJITSU MPE3170AT ED-03-08
Primary Slave : None
Secondary Master : CREATIVEDVD-RM DVD1242E BC101
Secondary Slave : None
Press DEL to enter SETUP / Q-Flash
03/18/2003-I845GE-6A69YG01C-00
6. Press Del to enter BIOS menu after system reboots and "Load BIOS Fail-Safe Defaults". See how
to Load BIOS Fail-Safe Defaults, please kindly refer to Step 6 to 7 in Part One.
Congratulation!! You have updated BIOS successfully!!
GA-8I845GE775-G Motherboard - 58 -
TM
English
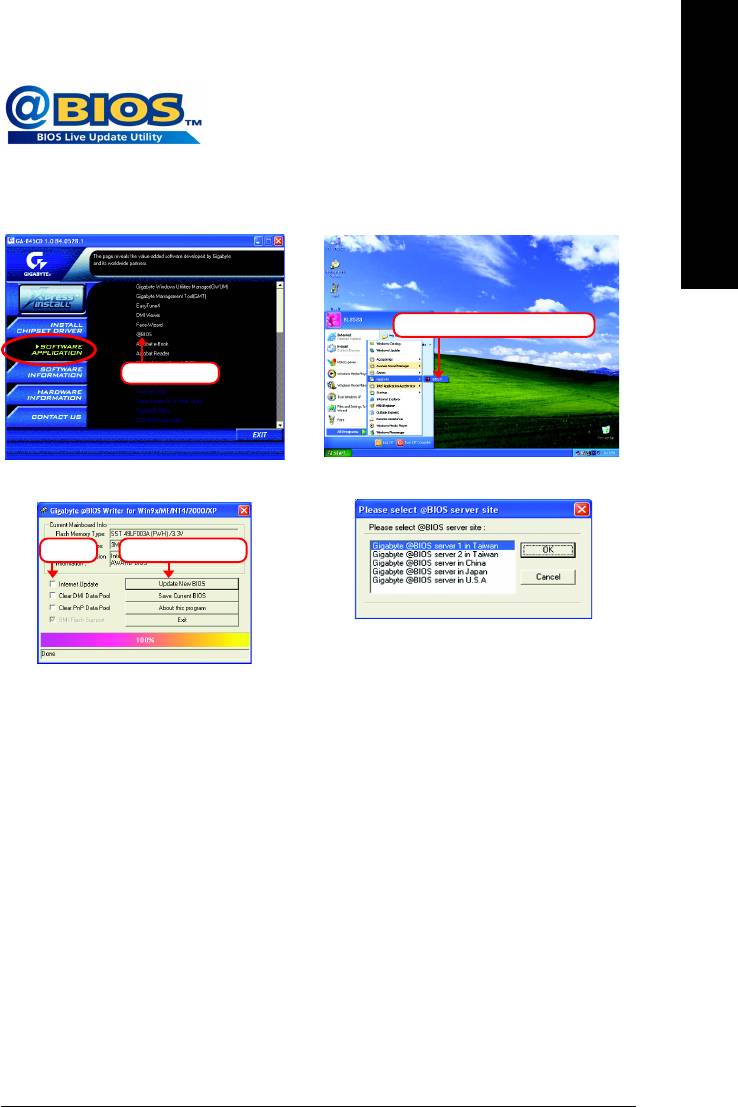
Method 2 : @BIOS
Utility
If you do not have a DOS startup disk, we recommend that you use the
new @BIOS utility. @BIOS allows users to update their BIOS under
Windows. Just select the desired @BIOS server to download the latest
version of BIOS.
Fig 1. Installing the @BIOS utility Fig 2. Installation complete and run @BIOS
Click Start/ Programs/ GIGABYTE/@BIOS
Select @BIOS item.
Fig 3. The @BIOS utility Fig 4. Select the desired @BIOS server
Click "" Click "Update New BIOS"
1. Methods and steps:
I. Update BIOS through Internet:
a. Click "Internet Update" icon.
b. Click "Update New BIOS" icon.
TM
c. Select @BIOS
server.
d. Select the exact model name on your motherboard.
e. System will automatically download and update the BIOS.
II. Update BIOS NOT through Internet:
a. Do not click "Internet Update" icon.
b. Click "Update New BIOS".
c. Please select "All Files" in dialog box while opening the old file.
d. Please search for BIOS unzip file, downloading from internet or any other methods (such as:
45GE775G.F1).
e. Complete update process following the instruction.
Appendix- 59 -

III. Save BIOS:
In the very beginning, there is "Save Current BIOS" icon shown in dialog box. It means to save the
current BIOS version.
English
IV. Check out supported motherboard and Flash ROM:
In the very beginning, there is "About this program" icon shown in dialog box. It can help you check out
which kind of motherboard and which brand of Flash ROM are supported.
2. Note:
I. In method I, if it shows two or more motherboard's model names to be selected, please make sure
your motherboard's model name again. Selecting wrong model name will cause the system
unbooted.
II. In method II, be sure that motherboard's model name in BIOS unzip file are the same as your
motherboard's. Otherwise, your system won't boot.
TM
III. In method I, if the BIOS file you need cannot be found in @BIOS
server, please go onto Gigabyte's
website for downloading and updating it according to method II.
IV. Please note that any interruption during updating will cause system unbooted.
GA-8I845GE775-G Motherboard - 60 -
English
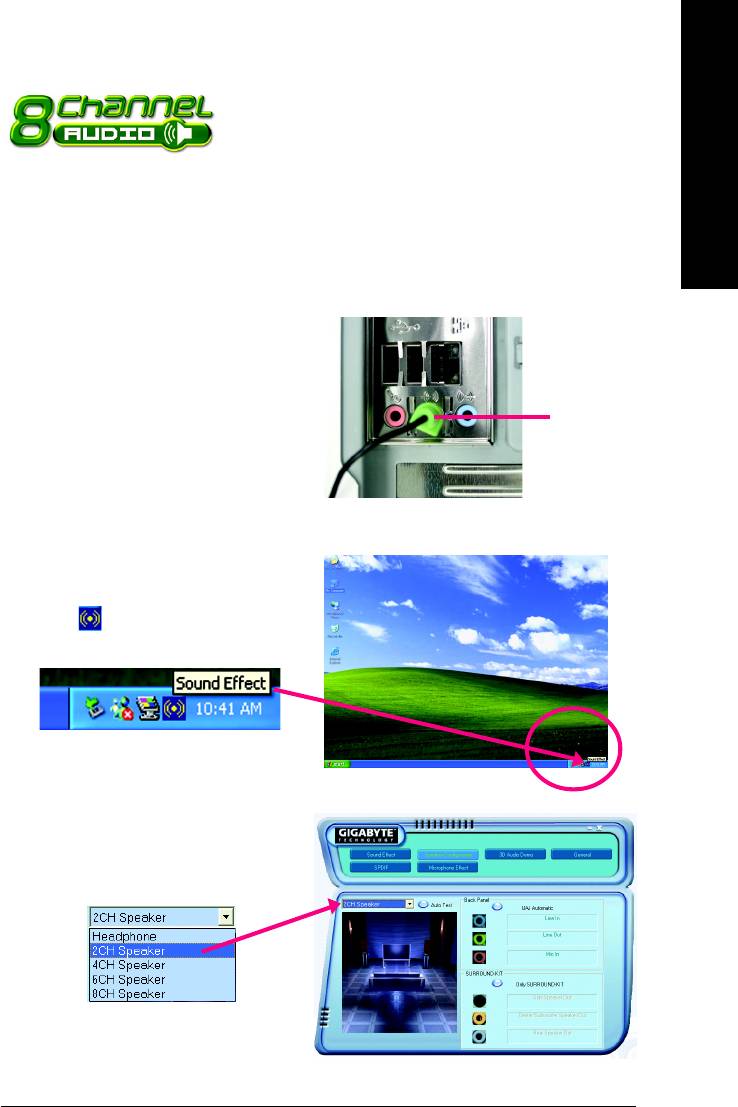
4-1-3 2- / 4- / 6-/ 8- Channel Audio Function
Introduction
The installation of audio software is very simple. Follow the steps to install the function. (Following
pictures are in Windows XP). Please note that if you want to set up an 8 channel audio configuration,
you must use Audio Combo Kit (optional device).
Stereo Speakers Connection and Settings:
We recommend that you use the speaker with amplifier to acquire the best sound effect if the stereo output
is applied.
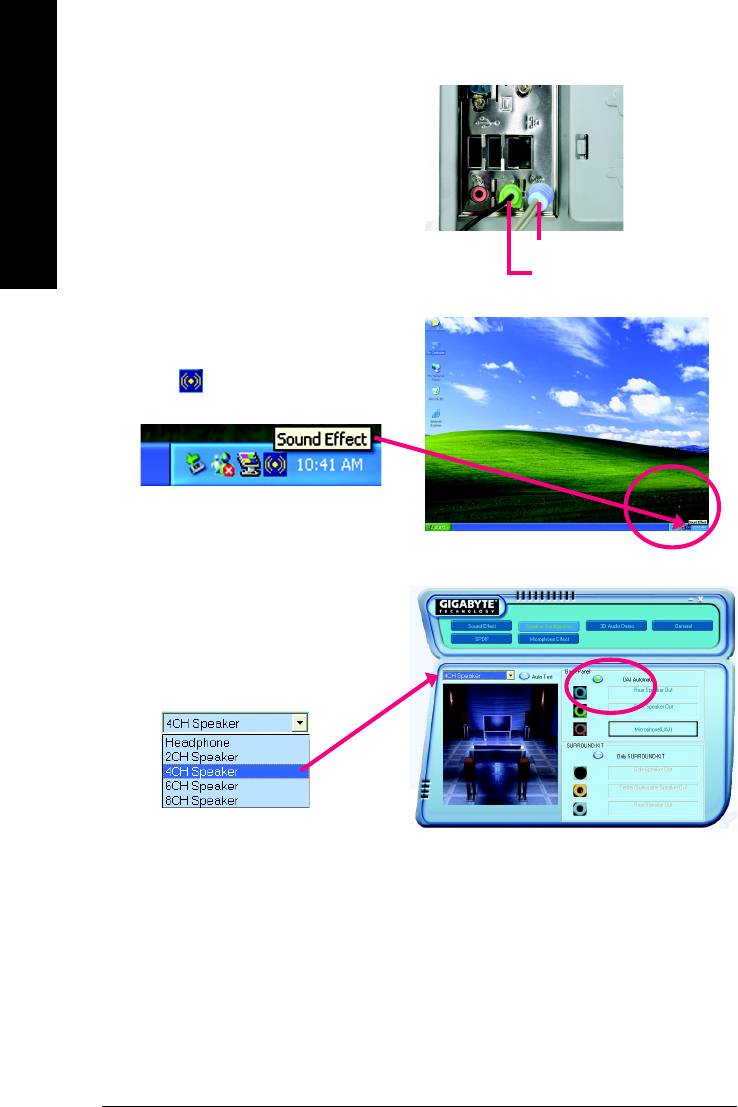
STEP 1:
Connect the stereo speakers or earphone to "Line
Out".
Line Out
STEP 2:
Following installation of the audio driver, you find a
Sound Effect icon on the lower right hand taskbar.
Click the icon to select the function.
STEP 3:
Click "Speaker Configuration" then click on the left
selection bar and select "2CH Speaker" to complete
2 channel audio configuration.
Appendix- 61 -
4 Channel Audio Setup
STEP 1:
Connect the Front Speakers to "Line Out", the Rear
English
Speakers to "Line In".
Line In (Rear Speaker Out)
Line Out (Front Speaker Out)
STEP 2:
Following installation of the audio driver, you find a
Sound Effect icon on the lower right hand taskbar.
Click the icon to select the function.
STEP 3:
Click "Speaker Configuration" and select the "UAJ
Function". Then click on the left selection bar and
select "4CH Speaker" to complete 4 channel audio
configuration.
GA-8I845GE775-G Motherboard - 62 -
English
6 Channel Audio Setup
STEP 1:
Connect the Front Speakers to "Line Out", the Rear
Speakers to "Line In", and the Center/Subwoofer
Speakers to "MIC In".
Line In (Rear Speaker Out)
Line Out (Front Speaker Out)
Mic In (Center/Subwoofer Speaker Out)
STEP 2:
Following installation of the audio driver, you find a
Sound Effect icon on the lower right hand taskbar.
Click the icon to select the function.
STEP 3:
Click "Speaker Configuration" and select the "UAJ
Function". Then click on the left selection bar and
select "6CH Speaker" to complete 6 channel audio
configuration.
Appendix- 63 -
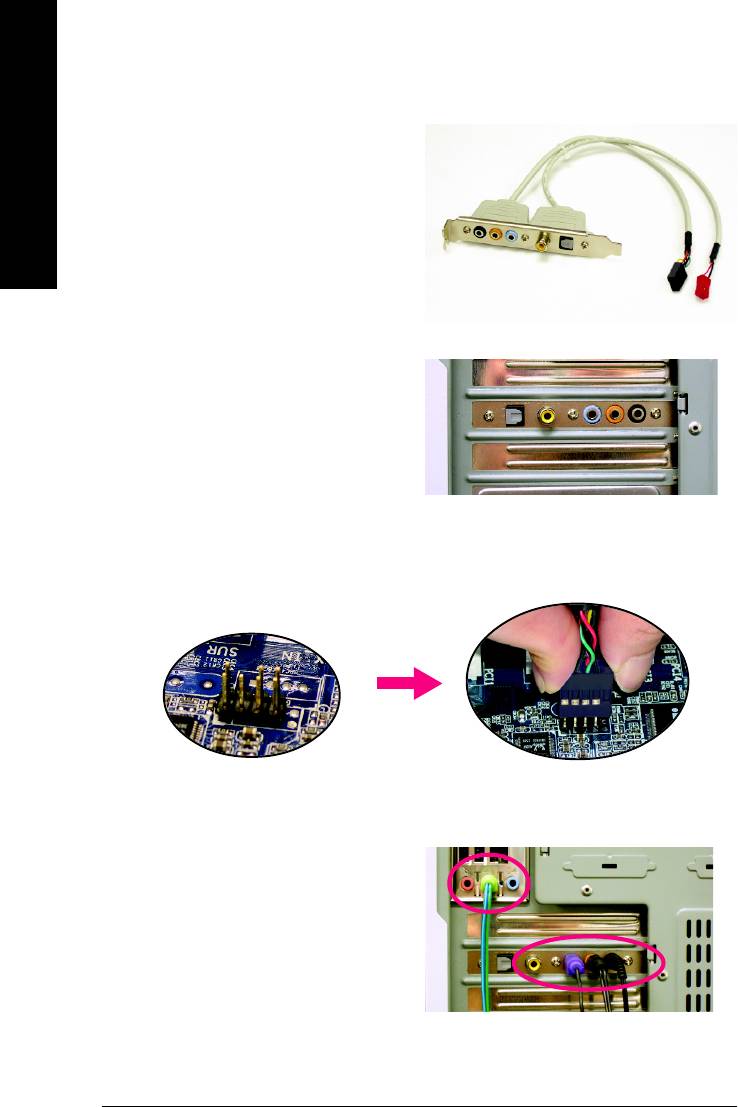
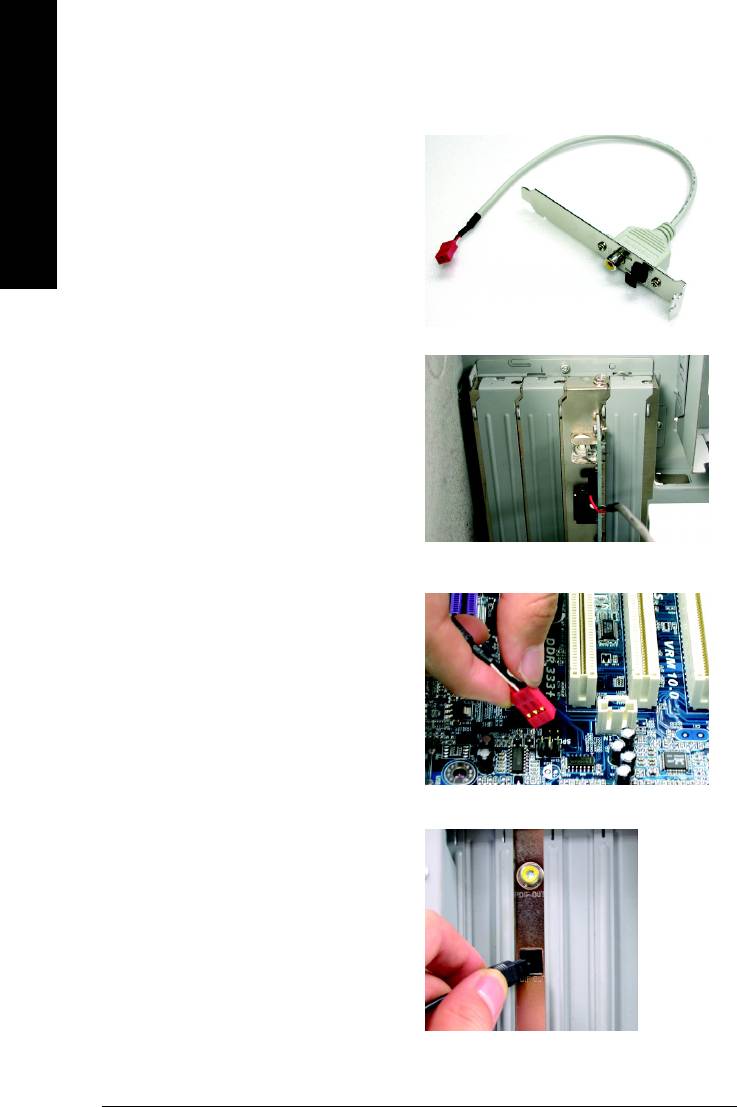
8 Channel Audio Setup (requires Audio Combo Kit, optional device) :
Audio Combo Kit includes a Surround-Kit and a
English
SPDIF output cable (an optical and coaxial cable).
If you want to set up an 8 channel configuration,
you need to use the Surround-Kit. The Surround-
Kit offers R/L surround, center/subwoofer output
and rear surround.
Surround-Kit connector
SPDIF cable connector
STEP 1:
Secure the Audio Combo Kit at the panel on the back
of the case.
STEP 2:
Connect the Surround-Kit to the SUR_CEN connector located on the motherboard.
STEP 3:
There are two methods of 8 channel audio
configuration:
Method 1:
Connect the front channels to the "Line Out" port
located on the audio panel and the rear channels to
the Surround-Kit "REAR R/L" port. Connect the
center/subwoofer channels to the Surround-Kit "SUB
CENTER" and the R/L channels to the Surround-
Kit "SUR BACK" port.
GA-8I845GE775-G Motherboard - 64 -
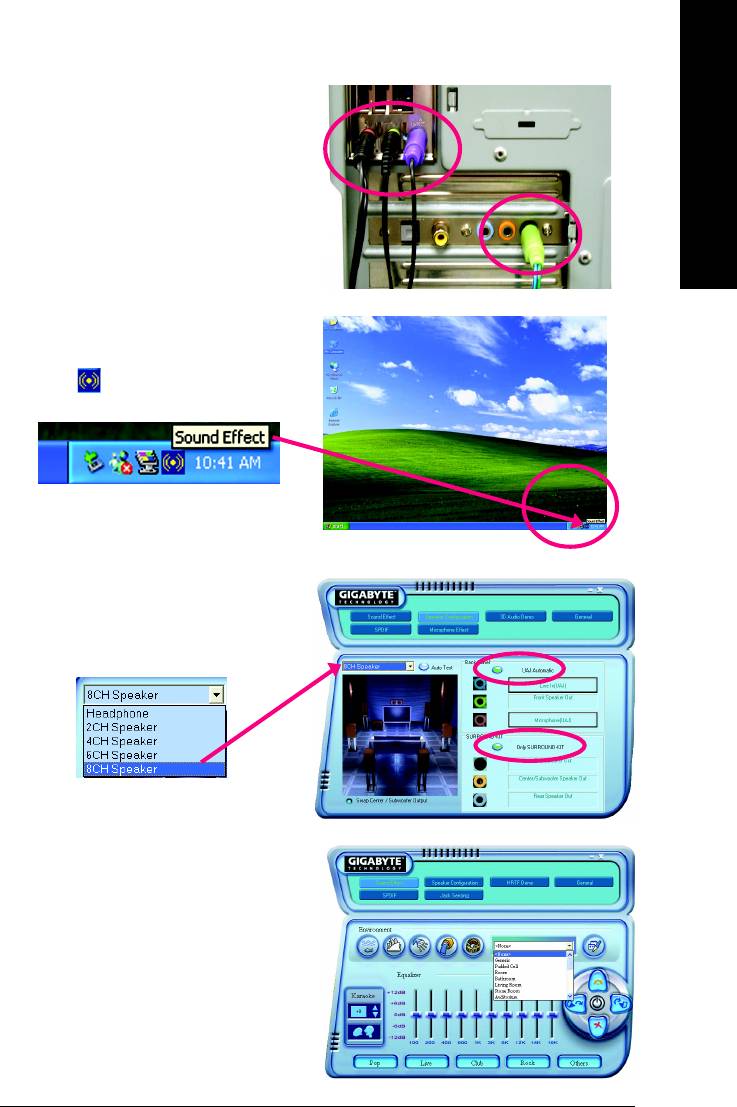
Method 2:
English
Connect the front channels to the "Line Out" port
located on the audio panel and the rear channels to
the "Line In" port. Connect the center/subwoofer
channels to the "MIC In" port located on the audio
panel and the R/L channels to the Surround-Kit
"SUR BACK" port. (This method requires UAJ
function)
STEP 4:
Following installation of the audio driver, you find a
Sound Effect icon on the lower right hand taskbar.
Click the icon to select the function.
STEP 5:
Click "Speaker Configuration" and select both the
"UAJ Function" and "Only Surround-Kit". Then click
on the left selection bar and select "8CH Speaker"
to complete 8 channel audio configuration.
Sound Effect Configuration:
At the sound effect menu, users can adjust sound
option settings as desired.
Appendix- 65 -
SPDIF Output Device (Optional Device)
A "SPDIF output" connector is available on the
English
motherboard. Cable with rear bracket could link to
the "SPDIF output" connector (As picture.) For the
further linkage to decoder, rear bracket
provides coaxial cable and Fiber connecting port
(Note1)
.
1. Connect the SPDIF output device to the rear
bracket of PC, and fix it with screw.
2. Connect SPDIF device to the motherboard.
3. Connect SPDIF to the SPDIF decoder.
(Note1) If you want to use both of the 8 channel audio function and SPDIF out function, you may buy
the Audio Combo Kit (refer to the 8 channel Audio Setup section).
GA-8I845GE775-G Motherboard - 66 -
English
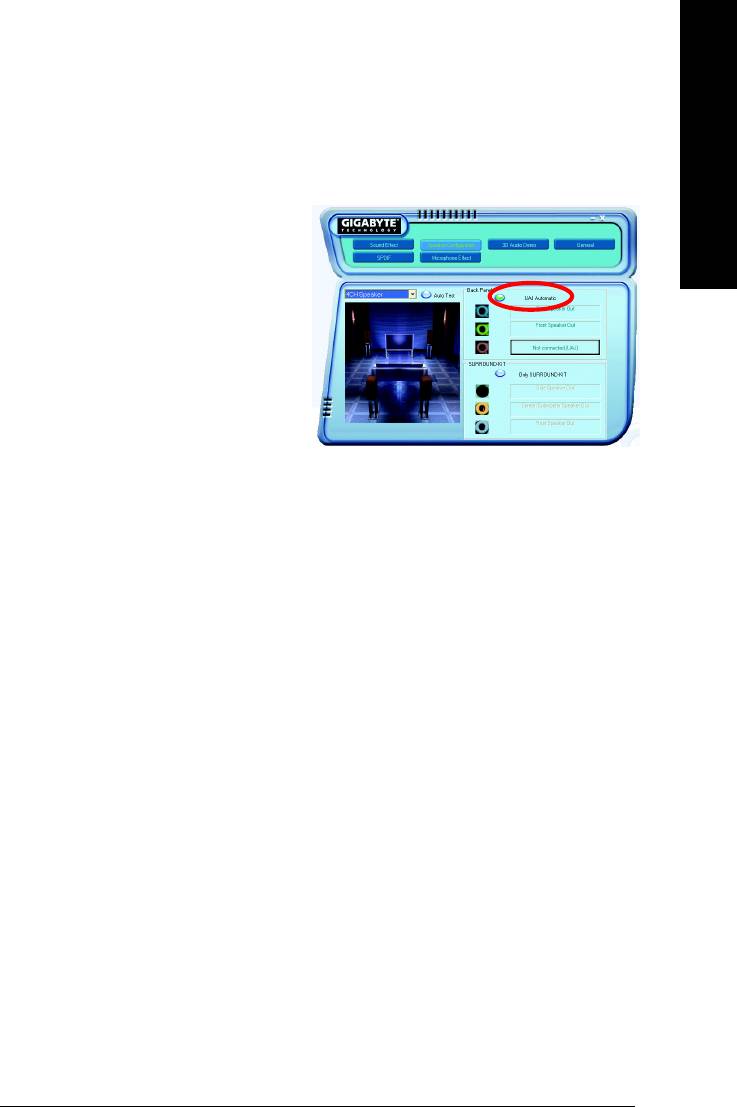
UAJ Introduction
UAJ (Universal Audio Jack) has a very smart feature: It will switch signal automatically when user plugs his
audio device to the wrong jack (Line-in/ Line-out). That means users do not need to worry the audio device
should be plug in Line-in or Line-out jack, the device will work perfectly after UAJ is activated.
Enable UAJ function:
You can click "UAJ Automatic" button to enable UAJ
function.
Appendix- 67 -

4-2 Troubleshooting
Below is a collection of general asked questions. To check general asked questions based on a specific
motherboard model, please log on to www.gigabyte.com.tw
English
Question 1: I cannot see some options that were included in previous BIOS after updating BIOS. Why?
Answer: Some advanced options are hidden in new BIOS version. Please press Ctrl and F1 keys after
entering BIOS menu and you will be able to see these options.
Questions 2: Why is the light of my keyboard/optical mouse still on after computer shuts down?
Answer: In some boards, a small amount of electricity is kept on standby after computer shuts down
and that's why the light is still on.
Question 3: How do I clear CMOS?
Answer: If your board has a Clear CMOS jumper, please refer to the Clear CMOS steps in the manual.
If your board doesn't have such jumper, you can take off the on-board battery to leak voltage to clear
CMOS. Please refer to the steps below:
Steps:
1. Turn off power.
2. Disconnect the power cord from MB.
3. Take out the battery gently and put it aside for about 10 minutes (Or you can use a metal object
to connect the positive and negative pins in the battery holder to makethem short for one
minute).
4. Re-insert the battery to the battery holder.
5. Connect power cord to MB again and turn on power.
6. Press Del to enter BIOS and load Fail-Safe Defaults(or load Optimized Defaults).
7. Save changes and reboot the system.
Question 4: Why do I still get a weak sound after turning up the speaker to the maximum volume?
Answer: Please make sure the speaker you are using is equipped with an internal amplifier. If not,
please change another speaker with power/amplifier and try again later.
Question 5: Sometimes I hear different continuous beeps from computer after system boots up. What do
these beeps usually stand for?
Answer: The beep codes below may help you identify the possible computer problems. However,
they are only for reference purposes. The situations might differ from case to case.
AMI BIOS Beep Codes
AWARD BIOS Beep Codes
*
Computer gives 1 short beep when system boots successfully.
1 short: System boots successfully
*Except for beep code 8, these codes are always fatal.
2 short: CMOS setting error
1 beep Refresh failure
1 long 1 short: DRAM or M/B error
2 beeps Parity error
1 long 2 short: Monitor or display card
3 beeps Base 64K memory failure
error
4 beeps Timer not operational
1 long 3 short: Keyboard error
5 beeps Processor error
1 long 9 short: BIOS ROM error
6 beeps 8042 - gate A20 failure
Continuous long beeps: DRAM error
7 beeps Processor exception interrupt error
8 beeps Display memory read/write failure
Continuous short beeps: Power error
9 beeps ROM checksum error
10 beeps CMOS shutdown register read/write error
11 beeps Cache memory bad
GA-8I845GE775-G Motherboard - 68 -

English
Appendix- 69 -

English
GA-8I845GE775-G Motherboard - 70 -

English
Contact Us
Taiwan (Headquarters)
Japan
GIGA-BYTE TECHNOLOGY CO., LTD.
NIPPON GIGA-BYTE CORPORATION
Address: No.6, Bau Chiang Road, Hsin-Tien, Taipei 231,
WEB address : http://www.gigabyte.co.jp
Taiwan
Singapore
TEL: +886-2-8912-4888
GIGA-BYTE SINGAPORE PTE. LTD.
FAX: +886-2-8912-4003
Tech. Support :
Tech. Support :
http://tw.giga-byte.com/TechSupport/ServiceCenter.htm
http://tw.giga-byte.com/TechSupport/ServiceCenter.htm
Non-Tech. Support(Sales/Marketing) :
Non-Tech. Support(Sales/Marketing) :
http://ggts.gigabyte.com.tw/nontech.asp
http://ggts.gigabyte.com.tw/nontech.asp
WEB address: http://www.gigabyte.com.sg
WEB address (English): http://www.gigabyte.com.tw
U.K.
WEB address (Chinese): http://chinese.giga-byte.com
G.B.T. TECH. CO., LTD.
U.S.A.
TEL: +44-1908-362700
G.B.T. INC.
FAX: +44-1908-362709
TEL: +1-626-854-9338
Tech. Support :
FAX: +1-626-854-9339
http://tw.giga-byte.com/TechSupport/ServiceCenter.htm
Tech. Support :
Non-Tech. Support(Sales/Marketing) :
http://tw.giga-byte.com/TechSupport/ServiceCenter.htm
http://ggts.gigabyte.com.tw/nontech.asp
Non-Tech. Support(Sales/Marketing) :
WEB address : http://uk.giga-byte.com
http://ggts.gigabyte.com.tw/nontech.asp
The Netherlands
WEB address : http://www.giga-byte.com
GIGA-BYTE TECHNOLOGY B.V.
Germany
TEL: +31-40-290-2088
G.B.T. TECHNOLOGY TRADING GMBH
NL Tech.Support: 0900-GIGABYTE (0900-44422983)
TEL: +49-40-2533040 (Sales)
BE Tech.Support: 0900-84034
+49-1803-428468 (Tech.)
FAX: +31-40-290-2089
FAX: +49-40-25492343 (Sales)
Tech. Support :
+49-1803-428329 (Tech.)
http://tw.giga-byte.com/TechSupport/ServiceCenter.htm
Tech. Support :
Non-Tech. Support(Sales/Marketing) :
http://tw.giga-byte.com/TechSupport/ServiceCenter.htm
http://ggts.gigabyte.com.tw/nontech.asp
Non-Tech. Support(Sales/Marketing) :
WEB address : http://www.giga-byte.nl
http://ggts.gigabyte.com.tw/nontech.asp
WEB address : http://www.gigabyte.de
Appendix- 71 -

China
Russia
NINGBO G.B.T. TECH. TRADING CO., LTD.
Moscow Representative Office Of GIGA-BYTE Technology Co.,
Tech. Support :
Ltd.
http://tw.giga-byte.com/TechSupport/ServiceCenter.htm
Tech. Support :
English
Non-Tech. Support(Sales/Marketing) :
http://tw.giga-byte.com/TechSupport/ServiceCenter.htm
http://ggts.gigabyte.com.tw/nontech.asp
Non-Tech. Support(Sales/Marketing) :
WEB address : http://www.gigabyte.com.cn
http://ggts.gigabyte.com.tw/nontech.asp
Shanghai
WEB address : http://www.gigabyte.ru
TEL: +86-021-63410999
Poland
FAX: +86-021-63410100
Office of GIGA-BYTE TECHNOLOGY Co., Ltd. in POLAND
Beijing
Tech. Support :
TEL: +86-10-62102838
http://tw.giga-byte.com/TechSupport/ServiceCenter.htm
FAX: +86-10-62102848
Non-Tech. Support(Sales/Marketing) :
Wuhan
http://ggts.gigabyte.com.tw/nontech.asp
TEL: +86-27-87851061
WEB address : http://www.gigabyte.pl
FAX: +86-27-87851330
Serbia & Montenegro
GuangZhou
Representative Office Of GIGA-BYTE Technology Co., Ltd. in
TEL: +86-20-87586074
SERBIA & MONTENEGRO
FAX: +86-20-85517843
Tech. Support :
Chengdu
http://tw.giga-byte.com/TechSupport/ServiceCenter.htm
TEL: +86-28-85236930
Non-Tech. Support(Sales/Marketing) :
FAX: +86-28-85256822
http://ggts.gigabyte.com.tw/nontech.asp
Xian
WEB address: http://www.gigabyte.co.yu
TEL: +86-29-85531943
Czech Republic
FAX: +86-29-85539821
Representative Office Of GIGA-BYTE Technology Co., Ltd. in
Shenyang
CZECH REPUBLIC
TEL: +86-24-23960918
Tech. Support :
FAX: +86-24-23960918-809
http://tw.giga-byte.com/TechSupport/ServiceCenter.htm
Australia
Non-Tech. Support(Sales/Marketing) :
GIGABYTE TECHNOLOGY PTY. LTD.
http://ggts.gigabyte.com.tw/nontech.asp
Tech. Support :
WEB address: http://www.gigabyte.cz
http://tw.giga-byte.com/TechSupport/ServiceCenter.htm
Romania
Non-Tech. Support(Sales/Marketing) :
Representative Office Of GIGA-BYTE Technology Co., Ltd. in
http://ggts.gigabyte.com.tw/nontech.asp
Romania
WEB address : http://www.giga-byte.com.au
Tech. Support :
France
http://tw.giga-byte.com/TechSupport/ServiceCenter.htm
GIGABYTE TECHNOLOGY FRANCE S.A.R.L.
Non-Tech. Support(Sales/Marketing) :
Tech. Support :
http://ggts.gigabyte.com.tw/nontech.asp
http://tw.giga-byte.com/TechSupport/ServiceCenter.htm
WEB address: http://www.gigabyte.com.ro
Non-Tech. Support(Sales/Marketing) :
http://ggts.gigabyte.com.tw/nontech.asp
WEB address : http://www.gigabyte.fr
GA-8I845GE775-G Motherboard - 72 -


