Olympus STYLUS 1030 SW: Basic operation
Basic operation: Olympus STYLUS 1030 SW
d4354_basic_e_00.book Page 12 Tuesday, December 18, 2007 5:26 PM
Basic operation
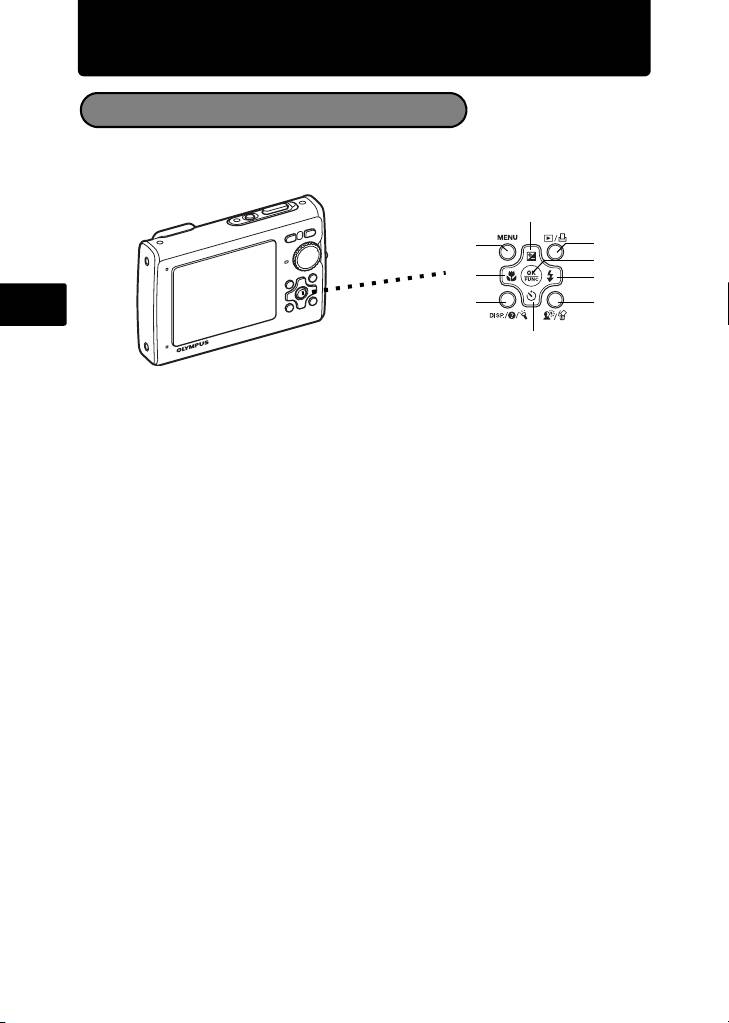
Shooting Mode Buttons
While in shooting mode, use these buttons for quick access to some of the more
commonly used features.
2
7
6
5
1
3
En
9
8
4
1 4& button (Macro Mode)
Use macro, super macro or S-macro LED mode when taking close-up pictures such
as of a flower.
2 1F button (Exposure Compensation)
Use this setting to overexpose (+) or underexpose (–) a picture. Use the arrow pad
to select the frame with the settings you want, and press o.
3 3# button (Flash Mode)
Select from 4 flash modes – Auto, Red-eye reduction, Fill-in flash, or Flash off.
4 2Y button (Self-timer)
Select the self-timer to delay the shot approximately 12 seconds from when the
shutter button is pressed.
5 o button (OK/FUNC)
Displays the function menu and sets the functions often used in shooting mode.
Also confirms and sets your selection of menu items.
6 m button (MENU)
Press this button to display the top menu.
7 q/< button
Press q in shooting mode to switch to playback mode and display the last picture
taken.
8 f/S button
Press f in shooting mode to turn on or off Shadow Adjustment Technology. This
function makes the subject’s face appear brighter even against backlight.
Hold down f/S in shooting mode to display the guide indicating the location of
the buttons.
9 g/E/Y button
Press g/E/Y repeatedly to display the composition guide lines and histogram.
Select a menu item, and press g/E/Y to display an explanation of its function.
12

d4354_basic_e_00.book Page 13 Tuesday, December 18, 2007 5:26 PM
s Modes (Scene)
This function allows you to switch the s (scene mode) according to the subject.
1 Set the mode dial to s.
2 Press 12 to select a scene mode, and press o.
PORTRAIT
Mode Dial
m button
o button
En
12 button
EXIT
MENU
SET
OK
Shooting s (Scene) Modes
• PORTRAIT • SELF PORTRAIT • SHOOT & SELECT1
• LANDSCAPE • AVAILABLE LIGHT• SHOOT & SELECT2
• LANDSCAPE+PORTRAIT• SUNSET • BEACH & SNOW
• NIGHT SCENE • FIREWORKS • PRE-CAPTURE MOVIE
• NIGHT+PORTRAIT • CUISINE • UNDERWATER SNAPSHOT
• SPORT • BEHIND GLASS • UNDERWATER WIDE1
• INDOOR • DOCUMENTS • UNDERWATER WIDE2
• CANDLE • AUCTION • UNDERWATER MACRO
Macro Mode
& This mode lets you shoot from as close as 10 cm/3.9 in. (when the zoom is set
for the zoom-out angle) and as close as 30 cm/11.8 in. (when the zoom is set for
the zoom-in angle) to your subject.
% Use this mode to take pictures as close as 2 cm/0.8 in. to your subject. In %
mode, the position of the zoom lens is fixed. If the distance between the camera
and the subject is over 50 cm/19.7 in., the picture will be out of focus.
O The LED light illuminates from 7 cm/2.8 in to 20 cm/7.9 in. from the lens in super
macro mode. Press the shutter button halfway to turn on the LED light.
1 Press 4&.
2 Press 4 3 to select [&], [%] or [O] and press o.
13

d4354_basic_e_00.book Page 14 Tuesday, December 18, 2007 5:26 PM
Self-Timer
1 Press 2Y.
Self-Timer Lamp
2 Press 12 to select [ON], and press o.
3 Press the shutter button fully to take the picture.
The self-timer lamp lights for approximately 10 seconds after
the shutter button is pressed, then starts blinking. After blinking
for approximately 2 seconds, the picture is taken.
Flash Modes
En
1 Press 3#.
2 Press 4 3 to select the flash mode, and press o.
3 Press the shutter button halfway.
When the flash is set to fire, the # mark lights.
4 Press the shutter button completely to take the picture.
Icon Flash Mode Description
Auto flash The flash fires automatically in low light or backlight
AUTO
conditions.
Red-eye
The red-eye reduction flash mode significantly reduces
!
reduction flash
this phenomenon by emitting pre-flashes before firing
the regular flash.
#
Fill-in flash The flash fires regardless of the available light.
$ Flash off The flash does not fire.
Power Save Feature
To save battery power, the camera automatically enters sleep mode and stops
operating if not used for 3 minutes in shooting mode. Press the shutter button
or zoom button to reactivate the camera.
If the camera is not operated for 15 minutes after the camera enters sleep
mode, the camera automatically turns off. To resume operation, turn on the
power again.
14
Table of contents
- Table of Contents
- Gather these items (box contents)
- Prepare the camera
- Turn the camera on
- Set date and time
- Select a language
- Take a picture
- View pictures
- Basic operation
- Menus and settings
- Connecting the camera
- Transfer images
- OLYMPUS Master Software
- Specifications
- Safety precautions
- Table des matières
- Sélectionnez une langue
- Fonctionnement de base
- Menus et réglages
- Connexion de l’appareil photo
- Transférez des images
- Logiciel OLYMPUS Master
- Caractéristiques
- Précautions de sécurité
- Contenidos
- Seleccionar un idioma
- Ver fotografias
- Funcionamiento básico
- Menús y ajustes
- Conexión de la cámara
- Transferencia de imágenes
- Software OLYMPUS Master
- Especificaciones
- Precauciones de seguridad
- Inhaltsverzeichnis
- Überprüfen Sie, ob die folgenden Komponenten (Verpackungsinhalt) vorhanden sind
- Vorbereiten der Kamera
- Die Kamera einschalten
- Stellen Sie das Datum und die Zeit ein
- Eine Sprache auswählen
- Ein Bild aufnehmen
- Bilder anzeigen
- Grundlegende Bedienung
- Menüs und Einstellungen
- Die Kamera anschließen
- Bilder übertragen
- OLYMPUS Master-Software
- Technische Daten
- Sicherheitshinweise
- Содержание
- Выньте из коробки эти предметы
- Подготовьте фотокамеру
- Включите фотокамеру
- Установите дату и время
- Выберите язык
- Съемка
- Просмотр снимков
- Основные операции
- Меню и настройки
- Подсоединение фотокамеры
- Перенос изображений
- Программное обеспечение OLYMPUS Master
- Технические характеристики
- Меры предосторожности


