Nikon PC-E NIKKOR 24mm f-3.5D ED: 5. Using bayonet hood HB-41 6. Determining exposure When using the Nikon D3 or D300 camera
5. Using bayonet hood HB-41 6. Determining exposure When using the Nikon D3 or D300 camera: Nikon PC-E NIKKOR 24mm f-3.5D ED
Table of contents
- Notes on Safety Operations
- 1. Nomenclature
- 2. Major features
- 3. Usable cameras and available functions
- Aperture stop-down button (one-touch preset aperture operation)
- 4. Mounting lens
- 5. Using bayonet hood HB-41 6. Determining exposure When using the Nikon D3 or D300 camera
- When using other Nikon cameras Determining exposure (with an external exposure meter) 7. The shift/tilt function Important
- The shift function The tilt function
- Revolving
- 8. Focusing
- 9. Depth of field 10. Taking flash pictures using cameras with a built-in flash
- 11. Recommended focusing screens
- 12. Lens care 13. Standard accessories 14. Optional accessories
- 15. Specifications
- Weight: Approx. 730 g (25.7 oz)
c
Turn the camera power off, align
the mounting indexes on the lens
and camera and then twist the lens
counterclockwise until it locks into
En
place. (Fig. 4)
•
Mounting the lens to a camera
while camera’s power is on, may
prevent the camera from operating
Fig. 4
correctly.
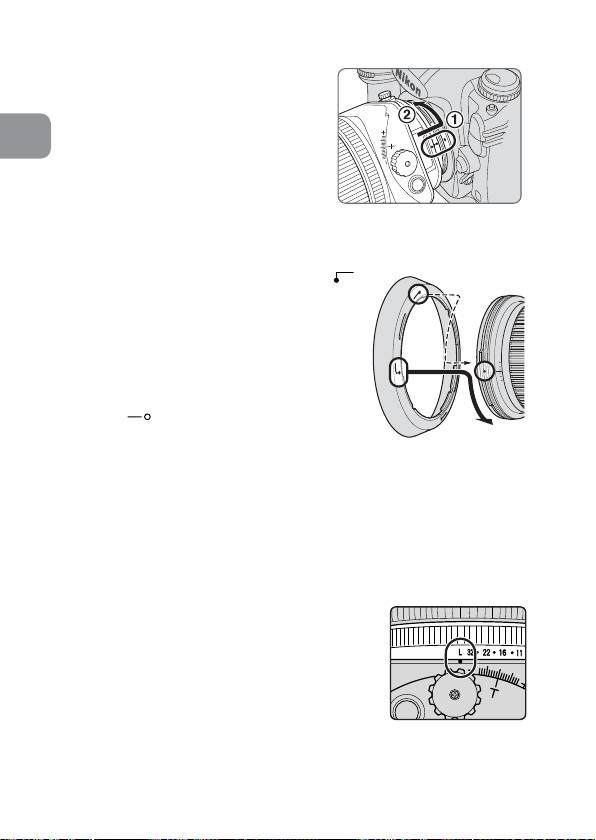
5. Using bayonet hood HB-41
Align the lens hood attachment index ( )
on the hood (either of two indexes) with
the lens hood mounting index on the lens,
and turn the hood clockwise until it click
stops to secure.
• Make sure that the lens hood mounting
index aligns with the lens hood setting
index ( ).
• If the lens hood is not correctly attached,
Fig. 5
vignetting can occur.
• To facilitate attachment or removal of the hood,
hold it by its base around the lens hood
attachment index rather than its outer edge.
• To store the lens hood, attach it in the reverse position.
6. Determining exposure
When using the Nikon D3 or D300 camera
a
Set the shift and tilt amount to 0 by
rotating the shift and tilt knobs. (Fig. 2)
b
Set the camera’s exposure mode.
c
With A or M exposure mode, set the aperture
using the aperture ring or the camera’s
command dial. When using the camera’s
command dial, set the aperture to minimum
Fig. 6
aperture lock (L) (Fig. 6).
With P or S mode, set the aperture using
the camera’s command dial.
24
