Nikon PC-E NIKKOR 24mm f-3.5D ED – page 2
Manual for Nikon PC-E NIKKOR 24mm f-3.5D ED
Table of contents
- Notes on Safety Operations
- 1. Nomenclature
- 2. Major features
- 3. Usable cameras and available functions
- Aperture stop-down button (one-touch preset aperture operation)
- 4. Mounting lens
- 5. Using bayonet hood HB-41 6. Determining exposure When using the Nikon D3 or D300 camera
- When using other Nikon cameras Determining exposure (with an external exposure meter) 7. The shift/tilt function Important
- The shift function The tilt function
- Revolving
- 8. Focusing
- 9. Depth of field 10. Taking flash pictures using cameras with a built-in flash
- 11. Recommended focusing screens
- 12. Lens care 13. Standard accessories 14. Optional accessories
- 15. Specifications
- Weight: Approx. 730 g (25.7 oz)

3. Usable cameras and available functions
There may be some restrictions or limitation of available functions.
Refer to your camera’s instruction manual for details.
Exposure
En
*1
Aperture
One-touch
mode
Mounting
setting
preset
Tilting/
Cameras
to a
by
aperture
shifting
*2
camera
P
6$0
camera
operation
D3
D300
D2-Series, D1-Series,
D200, D100, D80,
D70-Series, D60, D50,
D40-Series, F6, F5,
F4-Series
, F100,
—
———
F80-Series/N80-Series*,
F75-Series/N75-Series*,
F65-Series/N65-Series*,
Pronea 600i/6i*
F90X/N90s*,
F90-Series/N90*,
F70-Series/N70*,
F60-Series/N60*,
F55-Series/N55-Series*,
F50-Series/N50*,
F-401x/N5005*,
F-401s/N4004s*,
F-401/N4004*,
— — — — ————
F-801s/N8008s*,
F-801/N8008*,
F-601M/N6000*,
F3AF, F-601/N6006*,
F-501/N2020**,
Pronea S,
Nikon MF cameras,
(except
F-601M/N6000*)
: Possible
—
: Impossible
* Sold exclusively in the USA
** Sold exclusively in the USA and Canada
21

*1 Exposure will be incorrect when the lens is shifted and/or tilted.
*2
P includes AUTO (General-Purpose Program) and Vari-Program System.
*3 When the lens power or the camera is turned off (including
using the auto meter off function) while stopping down the
lens aperture, the diaphragm blades fully open to the maximum
En
aperture. This is not a malfunction.
*4 Stopping down the lens aperture activates AE-L (AE lock).
*5 Handle the lens with care while shifting and/or tilting. Failure to
do so may cause the lens to scratch the camera body.
*6 See “Mounting lens” (P. 23)
*7
Diaphragm blades open and close after each press of the shutter
button, and exposure will be incorrect for continuous shooting.
*8 When the lens power or the camera is turned off (including
using the auto meter off function) while stopping down the
lens aperture, the lens aperture remains at the stopped down
setting. When the camera is turned on again or the camera
shutter release button is lightly pressed, the diaphragm blades
open once and then close. This is not a malfunction.
*9 When the camera is turned off using the auto meter off
function while stopping down the lens aperture, lightly press
the shutter release button to display the selected aperture value
in the camera’s LCD or view finder before shooting. Failure to
do this may lead to incorrect exposure when the shutter release
button is fully depressed.
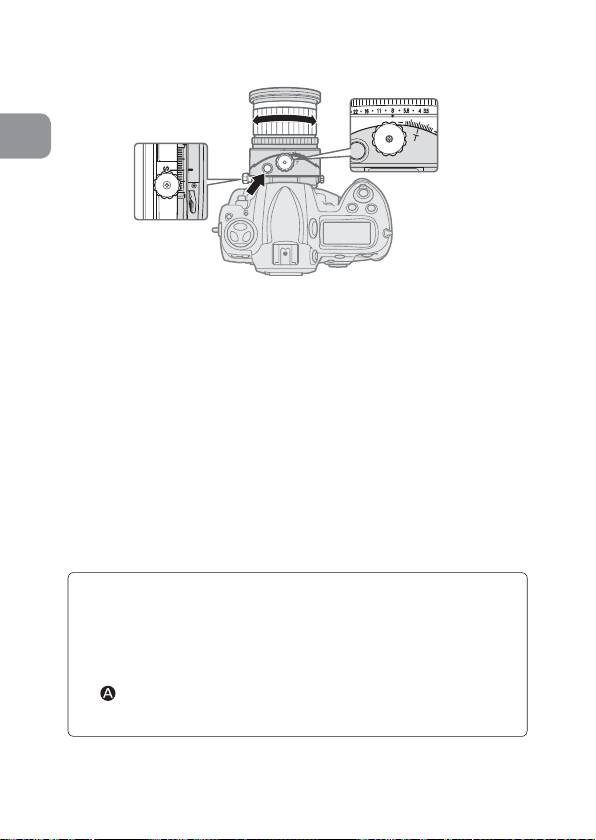
Aperture stop-down button (one-touch preset
aperture operation)
• The lens aperture can be stopped down from maximum aperture
to a selected aperture by pressing the aperture stop-down
button. Pressing the button again fully opens the aperture.
Whether the aperture is stopped down or not, check the camera
viewfinder, or check the diaphragm from the front of the lens.
• Even at maximum aperture after canceling the aperture stop-
down, the preset aperture value is displayed on the camera body.
• When using the D3 or D300 camera, the aperture is stopped
down to a selected aperture automatically by pressing the
shutter release button, even when the aperture is fully open
(maximum aperture) before shooting. When the lens power or
the camera is turned off (including using auto meter off
function) after stopping down the lens aperture by pressing the
aperture stopdown button, the aperture stop-down is cancelled
and the diaphragm blades fully open to the maximum aperture.
22
Important!
• When the lens is mounted to a camera other than the D3, shift,
tilt and/or revolve the lens with care. Failure to do so, may result
in the lens scratching the camera body.
• This lens is a manual focus lens, and autofocus is not possible
En
even when the camera's focus mode is set to AF mode.
•
Use of tilt/shift function can cause some vignetting or slight color
change. (Vignetting is the darkening of the corners around the image.)
• When mounted on Nikon digital SLR (Nikon DX format) cameras,
such as the D2-Series and D300, the lens’ picture angle becomes
61° and its 35 mm equivalent focal length is approx. 36 mm.
• Be careful not to soil or damage the CPU contacts.
• If the lens mount rubber gasket is damaged, be sure to visit your
nearest Nikon authorized dealer or service center for repair.
• In low temperatures, new or fully charged batteries should be
used in the camera.
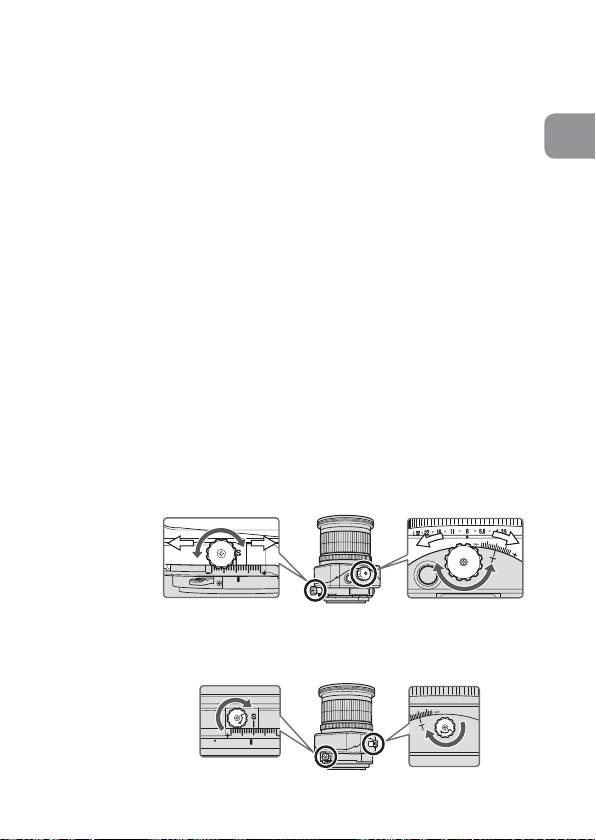
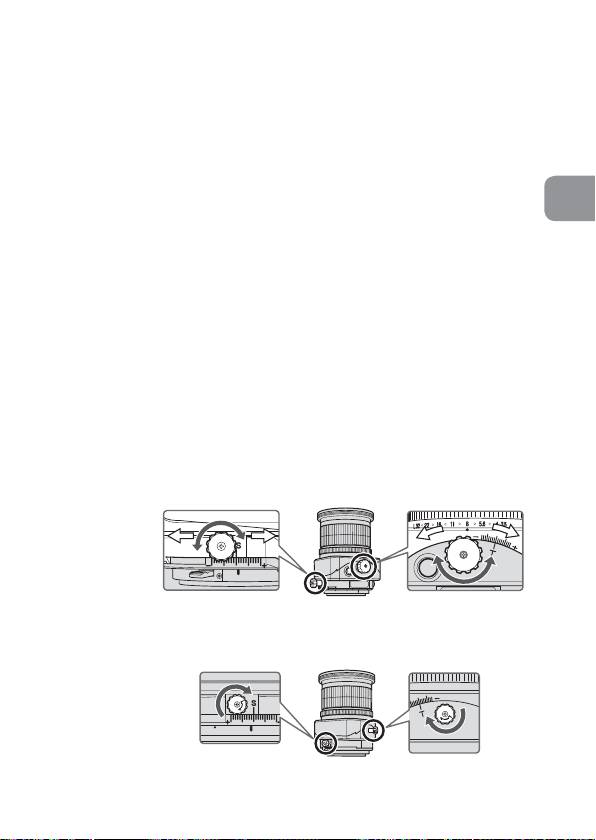
4. Mounting lens
a
Set the shift amount and tilt amount to 0 by rotating the shift
and tilt knobs (Fig. 2).
Note: Avoid attaching/detaching the lens to/from the camera
while using tilt, shift and/or revolving, and without locking
each knob. Failure to do so can lead to you pinching your
fingers between the lens and the camera body, or the lens
scratching the camera body.
Fig. 2
b
Set the tilt and shift knobs. (Fig. 3)
Note: Turning either knob too tightly may damage the knob.
Fig. 3
23
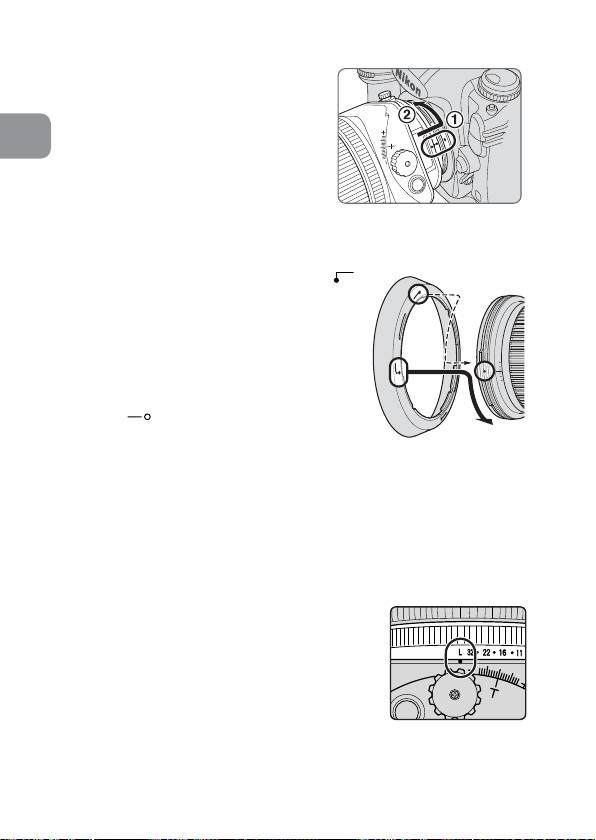
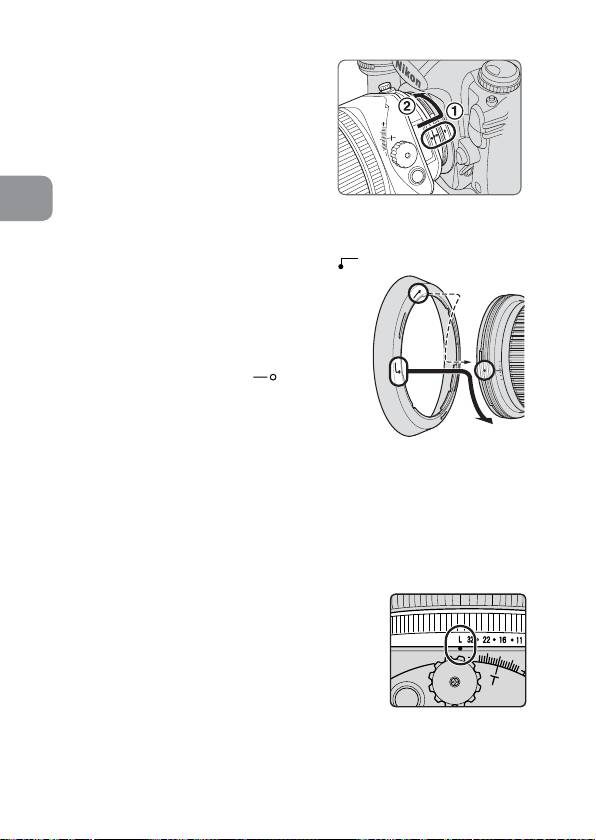
c
Turn the camera power off, align
the mounting indexes on the lens
and camera and then twist the lens
counterclockwise until it locks into
En
place. (Fig. 4)
•
Mounting the lens to a camera
while camera’s power is on, may
prevent the camera from operating
Fig. 4
correctly.
5. Using bayonet hood HB-41
Align the lens hood attachment index ( )
on the hood (either of two indexes) with
the lens hood mounting index on the lens,
and turn the hood clockwise until it click
stops to secure.
• Make sure that the lens hood mounting
index aligns with the lens hood setting
index ( ).
• If the lens hood is not correctly attached,
Fig. 5
vignetting can occur.
• To facilitate attachment or removal of the hood,
hold it by its base around the lens hood
attachment index rather than its outer edge.
• To store the lens hood, attach it in the reverse position.
6. Determining exposure
When using the Nikon D3 or D300 camera
a
Set the shift and tilt amount to 0 by
rotating the shift and tilt knobs. (Fig. 2)
b
Set the camera’s exposure mode.
c
With A or M exposure mode, set the aperture
using the aperture ring or the camera’s
command dial. When using the camera’s
command dial, set the aperture to minimum
Fig. 6
aperture lock (L) (Fig. 6).
With P or S mode, set the aperture using
the camera’s command dial.
24

When using other Nikon cameras
a
Set the shift and tilt amount to 0 by rotating the shift and tilt knobs. (Fig. 2)
b
Set the camera’s exposure mode to M.
c
Press the aperture stop-down button to fully open the aperture,
En
set the aperture ring to “3.5” (maximum aperture), and set the
shutter speed for correct exposure.
d
Set the desired aperture by rotating the aperture ring and shift
the shutter speed by the same number of changed steps.
• Setting the aperture ring to minimum aperture lock (L) fixes the
aperture at f/32 (minimum aperture).
• Set the aperture with the lens’ aperture ring even on a camera
that requires aperture to be set via its command dial. With a
camera that has the custom setting menu “aperture setting
with lens’ aperture ring,” this setting is not required.
Determining exposure (with an external exposure meter)
a
Set the shift and tilt amount to 0 by rotating the shift and tilt knobs. (Fig. 2)
b
Set the camera’s exposure mode to M.
c
Set the desired aperture via the lens’ aperture ring or the
camera’s command dial and read the aperture value displayed
in the camera’s LCD panel or selected aperture ring value. Input
the aperture value to the external exposure meter to determine
exposure, and set the shutter speed.
• When using a camera other than the D3 or D300, set the
aperture with the lens’ aperture ring even on a camera that
requires aperture to be set via its command dial. With a camera
that has the custom setting menu “aperture setting with lens’
aperture ring,” this setting is not required.
7. The shift/tilt function
Important
• Use of a tripod is recommended for correct shooting.
• Turning each knob too tightly can cause damage.
• Use of tilt/shift function can cause some vignetting. (Vignetting is
the darkening of the corners around the image.) To counteract
this, close the aperture (choose a larger f-number), or
compensate the exposure before shooting.
25
• Determining correct exposure with shift and/or tilt use requires
experience. We recommend that you take a series of test shots
until you feel comfortable with the operation.
• When the lens is mounted to a camera other than the D3, shift
En
and/or tilt the lens with care. Failure to do so, may result in your
fingers being nipped between the lens and the camera body, or
the lens scratching the camera body.
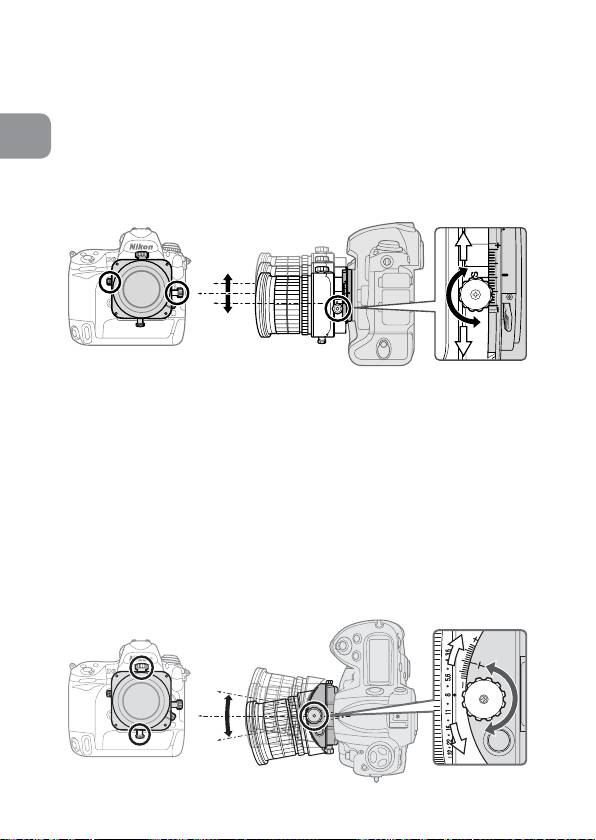
The shift function
Fig. 7
When the shift knob is rotated, the lens is shifted horizontally (or vertically,
when the lens is revolved) parallel to the camera body (±11.5 mm).
By shifting, you can recompose the frame of the shot without
moving the camera.
This lets you correct the perspective distortion of the subject
or exclude unwanted objects from appearing in front of the main
subject (p. 195).
• After shifting, tighten the shift lock release knob to fix the lens’
shift position.
Note: When shifting the lens, be careful not to pinch your fingers
between the lens and the grip of the camera body.
The tilt function
Fig. 8
26
By rotating the tilt knob, the lens is tilted up and down (or right
and left, when the lens is revolved) ±8.5° to the camera body. By
tilting, you can obtain clear focus of the entire subject plane when
it is not parallel to the camera or can focus small areas of the
En
subject which are parallel to the camera (p. 195).
• After tilting, tighten the tilt lock release knob to fix the lens’
tilt position.
• Note that tilting the lens also changes the viewfinder image.
• Once the lens is tilted, neither the depth-of-field scale nor the
distance scale on the lens barrel can be used.
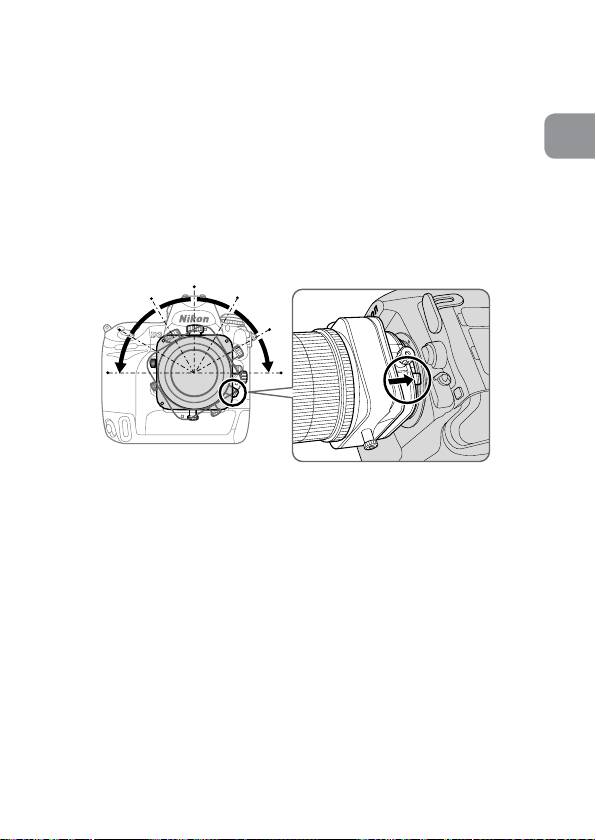
Revolving
Fig. 9
This lens can be revolved up to 90° right or left. By revolving the
lens, the shift function can be changed to operate vertically, and
the tilt function can be changed to operate horizontally.
• Before rotating the lens, set the shift and tilt amount to “0” by
rotating the shift and tilt knob.
Note:
When revolving the lens while using tilt and/or shift, be
careful to avoid nipping your fingers between the lens and
the camera body or scratching the camera body with the
lens. Failure to lock each knob can also have the same effect.
• Push the revolving lever and rotate the lens holding the square
parts of the lens.
• Click stops are provided in 30° steps both right and left.
At 30° and 60°, you can rotate the lens without pushing the
revolving lever.
27
8. Focusing
En
Fig. 10
a
Set the aperture to its maximum by pressing the aperture stop-
down button, and focus by rotating the focus ring.
b
Before shooting, press the aperture stop-down button again to
stop-down the aperture.
•
When using the Nikon D3 or D300 camera, you can take a picture
without operating the aperture stop-down button (the aperture can
be stopped down to a selected aperture automatically by pressing
the shutter release button without pressing the aperture stop-down
button). Alternatively, the aperture stop-down button can be used.
• While using tilting and/or shifting, the camera’s electronic range
finder cannot be used to confirm correct focusing. Focus should
be confirmed by checking the image in the camera's viewfinder.
•
When you change the degree of tilt and/or shift after focusing
the subject will become out of focus.
Infrared compensation
For photography using infrared film, attach a red (R60) filter to
the lens and compensate the focus manually.
First, focus on the subject manually. Rotate the focus ring to
realign the desired distance scale number (“0.5 m” in fig. 11)
to (“8” on the depth of field scale in fig. 11) to compensate
the focus. Attach an R60 filter for infrared photography.
28
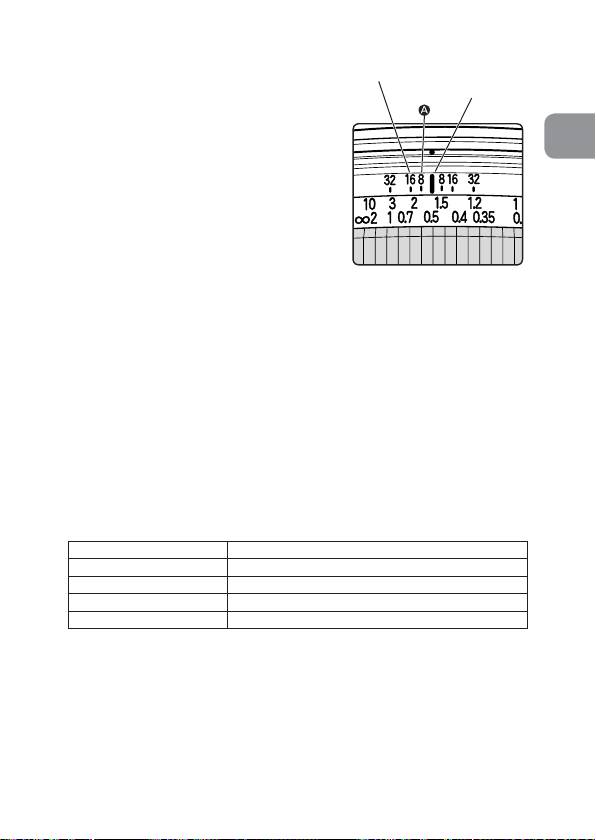
Depth of field scale
9. Depth of field
• Approximate depth of field can be
Distance index
determined by checking the depth of
field scale.
En
•
Using the aperture stop-down button
of the lens or the camera’s depth-of-
field preview (stop-down) button (with
the D3 or D300 camera), the depth of
field can be observed while looking
through the camera viewfinder.
• For more information, see p. 222.
Fig. 11
Note: When the lens is tilted, neither
the depth of field scale nor the distance scale can be used.
(Both scales can be used when the lens is shifted only.)
10. Taking flash pictures using cameras with a
built-in flash
To prevent vignetting, do not use a lens hood, and take images
referring to the shooting distance below.
Note: The following limitations are only for shooting without tilt
and/or shift. When using the camera’s built-in flash for tilt/
shift shooting, vignetting will be greater than shooting
without tilt/shift. For tilt/shift shooting, use of camera's
built-in flash is not recommended.
Cameras Available shooting distance
D300, D200, D100 1 m (3.3 ft.) or greater
D80, D70-Series, D50 2 m (6.6 ft.) or greater
D60, D40-Series 3 m (9.9 ft.) or greater
Other cameras Vignetting occurs at all shooting distances
29

11. Recommended focusing screens
Various interchangeable focusing screens are available for certain
Nikon SLR cameras to suit any picture-taking situation. The ones
recommended for use with this lens are:
En
Screen
EC-B
G1
ABCE
F
G2 G3 J K L M P U
EC-E
G4
Camera
F6
F5+DP-30
(+1.0)
F5+DA-30
(+1.0) (+0.5) (+0.5) (+1.0)
F4+DP-20
(+1.0) (+1.0) (+1.0) (+1.0) (+1.0)
F4+DA-20
(+1.0) (+1.0) (+0.5) (+1.0) (+1.0) (+1.0)
: Excellent focusing
: Acceptable focusing
Slight vignetting or moiré patterns appear in the viewfinder,
but not on the film.
− : Not available.
( ): Indicates degree of exposure compensation needed (Center-
Weighted metering only). For F6 cameras, compensate by
selecting “Other screen” in Custom Setting “b6: Screen comp.“
and setting the EV level to -2.0 to +2.0 in 0.5 EV steps. When
using screens other than type B or E, “Other screen” must be
selected even when the required compensation value is “0” (no
compensation required). For F5 cameras, compensate using
Custom Setting #18 on the camera body. For F4-Series cameras,
compensate using the Exposure Compensation Dial for the
focusing screen.
See instruction manual of the camera body for more details.
Blank box means not applicable. Since type M screen can be used for
both macrophotography at a magnification ratio of 1:1 or above and for
photomicrography, it has different applications than other screens.
Note:
• For F5 cameras, only EC-B, EC-E, B, E, J, A, L focusing screens are
usable in Matrix Metering.
• When using the B and E focusing screens in cameras other than
those listed above, refer to the columns for the B and E screens.
30

12. Lens care
• When the lens is not in use, set the tilt and shift amount to “0.”
The lens has many moving parts and can be easily soiled by dust,
dirt or water drip.
En
• Clean the lens surfaces with a blower brush. To remove dirt and
smudges, use a soft, clean cotton cloth or lens tissue moistened
with ethanol (alcohol) or lens cleaner. Wipe in a circular motion
from center to outer edge, taking care not to leave traces or
touch other parts of the lens.
• Never use thinner or benzene to clean the lens as this might
damage it, result in a fire, or cause health problems.
• To protect the front lens element, an NC filter is recommended
at all times. A lens hood also helps protect the front of the lens.
• When storing the lens in its lens case, attach both front and
rear caps.
• When the lens will not be used for a long time, store it in a cool,
dry place to prevent mold. Also store the lens away from direct
sunlight or chemicals such as camphor or naphthalene.
• Do not get water on the lens or drop it in water as this will cause
it to rust and malfunction.
• Reinforced plastic is used for certain parts of the lens. To avoid
damage, never leave the lens in an excessively hot place.
13. Standard accessories
• 77 mm snap-on front lens cap LC-77 • Rear lens cap LF-1
• Bayonet hood HB-41 • Flexible lens pouch CL-1120
14. Optional accessories
• 77 mm screw-in filters
31

15. Specifications
Type of lens: D-type NIKKOR lens with built-in CPU and
Nikon bayonet mount
Focal length: 24 mm
En
Maximum
f/3.5
aperture:
Lens construction: 13 elements in 10 groups (3 ED, 3
aspherical and 1 Nano Crystal Coat-
deposited lens elements)
Picture angle: 84° with 35 mm (135) format Nikon film-
SLR cameras and Nikon FX format digital
SLR cameras
61° with Nikon DX format digital SLR
cameras
71° with IX240 system cameras
Maximum
1/2.7
reproduction ratio:
Distance
Output to camera body
information:
Focusing: Manually via separate focus ring
Shooting distance
Graduated in meters and feet from 0.21 m
scale:
(0.75 ft) to infinity ()
Closest focusing
0.21 m (0.75 ft)
distance:
No. of diaphragm
9 pcs. (rounded)
blades:
Diaphragm: Electrically automatic/One-touch preset
aperture operation
Aperture scale: f/3.5—f/32
32

Lens movement: Shift and tilt movement at right angles
(the two operations can be modified for a
surcharge, to move in the same [parallel]
direction. The shift lock release knob can
En
also be changed for a larger one, but the
changed knob may affect mounting the
lens to the camera or lens operation. For
details, contact a Nikon authorized
service representative.)
Maximum shift amount: ±11.5mm
Maximum tilt amount: ±8.5°
Lens rotation: 90° right and left (click-stop for each 30°
step)
Exposure
Via full-aperture method
measurement:
Attachment size: 77 mm (P = 0.75 mm)
Dimensions: Approx. 82.5 mm dia. x 108 mm extension
from the camera’s lens mount flange
Weight: Approx. 730 g (25.7 oz)
Specifications and designs are subject to change without any
notice or obligation on the part of the manufacturer.
33

Hinweise für sicheren Betrieb
ACHTUNG
Nehmen Sie das Objektiv nicht auseinander
Beim Berühren der Innenteile von Kamera oder Objektiv droht Verletzungsgefahr.
Überlassen Sie Reparaturen unbedingt ausschließlich qualifizierten Technikern. Kommt es
durch einen heftigen Stoß (z.B. Fall auf den Boden) zu einem Bruch von Kamera oder
Objektiv, so trennen Sie zunächst das Produkt vom Stromnetz bzw. entnehmen die Akkus/
Batterien, und geben es dann an eine autorisierte Nikon-Servicestelle zur Überprüfung ab.
De
Schalten Sie die Kamera bei einer Fehlfunktion sofort aus
Entnehmen Sie bei Entwicklung von Rauch oder ungewöhnlichem Geruch durch Kamera
oder Objektiv sofort die Akkus/Batterien. Gehen Sie dabei vorsichtig vor, denn es besteht
Verbrennungsgefahr. Bei einem Weiterbetrieb unter diesen Umständen droht
Verletzungsgefahr. Geben Sie das Gerät nach Entnahme der Akkus/Batterien bzw. nach
Trennung vom Netzadapter an eine autorisierte Nikon-Servicestelle zur Überprüfung ab.
Verwenden Sie Kamera oder Objektiv nicht in der Nähe von brennbarem Gas
In der Nähe von brennbarem Gas sollten Sie niemals elektronische Geräte in
Betrieb nehmen. Es besteht Explosions- und Brandgefahr.
Schauen Sie niemals durch Objektiv oder Sucher in die Sonne
Beim Betrachten der Sonne oder anderer starker Lichtquellen durch Objektiv
oder Sucher droht eine permanente Schädigung des Sehvermögens.
Achten Sie darauf, dass Kamera und Zubehör nicht in
die Hände von Kindern gelangen
Es ist unbedingt dafür zu sorgen, dass Kleinkinder keine Batterien/Akkus
oder andere kleine Teile in den Mund nehmen können.
Beachten Sie beim Umgang mit Kamera und Objektiv
unbedingt die folgenden Vorsichtmaßnahmen
• Halten Sie Kamera oder Objektiv stets trocken. Andernfalls droht Brand-
oder Stromschlaggefahr.
• Handhaben oder berühren Sie die Komponente keinesfalls mit nassen
Händen. Andernfalls droht Stromschlaggefahr.
• Achten Sie bei Gegenlichtaufnahmen darauf, dass sich die Sonne nicht
im Bildfeld befindet.
Das Sonnenlicht könnte in gebündelter Form in das Objektivgehäuse
geleitet werden und einen Brand verursachen. Auch wenn sich die
Sonne zu nahe am Bildfeld befindet, kann es zu einem Brand kommen.
•
Bringen Sie vor einem längeren Nichtgebrauch des Objektivs den vorderen
und hinteren Deckel an, und bewahren Sie das Objektiv geschützt vor
direkter Sonnenlichteinwirkung auf. Andernfalls droht Brandgefahr wegen
möglicher Fokussierung von Sonnenlicht auf Gegenstände.
• Gehen Sie vorsichtig mit dem Objektiv um, wenn Sie die Kamera oder
das Objektiv handhaben.
Andernfalls besteht die Gefahr, dass Ihre Finger zwischen Objektiv und
Kameragehäuse eingeklemmt werden oder dass das Objektiv das
Kameragehäuse zerkratzt.
34
Wir danken Ihnen für das Vertrauen, das Sie uns mit dem Kauf des
Nikon PC-E NIKKOR 24mm f/3.5D ED erwiesen haben.
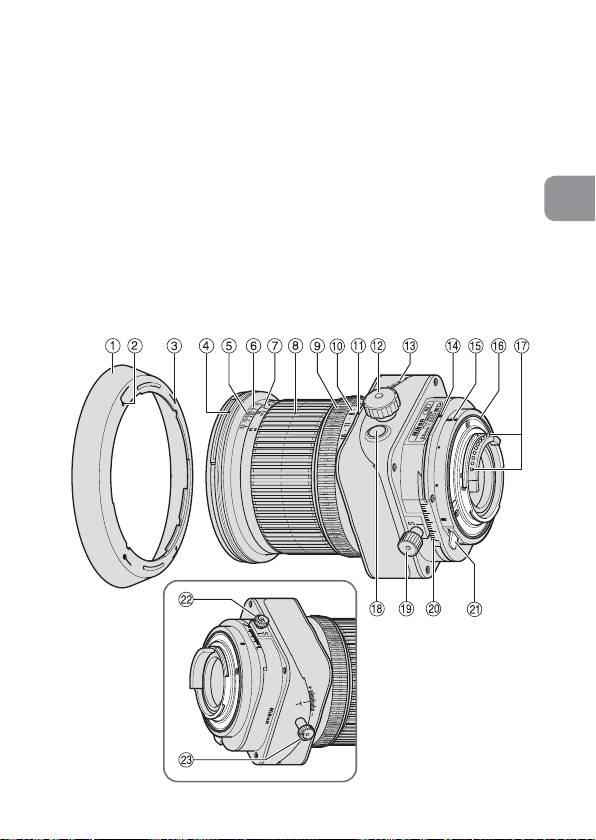
1. Nomenklatur
1
Gegenlichtblende
8
Entfernungseinstellring
&
CPU-Kontakte
2
Montagemarkierung
9
Blendenring
*
Abblendtaste
der Gegenlichtblende
0
Blendenskala
(
Dezentrierknopf
De
3
Kontrollmarkierung
!
Blendenindex
)
Dezentrierskala
der Gegenlichtblende
@
Verschwenkungsknopf
q
Drehhebel
4
Montagemarkierung
#
Verschwenkungsskala
w
Klemmschraube für
für Gegenlichtblende
$
Drehender Index
Dezentrierbewegung
5
Entfernungsindexlinie
%
Index zum Ansetzen
e
Klemmschraube für
6
Schärfentiefeskala
^
Gummiring der
Schwenkbewegung
7
Entfernungsskala
Objektivfassung
35

2. Wichtige Ausstattungsmerkmale
Das Retrofokus-Objektiv dient sowohl der Perspektivekorrektur (PC)
als auch der Steuerung der Schärfentiefe. So gestattet es zum
Beispiel die Ausschaltung perspektivischer Verzerrung und die
Scharfabbildung diagonal durchs Bild laufender Strukturen.
• Das Objektiv ist mit einer automatischen Blendensteuerung
ausgestattet. Wird es an einem Kameramodell Nikon D3 oder
D300 angebracht, können Sie sämtliche Belichtungssteuerungen
De
ohne Betätigung der Abblenddtaste verwenden.
• Das Objektiv überträgt die eingestellte Entfernung an die Kamera
und ermöglicht so eine präzisere Belichtungssteuerung (3D-
Matrixmessung), ohne Schwenken bzw. Drehen bei maximaler
Lichtstärke und wenn es an der Kamera angesetzt ist).
• Der Einsatz dreier asphärischer und dreier ED-Linsen (mit
besonders geringer Dispersion) gewährleistet scharfe, nahezu
farbsaumfreie Bilder. Neun Blendenlamellen sorgen für eine
nahezu kreisrunde Blendenöffnung, sodass außerhalb des
Schärfenbereichs vor und hinter dem Motiv liegende Elemente in
ansprechende Unschärfe getaucht werden.
• Die Nanokristallvergütung einiger Linsen sorgt für klare Bilder in
den unterschiedlichsten Aufnahmesituationen, von
Außenaufnahmen bei hellem Sonnenschein bis hin zu
Innenaufnahmen bei grellem Scheinwerferlicht.
• Die kürzest mögliche Aufnahmeentfernung beträgt 0,21 m.
• An der Vorderseite des Objektivs können bis zu zwei Slave-
Blitzgeräte vom Typ SB-R200 angebracht werden*.
* Beim Anbringen eines SB-R200 müssen Sie die Klemmschraube
für die Dezentrierbewegung anziehen. Ansonsten kann das
Objektiv sich aufgrund des Gewichts des SB-R200 nach unten
verschieben. Es ist nicht empfehlenswert, das Objektiv zu
verschwenken und/oder verschieben, wenn das SB-R200
angebracht ist.
Hinweis zu den Dezentrier- und Verschwenkungsköpfen
Das Objektiv wird von den Dezentrier- und
Verschwenkungsköpfen nicht vollständig verriegelt. Dies ist keine
Fehlfunktion. Ein zu kräftiges Festziehen der Knöpfe oder das
gewaltsame Dezentrieren/Verschwenken bei verriegeltem Objektiv
können das Objektiv beschädigen.
36

3.
Verwendbare Kameras und verfügbare Funktionen
Möglicherweise gibt es hinsichtlich der verfügbaren Funktionen
Einschränkungen. Informationen hierzu finden Sie in der
Bedienungsanleitung zu Ihrer Kamera.
*1
Abblendung
Ansetzen
Belichtungssteuerung
Automatische
Schwenken/
Kamera
auf
an eine
Blendeneinstellung
Dezentrieren
Tastendruck
Kamera
3
6$0
De
D3
D300
D2-Serie, D1-Serie,
D200, D100, D80,
D70-Serie, D60,
D50, D40-Serie,
—
———
F6, F5, F4-Serie
,
F100, F80-Serie,
F75-Serie,
F65-Serie,
Pronea 600i
F90X, F90-Serie,
F70-Serie,
F60-Serie,
F55-Serie,
F50-Serie,
F-401x, F-401s, F-
401, F-801s, F-801,
— — — — ————
F-601M, F3AF,
F-601,
F-501,
Pronea S,
Nikon MF Kameras
(außer F-601M)
: Möglich
—
: Nicht möglich
*1
Bei verschobenem und/oder verschwenktem Objektiv ist die
Belichtung nicht korrekt.
*2 P schließt die Automatik (AUTO) und Motivprogramme mit ein.
*3 Werden Objektiv oder Kamera abgeschaltet (mittels der
Abschaltfunktion für die Automessung) während die
Objektivblende abgeblendet wird, öffnen sich die
Blendenlamellen in die Maximalstellung. Dies ist kein Defekt.
*4
Das Abblenden der Objektivblende aktiviert AE-L (AE-Verriegelung).
*5 Gehen Sie vorsichtig mit dem Objektiv um, wenn Sie die
Kamera oder das Objektiv handhaben. Andernfalls besteht die
Gefahr, dass das Kameragehäuse zerkratzt wird.
37

*6 Siehe »Ansetzen des Objektivs« (S. 39)
*7
Blendenlamellen öffnen und schließen automatisch nach jedem
Drücken des Auslösers, und die Belichtung ist bei kontinuierlichem
Aufnehmen falsch.
*8
Werden Objektiv oder Kamera abgeschaltet (mittels der Abschaltfunktion
für die Automessung) während die Objektivblende abgeblendet wird,
bleibt diese in der Abblendeinstellung stehen. Wird die Kamera erneut
eingeschaltet oder der Auslöser leicht gedrückt, öffnen sich die
De
Blendenlamellen einmal und schließen sich dann. Dies ist kein Defekt.
*9
Wird die Kamera mittels der Abschaltfunktion der Automessung
abgeschaltet während die Objektivblende abgeblendet wird, drücken
Sie leicht auf den Auslöser, um den ausgewählten Blendenwert vor
der Aufnahme in der LCD-Anzeige der Kamera oder dem Sucher
anzuzeigen. Erfolgt dies nicht, kann es bei vollständiger Betätigung
des Auslösers zu einer falschen Belichtung kommen.
Abblendtaste (Abblendung auf Tastendruck)
• Die Objektivblende kann mit der Abblendtaste von voller
Öffnung auf eine gewünschte Öffnung abgeblendet werden.
Durch erneutes Drücken der Taste wird die Blende vollständig
geöffnet. Unabhängig davon, ob die Blende abgeblendet ist oder
nicht, überprüfen Sie den Sucher der Kamera bzw. die Blende
vorne am Objektiv.
• Selbst bei voller Öffnung wird die vorgewählte Arbeitsblende an
der Kamera angezeigt.
• Bei der Kamera D3 oder D300 wird die Blende durch Drücken
des Auslösers automatisch auf eine ausgewählte Öffnung
abgeblendet, auch wenn die Blende vor der Aufnahme maximal
geöffnet ist (maximale Öffnung). Werden Objektiv oder Kamera
abgeschaltet (mittels der Abschaltfunktion für die Automessung),
nachdem die Objektivblende durch Drücken der Abblendtaste
abgeblendet wurde, wird der Abblendvorgang abgebrochen und
die Blendenlamellen öffnen sich vollständig.
Achtung!
• Wird das Objektiv an einer anderen Kamera als der D3 angesetzt,
dezentrieren, schwenken bzw. drehen Sie das Objektiv vorsichtig.
Ansonsten kann das Objektiv die Kamera zerkratzen.
• Dieses Objektiv wird manuell fokussiert. Die Autofokusfunktion
ist auch dann nicht verfügbar, wenn der Fokusmodus auf »AF«
eingestellt ist.
• Bei Verwendung der Funktion zum Dezentrieren bzw.
38
Schwenken kann eine leichte Vignettierung oder leichte
Farbveränderung auftreten. (Unter Vignettierung versteht man
die Abdunkelung der Bildecken.)
• Wird das Objektiv mit Nikon Digital-SLR-Kameras (Nikon DX-
Format), wie etwa der Modelle der D2-Serie sowie Modell D300
verwendet, beträgt der Bildwinkel 61° und der
Brennweitenbereich entspricht 36 mm bei einer
Kleinbildformatkamera.
De
• Halten Sie die CPU-Kontakte sauber und schützen Sie sie vor
Beschädigung.
• Bei einer Beschädigung des Gummirings der Objektivfassung
sollten Sie das Objektiv beim nächsten Nikon-Vertragshändler
bzw. bei einer Nikon-Reparaturwerkstatt zur Reparatur abgeben.
• Bei niedrigen Temperaturen sollten neue oder vollständig
aufgeladene Batterien verwendet werden.
4. Ansetzen des Objektivs
a
Stellen Sie die Dezentrier- und Schwenkbewegungen mit den
betreffenden Knöpfen auf Null. (Abb. 2).
Hinweis:
Setzen Sie das Objektiv bei Verwendung der Dezentrier-,
Schwenk- und Drehfunktion sowie ohne vorherige
Verriegelung der Knöpfe nicht an der Kamera an bzw.
entfernen Sie es nicht. Andernfalls besteht die Gefahr, dass
Ihre Finger zwischen Objektiv und Kameragehäuse
eingeklemmt werden oder dass das Objektiv das
Kameragehäuse zerkratzt.
Abb
. 2
b
Stellen Sie die Knöpfe zum Dezentrieren und Schwenken ein. (Abb. 3)
Hinweis:
Zu starkes Drehen der Knöpfe kann zu Beschädigungen führen.
Abb
. 3
39
c
Schalten Sie die Kamera aus, richten Sie
die betreffenden Indizes an Objektiv
und Kamera aufeinander aus, und
drehen Sie das Objektiv gegen den
Uhrzeigersinn, bis es einrastet. (Abb. 4)
• Wird das Objektiv an der Kamera
angesetzt, während diese
eingeschaltet ist, kann es zu
De
Abb
. 4
Fehlfunktionen kommen.
5.
Verwenden der Bayonett-Gegenlichtblende HB-41
Richten Sie die Montagemarkierungen ( )
an Gegenlichtblende (eine der beiden
Markierung) und Objektiv aneinander aus,
und drehen Sie die Gegenlichtblende im
Uhrzeigersinn, bis sie hörbar einrastet.
•
Stellen Sie sicher, dass die Montagemarkierung
mit der Kontrollmarkierung ( ) am Objektiv
fluchtet.
•
Wenn die Gegenlichtblende falsch angebracht
ist, kann es zu Vignettierung kommen.
Abb
. 5
• Halten Sie die Gegenlichtblende zum
Anbringen oder Abnehmen an ihrer Basis fest,
nicht am vorderen Rand.
• Die Gegenlichtblende kann zum Verstauen in umgekehrter
Position an das Objektiv angesetzt werden.
6. Belichtungsmessung
Bei Verwendung der Kamera Nikon D3 oder D300
a
Stellen Sie die Dezentrier- und
Schwenkbewegungen durch Drehen der
betreffenden Knöpfe auf Null. (Abb. 2)
b
Stellen Sie den Belichtungsmodus der
Kamera ein.
c
Im Belichtungsmodus »A« oder »M« stellen Sie
die Blende mit dem Blendenring am Einstellrad
Abb
. 6
der Kamera ein. Bei Verwendung des Einstellrads
stellen Sie die Blende auf die minimale Öffnung
ein (L) (Abb. 6).
Stellen Sie die Blende im Modus
»P« oder »S« am Einstellrad der Kamera ein.
40
