Valera ACTION SUPER PLUS 1600 SHAVER: инструкция
Раздел: Товары для укладки и стрижки
Тип: Фен/фен-щетка
Инструкция к Фену/фену-щетке Valera ACTION SUPER PLUS 1600 SHAVER

Stamp and signature of delear
Stempel und Unterschrift des Händlers
Cachet et signature du commerçant
Timbro e firma del rivenditore
Sello y firma del proveedor
Stempel en handtekening van de handelaar
Tampila i semnãtura vãnzãtorului
Satıcının mühür ve imzası
Guarantee card
Garantiekarte
Carte de garantie
Certificato di garanzia
Tarjeta de garantià
Garantiekarte
Garancialevél
Garanti sertificası
00060635
-1
1/1
2
Hairdryer
Haartrockner
Sèche-cheveux
Asciugacapelli
Secador
Haardroger
INSTRUCTIONS FOR USE AND INSTALLATION
BEDIENUNGSANLEITUNG UND MONTAGEANWEISUNG
INSTRUCTIONS D’UTILISATION ET DE MONTAGE
ISTRUZIONI PER L’USO E PER IL MONTAGGIO
INSTRUCCIONES DE USO Y MONTAJE
GEBRUIKAANWIJZINGEN EN INSTALLATIEAANWIJZINGEN
INSTRUCT,IUNI DE FOLOSIRE SI INSTRUCT,IUNI DE INSTALARE
GRECO
KULLANIM VE MONTAJ TALIMATLARI
UCRAINO
ИНСТРУКЦИИ ПО ЭКСПЛУАТАЦИИ И УСТАНОВКЕ
Made by Ligo Electric SA - 6853 Ligornetto - Switzerland
Valera is a registered trademark of Ligo Electric S.A. - Switzerland
Type:
530..
533..
542..
554..
561..
561.20
561.22
Type:
032.01
032.01/L
032.02
032.04
032.04/L
Wall holder
Wandhalter
Support mural
Supporto a muro
Soporte de pared
Muursteun
Suport de perete
Duvara monte
Настенный держатель
Uscător de păr
Saç kurutma makinasi
Фен
Фен
ϝΎϤόΘγϻϭ
ΐϴϛήΘϟ
ΕΎϤϴϠόΗ
ήόθϟ
ϒϔΠϣ
ΔϴτΎΣ
ΔϣΎϋΩ
GB
Hairdryer -
Wall holder
Translation from original instructions
4
D
Haartrockner -
Wandhalter
Übersetzung der Originalanweisungen
7
F
Sèche-cheveux -
Support mural
Traductions à partir des instructions d'origine
10
I
Asciugacapelli -
Supporto a muro
Istruzioni originali
13
E
Secador -
Soporte de pared
Traducción de las instrucciones originales
16
NL
Haardroger -
Muursteun
Vertaling van de originele instructies
19
RO
Uscător de păr -
Suport de perete
Traducerea instrucţiunilor originale
22
GR
-
μεταφράσεις από τις αρχικές οδηγίες
25
TR
Saç kurutma makinasi - Duvara monte
Orijinal talimatların çevirisi
28
UK
Фен -
Переклад з оригінальних інструкцій
31
RU
Фен - Настенный держатель
Перевод с оригинальных инструкций
34
SA
-
37
ΔϴϠλϷ
ΕΎϤϴϠόΘϟ
Ϧϣ
ΔϤΟήΗ
ΔϴτΎΣ
ΔϣΎϋΩ
00060635 cop nov2012:Layout 1 06/11/2012 8.05 Pagina 1
English
a
b
c
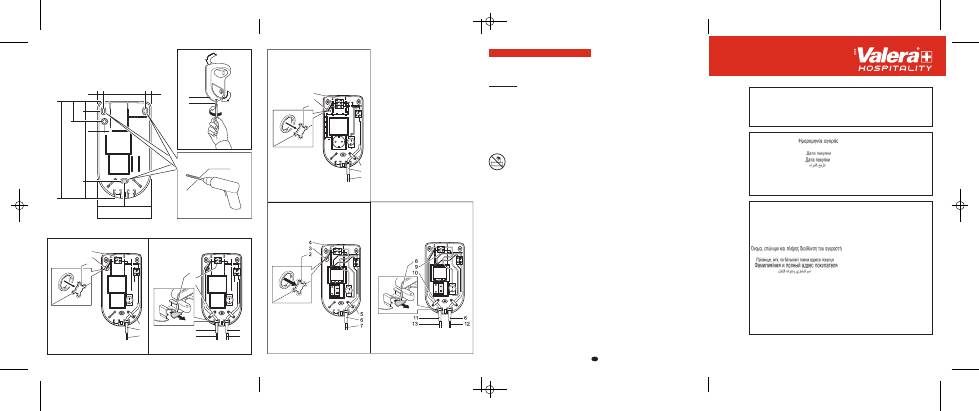
All measures are in mm
032..
Ø 6 mm
192 mm
106 mm
53
72
17
19
20
42
150
22
17
53
1
14
032.01
A
032.01
B
4
2
3
5
7
6
9
10
8
6
12
11
13
032.02
A
4
2
3
5
7
6
032.04 - 032.04/L
A
032.04 - 032.04/L
B
Mod. Nr.
Date of purchase
Kaufdatum
Date d’achat
Data d’acquisto
Fecha de adquisición
Datum aankoop
Data cumpãrãrii
Satın alma tarihi
Name and full address of purchaser
Name und vollständige Anschrift des Käufers
Nom et adresse completè de l’acheteur
Nome e indirizzo completo dell’acquirente
Nombre y dirección completa del comprador
Naam en adres van de consument
Numele i adresa completa˘ a compãrãtorului
Alıcının tam ismi ve adresi
Ligo Electric SA - 6853 Ligornetto - Switzerland
4
ASSEMBLY AND OPERATING INSTRUCTIONS
Read these instructions thoroughly
CAUTION
• For additional protection, the installation of a residual
current device (RCD) having a rated residual
operating current not exceeding 30mA is advisable
in the electrical circuit supplying the bathroom. Ask
your installer for advice.
• Make sure the unit is perfectly dry before using it.
• WARNING: Do not use this appliance near
bathtubs, showers, basins or other vessels
containing water.
• This appliance can be used by children from 8 years
of age and over, and by persons with limited
physical, sensory or mental abilities or who lack the
relevant experience and knowledge, if they are
suitably supervised or have been educated to use
the appliance safely and made aware of the
associated risks.
• Do not allow children to play with the appliance.
• Children must not perform cleaning and
maintenance procedures unless supervised.
• Plug the hairdryer into an alternating current outlet only, and make sure that the voltage of your electricity supply is the same
as that indicated on the rating plate of the appliance.
• Do not immerse in water or other liquids.
• Never put the appliance in a place where it could fall into water or in other liquids.
• Do not try to recover an electric appliance fallen into water, but unplug it immediately from the mains supply.
• Turn the unit off when you put it down.
• Unplug the appliance when not in use, but never do it by pulling the cord.
• Remember to check regularly that the air inlet and outlet grills are clean.
• Allow your appliance to cool before storing away and do not wrap the supply cord around the hairdryer in storage.
• Do not use the dryer if it does not work properly, if it dropped or if the supply cord is damaged. And do not try to repair an
electric appliance by yourself, but apply to an authorized Service Centre.
• If the hair dryer is going to be used in a bathroom, disconnect it from the mains power supply after use, since vicinity to
water may represent a hazard even if the appliance is switched off.
00060635 cop nov2012:Layout 1 06/11/2012 8.05 Pagina 2
5
INSTALLATION INSTRUCTIONS
Wall holder model 032.01 - 032.02
032.04 - 032.04/L
Model 032.01
Standard model with on/off switch
Model 032.02
Model with standard European socket 2P + earthing 16A and
hairdryer on/off switch
Model 032.04 - 032.04/L
Model with universal shaver socket and hairdryer on/off switch.
A safety transformer insulates the shaver socket from the mains
and a protection device inhibits the operation of appliances with a
load higher than 20VA.
Installation of wall holder
This work should only be carried out by a suitably qualified
electrical engineer, in order to comply with the existing national
safety regulations. When the spiral cord is extended to its
maximum length, the hairdryer shall not be reached by a person
using the bath or the shower.
There are two possible methods of installation:
A = connection to wall mains wiring
B = connection to surface mains wiring
Attention: before installing the hairdryer
always switch off the general switch
of your mains electricity.
For each pole a switch with a minimum break distance between
contacts of 3 mm must be fitted up-line of the appliance.
Each time the appliance is opened, the switch must be used to
disconnect the appliance.
Method A (connection to wall mains wiring)
for wall holder model 032.01 - 032.02
032.04 and 032.04/L
The connection wiring from the mains must be at least
3x1,5 mm
2
for wall holder model 032.02.
The connection wiring from the mains must be at least
2x1,0 mm
2
for wall holder models 032.01, 032.04 and 032.04/L
1. Separate the cover (1) of the wall holder from the back plate
by loosening the screw (14).
2. Remove the knockout (2) provided in the back plate of the
wall holder.
3. Feed the mains supply cable (3) coming out of the wall into
the hole in the back plate left after removing the knockout (2).
4. Secure the back plate of the wall holder to the wall using the
plugs and screws provided.
5. Remove the terminal connector (4), connect the mains
supply cable (3) to the terminal connector (4), as shown
in the picture, and then secure again the terminal
connector (4).
6. Model 032.01, 032.04 and 032.04/L are double insulated and
no earth connection is provided. Model 032.02 (with
standard European socket 2P + earthing): the earth cable
from the wall must be connected to the terminal connector.
The cables shall withstand 16A.
7. Fit the front cover of the wall holder, taking care to locate the
cable sleeve (6) properly.
8. Secure the front cover with the screw (14).
9. Switch on the general switch of your mains electricity. The
hairdryer is ready for use.
Method B: (connection to surface mains
wiring) only for wall holder model
032.01 - 032.04 and 032.04/L
The connection wiring must be at least type H05VV-F 2x1,0 mm
2
1. Separate the cover (1) of the wall holder from the back plate
by loosening the screw (14).
2. Remove the knockout (8) provided in the base of the back
plate of the wall holder for feeding the cable sleeve (11).
3. Secure the back plate of the wall holder to the wall using the
plugs and screws provided.
4. Feed cable sleeve (11) over end of mains cable (13), remove
the terminal connector (9), connect the mains supply cable
(13) to the terminal connector (9), as shown in the picture,
and then secure again the terminal connector (9). Secure the
cable grip (10) with the screws provided.
5. Locate the cable sleeves (6) and (11) in the slot provided in
the base of the back plate.
6. Fit the front cover of the wall holder, taking care to locate the
cable sleeves (6) and (11) properly.
7. Secure the front cover with the screw (14).
8. Switch on the general switch of your mains electricity. The
hairdryer is ready for use.
INSTRUCTIONS FOR USE
Control Switches
Control switch on wall holder 0-1 = Off/On
Hairdryer Mod. 530.02 - 530.15 - 530.22
533.03 - 533.05 - 540.05 - 540.06 - 542.05
and 542.06
Blue pushbutton:
ON = On/Off (pressure must
be maintained to
operate the hairdryer)
Slide Switch
Cool = (low power)
1 = (medium power)
2 = (maximum power)
Hairdryer
Type 554.02 - 554.05 - 554.08 - 554.11
554.13
Pushbutton:
ON=On/Off (pressure must be maintained to operate the hairdryer)
Slide Switch
1=(low power)
2=(maximum power)
Hairdryer
Type 554.03 - 554.06 - 554.09 - 554.12
Slide Switch
0=(OFF)
1=(low power)
2=(maximum power)
00060635 int ott2012:Layout 1 30/10/2012 13.11 Pagina 5
6
The symbol on the product or on its packaging indicates
that this product may not be treated as household waste. Instead
it shall be handed over to the applicable collection point for the
recycling of electrical and electronic equipment. By ensuring this
product is disposed of correctly, you will help prevent potential
negative consequences for the environment and human health,
which could otherwise be caused by inappropriate waste
handling of this product. For more detailed information about
recycling of this product, please contact your local city office,
your household waste disposal service or the shop where you
purchased the product.
VALERA is a registered trade mark
of Ligo Electric S.A. - Switzerland
Hairdryer Mod. 530.03 - 530.14 - 530.16
530.23 - 533.04 - 533.06 - 554.01 - 554.04
554.07 - 554.10
Grey pushbutton
= On / Off (pressure must
be maintained to
operate the hairdryer)
Hairdryer Mod. 561.02 - 561.17 - 561.20
561.22
Pushbutton
ON = On/off (pressure must be
maintained to operate the
hairdryer)
Left switch
0 = Off
1 = Low air speed
2 = High air speed
Right switch
Cool = Low air temperature
1 = Medium air temperature
2 = High air temperature
PRODUCT CARE
When not in use, the mains switch on the wall holder should be
in the “Off” position. The hairdryer requires no special care or
attention.
You can clean your appliance with a cloth dampened with water.
The cleaning of hairdryers with detergents, solvents, alcohol and
other chemical products is strictly prohibited.
When necessary, the air inlet grill should be cleaned with a soft
brush or by vacuum cleaner.
Important
This hairdryer conforms to the safety regulations regarding
electrical appliances. This hairdryer has a safety cut-out which
will operate in case of overheating. The dryer will re-set itself
after being left to cool for a few minutes, but please check air
inlet and outlet grills are clear before continuing to use the dryer.
This appliance conforms to European Directives 2004/108/EC,
2006/95/EC, 2009/125/EC and Regulation (EC) No. 1275/2008.
GUARANTEE
VALERA guarantees the appliance you have bought at following
conditions:
1. The guarantee conditions for this appliance are as defined by
our dealer in the country of sale. In Switzerland and in the
countries subject to the European directive 44/99/CE the
guarantee period is 24 months for domestic use and 12
months for professional or similar use. The guarantee period
starts from the date of purchase as stated on the present
guarantee card regularly filled out and stamped by the dealer
or on the sale’s invoice.
2. The guarantee is applicable only against submission of the
present guarantee card or the sale’s invoice.
3. The guarantee covers the elimination of all defects arisen
during the guarantee period resulting from proven faults in
material or workmanship. The elimination of the defects will
be made either by repairing the appliance or exchanging it.
The guarantee does not cover any damage arising from
incorrect connection to the power supply, improper use,
breakage, normal wear and non-compliance with the
Instructions for Use.
4. All other claims of any nature, including those for eventual
damages outside of the appliance, are excluded, unless our
liability is legally mandatory.
5. The guarantee service is carried out free of charge; it does not
affect the expiry date of the guarantee.
6. The guarantee becomes void if repairs are under-taken by
unauthorized persons.
For UK only: this guarantee in no way affects your rights under
statutory law.
In case of defect, please return the appliance well packed and
together with the guarantee card regularly dated and stamped
to one of our Valera Service Centres or to the dealer who will
send it to the official importer for the guarantee service.
00060635 int ott2012:Layout 1 30/10/2012 13.11 Pagina 6
7
Deutsch
MONTAGE- UND GEBRAUCHSANWEISUNGEN
Anweisungen bitte sorgfältig durchlesen
SICHERHEITSHINWEISE
• Wichtig: als zusätzlicher Schutz wird die Installation einer Fehlerstromschutzeinrichtung (FI) mit einem Bemessungauslösestrom von nicht mehr als 30 mA im Badezimmerstromkreis empfohlen. Lassen Sie sich von Ihrem Elektroinstallateur beraten. • Stellen Sie sicher, dass das Gerät völlig trocken ist, bevor Sie es benutzen. • Diese Geräte können von Kindern ab 8 Jahren sowie von Personen mit reduzierten physischen, sensorischen oder mentalen Fähigkeiten oder Mangel an Erfahrung und/oder Wissen benutzt werden, wenn sie beaufsichtigt oder bzgl. des sicheren Gebrauchs des Gerätes unterwiesen wurden und die daraus resultierenden Gefahren verstanden haben. • Kinder dürfen nicht mit dem Gerät spielen. • Reinigung und Wartung dürfen nicht durch Kinder durchgeführt werden, es sei denn sie sind beaufsichtigt. • Die Reinigungs- und Wartungsarbeiten dürfen nicht von unbeaufsichtigten Kindern durchgeführt werden.
00060635 int ott2012:Layout 1 30/10/2012 13.11 Pagina 7
8
• Schliessen Sie Ihren Haartrockner nur an eine Wechselstromleitung
an und stellen Sie sicher, dass die Anschlussspannung auch
tatsächlich der am Gerät angegebenen Spannung entspricht.
• Tauchen Sie Ihr Gerät nie in Wasser oder andere Flüssigkeiten.
• Legen Sie Ihr Gerät nie so ab, dass es in Wasser oder eine
andere Flüssigkeit fallen kann.
• Sie sollten nie versuchen, ein in Wasser oder eine andere
Flüssigkeit gefallenes Elektrogerät wieder herauszuholen,
solange es an den Stromkreis angeschlossen ist, sondern
sollten sofort den Netzstecker ziehen.
• Legen Sie den Haartrockner nicht beiseite, solange er
eingeschaltet ist.
• Achten Sie darauf, dass die Luftansaug- und Austrittsöffnungen
stets frei sind.
• Benutzen Sie Ihr Gerät nicht, wenn Sie daran eine
Unregelmässigkeit feststellen, wenn es zu Boden gefallen ist
oder wenn die Geräteschnur beschädigt ist.
• Reparaturen an Elektrogeräten sind nur von Fachkräften
auszuführen.
• Wenn die Netzanschlussleitung dieses Gerätes beschädigt
wird, muss sie durch den Hersteller oder seinen Kundendienst
oder eine ähnlich qualifizierte Person ersetzt werden, um
Gefährdungen zu vermeiden.
• Bringen Sie den Kindern den sicheren Umgang mit
Elektrogeräten bei.
• Wird der Haartrockner in Badezimmern verwendet, muss er
nach dem Gebrauch von der Stromversorgung getrennt
werden, da die Nähe zu Wasser auch bei ausgeschaltetem
Haartrockner eine Gefahr darstellen kann.
• Wenn das Gerät in einem Badezimmer benutzt wird, ziehen Sie
den Netzstecker, wenn Sie es nicht mehr benutzen, da die Nähe
von Wasser auch bei ausgeschaltetem Gerät eine Gefahr darstellt.
MONTAGEANWEISUNG
Wandhalter Type 032.01 - 032.02
032.04 - 032.04/L
Modell 032.01
Basismodell mit Ein/Aus-Schalter für den Haartrockner.
Modell 032.02
Modell mit Schukosteckdose 16A und Ein/Aus-Schalter für den
Haartrockner.
Modell 032.04 - 032.04/L
Modell mit universal Rasiersteckdose und Ein/Aus-Schalter für den
Haartrockner. Ein Sicherheits-Trenntrafo isoliert die Rasiersteckdose
vom Netz und verhindert die Benutzung von angeschlossenen
Geräten mit einer Leistung von mehr als 20VA.
Montageanweisung für Wandhalter
Mit der Montage ist ein Fachmann zu beauftragen, damit gewährleistet
ist, dass der Wandhalter unter Beachtung der bestehenden nationalen
Sicherheitsvorschriften angeschlossen wird.
Bei grösstem Auszug des Spiralkabels darf der Haartrockner für
eine sich im Bad oder in der Dusche befindende Person nicht
erreichbar sein.
Je nach Art der Stromzuführung bestehen zwei verschiedene
Montagemöglichkeiten, d.h.:
A = Bei Unterputz-Zuleitung
Diese Montageart ist für Wandhalter 032.01, 032.02 und gestattet
B = Bei Aufputz-Zuleitung
Diese Montageart ist für Wandhalter 032.01 gestattet
Achtung:Vor der Montage den
Hauptnetzschalter immer ausschalten.
(Freischalten)
Dem Gerät muss netzseitig eine allpolige Trennvorrichtung mit
einer Mindestkontaktöffnungsweite von 3 mm vorgeschaltet
werden. Vor jedem Öffnen muss das Gerät freigeschaltet werden.
Montagereihenfolge A (bei Unterputz-
Zuleitung) Modelle 032.01 - 032.02
032.04 und 032.04/L
Die Zuleitung für die Wandhalter 032.02 muß min. 3x1,5 mm
2
sein.
Die Zuleitung für die Wandhalter 032.01, 032.04 und 032.04/L
muß min. 2x 1,0 mm
2
sein.
1. Schraube (14) lockern und Gehäuse (1) von der Rückwand
des Wandhalters abnehmen.
2. Die sich in der Rückwand des Wandhalters befindliche
Leitungsdurchführung (2) durchbrechen.
3. Die aus der Wand heraustretenden Leitungsdrähte (3) durch
die durchbrochene Durchführung (2) ziehen.
4. Rückwand mit den mitgelieferten Dübeln und Schrauben an
der Wand befestigen.
5. Zuleitung (3) gemäss Anschlusschema an der Klemme (4)
anschließen.
6. Modell 032.01, 032.04 und 032.04/L sind doppelt
schutzisoliert und deshalb ohne Schutzleiteranschluss. Modell
032.02 (mit Schukosteckdose): der Schutzleiter muss an der
Schutzleiterklemme (4) angeschlossen werden. Die Zuleitung
muss für mindestens 16A vorgesehen werden.
7. Wandhaltergehäuse aufsetzen, Knickschutztülle (6) richtig
einlegen.
8. Gehäuse mit Schraube (14) befestigen.
9. Hauptnetzschalter einschalten. Der Haartrockner ist
betriebsbereit.
Montagereihenfolge B: (Aufputz-
Zuleitung ) nur für Wandhalter 032.01
032.04 und 032.04/L
Die Zuleitung muß min. H05VV-F 2x1 mm
2
sein.
1. Schraube (14) lockern und Gehäuse (1) von der Rückwand
des Wandhalters abnehmen.
2. Die sich im unteren Rand der Rückwand befindliche
Membrane (8) für die Aufnahme der zweiten Knickschutztülle
(11) ausbrechen.
3. Rückwand mit den mitgelieferten Dübeln und Schrauben an
der Wand befestigen.
4. Knickschutztülle (11) über bewegliche Zuleitung (13) ziehen
und Anschlussleitung (12) gemäss Anschlusschema an der
Klemme (9) anschließen.
5. Beide Knickschutztüllen (6) und (11) in die dafür
vorgesehenen Sitze am unteren Rand der Rückwand des
Wandhalters einlegen.
6. Wandhaltergehäuse aufsetzen, Knickschutztüllen (6) und (11)
auf richtigen Sitz überprüfen.
7. Gehäuse mit Schraube (14) befestigen.
8. Hauptnetzschalter einschalten. Der Haartrockner ist
betriebsbereit.
BEDIENUNGSANLEITUNG
Schaltstufen
Schalter am Wandhalter:
0-1 = Aus/Ein
00060635 int ott2012:Layout 1 30/10/2012 13.11 Pagina 8
9
Haartrockner Type 530.02 - 530.15
530.22 - 533.03 - 533.05 - 540.05 - 540.06
542.05 - 542.06
Blauer Druckschalter: ON = Ein/Aus (Gerät
funktioniert nur, solange
dieTaste gedrückt wird)
Schiebetaste
Cool = (niedrige Leistung)
1 = (mittlere Leistung)
2 = (höhere Leistung)
Haartrockner
Type 554.02 - 554.05 - 554.08 - 554.11
554.13
Druckschalter:
ON=Ein/Aus (Gerät funktioniert nur, solange die Taste
gedrückt wird)
Schiebetaste
1=(niedrige Leistung)
2=(höhere Leistung)
Haartrockner
Type 554.03 - 554.06 - 554.09 - 554.12
Schiebetaste
0=(AUS)
1=(niedrige Leistung)
2=(höhere Leistung)
Haartrockner Type 530.03 - 530.14
530.16 - 530.23 - 533.04 - 533.06 - 554.01
554.04 - 554.07 - 554.10
Grauer Druckschalter
= Ein / Aus (Gerät funktioniert nur,
solange die Taste gedrückt wird)
Haartrockner Type 561.02 - 561.17
561.20 - 561.22
Blauer Druckschalter: ON = Ein/Aus (Gerät funktioniert nur,
solange dieTaste gedrückt wird)
Schiebetaste links
0 = Aus
1 = niedrige Luftmenge
2 = höhere Luftmenge
Schiebetaste rechts Cool = niedrige Temperatur
1 = mittlere Temperatur
2 = höhere Temperatur
DIE PFLEGE
Generell muss dabei der Schalter am Wandhalter in “Aus”-Stellung
gebracht werden. Das Gerät bedarf keiner besonderen Pflege.
Sie können das Gerät mit einem feuchten Tuch abwischen.
Die Reinigung der Haartrockner mit Reinigern, Lösungsmitteln,
Alkohol und sonstigen Chemikalien ist streng verboten.
Gegebenenfalls sollte das Lufteinlassgitter mit einem Pinsel
gereinigt oder einfach mit dem Staubsauger abgesaugt werden.
Wichtig
Der Haarfön ist mit einem Sicherheitsthermostat ausgestattet
und schaltet sich bei Überhitzung automatisch selbst ab. Nach
einer kurzen Betriebspause schaltet sich das Gerät automatisch
wieder ein. Dennoch sollten Sie sich vergewissern, dass die
Lufteinlass- und -austrittsöffnungen völlig frei sind.
Das Symbol auf dem Produkt oder seiner Verpackung weist
darauf hin, dass dieses Produkt nicht als normaler
Haushaltsabfall zu behandeln ist, sondern an einem
Sammelpunkt für das Recycling von elektrischen und
elektronischen Geräten abgegeben werden muss. Durch Ihren
Beitrag zum korrekten Entsorgen dieses Produktes schützen Sie
die Umwelt und die Gesundheit Ihrer Mitmenschen. Umwelt und
Gesundheit werden durch falsches Entsorgen gefährdet. Weitere
Informationen über das Recycling dieses Produkts erhalten Sie
von Ihrem Rathaus, Ihrer Müllabfuhr oder dem Geschäft, in dem
Sie das Produkt gekauft haben.
VALERA ist eine eingetragene Schutzmarke der
Ligo Electric S.A. - Schweiz
Dieses Gerät erfüllt die Bestimmungen der europäischen
Richtlinien 2004/108/EG, 2006/95/EG, 2009/125/EG und der
Verordnung (EG) Nr. 1275/2008.
GARANTIEBEDINGUNGEN
VALERA leistet für dieses Gerät – zusätzlich zu der gesetzlichen
Gewährleistung des Händlers aus Kaufvertrag – dem
Endabnehmer gegenüber eine Garantie zu nachstehenden
Bedingungen:
1. Für dieses Gerät gelten die Garantiebedingungen unseres
Händlers im Verkaufsland. In der Schweiz und in den
Ländern, wo die europäische Verordnung 44/99/CE gilt,
beträgt die Garantiezeit 24 Monate bei privatem Gebrauch
und 12 Monate bei gewerblichem oder einem solchen
gleichzusetzenden Gebrauch. Die Garantiezeit beginnt am
Kauftag des Gerätes, der durch die ausgefüllte Garantiekarte
oder einen sonstigen Kaufbeleg nachzuweisen ist.
2. Die Garantie wird nur bei Vorlage der Garantiekarte oder eines
Kaufbeleges geleistet.
3. Die Garantieleistung umfasst die Behebung aller innerhalb der
Garantiezeit auftretenden Mängel des Gerätes, die
nachweislich auf Material- oder Fertigungsfehlern beruhen.
Die Behebung der Mängel kann nach unserer Wahl durch
Instandsetzung oder durch Umtausch des Gerätes erfolgen.
Nicht unter Garantie fallen Mängel oder Schäden, die durch
nicht vorschriftsmässigen elektrischen Anschluss, durch
unsachgemässe Handhabung sowie durch
Nichtbeachtung der Gebrauchsanleitung entstanden sind.
4. Weitere Ansprüche irgendwelcher Art, insbesondere solche
auf Ersatz ausserhalb des Gerätes entstandener Schäden,
sind – soweit die Haftung nicht zwingend gesetzlich
angeordnet ist – ausgeschlossen.
5. Die Garantieleistungen werden ohne Berechnung
durchgeführt; sie bewirken weder eine Verlängerung noch
einen Neubeginn der Garantiezeit.
6. Diese Garantie erlischt bei Eingriff nicht autorisierter Stellen.
Sollten Sie die Garantie in Anspruch nehmen müssen, dann
senden Sie bitte das defekte Gerät gut verpackt an eine unserer
autorisierten Service-Stellen. Vergessen Sie nicht, unbedingt die
Garantiekarte und/oder den Kaufbeleg beizufügen, da ohne diese
keine Garantieleistung erfolgen kann.
ng erfolgen kann.
00060635 int ott2012:Layout 1 30/10/2012 13.11 Pagina 9
Оглавление
- • Wichtig: als zusätzlicher Schutz wird die Installation einer Fehlerstromschutzeinrichtung (FI) mit einemBemessungauslösestrom von nicht mehr als 30 mAim Badezimmerstromkreis empfohlen. Lassen Siesich von Ihrem Elektroinstallateur beraten. • Stellen Sie sicher, dass das Gerät völlig trocken ist, bevor Sie es benutzen. • Diese Geräte können von Kindern ab 8 Jahren sowie von Personen mit reduziertenphysischen, sensorischen oder mentalenFähigkeiten oder Mangel an Erfahrung und/oderWissen benutzt werden, wenn sie beaufsichtigtoder bzgl. des sicheren Gebrauchs des Gerätesunterwiesen wurden und die darausresultierenden Gefahren verstanden haben. • Kinder dürfen nicht mit dem Gerät spielen.• Reinigung und Wartung dürfen nicht durch Kinder durchgeführt werden, es sei denn sie sindbeaufsichtigt. • Die Reinigungs- und Wartungsarbeiten dürfen nicht von unbeaufsichtigten Kindern durchgeführtwerden.
- • Important: pour garantir une protection optimale, il est conseillé d’installer dans l’installation électriquealimentant l’appareil un interrupteur différentiel avecune prise de courant différentielle ne dépassant pas30 mA. Contactez votre électrotechnicien deconfiance pour tout renseignement complémentaire. • Vérifier que l’appareil soit complètement sec avant de l’utiliser • ATTENTION: ne pas utiliser cet appareil à proximité de baignoires, de lavabos ou autresrécipients contenant de l'eau. • Il est requit un âge minimum de 8 ans pour l’utilisation de cet appareil. L’utilisation de cet appareil par des personnes auxcapacités physiques, sensorielles ou mentalesréduites est fortement déconseillée à moins qu’ellessoient surveillées ou qu’elles aient été instruitescorrectement quant à l’utilisation de l’appareil de lapart de tiers • Cet appareil doit être tenu hors de portée des enfants. • Le nottoyage et l’entretien de l’appareil ne doivent pas être effectuées par des enfants non surveillés.
- •Importante: per garantire una protezione supplementare si consiglia di installare nell’impianto elettrico, con il qualeviene alimentato l’apparecchio, un interruttore differenzialecon una corrente di intervento non superiore a 30 mA. Permaggiori informazioni rivolgersi all’elettrotecnico di fiducia. •Assicurarsi che l’apparecchio sia perfettamente asciutto prima di utilizzarlo. •ATTENZIONE: Non utilizzare questo apparecchio in prossimità di vasche da bagno, lavelli o altri recipientiche contengano acqua. •Il presente apparecchio può essere utilizzato dai bambini a partire da 8 anni di età e da persone dalle ridottecapacità fisiche, sensoriali o mentali, oppure conmancanza di esperienza e di conoscenza se si trovanosotto adeguata sorveglianza, oppure se sono stati istruiticirca l’uso dell’apparecchio in modo sicuro e se sirendono conto dei pericoli correlati. •I bambini non devono giocare con l’apparecchio.•Le operazioni di pulizia e di manutenzione non devono essere effettuate dai bambini senza sorveglianza.
- • Importante: para garantizar una protección suplementaria, se aconseja colocar en la instalacióneléctrica de alimentación del aparato, un interruptordiferencial con una corriente de intervención que nosupere los 30 mA. Para mayores informaciones,dirigirse al electrotécnico de confianza. • Antes de usar el aparato, controle que esté bien seco. • ATENCIÓN: no utilizar este aparato cerca de bañeras, lavabos u otros recipientes quecontengan agua. • Este aparato puede ser utilizado por niños a partir de los 8 años de edad y también por personas concapacidades físicas, sensoriales o mentalesreducidas, o carentes de experiencia y deconocimiento, siempre que lo hagan bajo lasinstrucciones y la vigilancia de una persona que leshaya explicado el modo de uso del aparato y lospeligros que puede implicar. • Los niños no deben jugar con el aparato.• La limpieza y el mantenimiento no deben ser efectuados por los niños sin vigilancia.
- • Belangrijk: voor extra veiligheid raden wij u aan deelektrische installatie waarmee het apparaat gevoedwordt te voorzien van een aardlekschakelaar meteen stroomsterkte van niet meer dan 30 mA. Wendtu voor meer informatie tot uw elektrotechnicus. • Controleer voor gebruik van het apparaat of het goed droog is. • LET OP: gebruik dit apparaat niet in de buurt van badkuipen, wastafels of andere houdersmet water. • Dit apparaat mag worden gebruikt door kinderen vanaf 8 jaar en door personen met beperktelichamelijke, zintuiglijke of geestelijke vermogens ofmet weinig ervaring en/of kennis, mits dezepersonen onder passend toezicht staan ofgeïnstrueerd zijn over het gebruik van het apparaaten ze zich bewust zijn van de bijbehorende gevaren. • Kinderen mogen niet met het apparaat spelen.• De reiniging en het onderhoud mogen niet zonder toezicht door kinderen worden uitgevoerd.
- • Important: pentru a garanta o protecţie suplimentară, este recomandat ca un întrerupătordiferenţial cu un curent de intervenţie nu mai marede 30 mA să fie instalat în sistemul electric cu caree alimentat aparatul. Pentru mai multe informaţiiconsultaţi un electrician. • Asiguraţi-vă că aparatul este perfect uscat înainte de a-l folosi. • ATENŢIE: nu utilizaţi acest aparat în apropierea căzilor, a chiuvetelor sau a altor recipiente careconţin apă. • Acest aparat poate fi utilizat de copii începând cu vârsta de 8 ani şi de persoane cu capacităţi fizice,senzoriale sau mentale reduse, sau de persoanelipsite de experienţă şi de cunoştinţe,dacă acestea sunt supravegheate în modcorespunzător sau dacă au fost instruite în legăturăcu utilizarea aparatului în mod sigur şi dacă înţelegcare sunt pericolele legate de acesta. • Copiii nu trebuie să se joace cu aparatul.• Operaţiile de curăţare şi de întreţinere nu trebuie să fie efectuate de copii nesupravegheaţi.
- • Σημαντικό: Για μεγαλύτερη προστασία, συνιστάται να τοποθετήσετε στην ηλεκτρική εγκατάσταση από τηνοποία τροφοδοτείται η συσκευή ένα διαφορικό διακόπτημε ρεύμα λειτουργίας έως 30 mA. Για περισσότερεςπληροφορίες, απευθυνθείτε σε έναν έμπειροηλεκτρολόγο. • Βεβαιωθείτε ότι η συσκευή είναι εντελώς στεγνή πριν από τη χρήση. • ΠΡΟΣΟΧΗ: μη χρησιμοποιείτε τη συσκευή αυτή κοντά σε μπανιέρες, νεροχύτες ή άλλα δοχείαπου περιέχουν νερό. • Η συσκευή αυτή μπορεί να χρησιμοποιηθεί από παιδιά ηλικίας 8 ετών και άνω, καθώς και από άτομαμε μειωμένες σωματικές, αισθητήριες ή διανοητικέςικανότητες ή με έλλειψη εμπειρίας και γνώσεωνεφόσον βρίσκονται υπό επίβλεψη ή έχουν λάβειοδηγίες σχετικά με την ασφαλή χρήση της συσκευήςκαι έχουν κατανοήσει τους σχετικούς κινδύνους. • Τα παιδιά δεν πρέπει να παίζουν με τη συσκευή.• Οι εργασίες καθαρισμού και συντήρησης δεν πρέπει να εκτελούνται από παιδιά χωρίς επίβλεψη.
- • Önemli: ekstra bir koruma sağlamak amacıyla,cihaza elektrik sağlayan elektrik besleme tesisatına30 mA değerli bir otomatik atmalı diferansiyel şalter(devre kesici) takılması önerilir. Daha fazla bilgi için, lütfen elektrikçinizle temasageçiniz. • Kullanmadan önce cihazın tamamen kuru olduğundan emin olunuz. • DİKKAT: bu cihazı banyo küvetinin, evyenin veya su içeren diğer kapların yakınındakullanmayınız. • Bu cihaz, 8 yaşın üzerindeki çocuklar ve fiziksel, duyusal veya zihinsel kapasitesi düşük ya dadeneyimi yetersiz kişiler tarafından yeterli gözetimaltında oldukları ya da cihazın güvenli bir şekildekullanımı ile ilgili bilgilendirildikleri ve ilgili tehlikelerkonusunda bilinçli oldukları takdirde kullanılabilir. • Çocuklar cihaz ile kesinlikle oynamamalıdır.• Temizlik ve bakım işlemleri gözetim altında olmayan çocuklar tarafından gerçekleştirilmemelidir.
- • Важливо: Для гарантії додаткової безпекирекомендовано встановити в основнійелектромережі, до якої підключено пристрій,диференційне реле-запобіжник, розраховане наробочий струм до 30 мА. За докладнішоюінформацією зверніться до кваліфікованого електрика. • Перед використанням перевірте, чи повністю сухий прилад. • УВАГА: не використовуйте цей прилад біля ванн, душових кабінок, резервуарів та іншихємностей з водою. • Діти віком від 8 років та особи з обмеженими фізичними, психічними та сенсорними можливостямиабо недостатнім досвідом та знаннями, можутькористуватися цим приладом, за умови що вонизнаходяться під відповідним наглядом або булипроінструктовані щодо безпечної експлуатаціїприладу й усвідомлюють наявний ризик. • Не дозволяйте дітям гратися з приладом.• Чищення та догляд за приладом не повинні виконуватися дітьми без нагляду.
- • Внимание: Для обеспечения дополнительной защитырекомендуется установить в системе электропроводки, ккоторой подключается прибор, дифференциальныйвыключатель с током срабатывания не выше 30 мА. Заболее подробной информацией обращайтесь кквалифицированному электрику. • Прежде чем пользоваться прибором, убедись, чтобы он полностью высох. • ВНИМАНИЕ: не используйте этот прибор поблизости от ванн, раковин или других емкостей,заполненных водой. • Данный прибор может использоваться детьми от 8 лет и людьми с ограниченными физическими, сенсорнымиили умственными возможностями, либо с недостаткомопыта и знаний в случае, если они находятся поднадлежащим присмотром, либо были проинструктированы о безопасном способе эксплуатации прибора и отдают себе отчет овозникающих при этом рисках. • Не давайте детям играть с прибором.• Операции по чистке и техобслуживанию прибора не должны проводиться детьми без надзора.
- • ϡΎϫ : ϲϠοΎϔΗ ϊσΎϗ ΐϴϛήΘΑ ϲ λϮϧ ˬϲϓΎοϹ ϥΎϤπϟ ϑΪϬΑ ϕϮϔϳ ϻ έΎϴΘΑ Ω ϭΰϣ 30 ˰ ήϴΒϣ ϡ 30 A ϲΎΑήϬϜϟ ίΎϬΠϟ ϲϓ ίΎϬΠϟ ΔϳάϐΘΑ ϡϮϘϳ ϱάϟ . ϲϨϘΘΑ ϞμΗ ˬΕΎϣϮϠόϤϟ Ϧϣ ΪϳΰϤϠϟ Ψϣ ϲΎΑήϬϛ κΘ . • ϝΎϤόΘγϻ ϞΒϗ
