Valera Action Super Plus 1200 White 1200 W: инструкция
Раздел: Товары для укладки и стрижки
Тип: Фен/фен-щетка
Инструкция к Фену/фену-щетке Valera Action Super Plus 1200 White 1200 W
Stamp and signature of delear
Stempel und Unterschrift des Händlers
Cachet et signature du commerçant
Timbro e firma del rivenditore
Sello y firma del proveedor
Stempel en handtekening van de handelaar
Carimbo e firma do revendedor
Selgerens stempel og underskrift
Återförsäljarens stämpel och namnteckninge
Myyjän leima ja allekirjoitus
Forhandlerens stempel og underskrift
Eladó pecsétje és aláírása
razítko a podpis prodejce
Tampila i semnãtura vãnzãtorului
Pieczec i podpis sprzedawcyù
Satıcının mühür ve imzası
Guarantee card
Garantiekarte
Carte de garantie
Certificato di garanzia
Tarjeta de garantià
Garantiekarte
Certificado de garantia
Garantibevis
Garantibevis
Takuutodistus
Garantibevis
Certificat de garan
ţ
ie
Záruční list
Záručný list
Garancialevél
Karta Gwarancyijna
Garanti sertificası
UK
RU
ZH
AR
00060633-06/
15
INSTRUCTIONS FOR USE AND INSTALLATION
BEDIENUNGSANLEITUNG UND MONTAGEANWEISUNG
INSTRUCTIONS D’UTILISATION ET DE MONTAGE
ISTRUZIONI PER L’USO E PER IL MONTAGGIO
INSTRUCCIONES DE USO Y MONTAJE
GEBRUIKAANWIJZINGEN EN INSTALLATIEAANWIJZINGEN
INSTRUÇÕES DE USO E INSTALAÇÃO
BRUKSANVISNING OG INSTALLASJONSINSTRUKSJONER
INSTRUKTIONER FÖR INSTALLATION OCH ANVÄNDNING
KÄYTTÖ- JA ASENNUSOHJEET
BETJENINGS- OG INSTALLATIONSVEJLEDNING
HASZNÁLATI ÉS TELEPÍTÉSI ÚTMUTATÓ
NÁVOD K POUŽITÍ A INSTALACI
NÁVOD NA OBSLUHU A INŠTALÁCIU
INSTRUCT,IUNI DE FOLOSIRE SI INSTRUCT,IUNI DE INSTALARE
INSTRUKCJA OBSŁUGI I INSTALACJI
Οδηγίες χρήσης και εγκατάστασης
KULLANIM VE MONTAJ TALIMATLARI
ІНСТРУКЦІЯ ПО ЕКСПЛУАТАЦІЇ ТА МОНТАЖУ
ИНСТРУКЦИИ ПО ЭКСПЛУАТАЦИИ И УСТАНОВКЕ
安装及使用说明
Type:
533..
542..
554..
561..
Wall holder
Wandhalter
Support mural
Supporto a muro
Soporte de pared
Muursteupt
Suporte de parede
Veggholder
Vägghållare
Seinäteline
Vægbeslag
Fali tartó
Nástěnný držák
Držiak na stenu
Suport de perete
Uchwyt naścienny
Βάσης τοίχου
Duvara monte
Настінний утримувач
Настенный держатель
壁挂底座
Hairdryer
Haartrockner
Sèche-cheveux
Asciugacapelli
Secador
Haardroger
Secador de cabelo
Hårtørker
Hårtork
Hiustenkuivaaja
Hårtørrer
Hajszárító
Vysoušeč vlasů
Sušič vlasov
Uscător de păr
Suszarka do włosów
Σεσουάρ
Saç kurutma makinasi
Фен
Фен
吹风机
Type:
036
038A
038B
ΕΎϤϴϠόΗ
ϝΎϤόΘγϻϭ
ΐϴϛήΘϟ
ΔϴτΎΣ
ΔϣΎϋΩ
Made by Ligo Electric SA - 6853 Ligornetto / Mendrisio - Switzerland
Valera is a registered trademark of Ligo Electric S.A. - Switzerland
EN
Hairdryer -
Wall holder
Translation from original instructions
6
DE
Haartrockner -
Wandhalter
Übersetzung der Originalanweisungen
9
FR
Sèche-cheveux -
Support mural
Traductions à partir des instructions d'origine
12
IT
Asciugacapelli -
Supporto a muro
Istruzioni originali
15
ES
Secador -
Soporte de pared
Traducción de las instrucciones originales
18
NL
Haardroger -
Muursteun
Vertaling van de originele instructies
21
PT
Secador de cabelo - Suporte de parede
Tradução das instruções originais
24
NO
Hårtørker - Veggholder
Oversettelse av original bruksanvisning
27
SV
Hårtork - Vägghållare
Översättningar från originalinstruktioner
30
FI
Hiustenkuivaaja - Seinäteline
Alkuperäisen käyttöohjeen käännös
33
DA
Hårtørrer - Vægbeslag
Oversættelser fra oprindelige anvisninger
36
HU
Hajszárító - Fali tartó
Az eredeti utasítások fordítása
39
CS
Vysoušeč vlasů - Nástěnný držák
Překlad originálních pokynů
42
SK
Sušič vlasov - Držiak na stenu
Preklad z originálneho návodu
45
RO
Uscător de păr -
Suport de perete
Traducerea instrucţiunilor originale
48
PL
Suszarka do włosów - Uchwyt naścienny
Tłumaczenie oryginalnej instrukcji
51
EL
-
μεταφράσεις από τις αρχικές οδηγίες
54
HE
57
TR
Saç kurutma makinasi - Duvara monte
Orijinal talimatların çevirisi
60
UK
Фен -
Переклад з оригінальних інструкцій
63
RU
Фен - Настенный держатель
Перевод с оригинальных инструкций
66
ZH
吹风机 - 壁挂底座
翻译自原文说明
69
SA
-
72
ΔϴϠλϷ
ΕΎϤϴϠόΘϟ
Ϧϣ
ΔϤΟήΗ
ΔϴτΎΣ
ΔϣΎϋΩ
ήόθϟ
ϒϔΠϣ
ʤʰʷʺʤʥ
ʹʥʮʩʹ
ʺʥʠʸʥʤ
ʸʲʩʹ
ʹʡʩʩʮ
ʤʩʩʬʺ
ʯʷʺʮ
ʸʲʩʹ
ʹʡʩʩʮ
-
ʤʩʩʬʺ
ʯʷʺʮ
00060633 cop_giu2015:Layout 1 04/06/2015 11.47 Pagina 1
English
Mod. Nr.
Date of purchase
Kaufdatum
Date d’achat
Data d’acquisto
Fecha de adquisición
Datum aankoop
Data de compra
Innkjøpsdato
Inköpsdatum
Ostopäivämäärä
Købsdato
Eladás dátuma
Datum prodeje
Data cumpãrãrii
Dátum nákupu
Data zakupu
Satın alma tarihi
Ligo Electric SA - 6853 Ligornetto / Mendrisio - Switzerland
158 mm (Mod. 533..)
148 mm (Mod. 554..)
245 mm (Mod. 533.., 542..)
225 mm (Mod. 554..)
183 mm
(Mod. 533.., 542..)
160 mm
(Mod. 554..)
Name and full address of purchaser
Name und vollständige Anschrift des Käufers
Nom et adresse completè de l’acheteur
Nome e indirizzo completo dell’acquirente
Nombre y dirección completa del comprador
Naam en adres van de consument
Nome e endereço do cliente
Kjøperens fullstendige navn og adresse
Köparens namn och fullständig adress
Ostajan nimi ja täydellinen osoite
Køberens fulde navn og adresse
Vevo
˝ neve éstelies cime
Jméno a adresa záhaznika
Meno a celá adresa kupujúceho/zákazníka
Numele i adresa completa˘ a compãrãtorului
Nazwisko oraz pelny adres kupujacego
Alıcının tam ismi ve adresi
• If the hair
vicinity to
ASSEMBLY AND OPERATING INSTRUCTIONS
Read these instructions thoroughly. Available also on www.valera.com
CAUTION
• For additional protection, the installation of a residual current device (RCD)
having a rated residual operating current not exceeding 30mA is advisable in
the electrical circuit supplying the bathroom. Ask your installer for advice.
• Make sure the electrical system is fitted with a device which guarantees
omnipolar disconnection from the electricity mains under category III
overvoltage conditions.
• Make sure the unit is perfectly dry before using it.
• WARNING: Do not use this appliance near bathtubs, showers, basins
or other vessels containing water.
• This hairdryer must be fixed so that a person taking a bath or shower cannot
reach the handle, considering the cord at maximum extension.
• This appliance can be used by children from 8 years of age and over, and by
persons with limited physical, sensory or mental abilities or who lack the
relevant experience and knowledge, if they are suitably supervised or have been
educated to use the appliance safely and made aware of the associated risks.
• Do not allow children to play with the appliance.
• Children must not perform cleaning and maintenance procedures unless
supervised.
• Do not use your unit if it is not working properly. Do not try to repair this
electrical unit yourself, rather contact an authorized technician. If the supply
cord is damaged, it must be replaced by the manufacturer, its service agent or
a similarly qualified person in order to avoid a hazard.
• Plug the hairdryer into an alternating current outlet only, and make sure that
the voltage of your electricity supply is the same as that indicated on the
rating plate of the appliance.
• Do not immerse in water or other liquids.
• Never put the appliance in a place where it could fall into water or in other
liquids.
• Do not try to salvage an electrical appliance which has fallen into water.
• Turn the unit off when you put it down.
• Unplug the appliance when not in use, but never do it by pulling the cord.
• Remember to check regularly that the air inlet and outlet grills are clean.
• Allow your appliance to cool before storing away and do not wrap the supply
cord around the hairdryer in storage.
6
00060633 cop_giu2015:Layout 1 04/06/2015 11.47 Pagina 2
7
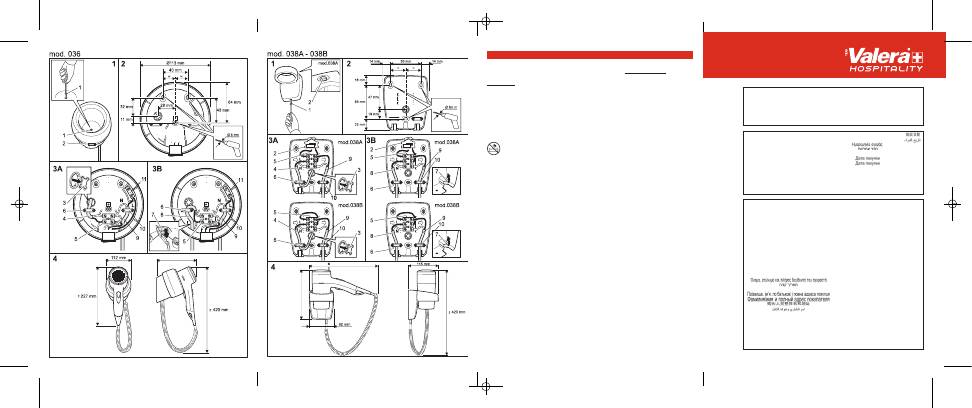
INSTALLATION INSTRUCTIONS
Wall holder for hairdryer
Type 036 - 038A - 038B
Type 036
Front housing model.
Type 038A
Vertical housing model.
Type 038B
As the 038A but with no switch.
Installation of wall holder
This wall holder must only be installed by a qualified
electrician in conformity to applicable safety standards.
The wall holder may be installed in one of two ways:
A = connection to wall mains wiring
B = connection to surface mains wiring
Attention: before installing the wall holder always switch
off the general switch of your mains electricity.
For each pole a switch with a minimum break distance
between contacts of 3 mm must be fitted up-line of the
appliance.
Each time the appliance is opened, the switch must be used
to disconnect the appliance.
The connection wiring must be at least type H05VV-F
2x1,0 mm
2
.
Method A
IMPORTANT: Refer to the figures for the model you have
purchased.
1. Unscrew the screw (1) (fig. 1) and remove the cover from
the wall unit.
2. Break the plastic membrane (3) at the back of the wall unit
(fig. 3A).
3. Route the main power cable from the wall (4) through the
hole left by the plastic membrane (3) (fig. 3A).
4. Fix the back of the wall unit to the wall using the fixing
screws and wall plugs provided (fig. 2).
5. Remove the terminal strip (5). The input power cable (4)
and the output power cable (9) of hairdryer with max input
current of 10A,if not already connected, must be
connected to the terminal strip(5).
In mod. 036 the Neutral output cable(9) must be connected
to terminal strip(5) and the Line output cable (9) to terminal
strip (11).
6. Reposition the terminal strip. Tighten the cable clamp
(6 and 10) with its own screws. (fig. 3A). IMPORTANT:
This appliance is double insulated and has no ground
(earth) connection.
7. Fit the cover back on the wall unit with (1) (fig. 1).
8. Switch the power on at the mains switch. The hair dryer is
now ready to use.
Method B
IMPORTANT: Refer to the figures for the model you have
purchased.
1. Unscrew the screw (1) (fig. 1) and remove the cover from
the wall unit.
2. Break the plastic membrane (7) (fig. 3B).
3. Fix the back of the wall unit to the wall using the fixing
screws and wall plugs provided (fig. 2).
4. Route the input power cable (8) and the output power (9)
into the holes (fig. 3B).
5. Remove the terminal strip (5). The input power cable (8)
and the output power cable (9) of hairdryer with max input
current of 10A,if not already connected, must be
connected to the terminal strip(5).
In mod. 036 the Neutral output cable(9) must be connected
to terminal strip (5) and the Line output cable (9) to
terminal strip (11).
Reposition the terminal strip. Tighten the cable clamp (6 and
10) with its own screws. (fig. 3B). IMPORTANT: This
appliance is double insulated and has no ground (earth)
connection.
6. Fit the cover back on the wall unit with (1) (fig. 1).
7. Switch the power on at the mains switch. The hair dryer is
now ready to use.
INSTRUCTIONS FOR USE
Hairdryer with wall holder
Control Switches
Control switch on wall holder
(only for models equipped with a switch) rif. 2 fig. 1:
0-1 = Off/On
Hairdryer
Type 533.03 - 533.05 - 533.03/I - 533.05/I
542.05 - 542.06 - 542.14 - 561.22
Pushbutton:
ON=On/Off
(pressure must be maintained to operate the hairdryer)
Slide Switch
Cool=(low power)
1=(medium power)
2=(maximum power)
Hairdryer
Type 554.02 - 554.05 - 554.08 - 554.11
554.13
Pushbutton:
ON=On/Off (pressure must be maintained to operate the
hairdryer)
Slide Switch
1=(low power)
2=(maximum power)
Hardryer
Type 533.04 - 533.06 - 533.14 - 533.15
554.01 - 554.04 - 554.07 - 554.10
Pushbutton=On/Off
(pressure must be maintained to operate the hairdryer)
00060633 int_giu2015:Layout 1 04/06/2015 11.45 Pagina 7
8
The symbol on the product or on its packaging
indicates that this product may not be treated as household
waste. Instead it shall be handed over to the applicable
collection point for the recycling of electrical and electronic
equipment. By ensuring this product is disposed of correctly,
you will help prevent potential negative consequences for the
environment and human health, which could otherwise be
caused by inappropriate waste handling of this product. For
more detailed information about recycling of this product,
please contact your local city office, your household waste
disposal service or the shop where you purchased the
product.
VALERA is a registered trade mark
of Ligo Electric S.A. - Switzerland
GUARANTEE
VALERA guarantees the appliance you have bought at
following conditions:
1. The guarantee conditions for this appliance are as defined
by our dealer in the country of sale. In Switzerland and in
the countries subject to the European directive 44/99/CE
the guarantee period is 24 months for domestic use and
12 months for professional or similar use. The guarantee
period starts from the date of purchase as stated on the
present guarantee card regularly filled out and stamped by
the dealer or on the sale’s invoice.
2. The guarantee is applicable only against submission of
the present guarantee card or the sale’s invoice.
3. The guarantee covers the elimination of all defects arisen
during the guarantee period resulting from proven faults in
material or workmanship. The elimination of the defects
will be made either by repairing the appliance or
exchanging it. The guarantee does not cover any damage
arising from incorrect connection to the power supply,
improper use, breakage, normal wear and non-
compliance with the Instructions for Use.
4. All other claims of any nature, including those for eventual
damages outside of the appliance, are excluded, unless
our liability is legally mandatory.
5. The guarantee service is carried out free of charge; it does
not affect the expiry date of the guarantee.
6. The guarantee becomes void if repairs are under-taken by
unauthorized persons.
For UK only: this guarantee in no way affects your rights
under statutory law.
In case of defect, please return the appliance well packed and
together with the guarantee card regularly dated and stamped
to one of our Valera Service Centres or to the dealer who will
send it to the official importer for the guarantee service.
Hairdryer
Type 554.03 - 554.06 - 554.09 - 554.12
Slide Switch
0=(OFF)
1=(low power)
2=(maximum power)
Hairdryer Mod. 561.02 - 561.17 - 561.20
561.22
Pushbutton
ON = On/off (pressure must be
maintained to operate the
hairdryer)
Left switch
0 = Off
1 = Low air speed
2 = High air speed
Right switch
Cool = Low air temperature
1 = Medium air temperature
2 = High air temperature
PRODUCT CARE
When not in use, the mains switch on the wall holder should be
in the “Off” position. The hairdryer requires no special care or
attention.
You can clean your appliance with a cloth dampened with water.
The cleaning of hairdryers with detergents, solvents, alcohol
and other chemical products is strictly prohibited.
When necessary, the air inlet grill should be cleaned with a soft
brush or by vacuum cleaner.
Important
This hairdryer conforms to the safety regulations regarding
electrical appliances. This hairdryer has a safety cut-out which
will operate in case of overheating. The dryer will re-set itself
after being left to cool for a few minutes, but please check air
inlet and outlet grills are clear before continuing to use the dryer.
This appliance conforms to European Directives 2004/108/EC,
2006/95/EC, 2009/125/EC and Regulation (EC) No.
1275/2008.
00060633 int_giu2015:Layout 1 04/06/2015 11.45 Pagina 8
9
Deutsch
MONTAGE- UND GEBRAUCHSANWEISUNGEN
Anweisungen bitte sorgfältig durchlesen. Verfügbar auch auf www.valera.com
SICHERHEITSHINWEISE
• Wichtig: als zusätzlicher Schutz wird die Installation einer Fehlerstromschutzeinrichtung (FI) mit einem Bemessungauslösestrom von nicht mehr als 30 mA im Badezimmerstromkreis empfohlen. Lassen Sie sich von Ihrem Elektroinstallateur beraten. •Prüfen Sie, ob in der elektrischen Anlage eine allpolige Trennvorrichtung vom Stromnetz gemäß Überspannungskategorie III installiert ist. • Stellen Sie sicher, dass das Gerät völlig trocken ist, bevor Sie es benutzen. • ACHTUNG: Benutzen Sie dieses Gerät nicht in der Nähe von Badewannen, Waschbecken oder sonstigen mit Wasser gefüllten Behältern. • Dieser Haartrockner muss angesichts der maximalen Länge des in der Hand gehaltenen Teils so befestigt werden, dass er von der Badewanne oder Dusche aus nicht erreichbar ist. • Diese Geräte können von Kindern ab 8 Jahren sowie von Personen mitreduzierten physischen, sensorischen oder mentalen Fähigkeiten oder Mangel an Erfahrung und/oder Wissen benutzt werden, wenn sie beaufsichtigt oder bzgl. des sicheren Gebrauchs des Gerätes unterwiesen wurden und die daraus resultierenden Gefahren verstanden haben. • Kinder dürfen nicht mit dem Gerät spielen. • Reinigung und Wartung dürfen nicht durch Kinder durchgeführt werden, es sei denn sie sind beaufsichtigt. • Die Reinigungs- und Wartungsarbeiten dürfen nicht von unbeaufsichtigten Kindern durchgeführt werden. •Verwenden Sie Ihr Gerät nicht, wenn eine Störung aufgetreten ist. Versuchen Sie niemals, das Gerät selbst zu reparieren, sondern wenden Sie sich an einen Techniker. Wenn die Netzanschlussleitung dieses Gerätes beschädigt wird, muss sie durch den Hersteller oder seinen Kundendienst oder eine ähnlich qualifizierte Person ersetzt werden, um Gefährdungen zu vermeiden. • Schliessen Sie Ihren Haartrockner nur an eine Wechselstromleitung an und stellen Sie sicher, dass die Anschlussspannung auch tatsächlich der am Gerät angegebenen Spannung entspricht. • Tauchen Sie Ihr Gerät nie in Wasser oder andere Flüssigkeiten. • Legen Sie Ihr Gerät nie so ab, dass es in Wasser oder eine andere Flüssigkeit fallen kann.
00060633 int_giu2015:Layout 1 04/06/2015 11.45 Pagina 9
Оглавление
- • Wichtig: als zusätzlicher Schutz wird die Installation einer Fehlerstromschutzeinrichtung (FI) mit einem Bemessungauslösestrom von nichtmehr als 30 mA im Badezimmerstromkreis empfohlen. Lassen Sie sich vonIhrem Elektroinstallateur beraten. •Prüfen Sie, ob in der elektrischen Anlage eine allpolige Trennvorrichtung vom Stromnetz gemäß Überspannungskategorie III installiert ist. • Stellen Sie sicher, dass das Gerät völlig trocken ist, bevor Sie es benutzen. • ACHTUNG: Benutzen Sie dieses Gerät nicht in der Nähe von Badewannen, Waschbecken oder sonstigen mit Wasser gefüllten Behältern. • Dieser Haartrockner muss angesichts der maximalen Länge des in der Hand gehaltenen Teils so befestigt werden, dass er von der Badewanne oder Duscheaus nicht erreichbar ist. • Diese Geräte können von Kindern ab 8 Jahren sowie von Personen mitreduzierten physischen, sensorischen oder mentalen Fähigkeiten oderMangel an Erfahrung und/oder Wissen benutzt werden, wenn sie beaufsichtigtoder bzgl. des sicheren Gebrauchs des Gerätes unterwiesen wurden und die darausresultierenden Gefahren verstanden haben. • Kinder dürfen nicht mit dem Gerät spielen.• Reinigung und Wartung dürfen nicht durch Kinder durchgeführt werden, es sei denn sie sind beaufsichtigt. • Die Reinigungs- und Wartungsarbeiten dürfen nicht von unbeaufsichtigten Kindern durchgeführt werden. •Verwenden Sie Ihr Gerät nicht, wenn eine Störung aufgetreten ist. Versuchen Sie niemals, das Gerät selbst zu reparieren, sondern wenden Sie sich an einenTechniker. Wenn die Netzanschlussleitung dieses Gerätes beschädigt wird, musssie durch den Hersteller oder seinen Kundendienst oder eine ähnlich qualifiziertePerson ersetzt werden, um Gefährdungen zu vermeiden. • Schliessen Sie Ihren Haartrockner nur an eine Wechselstromleitung an und stellen Sie sicher, dass die Anschlussspannung auch tatsächlich der am Gerätangegebenen Spannung entspricht. • Tauchen Sie Ihr Gerät nie in Wasser oder andere Flüssigkeiten.• Legen Sie Ihr Gerät nie so ab, dass es in Wasser oder eine andere Flüssigkeit fallen kann.
- • Versuchen Sie nicht, ein ins Wasser gefallenes elektrisches Gerät aus dem Wasser zu nehmen. • Legen Sie den Haartrockner nicht beiseite, solange er eingeschaltet ist.• Achten Sie darauf, dass die Luftansaug- und Austrittsöffnungen stets frei sind.• Benutzen Sie Ihr Gerät nicht, wenn Sie daran eine Unregelmässigkeit feststellen, wenn es zu Boden gefallen ist oder wenn die Geräteschnur beschädigt ist. • Reparaturen an Elektrogeräten sind nur von Fachkräften auszuführen.• Bringen Sie den Kindern den sicheren Umgang mit Elektrogeräten bei.
- • Important: pour garantir une protection optimale, il est conseillé d’installer dans l’installation électrique alimentant l’appareil un interrupteur différentiel avec uneprise de courant différentielle ne dépassant pas 30 mA. Contactez votreélectrotechnicien de confiance pour tout renseignement complémentaire. • Contrôler que l'installation électrique est bien dotée d'un dispositif omnipolaire en mesure de couper le courant dans les conditions de la catégorie de surtension III. • Vérifiez que l’appareil soit complètement sec avant de l’utiliser • ATTENTION: ne pas utiliser cet appareil à proximité de baignoires, de lavabos ou autres récipients contenant de l'eau. • Ce sèche-cheveux, compte tenu de la longueur maximale de la partie à empoigner, doit être fixé hors de la portée d'une personne prenant son bain ousa douche. • Il est requit un âge minimum de 8 ans pour l’utilisation de cet appareil. L’utilisation de cet appareil par des personnes aux capacités physiques,sensorielles ou mentales réduites est fortement déconseillée à moins qu’ellessoient surveillées ou qu’elles aient été instruites correctement quant àl’utilisation de l’appareil de la part de tiers • Les enfants ne doivent pas jouer avec l’appareil.• Le nottoyage et l’entretien de l’appareil ne doivent pas être effectuées par des enfants non surveillés. • N’utilisez pas l’appareil s’il présente des anomalies. N’essayez pas de réparer vous-même l’appareil électrique, adressez-vous à un technicien agréé. Toutcordon d’alimentation endommagé doit être remplacé par le fabricant, sonservice d’assistance technique ou par une personne ayant une compétenceanalogue de façon à éviter tout risque. • Branchez votre sèche-cheveux sur du courant alternatif uniquement et vérifiez que la tension sur laquelle votre appareil est branché est identique à celle de l’appareil. • N’immergez jamais votre appareil dans l’eau ou dans un autre liquide.• Ne posez, ni rangez votre appareil à un endroit d’où il pourrait tomber dans l’eau ou dans un autre liquide. • Ne pas tenter de récupérer un appareil électrique tombé dans l'eau.• Débranchez toujours votre appareil après l’utilisation.• Veillez à ne jamais obstruer les entrées et les sorties d’air de l’appareil.
- • N’utilisez pas votre appareil s’il présente une défaillance, s’il est tombé ou si le cordon d’alimentation est endommagé. • Apprenez aux enfants les dangers pouvant dériver des appareils électriques ainsi que les règles de la sécurité électrique correspondantes.
- •Importante: per garantire una protezione supplementare si consiglia di installare nell’impianto elettrico, con il quale viene alimentato l’apparecchio,un interruttore differenziale con una corrente di intervento non superiore a30 mA. Per maggiori informazioni rivolgersi all’elettrotecnico di fiducia. •Verificare che sull’impianto elettrico sia inserito un dispositivo che assicuri la disconnessione onnipolare dalla rete elettrica nelle condizioni dellacategoria di sovratensione III. •Assicurarsi che l’apparecchio sia perfettamente asciutto prima di utilizzarlo. •ATTENZIONE: Non utilizzare questo apparecchio in prossimità di vasche da bagno, lavelli o altri recipienti che contengano acqua. •Questo asciugacapelli, considerando la massima estensione della parte che va tenuta in mano, deve essere fissato fuori dalla portata di unapersona che stia usando la vasca da bagno o la doccia. •Il presente apparecchio può essere utilizzato dai bambini a partire da 8 anni di età e da persone dalle ridotte capacità fisiche, sensoriali o mentali,oppure con mancanza di esperienza e di conoscenza se si trovano sottoadeguata sorveglianza, oppure se sono stati istruiti circa l’usodell’apparecchio in modo sicuro e se si rendono conto dei pericoli correlati. •I bambini non devono giocare con l’apparecchio.•Le operazioni di pulizia e di manutenzione non devono essere effettuate dai bambini senza sorveglianza. •Non utilizzare il vostro apparecchio se presenta un’anomalia. Non cercare di riparare l’apparecchio elettrico da soli, bensì rivolgersi ad un tecnicoautorizzato. Se il cavo di alimentazione è danneggiato, deve esseresostituito dal costruttore o dal suo servizio assistenza tecnica o comunqueda una persona con qualifica similare, in modo da prevenire ogni rischio. •Collegate I’apparecchio solo a corrente alternata e controllate che la tensione di rete corrisponda a quella indicata sull’apparecchio. •Non appoggiate I’apparecchio in un luogo dove potrebbe cadere nell’acqua o in un altro liquido. •Non cercate di recuperare un apparecchio elettrico caduto nell’acqua.
- •Spegnete sempre I’apparecchio quando viene appoggiato.•Adoperate I’asciugacapelli in modo che le griglie di entrata e di uscita dell’aria non vengano mai ostruite.
- • Importante: para garantizar una protección suplementaria, se aconseja colocar en la instalación eléctrica de alimentación del aparato, un interruptordiferencial con una corriente de intervención que no supere los 30 mA.Para mayores informaciones, dirigirse al electrotécnico de confianza. • Comprobar que la instalación eléctrica cuente con un dispositivo que asegure la desconexión omnipolar de la red eléctrica en las condicionesde la categoría de sobretensión III. • Antes de usar el aparato, controle que esté bien seco. • ATENCIÓN: no utilizar este aparato cerca de bañeras, lavabos u otros recipientes que contengan agua. • Instale el secador fuera del alcance de quienes usen la bañera o la ducha, teniendo en cuenta la máxima extensión de la parte del secador que sesujeta con la mano. • Este aparato puede ser utilizado por niños a partir de los 8 años de edad y también por personas con capacidades físicas, sensoriales o mentalesreducidas, o carentes de experiencia y de conocimiento, siempre que lohagan bajo las instrucciones y la vigilancia de una persona que les hayaexplicado el modo de uso del aparato y los peligros que puede implicar. • Los niños no deben jugar con el aparato.• La limpieza y el mantenimiento no deben ser efectuados por los niños sin vigilancia. • No utilice el aparato si está averiado. No intente reparar nunca el aparato. Si está averiado, tiene que llevarlo a un centro técnico autorizado. Si elcable de alimentación está dañado, debe ser sustituido por el fabricante opor el servicio de asistencia técnica o por una persona con una calificaciónsimilar, para prevenir cualquier riesgo. • Conecte el aparato sólo a corriente alterna y compruebe que la tensión de red corresponda a la indicada en el aparato. • No sumerja el aparato en agua o cualquier otro líquido.• No apoye el aparato en un lugar desde donde pueda caer en el agua o en otro líquido. • No intentar recuperar un aparato eléctrico caído en el agua.
- • Desconecte siempre el aparato antes de dejarlo apoyado.• Utilice el secador de manera que las rejillas de entrada y salida del aire no queden obstruidas. • Con el fin de evitar peligros, si se dañara el cable de alimentación de este aparato, la sustitución del mismo debe ser realizada por el fabricante, unServicio Técnico autorizado o un técnico cualificado.
- • Belangrijk: voor extra veiligheid raden wij u aan de elektrische installatiewaarmee het apparaat gevoed wordt te voorzien van een aardlekschakelaarmet een stroomsterkte van niet meer dan 30 mA. Wendt u voor meerinformatie tot uw elektrotechnicus. • Controleer of de elektrische installatie is uitgerust met een meerpoligescheidingsinrichting van het elektriciteitsnet in overspanningscategorie III. • Controleer voor gebruik van het apparaat of het goed droog is. • LET OP: gebruik dit apparaat niet in de buurt van badkuipen, wastafels of andere houders met water. • Installeer de haardroger op een dusdanige plaats dat hij niet bereikbaar is voor personen die een bad of een douche nemen. • Dit apparaat mag worden gebruikt door kinderen vanaf 8 jaar en door personen met beperkte lichamelijke, zintuiglijke of geestelijke vermogensof met weinig ervaring en/of kennis, mits deze personen onder passendtoezicht staan of geïnstrueerd zijn over het gebruik van het apparaat en zezich bewust zijn van de bijbehorende gevaren. • Kinderen mogen niet met het apparaat spelen.• De reiniging en het onderhoud mogen niet zonder toezicht door kinderen worden uitgevoerd. • Gebruik uw apparaat niet als het niet goed functioneert. Probeer het elektrische apparaat niet zelf te repareren, maar wend u tot een erkendetechnicus. Als het netsnoer beschadigd is, moet het worden vervangendoor de fabrikant, de onderhoudsdienst of in elk geval door een persoon meteen vergelijkbare kwalificatie om elk risico uit te sluiten. • Koppel het toestel uitsluitend aan wisselstroom aan, en kijk na of de netspanning overeenstemt met de op het toestel vermelde spanning. • Dompel het toestel nooit in water of in een andere vloeistof onder.• Hang het toestel niet op een plaats vanwaar het in water of in een andere vloeistof zou kunnen vallen. • Probeer nooit een elektrisch apparaat dat in het water is gevallen eruit te halen. • Zet het toestel steeds uit wanneer u het terughangt.• Gebruik de haardroger zodanig dat de invoer- en afvoerroosters altijd vrij blijven.
- • Gebruik het toestel niet als het een defect vertoont, als het gevallen is of als de kabel beschadigd is. • Probeer een elektrisch apparaat niet zelf te herstellen, maar wend u tot een erkende hersteldienst.
- • Importante: para garantir uma protecção suplementar é aconselhável instalar no sistema eléctrico, com o qual o aparelho é alimentado, um interruptordiferencial com uma corrente de intervenção não superior a 30 mA. Para maisinformações, contacte um electricista da sua confiança. • Verifique se na instalação eléctrica está instalado um dispositivo que garanta a desconexão unipolar da rede eléctrica nas condições da categoria desobretensão III. • Certifique-se de que o aparelho está perfeitamente seco antes de o utilizar. • ATENÇÃO: não utilize o aparelho perto da banheira, lavatório ou outro recipiente que contenha água. • Este secador de cabelo, considerando a extensão máxima da parte que é segurada na mão, deve ser fixado fora do alcance de alguém que esteja a usara banheira ou o duche. • O presente aparelho pode ser utilizado por crianças a partir dos 8 anos de idade e por pessoas com capacidades físicas, sensoriais ou mentais reduzidas, ousem experiência e conhecimentos, desde que estejam sob vigilância adequada,tenham sido instruídas sobre a utilização segura do aparelho e estejamconscientes dos perigos associados. • As crianças não deverão brincar com o aparelho.• As operações de limpeza não deverão ser efectuadas por crianças sem vigilância. • Não utilize o aparelho se este apresentar alguma anomalia. Não tente reparar o aparelho eléctrico, contacte um técnico autorizado. Se o cabo de alimentaçãoestiver danificado, deverá ser substituído pelo fabricante ou assistência técnica,ou por uma pessoa com habilitação similar, de forma a prevenir quaisquerriscos. • Ligue o aparelho apenas a uma corrente alternada e certifique-se de que a tensão da rede de abastecimento corresponde à indicada no aparelho. • Não pouse o aparelho num local do qual ele possa cair na água ou noutro líquido.• Não tente pegar num aparelho eléctrico que tenha caído na água.• Desligue sempre o aparelho quando for inserido no suporte.• Opere o secador de maneira que as grelhas de entrada e de saída de ar não fiquem obstruídas.
- • Para evitar perigos, se o cabo de alimentação deste aparelho for danificado, deverá ser substituído pelo fabricante, pelo Serviço Técnico autorizado ou umtécnico qualificado.
- • Viktig: For å garantere en ekstra beskyttelse, anbefales det å montere en jordfeilbryter med utløserstrøm på maks. 30 mA i det elektriske anleggetsom forsyner apparatet. For flere opplysninger kontakt en autorisertelektriker. • Kontroller at det er en bryter som sørger for allpolig frakobling fra strømnettet i omgivelser med overspenningskategori III. • Påse at apparatet er helt tørt før du bruker det. • ADVARSEL: Ikke bruk dette apparatet i nærheten av badekar, servanter eller andre beholdere som inneholder vann. •Tatt i betraktning den maksimale utstrekningen på delen som skal holdes i hånden, må denne hårtørkeren monteres slik at en person som brukerbadekaret eller dusjen ikke kan nå frem til den. • Dette apparatet kan benyttes av barn over 8 år og personer med reduserte fysiske, følelsesmessige eller mentale evner, eller sommangler erfaring og kunnskap, så lenge de er under oppsyn eller har blirinstruert i sikker bruk av apparatet og forstår farene det innebærer. • Barn må ikke leke med apparatet.• Rengjøring og vedlikehold må ikke utføres av barn uten tilsyn.• Ikke bruk apparatet hvis det er defekt. Ikke forsøk å reparere det elektriske apparatet selv, men henvend deg til en autorisert tekniker.Dersom strømledningen er skadet, må den skiftes ut av produsenteneller serviceavdelingen, eller i alle fall av en kvalifisert person, slik atman ikke løper noen risiko. • Apparatet må kun kobles til vekselstrøm, og du må kontrollere at nettspenningen er den samme som angitt på apparatet. • Ikke sett apparatet et sted der det kan falle ned i vann eller andre væsker.• Ikke forsøk å plukke opp et apparat som er falt ned i vann.• Slå alltid av apparatet når det legges ned.• Pass på at luftgitteret ikke tildekkes når apparatet brukes.• Dersom apparatets strømledning skades, må den skiftes ut av produsenten, servicesenteret eller en kvalifisert tekniker for å unngårisiko.
- • Viktigt: för att garantera en högre säkerhet, rekommenderas att installera en jordfelsbrytare med en gränsutlösningsström som inte överstiger 30mA i elsystemet. Kontakta en tillförlitlig eltekniker för mer information. • Kontrollera att elsystemet är utrustat med en anordning som stänger av alla poler från elnätet om det skulle uppstå ett tillstånd av överslag ispänningen av kategori III. • Se till att apparaten är helt torr innan du använder den. • OBSERVERA: Använd inte apparaten i närheten av badkar, tvättställ eller andra kärl som innehåller vatten. • Denna hårtork skall fästas på sådant avstånd att den inte ens vid maximal utdragning kan användas av en person som befinner sig i ettbadkar eller en dusch. • Den här apparaten kan användas av barn från 8 år och av personer med nedsatt fysisk, känslomässig eller mental förmåga eller av personer medbristande erfarenhet och kunskap om har en lämplig övervakning eller om deinstruerats om apparatens säkra användning och är medvetna om farorna. • Barn får inte leka med apparaten.• Rengörings- och underhållsarbeten får inte utföras av barn utan övervakning.• Använd inte apparaten om den är defekt. Försök inte reparera den elektriska apparaten själv, utan vänd dig till en auktoriserad tekniker. Omelkabeln är skadad, måste den bytas av tillverkaren eller av tillverkarenstekniska service eller av en person med liknande kvalifikationer för attförebygga alla faror. • Anslut endast apparaten till växelström och kontrollera att nätspänningen motsvarar den som indikeras på apparaten. • Placera inte apparaten på en plats där den kan falla ned i vatten eller en annan vätska. • Försök aldrig att ta upp en apparat som fallit i vatten.• Stäng alltid av apparaten då du lägger den ifrån dig.• Använd hårtorken på så sätt att luftutloppsgallren aldrig täcks över.• Om strömkabeln på denna apparat skulle skadas skall den bytas ut av tillverkaren, av auktoriserad Service eller av kvalificerad tekniker för attundvika fara.
- • Tärkeää: laitteen virtapiiriin on suositeltavaa asentaa lisäsuojaukseksi vikavirtakytkin, jonka laukeamiskynnys on korkeintaan 30 mA. Pyydälisätietoja ammattitaitoiselta sähköasentajalta. • Varmista, että sähköjärjestelmään on asennettu laite, joka takaa kaikkien napojen erottamisen sähköverkosta luokan III ylijännitetilanteessa. • Varmista ennen käyttöä, että laite on täysin kuiva. • HUOMIO: älä käytä laitetta kylpyammeen, pesualtaan tai muiden vettä sisältävien astioiden lähellä. • Tämä hiustenkuivaaja täytyy kiinnittää kylpyammetta tai suihkua käyttävän henkilön ulottumattomiin. Ota huomioon kädessä pidettävän osan suurinpituus. • Laitteen käyttö on sallittu yli 8-vuotiaille lapsille ja fyysisesti, aisteiltaan tai henkisesti rajoitteisille henkilöille tai henkilöille, joilla ei ole kokemustalaitteen käytöstä, vain siinä tapauksessa, että käyttöä valvotaan riittävästi taiheille on neuvottu käyttämään laitetta turvallisella tavalla ja he ovat tietoisiakäyttöön liittyvistä vaaroista. • Älä anna lasten leikkiä laitteella.• Lapset eivät saa puhdistaa tai huoltaa laitetta ilman valvontaa.• Älä käytä vioittunutta laitetta. Älä yritä korjata sähkölaitetta omatoimisesti, vaan käänny aina ammattitaitoisen sähköasentajan puoleen. Jos laitteenvirtajohto vaurioituu, vaarojen välttämiseksi johdon saa vaihtaa vainvalmistaja tai valtuutettu huoltoliike tai muu ammattitaitoinen sähköasentaja. • Kytke laite ainoastaan vaihtovirtaa käyttävään verkkovirtaan ja tarkista, että verkkojännite vastaa laitteeseen merkittyä arvoa. • Älä aseta laitetta paikkaan, josta se voisi pudota veteen tai muuhun nesteeseen. • Älä yritä palauttaa toimintaan veteen pudonnutta sähkölaitetta.• Kytke laite aina pois päältä, kun laitat sen telineeseen.• Käytä hiustenkuivaajaa siten, että ilmanotto- ja poistoaukot eivät mene koskaan tukkoon. • Jos laitteen virtajohto vaurioituu, valmistajan, valtuutetun huoltoliikkeen tai ammattitaitoisen sähköasentajan on vaihdettava johto vaarojen välttämiseksi.
- • Vigtigt: for at sikre ekstra beskyttelse anbefales det at installere en differentialafbryder i det elektriske anlæg, der skal forsyne apparatet,med en grænse for afbrydelse på maksimalt 30 mA. For yderligereoplysninger skal man henvende sig til en autoriseret elektriker. • Kontroller, at der på enheden er tilsluttet en anordning, der sikrer afbrydelse af alle poler fra strømforsyningen under betingelser foroverspænding kategori III. • Sørg for, at apparatet er helt tørt, før det tages i anvendelse. • PAS PÅ: Brug aldrig dette apparat i nærheden af badekar, håndvaske eller andre beholdere med vand. • Denne hårtørrer skal med den maksimale udstrækning af håndholdte del fastgøres utilgængeligt for en person, der er ved at bruge badekareller bruser. • Dette apparat kan betjenes af børn fra 8 år og af personer, som er fysisk, sensorisk eller psykologisk funktionshæmmede, eller som mangler dennødvendige erfaring og viden, såfremt de er under passende opsyn,eller først er blevet instrueret i sikker brug af apparatet og er klar overde tilhørende risici. • Børn må ikke lege med apparatet.• Børn må ikke foretage rengøring og vedligeholdelse uden opsyn.• Brug ikke apparatet, hvis det udviser fejl. Prøv aldrig at reparere elektriske apparater på egen hånd, men kontakt altid en autoriseretelektriker. Hvis strømkablet er beskadiget, skal det udskiftes afproducenten eller af deres tekniske serviceværksted, eller under alleomstændigheder af en person med tilsvarende kvalifikationer, for athindre enhver risiko. • Slut kun apparatet til en vekselstrømskilde, og kontrollér, at netspændingen svarer til spændingen angivet på apparatet. • Anbring aldrig apparatet på steder, hvorfra det ville kunne falde ned i vand eller andre væsker. • Forsøg ikke at hente et elektrisk apparat, der er faldet i vandet.• Sluk altid apparatet, når det hænges i holderen.• Anvend hårtørreren på en måde, så luftristene ikke blokeres.
- • Hvis strømkablet til dette apparat skulle blive beskadiget, skal det udskiftes af producenten, af dennes autoriserede tekniskeserviceværksted eller af en uddannet tekniker for at undgå fare.
- • Fontos: fokozott védelem biztosításához javasoljuk, hogy a berendezés tápfeszültségét biztosító elektromos hálózatba egy nem több, mint 30mA beavatkozási áramerősségű differenciálkapcsoló legyen beépítve.További információért forduljon villanyszerelőhöz. • Ellenőrizze, hogy az elektromos berendezésre rá van-e kapcsolva egy III. túlfeszültség kategória esetén az elektromos hálózatról történőegypólusú leválasztást garantáló készülék. • Használat előtt győződjön meg arról, hogy a készülék tökéletesen száraz. • FIGYELEM: A készüléket ne használja fürdőkád, mosdó vagy más víztároló edény közelében. • Ezt a hajszárítót olyan helyen kell rögzíteni, ahol a kádat vagy a zuhanyt használó személy nem éri el, ehhez figyelembe kell venni, hogy akézben tartott részt maximálisan mennyire lehet eltávolítani. • A készüléket 8 évnél idősebb gyermekek, valamint korlátozott fizikai, érzékszervi vagy mentális képességű, illetve tapasztalattal ésismeretekkel nem rendelkező személyek csak megfelelő felügyeletmellett használhatják, vagy pedig ha biztonságosan megtanítottákszámukra a készülék használatát, és tudatában vannak a készülékkelkapcsolatos veszélyeknek. • Gyermekek nem játszhatnak a készülékkel.• Felügyelet nélküli gyermekek nem végezhetik a tisztítási és karbantartási műveleteket. • Ne használja a készüléket, ha rendellenességet mutat. Ne próbálja egyedül megjavítani az elektromos készüléket, forduljon errefelhatalmazott szakemberhez. Ha a tápvezeték megsérült, a gyártó, agyártó vevőszolgálata vagy hasonló felkészültségű szakember ki kell,hogy cserélje úgy, hogy minden kockázatot el lehessen kerülni. • A berendezést kizárólag hálózati váltóáramra csatlakoztassa, és ellenőrizze, hogy a hálózati feszültség megegyezik-e a berendezésenjelzett értékkel. • Ne tegye a berendezést olyan helyre, ahonnan vízbe vagy más folyadékba eshet. • Ha egy elektromos berendezés vízbe esik, ne próbálja meg kivenni.
- • Ha a készüléket, mindig kapcsolja ki.• A hajszárítót úgy használja, hogy a levegőbemeneti és kimeneti rács soha ne tömődjön el. • Ha a készülék tápvezetéke megsérül, a veszélyek elkerülése érdekében azt a gyártó, a felhatalmazott Vevőszolgálat vagy egy műszakiszakember kell, hogy kicserélje.
- • Důležité: pro zvýšení bezpečnosti doporučujeme, aby hodnota chrániče instalovaného v elektrickém rozvodu nebyla větší než 30 mA. Pro dalšíinformace kontaktujte kvalifikovaného elektrikáře. • Ověřte, zda je v elektrické instalaci zapojeno zařízení, které zajistí odpojení všech pólů od elektrické sítě v situaci kategorie přepětí III. • Před použitím přístroje se ujistěte, že je dokonale suchý. • POZOR: Tento přístroj nepoužívejte v blízkosti vany, umyvadla nebo jiných nádob s vodou. • Tento vysoušeč vlasů, vzhledem k maximálnímu prodloužení části, která se drží v ruce, musí být umístěn v dostatečné vzdálenosti odosob, které používají vanu, sprchu nebo umyvadlo. • Tento přístroj smí používat děti od 8 let věku a osoby s omezenými fyzickými, smyslovými nebo duševními schopnostmi nebo nedostatkemzkušeností a znalostí, pokud jsou pod vhodným dohledem nebo pokudbyli poučeni o bezpečném používání tohoto přístroje a pokud siuvědomují související nebezpečí. • Děti si nesmí s přístrojem hrát.• Čištění a údržba se nesmí svěřit dětem bez dozoru.• Přístroj nepoužívejte, pokud vykazuje závady. Nesnažte se elektrický přístroj opravovat sami, obracejte se vždy na oprávněnou opravnu.Pokud je přívodní kabel poškozený, musí jej vyměnit výrobce nebo jehooprávněné servisní středisko nebo osoba s obdobnou kvalifikací tak,aby se předešlo jakémukoli riziku. • Přístroj připojujte pouze k síti střídavého proudu a ujistěte se, že napětí v síti odpovídá hodnotě uvedené na přístroji. • Přístroj neodkládejte na místa, odkud by mohl spadnout do vody či jiné kapaliny. • Nesnažte se opravit elektrický přístroj, který spadl do vody• Když přístroj odkládáte, vždy jej vypněte.• Vysoušeč používejte tak, aby mřížky pro vstup a výstup vzduchu nikdy nebyly ucpané.
- • Pokud dojde k poškození přívodního kabelu, musí jej vyměnit pouze výrobce, oprávněné servisní středisko nebo kvalifikovaný technik, abyse vyloučila nebezpečí.
- • Dôležité upozornenie: na elektrické vedenie, pomocou ktorého sa bude spotrebič napájať, sa odporúča kvôli zaisteniu doplnkovej ochranynainštalovať diferenciálny spínač, ktorý zasiahne pri prúdeneprevyšujúcom 30 mA. Ďalšie informácie si vyžiadajte oddôveryhodného elektrikára. • Uistite sa, že je medzi zariadením a sieťou zapojený vypínač, ktorý umožňuje omnipolárne odpojenie od elektrickej siete v podmienkachkategórie prepätia III. • Pred použitím spotrebiča sa uistite, že je dokonale suchý. • POZOR: Tento spotrebič nepoužívajte v blízkosti vaní, umývadiel ani iných nádob s vodou. • Tento sušič na vlasy musí byť, vzhľadom na svoj maximálny dosah pri držaní v ruke, upevnený mimo dosahu osoby, ktorá používa vaňu alebo sprchu. • Tento spotrebič smú používať deti vo veku od 8 rokov a osoby s obmedzenými fyzickými, zmyslovými alebo rozumovými schopnosťami,ako aj osoby s nedostatkom skúseností a poznatkov o spotrebiči, ktorésú pod primeraným dozorom alebo boli poučené o používaní spotrebičabezpečným spôsobom a sú si vedomé súvisiacich nebezpečenstiev. • Deti sa nesmú hrať so spotrebičom.• Deti nesmú spotrebič čistiť ani na ňom vykonávať údržbu, pokiaľ nie sú pod dozorom. • Svoj spotrebič nepoužívajte, pokiaľ je na ňom nejaká porucha. Spotrebič sa nesnažte opraviť sami, ale požiadajte o pomoc autorizovanéhotechnika. Ak je napájací kábel poškodený, musíte ho dať vymeniť uvýrobcu alebo vo svojom servisnom stredisku, alebo v každom prípadeosobe s podobnou kvalifikáciou, aby sa predišlo každému riziku. • Spotrebič zapojte iba k zdroju striedavého prúdu a kontrolujte, či sieťové napätie zodpovedá napätiu indikovanému na spotrebiči. • Spotrebič neklaďte na miesta, odkiaľ by mohol spadnúť do vody alebo inej kvapaliny. • Nepoužívajte elektrospotrebič, ak spadol do vody.• Ak spotrebič uložíte na držiak, vypnite ho.
- • Sušič na vlasy používajte tak, aby nikdy neboli zakryté mriežky na vstup ani výstup vzduchu. • Ak by sa napájací elektrický kábel tohto spotrebiča poškodený, musíte ho dať vymeniť u výrobcu, v autorizovanom servisnom stredisku alebokvalifikovanému technikovi, aby ste zabránili ohrozeniu.
- • Important: pentru a garanta o protecţie suplimentară, este recomandat ca un întrerupător diferenţial cu un curent de intervenţie nu mai marede 30 mA să fie instalat în sistemul electric cu care e alimentat aparatul.Pentru mai multe informaţii consultaţi un electrician. • Verificaţi ca în instalaţia electrică să fie introdus un dispozitiv care să asigure deconectarea omnipolară de la reţeaua electrică în condiţiileprevăzute de categoria de supratensiune III. • Asiguraţi-vă că aparatul este perfect uscat înainte de a-l folosi. • ATENŢIE: nu utilizaţi acest aparat în apropierea căzilor, a chiuvetelor sau a altor recipiente care conţin apă. • Ţinând cont de dimensiunile maxime ale părţii care trebuie ţinută în mână, acest uscător de păr trebuie să fie instalat astfel încât să nu fiela îndemâna unei persoane care foloseşte cada sau duşul. • Acest aparat poate fi utilizat de copii începând cu vârsta de 8 ani şi de persoane cu capacităţi fizice, senzoriale sau mentale reduse, sau depersoane lipsite de experienţă şi de cunoştinţe, dacă acestea suntsupravegheate în mod corespunzător sau dacă au fost instruite înlegătură cu utilizarea aparatului în mod sigur şi dacă înţeleg care suntpericolele legate de acesta. • Copiii nu trebuie să se joace cu aparatul.• Operaţiile de curăţare şi de întreţinere nu trebuie să fie efectuate de copii nesupravegheaţi. • Nu folosiţi aparatul dacă nu funcţionează corect. Nu încercaţi să reparaţi defecţiunile, duceţi aparatul la un service. Dacă este deteriorat cablul dealimentare, trebuie să fie înlocuit de către producător sau de serviciulsău de asistenţă tehnică, sau oricum de către o persoană cu o calificaresimilară, astfel încât să se evite orice risc. • Conectaţi aparatul numai la o sursă de curent alternativ si verificaţi casursa de curent să corespundă cu numărul de V indicat pe aparat. • Nu introduceţi aparatul în apă sau alte lichide. • Nu aşezaţi aparatul într-un loc de unde poate cădea în apă sau alteIichide. • Nu încercaţi să scoateţi niciun aparat electric căzut în apă.
- • După folosire opriţi aparatul si scoateţi-I din priză. Nu trageţi de cablula scoaterea din priză. • Permiteţi aparatului să se răcească după folosire şi nu înfaşuraţicablul in jurul lui.
- • Ważne: aby zapewnić dodatkową ochronę, w instalacji elektrycznej zasilającej urządzenie zaleca się montaż wyłącznikaróżnicowoprądowego o prądzie zasilania nieprzekraczającym 30 mA. Pododatkowe informacje należy zwrócić się do kompetentnego elektryka. • Sprawdzić, czy w instalacji elektrycznej przewidziano wyłącznik, które zapewni jej całkowite odłączenie w warunkach przepięcia kategorii III. • Upewnić się, że urządzenie jest całkowicie suche przed jego użyciem. • UWAGA: Nie używać urządzenia w pobliżu wanien, umywalek lub innych zbiorników napełnionych wodą. • Z uwagi na maksymalną rozciągliwość rączki suszarka ta powinna być zamontowana z dala od wanny lub kabiny prysznicowej. • Urządzenie może być obsługiwane przez dzieci w wieku powyżej 8 lat oraz przez osoby o ograniczonej sprawności fizycznej, sensorycznej lubumysłowej, bądź nieposiadające doświadczenia i umiejętności, jeżeliznajdują się one pod odpowiednim nadzorem lub zostały poinstruowanew zakresie bezpiecznej obsługi urządzenia i są świadome związanychz nią zagrożeń. • Pilnować, aby dzieci nie bawiły się urządzeniem.• Czyszczenie i konserwacja nie mogą być wykonywane przez dzieci pozostające bez odpowiedniego nadzoru. • Nie używać urządzenia, jeśli pojawią się nieprawidłowości w jego funkcjonowaniu. Nie próbować naprawiać urządzenia elektrycznego nawłasną rękę, lecz zwrócić się do wykwalifikowanego technika. Jeżeliprzewód zasilający jest uszkodzony, ze względów bezpieczeństwanależy zlecić jego wymianę producentowi, autoryzowanemu serwisowilub osobie o podobnych kwalifikacjach. • Urządzenie należy podłączyć tylko do prądu zmiennego i należy sprawdzić, czy napięcie sieciowe odpowiada oznakowaniom na urządzeniu. • Nie stawiać nigdy urządzenia w miejscu, w którym mogłoby wpaść do wody lub innej cieczy. • Nie próbować nigdy wyciągnąć urządzenia, które przypadkowo wpadło do wody. • Odkładając urządzenie należy je zawsze uprzednio wyłączyć.
- • Korzystać z suszarki do włosów w taki sposób, aby nie blokować kratki wlotowej ani otworów wylotowych powietrza. • Jeśli kabel zasilający urządzenia uległby zniszczeniu, celem uniknięcia zagrożenia, musi on zostać wymieniony przez producenta, upoważnionySerwis Techniczny lub wykwalifikowanego technika.
- • Σημαντικό: Για μεγαλύτερη προστασία, συνιστάται να τοποθετήσετε στην ηλεκτρική εγκατάσταση από την οποία τροφοδοτείται η συσκευή ένα διαφορικό διακόπτη μερεύμα λειτουργίας έως 30 mA. Για περισσότερες πληροφορίες, απευθυνθείτε σεέναν έμπειρο ηλεκτρολόγο. • Βεβαιωθείτε ότι στην ηλεκτρική εγκατάσταση έχει τοποθετηθεί μια συσκευή που διασφαλίζει την πολυπολική αποσύνδεση από το ηλεκτρικό δίκτυο στις συνθήκεςτης κατηγορίας υπέρτασης III. • Βεβαιωθείτε ότι η συσκευή είναι εντελώς στεγνή πριν από τη χρήση. • ΠΡΟΣΟΧΗ: μη χρησιμοποιείτε τη συσκευή αυτή κοντά σε μπανιέρες, νεροχύτες ή άλλα δοχεία που περιέχουν νερό. • Αυτό το πιστολάκι μαλλιών, λαμβανομένης υπόψη της μέγιστης επέκτασης του τμήματος που πρέπει να κρατείται στο χέρι, πρέπει να στερεώνεται σε σημείο που δενμπορεί να προσεγγίσει κανείς όταν χρησιμοποιεί την μπανιέρα ή το ντους. • Η συσκευή αυτή μπορεί να χρησιμοποιηθεί από παιδιά ηλικίας 8 ετών και άνω, καθώς και από άτομα με μειωμένες σωματικές, αισθητήριες ή διανοητικέςικανότητες ή με έλλειψη εμπειρίας και γνώσεων εφόσον βρίσκονται υπό επίβλεψηή έχουν λάβει οδηγίες σχετικά με την ασφαλή χρήση της συσκευής και έχουνκατανοήσει τους σχετικούς κινδύνους. • Τα παιδιά δεν πρέπει να παίζουν με τη συσκευή.• Οι εργασίες καθαρισμού και συντήρησης δεν πρέπει να εκτελούνται από παιδιά χωρίς επίβλεψη. • Μη χρησιμοποιείτε τη συσκευή εάν εμφανίζει κάποια δυσλειτουργία. Μην επιχειρήσετε να επισκευάσετε την ηλεκτρική συσκευή μόνοι σας. Απευθυνθείτε σεεξουσιοδοτημένο τεχνικό. Εάν το καλώδιο τροφοδοσίας υποστεί ζημιά, πρέπει νααντικατασταθεί από τον κατασκευαστή ή από τον εξουσιοδοτημένο τεχνικό σέρβιςή από άλλο τεχνικό με παρόμοια εξειδίκευση, ώστε να αποφευχθεί κάθε κίνδυνος. • Συνδέστε το σεσουάρ μόνο με εναλλασσόμενο ρεύμα,αφού βεβαιωθείτε ότι ητάση του δικτύου παροχής ηλεκτρικού ρεύματος είναι ίδια με την τάση πουαναφέρεται στη συσκευή. • Μη βυθίζετε ποτέ τη συσκευή σας σε νερό ή σε άλλα υγρά. • Μην τοποθετείτε ποτέ τη συσκευή σας σε σημεία όπου μπορεί να πέσει νερό ήάλλο υγρό.
- • Μην επιχειρήσετε να βγάλετε μια ηλεκτρική συσκευή που έχει πέσει σε νερό. • Θέτετε εκτός λειτουργίας το σεσουάρ κάθε φορά που το τοποθετείτε στο πλάι. • Όταν δε χρησιμοποιείτε το σεσουάρ να βγάζετε το φις από την πρίζα. Πότέ μηντραβάτε το φις από το καλώδιο. • Ελέγχετε συχνά ότι οι δίοδοι εισόδου και εξόδου του αέρα είναι καθαροί. • Αφήστε το σεσουάρ να κρυώσει μετά τη χρήση του πριν το τοποθετήσετε στη θέσητου. Κατά την αποθήκευση του ποτέ μην τυλίγετε το καλώδιο γύρω από τοσεσουάρ.
- • ʡʥʹʧ : ʤʰʢʤ ʬʹ ʺʴʱʥʰ ʤʣʩʮ ʷʩʰʲʤʬ ʺʰʮ ʬʲ , ʩʬʮʹʧʤ ʯʷʺʤʡ ʯʩʷʺʤʬ ʵʬʮʥʮ ʸʩʹʫʮʤ ʯʦʥʩ ʥʰʮʮʹ , ʬʲ ʤʬʲʩ ʠʬʹ ʪʸʲʡ ʭʸʦ ʸʥʡʲʩ ʥʡʹ ʩʬʠʩʶʰʸʴʩʣ ʷʱʴʮ 30 ʸʴʮʠʩʬʩʮ . ʭʩʴʱʥʰ ʭʩʨʸʴʬ , ʪʮʱʥʮ ʩʠʬʮʹʧʬ ʺʥʰʴʬ ʠʰ .
- • Önemli: ekstra bir koruma sağlamak amacıyla, cihaza elektrik sağlayan elektrik besleme tesisatına 30 mA değerli bir otomatik atmalı diferansiyelşalter (devre kesici) takılması önerilir. Daha fazla bilgi için, lütfen elektrikçinizletemasa geçiniz. • Elektrik sisteminin, aşırı gerilim kategorisi III'e uygun, elektrik şebekesinden omnipolar akım kesmesi yapabilen bir aygıtla donatılmış olduğundan emin olun. • Kullanmadan önce cihazın tamamen kuru olduğundan emin olunuz. • DİKKAT: bu cihazı banyo küvetinin, evyenin veya su içeren diğer kapların yakınında kullanmayınız. • Bu saç kurutma makinesi, elle tutulan kısmın erişebileceği maksimum mesafe dikkate alınarak, banyo veya duştaki bir kişinin erişemeyeceği bir yere monteedilmelidir. • Bu cihaz, 8 yaşın üzerindeki çocuklar ve fiziksel, duyusal veya zihinsel kapasitesi düşük ya da deneyimi yetersiz kişiler tarafından yeterli gözetim altında olduklarıya da cihazın güvenli bir şekilde kullanımı ile ilgili bilgilendirildikleri ve ilgilitehlikeler konusunda bilinçli oldukları takdirde kullanılabilir. • Çocuklar cihaz ile kesinlikle oynamamalıdır.• Temizlik ve bakım işlemleri gözetim altında olmayan çocuklar tarafından gerçekleştirilmemelidir. • Eğer herhangi bir bozukluk varsa cihazı kullanmayınız. Elektrikli cihazları asla kendi başınıza tamir etmeye kalkmayınız, daima yetkili bir teknisyen çağırınız.Elektrik kablosu, hasarlı olması halinde herhangi bir riski önlemek için imalatçıfirma veya teknik destek servisi tarafından ya da benzer vasıflara sahip bir kişitarafından değiştirilmelidir. • Kullanmadan önce, cihaz kalifiye bir elektrik teknisyeni tarafından takılmalıve doğru şekilde monte edilmelidir. • Cihazı sadece alternatif akımlı bir elektrik prizinetakınız ve ana hat geriliminin cihazın üzerinde yazılı değere denk geldiğindenemin olunuz. • Suya düşen elektrikli cihazı yeniden kullanmaya çalışmayınız. • Bu saç kurutma cihazı banyo veya duşu kullanan insanların erişemeyeceği biryere monte edilmelidir. Yürürlükteki elektrik tesisatı tüzüklerine daima riayet ediniz. • Cihazın alt tarafındaki hava giriş ızgaralarının asla tıkanmamasına dikkat ediniz.
- • Eğer herhangi bir bozukluk varsa veya elektrik kablosunda herhangi bir hasarvarsa cihazı kullanmayınız. • Elektrikli cihazları asla kendi başınıza tamir etmeye kalkmayınız, daimakalifiye bir teknisyen çağırınız. • Cihazı paketlenmesinde kullanılan materyaller (plastik poşetler, kutukartonları, v.s.) küçük çocukların erişebileceği yerlerde bırakılmamalıdır,çünkü bu materyaller potansiyel bir tehlike kaynağıdır. • Bu cihaz sadece özel olarak tasarlanmış olduğu amaçlar doğrultusundakullanılmalıdır: yani saçınızı kurutmak için. Herhangi farklı bir kullanım şekliyanlııştır ve tehlike doğurabilir. Üretici firma, cihazın yanlış veya hatalıkullanımından doğabilecek zararlardan sorumlu olmayacaktır.
- • Важливо: Для гарантії додаткової безпеки рекомендовано встановити в основній електромережі, до якої підключено пристрій, диференційнереле-запобіжник, розраховане на робочий струм до 30 мА. Задокладнішою інформацією зверніться до кваліфікованого електрика. • Переконайтеся, що в електричній системі передбачений пристрій, який забезпечує двополюсне від'єднання від електричної мережі за умовперенапруги категорії III. • Перед використанням перевірте, чи повністю сухий прилад. • УВАГА: не використовуйте цей прилад біля ванн, душових кабінок, резервуарів та інших ємностей з водою. • Враховуючи максимальну протяжність частини приладу, яку слід тримати рукою, фен потрібно прикріпити поза зоною досяжності особи,якакористується ванною або душем. • Діти віком від 8 років та особи з обмеженими фізичними, психічними та сенсорними можливостями або недостатнім досвідом та знаннями,можуть користуватися цим приладом, за умови що вони знаходяться підвідповідним наглядом або були проінструктовані щодо безпечноїексплуатації приладу й усвідомлюють наявний ризик. • Не дозволяйте дітям гратися з приладом.• Чищення та догляд за приладом не повинні виконуватися дітьми без нагляду. • Не користуйтесь несправним приладом. Не намагайтеся самостійно полагодити електроприлад, зверніться до уповноваженого фахівця. З метоюзапобігання ризиків заміну несправного шнуру живлення має виконувативиробник, фахівці з його сервісного центру або фахівці з відповідноюкваліфікацією. • Вмикайте прилад тільки в мережу змінного струму та перевіряйте, щоб напруга в мережі співпадала з напругою, вказаною на приладі. • Не занурюйте прилад в воду та в інші рідини.• Не кладіть прилад туди, звідки він може впасти в воду або іншу рідину.• Не намагайтеся витягнути електричний прилад, якщо вiн упав у воду.• Вимкніть прилад перед тим, як покласти його.• Після користування приладом обов’язково відключіть його і витягніть
- вилку з розетки, але ніколи не тягніть за шнур. • Не забувайте постійно перевіряти чи чисті решітки вхідного та вихідного отворів. • Дайте приладу охолонути перед тим як зберігати його та не обмотуйте шнур живлення навколо фена при зберіганні.
- • Внимание: Для обеспечения дополнительной защиты рекоменд- уется установить в системе элект- ропроводки, к которой подключаетсяприбор, дифференциальный выключатель с током срабатывания невыше 30 мА. За более подробной информацией обращайтесь кквалифицированному электрику. • Убедитесь, что система электроснабжения оснащена размыкающим устройством, обеспечивающим отключение от сети всех его полюсов вусловиях перенапряжения: категории III. • Прежде чем пользоваться прибором, убедись, чтобы он полностью высох. • ВНИМАНИЕ: не используйте этот прибор поблизости от ванн, раковин или других емкостей, заполненных водой. • Ввиду большой длины части фена, которую нужно держать в руках, фен следует закрепить таким образом, чтобы он оказался вне досягаемостичеловека, принимающего ванну или душ. • Данный прибор может использоваться детьми от 8 лет и людьми с ограниченными физическими, сенсорными или умственнымивозможностями, либо с недостатком опыта и знаний в случае, если онинаходятся под надлежащим присмотром, либо былипроинструктированы о безопасном способе эксплуатации прибора иотдают себе отчет о возникающих при этом рисках. • Не давайте детям играть с прибором.• Операции по чистке и техобслуживанию прибора не должны проводиться детьми без надзора. • Не используйте прибор, если в нем наблюдается неисправность. Не пытайтесь сами отремонтировать электрический прибор, а обратитесь кавторизованному мастеру. Если кабель питания поврежден, его заменадолжна проводиться самим изготовителем или специалистами егосервисного центра, либо же техником с подобной им квалификацией сцелью предупреждения всех возможных рисков. • Подсоединяйте прибор только к источнику переменного тока и проверьте, чтобы напряжение в сети соответствовало напряжению,указанному на приборе. • Ни в коем случае не погружайте фен в воду или в другие жидкости.• Не кладите прибор на место, в которое может попасть вода или другие жидкости. • Не пытайтесь достать упавший в воду прибор.
- • Всегда, когда кладете прибор, выключайте его.• Пользуйтесь феном так, чтобы решетки для входа и выхода воздуха никогда не были закрыты посторонным предметами. • Не пользуйтесь прибором при наличии аномалий в работе, после его падения или при поврежденном шнуре. • Не пытайтесь починить электроприбор самостоятельно, а обратитесь к авторизованному техническому специалисту. • Дети должны пользоваться прибором под присмотром взрослых, бдительно следящих, чтобы они не играли с прибором.выключен.
- • 重要事项:为了保证具有额外的安全保护,建议在器具供 电电路中安装一个介入电流在30MA以下的差动开关。详情请向电气技术人员咨询。 • 检查电气设备已插入一个装置,确保在过电压类别III的 条件下与电源全极断开。 • 确保本器具在使用之前完全干燥。 • 注意:注意:请勿在浴缸、水槽或其它装有水的容器 附近使用本器具。 • 这款吹风机,考虑到手持部分的最大延伸,必须固定在使 用浴缸或淋浴者触及不到的地方。 • 8岁以上的儿童,以及身体残疾、聋盲或智障人士,或缺 乏经验和知识的人士可在适当的监督之下使用本器具,或者教导他们如何安全使用本器具,让他们能够意识到相关的危险。 • 儿童不得玩弄本器具。• 儿童不得在无人监管的情况下清洁和保养本器具。• 器具出现故障时,请勿使用本器具。• 请勿尝试自行修理本器具,必须请求授权的技术人员进行 维修。 • 如果电源线损坏,必须由制造商、售后技术服务中心或具 备等同资格的技术人员予以更换,以防危险产生。 • 请仅把本器具连接在交流电上使用,检查电网电压是否与 器具上标明的使用电压相符。 • 请勿把本器具放置在有可能会掉入水或其他液体中的位置。• 不要试图捡取落入水中的电器。• 放置器具时,应一直把器具先熄灭。• 保持器具的进气和送风网格畅通无阻地使用电吹风。• 如本器具的电源线损坏,必须由制造商、售后技术服务中 心或具备资格的技术人员予以更换,以防危险产生。
- • ϡΎϫ : ϱάϐΗ ϲΘϟ ϲΑήϬϜϟ έΎϴΘϟ ΔϜΒη ϲϓ ΐϛή ϳ ϥ΄Α μϨϧ ˬΔϴϓΎο· ΔϳΎϤΣ ϥΎϤπϟ ίϭΎΠΘϳ ϻ έΎϴΗ ϞΧΪΘΑ ϞλΎϓ ϊσΎϗ ΡΎΘϔϣ ίΎϬΠϟ 30 ήϴΒϣ ϡ ) mA .( ΪϳΰϤϟ Ϧϣ ϞϫΆϣ ϲΑήϬϛ ϲϨϓ ΔόΟήϤΑ Ϣϗ ˬΕΎϣϮϠόϤϟ . • ΔϜΒη Ϧϋ ΏΎτϗϷ ΩΪόΘϣ Ϟμϔϟ ϦϤπϳ ΔϴΎΑήϬϜϟ ΔϜΒθϟ ϰϠϋ ίΎϬΟ ΩϮΟϭ Ϧϣ ϖϘΤΗ
- ΐϴϛήΘϟ ΕΎϤϴϠόΗ
- WARNING
