Toshiba Gigaframe L80-81: Getting Started Placing the Unit Connecting to the A/C Power Turning on the Gigaframe Charging the battery (included with some models)
Getting Started Placing the Unit Connecting to the A/C Power Turning on the Gigaframe Charging the battery (included with some models): Toshiba Gigaframe L80-81
Table of contents
- Table of Contents
- 3D Album.............................................................................................. 32
- Introduction Check the components What else you’ll need:
- Important Information Safety Instructions System Requirements
- Gigaframe Overview Front View Bottom View
- Rear View Left View
- Getting Started Placing the Unit Connecting to the A/C Power Turning on the Gigaframe Charging the battery (included with some models)
- Connections
- Basic Operations Photo Mode Slideshow Sequence
- Transition Effect
- Frequency
- Background Color
- Effect
- Rotate
- Time and Date Mode Set Time and Date
- Time Setting
- Date Setting Set Alarm Clock and Alarm Tone Set Alarm Clock
- Set On/Off Set Alarm Tone
- Adding Photos to the Photo Calendar
- Photo + Audio Mode
- Video Mode
- Video Playback Mode Icons Definition
- Audio Mode
- One click playing
- Copy and Delete Files
- To copy all files in a storage device to another storage device:
- To delete files: To delete all files in a storage device:
- Sub View Function
- To set the Gigaframe to Extended mode:
- To set the Gigaframe to Clone mode:
- To play a video on the Gigaframe, it must be selected as your primary monitor. 3D Album Installing the 3D Album
- 2. Click Yes, I agree to accept the license agreement and continue the installation. 3. Choose a location in the install path field where you would like to
- 4. After the installation is complete, a QuickTime install window will pop 3D Album Functions
- Converting Photos
- Create a 3D-Album
- System Settings Brightness
- Language
- Timer Function (Auto On/Off) 1. Select Auto On/Off and press OK. To turn on the timer:
- To set the Auto Off time: To set the Auto On time:
- Restore to Default Settings Checking the Status of the Gigaframe
- Auto Tilt (included with some models)
- Auto Light (included with some models)
- Firmware Upgrades Supported Video Format Frequently Asked Questions
- TOSHIBA Support Regulatory statements
- Working Environment
- Following information is only for EU-member states: Disposal of batteries and/or accumulators
- Copyright Statement Trademarks
Gigaframe L80 / L81
Getting Started
Placing the Unit
The Gigaframe should be placed on a flat surface or hung on sturdy
hooks, close to a power socket. Do not expose to high temperatures or
high levels of moisture.
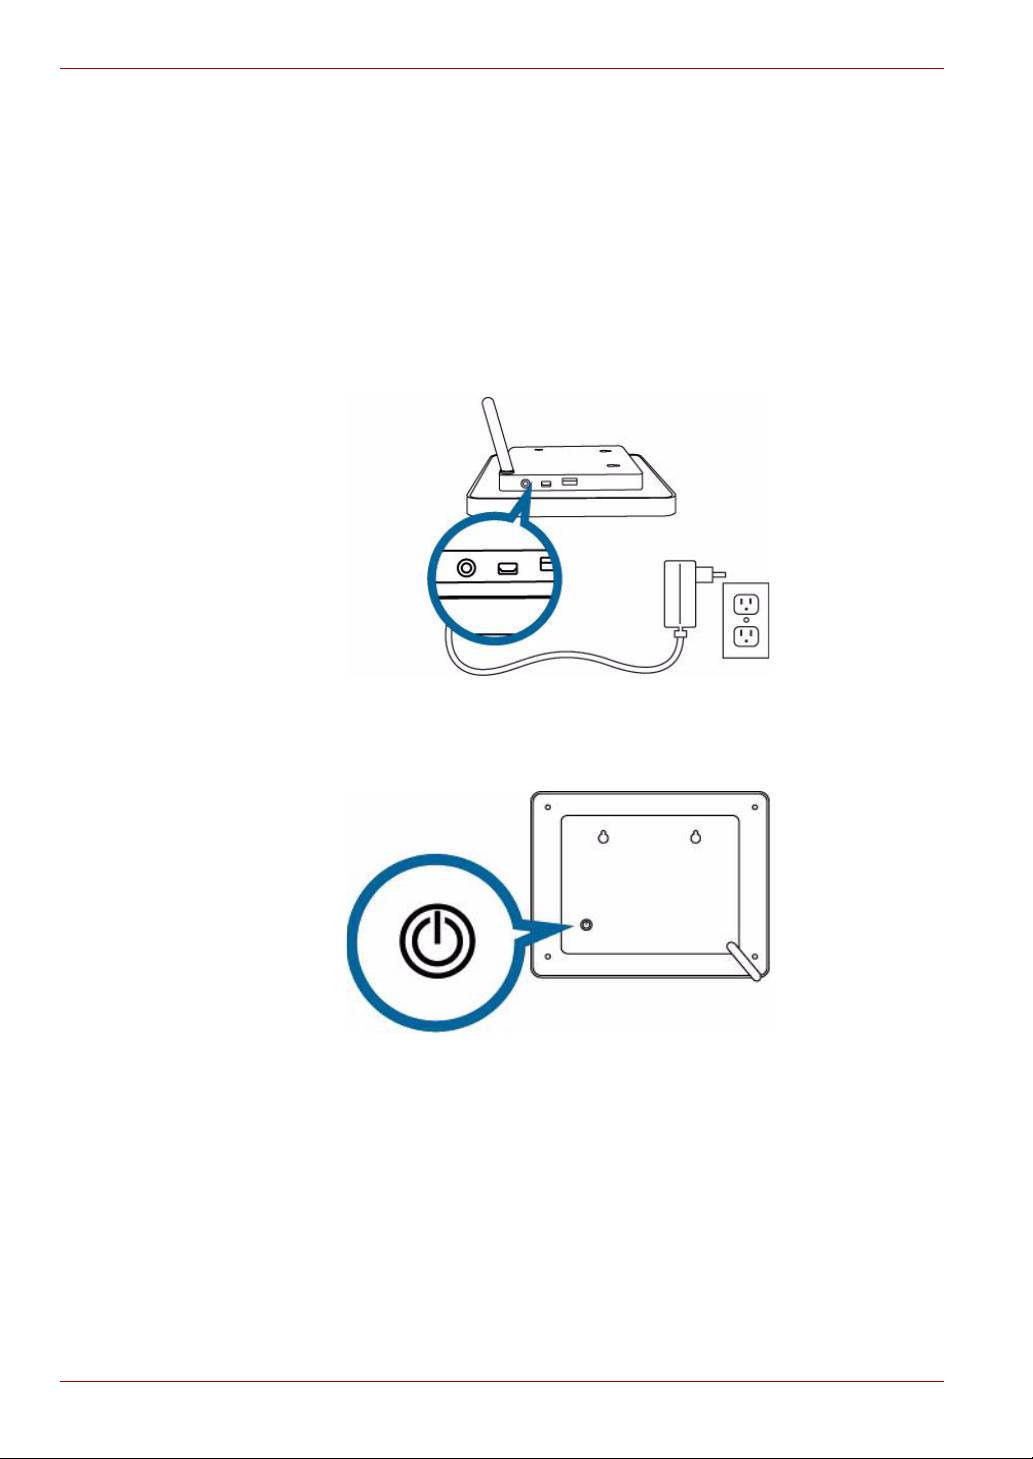
Connecting to the A/C Power
Connect the supplied power cable to a power outlet.
Turning on the Gigaframe
Press the power button on the back of the display.
Charging the battery (included with some models)
The Gigaframe is equipped with a built-in lithium polymer battery.
To charge the battery, follow the steps below:
1. Connect one end of the AC power adapter to the power jack on the
back of the Gigaframe.
2. Connect the other end to a power outlet.
EN-8 User’s Manual
Top 10 manuals
100.00
NZXT HALE90 1000W99.99
Samsung SM-R38099.97
AEG BSB 18C99.97
Dell 2700W99.97
Smeg KSEC70X99.96
Beurer HDE 4099.96
Pyramida KH 50 v.299.96
MSI CSM-H81M-P3299.96
AEG HR 562799.95
Melissa 640-048