Acme IA-200: instruction
Class: Household, kitchen appliances, electronics and equipment
Type: Iron
Manual for Acme IA-200
Table of contents
- introduction important safeguards READ ALL INSTRUCTIONS BEFORE USING
- 11. The iron must only be used and rested on a stable surface.
- special instructions SAVE THESE INSTRUCTIONS
- description of device
- ANTI-CALC SYSTEM ANTI-DRIP SYSTEM AUTOMATIC SHUT OFF (for model IA-200)
- general instructions PREPARATIONS
- SUGGESTIONS BEFORE USING THE IRON FOR THE FIRST TIME steam ironing
- Selecting the temperature Selecting the steam
- Selecting Shot of steam and steam when ironing vertically. dry ironing
- cleaning self-cleaning how to put it away
- advice for good ironing
- troubleshooting
Model: IE-200, IA-200
steam
iron
www.acme.eu


4 GB User’s manual
16 LT Vartotojo gidas
29 LV Lietošanas instrukcija
41 EE Kasutusjuhend
53 PL Instrukcja obsługi
65 DE Bedienungsanleitung
78 FI Kayttoohje
90 SE Bruksanvisning
102 RO Manual de utilizare
114 BG Ръководство за употреба
127 RU Инструкция пользователя
139 UA Інструкція
3

GB
introduction
Congratulations on your choice to purchase Acme product!
For your convenience record the complete model number and the date you received the product
together with your purchase receipt and attach to the warranty and service information. Retain in
the event that warranty service is required.
NOTE: The rating of this product (as marked on the product and product package) is based on
specic loading tests. Normal use or the use of other recommended attachments may draw
signicantly less power.
important safeguards
When using your atiron, basic safety precautions should always be followed, including the
following:
READ ALL INSTRUCTIONS BEFORE USING
1. Use the iron only for its intended use.
2. To protect against the risk of electric shock, do not immerse the iron in water or other liquids.
3. The iron should always be turned to “Min” before plugging or unplugging from the mains
outlet. Never pull the cord to disconnect from the mains; instead, grasp the plug and pull to
disconnect.
4. Do not allow the cord to touch hot surfaces. Allow the iron to cool down completely before
putting away.
5. The power cord plug must always be disconnected from the electrical outlet before lling the
4

GB
tank with water or emptying it, and when the iron is not in use.
6. Do not operate the iron with a damaged cord or if the iron has been dropped or damaged.
7. Close supervision is necessary for any appliance being used by or near children. Do not leave
the iron unattended when connected to the mains or on an ironing board.
8. Burns can occur from touching hot metal parts, hot water or steam. Use caution when you turn
a steam iron upside down, as there may be hot water in the tank.
9. If the iron is not operating normally, disconnect it from the power supply and contact the
Carrefour After-Sales Service.
10. Your iron is designed to rest on the heel. Do not leave the iron unattended when switched on.
Do not place the iron on an unprotected surface even if it is on its heel rest.
11. The iron must only be used and rested on a stable surface.
12. Before resting the iron on its support, check the stability of the surface on which the support
is installed.
13. Do not use the iron if it has been dropped or otherwise damaged, or if water is leaking from it.
14. Adults must pay special attention when using this appliance near children.
15. Never let young children play with the appliance.
16. Never let young children or invalids use this appliance without supervision.
5

GB
special instructions
1. To avoid a circuit overload, do not operate another high wattage appliance on the same
circuit.
2. If an extension cord is absolutely necessary, a 13-ampere cord should be used. Cords rated for
less amperage may overheat. Care should be taken to arrange the cord so that it cannot be
pulled or tripped over.
SAVE THESE INSTRUCTIONS
More specically:
DO NOT let children or untrained persons use the appliance without supervision.
NEVER immerse the iron, cable or plug in any liquid.
DO NOT leave the hot iron touching fabrics or very inammable surfaces.
DO NOT leave the appliance unnecessarily plugged in. Disconnect the plug from the mains
when the appliance is not being used.
NEVER touch the appliance with wet or damp hands.
DO NOT use the power cord or the appliance in order to pull the plug out of the socket.
DO NOT leave the appliance exposed to the weather (rain, sun, etc. ).
DO NOT leave the iron without supervision when it is connected to the power supply.
DO NOT ll the reservoir with water before removing the plug from the socket.
PLEASE NOTE!
Do not use chemical additives, scented substances or decalciers. Failure to comply with the above-
mentioned regulations leads to the loss of guarantee.
6
GB
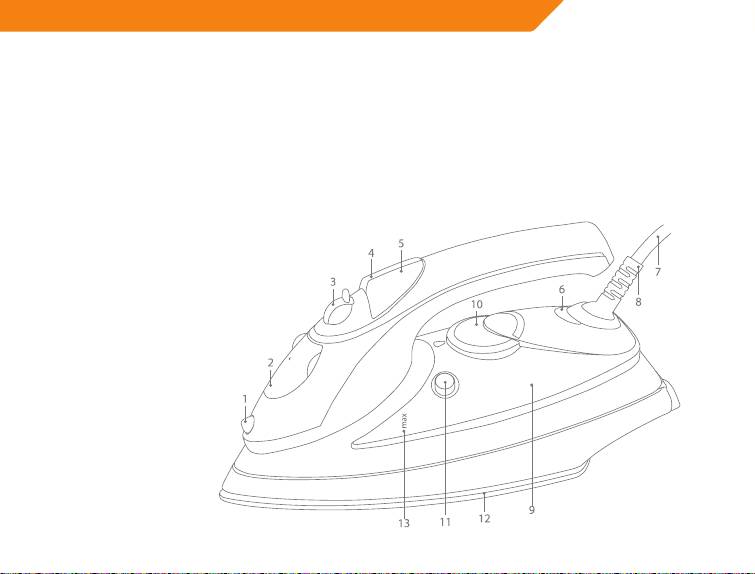
description of device
(1) Spray nozzle
(10) Thermostat dial for temperature regulation
(2) Water tank lling lid
(11) Self-cleaning button
(3) Steam control selector
(12) Plate with steam vents
(4) Spray button
(13) Maximum lling level
(5) Shot of steam button
(6) Temperature control / auto shot o control
lights (the last only for model IA-200)
(7) Supply cord
(8) Cord bushing
(9) Transparent water tank
7

GB
ANTI-CALC SYSTEM
A special resin lter inside the water reservoir softens the water and prevents scale build-up in the
plate. The resin lter is permanent and does not need replacing.
Please note:
Use tap water only. Distilled and demineralised water makes the anti-calc system ineective by altering
its physicochemical characteristics.
Do not use chemical additives, scented substances or decalciers. Failure to comply with the above-
mentioned regulations leads to the loss of guarantee.
ANTI-DRIP SYSTEM
With the anti-drip system, you can perfectly iron even the most delicate fabrics.
Always iron these fabrics at low temperatures. The plate may cool down to the point where no
more steam comes out, but rather drops of boiling water that can leave marks or stains. In these
cases, the Anti-drip system automatically activates to prevent vaporization, so that you can iron
the most delicate fabrics without risk of spoiling or staining them.
AUTOMATIC SHUT OFF (for model IA-200)
The automatic shut o device trips after the iron has been left for approx. eight minutes in the
upright position or unused for approx. thirty seconds in the horizontal position. The green ashing
light and beeps comes on to indicate that shut o has tripped. As soon as you move the iron, this
function turns o and the iron starts working again.
8
GB
general instructions
When using the iron for the rst time, you may notice a slight emission of smoke and hear some
sounds made by the expanding plastics. This is quite normal and it stops after a short time. We also
recommend passing the iron over an ordinary cloth before using it for the rst time.
PREPARATIONS
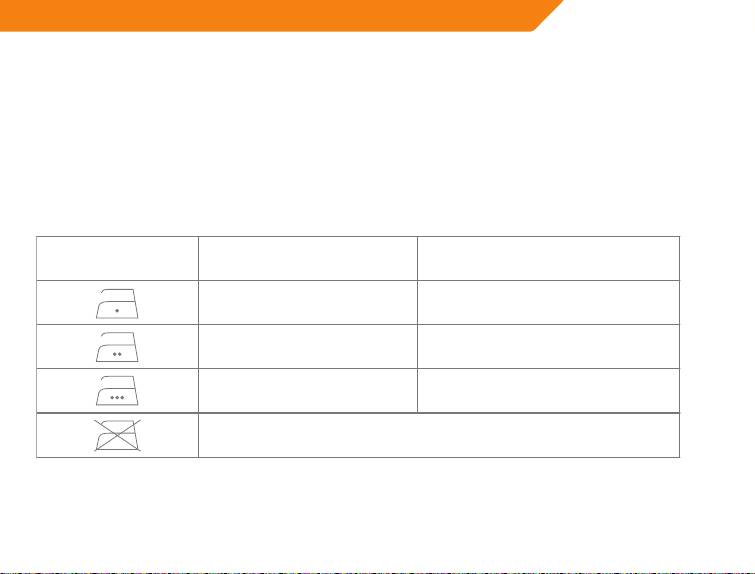
Sort the laundry to be ironed according to the international symbols on the garment label, or if
this is missing, according to the type of fabric.
GARMENT LABEL
FABRIC TYPE
THERMOSTAT REGULATION
synthetic
low temperature
silk - wool
medium temperature
cotton - linen
high temperature
fabric not to be ironed
Start ironing the garments requiring low temperature.
This reduces the waiting time (the iron takes less time to heat up than to cool down) and eliminates
the risk of scorching the fabric.
9

GB
SUGGESTIONS BEFORE USING THE IRON FOR THE FIRST TIME
1. Certain parts of the iron have been lightly greased; therefore the iron could give o a little
smoke when plugged in for the rst time. This will cease after a short time.
2. Before using the iron for the rst time, remove the plastic protector from the soleplate (if
present). Clean the soleplate with a soft cloth.
3. Keep the soleplate very smooth. Do not run it over metal objects (such as against the uncovered
ironing board, buttons, zips etc).
4. Pure wool garments (100% wool) can be ironed with the appliance in the steam position. You
should select preferentially a high steam position and use a dry ironing cloth.
steam ironing
Filling the reservoir
- Check that the plug is disconnected from the socket.
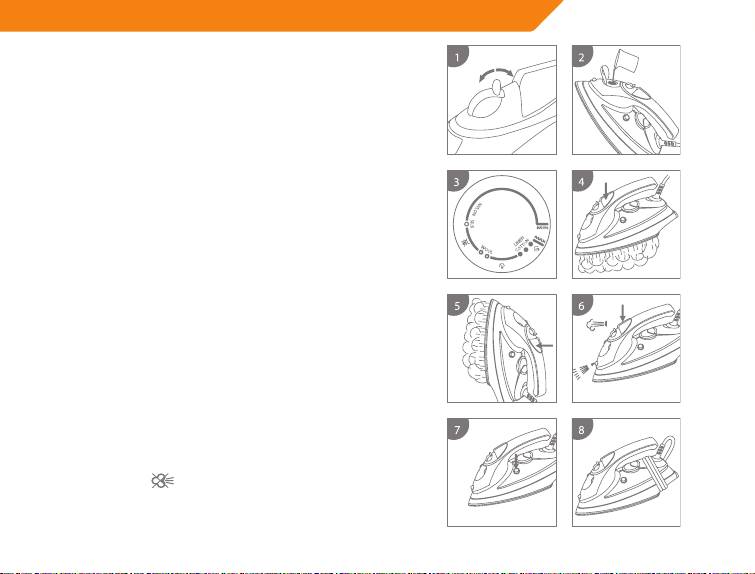
- Move the steam selector (3) to
[Fig. 1].
- Open the lid (2).
- Raise the tip of the iron to help the water enter the opening without overowing.
- Slowly pour the water into the tank and taking care not to go over the maximum level (about
300ml) indicated by “MAX” on the tank [Fig. 2].
- Close the lid (2).
10
GB
Selecting the temperature
- Put the iron in a vertical position.
- Put the plug in the socket (green light goes on in model
IA-200 and no indication light illuminate in model IE-200).
- Adjust the thermostat dial (10) [Fig. 3]. The plate
temperature control light (red) indicates that the iron is
heating up. Wait until the plate temperature control light
goes o before ironing.
Warning: during ironing, the plate temperature control light
comes on at intervals, indicating that the selected temperature
is maintained. If you lower the thermostat temperature after
ironing at a high temperature, do not start ironing until the
plate temperature control light comes on again.
Selecting the steam
The quantity of steam is regulated by the steam selector (3).
Move the steam selector to a position between minimum
and maximum depending on the quantity of steam
required and the temperature selected [Fig. 1].
Warning: the iron gives o steam continuously only if you
hold the iron horizontally. You can stop the continuous steam
by placing the iron in a vertical position or by moving the
steam selector to
. You can only use steam at the highest
temperatures. If the selected temperature is too low, water
may drip onto the plate.
11

GB
Selecting Shot of steam and steam when ironing vertically.
Press the shot of steam button (5) to generate a powerful burst of steam that can penetrate the
fabrics and smooth the most dicult and tough creases. Wait for a few seconds before pressing
again [Fig. 4].
By pressing the shot of steam button at intervals you can also iron vertically (curtains, hung
garments, etc.) [Fig. 5].
Warning: the shot of steam function can only be used at high temperatures. Stop the emission when
the plate temperature control light (6) comes on, than start ironing again only after the light has gone
o.
dry ironing
To iron without steam, follow the instructions in section “steam ironing”, leaving the steam selector
(3) on position
.
Spray Function
Make sure that there is water in the reservoir. Press the spray button (4) slowly (for a dense spray)
or quickly (for a vaporized spray) [Fig. 6].
Warning: for delicate fabrics, we recommend moistening the fabric beforehand using the spray
function (4), or putting a damp cloth between the iron and the fabric. To avoid staining, do not use the
spray on silk or synthetic fabrics.
12

GB
cleaning
Please note: before cleaning the iron in any way, make sure that the appliance plug is not
connected to the socket.
Any deposits, starch residue or size left on the plate can be removed using a damp cloth or an
non-abrasive liquid detergent.
Avoid scratching the plate with steel wool or metallic objects.
The plastic parts can be cleaned with a damp cloth then wiped over with a dry cloth.
self-cleaning
The self-cleaning feature cleans inside the plate, removing impurities. We recommend using it
every 10-15days. Directions:
- Fill the reservoir up to the maximum level indicated and set the steam selector
- Set the thermostat dial (10) to the maximum temperature and wait for the light (6) to turn o.
- Pull the plug out of the socket and hold the iron horizontally over the sink.
- Hold the cleanout button (11) setting until all the boiling water, steam, and impurities come out
[Fig. 7].
- When the soleplate has cooled down, you can clean it with a damp cloth.
how to put it away
- Disconnect the plug of the iron from the socket.
- Empty the reservoir by turning the iron upside down and gently shaking it.
13

GB
- Leave the iron to cool down completely.
- Roll up the power cord with the rewinder [Fig. 8].
- Always put the iron away in a vertical position.
advice for good ironing
• We recommend using the lowest temperatures with fabrics that have unusual nishes (sequins,
embroidery, ush, etc.).
• If the fabric is mixed (e.g. 40% cotton and 60% synthetics), set the thermostat to the temperature
of the bre requiring the lower temperature.
• If you don’t know the composition of the fabric, determine the suitable temperature by testing
on a hidden corner of the garment. Start with a low temperature and increase it gradually until
it reaches the ideal temperature.
• Never iron areas with traces of perspiration or other marks: the heat of the plate xes the stains
on the fabric, making them irremovable.
• The size is more eective if you use a dry iron at a moderate temperature: excess heat scorches
it with the risk of forming a yellow mark.
• To avoid marking silk, woollen or synthetic garments shiny, iron them inside out.
• To avoid marking velvet garments shiny, iron in one direction (following the bre) and do not
press down on the iron.
• The heavier the washing machine is loaded, the more garments come out creased. This also
happens when the spin drying revolutions are very high.
• Many fabrics are easier to iron if they are not completely dry. For example, silk should always be
ironed damp.
14

GB
troubleshooting
The iron emits a foul smell or gives o smoke
The iron may give o a bad smell when turned on for the rst time. Oil used for coating certain
parts during manufacture need to be burnt o. Allow ten minutes for the foul smell to disappear.
The iron does not heat
The iron should be plugged into electrical outlet. The thermostat dial must be set to the desired
temperature.
The iron does not produce steam
The water tank may be empty. Turn the steam control knob to required position and add water.
Allow the iron to heat and then set it to the “Steam” position.
The “Shot of steam” feature does not work
The water tank must be at least 1/4 full. The iron must be set to the “Steam” position. The iron
should be in the horizontal position. Prime the pump briey. Allow a short pause between shots.
Be sure to fully depress the “Shot of steam” button.
The “Water spray” feature does not work
The water tank must be at least 1/4 full. Fill the iron as described under “How to ll the water tank”.
Anti-drip function
1. Water supply is cut o automatically to prevent water from dripping from the soleplate when
the temperature of the iron is insucient to produce steam.
2. After plugging the iron into a mains outlet, wait for 3 minutes for steam to be produced.
15

LT
įžanga
Sveikiname nusprendus įsigyti „Acme“ gaminį!
Dėl savo patogumo užsirašykite visą modelio numerį ir gaminio įsigijimo datą ir laikykite kartu su
pirkimo kvitu, pridėję prie garantijos ir aptarnavimo informacijos. Išsaugokite tam atvejui, jeigu
reikės garantinio aptarnavimo.
PASTABA! Nominalus šio gaminio pajėgumas (kaip nurodyta ant gaminio ir gaminio pakuotės)
nustatytas remiantis speciniais apkrovimo testais. Normaliai naudojant arba naudojant kitus
rekomenduojamus įtaisus, galima suvartoti ženkliai mažiau energijos.
svarbios saugos instrukcijos
Naudojant laidynę, reikia visada laikytis pagrindinių atsargumo priemonių, įskaitant nurodytas
toliau.
PRIEŠ NAUDODAMI PERSKAITYKITE VISAS INSTRUKCIJAS.
1. Naudokite laidynę tik tam skirtais tikslais.
2. Norėdami apsisaugoti nuo elektros šoko rizikos, neįmerkite laidynės į vandenį ar kitus skysčius.
3. Prieš prijungiant ir atjungiant laidynę nuo maitinimo tinklo, visada turi būti nustatoma „Min“
padėtis. Norėdami atjungti laidynę nuo maitinimo tinklo, niekada netraukite už laido, suimkite
už kištuko ir patraukite.
4. Saugokite, kad laidas nesiliestų prie karštų paviršių. Prieš padėdami, leiskite laidynei visiškai
atvėsti.
5. Prieš pildant bakelį vandeniu arba tuštinant jį, arba kai laidynė nenaudojama, maitinimo laidas
16

LT
visada turi būti atjungtas nuo elektros lizdo.
6. Nesinaudokite laidyne, jeigu laidas pažeistas arba jeigu ji buvo numesta bei pažeista.
7. Jeigu prietaisą naudoja vaikai arba jis naudojamas arti vaikų, reikia atidžios priežiūros.
Nepalikite laidynės be priežiūros, kai ji prijungta prie maitinimo lizdo arba yra ant lyginimo
lentos.
8. Palietus karštas metalines dalis, karštą vandenį arba garus, galima nusideginti. Apversdami
garinę laidynę aukštyn kojomis būkite atidūs, nes bakelyje gali būti karšto vandens.
9. Jeigu laidynė tinkamai neveikia, atjunkite ją nuo maitinimo tinklo ir susisiekite su garantinio
aptarnavimo centru.
10. Jūsų laidynė suprojektuota taip, kad nenaudojama būtų pastatyta vertikaliai. Nepalikite
įjungtos laidynės be priežiūros. Nedėkite laidynės ant neapsaugoto paviršiaus, net jeigu ji
pastatyta vertikaliai.
11. Laidynė turi būti naudojama ir pastatoma tik ant stabilaus paviršiaus.
12. Prieš padėdami laidynę ant jos stovo, patikrinkite, ar paviršius, ant kurio pastatytas stovas,
stabilus.
13. Nenaudokite laidynės, jeigu ji buvo numesta ar kitaip pažeista ir jeigu iš jos teka vanduo.
14. Suaugusieji privalo būti itin atidūs naudodamiesi prietaisu netoli vaikų.
15. Niekada neleiskite mažiems vaikams žaisti su prietaisu.
16. Niekada neleiskite mažiems vaikams arba neįgaliems asmenims naudotis šiuo prietaisu be
priežiūros.
17

LT
specialūs nurodymai
1. Kad išvengtumėte perkrovos, niekada nejunkite kito didelės galios prietaiso į tą pačią elektros
grandinę.
2. Jeigu ilgintuvas būtinai reikalingas, reikėtų naudoti 13 amperų laidą. Mažesnio srovės stiprio
laidai gali perkaisti. Laidą reikia nutiesti taip, kad jo niekas nepatemptų ir už jo neužkliūtų.
SAUGOKITE ŠIĄ NAUDOJIMO ISNTRUKCIJĄ.
Specialūs nurodymai
NELEISKITE vaikams arba nemokytiems asmenims naudotis prietaisu be priežiūros.
NIEKADA nemerkite laidynės, laido arba kištuko į jokį skystį.
NEPALIKITE laidynės liestis prie medžiagų arba labai degių paviršių.
NEPALIKITE prietaiso be reikalo prijungto prie maitinimo tinklo. Ištraukite kištuką iš elektros lizdo,
kai prietaiso nenaudojate.
NIEKADA nelieskite prietaiso šlapiomis ar drėgnomis rankomis.
NETRAUKITE už maitinimo laido arba prietaiso, norėdami atjungti prietaisą nuo elektros lizdo.
NEPALIKITE prietaiso esant oro poveikiui (lietuje, saulėkaitoje ir pan.).
NEPALIKITE laidynės be priežiūros, kai ji prijungta prie maitinimo tinklo.
NEPILKITE į bakelį vandens, prieš tai neištraukę kištuko iš maitinimo lizdo.
PASTABA!
Nenaudokite cheminių priedų, kvapių medžiagų arba priemonių nuo kalkių. Nesilaikant anksčiau
minėtų taisyklių, garantija nustoja galioti.
18

LT
prietaiso aprašymas
(1) Purškimo antgalis
(10) Termostato ratukas temperatūrai reguliuoti
(2) Vandens bakelio pildymo angos dangtelis
(11) Savaiminio valymo mygtukas
(3) Garų kiekio reguliatorius
(12) Plokštė su angomis garams
(4) Purškimo mygtukas
(13) Maksimalus galimas vandens lygis
(5) Garų paleidimo mygtukas
(6) Temperatūros reguliavimo / automatinio
paleidimo reguliavimo lemputės
(paskutinė tik IA-200 modelyje)
(7) Maitinimo laidas
(8) Laido įdėklas
(9) Permatomas vandens bakelis
19

LT
APSAUGOS NUO KALKĖJIMO SISTEMA
Specialus ltras vandens bakelyje minkština vandenį ir neleidžia ant plokštelės susidaryti
nuoviroms. Šis ltras yra ilgalaikis, jo keisti nereikia.
Pastaba!
Naudokite tik vandenį iš čiaupo. Dėl distiliuoto ir demineralizuoto vandens apsaugos nuo kalkių
sistema tampa neveiksminga, nes pakeičiamos jos zinės ir cheminės savybės.
Nenaudokite cheminių priedų, kvapių medžiagų arba priemonių nuo kalkių. Nesilaikant anksčiau
minėtų taisyklių, garantija nustoja galioti.
APSAUGOS NUO LAŠĖJIMO SISTEMA
Su apsaugos nuo lašėjimo sistema galite puikiai išlyginti net jautriausias medžiagas.
Visada lyginkite šias medžiagas nustatę žemą temperatūrą. Plokštė gali atvėsti iki temperatūros,
kai nesusidaro garai, bet laša verdantis vanduo, galintis palikti žymių arba dėmių. Tokiais atvejais
apsaugos nuo lašėjimo sistema automatiškai įsijungia, kad būtų sustabdytas garavimas ir
galėtumėte lyginti net jautriausias medžiagas be rizikos jas sugadinti ar palikti dėmes.
AUTOMATINIS IŠSIJUNGIMAS (IA-200 modelyje)
Automatinio išsijungimo funkcija įsijungia, kai laidynė paliekama maždaug aštuonias minutes
stačioje padėtyje arba nenaudojama maždaug trisdešimt sekundžių horizontalioje padėtyje. Kai
įsijungs automatinė išjungimo funkcija, pradės mirksėti žalia lemputė ir girdėsis pypsėjimas. Kai tik
pajudinate laidynę, funkcija išsijungia ir laidynė vėl pradeda veikti.
20
