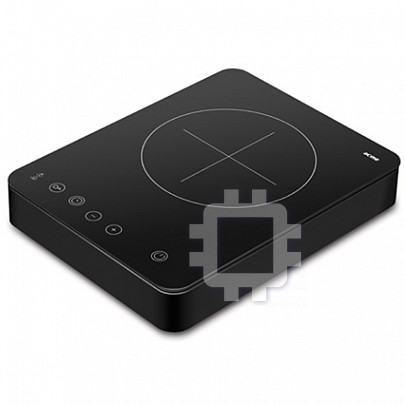
Acme GH200: instruction
Class: Household, kitchen appliances, electronics and equipment
Type: Stove
Manual for Acme GH200
Table of contents
Model: GH200
glass-
ceramic
hob
www.acme.eu

4 GB User’s manual 41 Warranty card
10
LT Vartotojo gidas 42 Garantinis lapas
16
LV Lietošanas instrukcija 43 Garantijas lapa
22
EE Kasutusjuhend 44 Garantiileht
28
PL Instrukcja obsługi 45 Karta gwarancyjna
34
RU Инструкция пользователя 46 Гарантийный талон
3
GB
Preface
Thank you for purchasing our glass-ceramic hob. In order to know more and use this product correctly, please
read this manual detail before using.
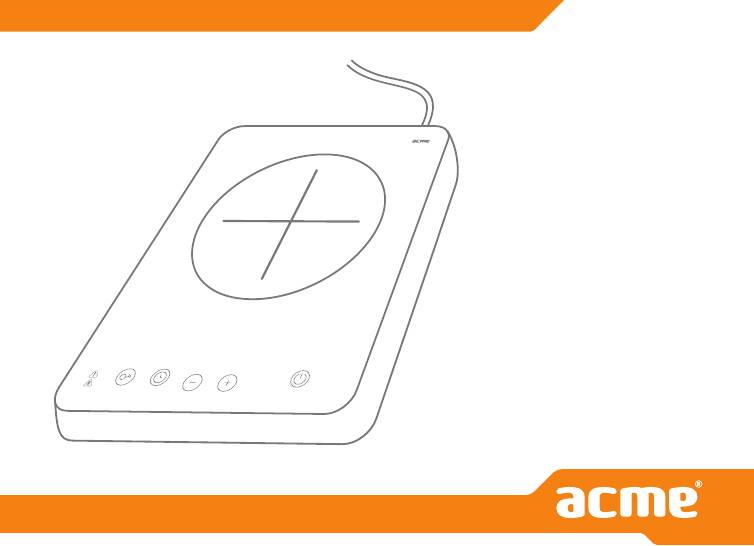
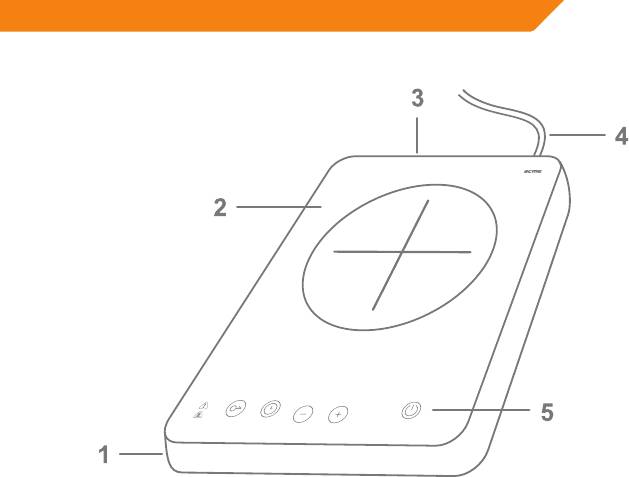
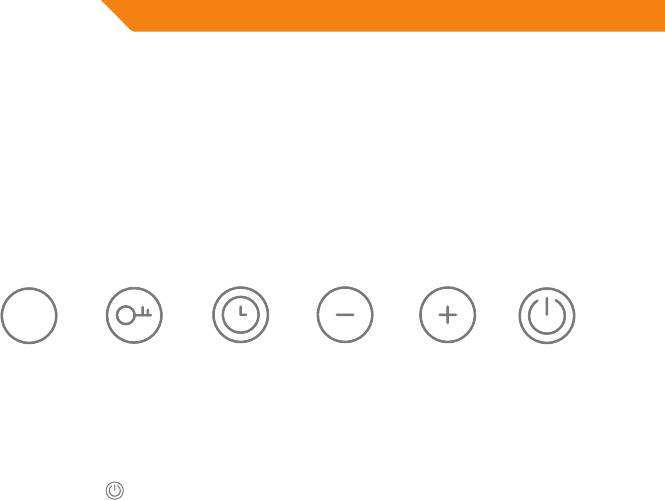
Component name
1. Air inlet
2. Faceplate
3. Air outlet
4. Power cord
5. Control panel
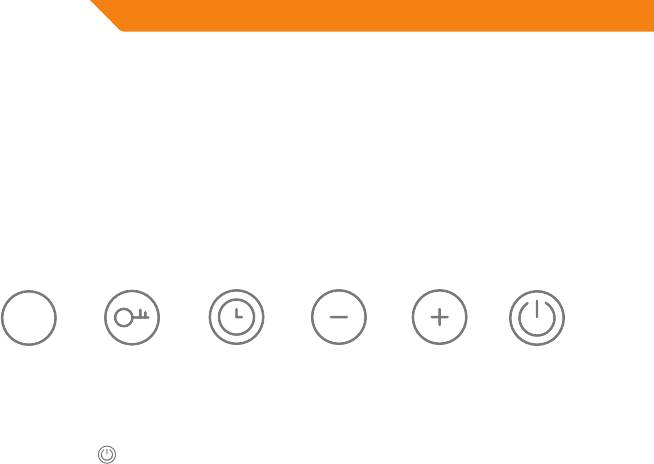
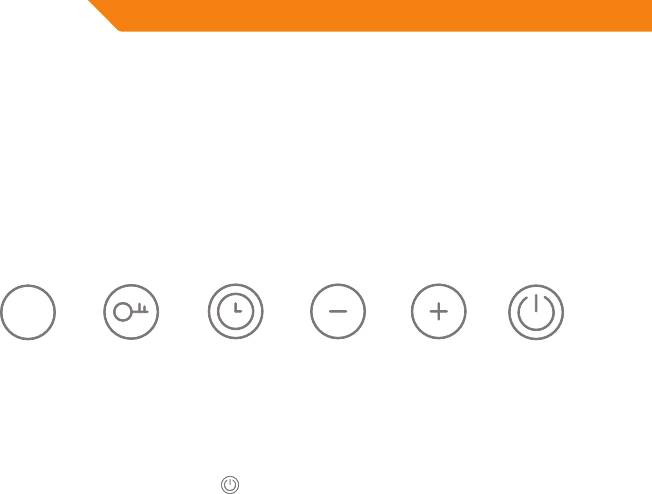
Function panel
High temperature
Child-lock Timing Turn down Turn up On-o
indicator
Operation Steps
Standby: Connect with power source with a buzz, digital tube display “o”, the hob goes to standby.
Turn on: Keep pressing
key for 3 seconds, “on-o” LED light up, digital tube display “P5” and acquiescence
to output 2000W.Regulate power and temperature: Press “+” “-” key to regulate the power, the power gear is
as below:
4
GB
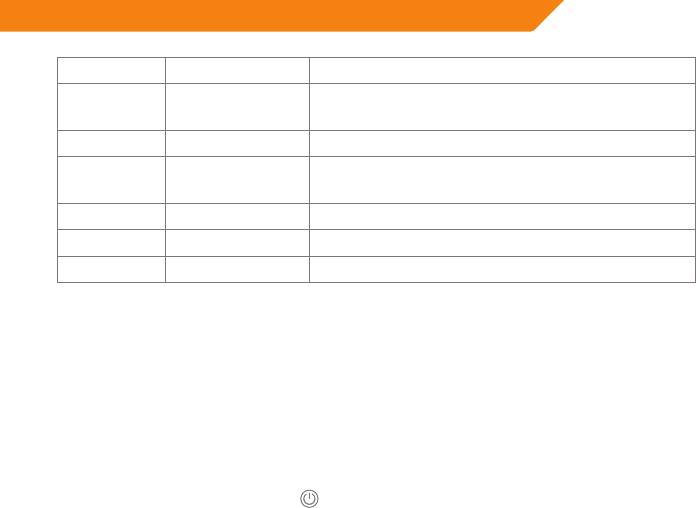
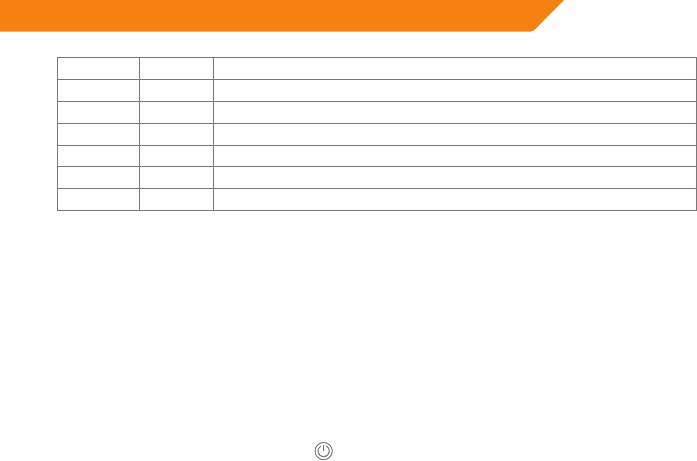
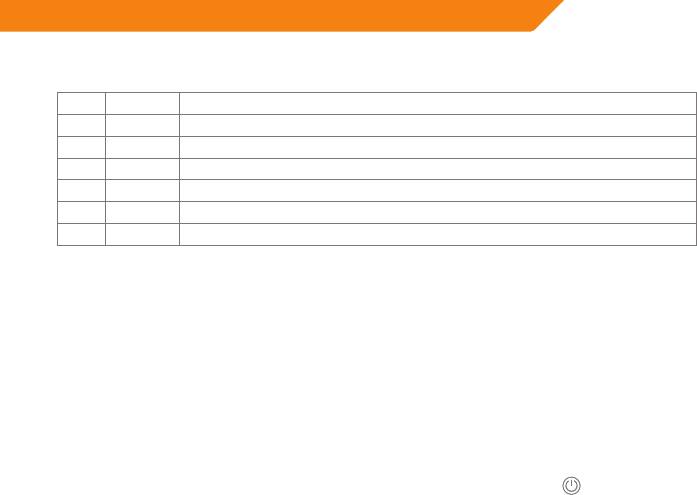
Title Power, W Suitable for
P5 2000 Bringing to a boil, browning, roasting (highest temperature)
(about 600°C)
P4 1500 Roasting, to make porridge
P3 1000 Simmering larger quantities or roasting larger pieces of meat
until they are cooked through.
P2 600 Simmering
P1 200 Simmering small portions (lowest setting)
P0 0 O
Turn on timing: The longest time is 4 hours. Press the timing key once to go to timing when the hob is on. The
selected point is the hour: press the “+” “-” key to regulate hours; press the timing key again to choose minutes
timing: “+” “-” key to regulate minutes; Wait 5 seconds while the digits stop blinking. The red timing key indicator
turns on. Finish the timing and shutdown with 3 buzzes.
Turn o timing: Keep pressing the timing key to cancel the timing with a long buzz.
Child lock: Pressing “child lock” to start up it when the hob is on. The other keys are invalid except child lock.
Press again on the child lock key for 3 seconds to cancel it.
High temperature indicator: the indicator is lit all the time when on and ickers when o as the temperature
of the surface is higher than 80°C. Keep shining and shutdown 20 minutes later when the temperature lower
than 80°C.
Turn o: When the hob is working, press
key to stop working and back to standby.
The hob will shutdown automatically when encountering a breakdown and the breakdown code display, please
send for repairs.
5
GB
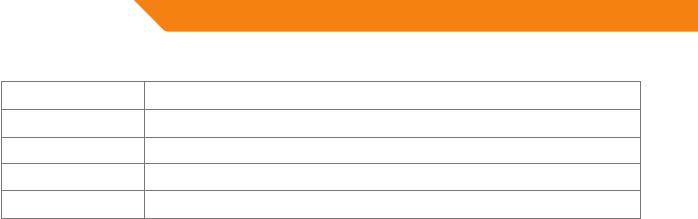
Breakdown code:
H1 Temperature sensor open circuit inside hob
H2 Environment temperature is higher than 85°C
E2 Environment temperature sensor open circuit
E3 Environment temperature sensor short circuit
E4 Heating 5 minutes short circuit alarm
Safety Tips
1. Overheating protection: if the hob appears to have overheated because of a breakdown or negligence.
2. The load weight of the surface shall not be over 10 kilograms.
3. Don’t unplug the power cord plug immediately after shutdown. Keep the fans operating to lower the
temperature inside. Please don’t block the air intakes when using.
This product is not suitable for children or disabled persons, to keep from danger.
Using knowledge
Please be sure to read this part of the contents and instructions carefully. So you can use the infrared hob
correctly and safely.
1. Please conrm if the model, output power of the used power socket match with the infrared hob’s. Also if
the voltage, current, power of the alternating power connected to the product meet the requirement of
the infrared hob.
2. Before you use the infrared hob for the rst time, please clean the surface and wipe o the potential residue
due to the package on the hob surface. Also, please clean it after use, general cleaning is often done after
the hob has cooled. Please refer to the “method of maintain and clean” for details.
6

GB
3. Please unplug the power cord or shutdown the hob to separate it from the power system.
4. The infrared hob has a very high thermal eciency and will create a high temperature at 600°C on the
surface when working. Minors and disable persons should not operate in order to prevent dangerous
circumstances. Please be sure that those not familiar with the hob to operate under your full guide or read
the manual carefully.
5. The hob must be placed on a clean, at and re safety surface for using. It is better to keep at least 10cm
from the wall and other objects beside it.
6. Please pick up the hob and move above the face if necessary. Don›t move it on the face by dragging. It is
possible to cause damage and scung. The breakage is not under the warranty owing to this.
7. The following circumstances are part of normal performance when the hob is in use.
• The heating zone of the surface will shine and shutdown continually when the surface temperature reaches
the set point value, but the temperature will keep constant.
• When regulating from high gear to low gear, the hob will be controlled by the left heating as the surplus
heating of the high gear. Therefore, the heating zone will not give o rays. The hob will heat according to the
temperature value of the low gear.
Attentions
1. Before use:
To prevent re or shock, short-circuit, please note the following:
1) Please don’t open the stove, modify parts or repair the furnace by yourself.
2) When there is plug cord damage or if the power plug is not rmly inserted, please don’t use furnace.
3) Please don’t bend, bind the power cord or force it to avoid excessive damage.
4) Please don’t use any obstacles attached to this plug or power supply.
5) Please don’t touch power lines and plug with wet hands.
6) Please don’t use the far-infrared furnace when damp or near re.
7

GB
2. When using:
To prevent scalding, please note the following:
1) Please don’t place in not smooth surface to use.
2) Please keep children away to prevent them from touching the surface.
3) Before placing the teapot on the surface, please check that the bottom is clean to prevent foreign body
combustion.
4) Please don’t use the stove in insucient space and in an area with bad conditions for heat dissipation.
5) Please don’t put plastic containers or paper on the panel for heating.
6) Please avoid the power cord or plastic products near infrared stove when in use.
7) To prevent the panel bursting, please don’t let articles fall on the panel.
8) Please don’t jam the intake and vent valve.
9) When the panel is cracked, shut o the power immediately and pull the plug and send for repairs.
3. After use:
To avoid burns and injury or shock, please note the following:
1) After using, please don’t touch the surface of the stove because of the high temperature.
2) Don’t unplug by pulling the cord out by hand.
3) After 20 minutes, when nished using, pull out the power plug, don’t keep the power line connecting.
Suitable Pan
This hob applies to all at-bottomed pans made of any kind of material. The pan should avoid indentation and
out jog, the at area of the pan should be bigger than the heating zone of the hob. For example, the heating
zone is 180mm., the suitable diameter of pan is 200mm.
If the material of the pan is too thin, it will pustule when frying. Therefore, please use pans made of thick
material as much as possible.
8
GB
Maintenance and cleaning
Please shut o the power and conrm the low temperature on the surface before cleaning.
1. Cleaning method for glass surface: please clean with a wet cloth when the glass surface is dirty and clean
oil stains with neutral detergent.
2. Please wipe the hob, control surface with soft wet cloth and clean oil stains with neutral detergent, then
wipe with wet cloth to clean the residue;
3. Please don’t clean with water directly;
4. Please keep the surface clean.
5. Use a cotton stick to remove dust on the air outlet and inlet, and clean oil stains carefully with a toothbrush
or other detergent which will not damage the hob.
6. It is normal for the glass surface to have spots after the hob has been used for a period of time; it will not
aect the usage.
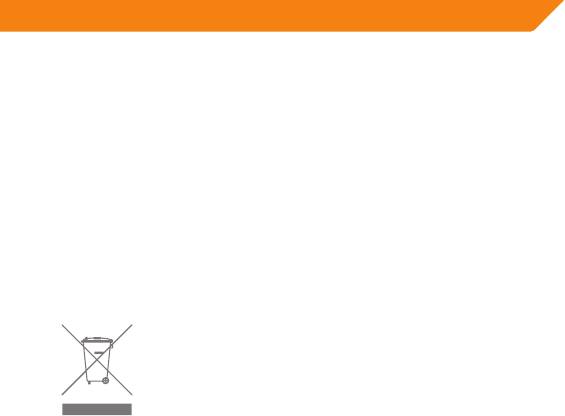
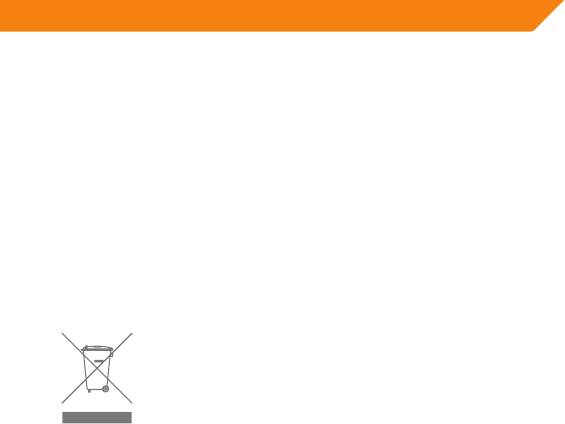
Waste Electrical and Electronic Equipment (WEEE) Symbol
The use of the WEEE symbol indicates that this product may not be treated as household
waste. By ensuring this product is disposed of correctly, you will help protect the environment.
For more detailed information about the recycling of this product, please contact your local
authority, your household waste disposal service provider or the shop where you purchased
the product.
9
LT
Įžanga
Dėkojame, kad įsigijote mūsų stiklo keramikos kaitlentę. Prašome prieš naudojantis įdėmiai perskaityti saugaus
naudojimo instrukcijas.
Kaitlentės dalys
1. Oro įleidimo anga
2. Kaitinamasis paviršius
3. Oro išleidimo anga
4. Elektros laidas
5. Valdymo blokas
Valdymo blokas
Aukštos
Užraktas Laikmatis Sumažinti Padidinti Įjungimas ir
temperatūros
išjungimas
indikatorius
Naudojimas
Paruošimas. Įjunkite į elektros tinklą. Pasigirs tai patvirtinantis garsinis signalas, o ekrane įsijungs indikatorius,
reiškiantis, kad kaitlentė paruošta naudoti.
Įjungimas. 3 sekundes palaikykite nuspaustą
mygtuką. Įsijungs P5 kaitinimo (2000 W galios) programa.
Galios ir temperatūros reguliavimas. Spausdami „+“ arba „-“ mygtukus galite keisti kaitinimo programas (žr.
programų suvestinę):
10
LT
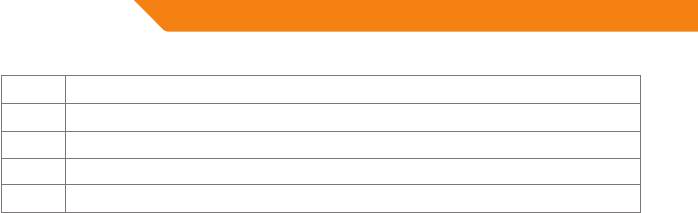
Programa Galia, W Programos paskirtis
P5 2000 Užvirimas, skrudinimas, kepimas (aukščiausia temperatūra – apie 600 °C)
P4 1500 Kepimas, košės virimas
P3 1000 Lėtas didesnio kiekio produktų virimas ar kepimas
P2 600 Lėtas kaitinimas
P1 200 Mažo produktų kiekio virimas (žemiausia temperatūra)
P0 0 Išjungta
Laikmačio įjungimas. Didžiausia galima laikmačio nuostata – 4 valandos. Įjungę laikmatį, paspauskite
laikmačio mygtuką vieną kartą – laikmatis ims veikti. Iš pradžių mygtukais „+“ arba „-“ galite pakeisti laikmačio
valandas. Paspaudę laikmačio mygtuką dar kartą, pereisite į laikmačio minučių nustatymo režimą. Minutes
taip pat galite keisti „+“ arba „-“ mygtukais. Pasirinkę norimą laikmačio nuostatą, palaukite 5 sekundes. Skaičiai
nustos mirksėję ir įsijungs laikmačio raudonos spalvos indikatorius. Laikmačio laikui pasibaigus, pasigirs 3 garso
signalai ir kaitlentė išsijungs.
Laikmačio išjungimas. Palaikykite nuspaustą laikmačio mygtuką, kol suskambės ilgas garsinis signalas.
Kaitlentės užrakinimas. Paspaudus užrakto mygtuką, visi kaitlentės mygtukai, išskyrus užrakto, bus užblokuoti.
Jei norite atrakinti kaitlentę, 3 sekundes palaikykite nuspaustą užrakto mygtuką.
Aukštos temperatūros indikatorius. Indikatorius veikia, jei kaitinimo paviršiaus temperatūra yra aukštesnė nei
80 °C. Jei kaitlentė įjungta – indikatorius šviečia nuolat, jei kaitlentė išjungta – mirksi. Indikatorius išsijungs po 20
minučių, kai temperatūra taps mažesnė nei 80 °C.
Išjungimas. Kaitlentei veikiant, paspauskite
mygtuką.
Įvykus gedimui, kaitlentė automatiškai išsijungia. Ekrane pasirodo gedimo kodas. Atiduokite kaitlentę
remontuoti.
11
LT
Gedimų kodai:
H1 Kaitlentės temperatūros jutiklio grandinės gedimas
H2 Aplinkos temperatūra aukštesnė nei 85 °C
E2 Aplinkos temperatūros jutiklio grandinės gedimas
E3 Aplinkos temperatūros jutiklio grandinės trumpasis jungimas
E4 Kaitinimas 5 minutes, trumpojo jungimo gedimas
Saugaus naudojimo patarimai
1) Apsauga nuo perkaitinimo suveikia, jei dėl gedimo ar neatsargumo kaitlentė perkaitinama.
2) Neapkraukite kaitlentės paviršiaus didesniu nei 10 kg svoriu.
3) Išjungę kaitlentę, elektros laido iš karto neištraukite. Veikiantys ventiliatoriai padės greičiau sumažinti vidaus
temperatūrą. Neužblokuokite kaitlentės ventiliacinių angų.
Šiuo gaminiu draudžiama naudotis vaikams ar neįgaliems asmenims.
Eksploatavimo instrukcijos
Įdėmiai perskaitykite šią instrukcijų dalį, kad galėtumėte saugiai ir tinkamai naudoti kaitlentę.
1. Prieš naudodami patikrinkite, ar vietinio kintamosios srovės elektros tinklo galia, įtampa ir srovė atitinka
kaitlentės parametrus.
2. Prieš naudodami pirmą kartą, nuvalykite kaitlentės paviršių, nes ant jo gali būti pakuotės medžiagų likučių.
Taip pat valykite kaitlentę po kiekvieno naudojimo. Kaitlentę valykite atvėsusią. Daugiau informacijos apie
kaitlentės valymą rasite skyriuje „Priežiūra ir valymas“.
3. Prieš atlikdami priežiūros darbus, visuomet išjunkite kaitlentę ir atjunkite nuo elektros šaltinio.
4. Stiklo keramikos kaitlentė pasižymi ypač didele šilumine galia ir gali įkaitinti paviršių iki 600 °C. Vaikams
12

LT
ir neįgaliems asmenims, siekiant apsaugoti nuo pavojingų situacijų, kaitlente naudotis draudžiama.
Užtikrinkite, kad asmenys, nemokantys naudotis kaitlente, būtų nuolat jūsų prižiūrimi arba iki galo
perskaitytų naudojimo instrukcijas.
5. Kaitlentė turi būti dedama ant švaraus, plokščio ir nedegaus paviršiaus. Atstumas nuo kaitlentės iki sienos ar
kitų objektų turi būti mažiausiai 10 cm.
6. Norėdami pakeisti kaitlentės vietą, kelkite ją, o ne traukite atraminiu paviršiumi. Traukdami kaitlentę, galite
pažeisti jos paviršių. Esant tokių pažeidimų gaminiui garantija netaikoma.
7. Toliau nurodytos aplinkybės yra įprasta kaitlentės eksploatavimo būsena:
• Kaitinamasispaviršiusgalireguliariaiišsijungti,pasiekęsnustatytątemperatūrą,irvėlįsijungtijaikrentant,
bet paviršiaus temperatūra išlaikoma nekintanti.
• Keičianttemperatūrąišaukštesnėsįžemesnę,kaitinamasispaviršiusneįsijungs,koltemperatūranenukrisiki
naujai pasirinktos temperatūros.
Dėmesio!
1. Prieš naudojimą
Siekiant apsisaugoti nuo gaisro, elektros smūgio ar trumpojo jungimo, prašome atkreipti dėmesį į šias pastabas:
1) neardykite, nekeiskite ir neremontuokite kaitlentės patys;
2) jei pažeistas elektros laidas, jungtis ar lizdas, kaitlentės nenaudokite;
3) neperlenkite ir nesunarpliokite elektros laido, apsaugokite nuo pažeidimų ir netraukite jėga;
4) nenaudokite netvarkingo elektros laido ar jungties;
5) nelieskite elektros laido ar jungties drėgnomis rankomis;
6) nenaudokite kaitlentės šlapios arba šalia ugnies.
2. Naudojant
Kad išvengtumėte nudegimų, atkreipkite dėmesį į šias pastabas:
13

LT
1) nedėkite kaitlentės ant nelygių paviršių;
2) saugokite vaikus, kad nepaliestų kaitinamojo paviršiaus;
3) prieš dėdami puodą ant kaitinamojo paviršiaus, patikrinkite jo dugną ir, jei reikia, nuvalykite, kad neužsidegtų
prilipę nešvarumai;
4) nenaudokite kaitlentės mažose erdvėse ir aplinkoje, kurioje negalima užtikrinti pakankamo vėdinimo;
neuždenkite ventiliacinių angų;
5) ant kaitinamojo paviršiaus nedėkite plastikinės ar popierinės taros ir kitokių degių daiktų;
6) šalia įjungtos kaitlentės nelaikykite elektros maitinimo laidų ir plastikinių objektų;
7) stenkitės apsaugoti kaitlentės paviršių nuo tyškančio maisto;
8) įskilus kaitlentės paviršiui, nedelsdami išjunkite kaitlentę iš elektros tinklo ir atiduokite remontuoti.
3. Pasinaudojus
Kad išvengtumėte nudegimų, sužalojimų ar smūgių, atkreipkite dėmesį į šias pastabas:
1) pasinaudoję kaitlente, nelieskite jos įkaitusio paviršiaus;
2) norėdami ištraukti elektros laidą iš tinklo, neimkite ranka už laido;
3) praėjus 20 minučių po paskutinio naudojimosi kaitlente, ištraukite jos elektros laidą iš tinklo.
Tinkami indai
Šiai kaitlentei tinka visų tipų puodai ir keptuvės, turintys plokščią, lygų, be iškyšų dugną. Plokščias apatinis puo-
do ar keptuvės paviršius turi būti didesnis nei kaitlentės kaitinamasis paviršius, t. y. jei kaitinamojo paviršiaus
skersmuo 180 mm, tinkamo puodo ar keptuvės plokščios apatinės dalies skersmuo turi būti 200 mm.
Jei puodo ar keptuvės dugnas per plonas, jis gali deformuotis. Naudokite kuo storesnio dugno puodus ar
keptuves.
14
LT
Priežiūra ir valymas
Prieš pradėdami valymo darbus, išjunkite kaitlentę, ištraukite elektros laidą ir palaukite, kol kaitlentės paviršius
visiškai atvės.
1) Stiklinį kaitlentės paviršių valykite sudrėkintu audiniu. Jei kaitlentės paviršius labai nešvarus ar apipiltas
riebalais, papildomai naudokite neutralų valiklį.
2) Valdymo bloko paviršių valykite švelniu sudrėkintu audiniu, riebalų dėmes – neutraliu valikliu. Pakartotinai
nuvalykite paviršių drėgnu audiniu.
3) Nepilkite ant kaitlentės paviršiaus vandens.
4) Ventiliacines angas valykite vatos krapštuku, minkštu šepetėliu ir valikliu.
5) Panaudojus kaitlentę ilgesnį laiką, ant paviršiaus gali atsirasti dėmių. Tai įprastas reiškinys, neturintis jokios
įtakos kaitlentės funkcijoms.
Elektroninių atliekų ir elektroninės įrangos (WEEE) ženklas
WEEE ženklu nurodoma, kad gaminys negali būti panaudotas kaip namų apyvokos atlieka.
Užtikrindami, kad šis gaminys būtų išmestas pagal taisykles, Jūs padėsite aplinkai. Norėdami
sužinoti daugiau informacijos apie šio gaminio perdirbimą, susisiekite su savo vietinės
valdžios institucija, Jūsų namų ūkiui priklausančiu atliekų paslaugų teikėju arba parduotuve,
iš kurios pirkote šį gaminį.
15
LV
Priekšvārds
Pateicamies, ka iegādājāties mūsu stikla keramikas plīti! Sīkāks izstrādājuma apraksts un lietošanas norādījumi
ir sniegti šajā rokasgrāmatā. Lūdzu, izlasiet to!
Komponenti
1. Gaisa ieplūdes atvere
2. Virsma
3. Gaisa izplūdes atvere
4. Barošanas vads
5. Vadības panelis
Funkciju panelis
Augstas
Bērnu
Taimeris Temperatūras
Temperatūras
Ieslēgšana/
temperatūras
slēdzene
samazināšana
palielināšana
izslēgšana
indikators
Darbības
Gaidstāve: pīksteņa signāls nozīmē savienojumu ar barošanas avotu, digitālajā displejā parādīsies OFF [izslēgt]
ziņojums, plīts ieslēgsies gaidstāves režīmā.
Ieslēgšana: nospiediet
pogu un turiet to nospiestu vismaz trīs sekundes. Iedegsies ieslēgšanas/izslēgšanas
LED gaismas indikators, digitālajā displejā parādīsies P5 kods un plīts nodrošinās 2000 W jaudu.
16
LV
Jaudas un temperatūras regulēšana: plīts jaudu regulē, spiežot „+” vai „-” taustiņu, jaudas kodi ir sniegti
turpmāk redzamajā tabulā:
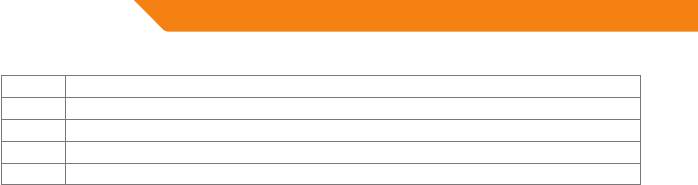
Kods Jauda (W) Lietojums
P5 2000 Ūdens uzvārīšana, grauzdēšana, cepšana (augstākā temperatūra) (apmēram 600°C)
P4 1500 Cepšana, putru vārīšana
P3 1000 Lielu porciju vārīšana vai lielu gaļas gabalu cepšana
P2 600 Vārīšana
P1 200 Nelielu porciju lēna vārīšana
P0 0 Izslēgts
Taimera ieslēgšana: maksimālais laika periods ir četras stundas. Lai ieslēgtu taimeri, kad plīts ir ieslēgta,
nospiediet taimera taustiņu. Lai iestatītu stundas, spiediet „+” vai „-” taustiņu. Lai pārietu uz minūšu iestatīšanu,
nospiediet taimera taustiņu un ar „+” vai „-” taustiņu iestatiet minūtes. Gaidiet apmēram piecas sekundes, kamēr
cipari beidz mirgot. Iedegsies taimera taustiņa sarkanais gaismas indikators. Kad iestatītais laiks ir pagājis,
pīkstenis atskanēs trīs reizes, un plīts izslēgsies.
Taimera izslēgšana: nospiediet taimera taustiņu – ilgs pīksteņa signāls nozīmē, ka taimeris ir izslēgts.
Bērnu slēdzene: lai to ieslēgtu, nospiediet bērnu slēdzenes taustiņu. Visi taustiņi, izņemot bērnu slēdzenes
taustiņu, nobloķēsies. Lai bērnu slēdzeni izslēgtu, nospiediet bērnu slēdzenes taustiņu un turiet to nospiestu
vismaz trīs sekundes.
Augstas temperatūras indikators: ja plīts virsmas temperatūra pārsniedz 80°C un plīts ir ieslēgta, gaismas
indikators deg nepārtraukti. Ja plīts ir izslēgta, tas mirgo. Pēc 20 minūtēm, kad temperatūra kļūst zemāka par
80°C, gaismas indikators izslēdzas.
Izslēgšana: lai pārtrauktu plīts lietošanu un ieslēgtu plīti gaidstāves režīmā, nospiediet
taustiņu.
Ja atgadās kļūme, plīts izslēgsies automātiski un displejā parādīsies kļūdas kods. Lūdzu, sazinieties ar
tehniskās apkopes dienestu.
17
LV
Kļūdas kods
H1 Plīts temperatūras sensora kontūrs ir bojāts.
H2 Vides temperatūra ir augstāka par 85°C.
E2 Vides temperatūras sensora kontūrs ir bojāts.
E3 Vides temperatūras sensora kontūra īsslēgums
E4 Sildīšanas piecu minūšu īsslēguma trauksme
Drošības noteikumi
1. Aizsardzība pret pārkaršanu: mehānisku bojājumu vai nepareizas lietošanas dēļ plīts var pārkarst.
2. Virsmas slodze nedrīkst pārsniegt 10 kg.
3. Barošanas vadu nedrīkst atvienot uzreiz pēc plīts izslēgšanas. Lai plīti atdzesētu, ļaujiet ventilatoram darboties.
Plīts lietošanas laikā, lūdzu, nenobloķējiet gaisa ieplūdes atveres.
Šo izstrādājumu nedrīkst lietot bērni vai personas ar garīgiem traucējumiem.
Lietošanas instrukcija
Lūdzu, rūpīgi izlasiet šo sadaļu un norādījumus. Šādi nodrošināsiet plīts pareizu un drošu lietošanu.
1. Pārbaudiet, vai strāvas kontaktligzda ir piemērota plīts barošanas vadam. Pārbaudiet, vai sprieguma, strāvas
un maiņstrāvas parametri atbilst plīts tehniskajai specikācijai.
2. Pirms pirmās lietošanas reizes, lūdzu, notīriet no plīts virsmas iepakojuma daļiņas un citus pārpalikumus.
Notīriet plīts virsmu, kad tā ir atdzisusi, arī pēc katras lietošanas reizes. Sīkākai informācijai skatīt sadaļu
„Apkopes un tīrīšanas metodes”.
3. Lai plīti atvienotu no elektrotīkla, atvienojiet barošanas vadu vai izslēdziet plīti.
4. Plītij ir ļoti augsta siltumvadītspēja un lietošanas laikā tās virsmas temperatūra var sasniegt 600°C. Lai
novērstu bīstamas situācijas, plīti nedrīkst lietot bērni un personas ar garīgiem traucējumiem. Lūdzu,
18

LV
nodrošiniet, lai personas, kuras nav iepazinušās ar plīts lietošanas instrukciju, strādātu jūsu uzraudzībā vai
rūpīgi izlasītu lietošanas rokasgrāmatu.
5. Plīts jānovieto uz tīras, stabilas un ugunsdrošas virsmas. Plīti ieteicams uzstādīt vismaz 10 cm attālumā no
sienas un citiem priekšmetiem.
6. Ja plīti nepieciešams pārvietot, tā jāpaceļ un jānovieto izvēlētajā vietā. Plīti nedrīkst vilkt pa virsmu. Pretējā
gadījumā plīts var sabojāties un priekšlaikus nolietoties. Garantija nesedz šāda veida bojājumus.
7. Turpmāk minētais ir normāla parādība plīts lietošanas laikā:
• uzturot nemainīgu temperatūru, plīts virsmas sildelementi nepārtraukti iedegsies un nodzisīs, kad virsma
būs sasniegusi iestatīto temperatūru;
• pārslēdzoties no augstas jaudas režīma uz zemāku, plīts darbību kādu laiku nodrošinās režīmu temperatūras
starpība. Šajā laikā plīts sildelementi nedarbosies. Plīts temperatūra tiks regulēta atbilstoši zemākās jaudas
režīmam.
Uzmanību!
1. Pirms lietošanas
Lai novērstu ugunsgrēka vai īsslēguma risku, lūdzu, ņemiet vērā turpmāk minētos norādījumus:
1) aizliegts patstāvīgi atvērt plīts korpusu un remontēt vai pārveidot plīti;
2) ja plīts barošanas vads ir bojāts vai to nevar atbilstoši iespraust kontaktligzdā, plīti nedrīkst lietot;
3) barošanas vadu nedrīkst saliekt, savīt vai pakļaut pārmērīgai ziskajai slodzei, jo šādi tas sabojāsies;
4) lūdzu, nodrošiniet ērtu piekļuvi barošanas vadam un sienas kontaktligzdai;
5) barošanas vadam un kontaktligzdai nedrīkst pieskarties ar mitrām rokām;
6) plīti nedrīkst lietot mitrā vietā vai atklātas liesmas tuvumā.
2. Lietošanas laikā
Lai novērstu apdegumus, ņemiet vērā turpmāk minētos norādījumus:
1) plīts jānovieto uz līdzenas virsmas;
19

LV
2) plīts lietošanas laikā tās tuvumā nedrīkst atrasties bērni;
3) pirms ēdiena gatavošanas trauka novietošanas uz plīts pārbaudiet, vai pie tā pamatnes nav pielipuši
netīrumi, kas plīts lietošanas laikā var aizdegties;
4) plīti nedrīkst lietot pārāk šaurā vietā vai vietā, kas traucē siltuma izkliedēšanos;
5) uz plīts virsmas nedrīkst sildīt plastmasas vai papīra traukus;
6) plīts lietošanas laikā tās tuvumā nedrīkst atrasties barošanas vads vai plastmasas priekšmeti;
7) lai aizsargātu plīts virsu, neļaujiet uz tās nokrist priekšmetiem;
8) nenobloķējiet plīts ventilācijas ieplūdes un izplūdes atveres;
9) ja plīts virsma ir saplaisājusi, nekavējoties izslēdziet plīti, atvienojiet no elektrotīkla un nododiet remontā.
3. Pēc lietošanas
Lai novērstu apdegumu, traumu vai elektriskās strāvas triecienu risku, ņemiet vērā turpmāk minētos
norādījumus:
1. uzreiz pēc lietošanas nepieskarieties plīts virsmai, jo tā joprojām ir ļoti karsta;
2. atvienojot barošanas vadu, neraujiet to;
3. atvienojiet barošanas vadu 20 minūtes pēc plīts lietošanas.
Piemērota cepešpanna
Plīts ir piemērota visām plakanas pamatnes metāla pannām. Pannas pamatne nedrīkst būt nelīdzena vai
izliekta un tai jābūt lielākai par sildvirsmu. Piemēram, ja sildvirsmas diametrs ir 180 mm, pannas diametram
jābūt vismaz 200 mm.
Ja pannas pamatne ir pārāk plāna, cepšanas laikā tā var deformēties. Tāpēc izvēlieties pannas, kuru pamatne ir
pēc iespējas biezāka.
20


