Levenhuk D870T Digital Trinocular Microscope: инструкция
Раздел: Оптика
Тип:
Инструкция к Levenhuk D870T Digital Trinocular Microscope
Levenhuk biological microscopes
Radost zaost
řit
Mit Vergnügen näher dran!
Rado
ść przybliżania
Приближает с удовольствием
Наближує з радістю
User Manual
Návod k použití
Bedienungsanleitung
Instrukcja obs
ł
ugi
Инструкция по эксплуатации
Посібник користувача
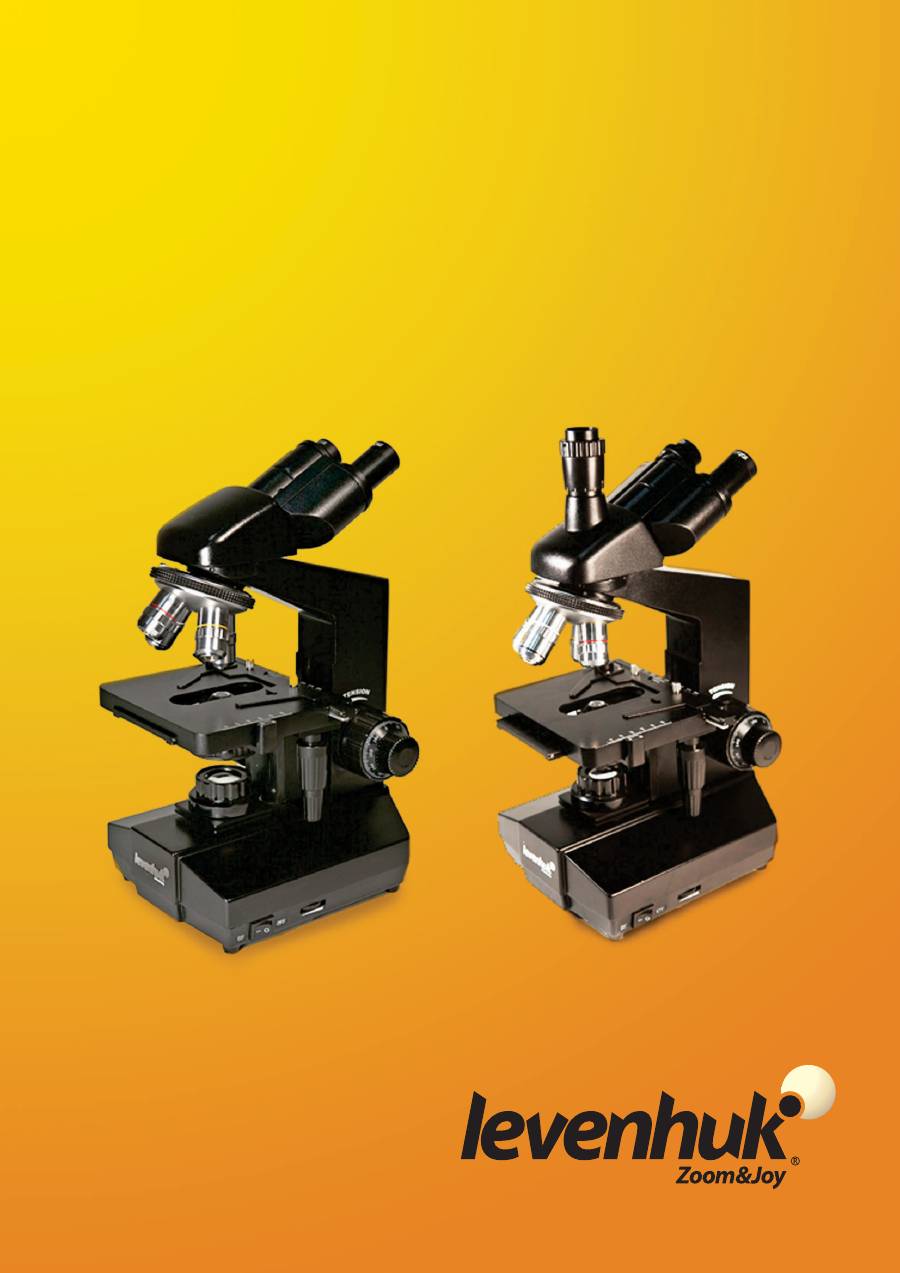
Levenhuk 850B (binocular)
Levenhuk 870T (trinocular)
Levenhuk D870T (trinocular)
1
2
3
5
8
11
16
18
20
21
23
19
22
4
6
7
9
12
13
14
15
17
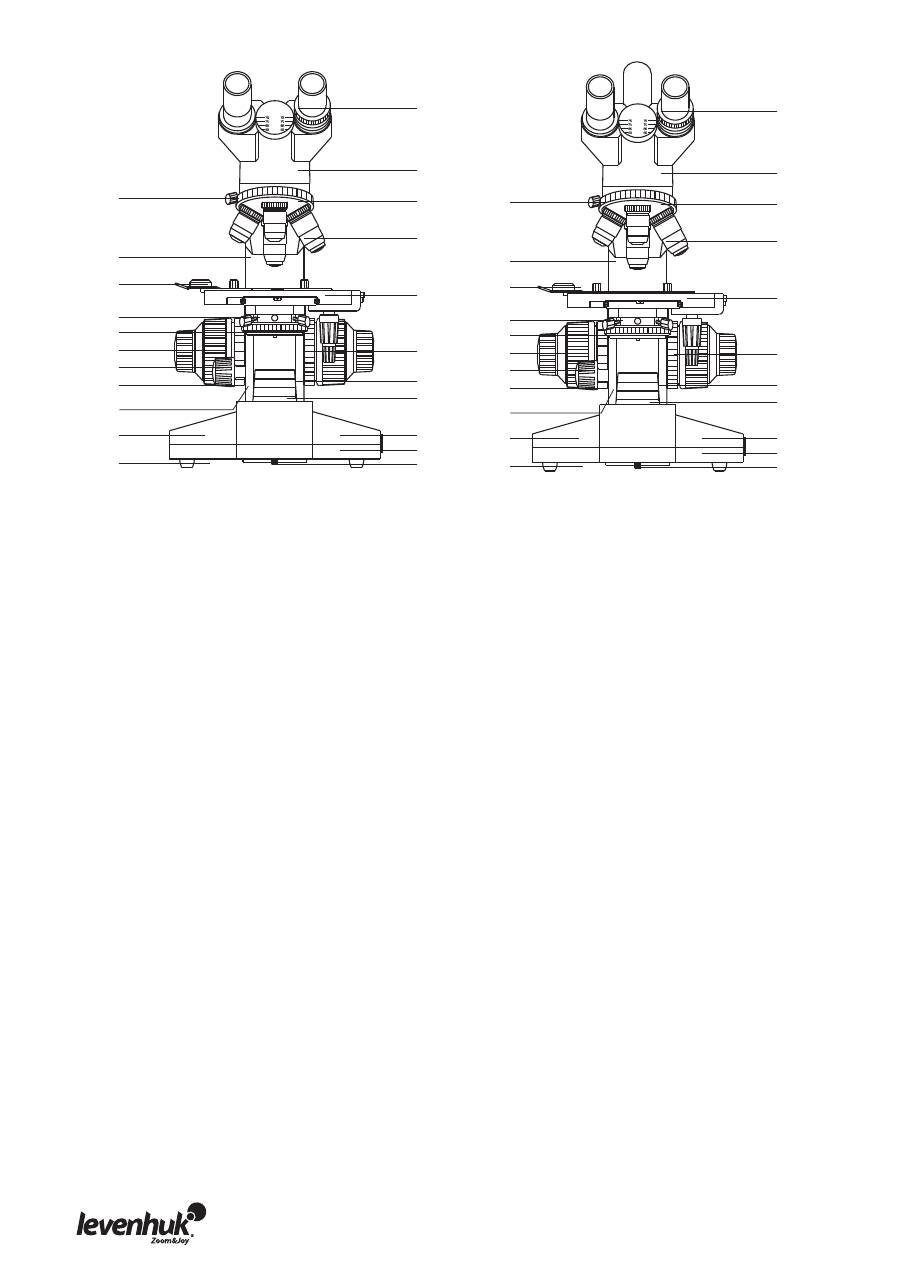
Eyepiece
Binocular head /
Revolving nosepiece
Locking screw
Objective lens
Arm
Specimen holder
Stage
Abbe condenser
Stage left/right movement control
Iris diaphragm
Fine focus knob
Coarse focus knob
Condenser vertical movement control
Focus system tension adjustment ring
Stage locking knob
Collector lens
Base
Power switch
Brightness adjustment knob
Rubber feet
Lamp compartment locking screw
Trinocular head
1
2
3
4
5
6
7
8
9
10
11
12
13
14
15
16
17
18
19
20
21
22
Okulár
Binokulární hlavice
/
Revolverový nosič objektivů
Pojistný šroub
Objektiv
Rameno
Držák preparátu
Pracovní stolek
Abeův kondenzor
Regulátor koaxiálního pohybu pracovního
stolku
Irisová clona
Mikrošroub
Makrošroub
Regulátor vertikálního pohybu kondenzoru
Regulátor mechanického napětí
Pojistný šroub stolku
Kolektor
Stativ
Hlavní vypínač
Regulátor jasu
Pryžové nožky
Pojistný šroub komory žárovky
Trinokulární hlavice
1
2
3
4
5
6
7
8
9
10
11
12
13
14
15
16
17
18
19
20
21
22
Okular
Trinokularkopf
Objektivrevolver
Verriegelungsschraube
Objektivlinse
Stativarm
Probenhalter
Objekttisch
Abbe-Kondensator
Gleichachsiger Objekttischtrieb
Irisblende
Feinfokussierknopf
Grobfokussierknopf
Kondensator-Vertikalbewegungsregler
Fokusspannungsring
Objekttisch-Verriegelungsknopf
Sammellinse
Sockel
Stromschalter
Helligkeitsregler
Gummifüße
Lampenfachschraube
Binokularkopf /
1
2
3
4
5
6
7
8
9
10
11
12
13
14
15
16
17
18
19
20
21
22
Okular
G
ł
owica dwuokularowa /
Miska rewolwerowa
Ś
ruba blokuj
ą
ca
Soczewka obiektywowa
Ramię mikroskopu
Uchwyt na preparaty
Stolik
Kondensor Abbego
Pokrętło regulacji ruchu stolika w pionie
Przysłona irysowa
Pokrętło precyzyjnej regulacji ostrości
Pokrętło zgrubnej regulacji ostrości
Pokrętło regulacji ruchu kondensora w
pionie
Pierścień regulacji napięcia
Pokrętło
blokujące
stolika
Soczewka
skupiająca
Podstawa
Wyłącznik
Pokrętło
regulacji
jasności
Gumowe
n
ó
ż
ki
Śruba
blokująca
obudowy
lampy
trójokularowa
1
2
3
4
5
6
7
8
9
10
11
12
13
14
15
16
17
18
19
20
21
22
Окуляр
Бинокулярная
/
т
насадка
Револьверная головка
Винт фиксации обзорной головки
Объектив
Корпус
Зажим препарата
Предметный столик
Конденсор Аббе
Регулятор перемещения предметного
столика
Пластина ирисовой диафрагмы
Ручка тонкой фокусировки
Ручка грубой фокусировки
Ручка подъема/опускания конденсора
Ручка регулировки натяжения
Ручка остановки предметного столика
Коллектор света
Основание
Переключатель
Регулятор яркости
Резиновые ножки
Винт замены лампы
ринокулярная
1
2
3
4
5
6
7
8
9
10
11
12
13
14
15
16
17
18
19
20
21
22
Окуляр
Бинокулярна
/
т
Обертальна насадка
Блокувальний гвинт
Лінза об'єктива
Стержень
Затискач зразка
Столик
Конденсор Аббе
Коаксіальне управління переміщенням
столика
Діафрагма отвору
Ручка точного фокусування
Ручка грубого фокусування
Ручка управління вертикальним
переміщенням конденсора
Колесо налаштування напруження
Ручка блокування столика
Лінза колектора
Основа
Перемикач
Ручка регулятора яскравості
Гумові ніжки
Блокувальний гвинт відділення лампи
ринокулярна голівка
1
2
3
4
5
6
7
8
9
10
11
12
13
14
15
16
17
18
19
20
21
22
1
2
3
5
8
11
16
18
20
21
23
19
22
4
6
7
9
12
13
14
15
17
These microscopes are high precision instruments that may be used for clinical research and university studies; in
laboratories and hospitals, technological centers and research institutes. They also perform well in medical studies in
biology, bacteriology, cytology and pharmacology. Levenhuk 850B and 870T may be used for microphotography with
additional accessories. The kit of Levenhuk D870T already includes an eyepiece digital camera that allows you to observe
specimens on your PC monitor and save images on the hard drive.
This manual contains detailed information on the design and operational principles of your new microscope, as well as a
troubleshooting and care and maintenance section. It is highly recommended that you read this manual before using the
microscope for the first time. Abiding by the following instructions will ensure maximum service life of your microscope:
Never look directly at the Sun through optical devices or with the unaided eye! It can result in
permanent eye damage or even BLINDNESS.
This instrument was designed for high-power observations of various biological specimens. It should not be used for any
other purpose.
Do
not
try
to
take
this
microscope
apart
on
your
own
, as you might damage the
intricate
optical
system
within
.
If the
troubleshooting section of this manual did not contain a solution to your issue, you should contact the local Levenhuk
service center.
Always unplug the microscope from a power source before opening the base or changing the illumination lamp. Regardless
of the lamp type (halogen or incandescent), give it some time to cool down before trying to change it, and always change
it to a lamp of the same type. When using the microscope, try not to use it near flammable materials or substances
(benzene, paper, cardboard, plastic, etc.), as the base may heat up during use, and might become a fire hazard.
Always use the power supply with the proper voltage, i.e. indicated in the specifications of your new microscope. Plugging
the instrument into a different power outlet may damage the electric circuitry of the microscope, burn out the lamp, or
even cause a short circuit.
Never touch the microscope optics with your fingers, as fingerprints and smudges will significantly reduce the quality of
your views.
These microscopes perform best under the following conditions: room temperature from 0 °C to 40 °C (32-104°F), relative
humidity not exceeding 85%. High temperatures and humidity may cause lenses to fog from inside, thus damaging the
optical system.
Any microscope is a very delicate instrument, so it should be handled with care. Even
a
slight
impact
might
damage
it
.
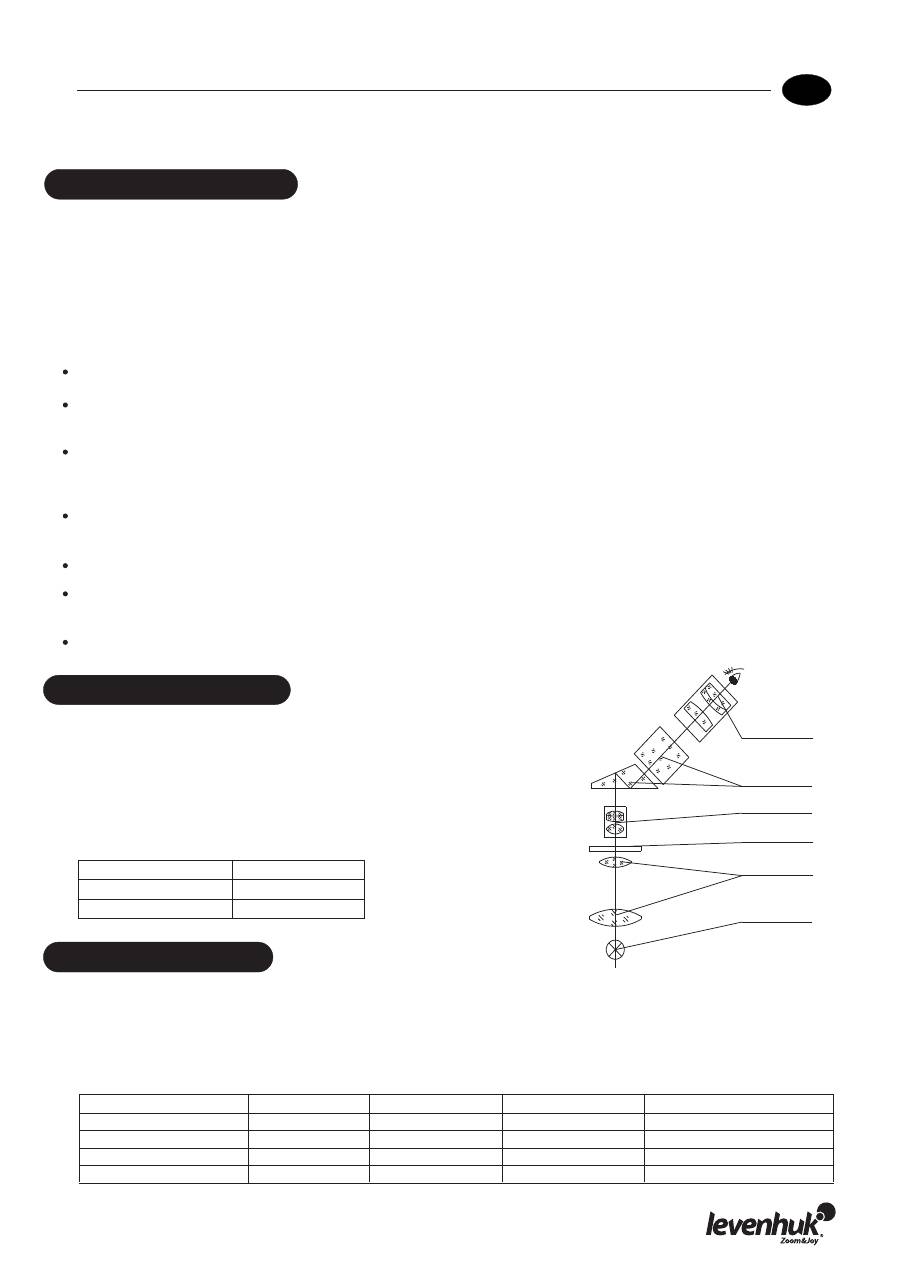
General Information
Light emitted from a lamp passes through the condenser and illuminates a
specimen. The image is magnified by the objective lens, refracted by the
prism and then magnified once more by the eyepiece.
Total magnification = (objective lens magnification) x (eyepiece
magnification).
The kit of these microscopes includes two WF10x eyepieces with wide
field of view:
Operating principle
Lamp
Condenser
Specimen
Objective lens
Prism
Eyepiece
Magnification
Field of view
Working distance
10x
18 mm (0.71 in)
24.95 mm (0.98 in)
EN
Biological microscopes
Levenhuk 850B
/
870T
/
D870T
The standard kit of these microscopes includes the following DIN achromatic objective lenses: 4x, 10x, 40x (spring-
loaded) and 100x (spring-loaded, oil immersion). When using the 100x objective lens, both the lens and the cover glass of
the observed specimen should be immersed in a transparent oil of high refractive index. This displaces the air and, as a
result, increases the quality of your views. If some air bubbles are still present, you may have to rotate the revolving
nosepiece once, or add some more immersion oil. Upon finishing the high-power observations, you should wipe the
objective lens and the cover glass clean. Otherwise, the oil will dry and reduce the quality of subsequent views.
Objective lenses Принцип работы
DIN achromatic objective lens
Magnification
Aperture
Working distance
Comments
4X
4
0.1 mm
36.9 mm (1.45 in)
10X
10
0.25 mm
7.116 mm (0.28 in)
40X
40
0
.
65
mm
0.632 mm (0.025 in)
Spring-loaded
100X
100
1
.
25
mm
0.158 mm (0.006 in)
Spring-loaded, oil immersion

Принцип работы
The numerical aperture (N.A.) of this high quality condenser is 1.25. Its position may be adjusted by turning the locking
screws, without any additional tools:
rotate the revolving nosepiece until either a 4x or a 10x objective lens is locked in place;
rotate the iris diaphragm to reduce its diameter;
lower the condenser until the diaphragm image is somewhat sharp;
focus the view by loosening or tightening the locking screws.
The condenser has been aligned with the objective lens during production. If this alignment hasn't been performed, the
field of view will be very irregular, with parts of it very bright, and others very dark. The rack-and-pinion mechanism
moves the condenser up and down within a 20 mm (0.79 in) range. Generally, you would want to raise the condenser when
using high-power objective lenses (40x, 100x) and lower it with low-power objective lenses (4x, 10x). The highest position
of the condenser is locked at 0.2 mm away from the stage.
If the condenser-objective lens alignment has somehow gone awry, you have to perform the following operations:
loosen the nut on the locking screw;
place a slide with a specimen on the stage;
raise the condenser to its highest position;
tighten the locking screw until the condenser touches the bottom of the stage;
retighten the nut on the locking screw.
Rotate the iris diaphragm to adjust its diameter in 2–30 mm (0.08–1.18 in) range, so that it corresponds with the N.A. of
the objective lens currently in use. When the iris diameter is approximately 70–80% of the objective lens N.A., the
observed image is sharp and clear. Remove one of the eyepieces and look through the tube. You will see the iris
diaphragm. You can use a color filter with the diaphragm for additional contrast and detail on the image. The filters come
in blue, green or yellow.
These microscopes are equipped with a 140 mm x 155 mm (5.5 in x 6.1 in) stage with coaxial controls. Press the stage
clip lever and place a slide with a specimen on the stage. Release the lever and it will securely lock the slide in place.
You can move the stage horizontally by using the coaxial controls below the stage. It moves within 70 mm (2.76 in) range
in 0.1 mm (0.004 in) increments.
Stage
The state of the art nosepiece provides for smooth rotation and easily locks in place on the desired objective lens. The
parfocal objective lenses used in these microscopes provide for simple switching from one magnification to the other,
without having to refocus your view over and over again.
Revolving
nosepiece
The binocular head of these microscopes may be inclined at a 30° angle and rotated 360 degrees. The interpupillary
distance adjustment range is 55–75 mm (2.16–2.95 in), the diopter adjustment range is from +5 to -5 diopters on each
eyepiece.
Binocular head
Abbe condenser
The coarse and fine focus systems are operated with a rack-and-pinion mechanism. The coaxial design of the focus system
allows you to adjust coarse and fine focus without any difficulties. Fine focus system adjusts in 0.002 mm (0.00008 in)
increments; total adjustment range is 25 mm (0.98 in). You can use the coarse focus knob to quickly raise or lower the
stage, and fine-tune the view with the fine focus knob.
Upon moving the stage into a desired position, you can secure it in place with the stage locking screw. Rotate it clockwise
to lock the stage in its current position. It will remain in this position until you loosen the locking screw. If you are
observing a large and heavy specimen, you might want to increase the coarse focus system knob tension. Rotate the
adjustment ring on the focus knob and the stage will be lowered slowly and steadily, even with heavy specimens.
Focus system
Generally, a 6V/20W halogen lamp is used in the illumination system of a microscope. To adjust its brightness, rotate the
corresponding knob, to better illuminate the observed specimen. The illumination should not be too bright with low-
powered objective lenses and vice versa. When changing the lamp to a new one, make sure to align it along the optical
axis, otherwise, the quality of your views will be significantly decreased.
To change the old lamp, loosen the screw on the bottom of the base, remove the cover and replace the lamp.
Illumination
Unpack your new microscope with great care. Check if all the parts and accessories are present. Note that some parts
might have been disassembled for easier shipping, therefore, you will have to assemble them before you can begin your
observations.
Assembly
Оглавление
- General Information
- Принцип работы
- Troubleshooting
- Care and maintenance
- Принцип работыПринцип работыПринцип работы
- Obecné informace
- Принцип работы
- Odstraňování závad
- Péče a údržba
- Принцип работыПринцип работыПринцип работы
- Allgemeine Informationen
- Принцип работы
- Problembehebung
- Pflege und Wartung
- Pflegehinweise
- Informacje ogólne
- Принцип работы
- Rozwiązywanie problemów
- Принцип работыПринцип работы
- Uwaga
- Общая информация
- Принцип работы
- Устранение неисправностей
- Уход за микроскопом
- Принцип работыПринцип работы
- Международная гарантия
- Загальна інформація
- Принцип работы
- Вирішення проблем
- Догляд і підтримка
- Цифрова фотокамера
- Міжнародна гарантія
