Levenhuk SkyMatic 127 GT MAK: инструкция
Раздел: Видео Аудио Фото Оборудование
Тип: Телескоп
Характеристики, спецификации
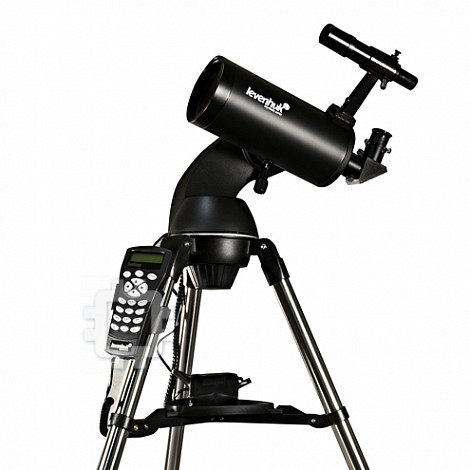
Инструкция к Телескопу Levenhuk SkyMatic 127 GT MAK

Levenhuk GoTo telescopes
SkyMatic
135 GTA
SkyMatic
105 GT MAK
SkyMatic
127 GT MAK
User Manual
Návod k použití
Инструкция по эксплуатации
Посібник користувача
Radost zaostřit
Приближает с удовольствием
Наближує з радістю
SkyMatic 135 GTA SkyMatic 105 GT MAK
SkyMatic 127 GT MAK
1
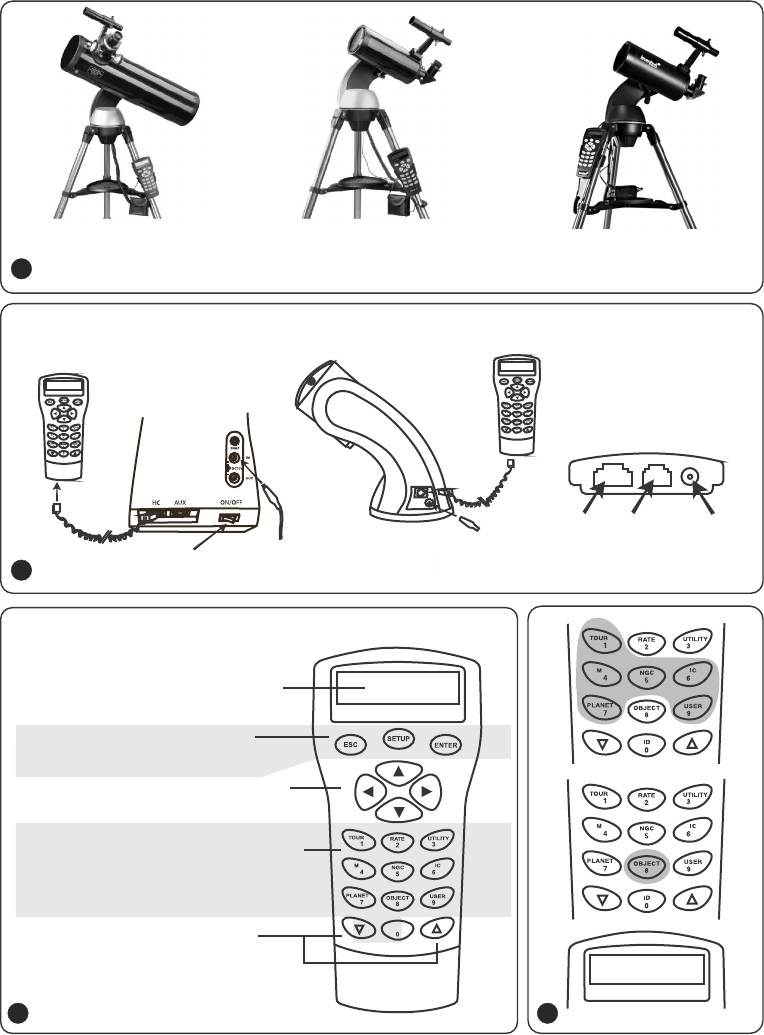
Multi-function mount / Multifunkční montáž
AutoTracking mount / Samonaváděcí montáž / Монтировка
Многофункциональная монтировка
с автоматическим трекингом / Багатофункціональне кріплення
Багатофункціональне кріплення
RJ-45 RJ-12 1 2V DC jack
Konektor 12V DC
Power cable / Napájecí kabel
Питание
Switch/ Vypínač
Переключатель /
2
Кабель живлення
Переключатель / Перемикач
Кабель живлення
Display/Displej
/ Экран / Дисплей
Function keys / Funkční klávesy
/Функциональные клавиши
/ Функціональні клавіші
Direction keys / Směrové klávesy
/ Клавиши режима / Клавіші напрямків
Numeric keys / Numerické klávesy
/ Клавиши двойного назначений
/ Цифрові клавіші
Scroll keys / Navigační klávesy
/ Клавиши прокрутки
/ Цифрові клавіші
3 4
1
SynScan Firmware Loader
SynScan Firmware Loader
1.0
Firmware File:
Browse
Update
Update
5
HC. Version
SynScan Firmware Loader
SynScan Firmware Loader
1.0
Firmware File:
Browse
Update
Update
HC. Version
6
7 8
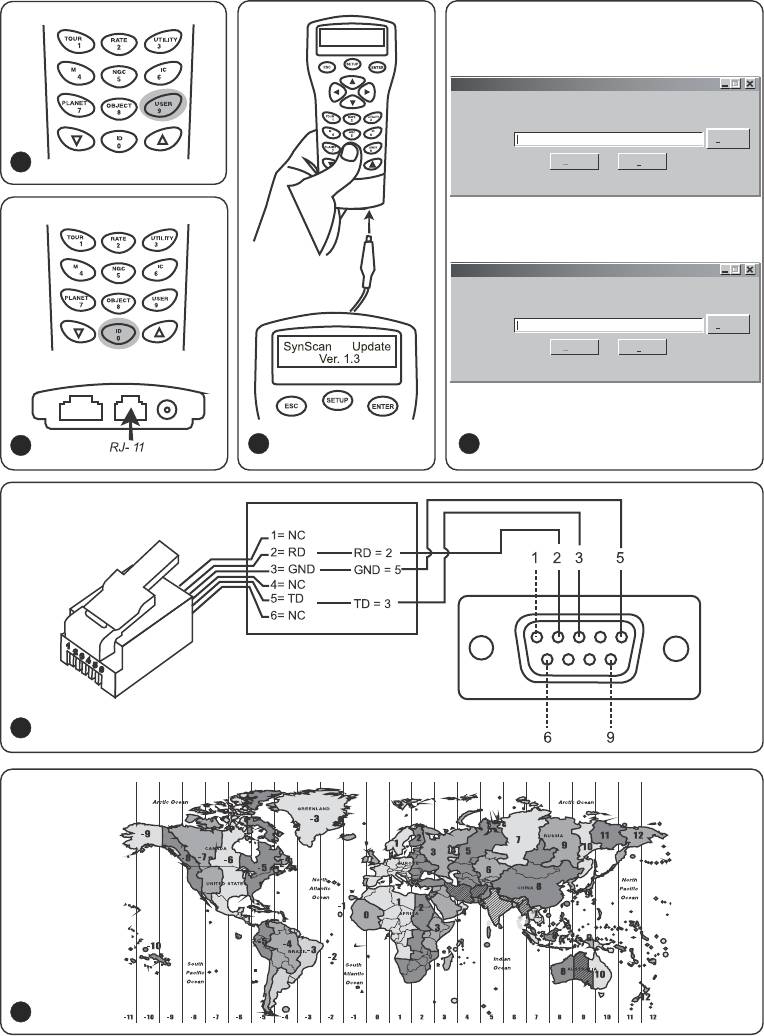
RJ-11 connector
Diagram připojení:
Коннектор RJ-11
Схема з'єднань:
Rear view of the DB9 connector
Zadní pohled na konektor Db9
Вид сзади — DB9 6 штекеров
9
Вигляд ззаду з'єднувача DB9
10
2

Levenhuk GoTo telescopes
EN
Congratulations!
Congratulations on your purchase of a high-quality Levenhuk SkyMatic GoTo telescope! This series
includes modern state of the art optical instruments that allow you to easily navigate across the
celestial sphere and find exactly what you need in no time at all! Easy-to-use controls provide
you with a simple way to locate desired objects and begin your observations at the touch of a
button. The expansive database includes coordinates of over 42,900 objects. Even an
inexperienced stargazer can learn all the functions after a few observations.
If this is your first GoTo telescope, congratulations on making this first step into the world of
amateur stargazing.
Take some time to familiarize yourself with the night sky and learn to recognize the major stars
and constellations. With a little practice, a little patience, and a reasonably dark sky away from
city lights, you’ll find your telescope to be a never-ending source of wonder, joy and exploration.
These instructions will help you set up, properly use, and care for your telescope. Please read
them thoroughly before getting started.
CAUTION! Never look directly at the Sun – even for an instant – through your telescope or
finderscope without a professionally made solar filter that completely covers the front of
the instrument, or permanent eye damage may result. To avoid damage to the internal
parts of your telescope, make sure the front end of the finderscope is covered with
aluminum foil or another non-transparent material. Children should use the telescope
under adult supervision only.
All parts of the telescope will arrive in one box. Be careful when unpacking it. We recommend
keeping the original shipping containers. In the event that the telescope needs to be shipped to
another location, having the proper shipping containers will help ensure that your telescope
survives the journey intact. Make sure all the parts are present in the packaging. Be sure to
check the box carefully, as some parts are small. No tools are needed other than those provided.
All screws should be tightened securely to eliminate flexing and wobbling, but be careful not to
overtighten them, as that may strip the threads.
During assembly (and anytime, for that matter), do not touch the surfaces of the optical
elements with your fingers. The optical surfaces have delicate coatings on them that can easily
be damaged if touched. Never remove mirrors from their housing, or the product warranty will
be null and void.
3

Assembling the telescope
Spread the tripod legs apart to stand the tripod upright and attach the accessory tray.
Adjust the height of the tripod as needed. Place the mount atop the tripod head and secure it in
place with a clamping screw.
Loosen the focuser thumbscrew and remove the plastic cap. Insert the 25mm eyepiece into the
focuser. Remove the dust cap from the front of the telescope.
Assemble the finderscope: slide the base of your finderscope into a dovetail mount on the
telescope tube and lock it in place with a thumbscrew.
Connect the hand controller by plugging it into the corresponding port at the lower part of the
mount.
Put eight AA batteries into the battery box, matching the polarity indicated. Plug the battery box
into the appropriate port at the lower part of the mount.
1
CAUTION!
When not connected to a power source, only altitude coordinates may be adjusted. Do not
attempt to adjust azimuth coordinates, or the telescope warranty will be null and void.
Any adjustments to azimuth coordinates should only be performed with a hand controller,
or the navigation mechanism may be broken.
Power requirements
To use a SkyMatic telescope, it has to be connected to a 1A, 11V–15V DC power source. Make sure
the power cable is properly plugged into the 12V DC jack on the mount.
2
SynScan™ AZ hand controller
The hand controller cable has an 8-pin RJ-45 connector on one end and a 6-pin RJ-12 on the
other. Plug the RJ-45 connector into the hand controller and the other end into the mount. There
are three ports at the base of SynScan™ AZ. The middle one is used to connect your telescope to
a computer or any other device with an RS-232 connector. The 12V DC jack on the hand
controller allows you to browse the database or update the software without having to connect
the device to a telescope.
SynScan™ AZ gives you direct control over the telescope navigation and access to an expansive
database of celestial objects. The hand controller has a 16-character backlit display with a
scrolling function.
The keypad may be divided into four groups.
3
4

Function keys
Function keys are located at the top of the hand controller, directly below the display.
ESC key may be used to cancel a command or to go up the menu tree. SETUP key may be used to
quickly access the Setup menu. ENTER key may be used to confirm selections and commands.
Direction keys
Direction keys give you complete control over your telescope. When automatically navigating to
the object, these keys are temporarily blocked. They may be used for telescope alignment,
centering on a celestial object and manual navigation. The left and right keys are also used to
control the display cursor when entering data.
Scroll keys
Scroll keys may be used to navigate the menu tree on the display.
Numeric keys
These keys have two functions: numeric entry of coordinates and quick navigation.
TOUR key activates an automatic tour across the observed region of the celestial sphere.
RATE key changes the rotation rate of the servo motors when navigating with direction keys.
There are 10 rates in total, from 0 (lowest) to 9 (fastest).
UTILITY key opens the utility functions, e.g. Show Position, Display Time, etc.
USER key opens the user-created database (up to 25 user-defined objects).
ID key identifies the currently observed object.
NGC, IC, M, PLANET and OBJECT keys open the corresponding catalogue in the database.
First setup
Make sure the mount is leveled. Point your telescope at a bright star or a star cluster. Connect
the hand controller to the mount.
For Auto-Tracking telescopes: power up your telescope by plugging it into a 12V DC power source.
For multi-function telescopes: simply power it up with the ON/OFF switch.
When the hand controller is connected, its display will show the current version number (Version
Screen). Press ENTER. A health warning regarding solar observations will be displayed. If you have
already read this warning, you can press ESC to continue.
If you are not using the hand controller for 30 seconds, it will enter the sleeping mode, the red
LED will be dimmed and the keypad backlight will be switched off. Upon pressing any key, the
sleeping mode will be cancelled.
Enter the longitude and latitude of your current location (in that order) with numeric keys.
Use scroll keys to scroll through cardinal directions: W for west, E for east, N for north and S for
south.
By using the left and right direction keys, you can scroll between the latitude and longitude.
Pressing ENTER will confirm your entry. Data should be entered in the following format: 123° 04’
W 49° 09’ N. Select your time zone by entering the hours and minutes using scroll and numeric
keys (+ for east, - for west). The PST time zone (e.g.) should look like this: -08:00.
5

Press ENTER to confirm your entry. Enter the current date in mm/dd/yyyy format with numeric
keys. Press ENTER to confirm your entry. Enter the current local time in 24-hour format (2PM =
1400 hrs.). Press ENTER to confirm and move on to setting the daylight savings time. If you want
to correct your entry, press ESC to go back to the previous setting and ENTER to make
corrections.
Upon entering the daylight savings time, a “DAYLIGHT SAVING?” message will be displayed. Use
scroll keys to choose the correct answer and press ENTER to confirm.
When you are finished with these settings, a “Begin alignment?” message will appear on display.
Press 1 or ENTER to begin alignment. Press 2 or ESC to cancel the procedure.
Star alignment
Before your telescope can navigate the expanse of the universe, you have to align it by two or
three known stars. As you know, Earth rotates about its axis during the day. That is why the stars
appear to be moving across the night sky following a curve. When your telescope is being
aligned, it memorizes a map of the celestial sphere and the movement of stars. This alignment
can be performed at any time during your observations (just select Alignment in Setup menu).
There are two methods of star alignment: brightest star alignment and two-star alignment. If this
is your first observation, it is recommended to begin with the brightest star alignment. Before
proceeding, make sure that the finderscope is properly aligned with the telescope tube.
Brightest star alignment
When choosing an alignment setting on the screen of your SynScan™ AZ, scroll to the Brightest
Star Align option. Press ENTER to confirm the selection. The next message – “Select Region” – will
appear, with eight options of azimuth cardinal directions, i.e. N, NE, E, SE, S, SW, W, NW. Each
direction covers a span of 90° along the azimuth, with North at 0° (or 360°), East at 90°, South
at 180° and West at 270°.
NE direction, for instance, covers an area from 0° to 90°.
Direction
Degree span along the azimuth
Northeast
315°-45°
East
45°-135°
Southeast
90°-180°
South
135°-225°
Southwest
180°-270°
West
225°-315°
Northwest
270°-360°
After you have selected the cardinal direction, the hand controller will create a list of stars of
at least 1.5 stellar magnitude, which may be observed in that direction. Stars that are located
outside the 10°–75° range along the R.A. axis and stars of less than 1.4 stellar magnitude will
not be listed.
The information on the alignment star will be displayed on the screen. The first line will tell you
its name and magnitude.
The second line will tell you its approximate location. Let’s assume Arcturus was chosen as the
alignment star. Its magnitude is 0.0, its location is 88.1° E and 24.1° along the R.A. axis.
6

The telescope will not turn to point at the first alignment star automatically, so you will have to
do this manually, using the direction keys. You can increase the rotation rate of the servo motor
by pressing the RATE key and scrolling through available options (0 is the slowest, 9 is the
fastest).
Make sure that the star is centered in the field of view (you can use direction keys to center it)
and press ENTER to confirm. Next, you will be prompted to choose a secondary alignment star
from a list. Use scroll keys to choose the second star, and your telescope will automatically turn
to point at the chosen star. Your hand controller will beep once the telescope has finished
rotating. Do not try to adjust anything until you hear the beep. The only command that will be
recognized by SynScan™ AZ at this time is ESC. Center the second star in the field of view with
direction keys. If the alignment has been done properly, the screen will display the “Alignment
Successful” message.
If something has gone wrong, the “Alignment Failed” message will be displayed, and the process
has to be repeated. You can cancel the alignment process at any time by pressing the ESC key.
Two-star alignment
This process is similar to the brightest star alignment, with one exception: it is done without
choosing the azimuth direction.
Choose the 2-Star Align option in the Star Alignment menu with scroll keys. Press ENTER to
confirm the selection.
A list of stars that are visible in your region will appear. Use scroll keys to select one as the
primary alignment star. The telescope will not turn to point at the first alignment star
automatically.
You have to do it manually, using the direction keys, so it is easier to choose a star that you are
familiar with. Center the first star it in the field of view with direction keys.
Press ENTER to confirm the selection. Another list will appear for you to choose a secondary
alignment star. Use scroll keys to choose a star and press ENTER to confirm. The telescope will
automatically turn to point at the second star. Center it in the field of view with direction keys.
Press ENTER to confirm. If the alignment has been done properly, the “Alignment Successful”
message will be displayed. If something has gone wrong, the “Alignment Failed” message will
appear, and the process has to be repeated.
For best results, choose stars that are at least 60° apart, since the greater the distance between
the stars, the more precise the alignment. Choosing the stars with the same R.A. coordinates will
yield even better results.
Pointing Accuracy Enhancement
Any of the above methods should give sufficient accuracy for your observations. However, if you
require additional precision, you may find the Pointing Accuracy Enhancement (PAE) option of
your SynScan™ AZ extremely useful. You can use this function in 85 different regions of the
celestial sphere, which should be enough to cover all of it. Make sure that the region is already
mapped by SynScan™ AZ before proceeding with PAE.
7

Center the currently observed object in the field of view (you can skip this step, if this is already
done).
Press and hold the ESC key for two seconds. The “Re-center” message and the name of the
reference object will appear on the display. The object name will blink three times. If you are
using planetarium software for navigation, the “Last goto object” message will appear instead.
Make sure that the reference object is still centered in your field of view and press ENTER.
If you do not wish to save the result, you can press ESC to cancel the operation. Once you press
ENTER, the information on current precision will be recorded and the region map will be updated
accordingly.
From now on, you should notice an increase in pointing precision within this region.
The results of alignment and PAE will be stored in your hand controller and will not be erased on
shutdown.
You may have to repeat the star alignment in the following cases:
1. The telescope hasn’t been returned to its initial position before shutdown.
2. Some of the settings of the telescope and the mount were changed.
Exercise caution when changing accessories, otherwise you might have to realign your
instrument. When turning the hand controller on during your next stargazing session, make sure
you enter the time from the same source, i.e. if you were using your watch to read the time, you
should use the same watch for reference again.
Object database
This GoTo telescope comes with an expansive database of over 42,900 objects, including their
coordinates.It includes the information from the following catalogues:
Solar system, which includes the seven planets and the Moon.
Named stars, which includes 212 well-known stars.
NGC, which includes 7840 brightest deep-sky objects.
IC, which includes 5386 stars and deep-sky objects.
Messier, which includes 110 objects, catalogued by C. Messier.
Caldwell, which includes 109 objects, catalogued by P. Caldwell-Moore.
Binary stars, which includes 55 well-known binary stars.
Variable stars, which includes 20 variable stars.
SAO, which includes 29,523 stars.
Selecting the object
Now that your telescope is aligned, you can begin your observations. There are five ways for you
to choose the object to observe:
4
TOUR key
Pressing the TOUR key will take you on a tour of the night sky, choosing the brightest and the
most beautiful deep-sky objects. You can scroll through the list of chosen stars with scroll keys.
Press ENTER to confirm your selection. The coordinates of this object will be displayed. Press
ENTER again, and your telescope will automatically locate the object.
8

M, NGC, IC keys
By pressing M, NGC, IC keys you will open the corresponding catalogue of celestial objects. Input
the number of the object you wish to observe with numeric keys.
Press ENTER and you will see the coordinates of the object on the display. Use scroll keys to see
the information on the object, including its size, magnitude and the corresponding constellation.
Press ENTER again, and your telescope will automatically locate the object.
PLANET key
The PLANET key opens up the Solar system database. Use scroll keys to choose the desired planet
and press enter to confirm your selection. After looking at the coordinates on the screen, press
ENTER again, and your telescope will point at the object.
USER key
The USER key opens up the user-created database. You can input the new object coordinates or
choose an object that you have already saved (for more info, see User database section).
OBJECT key
The OBJECT key grants you access to the full database of over 42,900 celestial objects.
Utility menu
Utility functions are a simple way to control your SynScan™ AZ directly.
SHOW POSITION will give you the coordinates of the currently observed object.
SHOW INFORMATION will show you the current settings of local and sidereal time, and the
information on software versions of the database and SynScan™ AZ. If the hand controller is
connected to the mount, it will also show you the current version of the motor firmware.
PARK SCOPE will bring the telescope tube to the initial (Home) position or memorize the current
position as Home.
PAE gives you access to the Pointing Accuracy Enhancement function.
CLEAR PAE DATA will delete all the PAE data.
GPS allows you to obtain information from the SynScan™ AZ GPS receiver.
Setup menu
This menu allows you to change the current settings of telescope location, date, time and
alignment. To access the setup menu, you can either press the SETUP key, or scroll through the
menu to the SETUP section.
Here is a list of all the functions available in Setup menu:
DATE allows you to change the current date.
TIME allows you to change the current time.
OBSERVING SITE allows you to change the current location.
DAYLIGHT SAVINGS allows you to change the current daylight savings settings.
ALIGNMENT allows you to perform the star alignment procedure once more.
AUTO SELECT will tell your hand controller to automatically choose the stars for star alignment.
SORT BY will tell your hand controller to compile a list of currently visible stars for manual
selection by the user. The stars will be listed either alphabetically or by their stellar magnitude.
BACKLASH allows you to input a value for backlash compensation on each rotation axis. For
precise navigation of your telescope it is important that this value is equal to or greater than the
actual backlash on the axes. The default value is 0 degrees, 0 arcminutes, 0 arcseconds (0d 00’
00’’). Use numeric keys to input the values and move to the next digit with the right direction
key. Calibrate the R.A. axis first. Press ENTER to confirm and calibrate the Dec. axis.
SID. RATE activates the Sidereal tracking rate.
9

LUNAR RATE activates the Lunar tracking rate.
SOLAR RATE activates the Solar tracking rate.
STOP TRACKING immediately stops the current tracking.
SET SLEW LIMITS allows you to set up the rotation limits on your mount about its vertical axis.
Setting these limits will prevent any impacts and collisions of your telescope tube and the
mount. The rotation range depends on the actual telescope-mount combination used.
HANDSET SETTING allows you to adjust the display brightness, keypad backlight and alarm
volume of your hand controller. Use the right and left direction keys to adjust.
FACTORY SETTING allows you to roll any changes you have made back to the factory settings.
User database
You can store up to 25 objects in the user database.
5
Saving an object in the database
Use scroll keys to choose the “Object Catalog” in the main menu. Press ENTER to confirm the
selection. Choose the "Select User Defined" option and press ENTER. You can also open this
database by pressing the USER key.
The first option in the submenu is “Recall Object”. This will give you access to the previously
saved objects. Use scroll keys to choose “Edit Objects” and press ENTER.
The telescope is capable of storing the coordinates in two formats: R.A./Dec. and Alt/Az.
Press 1 to choose the R.A./Dec. format, or 2 for Alt/Az format.
SynScan™ AZ will display either the R.A./Dec. or the Alt/Az coordinates of the currently observed
objects by default. This is a sample of what the R.A./Dec. format should read: "22h46.1m +90
00’”. This stands for 22 hours and 46.1 minutes right ascension and 90 degrees declination.
You can change the coordinates with numeric and scroll keys.
With the left and right direction key you can choose between the values to edit. Press ENTER to
save the entered coordinates. If there is no star at the given coordinates, the hand controller
will not save the data. Correct your entry and press ENTER to confirm.
To save the coordinates in Alt/Az coordinates, just point your telescope at a desired object and
press ENTER to confirm. Upon saving the coordinates, the user object ID will be displayed.
Use scroll keys to select the number you want and press ENTER to confirm.
“View object” message will be displayed, along with the saved user object ID. Press ENTER to
locate the object, press ESC to save another object.
When saving the object, you cannot use the previously used ID. Make sure that you know which
user object IDs are taken, before saving a new object.
Choosing an object from the user database
Open the user database (see the instructions above). Choose the “Recall Object” option and
press ENTER. Use scroll keys to choose the object you want to observe.
Press ENTER to see the coordinates of that object. Press ENTER again to have your telescope
navigate to it.
If no object has been saved under a given number, the hand controller will not react. In this
case, use scroll keys again to choose a different object. If you are trying to observe an object
that is currently below horizon, the “Below Horizon!!” warning will be displayed on the screen
and you will be prompted to choose a different object.
10

Identifying the unknown object
Your telescope can identify an object, at which it is currently pointing.
6
To do this, either press the ID key on the keypad or use scroll keys to choose the IDENTIFY
command in the main menu and press ENTER. SynScan™ AZ will display a list of the nearby
objects, as well as the distance from the object to the reticule center.
Scroll through the objects using scroll keys. Press ESC at any time to cancel the command.
Connecting to a computer
Your telescope can even be operated through a Stellarium software. To do this, you just have to
plug it into a computer. Make sure that the telescope is properly aligned before proceeding. You
should only plug it into a computer after checking the alignment. Use the cable supplied in the
kit.
Make sure that you use the cable provided, as any error in a substitute may damage your hand
controller or computer.
Once plugged in, you can operate your telescope from a computer.
Make sure to follow the instructions and remember to shut down the computer software before
you unplug the cable.
System requirements
Hand controller firmware 3.0 or later.
Windows 95 or higher.
An RS-232C port on the computer.
The SynScan™ AZ connector cable (supplied in the kit).
7.5~15V/100mA power source. The adapter cord should be tip positive to match the polarity of
the device.
By default, the transfer rate between the hand controller and the PC is set to 115 Kbps. The RS-
232C port on your PC may not support such high transfer rate. If you are unable to update the
SynScan™ AZ firmware, you can easily change the transfer rate by pressing the SETUP key, while
your hand controller is plugged into a power source. This will lower the transfer rate to 9.6 Kbps.
Upon doing this, a “Lo” icon should appear in the bottom right corner on the display. Now, try
updating the firmware again. Keep in mind that lowering the transfer rate will increase the
update time (up to 4 minutes).
Updating your SynScan™ AZ:
7
Connect your hand controller to a PC. The RJ-11 connector should go into the middle port on the
SynScan™ AZ, while the DB9 connector should go into the RS-232 port on the computer.
Press and hold the 0 and 8 keys simultaneously, then plug your hand controller into a power
source.
11

Your hand controller will beep to confirm that the connection has been established.
Run the SynScanFirmwareLoader application on your PC. The “HC. Version” button in the
application window will show you the current version of hardware, firmware and database of
your hand controller.
These numbers are just for your information, and will not be required for the update.
Press “Browse” and locate the “SynScanVXXXXAZ.ssf” file on your hard drive. Press "Update” to
begin updating the firmware.
You can see the update progress below “Update” and “HC. Version” buttons.
Upon finishing the update, the “Update complete” message will appear on the screen. This
process should take about 30 seconds, although if you are using a USB-RS232 adapter, this may
take longer. Congratulations on the successful update of the SynScan™ firmware!
8
If you receive the "Can not connect to a SynScan hand control" message during the update, make
sure that your hand controller is properly connected to the PC.
Close any applications that may be using the RS-232 port and try again.
If you receive the "Firmware update failed…" message, restart the hand controller by unplugging
it from the power supply and plugging it back in. Try running the update again. By default, the
transfer rate between the hand controller and the PC is set to 115 Kbps. The RS-232C port on
your PC may not support such high transfer rate. If you are unable to update the SynScan
firmware, you can easily change the transfer rate by pressing the SETUP key, while your hand
controller is plugged into a power source.
This will lower the transfer rate to 9.6 Kbps. Upon doing this, a “Lo” icon should appear in the
bottom right corner on the display. Now, try updating the firmware again. Keep in mind that this
procedure will also increase the update time (up to 4 minutes).
MAIN MENU
SETUP MODE
UTILITY FUNC.
OBJECT CATALOG TOUR
IDENTIFY
Date
Show Position
Time
Solar System
Show Information
Observ. Site
Mercury
Time Version
Daylight Saving Alignment
Venus
Temperature
Brightest
Mars
Power
Star Align.
Jupiter
Voltage
2-Star
Saturn
Park Scope
Align
Uranus
PAE
Alignment Stars
Neptune
Clear PAE Data
Auto Select
Pluto
GPS
Sort by Backlash
Moon
PC Direct Mode
Tracking
Named Star
Sidereal Rate
Messier Catalogue
Lunar Rate
IC Catalog
Solar Rate
NGC Catalog
Stop Tracking
Caldwell Catalog
Set Slew Limits
SAO Catalogue
Handset Setting
Double Star
Factory Setting
Variable Star
User defined
Edit Object
Recall Object
12

Specifications
Power supply
1A, 11 ~ 15V DC (tip positive) DC
Motor type
servo motors 1.8°
Resolution
0.144 arcseconds or 9,024,000 steps/rev (AZ-80)
Slew rate
0 = 1.0x, 1 = 2.0x, 2 = 16x, 3 = 32x, 4 = 64x, 5 = 128x
6 = 400x, 7 = 500x, 8 = 600x, 9 = 800x
Tracking rate
sidereal, lunar, solar
Tracking mode
dual-axis tracking
Alignment method
brightest star alignment, two-star alignment
Pointing accuracy
up to 10 arcminutes
Database
25 user-defined objects M, NGC, IC and SAO catalogues,
totaling in 42,900 objects
Connection diagram:
SkyMatic 135 GTA
SkyMatic 105 GT MAK
SkyMatic 127 GT MAK
Optical design
Reflector
Maksutov-Cassegrain
Maksutov-Cassegrain
Objective lens diameter
130 mm
102 mm
127 мм
Focal length; aperture
650 mm; f/5
1300 mm; f/12.8
1500 мм; f/11,8
Highest practical power
260x
204x
250x
Resolution threshold
0.92 arcseconds
1.18 arcseconds
1.1 arcseconds
Eyepiece
1.25'' SUPER10 &
SUPER25
1.25'' SUPER10 &
SUPER25
1.25" SUPER10 &
SUPER25
Finderscope
6x30
6x30
6x30
Mount type
AZ 114 GT; AZ SynScan
AZ 114 GT; AZ SynScan
AZ 114 GT; AZ SynScan
Tripod
stainless steel; 24-44.3
in. (630-1125 mm)
stainless steel; 24-44.3
in. (630-1125 mm)
stainless steel; 24.8–45.3
in (630–1150 mm)
9
To operate the SkyMatic GoTo telescope from a computer, you have to connect it to a PC through
an RS-232 port. After this, you can use any planetarium software available today to send
commands to your telescope.
The transfer rate of SynScan™ AZ to PC connection is 9600 bps, without parity or stop bits. All the
commands from your PC are transferred using the binary scaling technique.
Name
PC ASCII
command
SynScan controller
Information
Echo
Kx
Kx
Checks the connection to PC
Goto Az-Alt
B12AB, 4000
#
Sends ten characters. B = Command, 12AB = Az
coordinates, comma, 4000 = Alt coordinates. If the
command conflicts with preset limits, it will not be
executed
Goto RА-Dec
R34B, 12CE
#
The finderscope has to be aligned. If the command
conflicts with preset limits, it will not be executed
Get Az-Alt
Z
12AB, 4000#
Returns ten characters. 12AB = Azimuth
coordinates, comma, 4000
13

Get RA-Dec
E
34AB, 12CE#
The finderscope has to be aligned
Cancel Goto
M
#
Is Goto in
Progress
L
0# or 1#
0 = No, 1 = Yes. “0” is the ASCII zero character
Is Alignment
Complete
J
0# or 1#
0 = No, 1 = Yes
HC version
V
22
Two bytes represent Version 2.2
Stop/Start
Tracking
Tx x = 0
(tracking off)
x = 1 (Alt-Az
on) x = 2
(EQ-N) x = 3
(EQ-S)
#
Alt-Az tracking requires alignment
32-bit goto RA-
Dec
r34AB0500,1
2CE0500
#
32-bit get RA-
Dec
e
34AB0500,
12CE0500#
The last two characters should always be zero
32-bit goto Azm-
Alt
b34AB0500,1
2CE0500
#
32-bit get Azm-
Alt
z
34AB0500,
12CE0500#
The last two characters should always be zero
Additional commands
Setting the tracking rate via Rs232:
1. Multiply the required tracking rate (arcseconds/seconds) by 4. For instance, if you want to
track an object at 120 arcseconds/second (approx. 8 times more than sidereal rate), then
TRACKRATE should be 480.
2. Divide TRACKRATE into two bytes, so that TRACKRATE = TrackRateHighByte*256 +
TrackRateLowByte. E.g. if TRACKRATE = 480, then TrackRateHighByte = 1, TrackRateLowByte =
224.
3. To set the tracking rate, send the following 8-byte command:
a. Positive Az tracking: 80, 3, 16, 6, TrackRateHighByte, TrackRateLowByte, 0, 0
b. Negative Az tracking: 80, 3, 16, 7, TrackRateHighByte, TrackRateLowByte, 0, 0
c. Positive Alt tracking: 80, 3, 17, 6, TrackRateHighByte, TrackRateLowByte, 0, 0
d. Negative Alt tracking: 80, 3, 17, 7, TrackRateHighByte, TrackRateLowByte, 0, 0
4. Hand controller returns “35”.
Sending a slow-Goto command via Rs232:
1. Convert the angular position into a 24-bit number. E.g. if the desired angular position is 220°,
then POSITION_24BIT = (220/360)*224 = 10,252,743.
2. Divide POSITION_24BIT into three bytes, so that POSITION_24BIT = PosHighByte * 65536 +
PosMedByte *256 + PosLowByte. E.g. if POSITION_24BIT = 10,252,743, then PosHighByte = 156,
PosMedByte = 113, PosLowByte = 199.
3. Send the following 8-byte command:
a. Az slow Goto: 80, 4, 16, 23, PosHighByte, PosMedByte, PosLowByte, 0
b. Alt slow Goto: 80, 4, 17, 23, PosHighByte, PosMedByte, PosLowByte, 0
4. Hand controller returns “35”.
Resetting the Alt and Az positions
14

1. Convert the angular position into a 24-bit number (see “Slow-Goto command”).
2. Send the following 8-byte command:
a. Set Az position: 80, 4, 16, 4, PosHighByte, PosMedByte, PosLowByte, 0 b. Set Alt position: 80,
4, 17, 4, PosHighByte, PosMedByte, PosLowByte, 0
3. Hand controller returns “35”.
10
Batteries safety instructions
Always purchase the correct size and grade of battery most suitable for the intended use.
Always replace the whole set of batteries at one time; taking care not to mix old and new ones,
or batteries of different types.
Clean the battery contacts and also those of the device prior to battery installation.
Make sure the batteries are installed correctly with regard to polarity (+ and -).
Remove batteries from equipment that is not to be used for an extended period of time.
Remove used batteries promptly.
Never attempt to recharge primary batteries as this may cause leakage, fire, or explosion.
Never short-circuit batteries as this may lead to high temperatures, leakage, or explosion.
Never heat batteries in order to revive them.
Remember to switch off devices after use.
Keep batteries out of the reach of children, to avoid risk of ingestion, suffocation, or poisoning.
Care and maintenance
Never, under any circumstances, look directly at the Sun through this device without a special
filter, or look at another bright source of light or at a laser, as this may cause PERMANENT
RETINAL DAMAGE and may lead to BLINDNESS.
Take necessary precautions when using the device with children or people who have not read or
who do not fully understand these instructions.
Do not try to disassemble the device on your own for any reason, including to clean the mirror.
For repairs and cleaning of any kind, please contact your local specialized service center.
Protect the device from sudden impact and excessive mechanical force.
Do not touch the optical surfaces with your fingers. To clean the telescope exterior, use only
special cleaning wipes and special optics cleaning tools from Levenhuk.
Store the device in a dry, cool place away from hazardous acids and other chemicals, away from
heaters, open fire and other sources of high temperatures.
Replace the dust cap over the front end of the telescope whenever it is not in use. This prevents
dust from settling on the mirror or lens surfaces.
Seek medical advice immediately if a small part or a battery is swallowed.
Levenhuk Limited Warranty
All Levenhuk telescopes, microscopes, binoculars and other optical products, except for accessories, carry
a lifetime warranty against defects in materials and workmanship. All Levenhuk accessories are warranted
to be free of defects in materials and workmanship for six months from date of retail purchase. Levenhuk will
repair or replace such product or part thereof which, upon inspection by Levenhuk, is found to be defective in
materials or workmanship. As a condition to the obligation of Levenhuk to repair or replace such product, the
product must be returned to Levenhuk together with proof of purchase satisfactory to Levenhuk.
This warranty does not cover consumable parts, such as batteries.
A Return Authorization (RA) Number must be obtained in advance of return. Contact the local Levenhuk branch
to receive the RA number to be displayed on the outside of your shipping container. All returns must be
accompanied by a written statement setting forth the name, address and telephone number of the owner,
15

including a description of any claimed defects. Parts or products for which replacement is made will become
the property of Levenhuk.
The customer will be responsible for all costs of transportation and insurance to and from Levenhuk or its
authorized dealers and will be required to prepay such costs.
Levenhuk will use reasonable efforts to repair or replace any product covered by this warranty within thirty
days of receipt. If a repair or replacement will require more than thirty days, Levenhuk will notify the
customer accordingly. Levenhuk reserves the right to replace any product that has been discontinued from its
product line with a new product of comparable value and function.
This warranty does not apply to any defects or damages resulting from alteration, modification, neglect,
misuse, usage of improper power sources, damage in transportation, abuse, or any cause other than normal
use, or to malfunction or deterioration due to normal wear.
Levenhuk disclaims all warranties, express or implied, whether of merchantability or fitness for a particular
use, except as expressly set forth herein. The sole obligation of Levenhuk under this limited warranty will be
to repair or replace the covered product, in accordance with the terms set forth herein. Levenhuk disclaims
liability for any loss of profits, loss of information, or for any general, special, direct, indirect or
consequential damages which may result from breach of any warranty, or arising out of the use or inability to
use any Levenhuk product. Any warranties which are implied and which cannot be disclaimed will be limited in
duration to a term of six months for accessories from the date of retail purchase.
Some states/provinces do not allow the exclusion or limitation of incidental or consequential damages, so the
above limitations and exclusions may not apply to you. This warranty gives you specific legal rights, and you
may have other rights which vary from state to state or province to province.
Levenhuk reserves the right to modify or discontinue any product without prior notice.
NOTE: This warranty is valid to USA and Canadian customers who have purchased this product from an
authorized Levenhuk dealer in the USA or Canada. Warranty outside the USA or Canada is valid only to
customers who purchased from an authorized Levenhuk dealer in the specific country or international
distributor. Please contact them for any warranty service.
If warranty problems arise, or if you need assistance in using your product, contact the local Levenhuk branch:
Levenhuk Worldwide:
USA: www.levenhuk.com
Canada: www.levenhuk.ca
Czech Republic: www.levenhuk.cz
Netherlands: www.levenhuk.nl
Poland: www.levenhukoptics.pl
Russia: www.levenhuk.ru
Ukraine: www.levenhuk.ua
EU: www.levenhuk.eu
Purchase date ___________________________________ Signature ________________________________ Stamp
16
Оглавление
- Congratulations!
- Blahopřejeme!
- Поздравляем!
- Вітаємо!


