Beko GNE 134620 X: 3 Installation
3 Installation: Beko GNE 134620 X
3 Installation
C Please remember that the
manufacturer shall not be held liable if
the information given in the instruction
manual is not observed.
Points to be considered
when re-transporting your
refrigerator
1. Your refrigerator must be
emptied and cleaned prior to any
transportation.
2. Shelves, accessories, crisper and etc.
in your refrigerator must be fastened
securely by adhesive tape against any
Plastic wedges will provide the
jolt before repackaging.
required distance between your
3. Packaging must be tied with thick
refrigerator and the wall in order to
tapes and strong ropes and the
allow the air circulation.
rules of transportation printed on the
package must be followed.
3. Clean the interior of the refrigerator as
C Always remember...
recommended in the “Maintenance
Every recycled material is an
and cleaning” section.
indispensable source for the nature
4. Plug the refrigerator into the wall
and for our national resources.
outlet. When the door is open the
If you wish to contribute to recycling
respective interior light will come on.
the packaging materials, you can
5. You will hear a noise as the
get further information from the
compressor starts up. The liquid and
environmental bodies or local
gases sealed within the refrigeration
authorities.
system may also give rise to noise,
even if the compressor is not running
and this is quite normal.
Before operating your
6. Front edges of the refrigerator may
refrigerator
feel warm. This is normal. These
Before starting to use your refrigerator
areas are designed to be warm to
check the following:
avoid condensation.
1. Is the interior of the refrigerator dry
and can the air circulate freely in the
Electric connection
rear of it?
Connect your refrigerator to a grounded
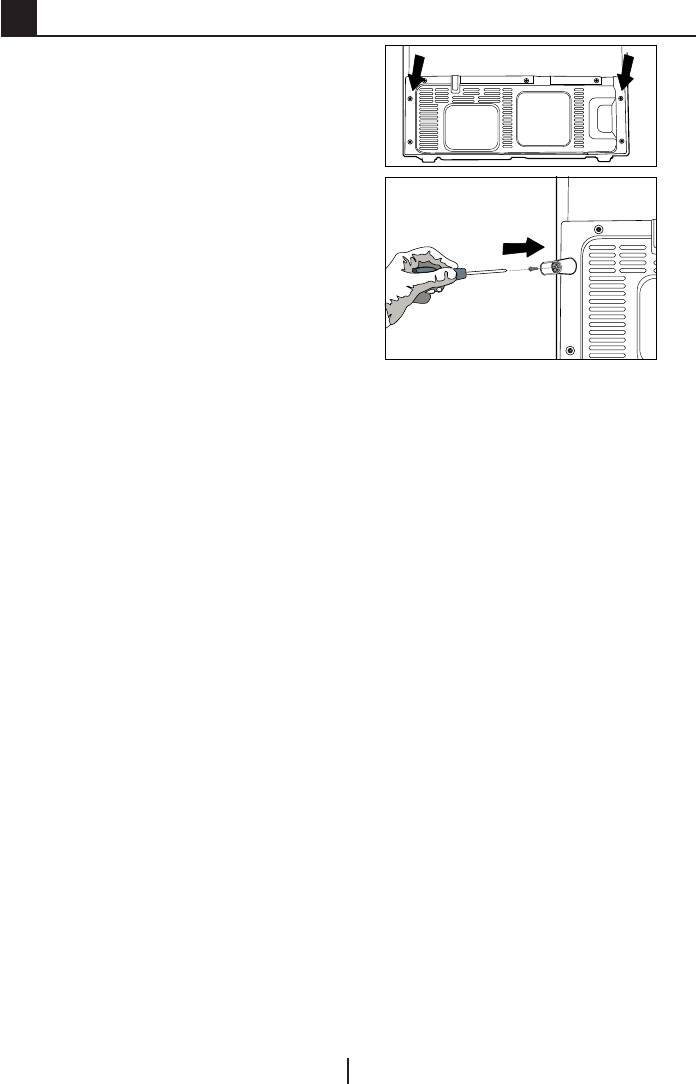
2. Insert the 2 plastic wedges onto the
socket which is being protected by a
rear ventilation cover as illustrated
fuse with the appropriate capacity.
in the following figure. To do this,
Important:
remove the screws on the product
and use the screws given in the same
pouch.
9
EN

B The connection must be in
compliance with national regulations.
Disposing of your old
refrigerator
B The power cable plug must be easily
Dispose of your old machine without
accessible after installation.
giving any harm to the environment.
B Voltage and allowable fuse protection
A You may consult your authorized
are specified in the “Technical
dealer or waste collection center of
Specifications” section.
your municipality about the disposal
BThe specified voltage must be equal
of your refrigerator.
to your mains voltage.
A Before disposing of your refrigerator,
B Extension cables and multiway plugs
cut out the electric plug and, if there
must not be used for connection.
are any locks on the door, make them
B A damaged power cable must be
inoperable in order to protect children
replaced by a qualified electrician.
against any danger.
B The appliance must not be operated
before it is repaired! There is danger
Placing and Installation
of electric shock!
B Caution: Never plug the refrigerator
Disposing of the packaging
into the wall outlet during installation.
A The packing materials may be
Otherwise, risk of death or serious
dangerous for children. Keep the
injury may arise.
packing materials out of the reach
of children or dispose them of by
A If the entrance door of the room
classifying them in accordance
where the refrigerator will be installed is
with the waste instructions. Do not
not wide enough for the refrigerator to
dispose them of along with the
pass through, than call the authorised
normal household waste.
service to have them remove the
The packing of your refrigerator is
doors of your refrigerator and pass it
produced from recyclable materials.
sideways through the door.
Changing the illumination
lamp
1. Install your refrigerator to a place
To change the lamp used for
that allows ease of use.
illumination of your refrigerator, please
2. Keep your refrigerator away from
call your Authorized Service.
heat sources, humid places and direct
sunlight.
3. There must be appropriate air
ventilation around your refrigerator in
order to achieve an efficient operation.
10
EN
If the refrigerator is to be placed in a
recess in the wall, there must be at
least 5 cm distance with the ceiling
and at least 5 cm with the wall.
If the floor is covered with a carpet,
your product must be elevated 2.5 cm
from the floor.
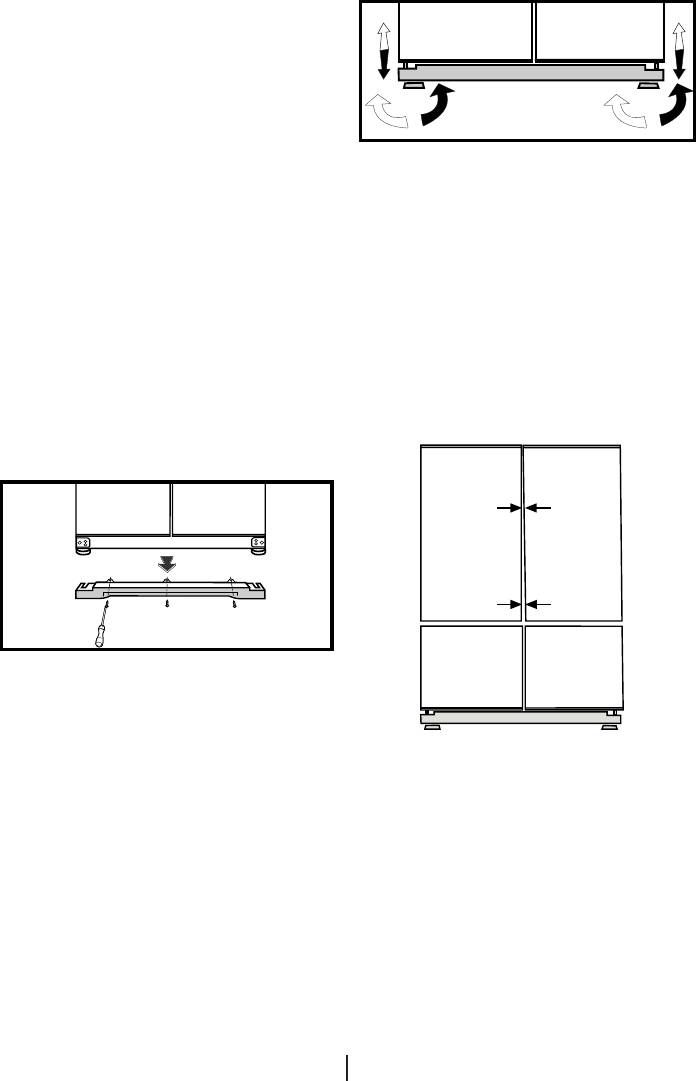
4. Place your refrigerator on an even
2. After the balance issue is remedied,
floor surface to prevent jolts.
install back the ventilation cover and
fasten the screws.
5. Do not keep your refrigerator in
ambient temperatures under 10°C.
3. Remove the screws fastening the
Floor balance adjustment
lower ventilation cover using a Philips
screwdriver.
AIf your refrigerator is unbalanced;
Adjusting the gap between
B First unplug the product. The
the upper door
product must be unplugged when
making the balance adjustment. There
is the risk of electric shock.
4
1 2 3
1- Ventilation cover is removed by
unscrewing its screws as illustrated
in the figure before the procedure.
You can balance your refrigerator by
C You can adjust the gap between
turning the front legs of it as illustrated
the fridge compartment doors as
in the figure. The corner where the
illustrated in the figures.
leg exists is lowered when you turn
Door shelves should be empty when
in the direction of black arrow and
adjusting the door height.
raised when you turn in the opposite
direction. Taking help from someone to
slightly lift the refrigerator will facilitate
this process.
11
EN
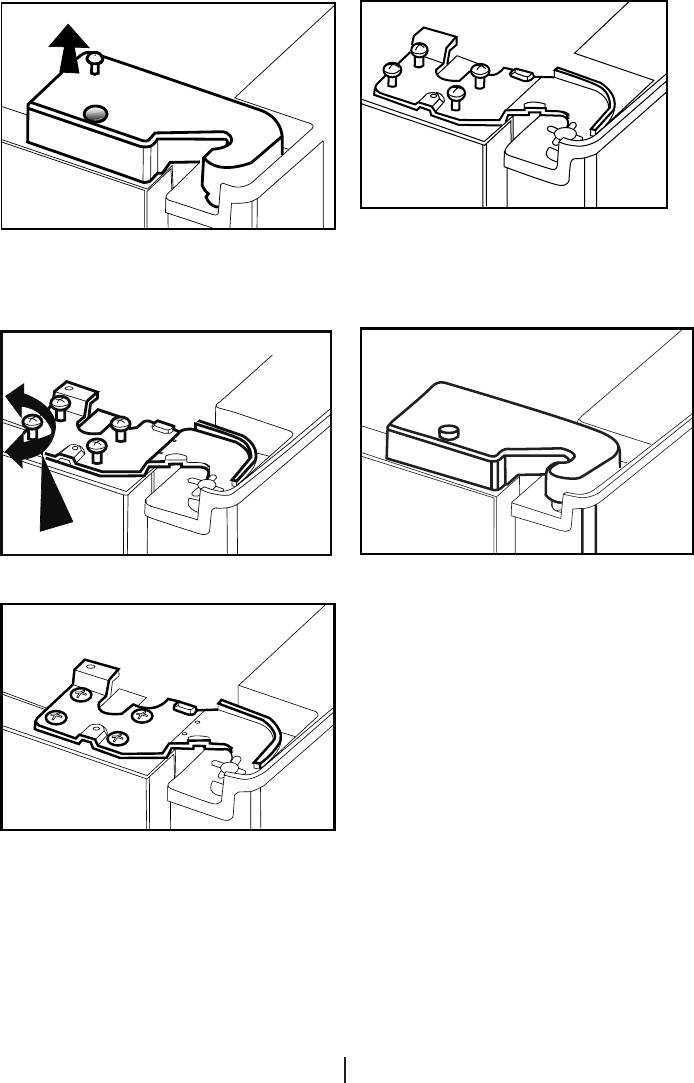
C Fix the door you have adjusted by
C Using a screwdriver, remove the
tightening the screws without changing
screw of upper hinge cover of the door
the position of the door.
you want to adjust.
C Replace the hinge cover and fix
with the screw.
C Adjust the door appropriately as
you desire by loosing the screws.
12
EN
Installing Water Filter
5. Water Filter or externally connectable
(in some models)
filter to be fitted to the bracket inside
Two different water sources may
the fridge compartment.
be connected to the refrigerator
Place where the external filter is going
for water supply: the mains cold
to be fitted should be determined
water supply and water in a jug.
first. (Applies to the filter being
Installation Requirements
used outside the refrigerator.) Then,
A pump should be used for jug water
determine the distance between the
usage.
filter and the refrigerator and required
hose lengths from the filter to the
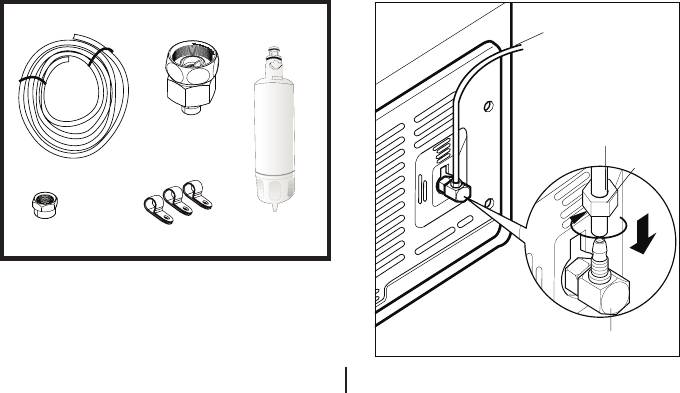
Check that the parts stated below are
refrigerator water inlet.
supplied with your appliance.
Water filter must be hold upright as
1. Union for connection of the water
shown in the figure. It is important to
pipe to the rear of the appliance.
properly attach the filter to water inlet
(If it does not fit, provide it from the
and water outlet points.
nearest authorized service.)
After attaching the filter, do not use first
2. 2 pieces of pipe clips (In case
3-4 glasses of water.
required to secure the water pipe)
Connection of the Water
Note: Since the following parts are
Pipe to the Refrigerator
not required in use with a jug, they
1. After installing the union onto the
may not be found in the product you
water pipe, insert the water pipe to
purchased.
the refrigerator inlet valve by pressing
3. 5-meter long water pipe (1/4 inch in
downwards firmly.
diameter)
2. Fix union as seen in the opposite
4. Cold mains water valve with mesh
figure, by squeezing by hand on the
filter (Tap Adapter)
refrigerator inlet valve.
a
3
*5
4
a
b
2
1
c
13
EN
2
1
(a- Water Pipe, b-Union, c-Valve)
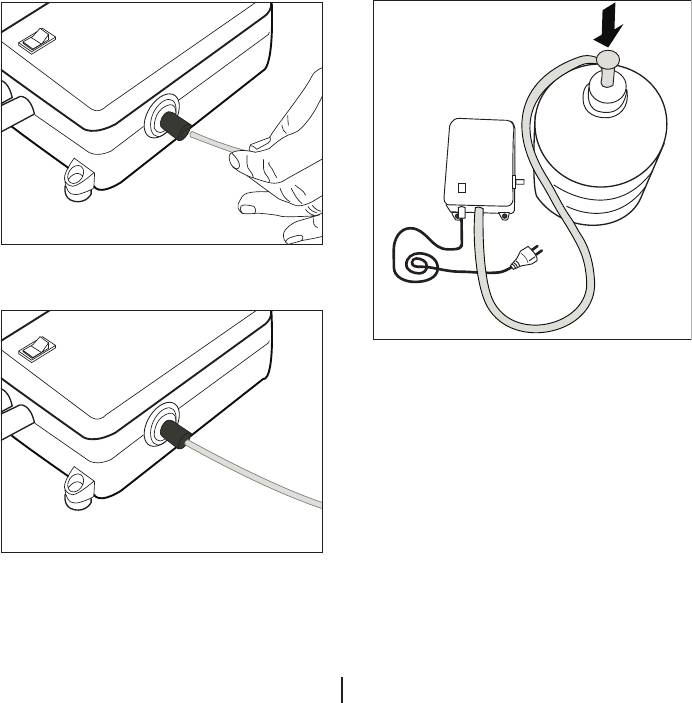
1. Finish the connection by pushing
the other end of the water pipe into
C Note 1: You should not need to
the water pipe inlet of the pump as
tighten the union with a tool to achieve
shown in the figure.
water tight assembly. In case of a leak
2. Put and fix the pump hose into the
use a spanner or a pair of pliers to
jug as shown in the figure.
tighten the union.
3. After completing the connection, plug
Connection of Water Hose to
in and run the pump.
the Jug
To provide an efficient operation of the
(in some models)
pump, wait for 2-3 minutes after
To connect water to the refrigerator
starting the pump.
from a jug, a pump is needed. Follow
C You may refer to the user manual
the instructions below after connecting
of the pump while making the water
one end of the water pipe coming
connection.
out of the pump to the refrigerator as
described on the previous page.
14
EN
C There is no need to use water filter in
case a jug is used.
C Pump must be used when jug will be
used.
Connection of the Water
Pipe to the Cold Water Mains
Line
(in some models)
If you want to use your refrigerator by
connecting it to the cold water mains
line,
you will have to connect a standard
1/2" valve connection fitting to the cold
water supply in your house. In case
this valve is not present or in case
you are not sure, consult a qualified
plumber.
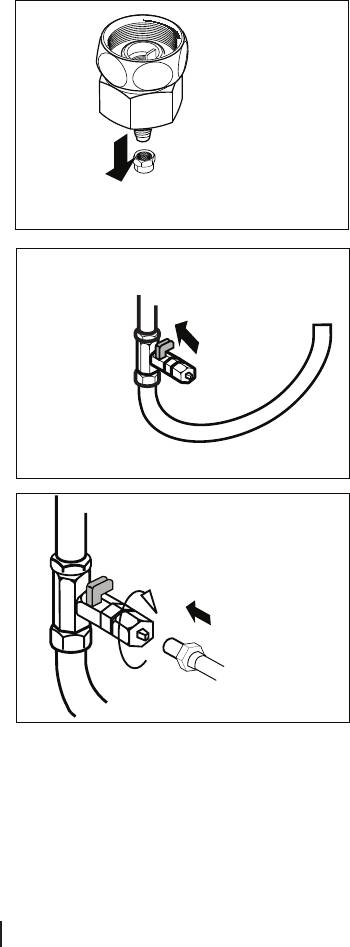
1. Separate the union from the tap
adaptor. (Figure A)
2. Install the tap adaptor to 1/2” valve
fitting as shown in the figure. (Figure
B)
3. After inserting the water pipe to the
union, install it to the tap adaptor
and insert to the tap as shown in the
figure. (Figure C)
4. Tighten the union manually. In case of
a leak use a spanner or a pair of pliers
to tighten the union.
A Caution: Secure the water pipe
to suitable points by means of the
pipe clips supplied to avoid any
damage or displacement or accidental
disconnection.
15
EN
A Caution: After turning on the water
valve, make sure that there is no
leakage at both connection points of
the water pipe. In case of a leak, turn
off the valve immediately and tighten all
joints again using a spanner or a pair
of pliers.
A Caution: Make sure that standard
1/2" valve fitting fed by cold mains
water supply is available and is turned
To fit the water filter follow the
off fully.
instructions below referring to figures
supplied:
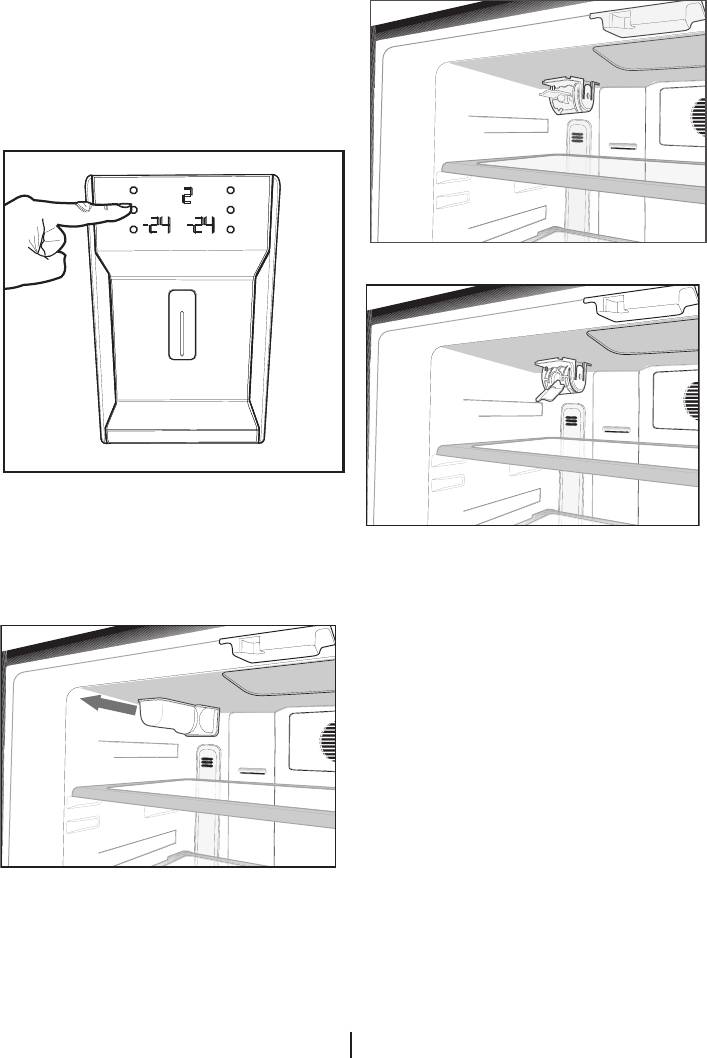
1. Press ice cancel button on the
display.
2. Remove the filter cover in the fridge
compartment by pulling it forward.
3. Take out the water filter by-pass
cover by rotating it downwards.
A Caution: Make sure that the “Ice
off” mode is active before taking out
the by-pass cover.
Note: It is normal that a few drops of
water drip after the cover has been
taken out.
4. Remove the lid on top of the water
filter to place it as shown in the figure
and turn upwards to lock it.
16
EN
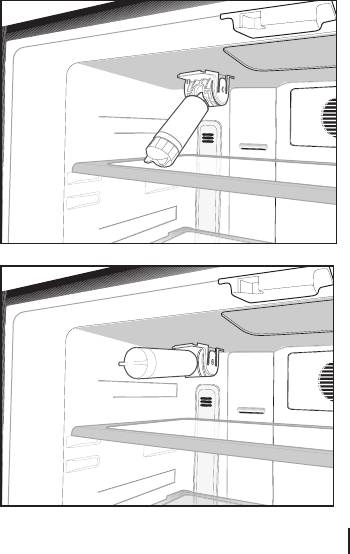
5. Press ice cancel button on the
water filter or installing the by-pass
display again to exit from this mode.
cover.
Water filter should be replaced every 6
Prior to first use of Water
months.
Dispenser
If you want to have the filter change
C Water mains pressure must not be
time calculated automatically and
below 1 bar.
receive a warning at the end of usage
C Water mains pressure must not be
time, please read "Calculating the Filter
above 8 bars.
Usage Time Automatically" section.
C Pumps must be used in case the
The water filter must be removed as
supply water pressure drops below 1
shown in the figure when it is going to
bar or if a jug is going to be used.
be replaced or when it will no longer
be used and by-pass cover must be
C Water system of the refrigerator
attached. It must be made sure that
must be connected to the cold water
Ice Off mode is active before taking it
line. It must not be connected to hot
out.
water line.
A Caution: Water filter cleans some
C No water may be obtained in the
foreign particles in the water. It does
initial operation of the refrigerator. This
not purify water from microorganisms.
is caused by the air in the system. To
discharge air from the system, press
A Caution: Ice Off button must always
Dispenser latch for periods of 1 minute
be pressed during replacement of the
until water comes from the Dispenser.
Water flow may be irregular in the
beginning. Irregular water flow will be
normalized after the air in the system is
discharged.
C At the initial startup of the
refrigerator approx.12 hours must pass
before cold water can be obtained.
C Water mains pressure must be
between 1-8 bars for the operation
of Ice/Water Dispenser smoothly. For
this, check that 1 glass of water (100
cc) can be filled in 10 seconds.
C The first 10 glasses of water should
not be consumed.
C Approximately the first 30 cubes
of ice to be obtained from the Ice
Dispenser must not be used.
C Always use the water filter when a
jug is not being used.
17
EN
Оглавление
- GNE 134620 X
- 1 Your Refrigerator
- 2 Important Safety Warnings
- 3 Installation
- 4 Preparation
- 5 Using your refrigerator
- A B
- 6 Cleaning and care
- 7 Recommended solutions for the problems
- 1 Холодильник
- 2 Важные указания по технике безопасности
- 3 Установка
- 4 Подготовка
- 5 Пользование холодильником
- A B
- 6 Чистка и уход
- 7 Рекомендации по устранению неисправностей


