Акку-Чек Перформа Нано: инструкция
Раздел: Товары для здоровья
Тип:
Инструкция к Акку-Чек Перформа Нано

This fi le may not print or view at 100%.
Die lines and color breaks do not print.
Roche USA – 44702
V6/1 – 05106508001(01) – Schwarz
Roche USA – 44702
V6/2 – 05106508001(01) – Cyan
Roche USA – 44702
V6/3 – 05106508001(01) – Magenta
Roche USA – 44702
V6/4 – 05106508001(01) – Yellow
Roche USA – 44702
V6/5 – 05106508001(01) – PMS 181
Roche USA – 44702
V6/6 – 05106508001(01) – PMS Cool Gray 4
44702_NanoPerf_Cov.indd 144702_NanoPerf_Cov.indd 1 10/9/09 2:36:59 PM10/9/09 2:36:59 PM

44702_NanoPerf_Cov.indd 244702_NanoPerf_Cov.indd 2 10/9/09 2:36:59 PM10/9/09 2:36:59 PM

This fi le may not print or view at 100%.
Die lines and color breaks do not print.
1
Roche USA – 44702
EN
V4/1 – 05106508001(01) – Schwarz
®
Roche USA – 44702
Whether the Accu-Chek
Performa Nano Meter is your fi rst blood glucose meter or
V4/2 – 05106508001(01) – Cyan
you have used a meter for some time; please take time to read this booklet carefully
Roche USA – 44702
before you use your new meter. To use it correctly and dependably, you need to
V4/3 – 05106508001(01) – Magenta
Roche USA – 44702
understand its operation, screen displays, and all individual features.
V4/4 – 05106508001(01) – Yellow
Should you have any questions, please contact one of our customer support and
service centers. A list of addresses is at the back of this booklet.
44702_EN_PNano_24_Ins.indd 144702_EN_PNano_24_Ins.indd 1 10/9/09 2:38:53 PM10/9/09 2:38:53 PM

®
The Accu-Chek
Performa Nano System
2
Your new Accu-Chek Performa Nano Meter is for quantitative blood glucose testing
using Accu-Chek Performa Test Strips.
Suitable for self-testing.
The Accu-Chek Performa Nano Meter may be used by patients who test their own
blood glucose as well as by healthcare professionals for monitoring patient’s blood
glucose values.
The system includes (some items may be sold separately):
Accu-Chek Performa Nano Meter with batteries•
Accu-Chek Performa Test Strips and code chip•
Accu-Chek Performa Control Solution•
Any object coming into contact with human blood is a potential
source of infection (see: Clinical and Laboratory Standards Institute:
Protection of Laboratory Workers from Occupationally Acquired
Infections; Approved Guideline – Third Edition; CLSI document
M29-A3, 2005).
44702_EN_PNano_24_Ins.indd 244702_EN_PNano_24_Ins.indd 2 10/9/09 2:38:53 PM10/9/09 2:38:53 PM

Why Regular Blood Glucose Testing Is Important
3
Testing your blood glucose regularly can make a big difference in how you manage
your diabetes every day. We have made it as simple as possible.
Important Information About Your New Meter
Your new meter is designed for testing fresh whole blood samples (for example, •
blood from your fingertip or forearm). The meter is for outside the body (in vitro)
use. It should not be used to diagnose diabetes.
Only use Accu-Chek Performa Test Strips. Other test strips will give inaccurate •
results.
The meter comes with a preset time and date. You may need to change the time to •
your time zone.
If you follow the steps in the booklet, but still have symptoms that do not seem to •
match your test results, or if you have questions, talk to your healthcare
professional.
44702_EN_PNano_24_Ins.indd 344702_EN_PNano_24_Ins.indd 3 10/9/09 2:38:53 PM10/9/09 2:38:53 PM

4
44702_EN_PNano_24_Ins.indd 444702_EN_PNano_24_Ins.indd 4 10/9/09 2:38:53 PM10/9/09 2:38:53 PM

Contents
5
Chapter 1: Understanding Your New System ................................................ 7
The Accu-Chek Performa Nano Meter ............................................................................ 7
Coding the Meter ........................................................................................................... 9
Using the Accu-Chek Performa Nano System ............................................................... 11
Chapter 2: Testing Your Blood Glucose ...................................................... 13
Performing a Blood Glucose Test ................................................................................. 13
Marking Test Results and Setting the Post-Meal Reminder .......................................... 17
Alternative Site Testing (AST) ....................................................................................... 19
Unusual Test Results ................................................................................................... 24
Symptoms of High or Low Blood Glucose ..................................................................... 26
Chapter 3: Meter Memory, Setup, and Downloading ................................... 27
Memory ....................................................................................................................... 27
Viewing Test Results .................................................................................................... 28
Meter Setup ................................................................................................................. 30
Setting the Time and Date ........................................................................................... 31
Setting the Beeper On/Off ............................................................................................ 34
Setting the Post-Meal Reminder Time .......................................................................... 37
Setting the Alarm Clock Function ................................................................................. 40
Setting the Hypo Indicator Function.............................................................................. 45
Transferring Data Directly to a Computer or PDA Using Specialized Software
and an Infrared Cable .................................................................................................. 48
44702_EN_PNano_24_Ins.indd 544702_EN_PNano_24_Ins.indd 5 10/9/09 2:38:53 PM10/9/09 2:38:53 PM

Chapter 4: Control Testing ......................................................................... 51
6
Why Perform Control Tests .......................................................................................... 51
About the Control Solutions .......................................................................................... 52
Performing a Control Test ............................................................................................ 53
Understanding Out-of-Range Control Test Results ....................................................... 57
Chapter 5: Maintenance and Troubleshooting ............................................ 59
Changing the Batteries ................................................................................................. 59
Cleaning the Meter....................................................................................................... 61
Maintenance and Troubleshooting ............................................................................... 62
Screen Messages and Troubleshooting ........................................................................ 63
Chapter 6: Technical Information .............................................................. 73
Product Limitations ...................................................................................................... 73
Specifications .............................................................................................................. 73
Product Safety Information ........................................................................................... 76
Disposing of Your Meter ............................................................................................... 76
Explanation of Symbols ................................................................................................ 77
Guarantee .................................................................................................................... 78
Additional Supplies ...................................................................................................... 78
Information for Healthcare Professionals ...................................................................... 79
Index ........................................................................................................................... 81
44702_EN_PNano_24_Ins.indd 644702_EN_PNano_24_Ins.indd 6 10/9/09 2:38:53 PM10/9/09 2:38:53 PM
Chapter 1: Understanding Your New System
7
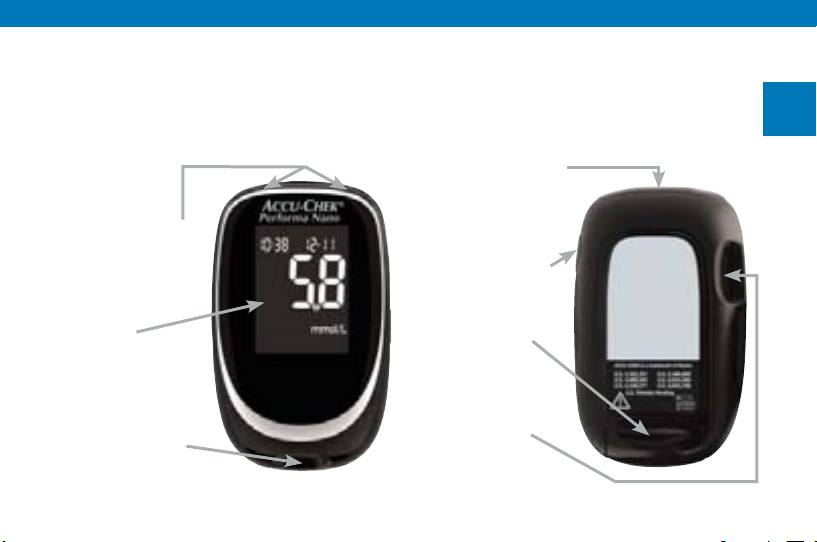
The Accu-Chek Performa Nano Meter
Infrared (IR) Window –
Transfers data from the
Right and Left
meter to a computer or
Arrow Buttons –
PDA.
Press to enter
memory, adjust
On/Off/Set Button –
settings, and scroll
Turns the meter on or
through results.
off and sets options.
Display –
Battery Drawer –
Shows results,
Pull out the battery
messages, and
drawer to replace
results stored in
batteries, when needed.
memory.
Code Chip Slot –
Test Strip Slot –
Insert code chip into
Insert test strip here.
this opening.
Front View Back View
44702_EN_PNano_24_Ins.indd 744702_EN_PNano_24_Ins.indd 7 10/9/09 2:38:53 PM10/9/09 2:38:53 PM
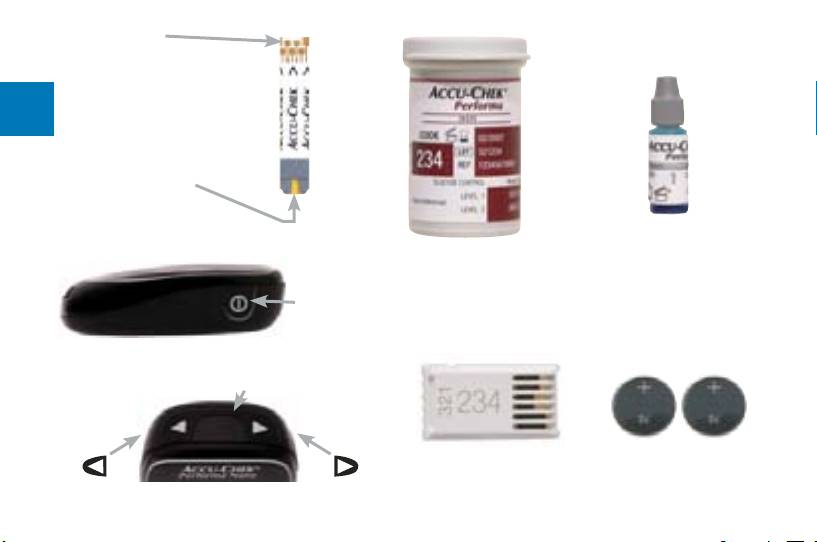
Golden End –
Insert this end of the test
strip into the meter.
8
Yellow Window –
Touch blood drop or
control solution here.
Test Strip
Control Solution Bottle
Test Strip Container
On/Off/Set Button
Side View
Infrared (IR) Window
Code Chip
Batteries – Insert into
(for example)
drawer with (+) side
Left Arrow
Right Arrow
Top View
facing down.
Button
Button
44702_EN_PNano_24_Ins.indd 844702_EN_PNano_24_Ins.indd 8 10/9/09 2:38:54 PM10/9/09 2:38:54 PM
Coding the Meter
9
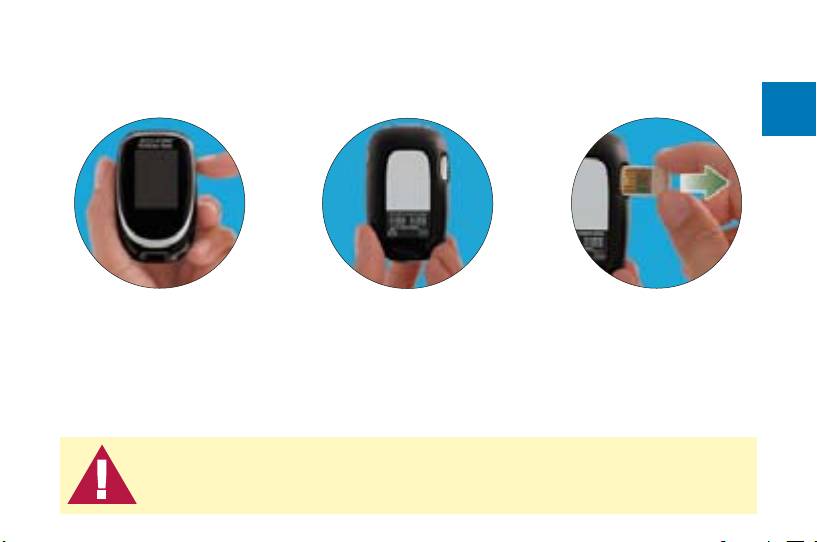
1. Make sure the meter
2. Turn the meter over. 3. Remove the old code
is off.
chip (if there is one
in the meter) and
discard it.
Change the code chip every time you open a new box of test strips!
44702_EN_PNano_24_Ins.indd 944702_EN_PNano_24_Ins.indd 9 10/9/09 2:38:54 PM10/9/09 2:38:54 PM
10
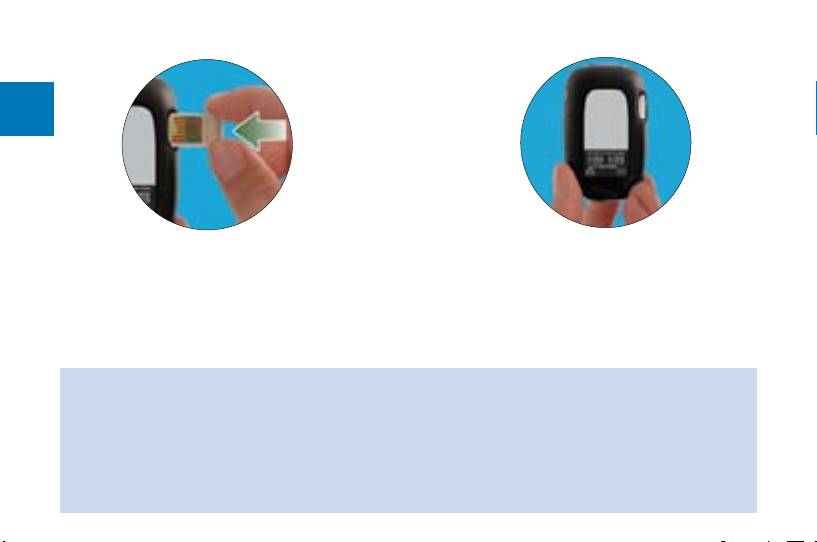
4. Turn the code chip over so the
5. Leave the code chip in the meter
code number faces away from
until you open a new box of test
you. Push it into the code chip slot
strips.
until it stops.
Notes:
Do not force the code chip into the meter. It is designed to go into the meter only •
one way.
If you see a code “- - -” on the display, insert a code chip into the meter.•
44702_EN_PNano_24_Ins.indd 1044702_EN_PNano_24_Ins.indd 10 10/9/09 2:38:54 PM10/9/09 2:38:54 PM

Using the Accu-Chek Performa Nano System
Only use Accu-Chek Performa Test •
Be sure to check the expiry date on the •
Strips.
test strip container. Do not use the test
11
strips after that date.
Change the code chip every time you •
open a new box of test strips.
Store the test strip container and meter •
in a cool dry place, such as a bedroom.
Store the unused test strips in their •
original container.
Refer to the test strip package insert •
for test strip storage and system
Close the container tightly immediately •
operating conditions.
after you take a test strip out. This
helps keep the test strips dry.
Do not apply blood or control solution •
to the test strip before you insert it into
Use the test strip immediately after you •
the meter.
take it out of the container.
Do not store test strips in high heat and moisture areas (bathroom or
kitchen)! Heat and moisture can damage test strips.
44702_EN_PNano_24_Ins.indd 1144702_EN_PNano_24_Ins.indd 11 10/9/09 2:38:55 PM10/9/09 2:38:55 PM

12
44702_EN_PNano_24_Ins.indd 1244702_EN_PNano_24_Ins.indd 12 10/9/09 2:38:55 PM10/9/09 2:38:55 PM
Оглавление
- Chapter 1: Understanding Your New System
- Chapter 2: Testing Your Blood Glucose
- Chapter 4: Control Testing
- Chapter 5: Maintenance and Troubleshooting
- Chapter 6: Technical Information
- Kapitel 1: Ihr neues System kennen lernen
- Kapitel 2: Blutzuckermessung
- Kapitel 3: Speicherfunktionen, Einstellungen und Messwertübertragung
- Kapitel 4: Funktionskontrollen
- Kapitel 5: Wartung und Fehlerbeseitigung
- Kapitel 6: Technische Informationen
- Kapitola 1: Základní informace o novém systému
- Kapitola 2: Měření krevní glukózy
- Kapitola 4: Kontrolní měření
- Kapitola 5: Údržba a řešení potíží
- Kapitola 6: Technické informace
- Глава 1: Знакомство с Вашей новой системой
- Глава 2: Проведение измерения уровня глюкозы крови
- Глава 4: Контрольные измерения
- Глава 5: Техобслуживание, поиск и устранение неисправностей
- Глава 6: Техническая информация
