Акку-Чек Перформа Нано: Chapter 4: Control Testing
Chapter 4: Control Testing: Акку-Чек Перформа Нано
Chapter 4: Control Testing
Why Perform Control Tests
Performing a control test lets you know that the meter and test strips are working
properly to give reliable results. You should perform a control test when:
You open a new box of test strips•
You left the test strip container open•
51
You want to check the meter and test strips•
Your test strips were stored in extreme temperature and/or humidity•
You dropped the meter•
Your test result does not agree with how you feel•
You want to check if you are testing correctly•
44702_EN_PNano_24_Ins.indd 5144702_EN_PNano_24_Ins.indd 51 10/9/09 2:39:00 PM10/9/09 2:39:00 PM

About the Control Solutions
Only use Accu-Chek Performa Control Solutions.•
The meter automatically recognizes the Accu-Chek Performa Control Solution.•
The control results are not displayed in memory.•
Write the date you opened the control solution bottle on the bottle label. The •
solution is good for three months from that date or until the expiry date on the
bottle label, whichever comes first.
Do not use control solution that is past the expiry date.•
52
The solution can stain clothing. If you spill it, wash your clothes with soap and •
water.
Close the bottle tightly after use.•
Store the bottle at 2 °C to 32 °C. Do not freeze.•
44702_EN_PNano_24_Ins.indd 5244702_EN_PNano_24_Ins.indd 52 10/9/09 2:39:00 PM10/9/09 2:39:00 PM
Performing a Control Test
You need the meter, a test strip, and control solution Level 1 and/or Level 2.
The control level is printed on the bottle label.
53
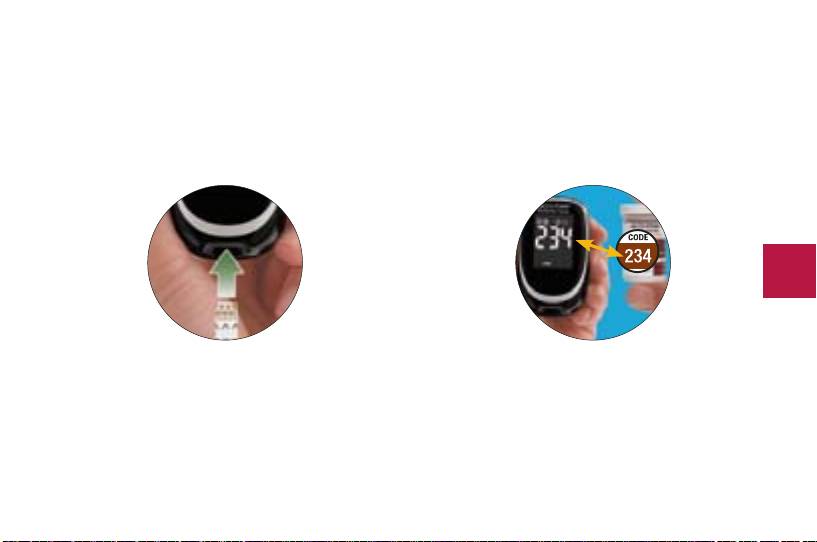
1. Insert the test strip into the meter in
2. Make sure the code number on the
the direction of the arrows. The meter
display matches the code number on
turns on.
the test strip container. If you miss
seeing the code number, remove the
test strip and reinsert it into the meter.
44702_EN_PNano_24_Ins.indd 5344702_EN_PNano_24_Ins.indd 53 10/9/09 2:39:00 PM10/9/09 2:39:00 PM
OR
54
3. Select the control
4. Put the meter on a flat
5. Remove the control
solution you want to
surface, like a table.
bottle cap. Wipe the tip
test. You will enter the
of the bottle with a
level later in the test.
tissue.
44702_EN_PNano_24_Ins.indd 5444702_EN_PNano_24_Ins.indd 54 10/9/09 2:39:00 PM10/9/09 2:39:00 PM
OR
55
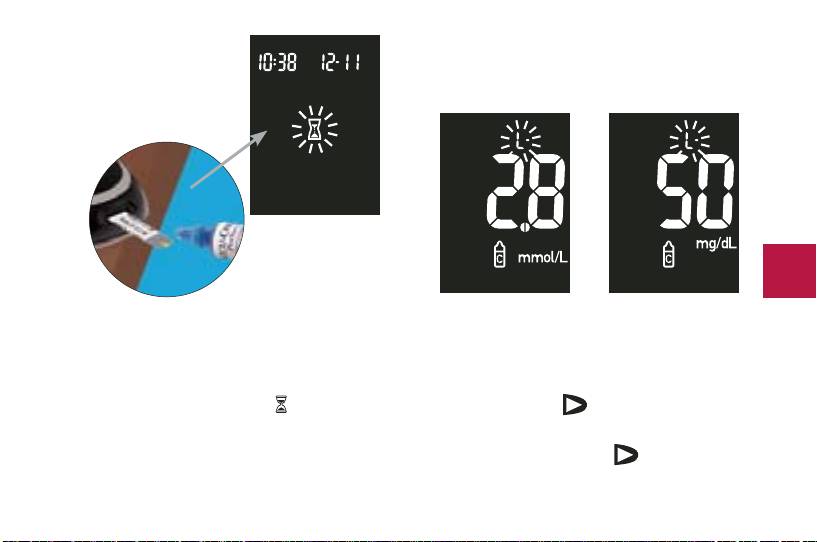
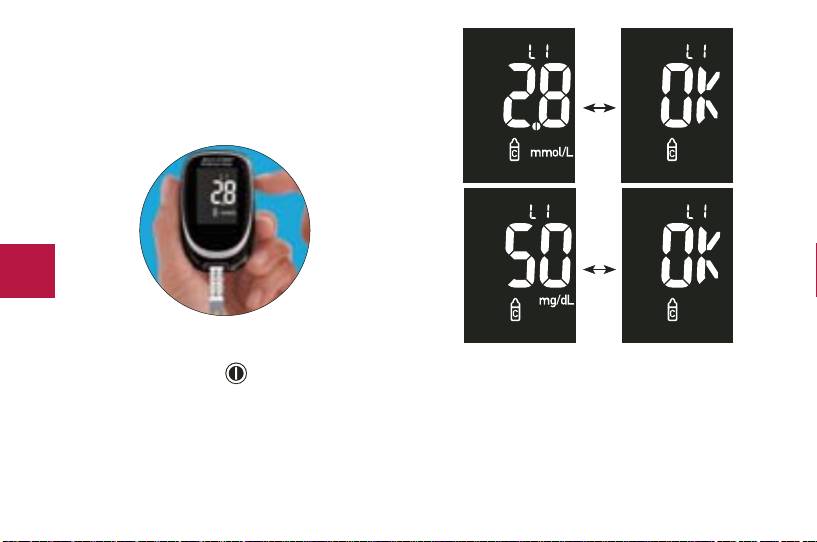
6. Squeeze the bottle until a tiny drop
7. The result appears on the display, along
forms at the tip. Touch the drop to the
with the control bottle symbol and
front edge of the yellow window of the
flashing “L.” Do not remove the test
test strip. When you see
flash, you
strip yet. Press
once to mark the
have enough control solution in the test
result as a Level 1. If you tested the
strip. Wipe the tip of the bottle with a
Level 2 control, press
a second
tissue then cap the bottle tightly.
time.
44702_EN_PNano_24_Ins.indd 5544702_EN_PNano_24_Ins.indd 55 10/9/09 2:39:00 PM10/9/09 2:39:00 PM
56
8. Press and release to confirm the
is inside the range on the test strip
control level in the meter.
container, the test strips and meter are
working properly. “Err” and the control
9. “OK” and the control result alternate on
result alternate on the display if the
the display if the result is in range. The
result is not in range. Remove and
range is printed on the test strip
discard the used test strip.
container label. When the control result
44702_EN_PNano_24_Ins.indd 5644702_EN_PNano_24_Ins.indd 56 10/9/09 2:39:01 PM10/9/09 2:39:01 PM
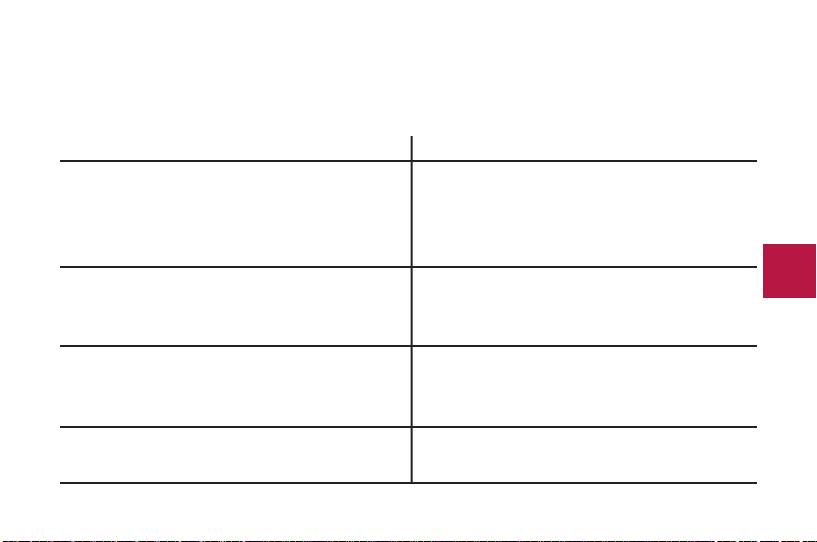
Understanding Out-of-Range Control Test Results
If the control result is not inside the acceptable range, here are some things you can
do to solve the problem:
Troubleshooting Checks
Action
1. Check if test strips or control solutions
Discard the test strips or control solutions
were expired.
if either is past the expiry date. If the
control solution was opened more than
three months ago, discard it.
57
2. Check if you wiped the tip of the control
Wipe the tip of the bottle with a tissue.
solution bottle before and after use.
Repeat the control test with a new test
strip and a fresh drop of control solution.
3. Check if the caps on the test strip
Replace the test strips or control solutions
container and the control solution bottle
if you think either may have been
were always closed tightly.
uncapped for some time.
4. Check if the test strip was out of the
Repeat the control test with a new test
container for a long time.
strip.
44702_EN_PNano_24_Ins.indd 5744702_EN_PNano_24_Ins.indd 57 10/9/09 2:39:01 PM10/9/09 2:39:01 PM
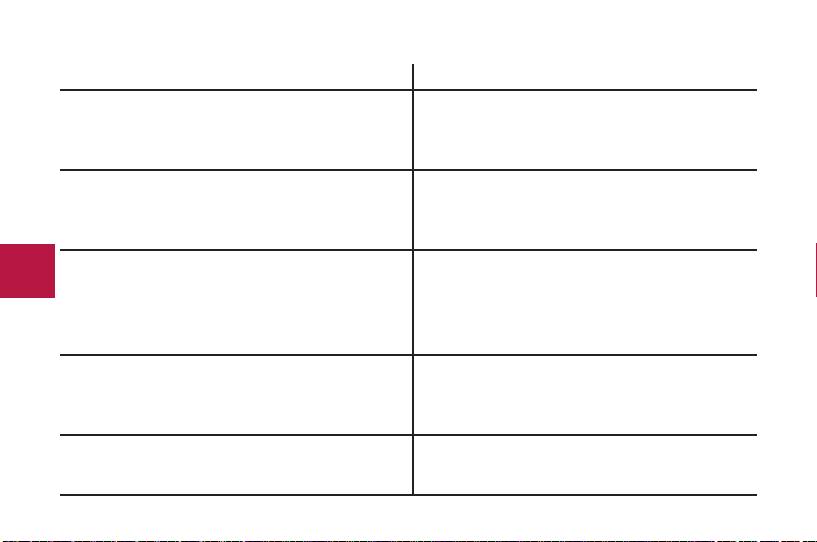
Troubleshooting Checks
Action
5. Check if the test strips and control
Repeat the control test with a properly
solutions were stored in a cool, dry
stored test strip or control solution.
place.
6. Check if you followed the testing steps.
Read Chapter 4, “Control Testing” and
test again. If you still have problems,
call Roche.
7. Check if you chose the correct control
If you chose the wrong control solution
58
solution level, either 1 or 2, when you
level, you can still compare the control
performed the test.
result to the range printed on the test strip
container.
8. Check if the code number on the meter
If they do not match, insert the correct
display matches the code number on
code chip into the meter and test again.
the test strip container.
9. If you are still unsure of the problem…
Repeat the control test with a new test
strip. If you still have problems, call Roche.
44702_EN_PNano_24_Ins.indd 5844702_EN_PNano_24_Ins.indd 58 10/9/09 2:39:01 PM10/9/09 2:39:01 PM
Оглавление
- Chapter 1: Understanding Your New System
- Chapter 2: Testing Your Blood Glucose
- Chapter 4: Control Testing
- Chapter 5: Maintenance and Troubleshooting
- Chapter 6: Technical Information
- Kapitel 1: Ihr neues System kennen lernen
- Kapitel 2: Blutzuckermessung
- Kapitel 3: Speicherfunktionen, Einstellungen und Messwertübertragung
- Kapitel 4: Funktionskontrollen
- Kapitel 5: Wartung und Fehlerbeseitigung
- Kapitel 6: Technische Informationen
- Kapitola 1: Základní informace o novém systému
- Kapitola 2: Měření krevní glukózy
- Kapitola 4: Kontrolní měření
- Kapitola 5: Údržba a řešení potíží
- Kapitola 6: Technické informace
- Глава 1: Знакомство с Вашей новой системой
- Глава 2: Проведение измерения уровня глюкозы крови
- Глава 4: Контрольные измерения
- Глава 5: Техобслуживание, поиск и устранение неисправностей
- Глава 6: Техническая информация
