Акку-Чек Перформа Нано: Chapter 5: Maintenance and Troubleshooting
Chapter 5: Maintenance and Troubleshooting: Акку-Чек Перформа Нано
Chapter 5: Maintenance and Troubleshooting
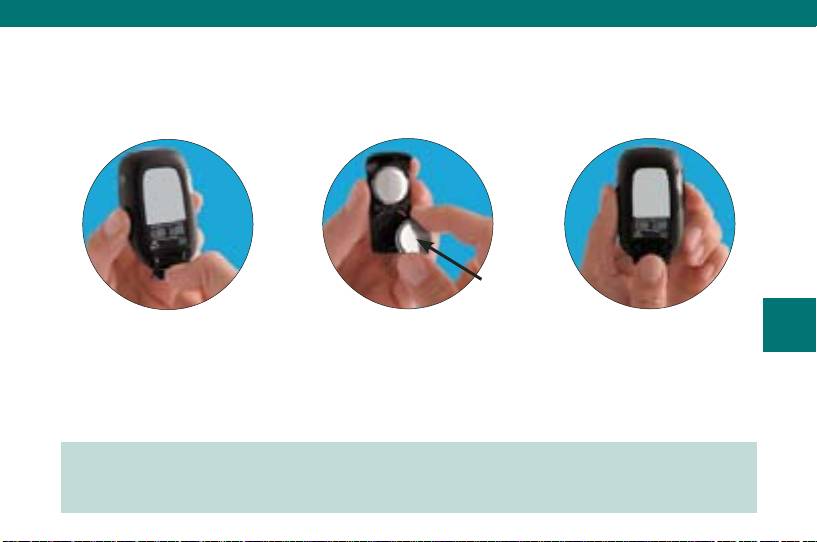
Changing the Batteries
(+) side
facing down
59
1. Use your thumb to slide
2. Remove the old batteries
3. Slide the battery drawer
the battery drawer out of
and place the new ones
back into position until it
the meter.
in the drawer with the
locks into place.
(+) side facing down.
Note: When you install new batteries, the meter automatically prompts you to check
the time and date when you turn it on.
44702_EN_PNano_24_Ins.indd 5944702_EN_PNano_24_Ins.indd 59 10/9/09 2:39:01 PM10/9/09 2:39:01 PM

Notes:
The meter uses two 3-volt lithium batteries, type 2032. This type of battery can be •
found in many stores. It is a good idea to have spare batteries available.
Be sure the batteries are inserted • (+) side facing down or facing away from you.
After you change the batteries, the meter prompts you to confirm the meter’s time •
and date settings. All test results are saved in memory.
Always replace both batteries at the same time and with the same brand.•
60
44702_EN_PNano_24_Ins.indd 6044702_EN_PNano_24_Ins.indd 60 10/9/09 2:39:01 PM10/9/09 2:39:01 PM

Cleaning the Meter
Caring for the Accu-Chek Performa Nano Meter is easy. Just keep it free of dust. If
you need to clean it, follow these guidelines carefully to help you get the best
performance possible:
Do
Do Not
Make sure the meter is off•
Get any moisture in the code chip slot •
or test strip slot
Gently wipe the meter’s surface with a •
soft cloth slightly dampened (wring out
Spray any cleaning solution directly •
any excess liquid) with one of these
onto the meter
61
cleaning solutions:
Put the meter under water or liquid•
70 % isopropyl alcohol•
Pour liquid into the meter•
Mild dishwashing liquid mixed with •
water
10 % household bleach solution •
(1 part bleach plus 9 parts water)
made the same day
44702_EN_PNano_24_Ins.indd 6144702_EN_PNano_24_Ins.indd 61 10/9/09 2:39:01 PM10/9/09 2:39:01 PM
Maintenance and Troubleshooting
The meter needs little or no maintenance with normal use. It automatically tests its
own systems every time you turn it on and lets you know if something is wrong.
If you drop the meter or think it is not giving accurate results, call Roche.
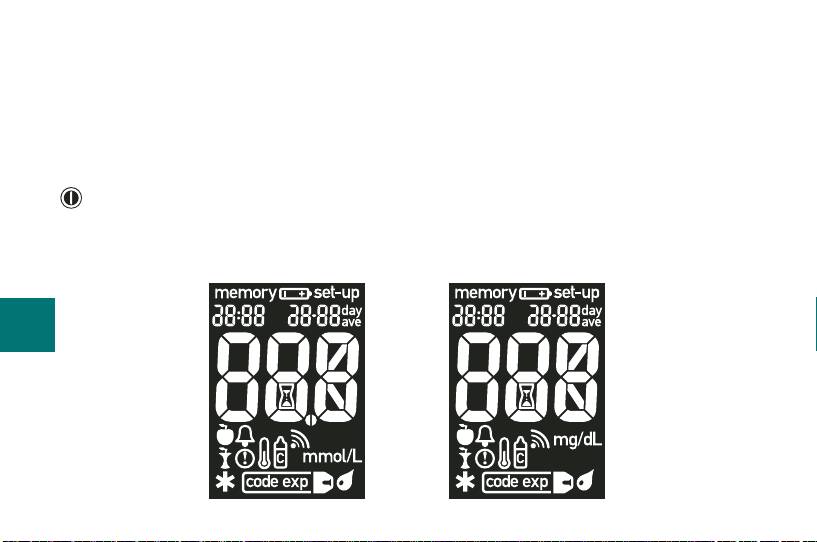
To make sure the display is working properly, turn the meter off, then press and hold
to see the complete display. All the segments should be clear and look exactly like
the picture below. If not, call Roche.
62
OR
44702_EN_PNano_24_Ins.indd 6244702_EN_PNano_24_Ins.indd 62 10/9/09 2:39:01 PM10/9/09 2:39:01 PM

Screen Messages and Troubleshooting
Never make treatment decisions based on an error message. If you
have any concerns, call Roche.
The meter will not turn on or the display is blank.
Batteries are dead – •
Insert new batteries
Display is damaged – •
63
Call Roche
Meter is defective – •
Call Roche
Extreme temperatures – •
Move the meter to a more temperate area
44702_EN_PNano_24_Ins.indd 6344702_EN_PNano_24_Ins.indd 63 10/9/09 2:39:02 PM10/9/09 2:39:02 PM
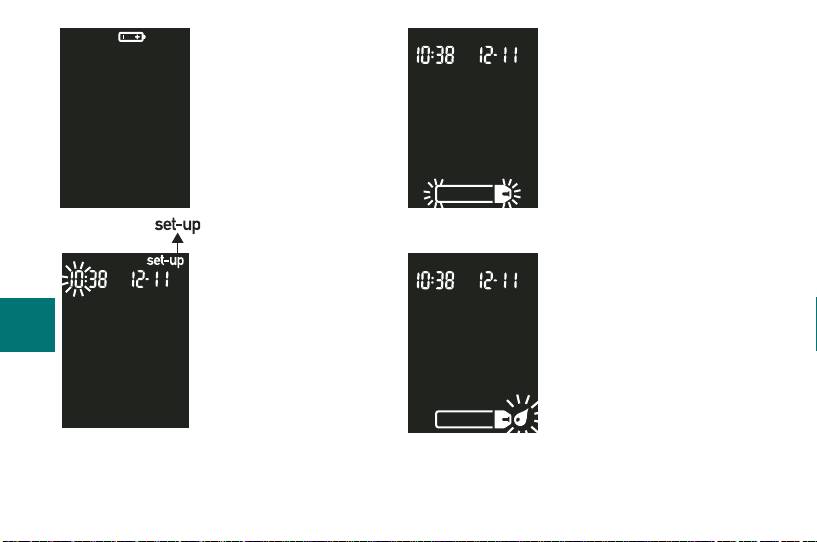
Battery power is low.
The meter is ready for
Change the batteries
you to insert a test strip.
soon.
The meter is in
The meter is ready for a
set-up mode, waiting
drop of blood or control
for you to change or
solution.
64
confi rm settings.
44702_EN_PNano_24_Ins.indd 6444702_EN_PNano_24_Ins.indd 64 10/9/09 2:39:02 PM10/9/09 2:39:02 PM
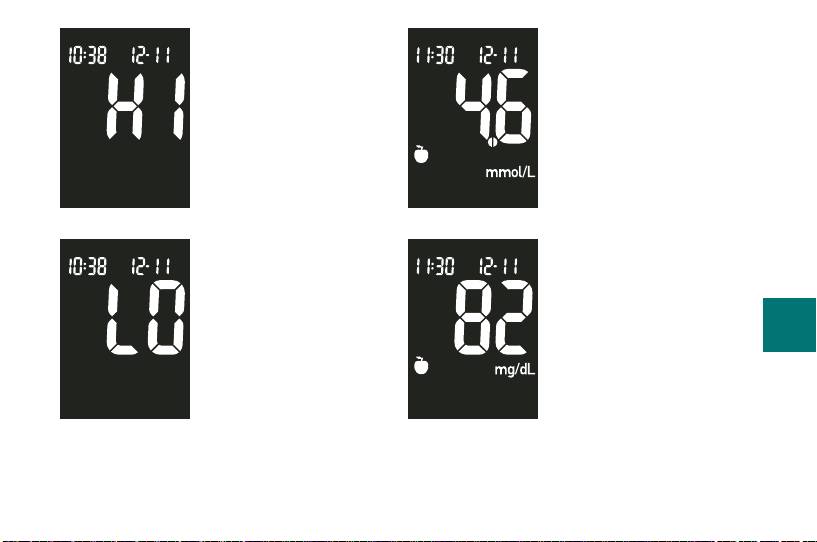
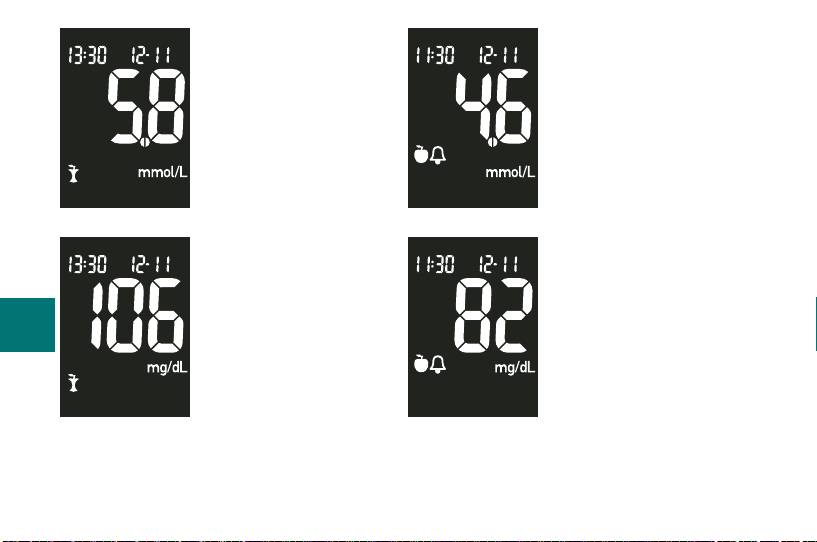
Blood glucose may be
higher than the
measuring range of
the system.
A pre-meal marker was
OR
assigned to this test
Blood glucose may be
result.
lower than the
measuring range of
the system.
65
44702_EN_PNano_24_Ins.indd 6544702_EN_PNano_24_Ins.indd 65 10/9/09 2:39:02 PM10/9/09 2:39:02 PM
A pre-meal marker was
A post-meal marker
assigned to this test
OR
was assigned to this
OR
result and the post-meal
test result.
reminder has been
activated.
66
44702_EN_PNano_24_Ins.indd 6644702_EN_PNano_24_Ins.indd 66 10/9/09 2:39:02 PM10/9/09 2:39:02 PM
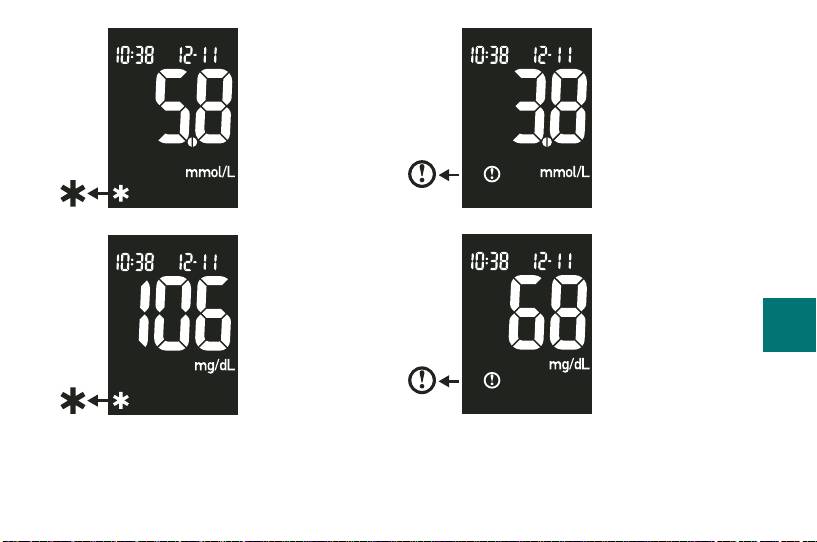
Blood glucose is
A general marker
below the defi ned
OR
was assigned to
OR
hypoglycemia
this test result.
(low blood
glucose) level.
67
44702_EN_PNano_24_Ins.indd 6744702_EN_PNano_24_Ins.indd 67 10/9/09 2:39:02 PM10/9/09 2:39:02 PM
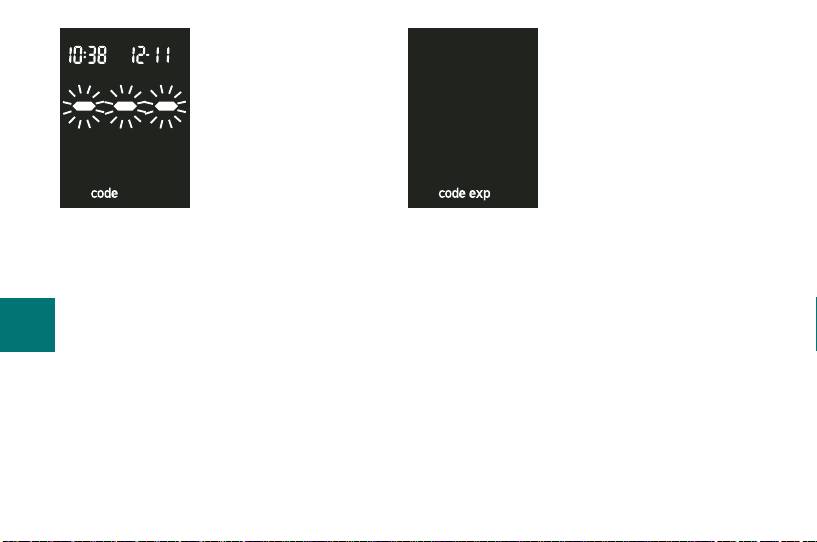
The meter is not
The test strips will expire
coded or the code
at the end of the current
chip is not inserted.
month. Before the end of
Turn off the meter
the month, insert a new
and recode it.
code chip from a new
box of test strips and
ensure the code chip
number matches the
code number on the test strip container.
Make sure the time and date in the meter
are correct.
68
44702_EN_PNano_24_Ins.indd 6844702_EN_PNano_24_Ins.indd 68 10/9/09 2:39:02 PM10/9/09 2:39:02 PM
The test strip is
Your blood glucose
damaged. Remove the
may be extremely high
test strip and reinsert it,
or a meter or a test
or replace it if
strip error has
damaged. Or the code
occurred. If this
chip is incorrect. Turn
confi rms how you feel,
off the meter and insert
contact your healthcare
a new code chip. If the
professional
message reappears,
immediately. If it does not confi rm how
call Roche.
you feel, repeat the test and refer to
Chapter 2, “Unusual Test Results.” If this
The code chip is
does not confi rm the way you feel, run a
69
incorrect. Turn off the
control test with your control solution
meter and insert a new
and a new test strip. If the control result
code chip. If this does
is within the acceptable range, review
not fi x the problem, call
the proper testing procedure and repeat
Roche.
your blood glucose test with a new test
strip. If the E-3 code still appears for
your blood glucose test, your blood
44702_EN_PNano_24_Ins.indd 6944702_EN_PNano_24_Ins.indd 69 10/9/09 2:39:02 PM10/9/09 2:39:02 PM
glucose result may be extremely high
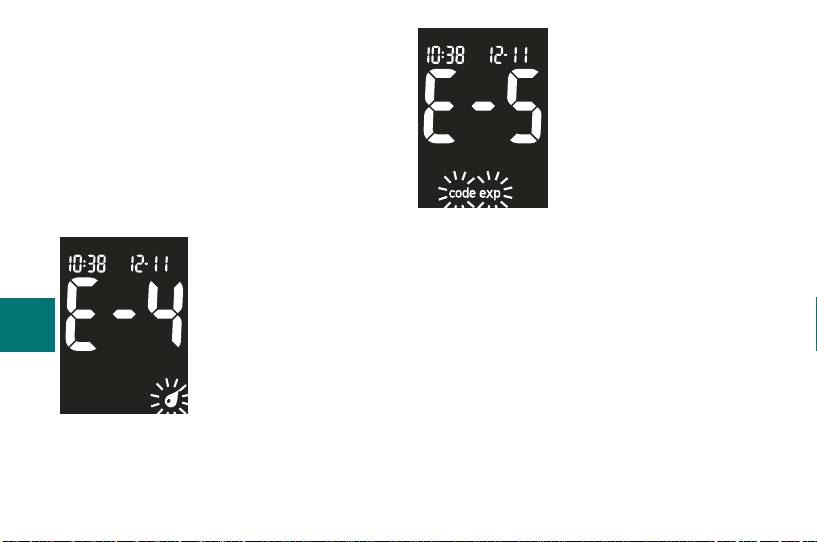
The code chip is from an
and above the system’s reading range.
expired lot of test strips.
Contact your healthcare professional
Ensure the code chip
immediately. If the control result is not
number matches the
within the acceptable range, see
code number on the test
Chapter 4, “Understanding Out-of-Range
strip container. Remove
Control Test Results.”
the code chip and enter
the set-up mode to
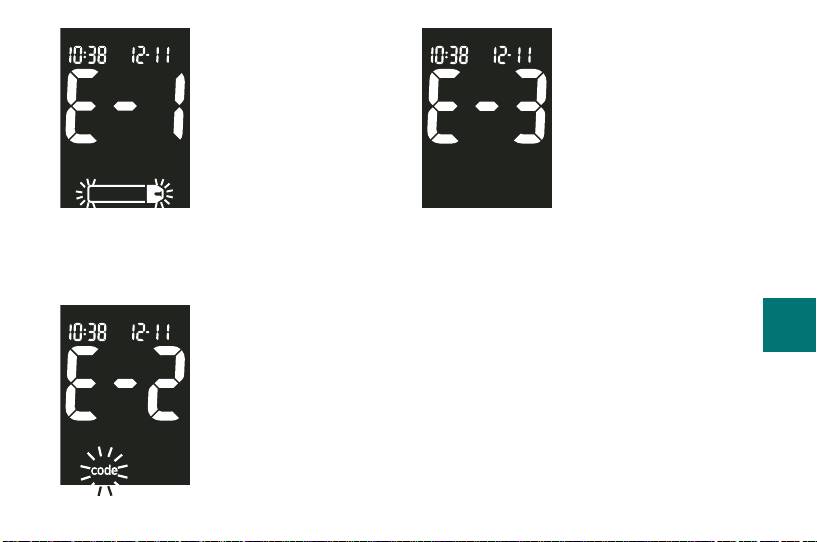
Not enough blood or
ensure the time and date in the meter
control solution was
are correct.
drawn into the test
strip for measurement
70
or was applied after the
test had started.
Discard the test strip
and repeat the test.
44702_EN_PNano_24_Ins.indd 7044702_EN_PNano_24_Ins.indd 70 10/9/09 2:39:02 PM10/9/09 2:39:02 PM
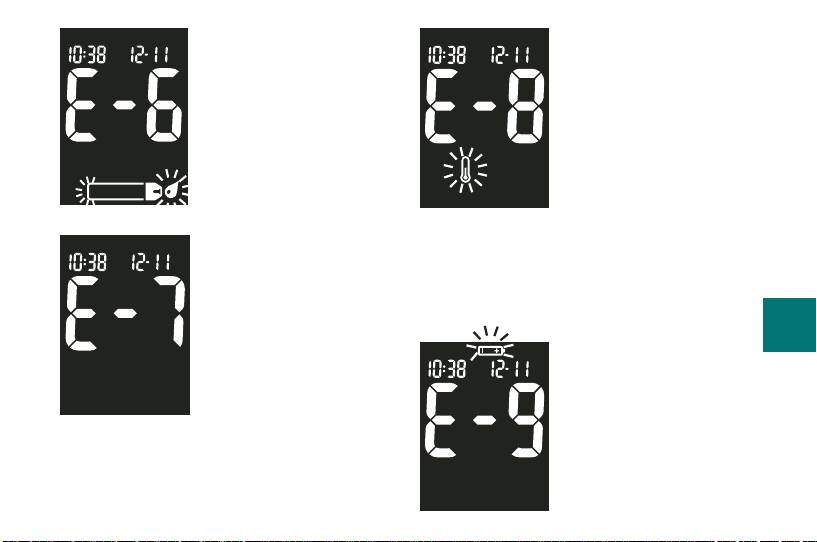
Blood or control solution
The temperature is
was applied to the test
above or below the
strip before the fl ashing
proper range for the
drop symbol appeared
system. Move to an
on the display. Discard
area within the
the test strip and repeat
temperature range
the test.
indicated for test strip
use in the test strip
An electronic error
package insert, wait fi ve minutes, and
occurred or, in rare
repeat the test. Do not artifi cially heat or
cases, a used test strip
cool the meter.
was removed and
71
reinserted. Turn the
The batteries are
meter off and on, or
almost out of power.
take the batteries out
Change the batteries
for 20 seconds and
now.
reinsert them. Perform a blood glucose
or control test. If the problem persists,
call Roche.
44702_EN_PNano_24_Ins.indd 7144702_EN_PNano_24_Ins.indd 71 10/9/09 2:39:02 PM10/9/09 2:39:02 PM
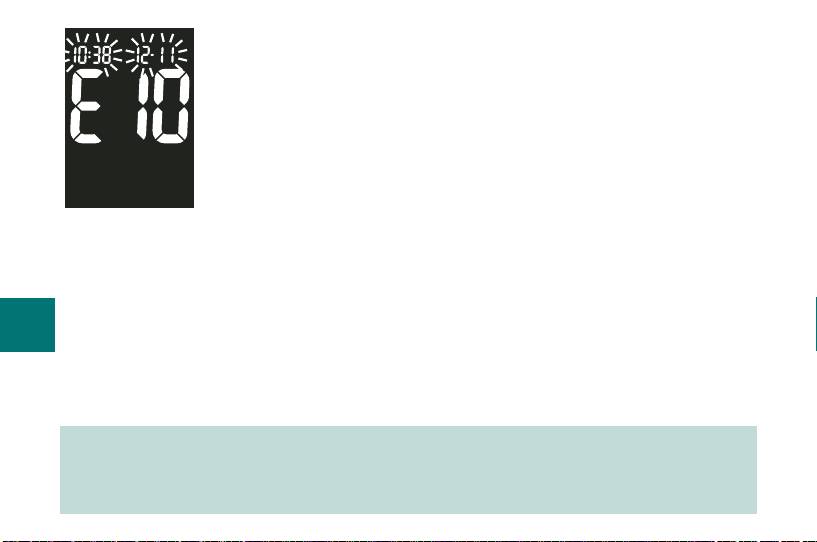
The time and date
settings may be
incorrect. Make sure
the time and date are
correct and adjust, if
necessary.
72
Note: If you see any other error screen, please call Roche.
44702_EN_PNano_24_Ins.indd 7244702_EN_PNano_24_Ins.indd 72 10/9/09 2:39:02 PM10/9/09 2:39:02 PM
Оглавление
- Chapter 1: Understanding Your New System
- Chapter 2: Testing Your Blood Glucose
- Chapter 4: Control Testing
- Chapter 5: Maintenance and Troubleshooting
- Chapter 6: Technical Information
- Kapitel 1: Ihr neues System kennen lernen
- Kapitel 2: Blutzuckermessung
- Kapitel 3: Speicherfunktionen, Einstellungen und Messwertübertragung
- Kapitel 4: Funktionskontrollen
- Kapitel 5: Wartung und Fehlerbeseitigung
- Kapitel 6: Technische Informationen
- Kapitola 1: Základní informace o novém systému
- Kapitola 2: Měření krevní glukózy
- Kapitola 4: Kontrolní měření
- Kapitola 5: Údržba a řešení potíží
- Kapitola 6: Technické informace
- Глава 1: Знакомство с Вашей новой системой
- Глава 2: Проведение измерения уровня глюкозы крови
- Глава 4: Контрольные измерения
- Глава 5: Техобслуживание, поиск и устранение неисправностей
- Глава 6: Техническая информация
