Акку-Чек Перформа Нано: Chapter 2: Testing Your Blood Glucose
Chapter 2: Testing Your Blood Glucose: Акку-Чек Перформа Нано
Chapter 2: Testing Your Blood Glucose
Performing a Blood Glucose Test
Before you perform your first blood glucose test, set up the meter correctly.
13
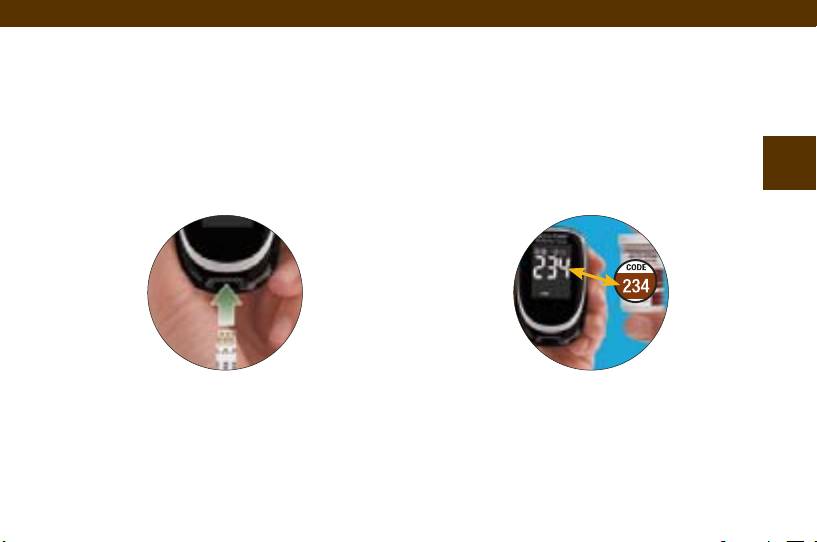
You need the meter, a test strip, and a lancing device with a lancet loaded.
1. Wash and dry your hands.
4. Make sure the code number on the
display matches the code number on
2. Prepare your lancing device.
the test strip container. If you miss
3. Insert the test strip into the meter in
seeing the code number, remove the
the direction of the arrows. The meter
test strip and reinsert it into the meter.
turns on.
44702_EN_PNano_24_Ins.indd 1344702_EN_PNano_24_Ins.indd 13 10/9/09 2:38:55 PM10/9/09 2:38:55 PM
14
OR
Yellow Release
Button
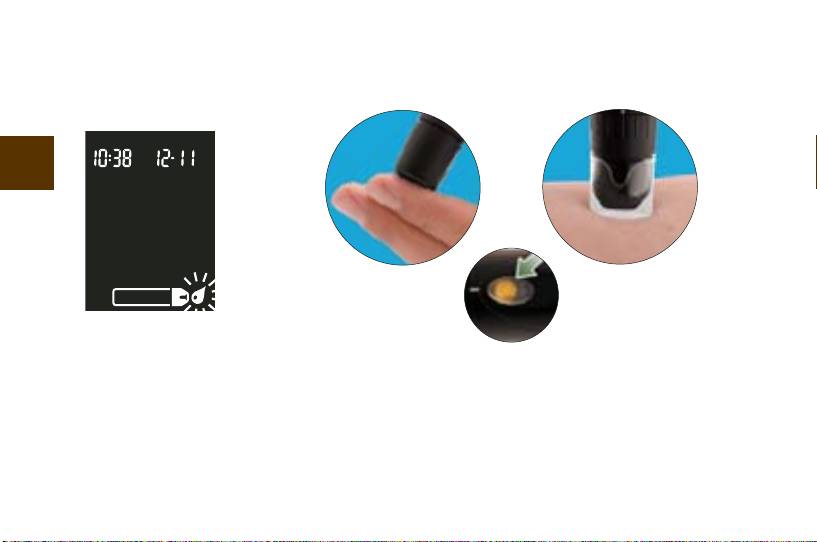
5. A test strip and
6. Perform a fingerstick with the lancing device. Blood samples
flashing blood drop
taken from the palm are equivalent to blood taken from the
symbol appear on
fingertip. For detailed information on how to obtain blood
the display.
from the palm, refer to the Alternative Site Testing (AST)
section, steps 5 and 6.
44702_EN_PNano_24_Ins.indd 1444702_EN_PNano_24_Ins.indd 14 10/9/09 2:38:55 PM10/9/09 2:38:55 PM
15
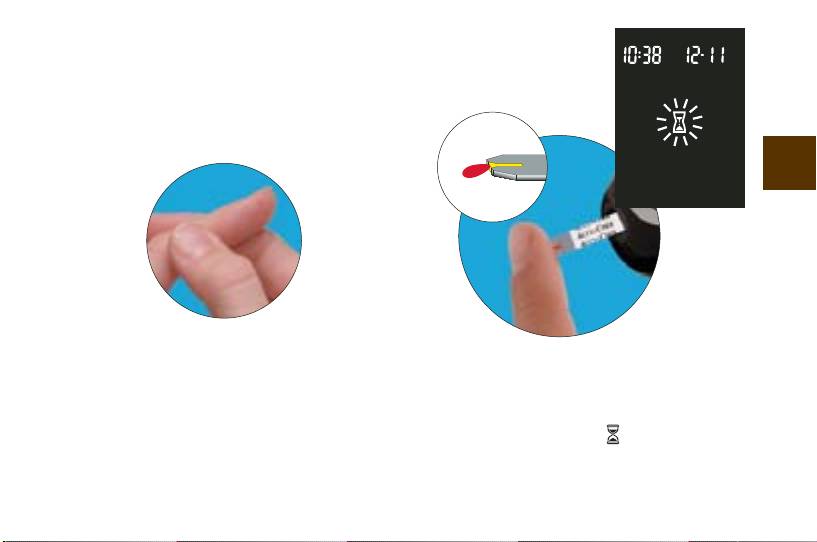
7. Gently squeeze your finger to assist the
8. Touch the blood drop to the front edge
flow of blood. This helps you get a
of the yellow window of the test strip.
blood drop.
Do not put blood on top of the test
strip. When you see
flash, you have
enough blood in the test strip.
44702_EN_PNano_24_Ins.indd 1544702_EN_PNano_24_Ins.indd 15 10/9/09 2:38:55 PM10/9/09 2:38:55 PM
OR
16
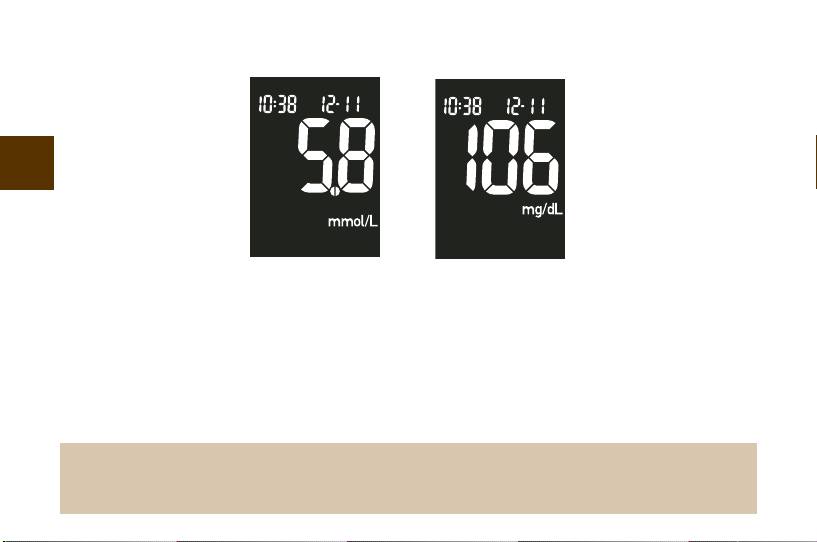
9. The result appears on the display. If you
the meter (see the next section).
want to mark the test result as a
Otherwise, remove and discard the used
pre-meal or post-meal test, or with a
test strip.
general marker, leave the test strip in
Note: After a successful test, the meter turns off five seconds after the test strip is
removed.
44702_EN_PNano_24_Ins.indd 1644702_EN_PNano_24_Ins.indd 16 10/9/09 2:38:55 PM10/9/09 2:38:55 PM

Marking Test Results and Setting the Post-Meal
Reminder
If you wish, you can mark your test result with:
Pre-Meal Marker
17
Pre-Meal Marker with Post-Meal Reminder
Post-Meal Marker
General Marker
M• arking results with a pre-meal or post-meal marker provides more information
about your blood glucose results to help you and your healthcare professional in
the management of your diabetes.
When a pre-meal result is marked with a • post-meal reminder the meter beeps
one or two hours after you test to remind you to do a post-meal test.
You might want to use the • general marker to mark an event such as an AST
(alternative site testing) result or exercise.
When you review the results in memory, these markers can help you remember what
was different about the result.
44702_EN_PNano_24_Ins.indd 1744702_EN_PNano_24_Ins.indd 17 10/9/09 2:38:56 PM10/9/09 2:38:56 PM

Here is how to mark a test result and initiate a post-meal reminder:
Perform a test. Do not remove the test strip.
1. Press and release
to toggle through the test result markers and post-meal reminder.
Pre-Meal Marker
18
Pre-Meal Marker with Post-Meal Reminder
Post-Meal Marker
General Marker
2. When the test result marker (
, , or ) or pre-meal marker with post-meal reminder
(
) that you wish to select appears on the display, remove the test strip from the
meter.
If you select the post-meal reminder, the meter beeps one or two hours after the •
pre-meal test to remind you to do a post-meal test.
If you select a test result marker, it is automatically stored in memory.•
Note: The post-meal marker automatically appears with the test result if a
test is performed 15 minutes before or after the post-meal reminder is
programmed to beep. Set the post-meal reminder time to one or two
hours in the set-up mode.
44702_EN_PNano_24_Ins.indd 1844702_EN_PNano_24_Ins.indd 18 10/9/09 2:38:56 PM10/9/09 2:38:56 PM
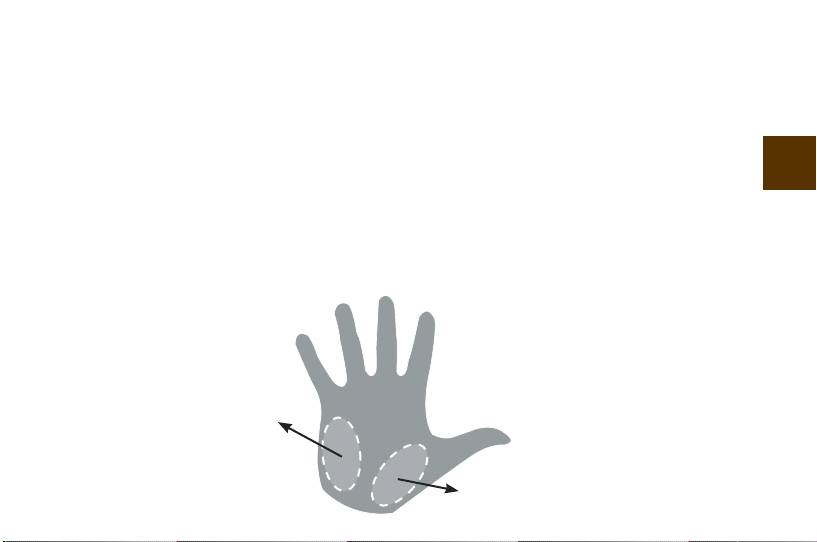
Alternative Site Testing (AST)
You have the option of testing other places on your body besides the fingertip. Blood
obtained from a fingertip or palm can be used at any time to measure blood glucose.
The two palm testing sites are the fleshy areas under the thumb (thenar) and under
the little finger (hypothenar). If blood from an alternative site such as the forearm,
19
upper arm, thigh or calf is used, there are certain times when testing is not
appropriate (see next page). This is because your glucose level changes quicker in
your fingertip or palm than in the alternative sites. These differences may cause you
to make the wrong therapeutic decision produc ing adverse health effects. Please
read the following section before you try testing from other places.
Hypothenar
Thenar
44702_EN_PNano_24_Ins.indd 1944702_EN_PNano_24_Ins.indd 19 10/9/09 2:38:56 PM10/9/09 2:38:56 PM

IMPORTANT
Alternative site testing may be done:
Talk to your healthcare professional about Alternative •
Immediately before a meal•
Site Testing.
Fasting•
DO NOT test from an alternative site:
Do not change your treatment because of
Two hours or less after eating•
just one result.
After exercising•
NEVER ignore symptoms of high or low
If you are sick•
20
blood glucose.
If you think your blood glucose is low•
If you often don’t notice when your blood •
If your blood glucose result does not
glucose is low
match how you feel, perform a fingertip/
During peak action time of short-acting •
palm test to confirm your result. If the
insulin or rapid-acting insulin analogues
fingertip/palm result still does not match
Up to two hours after injecting a •
how you feel, call your healthcare
short-acting insulin or rapid-acting insulin
professional.
analogue
44702_EN_PNano_24_Ins.indd 2044702_EN_PNano_24_Ins.indd 20 10/9/09 2:38:56 PM10/9/09 2:38:56 PM

You need the meter, a test strip, a lancing device designed for AST, and a
lancet.
21
1. Prepare the lancing device.
3. Make sure the code number on the
display matches the code number on
2. Insert the test strip into the meter in
the test strip container. If you miss
the direction of the arrows. The meter
seeing the code number, remove the
turns on.
test strip and reinsert it into the meter.
44702_EN_PNano_24_Ins.indd 2144702_EN_PNano_24_Ins.indd 21 10/9/09 2:38:56 PM10/9/09 2:38:56 PM
22
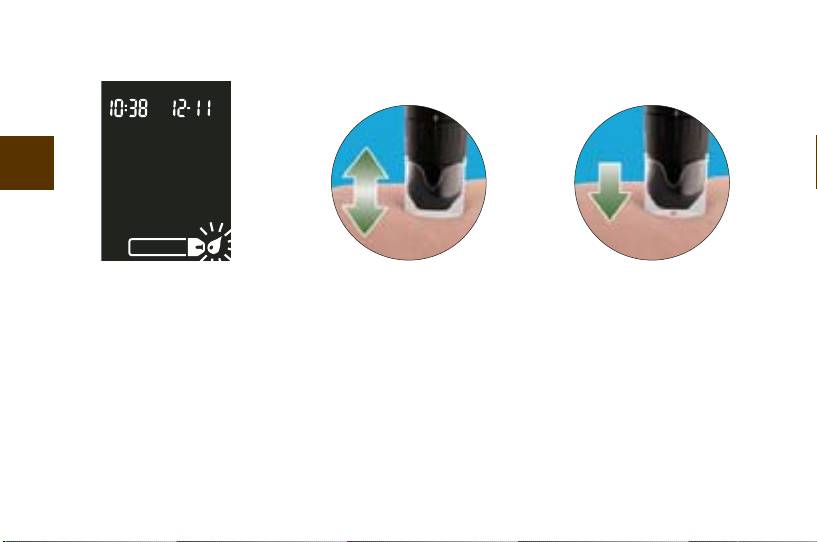
4. A test strip and flashing
5. Press the lancing device
6. Trigger the lancing
blood drop symbol
firmly against a fleshy
device while keeping
appear on the display.
area on the alternative
steady pressure on the
site. Press the lancing
site. Apply pressure to
device up and down in a
the site with the lancing
slow pumping motion to
device to assist the flow
assist the flow of blood.
of blood.
44702_EN_PNano_24_Ins.indd 2244702_EN_PNano_24_Ins.indd 22 10/9/09 2:38:56 PM10/9/09 2:38:56 PM
23
OROR
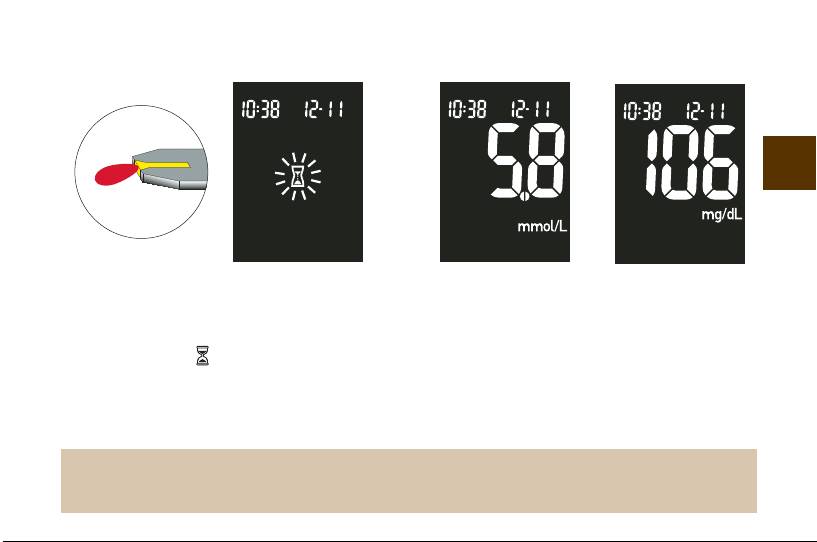
7. Touch the blood drop to the front edge
8. The result appears on the display. Mark
of the yellow window of the test strip.
the result, or remove and discard the
When you see
flash, you have
used test strip.
enough blood in the test strip.
Note: If the blood drop is too small, reapply pressure to get a sufficient blood drop.
44702_EN_PNano_24_Ins.indd 2344702_EN_PNano_24_Ins.indd 23 10/9/09 2:38:56 PM10/9/09 2:38:56 PM
Unusual Test Results
If your blood glucose result does not match how you feel, follow these steps:
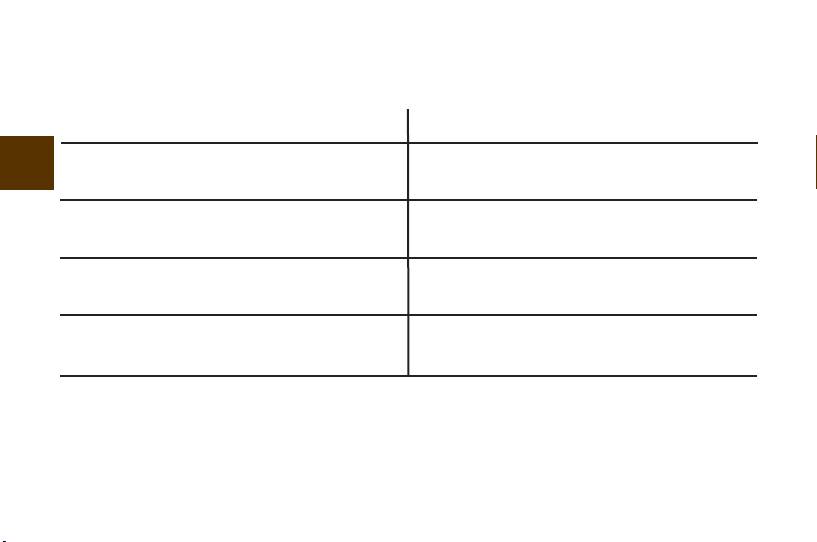
Troubleshooting Checks
Action
1. Check if the test strips were expired.
Discard the test strips if they are past the
24
expiry date.
2. Check if the cap on the test strip
Replace the test strips if you think they
container was always closed tightly.
were uncapped for some time.
3. Check if the test strip was out of the
Repeat the test with a new test strip.
container for a long time.
4. Check if the test strips were stored in a
Repeat the test with a properly stored test
cool, dry place.
strip.
44702_EN_PNano_24_Ins.indd 2444702_EN_PNano_24_Ins.indd 24 10/9/09 2:38:56 PM10/9/09 2:38:56 PM
Troubleshooting Checks
Action
5. Check if you followed the testing steps.
Read Chapter 2, “Testing Your Blood
Glucose” and test again. If you still have
25
problems, call Roche.
6. Check if the code number on the meter
If they do not match, insert the correct
display matches the code number on
code chip into the meter and test again.
the test strip container.
7. If you are still unsure of the problem…
Repeat the test with a new test strip
and perform a control test. If you still have
problems, call Roche.
44702_EN_PNano_24_Ins.indd 2544702_EN_PNano_24_Ins.indd 25 10/9/09 2:38:57 PM10/9/09 2:38:57 PM

Symptoms of High or Low Blood Glucose
Being aware of the symptoms of high or low blood glucose can help you understand
your test results and decide what to do if they seem unusual. Here are the most
common symptoms:
26
High blood glucose (hyperglycemia): fatigue, increased appetite or thirst, frequent
urination, blurred vision, headache, or general aching.
Low blood glucose (hypoglycemia): sweating, trembling, blurred vision, rapid
heartbeat, tingling, or numbness around mouth or fi ngertips.
If you are experiencing any of these symptoms, test your blood
glucose. If your blood glucose result is displayed as LO or HI, contact
your healthcare professional immediately.
44702_EN_PNano_24_Ins.indd 2644702_EN_PNano_24_Ins.indd 26 10/9/09 2:38:57 PM10/9/09 2:38:57 PM

Chapter 3: Meter Memory, Setup, and Downloading
Memory
Storing Test Results
The meter automatically stores up to 500 blood glucose test results with the time and
date of the test and any test markers. You can review them at any time. Test results
27
are stored from the newest to the oldest. It is very important to set the correct time
and date in the meter. Having the correct time and date setting helps ensure
appropriate interpretation of blood glucose results by you and your healthcare team.
Notes:
Do not change your therapy based on one individual result in memory.•
The memory is not lost when you replace the batteries. You do need to check that the •
time and date are correct after you replace the batteries.
Once 500 results are in memory, adding a new result causes the oldest one to be deleted.•
If more than 500 tests are performed within a 90 day period, only the most recent •
500 results are included in the 90 day average.
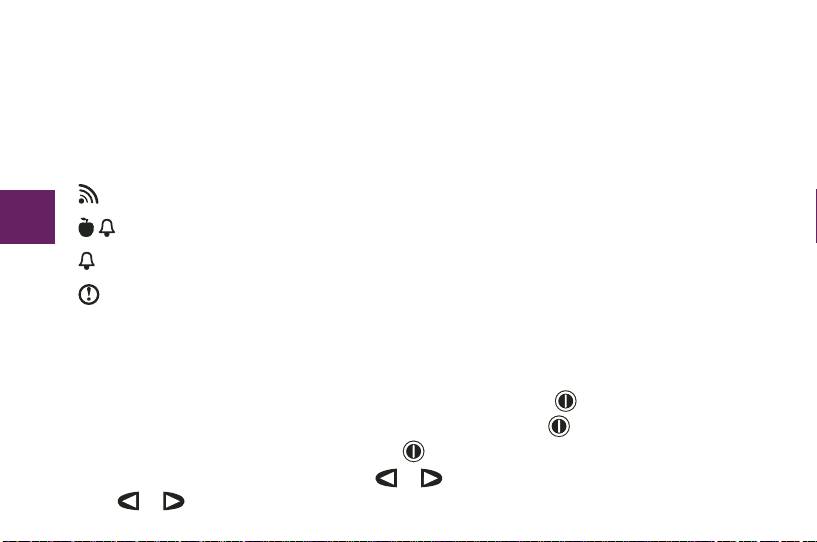
Hold • or down to scroll through the results faster.
44702_EN_PNano_24_Ins.indd 2744702_EN_PNano_24_Ins.indd 27 10/9/09 2:38:57 PM10/9/09 2:38:57 PM
The control results are stored in memory, but cannot be reviewed on the meter. They are •
not included in the 7, 14, 30, and 90 day averages. To view stored control results, first
download them to a compatible software application. For product availability, please
contact Roche.
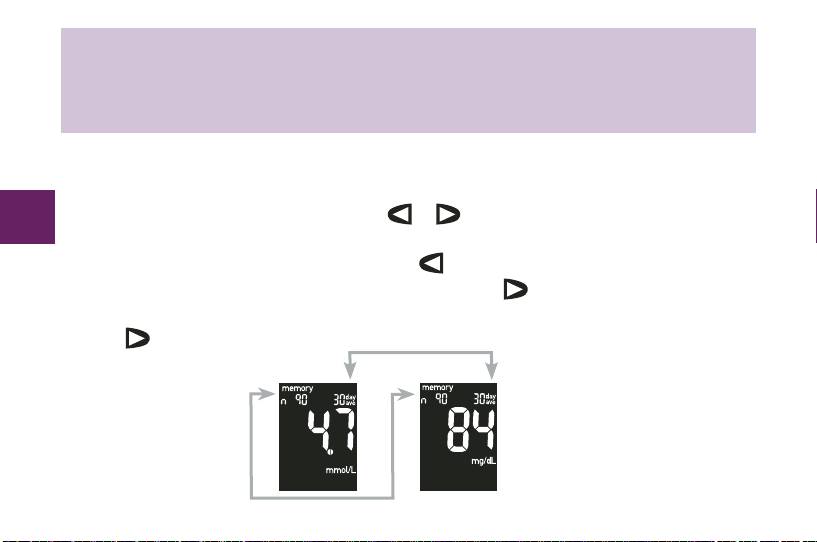
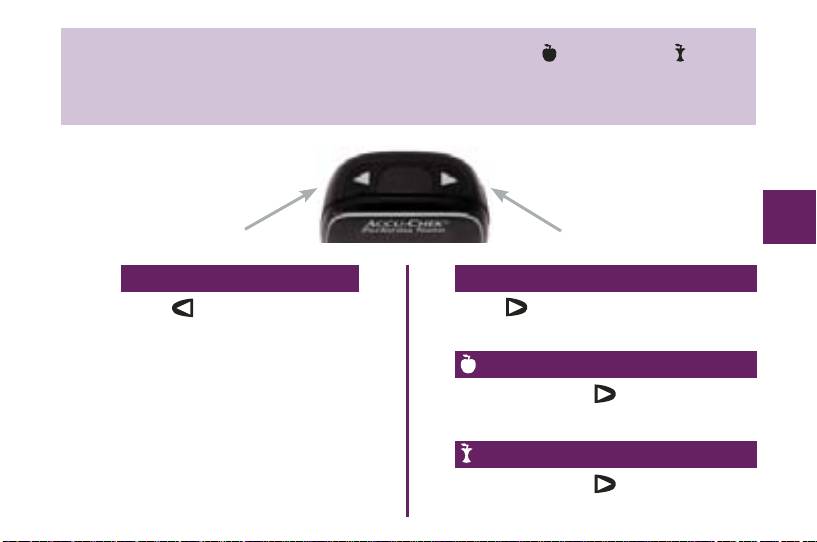
Viewing Test Results
With the meter on or off, press and release or to enter memory. The most recent
28
result appears.
To view previous results in order• – press
To look at the 7, 14, 30, or 90 day averages• – press
To view pre-meal and post-meal 7, 14, 30, and 90 day averages• – continue to
press
Number of days in the average
Number of results in the average
44702_EN_PNano_24_Ins.indd 2844702_EN_PNano_24_Ins.indd 28 10/9/09 2:38:57 PM10/9/09 2:38:57 PM
Note: Only test results that have been assigned a pre-meal ( ) or post-meal ( ) marker
are included in pre-meal and post-meal averages. All blood glucose results are
included in the general 7, 14, 30, and 90 day averages.
29
OR
OR
Past Results
General Average
Press to view past results
Press
to view 7, 14, 30, and 90 day
from newest to oldest.
averages.
Pre-Meal Average
Continue to press
to view 7, 14, 30,
and 90 day pre-meal averages.
Post-Meal Average
Continue to press
to view 7, 14, 30,
and 90 day post-meal averages.
44702_EN_PNano_24_Ins.indd 2944702_EN_PNano_24_Ins.indd 29 10/9/09 2:38:57 PM10/9/09 2:38:57 PM
Meter Setup
Using the Set-Up Mode
By using the set-up mode, you can personalize the meter to suit your lifestyle. Here are the
features you can customize in the order in which they appear in the set-up mode:
Time and date – set the time and date.
Beeper – select “On” or “OFF.”
30
Post-meal reminder time – select 1 hour or 2 hours.
Alarm clock – select “On” or “OFF.”
Hypo indicator – select “On” or “OFF.” If you select “On,” choose the blood
glucose level for the alert.
Using the set-up mode is easy.
Here is a general overview of the function that each button performs in the set-up mode.
To enter the set-up mode• – with the meter on, press and hold until “set-up” appears.
To confirm the feature you have chosen• – press and release .
To exit the set-up mode• – press and hold until you see the flashing test strip symbol.
To adjust settings• – press and release or . To scroll faster press and
hold or .
44702_EN_PNano_24_Ins.indd 3044702_EN_PNano_24_Ins.indd 30 10/9/09 2:38:57 PM10/9/09 2:38:57 PM
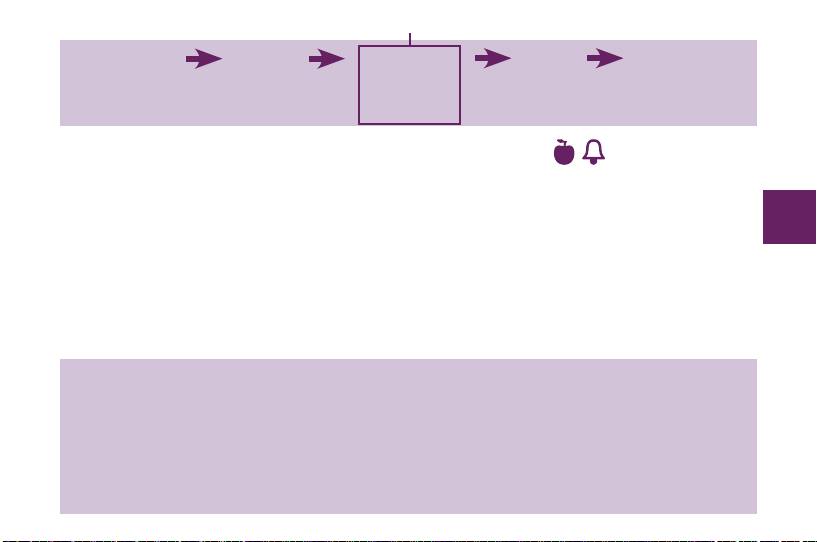
You are here
TIME / DATE
BEEPER
POST-MEAL
ALARM
HYPO INDICATOR
(hrs, min,
(on/off)
REMINDER
CLOCK
(off, on, level)
day, month, year)
TIME
(A-1, A-2, A-3, A-4)
(1 hr or 2 hr)
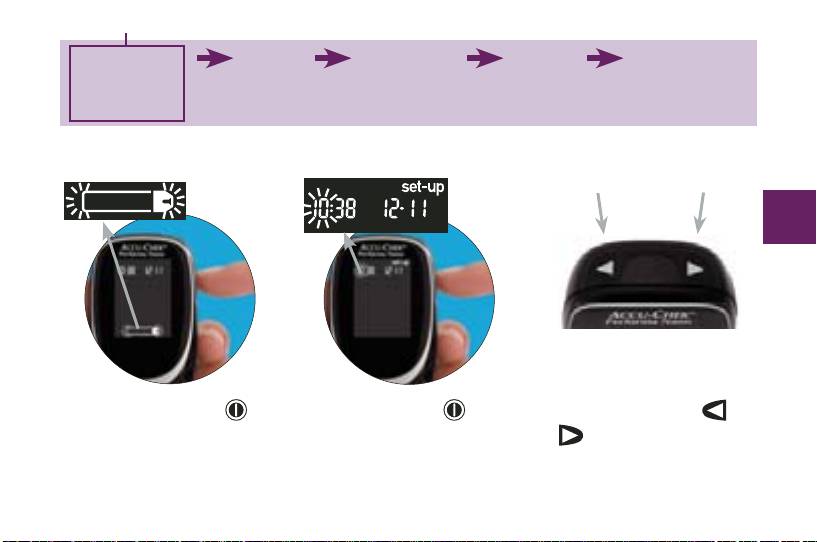
Setting the Time and Date
decrease
increase
31
1. Press and release to
2. Press and hold
until
3. Press and release
or
turn the meter on. The
“set-up” appears on the
to decrease or
flashing test strip symbol
display. The hour
increase the hour.
appears.
flashes.
44702_EN_PNano_24_Ins.indd 3144702_EN_PNano_24_Ins.indd 31 10/9/09 2:38:57 PM10/9/09 2:38:57 PM
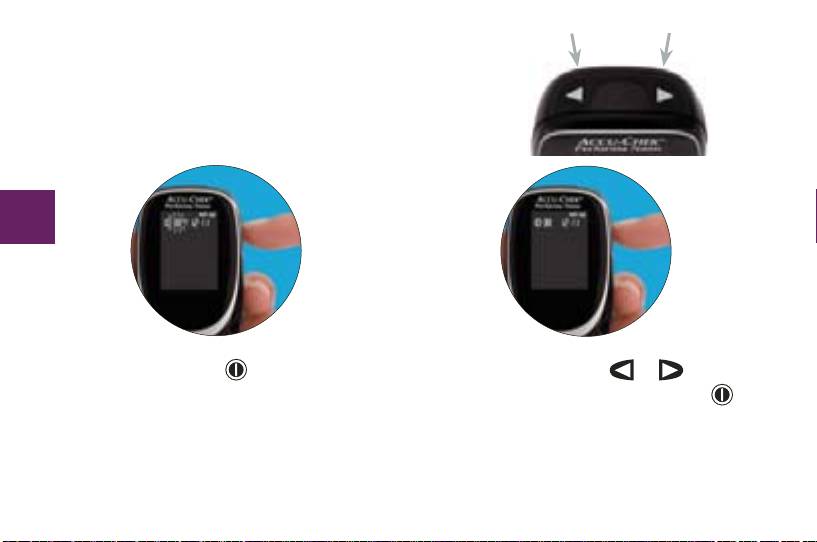
decrease increase
32
4. Press and release to confirm the
5. Press and release or to adjust
hour. The minutes flash.
the minutes. Press and release
to
confirm the minutes.
44702_EN_PNano_24_Ins.indd 3244702_EN_PNano_24_Ins.indd 32 10/9/09 2:38:57 PM10/9/09 2:38:57 PM
33
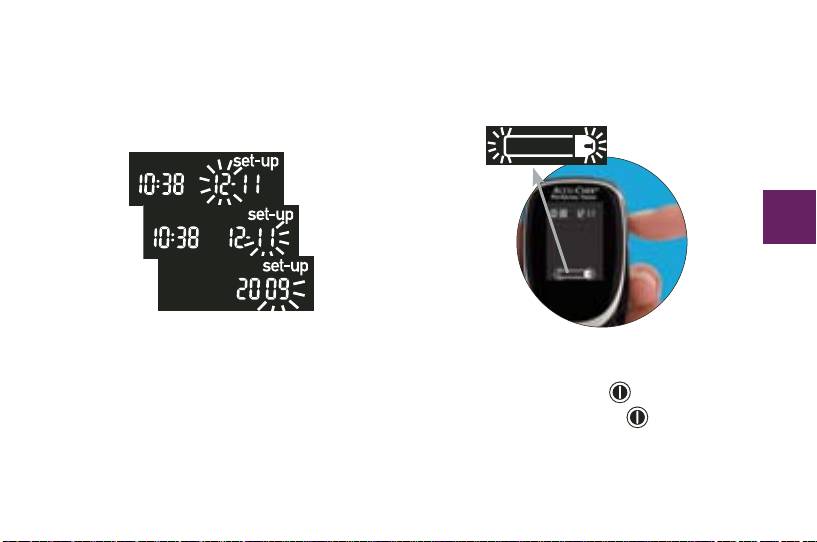
6. Repeat step 5 to set day, month, and
7. If you want to set up more options,
year.
press and release
. If you want to
exit, press and hold
until you see
the flashing test strip symbol.
44702_EN_PNano_24_Ins.indd 3344702_EN_PNano_24_Ins.indd 33 10/9/09 2:38:58 PM10/9/09 2:38:58 PM

You are here
TIME / DATE
BEEPER
POST-MEAL
ALARM
HYPO INDICATOR
(hrs, min,
(on/off)
REMINDER
CLOCK
(off, on, level)
day, month, year)
TIME
(A-1, A-2, A-3, A-4)
(1 hr or 2 hr)
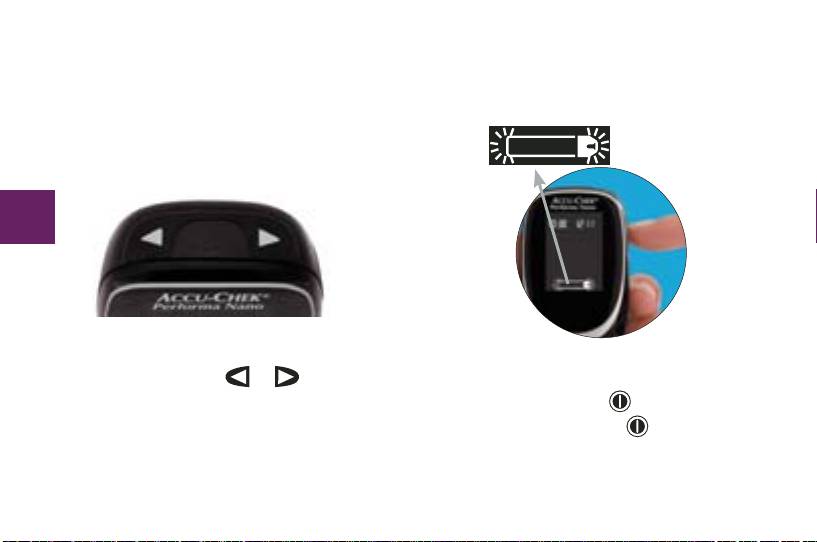
Setting the Beeper (
) On/Off
Your new meter has the beeper preset to “On.” You can set the beeper to “OFF,” if
you prefer. This will not affect your test results.
34
The beeper is helpful because it prompts you:
To apply blood or control solution to the test strip•
When enough blood or control solution is drawn into the test strip•
When the test is complete•
When a button is pressed•
When it is time to test (if you set the alarm clock or post-meal reminder)•
If an error occurred while testing (even if the beeper is set to off, it still beeps for •
an error)
44702_EN_PNano_24_Ins.indd 3444702_EN_PNano_24_Ins.indd 34 10/9/09 2:38:58 PM10/9/09 2:38:58 PM

35
1. Press and release to
2. Press and hold
until
3. Press and release
turn the meter on. The
“set-up” appears on the
repeatedly until you
flashing test strip symbol
display.
reach the display with
appears.
the flashing beeper
symbol and “On” or
“OFF.”
44702_EN_PNano_24_Ins.indd 3544702_EN_PNano_24_Ins.indd 35 10/9/09 2:38:58 PM10/9/09 2:38:58 PM
36
4. Press and release or to
5. If you want to set up more options,
switch between “On” and “OFF.”
press and release
. If you want to
exit, press and hold
until you see
the flashing test strip symbol.
44702_EN_PNano_24_Ins.indd 3644702_EN_PNano_24_Ins.indd 36 10/9/09 2:38:58 PM10/9/09 2:38:58 PM
You are here
TIME / DATE
BEEPER
POST-MEAL
ALARM
HYPO INDICATOR
(hrs, min,
(on/off)
REMINDER
CLOCK
(off, on, level)
day, month, year)
TIME
(A-1, A-2, A-3, A-4)
(1 hr or 2 hr)
Setting the Post-Meal Reminder Time (
)
The post-meal reminder:
Beeps one or two hours after the test to remind you to do a post-meal test.•
37
Beeps every two minutes up to three times.•
Turns off by inserting a test strip or pressing any button.•
The post-meal reminder time is preset on your meter to two hours, however, you can
choose one or two hours in the set-up mode.
Notes:
The beeper must be set to “On” for the reminder to occur.•
If you tested within 15 minutes of a reminder, the reminder does not occur.•
If the meter is on at the reminder time, the reminder does not occur.•
Exposure to cold conditions may disable reminders until the meter is turned on.•
44702_EN_PNano_24_Ins.indd 3744702_EN_PNano_24_Ins.indd 37 10/9/09 2:38:58 PM10/9/09 2:38:58 PM
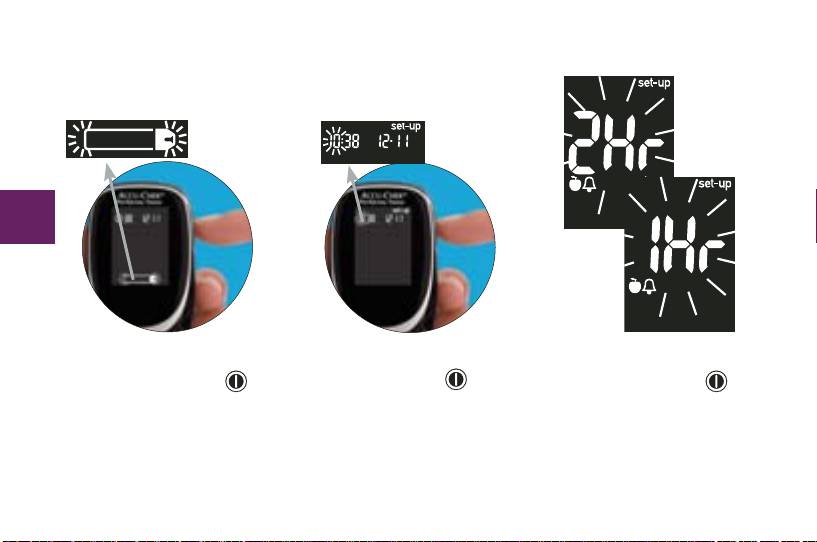
38
1. Press and release to
2. Press and hold
until
3. Press and release
turn the meter on. The
“set-up” appears on the
repeatedly until you
flashing test strip symbol
display.
reach the display with
appears.
“set-up,” and the
flashing “1Hr” or “2Hr.”
44702_EN_PNano_24_Ins.indd 3844702_EN_PNano_24_Ins.indd 38 10/9/09 2:38:58 PM10/9/09 2:38:58 PM
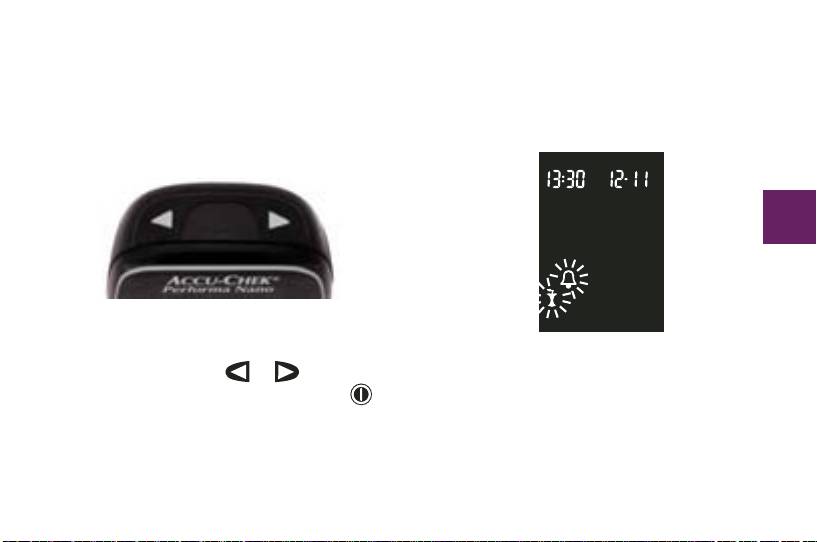
39
4. Press and release or to select
When a post-meal reminder occurs
“1Hr” or “2Hr.” Press and release
this screen appears.
to confirm your choice.
44702_EN_PNano_24_Ins.indd 3944702_EN_PNano_24_Ins.indd 39 10/9/09 2:38:58 PM10/9/09 2:38:58 PM
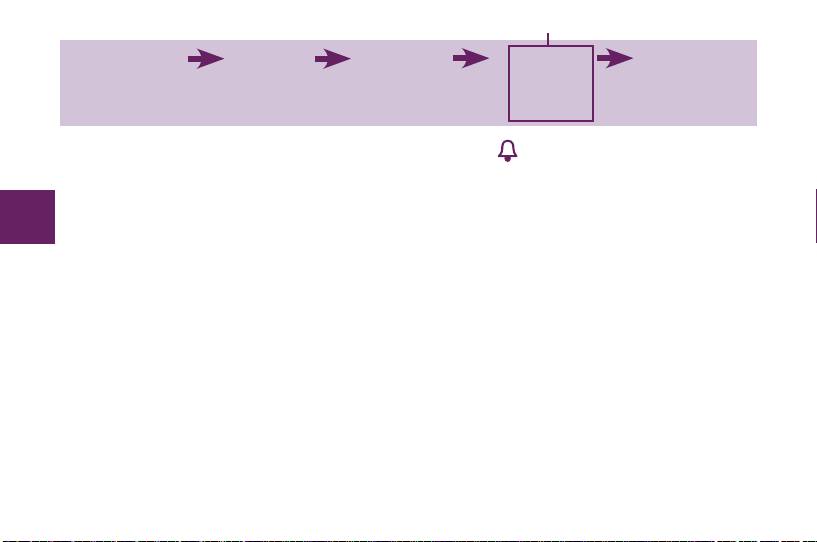
You are here
TIME / DATE
BEEPER
POST-MEAL
ALARM
HYPO INDICATOR
(hrs, min,
(on/off)
REMINDER
CLOCK
(off, on, level)
day, month, year)
TIME
(A-1, A-2,
A-3, A-4)
(1 hr or 2 hr)
Setting the Alarm Clock Function (
)
The alarm clock:
40
Beeps to remind you to perform a test.•
Beeps every two minutes up to three times.•
Turns off by inserting a test strip or pressing any button.•
Is preset to “OFF.” You must turn it on to use this feature.•
You can set up to 4 alarms per day. If you turn A-1, A-2, A-3, and A-4 on, your meter
is preset with the following times for your convenience. You can adjust the times to
suit your needs.
A-1 8:00 A-2 12:00 A-3 18:00 A-4 22:00
44702_EN_PNano_24_Ins.indd 4044702_EN_PNano_24_Ins.indd 40 10/9/09 2:38:59 PM10/9/09 2:38:59 PM

Notes:
If you tested within 15 minutes of an alarm, the alarm does not occur.•
If the meter is on at the alarm time, the alarm does not occur.•
Exposure to cold conditions may disable alarms until the meter is turned on.•
41
44702_EN_PNano_24_Ins.indd 4144702_EN_PNano_24_Ins.indd 41 10/9/09 2:38:59 PM10/9/09 2:38:59 PM
When you are setting the time for the alarm clock function, the bell symbol and
“set-up” remain on the display.
42
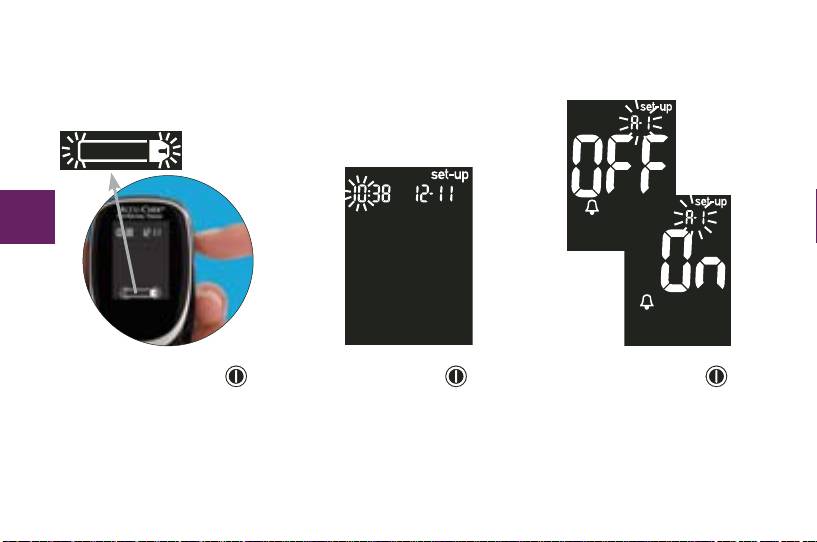
1. Press and release to
2. Press and hold
until
3. Press and release
turn the meter on. The
“set-up” appears on the
repeatedly until you
flashing test strip symbol
display.
reach the display with
appears.
the bell symbol, “OFF,”
“set-up,” and the
flashing “A-1.”
44702_EN_PNano_24_Ins.indd 4244702_EN_PNano_24_Ins.indd 42 10/9/09 2:38:59 PM10/9/09 2:38:59 PM
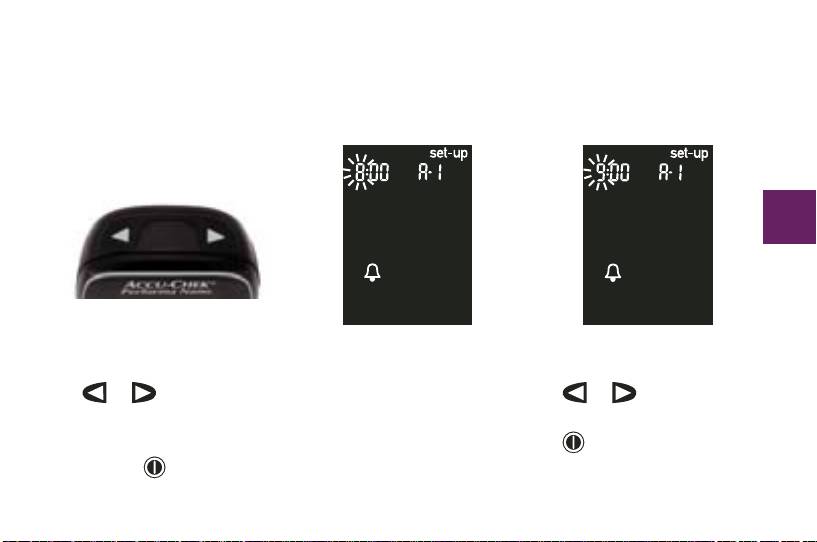
43
4. Press and release
5. If you select “On,” the
6. Press and release
or to switch
hour flashes. “A-1” and
or to select the
between “On” and
the bell symbol remain
hour. Press and release
“OFF.” Press and
on the display.
to confirm the hour.
release
to confirm
your choice.
44702_EN_PNano_24_Ins.indd 4344702_EN_PNano_24_Ins.indd 43 10/9/09 2:38:59 PM10/9/09 2:38:59 PM

44
7. The minutes flash. Press
8. Press and release
to
9. “Set-up,” “OFF,” and the
and release
or to
confirm the minutes.
bell symbol appear on
select 00, 15, 30, or 45.
the display with the next
These are the only
alarm (“A-2”) flashing.
choices.
You can either set a
second alarm or press
and hold
until you
see the flashing test strip
symbol to exit the set-up
mode.
44702_EN_PNano_24_Ins.indd 4444702_EN_PNano_24_Ins.indd 44 10/9/09 2:38:59 PM10/9/09 2:38:59 PM
You are here
TIME / DATE
BEEPER
POST-MEAL
ALARM
HYPO INDICATOR
(hrs, min,
(on/off)
REMINDER
CLOCK
(off, on, level)
day, month, year)
TIME
(A-1, A-2, A-3, A-4)
(1 hr or 2 hr)
Setting the Hypo Indicator (
) Function
The hypo indicator:
45
Can be set to a level between 2.8 to 5.0 mmol/L •
(50 and 90 mg/dL) to let you know when your blood
glucose is possibly too low.
Notes:
Before you set the hypo indicator, talk to your •
healthcare professional to help you decide what
blood glucose level is your hypoglycemic level.
The hypo indicator is preset to “OFF” in your •
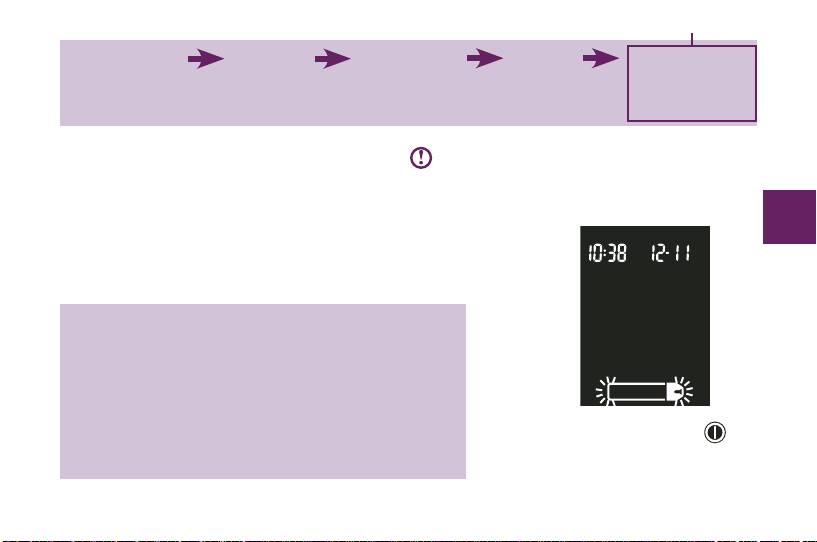
1. Press and release
to turn the meter on.
new meter.
The flashing test strip
symbol appears.
44702_EN_PNano_24_Ins.indd 4544702_EN_PNano_24_Ins.indd 45 10/9/09 2:38:59 PM10/9/09 2:38:59 PM

46
2. Press and hold until
3. Press and release
4. Press and release
“set-up” appears on the
repeatedly until you
or to switch
display.
reach the display with
between “On” and
“set-up” and “OFF,” and
“OFF.” Press and
the flashing
.
release
to confirm
your choice.
44702_EN_PNano_24_Ins.indd 4644702_EN_PNano_24_Ins.indd 46 10/9/09 2:38:59 PM10/9/09 2:38:59 PM
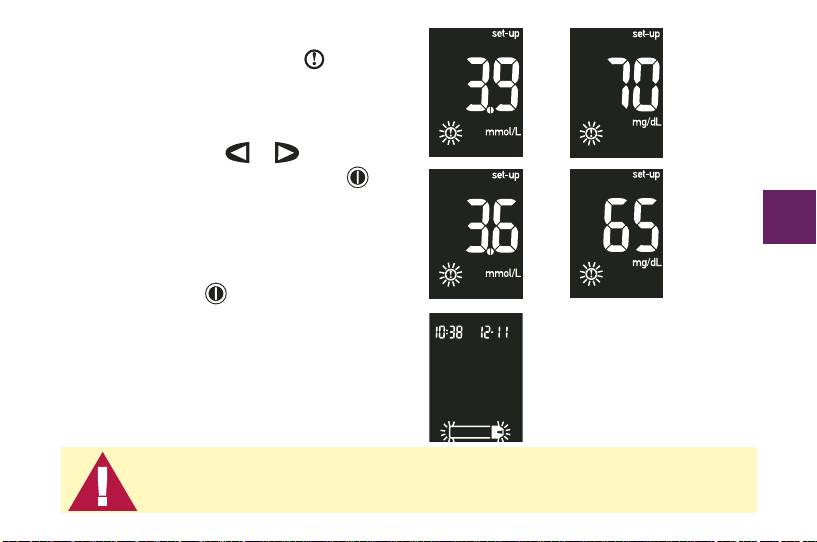
5. If you choose to set the hypo indicator to
“On,” “set-up” appears and
flashes.
The display shows 3.9 mmol/L (70 mg/dL).
OR
6. Press and release
or to select the
level you want. Press and release
to
confirm it.
47
OR
7. Press and hold
until you see the
flashing test strip symbol to exit the
set-up mode.
This function is no substitute for hypoglycemia training by your
healthcare professional.
44702_EN_PNano_24_Ins.indd 4744702_EN_PNano_24_Ins.indd 47 10/9/09 2:39:00 PM10/9/09 2:39:00 PM
Transferring Data Directly to a Computer or PDA Using
Specialized Software and an Infrared Cable
You can transfer your stored results to a computer to track, identify patterns, and
print.
1. Install the software according to the
instructions. To transfer the results to a
48
computer, connect the infrared cable
according to the instructions.
2. Run the software program and follow the
instructions about how to download
information. Make sure the software is
ready to accept data from the meter.
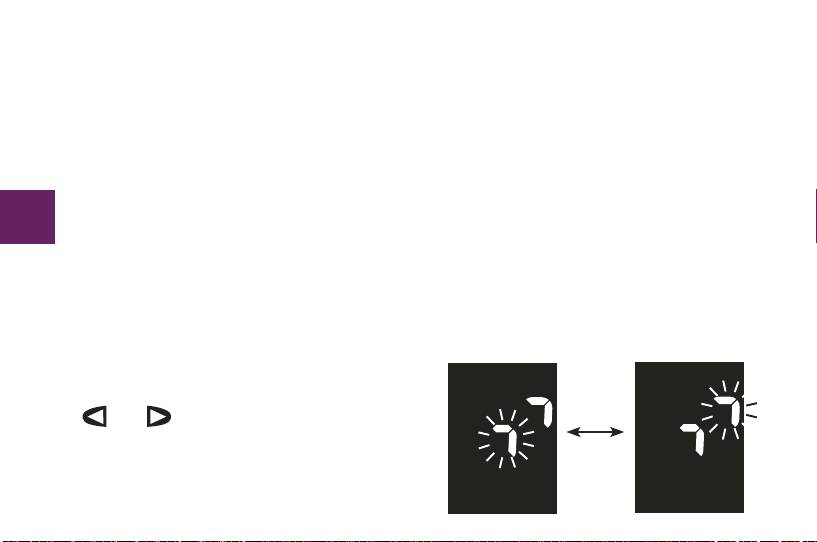
3. With the meter off, press and hold both
and until two arrows on the display
alternately flash.
44702_EN_PNano_24_Ins.indd 4844702_EN_PNano_24_Ins.indd 48 10/9/09 2:39:00 PM10/9/09 2:39:00 PM
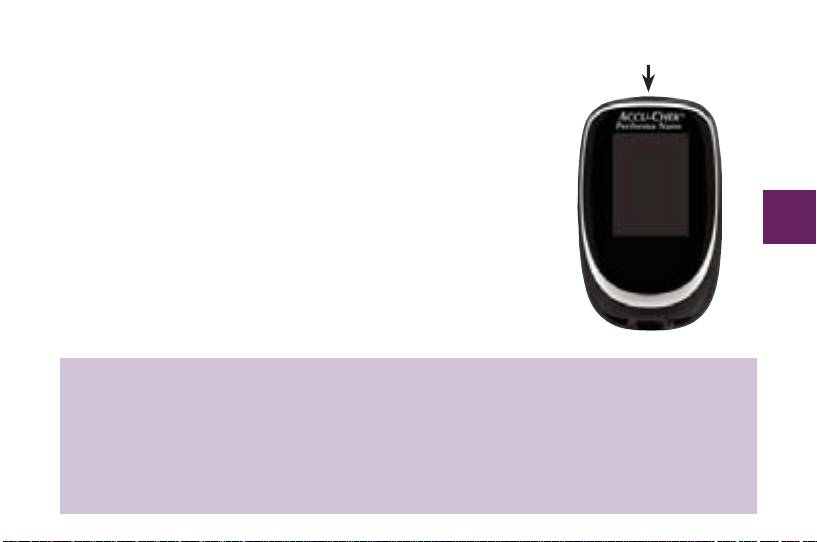
4. Locate the infrared (IR) window on the top of the meter.
Infrared (IR) Window
5. Locate the IR window on either the infrared cable
(computer) or PDA.
6. Put the meter on a flat surface. Point the two IR windows
toward each other. They should be 3 to 10 cm apart.
7. Do not move the infrared cable (computer), PDA, or
meter during the transfer.
49
8. Follow the prompts on the software.
9. The software program may shut off the meter
automatically when the data transfer is complete.
Notes:
If the data did not transfer successfully, try again. If you still have problems, •
contact Roche.
To make the most of the download feature, you must set the time and date in the •
meter correctly.
44702_EN_PNano_24_Ins.indd 4944702_EN_PNano_24_Ins.indd 49 10/9/09 2:39:00 PM10/9/09 2:39:00 PM

5050
44702_EN_PNano_24_Ins.indd 5044702_EN_PNano_24_Ins.indd 50 10/9/09 2:39:00 PM10/9/09 2:39:00 PM
Оглавление
- Chapter 1: Understanding Your New System
- Chapter 2: Testing Your Blood Glucose
- Chapter 4: Control Testing
- Chapter 5: Maintenance and Troubleshooting
- Chapter 6: Technical Information
- Kapitel 1: Ihr neues System kennen lernen
- Kapitel 2: Blutzuckermessung
- Kapitel 3: Speicherfunktionen, Einstellungen und Messwertübertragung
- Kapitel 4: Funktionskontrollen
- Kapitel 5: Wartung und Fehlerbeseitigung
- Kapitel 6: Technische Informationen
- Kapitola 1: Základní informace o novém systému
- Kapitola 2: Měření krevní glukózy
- Kapitola 4: Kontrolní měření
- Kapitola 5: Údržba a řešení potíží
- Kapitola 6: Technické informace
- Глава 1: Знакомство с Вашей новой системой
- Глава 2: Проведение измерения уровня глюкозы крови
- Глава 4: Контрольные измерения
- Глава 5: Техобслуживание, поиск и устранение неисправностей
- Глава 6: Техническая информация
